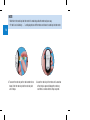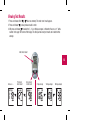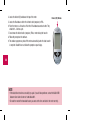
1
This file may not print or
view at 100%.
Die lines and color breaks do
not print.
Aviva
BLOOD GLUCOSE METER /
MEDIDOR DE GLUCEMIA
Owner’s Booklet for Self-Testing Only
Instrucciones de uso únicamente
para autocontrol
Roche USA – 47212
V6/1 – 05958083001 – Schwarz –
Roche USA – 47212
V6/2 – 05958083001 – Cyan –
Roche USA – 47212
V6/3 – 05958083001 – Magenta –
Roche USA – 47212
V6/4 – 05958083001 – Yellow –
Roche USA – 47212
V6/5 – 05958083001 – PMS 287 –
Roche USA – 47212
V6/6 – 05958083001 – PMS 5445 –
Contents
Introduction................................................................................................................................................5
1
The ACCU‑CHEK Aviva Plus System.................................................................................................................. 6
Important Safety Information............................................................................................................................ 8
About Testing Yourself....................................................................................................................................... 9
Before You Start Testing..................................................................................................................................10
Roche USA – 47212
V4/1 – 05958083001 – Schwarz
Chapter 1: Understanding Your New System..........................................................................................11
Roche USA – 47212
V4/3 – 05958083001 – Magenta
The ACCU‑CHEK Aviva Meter..........................................................................................................................11
Coding the Meter............................................................................................................................................13
Adjusting the Time and Date – First Time Use................................................................................................15
Using the ACCU‑CHEK Aviva Plus System.......................................................................................................17
Chapter 2: Control Testing.......................................................................................................................19
Why Perform Control Tests..............................................................................................................................19
About the Control Solutions............................................................................................................................19
Performing a Control Test...............................................................................................................................20
Understanding Out-of-Range Control Test Results..........................................................................................24
Chapter 3: Testing Your Blood Glucose...................................................................................................27
Using the ACCU‑CHEK FastClix Lancing Device...............................................................................................27
Inserting a Lancet Drum.................................................................................................................................29
Preparing the Lancing Device for Fingertip Testing.........................................................................................30
Performing a Blood Glucose Test with Blood from Your Fingertip....................................................................31
Changing the Lancet Drum.............................................................................................................................36
Performing a Blood Glucose Test with Blood from Your Palm, Forearm or Upper Arm (Alternate Site Testing).38
Roche USA – 47212
V4/2 – 05958083001 – Cyan
Roche USA – 47212
V4/4 – 05958083001 – Yellow
2
Flagging Test Results......................................................................................................................................47
Understanding Test Results.............................................................................................................................48
Unusual Test Results..................................................................................................................................48
Symptoms of High or Low Blood Glucose..................................................................................................49
Comparing Your Meter Result to a Laboratory Result.................................................................................50
Chapter 4: Meter Memory, Setup, and Downloading.............................................................................51
Memory..........................................................................................................................................................51
Viewing Test Results.......................................................................................................................................53
Meter Setup....................................................................................................................................................54
Setting the Time and Date..............................................................................................................................55
Setting the Beeper On/OFF.............................................................................................................................57
Setting Test Reminders...................................................................................................................................59
Setting the Hypoglycemic (Hypo) Alert............................................................................................................62
Downloading Your Results to a Computer or PDA...........................................................................................65
Chapter 5: Cleaning and Disinfecting the Meter and Lancing Device..................................................67
Cleaning and Disinfecting the Meter...............................................................................................................69
Cleaning and Disinfecting the Lancing Device................................................................................................75
Chapter 6: Maintenance and Troubleshooting........................................................................................79
Changing the Battery......................................................................................................................................79
Maintenance and Troubleshooting..................................................................................................................81
Display Messages and Troubleshooting..........................................................................................................82
Chapter 7: Technical Information............................................................................................................89
Product Limitations.........................................................................................................................................89
Specifications.................................................................................................................................................89
Product Safety Information.............................................................................................................................91
Travel Documentation.....................................................................................................................................91
Disposing of the Meter, Test Strips, Lancets, and Batteries.............................................................................92
Explanation of Symbols...................................................................................................................................93
Warranty.........................................................................................................................................................94
Limited License..............................................................................................................................................96
Additional Supplies.........................................................................................................................................98
Index..........................................................................................................................................................99
3
4
5
Dear ACCU‑CHEK System Owner,
Thank you for choosing the ACCU‑CHEK Aviva Plus system!
Congratulations on your decision to take control of your diabetes. We’ve designed your new ACCU‑CHEK
Aviva Plus system with comfort, convenience, and control in mind to help make living with diabetes a little
easier.
This booklet will help you get the most from your ACCU‑CHEK Aviva Plus system.
To start testing quickly, you can also refer to the Quick Start Guide.
If you have questions, we are here to help. Just contact the ACCU‑CHEK Customer Care Service Center
toll‑free at 1‑800‑858‑8072. We offer assistance 24 hours a day, 365 days a year in many languages. You
can also visit www.accu-chek.com for diabetes management tools and product demonstrations.
Thanks again for choosing the ACCU‑CHEK Aviva Plus system.
WARNING
Before using the system, please read the Important Safety Information section on the following
pages.
6
The ACCU‑CHEK Aviva Plus System
The ACCU‑CHEK Aviva Plus blood glucose monitoring system is intended to be used for the quantitative
measurement of glucose (sugar) in fresh capillary whole blood samples drawn from the fingertips, forearm,
upper arm, or palm. The ACCU‑CHEK Aviva Plus blood glucose monitoring system is intended to be used by a
single person and should not be shared.
The ACCU‑CHEK Aviva Plus blood glucose monitoring system is intended for self testing outside the body
(in vitro diagnostic use) by people with diabetes at home as an aid to monitor the effectiveness of diabetes
control. The ACCU‑CHEK Aviva Plus blood glucose monitoring system should not be used for the diagnosis of
or screening of diabetes or for neonatal use. Alternative site testing should be done only during steady-state
times (when glucose is not changing rapidly).
The ACCU‑CHEK Aviva Plus test strips are for use with the ACCU‑CHEK Aviva blood glucose meter to
quantitatively measure glucose (sugar) in fresh capillary whole blood samples drawn from the fingertips,
forearm, upper arm, or palm.
This system is intended to be used by a single person and should not be shared.
NOTE
In this Owner’s Booklet the term “blood glucose” is used when referring to “blood sugar.”
The system includes:
•ACCU‑CHEK Aviva meter with battery
•ACCU‑CHEK Aviva Plus test strips and code key*
•ACCU‑CHEK Aviva control solution*
•ACCU‑CHEK FastClix lancing device* .
(with a black cap for fingertip testing and an AST cap for alternate site testing)
•ACCU‑CHEK FastClix lancet drum*
*may be sold separately
Need Help?
Just contact the ACCU‑CHEK Customer Care Service Center toll-free at 1-800-858-8072. We offer assistance
24 hours a day, 365 days a year in many languages. You can also visit www.accu-chek.com for diabetes
management tools and product demonstrations.
Please complete your Warranty Card and mail it, so you receive the best customer service possible and
product update news.
7
8
Important Safety Information
WARNING
• During normal testing, any blood glucose meter or lancing device may come in contact with
blood. All parts of the kit are considered biohazardous and can potentially transmit infectious
diseases from bloodborne pathogens, even after you have performed cleaning and disinfection.1,2
• Cleaning and disinfecting the meter and lancing device destroys most, but not necessarily all,
bloodborne pathogens.3
• The meter and lancing device should never be used by more than one person. Do not share the
meter and lancing device with anyone, including family members, due to the risk of infection
from bloodborne pathogens.1,2
• If the meter is being operated by a second person who is providing testing assistance to the
user, the meter and lancing device should be cleaned and disinfected prior to use by the second
person.
• Disinfect the meter and lancing device before allowing anyone else to handle them. Do not allow
anyone else to test with the meter or lancing device.
• It is important to keep the meter and lancing device clean and disinfected. For instructions on
how to clean and disinfect the meter and lancing device, see Chapter 5 “Cleaning and
Disinfecting the Meter and Lancing Device.”
• Wash hands thoroughly before and after handling the meter, lancing device, or test strips.
About Testing Yourself
WARNING
• If you are very dehydrated or urinating frequently, you may get an inaccurate test result. If you
think you are dehydrated, contact your healthcare professional right away.
• DO NOT CHANGE YOUR TREATMENT BASED ON A SINGLE RESULT THAT DOES NOT MATCH HOW YOU
FEEL OR IF YOU BELIEVE THAT YOUR TEST RESULT COULD BE INCORRECT.
• Some people with diabetes do not experience symptoms of low blood glucose (hypoglycemia).
Others, such as children or people who are unconscious or have certain disabilities, may not be
able to communicate their symptoms to caregivers. For these reasons, do not change any
treatment without first talking to a healthcare professional.
• It is always a good idea to have a back-up testing method available. Failure to test could cause a
delay in treatment decisions and lead to a serious medical condition. Examples of back-up
testing methods include a back-up meter or testing by a laboratory. Ask your healthcare
professional or pharmacist about other possible back-up methods.
• If your blood glucose result doesn’t match how you feel and you have followed the instructions
in this Owner’s Booklet, follow your healthcare professional’s instructions, or contact your
healthcare professional.
NOTE
• Perform a control test when you open a new box of test strips or if you think that your test result is
incorrect. Performing a control test lets you know that the meter and test strips are working properly.
• Refer to your Test Strip and Control Solution Package Inserts for additional health-related information.
9
Before You Start Testing
10 About the Meter and Test Strips
WARNING
• Carefully read and follow the instructions in the Owner’s Booklet and Package Inserts for the
test strips and control solutions. It is very important to follow the instructions in order to prevent
a wrong result or improper treatment.
• Inspect the container of test strips before using the test strips for the first time. If you see any
damage to the container cap or if anything prevents the cap from closing properly, do not use
the test strips. Contact the ACCU‑CHEK Customer Care Service Center. Damaged test strips can
cause inaccurate results, which could lead to improper treatment.
• The meter, test strips, and control solutions are only for use outside the body (in vitro). Do not
eat the test strips. Do not swallow or inject control solutions or use control solutions for any
purpose other than testing the ACCU‑CHEK Aviva Plus system.
NOTE
• Set the time and date on your meter before you begin testing.
• Although you always apply fresh capillary whole blood to the test strip, your system has been
calibrated to deliver plasma-like values for easier comparison to lab results.
Chapter 1: Understanding Your New System
The ACCU‑CHEK Aviva Meter
11
Infrared (IR) Window –
Transfers data from the
meter to a computer or
PDA.
Power/Set Button –
Turns the meter on
or off and sets
options.
Display –
Shows results,
messages, and results
stored in memory.
Battery Door –
Flip open the battery
door by pushing the
tab in the direction
of the arrow.
Right and Left Arrow
Buttons –
Press to enter memory,
adjust settings, and scroll
through results.
Test Strip Slot –
Insert test strip here.
Code Key Slot –
Insert code key
into this opening.
Code Key
(for example)
Battery –
Insert with
(+) symbol .
facing up.
12
Golden End –
Insert this end of
the test strip into
the meter.
AST Cap - .
(for obtaining blood
from alternate sites)
Yellow Window –
Touch blood drop
or control solution
here.
Lancet Drum
Test Strip Container
Control Solution
Bottle
Infrared (IR) Window
Comfort Dial with
Depth Selection
Lancet
Counter
Power/Set Button
Cap
Lever
(for advancing to new lancet)
Lancing Device
Test Strip
Top View
NOTE
Some items may be sold separately.
Depth Indicator
Plunger
Coding the Meter
A new code key is inside each new box of test strips.
13
1. Make sure the meter is off.
WARNING
2. Turn over the meter.
3. Remove the old code key
(if there is one in the meter)
and discard it.
Change the code key every time a new box of test strips is opened! For accurate results, it is
important to be sure the code key matches the code number on the test strip container.
NOTE
• Don’t force the code key into the meter. It is made to go into the meter only one way.
• If “code” and a flashing “- - -” are displayed, turn off the meter and reinsert a code key into the meter.
14
4. Turn over the code key so the code number faces
down. Push the code key into the code key slot
until it stops.
5. Leave the code key in the meter until a new box
of test strips is opened. Change the code key
each time a new box of test strips is opened.
Adjusting the Time and Date – First Time Use
The meter is preset with the time and date which may need to be adjusted to the local time zone. Setting
the correct time and date in the meter is important to review the results in memory or to download the
results to a computer.
decrease
1. Press and release
to turn
on the meter. The time and
date appear on the display.
“Set-up” and the hour flash. If
the correct time and date are
displayed, press and hold
to exit the set-up mode.
increase
2. Press and release
or
to
decrease or increase the hour.
Press and hold
or
to
scroll faster.
to set
3. Press and release
the hour. The minutes flash.
15
NOTE
When you install a new battery, the meter automatically prompts you to check the time and date when you
turn it on. If the time and date are correct, press and hold
to exit the set-up mode.
16
4. Repeat steps 2 and 3 to set the minutes, am/pm,
month, day, and year. The flashing field is the one
that is being changed.
5. Once the year is set, press and hold
until the
flashing test strip symbol appears. The time and
date are now set.
See Chapter 4, “Meter Setup” to set other options.
Using the ACCU‑CHEK Aviva Plus System
• Replace the code key and perform a control test every time you open a new box of test strips.
• Refer to the test strip package insert for test strip storage and system operating conditions.
• Store unused test strips in their original container with the cap tightly closed.
• Close the container tightly immediately after removing a test strip. Moisture can damage the test strips
and produce incorrect results.
• Do not remove test strips from the test strip container and put them into another container, such as a
plastic bag, pocket, purse, wallet, etc.
• Discard the test strips if they are past the “Use By” date printed on the test strip container. If the “Use By”
date is missing or cannot be read, do not use the test strips. Contact the ACCU‑CHEK Customer Care
Service Center at 1-800-858-8072.
• Use the test strip immediately after removing it from the container.
• Do not apply blood or control solution to the test strip before inserting it into the meter. If a result appears
before applying blood or control solution, do not act on that result.
• Do not reuse test strips. Once blood or control solution has been applied to a test strip, discard it. If a
retest is necessary, use a new test strip.
17
WARNING
18
• DO NOT expose test strips to heat, moisture or humidity. Temperatures outside the required
range, as well as moisture and humidity can damage your test strips and lead to inaccurate
results.
• DO NOT bend, cut, or alter the test strips.
• DO NOT get dirt, food, or other material on the test strip.
Not following these precautions can lead to inaccurate results.
Chapter 2: Control Testing
Why Perform Control Tests
Performing a control test lets you know that the meter and test strips are working properly. You should
perform a control test when:
• You open a new box of test strips
• You left the test strip container open or you think your test strips have been damaged
• You want to check the meter and test strips
• Your test strips were stored in extreme temperatures and/or humidity
• You dropped the meter
• Your test result does not agree with how you feel
• You want to check if you are testing correctly
About the Control Solutions
• Only use ACCU‑CHEK Aviva control solutions.
• The meter automatically recognizes the difference between the ACCU‑CHEK Aviva control solution and
blood.
• Write the date you open the bottle on the bottle label. The control solution must be discarded 3 months
from the date the bottle was opened (discard date) or on the “Use By” date on the bottle label, whichever
comes first.
• Do not use control solution that is past the “Use By” or discard date.
19
• The control results are not displayed in memory.
• Close the bottle tightly after use.
• The control solution can stain clothing. If you spill it, wash your clothes with soap and water.
• Refer to the control solution package insert for storage conditions.
Performing a Control Test
20 You need the meter, a test strip, and control solution Level 1 or Level 2. The control level is printed on
the bottle label.
NOTE
Most people just test the Level 1 control. If you wish, you can also test a Level 2 control. A set of
Level 1 and Level 2 control solutions is available for purchase. To order control solutions, talk to your
pharmacist or visit www.accu-chek.com to order online. Your meter is designed to recognize the
difference between the ACCU‑CHEK Aviva control solution and blood. The control results are not
displayed in memory.
21
1. To make sure the display is
working properly, turn off the
meter, then press and hold
to see the complete display. All
segments should be clear and
look exactly like the picture. If
any segments are missing
from the display, there may be
a problem with the meter.
Contact the ACCU‑CHEK
Customer Care Service Center
at 1‑800‑858‑8072.
2. Insert the test strip into the
meter in the direction of the
arrows. The meter turns on.
3. Make sure the code number on
the display matches the code
number on the test strip
container. If you miss seeing
the code number, remove the
test strip and reinsert it into
the meter.
22
OR
4. Select the control solution you
want to test. You will enter the
level later in the test.
5. Place the meter on a flat
surface, like a table.
6. Remove the control bottle cap
and wipe the tip of the bottle
with a tissue.
7. Squeeze the bottle until a tiny
drop forms at the tip. Touch the
drop to the front edge of the
yellow window of the test strip.
Do not put control solution
on top of the test strip. When
you see flash, you have
enough control solution in the
test strip. Wipe the tip of the
bottle with a tissue then cap
the bottle tightly.
23
8. The result appears on the
display, along with the control
bottle symbol and a flashing
“L.” Do not remove the test
strip yet. Press and release
once to mark the result as a
Level 1. If you tested the
Level 2 control, press and
release
a second time.
9. Press and release
to set the
control level in the meter.
10. The control result and “OK”
alternate on the display if the
result is in range. The range is
printed on the test strip
container label. The control
result and “Err” alternate on
the display if the result is out
of range. Remove and discard
the used test strip.
Understanding Out-of-Range Control Test Results
WARNING
The control ranges apply only to control results. They only indicate that your test strips and meter
are working properly. Do not use control results to interpret blood glucose results.
If the control result is not inside the acceptable range (printed on the test strip container), do not use the
24 meter until you solve the problem. Here are some things you can check:
Troubleshooting Checks
Action
1. Are the test strips or control solution past the
“Use By” date or discard date?
If either is past the “Use By” date or discard date,
throw it away.
2. Did you wipe the tip of the control solution
bottle with a tissue prior to use?
Wipe the tip of the bottle with a tissue. Repeat the
control test with a new test strip and a fresh drop of
control solution.
3. Were the test strip container and control
solution bottle always closed tightly?
If you think either may have been uncapped for some
time, replace the test strips or control solution.
4. Was the test strip used immediately after
removing it from the container?
Repeat the control test with a new test strip.
5. Were the test strips and control solution stored Repeat the control test with properly stored test strips
in a cool, dry place?
or control solution.
Troubleshooting Checks
Action
6. Did you follow all of the testing instructions?
Read Chapter 2, “Control Testing” and test again. If
you still have problems, contact the ACCU‑CHEK
Customer Care Service Center at 1‑800‑858‑8072.
7. Did you choose the correct control solution
level, either 1 or 2, when you performed the
test?
If you chose the wrong control solution level, you can
still compare the control result to the range printed on
the test strip container.
8. Does the code number on the meter display
match the code number on the test strip
container?
If they don’t match, insert the correct code key in the
meter and test again.
9. If you are still unsure of the problem …
Repeat the control test with a new test strip. If you
still have problems, contact the ACCU‑CHEK Customer
Care Service Center at 1‑800‑858‑8072.
25
26
Chapter 3: Testing Your Blood Glucose
Using the ACCU‑CHEK FastClix Lancing Device
WARNING
• During normal testing, any blood glucose meter or lancing device may come in contact with
blood. All parts of the kit are considered biohazardous and can potentially transmit infectious
diseases from bloodborne pathogens, even after you have performed cleaning and disinfection.1,2
• Cleaning and disinfecting the meter and lancing device destroys most, but not necessarily all,
bloodborne pathogens.3
• The meter and lancing device should never be used by more than one person. Do not share the
meter and lancing device with anyone, including family members, due to the risk of infection
from bloodborne pathogens1,2
• If the meter is being operated by a second person who is providing testing assistance to the
user, the meter and lancing device should be cleaned and disinfected prior to use by the second
person.
• Disinfect the meter and lancing device before allowing anyone else to handle them. Do not allow
anyone else to test with the meter or lancing device.
• It is important to keep the meter and lancing device clean and disinfected. For instructions on
how to clean and disinfect the meter and lancing device, see Chapter 5 “Cleaning and
Disinfecting the Meter and Lancing Device.”
• Wash hands thoroughly before and after handling the meter, lancing device, or test strips.
27
NOTE
• Testing with blood from alternate sites requires the AST cap. This is explained later in the chapter.
• The best depth setting is the lowest number that lets you get enough blood for a test. Try different
settings to find the one that is right for you.
• Never share your lancing device with anyone.
• ALWAYS use a new, sterile lancet each time you test. NEVER reuse a lancet that has already been
used.
28
The black cap is for fingertip testing only.
The AST cap is for testing other approved sites on the body, not the fingertip.
A new drum is dark gray with a white end.
A used drum has a visible red stripe on the white end. You cannot insert a used drum into the
lancing device.
Inserting a Lancet Drum
You must first load the drum into the lancing device to get it ready for use.
29
correctly inserted
drum
2. Insert a new drum,
1. Remove the cap by
white end first, until it
pulling it straight off. It
stops. It clicks into
is not a twist cap. The
place.
easiest way to do this
is to place your thumb
to the side of the notch
as seen in the
illustration.
NOTE
3. Slide the cap on until it 4. You are now ready to
stops by aligning the
use the first lancet. The
notch on the cap with
lancet counter on the
the notch on the
device shows a
device.
number 6, meaning
you have 6 new
lancets remaining.
Once the drum is inserted into the lancing device, do not remove the drum until completely used. The drum
cannot be reinserted.
Preparing the Lancing Device for Fingertip Testing
WARNING
Use a new lancet for each fingerstick to avoid infection.
30
1. Make sure the black cap is on the lancing device.
Do not use the AST cap to perform a fingertip test.
2. Adjust the depth by turning the Comfort Dial. The
depth indicator shows the current depth selection.
The higher the number, the deeper the
penetration. If you have soft skin, we suggest
starting at a depth of 2. If your skin is calloused
or thick, try a higher setting. Set the lancing
device aside until later in the test.
Performing a Blood Glucose Test with Blood from Your Fingertip
Before you perform your first blood glucose test, set up the meter correctly and perform a control
test. You need the meter, a test strip, and a lancing device with a drum loaded to perform a blood
glucose test.
WARNING
• During normal testing, any blood glucose meter or lancing device may come in contact with
blood. All parts of the kit are considered biohazardous and can potentially transmit infectious
diseases from bloodborne pathogens, even after you have performed cleaning and
disinfection.1,2
• Cleaning and disinfecting the meter and lancing device destroys most, but not necessarily all,
bloodborne pathogens.3
• The meter and lancing device should never be used by more than one person. Do not share the
meter and lancing device with anyone, including family members, due to the risk of infection
from bloodborne pathogens.1,2
• If the meter is being operated by a second person who is providing testing assistance to the
user, the meter and lancing device should be cleaned and disinfected prior to use by the second
person.
• Disinfect the meter and lancing device before allowing anyone else to handle them. Do not allow
anyone else to test with the meter or lancing device.
• It is important to keep the meter and lancing device clean and disinfected. For instructions on
how to clean and disinfect the meter and lancing device, see Chapter 5 “Cleaning and
Disinfecting the Meter and Lancing Device.”
• Wash hands thoroughly before and after handling the meter, lancing device, or test strips.
31
32
1. To make sure the display is working
properly, turn off the meter, then press and
hold
to see the complete display. All
segments should be clear and look exactly
like the picture. If any segments are missing
from the display, there may be a problem
with the meter. Contact the ACCU‑CHEK
Customer Care Service Center at
1‑800‑858‑8072.
2. Wash your hands with
warm soapy water
and dry thoroughly.
Dirty or wet hands
could affect results.
3. Prepare the lancing
device.
4. Insert the test strip
into the meter in the
direction of the
arrows. The meter
turns on.
33
5. Make sure the code number on
the display matches the code
number on the test strip
container. If you miss seeing
the code number, remove the
test strip and reinsert it into the
meter.
6. When the blood drop symbol
flashes, obtain a blood drop
from your fingertip.
7. Hold the lancing device firmly
against the side of your
fingertip. Remember that the
opening where the lancet
comes out is not in the center
of the cap. Press the plunger
on the end of the device all
the way down to prime the
lancet and prick the finger. The
ACCU‑CHEK FastClix lancing
device is primed and pricks the
finger in a single push of the
plunger.
34
8. Gently squeeze your finger to
assist the flow of blood. This
helps you get a blood drop.
Touch the blood drop to the
front edge of the yellow
window of the test strip. Do
not put blood on top of the
test strip.
9. When you see flash, you
have enough blood in the test
strip.
10. The result appears on the
display. If you want to flag
your test result for a special
event, leave the test strip in
the meter. (See Chapter 3,
“Flagging Test Results.”)
Otherwise, throw the used test
strip away.
NOTE
After completing a blood glucose or control test, the meter turns itself off 5 seconds after the test strip is
removed.
WARNING
If mg/dL does not appear with the test result contact the ACCU‑CHEK Customer Care Service
Center at 1‑800‑858‑8072. Use of the wrong unit of measure may cause misinterpretation of your
actual blood glucose level, and may lead to incorrect treatment.
35
11. ALWAYS use a new, sterile
lancet each time you test.
NEVER reuse a lancet that has
already been used. To load the
next lancet, slide the lever
forward (until it stops), then
slide it back all the way.
12. The lancet counter decreases
one number. For safety
reasons, once you advance to
a new lancet, you cannot go
back to a used lancet.
13. Wash hands thoroughly with
soap and water.
Changing the Lancet Drum
When you have used the sixth and last lancet, you should change the drum.
36
1. Take the black cap off the lancing device by
pulling it straight off. It is not a twist cap. The
easiest way to do this is to place your thumb to
the side of the notch as seen in the illustration.
NOTE
2. Hold the drum between your thumb and index
finger and pull it straight out of the lancing
device. A red stripe is visible on the white part,
indicating that the drum has been used.
A used drum cannot be reinserted into the lancing device.
OR
3. Throw away the old drum. Always dispose in
accordance with local regulations.
NOTE
37
4. Insert a new drum, white end first, until it stops. It
clicks into place.
Once the drum is inserted into the lancing device, do not remove the drum until completely used. The
drum cannot be reinserted.
Performing a Blood Glucose Test with Blood from Your Palm,
Forearm or Upper Arm (Alternate Site Testing)
WARNING
38
• During normal testing, any blood glucose meter or lancing device may come in contact with
blood. All parts of the kit are considered biohazardous and can potentially transmit infectious
diseases from bloodborne pathogens, even after you have performed cleaning and
disinfection.1,2
• Cleaning and disinfecting the meter and lancing device destroys most, but not necessarily all,
bloodborne pathogens.3
• The meter and lancing device should never be used by more than one person. Do not share the
meter and lancing device with anyone, including family members, due to the risk of infection
from bloodborne pathogens.1,2
• If the meter is being operated by a second person who is providing testing assistance to the
user, the meter and lancing device should be cleaned and disinfected prior to use by the second
person.
• Disinfect the meter and lancing device before allowing anyone else to handle them. Do not
allow anyone else to test with the meter or lancing device.
• It is important to keep the meter and lancing device clean and disinfected. For instructions on
how to clean and disinfect the meter and lancing device, see Chapter 5 “Cleaning and
Disinfecting the Meter and Lancing Device.”
• Wash hands thoroughly before and after handling the meter, lancing device, or test strips.
You have the option of obtaining a blood sample from other sites on your body besides the fingertip.
Alternate sites include the palm, forearm, and upper arm. The two palm testing sites are the fleshy areas
under the thumb (thenar) and under the little finger (hypothenar). Blood obtained from the fingertip can be
used at any time to test blood glucose. If blood from an alternate site is used, there are certain times when
testing is not appropriate (see next section). This is because your blood glucose level changes faster in your
fingertip than in the alternate sites. These differences may cause you to make the wrong therapeutic
decision, producing adverse health effects. Please read the following section before you test from alternate
sites.
39
hypothenar
thenar
IMPORTANT
Talk to your healthcare professional before you begin using alternate test sites.
WARNING
Do not change your treatment because of just one result.
NEVER ignore symptoms of high or low blood glucose.
Do not use an AST measurement to calibrate a continuous glucose monitoring (CGM) device or to
make insulin dosing calculations.
If your blood glucose result does not match how you feel, do a fingertip test to confirm your result.
If the fingertip result still does not match how you feel, contact your healthcare professional.
40
Tests from the palm, forearm, or upper arm may be performed:
•Immediately before a meal
•Fasting
Tests from the palm, forearm, or upper arm may NOT be performed:
•Two hours or less after eating
•After exercising
•If you are sick
•If you think your blood glucose is low
•If you often don’t notice when your blood glucose is low
•During peak action time of short-acting insulin or rapid-acting insulin analogues
•Up to 2 hours after injecting a short-acting insulin or a rapid-acting insulin analogue
You need the meter, a test strip, a lancing device with a drum loaded, and the AST cap from the kit.
41
1. To make sure the display is working properly, turn
off the meter, then press and hold
to see the
complete display. All segments should be clear
and look exactly like the picture. If any segments
are missing from the display, there may be a
problem with the meter. Contact the ACCU‑CHEK
Customer Care Service Center at
1‑800‑858‑8072.
2. Wash your hands and the test site with warm,
soapy water and dry thoroughly.
42
3. Remove the black cap from the
lancing device by pulling it
straight off. It is not a twist
cap. The easiest way to do this
is to place your thumb to the
side of the notch as seen in
the illustration.
NOTE
4. Put the AST cap on by lining
up the notched sections on the
cap and the lancing device.
5. Dial the depth selection
appropriate for your testing
site. Set the lancing device
aside until later in the test.
We suggest starting at a depth setting of 5½ for forearm or upper arm testing, and 3 for palm testing.
Once you perform a successful test, you may want to find the lowest depth setting that provides enough
blood with the least amount of pain.
43
6. Insert the test strip into the
meter in the direction of the
arrows. The meter turns on.
7. Make sure the code number on
the display matches the code
number on the test strip
container. If you miss seeing
the code number, remove the
test strip and reinsert it into
the meter.
8. When the blood drop symbol
flashes on the display, obtain a
blood drop from the site.
TIP: Rub the skin prior to lancing to increase blood flow.
44
9. Press the opening of the AST cap firmly against a
fleshy area on the alternate site. Press the
lancing device up and down in a slow pumping
motion to assist the flow of blood. Remember
that the opening where the lancet comes out is
not in the center of the cap.
NOTE
10. Keep steady pressure on the area and press the
plunger on the end of the device all the way
down to prime the lancet and prick the site.
Don’t be afraid to apply pressure to the area
with the lancing device to assist the flow of
blood. Continue to press the cap against the
area for a few seconds to allow blood to come
to the surface.
If the blood drop is too small, reapply pressure to get a sufficient blood drop.
45
11. Touch the blood drop to the
front edge of the yellow
window of the test strip. Do
not put blood on top of the
test strip.
WARNING
12. When you see flash, you
have enough blood in the test
strip.
13. The result appears on the
display. If you want to flag
your test result for a special
event, leave the test strip in
the meter. (See Chapter 3,
“Flagging Test Results.”)
Otherwise, discard the used
test strip.
If mg/dL does not appear with the test result contact the ACCU‑CHEK Customer Care Service
Center at 1‑800‑858‑8072. Use of the wrong unit of measure may cause misinterpretation of your
actual blood glucose level, and may lead to incorrect treatment.
46
14. ALWAYS use a new, sterile
lancet each time you test.
NEVER reuse a lancet that
has already been used. To
load the next lancet, slide the
lever forward (until it stops),
then slide it back all the way.
15. T he lancet counter decreases
one number. For safety
reasons, once you advance
to a new lancet, you cannot
go back to a used lancet.
16. Wash hands thoroughly with
soap and water.
Having Trouble Testing from Alternate Sites?
If you experience difficulty obtaining a sufficient blood drop while testing from an alternate site, please
contact the ACCU‑CHEK Customer Care Service Center at 1-800-858-8072 for assistance. We will guide
you through the testing procedure step by step. If you continue to have difficulty, we can also offer you,
free of charge, our ACCU‑CHEK Softclix lancing device. Because the ACCU‑CHEK Softclix lancet has a
thicker diameter needle than the ACCU‑CHEK FastClix lancet, you may have better success when trying to
test from alternate sites.
Flagging Test Results
If you wish, you can “flag” your test result with an asterisk to mark a special result. You might want to
flag an event such as an after-meal (post prandial) test, exercise, or an alternate site test result. When you
review your results in memory, this “flag” can help you remember what was different about the result.
Here is how to flag a result:
1. Perform a test.
2. With the test result on the display, and the test strip STILL IN
THE METER, press and release
or
once. The
appears in the lower right corner.
3. Remove and discard the used test strip.
47
flag
Understanding Test Results
Unusual Test Results
If your blood glucose result does not match how you feel, follow these steps:
1. Perform a control test. See Chapter 2, “Control Testing.”
2. Repeat a blood glucose test. See Chapter 3, “Performing a Blood Glucose Test with Blood from Your
Fingertip.”
3. If your blood glucose results still do not match how you feel, follow your healthcare professional’s
instructions or contact your healthcare professional immediately.
48
NOTE
Always follow your healthcare professional’s instructions. For example, if your healthcare professional has
advised you to immediately treat a low blood glucose result (such as by eating something), then do that
first.
Symptoms of High or Low Blood Glucose
Being aware of the symptoms of high or low blood glucose can help you understand your test results and
decide what to do if they seem unusual. Here are some common symptoms:
High blood glucose (hyperglycemia): Symptoms of hyperglycemia may include, but are not limited to,
increased thirst, frequent urination, blurred vision, drowsiness, and/or unexplained weight loss.
Low blood glucose (hypoglycemia): Symptoms of hypoglycemia may include, but are not limited to, anxiety,
shakiness, sweating, headache, increased hunger, dizziness, pale skin color, sudden change in mood or
irritability, fatigue, difficulty concentrating, clumsiness, palpitations, and/or confusion.
If you are experiencing any of these symptoms, or other unusual symptoms, test your blood glucose
from your fingertip. If your blood glucose result is displayed as LO or HI and you have symptoms of
low or high blood glucose, follow your healthcare professional’s instructions or contact your
healthcare professional immediately. If your blood glucose result does not match how you feel, follow
the steps in Chapter 3, “Unusual Test Results.”
WARNING
The meter is designed to display blood glucose results from 20 to 600 mg/dL. If a result below
20 mg/dL or over 600 mg/dL appears on the display, contact the ACCU‑CHEK Customer Care
Service Center toll-free at 1‑800‑858‑8072.
49
Comparing Your Meter Result to a Laboratory Result
50
A common question is how the blood glucose results on your meter compare to the laboratory results. Your
blood glucose can change quickly, especially after eating, taking medication, or physical activity. If you test
yourself in the morning and then go to your healthcare professional’s office for a blood glucose test, your
results will probably not match even if you are fasting. This is typically not a problem with your meter; it just
means that time has elapsed and your blood glucose has changed.
If you want to compare your meter result to the laboratory result, you must be fasting. Take your meter to
the healthcare professional’s office, and test yourself by fingerstick within 5 minutes of having blood drawn
from your arm by a healthcare professional. Keep in mind that the laboratory uses different technology than
the meter, and that blood glucose meters for self-testing generally read somewhat lower than the laboratory
result.
If you are fasting and you do a fingerstick test within 5 minutes of having your blood drawn, here are the
general guidelines to compare your meter result to the laboratory result:
• If your blood glucose is below 75 mg/dL, your results generally should fall within ±15 mg/dL of the
laboratory result.
• If your blood glucose is equal to or over 75 mg/dL, your results generally should fall within ±20 % of the
laboratory result.
Chapter 4: Meter Memory, Setup, and Downloading
Memory
Storing Blood Glucose and Control Test Results
The meter automatically stores up to 500 blood glucose test results with the time and date of the test.
Results can be reviewed at any time. Test results are stored from the newest to the oldest, so set the time
and date correctly in the meter. Having the correct time and date setting helps ensure appropriate
interpretation of stored blood glucose results by you and your healthcare team.
51
NOTE
• The memory is not lost when the battery is replaced; however, confirm that the time and date are still
correct.
• Once 500 blood glucose or 20 control results are in memory, adding a new result causes the oldest one
to be deleted.
or
to scroll through the results faster.
• Press and hold
• Up to 20 control results are stored in memory, but cannot be reviewed on the meter. The stored control
results must first be downloaded to a compatible software application. For product availability, please
contact the ACCU‑CHEK Customer Care Service Center at 1‑800‑858‑8072.
• Control results are not included in the 7-, 14-, and 30-day averages.
52
WARNING
Do not change your therapy based on an individual result in memory. Talk to your healthcare
professional before changing therapy based on results in memory.
Viewing Test Results
1. Press and release either
or
to access memory. The most recent result appears.
2. Press and release
to view previous results in order.
3. OR, press and release
to look at the 7-, 14-, or 30-day averages, in that order. You see an “n” with a
number in the upper left corner of the display. This tells you how many test results are included in that
average.
Most recent result
53
And so on …
Third most
recent result
Second most
recent result
7-Day average
14-Day average
30-Day average
Meter Setup
Using the Set-Up Mode
The following features can be customized as required:
•Time and date – set the time and date.
•Beeper – select “On” or “OFF.”
•Test reminders – select “On” or “OFF.” If you choose “On,” select 1 to 4 reminders per day
•Hypoglycemic (Hypo) alert – select “On” or “OFF.” If you choose “On,” select the blood glucose level
for the alert.
54
The
has three functions for the set-up mode:
• To enter the set-up mode, turn on the meter then press and hold
until “set-up” flashes on the display.
This takes about 4 seconds.
to set the selected option.
• Press and release
for about 4 seconds until the flashing test strip
• To exit the set-up mode at any time, press and hold
symbol appears on the display.
Throughout this section, the red progress bar helps guide you through the setup process.
You are here
TIME / DATE.
(hrs, min, am/pm,
month, day, year)
BEEPER .
(on/off)
TEST REMINDERS .
(A-1, A-2, A-3, A-4)
HYPO ALERT .
(off, on, level)
Setting the Time and Date
| | |
decrease
| |
| | |
| |
increase
|
||
| | |
55
1. Press and release
to turn
on the meter. The flashing test
strip symbol appears.
NOTE
Press and hold
or
2. Press and hold
for about
4 seconds to enter the set-up
mode. “Set-up” and the hour
flash on the display.
to scroll faster.
3. Press and release
or
to
decrease or increase the hour.
| | |
| |
| | |
| |
|
||
| | |
56
4. Press and release
to set
the hour. The minutes flash.
5. Repeat steps 3 and 4 to set
the minutes, am/pm, month,
day, and year. The flashing
field is the one that is being
changed.
6. To set up more options, press
and release . To exit, press
and hold
until the flashing
test strip symbol appears on
the display.
You are here
TIME / DATE.
(hrs, min, am/pm,
month, day, year)
BEEPER .
(on/off)
TEST REMINDERS .
(A-1, A-2, A-3, A-4)
HYPO ALERT .
(off, on, level)
Setting the Beeper On/OFF
The meter beeper is preset to “On.” Setting the beeper to “OFF” does not affect test results.
The beeper is helpful because it prompts you:
• To apply blood or control solution to the test strip
• When enough blood or control solution is drawn into the test strip
• When the test is complete
• When a button is pressed
• When it is time to test (if you set test reminders)
• If an error occurred while testing (even if the beeper is off, it still beeps for an error)
57
| | |
| |
| | |
| |
|
||
| | |
58
1. Press and release
to turn on the meter.
The flashing test strip
symbol appears.
2. Press and hold
for
about 4 seconds to
enter the set-up
mode. “Set-up” and
the hour flash on the
display.
3. Press and release
repeatedly until the
flashing beeper
symbol and “On” or
“OFF” appear on the
display.
4. Press and release
or
to switch
between “On” or
“OFF.”
5. To set up more
options, press and
release . To exit,
press and hold
until the flashing test
strip symbol appears
on the display.
You are here
TIME / DATE.
(hrs, min, am/pm,
month, day, year)
BEEPER .
(on/off)
TEST REMINDERS .
(A-1, A-2, A-3, A-4)
HYPO ALERT .
(off, on, level)
Setting Test Reminders
One to four test reminders can be set per day. The meter beeps every 2 minutes – up to 3 times. Turn off the
test reminder by inserting a test strip or pressing any button. The beeper must be set to “On” for the test
reminder to sound.
The meter is preset with the test reminders set to “OFF.” They must be turned “On” to use this feature.
If A-1, A-2, A-3, and A-4 are turned on, the meter is preset with the following times which can be adjusted
as necessary.
A-1 8:00 am
A-2 12:00 pm (noon)
A-3 6:00 pm
A-4 10:00 pm
NOTE
• If a test was performed within 30 minutes of a test reminder, the test reminder does not occur.
• If the meter is on at the test reminder time, the test reminder does not occur.
• Exposure to cold conditions may disable test reminders until the meter is turned on.
• When you are setting the time for test reminders, the bell symbol remains on the display and “set-up”
flashes continuously.
59
| | |
| |
| | |
| |
|
||
| | |
60
1. Press and release
to turn on the meter.
The flashing test strip
symbol appears.
for
2. Press and hold
about 4 seconds to
enter the set-up
mode. “Set-up” and
the hour flash on the
display.
3. Press and release
repeatedly until the
bell symbol, “OFF,”
and the flashing
“set-up” and “A-1”
appear on the display.
4. Press and release
or
to switch
between “On” or
“OFF.” Press and
release
to set the
option.
61
5. If “On” is selected, the
hour flashes. “A-1”
and the bell symbol
remain on the display.
6. Press and release
or
to select
the hour. Press and
release
to set the
hour.
7. The minutes flash.
Press and release
or
to select
00, 15, 30, or 45.
These are the only
choices.
8. Press and release
to set the minutes.
“am” or “pm” flashes
on the display.
9. Press and release
or
to switch
between “am” and
“pm.” Press and
release
to set
“am” or “pm."
10. The next test
reminder “A-2” and
“set-up” flash on the
display with “OFF”
and the bell symbol.
You can set
additional test
reminders or press
and hold
until
you see the flashing
test strip symbol to
exit the set-up mode.
You are here
TIME / DATE.
(hrs, min, am/pm,
month, day, year)
BEEPER .
(on/off)
TEST REMINDERS .
(A-1, A-2, A-3, A-4)
HYPO ALERT .
(off, on, level)
Setting the Hypoglycemic (Hypo) Alert
You can set the meter to let you know when your result indicates a possible low blood glucose
(hypoglycemia). You can also select what blood glucose level you want this alert to have (60–80 mg/dL).
Before you set the alert, talk to your healthcare professional to help you decide what blood glucose
level is your hypo level. Your new meter is preset to “OFF” for the hypo alert. If you want to turn it “On,”
follow these steps.
62
WARNING
This function is no substitute for hypoglycemia training by your healthcare professional or diabetes
team.
63
1. Press and release
to turn on the meter.
The flashing test strip
symbol appears.
2. Press and hold
for about 4 seconds
to enter the set-up
mode. “Set-up” and
the hour flash on the
display.
3. Press and release
repeatedly until
“OFF” and the
flashing “set-up” and
appear on the
display.
4. Press and release
to switch
or
between “On” and
“OFF.” Press and
release
to set the
option.
64
5. If “On,” is selected, “set-up,”
and
flash. The display
shows 70 mg/dL (first use) or
the current level.
or
to
6. Press and release
select the level. Press and
release
to set the level.
until
7. To exit, press and hold
the flashing test strip symbol
appears on the display.
Downloading Your Results to a Computer or PDA
We offer a variety of software to help you download your results. For information on ACCU‑CHEK software,
contact the ACCU‑CHEK Customer Care Service Center at 1‑800‑858‑8072.
You can transfer the stored results to a computer to track, identify patterns, and print.
Transferring Data Directly to a Computer or PDA Using Specialized Software and
Infrared Cable
1. Install the software according to the instructions. To transfer the results to a computer, connect the
infrared meter cable according to the instructions.
2. Run the software program and follow the instructions to download information. Make sure the software is
ready to accept data from the meter.
3. With the meter off, press and hold both
and
until 2 arrows on the display alternately flash.
65
| | |
| | |
|
| | |
| |
| | |
| |
| | |
|
| | |
4. Locate the infrared (IR) window on the top of the meter.
Infrared (IR) Window
5. Locate the IR window on either the infrared cable (computer) or PDA.
6. Place the meter on a flat surface. Point the 2 IR windows toward each other. They
should be 1–4 inches apart.
7. Do not move the infrared cable (computer), PDA, or meter during the transfer.
8. Follow the prompts on the software.
9. The software program may shut off the meter automatically when the data transfer
is complete. Should this occur, follow the prompts on your display.
66
NOTE
• If the data did not transfer successfully, try again. If you still have problems, contact the ACCU‑CHEK
Customer Care Service Center at 1‑800‑858‑8072.
• To make the most of the download feature, you must set the time and date in the meter correctly.
Chapter 5: Cleaning and Disinfecting the Meter and
Lancing Device
WARNING
• During normal testing, any blood glucose meter or lancing device may come in contact with
blood. All parts of the kit are considered biohazardous and can potentially transmit infectious
diseases from bloodborne pathogens, even after you have performed cleaning and disinfection.1,2
• Cleaning and disinfecting the meter and lancing device destroys most, but not necessarily all,
bloodborne pathogens.3
• The meter and lancing device should never be used by more than one person. Do not share the
meter and lancing device with anyone, including family members, due to the risk of infection
from bloodborne pathogens.1,2
• If the meter is being operated by a second person who is providing testing assistance to the user,
the meter and lancing device should be cleaned and disinfected prior to use by the second
person.
• Disinfect the meter and lancing device before allowing anyone else to handle them. Do not allow
anyone else to test with the meter or lancing device.
• It is important to keep the meter and lancing device clean and disinfected.
• Wash hands thoroughly before and after handling the meter, lancing device, or test strips.
67
What is the difference between cleaning and disinfecting?
Cleaning is the removal of dirt from the meter or lancing device.3
Disinfecting is the removal of most, but not all, disease-causing and other types of microorganisms
(bloodborne pathogens) from the meter or lancing device.3
When should the meter and lancing device be cleaned and disinfected?
Clean and disinfect the meter and lancing device:
•Once per week
•When blood gets on the meter or lancing device
•Before allowing anyone else to handle the meter or lancing device
68
NOTE
For technical assistance or questions on cleaning and disinfecting, please contact the ACCU‑CHEK Customer
Care Service Center at 1-800-858-8072.
Cleaning and Disinfecting the Meter
To clean and disinfect without damaging the meter, follow these procedures carefully.
When to Clean and Disinfect the Meter
• Clean the meter to remove visible dirt or other material prior to disinfecting.
• Clean and disinfect the meter at least once per week and when blood is present on the surface of the
meter.
• Clean and disinfect the meter before allowing anyone else to handle the meter. Do not allow anyone else
to use the meter on themselves for testing purposes.
69
Approved Cleaning and Disinfecting Product
The following product has been approved for cleaning and disinfecting the meter:
•Super Sani-Cloth (EPA* reg. no. 9480-4)
*Environmental Protection Agency
Super Sani-Cloth can be purchased from the following sources:
•Amazon.com
•Officedepot.com
•Walmart.com
NOTE
70
If you notice any of the following signs of deterioration after cleaning and disinfecting your meter, please
contact the ACCU‑CHEK Customer Care Service Center at 1-800-858-8072: Residue around buttons,
clouding of display, or button malfunction.
What to Clean and Disinfect
The following parts of the meter should be cleaned and disinfected:
•The area around slots and openings (do not get any moisture in slots or openings)
•The meter display
•The entire meter surface
How to Clean and Disinfect the Meter
WARNING
• DO NOT clean or disinfect the meter while performing a blood glucose or control test.
• DO NOT get any moisture in slots or openings.
• DO NOT spray anything onto the meter.
• DO NOT immerse the meter in liquid.
Failure to follow these instructions will damage the meter and stop it from working properly.
71
72
1. Wash hands thoroughly with soap and water.
WARNING
2. Turn off the meter and wipe the entire meter
surface with an approved cleaning and
disinfecting product. Always use the same product
for both cleaning and disinfecting.
The effect of using more than one product interchangeably to clean and disinfect the meter has .
not been tested. Always use Super Sani-Cloth (EPA reg. no. 9480-4) to clean and disinfect the
meter. Do not use any other cleaning or disinfecting solutions. Using solutions other than the .
Super Sani-Cloth could result in damage to the meter.
73
3. Carefully wipe around the test strip slot and other
openings. Make sure that no liquid enters any slot
or opening.
4. Dry the meter with a soft cloth or gauze. Make
sure that no solution is seen in any slot or
opening.
74 5. For disinfecting the meter, get a new wipe or
cloth. Repeat steps 2 and 3 following the
manufacturer’s instructions for disinfecting.
NOTE
6. Wash hands thoroughly with soap and water.
Roche has tested the approved products for a total of 520 cycles, which is equal to cleaning and
disinfecting once per week for a 5 year period.
Cleaning and Disinfecting the Lancing Device
NOTE
• Do not throw away the lancing device cap after each use. Use an approved cleaning and disinfecting
product on it.
• Remove the lancet drum before cleaning and disinfecting the lancing device.
To clean and disinfect without damaging the lancing device, follow these procedures carefully.
When to Clean and Disinfect the Lancing Device
• Clean the lancing device to remove visible dirt or other material prior to disinfecting.
• Clean and disinfect the lancing device once per week to remove visible dirt or other material for safe
handling.
• Clean and disinfect the lancing device before allowing anyone else to handle the lancing device, for
instance, if you have someone assisting you. Do not allow anyone else to use the lancing device.
75
Approved Cleaning and Disinfecting Product
The following product has been approved for cleaning and disinfecting the lancing device:
•Super Sani-Cloth (EPA* reg. no. 9480-4)
*Environmental Protection Agency
Super Sani-Cloth can be purchased from the following sources:
•Amazon.com
•Officedepot.com
•Walmart.com
NOTE
76
• If you notice any of the following signs of deterioration after cleaning and disinfecting your lancing
device, please contact the ACCU‑CHEK Customer Care Service Center at 1-800-858-8072: Residue
around buttons.
• You might observe a slight discoloration of the lancing device after multiple cleaning and disinfecting
cycles. This does not affect the functionality of the device.
What to Clean and Disinfect
The following parts of the lancing device should be cleaned and disinfected:
•The entire lancing device surface
•The cap
How to Clean and Disinfect the Lancing Device
WARNING
DO NOT get any moisture into any openings.
Failure to follow these instructions may damage the lancing device and stop it from working
properly.
77
1. Wash hands thoroughly with
soap and water.
3. Dry the lancing device and cap
2. Wipe the entire surface of the
with a soft cloth or gauze. Make
lancing device and the inside of
sure no solution is seen in any
the lancing device cap with an
opening.
approved cleaning and
disinfecting product. Always use
the same product for both
cleaning and disinfecting.
WARNING
The effect of using more than one product interchangeably to clean and disinfect the lancing
device has not been tested. Always use Super Sani-Cloth (EPA reg. no. 9480-4) to clean and
disinfect the lancing device. Do not use any other cleaning or disinfecting solutions. Using
solutions other than the Super Sani-Cloth could result in damage to the lancing device.
78
4. For disinfecting the lancing device, get a new
wipe or cloth. Repeat step 2 following the
manufacturer’s instructions for disinfecting.
NOTE
5. Wash hands thoroughly with soap and water.
Roche has tested the approved products for a total of 520 cycles, which is equal to cleaning and
disinfecting once per week for a 5 year period.
Chapter 6: Maintenance and Troubleshooting
Changing the Battery
1. Open the battery door on the back of the meter
by pushing the tab in the direction of the arrow
and pulling the door up. Remove the old battery.
2. Insert the new battery with the + side up. The
battery rests on the metal contact. The door holds
the battery in place.
3. Put the battery door back in place and snap it
closed.
4. Turn on the meter. Confirm that the time and date
are correct.
79
NOTE
• The meter uses one 3-volt lithium battery, coin cell type CR2032. This type of battery can be found in
many stores. Always keep a spare packaged battery on hand.
• Be sure the battery goes in + side up, or facing you.
• After you change the battery, your meter prompts you to confirm the meter’s time and date settings.
See Chapter 4, “Setting the Time and Date.” All test results are saved in memory.
• All control and blood glucose test results remain saved in memory.
80
Maintenance and Troubleshooting
The meter needs little or no maintenance with normal use. It automatically tests its own
systems every time you turn it on and lets you know if something is wrong. See
Chapter 6, “Display Messages and Troubleshooting.”
If you drop the meter or think it is not giving accurate results, make sure that the test
strips and control solution have not expired, then perform a control test. If the control is
out of the acceptable range, contact the ACCU‑CHEK Customer Care Service Center at
1-800-858-8072.
Test the display before each blood glucose test to make sure it is working properly. Turn
off the meter, then press and hold
to see the complete display. All the segments
should be clear and look exactly like the picture shown. If not, do not use the meter.
Contact the ACCU‑CHEK Customer Care Service Center at 1‑800‑858‑8072.
81
Display Messages and Troubleshooting
WARNING
Never make treatment decisions based on an error message. If you have any concerns, contact the
ACCU‑CHEK Customer Care Service Center at 1‑800‑858‑8072.
The meter will not turn on or the
display is blank.
•Battery is dead –
Insert new battery.
•Display is damaged –
Contact the ACCU‑CHEK Customer
Care Service Center at
(blank display)
1‑800‑858‑8072.
•Extreme temperatures –
Move the meter to a more
temperate area.
82
Battery power is low. Change the
battery soon. See Chapter 6,
“Changing the Battery.”
The meter is in the set-up mode,
waiting for you to change or confirm
settings. See Chapter 4, “Meter
Setup.”
The meter is ready for you to insert a
test strip.
Blood glucose may be lower than the
measuring range of the system. See
Chapter 3, “Understanding Test
Results.”
The meter is ready for a drop of
blood or control solution.
This test result was flagged. See
Chapter 3, “Flagging Test Results”
for more details.
Blood glucose may be higher than
the measuring range of the system.
See Chapter 3, “Understanding Test
Results.”
Blood glucose is below the defined
hypo (low blood glucose) level. See
Chapter 3, “Understanding Test
Results.”
83
The meter is not coded or the code
key is not inserted. Turn off the meter
and recode it. See Chapter 1,
“Coding the Meter.”
84
The test strips expire at the end of
the current month. Before the end of
the month, insert a new code key
from a new box of test strips and
ensure the code key number
matches the code number on the
test strip container. Make sure the
time and date in the meter are
correct.
The test strip may be damaged or
the code key is incorrect. Remove
and reinsert the test strip. If the
message reappears, turn off the
meter and insert a new code key.
Make sure the code number on the
code key inserted in the meter
matches the code number on the container of test
strips. If the message reappears contact the
ACCU‑CHEK Customer Care Service Center at
1-800-858-8072.
The code key is incorrect. Turn off
the meter and insert a new code key.
If this does not fix the problem,
contact the ACCU‑CHEK Customer
Care Service Center at
1‑800‑858‑8072.
Your blood glucose may be extremely
high or a meter or a test strip error
has occurred. If this confirms how
you feel, contact your healthcare
professional immediately. If it does
not confirm how you feel, repeat the
test and refer to Chapter 3, “Unusual
Test Results.” If this does not confirm how you feel,
perform a control test with your control solution and
a new test strip. If the control result is within the
acceptable range, review the proper testing
procedure and repeat your blood glucose test with a
new test strip. If the E-3 code still appears for your
blood glucose test, your blood glucose result may be
extremely high and above the system’s reading
range. Contact your healthcare professional
immediately. If the control result is not within the
acceptable range, see Chapter 2, “Understanding
Out-of-Range Control Test Results.”
85
Not enough blood or control solution
was drawn into the test strip for
measurement or was applied after
the test had started. Discard the test
strip and repeat the test.
86
The code key is from an expired lot
of test strips. Make sure the code
key number matches the code
number on the test strip container.
Make sure the time and date in the
meter are correct.
Blood or control solution was applied
to the test strip before the flashing
blood drop symbol appeared on the
display. Discard the test strip and
repeat the test.
An electronic error occurred or, in
rare cases, a used test strip was
removed and reinserted. Turn the
meter off and on or take the battery
out for 20 seconds and reinsert it.
Perform a blood glucose or control
test. If the problem persists, contact
the ACCU‑CHEK Customer Care Service Center at
1‑800‑858‑8072.
The time and date settings may be
incorrect. Make sure the time and
date are correct and adjust, if
necessary. See Chapter 4, “Setting
the Time and Date.”
The temperature is above or below
the proper range for the system.
Refer to the test strip package insert
for system operating conditions.
Move to an area with the appropriate
conditions, wait 5 minutes, and
repeat the test. Do not artificially
heat or cool the meter.
The battery is almost out of power.
Change the battery now. See
Chapter 6, “Changing the Battery.”
NOTE
If you see any other error display, please contact
the ACCU‑CHEK Customer Care Service Center at
1‑800‑858‑8072.
87
88
Chapter 7: Technical Information
Product Limitations
Please read the literature packaged with the test strips and control solutions to find the latest information on
product specifications and limitations.
Specifications
Blood volume
Sample type
Measuring time
Measuring range
Test strip storage conditions
Meter storage conditions
System operating conditions
Relative humidity operating range
Calibration
Memory capacity
Automatic power off
Power supply
Display
Dimensions
Weight
Refer to the test strip package insert.
Refer to the test strip package insert.
Refer to the test strip package insert.
Refer to the test strip package insert.
Refer to the test strip package insert.
Temperature: -13–158 °F
Refer to the test strip package insert.
Refer to the test strip package insert.
Plasma equivalent
500 blood glucose results and 20 control results with time and date
2 minutes
One 3-volt lithium battery (coin cell type CR2032)
LCD
94 × 53 × 22 mm (LWH)
Approximately 60 g (with battery)
89
Construction
Protection class
Meter type
Control solution storage conditions
Electromagnetic Compatibility
Hand-held
III
The ACCU‑CHEK Aviva meter is suitable for continuous operation.
Refer to the control solution package insert.
This meter meets the electromagnetic immunity requirements as per EN ISO 15197 Annex A. The chosen basis for
electrostatic discharge immunity testing was basic standard IEC 61000-4-2. In addition, it meets the
electromagnetic emissions requirements as per EN 61326. Its electromagnetic emission is thus low. Interference
from the meter to other electrically-driven equipment is not anticipated.
Performance Analysis
Refer to the test strip package insert.
Test Principle
90
Refer to the test strip package insert.
Product Safety Information
WARNING
• Strong electromagnetic fields may interfere with the proper operation of the meter. Do not use
this meter close to sources of strong electromagnetic radiation.
• To avoid electrostatic discharge, do not use the meter in a very dry environment, especially one in
which synthetic materials are present.
• Choking hazard. Small parts. Keep away from children under the age of 3 years.
Travel Documentation
If you are traveling on a commercial airline, you may be required to provide documentation certifying that this
meter meets environmental conditions and test procedures for Airborne Equipment (RTCA/DO-160F) section 21
Emission of Radio Frequency Energy. Please visit www.accu-chek.com or contact the ACCU‑CHEK Customer Care
Service Center at 1‑800‑858‑8072 to obtain a copy of the document.
91
Disposing of the Meter, Test Strips, Lancets, and Batteries
WARNING
Any product coming in contact with blood is considered contaminated (potentially infectious).*
During normal testing, any blood glucose meter may come in contact with blood. Lancing devices
may also be considered sharps. Disposal of sharps is regulated by law in many jurisdictions.
The European Union has a requirement for improving waste management practices for certain electronic
equipment, but meters fall outside the scope of the European Directive 2002/96/EC** This is not a requirement for
the U.S.A.; however, Roche is committed to recycling and sustainability. Comply with any laws or ordinances
relating to the disposal of sharps and/or contaminated products. Contact your local health department or other
appropriate authorities for proper handling and disposal of used meters, used test strips, used lancets, and used
batteries. Please consider the following points when disposing of your used testing materials:
• Consider recycling of the meters and batteries at an appropriate facility. Be aware the meter is potentially
hazardous electronics scrap (e-scrap) and should be disposed of accordingly. The batteries are potentially
hazardous also and should be disposed of accordingly.
• Disinfect the meter before recycling or disposing.
*29 CFR 1910.1030 – Bloodborne pathogens
**Directive 2002/96/EC – Directive on waste electrical and electronic equipment (WEEE)
92
Explanation of Symbols
CAUTION (refer to accompanying documents)! Please refer to safety-related notes in the
instructions for use accompanying this instrument.
3V coin cell type CR2032
93
Warranty
ACCU‑CHEK Aviva Meter 30-day Money-back Guarantee for Qualifying Consumers
Roche Diagnostics offers qualifying consumers that purchase an ACCU‑CHEK Aviva meter, a 30-day money back
guarantee. If you are not fully satisfied with your ACCU‑CHEK Aviva meter, contact the ACCU‑CHEK Customer Care
Service Center toll-free at 1‑800‑858‑8072 to determine whether you qualify to receive a full refund within 30
days of purchase. If you are covered under Medicare, Medicaid, other federal/state programs, or private insurance
you are NOT eligible for this money-back offer. Consumers affected by this exclusion may instead request a
different ACCU‑CHEK meter/system. The refund will be limited to the amount paid by you net of any rebates. You
must have a copy of the dated itemized purchase receipt and the original packaging to obtain this refund.
ACCU‑CHEK Aviva Meter Limited 3-Year Warranty
94
Roche Diagnostics warrants to the original purchaser of the meter that your ACCU‑CHEK Aviva meter will be free
from defects in materials and workmanship for three years from the date of purchase. If, during this three-year
period, the meter does not work properly because of a defect in materials or workmanship, Roche Diagnostics will
replace it with a new ACCU‑CHEK Aviva meter or equivalent product free of charge. The warranty on the
replacement meter will expire on the date of the original warranty expiration or 90 days after the shipment of a
replacement system, whichever period is longer. The purchaser’s exclusive remedy with respect to the ACCU‑CHEK
Aviva meter shall be replacement.
This warranty does not apply to the performance of an ACCU‑CHEK Aviva meter that has been damaged by
accident or has been altered, misused, tampered with, or abused in any way. Roche Diagnostics will handle meters
that show damage or abuse according to its Non-Warranty Service Policy described on the following page.
THE ABOVE WARRANTY IS EXCLUSIVE OF ALL OTHER WARRANTIES, AND ROCHE DIAGNOSTICS MAKES NO OTHER
WARRANTIES, EXPRESS OR IMPLIED, INCLUDING WITHOUT LIMITATION, THE IMPLIED WARRANTY OF
MERCHANTABILITY OR FITNESS FOR A PARTICULAR PURPOSE. IN NO EVENT SHALL ROCHE DIAGNOSTICS BE
LIABLE TO THE PURCHASER OR ANY OTHER PERSON FOR ANY INCIDENTAL, CONSEQUENTIAL, INDIRECT, SPECIAL,
OR PUNITIVE DAMAGES ARISING FROM OR IN ANY WAY CONNECTED WITH THE PURCHASE OR OPERATION OF THE
METER OR ITS PARTS. NO WARRANTY OF MERCHANTABILITY OR FITNESS FOR A PARTICULAR PURPOSE, IF ANY IS
IMPLIED FROM THE SALE OF THE METER, SHALL EXTEND FOR A LONGER DURATION THAN THREE YEARS FROM
THE DATE OF PURCHASE.
Some states do not allow limitations on how long an implied warranty will last or the exclusion of incidental or
consequential damages, so the above limitation and exclusion may not apply to you. This warranty gives you
specific legal rights, which vary from state to state.
Non-Warranty Service Policy
Roche Diagnostics Non-Warranty Service Policy applies to meters where the above warranty has not become
effective, has become inapplicable, or has expired. Roche Diagnostics will replace, at its option, meters returned to
it for a service charge (not to exceed $35). Replacement will be with the same or similar product. Replacement
meters will be warranted for a period of 90 days from shipment under a limited warranty providing for replacement
of parts and labor at no charge.
Warranty and Service Instructions
All requests for return of ACCU‑CHEK Aviva meters under the above warranty or service policy must be made to the
ACCU‑CHEK Customer Care Service Center. You will be mailed a return authorization label, which must be affixed to
your carton for shipping the system to Roche Diagnostics. Cartons received without this label will be returned to
you at your expense.
Customers experiencing difficulties should review the troubleshooting information in Chapter 6 of this booklet.
Further inquiries should be directed to the ACCU‑CHEK Customer Care Service Center.
Be sure to fill out and mail the Warranty Card that comes with the ACCU‑CHEK Aviva Plus system.
95
Limited License
CAUTION
A RESTRICTED LICENSE LIMITS USE OF THE ACCU‑CHEK AVIVA PLUS SYSTEM IN THE UNITED STATES
– READ CAREFULLY THE LIMITATIONS RECITED BELOW.
96
The ACCU‑CHEK Aviva Plus system (meter, including the code key, and test strips) and its use are protected by U.S.
Patent Nos. 6,645,368 (expires 22-December-2017); 5,366,609 (expires 8-June-2013); 5,352,351 (expires 8-June2013); 7,276,146 (expires 4-October-2022); 7,276,147 (expires 4-October-2022); 7,407,811 (expires 9-May-2020);
7,452,457 (expires 2-May-2026); 7,488,601 (expires 1-February-2026); 7,494,816 (expires 29-December-2019);
7,569,126 (expires 28-December-2026); and 7,604,721 (expires 12-August-2026). A license to use the
ACCU‑CHEK Aviva Plus system is required until the expiration of the last-to-expire patent listed above and is only
granted when the ACCU‑CHEK Aviva meter is used with the ACCU‑CHEK Aviva Plus test strips and ACCU‑CHEK
Aviva Plus code keys.
ACCU‑CHEK Aviva Plus test strips are provided with a specifically matched ACCU‑CHEK Aviva Plus code key. These
test strips and code keys are specifically manufactured for operation with the ACCU‑CHEK Aviva meter. Use of other
test strips with an unmatched code key or even with the matched code key supplied by another manufacturer may
prevent or impair the proper function of the ACCU‑CHEK Aviva Plus system.
Using the ACCU‑CHEK Aviva Plus system indicates your acceptance of the restricted license to use the ACCU‑CHEK
Aviva Plus system only with ACCU‑CHEK Aviva Plus test strips and the corresponding ACCU‑CHEK Aviva Plus code
key. Further, if you have purchased an ACCU‑CHEK Aviva monitoring kit or an ACCU‑CHEK Aviva meter that includes
this restricted license, then this restricted license applies regardless of any additional offers found in ACCU‑CHEK
Aviva Plus test strip packages. If you do not agree to the terms and conditions of the restricted license, you may
return, at the place of purchase, the unused ACCU‑CHEK Aviva Plus system for a full refund. If you have any
questions, please call the ACCU‑CHEK Customer Care Services Center at 1-800-858-8072.
Except where prohibited by statute, all warranties covering the ACCU‑CHEK Aviva Plus system are voided by use of
the ACCU‑CHEK Aviva Plus system with any test strips or code keys other than ACCU‑CHEK Aviva Plus test strips or
code keys.
CAUTION
A RESTRICTED LICENSE LIMITS USE OF THE ACCU‑CHEK FASTCLIX SYSTEM (lancing device and
lancet drums). READ CAREFULLY THE LIMITATIONS RECITED BELOW.
The ACCU‑CHEK FastClix system (device and lancet drums) and its use are protected by U.S. Patent Nos.
Re. 35,803 (expires 9-December-2012); 6,419,661 (expires 3-March-2020); 7,077,828 (expires 3-March-2020);
7,322,998 (expires 3-March-2020); and 7,785,338 (expires 5-January-2026). A license to use the ACCU‑CHEK
FastClix system is required until the expiration of the last-to-expire patent listed above and is only granted when
ACCU‑CHEK FastClix lancet drums are used with the ACCU‑CHEK FastClix device.
ACCU‑CHEK FastClix lancet drums are high precision components that are produced to the close tolerances
required for satisfactory operation with the ACCU‑CHEK FastClix device. Use of other lancet drums with the
ACCU‑CHEK FastClix device may prevent or impair proper function of the ACCU‑CHEK FastClix device.
Using the ACCU‑CHEK FastClix device indicates your acceptance of the restricted license to use the ACCU‑CHEK
FastClix device only with ACCU‑CHEK FastClix lancet drums. Further, if you have purchased an ACCU‑CHEK FastClix
device that includes this restricted license, then this restricted license applies regardless of any additional offers
found in ACCU‑CHEK FastClix device packages. If you do not agree to the terms and conditions of the restricted
license, you may return, at the place of purchase, the unused ACCU‑CHEK FastClix device for a full refund. If you
have any questions, please call the ACCU‑CHEK Customer Care Services Center at 1-800-858-8072.
Except where prohibited by statute, all warranties covering the ACCU‑CHEK FastClix device are voided by use of the
ACCU‑CHEK FastClix device with any lancet drums other than ACCU‑CHEK FastClix lancet drums.
97
Additional Supplies
Test Strips
ACCU‑CHEK Aviva Plus 50 ct test strips
ACCU‑CHEK Aviva Plus 100 ct test strips
Control Solutions
ACCU‑CHEK Aviva 2 level control solutions
Lancets
ACCU‑CHEK FastClix 102 ct lancets
References
98
FDA Public Health Notification: Use of Fingerstick Devices on More than One Person Poses Risk for Transmitting Bloodborne Pathogens:
Initial Communication, Update November 29, 2010.
http://www.fda.gov/MedicalDevices/Safety/AlertsandNotices/ucm224025.htm. Accessed May 26, 2011.
2
CDC Clinical Reminder: Use of Fingerstick Devices on More than One Person Poses Risk for Transmitting Bloodborne Pathogens, (2010).
http://www.cdc.gov/injectionsafety/Fingerstick-DevicesBGM.html. Accessed May 26, 2011.
3
Healthcare Infection Control Practices Advisory Committee (HICPAC), William A. Rutala, Ph.D., M.P.H., and David J. Weber, M.D., M.P.H.
Centers for Disease Control and Prevention, 2008. Guideline for Disinfection and Sterilization in Healthcare Facilities. Atlanta.
1
Index
B
D
battery,
changing, 79
type, 80, 89, 93
beeper settings, 57
blood glucose, testing, 27
button, power/set, 11–12
dehydration, 9
disinfecting,
lancing device, 67–68, 75–78
meter, 67–74
display check, 81
display messages, 82–87
C
E
cleaning,
lancing device, 67–68, 75–78
meter, 67–74
code key, 11, 13
comfort dial, 12, 30
computer, connecting your meter to, 65
control solution, 19
control test, performing, 19–23
control test results, understanding out-of-range,
24–25
error messages, 84–87
F
frequent urination, 9
H
high blood glucose, symptoms, 49
hyperglycemia, 49
hypoglycemia, 9, 49
I
important safety information, 8
99
L
lancet drum, 12, 28
limited license, 96–97
low blood glucose, symptoms, 49
M
maintenance, meter, 81
memory, meter, 51
P
patent information, 96–97
product limitations, 89
product specifications, 89–90
S
safety information, 8, 91
settings, meter, 54
supplies, 98
symbols, 93
symptoms,
hyperglycemia, 49
hypoglycemia, 49
100
T
technical information, 89–93
test results,
understanding, 48
unusual, 48
test strips, ACCU-CHEK Aviva Plus, 12
time and date, setting, 55
travel, 91
troubleshooting, 82–87
U
use by, 17
W
warranty, 94–95
Índice de contenidos
Introduccíon................................................................................................................................................5
1
El sistema ACCU‑CHEK Aviva Plus.................................................................................................................... 6
Información importante de seguridad............................................................................................................... 8
Información para realizar pruebas para usted mismo....................................................................................... 9
Antes de empezar a realizar pruebas..............................................................................................................10
Roche USA – 47212
V4/1 – 05958083001 – Schwarz
Capítulo 1: Cómo funciona su nuevo sistema........................................................................................11
Roche USA – 47212
V4/3 – 05958083001 – Magenta
El medidor ACCU‑CHEK Aviva.........................................................................................................................11
Codificar el medidor.......................................................................................................................................13
Ajustar la hora y la fecha – primera puesta en marcha..................................................................................15
El sistema ACCU‑CHEK Aviva Plus..................................................................................................................17
Capítulo 2: Pruebas de control................................................................................................................19
Por qué realizar pruebas de control................................................................................................................19
Acerca de las soluciones de control................................................................................................................19
Realizar una prueba de control.......................................................................................................................20
Interpretar los resultados de control fuera del rango aceptable......................................................................24
Capítulo 3: Pruebas de glucemia............................................................................................................27
Usar el dispositivo de punción ACCU‑CHEK FastClix.......................................................................................27
Insertar un cartucho de lancetas....................................................................................................................29
Preparar el dispositivo de punción para realizar pruebas con sangre de la yema del dedo............................30
Realizar una prueba de glucemia con sangre de la yema del dedo................................................................31
Cambiar el cartucho de lancetas....................................................................................................................36
Realizar una prueba de glucemia con sangre de la palma de la mano, del antebrazo o del brazo (pruebas en
lugares alternativos)................................................................................................................................38
Roche USA – 47212
V4/2 – 05958083001 – Cyan
Roche USA – 47212
V4/4 – 05958083001 – Yellow
2
Marcar los resultados de prueba....................................................................................................................47
Interpretar los resultados de prueba...............................................................................................................48
Resultados de prueba no esperados..........................................................................................................48
Síntomas de un nivel de glucemia alto o bajo............................................................................................49
Comparar los resultados obtenidos con su medidor con los obtenidos en laboratorio...............................50
Capítulo 4: Memoria del medidor, ajustes y descarga...........................................................................51
Memoria.........................................................................................................................................................51
Ver los resultados de prueba..........................................................................................................................53
Ajustar el medidor..........................................................................................................................................54
Ajustar la hora y la fecha................................................................................................................................55
Ajustar la señal sonora On/OFF.......................................................................................................................57
Ajustar la función de alarma...........................................................................................................................59
Ajustar la alerta de hipoglucemia....................................................................................................................62
Descargar sus resultados a una computadora o PDA.....................................................................................65
Capítulo 5: Limpiar y desinfectar el medidor y el dispositivo de punción...........................................67
Limpiar y desinfectar el medidor....................................................................................................................69
Limpiar y desinfectar el dispositivo de punción..............................................................................................75
Capítulo 6: Mantenimiento y solución de problemas.............................................................................79
Cambiar la pila...............................................................................................................................................79
Mantenimiento y solución de problemas.........................................................................................................81
Mensajes en la pantalla y solución de problemas...........................................................................................82
Capítulo 7: Datos técnicos.......................................................................................................................89
Limitaciones del producto...............................................................................................................................89
Especificaciones.............................................................................................................................................89
Datos acerca de la seguridad del producto.....................................................................................................91
Documentación para viajes.............................................................................................................................91
Desechar el medidor, la tiras reactivas, las lancetas y las pilas......................................................................92
Explicación de los símbolos............................................................................................................................93
Garantía..........................................................................................................................................................94
Licencia limitada.............................................................................................................................................96
Suministros y accesorios................................................................................................................................98
Índice........................................................................................................................................................99
3
4
5
Estimado propietario de un sistema ACCU‑CHEK:
¡Gracias por elegir el sistema ACCU‑CHEK Aviva Plus!
Le felicitamos por su decisión de tomar el control de su diabetes. Al diseñar su nuevo sistema ACCU‑CHEK
Aviva Plus hemos querido hacerlo cómodo, práctico y al mismo tiempo una gran herramienta de control y así
contribuir a hacer más fácil vivir con diabetes.
Este manual le ayudará a sacar el mayor provecho posible de su sistema ACCU‑CHEK Aviva Plus.
Para poder empezar rápidamente a realizar pruebas, le recomendamos consultar la Guía rápida de
instrucciones.
Si tiene preguntas, estamos aquí para ayudarle. Simplemente llame gratuitamente al ACCU‑CHEK Customer
Care Service Center al 1‑800‑858‑8072. Ofrecemos asistencia en muchos idiomas 24 horas al día, 365 días
al año. También puede visitar www.accu-chek.com, donde obtendrá más información acerca de
herramientas para el control de la diabetes y podrá ver demostraciones de productos.
Gracias de nuevo por elegir el sistema ACCU‑CHEK Aviva Plus.
ADVERTENCIA
Antes de utilizar el sistema, lea la sección de Información importante de seguridad en las
siguientes páginas.
6
El sistema ACCU‑CHEK Aviva Plus
El sistema para el control de la glucemia ACCU‑CHEK Aviva Plus está diseñado para la medición cuantitativa
de glucemia (azúcar) en sangre capilar fresca total extraída de la yema del dedo, del antebrazo, del brazo y
de la palma de la mano. El sistema para el control de la glucemia ACCU‑CHEK Aviva Plus está previsto para
el uso de un paciente individual y no debe ser compartido.
El sistema para el control de la glucemia ACCU‑CHEK Aviva Plus ha sido diseñado para el autocontrol fuera
del cuerpo (diagnóstico in vitro) en personas con diabetes en casa como ayuda para controlar la efectividad
del control de la diabetes. El sistema para el control de la glucemia ACCU‑CHEK Aviva Plus no está previsto
para el diagnóstico o la evaluación de la diabetes ni para el uso con sangre neonatal. Las pruebas en
lugares alternativos solo deben realizarse en momentos de estado estable (cuando la glucemia no cambia
rápidamente).
Las tiras reactivas ACCU‑CHEK Aviva Plus están diseñadas para ser usadas junto con el medidor de glucemia
ACCU‑CHEK Aviva para la medición cuantitativa de glucemia (azúcar) en sangre capilar fresca total extraída
de la yema del dedo, del antebrazo, del brazo o de la palma de la mano.
El sistema ha sido diseñado para ser utilizado por un paciente individual y no debe ser compartido.
El sistema incluye:
•Medidor ACCU‑CHEK Aviva con pila
•Tiras reactivas ACCU‑CHEK Aviva Plus y chip de codificación*
•Solución de control ACCU‑CHEK Aviva*
•Dispositivo de punción ACCU‑CHEK FastClix*
(con un capuchón negro para punciones en la yema del dedo y un capuchón AST para
punciones en lugares alternativos)
•Cartucho de lancetas ACCU‑CHEK FastClix*
*se pueden adquirir por separado
¿Necesita ayuda?
Simplemente llame gratuitamente al ACCU‑CHEK Customer Care Service Center al 1‑800‑858‑8072.
Ofrecemos asistencia en muchos idiomas 24 horas al día, 365 días al año. También puede visitar
www.accu-chek.com, donde obtendrá más información acerca de herramientas para el control de la
diabetes y podrá ver demostraciones de productos.
Por favor, rellene la Tarjeta de garantía y envíela de vuelta para recibir el mejor servicio postventa posible y
asegurarse de ser informado de novedades en nuestra gama de productos.
7
8
Información importante de seguridad
ADVERTENCIA
• Durante el uso normal para las pruebas, cualquier medidor de glucemia o dispositivo de punción
puede entrar en contacto con la sangre. Todas las piezas del kit representan un peligro biológico
y pueden transmitir enfermedades infecciosas a causa de patógenos nacidos de la sangre,
incluso después de limpiarlas y desinfectarlas.1,2
• La limpieza y la desinfección del medidor y del dispositivo de punción destruyen la mayoría de
los patógenos nacidos de la sangre, pero no necesariamente todos.3
• El medidor y el dispositivo de punción nunca deben ser utilizados por más de una persona. No
comparta con nadie el medidor ni el dispositivo de punción, ni siquiera con miembros de su
familia, debido al riesgo de infección a causa de patógenos nacidos de la sangre.1,2
• Si el medidor es utilizado por una segunda persona para ayudar al paciente a realizar las
pruebas, el medidor y el dispositivo de punción deben ser limpiados y desinfectados antes de
ser utilizados por dicha segunda persona.
• Desinfecte el medidor y el dispositivo de punción antes de permitir que otra persona los maneje.
No permita que nadie más realice pruebas con su medidor o su dispositivo de punción.
• Es importante conservar el medidor y el dispositivo de punción limpios y desinfectados. En el
capítulo 5 “Limpiar y desinfectar el medidor y el dispositivo de punción” hallará instrucciones
para limpiar y desinfectar el medidor y el dispositivo de punción.
• Lávese bien las manos antes y después de manipular el medidor, el dispositivo de punción o las
tiras reactivas.
Información para realizar pruebas para usted mismo
ADVERTENCIA
• Si está muy deshidratado o miccionando con frecuencia, puede obtener resultados incorrectos.
Si piensa que sufre de deshidratación, consulte inmediatamente a su profesional de la salud.
• NO MODIFIQUE SU TRATAMIENTO BASÁNDOSE EN UN SOLO RESULTADO QUE NO COINCIDA CON
CÓMO SE SIENTE O SI PIENSA QUE SU RESULTADO DE PRUEBA PODRÍA SER INCORRECTO.
• Algunas personas con diabetes no experimentan síntomas de niveles de glucemia bajos
(hipoglucemia). Otras, tales como niños pequeños, personas que están inconscientes o que
sufren de ciertas discapacidades, no pueden comunicar sus síntomas a quienes las atienden. Por
estos motivos, no modifique ningún tratamiento sin consultar antes a un profesional de la salud.
• Siempre resulta conveniente tener a mano un método alternativo para realizar las pruebas. La
imposibilidad de realizar una prueba puede conllevar retrasos en las decisiones relativas al
tratamiento y causar así serios problemas de salud. Algunos ejemplos de métodos alternativos
son un medidor de reserva o pruebas realizadas por un laboratorio. Consulte a su profesional de
la salud o a su farmacéutico si desea más información sobre otros posibles métodos alternativos.
• Si su resultado de glucemia no coincide con cómo se siente y usted ha seguido las instrucciones
de este Manual del usuario, siga las instrucciones de su profesional de la salud o consulte a su
profesional de la salud.
NOTA
• Realice una prueba de control tras abrir una nueva caja de tiras reactivas o si piensa que su resultado
de prueba es incorrecto. Una prueba de control le permite comprobar si el medidor y las tiras reactivas
funcionan correctamente.
• Para más información relacionada con su salud, consulte los prospectos de las tiras reactivas y de las
soluciones de control.
9
Antes de empezar a realizar pruebas
10 Información sobre el medidor y las tiras reactivas
ADVERTENCIA
• Lea detenidamente y siga las instrucciones que se ofrecen en el Instrucciones de uso y en los
prospectos que vienen con las tiras reactivas y las soluciones de control. Es muy importante que
se sigan las instrucciones para evitar un resultado incorrecto o un tratamiento inadecuado.
• Inspeccione el tubo de tiras reactivas antes de usar las tiras reactivas por primera vez. Si ve
algún daño en la tapa del tubo o si ésta no puede cerrarse correctamente con facilidad, no use
las tiras reactivas. En ese caso, contacte a ACCU‑CHEK Customer Care Service Center. Las tiras
reactivas dañadas pueden causar resultados incorrectos, lo que redundaría en un tratamiento
inadecuado.
• El medidor, las tiras reactivas y las soluciones de control solamente deben usarse fuera del
cuerpo (in vitro). No ingiera las tiras reactivas. No ingiera ni se inyecte las soluciones de control
ni use las soluciones de control para cualquier finalidad que no sea realizar pruebas de control
con el sistema ACCU‑CHEK Aviva Plus.
NOTA
• Ajuste la hora y la fecha en su medidor antes de realizar pruebas.
• A pesar de que siempre se aplica sangre capilar fresca total a la tira reactiva, su sistema se ha
calibrado para proporcionar valores similares a los del plasma y facilitar así la comparación con
resultados de laboratorio.
Capítulo 1: Cómo funciona su nuevo sistema
El medidor ACCU‑CHEK Aviva
11
Ventana de infrarrojos (IR) –
Se usa para transferir datos
del medidor a una
computadora o PDA.
Botón Power/Set –
Enciende y apaga el
medidor y ajusta las
opciones.
Pantalla –
Muestra resultados,
mensajes y resultados
almacenados en la
memoria.
Tapa del
compartimiento
de la pila –
Abra el
compartimiento de
la pila empujando la
tapa en la dirección
de la flecha.
Botones flecha derecha
e izquierda –
Púlselos para ver la
memoria, realizar ajustes
y navegar por los
resultados.
Ranura de la tira
reactiva –
Inserte la tira reactiva
aquí.
Ranura del chip
de codificación –
Inserte el chip de
codificación en
esta ranura.
Chip de
codificación
(es solo un
ejemplo)
Pila –
Insértela con el
símbolo (+) mirando
hacia arriba.
12
Extremo dorado –
Inserte este extremo
de la tira reactiva en
el medidor.
Capuchón AST –
(para obtener sangre
de lugares alternativos)
Ventana amarilla –
Toque esta ventana
con la gota de sangre
o de solución de
control.
Tira
reactiva
Botón
Power/Set
Ventana de
infrarrojos (IR)
Tubo de tiras
reactivas
Selector de
profundidad
Capuchón
Vista superior
NOTA
Algunos de estos artículos se venden por separado.
Frasco de solución
de control
Cartucho de
lancetas
Contador de
lancetas
Botón de
preparación
Palanca
Indicador de
(para avanzar a una lanceta nueva)
profundidad
Dispositivo de punción
Codificar el medidor
En cada caja de tiras reactivas se encuentra un chip de codificación nuevo.
13
1. Asegúrese de que el medidor
esté apagado.
ADVERTENCIA
2. Dé la vuelta al medidor.
3. Retire el chip de codificación
antiguo (si está aún dentro del
medidor) y deséchelo.
¡Cambie el chip de codificación cada vez que abra una nueva caja de tiras reactivas! Para obtener
resultados correctos, es importante asegurarse de que el número de código del chip de
codificación coincida con el número de código del tubo de tiras reactivas.
NOTA
14
• No use fuerza para insertar el chip de codificación en el medidor. Se ha diseñado para insertarlo en el
medidor en un sólo sentido.
• Si en la pantalla aparece “code” y “- - -”, apague el medidor y vuelva a insertar el chip de codificación
en el medidor.
4. Dé la vuelta al chip de codificación de modo que
el número de código quede hacia abajo. Empuje
el chip de codificación en la ranura hasta que
llegue al tope.
5. Deje el chip de codificación dentro del medidor
hasta que abra una nueva caja de tiras reactivas.
¡Cambie el chip de codificación cada vez que
abra una nueva caja de tiras reactivas!
Ajustar la hora y la fecha – primera puesta en marcha
Su nuevo medidor viene de fábrica con la hora y la fecha preajustadas. Es posible que deba cambiar la hora
de acuerdo con su zona horaria. Es importante que la hora y la fecha estén ajustadas correctamente si
desea usar la memoria del medidor o si desea descargar sus resultados a una computadora.
disminuir
1. Pulse y suelte
para
encender el medidor. La hora y
la fecha aparecen en la
pantalla. “Set-up” y la hora
parpadean. Si la hora y la
fecha están correctas, pulse y
mantenga pulsado
para
salir del modo de ajuste.
aumentar
2. Pulse y suelte
o
para
disminuir o aumentar la hora.
Pulse y mantenga pulsado
o
para desplazarse
más rápidamente.
para
3. Pulse y suelte
confirmar la hora. Los minutos
parpadean.
15
NOTA
16
Al encender el medidor tras cambiar la pila, el medidor le solicita automáticamente que compruebe que la
hora y la fecha están correctas. Si la hora y la fecha están correctas, pulse y mantenga pulsado
para
salir del modo de ajuste.
4. Repita los pasos 2 y 3 para ajustar los minutos, el
formato am/pm, el mes, el día y el año. El campo
que parpadea es el que se está modificando en
este instante.
5. Una vez ajustado el año, pulse y mantenga
pulsado
hasta que aparezca el símbolo de la
tira reactiva parpadeando. Ahora la fecha y la hora
están ajustadas. Para realizar otros ajustes, vea el
capítulo 4 “Ajustar el medidor”.
El sistema ACCU‑CHEK Aviva Plus
• Reemplace el chip de codificación y realice una prueba de control cada vez que abra una nueva caja de
tiras reactivas.
• Vea el prospecto de las tiras reactivas para más información sobre el almacenamiento de las tiras
reactivas y las condiciones de operación del sistema.
• Almacene las tiras reactivas no usadas en su tubo original herméticamente cerrado con la tapa.
• Cierre el tubo herméticamente inmediatamente después de retirar una tira reactiva. La humedad puede
deteriorar las tiras reactivas y causar resultados incorrectos.
• No retire las tiras reactivas del tubo que las contiene ni las coloque en otros recipientes, tales como
bolsas plásticas, bolsillos de la camisa, carteras, monederos, etc.
• Deseche las tiras reactivas si ha expirado la fecha de caducidad (“Use By”) impresa en el tubo de tiras
reactivas. Si no hay ninguna fecha de caducidad indicada o si no se puede leer, no use las tiras reactivas.
Llame al ACCU‑CHEK Customer Care Service Center al 1‑800‑858‑8072.
• Utilice la tira reactiva inmediatamente después de sacarla del tubo.
• No aplique sangre o solución de control a la tira reactiva antes de insertarla en el medidor. Si aparece un
resultado antes de que se aplique sangre o solución de control, no tome en cuenta ese resultado.
• No use las tiras reactivas más de una vez. Una vez que haya aplicado sangre o solución de control a una
tira reactiva, deséchela. Si necesita repetir la prueba, use una tira reactiva nueva.
17
ADVERTENCIA
18
• NO DEBE exponer las tiras reactivas al calor ni a la humedad. Las temperaturas fuera del rango
requerido así como la humedad pueden dañar las tiras reactivas y causar resultados incorrectos.
• NO DEBE doblar, cortar o alterar las tiras reactivas.
• NO DEBE dejar que las tiras reactivas entren en contacto con suciedad, comida u otros
materiales.
Si no toma estas precauciones, es probable que obtenga resultados incorrectos.
Capítulo 2: Pruebas de control
Por qué realizar pruebas de control
Una prueba de control le permite comprobar si el medidor y las tiras reactivas funcionan correctamente.
Debería realizar una prueba de control cuando:
• Abre una nueva caja de tiras reactivas
• Ha dejado abierto el tubo de tiras reactivas o piensa que las tiras reactivas pueden estar dañadas
• Desea comprobar el buen funcionamiento del medidor y de las tiras reactivas
• Las tiras reactivas han estado almacenadas a temperaturas y/o humedad extremas
• Se le ha caído el medidor
• Su resultado de prueba no coincide con cómo se siente
• Desea comprobar si realiza las pruebas correctamente
Acerca de las soluciones de control
• Use sólo soluciones de control ACCU‑CHEK Aviva.
• El medidor reconoce automáticamente la diferencia entre la solución de control ACCU‑CHEK Aviva y la
sangre.
• Anote en la etiqueta del frasco de solución de control la fecha en que abrió el frasco. La solución de
control debe desecharse después de 3 meses contados desde la fecha en que se abre el frasco (fecha de
eliminación), o en la fecha de caducidad (“Use By”) indicada en el frasco, dependiendo de cuál sea la
fecha más cercana.
• No use solución de control cuya fecha de caducidad (“Use By”) o de eliminación haya expirado.
19
• Los resultados de control no se muestran en la memoria.
• Cierre el frasco herméticamente después de usarlo.
• La solución de control puede manchar su ropa. Si se le derrama, lave su ropa con agua y jabón.
• Vea el prospecto de la solución de control para más información sobre las condiciones de
almacenamiento.
20
Realizar una prueba de control
Necesita el medidor, una tira reactiva y solución de control del nivel 1 ó 2. El nivel de control está
indicado en la etiqueta del frasco.
NOTA
La mayoría de personas sólo realizan el control del nivel 1. Si lo desea, también puede realizar el
control del nivel 2. Puede adquirir un paquete de solución de control que incluya ambos niveles. Para
adquirir soluciones de control, consulte a su farmacéutico o visite www.accu-chek.com para hacer un
pedido por internet. Su medidor está diseñado para reconocer automáticamente la diferencia entre la
solución de control ACCU‑CHEK Aviva y la sangre. Los resultados de control no se muestran en la
memoria.
21
2. Inserte una tira reactiva en el
3. Asegúrese de que el número de
1. Para asegurarse de que la
código en la pantalla coincida
pantalla funciona correctamente, medidor en la dirección indicada
por las flechas. El medidor se
con el número de código del
apague el medidor y, a
enciende.
tubo de tiras reactivas. Si no
continuación, pulse y mantenga
llega a ver el número de código,
pulsado
para ver la pantalla
retire la tira reactiva e insértela
completa. Todos los segmentos
de nuevo en el medidor.
deben verse claramente y ser
exactamente iguales a la
imagen. Si falta uno de los
segmentos en la pantalla, esto
puede indicar un problema con
el medidor. Llame al ACCU‑CHEK
Customer Care Service Center al
1‑800‑858‑8072.
O
22
4. Seleccione la solución de control 5. Coloque el medidor en una
que quiere usar. Podrá
superficie plana, como por
especificar el nivel de la
ejemplo una mesa.
solución en una fase posterior
6. Retire la tapa del frasco de
de la prueba.
solución de control y limpie la
punta del frasco con un paño.
7. Apriete el frasco hasta que se
forme una gotita en la punta del
mismo. Toque el borde
delantero de la ventana
amarilla de la tira reactiva con la
gota formada. No deposite
solución de control encima de
la tira reactiva. Cuando el
parpadea, significa que hay
suficiente solución de control en
la tira reactiva. Limpie la punta
del frasco con un paño y cierre
el frasco herméticamente.
23
8. Un resultado aparece en la
para
9. Pulse y suelte
pantalla junto con el símbolo
confirmar el nivel de control en
del frasco de solución de
el medidor.
control y una “L” parpadeando.
No retire aún la tira reactiva.
Pulse y suelte
una vez para
marcar el resultado como de
nivel 1. Si ha realizado la
prueba de control con nivel 2,
pulse y suelte
una vez más.
10. Si el resultado está dentro del
rango aceptable, el resultado
de control y “OK” se alternan
en la pantalla. El rango está
indicado en la etiqueta del
tubo de tiras reactivas. Si el
resultado está fuera del rango
aceptable, el resultado de
control y “Err” se alternan en
la pantalla. Retire y deseche la
tira reactiva usada.
Interpretar los resultados de control fuera del rango aceptable
ADVERTENCIA
Los rangos de control sólo son válidos para los resultados de control. Solamente indican que las
tiras reactivas y su medidor funcionan correctamente. No use los resultados de control para
interpretar resultados de glucemia.
24 Si el resultado de control no está dentro del rango aceptable (indicado en el tubo de tiras reactivas), no use
su medidor hasta solucionar el problema. A continuación encontrará algunos de los puntos que debe
comprobar:
Posibles fuentes de error
Acción
1. ¿Ha expirado la fecha de caducidad (“Use By”) Si ha expirado la fecha de caducidad (“Use By”) o de
o de eliminación de las tiras reactivas o de la eliminación, deseche las tiras reactivas o la solución
solución de control?
de control.
2. ¿Ha limpiado la punta del frasco de solución
de control con un paño antes de usarlo?
Limpie la punta del frasco con un paño. Repita la
prueba de control con una tira reactiva nueva y otra
gota de solución de control.
3. ¿El tubo de tiras reactivas y el frasco de
solución de control estaban siempre cerrados
herméticamente?
Si piensa que el tubo de tiras reactivas o el frasco de
solución de control pueden haber estado destapados
durante algún tiempo, reemplace las tiras reactivas o
la solución de control.
4. ¿Se usó la tira reactiva inmediatamente
después de sacarla del tubo?
Repita la prueba de control con una tira reactiva
nueva.
Posibles fuentes de error
Acción
5. ¿Ha almacenado las tiras reactivas y la
solución de control en un sitio fresco y seco?
Repita la prueba de control con tiras reactivas o
solución de control debidamente almacenadas.
6. ¿Siguió todas las instrucciones para realizar la
prueba de control?
Lea el capítulo 2 “Pruebas de control” y realice
nuevamente la prueba de control. Si todavía tiene
problemas, llame al ACCU‑CHEK Customer Care
Service Center al 1‑800‑858‑8072.
7. ¿Ha seleccionado el nivel de solución de
control correcto, es decir, 1 ó 2, al realizar la
prueba de control?
Aún habiendo seleccionado el nivel de solución de
control incorrecto, usted puede comparar el resultado
de control con el rango indicado en el tubo de tiras
reactivas.
8. ¿Coincide el número de código en la pantalla
del medidor con el número de código del tubo
de tiras reactivas?
Si no concuerdan, inserte el chip de codificación
correcto en el medidor y realice nuevamente la
prueba de control.
9. Si aún no está seguro de cuál es la causa …
Repita la prueba de control con una tira reactiva
nueva. Si todavía tiene problemas, llame al
ACCU‑CHEK Customer Care Service Center al
1‑800‑858‑8072.
25
26
Capítulo 3: Pruebas de glucemia
Usar el dispositivo de punción ACCU‑CHEK FastClix
ADVERTENCIA
• Durante el uso normal para las pruebas, cualquier medidor de glucemia o dispositivo de punción
puede entrar en contacto con la sangre. Todas las piezas del kit representan un peligro biológico
y pueden transmitir enfermedades infecciosas a causa de patógenos nacidos de la sangre,
incluso después de limpiarlas y desinfectarlas.1,2
• La limpieza y la desinfección del medidor y del dispositivo de punción destruyen la mayoría de los
patógenos nacidos de la sangre, pero no necesariamente todos.3
• El medidor y el dispositivo de punción nunca deben ser utilizados por más de una persona. No
comparta con nadie el medidor ni el dispositivo de punción, ni siquiera con miembros de su
familia, debido al riesgo de infección a causa de patógenos nacidos de la sangre.1,2
• Si el medidor es utilizado por una segunda persona para ayudar al paciente a realizar las
pruebas, el medidor y el dispositivo de punción deben ser limpiados y desinfectados antes de ser
utilizados por dicha segunda persona.
• Desinfecte el medidor y el dispositivo de punción antes de permitir que otra persona los maneje.
No permita que nadie más realice pruebas con su medidor o su dispositivo de punción.
• Es importante conservar el medidor y el dispositivo de punción limpios y desinfectados. En el
capítulo 5 “Limpiar y desinfectar el medidor y el dispositivo de punción” hallará instrucciones
para limpiar y desinfectar el medidor y el dispositivo de punción.
• Lávese bien las manos antes y después de manipular el medidor, el dispositivo de punción o las
tiras reactivas.
27
NOTA
28
• Para realizar pruebas con sangre de lugares alternativos es necesario el capuchón AST. Esto se explicará
más adelante en este capítulo.
• El ajuste óptimo de la profundidad de punción corresponderá al nivel más bajo con el que pueda extraer
suficiente sangre para realizar una prueba. Pruebe diferentes ajustes hasta encontrar el mejor para
usted.
• Nunca comparta su dispositivo de punción con otra persona.
• Use SIEMPRE una lanceta nueva estéril cada vez que haga una prueba. NUNCA vuelva a usar una
lanceta que ya haya sido utilizada.
El capuchón negro es apto sólo para punciones en la yema del dedo.
El capuchón AST es apto para realizar pruebas con sangre de otras partes del cuerpo que no
sean la yema del dedo, adecuadas también para obtener muestras de sangre.
Un cartucho nuevo es gris oscuro con un extremo blanco.
En un cartucho usado se ve una raya roja en el extremo blanco. No puede insertar un
cartucho usado en el dispositivo de punción.
Insertar un cartucho de lancetas
Para poder usar el dispositivo de punción, debe primero cargarlo con un cartucho de lancetas.
29
cartucho correctamente
insertado
2. Inserte un nuevo
1. Retire el capuchón
cartucho, con el
tirando de él
extremo blanco por
directamente hacia
delante, hasta que
fuera. No es de rosca.
llegue al tope. Notará
El modo más fácil de
como encaja.
retirarlo es poniendo el
pulgar al lado de la
muesca tal como se
muestra en la
ilustración.
NOTA
3. Deslice el capuchón
hasta que pare y la
muesca del capuchón
esté alineada con la
del dispositivo de
punción.
4. Ya está listo para usar
la primera lanceta. El
contador de lancetas
del dispositivo muestra
el número 6, lo que
indica que aún le
quedan seis lancetas
nuevas.
Una vez que haya insertado el cartucho en el dispositivo de punción, no retire el cartucho hasta que haya
usado todas las lancetas. No se puede volver a insertar el cartucho.
Preparar el dispositivo de punción para realizar pruebas con
sangre de la yema del dedo
ADVERTENCIA
Use una lanceta nueva para cada punción del dedo con el fin de evitar infecciones.
30
1. Asegúrese de que el capuchón negro esté en el
dispositivo de punción. No use el capuchón AST
para realizar pruebas con sangre de la yema del
dedo.
2. Ajuste la profundidad girando el selector de
profundidad. El indicador de profundidad muestra
la profundidad seleccionada actualmente. Cuanto
más alta sea la cifra, mayor será la profundidad.
Si su piel es fina, le recomendamos que empiece
con la profundidad 2. Si su piel es callosa o
gruesa, empiece con un ajuste mayor. Deje el
dispositivo de punción a un lado hasta una fase
posterior de la prueba.
Realizar una prueba de glucemia con sangre de la yema del dedo
Antes de realizar su primera prueba de glucemia, ajuste su medidor correctamente y realice una
prueba de control. Para realizar una prueba con sangre, necesita el medidor, una tira reactiva y el
dispositivo de punción cargado con un cartucho de lancetas.
ADVERTENCIA
• Durante el uso normal para las pruebas, cualquier medidor de glucemia o dispositivo de punción
puede entrar en contacto con la sangre. Todas las piezas del kit representan un peligro biológico
y pueden transmitir enfermedades infecciosas a causa de patógenos nacidos de la sangre,
incluso después de limpiarlas y desinfectarlas.1,2
• La limpieza y la desinfección del medidor y del dispositivo de punción destruyen la mayoría de
los patógenos nacidos de la sangre, pero no necesariamente todos.3
• El medidor y el dispositivo de punción nunca deben ser utilizados por más de una persona. No
comparta con nadie el medidor ni el dispositivo de punción, ni siquiera con miembros de su
familia, debido al riesgo de infección a causa de patógenos nacidos de la sangre.1,2
• Si el medidor es utilizado por una segunda persona para ayudar al paciente a realizar las
pruebas, el medidor y el dispositivo de punción deben ser limpiados y desinfectados antes de ser
utilizados por dicha segunda persona.
• Desinfecte el medidor y el dispositivo de punción antes de permitir que otra persona los maneje.
No permita que nadie más realice pruebas con su medidor o su dispositivo de punción.
• Es importante conservar el medidor y el dispositivo de punción limpios y desinfectados. En el
capítulo 5 “Limpiar y desinfectar el medidor y el dispositivo de punción” hallará instrucciones
para limpiar y desinfectar el medidor y el dispositivo de punción.
• Lávese bien las manos antes y después de manipular el medidor, el dispositivo de punción o las
tiras reactivas.
31
32
1. Para asegurarse de que la pantalla funciona
2. Lávese las manos con
correctamente, apague el medidor y, a
agua tibia y jabón y
continuación, pulse y mantenga pulsado
séqueselas bien. Las
para
manos sucias o
ver la pantalla completa. Todos los segmentos
húmedas pueden
deben verse claramente y ser exactamente
influir sobre los
iguales a la imagen. Si falta uno de los segmentos
resultados.
en la pantalla, esto puede indicar un problema
con el medidor. Llame al ACCU‑CHEK Customer
3. Prepare el dispositivo
Care Service Center al 1‑800‑858‑8072.
de punción.
4. Inserte una tira
reactiva en el medidor
en la dirección
indicada por las
flechas. El medidor se
enciende.
33
5. Asegúrese de que el número de 6. Cuando el símbolo de la gota de
código en la pantalla coincida
sangre parpadea, extraiga una
con el número de código del
gota de sangre de la yema del
tubo de tiras reactivas. Si no
dedo.
llega a ver el número de código,
retire la tira reactiva e insértela
de nuevo en el medidor.
7. Mantenga el dispositivo de
punción presionado firmemente
contra el costado de la yema del
dedo. Recuerde que la apertura
por donde sale la lanceta no
está en el centro del capuchón.
Pulse el botón de preparación
del extremo del dispositivo hasta
el tope para pinchar el dedo.
El dispositivo de punción
ACCU‑CHEK FastClix está
tensado y pinchará el dedo con
solo pulsar el botón de
preparación una vez.
34
8. Apriete ligeramente su dedo
para provocar el flujo de la
sangre. Esto ayuda a obtener
una gota de sangre. Toque el
borde delantero de la ventana
amarilla de la tira reactiva con
la gota formada. No deposite
sangre encima de la tira
reactiva.
9. Cuando vea que el parpadea, 10. El resultado aparece en la
pantalla. Si quiere marcar su
significa que hay suficiente
resultado de prueba para un
sangre en la tira reactiva.
evento en especial, deje la tira
reactiva en el medidor. (Vea el
capítulo 3 “Marcar los
resultados de prueba”.) En
caso contrario, deseche la tira
reactiva usada.
NOTA
Una vez finalizada una prueba de glucemia o de control, el medidor se apaga automáticamente 5 segundos
después de que se retire la tira reactiva.
ADVERTENCIA
Si mg/dL no aparece junto con el resultado de prueba, llame al ACCU‑CHEK Customer Care Service
Center al 1‑800‑858‑8072. Si se usa una unidad de medida incorrecta, se puede interpretar
incorrectamente su nivel de glucemia actual, lo que puede conducir a un tratamiento incorrecto.
35
11. Use SIEMPRE una lanceta
nueva estéril cada vez que
haga una prueba. NUNCA
vuelva a usar una lanceta que
ya haya sido utilizada. Para
cargar la siguiente lanceta,
deslice la palanca hacia
adelante (hasta que llegue al
tope), después deslícela una
vuelta completa hacia atrás.
12. El contador de lancetas
disminuye un número. Por
razones de seguridad, no es
posible volver a una lanceta
usada una vez que se ha
avanzado a una lanceta
nueva.
13. Lávese las manos con agua
tibia y jabón y séqueselas
bien.
Cambiar el cartucho de lancetas
Debe cambiar el cartucho de lancetas cuando haya usado la sexta y última lanceta.
36
1. Retire el capuchón negro del dispositivo de
punción tirando de él directamente hacia fuera.
No es de rosca. El modo más fácil de retirarlo es
poniendo el pulgar al lado de la muesca tal como
se muestra en la ilustración.
NOTA
2. Sujete el cartucho entre sus dedos pulgar e
índice y tire de él hasta sacarlo del dispositivo de
punción. En la parte blanca se ve una raya roja,
indicando que el cartucho está usado.
No se puede volver a insertar un cartucho usado en el dispositivo de punción.
O
3. Deseche el cartucho usado. Deséchelo siempre
de acuerdo con las normas locales.
NOTA
37
4. Inserte un nuevo cartucho, con el extremo blanco
por delante, hasta que llegue al tope. Notará
como encaja.
Una vez que haya insertado el cartucho en el dispositivo de punción, no retire el cartucho hasta que haya
usado todas las lancetas. No se puede volver a insertar el cartucho.
Realizar una prueba de glucemia con sangre de la palma de la
mano, del antebrazo o del brazo (pruebas en lugares
alternativos)
ADVERTENCIA
38
• Durante el uso normal para las pruebas, cualquier medidor de glucemia o dispositivo de punción
puede entrar en contacto con la sangre. Todas las piezas del kit representan un peligro biológico
y pueden transmitir enfermedades infecciosas a causa de patógenos nacidos de la sangre,
incluso después de limpiarlas y desinfectarlas.1,2
• La limpieza y la desinfección del medidor y del dispositivo de punción destruyen la mayoría de
los patógenos nacidos de la sangre, pero no necesariamente todos.3
• El medidor y el dispositivo de punción nunca deberían ser utilizados por más de una persona. No
comparta con nadie el medidor ni el dispositivo de punción, ni siquiera con miembros de su
familia, debido al riesgo de infección a causa de patógenos nacidos de la sangre.1,2
• Si el medidor es utilizado por una segunda persona para ayudar al paciente a realizar las
pruebas, el medidor y el dispositivo de punción deben ser limpiados y desinfectados antes de ser
utilizados por dicha segunda persona.
• Desinfecte el medidor y el dispositivo de punción antes de permitir que otra persona los maneje.
No permita que nadie más realice pruebas con su medidor o su dispositivo de punción.
• Es importante conservar el medidor y el dispositivo de punción limpios y desinfectados. En el
capítulo 5 “Limpiar y desinfectar el medidor y el dispositivo de punción” hallará instrucciones
para limpiar y desinfectar el medidor y el dispositivo de punción.
• Lávese bien las manos antes y después de manipular el medidor, el dispositivo de punción o las
tiras reactivas.
Tiene la opción de obtener sangre de otros sitios de su cuerpo que no sean la yema del dedo. Los lugares
alternativos son la palma de la mano, el antebrazo y el brazo. Los dos sitios para realizar pruebas en la
palma de la mano son las partes carnosas debajo del pulgar (tenar) y debajo del dedo meñique (hipotenar).
La sangre obtenida de la yema de un dedo puede usarse siempre para medir la glucemia. Si usa sangre de
un lugar alternativo, hay determinados momentos que no son adecuados para realizar una prueba (vea la
siguiente sección). Esto se debe a que su nivel de glucemia cambia más rápidamente en la yema de los
dedos que en los lugares alternativos. Estas diferencias podrían conducirle a tomar medidas terapéuticas
incorrectas, lo que tendría efectos negativos para su salud. Por favor, lea la sección siguiente antes de
realizar pruebas con sangre de lugares alternativos.
39
hipotenar
tenar
IMPORTANTE
Consulte a su profesional de la salud antes de empezar a usar lugares alternativos para extraer la sangre.
ADVERTENCIA
No modifique su tratamiento a causa de un único resultado.
NUNCA ignore síntomas de hiperglucemia o hipoglucemia.
No utilice una prueba AST para calibrar un dispositivo de monitorización continua de glucosa (MCG)
o para hacer cálculos de dosificación de insulina.
Si su resultado de glucemia no coincide con cómo se siente, realice otra prueba con sangre de la
yema del dedo para confirmar su primer resultado. Si tampoco el segundo resultado con sangre de
la yema del dedo coincide con cómo se siente, consulte a su profesional de la salud.
40
Es posible realizar pruebas con sangre de la palma de la mano, el antebrazo y el brazo:
•Inmediatamente antes de una comida
•Cuando esté en ayunas
NO se deben realizar pruebas con sangre de la palma de la mano, el antebrazo y el brazo:
•dos horas o menos después de comer
•después de hacer ejercicio físico
•si está enfermo
•si piensa que su nivel de glucemia está bajo
•si sabe que a menudo no se da cuenta de cuándo su nivel de glucemia está bajo
•durante el pico máximo del efecto de insulina de acción corta o de análogos de insulina de acción
rápida
•hasta 2 horas después de inyectarse insulina de acción corta o un análogo de insulina de acción
rápida
Para realizar una prueba con sangre, necesita el medidor, una tira reactiva, un dispositivo de punción
cargado con un cartucho de lancetas y el capuchón AST del kit.
41
1. Para asegurarse de que la pantalla funciona
correctamente, apague el medidor y, a
continuación, pulse y mantenga pulsado
para
ver la pantalla completa. Todos los segmentos
deben verse claramente y ser exactamente
iguales a la imagen. Si falta uno de los segmentos
en la pantalla, esto puede indicar un problema
con el medidor. Llame al ACCU‑CHEK Customer
Care Service Center al 1‑800‑858‑8072.
2. Lávese las manos y el sitio de punción con agua
tibia y jabón y séqueselos bien.
42
3. Retire el capuchón negro del
dispositivo de punción tirando
de él directamente hacia fuera.
No es de rosca. El modo más
fácil de retirarlo es poniendo el
pulgar al lado de la muesca tal
como se muestra en la
ilustración.
NOTA
4. Coloque el capuchón AST
alineando las secciones con
muescas del capuchón y del
dispositivo de punción.
5. Ajuste la profundidad adecuada
para la parte del cuerpo en la
que obtendrá la sangre. Deje el
dispositivo de punción a un
lado hasta una fase posterior
de la prueba.
Recomendamos que empiece con una profundidad de 5½ para el antebrazo o el brazo y de 3 para la
palma de la mano. Una vez que realice una prueba con éxito, es recomendable que tome nota de cuál ha
sido el ajuste de menor profundidad que ha proporcionado suficiente sangre con el menor dolor posible.
43
6. Inserte una tira reactiva en el
medidor en la dirección
indicada por las flechas. El
medidor se enciende.
7. Asegúrese de que el número
de código en la pantalla
coincida con el número de
código del tubo de tiras
reactivas. Si no llega a ver el
número de código, retire la tira
reactiva e insértela de nuevo
en el medidor.
8. Cuando el símbolo de la gota
de sangre parpadea en la
pantalla, extraiga una gota de
sangre del sitio escogido.
CONSEJO: Para incrementar el flujo de la sangre, frote la piel antes de realizar la punción.
44
9. Presione firmemente la apertura del capuchón
AST contra una zona carnosa del lugar
alternativo. Presione con el dispositivo de punción
lentamente hacia arriba y hacia abajo para
incentivar el flujo de la sangre. Recuerde que la
apertura por donde sale la lanceta no está en el
centro del capuchón.
NOTA
10. Mantenga una presión constante sobre la zona y
pulse el botón de preparación del extremo del
dispositivo hasta el tope para pinchar el lugar
alternativo. No tenga miedo de aplicar presión a
la zona para incentivar el flujo de la sangre.
Continúe presionando el capuchón contra la piel
durante unos segundos para facilitar que la
sangre salga.
Si la gota de sangre es demasiado pequeña, vuelva a aplicar presión para obtener una gota de sangre
adecuada.
45
11. Toque el borde delantero
de la ventana amarilla de
la tira reactiva con la gota
formada. No deposite sangre
encima de la tira reactiva.
ADVERTENCIA
12. Cuando vea que el
parpadea, significa que hay
suficiente sangre en la tira
reactiva.
13. El resultado aparece en la
pantalla. Si quiere marcar su
resultado de prueba para un
evento en especial, deje la tira
reactiva en el medidor. (Vea el
capítulo 3 “Marcar los
resultados de prueba”.) En
caso contrario, deseche la tira
reactiva usada.
Si mg/dL no aparece junto con el resultado de prueba, llame al ACCU‑CHEK Customer Care Service
Center al 1‑800‑858‑8072. Si se usa una unidad de medida incorrecta, se puede interpretar
incorrectamente su nivel de glucemia actual, lo que puede conducir a un tratamiento incorrecto.
46 14. Use SIEMPRE una lanceta
nueva estéril cada vez que
haga una prueba. NUNCA
vuelva a usar una lanceta que
ya haya sido utilizada. Para
cargar la siguiente lanceta,
deslice la palanca hacia
adelante (hasta que llegue al
tope), después deslícela una
vuelta completa hacia atrás.
16. Lávese las manos con agua
15. E l contador de lancetas
tibia y jabón y séqueselas bien.
disminuye un número. Por
razones de seguridad, no es
posible volver a una lanceta
usada una vez que se ha
avanzado a una lanceta nueva.
¿Algún problema durante las pruebas con sangre de lugares alternativos?
Si tiene problemas para obtener una gota de sangre adecuada de lugares alternativos, llame al ACCU‑CHEK
Customer Care Service Center al 1‑800‑858‑8072. Le explicaremos el procedimiento de prueba paso a paso.
Si aún tiene dificultades, le ofreceremos nuestro dispositivo de punción ACCU‑CHEK Softclix totalmente
gratis. Dado que la lanceta ACCU‑CHEK Softclix tiene un diámetro más ancho que el de la lanceta
ACCU‑CHEK FastClix, es posible que tenga más éxito al extraer sangre de lugares alternativos.
Marcar los resultados de prueba
Si lo desea, puede “marcar” su resultado de prueba con un asterisco para resaltar un resultado especial.
Es posible que desee marcar un evento específico, como por ejemplo el resultado después de una comida
(postprandial), después de ejercicio físico o de una prueba de un lugar alternativo. Al revisar sus resultados
en la memoria, esta “marca” le ayuda a recordar qué diferencia hay entre este resultado y los demás.
Así se marca un resultado:
1. Realice una prueba.
2. Con el resultado de prueba en la pantalla y la tira reactiva
AÚN DENTRO DEL MEDIDOR, pulse y suelte
o
una vez.
El asterisco aparece en la esquina inferior derecha.
3. Retire y deseche la tira reactiva usada.
47
marca
Interpretar los resultados de prueba
Resultados de prueba no esperados
Si su resultado de glucemia no coincide con cómo se siente, siga estos pasos:
1. Realice una prueba. Vea el capítulo 2 “Pruebas de control”.
2. Repita la prueba de glucemia. Vea el capítulo 3 “Realizar una prueba de glucemia con sangre de la yema
del dedo”.
3. Si sus resultados de glucemia no coinciden aún con cómo se siente, siga las instrucciones de su
profesional de la salud o consulte a su profesional de la salud inmediatamente.
48
NOTA
Siga siempre las instrucciones de su profesional de la salud. Por ejemplo, si su profesional de la salud le
ha recomendado tratar inmediatamente un resultado que muestra un bajo nivel de glucemia (por ejemplo,
comer algo), eso es lo primero que debe hacer.
Síntomas de un nivel de glucemia alto o bajo
El conocimiento de los síntomas de un nivel de glucemia alto o bajo puede ayudarle a interpretar sus
resultados de prueba y a decidir cómo actuar si obtiene resultados no esperados. Estos son algunos de los
síntomas más frecuentes:
Nivel de glucemia alto (hiperglucemia): los síntomas de hiperglucemia pueden ser, entre otros, mayor sed de
lo normal, micción frecuente, visión borrosa, somnolencia y/o pérdida de peso injustificada.
Nivel de glucemia bajo (hipoglucemia): los síntomas de hipoglucemia pueden ser, entre otros, ansiedad,
temblores, sudor, dolor de cabeza, mayor hambre de lo normal, mareos, piel pálida, cambios repentinos de
humor o irritabilidad, fatiga, dificultad para concentrarse, movimientos torpes, palpitaciones y/o confusión.
Si padece alguno de estos síntomas o algún otro síntoma inusual, realice una prueba de glucemia
con sangre de la yema del dedo. Si su resultado de glucemia se visualiza como LO o HI y usted
presenta síntomas de hipoglucemia o hiperglucemia, siga las instrucciones de su profesional de la
salud o póngase en contacto con su profesional de la salud inmediatamente. Si su resultado de
glucemia no coincide con cómo se siente, siga los pasos descritos en el apartado “Resultados de
prueba no esperados” del capítulo 3.
ADVERTENCIA
El medidor está diseñado para mostrar resultados de glucemia de 20 a 600 mg/dL. Si aparece en
la pantalla un resultado inferior a 20 mg/dL o superior a 600 mg/dL, llame gratuitamente al
ACCU‑CHEK Customer Care Service Center al 1‑800‑858‑8072.
49
Comparar los resultados obtenidos con su medidor con los obtenidos en
laboratorio
50
Una pregunta muy común es si los resultados de glucemia obtenidos con su medidor son equiparables a los
obtenidos en laboratorio. Su nivel de glucemia puede cambiar rápidamente, especialmente después de las
comidas, de tomar medicamentos o tras hacer ejercicio físico. Si realiza una prueba por la mañana y
después va a la consulta de su profesional de la salud para una prueba de glucemia, los resultados
probablemente no concuerden, incluso estando aún en ayunas. Generalmente esto no indica un problema
con su medidor, sino simplemente que el tiempo ha pasado y su nivel de glucemia ha cambiado.
Si desea comparar los resultados obtenidos con su medidor con los obtenidos en laboratorio, debe estar en
ayunas. Llévese su medidor a la consulta del profesional de la salud y en el transcurso de 5 minutos desde
que un profesional de la salud le extraiga sangre del brazo, realice usted mismo una prueba con sangre de
la yema del dedo. No olvide que los laboratorios usan tecnología diferente a la del medidor, y que en general
los resultados obtenidos con medidores destinados al autocontrol son ligeramente inferiores a los del
laboratorio.
Si realiza la prueba en ayunas y con sangre extraída de la yema del dedo en el transcurso de 5 minutos
desde que le extraen sangre, éstas son las directrices para comparar los resultados obtenidos con el
medidor con los del laboratorio:
• Si su nivel de glucemia es inferior a 75 mg/dL, los resultados generalmente tienen un margen de
diferencia de ±15 mg/dL respecto a los del laboratorio.
• Si su nivel de glucemia es igual o superior a 75 mg/dL, los resultados generalmente tienen un margen de
diferencia de ±20 % respecto a los del laboratorio.
Capítulo 4: Memoria del medidor, ajustes y descarga
Memoria
Almacenar resultados de glucemia y de control
El medidor almacena automáticamente hasta 500 resultados de glucemia con la hora y la fecha
correspondientes. Puede consultarlos en cualquier momento. Los resultados de prueba se almacenan del
más reciente al más antiguo, por lo que debe ajustar la hora y la fecha correctamente en el medidor. Cuando
la hora y la fecha correctas están ajustadas, esto les permite a usted y a su equipo de profesionales de la
salud interpretar adecuadamente los resultados de glucemia almacenados.
51
NOTA
• La memoria no se borra al cambiar la pila; no obstante, asegúrese de que la hora y la fecha sean
correctas.
• Una vez que la memoria contiene 500 resultados de glucemia o 20 resultados de control, al añadir un
nuevo resultado la memoria borra automáticamente el resultado más antiguo.
o
para desplazarse más rápidamente por los resultados.
• Pulse y mantenga pulsado
• Hasta 20 resultados de control se almacenan en la memoria, pero no se pueden revisar en el medidor.
Los resultados de control almacenados deben descargarse primero a una aplicación de software
compatible. Para más información sobre la disponibilidad de productos, llame al ACCU‑CHEK Customer
Care Service Center al 1‑800‑858‑8072.
• Los resultados de control tampoco se incluyen en los promedios de 7, 14 y 30 días.
52
ADVERTENCIA
No modifique su terapia basándose en un único resultado de prueba almacenado. Consulte a su
profesional de la salud antes de modificar su terapia basándose en los resultados de la memoria.
Ver los resultados de prueba
1. Pulse y suelte
o
para acceder a la memoria. Aparecerá el resultado más reciente.
2. Pulse y suelte
para ver resultados anteriores en orden.
3. O pulse y suelte
para ver los promedios de 7, 14 ó 30 días en este orden. En la esquina superior
izquierda de la pantalla verá una “n” con un número. Esto le indica cuántos resultados de prueba se
incluyen en dicho promedio.
Resultado más reciente
53
etcétera …
Tercer
resultado más
reciente
Segundo
resultado más
reciente
Promedio
de 7 días
Promedio
de 14 días
Promedio
de 30 días
Ajustar el medidor
Usar el modo de ajuste
Estos son los elementos que puede personalizar:
•Hora y fecha – ajuste la hora y la fecha.
•Señal sonora – le permite activarla (“On”) o desactivarla (“OFF”).
•Función de alarma – le permite activarla (“On”) o desactivarla (“OFF”). Si selecciona activado (“On”),
seleccione de 1 a 4 momentos al día
•Alerta de hipoglucemia – le permite activarla (“On”) o desactivarla (“OFF”). Si selecciona activada
(“On”), seleccione también el nivel de glucemia para la alerta.
54
El
tiene tres funciones para el modo de ajuste:
• Para acceder al modo de ajuste, encienda el medidor y, a continuación, pulse y mantenga pulsado
hasta que “set-up” parpadee en la pantalla. Esto tardará unos 4 segundos.
para confirmar la opción seleccionada.
• Pulse y suelte
durante unos
• Para salir del modo de ajuste en cualquier momento, pulse y mantenga pulsado
4 segundos hasta que parpadee el símbolo de la tira reactiva.
En toda esta sección, la barra roja de progreso le guía a través del proceso de ajuste.
Se encuentra aquí
HORA / FECHA
(horas, minutos,
am/pm, mes, día, año)
SEÑAL
SONORA
(on/off)
FUNCIÓN
DE ALARMA
(A-1, A-2, A-3, A-4)
ALERTA
HYPO
(off, on, nivel)
Ajustar la hora y la fecha
| | |
disminuir
| |
| | |
| |
aumentar
|
||
| | |
55
1. Pulse y suelte
para encender 2. Para acceder al modo de ajuste, 3. Pulse y suelte
o
para
el medidor. El símbolo de la tira
pulse y mantenga pulsado
disminuir o aumentar la hora.
reactiva parpadea.
durante aproximadamente
4 segundos. En la pantalla
parpadean “set-up” y la hora.
NOTA
Pulse y mantenga pulsado
o
para desplazarse más rápidamente.
| | |
| |
| | |
| |
|
||
| | |
56
4. Pulse y suelte
para
confirmar la hora. Los minutos
parpadean.
5. Repita los pasos 3 y 4 para
ajustar los minutos, el formato
am/pm, el mes, el día y el año.
El campo parpadeando es el
que se está modificando.
6. Si desea ajustar más opciones,
pulse y suelte . Si quiere
salir del modo de ajuste, pulse
y mantenga pulsado
hasta que parpadee el símbolo
de la tira reactiva.
Se encuentra aquí
HORA / FECHA
(horas, minutos,
am/pm, mes, día, año)
SEÑAL
SONORA
(on/off)
FUNCIÓN
DE ALARMA
(A-1, A-2, A-3, A-4)
ALERTA
HYPO
(off, on, nivel)
Ajustar la señal sonora On/OFF
La señal sonora del medidor viene activada (“On”) de fábrica. Desactivar la señal sonora (“OFF”) no afecta a
los resultados de prueba.
La señal sonora es una gran ayuda porque le avisa:
• Cuando debe aplicar sangre o solución de control a la tira reactiva
• Cuando la tira reactiva ha absorbido suficiente sangre o solución de control
• Cuando ha finalizado la prueba
• Cuando se pulsa un botón
• Cuando es hora de realizar una prueba (si ha ajustado las alarmas correspondientes)
• Si ha ocurrido un error al realizar la prueba (incluso cuando está desactivada, la señal sonora suena
avisándole de un error)
57
| | |
| |
| | |
| |
|
||
| | |
58
1. Pulse y suelte
para
encender el medidor.
El símbolo de la tira
reactiva parpadea.
2. Para acceder al modo
de ajuste, pulse y
mantenga pulsado
durante
aproximadamente
4 segundos. En la
pantalla parpadean
“set-up” y la hora.
3. Pulse y suelte
repetidamente
hasta que aparezcan
en la pantalla el
símbolo de la señal
sonora parpadeando y
“On” u “OFF”.
4. Pulse y suelte
o
para
seleccionar “On” u
“OFF”.
5. Si desea ajustar más
opciones, pulse y
suelte . Si quiere
salir del modo de
ajuste, pulse y
mantenga pulsado
hasta que
parpadee el símbolo
de la tira reactiva.
Se encuentra aquí
HORA / FECHA
(horas, minutos,
am/pm, mes, día, año)
SEÑAL
SONORA
(on/off)
FUNCIÓN
DE ALARMA
(A-1, A-2, A-3, A-4)
ALERTA
HYPO
(off, on, nivel)
Ajustar la función de alarma
Se pueden ajustar de una a cuatro alarmas por día. El medidor emite una señal sonora cada 2 minutos –
hasta 3 veces. Desactive la alarma insertando una tira reactiva o pulsando cualquier botón. Para que suene
la alarma, la señal sonora debe estar activada (“On”).
Su medidor viene con la función de alarma desactivada (“OFF”). Si quiere usar esta opción, debe activar la
función de alarma (“On”).
Si A-1, A-2, A-3 y A-4 están activadas, el medidor adjudicará a las alarmas las siguientes horas que pueden
ser ajustadas como sea necesario.
A-1 8:00 am
A-2 12:00 pm (mediodía) A-3 6:00 pm
A-4 10:00 pm
NOTA
• Si ha realizado una prueba 30 minutos antes de una alarma programada, la alarma no sonará.
• Si el medidor está encendido en el momento previsto para la alarma, ésta no sonará.
• La exposición al frío puede deshabilitar las alarmas hasta que el medidor esté encendido.
• Si está ajustando la hora de una alarma, el símbolo de la campana permanece en la pantalla y “set-up”
parpadea continuamente.
59
| | |
| |
| | |
| |
|
||
| | |
60
1. Pulse y suelte
para
encender el medidor.
El símbolo de la tira
reactiva parpadea.
2. Para acceder al modo
de ajuste, pulse y
mantenga pulsado
durante
aproximadamente
4 segundos. En la
pantalla parpadean
“set-up” y la hora.
4. Pulse y suelte
3. Pulse y suelte
repetidamente
o
para
hasta que aparezcan
seleccionar “On” u
en la pantalla el
“OFF”. Pulse y suelte
símbolo de la
para confirmar la
campana, “OFF”, así
opción.
como “set-up” y “A-1”
parpadeando.
5. Si selecciona “On”,
o
7. Los minutos
9. Pulse y suelte
10. La próxima alarma
parpadea la hora.
para seleccionar “am”
parpadean. Pulse y
“A-2” y “set-up”
“A-1” y el símbolo de
o “pm”. Pulse y suelte
suelte
o
para
parpadean en la
la campana siguen
seleccionar 00, 15, 30
para confirmar
pantalla junto con
viéndose en la pantalla. ó 45. Estas son las
“am” o “pm”.
“OFF” y el símbolo de
únicas opciones
la campana. Puede
6. Pulse y suelte
o
disponibles.
ajustar más alarmas o
para seleccionar la
salir del modo de
8. Pulse y suelte
hora. Pulse y suelte
para
ajuste pulsando y
para confirmar la hora.
confirmar los minutos.
manteniendo
“am” o “pm” parpadea
pulsado
hasta
en la pantalla.
que parpadee el
símbolo de la tira
reactiva.
61
Se encuentra aquí
HORA / FECHA
(horas, minutos,
am/pm, mes, día, año)
SEÑAL
SONORA
(on/off)
FUNCIÓN
DE ALARMA
(A-1, A-2, A-3, A-4)
ALERTA
HYPO
(off, on, nivel)
Ajustar la alerta de hipoglucemia
Puede ajustar el medidor de tal modo que le indique cuando un resultado es indicio de una posible
hipoglucemia (nivel de glucemia demasiado bajo). También puede seleccionar el nivel de glucemia de dicha
alerta (de 60 a 80 mg/dL). Antes de ajustar la alerta, consulte a su profesional de la salud para
determinar cuál es su nivel de hipoglucemia. La alerta de hipoglucemia de su nuevo medidor está
ajustada de fábrica en “OFF”. Si desea activarla (“On”), siga los siguientes pasos.
62
ADVERTENCIA
Esta función no sustituye un entrenamiento adecuado para hipoglucemia por parte de su
profesional de la salud o equipo para la diabetes.
63
1. Pulse y suelte
para encender el
medidor. El símbolo
de la tira reactiva
parpadea.
2. Para acceder al modo
de ajuste, pulse y
mantenga pulsado
durante
aproximadamente
4 segundos. En la
pantalla parpadean
“set-up” y la hora.
3. Pulse y suelte
repetidamente
hasta que aparezcan
en la pantalla “OFF”
así como “set-up” y
parpadeando.
4. Pulse y suelte
para
o
seleccionar “On” u
“OFF”. Pulse y suelte
para confirmar la
opción.
64
5. Si “On” está seleccionado,
“set-up” y
parpadean. La
pantalla muestra 70 mg/dL
(primer uso) o el nivel actual.
o
para
6. Pulse y suelte
seleccionar el nivel. Pulse y
suelte
para confirmar el
nivel.
7. Si quiere salir del modo de
ajuste, pulse y mantenga
pulsado
hasta que
parpadee el símbolo de la tira
reactiva.
Descargar sus resultados a una computadora o PDA
Ofrecemos una gran variedad de software para ayudarle a descargar sus resultados. Para más información
acerca de software ACCU‑CHEK, llame al ACCU‑CHEK Customer Care Service Center al 1‑800‑858‑8072.
Puede transferir los resultados almacenados a una computadora, para consultarlos posteriormente,
establecer pautas e imprimirlos.
Transferir datos directamente a una computadora o PDA mediante software
especializado y un cable de infrarrojos
1. Instale el software siguiendo las instrucciones. Para transferir los resultados a una computadora, conecte
el cable de infrarrojos del medidor de conformidad con las instrucciones.
2. Abra el programa y siga las instrucciones acerca de cómo descargar información. Asegúrese de que el
software esté listo para aceptar datos del medidor.
3. Con el medidor apagado, pulse y mantenga pulsados
y
simultáneamente hasta que vea 2 flechas
en la pantalla parpadeando alternadamente.
| | |
| | |
|
| | |
| |
| | |
| |
| | |
65
|
| | |
4. Localice la ventana de infrarrojos (IR) en la parte superior del medidor.
5. Localice la ventana de infrarrojos en el cable de infrarrojos (computadora) o en la
PDA.
6. Coloque el medidor sobre una superficie plana. Coloque las 2 ventanas de
infrarrojos una enfrente de la otra. Deben de estar colocadas de 1–4 pulgadas de
distancia.
7. No mueva el cable de infrarrojos (computadora), la PDA ni el medidor durante la
transferencia.
8. Siga las instrucciones del software.
9. Es posible que el software apague su medidor automáticamente al concluir la
transferencia de los datos. Si esto ocurre, siga las instrucciones en la pantalla.
Ventana de
infrarrojos (IR)
66
NOTA
• Si la transferencia no ha tenido éxito, inténtelo de nuevo. Si todavía tiene problemas, llame al
ACCU‑CHEK Customer Care Service Center al 1‑800‑858‑8072.
• Para sacar el mayor provecho posible de la función de descarga, debe ajustar la hora y la fecha
correctamente en el medidor.
Capítulo 5: Limpiar y desinfectar el medidor y el
dispositivo de punción
ADVERTENCIA
• Durante el uso normal para las pruebas, cualquier medidor de glucemia o dispositivo de punción
puede entrar en contacto con la sangre. Todas las piezas del kit representan un peligro biológico
y pueden transmitir enfermedades infecciosas a causa de patógenos nacidos de la sangre,
incluso después de limpiarlas y desinfectarlas.1,2
• La limpieza y la desinfección del medidor y del dispositivo de punción destruyen la mayoría de
los patógenos nacidos de la sangre, pero no necesariamente todos.3
• El medidor y el dispositivo de punción nunca deben ser utilizados por más de una persona. No
comparta con nadie el medidor ni el dispositivo de punción, ni siquiera con miembros de su
familia, debido al riesgo de infección a causa de patógenos nacidos de la sangre.1,2
• Si el medidor es utilizado por una segunda persona para ayudar al paciente a realizar las
pruebas, el medidor y el dispositivo de punción deben ser limpiados y desinfectados antes de ser
utilizados por dicha segunda persona.
• Desinfecte el medidor y el dispositivo de punción antes de permitir que otra persona los maneje.
No permita que nadie más realice pruebas con su medidor o su dispositivo de punción.
• Es importante conservar el medidor y el dispositivo de punción limpios y desinfectados.
• Lávese bien las manos antes y después de manipular el medidor, el dispositivo de punción o las
tiras reactivas.
67
¿Cuál es la diferencia entre limpiar y desinfectar?
Limpiar es retirar la suciedad del medidor o del dispositivo de punción.3
Desinfectar es retirar del medidor o del dispositivo de punción la mayoría de microorganismos que
originan enfermedades o de otro tipo (patógenos nacidos de la sangre).3
¿Cuándo se debe limpiar y desinfectar el medidor o el dispositivo de punción?
Limpiar y desinfectar el medidor y dispositivo de punción:
•Una vez por semana
•Cuando haya sangre en el medidor o en el dispositivo de punción
•Antes de permitir que alguien manipule el medidor o el dispositivo de punción
68
NOTA
Si necesita asistencia técnica o tiene preguntas acerca de la limpieza y desinfección, llame al ACCU‑CHEK
Customer Care Service Center al 1‑800‑858‑8072.
Limpiar y desinfectar el medidor
Para limpiar y desinfectar el medidor sin dañarlo, siga los siguientes procedimientos cuidadosamente.
Cuándo limpiar y desinfectar el medidor
• Limpie el medidor para retirar la suciedad visible u otros materiales antes de desinfectarlo.
• Limpie y desinfecte el medidor por lo menos una vez por semana y cuando haya sangre en la superficie
del medidor.
• Limpie y desinfecte el medidor antes de permitir que alguien lo manipule. No permita que otras
personas utilicen el medidor para realizar pruebas en sí mismas.
69
Producto de limpieza y desinfección aprobado
El siguiente producto ha sido aprobado para limpiar y desinfectar el medidor:
•Super Sani-Cloth (EPA* nº reg. 9480-4)
*Environmental Protection Agency (Agencia de Protección Ambiental de EE.UU.)
Super Sani-Cloth puede ser adquirido a través de:
•Amazon.com
•Officedepot.com
•Walmart.com
NOTA
70
Si observa alguno de los siguientes signos de deterioro después de limpiar y desinfectar el medidor, llame
al ACCU‑CHEK Customer Care Service Center al 1‑800‑858‑8072: Residuos alrededor de los botones,
pantalla turbia o mal funcionamiento de los botones.
Qué limpiar y desinfectar
Las siguientes piezas del medidor deben limpiarse y desinfectarse:
•El área alrededor de las ranuras y aperturas (evite que entre humedad en las ranuras y aperturas)
•La pantalla del medidor
•Toda la superficie del medidor
Cómo limpiar y desinfectar el medidor
ADVERTENCIA
• NO limpie o desinfecte el medidor mientras realiza una prueba de glucemia o de control.
• NO deje que entre humedad en las ranuras y aperturas.
• NO pulverice nada sobre el medidor.
• NO sumerja el medidor en un líquido.
Si no se siguen estas instrucciones el medidor sufrirá daños o dejará de funcionar correctamente.
71
72
1. Lávese bien las manos con agua y jabón.
ADVERTENCIA
2. Apague el medidor y limpie toda la superficie del
medidor con un producto de limpieza y
desinfección aprobado. Utilice siempre el mismo
producto para limpiar y para desinfectar.
El efecto de usar más de un producto para limpiar y para desinfectar el medidor no ha sido probado.
Utilice siempre Super Sani-Cloth (EPA nº reg. 9480-4) para limpiar y para desinfectar el medidor. No utilice
ninguna otra solución de limpieza o desinfección. El uso de soluciones que no sean Super Sani-Cloth
puede ocasionar daños en el medidor.
73
3. Limpie cuidadosamente alrededor de la ranura
de la tira reactiva y de otras aperturas. Asegúrese
de que no entra ningún líquido en ninguna ranura
o apertura.
4. Seque el medidor con un paño suave o una gasa.
Asegúrese de que no entra ninguna solución en
ninguna ranura o apertura.
74 5. Para desinfectar el medidor, use un nuevo paño.
Repita los pasos 2 y 3 siguiendo las
instrucciones del fabricante para desinfectar.
NOTA
6. Lávese bien las manos con agua y jabón.
Roche ha testado los productos aprobados en un total de 520 ciclos, que es igual a limpiar y desinfectar
una vez por semana durante 5 años.
Limpiar y desinfectar el dispositivo de punción
NOTA
• No deseche el capuchón del dispositivo de punción después de cada uso. Utilice un producto aprobado
para limpiarlo y desinfectarlo.
• Retire el cartucho de lancetas antes de limpiar y desinfectar el dispositivo de punción.
Para limpiar y desinfectar el dispositivo de punción sin dañarlo, siga los siguientes procedimientos
cuidadosamente.
Cuándo limpiar y desinfectar el dispositivo de punción
• Limpie el dispositivo de punción para retirar la suciedad visible u otros materiales antes de desinfectarlo.
• Limpie y desinfecte el dispositivo de punción una vez por semana para retirar la suciedad visible u otros
materiales y garantizar un manejo seguro.
• Limpie y desinfecte el dispositivo de punción antes de permitir que otra persona lo manipule, por ejemplo
si alguien le está ayudando. No permita que nadie más utilice el dispositivo de punción.
75
Producto de limpieza y desinfección aprobado
El siguiente producto ha sido aprobado para limpiar y desinfectar el dispositivo de punción:
•Super Sani-Cloth (EPA* nº reg. 9480-4)
*Environmental Protection Agency (Agencia de Protección Ambiental de EE.UU.)
Super Sani-Cloth puede ser adquirido a través de:
•Amazon.com
•Officedepot.com
•Walmart.com
NOTA
76
• Si observa alguno de los siguientes signos de deterioro después de limpiar y desinfectar el dispositivo
de punción, llame al ACCU‑CHEK Customer Care Service Center al 1‑800‑858‑8072: Residuos alrededor
de los botones.
• Es posible que tras múltiples ciclos de limpieza y desinfección el dispositivo de punción se haya
descolorido. Esto no afecta al buen funcionamiento del dispositivo.
Qué limpiar y desinfectar
Las siguientes piezas del dispositivo de punción deben limpiarse y desinfectarse:
•Toda la superficie del dispositivo de punción
•El capuchón
Cómo limpiar y desinfectar el dispositivo de punción
ADVERTENCIA
NO deje que entre humedad en las aperturas.
Si no se siguen estas instrucciones el dispositivo de punción puede sufrir daños o dejar de
funcionar correctamente.
77
3. Seque el dispositivo de punción
1. Lávese bien las manos con agua 2. Limpie toda superficie del
y el capuchón con un paño
y jabón.
dispositivo de punción y el
suave o una gasa. Asegúrese de
interior del capuchón del
que no entra ninguna solución
dispositivo de punción con un
en ninguna apertura.
producto de limpieza y
desinfección aprobado. Utilice
siempre el mismo producto para
limpiar y desinfectar.
ADVERTENCIA
El efecto de usar más de un producto para limpiar y para desinfectar el dispositivo de punción no
ha sido probado. Utilice siempre Super Sani-Cloth (EPA nº reg. 9480-4) para limpiar y desinfectar el
dispositivo de punción. No utilice ninguna otra solución de limpieza o desinfección. El uso de
soluciones que no sean Super Sani-Cloth puede ocasionar daños en el dispositivo de punción.
78
4. Para desinfectar el dispositivo de punción, use un
nuevo paño. Repita el paso 2 siguiendo las
instrucciones del fabricante para desinfectar.
NOTA
5. Lávese bien las manos con agua y jabón.
Roche ha testado los productos aprobados en un total de 520 ciclos, que es igual a limpiar y desinfectar
una vez por semana durante 5 años.
Capítulo 6: Mantenimiento y solución de problemas
Cambiar la pila
1. Abra el compartimiento de la pila al dorso del
medidor empujando la tapa en la dirección
indicada por la flecha y levantándola hacia arriba.
Retire la pila usada.
2. Inserte la pila nueva con el lado + hacia arriba.
La pila descansa sobre el contacto metálico. La
tapa mantiene la pila en su lugar.
3. Coloque la tapa del compartimiento nuevamente
en su sitio y ciérrela de modo que encastre.
4. Encienda el medidor. Confirme que la hora y la
fecha son correctas.
79
NOTA
• El medidor usa una pila de litio de 3 voltios del tipo botón CR2032. Este tipo de pila está a la venta en
muchos establecimientos. Tenga siempre una pila de reserva empaquetada a mano.
• Asegúrese de que haya puesto el lado + de la pila hacia arriba, mirando hacia usted.
• Tras cambiar la pila, el medidor le solicita que confirme los ajustes de la hora y la fecha. Vea el
capítulo 4 “Ajustar la hora y la fecha”. Todos los resultados de prueba se almacenan en la memoria del
medidor.
• Todos los resultados de prueba se almacenan en la memoria del medidor.
80
Mantenimiento y solución de problemas
Si lo usa bajo condiciones normales, el medidor requiere de poco o prácticamente de
ningún mantenimiento. El medidor comprueba automáticamente sus sistemas cada vez
que se enciende y le comunica si hay algún problema. Vea el capítulo 6, “Mensajes en la
pantalla y solución de problemas”.
Si deja caer el medidor o piensa que los resultados obtenidos no son correctos,
asegúrese de que ni las tiras reactivas ni la solución de control hayan expirado y realice
una prueba de control. Si el resultado de control está fuera del rango aceptable, llame al
ACCU‑CHEK Customer Care Service Center al 1‑800‑858‑8072.
Compruebe la pantalla antes de cada prueba de glucemia para asegurarse de que
funciona correctamente. Apague el medidor y, a continuación, pulse y mantenga pulsado
para ver la pantalla completa. Todos los segmentos deben verse claramente y ser
exactamente iguales a la imagen. De lo contrario, no utilice el medidor. Llame al
ACCU‑CHEK Customer Care Service Center al 1‑800‑858‑8072.
81
Mensajes en la pantalla y solución de problemas
ADVERTENCIA
Nunca tome decisiones terapéuticas basándose en un mensaje de error. Si tiene dudas, llame al
ACCU‑CHEK Customer Care Service Center al 1‑800‑858‑8072.
(pantalla
vacía)
82
El medidor no se enciende o la
pantalla está en blanco.
•La pila está agotada –
Inserte una nueva pila.
•La pantalla está dañada –
Llame al ACCU‑CHEK Customer
Care Service Center al
1‑800‑858‑8072.
•El medidor se ha expuesto a
temperaturas extremas –
Póngalo en un lugar con una
temperatura adecuada.
La pila está baja. Cambie la pila sin
demora. Vea el capítulo 6 “Cambiar
la pila”.
El medidor está en el modo de
ajuste, esperando a que usted
modifique o confirme los ajustes.
Vea el capítulo 4 “Ajustar el
medidor”.
El medidor está listo para que inserte
una tira reactiva.
El nivel de glucemia puede ser
inferior al rango de medición del
sistema. Vea el capítulo 3
“Interpretar los resultados de
prueba”.
El medidor está listo para que
aplique una gota de sangre o de
solución de control.
Este resultado de prueba ha sido
marcado. Para más datos, vea el
capítulo 3 “Marcar los resultados de
prueba”.
El nivel de glucemia puede ser
superior al rango de medición del
sistema. Vea el capítulo 3
“Interpretar los resultados de
prueba”.
El nivel de glucemia es inferior al
nivel de hipoglucemia (nivel de
glucemia bajo) definido. Vea el
capítulo 3 “Interpretar los resultados
de prueba”.
83
El medidor no ha sido codificado o el
chip de codificación no está
insertado. Apague el medidor y
vuelva a codificarlo. Vea el capítulo 1
“Codificar el medidor”.
84
Las tiras reactivas expiran al final del
mes en curso. Antes de que termine
el mes, inserte un nuevo chip de
codificación de una nueva caja de
tiras reactivas y asegúrese de que el
número de código del chip de
codificación coincida con el número
de código del tubo de tiras reactivas. Asegúrese de
que la hora y la fecha indicadas en el medidor sean
correctas.
La tira reactiva puede estar dañada
o el chip de codificación es
incorrecto. Retire la tira reactiva e
insértela de nuevo. Si el mensaje
aparece de nuevo, apague el
medidor e inserte un nuevo chip de
codificación. Asegúrese de que el
número de código impreso en el chip de codificación
insertado en ese momento en el medidor coincida
con el número de código impreso en el tubo de tiras
reactivas. Si el mensaje aparece de nuevo, llame al
ACCU‑CHEK Customer Care Service Center al
1‑800‑858‑8072.
El chip de codificación es incorrecto.
Apague el medidor e inserte un
nuevo chip de codificación. Si el
problema persiste, llame al
ACCU‑CHEK Customer Care Service
Center al 1‑800‑858‑8072.
Su nivel de glucemia puede ser
extremadamente alto o se ha
producido un error con el medidor o
la tira reactiva. Si esto coincide con
cómo se siente, póngase en contacto
con su profesional de la salud
inmediatamente. Si esto no coincide
con cómo se siente, repita la prueba y consulte el
capítulo 3 “Resultados de prueba no esperados”. Si
esto no coincide con cómo se siente, realice una
prueba de control con solución de control y una tira
reactiva nueva. Si el resultado de control está dentro
del rango aceptable, lea de nuevo las instrucciones
para el procedimiento de prueba correcto y repita la
prueba de glucemia con una tira reactiva nueva. Si
el mensaje E-3 aparece de nuevo después de su
prueba de glucemia, su resultado de glucemia puede
ser extremadamente alto y superior al rango de
medición del sistema. Póngase en contacto con su
profesional de la salud inmediatamente. Si el
resultado de control está fuera del rango aceptable,
consulte el capítulo 2 “Interpretar los resultados de
control fuera del rango aceptable”.
85
La tira reactiva no ha absorbido
suficiente sangre o solución de
control para realizar la prueba, o la
sangre o solución de control se
aplicó después de que la prueba
comenzara. Deseche la tira reactiva
y repita la prueba.
86
El chip de codificación proviene de
un lote de tiras reactivas caducado.
Asegúrese de que el número de
código del chip de codificación
coincida con el número de código del
tubo de tiras reactivas. Asegúrese de
que la hora y la fecha indicadas en el
medidor sean correctas.
La sangre o la solución de control se
aplicaron a la tira reactiva antes de
que el símbolo de la gota apareciera
parpadeando en la pantalla. Deseche
la tira reactiva y repita la prueba.
Se ha producido un fallo electrónico
o, en casos poco frecuentes, se ha
retirado y reinsertado una tira
reactiva usada. Apague y encienda el
medidor o retire las pilas durante
20 segundos e insértelas de nuevo.
Realice una prueba de glucemia o de
control. Si el problema persiste, llame al ACCU‑CHEK
Customer Care Service Center al 1‑800‑858‑8072.
Los ajustes de la hora y la fecha
podrían ser incorrectos. Asegúrese
de que la hora y la fecha sean
correctas y ajústelas si es preciso.
Vea el capítulo 4 “Ajustar la hora y la
fecha”.
La temperatura es superior o inferior
al rango adecuado para el sistema.
Vea el prospecto de las tiras
reactivas para más información
sobre las condiciones de operación
del sistema. Vaya a un área con las
condiciones adecuadas, espere 5
minutos y repita la prueba. No caliente ni enfríe el
medidor por medios artificiales.
La pila está casi agotada. Cambie la
pila ahora. Vea el capítulo 6
“Cambiar la pila”.
NOTA
Si ve cualquier otro error en la pantalla, llame al
ACCU‑CHEK Customer Care Service Center al
1‑800‑858‑8072.
87
88
Capítulo 7: Datos técnicos
Limitaciones del producto
Por favor, para obtener la última información acerca de las especificaciones y las limitaciones del producto,
lea la documentación incluida en la caja de tiras reactivas y de soluciones de control.
Especificaciones
Volumen de sangre
Tipo de muestra
Tiempo de medición
Rango de medición
Condiciones de almacenamiento de las tiras reactivas
Condiciones de almacenamiento del medidor
Condiciones de operación del sistema
Rango de humedad relativa
Calibrado
Capacidad de memoria
Apagado automático
Suministro de corriente
Pantalla
Dimensiones
Vea el prospecto de las tiras reactivas.
Vea el prospecto de las tiras reactivas.
Vea el prospecto de las tiras reactivas.
Vea el prospecto de las tiras reactivas.
Vea el prospecto de las tiras reactivas.
Temperatura: -13–158 °F
Vea el prospecto de las tiras reactivas.
Vea el prospecto de las tiras reactivas.
Equivalente al plasma
500 resultados de glucemia y 20 resultados de control
con hora y fecha
2 minutos
Una pila de litio de 3 voltios (tipo botón CR2032)
LCD
94 × 53 × 22 mm (L x An x Al)
89
Peso
Construcción
Categoría de protección
Tipo de medidor
Condiciones de almacenamientol
de la solución de contro
Compatibilidad electromagnética
Aprox. 60 g (pila incluida)
Aparato de bolsillo
III
El medidor ACCU‑CHEK Aviva es apropiado para
uso continuo.
Vea el prospecto de la solución de control.
Este medidor cumple los requisitos de inmunidad electromagnética según EN ISO 15197 Anexo A. La base elegida
para la prueba de inmunidad a descargas electrostáticas ha sido el estándar básico IEC 61000-4-2.
Adicionalmente, cumple los requisitos de emisiones electromagnéticas según EN 61326. Por lo tanto la emisión
electromagnética del medidor es baja. El medidor no interfiere con otros equipos que funcionan eléctricamente.
Análisis de funcionamiento
Vea el prospecto de las tiras reactivas.
Principio de medición
90
Vea el prospecto de las tiras reactivas.
Datos acerca de la seguridad del producto
ADVERTENCIA
• Los campos electromagnéticos fuertes pueden interferir con el funcionamiento correcto del
medidor. No use el medidor cerca de fuentes de radiación electromagnética fuerte.
• Para evitar las descargas electrostáticas, no use el medidor en entornos sumamente secos,
especialmente si hay en ellos materiales sintéticos.
• Riesgo de asfixia. Piezas pequeñas. Conserve fuera del alcance de niños menores de 3 años.
Documentación para viajes
Si viaja con una línea aérea comercial, es posible que necesite suministrar documentación para certificar que este
medidor cumple las condiciones medioambientales y los procesos de prueba para equipamiento aerotransportado
(RTCA/DO-160F) sección 21 Emisión de energía por radiofrecuencia. Por favor, visite www.accu-chek.com o llame
al ACCU‑CHEK Customer Care Service Center al 1‑800‑858‑8072 para obtener una copia del documento.
91
Desechar el medidor, la tiras reactivas, las lancetas y las pilas
ADVERTENCIA
Cualquier producto que entre en contacto con la sangre se considera contaminado (potencialmente
infeccioso).* Durante el uso normal para las pruebas, cualquier medidor de glucemia puede entrar
en contacto con la sangre. Los dispositivos de punción pueden considerarse punzantes. La
eliminación de objetos punzantes está regulada por la ley en muchas jurisdicciones.
La Unión Europea impone algunas exigencias para la mejora de las prácticas de eliminación de residuos de ciertos
equipos electrónicos, pero los medidores están fuera del alcance de la Directiva Europea 2002/96/CE .** Esto no se
exige en los EE.UU., pero no obstante, Roche tiene un firme compromiso con el reciclaje y la sostenibilidad. Cumplir
con cualquier ley o normativa relacionada con la eliminación de productos punzantes y/o contaminados. Contacte
con el departamento local de salud o las autoridades pertinentes respecto al manejo y la eliminación adecuados de
medidores usados, tiras reactivas usadas, lancetas usadas y pilas usadas. Por favor, tenga en cuenta los puntos
siguientes cuando deseche material de prueba usado:
• Intente reciclar los medidores y las pilas en un sitio de recogida adecuado. Tenga en cuenta que el medidor es
un residuo electrónico potencialmente peligroso (e-scrap) y que debe eliminarse de la forma correspondiente.
Las pilas son también potencialmente peligrosas y deben desecharse, asimismo, de la forma correspondiente.
• Descontamine el medidor antes de reciclarlo o desecharlo.
*29 CFR 1910.1030 – Patógenos nacidos de la sangre
**Directiva 2002/96/EC – Directiva sobre residuos de aparatos eléctricos y electrónicos (RAEE)
92
Explicación de los símbolos
¡PRECAUCIÓN (consulte la documentación)! Observe las advertencias de seguridad en las
instrucciones de uso del aparato.
Tipo botón de 3V CR2032
93
Garantía
Garantía de devolución de dinero de 30 días del medidor ACCU‑CHEK Aviva para el
comprador cualificado
Roche ofrece una garantía de devolución de dinero de 30 días al comprador cualificado que compra un medidor
ACCU‑CHEK Aviva. Si usted no queda totalmente satisfecho con su medidor ACCU‑CHEK Aviva llame gratuitamente
al ACCU‑CHEK Customer Care Service Center al 1‑800‑858‑8072 dentro de 30 días de la fecha de compra de su
medidor para determinar si está cualificado para recibir la devolución de su dinero. Si usted dispone de una
cobertura de Medicare, Medicaid, programas federales/estatales o aseguradoras privadas, está EXCLUIDO de esta
oferta de devolución de dinero. Si está afectado por esta exclusión puede, de todas formas, solicitar un medidor/
sistema ACCU‑CHEK diferente. La devolución estará limitada al importe pagado por el comprador, neto y sin
rebajas. Para obtener una devolución de dinero, debe tener una copia del recibo de compra en el que aparezcan la
fecha y el producto comprado, así como el embalaje original.
Garantía limitada por 3 años para el medidor ACCU‑CHEK Aviva
94
Roche Diagnostics garantiza al comprador original del medidor que su medidor ACCU‑CHEK Aviva estará libre de
defectos y averías tanto de material como de mano de obra durante tres años desde la fecha de adquisición. Si
durante esos tres años su medidor no funcionara bien debido a un defecto de material o de fabricación, Roche
Diagnostics lo reemplazará gratuitamente por otro medidor ACCU‑CHEK Aviva o su equivalente. La garantía del
medidor de repuesto expirará bien el mismo día que la garantía del medidor original ó 90 días después de su
expedición, cualquiera sea el periodo más largo. El único recurso del comprador con respecto al medidor
ACCU‑CHEK Aviva será su reemplazo.
Esta garantía carece de validez para el funcionamiento de un medidor ACCU‑CHEK Aviva que haya sido dañado por
accidente o alterado, usado indebidamente, manipulado o maltratado en modo alguno. Roche Diagnostics tratará
los medidores que presenten daños o abusos de acuerdo con su Póliza de servicio sin garantía descrita en la
página siguiente.
LA GARANTÍA EXPUESTA ARRIBA EXCLUYE CUALQUIER OTRA GARANTÍA Y ROCHE DIAGNOSTICS NO OTORGARÁ
NINGÚN OTRO TIPO DE GARANTÍA NI EXPRESA NI IMPLÍCITA, INCLUIDA LA GARANTÍA SIN LIMITACIONES, LA
GARANTÍA IMPLÍCITA DE COMERCIALIZACIÓN O ADECUACIÓN PARA UNA FINALIDAD ESPECÍFICA. EN NINGÚN CASO
ROCHE DIAGNOSTICS SERÁ RESPONSABLE ANTE AL COMPRADOR O CUALQUIER OTRA PERSONA DE NINGÚN DAÑO
FORTUITO, RESULTANTE, INDIRECTO, ESPECIAL, NI DE DAÑOS PUNITIVOS QUE SE DERIVEN DE LA COMPRA O
MANEJO DEL MEDIDOR O DE SUS COMPONENTES, O QUE DE CUALQUIER OTRO MODO SE RELACIONEN CON
DICHA COMPRA O MANEJO. NINGUNA GARANTÍA DE COMERCIALIZACIÓN O ADECUACIÓN PARA UNA FINALIDAD
ESPECÍFICA, SI EXISTIERA ALGUNA FUERA IMPLÍCITA CON LA VENTA DEL MEDIDOR, SE EXTENDERÁ POR UN
PERIODO SUPERIOR A TRES AÑOS DESDE LA FECHA DE COMPRA.
Algunos estados no admiten limitaciones en la duración de una garantía implícita ni la exclusión de daños
incidentales o consecuenciales, así que la anterior limitación y exclusión quizá no tenga validez en su caso. Esta
garantía le otorga derechos legales específicos que varían según el estado.
Póliza de servicio sin garantía
La Póliza de servicio sin garantía de Roche Diagnostics se aplica en caso de que la garantía mencionada arriba no
se haya hecho efectiva, sea inaplicable o haya expirado. A su discreción, Roche Diagnostics reemplazará los
medidores que se le devuelvan a cambio de un pago en concepto de servicio (el cual no excederá $35). El medidor
se reemplazará por uno del mismo modelo o un modelo similar. Los medidores reemplazados tendrán una garantía
de 90 días a partir de la fecha de envío y estarán cubiertos por una garantía limitada que cubrirá el reemplazo
gratuito de repuestos y la mano de obra.
Instrucciones de garantía y servicio
Todas las peticiones de devolución de un medidor ACCU‑CHEK Aviva acogiéndose a la garantía o a la póliza de
servicio descritas arriba deben enviarse directamente al ACCU‑CHEK Customer Care Service Center. Le enviaremos
por correo una etiqueta de autorización que debe fijar al embalaje antes de enviar el sistema de vuelta a Roche
Diagnostics. Los embalajes recibidos sin esta etiqueta serán devueltos a su remitente con los portes a cargo del
mismo.
Aquellos clientes que tengan dificultades con el medidor deberán repasar la información para solucionar problemas
y averías incluida en el capítulo 6 de este manual. Si aún tiene dudas, diríjase al ACCU‑CHEK Customer Care
Service Center.
Asegúrese de rellenar y enviar de regreso la Tarjeta de garantía que viene con el sistema ACCU‑CHEK Aviva Plus.
95
Licencia limitada
ATENCIÓN
UNA LICENCIA LIMITADA RESTRINGE EL USO DEL SISTEMA ACCU‑CHEK AVIVA PLUS – LEA
CUIDADOSAMENTE LAS LIMITACIONES QUE SE INDICAN ABAJO.
96
El sistema ACCU‑CHEK Aviva Plus (medidor, incluyendo chip de codificación y tiras reactivas) y su uso están protegidos por
las patentes estadounidenses nº. 6,645,368 (expira el 22 de diciembre de 2017); 5,366,609 (expira el 8 de junio de
2013); 5,352,351 (expira el 8 de junio de 2013); 7,276,146 (expira el 4 de octubre de 2022); 7,276,147 (expira el 4 de
octubre de 2022); 7,407,811 (expira el 9 de mayo de 2020); 7,452,457 (expira el 2 de mayo de 2026); 7,488,601 (expira
el 1 de febrero de 2026); 7,494,816 (expira el 29 de diciembre de 2019); 7,569,126 (expira el 28 de diciembre de 2026);
y 7,604,721 (expira el 12 de agosto de 2026). La licencia para usar el sistema ACCU‑CHEK Aviva Plus sólo se concede si
el medidor ACCU‑CHEK Aviva se usa con las tiras reactivas ACCU‑CHEK Aviva Plus y los chips de codificación ACCU‑CHEK
Aviva Plus.
Las tiras reactivas ACCU‑CHEK Aviva Plus están provistas de un chip de codificación ACCU‑CHEK Aviva Plus y ambos han
sido diseñados para su uso conjunto. Además, tanto las tiras reactivas como el chip de codificación se han fabricado
específicamente para ser usados con el medidor ACCU‑CHEK Aviva. El uso de las tiras reactivas con un chip de
codificación con un código distinto, o incluso con un chip de codificación con el mismo código pero de otro fabricante,
pueden impedir o afectar el buen funcionamiento del sistema ACCU‑CHEK Aviva Plus.
El uso del sistema ACCU‑CHEK Aviva Plus indica su aceptación de la licencia restringida para usar el sistema ACCU‑CHEK
Aviva Plus sólo con las tiras reactivas ACCU‑CHEK Aviva Plus y el chip de codificación ACCU‑CHEK Aviva Plus. Además, si
ha comprado un kit de control ACCU‑CHEK Aviva o un medidor ACCU‑CHEK Aviva que incluya esta garantía restringida,
entonces esta licencia restringida es aplicable por encima de otras ofertas adicionales que viniesen con las cajas de tiras
reactivas ACCU‑CHEK Aviva Plus. Si no está de acuerdo con las condiciones de la licencia restringida, puede devolver el
sistema ACCU‑CHEK Aviva Plus no usado en el lugar de su compra donde se le reembolsará su importe completo. Si tiene
preguntas, por favor llame al ACCU‑CHEK Customer Care Service Center al 1‑800‑858‑8072.
Excepto donde lo prohíba un estatuto, todas las garantías que cubren el sistema ACCU‑CHEK Aviva Plus se anularán en
caso de usar el sistema ACCU‑CHEK Aviva Plus con tiras reactivas o chips de codificación que no sean tiras reactivas o
chips de codificación ACCU‑CHEK Aviva Plus.
ATENCIÓN
UNA LICENCIA LIMITADA RESTRINGE EL USO DEL SISTEMA ACCU‑CHEK FASTCLIX (dispositivo de
punción y cartuchos de lancetas). LEA CUIDADOSAMENTE LAS LIMITACIONES QUE SE INDICAN
ABAJO.
El sistema ACCU‑CHEK FastClix (dispositivo y cartuchos de lancetas) y su uso están protegidos por las patentes
estadounidenses nº Re. 35,803 (expira el 9 de diciembre de 2012); 6,419,661 (expira el 3 de marzo de 2020);
7,077,828 (expira el 3 de marzo de 2020); 7,322,998 (expira el 3 de marzo de 2020) y 7,785,338 (expira el 5 de
enero de 2026). La licencia para usar el sistema ACCU‑CHEK FastClix es necesaria hasta la expiración de la última
patente mencionada arriba y solo se concede si los cartuchos de lancetas ACCU‑CHEK FastClix se usan con el
dispositivo ACCU‑CHEK FastClix .
Los cartuchos de lancetas ACCU‑CHEK FastClix son componentes de alta precisión fabricados de acuerdo con
tolerancias mínimas requeridas para su uso satisfactorio con el dispositivo de punción ACCU‑CHEK FastClix. El uso
de otras lancetas con el dispositivo de punción ACCU‑CHEK FastClix puede impedir o afectar el funcionamiento
correcto del dispositivo ACCU‑CHEK FastClix.
El uso del dispositivo ACCU‑CHEK FastClix indica que acepta la licencia restringida para usar el dispositivo
ACCU‑CHEK FastClix solo en conjunción con los cartuchos de lancetas ACCU‑CHEK FastClix. Además, si ha
comprado un dispositivo ACCU‑CHEK FastClix que incluya esta garantía restringida, entonces esta licencia
restringida es aplicable por encima de otras ofertas adicionales que viniesen con las cajas de dispositivos
ACCU‑CHEK FastClix. Si no está de acuerdo con las condiciones de la licencia restringida, puede devolver el
dispositivo ACCU‑CHEK FastClix no usado en el lugar de su compra donde se le reembolsará su importe completo.
Si tiene preguntas, por favor llame al ACCU‑CHEK Customer Care Service Center al 1‑800‑858‑8072.
Excepto donde lo prohíba un estatuto, todas las garantías que cubren el dispositivo ACCU‑CHEK FastClix se
anularán en caso de usar el dispositivo ACCU‑CHEK FastClix con cartuchos de lancetas que no sean cartuchos de
lancetas ACCU‑CHEK FastClix.
97
Suministros y accesorios
Tiras reactivas
50 tiras reactivas ACCU‑CHEK Aviva Plus
100 tiras reactivas ACCU‑CHEK Aviva Plus
Soluciones de control
Solución de control ACCU‑CHEK Aviva de 2 niveles
Lancetas
102 lancetas ACCU‑CHEK FastClix
Referencia
98
Notificación de salud pública de la FDA: El uso de dispositivos de punción capilar en más de una persona supone un riesgo de
transmisión de patógenos nacidos de la sangre: Comunicación inicial, actualización del 29 de noviembre de 2010.
http://www.fda.gov/MedicalDevices/Safety/AlertsandNotices/ucm224025.htm. Consulta: 26.05.11.
2
Recordatorio clínico de CDC: El uso de dispositivos de punción capilar en más de una persona supone un riesgo de transmisión de
patógenos nacidos de la sangre, (2010). http://www.cdc.gov/injectionsafety/Fingerstick-DevicesBGM.html. Consulta: 26.05.11.
3
Healthcare Infection Control Practices Advisory Committee (HICPAC), William A. Rutala, Ph.D., M.P.H., and David J. Weber, M.D., M.P.H.
Centers for Disease Control and Prevention, 2008. Guideline for Disinfection and Sterilization in Healthcare Facilities. Atlanta.
1
Índice
A
G
B
H
ajustes de señal sonora, 57
ajustes, medidor, 54
botón Power/Set, 11–12
C
cartucho de lancetas, 12, 28
chip de codificación, 11, 13
comprobación de la pantalla, 81
computadora, conectar su medidor a, 65
D
deshidratación, 9
desinfectar,
dispositivo de punción, 67–68, 75–78
medidor, 67–74
E
especificaciones del producto, 89–90
F
fecha de caducidad (“Use By”), 17
garantía, 94–95
glucemia, realizar pruebas, 27
hiperglucemia, 49
hiperglucemia, síntomas, 49
hipoglucemia, 9, 49
hipoglucemia, síntomas, 49
hora y fecha, ajuste, 55
I
información de patentes, 96–97
información de seguridad, 8, 91
información técnica, 89–93
L
licencia limitada, 96–97
limitaciones del producto, 89
limpiar,
dispositivo de punción, 75–78
medidor, 67–74
99
M
mantenimiento, medidor, 81
memoria, medidor, 51
mensajes de error, 84–87
mensajes en la pantalla, 82–87
micción frecuente, 9
N
nivel de glucemia alto, 49
nivel de glucemia bajo, 49
P
pila,
cambiar, 79
tipo, 80, 89, 93
prueba de control, realizar, 19–23
R
resultados de control, interpretar fuera del rango,
24–25
resultados de prueba,
interpretar, 48
inusual, 48
100
S
selector de profundidad, 12, 30
símbolos, 93
síntomas,
hiperglucemia, 49
hipoglucemia, 49
solución de control, 19
solución de problemas, 82–87
suministros, 98
T
tiras reactivas ACCU-CHEK Aviva Plus, 12
V
viajar, 91
Assembled and Distributed in the U.S. by:
Roche Diagnostics
9115 Hague Road
Indianapolis, IN 46256
www.accu-chek.com
ACCU-CHEK, ACCU-CHEK AVIVA, FASTCLIX, and SOFTCLIX are
trademarks of Roche. All other product names and trademarks
are the property of their respective owners.
©2011 Roche Diagnostics. 05958083001-1011