1
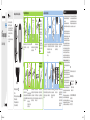
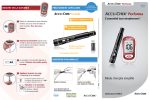
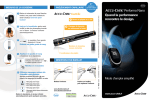
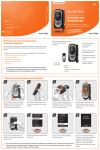
 Warning
Start Here
1
• This Quick Start Guide does not replace the
User’s Manual for your Accu-Chek Performa
blood glucose meter. The User’s Manual
contains important handling instructions and
additional information.
• The lancing device is intended for personal
use only.
1
Cap
2
2
Release Button
Penetration
depth
1 Lancet Drum = 6 Lancets
3
Number
of lancets
remaining
Advance to next lancet
Quick Start Guide
5
3
4
Familiarize yourself with the
Accu-Chek FastClix lancing
device.
Get the lancet drum from the
pocket in the carry case.
4
Error Messages
Performing a Blood Glucose Test
Setting up the Lancing Device
Meter Overview
Note
Remove the cap by pulling it
Each lancet drum contains 6 sterile straight off. Do not twist the cap.
lancets.
5
6
Warning
You must not insert the lancet
drum into the lancing device and
simultaneously press the release
button or hold the lancing device
with the release button resting
on a surface such as a table top.
This could release a lancet and
inadvertently cause injury.
When ready to test…
1
Wash and dry your hands before
you perform a blood glucose test.
5
2
Check the use by date on the test
strip container. Do not use test
strips past the use by date.
3
Remove a test strip from the test
strip container. Close the cap
tightly.
4
Insert the test strip into the meter
in the direction of the arrows until
the meter beeps.
6
A flashing blood drop symbol
appears.
Before you finish…
or
1
6
1 Power/Set Button
2 Display
3 Right Arrow and Left Arrow Buttons
4 Test Strip Slot
5 Battery Door
6 Infrared (IR) Window
51825_07054238001_01.indd 1
Insert the lancet drum, white end
first, into the lancing device. Push
the lancet drum all the way in until
it clicks firmly into place.
Note
Do not remove the lancet drum
until all 6 lancets are used since
the drum cannot be reused once it
has been removed from the
lancing device.
Replace the cap on the lancing
device. Make sure the notch on the
cap lines up with the notch on the
lancing device.
Adjust the lancet depth to a
comfortable penetration level. Start
at 2. For tougher skin, dial to a
higher number.
Using the lancing device: By
pressing the release button, the
lancing device primes and pricks
with 1 click.
Hold the lancing device firmly
against the edge of your fingertip
and press the release button to
prick your finger.
Touch the end of the test strip to
The meter beeps and flashes
the blood drop. Do not put blood on when there is enough blood in the
top of the test strip.
test strip.
The test result appears on the
display after 5 seconds.
Prepare the lancing device for the
next test. Slide the lever over and
back once to advance to the next
lancet. The window shows the
number of lancets remaining.
If any of the error messages below appear on the display at any time,
refer immediately to the User’s Manual, Chapter 5, Display and Error
Messages.
E-1 The test strip may be damaged or not properly inserted. Remove and
reinsert the test strip, or replace it if damaged.
E-3 Your blood glucose may be extremely high or a meter or a test strip
error has occurred. If your test result matches how you feel, contact your
healthcare professional immediately. If your test result does not match
how you feel, repeat the blood glucose test. See the User’s Manual,
Chapter 2, Unusual Blood Glucose Results. If the second test result does
not match how you feel, perform a control test with the control solution
and a new test strip. If the control result is within the acceptable range,
review the proper testing procedure and repeat the blood glucose test
with a new test strip. If the E-3 code still appears for your blood glucose
test, your blood glucose result may be extremely high and above the
system’s reading range. Contact your healthcare professional
immediately. If the control result is not within the acceptable range, see
the User’s Manual, Chapter 4, Understanding Out-of-Range Control
Results.
E-4 Not enough blood or control solution was drawn into the test strip for
measurement or was applied after the test had started. Discard the test
strip and repeat the blood glucose or control test.
E-6 Blood or control solution was applied to the test strip before the
flashing drop symbol appeared on the display. Discard the test strip and
repeat the blood glucose or control test.
E-7 An electronic error occurred, or in rare cases, a used test strip was
removed and reinserted. Turn the meter off and on, or take the battery
out for 20 seconds and reinsert it. Perform a blood glucose or control
test.
E-8 The temperature is above or below the proper range for the system.
Refer to the test strip package insert for system operating conditions.
Move to an area with the appropriate conditions, wait 5 minutes, and
repeat the blood glucose or control test. Do not artificially heat or cool
the meter.
This file may not print or view at 100%.
Die lines and color breaks do not print.
E-9 The battery is almost out of power. Change the battery now. If the
message reappears after the battery has been replaced, remove the
battery again, press any meter button, then reinsert the battery.
E-10 The time and date settings may be incorrect. Make sure the time
and date are correct and adjust, if necessary.
Roche USA –51825
V4/1 –07054238001_01 – Black
Roche USA –51825
V4/2 –07054238001_01 – Cyan
Roche USA –51825
V4/3 –07054238001_01 – Magenta
Roche USA –51825
V4/4 –07054238001_01 – Yellow
Note
Contact Roche if the error message continues.
LAST UPDATE: 2013-04
Roche Diagnostics GmbH
Sandhofer Strasse 116
68305 Mannheim, Germany
www.accu-chek.com
ACCU-CHEK, ACCU-CHEK PERFORMA, and FASTCLIX are
trademarks of Roche.
© 2013 Roche Diagnostics
07054238001(01)-0713
9/9/13 1:07 PM
Advertência
Começar aqui
Guia de iniciação
1
• Este Guia de iniciação não substitui o
Manual de utilização do aparelho de
medição da glicemia Accu-Chek Performa.
O Manual de utilização contém instruções
de manuseamento e outras informações
importantes.
• O dispositivo de punção destina-se apenas
ao uso pessoal.
Botão de ejeção
Profundidade de
penetração
1
Tampa
2
2
1 cartucho de lancetas =
6 lancetas
3
Número de
lancetas
disponíveis
Avançar a lanceta
seguinte
5
3
4
Analisar o dispositivo de punção
Accu-Chek FastClix para o
conhecer.
Retirar o cartucho de lancetas da
bolsa do estojo.
4
Mensagens de erro
Realização de um teste de glicemia
Preparação do dispositivo de punção
Resumo do aparelho de medição da glicemia
Nota
Cada cartucho de lancetas contém
6 lancetas esterilizadas.
5
Retirar a tampa, puxando-a a
direito para fora. Não rodar a
tampa.
6
Advertência
Não introduzir o cartucho de
lancetas no dispositivo de
punção ao mesmo tempo que se
prime o botão de ejeção nem
manter o dispositivo de punção
com o botão de ejeção
encostado a uma superfície
como o tampo de uma mesa.
Este procedimento pode libertar
uma lanceta e causar ferimento
inadvertidamente.
Quando o utilizador estiver
preparado para testar...
1
Lavar e secar as mãos antes de
efetuar um teste de glicemia.
5
2
Verificar a data limite de utilização
no recipiente de tiras-teste. Não
utilizar tiras-teste que tenham
ultrapassado a data limite de
utilização.
3
4
Retirar uma tira-teste do recipiente Introduzir a tira-teste no aparelho,
de tiras-teste. Fechar bem a
na direção das setas, até o
tampa.
aparelho emitir um toque.
6
Aparece o símbolo da gota de
sangue a piscar.
Antes de terminar...
ou
1
6
1 Botão ligar/desligar/configurar
2 Visor
3 Botões de direção para a direita e para a esquerda
4 Ranhura de tiras-teste
5 Tampa do compartimento da pilha
6 Janela de infravermelhos (IV)
51825_07054238001_01.indd 2
Introduzir o cartucho de lancetas –
com a ponta branca primeiro –
no dispositivo de punção. Empurrar
o cartucho de lancetas totalmente,
até este encaixar.
Nota
Não retirar o cartucho de lancetas
até todas as 6 lancetas terem sido
utilizadas, uma vez que o cartucho
de lancetas não pode ser
reutilizado depois de retirado do
dispositivo de punção.
Colocar novamente a tampa no
dispositivo de punção. Confirmar
que o recorte da tampa está
alinhado com o contorno saliente
do dispositivo de punção.
Regular a profundidade de
penetração da lanceta para um
nível confortável. Começar por 2.
Para pele mais dura, regular para
um número superior.
Utilizando um dispositivo de
punção: Premindo o botão de
ejeção, o dispositivo de punção
arma e pica o dedo com 1 clique.
Manter o dispositivo de punção
Encostar a ponta da tira-teste à
firmemente contra a ponta do dedo gota de sangue. Não pôr sangue
e premir o botão de ejeção para
em cima da tira-teste.
picar o dedo.
O resultado do teste aparece no
O aparelho emite um toque e
visor após 5 segundos.
começa a piscar quando a
quantidade de sangue na tira-teste
for suficiente.
Preparar o dispositivo de punção
para o teste seguinte. Deslizar a
patilha para um lado e para o
outro para fazer avançar a lanceta
seguinte. O visor do dispositivo de
punção mostra o número de
lancetas disponíveis.
Se aparecer no visor alguma das mensagens de erro abaixo, em qualquer
altura, consultar imediatamente o Manual de utilização, Capítulo 5,
Mensagens do visor e de erro.
E-1 A tira-teste pode estar danificada ou não foi corretamente
introduzida. Retirar e introduzir a tira-teste novamente ou substituí-la, se
danificada.
E-3 A glicemia pode estar extremamente elevada ou ocorreu um erro no
aparelho ou na tira-teste. Se o resultado do teste corresponder ao que
sente, contatar imediatamente o profissional de saúde. Se o resultado do
teste não corresponder ao que sente, repetir o teste de glicemia.
Consultar o Manual de utilização, Capítulo 2, Resultados de glicemia
invulgares. Se o segundo resultado de teste não corresponder ao que
sente, efetuar um teste de controlo com a solução de controlo e uma
nova tira-teste. Se o resultado de controlo estiver dentro do intervalo
aceitável, rever o procedimento de teste e repetir o teste de glicemia
com uma nova tira-teste. Se a mensagem E-3 continuar a aparecer
quando se efetua um teste de glicemia, o resultado de glicemia pode
estar extremamente elevado e acima do intervalo de leitura do sistema.
Contatar imediatamente o profissional de saúde. Se o resultado de
controlo não estiver dentro do intervalo aceitável, consultar o Manual de
utilização, Capítulo 4, Interpretação dos resultados de controlo fora do
intervalo aceitável.
E-4 A quantidade de sangue ou de solução de controlo absorvida pela
tira-teste foi insuficiente para a leitura ou foi aplicada após o início do
teste. Descartar a tira-teste e repetir o teste de glicemia ou de controlo.
E-6 A aplicação de sangue ou de solução de controlo na tira-teste foi
realizada antes de ter aparecido no visor o símbolo da gota a piscar.
Descartar a tira-teste e repetir o teste de glicemia ou de controlo.
E-7 Ocorreu um erro eletrónico ou, em casos raros, uma tira-teste usada
foi retirada e novamente introduzida. Desligar e ligar o aparelho ou
retirar a pilha durante 20 segundos e introduzi-la novamente. Efetuar um
teste de glicemia ou de controlo.
E-8 A temperatura está acima ou abaixo do intervalo correto para o
sistema. Consultar o folheto informativo das tiras-teste sobre as
condições de funcionamento do sistema. Mudar para uma área com as
condições adequadas, aguardar 5 minutos e repetir o teste de glicemia
ou de controlo. Não aquecer nem arrefecer artificialmente o aparelho.
E-9 A pilha está quase descarregada. Substituir a pilha imediatamente.
Se a mensagem reaparecer depois de substituir a pilha, voltar a retirar
a pilha, premir qualquer botão do aparelho e voltar a colocar a pilha.
E-10 A configuração da hora e da data pode não estar certa. Verificar
se a hora e a data estão certas e, se necessário, acertar.
Nota
Contatar a Roche se a mensagem de erro persistir.
ÚLTIMA ATUALIZAÇÃO: 2013-04
Roche Diagnostics GmbH
Sandhofer Strasse 116
68305 Mannheim, Germany
www.accu-chek.com
ACCU-CHEK, ACCU-CHEK PERFORMA, and FASTCLIX are
trademarks of Roche.
© 2013 Roche Diagnostics
07054238001(01)-0713
9/9/13 1:07 PM