1
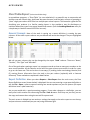
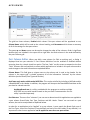
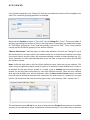
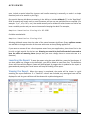
AceViewer
Catalog Viewing and Reporting
Software User Manual
Version 3.0
Table of Contents
Notice ........................................................................................ i
Overview .................................................................................. 1
Installation ................................................................................ 1
Software Registration ............................................................... 1
AAIA Vehicle Tables................................................................. 2
Launching AceViewer............................................................... 2
Main Screen ............................................................................. 2
Part Usage Report ................................................................... 6
Pivot Table Report (Professional Edition Only) ......................... 7
Notice
Winsby Group, LLC makes no warranty of any kind with regard to this material, including, but not limited to the implied
warranties of merchantability and fitness for a particular purpose. Winsby Group shall not be liable for errors contained
herein or for incidental or consequential damages in connection with the furnishing, performance, or use of this
material.
©Copyright 2012 Winsby Group LLC.
This document contains proprietary information, which is protected by copyright. All rights are reserved. No part of this
document may be photocopied, reproduced, or translated to another language without the prior written consent of
Winsby Group, LLC. The information contained in this document is subject to change without notice.
ACEVIEWER
Overview
Today, electronic catalog data for the Automotive Aftermarket is delivered primarily using XML. This
language is a wonderful way for computers to communicate, but it is less than optimal for people to
understand. AceViewer gives you the ability to translate these ACES xml coded files to flat
spreadsheets. But we didn’t stop there. AceViewer also adds the ability to generate powerful reports
such as Part Usage and “Pivot Tables” (in the Professional Edition).
Installation
The setup program is a Windows Installer package stored in a zip file and downloaded from the
AceViewer product page of our website (the trial version becomes licensed when registered). The
installer is digitally signed and should not be used if "Unknown" or has a signer other than "Winsby
Group LLC". The name of the file is:
AceViewer_Setup.msi
The End User License Agreement is displayed during installation. By using the program you agree to
the terms and conditions of the Agreement.
Running the setup program will install two shortcuts on your desktop, one for AceViewer and a
second for an ACES xml merge utility. The AceViewer icon will accept ACES xml files dropped on it.
(You may also want to Pin these to the Task Bar or Start Menu).
A shortcut to “AceViewer Samples” is created in your Documents folder and contains sample ACES
xml and pivot report definitions.
Software Registration
The program will run in a limited “Trial” mode until it is registered. When you purchase a license, you
will receive two pieces of information via email such as.
ACME Automotive (Jim Smith)
9d91d202-6ce8086c-fc571dc2-3c40ff9a
Start AceViewer and use the Help > Registration… menu to bring up a dialog screen. Copy and paste
the two lines exactly as they are delivered in the email. The OK button will become enabled when a
valid registration is found. Press OK to complete the registration process.
1
ACEVIEWER
AAIA Vehicle Tables
In order to translate the “id” numbers contained in the ACES xml file, AceViewer must use the AAIA
Vehicle and Product Category databases (VCDB & PCDB). These are available only through a
subscription with AAIA.
AceViewer requires that you download the Access (.mdb) versions of the vehicle tables. These should
be stored on your local hard drive for best performance. It can be helpful to keep multiple versions of
these tables so you can match the ACES file to the version of the tables used to create them.
When you first run the program, you'll need to open both a VCDB.mdb and PCDB.mdb database. The
program will remember these and use them in the future. You can change them whenever you get
new versions from AAIA. The version dates are shown in the status bar.
Launching AceViewer
There are several ways to open an ACES xml file for viewing: (1) Double click on the executable or
shortcut, (2) Drop an ACES xml file on the executable or shortcut, and (3) Start the program and drop
an ACES xml file on the grid.
Main Screen
When you first start the program, you will see the following screen. (Note that Columns are kept the
same for all ACES versions for consistency, making it easier for you to work with different versions).
2
ACEVIEWER
File Menu.
Before you can view an ACES xml file, you need to open both a VCdb and PCdb
database (the Microsoft Access versions) so the program can translate the id
numbers found in the xml.
The locations of these files will be remembered so you don’t need to open
them each time you start the program, but they can be changed at any time.
When opened, the “version” of each database is shown in the status bar at the
bottom of the screen.
Once you have the vehicle and part type databases open you can open an ACES file. This can be done
either from the File menu, the toolbar folder icon or by dragging a file to the main screen or on the
program icon. When an ACES file is loaded, you can use the “Export Grid…” function.
The Export function can create two different file formats: “.csv” (comma-separated values) and “.txt”
(tab-delimited). The Save As dialog (shown by
pressing the folder icon) has a “Save as type”
drop down, but the file type is actually
determined only by the file extension you
provide (.csv or .txt).
The “Include App Fingerprint (GUID)” option
gives you the ability to create a single value
(App Fingerprint) that can be used as a
primary key to identify the application
This App Fingerprint is not included in the
ACES xml file. ACES does have an app id that is
delivered, but it is not unique and usually is
just a sequential number in the xml file.
The fingerprint is actually a 128 bit MD5 cryptographic hash of all the fields on the application
(except the App id and Ref). It is not 100% statistically guaranteed that two applications won't have
the same hash, but the likelihood is extremely remote. Note that only applications in the main grid
will be exported (so any active Filters are used).
The “Generate Separate Apps for each Ref” option is only available if the file includes “ref”
attributes (usually used to point back to your source data). Some programs (such as our AceMapper
product) will combine these source id references in a comma-separated list if applications were
combined. If you select this option, it will split apart any "ref lists" (such as ref="123, 456, 789") into
rows with a single ref on each. This makes it very easy to load into a database and join to your source
data so you can see your source and the ACES matching ACES output. (The ref ids may be separated
by a comma, space or semicolon.)
The “Generate Separate Apps for each Year” option separates applications with year ranges.
3
ACEVIEWER
View Menu. This menu contains functions that change the way the currently loaded ACES file is
viewed.
Use View > Word Wrap to turn on/off in-cell word wrapping. It will adjust the
row height to the deepest one so you can see all the data. Otherwise the text
will be truncated and can only be seen by making the column width bigger. (This
can be done by dragging the right side of the header). Column widths are
remembered from one program session to another.
Use View > Separate Columns to show each ACES attribute in a separate
column instead of combining them where possible. This is a toggled feature and
will show a check-mark next to the menu item if active. In this view, vehicle attribute data is shown
raw without any “decoration” exactly as it is contained in the VCdb.
Use View > Hide Empty Columns to show only those columns that have data. This process may take
some time on large files because all of the information to the end of the file must be examined.
Double-Click or press the Enter key while on a row (or use View > Row Source...) to bring up an XML
Viewer if you want to see the raw data stored in the file for that row. You can keep this window open
(move it off the grid if you like) and it will update automatically as you navigate from one record
another.
The “Stay on Top” option guarantees that the window will
not be covered up by the main form.
Note that if an id code is not found in the database, it is
surrounded by angle brackets (for example, <345>). This can
happen if you've used an old database with a newer data
file.
Use View > Find... (or Ctrl-F) to perform a case-insensitive
search beginning after the current row. If one or more
columns are selected, only those columns will be included in
the search. If columns are selected, look at the "row
indicator" arrow in the left gutter to see which row contains
the search string. Note that the first search can be much
slower than subsequent ones.
Use View > Sort... (or Ctrl-S) to bring up a sort dialog. Move the columns you want sorted into the
right-hand list (you can multi-select). The order of the columns is significant to the sort and can be
changed with the up and down arrow buttons. The default is ascending for each column. You can
change this with the +/- button.
4
ACEVIEWER
If you check the "Move Sort Columns in Grid"
checkbox, the sort columns will be shown together
at the front of the grid.
To revert back to the natural order of the file, just
select no columns to sort by. Part Numbers are
ordered intelligently by alpha/numeric segmentation.
You can use the “Store” and “Restore” menu items
to store/restore a single sort definition from the
sort screen. A separate store/restore is available for
each of the “views” (separated or combined
columns).
View > Headers… will display a dialog like the following screen. It lets you see the Header and Footer
values included in the file. This is a read-only screen since AceViewer does not allow you to change
any data. The form is resizable and will adjust automatically to show more data.
NOTE: If MfrCode is included in the header, and it
looks like an AAIA Brand Code, it will be used as one.
Use View > Filter to temporarily limit the applications shown in the grid to only those with the
substring entered for a column. You can use View > Add a Filter to further limit the list by another
column.
Pressing the Value drop-down will load all the current data values for the selected column. This may
take some time. You can also type directly into the Value box or edit one of the existing. The filter
does not need to match the entire value in the field, so if you enter “bolt”, for example, for the Notes
column, it will limit the display to all applications that have “bolt” anywhere in the Notes.
5
ACEVIEWER
Part Usage Report
Reports > Part Usage… will open a window and show a progress bar as it builds a report showing a
compressed list of make / model / years for each part number. The part numbers are sorted with
special alpha/numeric logic so A15 sorts before A100. Only applications in them main grid will be
used in the report (so any active Filters are used).
The Save button will open a file save dialog allowing you to enter a file name. The only output format
available is csv.
6
ACEVIEWER
Pivot Table Report (Professional Edition Only)
In spreadsheet programs, a “Pivot Table” (or cross-tabulation) is a powerful way to summarize and
visualize row and column data. AceViewer borrows the name, and the basic concept of grouping to
“pivot” single part-column ACES files into multiple part column reports. This becomes a great tool for
visualizing your products in a familiar catalog layout. It also provides a way for distributors to
combine related part types from several brands and sources. (See the AceMergeBrand.exe utility for
a simple way to combine several ACES files into one).
General Concept.
Most of the work in setting up a report definition is creating the part
columns. All the other report columns are pre-defined and cannot be changed. They are highlighted
below:
STUB COLUMNS
We call non-part columns that can be changed by the report “Stub” columns. These are “Notes”,
“Position”, “Part Type” and “MfrLabel”.
One of the goals when creating a report is to compress records to show as many part numbers on the
same row as possible. All the columns to the left of the part columns must match in order for a part
to go on the same row. This can be done in two ways, (1) making similar terminology identical, and
(2) moving fitment information from the stub to the part column (optionally with a footnote
reference). These methods are explained in detail below.
Report Definition. When you select Reports > Pivot Report from the main menu, the Pivot
Report Definition screen (shown below) is displayed. You can start entering a new report definition or
use the File > Open… menu to open an existing one stored anywhere on your file system. (All report
definitions have a .pdef extension).
Just as you would with a word processing program, If you make changes to a definition, you can
easily save it with another file name using the File > Save As menu. Since they are just files, you can
also copy and rename them using the normal file system tools.
The main screen is divided into two sections: settings that apply to the entire report are on the top,
and part columns are defined (one per row) using the bottom grid.
7
ACEVIEWER
Report Name. This field can be anything that helps you identify the report and could be thought of
as the title of the report. If a new file is being saved, the file name defaults to this Report Name (but
can be overridden).
Include Unassigned Applications. This check box determines whether or not to include an additional
part column to catch any applications that are not assigned to one of the defined part columns. This
part column is always called “Catch-All” and placed at the end of the row. It is a good idea to use this
option when developing a new report so you can make sure you are not dropping any applications
you want to keep. The report will also always give you a count of the applications that were
unassigned.
Multiple Parts Separator. Select from one of the drop-down options with the default being a linefeed
(LF). The selected character will be used to separate part numbers when more than one is assigned
to the same “cell”. A linefeed works well with .csv files putting each part on its own line in the cell.
Two of the options “comma” and “semicolon” will also put a space after the separator to make them
read better.
Part Columns Grid. Part column definitions are maintained, one per row in a grid. Use the Plus
Sign (+) to add a new part column, Minus Sign (-) to delete the selected part column, the pencil icon
to Edit the selected part column (or double-click on the row) and the Copy icon to add a copy of the
selected part column as a new row at the end of the grid.
8
ACEVIEWER
The grid has three columns, Enabled which shows if the part column will be populated or not,
Column Name which will be used as the column heading, and Parameters which shows a summary
of all of the settings for that part column.
The green up and down arrows can be used to change the order of the columns. Order is significant
because they are included in the report left to right after the Stub columns in the order defined by
the part Columns grid.
Part Column Editor.
When you Add a new column (or Edit an existing one), a dialog is
displayed that lets you maintain it. Part Column definitions can be enabled or disabled without
removing them by a simple check box option. The four “tabs” on this screen correspond to the four
“Stub” columns and are used both to select which applications to include in this part column and to
make changes to the stub information as explained below.
Column Name. This field gives a unique name to the column and is used as the header for the
column in the report grid. It should represent all of the information “selected” by the column
definition (such as Brand, Part Type and Position).
AceViewer only works with branded ACES files. This can be satisfied by including a MfrCode and/or
a BrandAAIAID in the Header. In addition, the program will interpret the BrandAAIAID attribute at the
part level as a brand override.
AceMergeBrands.exe is a utility provided with the program to combine multiple
ACES files into one with brands moved to the part level. Documentation for this
utility is provided separately.
Part Selectors. There are four “selectors” you can use to determine which applications are applied to
a part column: Brand Code, Part Type, Positions and Mfr Labels. “Notes” are not used as a part
selector, but can be manipulated as explained below.
In order for an application to be “applied” to a part column, it must match the Brand Code, one of
the Part Types, one of the Positions (if any defined) and one of the Mfr Labels (if any defined). It is
important to note that an application can be applied to more than one part column.
9
ACEVIEWER
Both the “Brand” and “Part Type” part selectors are required. When you press the Brand Code
(AAIA) drop-down, the program will pause as it retrieves a unique list of all brand codes found in the
file.
.
Default Quantity. Set this field to the quantity you want to ignore (because it is the default). Every
application in an ACES file must provide a quantity, but you don’t want to show it all the time. If the
application has a quantity different from the “Default”, it will use the “Display Format” to included it
in the Part Column. The “%s” will be replaced with the quantity amount.
Part Types / Positions / Mfr Labels. AceViewer uses a similar dialog to maintain all the part selector
grids. They consist of a combo box (loaded with a unique list taken from the file when you press the
drop down) and a “Change To” text box.
If the Change To is left blank, it is a pure selector which means that the part column represents the
entire selection (in this case the “Windshield Wiper Motor” Part Type). The Part Type will be
removed from the stub column. (Be sure that the Column Name represents this value in some way).
10
ACEVIEWER
If you include something in the “Change To” field, the associated stub column will be changed to this
value. This is useful for grouping purposes. For example:
Notice that the Position to match is “Front Left”, but the Change To is “Front”. This has the effect of
splitting (or grouping) the position by Front in the stub column. Presumably, you would have another
for “Front Right” grouping on “Front”, and then possibly a pair for the “Rear”. This is a very powerful
concept and can be used to group any of the selector columns.
“Move to Part Column” check box option is used to take whatever is found in the “Change To” out of
the stub and put it in the part column. You would normally use a simple footnote number since there
is not much room in the part column. We recommend placing a number in square brackets (e.g. [5]).
These “footnotes” are also exported separately so you can have an easy way to relate the text with
the reference number.
Notes. Unlike the other tabs on the Part Column definition screen, Notes are not part selectors. This
means that your application doesn’t need to have any of the fitment notes defined here in order to
be selected for that part column. Instead, it is simply a way to translate one note terminology to
another (in case they were inconsistent or came from different sources). Notes will only translate
Note tags and Qualifiers (not Vehicle Attributes). With the Move to Part Column option, matched
notes can also be treated as footnotes and moved from the stub column to a reference in the part
column. (All comparisons are case-insensitive (ignore case), so for example, “AbC” matches “abc”).
The maintenance screen will not let you enter a Note without a Change To value because it would be
very easy to lose information about an application without realizing it. If you really want to remove a
11
ACEVIEWER
note, include a special value like <ignore> and handle removing it externally, or make it a simple
footnote (such as an asterisk or plus sign).
One special feature with Notes processing is the ability to include wildcards (*) in the “Appl Note”
field. An asterisk will match zero or more characters and you can use multiple ones as required. (For
example: *a, a*, a*b, a*b*c, etc.) You would normally use a wildcard if several notes are similar but
have a variable portion and you are not interested in keeping the detail. For example,
Requires Installation Fitting Kit 90-1090
Could be matched with:
Requires Installation Fitting Kit*
Allowing wildcards means that the order of the notes becomes significant. Green up/down arrows
are available to change the order of the notes with notes at the top being applied first.
If you want to remove all but a few important notes from your applications, place them first in the
list with a single asterisk for the last one. Warning: an asterisk by itself will match all notes and so
have the effect of removing them (except that you must change them to some stub text or a
footnote).
Launching the Report. To start the report using the open definition, press the Start button. If
you have made any changes to the definition, you will be asked to save them first. The definition
screen will close and the Report Viewer will be displayed. A progress bar is updated as the report is
generated and pressing the Cancel button will stop the loading of the report.
Viewing the Report.
When the report is completed, the results will be shown in a grid
matching the report definition. If a “Catch-All” column was included, any unassigned rows will be
displayed in red. Any part collisions will be shown with a yellow background.
12
ACEVIEWER
The screen is resizable as are the column widths. Notice that the number of Unassigned applications
and part collisions are displayed at the bottom left.
A "Collision" (indicated by a yellow fill color) is when there are two or more parts in the same cell
without "extra stuff" (quantity or footnotes) to differentiate them.
The report will run in TRIAL MODE until you purchase a Professional Edition License and enter it in
the Registration screen. The evaluation version is limited to only showing 25 rows, however the
entire file is processed so that all groupings can be completed.
The Footnotes button will show a list of footnotes defined in the report defintion and looks like the
following:
The Save button will let you export the report to either an Excel file (provided it is less than 65000
rows) or a .csv file and, if footnotes are defined, will also create a <savefile>_FN.txt file showing the
information like above.
13