1
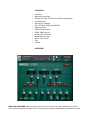
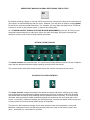
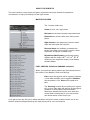
ZERO-G WHOOSH DESIGNER
USER MANUAL
“Add a whoosh, instant rush.”
CONTENTS
•
•
•
•
•
•
•
•
•
•
•
•
•
•
Overview
Whoosh Psychology
General Principle Of The Zero-G Whoosh Designer
The MIDI Keys
Saving Your Settings
GUI: ATTACK, PEAK and DECAY
Random Button
DIRECTION controls
PEAK TIME controls
Bottom Row Of Knobs
Master Effects Page
About The Presets
Tips
Credits
OVERVIEW
WHOOSH DESIGNER makes the best whoosh noises you will ever hear. Whooshes are short
noise sounds that give an instant rush of movement, excitement, anticipation and release. Placed
around an impact sound they add massive size and power. Placed under a drum fill they add an
almighty rush and a powerful transition from one section to another.
Whooshes have the power to transform all sound and music into a higher dimension of elite
amazingness. Sound design, trailer music, epic music, film scores, EDM, hip-hop, indie, rock;
whatever you are doing, adding whooshes will make it more exciting.
Not only does this product give you whooshes but it gives you the best whooshes in the world,
packaged in an extremely simple and highly controllable instrument which syncs automatically to
your DAW.
It is built from impossibly high quality raw sounds painstakingly crafted by a Professor of Sound
Design and Hollywood trailer sound professional Alessandro Camnasio, whose credits include the
trailers for Transformers: Age of Extinction, Captain America - The First Avenger, THOR and many
more.
WHOOSH PSYCHOLOGY
A whoosh sounds like an almighty big thing coming at you very quickly, such as an enemy stick,
tidal wave, train coming up behind you or a pterodactyl attack. This produces an immediate,
instinctive, evolved fight-or-flight reaction. Your heart rate increases and oxygen goes to your brain,
increasing mental alertness.
Once the immediate threat of danger has forced you to wake up and pay attention, your brain
assesses that the danger is not real, being buried in music and sound, and like the controlled fear
of a rollercoaster or horror film, the danger and fear turn to excitement.
So: add a whoosh, instant rush.
GENERAL PRINCIPLE OF THE WHOOSH DESIGNER
Every Whoosh is made up of 3 elements - ATTACK, PEAK and DECAY. These 3 elements are the
initial attack, the intense peak of the whoosh and the long release of the sound. This Whoosh
Designer instrument quickly crossfades between 3 different sounds in order to produce sonic
complexity and a very wide range of possible variations.
NOTE: The final DECAY influences the sound much more than the ATTACK or PEAK. Play with
different ATTACK and PEAK sounds and you can hear for yourself how that works.
THE MIDI KEYS
The sounds are on the blue keys spread over 16 white notes, so there are 16 different whoosh
sounds for every nki. The most recently-played note is held green.
The black notes cut off the sound, acting as a playable noise gate.
The red notes control GUI elements. The first 3 red notes control the pan DIRECTION (right to
left, central (no pan), or left to right). The next 4 red notes control the PEAK TIME (1/8th note, ¼
note, 1 bar or 2 bars) that is, the amount of time it takes for the whoosh to reach the intense peak
part of the sound.
MAIN GUI OVERVIEW
As a brief overall description, the main GUI page allows you to mix and match different sounds,
change their volumes, randomize the sounds, change the length of the whoosh, the way it is
panned, the pitch, the envelope shapes, filters and send effects (delay and reverb).
Meanwhile the moving lights give you a visual guide to the panning and peak points of the whoosh.
IMPORTANT! MAKING GLOBAL EDITS USING THE ALT KEY
By default, pressing a button or moving a GUI knob will only change the setting for the last whoosh
you played, on the last MIDI key that you used. However, you may wish to make a change global
for the whole currently loaded instrument. For example, you may want the whole set of 16 sounds
to have no reverb, or be panned centre, or have a zero decay time.
So, TO MAKE AN EDIT GLOBAL FOR THE WHOLE INSTRUMENT, press the ALT key on your
computer keyboard while you make your edit on the main GUI page. Doing this changes that
setting for every sound in the currently loaded instrument.
ATTACK, PEAK & DECAY
The black windows are sound menus. You can mix and match different sounds into the 3 different
slots, with the white downward triangles opening up menus and sub-menus.
The 3 silver knobs under each black window control the volume of that part of the sound.
IN AND OUT SLOPE CONTROLS
The slope controls change the shape of the attack and decay. Minimum settings give a steep
curved slope which would make the attack more quiet at first then suddenly loud near the peak,
and would make the decay drop suddenly after the peak then fade out slowly. The result is that
minimum settings make the attack and decay quieter but emphasize the short peak part of the
sound. Conversely, maximum settings give a straight slope, meaning the attack starts sooner and
is less pronounced, and the decay takes longer to drop down.
The upshot is that minimum settings sound more quiet but have more emphasis on the peak.
Maximum settings are more loud generally but the peak part of the sound doesn’t jump out so
much. As always, try it and listen for yourself.
DIRECTION BUTTONS
The DIRECTION buttons alter the way the whoosh is panned. The 3 options are a right to left pan,
no pan (a wide central sound) or a left to right pan. For whooshes, this fast panning gives a very
strong sense of rapid movement, but a static wide central sound can be great too because it
carries a lot of power. So, choose the option that goes best with your music or visuals!
These buttons can also be selected using the red key switches on your MIDI keyboard (C5 to D5)
so changes can be sequenced.
PEAK TIME BUTTONS
The PEAK TIME buttons control the time (in bar divisions) from the time a key is triggered to the
peak point of the whoosh. This is extremely important for whoosh sounds because you will usually
want the peak to land precisely on a particular beat or bar start. It is synced to your sequencer
tempo. 1/8 is an 8th note, 1/4 is a quarter note, 1 is 1 bar and 2 is 2 bars.
As with the DIRECTION, 4 of the red MIDI key switches can be used to control and change these
settings live or in a sequence notes E5 to A5.
RANDOM BUTTON
This magic button loads a random set of sounds into the slots on the last-played key, offering you
an endless set of fantastic new sounds to play with.
Beware though doing this wipes out whatever was on that key so make sure you save your nki
under a new name if you want to keep your previous creations.
BOTTOM ROW OF KNOBS
This row gives you a lot of control over the sound on your last-played MIDI key-pair, because the
settings only affect that sound - they are not global for the whole keyboard.
VEL is the velocity sensitivity. Low levels give you a loud sound with a gentle keyboard hit.
F is the filter cutoff
Q is the Filter Q, aka resonance.
V/F is the velocity to filter map. High settings make the velocity affect the filter cutoff a lot, but you
can only hear that if the F (filter) has a low setting.
ENV/F is the envelope to filter map. This controls how much the filter rises at the peak point of the
whoosh. Like V/F the effect is more audible with lower F (filter) settings.
TUNE - pitch of course! These whooshes sound great with low and high pitches. High pitches give
more of a high speed quality to the whoosh.
DEC This controls the decay time of the sound after the peak. A zero setting will stop the sound
dead when it hits the peak a useful effect for reverse type sounds.
REL - Length of the release after you stop playing the key
Bottom row:
DEL and REV - These are the individual DELay and REVerb sends just for the last played sound.
To make a difference, the delay and/or reverb effects need to be switched on on the MASTER FX
page.
MASTER FX takes you to the other GUI page, the MASTER EFFECTS page
MASTER EFFECTS PAGE
These are global effects, which will affect every sound currently loaded on the whole keyboard.
This will all be obvious enough if you've used effects before, which you have!
The top 3 effects (DRIVE, COMPRESSION and FILTER) are all INSERT EFFECTS while DELAY
and REVERB are SEND EFFECTS. Delay and Reverb send levels are controlled separately for
each sound back on the MAIN page.
The GATER is a simple rhythmical noise gate, where you can control the speed (RATE), DEPTH
(amount of gating) and WIDTH (the size of the gaps being chopped out of the sound). The dots
between the RATE numbers represent triplets.
SAVING YOUR SETTINGS
If you've made some great noises, you should re-name the nki and save it, to keep it for posterity.
True, your changes will also load as part of your DAW project but you really should save it to a new
nki if you made some good noises - you’ll want to load them back up again on future projects!
ABOUT THE PRESETS
The user interface is very simple, but plenty of presets have been created for speed and
convenience, to help you instantly find the right sounds.
MASTER FOLDERS
The 7 master folders are:
Clean for pure, rich, big sounds.
Detuned are the same sounds but pitched lower.
Distorted has versions with some extra crunch
power.
High Speed are just pitched up versions which
make the whooshes feel very fast.
Reverse Stops are suddenly cut dead at the
height of the peak so are good to use as a short
rise before an impact or sudden stop.
Rhythmical (Mod Speed) sounds have gated
rhythms with the tempo (32nd, 16T, 16th, 8T, 8th
divisions of the sequencer tempo) controlled by
the Mod Wheel.
FAST, MEDIUM, SLOW and PANNING variations
When you look at the preset names they have these terms in
the names: Fast, Medium, Slow and Panning.
Fast means the whoosh will hit a peak of intensity
¼ note after the MIDI note is triggered. Medium
hits the peak at 1 bar. Slow hits the peak at 2
bars.
The ‘Panning’ sounds all pan quickly from right to
left, or left to right while the whoosh is playing and
creates a lot of movement and excitement.
Whooshes without panning are more wide and
central. Both sound great so you need to listen
and decide which is best for the job.
If you get to know the GUI you’ll realize that these are just the same sounds but with one or two
knobs or buttons changed and they are really there just for your convenience.
BRIGHT, EPIC, MIXED, NOISE and SYNTHETIC sounds
These words come up in most of the presets: Bright, Epic, Mixed, Noise and Synthetic. Mixed
whooshes have a random combination of different types of sound. With Bright, Epic and Synthetic,
different raw underlying sounds have been grouped together make a collection that all share
certain properties.
In fact each nki with 16 notes is really a set of 4x4 sounds side by side. If you play through one of
these nkis you will hear how the sound changes every 4 notes up the keyboard, and you will see
on the black menu boxes how each set of 4 sounds is drawn from a different category menu. This
is easier to follow just by playing, listening and looking than reading here.
TIPS
There are some great presets included which show the wide range of different sounds that can be
created with very simple tools. However, every track is different and you will get the best results
by creating your own customised sounds and settings that better fit your track.
For example, you might want to ditch the reverb so you can use your superior reverb sounds, or
have them sounding more dry.
You might want to extremely detune everything by dropping the master instrument Tune knob
from 0 anything down to -36 semitones (3 octaves) or up from 0 to +36 to create small fast sounds.
You might want to trigger many sounds together to get a very rich noise sound (but lower the
volume if so!).
Above all, just move the knobs, press RANDOM and remember: add a whoosh, instant rush.
Enjoy!
Dan Graham
CREDITS
Alessandro Camnasio….Sound Designer
Adam Hanley……………Scripter
Dan Graham…………….Producer
©Xfonic Ltd / Zero-G Ltd