1
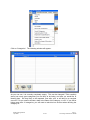
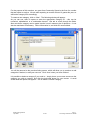
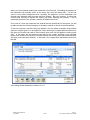
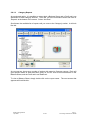
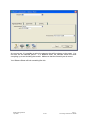
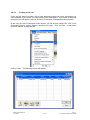
April
2.6
Additional Topics
2.6.1
Category/Job Costing
Many organisations receive grants from various sources, many of which require regular
acquittals as per the grant agreement put in place at the time. An optional facility exists
in MYOB to enable the organisation to generate reports showing the acquittal of each
grant (or activity). This can be broken into two distinct areas – Job Costing, and
Category Costing.
By coding each revenue and expense item to a particular ‘job’ or ‘category’ (i.e. grant), it
is possible to keep a track of revenues and expenses pertaining to each grant. MYOB
allows you to print off a Profit and Loss Statement for each ‘job’ (or grant), and a Balance
Sheet and Profit and Loss Statement for each Category. While this sounds fairly
complex, once the concept is understood you will have no troubles applying this function.
2.6.1.1
Category Costing
Category costing is potentially more useful than Job Costing in that it is possible to
produce both a Balance Sheet and a Profit and Loss Statement for each individual
category that is set up – a very useful feature under certain circumstances. Ideally, for
each grant that is received by your organisation, if an acquittal is required, there should
be a category code set up for it, allowing all transactions pertaining to that grant to be
tracked.
To activate the Category Costing option, first go to the Command Screen of MYOB.
Along the very top of the window you will see the words ‘File’ ‘Edit’ ‘Lists’ ‘Command
Centres’ ‘ Setup’ ‘Reports’ ‘Window’ and ‘Help’. Clicking on each of these will cause a
drop down menu to appear. Click on ‘Setup’. The following menu will appear:
Now click on ‘Preferences’. The following window will open:
MYOB Training Manual
April 2006
2-132
Part 2:
Processing Transactions in MYOB
As you can see, this is the place to set up security measures, and alert MYOB to your
various preferences within each of the modules. For now, we will concentrate on the tab
called ‘System’. Read through the window – you will notice that for Category costing to
function, a tick must be placed beside that option. It is also possible to request that
Categories be either required or not required for each transaction entered. Leave this at
‘Not Required’, because there will be transactions entered for which there will not need to
be a category added. Click ‘OK’ when you have finished.
You will be returned to the Command Centre. At this point you will notice no changes –
these will be apparent only when you enter your first purchase, sale, or bank transaction.
For the following example, we will assume that you have received a grant from Community
Sports for $100,000.00 + GST. Community Sports require a full acquittal on this grant, and
so we will set up a category code for it to be assigned to.
2.6.1.2
Creating a Category List
Categories can be added during the course of transaction processing, and this will be
explained shortly – however, if you have an idea of how you want to organise your
category listing, this list can be created in advance.
To do this, start at the Command Centre screen. Along the top of the window are the
words ‘File’ ‘Edit’ ‘Lists’ ‘Command Centres’ ‘Setup’ ‘Reports’ ‘Window’ and ‘Help’.
Clicking on each of these will cause a drop down menu to appear. Click on ‘Lists’. The
following menu will appear:
MYOB Training Manual
April 2006
2-133
Part 2:
Processing Transactions in MYOB
Click on ‘Categories’. The following window will appear:
As you can see, it is currently completely empty. This can be changed! Think carefully
about how many grant categories you are likely to be listing, and how you would like to
identify them. Are they likely to be repeated, year after year, or will they be a complete
once-off? Do you need to include a date in the name of the category, or not? If you will be
listing more than 10 categories, you will need to take this into account when devising the
category ID.
MYOB Training Manual
April 2006
2-134
Part 2:
Processing Transactions in MYOB
For the purpose of this exercise, our grant from Community Sports is the first of a number
that we expect to receive. We are also expecting to receive at least 12 grants this year, so
will list the category ID’s accordingly.
To create a new category, click on ‘New’. The following window will appear:
As you can see, there is space to enter the appropriate Category ID – this can be
numerical, alphabetical, or a combination thereof. Use tab to move through the fields.
Also note that a category can be made ‘Inactive’ once it ceases to be of relevance – it can
also be reactivated if necessary. Fill the information in, and click OK once finished.
You will be returned to the previous listing screen, which will allow you to continue to add
categories if desired, or edit your new one. Click ‘close’ when you have finished.
It is possible to delete a category if you need to – simply hover your mouse arrow over the
category you wish to remove, and click the right side button on your mouse. A small
screen with two options will appear – one of which is ‘Delete Category’.
MYOB Training Manual
April 2006
2-135
Part 2:
Processing Transactions in MYOB
2.6.1.3
Entering Transactions using Categories
We will now enter the receipt of the grant mentioned earlier. In MYOB, this is a Sale
transaction, so go to the Command Centre, and click on the Sales icon, then on ‘Enter
Sales’. The following screen will appear:
Although the window looks the same as usual, you will notice that an extra option is now
available at the bottom right hand of the screen. You will be able to select a category once
you have entered the customer name. Fill out the window as usual, with all the details of
the sale. Using the example of the $100,000 + GST grant from Community Sports, our
completed window will look something like this:
MYOB Training Manual
April 2006
2-136
Part 2:
Processing Transactions in MYOB
You will notice that the category section at the bottom of the window has been filled in. To
do this, simply click on the drop down menu arrow to the right of the field. A window
showing all of the available categories will appear, allowing you to select the relevant one.
If the category you require is not shown, you can create a new one right then and there.
The window will look like this:
Simply click on ‘New’, and a window which will allow you to fill in the relevant details will
appear.
MYOB Training Manual
April 2006
2-137
Part 2:
Processing Transactions in MYOB
When you have finished entering the transaction, click ‘Record’. Recording the payment of
the transaction will normally occur on the same day, using the same date. You will not
need to worry about categories when recording the payment, as this information has
already been selected when the sale was first entered. Be sure, however, to select the
correct bank account to deposit the money into when entering the payment – this is
particularly relevant if you operate a number of different accounts.
From now on, when any expenses are entered that are specifically for that grant, you will
be able to select the relevant category in the same manner as shown for this transaction.
To be truly accurate, and this really only applies if you are aware of exactly what projects
(jobs) the original grant is to be applied to, when entering the original Sale transaction for
the grant, the monies can split to show exactly how much will be applied to each project
(job). In this case, the two amounts can then be job costed, allowing a very accurate
report to be produced for each job, showing exactly how much money has been allocated,
and how much has been retained. In this case, your original Sale transaction would look
like this:
Job costing will be explained in Section 2.6.1.4.
MYOB Training Manual
April 2006
2-138
Part 2:
Processing Transactions in MYOB
2.6.1.4
Category Reports
As mentioned earlier, it is possible to extract both a Balance Sheet and a Profit and Loss
Statement for each category entered. To do this, go to the Command Centre and click on
‘Reports’ at the bottom of the screen. Select ‘Accounts’.
Scroll down the available list of reports until you come to the ‘Category’ section. It will look
like this:
As you can see, there are a number of options with regard to Category reports. Each will
give specific details of what has been going on, but for now we will concentrate on the
Balance Sheet, and the Profit and Loss Statement.
To view a Balance Sheet, simply double click on the report name. The next screen that
appears will look like this:
MYOB Training Manual
April 2006
2-139
Part 2:
Processing Transactions in MYOB
As you can see, it is possible to select the category that will be shown on the report. You
can also set the selected period – in a Balance sheet, the selected month will show
everything up to and including that month. Make sure that the financial year is correct.
Your Balance Sheet will look something like this:
MYOB Training Manual
April 2006
2-140
Part 2:
Processing Transactions in MYOB
As you can see, the category ID and name is shown at the top of the report, allowing you
to see accurately exactly what the report is referring to. This report is obviously shorter
that your full Balance Sheet, as it is only showing those transactions which have been
coded to that category.
If you want to print the report, simply click on the ‘Print’ button at the bottom of the report
window. To exit the report, click ‘close’.
To view a Profit and Loss Statement, again double click on the report name in the report
index. The following screen will appear:
MYOB Training Manual
April 2006
2-141
Part 2:
Processing Transactions in MYOB
Unlike the Balance Sheet, a Profit and Loss Statement will allow you to view just one
month of transactions, or for several months. Select the months that you wish to view, and
make sure that the Financial Year is correct. Click ‘Display’. The report should look
something like this:
MYOB Training Manual
April 2006
2-142
Part 2:
Processing Transactions in MYOB
If you with to print the report, click ‘Print’ at the bottom of the report window. To close the
report, click on ‘Close’.
2.6.1.5
Job Costing
Job Costing is similar to Category Costing, but with an important difference. You cannot
view a Balance Sheet for a Job, and for this reason, is not quite as useful in this sense.
However, from the point of view of a nonprofit organisation, where multiple projects,
service programs or exercises will be accomplished with the money from one grant, job
costing will be very useful, especially if each project requires its own acquittal.
As we covered in the previous section on Categories, it is possible to set up any number of
categories. It is also possible to set up a huge number of jobs – if planned carefully, these
can be numbered to be a subset of each grant that they are attached to.
We will continue with the example of the Grant previously used in the Category Costing
section. This was for the sum of $100,000 from Community Sports, allocated to Category
01-100. Assume that there are 2 projects to be funded by this one grant – one for
$60,000, another for $40,000. A ‘Job’ code can be set up for each project, so that as
expenses are allocated to each project, they can be both job costed, and categorised.
MYOB Training Manual
April 2006
2-143
Part 2:
Processing Transactions in MYOB
2.6.1.6
Creating a Job List
There are two ways to create a list of jobs, depending upon how much information you
have available to you before you start inputting your transactions. If you know exactly how
many jobs you will require, jobs can be set up in advance of transactions being entered.
At the very top of the Command Centre screen, you will find the words ‘File’ ‘Edit’ ‘Lists’
‘Command Centres’ ‘Setup’ ‘Reports’ ‘Window’ and ‘Help’. Click on ‘Lists’. A drop down
menu will appear, looking like this:
Click on ‘Jobs’. The following screen will appear:
MYOB Training Manual
April 2006
2-144
Part 2:
Processing Transactions in MYOB
As you can see, it is possible to list a number of jobs. To create a new one, click on ‘New’.
The following window will appear:
The job, when filled out, will look something like this. As you can see, the Job Number is
based on the category that it will ultimately be linked to, and the title of the job also reflects
the original grant/category. Of course, it is possible to name and number your jobs in any
way that makes sense to you – careful thought will make this facility an excellent way to
track a grant, and provide the necessary acquittal forms. When you have finished filling
out the information, click OK.
You will now be returned to the previous screen, allowing you to create more jobs as
necessary. It is also possible to delete or edit any of these jobs at this screen – to delete a
job, hover the mouse arrow over the job to be deleted, and click once with the right button
on the mouse. Choose the relevant option.
Jobs can also be made Inactive when they are no longer being used, or reactivated if
necessary. This can be done in much the same way as deleting a job – simply hover your
mouse arrow over the selected job listing, right click with the mouse, and choose the
relevant option.
When you have finished creating or rearranging the jobs, click ‘Close’.
returned to the Command Centre.
You will be
2.6.1.7 Entering a Transaction using Job Costing
To enter a transaction using job costing, go to the usual ‘Enter Purchases’ or ‘Enter Sales’
screen, depending upon which is relevant. This can be found when you click on the
‘Purchases’ or ‘Sales’ icon on the Command Centre.
Enter the information for your purchase as usual. For the following example, we will enter
a purchase, one that is relevant to our created Job #01-101 – the purchase of 10 new
cricket balls for the new season. Your screen will look like this:
MYOB Training Manual
April 2006
2-145
Part 2:
Processing Transactions in MYOB
At this point, you can enter the relevant Job Code. To do this, click on the drop down
menu arrow to the right of the Job field. A window will appear, showing all available jobs,
looking like this:
Now you can select the relevant job. Do this by double clicking on the selected job, or by
clicking on the heading once, and then on ‘Use Job’ at the bottom right of the window. The
job will now be filled in.
If you then go on to link the expense to a category as well, choose the relevant category at
the bottom right of the ‘Enter Purchase’ window. Your finished screen will look like this:
MYOB Training Manual
April 2006
2-146
Part 2:
Processing Transactions in MYOB
Notice that both the job and category fields have now been filled in. Be aware, as well,
that ‘Job’ does not have to be filled in. If the purchase that you are entering does not need
this kind of distinction, MYOB will accept the entry with neither Job nor Category
information.
2.6.1.8
Job Reports
Once a number of entries have been made, it is possible to obtain a number of different
reports for Job costing. To view these, click on ‘Reports’ at the bottom of the Command
Centre, and choose ‘Accounts. Scroll down through the options until you come to the
‘Jobs’ Section. It will look like this:
MYOB Training Manual
April 2006
2-147
Part 2:
Processing Transactions in MYOB
As you can see, there are a number of available options. To view a Profit and Loss
Statement, double click on the report name, and then make the relevant selections. Your
screen will look like this:
Select the job from the list available when you click on the drop down menu arrow to the
right of the field. If wishing to view only one job, ‘un-tick’ the others available. Select the
months that you wish to view the transactions for, and then make sure that the financial
year is correct. Click ‘Display’. Your report will look something like this:
MYOB Training Manual
April 2006
2-148
Part 2:
Processing Transactions in MYOB
As you can see, the Job ID and name are shown at the top of the report, so that you can
see easily what the report relates to. This report looks a little bare – very little information
has been added – but you get the idea. If a job has been linked to a category, this kind of
report will allow you to quickly see exactly what the expenses and revenues in the Profit &
Loss Statement for the category are broken up into.
If you want to print the report, click ‘Print’ at the bottom of the window. To close, simply
click ‘Close’.
MYOB Training Manual
April 2006
2-149
Part 2:
Processing Transactions in MYOB
2.6.2
Finding Transactions
Occasionally it will be necessary to locate transactions that have taken place in the past.
There are two ways to do this.
Option 1:
At the bottom of the Command Centre, you will find the following words: ‘To Do List’;
‘Find Transactions’; ‘Reports’; and ‘Analysis’. For the purpose of this section, we will
focus on ‘Find Transactions’. Note that the wording at the bottom of the screen remains
the same, regardless of which option you have chosen from the Command Centre. Click
on the wording ‘Find Transactions’.
This will bring up the following screen:
As you can now see, it is possible to search one of several options.
(a)
searching by Account allows you to pull up the transactions coded to any
account from the Chart of Accounts, within the date range of your choice.
Simply click on the ‘Account’ Tab at the top of the window, enter the account
code, or choose it from the drop down menu and select the dates that you
wish to view entries between.
(b)
searching by Card allows you to view all transactions attached to a particular
card – these can be coded to many different accounts, again within the date
range of your choice.
(c)
searching by Item will only work if you have set up the Item database – for
more information on this, please consult the MYOB User’s Manual
accompanying your software.
MYOB Training Manual
April 2006
2-150
Part 2:
Processing Transactions in MYOB
(d)
searching by Invoice allows you to search by the sales invoice that the
organisation has issued.
(e)
searching by Bill allows you to search by suppliers invoice numbers, provided
you have recorded these when recording any purchases.
(f)
searching by Category will only work if this has been set up. For more
information on this, please see Section 2.6.1 ‘Category/Job costing’.
(g)
searching by Job will only work if this has been set up. For more information
on this, please see Section 2.6.1 ‘Category/Job Costing’.
(h)
searching by Payroll Category allows you to see what transactions have
been entered against any of the categories set up when the employee cards
were set up. Again, these can all be accessed by means of the drop down
menu, and within certain date ranges.
Option 2:
The second way to find a transaction is to access all of these options by using the options
at the very top of the screen under ‘File; Edit; Lists; Command Centres’ etc.
To do a search, click on the word ‘Command Centres’, and choose from the drop down
menu which area you wish to search in – for example, Accounts. Your screen should
look something like this:
MYOB Training Manual
April 2006
2-151
Part 2:
Processing Transactions in MYOB
Once you have chosen ‘Find Transactions’, you will be thrown into the ‘Account’ search
option – however, from this point, you can choose to use any of the search options – the
results will all be the same.
TIP:
Which method you choose depends purely on personal
preference – the results are exactly the same.
2.6.3
Using the Card File
The Card File section is where MYOB stores the supplier, customer, employee and
personal information that has been previously entered. The ‘Card File’ feature is used to
store new information, set up employee cards, or manage and update information
currently held there.
While MYOB 15+ does not allow you to view all transactions attached to the card, it does
allow you to view any outstanding amounts owing – either as an accounts payable, or as
a receivable, whichever may be relevant. It only allows you to access basic information
such as address, and so on. To view Transactions, see Section 2.6.2.
Generally speaking, it is unnecessary to delete old cards. Past information can be very
useful to keep, as you never know when you may need it again. If recent transactions
are attached to the card, it will be impossible to delete it anyway – MYOB will not allow
you to. If you do not want a card used, your best option will be to make it ‘inactive’ – this
will be explained later. In the case of an employee card, the card can be made inactive,
and a termination date entered for good measure.
When at the Command Centre, click on the ‘Card File’ icon. The following screen will
appear:
MYOB Training Manual
April 2006
2-152
Part 2:
Processing Transactions in MYOB
As you can see, there are a few options available to us here – however, we will
concentrate on the ones offered in ‘Cards List’. Click on the words ‘Card List’.
The following options will appear:
MYOB Training Manual
April 2006
2-153
Part 2:
Processing Transactions in MYOB
As you can see, a number of searching options are now available. By selecting ‘All
Cards’ you will get a complete list of all cards entered, regardless of whether they are
inactive or not.
To view the further information attached to a particular card, simply double click on the
zoom arrow to the left of the name, or on the name itself. You will then be able to edit or
add to any information already on the card.
If you have a large number of cards entered, you can search alphabetically. Simply click
on the box beside the word ‘Search’, and type the name (or approximate name) required
– MYOB will take you to the alphabetical listing, allowing you to make your choice.
Alternatively, if you have a large number of cards entered, and you know exactly whether
the required one is for a customer, supplier or employee, simply click on the appropriate
tab at the top of the window, and then type the name into the search section.
Once you have made your changes to the card, simply click ‘OK’ at the bottom of the
card window.
2.6.4
Making a Card Inactive
An inactive card can be viewed and entered whilst in the ‘Card File’ section, but not in
any other part of MYOB. This is particularly useful if you have a supplier that is no longer
to be used but you wish to retain their information, or an employee who has moved on,
and is to no longer receive a pay cheque, but will require contact at later stages – to
have their PAYG Payment Summary posted out…
To make a card inactive, simply go into the Card File section, select the card, and tick
the box marked ‘Inactive Card’, to the top right of the window. The following message will
appear:
As you can see, it is possible to ‘reactivate’ the Inactive card. To get rid of the message,
simply click OK.
If you want the card to remain inactive, make sure the box is still checked, and click ‘OK’
at the bottom of the card window. You will be returned to the main screen.
MYOB Training Manual
April 2006
2-154
Part 2:
Processing Transactions in MYOB
2.6.5
Help
Unfortunately it is beyond the scope of this manual to provide detailed instructions on
every MYOB function, and for this reason we would like to direct your attention to
another aid to assist you. MYOB has a very useful ‘Help’ function built into the software.
It is very similar to the Microsoft Office Help system, and is relatively easy to navigate
around. To access the help command, click on the ‘Help’ button on the top right hand
corner of the menu at the top of the screen.
You have also been provided with a basic MYOB manual with your software. This is
another very helpful resource, and worth a look.
MYOB Training Manual
April 2006
2-155
Part 2:
Processing Transactions in MYOB