1
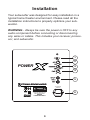
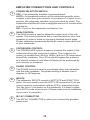
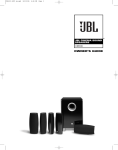
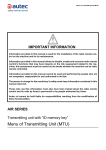
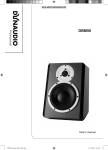
USER’S MANUAL
POWER
XV30
XS30
SUBWOOFERS
XV15 XS15
AVIS:
CAUTION:
FOR CONTINUED PROTECTION AGAINST RISK OF FIRE,
REPLACE ONLY WITH SAME TYPE FUSE AND RATING.
The lightning flash with arrowhead symbol is intended
to alert the user to the presence of uninsulated “dangerous voltage” within the product’s enclosure that may
be of sufficient magnitude to constitute a risk of electric
shock to persons.
The exclamation point symbol is intended to alert the
user to the presence of important operating and maintenance (servicing) instructions in the literature accompanying the subwoofer
IMPORTANT SAFETY INSTRUCTIONS
1.
2.
3.
4.
5.
6.
7.
8.
9.
10.
11.
12.
13.
14.
15.
16.
17.
Read Instructions - All safety and operating instructions should be read before the
subwoofer is operated.
Retain Instructions - The safety and operating instructions should be retained for
future reference.
Heed Warnings - Adhere to all warnings on the subwoofer and in the operating instructions.
Follow Instructions - All operating and use instructions should be followed.
Water and Moisture - The subwoofer should not be used near water. Examples: near a
bathtub, kitchen sink, in a wet basement, near a swimming pool or similar areas.
Carts and Stands - The subwoofer should only be used with a cart or
stand recommended by the manufacturer. When a cart is used, use
caution when moving the cart/subwoofer combination to avoid injury
from tip-over.
Ventilation - The subwoofer should be situated so that its location or position does not
interfere with its proper ventilation. Do not place the subwoofer in a cabinet or bookcase that may impede the flow or air through ventilation openings.
Heat - The subwoofer should be situated away from heat sources such as radiators,
heaters, heat registers, stoves, or any other device that produces heat.
Power Sources - The subwoofer should be connected to a power supply only of the
type described in the operating instructions or as marked on the subwoofer.
Power Cord Protection - Power supply cords should be routed so they are not likely
to be walked on or pinched by items placed upon or against them, paying particular
attention to cords at plugs, convenience receptacles, and the point at which they exit
from the subwoofer.
Cleaning - The subwoofer should only be cleaned with a dry cloth.
Non-Use Periods & Lightning Storms - The power cord of the subwoofer should be
unplugged when left unused for a long period of time or during a lightning storm.
Caution - Do not defeat the safety purpose of the polarized or grounding-type plug.
A polarized plug has two blades with one wider than the other. A grounding type plug
has two blades and a third grounding prong. The wide blade or the third prong are
provided for your safety. If the provided plug does not fit into your outlet, consult an
electrician for replacement of the obsolete outlet.
Object and Liquid Entry - Care should be taken so that objects do not fall and liquids
are not spilled onto the subwoofer.
Only use attachments/accessories specified by the manufacturer.
Damage Requiring Service - The subwofer should be serviced by qualified service
personnell when: the power supply cord or plug has been damaged, objects have
fallen or liquid has been spilled into the subwoofer, the subwoofer has been exposed
to rain, the subwoofer does not appear to operate normally or exhibits a change in
performance.
Servicing - The user should not attempt to service the subwoofer beyond what is
described in this manual or manufacturer supplied instructions.
Welcome to the Power Sound Audio family.
We are very excited to welcome you to the Power Sound
Audio family. We would like to take this time to congratulate
you on your purchase of a POWER
subwoofer. We are
confident that the Power Sound Audio subwoofer will meet
and possibly exceed your expectations.
WARNING!
To prevent fire or shock hazard, do not expose this equipment to
rain or moisture. To avoid electrical shock, do not remove the driver or amplifier from the enclosure. Please read all warnings on the
subwoofer’s amplifier. There are no user serviceable parts inside
the subwoofer. Please refer all service questions to techsupport@
powersoundaudio.com.
Table of Contents
Unpacking................................................................6
Placement................................................................7
Installation................................................................9
Warranty.................................................................14
Please read before unpacking your subwoofer.
We suggest unpacking your Power Sound Audio subwoofer on a
carpeted floor. This will avoid accidental scratches to a hard surface or to the subwoofer as you remove it from the shipping box.
Your Power Sound Audio subwoofer may be very heavy. Please
find assistance when needed, and be sure to use all proper lifting
methods during the unpacking process (and whenever you move
the subwoofer).
5
Unpacking
Unpacking Process (XS15, XV15, & XS30 ONLY)
1. Inspect the shipping box for any damage. If you notice any
damage please contact us at [email protected].
2. With assistance, place the subwoofer upside down, so the UP
arrows are pointing at the ground.
3. Carefully cut the tape on the bottom (now facing up) of the box
with a knife or other sharp object. Be very careful not to cut too
deep because you will damage the bottom of the subwoofer.
4. Fold back the cardboard flaps so the bottom of the enclosure
is completely exposed. You can leave the foam corners in
place if you prefer.
5. With assistance, rotate the shipping box so the open side of
the box is now facing the floor. Make sure to keep the cardboard flaps folded back so they do not end up under the
subwoofer.
6. With assistance, lift straight up on the shipping box to reveal
your subwoofer.
7. Remove the plastic bag.
8. Remove and retain the foam packaging, the plastic covering,
and the shipping box.
9. Visually inspect the subwoofer for any damage. If you notice
any damage please contact us at support@powersoundaudio.
com.
Unpacking Process (XV30 ONLY)
1. Inspect the shipping box for any damage. If you notice any
damage please contact us at [email protected].
2. Carefully cut the straps that secure the subwoofer to the pallet.
3. With assistance, lift straight up on the shipping box to reveal
your subwoofer.
4. With assistance, lift your subwoofer out of the shipping box
and place it on a carpeted floor or blanket to prevent damage.
5. Remove the plastic bag.
6. Remove and retain the foam packaging, the plastic covering,
and the shipping box.
7. Visually inspect the subwoofer for any damage. If you notice
any damage please contact us at support@powersoundaudio.
com.
6
Placement
Proper placement of your new Power Sound Audio subwoofer is
very important. Bass frequencies are non-directional, meaning
the human ear cannot locate a properly functioning subwoofer
in a typical home theater environment. While there are “rules of
thumb” regarding placement options, every room is a little different. Please remember that each time you move the subwoofer
to a different location you should recalibrate the bass levels and
experiment a little to ensure the phase setting is optimized.
Corner placement tends to work well, particularly if there are no
large openings into the room near the corner. Another popular
placement option is “nearfield”. Place the subwoofer as close
as possible to the key seating positions. For example, place the
subwoofer directly behind the sofa. Every room has its own set of
acoustical challenges, so experiment with different placement options as much as time allows.
One method that often works well (particularly if the key seating
positions are in close proximity to one another) is to place the subwoofer in your key seating position and then walk around the room
while a variety of bassy music and film play through the system.
Mark the top 2 or 3 spots where the bass seems to sound best,
then try the subwoofer in those spots. If you purchased a ported
Power Sound Audio subwoofer (XV15 or XV30), please maintain
a minimum of three inches of clearance between the port opening
on your subwoofer and the nearest wall or obstruction.
If you are using more than one subwoofer, placing them as close
as possible (collocate) to one another will give you the maximum clean output capabilities, but separating them may give you
smoother overall bass response at your seating positions. Again,
experiment as much as time allows and decide which option
sounds best to you.
7
Corner placement away from large opening
Nearfield placement
Multiple subwoofer placement
Option 1 (collocated)
Option 2
8
Installation
Your subwoofer was designed for easy installation in a
typical home theater environment. Please read all the
installation instructions to properly optimize your subwoofer.
WARNING - Always be sure the power is OFF to any
audio component before connecting or disconnecting
any wires or cables. This includes your receiver, processor, and subwoofer.
1
2
POWER
3
LFE
4
5
100-120V/220-240V
~50/60Hz 6.3A
AVIS:
CAUTION:
6
FORC ONTINUED PROTECTION AGAINST
RISK OF FIRE, REPLACE ONLY WITH
SAME TYPE FUSE AND RATING.
ATTENTION:
UTILISER UN FUSIBLE DE RECHANG E
DE MEME TYPE ET CALIBRE.
9
FUSE T6.3A L 250V
AMPLIFIER CONNECTIONS AND CONTROLS
1
POWER SELECTOR SWITCH
OFF = The subwoofer amplifier is powered down.
AUTO = Automatically powers up the subwoofer amplifer when
a signal is sent from your receiver or processor. If a signal is not
present, the subwoofer amplifier is put into stand-by mode. The
subwoofer amplifier will draw a negligible amount of current while
in stand-by.
ON = Turns on the subwoofer and leaves it on.
2
GAIN CONTROL
The GAIN control is used to adjust the output level of the subwoofer. This control should be set to a similar level as your loudspeakers in order to achieve a properly blended sound stage.
Proper calibration procedures should be used to adjust the level
of your subwoofer.
3
CROSSOVER CONTROL
The CROSSOVER control is used to minimze the output of the
subwoofer above the crossover’s setting. The crossover frequency is variable from 40Hz to 150Hz, with an LFE mode when
turned fully clockwise. The LFE mode will bypass the subwoofer’s internal crossover and allow all filtering to be performed by
your receiver or processor.
4
PHASE CONTROL
The PHASE control is used to acoustically align the subwoofer
with the main speakers. The phase setting is variable from 0
degrees to 180 degrees.
5
INPUTS
The subwoofer INPUTS consist of LEFT/LFE and RIGHT RCA
jacks. You only need to use the LEFT/LFE connection if you are
using a receiver or processor with an LFE or subwoofer output.
You can use a Y-connector on the subwoofer if it doesn’t power
up in AUTO mode at low levels. (Please make sure to recalibrate
if you use a Y-connector.)
6
IEC AC CONNECTOR
The IEC AC CONNECTOR is where you connect the provided
power cord.
10
CONNECTING YOUR SUBWOOFER
WARNING - Always be sure the power is OFF to any audio component before connecting or disconnecting any wires or cables.
This includes your receiver, processor, and subwoofer.
Connecting your new subwoofer is relatively easy as long as you are
using a modern DD/DTS 5.1 or 7.1 receiver or processor. Simply connect
the subwoofer preout (RCA) on the rear panel of your receiver/processor
to the LEFT/LFE input jack on the subwoofer amplifier. If you have a two
channel stereo system please contact Power Sound Audio to discuss the
best option to connect your new subwoofer.
POWER
LFE
100-120V/220-240V
~50/60Hz 6.3A
AVIS:
CAUTION:
FORC ONTINUED PROTECTION AGAINST
RISK OF FIRE, REPLACE ONLY WITH
SAME TYPE FUSE AND RATING.
ATTENTION:
UTILISER UN FUSIBLE DE RECHANG E
DE MEME TYPE ET CALIBRE.
FUSE T6.3A L 250V
RECEIVER/PROCESSOR
PRE OUT
FRONT
SIDE
REAR
CENTER
SUBWOOFER
11
SETUP PROCEDURES
RECEIVER/PROCESSOR BASS MANAGEMENT OPTIONS
Once the subwoofer is connected to your receiver or processor you
should enter the “set up” menu and set all of your speakers to “small”. If
they give you options for the crossover frequency e.g., 40hz, 60hz, 80hz,
100hz, start with 80hz. This will reroute all of the bass from your main
speakers to the subwoofer.
TURNING THE SUBWOOFER ON FOR THE FIRST TIME
Please set the GAIN to minimum, the CROSSOVER control to 150HZ/
LFE, and the PHASE to 0. Move the power selector switch to ON. The
power LED should now glow green. While listening to a bass heavy material, slowly increase the GAIN control until the overall bass levels sound
natural to you. This will give you a starting point for the GAIN control.
Typical setting is about the 1-2 o’clock position.
GAIN SETTING
Setting bass levels in your home system is usually accomplished in one
of three ways: automatically by your receiver or processor, manually with
your receiver or processors built-in test tones (or a test disc) and an SPL
meter, or by ear.
Auto-level adjustment
Your receiver or processor will automatically adjust the output level of
your subwoofer. You may need to adjust the GAIN on the subwoofer if
it is too low or too high for the receiver or processor to correct. Please
see your receiver or processor’s manual for instructions on automatically setting the GAIN on your subwoofer.
Setting bass levels using a SPL meter
This method tends to result in the most accurate bass volume. Simply
hold the SPL meter about ear high while sitting in your key seating
position. Activate the receiver or processor’s calibration test tones and
watch the meter as the tones move from speaker to speaker. Unless
your receiver or processor’s manual specifies otherwise, set all speakers, including the subwoofer, to the same output level.
Setting bass levels by “ear”
The best way to adjust the GAIN on your subwoofer is to use familiar
bass heavy material. Use the receiver or processor’s remote control to
manually adjust the bass levels to your preference. While it is human
nature to want to really “HEAR” the bass from your brand new subwoofer, setting the levels to a more natural level will sound best in the
long run.
12
SETUP PROCEDURES
PHASE SETTING
The PHASE control is used to properly blend the main speakers with
the subwoofer through the crossover region. The goal is to adjust the
PHASE control so the subwoofer driver moves in unison with the main
speaker drivers through the crossover region. Think of it as a “timing
delay” for the subwoofer driver.
When experimenting with the phase setting the idea is to get the output
from the subwoofer perfectly “in time” with the output from the rest of
your speakers, primarily the left and right front speakers. If you have an
SPL meter it is easy to optimize the phase setting. Set the SPL meter in
your key seating position and play several “bassy” music tracks. While
the music is playing SLOWLY turn the phase control and watch the SPL
meter (you may need a friend for this). The highest reading is usually
indicative of the best phase setting. If you don’t have an SPL meter, you
can repeat the above process but simply use your ears to determine
when the bass seems loudest. In this scenario, sit in your key seating position and have a friend SLOWLY turn the phase control. When the bass
sounds loudest to you....you have the best phase setting!
CROSSOVER SETTING
The CROSSOVER control is an adjustable low pass filter. Output at
frequencies above the crossover setting are minimized. This control is
typically set to the fully clockwise position (LFE) and your receiver or processor performs all of the proper filtering. Please contact us if you need
help adjusting the CROSSOVER control.
13
Warranty
Power Sound Audio warrants its products to be free from
original manufacturing defects in materials and workmanship
for a period of 5 years from the original date of purchase.
The warranty applies to the product and not the end user. If
the product is transferred to another party, we ask that the
new owner contact us with their information so we can update our records.
Power Sound Audio will repair or replace any defective part
with a new or refurbished part, free of charge, during the
warranty period. If the product under warranty has been discontinued and cannot be repaired, Power Sound Audio will
replace the original product with a product of equal or greater
value, either new or refurbished.
This warranty does not cover cosmetic damage, damage
from improper use, accidents, abuse, misuse, acts of God,
or unauthorized modifications.
Please contact us if you need warranty service.
Warranty Department
[email protected]
14
15