1
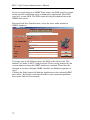
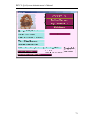
PICC 5 QA Manual
User’s Manual .......................................................................................... 5
1. Starting to use PICC 5..................................................................... 7
2. Manage Staff / Patients. .................................................................. 9
3. Filling in the Supporting Data. ..................................................... 17
4. Creating PICC entries................................................................... 27
5. Add to or Update Existing PICC records.................................... 31
6. Editing PICC Records................................................................... 33
7. Viewing Reports............................................................................. 38
8. Generate Quarterly / Annual Reports. ........................................ 40
9. Management Reports. ................................................................... 42
10. Statistical Analysis ....................................................................... 44
11. Duplicate Patient Management .................................................. 56
PICC 5 QA System Administrator’s Manual ..................................... 65
1. Installation...................................................................................... 67
2. Linking............................................................................................ 69
3. Licensing......................................................................................... 75
4. Sample Installation ........................................................................ 77
5. Backend Database Relationships.................................................. 83
1
PICC 5 QA Manual
Single User Software License Agreement
This is a legal agreement between you, the end user, and PoutineSoft Corporation (“PoutineSoft”).
BY USING THIS SOFTWARE, YOU ARE AGREEING TO BE BOUND BY THE TERMS OF THIS
AGREEMENT. IF YOU DO NOT AGREE TO THE TERMS OF THE AGREEMENT, PROMPTLY
RETURN THE DISKS AND THE ACCOMPANYING ITEMS (including written materials and other
containers) TO THE PLACE FROM WHICH YOU OBTAINED THEM FOR A FULL REFUND.
SOFTWARE LICENSE
1. GRANT OF LICENSE. PoutineSoft grants to you the right to use one copy of the enclosed
software program (the “SOFTWARE”) on a single computer (i.e., with a single CPU at a single
location). If you wish to put the SOFTWARE on a network server, you must purchase the same
number of copies as computers attached to the network that use the SOFTWARE.
2. COPYRIGHT. The SOFTWARE is owned by PoutineSoft or its suppliers and is protected by
United States copyright laws and international treaty provisions. You may (a) make copies of the
SOFTWARE solely for backup or archival purposes, and (b) transfer the software to hard disks
provided that only one copy of the SOFTWARE is used at any time.
3. OTHER RESTRICTIONS. You may not rent or lease the SOFTWARE, but you may transfer the
SOFTWARE and accompanying written materials to a recipient that agrees to the terms of this
Agreement after receiving written approval from PoutineSoft on a permanent basis t.
4. SOFTWARE Media. The SOFTWARE package contains a CD disk. You may use only the disk
appropriate for your single-user computer. You may not loan, rent, lease, or transfer the disks to
another user except as part of the permanent transfer (as provided above) of all SOFTWARE and
written materials.
LIMITED WARRANTY
LIMITED WARRANTY. PoutineSoft warrants that (a) you may return the SOFTWARE and all
accompanying written materials, for any reason, for a full refund, for a period of 30 days from the
date of receipt; and (b) the SOFTWARE will perform substantially in accordance with the
accompanying written materials for a period of 90 days from the date of receipt. Any implied
warranties on the software and hardware are limited to 90 days.
CUSTOMER REMEDIES. The entire liability of PoutineSoft and your exclusive remedy shall be, at
the option of PoutineSoft, either (a) return of the price paid or (b) repair or replacement of the
SOFTWARE that does not meet PoutineSoft Limited Warranty and which is returned to PoutineSoft
with a copy of your invoice or receipt. This Limited Warranty is void if failure of the SOFTWARE or
hardware has resulted from accident, abuse, or misapplication. Any replacement SOFTWARE will
be warranted for the remainder of the original warranty period or 30 days, whichever is longer.
NO OTHER WARRANTIES. PoutineSoft DISCLAIMS ALL OTHER WARRANTIES, EITHER
EXPRESSED OR IMPLIED, INCLUDING BUT NOT LIMITED TO IMPLIED WARRANTIES OF
MERCHANTABILITY AND FITNESS FOR A PARTICULAR PURPOSE, WITH RESPECT TO THE
SOFTWARE, THE ACCOMPANYING WRITTEN MATERIALS, AND ANY ACCOMPANYING
HARDWARE. THIS LIMITED WARRANTY GIVES YOU SPECIFIC LEGAL RIGHTS; YOU MAY
HAVE OTHERS WHICH VARY FROM STATE TO STATE.
NO LIABILITY FROM CONSEQUENTIAL DAMAGES. In no event shall PoutineSoft, its distributors,
its representatives, or its suppliers be liable for any damages whatsoever (including, without
limitation, damages for the loss of business profits, business interruption, loss of business
information, or other pecuniary loss) arising out of the use or inability to use this PoutineSoft product,
even if PoutineSoft has been advised of the possibility of such damages.
Copyright © PoutineSoft. All Rights Reserved.
2
PICC 5 QA Manual
U.S. GOVERNMENT RESTRICTED RIGHTS
This software and documentation are provided with RESTRICTED RIGHTS. Use, duplication,
or disclosure by the
Government is subject to restrictions as set forth in FAR52.227-14 and DFAR252.227-7013 et
seq. or its successor. Use of the Materials by the Government constitutes acknowledgment of
PoutineSoft's proprietary rights in them.
3
PICC 5 QA Manual
4
PICC 5 QA User’s Manual
PICC 5 QA User’s Manual
PICC 5 QA
User’s Manual
5
PICC 5 QA User’s Manual
6
PICC 5 QA User’s Manual
1. Starting to use PICC 5.
The PICC 5 application is based on the concept that it takes two to
tango. A PICC record requires both an Inserter who inserts the PICC and
a Patient who receives the PICC. The Application begins with no Patient
records or Inserter Records in it.
All other data used to describe the PICC event is supplied from
other supporting tables in the Application that the user can build upon to
suit their individual needs.
It is best to begin by introducing the Home form, which is the
heart of the application.
In The upper Right, immediately below the Application Banner
are a series of fields identifying the ownership and purpose of the
application. The defaults for these fields are as shown: Hospital, Unit and
Campus. These fields are stored in the backend datafile and are entered
through the button to the left for Manage Program Data > Manage
Security and program Data. More on each of the functions available from
the Left side buttons will follow.
Below these is the License number which is also stored in the
datafile. It is the number Issued to you when you purchase a license for
PICC 5 QA, and uniquely identifies your license to use the software
product.
7
PICC 5 QA User’s Manual
In the far lower right corner is a button that is only visible when you have
purchased the Access backend datafile. This button allows you to run a
repair / compact utility to keep the backend datafile free of corruption.
Immediately to the left of this button, in the lower right corner is a control
that always lets you know where you are currently looking for your
data.It is important to keep an eye on where your data is located. Whether
the Access backend datafile is used or the ODBC databases, this control
will always let you know where your data is located.
Above the datafile location control is a control indicating the
current user that is logged into PICC 5 QA. If there are no records in the
security table, this control will display “Security Off”.
In the lower center of the Home form, the current version of the
application is available. With subsequent releases of the software being
available, it is beneficial to know what version you are currently using.
On the left side of the form are five buttons that give you access to
all workings of the application. Each one will be described in order of
importance to building your database, not in the order they appear on the
Home form.
8
PICC 5 QA User’s Manual
2. Manage Staff / Patients.
Click on this button and you will be presented with the Staff and
Patient Management form:
From this Form, you have control over both of our “tangoers” we
discussed in the first part of the manual, the inserters, and the patients.
The button with the finger pointing to the left will allow you to quickly
go back to the Home form.
The Top button will be used the most frequently, to add new
patients to the database, and to verify if they are already in the database as
current or former patients.
The four buttons in the middle are to move patients and inserters
from current to former status and back again, or to delete erroneously
entered patients and any name / title, personal information changes for
our inserters,
The reason for allowing users to move patients and staff into the noncurrent or active status is to reduce the number of records displayed in the
drop down lists when using the application after significant amounts of
data have been entered over the years. A patient can leave the hospital
and not come back for several months, they may never have to come back
for another PICC placement. The decision on the time frame to move a
patient or staff from active / current status is up to you. If either come
back to your service as an inserter or patient, you can move them back
into current / active status. For patients, this process is helped by the
verification function.
Because most of the usage volatility will surround the Patients
entered into the system, it is best to start to describe the process of
9
PICC 5 QA User’s Manual
entering your core resource, your staff that will be performing the
insertions. The records in this area of the application will be considerably
less volatile.
The Add New Staff button will open the form of the same name:
This form displays with very little visible at first, guiding the user to the
New Record button. After pressing the new record button, the new record
is added to the database, and the empty controls for data entry are visible.
This oscillation between visibility is necessary to control the
form’s refreshing after each record is verified and protects the underlying
data in the database tables from corruption. This visibility toggling
feature is used extensively in PICC 5 QA.
When the form has created the new record, the visible controls
will display as follows:
Notice the Active checkbox is checked by default for all new
Staff. Also notice the checkbox for Team Member is also checeked by
default. This differentiation is used in the Statistical tallying in the
application to generate comparative analyses. After entering the new staff
member’s information you have the choice to either save and return to the
Staff Patient Management form or to save and enter another, which will
present a refreshed form as in the first example, with only the New
Record button visible.
The top button, for Add New Patients which will the most
frequently used only requires the lowest data entry level of security, will
display the Enter New Patients form:
10
PICC 5 QA User’s Manual
Again, this form displays with very little visible at first, guiding
the user to the New Record button. After pressing the new record button,
the new record is added to the database, and the empty controls for data
entry are visible.
When the form has created the new record, the visible controls
will display as follows:
This allows you to enter the first known information about the
patient for whom the PICC is being placed. Notice the Current checkbox
is checked by default for all new patients.
After entering patient information, the only button visible is the
Verify button. The verification function will tell you if this patient’s MR
number is already in use in the database, who it is assigned to, how many
it has been assigned to, whether they are current or former patients.
Usually a duplication in MR number would be cause to further research
all records (using Review Former and Current Patient buttons on the Staff
and Patient Management form) to clear up any data integrity issues.
If the MR Number that you are attempting has Duplicate Patient
records that are former Patients, the Verify function will present you a
dialog option to remove the Patient from Former Status and change the
status to Current, for creation of a new PICC record for a Patient that has
been in the facility, but perhaps a long time ago, before returning. If you
select to change the status, the new record will not be created for this MR
Number. If you select not to change the status, but to conduct further
research on the duplicate MR Number, the application will present you a
warning dialog that also states that the new Record has not been created
and the status of any other duplicate MR Number records have not been
changed.
11
PICC 5 QA User’s Manual
If the new patient has duplication issues, you will be prompted to
either discard the new entry or proceed with committing the new patient
to the datafile (for review later). This is because data entry must be
allowed to continue if not all information for a patient is present at the
time the record is entered. You can select to change Former Patient status
to Current and then add the new record for the same MR Number if the
MR Number is the same, but the Patient Name is different, indicating the
need by further review by Management.
If the new patient entered has no verification issues, the verify
button will disappear and be replaced with two other buttons for
finalizing the record and go back to the Staff and Patient Management
form or to finalize and enter another ( this will present the form to you in
it’s first iteration as shown, with only the New Record button visible):
The five buttons in the center of the configuration of selections at
the left side of the Staff and Patient Management form are more simple,
and all will offer you a choice to select by Name or by MR Number in the
case of patients, or Badge Number in the case of staff.
Because these five forms are so similar, and the one that will be
used the most are the patient forms, we will outline the functionality of
the Current Patient Management form, selected from the Review Current
Patients button on the Staff and Patient Management form.
Again, the form displays with only the choice presented to select by
Name or by MR Number:
Selecting to search by name gives you a drop down list to choose
from, and similarly for selecting search by MR number:
12
PICC 5 QA User’s Manual
These dropdown lists are filtered for you by the function of each
form, the Current Patient Management form shows only current patients,
and the Former Patient Management shows only former (records which
the current checkbox is not checked) patients, and similarly for the
Review Current Staff and Review Former Staff forms.
After making your selection, the fields in the record become
visible, and allow you to make your edits, changing Current / Active
status, name changes and the like:
These four forms save each record upon closing the form, and do
not recycle back to the rather void form presented when first opened. The
buttons to select to search by name or MR Number (Badge Number)
remain visible and allow you to quickly execute many searches and edits
at a single sitting.
Deleting Patients.
The center button on the Staff and Patient Management form is
solely for deleting patients out of the database that were erroneously
entered or duplicated. Notice there is no corresponding button for deleting
Staff, they cannot be removed from the system, only changed to inactive,
where they will not be available for selection during the creation of new
PICC procedure records. The reason for this is to maintain absolute
integrity of data over the entire history of your records maintained in the
database.
Selecting the Delete Patients button from the Staff and Patient
Management presents the Delete Patient Management form:
13
PICC 5 QA User’s Manual
This Form is similar in appearance and behavior to the Other staff and
patient management forms. After selecting a Patient either by Name or
MR Number, the patient’s information appears with a button to choose to
proceed with the deletion of this patient.
Clicking the button to delete this patient will proceed to delete the
patient (you will be presented with another Yes/No option to continue
with the deletion) only if this patient record has no related PICC
procedure records created for this patient. If there are related PICC
procedure records you will be presented with a form allowing you to
review these records for accuracy, to judge whether to continue to delete
the patient record from the database.
From the example provided, we can see this patient had it’s MR
number changed between the time of the first record to the times of the
two subsequent records. This would be a cause to review all of these
records for validity. After review, it is decided to remove the one
14
PICC 5 QA User’s Manual
erroneous PICC record. We put a checkmark in the Red Delete checkbox
for that record only:
Click the Delete the Selected Records button and you will receive
a prompt that says All records for this patient have not been deleted and
that the patient cannot be deleted from the database. This prompt can only
be OKed. The form will then present the two remaining records and can
be closed to reveal the Delete Patient Management form. If you choose to
check off all the procedure records for this patient you will be presented
with a Yes/No choice that states that all related PICC procedure records
have been deleted and allowing you to choose to continue with deleting
this patient or not. If a Patient is deleted and must be reentered, all
associated PICC records that actually belong to this patient must also be
recreated in the database.
15
PICC 5 QA User’s Manual
16
PICC 5 QA User’s Manual
3. Filling in the Supporting Data.
The PICC 5 QA application Recognizes that the requirements for
the supporting data necessary for completing the entry of a PICC
insertion event will be different for different clinical environments. The
application comes with representative default data in each of the
supporting tables, such as a short listing of possible entries for DX,
possible complications, insertion points, sedations and others. These lists
can be added to and subtracted from to your needs.
The reason for having predefined data in these supporting tables is
to eliminate typos and other data entry errors that prevent the application
from presenting a uniform nomenclature from which proper statistical
data can be derived.
A single source for editing the data in these tables is provided
from the Manage Program Data button on the Home form. Clicking this
button will present the Manage Program Variables form:
From this form, selecting the buttons will display the form that will allow
you to add to and manage the usability of default data provided by the
application.
All of the forms are of the same style and behavior, except for the last one
on the left side, Manage security and Program Data which is completely
different and will be discussed last.
Two forms, displayed by the Manage Treatment Locations and Manage
Tip Locations are of a different style due to the additional yes / no field
required for these Data tables. The Manage Sedations, Manage PT
Therapies, Manage Complications, Manage Insertion Points, Manage
PICC Sizes and Types and Manage DX Listing forms have no associated
yes / no field for the underlying data table.
First, the Manage / Edit Sedations form will be discussed as an
example of the six that are the same:
17
PICC 5 QA User’s Manual
This is an example of a Supporting table that has more rows in it
than the form can display. To see further down the rows displayed, use
the scroller at the right edge of the form.
Deletions are not allowed from any of these forms. This is to ensure data
integrity over all time periods covered by all records in the database.
These forms allow spelling changes and if a spelling change is made in
this form, all records in the database that use this Sedation as displayed in
the Number Of Records column will be affected by this change.
If a sedation is to be no longer used, do not just change it’s name to the
name of the new one, this will affect all records as shown going back into
the past as shown with the number of records. When a sedation is to no
longer be used, simply remove the check mark from the Currently Used
column and it will no longer be available for future data entry into the
database and will not upset the data integrity of all records previously
entered.
If a new sedation is to be introduced to the system, scroll down to
the bottom record and add the new one to the new record at the last
record.
To add a record to this table, scroll down to the last row, and just
type the value in the new record signified by the star (*) in the left side
record selector. To edit one of the current entries, just highlight the text in
the row and type over it.
Closing these forms with the x in the upper right, or with the Done
button will bring you back to the Manage Program Variables form.
Editing procedures for this form is the same for all eight of these
supporting data management forms:
18
PICC 5 QA User’s Manual
The Manage / Edit Tip Locations form is accessed from the
Manage Tip Locations button on the Manage Program Variables form.
This form has the additional field for the Yes / No value of
Central. This is necessary for statistical analysis of tip placement. Editing
and adding to the listings in the supporting table from this form is the
same as for the Manage / Edit Sedations and all the other forms.
Similarly, when you are done, click the Done button to be returned to the
Manage Program Variables form.
Next in this series is the Manage / Edit Treatment Locations form.
It is similar to the above two forms:
This form is an example of an editing form where the number of
records is small enough so that the last record with the star (* new record)
is visible. This record does not yet exist in the table, it is empty and just
19
PICC 5 QA User’s Manual
waiting for you to use it to add a new record to your supporting table
listing.
Also, this form has the additional Yes / No field for In Unit to
assist in the separation of statistics for teams. All Editing from this form
is similar to the first three discussed.
The Default Data supplied for the Supporting tables is as follows.
Manage Sedations:
Versed-MS-Lido. SQ
Diazapam-Valium
General Anesthesia
EMLA
Lido. SQ
Lorazepam-Ativan
Midazolam-Versed
Pentothal
Morphine
None
Fentanyl-Sublimaze
Chloral Hydrate
Ketamine
Versed-MS-Lido. SQ-EMLA
Other
Manage Tip Locations:
Right Subclavian
Left Subclavian
SVC
IVC
Right MidLine
Left MidLine
Right Inominate Vein
Left Inominate Vein
Right Femoral
Left Femoral
Right Atrium
Right Atrial Junction
Midclavicular
Brachiocephalic
Manage DX Listing:
Sepsis
Respiratory
Cardiac
20
(Central)
(Central)
(Central)
PICC 5 QA User’s Manual
Hematology
FTT
Renal
Manage PT Therapies:
ABX
Blood Products
Chemo Therapy
Hydration
Labs
Other
Pain Meds
TPN-IL
Manage Complications:
Un Able to Wire
Infiltration
Un Able to Access Vein
Unable to Thread Catheter
Difficulty Advancing
Poorly Sedated
Air
Embolus
Sepsis
Thrombus
Leaking
Pulled-Fell Out ****
Pain At Site
Phlebitis
Occlusion
Catheter Migration
Catheter Damage
Tip Cultured
Blood Cultures
Early Stage Mechanical Phlebitis
Infection
Suspected Line Sepsis
Other
**** This Entry is specific to the text string “Pulled-Fell Out” if this text
string is changed, some of the statistical checks that isolate this
Complication will fail to produce the expected results.
Manage Insertion Points:
Right Antecube
21
PICC 5 QA User’s Manual
Left Antecube
Right Saph
Left Saph
Right Hand
Left Hand
Right Scalp
Left Scalp
Right Foot
Left Foot
Manage PICC Size and Type:
2F Neocath
2f Per Q Cath
3F Groshong
4F Groshong
5F Groshong DL
3F Arrow
4F Arrow
4F Arrow DL
5F Arrow DL
3F Cook
4F Cook
5F Cook
Manage Treatment Locations:
ICU
Pediatrics
Radiology
Outside Facility
(In Unit)
The last button on the Manage Program Variables form is Manage
Security and Program Data. Clicking this button displays the Manage
Program Data form. This is a two tab form, one for Program Data, and the
other for Security. By Default the Program Data tab is displayed on
22
PICC 5 QA User’s Manual
opening the form:
The first four text boxes are for your use in customizing the
display controls on the Home form. They allow you to personalize the
application you use to the particulars of the team the statistics will
analyze.
The License Number text box is for you license number, which will be
provided upon purchase of the PICC 5 application. You will be asked for
this Licensing number when licensing your desktop application. All
installations of PICC 5 QA install as a thirty day demo and must be
licensed by PoutineSoft individually by each desktop the application is
installed to. The text box for the PICC Document Footer text is specific to
your legal statement usually required at the bottom of all printed PICC
entry reports entered into the Patient’s record.
The final Text box will only accept integer data. It is the number
of minutes the application will stand open before automatically saving
and closing all forms and returning to the Home page (The default is 150
minutes to start with). If Security is enabled, it will also close the home
form and require logging into the Application as if first launching it.
The second tab is the Security tab:
23
PICC 5 QA User’s Manual
It will show you one record for each entry into the Security table.
Security in PICC 5 QA is not enabled until there is at least one record in
this table, the application will not allow you to create a non-manager
security level entry without at least one Manager level entry. This is to
make sure there is always at least one person in the staff that has access to
this form and all other manager level functions within the application.
To view the records in the security table, just click on the
navigation buttons at the bottom of the form. To delete an erroneous or no
longer needed record, click in the record selector at the left side of the
form.
And delete the record using the delete key on the keyboard. You will be
reminded and prompted to continue the deletion of this record.
Attempting to edit the password will immediately challenge the
second entry of the password just like entering a new security record. The
passwords must match after any editing to continue.
Enter a new record by clicking the new record button in the record
selectors on the far right (arrow pointing to the star). This will present
you with a blank new record. (Notice, before we had 12 records, now we
24
PICC 5 QA User’s Manual
are at record 13 of 13):
After entering a User Name, hitting the tab key or entering the
password text box will cause the Verify Password text box to appear and
the Security Manager warning pop-up to not allow you to continue until it
is responded to.
The default Security Level for a new record is Management. You
may wish to restrict access to the applications statistical reports, forms for
editing PICC entries, and Adding to data lists stored in tables from the
Manage Program Variables forms. If you wish to allow a user to only
have restricted access, select the radio button for Editing – Corrections.
The radio button for Data Entry only gives that user the ability to enter
new patients, new PICC records and update the PICC record when DCed
or Sent Home or Complications are added or amended.
To save the new record in security, click on the pencil that is now
in the record selector at the left of the form, or move to another record.
Remember, if the password and verification of the password do not
match, the form will not allow you to save the record or go anywhere
else.
25
PICC 5 QA User’s Manual
26
PICC 5 QA User’s Manual
4. Creating PICC entries.
After entering the staff who will be performing the insertions, and
the patients as they have become known, you are now ready to complete
the PICC entry. From the Home Form, click on the Create PICC Entry
and you will be presented with the Set Up a new PICC entry form:
First, use the drop Down List for Choose and Inserter, you will be
presented with the list of all entries in the Inserters table that are active.
After selecting the correct inserter for this procedure, choose the patient.
You have the option to sort the patient selection list by Most recent
Patient entered into the patient table or to sort by Patient Name (Last
Name, then First Name, ascending) for returning patients entered perhaps
a while back.
Once you have selected both the inserter and the patient (you must
have both), click the Add a New Record button and the new record will
27
PICC 5 QA User’s Manual
be created with the form partially filled out from the selections you have
just made:
This is where you first come into contact with the efforts you put
in to setting up the program data discussed in the Filling In the
Supporting Data section of this manual. The Cursor by default will be in
the Treatment Location dropdown in the upper right. Select this drop
down and only the records you entered into the Manage / Edit Treatment
Locations form will be available to you. You must select from this list.
This is to prevent misspellings, and erroneous data from being entered
during the data entry phase that will have a deleterious effect on any
statistical reporting carried out later on that data. The data concerning the
patient and the inserter, which can span multiple PICC procedures are in
the two blocks to the upper left and center. Back to the upper right,
moving the cursor to the Date field will cause today’s date to appear, if
this default date is not the correct date, a down arrow will appear next to
the Date control and allow you to backstep to the correct date. After
backstepping one day, another up arrow will appear to right of the date
control in tandem with the down arrow and allow you to specify the exact
date the PICC procedure actually occurred on.
The default for all new PICC records is Successful. This is
indicated by the checkmark in the Success field also in the upper right. If
this PIIC procedure was not successful, his checkmark needs to be
removed to indicate this.
Fill in the data in the form as known at the time of entry. Further updating
of data above the TX Complete checkbox can be edited from the Edit
28
PICC 5 QA User’s Manual
Current PICC Entries Button on the Home form (this form requires
management security level because only this form allows deletion of
PICC records from the database. Further additions to the part of the form
from the row that contains TX Complete and below, including the dates
sent home with PICC and DCed or DCed due to complications and the
entry of specific complications and the final disposition of the procedure
can be modified by staff given only the Data Entry level of security from
the Add or View Complications in Existing PICCs button on the Home
form.
The dropdown lists for Previous PICC by Whom and the Vein
Selected are the only self building dropdown lists on either of the editing
forms or this, the New PICC form. You are not limited to the items in
these listings, you can type a new entry which will be available in that
drop down the next new PICC record you enter.
The four separated boxes in the upper center left of the form are
also for entering data related to this procedure that are entered in other
tables in the database and are limited to the selections in their dropdown
lists. The Other Sites Tried dropdown gives you the same choices as the
Insertion Point dropdown lower on the form. This data is entered through
the Manage / Edit Insertion Point form discussed earlier. Similarly the
Others who Attempted list shows the same data as the Inserter dropdown
on the Set Up a New PICC Entry form used to create this new PICC
record. The data in this list comes from the Inserters table in the database
and is entered and edited from the Staff and Patient Management form
also discussed earlier.
Also the Select PT Therapies and the Select Sedations are both
lists that are provided by an limited to the data already entered into their
respective tables from the Mange Program Variables form discussed in
part 3. earlier.
To the right side of the line on the form that contains TX
Complete is a button for manually calculating In Unit Dwell. This can
only be calculated if the PT is sent home with PICC and the date they are
sent home is entered. The application will automatically calculate In Unit
Dwell for you after a date is entered into the Date Sent Home with PICC
control.
Below this button is a button for manually calculating True Dwell.
This can only be calculated when the actual date the PICC is DCed is
known and entered. The application will also calculate true dwell for you
automatically.
The button for Abandon Ship is for emergencies when entering
data and you are called away. It will save all information in the current
record and bring the application back to the Home form so that no data is
seen on your screen for security reasons.
29
PICC 5 QA User’s Manual
The button for print this record will print the current record in it’s
current state for insertion into the Patient’s record. This button is
available on all forms for editing PICC records and can be useful to
provide updated paper records for inclusion in the Patient’s record.
The two buttons to the immediate left are for navigation within the
application only, they will save the record and go back to the Home form,
or save the current record and provide you the opportunity for entering
another new PICC record.
30
PICC 5 QA User’s Manual
5. Add to or Update Existing PICC records.
From the Home form, the button for Add or View Complications
in Existing PICCs will present the Find Existing PICCs to Update form:
This form gives you the ability to search the PICC records by
Name or MR number of Patient. Selecting one or the other will present a
dropdown list for each and selecting an entry from either will present the
Update Existing PICC form:
This form, unlike the Enter New PICC Record form, will show you all the
records for the Patient’s PICC procedures. You can walk between the
records using the navigation buttons at the bottom.
This form only allows edits to the controls on the TX Complete
line and below. This is due to the security requirements for this form is at
the level of Data Entry. Use this form to update home with PICC, tx
complete, PICC DCed or any additions or updates to complication
records associated with this procedure. All the control buttons on this
form are the same as the Enter New PICC Record form.
31
PICC 5 QA User’s Manual
32
PICC 5 QA User’s Manual
6. Editing PICC Records.
From the home form, the button Edit Current PICC Entries will
present the Find Sets of Records for editing form. (Access to this form
requires Editing - Correcting level security because this form allows you
to delete erroneous PICC records.):
This form is similar to the Set Up a New PICC Entry form, except
allows you to pick all records for a particular inserter (staff) or patient.
Use either dropdown list for your choice and after selecting from the list
you will be presented the Edit and Correct PICC Entries form filtered for
the data you specified:
This form allows you to edit all aspects of the PICC record
including the Patient and Inserter information in the two areas in the
upper left and center of the form. This form also allows you to delete an
erroneous PICC entry, perhaps a duplicate procedure record or the like.
To Delete the current PICC record, Click in the record selector along the
left side of the form and It will Turn Black, with a white arrow pointing
to the right at the top:
33
PICC 5 QA User’s Manual
Hit the delete key on the keyboard and you will be presented with
a reminder of what you are about to do, and you must answer with a yes
or no:
Answering no will not delete the record, yes will delete the record
and any associated Others who Attempted, Other Sites Tried, PT Therapy
and Sedations records from their related tables in the database.
34
PICC 5 QA User’s Manual
The Buttons under the Inserter information and Patient
information areas will Allow you to correct erroneous information in the
record. We will present as an example here a change in the Associated
Inserter for this record, the changing of the patient for a record is similar,
and will be discussed later under the Duplicate Patient management
section.
Suppose this record is in error. It has been determined through
research that the Patient did receive this procedure as documented, but,
the inserter was chosen improperly. We click the Change the Inserter for
this Record button and are presented with a pop up form with a blank
drop down list of Staff members listed in the Staff Entry section of the
application. We choose the correct inserter for this record from this list.
Suppose the correct Inserter is not Lisa Deschanet, but Kathleen
olsarth, we choose that name from the list:
The application will change the inserter for this record as the
popup form closes:
35
PICC 5 QA User’s Manual
All the form control buttons at the lower right are the same for this
form as the Updating and New PICC forms.
This form is the only form that allows the deletion of erroneous
Complication records from a procedure record. To delete a complication
record, click that record’s (row’s) square record selector to the left of the
row and then hit the delete key. You will be prompted to OK the deletion
of that particular complication record in the usual fashion.
36
PICC 5 QA User’s Manual
37
PICC 5 QA User’s Manual
7. Viewing Reports.
Viewing reports requires full management level of security, along
with managing the program data and security. Along with viewing report
are the auditing functions provided within the application to allow you to
review data for possible errors and omissions.
From the Home form, click on the View / Print reports button.
This will display the Select Report Category form:
From this form you can select to view and print the blank PICC
QA forms or Use the query by form feature to further filter you PICC
data for analysis. The most used functions will be the Quarterly / Annual
Report, the Daily Audit and Management reports, the Statistical Analysis
and Error Checking and Duplicate Patient Management.
The Daily Audit function displays all records in the database that
are not DCed or sent home with PICC as of the date selected on the Daily
audit form:
The up and down arrows allow you to specify the exact date
required to audit until, usually the last date of your reporting date range.
38
PICC 5 QA User’s Manual
Viewing the Daily Audit will present the form with the required
data:
39
PICC 5 QA User’s Manual
8. Generate Quarterly / Annual Reports.
The Quarterly / Annual report form has a radio button to select a
date range of one quarter or a full year from the starting date entered into
the Start Date control:
This form provides three auditing functions based on the date
range selected. The View Error Check Still in as of Now is different from
the Daily Audit discussed above in that it reviews the date range selected,
not all up until a given date like the former.
The next two audit selections provide different views of PICC
records that are left open with no apparent closure (DC).
The Quarterly / Annual Report or the Quarterly / Annual Report
Charts reports can be viewed, or printed, from this form.
40
PICC 5 QA User’s Manual
41
PICC 5 QA User’s Manual
9. Management Reports.
The Management reports Home form is where you will develop
your most serious reporting:
All reports and charts generated from this form are limited to a
specific date range you specify, they are not limited to a quarter or year
like the Quarterly / Annual reports. Many of the reports and charts
developed from this form are similar to those developed with the
Quarterly / Annual report, but have substantial additions as well.
The lowermost two buttons output the data from their respective
views of the data within the date range specified to Excel for charting
options that are not available within the application, most notable of these
is the ability of Excel to fully stack Multiple sets of data (complications)
in a bar chart vs. Dwell for the Complications and Related Dwell
statistics. The button for Output Complications Requiring Picc Removal
exports a two column spreadsheet in the default folder C:\Program
FilesPICC5. If this folder is not found, the outputting functions will
generate the appropriate file system error. The outputting functions will
create a spreadsheet with the date they are created in the filename.
42
PICC 5 QA User’s Manual
43
PICC 5 QA User’s Manual
10. Statistical Analysis
Clicking the button for Statistical Analysis and Error Checking
will present you with the Statistical Analysis Form:
This form, by default, when first opened gives you a datasheet
view of all records in your datafile, combined by a query from three of
the tables, Patient, Inserter and ProcedureRelation. This is your most
powerful editing and analysis tool in the application. This grid is another
form that allows you to change the patient that a PICC procedure was
performed on or the Inserter when errors in data entry are made. Notice
the Radio button on the Right side of the upper part of the form is always
set to Procedures by default. You can select to view your records with the
Complications table as the primary table as well by moving the Radio
button to the Complications setting. We will discuss this viewing/filtering
option later in this chapter.
The Data set returned in the grid can be filtered for a specific date
range with entries in the From Date and To Date fields:
44
PICC 5 QA User’s Manual
Enter the selected date range you wish to filter for and click Apply
Filters.
Notice the record count in the grid went from 28 to 8 records
when the date range was enforced. Each successive filtering step you
choose will require clicking on the Apply Filters button. To remove all
filters, it is best to close the form and start all over again by reopening it.
Most of the columns of data presented are sortable by
Highlighting the column by clicking in the column Data (not on the
column header) and then right clicking and selecting from the menu:
In the above example, the date column is to be sorted ascending.
45
PICC 5 QA User’s Manual
The date column (or any other column) can also be sorted by
highlighting the entire column by clicking in the column header, and then
selecting from the form’s menu area in the upper left Records > Quick
Sort > Ascending:
Also, you may use the Query by Example (Advanced Filter/Sort)
to further filter any displayed recordset. The Advanced Filter/Sort is
available from the Reports menu:
46
PICC 5 QA User’s Manual
This will Display the Query by Example window. In this
illustration we will filter for records that have the checkmark for
Complications Checked and also both 10cc or 10 cc, using both criteria in
case of User typing error:
Use Apply Filter Sort from the Records menu after clicking in the
header of the main Statistical Analysis form to bring it back to the front
(has the Focus). This will show us the two records within the current 8
(filtered) that satisfy these criteria:
Further filtering of the dataset by the supporting data stored in the
five relating tables can be achieved by selecting the button from the top of
the form for the appropriate supporting table to filter for the desired
47
PICC 5 QA User’s Manual
included records. In the following example, we will apply further filtering
for two complications, Infiltration and Unable to Thread Catheter.
First, click on the Filter for Complications button and the Filter
for Complications Form will pop up above the Statistical analysis form:
From this form we select our two entries by holding down the Ctrl
key (because they are not contiguous):
Clicking the Commit! Button will close the pop up filter form and
add these two to a visible grid on the main form under the filter button
they apply to:
48
PICC 5 QA User’s Manual
Remember, you must always click the Apply Filters button for
each filtering step undertaken other than form menu and right-click
sorting:
These two records are the only ones that fulfill the additional
criteria supplied by filtering. This can be further illustrated by clicking on
the small plus sign on the left of each record by its record selector:
49
PICC 5 QA User’s Manual
If we want to filter for another set of criteria in the same
supporting table, we must reopen the criteria selection form from the
same button, in this case Filter for Complications and click the Commit!
Button without selecting any of the items in the supporting table’s list,
this will return the form to it’s original 11 records filtered by date and
render the display box of filtering criteria below the filter button invisible
once again.
To filter these 11 records again by another criteria, in this example
we will filter the second time for only complication of Poorly sedated, we
click the Filter for complications button and select this one criteria:
50
PICC 5 QA User’s Manual
When we hit the Commit! Button and Apply Filters, we see only
one row that satisfies this criteria within the selected date range as shown
below:
Note: this record has two complications, One of which is resolved,
and satisfies the criteria, the other required DCing and displays in the
results even though it does not satisfy the criteria.
This procedure will be the same for all filters for the supporting tables.
Note: When any filter in one of the Five Supporting Tables returns
no records, that filter is ignored and all other filters that are employed that
do find records will be reflected in the result set. This can be shown by
going back to our original 8 records returned within our date range, and
then filtering for another Inerter Who Attempted that is not associated
with any of the original 8 records, and apply this filter and we still get 8
records, not zero records:
51
PICC 5 QA User’s Manual
Lastly, the button for Send to Editing Form will display the
current filtered recordset in the Editing form for full research and editing.
Notice when this form displays, the same 8 records are displayed at the
bottom navigation buttons:
Next, close the editing form view with the ‘x’ in the upper right
and move the radio button to the Complications setting on the main form.
This will display all the complications records for PICCs during the date
range you specified earlier on the form:
52
PICC 5 QA User’s Manual
Note that we see all the complications we saw earlier when
filtering for the various complications (Unable to Thread Catheter,
Infiltration, Poorly Sedated and the single Embolus that we noticed
required DCing), plus all other related complications associated to PICC
records between the dates specified on the form.
This form of analysis will mainly be used to filter for specifics in
complication records. Note also that the 5 buttons at the top of the main
form are now gone, as they do not apply to this form, only the date range
specified applies when Complications are selected. Filtering this view of
your data will be done solely with form commands for sorting columns
ascending or descending, Find and Replace or by using the Advanced
Filter/Sort to find text strings in various columns.
Lets filter for all complications within the ResMethod column that
may indicate reinsertion:
53
PICC 5 QA User’s Manual
Select Advanced Filter/Sort from the Records menu and this
displayed the Query by Example grid and Then drag and drop the
ResMethod field into the Field row of the first column and enter a criteria
of Like “*R*sert*” (because we know there are two records in this
example and one of them is misspelled), then Click the main form and
select Apply Filter/Sort from the records menu and you now see these
two records:
You can see these two entries with the one row with the
misspelling and also see the underlying PICC entry records for each
54
PICC 5 QA User’s Manual
complication record by clicking the plus sign for each on the right side of
the form, just as you did with this form in the Procedures setting.
The Advanced Filter sort accepts many common filtering options
such as:
Square brackets:
B[ai]ll returns “Ball” and Bill” but not Bull
12[3-5]4 returns “1234”, “1244”, and “1254” similarly,if they
exist.
The asterisk (*) which is a complete wild card, will return all characters
in any number.
To sort for a date range within the Query by Example grid you must use
the following syntax:
Between #7/1/2002# And #7/30/2002#
The pound signs are a special date literal indicator in the application and
should not be used in text strings such as MR number. The Single (‘) and
Double (“) quote characters are also special identifiers of string literals in
the application and may interfere with searching for Criteria such as a last
name of O’Donnell. In this case you may be able to use Like
“O””’””Donnell”” as your criteria.
To go back to Procedures view, just move the radio button back
from the main form. The Procedures view will display and respect any
date range you have specified on the main form when switching back.
To close the form to go back to the Select Report Category form,just click
the “x” in the upper right of the main form.
55
PICC 5 QA User’s Manual
11. Duplicate Patient Management
The Duplicate Patient Management form helps you track data
entry errors that sometimes occur that create duplicate patient entries. The
form Initially displays devoid of information, unlike the Statistical
Analysis form, which can take a long time to load. The Duplicate Patient
Management form allows you three views of your patient data, but only
one view at a time, selected by a radio button in the upper Left.
The first view is for Patient Records that have the same MR
Number used for more than one Patient record. Selecting this radio button
will show you this view:
56
PICC 5 QA User’s Manual
In this example, only three patients have had multiple entries into
the patient table with the same MR Number. The first, Lamont Connors
has three separate entries, one of which has no checkmark in the Current
Patient field indicating that this Patient has been in the unit multiple times
and has been removed from current status once, but not removed from
current status upon return to the unit for a subsequent procedure. Instead,
for whatever reason, he was re-entered into the database and the
application assigned the same patient a separate patient record, as you can
see by the individual Patient ID number in that column.
The second and third patients would seem to be two separate
patients due to the separate Name and DOB for each patient, but they
may have been erroneously entered with the same MR Number. When
any patient has been entered with an erroneous MR Number, viewing the
respective records for each is available to you using the method described
below, where we look at the fourth patient. But in order to change the MR
Number on any patient record, you must use Current / Former patient
management in Staff / Patient Management to find that patient record by
Name and fix the MR Number to the correct one. That will automatically
correct the PICC procedure form for all procedures for that patient so
they can be reprinted from the Edit PICC records area of the application
as well (Chapter 6.)
The fourth Patient has two separate patient records due to possible
unreliable data for the patient last name. Notice that for patient Ayala
Villanueva, the DOB is the same as well as the MR Number, indicating
that the proper Last Name is most probably Villanueva, due to the higher
Patient ID number assigned by the application to this record.
57
PICC 5 QA User’s Manual
This form allows you to select individual records and send these
records to the Editing form to correct the inaccuracies in any underlaying
procedure records for any patient record listed.
In this example we will correct the procedure records for
Villanueva in order to change the patient for the erroneous procedures to
the correct patient with the correct last name, after correcting procedure
records, then it will be safe to delete the erroneous patient record for the
“Villa” patient via Delete Patient Management form (available from Staff
/ Patient Management).
In order to view all the records for the two patient records
assigned to this assumed patient, Villanueva, we put a check mark in the
View These Records checkbox for each Record:
Click the View the selected Records button at the lower right to
display the selected records in the Editing form:
58
PICC 5 QA User’s Manual
At the bottom of the editing form, you see record one of two, and
the first record is the first record for the patient Villanueva. The second
record is the earlier record for this patient, with the incorrect name, but, it
is a valid procedure record, due to the earlier dates and patient age at the
time of the PICC placement. Had this second record just been an exact
duplicate with the same date and all other data the same just the patient
was erroneous we could just delete the PICC record from this form. But,
we will proceed with our example of two verified records for the same
patient, but one record with a patient record entered with an erroneous
name. The second record in the displayed records is assigned to the
patient record entered with the incorrect last name:
59
PICC 5 QA User’s Manual
Now, use the Change the Patient for this Record button under the
Patient information area of the form and you are presented with a pop up
form with a blank Drop Down list for you to use to select the correct
patient record for this patient. This drop down list has all patients listed,
their MR Numbers and their status in the database (Current or Former) as
well. Here, select the correct patient, Villanueva, with the same MR
Number from the dropdown list:
60
PICC 5 QA User’s Manual
After selecting the correct patient, the application will change the
patient association for this procedure record for you:
When you are done with edits using the Editing form, close it with
the X in the upper right and the Duplicate Patient Management will once
more be visible.
In order to see a different view of your patient records, just select
another one of the three radio buttons. We will look at an example of the
second view, where the same Patient Name was used for more than one
patient record:
61
PICC 5 QA User’s Manual
Here, we see the same patient we saw in the first view, Lamont
Connors, with the same three records in the patient table. The other
patient we saw in the first view, Villanueva would not display in this
view because the last name was different for both records for the same
patient. Also in this view we see two other patients, Jan Justomer who has
two patient records for the same name, but the two patient records have
the same DOB, but different MR Numbers, and Jacob Lawrence,
Obviously two separate patients, both with Different MR Numbers and
Different DOB for each individual patient record.
The patient Jan Justomer with two records with the same DOB,
but different MR Numbers could have been caused by a management
decision to change the method of generating MR Numbers in between an
older procedure record for this same patient and a subsequent return to
the unit for a separate procedure or, one of the MR Numbers could have
been entered incorrectly during the data entry operation. In any case, we
would check both the checkboxes for this patient and view the procedure
records and change the records with the erroneous MR Numbers to the
correct patient ID using the same technique discussed earlier. Then, it
would be decided to delete the patient with the erroneous MR Number in
the Delete Patient Management area if that was deemed appropriate.
The third view of Patient data, where the same patient name was
used in more than one patient record with separate MR Numbers is a very
complex query and can take quite a while to load:
This view of your patient data is free from the clutter of the data
for repetitive Patient names and repetitive MR Numbers seen in the other
views of our data and allows you to concentrate solely on patients that
62
PICC 5 QA User’s Manual
may have had been entered more than once with separate and possibly
incorrect MR Numbers.
As you see, the second view of your patient data built on what
was seen in the first view, and so, this third view builds on what was seen
in the second view of this same data, allowing you to adjust and correct
all patient data and their respective PICC procedure data as well.
63
PICC 5 QA User’s Manual
64
PICC 5 QA System Administrator’s Manual
PICC 5 QA System Administrator’s Manual
PICC 5 QA
System Administrator’s Manual
65
PICC 5 QA System Administrator’s Manual
66
PICC 5 QA System Administrator’s Manual
1. Installation
PICC 5 QA is a simple two tier application, consisting of a Front end
client application file, and a backend datafile with just tables for user
specific data. The front end application file is a Microsoft Access 2002
based application that runs in it’s own runtime environment installed on
the client PCs. The backend datafile is an Access 2002 database by
default and can be either an SQL Server database or an Oracle database.
Installing from CD requires Local Administrator rights. If it is planned to
keep the backend datafiles on a Network Volume, rights to Create and
Modify must be assigned to this directory also.
After Installation, the installer will require a reboot, as the required
registry updates are finalized after reboot, it is necessary to log on with
the same admistrator login as was used to perform the installation. The
Program Files entries are created in the All Users group.
After the Welcome form of the installer, the next form allows you to
specify the location of the Application Directory, the default is C:\
Program Files\PICC5.
The next form allows you to specify the Directory the Datafiles will be
installed in. Next, the installer allows you to name the program group the
system utilities will be installed to. They are always installed to the
Common User’s group, the default Name is PICC 5 QA.
Then, review the installation directories and complete the install.
If it is elected not to have the datafiles reside on a server volume, user’s
must develop their own backup and restore program.
It is beneficial to test launch the application after rebooting and logging
back in as the same User that performed the application. Test the ability
of the application to connect to it’s backend datafile. This application is
supplied with it’s default Access 2002 backend datafiles. It is also
available with Optional SQL Server or Oracle backend scripts.
The user accounts must be given rights to write and modify in the
application directory (Default: C:\Program Files\PICC5\) as well as the
datafile directory either locally or on a server volume. User accounts also
must have rights to use the Access Runtime environment, if that version
is chosen to install, The Runtime Environment is usually in Common
Files locally and user rights are by default sufficient. So, this means only
special attention need be directed towards giving full rights to the folder
67
PICC 5 QA System Administrator’s Manual
the datafile is chosen to reside in, as well as the Application Directory.
When the Access backend is used, the user must have the rights to create
and delete and modify the .ldb file in that same directory. Also, when the
Access backend is used, the user’s should be directed to run the Compact
Current Access Datafile from the Home form of PICC 5 QA. When
attached to an ODBC datafile, this button is not visible or enabled. The
users must have Full Rights to the folder in which the Access datafile
resides due to the necessity of Creating, Modifying, Deleting and
Renaming of files that occurs during the Compact operation.
68
PICC 5 QA System Administrator’s Manual
2. Linking
You can connect to many other PICC5 backend datafiles. To change the
program’s attachment to another datafile, from the Homeform click the
File menu, and select Link New Datafile:
Note: the bottom left control on the Home form will always tell you
which datafile the application is currently linked to.
Selecting Link New Datafile will present the Link New Datafile form:
69
PICC 5 QA System Administrator’s Manual
Again, the current connection string and datafile type is specified on this
form. To connect to another Access based PICC 5 datafile, select the
browse button in the upper right, this will bring up a common dialog to
allow you to select another file for linking:
Selecting Open will populate the connection string in the Link New
Datafile form with the path to the selected file system object:
70
PICC 5 QA System Administrator’s Manual
If you click cancel, you will be returned to the Home form and the current
links will be maintained. Click link to link the Application to the new
datafile. The lower left control on the Home form will reflect the new
program link to the selected datafile, and you will be presented with a
request for the security credientials for the new datafile if security is
enabled in the new datafile:
71
PICC 5 QA System Administrator’s Manual
If you are connecting to an ODBC Data source, the DSN must be created
on the specific workstation prior to linking the Application. This DSN
must be a system DSN. The DSN name must be provided to link to the
ODBC data source.
From the Link New Datafile form, select the lower radio button for
ODBC databases:
You must type in the Schema name, the DSN on the local client. The
default User name is PICC5 and password. These can be changed by the
system admin creating the ODBC database at creation. These must be
changed if you have multiple ODBC datafiles for different segments of
users.
Clicking the Link button will link the Application to the selected ODBC
data source. If the link is unsuccessful due to any connection problems,
the current Link will be restored:
72
PICC 5 QA System Administrator’s Manual
73
PICC 5 QA System Administrator’s Manual
74
PICC 5 QA System Administrator’s Manual
3. Licensing
All installations of the Application on all clients will install as a 30 day
Demo. If a License has been purchased from PoutineSoft, PoutineSoft
will issue a license code for the licensed workstation. If you need more
time to evaluate the Application prior to purchase, PoutineSoft can also
extend the Demo period within reason. These Licensing functions are
carried out through the licensing form, available from The Home Form’s
File Menu before the application expires:
Selecting Licensing from this menu displays the Licensing form. If the
Application has already expired, the Licensing form will display before
the Application launches and the Security challenge or the Home form
will display:
75
PICC 5 QA System Administrator’s Manual
Here, the License Number will be displayed if it has been entered into the
backend datafile. The License number along with the Identification String
is required to remove the Demo restriction from a workstation with a
purchased license. You will receive either an extension or removal
License Code from PoutineSoft and putting that code into the License
Code on this form and hitting OK will either reset the demo or remove
the demo restriction.
76
PICC 5 QA System Administrator’s Manual
4. Sample Installation
The CD is designed to autorun the setup.exe file at it’s root. The first
screen presented is the Welcome screen.
Next, the installer asks you where to install the application’s main
program files. The default directory is C:\ Program Files\PICC5. The
program Files should not be installed on a network server, unless
Terminal Server or Citrix Server must be employed for security reasons.
The runtime environment and the supporting Office functions for the
runtime environment would crate an unnecessary burden of server
overhead and disk space.
77
PICC 5 QA System Administrator’s Manual
Next, the installer asks you where you want the default Access Databases
to be installed:
The default datafile location is again C:\ Program Files\PICC5. The
database location can be on a network drive so the files are backed up for
the user. If a server volume location is chosen, the range of users
expected to use the application should have a minimum of Add, Modify
and Delete rights on that folder due to the creation and deletion of the
.ldb file and also the creation, renaming and deletion of files required for
users to run the Compact Datafile function on their own, without
requiring IT support.
78
PICC 5 QA System Administrator’s Manual
Next, the installer presents the default selection for creating the program
group to add the application’s utilities to. The Installer will also create a
desktop Icon for the Users to more conveniently launch the application.
Next the installer presents a small review screen for verifying your
previous choices:
Clicking the Install button begins the installation:
79
PICC 5 QA System Administrator’s Manual
If this is a subsequent install to upgrade the software product to a higher
release, the following pop-up will appear, it is from the Microsoft Access
2002 runtime update.
Finally, the installer brings you to the end and asks you to reboot. It is
advised to log back on as the same admin login you used to install the
application as the completion of the registry entries and installation of
other files selected to run from RunOnce will begin their tasks after
reboot and re-logging into Windows.
80
PICC 5 QA System Administrator’s Manual
After logging back in, the Runtime Updater will continue and may
present a message depending on the OS and rights of the admin login.
Just OK this pop-up, the software will be ready for the Users.
81
PICC 5 QA System Administrator’s Manual
82
PICC 5 QA System Administrator’s Manual
5. Backend Database Relationships
83