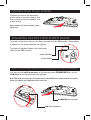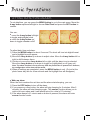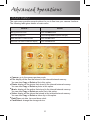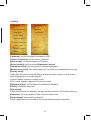
1
Welcome: Dear user, thanks for purchasing this product. Much investment in time and effort has gone into its development, and it is our hope that it will give you many years of trouble-free service. Safety Notice: 1. Place the digital photo frame on a flat surface. Any collision or falling to the ground is likely to damage the product. 2. This product should be protected against damp, and it will be damaged when damp or liquid gets inside. 3. The screen (LCD panel) of this product is made of glass, which can easily be damaged by abnormal external force or sharp object. 4. Never press the LCD, lest it may be damaged. If liquid crystal leaks, you need to clean it immediately with soap and water. 5. This product supports hot plugging of memory cards. However, it is suggested to power off this product before plugging/unplugging your memory card to protect the memory card or other devices. 6. To ensure safety and the display effect, always use the power adapter supplied by the manufacturer. 7. To clean the screen, cut off the power supply first and use lightly wet soft cloth to wipe it. Never apply alcohol, gasoline or other chemical agents. 8. To ensure normal operations of this product and avoid any accident, do not use or store this product under the following conditions: environment with too low/high temperature; places with heavy dampness or long-term direct sunshine; bad conditions such as strong shock. 9. During the operation, this product may heat lightly, which is normal. 10. According to the manufacturer, for the colored LCD, 0.01% of pixel-sum flaw rate is allowable. Your understanding is appreciated. 11. Both product and user’s manual are subject to further improvement or supplement without further notice. FCC Compliance Statement: This device complies with Part 15 of the FCC Rules. Operation is subjected to the following two conditions: (1) this device may not cause harmful interference, and (2) this device must accept any interference received, including interference that may cause undesired operation. This equipment has been tested and found to comply with limits for a Class B digital device, pursuant to Part 15 of the FCC rules. These limits are designed to provide reasonable protection against harmful interference in residential installations. This equipment generates, uses, and can radiate radio frequency energy, and if not installed and used in accordance with the instructions, may cause harmful interference to radio communications. However, there is no guarantee that interference will not occur in a particular installation. If this equipment does cause interference to radio or television equipment reception, which can be determined by turning the equipment off and on, the user is encouraged to try to correct the interference by one or more of the following measures: -Reorient or relocate the receiving antenna. -Move the equipment away from the receiver. -Plug the equipment into an outlet on a circuit different from that to which the receiver is connected. -Consult the dealer or an experienced radio/television technician for additional suggestions. You are cautioned that any change or modifications to the equipment not expressly approved by the party responsible for compliance could void Your authority to operate such equipment. If the time arises to throw away your product, please recycle all the components possible. Batteries and rechargeable batteries are not to be disposed in your domestic waste! Please recycle them at your local recycling point. Together we can help to protect the environment. Getting Started Photo frame parts IR receiver LCD Panel DPF button DSC button Lens Power indicator Power switch Volume control COPY button USB drive connector DELETE button EXIT button 4-Way button MENU button Up button Down button Left button Right button DC power jack Battery compartment cover SD/MMC/MS Pro card slot Stand on Connecting to AC power Connect one end of the accessory power cable to the photo frame, and then connect the power adapter to a power socket. Note: Always use the accessory power cable only. Powering on/off your photo frame To power on the photo frame, turn the power switch to the ON position. When power is turned on, the power indicator will light up. To power off the photo frame, turn the power switch to the OFF position. Power indicator Power switch Using the internal MEMORY/external memory card or USB drive You can use the built-in memory, or the memory card (SD/MMC/MS Pro), or the USB drive to store the photos you captured. Note: When the memory card is inserted into or the USB drive is connected to your photo frame, the data in the USB drive will be read first. SD/MMC/MS Pro card slot USB drive connector Basic Operations Setting date/time/alarm To set date/time, you can press the MENU button to go to the main menu. Move the 4-way button up/down/left/right to choose Date/Time and press the DPF button to confirm. You can: ● move the 4-way button left/right to toggle analog/digital clock ● move the 4-way button up/ down to toggle calendar on/off Calendar with analog clock Calendar with digital clock To adjust date, time and alarm: 1) Press the MENU button for about 2 second. The clock will turn into digital format and a highlight box will appear. 2) Move the 4-way button up or down to adjust value. Move the 4-way button left or right to shift between items. 3) Continue to move the 4-way button left or right until the alarm icon is selected. Move the 4-way button up or down to toggle on (highlighted) or off (gray out). Note: The alarm function is set to off every time the photo frame is powered on. However, the configuration of the alarm will be saved. 4) When all settings are completed, press the MENU button to exit. (Or just let the photo frame stay idle for a few seconds and the highlight box will disappear.) ● Wake up alarm When the clock reaches the set time and the alarm starts beeping, you can: 1) Press the DPF button to turn off the alarm. 2) If you press any other button, the alarm will stop beeping for 5 minutes. After 5 minutes, the alarm will start beeping again. This snooze function allows you to catch a bit more sleep and it can launch twice (for a total of 10 minutes). 3) If the alarm beeps for 1 minute and no button is pressed, the alarm will enter snooze function mode. e or r, Recapturing aged photos ● LCD indicators in preview mode Power indicator Zoom out Image resolution Zoom indicator Zoom in 6 Remaining shots ● To recapture aged photos: 1) Place your photo aligned with the base line on the foot stand. 2) Press the DSC button to enter the preview mode. 3) Zoom in to compose your photo if needed by moving the 4-way button up or down. 4) Press the DSC button halfway to auto focus and then fully down to capture a photo. Save 5) The photo frame will automatically play back Cancel the photo you just captured and the menu Adjust (Save/Cancel/Adjust) will show up. 6) Choose [Save] or [Cancel] or [Adjust] as you need by moving the 4-way button up or down and then press DSC button to confirm. ● When choose [Adjust]: You will see four lines indicating the default size of the photo. Move the 4-way button up/down/left/right to choose the up/down/left/right line respectively. While the line is chosen, you can move the line by using the volume control. To move the line in the right/up direction, you can turn the volume control toward the + direction. To move the line in the left/down direction, you can turn the volume control toward the direction. After all the lines are adjusted, you can press the DSC button to confirm. Move Playing back your files To see your pictures in action, only a few simple steps are needed: 1) Save your favorite pictures onto a memory card or a USB drive. You may need to use your computer and a card reader for this operation. 2) Insert the card into the photo frame or plug the USB drive to the photo frame. 3) Power on the photo frame. 4) Wait for the slideshow to automatically start. ● Slideshow playback By default, the photo frame will automatically play picture slideshow shortly after powered on. If the photo frame is in other mode, you can press the DPF button once to switch to slideshow mode. In slideshow mode, when the function bar is inactive you can: ● Press the DPF button to pause/resume slideshow. ● Move the 4-way button left or right to view previous or next picture. ● Press the DSC button to go to the preview mode for capturing a picture. ● Press the EXIT button to go back to main menu. ● Press the COPY button to copy a photo from your memory card to the internal memory. ● Press the DELETE button to delete a photo from your memory card or the internal memory. e ● Using function bar While in slideshow, you can press the MENU button for about 2 seconds to bring up the function bar. To perform a function, use the 4-way button (up/down/left/right) to shift between items, and press the DPF button to confirm. The function bar provides the following items: 1 2 3 4 5 6 7 1) Rotate picture: rotate current picture 90º clockwise. The rotated position will be kept until you remove your external memory device. 2) Zoom in/out picture. 3) Show previous picture. 4) Pause/Resume slideshow. 5) Show next picture. 6) Index playback: The image index mode allows you to view 12 image miniatures in one single page. This function is handy when you want to browse all pictures in a quick way or select a particular picture among tons of image files. In index mode, you can: ● Use the 4-way button (up/down/left/right) to move the highlight box. The pages can be scrolled up or down as well. When the desired picture is selected, press the DPF button to view the image in full screen. Note that this operation will switch the mode to slideshow. ● Copy the file from the internal memory to your external memory card: Use the 4-way button (up/down/left/right) to select the desired file and press the DPF button to confirm. The YES/NO window will show up. Use the 4-way button (up/down/left/right) to choose and press the DPF button to confirm. ● Delete the file from the internal memory or your external memory card: Use the 4-way button (up/down/left/right) to select the desired file and press the DPF button to confirm. The YES/NO window will show up. Use the 4-way button (up/down/left/right) to choose and press the DPF button to confirm. 7) The file name of current picture. Advanced Operations MAIN Menu The main menu provides several options for you to fine-tune your camera functions. The following table gives details on main menu. How to... ● Action Bring up the main menu Press the MENU button. Move the highlight bar Use the 4-way button (up/down/left/right). Enter sub-menu / Confirm an item Press the DPF button. Exit menu / Go back to slideshow display Press the EXIT button. Camera File Photo Music Video Date/Time Setting Card Select ● Camera: go to the camera preview mode. ● File: display all the files that stored in the internal/external memory. You can also Copy or Delete a file in this option. ● Photo: display all the photos that stored in the internal/external memory. You can also Copy or Delete a photo in this option. ● Music: display all the audios that stored in the internal/external memory. You can also Copy or Delete an audio file in this option. ● Video: display all the videos that stored in the internal/external memory. You can also Copy or Delete a video clip in this option. ● Date/Time: set date, time and alarm clock. ● Card Select: change the storage device. [L [C [S [S [S [M [D S m O F [S [F [D If [D [R If ● Setting: Language Date stamp Camera resolution Date/time Sleep mode Reset default Screen setting Slideshow speed Memory size check Display mode Slideshow effect Flicker [Language]: set the language that used for OSD [Camera resolution]: set the picture resolution [Sleep mode]: set the auto-power-off function [Screen setting]: set the screen Brightness/Contrast [Slideshow speed]: set the speed for slideshow playback [Memory size check]: this option allows you to check the remaining memory size [Display mode]: Smart ratio: the photo frame will display a photo in either original or fit-to-screen mode depending on its smart program Original: display a photo in original mode Fit to screen: display a photo in fit-to-screen mode [Slideshow effect]: set the pattern for slideshow playback [Flicker]: set flicker frequency [Date stamp]: If date stamp function is enabled, the date will be printed on the captured pictures. [Date/time]: check the status of date, time and alarm clock [Reset default]: restore factory defaults If reset default function is enabled, the current settings will be overridden. Appendix Troubleshooting Problem Cause Solution Power indicator is not lit. Power is off or power indicator is broken. Check whether the AC adapter is well connected and power supply is normal. No start-up interface. AC adapter is not well connected or does not power on normally. Check whether the AC adapter is well connected and make sure the photo frame is powered on normally. Can see start-up clock, but could not play (when a card or USB drive is present). Card is not correctly inserted or card is corrupt or not fully compatible. Insert the card correctly; format the card before copy files, or replace with a new card. The order of image files is not what I wanted. The order of files is sorted by file name.Numbers have higher priority than alphabets. Rename the files. Note: Since there are many brands of memory cards, please test the compatibility on the spot when you purchase the memory cards. This digital photo frame could not support pirate cards. If the memory card is correctly inserted, and the start-up interface is displayed but the photo frame can not read the card, please turn off and restart the photo frame, or format the card and re-copy files. Flicker settings Country England Germany France Italy Spain Netherlands Russia Setting 50Hz 50Hz 50Hz 50Hz 50Hz 50Hz 50Hz Country Portugal America Taiwan China Japan Korea Thailand Setting 50Hz 60Hz 60Hz 50Hz 50/60Hz 60Hz 50Hz Note: The flicker setting is based on the frequency standard of your local power supply. No 10 Appendix Specifications Item Specification Panel Size 8-inch TFT LCD Panel Resolution 800x480 pixels RGB Image Sensor 5 mega-pixel CMOS (2592x1944) Resolution Best mode (5M) / Fine mode (3M) Lens Auto focus Photo Format JPEG Max. Resolution 16 mega-pixel Auto Slide Show Yes Photo Effect Yes, Auto Video Format MPEG-4 Audio Format MP3 Background Music Yes Speaker Yes (Stereo) Internal Memory 1GB for storage; Best mode: up to 1000 pictures, Fine mode: up to 3000 pictures External Memory SD/MMC/MS Pro, up to 8GB USB Flash Drive Yes IO USB Port Yes (Host / Slave) File Browser Copy / Delete Yes Clock / Calendar Yes Alarm mode / Sleep mode Yes Power External Power Supply AC-input: 100~240V, 50~60Hz, 5V, 2A Battery NP120 (1600mA) Yes Accessory Remote Control Yes Panel Photo Capture Photo Video Audio Storage Date / Time Note: Specifications are subject to change without notification. 11