1
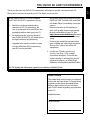
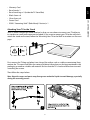
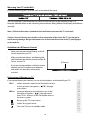
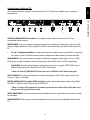
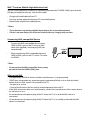
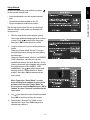
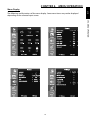
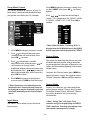
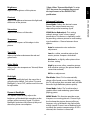
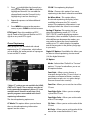
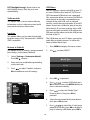
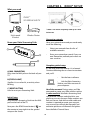
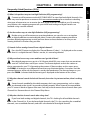
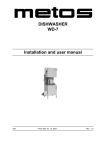
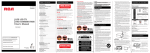
USER MANUAL
IMPORTANT SAFETY INSTRUCTIONS
1. Please carefully read and keep these instructions.
2. For your safety, please heed all warnings and follow all instructions.
3. Do not use the product, its components, or its accessories near water or any kind of moisture.
4. Clean the TV stand and frame only with dry cloth. Do not use any kind of liquid or chemical.
5. Do not block any ventilation openings on product.
6. Do not install or place product near any heat source and/or devices that produce excessive heat.
7. Only use attachments and/or accessories specified by the manufacturer.
8. Use only with the stand, bracket, or compatible display unit specified by the manufacturer, or sold
with the product. If a mobile stand is used, exercise caution when moving in order to avoid injury.
9. This product should be operated only from a type of power source with the appropriate voltage
range as indicated on the product itself. If you are unsure of the type of power supply to your
home, consult your product dealer or local power company. For products intended to operate
from battery power, or other sources, refer to the operating instructions.
10. Do not overload wall outlets, extension cords, etc. as this can result in a risk of fire or electric shock.
11. Never insert objects of any kind into this product through openings other than the designated
parts as they may touch dangerous voltage points or components that could result in fire or
electric shock.
12. Refer all servicing to qualified service personnel. Servicing is required when the product has been
damaged in any way, such as power cord or plug damage, contact with or exposure to liquids or
moisture, objects having fallen into the product, product does not operate normally according
to these operating instructions, product has been dropped, or product exhibits a distinct and/
or sudden change in performance. If any of the following has occurred, unplug this product and
refer servicing to qualified service personnel.
*Adjust only controls and/or modes according to the operating instructions, as an improper
adjustment may result in damage and will often require extensive work by a qualified technician
to restore the product to its normal operation.
13. When replacement parts are required, be sure the service technician has used parts specified
by the manufacturer or those which have the same characteristics as the original part(s) being
replaced. Unauthorized substitutions may result in fire, electric shock, or other hazards.
14. Upon completion of any service or repair to this product, ask the service technician to perform
safety checks to determine that the product is in proper operating condition.
15. Use a wall mount bracket that has been listed by an independent laboratory (such as UL, CSA,
ETL).
16. Do not defeat the safety purpose of the polarized or grounding plug. A polarized plug has two
blades with one wider than the other. A grounding plug has two blades and a third grounding
prong. The wide blade or the third prong is provided for your safety. If the provided plug does not
fit into your outlet, consult an electrician for replacement of the obsolete outlet.
2
THE OVIVO 4K UHD TV EXPERIENCE
Simply follow these 3 STEPS to complete
your OVIVO 4K UHD TV experience set up:
• Bring the astonishing resolution of your
OVIVO 4K UHD TV to life with a 4K Ultra
HD Media Player. (Availability varies per
region.)
• Receive over-the-air HD broadcasts
with a HD-quality antenna connected
directly to the back of your TV. Visit
http://www.antennaweb.org for more
information on antenna selection and
setup.
• Discover the wealth of entertainment
now available on super-high resolution
Blu-ray Disc™ player and other HD
equipment.
1. Now that you have made the best
selection in LED TV technology, be
sure to remove all accessories from the
packaging before setting up your TV.
2. To experience the stunning detail of
your OVIVO 4K UHD TV, you need access
to High-Definition programming.
• Upgrade your signal or content source
to high-definition (4K) by contacting
your HD service provider.
3. Install your TV and connect your
sources. See Page 13 for sample
connection diagrams. To ensure the
highest quality is achieved for your 4K
experience, please use HDMI (HighDefinition Multimedia Interface) cables.
This TV displays all video input signals in a resolution of 3,840 X 2,160.
Owner’s Record
The model and serial numbers are located
at the side and rear of the TV. Record these
numbers in the spaces provided below.
Refer to them whenever you call upon
your OVIVO dealer regarding any question
of this TV.
Model Number:
Serial Number:
3
US
Thank you for choosing OVIVO! This document will help you get the most out of your TV.
Please take a moment to register your TV at: http://www.ovivo.tv
IMPORTANT SAFETY INSTRUCTIONS
These servicing instructions are for use by qualified service personnel only. Do not perform any
servicing other than that contained in this User Manual or other included instructions unless you
are qualified and/or licensed to do so.
Outdoor Antenna Grounding /
If an outside antenna is connected to the
television equipment, be sure the antenna
system is grounded so as to provide some
protection against voltage surges and built-up
static charges. Article 810 of the National
Electrical Code, ANSI/NFPA 70, provides
information with regard to proper grounding
of the mast and supporting structure,
grounding of the lead-in wire to an antenna
discharge unit, size of grounding conductors,
location of antenna-discharge unit,
connection to grounding electrodes, and
requirements for the grounding electrode.
ANTENNA LEAD IN WIRE
GROUND CLAMP
ANTENNA DISCHARGE
UNIT(NEC SEC TION 810-20)
GROUNDING CONDUC TORS
(NEC SEC TION 810-21)
GROUND CLAMPS
ELEC TRIC SER VICE
EQUIPMENT
POWER SER VICE GROUNDING
ELEC TRODE SYSTEM
(NEC ART 250, PARTH)
EXAMPLE OF ANTENNA GROUNDING
AS PER NATIONAL ELECTRICAL CODE, ANSI/NFPA 70
WARNING: TO REDUCE THE RISK OF FIRE OR ELECTRIC SHOCK, DO NOT EXPOSE THIS PRODUCT
TO RAIN OR MOISTURE
Located on the product and/or box is a triangular symbol containing a lightning bolt with an
arrowhead. This symbol is intended to alert the user to the presence of uninsulated “dangerous
voltage” within the product’s enclosure that may be of sufficient magnitude to constitute a risk
of electric shock to persons. The graphic below indicates important operating and maintenance
instruction in the literature accompanying the product. This equipment is a Class II or double
insulated electrical appliance.
*CAUTION: DO NOT REMOVE COVER OR BACKING OF THE PRODUCT. THERE ARE NO USER
SERVICEABLE PARTS INSIDE. REFER SERVICING TO QUALIFIED SERVICE PERSONNEL.
RISK OF ELECTRIC SHOCK.
DO NOT OPEN
CAUTION: TO REDUCE THE RISK OF ELECTRIC SHOCK,
DO NOT REMOVE COVER (OR BACK).
NO USER SERVICEABLE PARTS INSIDE.
REFER SERVICING TO QUALIFIED SERVICE
PERSONNEL
4
IMPORTANT INFORMATION
WARNING: FCC Regulations state that any unauthorized changes or modifications to this
equipment not expressly approved by the manufacturer could void the user’s authority
to operate this equipment.
CAUTION: This product satisfies FCC Regulations when shielded cables and connectors
are used to connect the unit to other equipment. To prevent electromagnetic
interference with electric appliances such as radios and televisions, use shielded cables
and connectors for connections.
DECLARATION OF CONFORMITY:
OVIVO 4K UHD LED TELEVISION, MODEL: ONU55MA67/ONU55MA67-SH
This device complies with Part 15 of the FCC Rules.
Operation is subject to the following two conditions: (1) This device may not cause
harmful interference, and (2) this device must accept any interference received, including
interference that may cause undesired operation.
FCC RELATED INFORMATION:
This equipment has been tested and found to comply with the limits for a Class B
digital device, pursuant to Part 15 of the FCC Rules. These limits are designed to provide
reasonable protection against harmful interference in a residential installation. This
equipment generates, uses, and can radiate radio frequency energy and, if not installed
and used in accordance with the instructions, may cause harmful interference to radio
communications. However, there is no guarantee that interference will not occur in a
particular installation. If this equipment does cause harmful interference to radio or
television reception, which can be determined by turning the equipment off and on,
the user is encouraged to try to correct the interference by one or more of the following
measures:
• Reorient or relocate the receiving antenna.
• Increase the separation between the equipment and receiver.
• Connect the equipment into an outlet on a circuit different from that to which the
receiver is connected.
• Consult the dealer or an experienced radio/TV technician for help.
5
US
CAUTION: TO PREVENT ELECTRIC SHOCK, MATCH THE WIDER PRONG OF PLUG TO WIDE
SLOT IN OUTLET. FULLY INSERT.
TRADEMARKS
• HDMI, the HDMI logo, and High-Definition Multimedia Interface are trademarks or
registered trademarks of HDMI Licensing LLC in the United States and other countries.
• “Dolby” and the double-D symbol are trademarks of Dolby Laboratories.
• ENERGY STAR® is a set of power-saving guidelines issued by the U.S. Environmental
Protection Agency (EPA). ENERGY STAR is a joint program of the U.S. Environmental
Protection Agency and the U.S. Department of Energy helping us all save money and
protect the environment through energy efficient products and practice.
• ROKU®, the ROKU Logo, ROKU READY®, the ROKU READY Logo, and STREAMING STICK™
are trademarks and/or registered trademarks of Roku, Inc. in the United States and other
countries.
• MHL, the MHL logo are trademarks or registered trademarks or service marks of MHL LLC
in the United States and other countries.
• Other brand and product names are trademarks or registered trademarks of their
respective owners.
6
CONTENTS
The OVIVO 4K UHD TV Experience
Chapter 3. Roku® SETUP
Important Safety Instructions
What You Need
Know Your Roku Streaming Stick
Troubleshooting for Your ROKU® SETUP
Safety Precautions
Use and Handling
The License Agreement
Need More Help?
Important Information
Trademarks
Chapter 1.
GETTING STARTED
Before setting up your TV
Protecting Against Power Surges
Safety Information
Avoiding Audio Interference
Avoiding Direct Light
Checking the accessories
Attaching Your TV to the Stand
Mounting Your TV to the Wall
Explanation of Buttons on TV
Explanation of Jacks on TV
Choose Your Connections
MHL™ Function
When using MHL
Obtaining a Signal
Switching On / Off
Setup Wizard
8
8
8
8
8
8
9
10
10
11
12
14
14
16
16
17
30
30
31
31
31
32
32
Chapter 4. OTHER INFORMATION
Frequently Asked Questions
Troubleshooting
Battery Caution & Disposal Information
Care and Cleaning
Television Specification
FCC Information
Chapter 2. MENU OPERATION
Menu Display
Using Menu System
Input Menu
Picture Mode
Color Mode
Advanced Settings
Sound Menu
Settings Menu
Parental Control
Time Setting
Software Info.
Location
28
28
19
20
20
20
21
21
22
23
25
27
28
28
7
33
34
38
38
39
41
US
Restore to Default
USB Menu
Important Safety Instructions
CHAPTER 1.
GETTING STARTED
Before setting up your TV
Protecting Against Power Surges
•
•
•
•
Connect all components before you plug any power cords into the wall outlet or power strip.
NEVER plug your TV into an outlet that is controlled by a wall switch.
Turn off the TV before you connect or disconnect any cables.
Make sure all antennas and cables are properly grounded. Refer to the “Important Safety
Instructions” on page 2 for further information.
Safety Information
• Don’t block ventilation holes on any of the components. Arrange the components so that air
can circulate freely.
• If placing the TV in a cabinet or semi-closed structure, check for adequate ventilation behind
and around the TV.
• Don’t put weight on product after assembly. Only the TV screen may weigh on the
accompanying stand.
• If connecting speakers and/or audio receivers etc.; do not place the elements too close to
the TV. It is recommended that you arrange components far enough from the TV so that the
possibility of heat from the product won’t harm audio components.
Avoiding Audio Interference
• Position cables properly; insert each cable firmly into the designated jack.
• If placing components above the TV, route all cables to one side of the back of the TV instead
of down the middle in order to ensure proper reception.
• If your antenna uses 300-ohm twin lead cables, do not coil the cables.
• Keep twin lead cables away from audio/video cables.
Avoiding Direct Light
Don’t place the TV where excessive sunlight or interior lighting is directed towards the front
screen. Use soft or indirect lighting to better ensure the life of your product.
Checking the accessories
Check that the following parts are included with your product in addition to this User Manual.
•
•
•
•
Remote Control x 1
Size AAA Batteries x 2
Quick Start Guide x 1
User Manual x 1
8
Warranty Card
Base Stand x 1
Base Stand Legs x 2 (Inside the TV Stand Box)
Black Screw x 6
Silver Screw x 6
Power Cord
ROKU® Streaming Stick™ (Roku Ready® Version) x 1
US
Attaching Your TV to the Stand
Your TV comes without the stand attached so that you can choose to mount your TV either to
its stand or to a wall (wall mount not included.) If you want to mount your TV to the wall, don’t
attach the stand and instead, follow the “Mounting Your TV to the Wall” instructions on the next
page.
First, remove the TV bag and place it on a large, flat surface such as a table or countertop. Next,
remove the TV screen itself from the carton and place it face down on the bag contained in the
packaging or another suitable soft material. Be sure that the TV is level and face down to avoid
scratching the screen.
Then follow the steps below:
Note: Keep the screws and parts away from grease and other liquids to avoid damage, especially
during the assembly process.
1
2
9
CH1. GETTING STARTED
•
•
•
•
•
•
•
Mounting Your TV to the Wall
If you are mounting your TV to the wall, do not attach the stand.
The VESA number is the horizontal and vertical measurement of the mounting holes. For
example, 400x400 refers to the mounting measurements being 400mm horizontally and 400mm
vertically.
Notes: Follow the directions included with the wall mount to mount the TV to the wall.
Caution: Your wall mount must be able to bear a minimum of five times the TV’s net weight to
avoid causing damage. Weight information can be found on the outside of the TV packaging or
on our website.
Guidelines for IR Remote Control
•
Point your remote control directly at the IR
sensor located on your TV.
•
Make sure that no objects are blocking the
path between the remote control and the IR
sensor on your TV.
•
If you are having problems with the remote
control, reinsert or replace your batteries
and make sure that they are correctly
inserted.
IR Sensor
Explanation of Buttons on TV
If you cannot locate your remote, you can use the buttons on the back of your TV.
CH+/-
Selects channels stored in the channel list or acts
as the up/ down navigation (
) through
menu items.
VOL+/-
Increases/decreases the volume or acts as the
) through menu
left/right navigation (
items. VOL+ also acts as the OK button when in
the menu system.
Brings up the TV’s main menu.
Selects the signal source.
Turns the TV on or to standby mode.
10
Explanation of Jacks on TV
US
This section describes the jacks on the back of your TV. There are multiple ways to connect
components.
CH1. GETTING STARTED
DIGITAL AUDIO OUTPUT (coaxial): Use a digital coaxial cable to connect your TV to a
compatible audio receiver.
VIDEO INPUT: Lets you connect a component that has component video jacks, such as a DVD
player or digital cable box. (Green jack for Y/VIDEO connection, blue jack for Pb and red jack for
Pr)
•
Pr, Pb, Y (Component Video): Provides good picture quality because the video is separated
into three signals. Use three video-grade or component video cables for the connection.
AUDIO INPUT: Lets you connect a component that has composite video jacks, such as a VCR,
DVD player or digital cable box. Red and white jacks for R AUDIO and L AUDIO connection.
•
L/R AUDIO: Provides left and right audio connection when using the CMPT VIDEO input.
Red and white jacks for R AUDIO and L AUDIO connection.
**Note: AV IN and COMPONENT IN share the same L/R AUDIO and Y/Video input jacks.
VGA/PC INPUT: Connect your computer or other component with a VGA output to this jack
using a 15-pin, D sub cable.
DVI/PC AUDIO INPUT (used for DVI/PC only): Provides audio connection when using HDMI/
DVI INPUT 1 jack for DVI or when using PC VIDEO IN.
**Note: If using a DVI component, remember to connect the audio cable as DVI cable carry
only the picture signal, not the sound.
ANT/CABLE INPUT: Lets you connect a coaxial cable to receive signal from your antenna, cable,
or cable box.
AUDIO OUTPUT: Allow you to connect headphones to listen to the sound produced from the
TV.
11
HDMI 1 (4K/DVI IN) : Provides an uncompressed digital connection that
carries both video and audio data by way of an integrated mini-plug
cable. Since HDMI technology is based on Digital Visual Interface (DVI),
the jack on the back of your TV is also compatible with DVI components.
HDMI 2 (4K) : Lets you connect a component, such as a digital cable
box, with an HDMI output for the best picture quality.
HDMI 3 (4K) : Lets you connect a component, such as a digital cable
box, with an HDMI output for the best picture quality.
HDMI 4 (MHL®) : Lets you connect a component, such as a digital cable
box, with an HDMI output for the best picture quality. MHL® stands for
Mobile High-definition Link, and allows you to link an MHL®-capable
mobile device to the television.
USB: Allows you to connect a compatible flash drive or storage device.
Choose Your Connections
There are several ways to connect components, such as DVD players and digital cable boxes, to
your TV.
**Note: No cables are supplied with this unit. Please purchase the necessary cables separately. A
high-speed HDMI cable is recommended for better compatibility.
12
US
HDMI Connection [ BEST ]
HDMI 2
Component Video Connection [ BETTER ]
Composite Video Connection [ GOOD ]
COMPONENT INPUT (CMPT)
AUDIO/VIDEO INPUT (AV)
Select the input source by pressing the
“INPUT” button on the remote control.
ROKU
PC Connection
DVI port
PC Connection
VGA port
Connection
HDMI 4
Included
**Only when the Roku® Streaming Stick™
(Roku Ready® Version) is plugged into the
HDMI4/ MHL™ port, the HDMI4 under the
INPUT source menu will be displayed as
ROKU.
HDMI 1
13
CH1. GETTING STARTED
** Connection quality will be same on HDMI1/3/4
MHL™ Function (Mobile High-definition Link)
You can use the following functions by connecting between the TV HDMI 4 (MHL) port and the
USB port of mobile phones etc. with an MHL cable.
• Charge with mobile phone from TV
• Two-way remote operation between TV and mobile phone
• Video/Audio output from mobile phone
**Notes:
• These functions may not be available depending on the connected equipment.
• If there is no more battery life left in the connected device, charging may not start.
Connecting MHL-compatible Device
•
•
Connect the MHL-compatible device to the
HDMI 4 (MHL) port on the TV using an MHL
cable (not supplied), and charging will start
automatically.
HDMI 4
When connecting MHL-compatible device to
HDMI 4 (MHL) port on the TV, switch TV source
to HDMI 4.
**Note:
• Do not connect the MHL-compatible device to any
port other than the HDMI 4 (MHL) port.
When using MHL
• Interoperability with MHL devices of other manufacturers is not guaranteed.
• OVIVO does not provide any guarantee against operational failure such as that described
below when an MHL source is connected to the TV:
- No picture or sound
- Some of the functions do not work by remote operation from the TV
• If the MHL connection does not work properly, contact the manufacturer of the source device
for advice on its use.
• Do not disconnect the power plug of the TV when the TV is on and the MHL device is
connected.
• Do not disconnect the power plug of the TV when the TV is in standby mode and the MHL
device is connected.
14
Remote Buttons And Features
Turns the TV on or off.
US
INPUT Press to choose and display a connected device.
Enters a channel number, then press OK (or let the
0 - 9 entry timeout).
CH1. GETTING STARTED
To enter a digital channel with a sub-channel, enter
. the main channel; then, press the dot (•), the subchannel, and then the OK button.
Press to bring up the main menu or to return to the
MENU previous menu.
Press
to navigate in the Roku GUI and
press OK to make selection.
OK Highlights different items in the TV menu and adjusts
the menu controls.
ZOOM+/- Selects the desired screen format.
Sets a time for UHD TV to power off after a
SLEEP+/- designated amount of time.
Press to back one level in the Roku GUI.
BACK Press to return to a previous channel.
Press for special function in the Roku GUI.
*/INFO If no menus are currently active, press */INFO to
show information.
Change between 6 picture display modes: Personal,
PICTURE Energy Star, Dynamic, Cinematic, Natural, and Sports.
VOL+/- Increases or decreases the TV volume.
MUTE Turns silent mode on or off.
Press the FAV button to browse the channels set in
to select one of the favorite
channel to watch. Press CLEAR to exit the menu.
FAV your favorite list. Use
MEDIA Opens up the USB menu.
Toggles the Electronic Programme Guide between on
GUIDE and off. Only available for digital channels.
Removes any menu or display from the screen and
CLEAR return to normal viewing.
ROKU
Launches Roku home menu. Choose from 1500+
streaming channels.
CH+/- Navigates through channels.
TV Press to access TV mode.
MTS Press to adjust audio language if applicable.
These buttons can be used to play, pause playback,
fast forward or rewind the video in the Roku GUI.
Play and navigate through music or photos in the
USB menu or other applicable device.
15
**Note: Most of the remote
buttons are available when
streaming movies, music by
plugging the Roku ®Streaming
Stick™ into the MHL™ port.
Obtaining a Signal
The first step in connecting your TV is obtaining a signal. The back panel of your TV allows you to
receive analog and/or digital channels by using the HDMI or ANT/CABLE INPUT connections. To
obtain the best quality, use the HDMI connection.
Connect the outdoor aerial device to the ANT/
CABLE INPUT connection on the back of the
TV to receive off-air channels. Use an HDMI
connection to display the best picture and
sound quality for input.
ANT/CABLE
INPUT
Outdoor or indoor Antenna
• If you have a digital cable box, you may need
Or
to call your cable company provider. They
may recommend special cables to use to view
Or
digital channels.
• The aerial socket (75 OHM - VHF / UHF
RF Coaxial
/ cable) can be used for connecting an
Wire
Cable Box,
external antenna or other equipment fitted
(75 ohm)
(Wall Outlet)
with a modulator (video recorder, etc.) We
recommend that you do not connect another
equipment to your TV initially, so as not to
complicate the set-up procedure with the
additional steps involved. Connect them once you have finished setting up channels.
• Visit www.antennaweb.org for help in deciding which type of antenna to use in order to
receive the local channels available to you.
Switching On
Follow the instructions below on how to switch on your TV set and use the remote control
before proceeding to following pages regarding channel scan procedure.
1. Insert two AAA batteries in the remote control.
Precautions on using batteries:
- Only use the battery type specified.
- Make sure you use the correct polarity.
- Do not mix new and used batteries.
- Do not use rechargeable batteries.
2. Connect the power cord to the TV then plug it into a power outlet. Do not connect to an
outlet with any kind of on/off switch.
3. When powered on, if the TV set is in standby mode, press
the TV to turn on.
on the remote control or on
Switching Off
To put the TV into standby mode, press on
the remote control or on the TV. The TV set will
remain powered up, but with low energy consumption. To disconnect power from the TV set,
unplug the power cord from the power outlet.
16
Setup Wizard
US
Perform the following steps before you press
on the remote control unit.
OVIVO
Français
The first time you switch the set on, the Setup
Wizard will open, and guide you through the
setup process.
1. The first step of the setup requires you to
select your preferred language for the menu
system. Press
to select your language
then press OK to enter the next screen.
2. A menu screen asks you to set the power on
mode.
• Choosing “Home Mode” for the TV assigns
the optimal picture settings for most home
environments.
• Choosing “Retail mode”, which is not ENERGY
STAR® compliant, sets the unit up with
predefined settings for retail displays. In this
setting, the power consumption may exceed
the requirements of the ENERGY STAR®
qualification. Use
to select the desired
location setting (“Home Mode” or “Retail
mode”); then press OK to continue to the
next screen.
Note: If you select “Retail Mode”, a screen
menu will display the option to return to the
previous menu to select “Home Mode” by
pressing to select Go Back and press OK to
confirm, or select “Proceed“ to proceed to the
next screen.
to select the current local time zone.
3. Use
Press OK to continue to the next screen.
4. Select either “Antenna” or “Cable” as the
channel scan type. Press OK to begin the
channel scan process.
17
CH1. GETTING STARTED
• Insert the batteries into the remote control
unit.
• Connect the antenna cable to the TV.
• Plug in the power cord into an outlet.
Note: Find out what kind of connection is made
with your TV before selecting “Antenna” or
“Cable”.
5. The screen will change to show the progress
of the channel scanning process; available
channels will be stored in the TV’s memory.
Note: If you do not want to scan for channels
at this time, you can press CLEAR or MENU
to exit the scanning process, and perform
the channel scan later in the “Settings”
menu. If you are using a digital cable box
and connected using the RF connection, you
do not need to complete the Channel Scan.
You can simply tune to channel 3 or 4 on the
TV, then use the remote that came with your
cable box.
6. When the scanning is finished, the unit will
display the first channel found.
18
CHAPTER 2. MENU OPERATION
Menu Display
Tint (G/R)
19
CH2. MENU OPERATION
Personal
US
The following are illustrations of the menu display. Some menu items may not be displayed
depending on the selected input source.
Press MENU to display the menu screen. Press
to select INPUT, then press OK/ to display
options.
Using Menu System
This section explores the menus of your TV.
Each menu is outlined and detailed to help
you get the most from your TV. Example:
Press
to select the desired input
source: “ TV / Component/ AV / HDMI1 / HDMI
2 / HDMI 3 / HDMI 4 / PC / USB “. Press OK to
confirm.
Dynamic
Dynamic
Tint (G/R)
**Note: When the Roku® Streaming Stick™ is
plugged into the HDMI4/MHL port, the HDMI 4
on the input menu will be displayed as “ROKU”.
1. Press MENU to display the menu screen.
2. Press
to select the desired menu
(selected item will turn to blue), then
press OK/ to enter.
Picture Menu
The menus for adjusting the picture are used
to obtain the best picture settings based on
to your preference, the types of programs you
watch, and the ambient lighting environment
of your room.
3. Press
to highlight a specific
adjustment item, and then press
to
set functions or change values.
• Additional related adjustment items may
be displayed. Press
to select or
adjust the desired item, and if necessary,
press OK to confirm.
To access the “Picture” menu, press MENU to
display the menu screen. Press
to select
“Picture”, then press OK/ to display options.
4. Press MENU to return to the previous
menu or press CLEAR to close the menu.
Picture Mode
**Note: Operations vary depending on the
function or item. Some menu items may not
be displayed or may be displayed in grey (not
selectable) depending on the selected input
source.
Displays a list that lets you select one of the
preset picture settings: “Energy Star, Dynamic,
Cinematic, Natural, Sports, Personal.” Choose
the setting that best suits your viewing
environment.
Input Menu
**Note: “Energy Star” will set the TV to
maintain energy levels qualifying as ENERGY
STAR® compliant. Selecting other options may
cause power consumption to change.
The “INPUT” menu allows you to select the
input source.
20
Adjusts the brightness of the picture.
US
**Note: When “Dynamic Backlight” is set to
“Off ”, the power consumption may exceed
the requirements of the ENERGY STAR®
qualification.
Brightness
Contrast
Advanced Settings
Zoom Mode: Selects the desired screen
format. The screen format may vary
depending on the incoming signal.
Saturation
3DNR (Noise Reduction): This setting
reduces picture “static” or any type of
interference. This feature is especially useful
for providing a clearer picture in weak analog
signal conditions. Choose between these
options:
Adjusts the richness of the color.
Sharpness
Adjusts the crispness of the edges in the
picture.
Auto for automatic noise reduction
adjustment.
Tint (G/R)
Low for a softer, smoother picture that
retains picture sharpness and detail.
Adjusts the balance between the red and
green levels.
Medium for a slightly softer picture than
the Low setting.
Color Mode
High for an even softer, smoother picture
than all other settings (the picture detail is
somewhat reduced.)
Adjusts the color temperature: “Normal, Warm
and Cool”.
Off for no adjustment.
Backlight
Film Mode: Select “On” to automatically
detect a film-based source. With this feature,
the TV will analyze then recreate each still film
frame for high-definition picture quality.
Adjusts the backlight level. the menu line is
grayed out by default. Only when “Dynamic
Backlight” is set to “Off ”, canthe menu line can
be adjustable.
Game Mode: Select “On” to achieve best
graphic effects and rendering speed when
playing games.
Dynamic Backlight
This option automatically adjusts the
brightness of the backlight according to the
content of the incoming signal. “Dynamic
Backlight” optimizes the picture quality and
decreases power consumption.
MEMC Mode: This function provides more
sharpness on moving pictures. Choose High
level to keep the picture sharp at all times;
however, very small details may fade a little
at high speed. Choose Low or Medium levels
to reduce the motion compensation. If Off is
selected, this function is turned off.
21
CH2. MENU OPERATION
Adjusts the difference between the light and
dark areas of the picture.
Sound Menu
MTS
The “Sound” menu lets you adjust audio
output. To access the “Sound” Menu, press
to
MENU on the remote, and then use
select “Sound”. Press OK/ to enter. The
following options will be displayed:
This option controls the manner in which the
sound comes through your speakers. Available
options vary according to the input selected.
**Note: The MTS option is only available for
analog channels.
Equalizer
The equalizer allows you to adjust the audio
frequency settings. You can select one of the
five preset options or create a custom preset.
Mono (available for regular TV viewing
only): This option plays the sound in
mono only. Use this setting when receiving
broadcasts with weak stereo signals.
Sound Mode: Allows you to choose a specific
sound preset: “Standard, Music, Movie, Sports
and Personal”.
Stereo: This option splits the incoming
stereo audio signal into left and right
channels. Most TV programs and recorded
materials have stereo audio.
Balance: Adjust the amount of audio
transmitted through the left and right
speakers. Generally, this option does not need
to be modified.
Second Audio Program (SAP): This
option plays the program’s audio in a
second language, if available. SAP audio
is broadcasted in mono only. SAP is also
used to broadcast a program’s audio with
descriptions of the video for the visually
impaired.
Frequency Range: Choose a band and make
adjustments. When making adjustments, the
“Sound Mode” option automatically changes
to “Personal.” Press
to select the desired
frequency (100Hz, 300Hz, 1.5KHz, 5KHz,
to adjust
10KHz) you wish to adjust. Use
the level.
Audio Language
Choose from the list of languages available for
the program you’re watching. The language
chosen becomes your preferred language for
all digital channels until you turn the TV off. If
the language chosen is not being broadcasted
with a program, the TV plays the default
language for the program (usually “English” in
the US.)
Speaker
Option “On/Off.” When you select the “Off ”
option, the TV’s built-in speakers will be
turned off.
SPDIF Type
This option controls the type of audio stream
sent to the Digital Audio Output jack (SPDIF
OUT). Available options are “Dolby Digital®,
PCM”.
**Note: The “Audio Language” option is only
available for digital channels.
Smart Volume
Option “On/Off.” This option reduces the
annoying spike in volume that often occurs
during commercial breaks, and also amplifies
softer sounds in program material, eliminating
the need for constant volume adjustment.
22
Settings Menu
US
The “Settings” menu allows you to configure
the TV to your preferences. Press MENU to
to select
display the menu screen. Press
“Settings”; then press OK/ to display the
following options below.
Select the menu language from English,
Spanish, and French.
the search progress and how many
channels are found in the on-screen
menu. **Note: If you wish to stop the
search, press the CLEAR button.
3. After the scan is complete, press MENU
to return to the previous menu, or press
CLEAR to close the menu.
Favorite:
1. Select Settings > Channel > Favorite,
press OK/ to enter, a list of available
channels displayed.
Channels
Signal Source: Choose the signal source
(“Cable” or “Antenna”) you have connected to
the ANT/ CABLE INPUT.
2. Press
to select the desired channel,
then press OK to set it as a favorite, and a
heart icon will appear to the right side of
the channel indicating this channel has
been stored in the favorite channel list.
Scan: When you perform a Channel Scan,
your TV searches for channels with signals and
stores the channel information in the Channel
List. Then, as you watch TV and press CH+
or CH-, your TV goes to the next or previous
channel in the Channel List and skips the
channels that do not have signals. If the TV
signal source changes – for example, if you
change from an outdoor antenna to cable TV
– you will need to rescan for channels.
3. Set other favorite channels as desired.
4. You can easily select the favorite channel
to watch using FAV and
buttons.
Show/Hide: You can hide channels in the
Channel List. Then, when you press the CH+
or CH- button, the TV will skip the hidden
channels. You can still access these hidden
channels by pressing the number of the
channel into the numeric keypad.
To automatically scan for channels:
1. After choosing a signal source, select
Settings > Channel > Scan.
To hide specific channels:
1.
2. Press OK/
to start the scan. You can see
23
Select “Show/Hide”, press OK/
the submenu.
to open
CH2. MENU OPERATION
Language
2.
Press
to highlight the channel you
wish to hide; then press OK to select the
highlighted channel. You can add the
channel back into the Channel List by
highlighting it and un-checking it.
3.
Repeat the process to hide additional
channels.
4.
Press MENU to return to the previous
menu, or press CLEAR to close the menu.
CC Off - No captioning displayed.
CC On - Chooses this option if you want
captioning to be shown whenever available.
On When Mute - This option allows
the closed captioning to display (when
available) whenever the TV’s sound is
muted. The captioning information is not
displayed when the sound is not muted.
Analog CC Option: This option lets you
select the captioning mode (CC1-CC4 or
TEXT1-TEXT4) used for displaying caption
information, when available. If you are unsure
of the differences between the modes, you
may prefer to leave the closed captioned
mode set to CC1, which displays complete
text of the program in the primary language
in your area.
DTV Signal: Show the condition of DTV
signal: Good or Bad, Normal. Bad for no DTV
signal or very weak DTV signal.
Closed Captioning
Many programs are encoded with closed
captioning (or CC) information, which allows
you to display the audio portion of a program
as text on the TV screen.
Digital CC Option: If available, this allows you
to select a closed captioning service mode
(1-6) for digital channels.
CC Option
Mode - Select either “Default” or “Custom”
options. “Custom” mode allows you to set
the options below.
Font Style - Allows you to choose a
character design for the CC text. A font is a
complete assortment of letters, numbers,
punctuation marks, etc. in a given design.
You can choose from a variety.
Font Size - Allows you to set the size of the
CC text.
**Note: CC settings are not available for HDMI,
CMPT or PC inputs. These settings must be set
in the connected component’s menu. CC is not
available on all channels at all times. Only
specific programs are encoded with closed
captioning information.
Font Edge Style - Allows you to set edge
style of the CC text.
Font Edge Color - Allows you set the color
of the CC text edge.
The closed captioning options are:
FG Color - Allows you to set the color of the
CC text.
CC Mode: This option allows you to choose
the way closed captioning information
appears on the screen.
BG Color - Allows you to set the color of the
area of the screen behind the CC text.
24
FG Opacity - Allows you to set the
appearance of the CC text.
BG Opacity - Allows you to adjust the
intensity of the BG Color behind the CC text.
US
no content themes are blocked only if you
block age-based ratings. You can also block
programs that are considered unrated.
Change Password
Parental Control
The choices in the US V-Chip and Canada
V-Chip menus involve software inside your
TV, referred to as V-Chip, which allows you to
block TV programs and movies. TV programs
can be blocked by age-based ratings, such as
1.
Select “Parental Control > Change
Password”, press OK/ to enter.
2.
Use the number buttons to enter the
four-digit number for your password.
3.
Re-enter the same code to confirm the
password.
**Note: The password must be entered before
the TV will continue with Parental Control
settings next time. The master password is
2458. If you forget your password, enter this to
override any existing password.
System Lock
TV-MA. If available, TV programs can also be
blocked by content, such as adult language
(L). Movies can only be blocked by age-based
ratings. Once you block programs, you can
unblock them by entering a password. By
default, the software inside your TV is turned
off or unlocked.
You must remember to set “System Lock” to
On mode to have the following parental lock
settings to take effect.
Input Block
The V-Chip is the component which reads
the program’s age-based rating (TV-MA, TV14, etc.) and content themes (Violence (V),
Adult Language (L), etc.). If you have blocked
the rating and/or content themes that the
program contains, you will receive a message
indicating the channel is currently blocked.
Change the channel or to enter your password
and temporarily deactivate the parental
controls.
1.
Select “Parental Control” > “Input Block”,
press OK/ to display the Input source
list screen.
2.
Press
to select an input source, and
to block or unblock the input.
press
When you tune to the blocked input, you
must enter the password to view it.
US
Before proceeding, you may need to switch
INPUT to “TV” in order to continue. At “US”,
press OK/ to display submenus:
Broadcasters are not required to provide
content themes, so programs received with
25
CH2. MENU OPERATION
The first time you enter the Parental Control
menu, you must enter the default password
0000 to adjust other parental control settings.
Then set your individual password:
US V-Chip TV Ratings
G
General audience
You can automatically block all program
ratings above a specified age-based rating
level.
PG
Parental guidance suggested
PG-13
For children under 13
R
For children under 17
requires accompanying
parent or adult guardian
NC-17
No one under 17 permitted
X
Mature audience only
1.
Select “Parental Control > US > TV
Rating”, press OK/ to enter the US TV
Ratings screen. In the US TV Ratings
panel, you can customize the program
blocking of the following TV ratings:
TV-Y
All Children
Canada English or French V-Chip Ratings
TV-Y7
Children 7 years old and
older
TV-G
General audience
TV-PG
Parental guidance suggested
TV-14
Parents strongly cautioned
TV-MA
Mature audience only
If you receive Canadian programs, you can
block Canadian English and French V-Chip
by ratings only. When you block a particular
rating, you automatically block the higherrated programs as well. To block Canadian
English and French program ratings, follow
these steps:
You can also customize the TV ratings for
the following content labels:
1.
Select Parental Control > Canada, press
OK/ to enter the next screen.
2.
Press
to select “Canada Eng or
Cannada Fre”. Press OK/ to proceed.
D
Suggestive or sexual dialogue
L
Adult language
Canadian English Ratings
S
Sexual situations
C
Children
V
Violence
C8+
Children 8 and older
FV
Fantasy violence
G
General audience
PG
Parental guidance
14+
Viewer 14 and older
18+
Adult
2. Press
to navigate through the
TV rating options. Press OK to block or
unblock it.
US V-Chip Movie Ratings (MPAA)
Canadian French Ratings
You can automatically block all program
ratings above a specified age-based rating
level.
G
General Audience
8 ans+
Viewer 8 and older
1.
16 ans+ Viewer 16 and older
13 ans+ Viewer 13 and older
Select “Parental Control > US > MPAA”,
press OK/ to enter the US Movie
Ratings screen. In the US, Movie Ratings
panel, you can customize the program
blocking of the following movie ratings:
18 ans+ Adult
26
3.
Press
to select the desired rating, and
press OK to block or unblock it.
Clear All
Time Zone: You can set the correct Time Zone
for your area.
Unrated
Auto Sync: Press
to choose On to acquire
the time automatically from digital channels.
The Unrated Ratings option lets you decide
if programs that the V-Chip recognizes as
unrated or exempt can be viewed. Unrated TV
programs may include news, sports, political,
religious, local programs, weather programs,
emergency bulletins, public announcements,
and other programs without ratings. The
Exempt option applies to both US and
Canadian unrated programs and Canadian
programs rated E.
1.
Select “Parental Control” > “Unrated”.
2.
Press
Block.
to toggle between View and
View All unrated programs are available.
Block All unrated programs are not
available.
1.
Select “Settings > Time Setup ”, press
OK/ to proceed to the next screen.
2.
Options on this screen include:
Keyboard Lock
This option allows you to block (disable) or
unblock (enable) the buttons on the back of
the TV, also known as the “keyboard.” The
remote will still tune to any channel entered. If
you are using this to keep children from
changing channels, be sure to remove access
to any and all remotes that are capable of
operating the TV while you have the keyboard
blocked. To block the keyboard buttons, select
“Parental Control > Keyboard Lock”, and
to choose the “Block” option. To
press
enable these buttons again, return to this
menu and choose the “UnBlock” option.
Clock: Only available when “Auto
Synchronization” is set to “Off ”. Select
“Clock” and press OK to enter, set the
following time items:
Year: Press
to select “Year”, press
to set the year. Follow the same steps to
set “Month, Day, Hour, Minute.” PM/AM
will change automatically when you set
the time.
Sleep Timer: Press
to set the TV to turn
off after a given amount of time.
27
CH2. MENU OPERATION
Time Setting
Reset RRT: Reset to the default RRT setting.
US
This option resets all settings (including
parental control settings) to the factory
defaults. When you select this option, a
confirmation window will appear.
RRT Setting: Allows you to select the
downloadable rating level. In the event
that a new rating system is provided by the
broadcaster, the new rating options would
appear within this menu.
DST (Daylight Saving): Select Auto to set
the Daylight Savings Time for your area
automatically.
USB Menu
You can connect a device with USB to your TV
or use a USB flash drive (only FAT, FAT32 and
NTFS formatted USB devices are supported).
This connection allow you to insert a USB flash
drive directly or connect a compatible mass
storage device with USB, such as a digital
camera, a multi-format card reader, or an MP3
player. If you have a USB drive, plug it into the
drive directly. If you have a device with a USB
port, connect one end of the USB cable to the
USB port and the other end to the USB jack on
the side of the TV.
Software Info.
This option allows you to see the software
information such as software version, build
time, panel and tuner information.
Location
This option allows you to select the desired
location setting. Only “Home mode” is ENERGY
STAR® compliant.
The USB feature on your TV allows you to play
audio files or display pictures. To utilize this
feature, follow these steps:
Restore to Default
1.
Press MENU to display the menu screen.
This option resets all settings (except parental
lock settings) to the factory defaults.
2.
Use
1.
2.
3.
to select “INPUT“.
Select “Settings > Restore to default”,
Press OK/ to enter
Media Type
Enter your password before proceeding
to the next step.
Photo
Press
to select “Confirm” and press
OK to confirm to reset all settings.
Music
28
to proceed.
3.
Press OK/
4.
Press
to select “USB” then press
OK to enter or press the MEDIA button to
access the menu directly.
5.
Press
to select the “Media Type”Photo or Music. Then press OK to
proceed.
6.
Select the connected disk and/or device
then press OK to enter.
7.
Press
to select files. If selecting a
photo or music file, press OK to display or
play. If selecting a file folder, press OK to
enter and press
to select a file
and press OK to display or play.
9.
Press CLEAR to return to previous menu.
Press BACK to exit USB.
CH2. MENU OPERATION
While displaying photos or playing
music, adjust as you like according to the
operation guide icon on the bottom of
the screen.
US
8.
**Note: The USB function can only be used
for photos or music. Other data will not be
recognized. To play other content such as
movies or videos from a USB flash drive,
connect it to your computer then connect the
computer to your TV.
29
CHAPTER 3. ROKU® SETUP
What you need
TM
OVIVO
55” ARES 4K UHD TV
**Note: The initial setup may take up to 1min
to turn on.
High speed
Internet
Wireless Router
Connect to network
Have your network name and password ready
to do the following:
Know your Roku Streaming Stick
•
Select your network from the list of
available networks.
•
Enter your network password, if you use
one. Remember, network passwords are
case sensitive.
Complete guided setup
It’s the final strech and hooray--it’s a breeze!
Continue following the on-screen instructions
and you’ll:
A.[MHL CONNECTOR]
Plugs into the MHL port on the back of your
TV.
•
B.[STATUS LIGHT]
Signifies it is on when lit, or activity when
flashing.
Get the latest software.
•
Link the Roku Streaming
Stick to your Roku account on
your computer.
C. [RESET BUTTON]
Used to reset your Streaming Stick.
Your Roku account: During setup, you’ll be
prompted to create your Roku account online
at roku.com/link. Your Roku Streaming Stick
will generate a unique code that links your
player to your new account. Roku accounts are
free and secure. And while a valid credit card
number is required to create your account,
rest assured you will only be charged if you
authorize purchases of channels and games
from the Roku Channel Store.
Initial Setup
Plug the Roku Streaming Stick into the MHL
port on the back of the TV.
RO
KU
Now press the ROKU home button (
) on
the remote to jump right into the guided
setup on the screen.
30
If you cannot see a picture on your TV:
Make sure your TV is turned on.
•
Press the ROKU Home button on the
remote to jump right in the the guided
Roku setup on the screen.
If you cannot connect to your wireless
home network during guided setup:
•
Make sure there are no obstructions,
like cement walls, between your Roku
Streaming Stick and your wireless router.
It’s highly suggested to adjust the
location of your wireless router in a good
signal range from your Roku Steaming
Stick.
•
Make sure you select the correct wireless
router name on the “Wireless” screen.
•
Make sure you enter the correct
password, if your network is securityenabled (password is case sensitive).
•
If you have turned off SSID broadcasting
on your wireless router, you can add your
network by selecting “My network is not
shown” from the “Wireless” screen.
•
Observe all warnings, precautions, and
instructions.
•
Stop use, unplug the device that the
Streaming Stick is inserted into from the
electrical outlet and disconnect any other
cables immediately if the Streaming Stick
or the device functions in an abnormal
manner, produces unusual sounds, or
becomes too hot to touch.
•
For more information on product safety
and troubleshooting, please go to www.
roku.com/support.
Use and Handling
•
**Note: Roku Streaming Stick (Roku
Ready Version) Enhanced Game Remote
is sold seperately.
•
Take a 10-15 minute break every hour
if playing video games and avoid
prolonged use of the remote.
•
Stop playing video games if you begin to
feel tired or if you experience discomfort
or pain in your hands or arms while
operating the remote. If the condition
persists, consult a doctor.
•
If you experience any of the following
health problems, discontinue use of the
Streaming Stick immediately:
If you cannot hear sound:
•
Make sure the connectors on the cables
between your TV are fully connected.
•
Make sure the volume on your TV or
connected device is turned up and isn’t
on mute.
•
Make sure the input on your TV matches
the output (HDMI or MHL) used with your
Roku Streaming Stick.
When playing video games, use in a welllit area and stand or sit as far away from
the screen as possible.
-Dizziness, nausea, fatique or symptoms
similar to motion sickness.
-Discomfort or pain in a part of the body,
such as eyes, ears, hands, or arms. If
symptoms persist, consult your physician.
Safety Precautions
The Streaming Stick has been designed with
31
CH3. ROKU SETUP
•
US
the highest concern for safety. However, any
electrical device, if used improperly, has the
potential to cause fire, electrical shock, or
personal injury. To help ensure accident-free
operation, follow these guidelines:
Troubleshooting for your ROKU® SETUP
•
Keep the Streaming Stick and any
accessories, including the remote, out of
the reach of small children.
•
Do not touch the Streaming Stick during
an electrical storm.
•
Do not allow liquid, small particles or
other foreign to get into the Streaming
Stick or accessories.
•
Do not expose the Streaming Stick to
smoke or steam.
•
Do not expose the Streaming Stick or
accessories to high temperatures, high
humidity or direct sunlight.
from the date of purchase (“Warranty Period”).
If Roku determines that the Streaming Stick’s
hardware is defective, Roku will either repair
the unit or replace the unit with either a new
or rebuilt Streaming Stick, at the company’s
discretion. If the Warranty Period has expired
or is otherwise not applicable, we will return
the Streaming Stick to you. More information
about this warranty can be found at www.
roku.com/support. THE FOREGOING
SETSFORTH ROKU’S SOLE OBLIGATION AND
YOUR EXCLUSIVE REMEDY IN THE EVENT OF
ANY BREACH OF THIS LIMITED WARRANTY.
Need more help?
Check out the FAQs, instructional videos, and
user forums on www.roku.com/support.
Roku Streaming Stick™
The License Agreement
The Roku and third-party software license
terms can be found at: www. roku.com/
license. Use of the Roku Streaming Stick
(“Streaming Stick”) constitutes acceptance of
as well as agreement to those license terms.
ROKU®, the ROKU Logo, ROKU READY®, the
ROKU READY Logo, and STREAMING STICK™
are trademarks and/or registered trademarks
of Roku, In. In the United States and other
countries.
Roku Streaming Stick™
One (1) Year Limited Hardware Warranty
Subject to the additional terms and conditions
set forth below, Roku provides this Limited
Warranty:
•
Only to the person or entity that
originally purchased the Streaming Stick
from Roku or from one of its authorized
re-sellers or distributors; and
•
Only for Streaming Stick purchased and
delivered to the end user within the
United States and Canada.
Limited Warranty
Roku warrants the Streaming Stick hardware
against defects in materials and workmanship
under normal use for a period of one (1) year
32
CHAPTER 4. OTHER INFORMATION
Frequently Asked Questions (FAQs)
US
Q. What’s the quickest way to view High Definition (HD) programming?
Connect an off-air antenna to the ANT/CABLE INPUT to view free local digital channels. You
may need to purchase an antenna. Visit www.antennaweb.org for assistance in deciding
what type of antenna to use to receive the local digital channels available to you. By entering
your location, this mapping program tells you which local analog and digital stations are
available using a certain antenna.
Q. Are there other ways to view High Definition (HD) programming?
A Besides using an off-air antenna as mentioned above, you can also use a set-top box
or digital cable box to receive digital video. Contact your cable company provider to
purchase digital programming service and have them connect the box to ensure you are
viewing channels in the best way possible.
Q. How do I tell an analog channel from a digital channel?
A Press the INFO button to display the Channel Banner. If a dot ( • ) is displayed on the screen,
then it is a digital channel. If there is no dot, it is an analog channel.
Q. Why are there bars on my screen and how can I get rid of them?
A Most digital programs are sent in a 16:9 format which fills your screen, but are sometimes
sent in 4:3 which does not fill your screen. The format depends on how the station or
device connected to your TV is formatting the content. If there are bars on the screen, press
the ZOOM -/+ button to try a different format that may eliminate the bars. Some bars can’t be
removed because of the way the format is sent by the broadcaster. The format changes as you
press the ZOOM -/+ button and the format type is displayed at the bottom of the screen.
Q. Why does channel search find a lot of channels, but when I try to tune to them, there’s nothing
there?
A Some channels enabled by the cable company don’t carry programming, such as videoon-demand or the signal is too weak to display properly. When channels are unavailable,
your TV screen is blank or appears like snow. You may want to remove these channels from your
Channel List. Remove these in the Channel Skip Menu.
Q. Why does the first channel search take a long time?
A If you have both analog and digital channels, the TV is looking for all available channels
in the Channel List. If you do have digital channels, the TV is also searching for scrambled
channels, non-scrambled channels, and each sub-channel of that digital channel.
33
CH4. OTHER INFORMATION
A Q. Why is my picture quality poor?
A Use the HDMI connections on your TV to display the best picture quality. However, even
when using HDMI, your content and content source will still dictate the picture quality you
see. For example, source content that is1080p will show better than 720p or 480p.
Troubleshooting
Most problems you encounter with your TV can be corrected by consulting the following
troubleshooting list.
Problems
Solutions
The TV won’t turn on.
•
Make sure the TV is plugged in.
•
Check the wall receptacle (or extension cord) to make sure it
is “live” by plugging in another device.
•
The TV panel controls may be locked (disabled.) Use the
remote control to unlock the TV panel controls.
•
Select the Button Block feature on the Parental Control
menu and press OK to uncheck the box.
•
You may be tuned to an input with no component
connected to it. If you’re trying to view a connected
component, press INPUT until the picture from that
component appears.
•
The Signal Type option may be set incorrectly.
•
The channel may be blank. Try changing channels.
•
If you’re watching your VCR and it’s connected with a coaxial
cable to the ANT/CABLE INPUT jack, tune the TV to channel
3 or 4 (whichever channel is selected on the 3/4 switch on
the back of your VCR.) Also make sure the TV/VCR button on
the VCR is in the correct mode (press the TV/VCR button on
your VCR.)
There is no picture and no
sound, but the TV is on.
34
The sound is fine, but the
picture is poor quality.
•
If you’re getting a black and white picture from a
component you’ve connected to your TV, you might have
your video cables connected to the wrong jacks. A yellow
video cable connects to the yellow VIDEO INPUT jack on
the side or back of your TV; three video cables or bundled
component video cables (red, blue, and green) connect to
the corresponding COMPONENT INPUT jacks on the back of
your TV.
•
Check the antenna connections. Make sure all of the cables
are firmly connected to the jacks.
•
The sound might be muted. Try pressing the volume up
button to restore sound.
•
If using DVI or Y, PB, PR, remember to also connect the
device’s left and right audio output jacks to the TV’s L and R
AUDIO INPUT jacks.
•
The sound settings may not be set correctly.
•
Check your connections. If you used yellow, red, and white
cables connection, make sure they’re connected to the
yellow, red, and white AUDIO/VIDEO INPUT jacks on the side
or back of the TV.
•
If you’re trying to watch something that’s playing on a
component connected to the TV (like a DVD), press INPUT
until you get to the correct video input channel.
•
Make sure the component connected to the TV is turned on.
•
Try another channel.
•
The TV keyboard may be locked (disabled.) Use the remote
control to unlock the TV keyboard by selecting the Button
Block feature in the Parental Control Menu and press
to uncheck the box.
•
Unplug the TV for 10 minutes and then plug it back in. Turn
the TV on and try again.
•
The electronic protection circuit may have been activated
because of a power surge. Wait 30 seconds, and then turn
the TV on again. If this happens frequently, the voltage in
your house may be abnormally high or low.
•
Unplug; wait 10 minutes, then plug it in again.
There is no sound, but the
picture is fine.
The screen is blank.
The buttons on the back
of TV don’t work.
The TV turns off
unexpectedly.
35
CH4. OTHER INFORMATION
Solutions
US
Problems
Problems
Solutions
You can’t select a certain
channel.
•
The channel may be blocked or not approved in the
Parental Control Menu.
•
If using a VCR, check to make sure the TV/VCR button on
the VCR is in the correct mode (press the TV/ VCR button on
your VCR.)
•
Press the TV button and then try to change channels.
The stereo reception is
noisy.
•
This may be caused by a weak station. Use the Sound Menu
and Analog TV Sound to choose mono.
A black box appears on
the screen.
•
Closed captioning might be on. Check Closed Caption in the
Setup menu.
You are having
problems with the HDMI
Connection.
•
Make sure the HDMI or DVI component is turned on and
the cables are firmly connected. If problems still occur, turn
off your component and reconnect it. Reset the power by
unplugging the power cord and plugging it back in.
•
If you are tuned to HDMI 1 or another HDMI INPUT, and
you’re receiving the Unusable Signal message screen, press
the INFO button on the remote. If “Acquiring Channel”
appears in the Channel Banner, the HDMI or DVI device isn’t
responding. Contact the manufacturer of the HDMI or DVI
device for further assistance.
•
If you tune to HDMI 1 or another HDMI INPUT, and you see
snow, the video goes in and out, or the video takes a long
time to appear, your HDMI or DVI component is having
trouble sending video information to the TV. Reconnect
your device. Reset the power by unplugging the power
cord and plugging it back in. If problems persist, try
connecting the Y Pb Pr jacks if they are available or contact
the manufacturer of the HDMI or DVI component for further
assistance.
•
If you have black bars on each side of your picture, the
component you connected might have a switch or a menu
option allowing you to change the picture quality output
that will fix this. Choose either 720p or 1080i.
•
Something might be between the remote and the IR sensor
on the front of the TV. Make sure there is a clear path.
•
The remote may not be aimed directly at the TV.
•
The batteries in the remote may be weak, dead, or installed
incorrectly. Put new batteries in the remote.
The remote control
doesn’t work.
36
Your Universal Remote
control doesn’t work on
this TV.
•
This TV utilizes new remote control signals and may not be
compatible with your existing universal remote (e.g. cable
box remotes, and generic universal remotes, etc.). Over
time, newer universal remotes and set-top box equipment
will become available that should pick up the new TV codes.
You are experiencing
problems with V-Chip/
Parental Controls.
•
If the rating limits don’t work, you must lock the settings. Go
to the Main Menu (press MENU on your remote), select
Parental Control > US > TV Rating, TV Rating is highlighted.
to select On to have the rating limits take effect.
Press
What else can I do?
If you’ve been through the Troubleshooting section and nothing
has fixed your problem, try rebooting your TV. Note that after a
reboot, you may need to run your TV through the setup process
again.
To do a reboot:
1.
2.
3.
Unplug the power cord from the wall outlet or power strip.
Keep your TV unplugged for about 5 minutes.
Then plug in the TV and turn it on.
If the problem remains after reboot, then please visit www.ovivo.
tv for updated FAQs or contact OVIVO Customer Support’s tollfree number: 1-888-826-1638.
37
CH4. OTHER INFORMATION
Solutions
US
Problems
Battery Caution & Disposal Information
1.
For best results, use alkaline type batteries.
2.
Install only new batteries of the same type in your product.
3.
Failure to insert batteries in the correct polarity, as indicated in the battery compartment,
may shorten the life of the batteries or cause batteries to leak.
4.
Do not mix old and new batteries.
5.
Do not use rechargeable (nickel cadmium) or (nickel metal hydride) batteries.
6.
Do not mix alkaline, standard (carbon-zinc) or rechargeable (nickel cadmium) or (nickel
metal hydride) batteries.
7.
Do not dispose of batteries in fire.
8.
Batteries should be recycled or disposed of as per state and local guidelines.
Care and Cleaning
Caution: Turn OFF your TV before cleaning.
Clean the TV as needed, using a soft lintfree cloth such as microfiber. Be sure to
occasionally dust the ventilation slots at
the back of the TV to help assure adequate
ventilation.
IMPORTANT: Never use strong cleaning agents as these types of cleaners will damage the TV
screen. The TV’s screen may be cleaned with a soft material and non-abrasive cleaners. The rest
of the components including the TV stand cannot come in contact with any kind of cleaner or
liquid, even water. While cleaning, do not spray liquid directly on the screen, or allow liquid to
run. Also, never place drinks or vases with water on top or near the top of TV. This could increase
the risk of fire, shock hazard, or damage to the TV.
38
Television Specifications
US System NTSC-M
ATSC standard (8VSB), QAM
Receiving Channels
US
Broadcasting system
VHF2-13
CATV 14-36 (A)-(W)
37-59 (AA)-(WW)
60-85 (AAA)-(ZZZ)
86-94 (86)-(94)95-99 (A-5)-(A-1)
100-135 (100)-(135)
01 (4A)
Tuner type
Frequency synthesized
Operating Temperature
5°C to 35°C (41°F to 95°F)
Operating Humidity
20% to 80%,non-condensing
Storage Temperature
-15°C to 45°C (5°F to 113°F)
Storage Humidity
10% to 90%,non-condensing
39
CH4. OTHER INFORMATION
UHF14-69
This product incorporates HDMI technology.
HDMI, the HDMI logo, and High-Definition Multimedia
Interface are trademarks or registered trademarks of
HDMI Licensing LLC.
Plug in an MHL-compatible mobile device to view your
favorite content and charge your device at the same
time. MHL, the MHL logo are trademarks or registered
trademarks or service marks of MHL LLC in the United
States and other countries.
ENERGY STAR is a set of power-saving guidelines issued by the U.S.
Environmental Protection Agency (EPA).
ENERGY STAR is a joint program of the U.S. Environmental Protection Agency
and the U.S. Department of Energy helping us all save money and protect the
environment through energy efficient products and practices.
Manufactured under license from Dolby Laboratories.
“Dolby” and the double-D symbol are registered
trademarks of Dolby Laboratories.
Each Roku Ready TV has been tested and certified by Roku engineers to ensure
the Roku Ready badge meets our award winning standards. Plug the Roku
Streaming Stick (Roku Ready Version) into the MHL port of your TV and you’ve
got the best streaming experience in the world—totally integrated with your
TV.
40
FCC Information
•
Reorient or relocate the receiving antenna.
Increase the separation between the equipment and receiver.
Connect the equipment into an outlet on a circuit different from that to which the receiver
is connected.
Consult the dealer or an experienced radio/TV technician for help.
This Class B digital apparatus complies with Canadian ICES-003.
This device complies with part 15 of the FCC Rules. Operation is subject to the following two
conditions:
(1) This device may not cause harmful interference, and
(2) this device must accept any interference received, including interference that may cause
undesired operation.
Please do not send any products to the California address listed in this manual or on the carton.
This will only add delays in service for your product.
Figures and illustrations in this User’s Guide are provided for reference only and may differ from
actual product appearance. Product design and specifications may be changed without notice.
41
CH4. OTHER INFORMATION
•
•
•
US
This equipment has been tested and found to comply with the limits for a Class B digital
device, pursuant to Part 15 of the FCC Rules. These limits are designed to provide reasonable
protection against harmful interference in a residential installation. This equipment generates,
uses, and can radiate radio frequency energy and, if not installed and used in accordance with
the instructions, may cause harmful interference to radio communications. However, there is
no guarantee that interference will not occur in a particular installation. If this equipment does
cause harmful interference to radio or television reception, which can be determined by turning
the equipment off and on, the user is encouraged to try to correct the interference by one or
more of the following measures:
Location of the identification label
Labels for the Model No. and Power Supply rating are located on the rear of the TV.
IMPORTANT NOTICE:
•
The figures and illustrations used in this manual are provided for reference only and may
differ from the displays accessible within actual product.
•
Retain this manual for future reference.
42
US
CH4. OTHER INFORMATION
43
OVIVO Customer Support
www.ovivo.tv
1.888.826.1638
Roku Customer Support
support.roku.com
1.888.600.7658
Printed in U.S.A