1
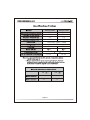
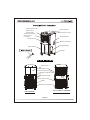
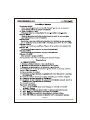
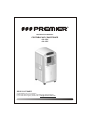
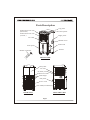
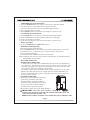
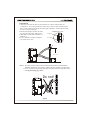
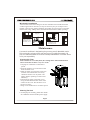
R
MANUAL DE INSTRUCCIONES
AIRE ACONDICIONADO PORTATIL
AA-1824
AA-1825
ESTIMADO CLIENTE
Felicitaciones por su compra!
Por favor lea cuidadosamente este manual, y guadelo para su futura referencia.
Si necesita soporte adicional, no dude en escribir a: [email protected]
WWW.PREMIERMUNDO.COM
R
WWW.PREMIERMUNDO.COM
R
Pagina 1
WWW.PREMIERMUNDO.COM
R
AM-12A4/R
AM-09A4/R
12000
9000
330
330
5.2
5.2
1150
1150
1PH 220V-240V~/50Hz
R407c
33.8
33
56
56
37.8 36.8 83.8
14-20
10-15
DB
WB
35
25
21
15
Pagina 2
WWW.PREMIERMUNDO.COM
R
Veleta de direcion
flujo de aire
(horizontal)
Veleta de direcion
flujo de aire
(vertical)
Salida de aire
Panel superior
Panel de control
Panel derecho
Hueco de asidero
Tanque de agua
Panel frontal
Ruedas
Panel trasero
Entrada de aire
Filtro aire(interior)
Conducto saida de
aire
Perchas de calbe
Panel izquirerdo
Cable
Entrada de aire(condensador)
VISTA LATERAL IZOUIERDA
VISTA TRASERA
Pagina 3
WWW.PREMIERMUNDO.COM
R
1
1
1
1
4
4
2
1
Indicador velocidad ventilador
Indicador de modo
(baja/media/alta)
Indicador de tiempo (fresco/seco/ventilador)
COOL
DRY
FAN
LOW
Pantalla digital
MED HIGH
ON/OFF
TIMER ON/OFF
MODE
SLEEP
WATER FULL
Indicador dormir
FAN
SWING
Indicador de
Agua llena
UP
DOWN
~
Recibidor de senal
Pagina 4
WWW.PREMIERMUNDO.COM
R
Pagina 5
WWW.PREMIERMUNDO.COM
R
Pagina 6
WWW.PREMIERMUNDO.COM
50
0 cm
de
de 5
M
as
Mas
cm
R
Adaptad or B
Pagina 7
WWW.PREMIERMUNDO.COM
R
Adaptador A
Clavija
I
Max 120cm
Min 30cm
Ino!
Pagina 8
WWW.PREMIERMUNDO.COM
R
Ventana horizontal
IMAGEN B
IMAGEN A
Piezas deslizantes
para ventanas
minimo 67.5 cm
maximo 123 cm
Piezas deslizantes
para ventanas
minimo 67.5 cm
maximo 123 cm
Pagina 9
Ventana
vertical
WWW.PREMIERMUNDO.COM
R
Pagina 10
WWW.PREMIERMUNDO.COM
R
Pagina 11
WWW.PREMIERMUNDO.COM
R
15998001155
R
INSTRUCTION MANUAL
PORTABLE AIR CONDITIONER
AA-1824
AA-1825
DEAR CUSTOMER
Congratulations for your purchase!
Please read this manual carefully, and keep it for future reference.
If you need extra support, please write to [email protected]
WWW.PREMIERMUNDO.COM
R
CONTENTS
Belief Introduction ........................................................1
Technical Specification.................................................2
Parts Description ..........................................................3
Accessories...................................................................4
Control Panel.................................................................4
Operation.......................................................................5
Installation ....................................................................7
Maintenance ..................................................................9
Troubleshooting ..........................................................10
WWW.PREMIERMUNDO.COM
R
Belief Introduction
This mobile air conditioner is a new generation air conditioner which is
ideal for using in bedroom, study room, lobby, office, meeting room, warehouse, attics, sports hall and other entertainment room. Its flexibility characteristic enable easy adjustment to desirable room temperature and humidity.
Besides, the built-in filter can remove floating dust, purify air to create a
healthy working environment.
It is designed under novelty, practically and convenience principles to
satisfy the needs for convenient, efficient and mobile small-sized air conditioner. It features easy using, no need for complicated installation and
convenient maintenance. Besides, the double control system (remote control
/manual control optional ) eases its operation.
The unit is highly competitive to other cooling capable products. With
tidy structure, multiple functions and reasonable ventilation design, the unit
minimizes noise and power consumption.
Aiming at harmonious human life, our company adopts human factors into
design, produced this high efficiency mobile air conditioner.
Page 1
WWW.PREMIERMUNDO.COM
R
Technical Specifications
Model
Cooling capacity (Btu/h)
Air flow (m3/h)
Rated current (A)
Rated input (W)
Power supply
AM-09A3
AM-12A3
9000
12000
340
340
8.0
8.5
900
950
115V~/60Hz
115V~/60Hz
R22
R22
34
34
56
56
378 368 838 378 368 838
10-15
15-20
Refrigerant
Weight (kg)
Noise dB(A)
Dimension(mm)
2
Suitable room area (m )
Note: 1.The above cooling capacity are calculated at ambient temperature
DB 30 , WB 25.4 .
2.Our company has quick technical improvement. There will be no prior
notice for any change of technical data. Please read the nameplate on
the air conditioner.
Working temperature range
DB
WB
Maximum cooling
35
25
Minimum cooling
21
15
Page 2
WWW.PREMIERMUNDO.COM
R
Parts Description
Top panel
Airflow direction vane
(horizontal )
Airflow direction vane
(vertical )
Air outlet
Control panel
Right panel
Handle recess
Water tank
Front panel
Truckle
Remote controller
FRONT VIEW
Rear panel
Air inlet
Air filter (inside)
Exhaust air outlet
Cord hanger
Left panel
Power cord
Air intake(condenser)
LEFT SIDE VIEW
REAR VIEW
Page 3
WWW.PREMIERMUNDO.COM
R
Accessories
Parts
Quantity
Parts name
Duct
1
Adaptor A
(for permanent mounting use)
1
Cover (cover the hole when
not in use)
1
Adaptor B(for temporary
mounting use)
1
Wall plug
4
Screw
4
Alkaline batteries
2
Remote controller
1
Control Panel
Timer indicator Mode indicator
COOL
DRY
FAN
Fan speed indicator
LOW
Digital display
MED HIGH
ON/OFF
TIMER ON/OFF
MODE
SLEEP
WATER FULL
Sleep indicator
FAN
SWING
Water full indicator
UP
DOWN
Signal receiver
Page 4
WWW.PREMIERMUNDO.COM
R
Function Buttons
SLEEP button
Press this button to set the sleep state.
TIMER ON/OFF button
Press this button to initiate the auto-on or auto-off timesequence .
MODE button
Each time you push the button, amode is selected in a sequence that goes
from cool, dry and fan.
FAN button
This button is used for setting fanspeed in the sequence that goes from
Low
Med , to High , then back to Low .
SWING button
Press the button to change the swing angle oflouver.
UP button
Push the button to make the indoor setting temperature increase.
DOWN button
Push the button to make the indoor setting temperature decrease.
ON/OFF button
To turn on or off the unit.
Note :The functions of these buttons are the same asyour remote controller's.
Operation
WARNING
1.Plug unit only into grounded electrical outlet.
2.Do not use an extension cord or plug adaptor with this unit.
3.Do not operate unit with front removed.
Failure to follow the above precaution could result in electrical shock, fire
or personal injury.
Before starting the unit
1) Select a suitable location, making sure you have easy access to an electrical
outlet.
2) Install the flexible exhaust hose and the adjustable window slider kit.
3) Plug the unit into a 220V-240V socket.
4) Make sure the water tank is correctly positioned inside the cabinet otherwise
the unit will not operate.
5) To turn the unit on.
Cooling operation mode
1. Press the MODE button in a sequence until the cool indicator lighted.
2. Press the UP and DOWN button to adjust your desired set temperature.
3. Press FAN button to select the fan speed.
4. Press the SWING button to change the airflow direction.
5. Press ON/OFF button to start the unit and press it again to stop.
Page 5
WWW.PREMIERMUNDO.COM
R
Dehumidifying operation mode
1. Press the MODE button in a sequence until the dry indicator lighted.
2. The fan will run at a fixed speed at this operation mode.
3. Close windows and doors for the best dehumidifying effect.
4. Do not put the duct to window.
5. Press ON/OFF button to start the unit and press it again to stop.
Circulation operation mode
1. Press MODE button in a sequence until the fan indicator lighted.
2. Press the FAN button to choose the fan speed.(low-med-high)
3. Do not put the duct to window.
4. Press the on/off button to start the unit and press it again to stop.
Timer operation
1. Press the TIMER ON or TIMER OFF button .
Wind direction adjusting
Horizontal airflow (automatically)
Press the SWING button, the vertical vanes rotate automatically. If you have
a desired direction, you also can press it again to stop at the position.
Vertical airflow(manually)
Grab and rotate the middle horizontal vane manually.
Note: Adjusting the vertical vane by hand in automatically-controlled operation
may damage the step-motor.
Deal with condensate
Condensate in water tank
1.When the water tank is full, dehumidification process will immediately
stop. However ,the fan motor will continue to operate for two min utes, then
the LED will display PI and the unit will alarm , at the same time the wate r
full indicator light starts flashing continuously.
2. Carefully remove the water tank from the cabinet and dispose of the water.
Replace the water tank back to its original position and the dehumidifying
process will automatically resume. It will take 3 minutes for the compressor
to restart. This is normal.
. Continuous drainage
1. Drain water can be collected externally
by directing the rubber tube(inner
diameter:12mm~12.5mm) inside the
drain tank cabin through the water tank
to any vessel such as bucket. Remove
the rubber tube cap before operate.
2.Do not take out the water tank during drainage.
IMPORTANT: This water is not suitable for drinking.
Please insert the rubber tube cap into the drain tank cabin when the
continuous drainage function is off.
NOTE:it will be easier to operate if the rubber tube cap is wetted by suds.
Page 6
WWW.PREMIERMUNDO.COM
R
Installation
Guide of customer
The customer should have a qualified power supply coincident with that
printed on the tag of the air conditioner. Its voltage should be in the range
of 90%-110% of its rated voltage.
Must use special circuit and efficient grounding socket matching with
the plug of the air conditioner.
If the supply wire is damaged, it must be replaced by the manufacturer,
its service agent or similarly qualified persons in order to avoid a hazard.
0c
or
et
ha
n5
an 5 0 cm
M
M o re th
m
Select a best location
Install the mobile air conditioner in a
flat and spacious location where the air
outlets will not be covered up. A
minimum clearance of 50cm from walls
or other obstacles should be kept. The
appliance shall not be used in the laundry.
The plug shall accessible after appliance
is positioned.
Duct mount instruction
Temporary
1.Attach one end of the duct to the
exhaust air outlet of the mobile
air conditioner. According to the
arrow direction, first fit the left
side of the duct on the exhaust
air panel, then the right side
duct. Push it downwards, be sure
to fix thoroughly.
2.Attach the other end of the duct
to adaptor B.
Adaptor B
3.Put the end of duct to a nearby
window.
Page 7
WWW.PREMIERMUNDO.COM
R
Permanent
1.Attach one end of the duct to the exhaust air outlet of the mobile air
conditioner. According to the arrow direction, first fit the left side of the
duct on the exhaust air panel, then the right side duct. Push it downwards,
be sure to fix thoroughly.
Amplified view for I
2.Install the adaptor A onto the wall
by using 4 wall plugs and screws.
Adaptor A
3.Attach the other end of the duct to
adaptor A.
Wall plugs
4.Cover the hole using the adaptor
cap when not in use.
I
Max 120cm
Min 30cm
Note: 1.The duct can be compressed to 450mm minimum and extended to
1800mm maximum. It is better to keep the duct length to a minimum.
2.Over stretching or bending the duct will affect the cooling efficiency.
(As the following fig. show)
Do not!
Page 8
WWW.PREMIERMUNDO.COM
R
Window kit installation
Your window kit has been design to fit most standard vertical and horizontal
window applications. However, it may be necessary for you to improvise or
modify some aspects of the installation procedure for certain types of window.
Please refer to fig. A &fig. B for minimum and maximum window openings.
Horizontal window
Fig. B
Fig. A
Vertical
window
Window slide kit
minimum:67.5cm
maximum:123cm
Window slide kit
minimum:67.5cm
maximum:123cm
Maintenance
Your new air conditioner is designed to give you many years of dependable service.
This section tells you how to clean and care for your air conditioner properly. Call
your local authorized dealer for an annual checkup. Remember the cost of this service
call is your responsibility.
Cleaning Air Filter
If the air filter is covered by dust, the cooling effect will be undermined.
Please clean the air filter every two weeks.
1. Unplug air conditioner or disconnect
power.
2. Pull out the filter cover and remove the
from the filter cover.
3. Wash air filter in warm soapy water. Do
air filter in the dishwasher or use any
chemical cleaners. Air dry filter completely before replacing to ensure max.
efficiency.
4. Attach the air filter to the filter cover
using the attachment hooks on the inner
surface of the cover. Put the filter cover
back to its place.
5. Plug in air conditioner or reconnect power.
Cleaning The Unit
1.For the purpose of safety, please turn off the
air-conditioner and cut off the power supply .
Page 9
WWW.PREMIERMUNDO.COM
R
2.Wipe the unit with dry cloth .
3.If the unit is very dirty, please wipe with
wet cloth dipped by cold water .
Cleaning Drain Tank
Wash the tank using warm water with
neutral detergent. Rinse and then dry in
a cool place. Put the tank to its original
place after it is dried completely.
Do not use gasoline ,benzene ,thinner or any other chemicals, or any liquid
insecticide on the air conditioner, as these substances may cause flaking off of
the paint ,cracking or deformation of plastic parts .
Never attempt to clean the unit by pouring water directly over any of the
surface areas, as this will cause deterioration of electrical components and
wiring insulation.
Never use hot water over 40 (104 )to clean the air filter.
Troubleshooting
You can solve many common air conditioner problem easily, saving you the cost
of a service call, try the suggestions below to see if you can solve your problem
without outside help.
Air Condition Will Not Operate
Causes
The power switch is released.
Power supply failure.
The fuse is burnt.
It doesn't reach the set time for start
up.
Solutions
Switch on the power.
Wait for the recovery of power supply.
Replace the fuse.
Wait or eliminate the original setting.
Unit Doesn't Start When Pressing On/off Button
Causes
Solutions
Water full indicator blinks, drain
tank is full.
It is not three minutes after switch
off.
Room temperature is lower than the
set temperature.
Page 10
Dump the water in the drain tank.
Wait three minutes.
Reset the temperature.
WWW.PREMIERMUNDO.COM
R
The Wind Blowing Out, But The Cooling Effect Is Bad
Causes
Mistakes in temperature setting.
The air filter is blocked by dust.
The air inlet or outlet of machine is
blocked.
Unit recently turned on in hot room.
Insufficient cooling capacity.
The doors or windows are open.
Solutions
Set a proper temperature, see the
methods of application.
Clean the air filter.
Remove the obstruction.
Allow additional time to remove
stored heat from walls ,ceiling,
floor and furniture.
Reconfirm the required cooling
capacity with your dealer.
Close the doors and windows.
Noise or vibration
Solutions
Causes
The ground is not level or not flat
enough.
Place the unit on a flat, level ground
if possible.
Page 11
WWW.PREMIERMUNDO.COM
R
15998004497
01258