1
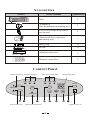
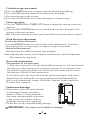
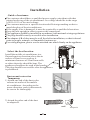
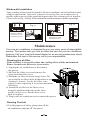
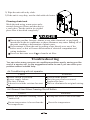
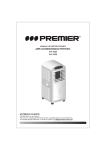
INSTRUCTION MANUAL
PORTABLE AIR CONDITIONER
12,000BTU
Model No: AM-12A4/R1
FOR FUTURE REFERENCE
CONTENTS
Introduction ..................................................................1
Safety Precaution .........................................................2
Technical Specifications...............................................4
Parts Description ..........................................................5
Accessories...................................................................6
Operation.......................................................................7
Installation ....................................................................9
Maintenance ................................................................11
Troubleshooting ..........................................................12
WEEE Warning .............................................................14
Brief Introduction
This mobile air conditioner is a new generation air conditioner which is
ideal for use in the bedroom, study, lobby, office, meeting room, warehouse, attic, sports hall and other entertainment rooms. Its flexibility
enables easy adjustment to a desirable room temperature and humidity.
The built-in filter can remove floating dust and purify air to create a
healthy working environment.
Safety Precaution
Your safety and the safety of others is very important. We have provided many
important safety warnings in this manual and on your appliance. Always read
and follow all safety warnings.
! WARNING
! CAUTION
This symbol indicates the possibility of death
or serious injury.
This symbol indicates the possibility of injury
or damage to properties only.
! WARNING
Plug in the power socket properly.
Otherwise, it will cause electric shock or fire due to heat generation.
Do not operate or stop the unit by inserting or pulling out the power plug.
It will cause electric shock or fire due to heat generation.
Do not damage or use an unspecified power cord.
It will cause electric shock or fire.
If the power cord is damaged, it must be replaced by a qualified electrician.
Do not modify power cord length or share the outlet with other appliances.
It will cause electric shock or fire due to heat generation.
Do not direct air flow at room occupants only.
This could lead to health problems.
! CAUTION
When the air filter is to be removed, do not touch the metal parts
of the unit.
They are sharp and may cause an injury.
Do not clean the air conditioner with water.
Water may enter the unit and degrade the insulation. It may cause an electric
Shock.
.
When the unit is to be cleaned, switch the unit off and unplug it.
Since the fan rotates at high speed during operation, it may cause an injury.
Do not operate the unit without the air filter or when the front intake
grill has been removed.
2
It could cause dust to accumulate on the heat exchanger.
Do not put pets or plants where it will be exposed to direct air flow.
This could injure the pets or plants.
Do not use for special purpose.
Do not use this air conditioner to preserve precision devices, food, pets,
Plants and art objects. It may cause deterioration of quality etc.
Do not apply an insecticide or flammable spray.
It may cause a fire or deformation of the cabinet.
3
Technical Specifications
Model
Cooling capacity (Btu/h)
3
Air flow (m /h)
Rated current (A)
Rated input (W)
Power supply
Refrigerant
Weight (kg)
Noise dB(A)
Dimension(mm)
2
Suitable room area (m )
Note:
AM-12A4/R1
12000
330
5.2
1200
1PH 220V-240V~/50Hz
R410a
33
53
378 368 838
14-20
The above cooling capacity are calculated at ambient temperature
DB 30 , WB 25.4 .
.
Working temperature range
DB
Maximum temp.
35
Minimum temp.
18
4
Parts Description
Top panel
Airflow direction vane
(horizontal )
Airflow direction vane
(vertical )
Air outlet
Control panel
Right panel
Handle recess
Water tank
Front panel
Castors
Remote controller
FRONT VIEW
Rear panel
Air inlet
Air filter (inside)
Exhaust air outlet
Cord hanger
Left panel
Power cord
Air intake(condenser)
LEFT SIDE VIEW
REAR VIEW
5
Accessories
Parts
Quantity
Parts name
Duct
1
Adaptor A
(for permanent mounting use)
1
Cover (cover the hole when
not in use)
1
Adaptor B(for temporary
mounting use)
1
Wall plug
4
Screw
4
Alkaline batteries
2
Remote controller
1
Control Panel
Timer indicator Mode indicator
COOL
DRY
FAN
Fan speed indicator
LOW
MED
Digital display
HIGH
ON/OFF
TIMER ON/OFF
FAN
MODE
SLEEP
SWING
WATER FULL
Sleep indicator
Water full indicator
UP
DOWN
Signal receiver
6
Function Buttons
SLEEP button
Press this button to set the sleep state.
TIMER ON/OFF button
Press this button to initiate the auto-on or auto-off time sequence .
MODE button
Each time you push the button, a mode is selected in a sequence that goes
from cool, dry and fan.
FAN button
This button is used for setting fan speed in the sequence that goes from
Low Me to Hig then back to Low.
SWING button
Press the button to change the swing angle of louver.
UP button
Push the button to make the indoor setting temperature increase.
DOWN button
Push the button to make the indoor setting temperature decrease.
ON/OFF button
To turn the unit on or off the unit.
Note :The functions of these buttons are the same on the remote control.
Operation
Before starting the unit
1) Select a suitable location, making sure you have easy access to an electrical
outlet.
2) Install the flexible exhaust hose and the adjustable window slider kit.
3) Plug the unit into a 220V-240V socket.
4) Make sure the water tank is correctly positioned inside the cabinet otherwise
the unit will not operate.
5) To turn the unit on press the ON/OFF button.
Cooling operation mode
1) Press the MODE button in a sequence until the cool indicator lights up.
2) Press the UP and DOWN button to adjust your desired set temperature.
3) Press FAN button to select the fan speed.
4) Press the SWING button to change the airflow direction.
5) Press the ON/OFF button to start the unit and press it again to stop.
Dehumidifying operation mode
1) Press the MODE button in a sequence until the dry indicator lights up.
2) The fan will run at a fixed speed at this operation mode.
3) Close windows and doors for the best dehumidifying effect.
4) Do not put the duct to the window.
5) Press the ON/OFF button to start the unit and press it again to stop.
7
Circulation operation mode
1) Press the MODE button in a sequence until the fan indicator lights up.
2) Press the FAN button to choose the fan speed (low-med-high)
3) Do not put the duct to the window.
4) Press the ON/OFF button to start the unit and press it again to stop.
Timer operation
1) Press the TIMER ON or TIMER OFF button to initiate the auto-on or auto-off
sequence.
2) Press the UP or DOWN button to set your desired wait time. Each press will
increase or decrease one hour.
Note: The timer operation in the control panel differs from the remote control.
Wind direction adjustment
Horizontal airflow (automatic)
Press the SWING button, the vertical vanes rotate automatically. If you have
a desired direction, you also can press it again to stop at the position.
Vertical airflow(manual)
Grab and rotate the middle horizontal vane manually.
Note: Adjusting the vertical vane by hand in automatically-controlled operation
May damage the step-motor.
Deal with condensation
Condensation in the water tank
1) When the water tank is full, the dehumidification process will immediately
stop. However the fan motor will continue to operate for two minutes, then
the LED will display PI and the unit will alarm, at the same time the water
full indicator light will flash continuously.
..
2) Carefully remove the water tank from the cabinet and dispose of the water.
Replace the water tank back to its original position and the dehumidifying
process will automatically resume. It will take 3 minutes for the compressor
to restart. This is normal.
Continuous drainage
1) Drain water can be collected externally
by directing the plastic tube(inner
diameter:12mm~12.5mm) inside the
drain tank cabin through the water tank
to any vessel such a bucket. Remove
the plastic tube cap before operating.
2.Do not take out the water tank during drainage.
IMPORTANT: This water is not suitable for drinking.
8
Installation
Guide of customer
The customer should have a qualified power supply coincident with that
printed on the tag of the air conditioner. Its voltage should be in the range
of 90%-110% of its rated voltage.
The customer must use a special circuit and efficient grounding socket to
match the plug of the air conditioner.
If the supply wire is damaged, it must be repaired by a qualified electrician.
Keep the unit upright in order to protect the compressor.
The appliance should be installed in accordance with national wiring regulations.
The plug should be easily accessible after installation.
The adaptor A/B of duct must be well fixed after installation, so that it doesn't
point to people, animals, or flammable furniture etc.
For wiring diagram, please see the attached one which firmly on the appliance.
0c
n5
ha
et
or
M
Install the mobile air conditioner in a
flat and spacious location where the air
outlets will not be covered up. A
minimum clearance of 50cm from walls
M o r e th
or other obstacles should be kept. The
a n 50 c
m
appliance should not be used in the laundry.
The plug should be accessible after the appliance
is positioned.
m
Select the best location
Duct mount instruction
Temporary
1) Attach one end of the duct to the
exhaust air outlet of the mobile
air conditioner. According to the
arrow direction, push it downwards,
be sure to fix thoroughly.
2) Attach the other end of the duct
to adaptor B.
Adapt or B
9
3) Put the end of duct to a nearby
window.
Permanent
1) Attach one end of the duct to the exhaust
air outlet of the mobile air conditioner.
According to the arrow direction, first fit
the left side of the duct on the exhaust air
Amplified view for I
panel, then the right side duct. Push it
Adaptor A
downwards, be sure to fix thoroughly.
2) Install the adaptor A onto the wall
by using 4 wall plugs and screws.
Wall plugs
3)Attach the other end of the duct to
adaptor A.
4)Cover the hole using the adaptor
cap when not in use.
I
Max 120cm
Min 30cm
Note: 1.The duct can be compressed to 450mm minimum and extended to
1800mm maximum. It is better to keep the duct length to a minimum.
2.Overstretching or bending the duct will affect the cooling efficiency.
(As the following fig. Show)
Do not!
10
Window kit installation
Your window kit has been designed to fit most standard vertical and horizontal
window applications. However, it may be necessary for you to improvise or
modify some aspects of the installation procedure for certain types of window.
Please refer to fig. A &fig. B for minimum and maximum window openings.
Horizontal window
Fig. B
Fig. A
Vertical
window
Window slide kit
minimum:67.5cm
maximum:123cm
Window slide kit
minimum:67.5cm
maximum:123cm
Maintenance
Your new air conditioner is designed to give you many years of dependable
service. This section tells you how to clean and care for your air conditioner
properly. Call your local authorised dealer for an annual maintenance check.
Remember the cost of this service call is your responsibility.
Cleaning the air filter
If the air filter is covered by dust, the cooling effect will be undermined.
Please clean the air filter every two weeks.
1) Unplug the air conditioner or disconnect
the power.
2) Pull out the filter cover and remove the
foam from the filter cover.
3) Wash the air filter in warm soapy water. Do
not wash the air filter in the dishwasher or use any
chemical cleaners. Air dry the filter completely before replacing it to ensure maximum
efficiency.
4) Attach the air filter to the filter cover
using the attachment hooks on the inner
surface of the cover. Put the filter cover
back in its place.
5) Plug in the air conditioner or reconnect the power.
Cleaning The Unit
1) For the purpose of safety, please turn off the
air-conditioner and turn off the power.
11
2) Wipe the unit with a dry cloth .
3) If the unit is very dirty, wet the cloth with cold water .
Cleaning drain tank
Wash the tank using warm water and a
neutral detergent. Rinse and then dry in
a cool place. Put the tank in its original
place after it has dried completely.
Do not use gasoline ,benzene ,thinner or any other chemicals, or any liquid
insecticide on the air conditioner, as these substances may cause flaking off of
the paint ,cracking or deformation of plastic parts .
Never attempt to clean the unit by pouring water directly over any of the
surface areas, as this will cause deterioration of electrical components and
wiring insulation.
Never use hot water over 40 to clean the air filter.
Troubleshooting
You can solve many common air conditioner problem easily, saving you the
cost of a service call, try the suggestions below to see if you can solve your
problem without outside help.
Air Conditioning will not operate
Causes
Power switch is released.
Power supply failure.
The fuse is burnt.
It doesn't reach the set time for start
up.
Solutions
Switch on the power.
Wait for power to be restored.
Replace the fuse.
Wait or eliminate the original setting.
Unit Doesn't Start When Pressing On/off Button
Causes
Solutions
Water full indicator flashing, drain
tank is full.
Dump the water in the drain tank.
Room temperature is lower than the
set temperature.
Reset the temperature.
12
Not cooling
Causes
Mistakes in temperature setting.
The air filter is blocked by dust.
The air inlet or outlet of machine is
blocked.
Unit recently turned on in hot room.
The doors or windows are open.
Solutions
Set a proper temperature, see the
methods of application.
Clean the air filter.
Remove the obstruction.
Allow additional time to remove
stored heat from walls ,ceiling,
floor and furniture.
Close the doors and windows.
Noise or vibration
Solutions
Causes
The ground is not level.
Place the unit on a flat surface.
.
13