Transcript
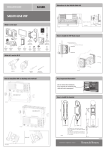
7July,11
LIGHTED WALL-MOUNTED MIRROR
INSTRUCTION SHEET
91405HW 91415HW 91425HW 91435HW 91445HW 91455HW
91465HW 91475HW 91485HW 91495HW 914135HW
FEATURES
The lighted mirror is suitable in a dim lighted room. The built-in 9 watts
Spiral Compact Fluorescent bulb is a suitable light source for makeup
and it does not need extra light source which can save more energy
and avoid interrupting other people in the same room.
OPERATING INSTRUCTIONS
1.Turn switch to the “OFF” position. Plug cord into any standard 120
volt wall outlet. Turn switch to the “ON” position.
2. Lighted mirror will rotate so that you can use either the normal, flat
mirror or 5X magnifying mirror located on the opposite side.
3. After use, always turn switch to the “OFF” position.
4. Unplug it from outlet when not in use.
IMPORTANT SAFETY
INSTRUCTIONS
INSTALLATION INSTRUCTIONS
TO REPLACE BULB
CAUTION: TURN OFF POWER AND UNPLUG.
ALLOW TO COOL AT LEAST 10 MINUTES
BEFORE REPLACING BULB.
1. Aptations, Inc recommends using a qualified electrician for all
electrical wiring procedures and installations.
NOTE: Do not use a bulb greater than 9 watts. Please
use a CFL Bulb (Fig.1) ,9 watts E 26 instead of other
shape or sphere shape because it will cause higher
temperature to mirrors.
3. Remove the mounting screws on both sides of the mirrors base.
2. A standard 120 Volts AC electrical box must be installed at the
desired location of the wall before continuing.
1. Turn the switch to the “OFF” position and unplug the lighted
mirror.
2. Unscrew and remove screws using screw driver from both
sides of the mirror housing near the rotating hinges. (Fig. 2)
3. Lift off the top half of the housing from the bottom half that is
affixed to the stand.
4. Unscrew the old bulb and replace with the new bulb. (Fig. 3)
5. Replace the top housing half and tighten two screws into
screw holes.
7. Connect the electrical wires coming from the electrical box
to the terminal connections in the base of mirror. Tighten the
set screws and re-fasten the ground wire from the mirror to its
fastening location on the mounting plate that is attached to the
electrical box. The mirror must be grounded when installed.
Wire references are:
L
N
4. Remove the mounting plate from the base and unfastened the
green ground wire attached to the mounting plate.
THIS APPLIANCE IS INTENDED FOR HOUSEHOLD USE. WHEN
USING ELECTRICAL APPLIANCES, BASIC SAFETY PRECAUTIONS SHOULD ALWAYS BE FOLLOWED, INCLUDING THE
FOLLOWING:
WARNING - To reduce the risk of burns, electrocution, fire, or
injury to persons:
1. Read all instructions before using the appliance and keep them for
later reference.
2. To protect against electrical hazards, do not use while bathing or in
the shower and do not touch plug or switch with wet hands.
3. To reduce the risk of burns.
3.1. Avoid swivel the makeup mirror into horizontal position when turn
switch to “ON”.
3.2. Do not touch the housing especially the top half and mirrors when
turn on the switch or off within 10 minutes.
4. Repairs and service should always be carried out by an authorized
service center. Do not use the appliance if it is damaged or if the cable
is damaged. Instead, send it to a service department.
5. Be sure mirror is not in a position where it can reflect sunlight;
reflected sunlight can cause fire.
6. After use, always pull the plug from the socket.
7. Handle cord carefully for longer life; do not jerk or strain at plug
connections, or wrap cord around mirror for storage. This could cause
damage to the cord and short circuit. To store mirror, coil cord loosely.
8. Use only the original accessories supplied.
9. Allow the light bulb in the mirror time to cool down before storing it
away.
10. Do not lay a switched appliance on soft furnishings, such as a bed,
cushion, etc. This will prevent over-heating.
11. Instruct young children about the dangers and safety rules
concerning electrical equipment.
12. Never let young children use electrical equipment without
supervision.
13. Turn switch to “OFF” position and unplug cord before replacing light
bulbs.
14. Do not place, hang or store appliance where it can fall or be pulled
into a tub or sink.
15. If an appliance falls into water, unplug it immediately. Do not reach
into the water.
16. Never use while sleeping.
17. Do not place in or drop into water or other liquid.
6. Feed the electrical wires from the electrical box through the
mounting plate and reserve convenient length.
Fig.1
Fig.2
Live wire/Line/Phase (Black wire)
Neutral
(White wire)
Ground
(Green/Yellow wire)
Mounting
Plate
Fig.3
LIVE WIRE / LINE / PHASE
GROUND
NEUTRAL
Ground wire
TROUBLE SHOOTING
Mirror Base
NO LIGHT: Bulb is not break and switch is in the “ON” position.
1. Check the plug and outlet.
2. Carefully unscrew the bulb and screw it back after follow the
procedure of “TO REPLACE BULB”
3. If there is still no light, unplug the lighted mirror and call the
manufacturer.
5. Secure the mounting plate to the electrical box on the wall
with four(4) wall anchors and mounting screws.
8. Finish installing mirror by mounting base of mirror over the
base plate that is attached to the electrical box.
9. Fasten the mounting screws on both sides of the base.
CLEANING AND MAINTENANCE
Always unplug lighted mirror first. Clean the outside of
appliance with a damp cloth. Never immerse it in water or any
other liquid. Clean mirror surfaces with a glass cleaner. Do not
light until you are certain mirror is completely dry to protect
against electrical hazards.
10. Put mirror at desired position and turn black rocker switch
on for use.
Please turn over
Front
914X5HW (Eng.)
User Manual
Dim: 227mm (W) x 273mm (H)
Letter height at less 1.6mm
Back