1
Aquila Embedded Developer Guide
v0.2.0
Aquila Embedded Developer Guide
Overview
The Aquila platform consist of a hardware development platform (Altair and USB-Serial), a wireless
simplified communication protocol, software tools for easy and rapid development, and a graphical
Web-based user interface and API for interacting with other internet web services and devices.
The applications for the technology are:
• Home automation devices
• Sensor networks
• Industrial control and analytics
• Other Internet of things devices
Our philosophy is that one should be able to develop and test IoT ideas easily and fast, using open
technology standards and getting the best of the hardware, software and web technologies that are
revolutionizing our life.
We think that combining the web flexibility and the hardware industry know-how is the way to go.
That’s why we are leveraging the embedded programming to the Arduino libraries, simplifying
repetitive tasks for the developer, while still being able to dive into the details of low level hardware
development.
Advantages of the Mesh network:
• Low power consumption
• Doesn’t overload your WiFi router
• Devices can communicate with each other directly
• Multi Hopping: If a device is out of reach from the sender, others can help repeating the message
• Simplified communication for simple, low power and affordable devices
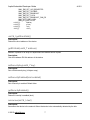
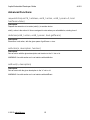
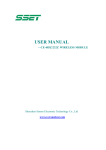
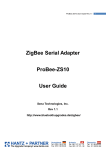
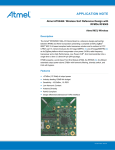
Network Topology:
WAN
HUB
IFTTT
Modem
PC
© 2015 makerlab.mx
3G Phone
Phone
Tablet
1
Weather
(Local Network)
(Aquila Mesh Network)
Google
…
LAN
PAN
Web Services
(Internet)
Aquila Embedded Developer Guide
v0.2.0
Embedded Software Stack
Altair uses an ATmega256rfr2 microcontroller as its main processing unit, it is based upon the AVR
8bit architecture and has 256KB of Flash memory, 32KB of SRAM, 8KB of EEPROM and runs at
16Mhz.
You can get more information about the hardware in:
• The Altair Datasheet: Altair-Datasheet-EN.pdf
• ATmega256rfr2 Datasheet: ATmega256/128/64RFR2 Datasheet
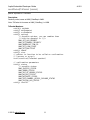
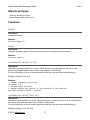
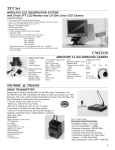
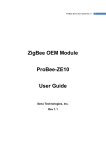
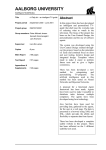
The software stack used in Aquila is as follows:
•
•
•
•
•
Compiler: avr-gcc C and C++ Compiler and the GNU environment (linker, make, gdb, etc.)
Programmer: avrdude - provides programming via the USB-Serial interface
Base libraries: avr-libc (Documentation: http://www.nongnu.org/avr-libc/user-manual/index.html)
Arduino Libraries for Altair (Documentation: http://arduino.cc/en/Reference/HomePage)
Communication Stack Libraries.
Aquila Communication Stack
Arduino Libraries
avr-libc
avr-gcc C & C++
© 2015 makerlab.mx
2
avrdude
Aquila Embedded Developer Guide
v0.2.0
Embedded Communication Stack
Altair, the heart of the Aquila Embedded devices, has a built-in Wireless IEEE 802.15.4 transceiver,
and an IEEE EUI-64 unique hardware address. Over this basis, there is a complete software
communication stack optimized for low-power mesh sensor networks, home automation devices,
industrial automation, security, monitoring, etc.
Each device has a 16-bit short address, that can be assigned manually in code, or auto assigned
based on its unique 64-bit EUI-64 hardware address.
Also, there can be multiple sub networks, (PANs), a device receives a message only when it’s
configured for the correct PAN and the message has its address as destination address, or the
broadcast address (0xFFFF).
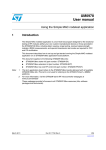
The software stack consist in 802.15.4 PHY and MAC layers, an upper network layer based on Atmel’s
Light Weight Mesh (LWM), that provides security, multi-hopping mesh routing, addressing and
endpoints. Over that we have the Aquila Mesh, that provides the EUI-64 unique hardware address,
security management, 16-bit short address auto assignment and collision prevention. Mesh has 16
endpoints where you can implement application-layer protocols (similar to Ports in the TCP/IP
protocol). Endpoints 0 to 7 are free for user implementation, and Endpoints 8 to 15 are reserved for
the Aquila Protocols.
• For more info and documentation on IEEE 802.15.4 standard, see 802.15.4-2011.pdf.
• For more info and documentation on Atmel’s Light Weight Mesh, see Lightweight Mesh Developer
Guide, Application Note AVR2130.
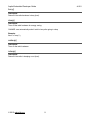
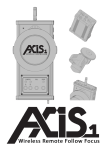
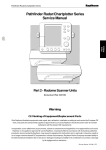
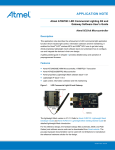
Current Aquila protocols are:
Endpoint 15: Short address collision discovery (part of Aquila Mesh)
Endpoint 14: WSerial (Simple Wireless Serial Sockets)
Endpoint 13: Aquila Protocol (Actions, Events and Interactions)
Endpoint 12: Services
Endpoints 0, 8 - 11: Reserved
Endpoints 1 - 7: For User custom protocols
1 - 7: User
8 - 11:
Reserved
12:
Services
13: Aquila
Protocol
14:
WSerial
Aquila Mesh
Light Weight Mesh
IEEE 802.15.4 MAC & PHY
© 2015 makerlab.mx
3
15: Short
Address
Aquila Embedded Developer Guide
v0.2.0
Aquila Protocols
Aquila Mesh
The Aquila mesh is a thin layer over LWM that provides access to the IEEE EUI-64 unique hardware
address, 16-bit short address auto assignment, encryption password management and a simplified
API over LWM.
Having 16-bit addresses means that there are 65535 possible device addresses. They are organized
as follows:
•
•
•
•
•
•
Address 0x0000 is reserved for uninitialized devices.
Addresses 0x0001 to 0x00FE are only for manual configuration
Address 0x00FF is for the bridge.
Addresses 0x0100 to 0xFFFD are for automatic assignment
Address 0xFFFE is reserved in 802.15.4 standard
Address 0xFFFF is the BROADCAST address.
This library is intended to be used in conjunction with the other Aquila libraries, but can also be used
directly for implementing custom protocols over endpoints 0 to 7. For an example on how to use this,
please see the Mesh_Ping example, you can access it from the Arduino IDE in File > Examples >
Mesh > Mesh_Ping.
API:
Required headers:
#include <Wire.h>
#include <Mesh.h>
Objects and types:
• Mesh: this library’s object.
• TxPacket: a packet that we will send.
• RxPacket: a packet that we receive.
Functions:
begin(uint16_t addr)
addr (optional): 16-bit manually set short address
Description:
Initializes the radio and communication stack. If no address is specified, it’s automatically assigned as
follows: The device derives the short address from a CRC of the hardware address, and then makes a
collision check. If a collision is detected, it adds again the last byte of the hardware address + 1, until
no collision is detected.
© 2015 makerlab.mx
4
Aquila Embedded Developer Guide
v0.2.0
Example:
Mesh.begin();
loop()
Description:
Attends radio requests and communication tasks. Needs to be called as often as possible, usually
inside the loop() function. You should avoid using long blocking functions, like delay(), inside your loop,
instead use alternative methods.
Example:
Mesh.loop();
setAddr(uint16_t addr)
addr: 16-bit manually set short address. Please note: valid manual addresses are 1 (0x0001) to 254
(0x00FE), the rest are reserved for automatic assignment and special cases.
Description:
Manually assigns a 16-bit address.
Example:
Mesh.setAddr(0x00A1);
setPanId(uint16_t panId)
panId: 16-bit PAN
Description:
Sets the device PAN. by default it’s 0xCA5A.
Example:
Mesh.setPanId(0xCAFE);
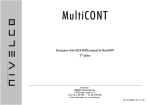
setChannel(uint8_t channel)
channel: radio frequency channel.
Description:
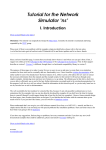
Sets the radio frequency channel. By default it’s 26.
Valid channels are 11 to 26
Channels and their frequencies:
© 2015 makerlab.mx
5
Aquila Embedded Developer Guide
Channel
Frequency
11
2.405GHz
12
2.410GHz
13
2.415Ghz
14
2.420Ghz
15
2.425Ghz
16
2.430GHz
17
2.435GHz
18
2.440Ghz
19
2.445GHz
20
2.450GHz
21
2.455GHz
22
2.460GHz
23
2.465GHz
24
2.470GHz
25
2.475GHz
26
2.480GHz
v0.2.0
Example:
Mesh.setChannel(25);
openEndpoint(uint8_t id, bool (*handler)(RxPacket *ind))
id: endpoint number. Can be 1 to 15, please note that endpoints 8 to 15 are reserved for Aquila
protocols.
handler: function that will handle received packets on endpoint id. The function must have the
following signature:
bool yourFunction(RxPacket *ind);
Description:
Assigns a handler function to an endpoint. When a packet is received at endpoint “id”, the function will
be called with the packet passed as parameter.
Note: RxPacket is the same as NWK_DataInd_t in LWM.
RxPacket Members:
uint16_t
srcAddr;
uint16_t
dstAddr;
uint8_t
srcEndpoint;
uint8_t
dstEndpoint;
uint8_t
options;
// Possible options:
© 2015 makerlab.mx
6
Aquila Embedded Developer Guide
v0.2.0
NWK_IND_OPT_ACK_REQUESTED
NWK_IND_OPT_SECURED
NWK_IND_OPT_BROADCAST
NWK_IND_OPT_LOCAL
NWK_IND_OPT_BROADCAST_PAN_ID
NWK_OPT_LINK_LOCAL
NWK_OPT_MULTICAST
uint8_t
*data;
uint8_t
size;
uint8_t
lqi;
int8_t
rssi;
uint16_t getShortAddr()
Description:
Returns the short address of the device.
getEUIAddr(uint8_t* address)
address: a pointer to an array of 8 bytes where the address will be copied.
Description:
Gets the hardware EUI-64 address of the device.
setSecurityKey(uint8_t *key)
Description:
Sets 128-bit security key (16-bytes array).
setSecurityEnabled(bool enabled)
Description:
Sets if security is enabled. Default false.
getSecurityEnabled()
Description:
Returns if security is enabled (bool).
announce(uint16_t dest)
Description:
Announces the device to the network. Allows the device to be automatically detected by the hub.
© 2015 makerlab.mx
7
Aquila Embedded Developer Guide
v0.2.0
sendPacket(TxPacket *packet)
packet: a pointer to a TxPacket.
Description:
Sends a packet, same as NWK_DataReq in LWM.
Note: TxPacket is the same as NWK_DataReq_t in LWM.
TxPacket Members:
uint16_t dstAddr
uint8_t dstEndpoint
uint8_t srcEndpoint
uint8_t options
// possible options, you can combine them
// with the operator or (|):
NWK_OPT_ACK_REQUEST
NWK_OPT_ENABLE_SECURITY
NWK_BROADCAST_PAN_ID
NWK_OPT_LINK_LOCAL
NWK_OPT_MULTICAST
uint8_t *data
uint8_t size
// pointer to function to be called on confirmation
// (success or error):
void (*confirm)(TxPacket *packet)
// confirmation parameters
uint8_t status
// possible status:
NWK_SUCCESS_STATUS
NWK_ERROR_STATUS
NWK_OUT_OF_MEMORY_STATUS
NWK_NO_ACK_STATUS
NWK_NO_ROUTE_STATUS
NWK_PHY_CHANNEL_ACCESS_FAILURE_STATUS
NWK_PHY_NO_ACK_STATUS
uint8_t control
© 2015 makerlab.mx
8
Aquila Embedded Developer Guide
v0.2.0
busy()
Description:
Returns if the radio hardware is busy (bool).
sleep()
Description:
Turns off the radio hardware for energy saving.
CHANGE: now automatically waits if radio is busy after going to sleep
Example:
Mesh.sleep();
wakeup()
Description:
Turns on the radio hardware.
asleep()
Description:
Returns if the radio is sleeping or not (bool).
© 2015 makerlab.mx
9
Aquila Embedded Developer Guide
v0.2.0
WSerial
Simple implementation of serial sockets over Aquila Mesh.
It has basically the same API as the standard Arduino Serial library, but allows simple wireless serial
data transfer between two or more Altairs.
For communicating two devices, both should be configured with the destination address for each other
(with begin or setDest).
If you want to accept messages from any device you should call
WSerial.setAllowFromAny(true), and for sending messages to all devices, you should
configure the destination address as BROADCAST.
You can find an example in the Arduino IDE, File > Examples > WSerial.
API:
Required headers:
#include <Wire.h>
#include <Mesh.h>
#include <WSerial.h>
Objects:
• WSerial: this library’s object.
Functions:
begin(uint16_t destAddr)
destAddr: 16-bit destination address.
Description:
Starts the library and sets the address to which we will be sending data.
Example:
WSerial.begin(0x0023);
end()
Description:
Closes the connection.
Example:
WSerial.end();
© 2015 makerlab.mx
10
Aquila Embedded Developer Guide
v0.2.0
setDest(uint16_t destAddr)
destAddr: 16-bit destination address.
Description:
Sets the address to which we will be sending data.
Example:
WSerial.setDest(0x0024);
setAllowFromAny(bool allow)
allow: if we will allow messages from any device, or not.
Description:
Sets if we want to accept messages from anyone, or just our destination device. By default, it is false.
Please note that we don’t have any way of knowing from which device came the message, just the
raw serial data we are receiving. This is a deliberate design decision for simplicity.
Example:
WSerial.setAllowFromAny(true);
loop()
Description:
Attends requests and other tasks. Should be called as often as possible in the main loop.
Example:
WSerial.loop();
Other functions:
All other functions are inherited from Arduino’s Stream class, and work exactly the same as the
standard Arduino Serial library. you can find it’s documentation here.
© 2015 makerlab.mx
11
Aquila Embedded Developer Guide
v0.2.0
Aquila Protocol
Events, Actions and interactions-based protocol.
The Aquila protocol is intended for Home Automation applications, or any other where devices should
talk to each other automatically. It allows a device to have Actions (things that the device can do), and
Events (things that can happen to a device), and make connections between them with Interactions
(when an Event happens, do some Actions).
In resume:
• Actions: What the device can DO
• Events: What can HAPPEN to a device
• Interactions: Do an Action when an Event happens.
The following API allows you to define the Actions in a device as functions, and Events as objects that
can be “emitted” anywhere in your code.
Interactions are configured inside the EEPROM memory of the device that will make the action, this
configuration is made from the Aquila Server interface, so you will need a hub for configuring them,
however, once they are configured, they will continue working even without a hub.
API:
Required headers:
#include <Wire.h>
#include <Mesh.h>
#include <AquilaProtocol.h>
Objects and types:
• Event: used for defining event identifiers.
• Aquila: This library’s object.
Functions:
begin()
Description:
Initializes the library.
Example:
Aquila.begin();
© 2015 makerlab.mx
12
Aquila Embedded Developer Guide
v0.2.0
loop()
Description:
Attends to incoming requests, should be called as often as possible in the loop function.
Example:
Aquila.loop();
setClass(char *nid)
Description:
Sets the device class.
By proposed convention, the device class should follow an "Inverted URL" style as follows: If your
company url is "example.com" and your device is called "Example Device", the class would be:
"com.example.exampledevice"
Example:
Aquila.setClass("com.mycompany.exampledevice");
setName(char *nName)
Description:
Sets the device default name, the one that you will see in the UI. For example: "Example Device”
Example:
Aquila.setName("Example Device");
addAction(char description[], bool (*function)(uint8_t param, bool
gotParam))
Description:
Adds an action with a description that will trigger the passed function.
Example:
bool turnOn(uint8_t param, bool gotParam)
{
// Do something...
}
// ...
Aquila.addAction("Turn On", turnOn);
Event addEvent(char description[])
Description:
Adds an event with description, and returns the event id that will be used when triggering the event.
Example:
Event buttonPressed;
© 2015 makerlab.mx
13
Aquila Embedded Developer Guide
v0.2.0
buttonPressed = Aquila.addEvent("Button Pressed");
emit(uint8_t event, uint8_t param=0, bool hasParam=false)
Description:
Emits an event. Must be called when the event occurs (a button is pressed, some time has passed,
etc…).
Example:
// When the button is pressed
Aquila.emit(buttonPressed);
emit(uint16_t dest, uint8_t event, uint8_t param=0, bool hasParam=false)
Description:
Emits an event only to a specific device. Must be called when the event occurs (a button is pressed,
some time has passed, etc…).
Example:
// When the button is pressed
Aquila.emit(0x0B9A, buttonPressed);
on(char eventName[], bool (*function)(uint8_t param, bool gotParam))
Description:
Statically subscribe to an event with its name. In the example, the function called “doSomething” will
be executed when any device emits an event called “Button Pressed” (Case sensitive).
Example:
Aquila.on("Button Pressed", doSomething);
on(char eventName[], uint8_t EUIAddress[], bool (*function)(uint8_t param,
bool gotParam))
Description:
Statically subscribe to an event specifically emitted by the device with the hardware address
“EUIAddress”. In the example, the function called “doSomething” will be executed only when the
device with the hardware address “longAddr” emits an event called “Button Pressed” (Case sensitive).
Example:
uint8_t longAddr[] = {00, 12, 23, 42, 00, 00, 65, 46};
Aquila.on("Button Pressed”, longAddr, doSomething);
© 2015 makerlab.mx
14
Aquila Embedded Developer Guide
v0.2.0
Advanced Functions:
requestAction(uint16_t address, uint8_t action, uint8_t param=0, bool
hasParam=false)
Description:
Request the execution of an action (uint8_t) to another device.
uint8_t action is the action id. id’s are assigned in order when you call addAction, starting from 0.
doAction(uint8_t action, uint8_t param, bool gotParam)
Description:
Executes a local action, with the given param if gotParam == true.
setAction(n, description, function)
Description:
Sets an action with the given description and function to the "n" slot or id.
WARNING: Use with caution as it can interfere with addAction.
setEvent(n, description)
Description:
Sets an event with the given description to the "n" slot or id.
WARNING: Use with caution as it can interfere with addEvent.
© 2015 makerlab.mx
15
Aquila Embedded Developer Guide
v0.2.0
Services
REST-like services library for Altair.
Inspired on HTTP REST services, this library allows simplified REST implementations over an
802.15.4 mesh network.
Important differences with HTTP REST services:
1. Because of 802.15.4 packet size limitations, the service name + the data must be less than 101
bytes (AQUILAMESH_MAXPAYLOAD - 4).
2. There is only one level for the service route. (e.g. You can have services like "temperature" and
"state", but not "state/12" or "temperature/something").
3. Requests only have a service name, method and data (body), there is no header.
Supported methods:
• GET
• PUT
• POST
• DELETE
Supported response status:
• R200 - OK
• R404 - Service not found
• R405 - Method not allowed
• R408 - Timeout
• R500 - Service error
Supported data formats:
Data can be anything you want as long it's formed by bytes.
As a suggestion, you can use JSON encoded strings with help of the included ArduinoJson library, you
can see how to do this in the examples: In the Arduino IDE, File > Examples > AquilaServices.
Rationale:
This library complements the Aquila Protocol in the following way. Now we have:
Actions: Things that the device can DO
Events: Things that can HAPPEN to the device
Services: Things that you can ASK to the device and get a response
WSerial: Logging and Debugging
API:
Required headers:
#include <Wire.h>
#include <Mesh.h>
#include <AquilaServices.h>
© 2015 makerlab.mx
16
Aquila Embedded Developer Guide
v0.2.0
Objects and types:
• Services: this library’s object.
• ServicePacket: what we will send.
Functions:
begin()
Description:
Initializes the library.
Example:
Services.begin();
loop()
Description:
Attends to incoming requests, should be called as often as possible in the loop function.
Example:
Services.loop();
variable(char name[], int *var)
Description:
Subscribes an integer variable as a service. When the service is requested from the hub or other
device, it will respond with the actual value of the variable in JSON format.
For more information on how to make requests from the hub, see: http://docs.aquila2.apiary.io/
Example response: {"val":123}
Example:
// Global variable definition:
int myVar = 0;
// Inside setup function:
// &myVar passes the pointer of the variable to the function
Services.variable("myVar", &myVar);
variable(char name[], float *var)
Description:
Subscribes a float variable as a service. When the service is requested from the hub or other device, it
will respond with the actual value of the variable in JSON format.
For more information on how to make requests from the hub, see: http://docs.aquila2.apiary.io/
Example response: {"val":123.234}
© 2015 makerlab.mx
17
Aquila Embedded Developer Guide
v0.2.0
Example:
// Global variable definition:
float myVar = 0.0;
// Inside setup function:
// &myVar passes the pointer of the variable to the function
Services.variable("myVar", &myVar);
float function(char name[], float (*func)(uint8_t method, char *data, uint8_t
dataSize))
Description:
Subscribes a function as a service. When the service is requested from the hub or other device, the
function will be called and the return value of the function will be sent as response in JSON format.
For more information on how to make requests from the hub, see: http://docs.aquila2.apiary.io/
Example response: {“val":123.456}
Example:
// Function definition:
float myFunction(uint8_t method, char *data, uint8_t dataSize)
{
// Do something
// Possible methods: GET, POST, PUT and DELETE
// Any data sent as the body from the Hub API will
// be passed as an array called “data” with size “dataSize”
// Return whatever you want to send as response
return 123.456;
}
// Inside setup function:
Services.function("myFunc", myFunction);
Advanced Functions:
add(char *name, bool (*function)(uint16_t reqAddr, uint8_t method, char
*data, uint8_t dataSize))
Description:
Adds a service. A service has a name and a function that will be executed wen it’s requested, passing
the data of the request.
The function must have the following signature:
bool myServiceFunction(uint16_t reqAddr, uint8_t method, char *data, uint8_t
dataSize);
Example:
Services.add(“myservice", myServiceFunction);
© 2015 makerlab.mx
18
Aquila Embedded Developer Guide
v0.2.0
request(destAddr, method, *name, (*callbackFunction), *data = NULL,
dataSize = 0)
Description:
Makes a request to another device.
Callback must have the following signature:
void myCallback(uint16_t srcAddr, uint8_t status, char *data, uint8_t dataSize)
Possible methods:
GET
PUT
POST
DELETE
Example:
Services.request(0x001D, GET, “myservice”, myCallback);
void response(destAddr, status, *data = NULL, dataSize = 0)
Description:
Responds to a request. This function is to be called inside a service function, when responding to a
request.
Possible status:
R200 - OK
R404 - Service not found
R405 - Method not allowed
R408 - Timeout
R500 - Service error
Example:
Services.response(0x001C, R200);
© 2015 makerlab.mx
19
Aquila Embedded Developer Guide
v0.2.0
References and Suggested Literature
• Altair Datasheet - https://github.com/makerlabmx/altair-hardware/raw/master/Altair-Datasheet•
•
•
•
•
EN.pdf
ATmega256rfr2 Datasheet - www.atmel.com/Images/Atmel-8393-MCU_Wireless-ATmega256RFR2ATmega128RFR2-ATmega64RFR2_Datasheet.pdf
avr-libc documentation - http://www.nongnu.org/avr-libc/user-manual/index.html)
Arduino Libraries documentation - http://arduino.cc/en/Reference/HomePage
IEEE 802.15.4 standard - standards.ieee.org/getieee802/download/802.15.4-2011.pdf
Atmel Lightweight Mesh Developer Guide - www.atmel.com/Images/Atmel-42028-LightweightMesh-Developer-Guide_Application-Note_AVR2130.pdf
Getting Support
• Aquila Homepage: http://www.aquila.io/en
• Aquila Community Forum: http://community.aquila.io/
• Contact us at: [email protected]
© 2015 makerlab.mx
20