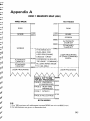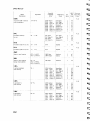
1
i ORIC-1
z Basic
i Programming
2 Manual
by John Scriven
1
c-
Edited and produced for Oric Products International Ltd. by Sunshine Publications
Ltd., London.
4
Cd
0 Sunshine Publications Ltd. 1983
4
Contents
I;;ii
--
Programming in Basic
Colour and Graphics
Page 15
Page 31
-
1
C
si
-
=i
-
-3
Page 47
There are powerful Editing commands to help you
write your own programs
CHAPTER 6
Number crunching
s;
t
Page 53
Your Oric is also a powerful mathematical tool
CHAPTER 7
More mathematical functions
Page 69
A guide to trigonometry and algebra
CHAPTER 8
Words
Page 7 7
Handling words in strings
CHAPTER 9
Advanced Graphics
Page 8 5
High resolution plotting and defining your own
characters
_
4
L
9
Learning Oric’s language
CHAPTER 4
Editing Basic programs
-4
c
Page
The Oric can work in four Modes and eight colours
CHAPTER 5
4
t
c
5
A guide to putting your Oric to work
CHAPTER 3
-
f
t
c
Page
CHAPTER 2
-4
t -
cr
Introduction
Setting the computer up
4
L
CHAPTER 1
3
0RIC Manual
CHAPTER 10
Sound
The Oric has four separate sound channels and
four predefined sounds for games
Page
95
Page 103
CHAPTER 12
Better Basic
With a bit of practice and care you can improve
your Basic programs
Page
CHAPTER 14
Using a printer
CHAPTER 15
Oric Basic
A list of all Oric’s Basic commands
APPENDICES
A
Memory map
B
Control characters
C
Attributes
D
ASCII chart
E
Binary/Hex/Decimal table
F
Pin output chart
G
Derived functions
H
Text screen map
I
High resolution screen map
J
Error codes
K
The 6502 monitor
Index
4
&
c
CHAPTER 11
Saving programs on tape
A guide to the cassette operating system
CHAPTER. 13
Machine code programs
Introducing machine code
5
*
5
109
*
s
2
Page
121
G
-
Page
131
b
-
Page 135 k
b-
Page 145
Page 146
Page 147
Page 148
Page 149
Page 151
Page 152
Page 154
Page 155
Page 156
Page 158
Page 165
=
6
-‘;
-”
6
6
-’
fk
G
-
I
-
CHAPTER 1
Introduction
=a
_-
;;i
1 Introduction
n
Congratulations! You are the possessor of one of the most advanced
micro-computers available today. This book will be required reading
to those of you who have never used a computer before. It will also be
useful to anyone coming from other systems, as ORIC has many
features that make it more powerful than other machines. If you are
used to computers, you may find it easier to skip through the next
chapter.
You will learn a lot from reading the manual, but you will
only become proficient by using ORIC frequently. We hope that
you will find it a friendly computer that will become the heart
of an expanding system. You will soon discover about ORIC’s
‘drivability’. Even beginners will find computing is easy with ORIC.
CHAPTER 2
Setting the Computer up
2. Setting the Computer Up
TV MAINS
LEAD
CENTRONICS
PRINTER
INTERFACE
EXPANSION
PORT
9V DC
POWER
IN
R G B MONITOR
f-l
When you unpack your ORIC, you will notice that it has a keyboard, to enter information, and several sockets at the back. It needs
these to communicate with the outside world. First of all, connect the
power supply according to the instructions on the lead and push the
small plug into the socket at the back. ORIC only needs a low D.C.
voltage so never plug it directly into the mains.
The keyboard provides an input, but you will not see the results of
any key presses unless you plug it into a T.V. Using the connecting
lead, plug one end in the back of ORIC and the other end to the
U.H.F. aerial socket on your T.V. Most T.V.‘s purchased in the last
15 years will operate satisfactorily, although a black and white T.V.
will only give you shades of grey.
Now the moment you’ve been waiting for - switch on the mains,
and tune your T.V. to approximately Channel 36. If you have a
rotary tuner, this won’t be difficult: otherwise tune in a spare button.
When you are in the right place, you should see the following picture
on your T.V.
11
ORIC Manual
If you look at the back of ORIC you will see some other sockets.
The setting-up diagram shows you their particular function. Some of
them will be useful fairly soon, some will be used as you expand your
system.
The most important socket is for the cassette recorder. Almost any
make will do - cheap portables are better than expensive hi-fi
models. When you type in a program and want to save it, ORIC will
turn it into a sound signal that can be recorded. This can be reloaded
whenever you wish and you won’t need to type it again!
You need a lead with a three or seven pin DIN plug on one end, and
either a DIN plug or 3 Smm jack plugs on the other, according to the
sockets on your recorder.
Next to the cassette socket is the R.G.B. colour monitor socket.
The signal that comes out of ORIC, through the T.V. socket, has to
be coded into a U.H.F. signal for your television set, which then
decodes it. A monitor is like a T.V. set without the sound and tuning
section. If you use ORIC with a monitor you’ll get an even better
picture. The signal does not have to be encoded and decoded.
If you want to make a permanent record of what ORIC prints on
the screen, you can connect a printer via the next socket. To make it
easier, most manufacturers make printers that use standard plugs.
ORIC will connect to any printer that has a Centronics interface.
The last socket is the largest, and provides ways of connecting up
ORIC to many other pieces of equipment.
Some examples are: - extra memory, games cartridges, joysticks
and, of course, the modem. This device will allow ORIC to
download PRESTEL pages, or even programs, and to send and
receive electronic mail via the PRESTEL MAILBOX system.
Underneath ORIC is a little button that you may need a pencil to
12
F
-
r’
4u
7!9
?
;;i
-
Chapter 2
Setting the Computer Up
operate. This is a RESET button and is an emergency device to get
you out of never ending loops. It does not switch off the power but
only stops execution of a program. It could also be referred to as a
warm start button, as it does not destroy the contents of the memory.
i
i
L
i
L
13
3
3
-
CHAPTER 3
Programming in Basic
-ii
-
-
3. Programming in BASIC
First the bad news - ORIC doesn’t understand English. But now the
good news - you don’t have to learn a complicated electronic language, because ORIC speaks a language called BASIC, (Beginners
All-purpose Symbolic Instruction Code). This language was invented in 1964 to help people to write computer programs easily. If your
machine is switched on, we’ll see how easy this is.
Type
PRINT “HELLO”
and then press the [RETURN] key.
As you typed the letters in they should have appeared on the screen
and, when you pressed [RETURN], the word HELLO should have
appeared just under it. The flashing square is called the cursor. It
tells you where the words appear on the screen. PRINT is a BASIC
command, yet it means the same as it does in English. Try PRINTing
+
-
17
0 RIC Manual
some other things on the screen. Remember to put quotation marks
round what you want to say and don’t forget to press [RETURN].
Now enter
WRITE “HELLO”
and press [RETURN].
Oops! You’ve just been given an error message. The words
? SYNTAX ERROR
means you’ve made a mistake. Although BASIC is easy to learn,
and close to English, you must use the correct words or ORIC won’t
understand.
A peek inside the ORIC may help to clarify things a little. Inside
ORIC, there are several microchips. The most important one is the
C.P.U. (Central Processor Unit) which is ORIC’s brain. Microchips
use high or low voltages to work. If you imagine a row of eight lightbulbs with switches underneath, then you can see that any of them
can be on or off. You can think of the chips as all containing lots and
lots of these eight block switches. Each switch is called a bit, and each
block is called a byte.
If you think about it, there are 256 different combinations of ons
and offs. If on = 1 and off = 0 then this is one way to store 256
numbers. This system is called binary.
Binary
Normal decimal
00000000 =
0
00000001
00000010
00000011
00000100
=
=
=
=
1
2
3
4
etc.
11111110
11111111
=
254
255
This is why some;eople think of computers as being only to do
with maths - in fact, the zeros and ones can stand for letters, or
words, or almost anything. This is similar to the way morse code can
say anything it likes using only dots and dashes.
Another important chip in ORIC is the BASIC ROM (Read Only
Memory). This translates words in BASIC into zeros and ones that
ORIC’s brain can understand. There are not very many BASIC
18
Chapter 3
PA
-
>
1
-
1
I-r
C
i
C
Programming in BASIC
words, somewhere between one and two hundred. There are several
different versions of BASIC around, just as there are several different versions of English.
For example, English spoken in London is not quite the same as
that spoken in New York. If a Londoner talks about the pavement,
he means what an American would call the sidewalk. This is why we
have to speak correctly to ORIC, or else we will be given error messages.
Type
PRINT “5”
then [RETURN], then type
PRINT 5
L;
-
then [RETURN] Apparently,, there’s no difference.
Now type
PRINT “5 + 2”
i
-
then type
1
1
C
1
-
PRINT 5 + 2
(By now you should be used to pressing [RETURN] key, so I’ll stop
reminding you.) If you enter information in quotes, it’s called a
string, and strings can be letters, numbers, even graphics characters!
If you enter information without quotes, then ORIC assumes it’s a
number, and if it’s in the form of a sum, it will work out the answer
for you.
Try
1
-
1
C
1
-
-z,
PRINT 75 + 25
You should get 100. Hint - you can type ? instead of PRINT to
save time. (notice the difference between a zero -0- and a capital 0,
and between one -l- and a capital I - you know which is meant, but
ORIC has to be told correctly).
Try other calculations. The subtract key is next to 0, divide is /
and multiply is * (shift 8).
If you make a mistake , press CTRL key and X. A backslash will
appear and the whole line will be deleted.
If you’re interested in more complicated maths, remember that
ORIC does not operate on numbers as they arrive.
C
1
-
19
ORIC Manual
PRINT 4 +3*2 will not give you 14, but 10 because * is more
important than + . Here is the order of priority, most important at
the top, least important at the bottom.
0
(“to the power of”)
^
*,/
+,-
Operators on the same line have the same priority. This is a way of
using ORIC as a calculator.
Enter these examples so you understand about priorities.
PRINT 2*3*4
PRINT 4 + 3*2
PRINT 4*3 + 2
PRINT 4/2 + 3
PRINT 2 + 3/4
PRINT 3 + 4^12
PRINT 3 - 4^2
PRINT 2 + 4^3*2
If you are uncertain then put the part of the argument (equation)
you want calculated first in brackets. e.g.
4+3*2=10
but
(4 + 3)*2 = 14
*********
Do you remember I said that ORIC assumed everything without
quotes was a number?
20
Chapter 3
Programming in BASIC
Type
PRINT H
-r
-r
-,
-r
-3
and see what happens You should get a 0. Of course it
can’t be a number - or can it? Type
LETH = 4
Now type
PRINT H
This time ORIC knows that you’ve set H equal to 4 (just like in
algebra). H is called a variable. ORIC will remember this until you
either change the value of H, or type CLEAR, or switch off. Try this
with other letters, then type CLEAR and see if ORIC has forgotten
them. You can use more than one letter, so AB could have a different
value to A or B. You can also have A5 or A6. ORIC will accept variables of more than two characters in length, but will only recognize
the first two.
Try:-
C
-r
-
LET JOHN = 36
LET JOCELYN = 28
-i;
Now type
C
PRINT JOHN
PRINT JOCELYN
4
-
4
You should get 28 each time, because ORIC has only remembered
a variable JO, which although originally set to 36, was reset to 28.
Enter
PRINT 4*JO
C
LET N $ = “BLAKE”
+
-
Now type
PRINT N$
21
ORIC Manual
You should see that “BLAKE” has been remembered as a
string variable. Try to set FP$ to your favourite person’s name.
If you type
PRINT N$, FP$
you should get both names on the screen. The comma sets a
space between the strings, like using TAB on a typewriter. ORIC
has TAB settings five characters apart. If you use a semi-colon(;)
there is no gap between variables. e.g.
PRINT N$;FP$
It is possible to add strings together to make a new string.
Type
LET A$ = N$ + FP$
then PRINT A$. This is called concatenation. Try using CLEAR
again to check if it clears string variables too.
Note:- You don’t have to use LET to assign values to variables.
i.e. A=10 is the same as LET A= 10 to ORIC.
When we were talking about number variables, you probably
discovered that decimal fractions could be held in variables, as
well as whole numbers.
Try:
LET X = l/3
PRINT X
You should get 0.333333333
(ORIC can hold numbers between 2.93874x10 -39 up to
1.7O141x1O38). For further explanation see Chapter 6.
Simple letters should be called floating point variables. If the
letter, or pair of letters, is followed by a % then it is called an
integer or whole number variable e.g. A% = 4762. These can be
between - 32768 and + 32767. In general integer variables can be
handled faster than floating point variables.
So far, we’ve only used ORIC to give us results in a simple
way. This is called immediate execution or calculator mode. The
usual way to use computers is to get them to store a sequence of
instructions and to use this program when we require.
22
Chapter 3
Programming in BASIC
In BASIC, the order of actions is controlled by line numbers. It is
usual to set the line numbers 10 apart so extra lines can be inserted
later. It doesn’t matter in which order you enter the lines. ORIC
will sort them into the correct order automatically.
Try this short program.
10 CLS
20 PRINT “ENTER YOUR NAME”
30 INPUT N$
40 PRINT “PLEASED TO MEET YOU , “;N$
ORIC will go to the first line number, 10 and clear the screen,
PRINT “Enter your name” and then go to line 30. This says
INPUT N$, so the program will halt here until you enter something
and type [RETURN]. N$ now contains your name. ORIC will leap
to line 40 and print
“PLEASED TO MEET YOU”
followed by your name. The semi-colon (;) prints your name
after it. Semi-colons are not necessary in PRINT statements but may
make the listing clearer. They suppress the line-feed so be careful
about putting them at the end of lines. Type RUN. This sets the program into operation from the lowest line number - it also clears
any variables previously set, so you can keep running the program
with different names.
Although it’s not necessary with ORIC, it’s usual to put END as
the last line of the program.
Type LIST and your program will scroll neatly up the screen.
Now add these lines.
50 PRINT “ENTER THE YEAR IN WHICH YOU WERE
BORN”
60 INPUT YEAR
70 LET AGE = 1983 - YEAR
110 PRINT “YOU MUST BE ABOUT “;AGE;“ YEARS
OLD “;N$
120 GOT0 200
200 END
If you make a mistake in a line you can delete the whole line by
simply entering the line number. Try typing 60 then LISTing the
program. Retype 60 INPUT YEAR. Now RUN the program.
23
ORIC Manual
*********
DECISIONS
So far we’ve used the computers to work through all the numbers without making any decisions. Let’s use ORIC’s brain a little
more. Add these lines. (Feminists may wish to alter the wording of
lines 80 + 150!)
80 PRINT “EXCUSE MY ASKING, BUT ARE YOU
FEMALE “;N$; “ (Y/N)?”
90 INPUT A$
100 IF A$ = “Y” THEN 150
150 PRINT “WELL, “N$“ AN ATTRACTIVE GIRL LIKE
YOU MUST BE ABOUT 18”
Line 100 contains a conditional branch. A$ should be either
“Y” or “N”. ORIC tests to see if A$ = “Y”. If this assertion is
true THEN the program jumps to line 150. If this assertion is
false, i.e. if anything else has been entered, then the program continues to the next line, prints the age, and then stops. See the end of
this chapter for a discussion on the use of ELSE.
You will probably see that the program only tests for “Y” as a
reply. “OK” or “YEAH” or “JUST ABOUT” would be counted
as not “Y” and therefore false - so be warned, although ORIC is
very good at obeying instructions, these must be specified carefully
in the first place.
You might like to try to alter line 100 to cope with other
answers. You can start with
IF A$ = “Y”
THEN 150
7
-‘
7
c7
Gn
7
OR A$ = “YES” OR A$ = “YUP”
Up till now all you’ve been printing has been in capitals. You’ve
probably discovered that SHIFT doesn’t seem to work.
If you press CTRL and T at the same time you’ll find ORIC’S
keyboard acts like a typewriter - lower case (small letters) normally and upper case (capitals) when you hold SHIFT down at the
same time. If you press control T (CTRL and T) ORIC will go
24
c1
c
-
2
-
Chapter 3 Programming in BASIC
-a
-*
back to using capitals only. To let you know you’re in CAPS
mode, ORIC prints CAPS on the status line at the top of your
screen.
There is a lot of sense in this. If you type run in small letters, you’ll
get
? SYNTAX ERROR
7
a
7
LOOPS
7
7
7
ORIC has shown us so far that computers are capable of making
decisions according to whether conditions are true or false. They are
also capable of repeating an action for however many times you
require.
For instance, if you want ORIC to print all the numbers from 1 to
1000 and scroll them up the side of the screen, you could typei10
20
30
40
PRINT1
PRINT2
PRINT3
PRINT4
But you’d get rather fed up doing this 1000 times! Luckily there is
a BASIC command called the FOR. . . . TO/NEXT loop, that will
repeat an instruction whilst it counts to itself until the final number is
reached.
This is how it works:25
ORIC Manual
10
20
30
40
FOR X = 1 TO 1000 STEP 1
PRINTX
NEXTX
PRINT “PHEW! THAT’S FINISHED”.
Line 10 sets the counter X to 1, then goes to line 20. There it prints
X, which is 1, and then goes to 30. This says NEXT X, so it shoots
back to the start of the loop at line 10 and increases it by the STEP
number (i.e. X is now 2). It prints X in line 20 then repeats as before
until X is 1000. This time it tries to make X = 1001, but it has
been told to only go up as far as 1000, so it jumps to the next line 40, where it prints
“FINISHED”.
If you change the STEP number to 2, then it will print 1,3,5,7 etc.
You can leave it out, and ORIC will assume you want a STEP size of
1.
Try other STEP sizes yourself.
FOR/NEXT loops can count backwards, but you have to specify
the STEP number as a negative quantity.
10 FOR X = 1000 TO 1 STEP - 1
will count downwards.
If you make a mistake in the numbers, e.g.
FORX=4TO2STEP5
&RX=~TOF~~STEP -1
26
Chapter 3
-4
-ii
-
-i
-i
C
-i
c-
Programming in BASIC
then the action in the loop will still be performed at least once,
because the test for whether the loop is completed is not made until
the loop has reached the NEXT statement and returned to the
start.
Another use for FOR/NEXT loops is as a pause. You probably
found that ORIC prints so fast that you couldn’t see the numbers.
To slow it down, we can put in
25 FOR PAUSE = 1 TO 100: NEXT PAUSE
This is like saying “Count up to 100 each time you print a
number, then continue’ ’ . Note the use of a colon to achieve two
statements in one line.
Be careful about using this facility if there is an IF. . THEN
branch in the line, as if the condition is true then ORIC will jump
to the new line and ignore any other statement in the original line.
An easier way to get pauses on ORIC is to use the WAIT
command.
25 WAIT N will delay execution of the program for N lots of 10
milliseconds.
*********
7
SUBROUTINES
At this stage you may be wondering about sections of a program
that occur several times, but can’t be achieved using simple
FOR/NEXT loops.
For instance, in our counting program, you might want to tell
people that the wait between numbers was intentional.
You send the program to a subroutine, where it waits, prints the
message, then returns to the place where it left the main program.
10 FOR X = 1 TO 10
20 GOSUB 1000
30 PRINT X
40 NEXT
l000 PRINT “THIS IS A SHORT BREAK”
l0l0 WAIT 50
1020 RETURN
*********
ON.. .GOTO
Sometimes, in the course of a program , it’s useful to
o be able to
branch to di fferent parts of the program according to the results of
I
27
4
t
1
c
c
ORIC Manual
some calculation. This is easy using the ON. . . . GOT0 command.
All you need to know are the expected results of the calculation and
the relevant line numbers to branch to.
50 INPUT “CHOOSE 1,2 OR 3”;X
60
70
100
200
300
ON X GOT0 100,200,300
PRINT “NUMBER NOT CHOSEN“: STOP
PRINT “1 CHOSEN”: STOP
PRINT “2 CHOSEN”: STOP
PRINT “3 CHOSEN” : STOP
Line 50 expects an input. If X is 1, control branches to the first
line number after GOTO, i.e. 100; if X is 2, it branches to the
second line number, i.e. 200 and if it is 3, it branches to the third
number, i.e. 300. If any other positive number is input, the program continues to the next statement following ON. . . . GOT0
A similar command is ON. . . .GOSUB, which will branch to a
particular subroutine. When the program returns, it will continue
from the next statement after the ON. . . . GOSUB.
*********
WHAT ELSE?
So far, we have only used IF/THEN in its simple form. It is possible to extend its power by using ELSE. Look at this:
1 0 FORX= lTO5
20 INPUT A
30 IF A > 10THENPRINT“TOO BIG”ELSEPRINT“0.K.”
40 NEXT
If the condition is true then the first command is obeyed; if
false, then the command following ELSE. If the program has not
been told to branch, then execution will continue from the next
program line.
28
Chapter 3
Programming in BASIC
REPEAT/UNTIL
If you wish to repeat a series of instructions a certain number of
times, then it is easy to use a FOR/NEXT loop. This will be repeated
the number of times that is set up in the first line, e.g.
FORN=lTO5
ii
C
+ii
c
.
will loop five times. If you wish to loop until a certain condition 1s
true, it is difficult to know what value to put in the loop counter.
REPEAT allows you to loop any number of times, and tests at the
end of each loop to check if the condition is met in the UNTIL line.
This short program demonstrates this
10
20
30
40
50
4
c
a
c
4
REPEAT
+1
D = D + INT(RND(1)*6)+
PRINT D
UNTIL D > 20
STOP
C
1
c
4
L
Gi
c
,
-4
C
Gii
c
.
1
L
1
c
a
This simulates a situation where a die is being thrown, and will
continue to be thrown until the total exceeds 20. It would not be
possible to know the number of loops before the condition in line 40
is met, so a FOR/NEXT loop cannot be used. It would be possible to
imitate this action using a GOT0 statement IF the condition was not
met, but the structure of the program would not be clear on reading
the listing, so REPEAT should be used where possible.
Note that as with FOR/NEXT, the condition is tested at the end,
so the loop is always negotiated at least once.
*********
Before we go on to more interesting areas such as the pictures and
sound, there is one last thing you can do to make your programs
easier to read.
Use REM statements to explain lines. REM stands for remark and
is ignored by ORIC. It is only there for your benefit when reading
through the listing, or for when you show the program to others.
This will show how you can use REM.
10
20
30
40
REM COPYRIGHT F. BLOGGS
FOR N = 1 TO 10 : REM COUNTS LOOP
PRINT “FRED IS MAGIC”
NEXTN
c
29
ORIC Manual
50 END
60 REM THIS IS A RATHER SILLY PROGRAM
Use REM statements to label your subroutines. Note that you
can have have more than statement on a line, but each statement
must be separated by a colon - See line 20.
1000 REM SUBROUTINE TO WAIT FOR A SHORT TIME
1010 WAIT 100
1020 RETURN
You can use ’ instead of REM, but only as a comment at the end
of a line.
10 PRINT “HELLO” ‘THIS SAYS HELLO
is permissable.
10 ‘ COPYRIGHT ORIC LTD
is not permissable
Basic isn’t hard to learn, and this is only a brief guide. You will
become more proficient the more you use it.
*******
I hear and I forget
I see and I remember
I do and I understand
Old Chinese proverb.
30
CHAPTER 4
Colour and Graphics
4. Colour and Graphics
4
t
When you switch ORIC on it automatically goes into TEXT mode,
i.e. you can use the screen to type on directly and when it’s full, it will
scroll up automatically. The TEXT area is also used for low-resolution graphics.
Before you experiment with LORES, it would be a good idea to
discover which colours are available for use. There are two colour
commands, INK and PAPER. These set the foreground and
background colours, respectively, and can be used either as direct
commands or in programs. They have to be followed by a number
(0 to 7) to specify which colour, and can be used in TEXT or HIRES
modes.
BLACK
RED
GREEN
YELLOW
BLUE
MAGENTA
CYAN
WHITE
4
c-
3
F
Try them out now. If you’re used to computers that have to clear
the screen before they can change colour, you will find that ORIC
doesn’t need to do this.
Here is a short program to show you all of ORIC’s colour combinations.
5
10
20
30
40
50
60
70
REM COLOURS
TEXT
FORN = lTO25
PRINT “THIS TEXT IS IN THE FOREGROUND
COLOUR”
NEXT N
FOR1 = 0TO7
FORP = 0TO7
INK I : PAPER P
33
ORJC Manual
80
90
100
210
WAIT 100
NEXTP
NEXT I
INK 7 : PAPER 4
Of course, when the foreground an d back grouu nd colours are the
sa me, you won’t be able to read the words!
For low-resolution graphics, you can use the screen in TEXT
mode or you can enter LORES 0 or LORES 1. The screen area
available for plotting is from 0 to 38 in the X axis (horizontal) and
from 0 to 26 in the Y axis (vertical). Position 0,0 is at the top left
hand corner of the screen. The far left column cannot be used, as it
contains the attribute that controls the background or PAPER
colour of that row.
The next column controls foreground or INK colour, but may be
used in TEXT mode. If LORES 0 or LORES 1 are selected, the
screen is cleared to background black, and the attribute for either
standard or alternate character set is also placed on the far left of the
screen.
LORES 0 uses the standard character set, and LORES 1, the
alternate set.
Try this:
10 LORES 0
20 PLOT 16,12,“HELLO”
If you run this short program, HELLO will be printed in the centre
of the screen. You could use the program in Chapter 9 to define other
character’s using the standard character set. The PLOT command
would save you having to POKE into the screen memory.
34
-
1
-
5
1
=k
-
1
=+
1
k
1
k
1
k
1
”
:
-I
-=a
7
=a
1
b
1
=-a
1
F;lr
1
F;r
1
1
_l
_1
-
4
.- -
a
_ -
Chapter 4
Colour and Graphics
If you now type
10 LORES 1
1
_ -
1
- 4
a
_ _
G
1
L d
4
c I
1
;7
Isi
m
Gi
Gi
c
4
ii
Isi
1
--4
ii
‘II
ii
r
If line 20 is still intact, instead of HELLO appearing, a strange
set of blocks will be printed. These are characters from the alternate
set, and these particular ones are those that share the same ASCII
codes as the letters in HELLO. This is the only difference between
LORES 0 and LORES 1.
This program will print out the complete set of alternate characters.
5
10
20
30
40
50
REM ** ALTERNATE CHARACTERS **
FOR N = 32 TO 128
PRINT N,CHR$(27);“I”;CHR$(N)
PRINT
WAIT 25
NEXT N
You can use this program to select characters to form your own
graphics shapes. This is one way in which it can be used.
1 REM *** MONSTER ***
2 REM *** LORES 0/l DEMO ***
5 LORES 1
6 D=0
9 REPEAT
10 A$ = “F9”:B$ = “6I”
20 FOR C=0 TO 35
30 PLOT C,D,A$
35 PLOT C,D+l,B$
45 PLOT C,D,“ ”
50 PLOT C,D+ 1,“ ”
55 NEXT C
56 SHOOT
6 0 D=D+2
70 UNTIL D=26
75 EXPLODE
80 CLS
The characters in A$ and B$ do not appear in their normal form,
as LORES 1 has been selected. The rest of the program sends the
composite character along the rows successively until row 26 is
35
t
0 RIC Manual
reached, when it will explode!
To see the standard characters, simply type LORES 0 in line 5.
Should you need to mix alternate and standard characters on the
same screen, i.e. to mix text and graphics, then it is easy. To use standard characters in LORES 1, CHR$(8) will switch to the standard set,
and CHR$(9) will switch back.
If you use them in reverse, you can of course, print alternate characters in LORES 0. Here are two programs to demonstrate this
effect. In all programs using LORES 0 or LORES 1, it is a good idea
to switch off the flashing cursor by typing CTRL and Q at the same
time. Repeating this action will switch the cursor back on.
5 REM ** TEXT IN LORES 1 **
10 LORES 1
20 A$ = CHR$(8) + “HELLO” + CHR$(9)
30 FOR N = 2 TO 24
40 PLOT N,N,“KKKK”
50 PLOT N,26=N,A$
60 NEXT N
70 WAIT 500
8 0 CLS
5 REM ** ALT. CHARS IN LORES 0 **
10 LORES 0
20 A$ = CHR$(9) + “HELLO” + CHR$(8)
30 FOR N = 2 TO 24
40 PLOT N,N,“KKKK”
50 PLOT N,26-N,A$
60 NEXT N
70 WAIT 500
80 CLS
*********
SCREEN POSITIONS
If you need to know which characters are at a particular position on
the screen in either TEXT or LORES modes, use SCRN(X,Y).
Type CLS to clear the screen. The cursor should now be at the top
left hand corner. Type
PLOT 10,20,“A”
A capital A will appear near the bottom of the screen.
36
Chapter 4
Colour and Graphics
Type
PRINT SCRN (10,20)
The number 65 will be returned, as this is the ASCII code for
the letter A.
Here is a short program that REPEATS a loop until a falling missile
reaches a target. SCRN(X,Y) detects when the missile is one place
away from the target (the Ascii code for + is 43 - see line 220), and
the program finishes with an explosion. After you have RUN the program, change the mode in which it operates, by adding line 115
LORES 0 or 115 LORES 1. This will show you the different effects
you get according to the mode you have selected.
100 :REM ** USE OF SCRN(X,Y) **
1 1 0 :CLS:INKl:PAPER4
120 :FOR N =20 TO 25
130 :
PLOT N,26,” + ”
140 :NEXT N
150 :REPEAT
160 : A = INT(RND(1)*36 + 2)
170 :
FOR P = 0 TO 24
180 :
PLOT A,P,“V”
190 :
WAIT 4
PLOT A,P,” ”
200 :
210 :
NEXT P
220 :UNTIL SCRN(A,P + 1) = 43
2 3 0 :EXPLODE
10 REM **** LORES COLOUR PLOTTING ****
20 LORES 0
30 STP = 2*PI/50
40 R=l0:X=l0:Y=l0
50 REPEAT
60 E = 18 + RND(1)*6
37
ORIC Manual
70
80
90
100
110
PLOT X + R*SIN(C),Y + R*COS(C),E
C=C+STP
UNTIL C
>2*PI
REPEAT:UNTIL KEY$< > “”
CLS
*********
HIGH RESOLUTION GRAPHICS
If you want to draw high resolution pictures, you need to type
HIRES. Try it now.
You should find that the top of the screen goes black, leaving you
just three lines for text at the bottom. This is useful, because you
can type in drawing instructions, and see the effect on the screen
above. In immediate mode, you can therefore use ORIC as a
drawing tablet to try out your instructions. When they’re correct,
you can incorporate them in your programs.
If you want to get back into TEXT mode, just type TEXT, and
the screen will go back to its original format. Both TEXT and
HIRES can be used as commands within programs.
Before you start to draw anything, you have to imagine that the
screen is divided up into 240 positions (labelled 0-239) across the
screen, and 200 positions, (labelled 0-199) down the screen.
Those across are called X positions, and those down Y positions. If
you’ve used graphs, then you’ll be familiar with this - the only difference is that the origin (0,0) is at the top left hand corner.
There are several specialist drawing commands that make
graphics easy on ORIC.
We’ll go through them one at a time so you can see their effect.
CURSET sets the cursor to an absolute X,Y position, or will plot
that point. It must be followed by three parameters. (These are
numbers that ORIC needs to know).
The HIRES cursor does not flash on the screen like the
TEXT
one.
.
will move the cursor to the centre of the screen and print a pixel, or
small dot. The first parameter is how far across the screen
(O-239), the second is how far down the screen (0-199) and the
third is the FB number (FOREGROUND/BACKGROUND)
38
Chapter 4
Co/our and Graphics
The FB codes are:0 background colour
1, foreground colour
2, invert colours
3, null (do nothing)
Now type HIRES and experiment with CURSET.
The next graphics command is CURMOV. This is similar to
CURSET except that X & Y are relative to the last position of the
cursor. Again, ORIC needs to know X, Y, and FB numbers. Make
sure that the value of X or Y plus the current cursor position does not
take you off the screen, or you will get an error message.
DRAW X, Y, FB will draw a straight line from the current cursor
position to the current cursor plus X and Y.
Try this short program. You should find it draws a square. Notice
that negative numbers draw from right to left or from down to up. If
the shape isn’t quite “square” enough, try changing lines 30 and
50.
5
10
20
30
40
50
60
si
ii
REM ** SQUARE **
HIRES
CURSET 60,40,3
DRAW 120,0,1
DRAW 0,120,l
DRAW - 120,0,1
DRAW 0, - 120,l
REMEMBER:- Changing modes, or even typing HIRES again, will
rub out your picture permanently!
*********
PATTERNS
ORIC has yet another trick for you. When you switch on, the
DRAW command is set to draw a continuous line. It’s possible,
however, to draw dotted lines, dashed lines, etc., according to your
own specification.
This is how it works. If you remember it was mentioned earlier that
ORIC thinks in 8 bit bytes, so you can count from 0 to 255 is using 8
zeros and ones. When ORIC is switched on, the number 255 is loaded
into the pattern mask. (255 is written as 11111111 in binary code.)
39
0 RIC Manual
You can set the mask to any number from 0 to 255 to get different
effects. If you want equal sized dashes, you could type PATTERN
15.
15 is00001111 in binary
i.e. 8 + 4 + 2 + 1, so half the line is “on” and half is “off”. Try
drawing the square again, but this time reset the pattern mask to different numbers. There is nothing to stop you having two sides continuous, one dotted and one dashed. To help you understand how it
works, just add this line as a starter.
15 PATTERN 170
(170 is 10101010 in binary).
It should send you dotty!
*********
For a really exciting look at ORIC’S capabilities in HIRES mode,
try this short program which generates interference patterns by
drawing lines close to each other.
5 REM ** MOIRE **
10
20
30
40
50
60
70
80
HIRES
FORA = 0TO1
FOR B = 0 TO 239 STEP 6
CURSET 0,199*A,3
DRAW B,l99-398*A,l
CURSET 239,199*A,3
DRAW -B, 199-398*A,l
NEXT B: NEXT A
*********
CHAR
If you were to try to PRINT in HIRES mode, you would only get text
on the bottom 3 lines. There is a command however, that lets you
print anywhere you like on the high resolution screen. Type NEW to
clear the memory, then HIRES. Now set the cursor to the middle of
the screen by typing CURSET 120, 100, 3. Now type C H A R
65,0,1. You should have a capital A in the middle of the screen.
CHAR is the command, and is followed by three parameters.
CHAR X, S, FB.
X is the A.S.C.I.I. code (32- 127)
S is either 0 (standard character set) or 1 (alternate set)
FB is foreground/background value (0-3)
40
a
F -
Chapter 4
Colour and Graphics
A.S.C.I.I. (usually pronounced “Askey”) stands for American
Standard Code for Information Interchange. It is fairly standardized and assigns code numbers to letters, figures and symbols.
(see appendix). There is a BASIC command ASC that returns the
value of a character in a string, and this will save time as you will see
in the next program.
5 REM ** SIDEPRINT **
10 H I R E S
2 0 CURSET 50,50,3
30 N$ = “HELLO I’M ORIC”
40 FOR A = 1 TO LEN (N$)
50 CHAR ASC (MID$(N$,A,l)),0,l
60 CURMOV 10,10,0
70 NEXT A
Lines 40 to 70 contain a loop that scans the length of N$ and
prints the characters according to the CURMOV command.
Change N$ to your name, or try changing the CURMOV
parameters so you can see what happens. Be careful you don’t go off
the screen, or you will get an error message.
*********
CIRCLES
To draw circles, simply type in CIRCLE, followed by two numbers - first the radius, then the FB code. The centre will be at the
current cursor position. Be careful your radius does not take the
circumference off the screen. Try this as a direct command in HIRES
mode.
CURSET 120,100,3
a
then
3
CIRCLE 50,l
a
-4
If you have previously set PATTERN to a different value, the
circle will be drawn in dots, etc.
Try this program, for an interesting effect.
ORIC Manual
100 : R E M ** LACE CIRCLES **
110 :HIRES
1 2 0 :CURSET 120,100,3
130 :FOR N = 99TOlSTEP - 1
140 : CIRCLE N,l
150 : PATTERN 100-N
1 6 0 :NEXT N
*********
POINTS
If you want to know if any particular pixel on the screen is in foreground or background colour, e.g. if there is a space invader at the
centre of the screen, then POINT is the command you need. To see
how it works, try this in direct mode.
Type HIRES
Now type
CURSET 0,0,0 (cursor set at position 0,0 in background
colour).
Now type
TEXT
next
PRINT POINT (0,0)
As 0,0 is set to background, you will get 0 printed. Type HIRES.
This time type CURSET 0,0,1 (cursor set at position 0,0 in
foreground colour).
Now
TEXT,
then
PRINT POINT (0,0).
This time you should get - 1, as the pixel is set to foreground.
*********
42
Chapter 4
4
F
4
--
-a
c
4
C
1
c-
4
C
4
4
c
=a
-
4
P
4
t
:
Colour and Graphics
FILL
This is a useful command that can fill an area of so many rows with
a value and so many character cells with a value, between 0 and 127.
There are 200 rows, 40 cells per row. The value produces colours
and patterns according to the attributes. (see appendix and chapter 7
for details).
Here is a short program to show you the fine detail that ORIC can
achieve.
5 HIRES
10 FORN = 0tol99
20 X = RND(l)*8 +16
30 FILLl,l,X
40 NEXTN
Line 20 chooses background colours at random from line 0
(top) to line 199 (bottom).
Experiment to find what the other attributes will achieve.
This program demonstrates mixing graphic patterns with colour
and flashing attributes.
Note that line 130 avoids using the control codes that disturb the
screen synchronization.
100 :REM **FILL DEMO **
1 1 0 :HIRES
1 2 0 :REPEAT
130 : A = RND(1)*128 + 1:IF A> 23 AND A< 32 THEN 130
140 : CURSET RND(1)*90 + 10,RND(l)*90 + 10,l
150 : FILL RND(1)*90 + l,l,A
160 :UNTIL KEY$< > ""
*********
DOUBLE HEIGHT AND FLASHING CHARACTERS
If you want special characters, e.g. flashing or in double height,
there is a routine in ORIC that will achieve this for you.
If you look at the appendix for ORIC attributes, you will see a
table specifying all the effects that are available. You will also need
to refer to the table that covers control characters.
Control D toggles auto double height on/off. This can only be
accessed through a print statement. Type PRINT CHR$(4)
43
0 RIC Manual
Anything you enter now will appear twice in consecutive rows. Try
it out. Help! How do we stop it?
As it’s a toggle action switch, typing PRINT CHR$(4) a second
time will turn this action off. The other control characters are
achieved in a similar manner. But. . . back to the double flashers!
The following program will give you the effect you desire.
10 PRINT CHR$(l2)
20 PRINT CHR$(4); CHR$(27);“N DOUBLE FLASH
CHARACTERS”
30 PRINT CHR$(4)
Don’t be alarmed if it looks fearsome; I’ll explain each line at a
time.
Line 10 clears the screen. It also ensures that you start at the top
of the screen. You’ll see why this is important when we add line 15
later.
Line 20 contains several statements. CHR$(4) switches on the
auto double height (to save typing everything in twice), CHR$(27) is
A.S.C.I.I. code for escape (to start the escape character routine) and
the N in the quotes selects double height and flashing characters for
the rest of the text - it won’t be printed itself.
Line 30 toggles the auto D/H off.
Try changing the message in quotes, as well as altering the escape
code, e.g. “J HELLO” will produce double height non-flashing
characters.
When you’ve discovered how to achieve different effects, add this
line: 15 PRINT - then RUN the program. From the strange result,
you will see how important it is to start on even line number
(0,2,etc.)
In conclusion, here is a program that uses many of the high-resolution graphics commands. It also demonstrates how information
for drawing commands can be held in DATA statements.
Chapter 4
;i
r -
-a
C-
--4
c-
4
cc
4
-
4
F
-4
t
-4
P--
3
C
G
L+
r
-1
c
100
110
120
130
140
150
160
170
180
190
200
210
220
230
240
250
260
270
280
290
300
310
320
330
340
350
360
370
380
390
400
410
420
430
440
450
500
510
520
530
Colour and Graphics
:REM ** PENNY FOR YOUR THOUGHTS**
:HIRES
:x = 100:Y = x
:CURSETX,Y,l
:PAPER6:INK1
:CIRCLE70,1
‘**FRONT WHEEL**
:REPEAT
: CURSETX,Y ,3
: DRAW69*SIN(F),69*COS(F),l
: F=F+.l
:UNTIL F> 2*PI
:F=0
:CURSET 200,140,3
‘**BACK WHEEL**
:CIRCLE30,1
:REPEAT
: DRAW29*SIN(F),29*COS(F),l
: CURSET200,140,3
: F=F+.l
:UNTILF> 2*PI
:CURSET100,15,3
:REPEAT
: READ A,B
: DRAW A,B,l
:UNTIL B = 25
:CURSET 160,20,3
:FOR N = 1 TO 10 ‘**TEXT 1**
: READ L
: CHAR L,0,l
: CURMOV 7,0,3
:NEXT
:CURSET 160,32,3
:FOR N = lTO9
9 ‘**TEXT 2**
: READ L
: CHAR L,0,1
: CURMOV 7,0,3
:NEXT
:DATA -10,0,10,10,0,20,0,-20,40,0
:DATA -10,-10,15,0,-5,10,60,60,0,25
:DATA 79,82,73,67,32,82,73,68,69,83
:DATA 84,79,32,87,79,82,75,33,33
45
-z
c
-7
c
-
,_
--
CHAPTER 5
Editing Basic programs
5. Editing Basic programs
-3
T--
4
c-
-3
c-
4
C-
;
L
4
4
c
3i
--
si
t
:
r
.-
c3
4
--
When you write a program and wish to change a line, there are
several methods of altering or deleting existing instructions.
If the whole line is incorrect, then typing the line number
followed by [RETURN] will delete the entire line.
10 PRINT “HELLO”
20 PRINT “OOPS!”
30 PRINT “GOODBYE”
Type:20 [RETURN]
Now type:LIST
You will see the program listing as before, but this time with line
20 missing
10 PRINT “HELLO”
30 PRINT “GOODBYE”
If you wish to delete all the lines in a program, then type NEW.
If you are typing a line in, and discover that you have made a
mistake, you can rub out the last character entered by pressing the
DEL key. Press DEL twice and the cursor will backspace (move to
the left) two positions.
To delete a complete line as you are entering it, hold down
CTRL and X. A backslash will appear at the end of the line, and
the cursor will jump down to the start of a new line.
If you LIST a long program, you probably find that it flashes
up the screen too fast to read. To halt the listing, press the space
bar once. Pressing any key will continue the listing. To halt the
listing completely, hold down CTRL and C. Control C will also
stop the execution of most Basic programs. They can be restarted
by typing CONT (for continue), unless you have changed any of
the program or its variables. Then you will have to use RUN or
GOTO.
*********
49
ORIC Manual
COPYING
It would be very time-consuming to have to re-type whole lines, particularly if they contain complicated information. You are not allowed to have lines that are longer than 78 characters. Very long program lines are difficult to read and spoil the lay-out of the listings.
ORIC will give out a PING if you try to exceed this number.
Should you need to change a line, ORIC has a COPY facility. To
see it in action, type this short program in.
10
20
30
40
REM ** EDIT TEST **
A=20:B=30
C=A*B
PRINT C
If you decide that line 20 should read A = 25: B = 5, and that line
30 should read C = A + B, this is what you do. LIST the program
and it will appear on the screen. It is a good idea to press control L
(CTRL and L at the same time) to clear the screen each time before
you LIST the program.
You can now move the cursor up the screen using the arrow keys
next to the space bar. The cursor will move in the direction of the
arrow on the key. When the cursor is next to line 20, hold down the
CTRL key, and at the same time press A. The cursor will move to the
right and each character it passes over will be entered in the input
buffer (a temporary store).
When the cursor is over the 0 in 20, release CTRL and A, and
press 5. A 5 will appear instead of the 0. Continue to copy the line
using control A until the cursor is positioned over the 3 in 30. Release control A and enter 5. The 5 will appear in place of the 3.
As you do not want the 0 in your new line, simply press
[RETURN] and the edited line will be stored in the program
memory. The screen display will show A = 25: B =50, which may
make you think it is incorrect. Clear the screen as before and LIST
the program. Voila! - Line 20 now reads A = 25: B = 5.
Because you did not copy the 0 at the end of the line, it was not
stored as part of the new line. To change line 30, move the cursor up
to the line and then copy as far as * using control A. Enter + then
copy B and press [RETURN].
50
r
64
1
I
7
--
a
1
Chapter 5 Editing Basic programs
Remember - moving the cursor anywhere on the screen does not
alter the program lines. Program lines are entered by copying existing screen characters using control A, or by entering new ones from
the keyboard. Control X will allow you to escape from the line, the
cursor keys can jump over letters, DEL will delete mistakes and
[RETURN] will enter the new line.
Until you are confident in using these features, always clear the
screen and LIST the new line to ensure it has been entered as you
wish. You will discover that you can edit and copy lines extremely
quickly and you will soon become proficient at using the various
editing facilities on ORIC.
*********
TRON and TROFF
If you are developing a Basic program and, in spite of all your
attempts, it does not work as expected, gives consistently strange
results, or simply stops execution with an error message, then it is
useful to know if the flow of control within the program is actually as
you intended it. Oric has two commands that allow you to do this.
TRON turns on a trace facility that prints up the line number being
executed. The line number itself is surrounded by brackets so that it
is not mistaken for the actual screen display. TRON cannot be
entered as a direct command but has to be inserted in a program
complete with line number, e.g:50
TRON
Here is an example of a program that does not work! Type it in and
RUN it.
10
20
30
40
50
100
110
200
210
300
310
FORN=lTO4
READ D
ON D GOSUB 100, 200,300,400
NEXT N
STOP
PRINT “I”’
RETURN
PRINT “AM”
RETURN
PRINT “ORIC”
RETURN
51
0RIC Manual
400 PRINT “THAT’S WHO”
410 RETURN
500 DATA 1,2,3
You will see that there is something wrong with the ON. . .
GOSUB line when it is compared to the DATA line.
If you enter
5 TRON
then RUN the program, the screen will fill with line numbers. You
can see that they never reach 400, and a check at the DATA line
will reveal why - it is missing a figure 4.
If you only wished to examine say, the working of a subroutine, it
would be possible to start the subroutine with TRON (TRace ON)
and finish it with TROFF (TRace OFF).
52
CHAPTER 6
Number crunching
s;i
r-
-
RI
-
7
-
4
-
-i
-
-3
*
-
1;;1,
-
?
-
6. Number crunching
As you have already discovered, ORIC can handle very large numbers and also very small ones, both positive and negative. The larger
numbers grow, the more figures they require, so 10 needs two figures, 100 needs three, and so on. This can become untidy and difficult to read and write when the number gets very large. There is a way
of writing numbers that is a lot more compact, called scientific or
exponent notation.
10 can be written 1 x 101 (10)
100 can be written 1 x lo* (10 x 10)
1000 can be written 1 x lo3 (10 x 10 x 10)
and so on
ORIC could write 1 x lo3 as 1.00000000E + 3. In fact, numbers up
to 999999999 are usually shown as they are normally written, as
ORIC is accurate to 9 digits.
Try these:-
H
-
F
PRINT 999999999 * 1
then
PRINT 9999999999 *1
-
1
w
This shows you how scientific notation works, and also how the
number is rounded off.
Enter large numbers and see how Oric prints them. You can also
enter numbers such as 2.3E + 4 to see what their equivalent is. An
easy way to remember how to convert these numbers is to say
2.3E + 4 means
“Write down 2.3 Move the figures 4 places to the left. Fill any
spaces with zeros”.
2.3
23.0
230.0
2300.0
23000.0
+l place (or times 1 0)
+2 places (or times 1W
-3 places (or times 1oW
+4 places (or times loooo)
PC
55
0RIC
Manual
So 2.3E + 4 is the same as 23000
2.3E - 4 What does this mean? The negative sign after the E does
not mean the number is negative, simply very small. It means:“Write down 2.3 Move the figures 4 places to the right. Fill any
spaces with zeros”.
2.3
0.23
+ 1 place (or divide by 10)
0.023 - 2 places (or divde by 100)
0 0023 + 3 places (or divide by 1000)
0.00023 + 4 places (or divide by l0000)
So 2.3E - 4 is a very small number: 0.00023. If the number is a
large negative number it would be written - 2.3E + 4. If the number
is a very small negative number, it would be written - 2.3E - 4 Make
sure you understand these differences if you wish to understand how
ORIC handles numbers.
*********
INT
INT is a function that returns the largest whole number less than
or equal to the value in brackets. Try these to see if Oric returns the
answers you expect:PRINT INT (1.5)
PRINT INT (2)
PRINT INT (- 2)
PRINT INT (- 1.5)
Note particularly the result of the last example - INT always rounds
to a number less than that in brackets, unless it is already an integer.
**********
ABS
ABS returns the absolute value of a number. If it is positive, it
remains so. If it is negative, it becomes positive.
Try these: PRINT ABS (4.3)
PRINT ABS (- 4.3)
*********
SGN
SGN returns either - 1,0 or 1, according to whether the value in
the brackets is negative, zero or positive. Try this to see how it
works:-
Chapter 6 Number crunching
rJ
-
--
m
-
-
H
-
d
-
rl
I
C
-
;;7
IL7
n
-
n
-
-
10 FORN= -5TO5
20 PRINT N, SGN(N)
30 NEXTN
*********
DATA
If you have a lot of numbers that will be used in a program
then it is possible to have them stored in the program as
DATA, rather than have to type them in each time. This short
example shows how to incorporate this information in your programs: 10 FORN= l T 0 5
20 READ A
30 S=S+A
40 NEXTN
50 PRINT “SUM = “S
60 DATA 1,3,8,6,4
Line 20 READS the DATA, one item at a time, and assigns
that value to the variable A. It is added to S (initially zero) each
time and printed out at line 50.
When the program is RUN, a pointer moves along each item
as it is READ, and it remains at the last item it reaches. If you
type in GOT0 10, the pointer is not reset, and you will get an
OUT OF DATA error message. RESTORE is a command that
resets the pointer in a program. Add 15 RESTORE and see the
effect this has on the program. The pointer is reset to the first
DATA item each time the loop is executed, so 1 is added to S
each time, and the rest of the DATA is ignored.
*********
ARRAYS
Sometimes it is a better idea to collect similar variables together,
instead of giving them different names. Arrays have brackets
following the variable letter so you can identify an element. e.g.
N(l),N(2),N(3) and N(4) are all elements in the array N.
Oric reserves space for up to 10 elements in an array,
automatically. If you require more room, you will have to use
the DIM statement. e.g. DIM N(14) will reserve space for 15
elements. (Arrays start with zero, not one, in most forms of
Basic).
57
0 RIC Manual
One reason for using arrays rather than simple variables is that
they can fit in FOR/NEXT loops easily.
10 FORN = lT05
20 A(N) = N*N
30 NEXTN
4 0 FORX=lTO5
50 PRINT X, A(X)
60 NEXTX
Lines 10 to 30 load the array A(N) with the squares of the loop
number (N). Lines 40 to 60 print the contents of the array on the
screen. Note that it is not necessary to fill every element in an array.
Any “empty” elements will contain zero.
An array like those we have just considered is similar to a column
of numbers, but it is also possible to have rows and columns - in
other words, a two-dimensional array. Multi- dimensional arrays
must be dimensioned before use.
10 DIM A(5,5)
2 0 FORN= l T 0 5
30 FORM= lTO5
40 A(N,M) = N*M
50 NEXT M,N
This will load numbers into 25 locations. You can probably see
from the program that they happen to be the answers to some simple
multiplication sums.
N
58
Chapter 6 Number crunching
-
Contents of array A(N,M) after execution of program.
m
-
The n umbers in the brackets identify which element you wish to
refer to, and are known as subscripts. e. g. A(2,3) is 6 and A(5,5) IS
25.
m
m
-
m
-
C
n
n
-
n
n
-
z
m
-
LOGS
I have mentioned that numbers can be written using scientific
notation. e.g. 1.6E + 2 is the same as 160. More usually 1.6E +2
wouldbewritten 1.6x10² which means 1.6x 1OxlO or 1.6x100.The
small 2 in 102 means “write the large number down this number of
times and multiply them together”. e.g. 10x10.
So 10 4 means 10 x 10 x 10 x 10 or 10000. The small number is called
the index or exponent. 10 4 is usually read as “10 raised to the power
of 4” or just “10 to the power of 4”.
This gives us an introduction to logarithms, or logs for short,
because the log of a number is the power to which 10 must be raised
to produce that number. i.e. 4 is the log of 10,000.
To find the log of a number between 1 and 10, we have to find the
index that will produce that number. It must be between 0 + 1. If you
type
PRINT LOG (5)
n
-
I
-
then the log will be returned. You should get
0.698970004.
-_
n
-
PRINT 10 T 0.698970004.
W
--
and see if you were right. (The sign T means “to the power of” and
is SHIFT 6 on the keyboard). Remember 10 log X = x.
59
0RIC Manual
As well as base 10 or common logs, there are also natural logs
available on Oric. Type
PRINT LN(5)
You should get
1.60943791
which is the natural log of 5. How can there be more than one log?
Base 10 logs are the power to which 10 must be raised to produce that
number. Natural logs are the power to which e must be raised to produce that number. e is
2.718281828
e is the result of this series
e =l+l+++&+& . . . , . . etc.
The natural exponential of a number is the inverse of the natural
log and can be produced by typing PRINT EXP (X)
Therefore X = EXP (LN(X))
To find the logarithm of a number to another base, use the formula
LOG base z (X) = LOGe (X)/LOGe (Z)
Log e is of course the same as LN on Oric.
**** *****
NUMBER BASES
So far we have encountered binary numbers and decimal numbers. Perhaps you are confused by so many different ways of representing the same quantities. In fact, they are not really as difficult to
grasp as they may appear - it all comes down to how we choose to
group numbers. Normally, we group things in tens - probably
60
d
Chapter 6 Number crunching
-
W
-
W
-
because we have ten fingers and thumbs - there is no other likely
reason. Our whole counting system uses groups of ten. When we
have ten groups of ten, it forms a hundred, and ten hundreds form a
thousand and so on.
e.g. 3742 is made up of 3 thousands, 7 hundreds, 4 tens and 2
units. The largest figure you may have in any column is 9. One
more, and you have enough for one group of 10 in the next column.
e.g.
9
+l
10
Ir
c-
Just suppose that humans had 8 fingers and thumbs. They would
have used these symbols: 0,1,2,3,4,5,6,7. 8 and 9 would not exist.
+
C
e.g.
c=
-
7
+1
10
+
C
-
m
C
The largest figure you may now have in any column is 7. One
more makes a group of eight, so the answer is 10. This is not read as
“ten” but “one-zero” in “base eight”. To show that it is not a
normal (or decimal or denary or base 10) number, then it is usual to
write it 10,.
Just as the column headings in base 10 numbers are in tens,
--
e.g.
+
-
so in base eight, the headings are in eights,
Ir
C
e.g.
thousands
(10x10x10)
512
(8x8x8)
hundreds
(10x10)
64
(8x8)
tens
(10)
8
(8)
units
units
so 1241, is the same as
(1x512) + (2x64) + (4x8) + 1 = 673 in base 10.
61
0 RIC Manual
In the language of the computer, binary or base 2, the same rules
apply - but now there are only 2 digits, 0 + 1 and the groupings are
in twos.
e.g.
16
(2x2x2x2)
8
(2x2x2)
4
(2x2)
2
(2)
units
So in binary, the number 10111 is the same as
(1 x 16) + (0 x 8) + (1 x 4) + (1 x 2) + 1 = 23 in base 10.
This can get rather cumbersome when large numbers are
involved. In face, you need 8 digits to make 255, and 65535 is
1111111111111111 - sixteendigits!
It would be possible to ignore binary code for large numbers and
stick to base 10, but that would give no clue as to how the number
was stored on a computer.
A compromise is reached by using base sixteen (or hexadecimal
or hex as it is more usually called.) Base 16 needs 16 digits, so letters
are used above 9. This means that counting in hexadecimal results
in this:-
0,1,2,3,4,5,6,7,8,9,A,B,C,D,E,F
You can see that fifteen in hex is F, and so sixteen is 10. This
gives column headings as follows:4096
(16x 16x 16)
256
(16x 16)
16
units
(16)
So 12AF in hex, is the same as
( 1 x 4096) + (2x 256) + (10x 16) + 15 = 4783 in base 10.
Why choose such a horrifying number system? Perhaps you’ve
guessed - it shows at a glance how the numbers are stored in a
computer, by taking blocks of four bits at a time.
F0 can be stored in one byte
62
Chapter 6 Number crunching
-i
c1
-
The enormous binary number that is the equivalent of 65535 in
base 10 becomes FFFF in hex. You may be able to see now why
65535 is the highest memory location you can address using two
bytes.
Oric will recognize hexadecimal numbers as such, provided they
are preceded by a #, pronounced “hash”. So P R I N T #1A
produces 26. Try out some conversions for yourself. The largest
number you may convert is #FFFF. Check your results against
the table in the appendices.
NOTE : You may fin d some books that identi fy hex numbers by use
c7
c
of a $, but Oric will interpret this as a string sign.
-i
If you need to convert between hexadecimal and base 10 numbers, you would use #. i.e.
I
‘7
I
c?
PRINT #10
CT
‘7
I
‘7
will produce 16.
To convert a decimal or base ten number into a string containing
the value and preceded by a # , type
PRINT HEX$(l6)
v-
This will produce # 10. As with #, there is an upper limit
of 65535 i.e. #FFFF. This program will print out base 10 numbers up to 255 and also their hexadecimal equivalent.
-4
-
10 FORN=0TO255
20 PRINT N, HEX$(N)
30 NEXTN
*********
MATHS ROUTINES
-i
c-
Although it is important not to think of computers purely as
manipulators of numbers, there is no doubt that they make many
maths tasks that are usually boring and repetitive, comparatively
simple. Oric has many built in routines that assist “numbercrunching”.
63
0RIC Manual
If you needed to know all the square roots from 1 to 100, you
would have to spend a long time looking in tables or pressing calculator keys. Oric can achieve this much more simply. Type in this
program:1 0 CLS
2 0 FORN=lTOl00
30 PRINT N, SQR(N)
40 NEXT N
If you RUN it, the numbers from 1 to 100 will flash down the
left side of the screen, with their square roots next to them in the
centre of the screen. Oric calculates them so fast that you probably
found it difficult to read. Put in
35 WAIT 10
to slow the program down.
Oric can even calculate roots without using the SQR facility.
There is a method of finding roots called the Newton-Raphson
iterative method. Iteration means to keep on doing the same thing
again and again - an ideal use for a loop on Oric. Each time, the
guess is refined and gets closer to the correct answer. This short
program shows the guesses, and stops when the answer is correct.
(Line 80 jumps out of the loop if the guess is within
t 0.000001 of the right answer - just in case there is not an
exact answer).
5
10
20
30
40
50
60
70
80
90
REM *** ITERATIVE ROOTS ***
INPUT “THINK OF A NUMBER”;S
INPUT “GUESS THE ROOT”;G
PRINTG
X=S/G
G=(X+G)/2
R=G*G
IF R< (S + 0.000001) AND R>
(S - 0.000001) THEN GOT0 90
GOT0 30
PRINT“ROOT = “;G
There is another use for ORIC’s high-speed maths brain. The
17th Centu ry mathematics Leibnitz, who made calcul us possible,
64
-4
-
A
-+
-
4
i
4
i
c+
P
li
Ic
rzi
C
--i
--i
Ir?
I
-i
ri
Lc
i-
Chapter 6 Number crunching
discovered a way of calculating TI.
n is an irrational number; in other words, it can never be calculated to
a finite number of decimal places.
Leibnitz discovered that this sequence approached closer and
closer to the true value.
n
2
4(1-+++--f++. . . .)etc.
You should be able to see a regular pattern in the fractions. ORIC
loves patterns, as they can ble put in loops. I f you were to try to
calcul ate the above form u l a with pencil and paper it would take
you a long time , even u P to - l/9. - all the worse wh.en you
realize that the answer isn’t close enoug h until you’ ve looped
several hundred times. Poor Leibnitz, but lucky you! Try this
program.
5
10
20
30
40
50
60
70
REM *** SLOW PI ***
CLS
DEF FNA(N) = (- l/N + l/(N + 2))
FOR X = 3 TO 10003 STEP 4
S = S + FNA(X)
APPROX = 4*(1+S)
PRINT APPROX
NEXTX
Line 20 defines a function, A, containing a variable N. This
saves having a cumbersome line later. FNA actually calculates the
series and is called at line 30. The loop goes up in steps of 4,
starting with 3, so X is 3,7,11,15 etc. This makes correct
increments and the result is printed at line 50. If you RUN the
program, Oric will print a result for TI that gets closer and closer to
the actual result. Compare it with 3.1416 and you will see that it’s
not the fastest way to calculate n, even with ORIC.
To find n rather more quickly, simply type
ri
-
PRINT PI
eFi
-
ri
-
This will give you an accurate value of 71 to several places o f
decimals, as PI is stored as a constant by ORIC.
Remember that this means you cannot choose PI as a variable
name, or indeed any word beginning with PI, such as PIG = 8 or
PIPES = 78, because PI is a reserved word.
ii
65
-i
-
c-
ORIC Manual
*********
RANDOM NUMBERS
There is a useful function on ORIC that is often used in games
programs. This is RND, which will return a pseudo-random
number. Due to the way computers generate random numbers, this
will not be truly random, and it would be possible to discover a pattern in the series of numbers produced. This is not likely to be
obvious unless you perform a statistical analysis on the series, so
RND can for all normal purposes be considered truly random.
If you aren’t sure what random num bers are, then consider a die.
It has an equal chance of producing any numbers from 1 to 6. The
order in which the numbers are actually produced in a series of
throws is random. To simulate this on ORIC, try this program.
5 REM *** DICE THROWER ***
10 FORN=lTO10
20 PRINT“PRESS ANY KEY TO THROW DIE”
30 GET A$
40 A = INT(RND(l)*6) + 1
50 PRINT A
60 NEXT
Line 20 waits for any key to be pressed. Line 30 chooses a
random number between 0 + 1, multiplies it by 6, the INT function
loses any decimal fraction, and finally, 1 is added. This ensures that a
number from 1 to 6 will be produced.
RND(n) will produce a random number greater than or equal to 0
and less than 1, if n is a positive number. If n is a negative number,
then the random seed is set to a particular number, and subsequent
positive n’s will always produce the same sequence. If n is zero, the
last random number generated will be produced.
*********
To conclude this chapter, here is a program that utilizes many of
the functions mentioned in this chapter. It also uses some string
handling routines that you may not fully understand until you have
read the relevant chapter. If necessary come back to it later.
Calendars are difficult to construct due to the awkwardness of the
earth in not taking an exact number of days to pass round the sun. In
fact, it takes 365.242216 days to make an exact year.
66
i
7
Chapter 6 Number crunching
+
ti
iii
-
Fi
C
ii
-
ii
C
ii
7
ii
-;i
-
Li
-i
C
-i
Various people, from Numa Pomilius and Julius Caesar down to
Pope Gregory, have attempted to correct the calendar, but it is still
not perfect.
All this makes it rather more complicated to calculate which day of
the week a particular date fell on. The German mathematician,
Gauss, worked out a formula that works for any date from 1752,
when the Gregorian calendar was initiated in the U.K. and the American colonies.
5
10
20
30
40
50
60
70
80
90
100
110
120
130
140
150
160
170
180
190
200
REM *** DAY CALCULATOR ***
CLS
PRINT“ENTER DATE, MONTH & YEAR”
INPUT “DATE”;D
IF D< 1 OR D>31 THEN 30
INPUT “MONTH”;M
IF M< 1 OR M> 12 THEN 50
INPUT “YEAR”;Y
IF Y< 1752 OR Y > 8000 THEN 70
M=M-2:IFM<l THEN M=M+12:Y=Y-1
Y$ = STR$(Y)
C = INT(Y/l00)
Y = VAL(RIGHT$(Y$,2))
A = INT(2.6*M - 0.19) + D + Y + INT(Y/4) + INT
(C/4) - C*2
DAY = INT((A/7 - INT(A/7))*7 + 0.1)
DAY = DAY + 1
FOR N=l TO DAY
READ DAY$
NEXT N
PRINT DAY$
DATA SUNDAY ,MONDAY ,TUESDAY,
WEDNESDAY ,THURSDAY ,FRIDAY ,SATURDAY
67
CHAPTER 7
More mathematical functions
7. More mathematical functions
TRIGONOMETRY
ORIC has many functions that you will recognize if you have a scientific calculator or if you remember your geometry lessons at
school. These are SIN (sines) COS (cosines), TAN (tangents). They
are ratios of lengths of sides of triangles for difference angles.
ABC is a right-angled triangle. x is the angle at corner ACB. The
side AB is opposite angle x, BC is adjacent to angle x, and AC is
called the hypotenuse.
AB
__ = opposite
adjacent
BC
= tangent of angle x
AB opposite
-=
= sine of angle x
AC hypotenuse
adjacent
-BC - ________
= cosine of angle x
AC- hypotenuse
71
0RIC Manual
You can probably see how the ratios change in these three example triangles: -
1.) When x is large
TAN (x) = opp
adj
SIN
(x)
+
a large number that
tends towards infinity as
x approaches 90”
= opp +
tends towards 1 as x
approaches 90”
hyp
COS (x) = adj
+
tends towards 0 as x
approaches 90”
--t
1
hyp
2.) When x is 45’
TAN 00 = OPP
adj
SIN (x) =
OPP
COS
opp
hyp
-_* 1
6
+1
(x) = adj
0
hyp
odj
3.) When x is small
TAN (x) = opp
-_*
a small number that
tends towards 0 as x
approaches 0”
(x) = opp +
tends towards 0 as x
approaches 0”
adj
SIN
hyp
Opp*
+
COS (x) = adj
adj
hyp
tends towards 1 as x
approaches 0”
You can obtain TAN, SIN & COS by simply typing PRINT TAN
(x), etc. The ony problem is that Oric, like most computers likes
angles in radians, not degrees. Luckily degrees can be turned into
radians, and vice versa very easily.
72
Chapter 7
More ma thema tical functions
A quick recap on circles.
diameter = 2 x radius
TI = circumference
diameter
Tr = circumference
2 x radius
..
circumference = 2 x TI x radius
and radius = circumference
2XR
How many times would the radius fit round the circumference?
More than 6 times - in fact 2 x TI times. If you were to cut out a slice
from the circle, so that the curved part equals the radius, r, then the
angle at the centre,
is 1 radian. One complete circle
= 360’ so 1 radian = 3X6b” = 57.29578”
27-I
r
To convert radians to degrees, use the formula:degrees = radians x 360 5 radians x 57 -29578
2ll
To convert degrees to radians, use the formula:radians = 2 x TI x degrees fi degrees
360”
57.29578
Here are some programs to show how ORIC can use trigonometric
functions to draw on the screen, as well as calculate for you.
73
ORIC Manual
PROG. 1. Sine waves
5
10
20
30
40
50
60
70
80
REM *** SINE ***
HIRES
DRAW 0,199,l
CURSET 0,100,3:DRAW 239,0,1
FORA = - PI TO PI STEP 0.02
CURSET A*38 + 120,SIN(A)*99 + 99,1
NEXT
PRINT “SINE CURVE”
GETA$
This draws a sine curve from - TI to 71. Line 70 prints on the 3 line
text screen and holds it until any key is pressed at line 80. Change
SIN in line 50 to COS and see the difference while ORIC plots
a COSINE curve.
PROG. 2. Tower
5
10
20
30
40
50
60
70
80
90
100
110
120
130
140
150
160
170
180
REM *** TOWER ***
HIRES
CURSET 20,20,3
DRAW 0,160,l
DRAW 200,0,1
DRAW - 200, - 160,l
CURSET 25,170,3
A$ = “TTOWER”
FORN = lTO6
CHAR ASC(MID$(A$,N,l)),0,1
CURMOV 8,0,3
NEXT
CURSET 200,170,3
CHAR ASC(“X”),0,l
INPUT “DISTANCE”;D
INPUT “ANGLE X (DEGREES)“;X
XR = X/57 *29578
H = TAN(XR)*D
PRINT H;
This calculates the height of a tower, if you can supply the distance
and the angle from your position to the top o f the tower. Lines 30 to
74
a
Chapter 7
More ma thema tical functions
50 draw the triangle, lines 70 to 110 are necessary to print on the
high resolution screen, and line 160 converts degrees to radians,
Note the semi-colon in line 180. This keeps the answer in view on the
text window.
There is a list of derived functions in the Appendices. You can
define these using DEF FN, or by use of the defined & character (see
the Machine Code chapter) as an extension function.
Ga
c-
d
I-
a
a
i
a
a
a
a
a
a
a
75
CHAPTER 8
Words
8. Words
ii
-
rr
ri
-
Earlier, we discovered that computers can manipulate any collection
of symbols, not just numbers. So that ORIC knows that the symbols
must be con.sidered as such, and does not mistake them for variables,
they have to be enclosed within quotes.
So,
ri
-
PRINT A
will result in a zero being printed, as it is considered to be a variable.
PRINT “A”
will result in A being printed, as it is enclosed within quotes.
String variables are identified by a dollar sign at the end. e.g. A$ or
A3$. Remember that ORIC only reads the first two characters of a
variable name, so BIG$ is the same as BIKE$.
Strings are assigned using LET, although this is optional.
+i
LET A$ = “HELLO”
is the same as
A$= “HELLO”.
is
The only simple mathematical operator that may be used with
strings is + . So,
10 A $ = “HELLO”
20 B $ = A $ + A $
30 PRINT B$
will print HELLOHELLO.
79
0RIC Manual
Line 20 could not be written as B$ =2*A$. Total length of a
string must not exceed 255 characters.
To find the length of a string there is a function called LEN.
IF A$= “HELLO” THEN PRINT LEN (A$)
will print 5. This value can be assigned to a variable.
10 INPUT A$
20 L = LEN(A$)
30 PRINT A$ “CONTAINS”;L;“CHARACTERS”
Although a string cannot be used as a number directly, it is possible to convert it into a number, using the VAL function.
10 A$ = “56”
20 V = VAL(A$)
30 PRINT V
Because V is not a string variable, it can be manipulated as a
number, and PRINT 2*V will return a value of 112. If the first character in the string is an alphabetic character then a value of zero is
returned.
10 A$ = “ORIC”
20 V = VAL(A$)
30 PRINT V
There is a function that works in the opposite direction. STR$ converts a numeric expression into a string.
10 A=128
20 A$ = STR$(A)
30 PRINT A$
You cannot tell the difference between PRINT A and PRINT A$
- the results appear the same. However, PRINT A + A will produce
256, whereas PRINT A$ + A$ will produce 128 128 as ORIC treats
them differently.
If you look at the end of this book, you will find a table entitled
ASCII codes. These are also mentioned in Chapter 4.
80
ii
Ii
-
ci
;r
-i
Ir
-i
-
Fi
?
Chapter 8 Words
Using the function ASC will return the code for any keyboard character. The function CHR$ works in the reverse direction, and converts a number between 32 and 128 into the corresponding character.
To list them all, run this program.
10
20
30
40
FOR N = 32 TO 128
PRINT “ASCII CODE” N “STANDS FOR”CHR$(N)
WAIT 20
NEXTN
Because all the characters have ASCII codes, they can be sorted
into order. As you can see, numerical order is the same as alphabetical order, so Z, which has the value 90, is greater than A which has
the value 65.
You can use the greater than (> ) and the less than (< ) signs to
compare strings, as well as numbers. Care must be taken, however,
to avoid mixing upper and lower case, and all lower case letters have
greater values than upper case, so although “apple” is less than
“zebra”, “apple” is greater than “Zebra”.
To assist you in manipulating strings, there are 3 more very useful
functions - RIGHT$, LEFT$ and MID$. RIGHT$ returns the
right hand portion of a string as follows:
A$= ‘ ‘ABCDEFGHIJ”
PRINT RIGHT$ (A$,2)
4
C
?
C
i
i
t
4
will print “IJ”. The number 2 is the quantity of characters to be
returned.
LEFT$ returns the left hand proportion of a string as follows:
A$= ‘ ‘ABCDEFGHIJ”
PRINT LEFT$(A$,2)
will print “AB”
MID$ needs just a little more information.
A$= “ABCDEFGHIJ”
PRINT MID$(A$,5,2)
will print “EF”. The example means - return the 2 characters from
string A$, starting at position 5. The second number can be omitted,
81
0 RIC Manual
in which case all the characters to the right of, and including, the first
number are returned.
A$= “ABCDEFGHIJ”
PRINT MID$(A$,5)
will print ‘ ‘EFGHIJ”.
Here is a short program that demonstrates these functions.
10 PRINT “ENTER A STRING”
20 INPUT A$
30 IF LEN(A$)< 3 THEN PRINT “TOO SHORT”: GOT0
10
40 PRINT A$ “IS”;LEN(A$);“CHARACTERS LONG”
50 PRINT “IT STARTS WITH”;LEFT$(A$,l)
60 PRINT “AND ENDS WITH”;RIGHT$(A$,l)
70 PRINT “AND HAS”;MID$(A$,2,LEN(A$) - 2); “IN
THE MIDDLE”
Often it is easier to have information stored in a program. J ust as it
is possible to hold numbers in DATA statements, strings can be held
just in a similar manner.
1 0 FORX=0TO3
20 READ NAME$(X)
30 PRINT NAME$(X)
40 NEXT
50 DATA TOM, TERESA, DENIS, MARTIN
The DATA is READ one name at a time and stored in array,
NAME$. NAME$(0) is then TOM, NAME$(l) is TERESA,
NAME$(2) is DENIS, and NAME$(3) is MARTIN.
String arrays are similar to numerical arrays. ORIC reserves space
automatically for up to 11 elements (numbered 0 to 10). If you
want more, then you must put in a DIM statement for the number
you need e.g. DIM A$ (19) would create space for 20 elements.
There is one special thing to note about strings held in DATA
lines. If you insert leading spaces, they will be ignored by ORIC. e.g.
DATA AB, C,DE
will lose the space before the C. If you want the space included, you
must surround the whole item by quotes. e.g.
DATA AB,“ C”,DE
82
Chapter 8 Words
i-i
ti
-
When you RUN a program, the DATA pointer goes to the first
item in the first DATA line and READS from there. If you RUN the
name program, the data pointer will READ 4 items, then stay at the
end. If you then enter
GOT0 10
ii
I+
-
rr
R
-
ii
Lt
the pointer cannot find any more items, so the error message
OUT OF DATA IN 20
appears. To send the pointer back in a program, use the command
RESTORE. If you add this line to the program, you will find that
you can use GOT0 10 without getting an error message.
35
RESTORE
Because it is in the loop, the pointer will be reset each time, and
TOM will be loaded into all the elements of the array.
*********
SORTING
r;
i
c
u
LI
-
li
I
To complete this chapter, here is a program that demonstrates
some of the string handling techniques of ORIC, particularly the use
of string arrays and string comparison.
There are many kinds of sorting methods that computers can use.
All operate on the principle that words starting with letters that have
low ASCII codes will finish the routine at the beginning of an array,
those with high ASCII codes at the end, and the rest arranged in
numerical and therefore alphabetical order in between.
This sample program loads the words to be sorted into an array
A$, and uses U$ as a temporary store while the list is worked
through. A$ is shuffled until the words are correctly ordered, when
they are printed out in lines 150 to 170.
You could use this program as a sorting subroutine in your own
programs and renumber it from, say, 2000.
L
83
ORIC Manual
5
10
15
20
30
40
50
60
70
80
90
100
110
120
130
140
150
160
170
84
REM ***SORT***
INPUT “NO. OF WORDS”;N
DIM A$(N + 1)
FORX=0TON-1
INPUT A$(X)
NEXT
FORX=0TON-1
PRINT A$(X):NEXT
FORK=0TON-1
FORL=K+lTON
IF A$(L)> = A$(K) THEN 130
U$ = A$(L)
A$(L) = AS(K)
A $ ( K ) = U$
NEXT L
NEXT K
FORX=0TON
PRINT A$(X)
NEXT
r;T
r-+
rr-4
I
P-
*
CHAPTER 9
Advanced Graphics
-4
C
-
“4
t
f4
.A
+I
d4
9. Advanced graphics
USER DEFINED GRAPHICS
When ORIC is switched on, both the standard and alternate character sets are loaded into Ram. The standard character set contains
all the usual ASCII characters as shown in the appendix and the
alternate character set contains teletext graphics. Either set can be
completely or partly overwritten.
In a game, you may wish to use text, and also a few graphics characters you have defined yourself, perhaps small aliens. You can
choose a standard character that is not used frequently, e.g. @ or
©and redefine it.
In a word processing situation you may wish to have the character
set containing not English characters, but a Greek or Russian
alphabet.
To understand how this can be achieved, we need to know how the
characters are stored originally. Looking at the memory map shows
us that the standard set is stored between locations 46080 and
47104, i.e. they take up 1K (1024) bytes. If there are 128 characters, then each must use up 8 bytes (128 x 8 = 1024). This may
lead you to think that they are stored in an 8 x 8 chess-board
meMor
locot iox
i;:
c7
G
Binor Y VI0ue
Decimal
8
20
3 4
F;
_
3 4
62
G
G
..
34
34
G
ctpivojcnt
0
87
ORIC Manual
arrangement as in some computers. However, this is not quite
how ORIC manages it. In each byte, only the last six bits contain
character information.
Each character can therefore be thought of as occupying 8
rows of 6 dots. Each row is a byte, of which the last 6 bits
determine its design. If a bit is 1 then the cell is “on” and if 0 it
is “off”.
“On” cells are in foreground colour, “off” cells, are in background.
To look at the contents of any memory position, we use
PEEK. To change the contents, we use POKE.
The characters in the set are stored in the order of their ASCII
codes. The ASCII code for A is 65, so the pattern for A should
be stored at 46080+ (65*8) i.e. 46600 and the next 7 bytes.
r v
4661214/
46601
46602
466453
466&
466@5
- - _L - - - -__- -
466k!k - 4-6&d? ----_
The zeros and ones form a letter A. It is very easy to change it.
Try this:
POKE
POKE
POKE
POKE
POKE
POKE
POKE
POKE
88
46600,31
46601,21
46602,31
46603,4
46604,31
46605,4
46606,10
46607,17
Chapter 9
Advanced graphics
Type A now - you have been invaded by ORIC! Any A will now
appear in its new guise, as you have redefined how ORIC draws an
A.
It would take a long time to POKE numbers one at a time, so it is
better to write a short program to redefine characters.
Here is a frightening program that redefines the entire character
set. When you have entered it, LIST it, then RUN it, and watch the
screen. This is total alien domination! The only way to escape from
them is to press ORIC’s reset button, when you will return to the
standard character set.
5 REM *** ALIEN DOMINATION ***
10 FOR X = 46344 TO 47088 STEP8
20 FOR I=0 TO 7
30 READ M
40 POKE I+X,M
50 NEXT I
60 RESTORE
70 NEXT X
80 DATA 18,12,30,45,45,30,18,0
Here is a more useful program. You can use it to redefine any keyboard character, upper or lower case. A 2-dimensional array, Y, is
set up to store the new character in its large form. C$ is whichever key
is pressed. A is the start of the standard character set in memory, D is
the position of the first byte of the chosen character in the standard
character set. The subroutine at line 1000 PEEKS that byte of the
character and converts the decimal contents of that byte into a
binary number, i.e. 45 would be converted into 00101101, and
either zeros or ones loaded into the array Y.
The last section pokes either a solid block (128) if the cell is a 1, or a
blank (32) if the cell is a 0 into the screen display. This causes a large
version of the character to appear on the screen. The rest of the program gives the user the opportunity to enter fresh data, one line at a
time, and to examine the result in actual or enlarged size.
5 REM *** CHARACTER GENERATOR ***
10 CLS
20 DIM X(8):DIM Y(8,8)
30 PRINT “PLEASE ENTER THE CHARACTER YOU
WISH”,“ TO REFEFINE”
89
0RIC Manual
40
50
60
70
80
90
100
110
120
130
140
150
160
200
1000
1010
1020
1030
1040
1050
1060
1070
1080
1090
1100
1110
GET C$
PRINT C$
C = ASC(C$)
A = 46080:D = C*8
GOSUB 1000
PRINT”ENTER THE DATA”
FORN=0TO7
PRINT“ROW “;N;
INPUT X(N)
IF X(N)> 63 OR X(N)< 0 THEN 120
POKE (A + D + N),X(N)
NEXT
GOSUB 1000
STOP
REM *** CHARACTER GEN.SUBR. ***
FORN=0TO7
X(N) = PEEK(A + D + N)
FORM=0TO7
Y(N,M) = INT(X(N)/2T(7 -M))
Z = ((X(N)/2T(7 -M)) - Y(N,M))*21(7 - M)
X(N) = Z + 0.0001
IF Y(N,M) = 0 THEN POKE 48220 + (N*40) + M,32
IF Y(N,M) = 1 THEN POKE 48220 + (N*40) + M,128
NEXT M
NEXT N
RETURN
*********
SERIAL ATTRIBUTES
To send information to the screen, ORIC uses serial attributes.
This means that a byte sent to the screen can be considered as a
graphic pattern or as an attribute controlling colour, flashing, etc.
The way the bits are set determines whether the byte is read as an
attribute or not. If bits 6+ 5 are both zero, then the remaining 5
bits are considered as an attribute - there are 32 of these. If bits
6 + 5 are not both zero, then bits 5 to 0 are read as a pattern.
In HIRES mode, bits 0 to 5 are the pattern bits. In TEXT and
LORES mode, bits 0 to 6 are the ASCII look up codes. Control
codes (bits 6 + 5 set to 0) become attributes. Bit 7 controls whether
the character is inverse or not, 1 is on, 0 is off.
90
Chapter 9
Advanced graphics
ottributc code
\
pattern bits
If an attribute is set, then it continues until the end of the line,
unless it is reset. To see how serial attributes can be used to control
the display in TEXT mode, try this program.
10
20
30
40
50
60
70
FORA=0TO255
FORN=lTO24
PRINT A;“SOME TEXT TO FILL THE SCREEN”
NEXTN
FOR J = 48042 TO 49002 STEP 40
POKE J,A
NEXT J,A
Lines 20 to 40 fill the screen with text. Lines 50 + 60 POKE
variable A onto the screen. You should be able to see which values of
A control colour, flashing, etc. and which result in normal or inverse
text being printed. When A is between 24 and 3 1, the screen will look
very strange. This is because you are changing the synchronisation
temporarily. See Appendix C for details.
This program demonstrates how serial attributes can control the
colour of a predefined characters on the TEXT screen.
5
10
20
30
40
50
60
70
80
90
100
REM **DROPPING ALIENS**
GOSUB 1000:CLS
FORM=lTO20
PAPER INT(RND(l)*4) + 4
A = RND (1)*32 + 1
ZAP
FOR N = 0 TO 1100 STEP 40
POKE 48039 + N + A, 1
POKE 48040 + N + A, 64
POKE48039+N+A+6,2
POKE 48040 + N + A + 6,64
91
ORIC Manual
110
120
130
140
150
160
170
180
190
200
210
1000
1010
1020
1030
1040
1050
POKE48039+N+A+3,3
POKE 48040 + N + A + 3,64
SOUND l,N/2,0
PLAY 1,0,5,5
POKE 48040 + N + A, 32
POKE 48040 + N + A + 6,32
POKE 48040 + N + A + 3,32
NEXT N
EXPLODE
WAIT RND(1)*200 + 100
NEXT M
REM *** CHARACTER DEFINITION ***
FORN=0TO7
READ X: POKE 46080 + (64*8) + N,X
NEXT N
DATA 18,12,30,45,45,30,18,0
RETURN
You will see from this program that you can have all the foreground colours on the screen at the same time, as well as changing
background colours. You do not have to POKE into the screen
display - PLOT will work as well.
Nomally the protected columns on the left of the screen control the
INK and PAPER colours for the whole screen. If you POKE an
attribute on to the screen, it occupies one character square and
effects all the character squares to its right unless you POKE another
colour attribute after it. As the INK attribute is separate to the
PAPER attribute, it is not necessary to cancel it unless other characters appear to its right. These would then take on the colour of the
closest attribute to their left.
In HIRES mode, it is possible to have a colour resolution of
200 lines by 40 character columns. Again, you have to POKE the
position just to the left of the position you wish to alter.
This program POKES background attributes into the centre of the
screen and foreground attributes to the far left. The circles that are
drawn take on the colour of the attributes according to their position
on the screen.
92
Chapter 9
5
10
20
30
40
50
60
70
80
90
Advanced graphics
REM ** SPLIT CIRCLE **
HIRES
FOR N = 41060 TO 48979 STEP 40
POKE N,INT (RND(1)*7) + 1
POKE N-45,1NT (RND(l)*7) + 16
NEXT N
CURSET 120,100,3
FOR X = 95 TO 1 STEP -1
CIRCLE X,1
NEXT X
The second program shows how a graph can have a multicoloured
start and then be just one colour for a pre-defined section. You can,
of course, POKE flashing or double-height attributes on to the screen
using this method.
5 REM ** COLOUR SINE **
10
20
30
40
50
60
70
80
HIRES
FOR N = 40960 TO 49079 STEP 40
POKE N,INT (RND(1)*7) + 1
POKE N + 100,l
NEXT N
FOR A = -PI TO PI STEP 0.02
CURSET A*38 + 120,SIN(A)*99 + 99,1
NEXT A
93
CHAPTER 10
Sound
10. Sound
ORIC contains some very sophisticated sound commands, using a
specialist chip that can synthesize 3 different tones as well as a noise
channel.
You have already experienced some of the sounds available each time you press a key, ORIC makes a high beep. If you press
CTRL or [RETURN] or any other control keys, you will get a low
beep. Try pressing CTRL and at the same time press F. This will turn
off the sound from the keys. If you type CTRL F a second time, the
sound will return.
Now for some excitement!
Type ZAP then [RETURN]. This will produce a rapidly falling
whistling tone that suggests a ‘galactic Laser gun’. Now try PING a bell-like tone that can also be produced by typing CTRL and G.
SHOOT simulates the sound of a gun being fired. EXPLODE
generates an explosion.
?
c
These are the four predefined sounds that should be useful in
arcade action games. They can be put in programs just like any
BASIC commands.
10
20
30
40
FORNN = lTO10
ZAP
WAIT 5
NEXTN
This should fire off a salvo of ZAP’s.
NOTE:- You must include a pause, as in line 30, to allow the
sound to finish before a new one is triggered. The wait length
depends on the sound.
97
0 RIC Manual
The main sound commands are SOUND, MUSIC and PLAY.
In most programs it will be necessary to define the type of
sound by the first two commands, and to control the envelope
by the third. The envelope determines the “shape” of the
sound, i.e. whether it starts sharply, like a guitar-or smoothly,
like an organ. These commands will take some time to become
familiar with as they offer the chance to make ORIC sound like
many existing instruments as well as any you care to invent!
“White noise” can be added to give the effects of bombs,
planes, etc. The possibilities are limited only by your imagination and are not as complicated as they may appear at first
sight.
Here are two short sample programs that will demonstrate
some of the things you can do.
5 REM ** MUSIC? **
2 + 1,7
20 MUSIC 1, RND(l)*6,RND(l)*l2
30 WAIT RND (1)*20+5
40 GOT0 5
You can stop execution of this program by typing CTRL C.
To find out how it works, see the later details that cover the
MUSIC command.
The next program is a little longer, but it gives you the
opportunity to use ORIC as a keyboard instrument. The keys
on the top row act to produce notes a semi-tone apart, start at
C, and ending with B (the “ =” key). Pressing “/” will STOP
the program. (Always include a PLAY 0,0,0,0 command at
the end or the last note will continue until you hit a key).
5
20
30
40
50
60
70
80
98
REM ** KEYBOARD **
GET A$
A=VAL A$
I F A $ = “ - ” THEN A=11
IF A$=“=” THEN A=12
IF A $ = “/” THEN PLAY 0,0,0,0: STOP
IF A=0 THEN A=10
MUSIC 1,3,A,5
Chapter 10 Sound
zil
;;i
--
4
-
=a
c-
?
c
4
i
90 GOT0 5
Line 20 waits for an input form the keyboard. Line 30 reads the
value into variable A. If you press a number then A will be the value
of that number, if another key, then A will equal 0. Lines 40 to 60
convert the remaining keys to the required values. Lie 70 stops A
from being 0. (This would result in an error message as the note
value in the MUSIC command cannot accept 0 as a valid
parameter).
Here are the details of the sound commands.
1. SOUND (Channel, Period, Volume)
All the parameters must be numeric. Out of range errors will be
detected.
Channel = 1,2 or 3 for tone channels
4,5 or 6 for noise channels
Note that there is only one noise channel, the 4,5 or 6 simply specify which tone channel it is mixed with.
Volume = 1 to 15 fixed volume levels
0 variable volume level controlled by PLAY
command
SOUND can be used to produce a wide variety of both musical and
non-musical sounds. Channels 1,2 and 3 produce pure tones, and 4,5
and 6 add noise to each tone. The period value controls the pitch,
(the name refers to the period of vibration or frequency of the note
- do not mistake it for a note length parameter.) Unless you are
using an external amplifer, you will probably find that volumes of 6
or 7 are sufficiently loud!
2. MUSIC (Channel, Octave, Note, Volume)
Channel = 1,2 or 3 - tone channels
Octave = 0 to 6 with 0 giving the lowest tone.
Note = 1 = C Any other numbers will produce an error
message.
2=c#
3 =D
4 = D#
5 =E
6=F
7 = F#
8 =G
99
-
L
0RIC Manual
9 = G#
10 = A
11 = A#
12 = B
MUSIC has been designed to offer you pure tones, and the pitch
has been set to make it easy to enter notes of a particular value, e.g.
from sheet music. There are three available channels, and notes,
octave (from 1 to 7), and volume are all selectable.
.
2_1
Db
4
DI
Eb
i
2s
XI,
Gb
Ab
Bb
D
E
F
G
A
B
L
,ir\
3
5
b
8
10 ‘2
If volume level zero is chosen on SOUND or MUSIC, then the
output is directed to the envelope section of the PLAY command.
Both SOUND and MUSIC are switched on by PLAY. Note length
can be controlled by WAIT statements and the sound is switched off
by PLAY 0,0,0,0.
3. PLAY (Tone Enable, Noise Enable, Envelope Mode, Envelope
Period)
Tone Enable =
0 = No tone channels on
1 = Channel 1 On
2 = Channel 2 On
3 = Channel 1 + 2 On
4 = Channel 3 On
5 = Channel 3 + 1 On
6 = Channel 3 + 2 On
7 = Channel 3 + 2 + 1 On
Noise Enable controls the routing of the noise channel and functions as for Tone Enable.
Envelope Mode=
1 = h
2 =
3 =w
4
5 1 p
6 =+
7= 7
100
CONTINUOUS
Chapter 10 Sound
4
-
Ir
+
?
4
1
-
”
-I?
-
3
c-
?
c-
?
C-
This controls the way the sound is produced i.e. repeating or rise
and falling etc.
Envelope Period = 0 to 32767
Controls how long the sound or note takes to start and end.
When you use the sound facilities on ORIC, you may wish to turn
off the keyboard click by pressing CTRL and F once. If it is left on,
then key presses may affect the sound output.
This program illustrates one way in which note values, both in
terms of pitch and length, may be held in DATA statements and
called when required during the execution of the program. A chord
effect is achieved by opening channels 1 and 2 in the PLAY
statement.
10
20
30
40
45
50
60
80
100
110
REM ** TUNE **
FOR N = 1TO11
READ A,B
MUSIC2,3,A,0
PLAY3,0,7,2000
WAIT B
PLAY 0,0,0,0
NEXT N
DATA 5,30,5,30,7,30,8,75,5,75
DATA 8,60,10,30,7,60,5,30,3,30,5,180
Although MUSIC and SOUND are fairly easy to imagine in terms
of the sounds they will produce, PLAY is more difficult.
This program allows you to enter the different channels, 1,2 and 3,
and also to alter the two envelope parameters, mode and period. In
this way, you will soon become familiar with all the sound
commands that ORIC has to offer.
5 REM ** ENVELOPE TEST **
10 INPUT “ENTER THE TONE CHANNEL- 1,2 OR
3”;T
20 IF T< 1 OR T> 3 THEN 10
30 INPUT “ENTER THE ENVELOPE MODE, 0 TO
7”;M
40 IF M< 0 OR M> 7 THEN 30
50 INPUT “ENTER THE ENVELOPE PERIOD, 0 TO
32767”;P
101
=w
ORIC Manual
60
IF P< 0 OR P> 32767 THEN 50
70 CLS
80 PRINT “CHANNEL “T
90 PRINT “ENVELOPE MODE “M
100 PRINT “ENVELOPE PERIOD “P
110 MUSIC T,3,4,0
120 PLAY T,0,M,P
130 PRINT “PRESS RETURN IF SOUND CONTINUES”
102
1
=-m
1
k
1
LL
L
2
.
2
,1
2
gj
2
2
2
2
51
2
2
2
2
;1
-4
P’
-s
c
5;
11.
Saving programs on tape
When you have spent some time typing in a long program, it’s nice to
know that you can store your program away somewhere and load it
into ORIC or another ORIC at a later stage.
You will need a cassette recorder and a connecting lead to do this.
As mentioned previously, the plugs depend on the type of recorder
you have. ORIC has a 7-pin socket at the back for cassette
input/output. If your recorder has a “remote” socket, it can be connected to the extra pins. (If not, don’t worry - a 3 pin DIN plug
should fit, but you will have to remember to switch the machine on
and off yourself, or use the PAUSE button).
Do not attempt to use a 5 pin DIN plug, as the outer pairs of pins
are usually shorted together and will not function on ORIC.
To save a program, switch the recorder on to record and type
CSAVE “XX”
Y
c
r
(XX is the name you give to your program and may be up to 17 characters in length and include full stops, hyphens, etc.) When you
press [RETURN], the program will be converted into sound signals
and recorded on the tape.
The message
Saving XX
will appear on the status line. When the program has been saved,
Ready will appear on the screen.
To load the program back in, make sure the recorder is connected
properly and type
CLOAD “XX”
ORIC will search through the tape until it reaches program “XX”
and will then load it into internal memory.
While it is searching, the message
Searching.. . .
will appear on the status line. When the required program has been
found, the message will change to
105
ORIC Manual
Loading XX
If you have forgotten the program name, o r simply wish to load in
the next program on the cassette, then type
CLOAD””
You can buy special computer data cassettes that are not very long
- Cl0 or Cl5 - or you can use good quality audio cassettes. Short
cassettes are preferable as it is easier to locate a program.
A final warning - don’t try and record on the plastic leader at the
start of the tape. Your ears may not mind missing half a note at the
start
of some music, but ORIC will complain if even one byte is miss. .
ing !
As well as saving programs normally, ORIC allows you to be far
more versatile in the use of your recorder. If you CSAVE programs as
above, they are recorded at the fast rate of 2400 baud (a measure
of data transfer). You should find that this speed is perfectly reliable
provided the record/replay head on the cassette recorder is clean and
well-aligned, and you are using good quality tapes.
If there is a fault in the tape, you may get the error message
FILE ERROR - LOAD ABORTED
If you wish to be absolutely sure that your masterpiece is CSAVEd
for posterity, then you may add the letter S to the CSAVE instruction
as follows, which will transfer data at the super reliable speed of
300 baud.
CSAVE “PROG l”,S
When you CLOAD slow programs, you must type CLOAD
“PROG l”,S or ORIC will expect a fast load.
If you wish your program to RUN automatically once it has been
loaded, add the instruction AUTO to the CSAVE instruction.
CSAVE “PROG l”,AUTO
There is no need to add anything to the instruction when an autorun program is CLOADed.
CLOAD “PROGl”
will RUN immediately after loading, as the AUTO message is
encoded with the program on the tape.
106
i?
-
-c?
C-
+=!
-F9
C
+i
i
C
Chapter 7 7
Saving programs on tape
To save blocks of memory, you n.eed to know the Address where
the block starts, and where it Ends, as follows.
CSAVE “PROGMEM”, A # 400, E # 499
This would save the contents of RAM held from locations
#400 to #499.
To load the block back, type
CLOAD “PROGMEM”, A # 400,E # 499
Because the rest of RAM is unaffected, it is possible to load in new
character sets, machine code programs, etc., without corrupting the
Basic program.
You can also use this method to save the screen displays, and load
them back in at a later date. Make sure if you use this method, that
you are in the same mode that the display needs, or strange things
may happen!
To save the TEXT or LORES screen, type
CSAVE “NICEPICCYl”,A48000,E49119.
Note that you can use decimal or hexadecimal numbers for the
locations. All the additional commands may be used together in any
order, e.g.
CSAVE “AVON”,S,A #40&E # 420
107
CHAPTER 12
Better Basic
12. Better Basic
+
- .
-il
C
4
c
*
151
3
C
151
c
Gi
C
Gi
w-
1
F-
i
Up until this point, you may have felt quite confident about using
ORIC. You will be copying programs from books and magazines
and probably starting to write your own original programs too.
This chapter is designed to help you improve your program
writing and to make the most of the considerable facilities available on ORIC.
The short example programs in this manual do not take up
much memory. When you switch on, you are told how much
memory is available for you to fill with programs. Some of this
will be used by the TEXT screen, and rather more if you are in
HIRES mode. Some more memory will be used to store variables,
etc. To find out the memory you have left, type
PRINT FRE (0)
The number of bytes left will be printed.
If you write longer programs, each time a string variable is
used, it is copied into an extra part of the memory. This is particularly noticeable in long FOR/NEXT loops, or in nested
subroutines. If you start to run out of memory, it may be useful
to clear out all the extra copies - after all, only the most recent
one is needed. This is sometimes referred to as “house-keeping”
or as “garbage-collection”. Although a certain amount is
automatic, you can force garbage-collection by having a line such
as
240 A = FRE (““)
in the necessary part of the program.
When you write small programs, they are easy to compose at
the keyboard. Any problems are fairly easy to sort out, and you
can probably tell what the program does by glancing at the listing.
With programs longer than about 20 lines or so, this gets progressively more difficult, and a week later you may wonder how
you got it to work in the first place, and to anyone else it may
appear totally incomprehensible.
F
Gi
c
111
ORIC Manual
There are several ways in which you may make your program
clearer to yourself and to others. These are not hard and fast
rules, but they will undoubtedly improve your programming and
also make it easier if you decide to move on to other languages,
such as Pascal or Forth.
First of all, it is a good idea to write down your ideas for the
program on paper, rather than attempt to work them out at the
keyboard. This does not have to be in the form of a traditional
flowchart; indeed, flowcharts should not be necessary for welldesigned programs. Something simple to show the order of events
is all that is needed.
As an example, imagine that you have been asked to write a
program that will demonstrate how straight lines can appear as a
smooth curve. This effect is often called Curve Stitching.
This is the effect.
0
1
2
3
4
5
6
The flow of control is like this:RUN - INITIALIZE --, INSTRUCTIONS MAIN PROGRAM - REPEAT OPTION
Instructions have been included so that anyone else using the
program w ill know what it does and how to operate it. Taking
the needs o f the user first is often termed an “outside-in”
approach.
Each section of the program will be written as a separate
module and each module will be called as a separate subroutine
in the order given above. At the beginning will be a control
112
4
F-
Chapter 12 Better Basic
module to call the subroutines. This is the module that is written
first.
2000 R E M ** CONTROL MODULE **
2010 GOSUB 3000 ‘INITIALIZATION
2020 GOSUB 4000 ‘INSTRUCTIONS
2030 GOSUB 5000 ‘MAIN PROGRAM
2040 STOP
-ii
C
<
Gi
F
Gi
c-
llii
c
4
The program is now effectively written! All that is necessary is for
the subroutines to be filled in. In practice, you may find you have
subroutines already written that will be suitable. It is quite useful to
build up a library of these.
At this stage, you will find it helpful to use the computer to test the
modules. These will be introduced one at a time.
***********
INITIALIZATION.
When you switch on ORIC, all variables are set to zero. This means
that you do not need to give variables initial values if they need the
value of zero in the program, although it is a good idea to use names
and letters that remind you of what they stand for e.g:SIZE = 160 (length of square in pixels).
Be careful you do not have two variables that start with the same
two letters. You must also avoid reserved words, like KEY or LET
which are already in Basic.
If you put REM statements at the beginning of subroutines and
next to variables, you will be able to see at a glance what they do.
e.g:I = RND(1)*7 :REM **CHOOSES INK COLOUR
AT RANDOM
113
0RIC Manual
*********
THE MAIN MODULE.
When you reach the main section of the progam, then if it involves
graphics it is useful to sketch the finished display on paper and work
out which values will keep the lines within the screen boundaries.
How will the display be built up? It is possible to define each line
on the screen one at a time, but this is wasteful on memory and hardly
elegant. If you know the starting position of the lines and the step
size, it is better to use FOR/NEXT loops.
In this program, it is possible to use two FOR/NEXT loops nested
inside one another.
= 31 TO 3 STEP -2
FOR COUNT = 0 TO SIZE STEP INCR
DRAW ROUTINE
NEXT COUNT
UNTIL KEY$ < > “”
These loops are held within a REPEAT. . . . UNTIL loop that controls the repeat option. Notice that the loops do not overlap, and that
you can only enter and leave each loop by one path.
There is another feature of ORIC that can be usefully employed
here. This is called program indenting. Normally, any leading spaces
are lost by ORIC, so if you enter
10
PRINT A
the listing will show
10 PRINT A
If however, you enter a semi-colon first, there will be no difference
in program execution, but leading spaces after the semi-- colon will
remain.
Using this feature, you can indent all the loop structures in your
program. Although this takes more time, the programs will be easier
to understand. Several of the programs in the manual are indented to
114
Chapter 72 Better Basic
I
7
-
4
-G
-4
-
_
-
w
ST
t-
4
c
make their structure clear. They will of course work with the semicolons and indenting removed.
As has been previously mentioned, it is usual to space program
lines 10 apart to allow for additions at a later date.
To complete your program, it needs a title, as well as your name
and the date upon which you completed that particular version. This
makes it clear to you and anyone else what you intend the program to
do and it reminds you when you wrote it.
At a later date you may acquire a printer. Listings produced by this
means will look much neater, and your programs therefore easier to
decipher if they are neatly indented.
Deciding on a program and building it up in this manner is called
top-down programming. Building one up from program lines is
called, naturally enough, bottom-up.
Top-down programming produces a clearly-defined structure. It
also means that you rarely use GOT0 statements. Although they
appear initially to be the programmer’s friend, their unrestricted use
all over your programs will make them difficult to understand and
lead to that unpleasant syndrome, “spaghetti programming”.
10
PRINT “ENTER THE DATA”
20 INPUT A
30 IF A = 30 THEN GOT0 50
40 GOT0 10
50 GOT0 70
60 PRINT A;” WAS MORE THAN 100”:STOP
70 PRINT A;” WAS THE LAST NUMBER”
80 IF A> 100 THEN GOT0 60
90 END
This is rather an extreme example, but it does demonstrate how
confusing unstructured programs can be. Use of REPEAT/UNTIL,
FOR/NEXT and IF/THEN . . . .ELSE will help you avoid falling
into a tub of spaghetti!
Here, then, is the completed curve stitching program. It is not
offered as the most wonderful program ever written, simply as an
example of how the use of loops, REMs and indenting can improve
the look of a program.
1000 :REM *** CURVE STITCHING **
1010 :REM
115
ORIC Manual
1020
1030
1040
1050
2000
2010
2020
2030
2040
2050
3000
3010
3020
3030
3040
3050
3060
4000
4010
4020
4025
4030
4032
4034
4035
4036
4040
4045
4050
4055
4060
4065
4070
4080
4090
4100
4110
4120
5000
116
:REM ** COPYRIGHT A.J.S. **
:REM
:REM ** l/l/83 **
:REM
:REM ** CONTROL MODULE **
:GOSUB 3000 ‘INITIALIZATION
:GOSUB 4000 ‘INSTRUCTIONS
:GOSUB 5000 ‘MAIN PROGRAM
:STOP
:REM
:REM ** INITIALIZATION **
:REM
:INKl:PAPER 4
:SIZE = 160
:TEXT
:RETURN
:REM
:REM ** INSTRUCTIONS **
:REM
:CLS
:B$ = “L
****CURVE STITCHING****”
:PRINT CHR$(27);B$
:PRINT
:PRINT
:PRINT
:PRINT
:PRINT “This program will draw lines from”
:PRINT “each side of a square to adjacent”
:PRINT “sides. The step size is the distance”
:PRINT “each line is from its neighbour.”
:PRINT “As each set is completed the square”
:PRINT “will be redrawn with the step size”
:PRINT “reduced by two.”
:PRINT
:PRINT “Press RETURN to start”
:GET A$
:RETURN
:REM
:REM ** MAIN PROGRAM **
krl
ik1
Chapter 12 Better Basic
r
7
i
7
7-
r
+
CI
-
5010
5020
5030
5040
5050
5060
5070
5080
5090
5100
5110
5120
5130
5140
5150
5160
5170
5180
5190
5200
5210
:REM
:REPEAT
: FOR INCR = 31 TO 3 STEP - 2
: HIRES
..
PRINT “STEP” INCR
..
INK (INCR/6) + 1
..
FOR COUNT = 0 TO SIZE STEP INCR
..
CURSET 180-COUNT,l0,3
..
DRAW COUNT,SIZE-COUNT,1
..
CURSET 20,COUNT + 10,3
..
DRAW COUNT,SIZE-COUNT,1
..
CURSET COUNT + 20,170,3
..
DRAW SIZE-COUNT,-COUNT,1
..
CURSET 20,COUNT + 10,3
..
DRAW SIZE-COUNT,-COUNT,1
..
NEXT COUNT
..
WAIT 100
: NEXT INCR
:PRINT “PRESS ANY KEY TO STOP”:WAIT
500
:UNTIL KEY$ < > “”
:RETURN
Structured programming does have its drawbacks and you will
have to decide when it is too wasteful on memory. Some people keep
a master copy of a program separately, complete with REM
statements, and explanations of how it works, while the working
copies have the REMs and indenting removed. It is always useful to
be able to refer to the master copy if you need to alter the program at
a later date.
-
7
c-
5i
Advantages of a structured approach.
1. The flow of control is easy to follow.
2. The structures will fit into neat, separate modules.
3. The numbers of mistakes will be reduced, and those errors that
do creep in are easily eliminated.
4. The ideas inherent in this approach make learning other
languages and their application much easier.
I17
0RIC Manual
Disadvantages.
1. Structured programs may use more memory.
2. The speed of the program may be reduced.
3. The hardware of the computer may not be used in the most
economical manner.
4. It is harder to learn to write good structured programs than it is
to pick up sloppy habits!
Mug- trapping.
Writing structured programs may make you a better programmer,
but it is no guarantee that your program is as good as it could be.
When you test your pièce de résistance, then if it is designed to be
used by others it is important to consider all the silly things they may
decide to enter.
If you ask for a number to be input, what happens if a user enters
“two” instead of “2”? What happens if they press RETURN
without entering anything?
Luckily, ORIC is kind to errant users. In the first instance - a
string being entered instead of a number - REDO FROM START
will be printed until a figure is input. In the second case, ORIC will
wait until something is actually entered. If RETURN is constantly
pressed, then the question mark prompt will constantly re-appear.
You can make your requirements easier for the user to
understand. If you check the ASCII code of the input, or the value of
a number, then a message telling the user what to enter can be built
into your program.
1 0 INPUT “ENTER THE YEAR”;A$
20 IF VAL(A$) < 1900 OR VAL(A$) > 1985 T H E N
PRINT “BETWEEN 1900 & 1985,
PLEASE”:GOTO 100
30 PRINT “THANKS!”
If you draw a line or move a character, it is important not to go off
the edge of the screen or to print it in one of the protected columns.
You may realise this, but another user may not.
If A is the horizontal position and B the vertical position on the
HIRES screen, then something like this may help.
If A > 238 THEN A = 238
IFA< 1 THEN A = 1
IF B > 198 THEN B = 198
IFB< 1 THEN B =l
118
--ri
-4
-
=+
c-’
+
-
Chapter 72 Better Basic
This should be useful provided the character is no larger than
two pixels. Change the values according to your requ irements.
You have to imagine the worst thing anyone could do to your
program, and even then it’s more likely that someone, somewhere
will be able to crash it. There is no such thing as a perfect program, but it is possible to “error-trap”, “mug-trap” or “idiotproof” your program to a fair degree. You will then have what is
more politely termed, a robust program.
119
I
f_
CHAPTER 13
Machine code programs
FA
4
13. Machine code programs
It has been mentioned previously that computers do not yet
understand normal English commands, as these are ambiguous as
well as idiosyncratic. The best they can do is interpret a language like
Basic that approaches to some degree, a limited sub-set of English.
Computer languages can be seen as a hierarchy, with those that are
close to natural language at the top - high level languges - and the
binary code of machine language - low level - at the bottom.
The high level language that is supplied with ORIC is Basic. The
chip that translates Basic into machine code is called the Basic ROM.
ROM stands for Read Only memory, and the interpreter program it
contains is fixed during manufacture, and cannot be altered. If you
have a 48K model, it actually contains 64K of RAM (Random Access
Memory that can be changed, and usually holds your programs).
If you purchase disc drives for large, fast memory storage, the
internal ROM is masked out, leaving nearly 64K of internal memory.
In this way, other high level language, such as Forth, Pascal, Logo,
Prolog and Lisp could be used with ORIC.
With all this potential for high level languages, that are much
clearer to understand, you may wonder why anyone should bother
with machine code. After all, it is estimated that it takes at least ten
times as long to write as the equivalent program in a high-level language. You do not get helpful error messages, faults are much more
difficult to trace, and machine code is difficult to document and difficult to understand - so why attempt to learn it?
An understanding of machine code will help you undertand the
workings of computers, and efficient machine code programs are
executed at a much faster rate than any high-level language. If you
imagine speaking to a German, who in turn translates your instructions to an Italian before a job is carried out, and you will see the
advantage of being able to speak to the Italian in his own language!
There are several ways in which machine languages can be made
more comprehensible. Firstly, it is usually written in hexadecimal a page of binary soon blurs into a mass of zeros and ones, and decima1 numbers do not readily show you what is happening at byte
level.
G
-
123
0RIC Manual
This is why the facility is provided on ORIC to enter numbers
in either decimal or hexadecimal form, rather than wasting time
doing base conversions. It also provides a code that is easier to
read.
In the heart of ORIC is the most important chip, the central
processor unit.
All computers need a C.P.U. but they do not all use the same
model. Any other computer that uses the same C.P.U. can,
within the limits of the computer, use the same machine code
program. ORIC uses a 6502 processor from Rockwell International Corporation. Other processors you may come across
are 6800, 6809, Z80 and 8080. These all operate in slightly different ways, so understand different instructions.
Internally, the processor manipulates numbers, stored as 8-bit
binary digits. Numbers are loaded into different memory locations and treated either as instructions or as data.
For instance, if the 6502 receives the number 10101001, it
understands this to be an instruction: load a register, or special
memory store called the accumulator with the next number
received. The 6502 only understands 8-bit numbers. ORIC
allows you to enter decimal or hex numbers, and converts them
into their binary equivalent before sending them to the 6502.
To make it easier to remember, a short name is given to each
6502 instruction, so in the previous example, 10101001, or
169 (decimal) or # A9 (hex) is known as LDA (LoaD Accumulator). These memory-joggers are called mnemonics. To
assist you in using machine code in ORIC, there is a section in
the appendices on 6502 mnemonics.
Although entering A9 into ORIC would be understood, the
mnemonic would not be recognised. To make it clearer, it could
be added as a REM statement, e.g.
100 DATA # A9, # 20 ‘LDA# 20
To aid you in entering machine code programs, it is possible
to have a short program that will allow you to enter mnemonics directly, as well as variables, data and addresses, etc., and
it will decode this into machine language. This is called an
assembler program. The user enters the mnemonics (the
“source” program) and the assembler translates this into a
124
-4
-
Chapter 13 Machine code programs
machine code or “object” program. A disassembler program works
in reverse.
*********
+i
-4
P--
-i
--
4
-
PEEK AND POKE
How can we tell what is stored in any memory location? You may
remember coming across PEEK and POKE in previous chapters.
Type: PRINT PEEK (48225)
This is looking into the part of memory that is used to store the
TEXT screen. The number return is the decimal equivalent of the
p;i
P
+i
-
s;t
P
Tzl
P
binary number stored at that location. As this location is mapped to
the screen area, the number is the ASCII code for the character at
that position. To change that value, type:POKE 48225,128
You should be able to see which position on your screen 48225
controls, as it will be filled with the character represented by ASCII
128, i.e. a solid block.
If you look at the memory map in the appendix, you will see what
is stored at different locations. You can try using POKE to put characters on the TEXT and HIRES screen.
This technique has already been used in the graphics chapter. It is
not a good idea to try to POKE into pages 0 to 3 (0 to 1024 in
decimal). You can of course experiment, as you will not damage
ORIC, whatever you enter.
*********
ADDRESSES
Perhaps you have wondered how ORIC can store numbers larger
than 255, particularly as there are 65536 different memory locations.
Addresses are stored as two byte numbers. e.g.
G
C
G
128 is stored as
1st byte
10000000
2nd byte
00000000
C
ii
If the number is greater than 255, the second byte contains the
number of 256’s in the number.
F;
t
125
0 RIC Manual
e.g. 258 is stored as
1st byte
00000010
2
2nd byte
0000000 1
+
(1 x 256)
It may seem strange that the low order byte comes first, but that
is the order in which the processor decodes it. So, if you know a
number is stored at locations 20345 and 20346, to calculate the
number stored would require you to type:
PRINT PEEK (20345) + (PEEK(20346)*256)
ORIC saves you having to do this. The instruction
PRINT DEEK (20345)
will do the same job as the line above. DEEK stands for Double
PEEK. If you wished to change the number held in those two locations, you would type
DOKE 20345, N
and N would be converted into a two byte number.
*********
Sometimes it is useful to be able to use short machine code
routines, although the rest of your program may be written in
Basic. These can be totally original, or you can borrow routines
that are already written into ROM by PEEKing.
There are several commands in ORIC BASIC that allow you to
do this.
CALL X, where X is an address in memory, transfers control to
the address specified and begins the machine code routine that is
held there. Return to Basic is accomplished when the routine
reaches an RTS. (ReTurn from Subroutine).
Another way of accessing information from a machine code
routine is to use DEF USR and PRINT USR (0). The routine is
written in machine code and the start address is entered by DEF
USR = start address.
If PRINT USR (0) is now entered, the result of the routine is
extracted from the floating-point accumulator and printed. Here is
an example of how it can be used:
126
G
-
+
+
+
-
c;;i
c---L
4
-
ti
+
-
;i
+
-
Li
;i
-
c;i
-
;?
t-
Chapter 13
5
10
20
30
40
100
110
120
130
Machine code programs
REM *** RAD/DEG CONSTANT ***
FOR DISP = 0 TO 12
: READDTA
: POKE # 400+DISP,DTA
NEXT DISP
DATA # A9, # 07
‘LDA # CON57 ;LO
DATA # A0, # 04
‘LDA # CON57 ;HI
DATA # 4C,# 73, # DE
‘JMP MOVFM ;FLOAT.
DATA # 86, # 65,# 2E, # E0, # D8
‘CONSTANT180/PI
R U N the program, then type DEF USR = # 400 At any
time, PRINT USR (0) will print out the conversion constant for
radians to degrees.
Here is a more detailed explanation of how it operates. The value
held in brackets after the USR function is actually passed to the
floating-point accumulator and a JSR to location # 21 is performed. Locations # 21 to # 23 must contain a JMP to the
beginning location of the machine language subroutine. The return
value for the function is placed in the floating-point accumulator.
To obtain a 2-byte integer from the value in the floating-point
accumulator, the subroutine should do a JSR to # D867. Upon
return, the integer value will be in locations # 34 (high-order
byte) and # 33 (low-order byte).
If you wish to convert an integer result to its floating-point
equivalent, so that the function can return that value, the two byte
integer must be placed in registers A(high-order byte) and Y(loworder byte). If a JSR is done to # D8D5 then upon return, the
floating-point value will have been loaded into the floating-point
accumulator.
There are two other useful operations that ORIC can perform.
! can be defined as a command that does not already exist in ORIC
Basic.
& (X) (where X = 0 to # FFFF)
can be defined as a function that does not already exist in ORIC
Basic.
The routines have to be written in machine code and loaded into a
particular location in memory. The start address is loaded as
follows:
127
0RIC Manual
DOKE # 2F5, address - start address of ! routine.
DOKE # 2FC, address - start address of & routine.
To define ! to mean PRINT AT type:5 R E M *****
* PROGRAM FOR
‘PRINT @ X,Y ;JJJJ’.
10 R E P E A T
20 READ DTA
30 POKE # 400+CL,DTA
40 CL=CL+l
50 UNTIL DTA = # FF
100 DATA # 20, # 96, # D9
110 DATA # AC, # F8, # 0 / 2
120 DATA # C8
130 DATA # 8C, # 69, # 02
140 DATA # A5, # 1F
150 DATA # A4, # 20
160 DATA # 85, # 12
170 DATA # 84, # 13
180 DATA # A9, # 3B
190 DATA # 20, # DB, # CF
200 DATA # 4C, # 61, # CB
210 DATA # FF
220 DOKE # 2F5, # 400
EXTENSION CMD FOR
:REM END OF PROG.
:REM JSR GTVALS
:REM LDY GCOL
:REM INY
:REM STY CURCOL
:REM LDA GCL
:REM LDY GHC
:REM STA CURBAS
:REM STY CURBAS + 1
:REM LDA # ‘;’
:REM JSR SYNCHR
:REM JMP PRINT
If you type:
!X,Y;“ORIC”
then ORIC will be printed at co-ordinates X and Y on the screen.
To define & to mean R E T U R N V E R T I C A L , C U R S O R
POSITION:5
10
20
30
40
50
60
70
128
REM ** EXTENSION CMD VERT/CURS/POS
FOR N = 0TO5
READ DTA
POKE # 400+N, DTA
NEXT
DOKE # 2FC, # 400
DATA # AC, # 68, # 02
DATA # 4C, # FD, # D3
Chapter 13
Machine code programs
It is useful to know which line the cursor is on if you need to use the
double height feature, so you do not end up with tops of letters under
their bottom halves.
A suitable line in a program to protect against this would be
500 IF & (0)/2< > INT(&(0)/2) THEN PRINT
This will move the cursor down to an even line.
Some of page 4 (locations # 0400 to # 0420) has been
reserved for your own machine code routines. Anywhere in memory
may be used for longer programs, but a Basic program may overwrite it if it occupies the USER PROGRAMS space in RAM.
To reserve memory for machine code programs, the top of the
user area can be lowered. To find its present position, enter
PRINT DEEK( # A6)
Work out how many bytes you require for your program, add on a
small number for safety (unless you are really pushed for memory),
and subtract the total from the number you previously found. Then
enter
HIMEM X
where X is the new top of user memory you have just calculated.
If you wish to learn more about using 6502 machine code, then
there are several books which cover the subject in great detail.
Some of the more useful ones are written by Rodnay Zaks
(published by Sybex) and Lance Leventhal (published by Osborne
McGraw-Hill). Other information and books can be obtained from
Rockwell International themselves.
129
14. Using a printer
-4
r4
Oric may be used with any printer that has a Centronics interface.
As well as the printer, you will need a connecting cable. The printer
connection is located at the back, next to the expansion port.
The printer should be connected before switching on. If all is well
the printing head should align itself at the starting position as soon
as power is supplied. In addition to the instruction booklet with the
printer, you may find the following information helpful.
On first connecting the printer, run the following program.
10
20
30
40
REM ** PRINTER TEST **
FOR N=0 TO 255
LPRINT N,CHR$(N)
NEXT N
When you have entered the program type
LLIST
:
c
This will list the program on the printer instead of on the screen.
If you do not get a listing, but merely Japanese or graphics characters, consult the printer handbook as to changing the character
set in the printer. When the listing is satisfactory run the program.
As you can see, it consists of a simple loop that will LPRINT
(print to the printer, rather than to the screen) the number followed
by the Ascii character that represents that code. This will show you
the character set available and, just as importantly, will show you
which numbers are read as control codes on the printer.
Although these are standardised to a certain extent, not all printers respond in the same manner. The control codes determine
actions such as line feed, carriage return, form feed, character size,
etc.
For example, Microline printers will print standard, compressed
or expanded characters. If you were to type
LPRINT CHR$(31)
133
ORIC Manual
then subsequent characters on the printer would be twice their
normal size - very useful for headings etc.
LPRINT CHR$(30)
would result in a return to normal print.
LPRINT CHR$(l2)
results in a form feed on Dee-writers. (The paper feeds through to
the bottom of the page) These codes are useful to know as they can be
incorporated in your programs.
Many printers that have graphic characters will also dump the
contents of the screen on to the printer which is a way to get a permanent record of pictures etc.
You will probably find a printer most useful in producing listing s
so you can see the structure of a complete program. They are also
essential for getting hard copy of electronic mail.
134
15. ORIC Basic
COMMAND
ABS
ASC
ATN
CALL
CHAR
CHR$
CIRCLE
CLEAR
CLS
CLOAD
CONT
EXAMPLE
ABS( - 4) is 4
ABS(4) is 4
Returns ASCII code of first cha- A =ASC(N$)
racter in string.
See appendix.
Returns arctangent in radians.
Z = ATN(Y/4)
Transfers control to machine code CALL X
routine starting at address X.
Return to Basic on reaching an
RTS.
CHAR X,S,FB
Draws a character at current
cursor position - top left of character is at cursor position.
X is ASCII code (32- 127), S is
either 0, standard character set or
1, alternate character set.
FB is 0 to 3 (see below).
Returns the ASCII character that CHR$(value)
corresponds to the value
(32- 128).
Draws a circle centred at current CIRCLE R,FB
cursor position.
No part of the circle may leave the
screen.
R is the radius (1- 119)
FB is 0 to 3 (see below).
Sets variables to 0, and strings to CLEAR
null (empty).
Clears screen display.
CLS
Loads file name XX from tape. CLOAD “XX”
For additional tape commands,
see Chapter 11.
Continues execution of program CONT
after break.
EFFECT
Returns absolute value
NOTE:- FB Codes. FB is foreground/background value
0 Background
2 Invert
3 Null (do nothing).
1 Foreground
137
ORIC Manual
DEF FN
Returns cosine of angle N
(N must be in radians).
Sets the cursor to a new
position. X,Y are relative to old
position. FB is 0 - 3 (see below).
Sets the cursor to absolute
X,Y position.
Note: - final position of X must
be 0 to 239, and Y 0 to 199 in all
graphics commands. FB is 0-3.
Saves file name XX to tape.
Stores a list of data that can
be READ into variables.
May include numeric and string
variables. Leading spaces will be
lost unless enclosed by quotes.
Returns the contents of byte plus
256 times of the contents of next
byte.
Defines numeric functions.
DEF USR
Defines start of USR routine.
DIM
Dimensions arrays. (Arrays are
predimensioned to 10).
Stores value V in locations X
and X + 1. INT(V/256) goes in
X + 1, and the remainder in X.
Draws a vector from current
cursor to current cursor plus
X,Y. FB is 0-3.
Ends program.
Returns natural exponential of N.
Produces predefined sound.
Returns a value of 0.
Fills A character cells by B rows
with N value.
There are 200 rows and 40 character cells. N must be an integer
between 0 and 127.
COS
CURMOV
CURSET
CSAVE
DATA
DEEK
DOKE
DRAW
END
EXP
EXPLODE
FALSE
FILL
138
A = COS(N)
CURMOV X,
Y,FB
CURSET X,Y,
FB
DATA 1,2,
BATH,
“ ANGIE”
?DEEK(45610)
DEF FNA(Z) =
Z+4
DEF USR= #
400
DIM A$(10,5)
DOKE X,V
DRAW X,Y,FB
END
A = EXP(N)
EXPLODE
FILL B,A,N
Chapter 15 ORIC Basic
FN
FOR....TO
STEP/NEXT
FRE
GET
GOSUB
GOT0
GRAB
HEX$
HIMEM
IF/THEN
. . . . ELSE
PRINT FNA(X)
Produces the result of a
predefined function.
FORN=lTO
Creates a loop to repeat all
program lines between FOR and NEXT N
NEXT. STEP determines the
incremental size. If omitted, 1 is
used.
Returns the amount of memory FRE(0)
available in bytes.
Also:FRE(““)
Forces variable garbagecollection.
Strobes the keyboard and waits GET A$
until a key is pressed.
GOSUB 1000
Causes program branch to line
number specified. See RETURN.
GOT0 4000
Unconditional branch to line
number specified.
Assigns the area in memory from GRAB
#9800 to #B400 (48K) or from
#1800 to #3400 (16K) to user
RAM (See memory map).
PRINT HEX$(V)
Prints the value V as a hexadecimal number.
Lowers top of memory available HIMEM # 8700
for BASIC programs. Memory
above may then be used for
machine code programs.
Switches to high-resolution mode. HIRES
Background is set to black, foreground to white, cursor to 0,0
Text lines remain in existing
colours.
IF A> 10THEN
If the expression following IF is
true, then executes all instructions PRINT “OK”
following THEN. If the expression is false, then these instructions are ignored and program
executes instructions following
ELSE.
ELSE may be omitted.
139
ORIC Manual
INK
INPUT
INT
KEY$
LEFT$
LEN
LET
LIST
LLIST
LN
LOG
LORES N
MID$
MUSIC
NEW
ON....GOSUB
ON....GOTO
PAPER
140
Changes foreground colour of
INK N
whole screen. N is an integer 0 - 7.
Stops program execution and
INPUT N$
waits for an input before
INPUT “Age?
continuing.
“;A
Returns largest integer less than or X = INT(Y +
equal to value in brackets.
0.5)
Strobes keyboard.
X$ = KEY$
Continues execution, whether or
not a key has been pressed. X$
contains value of any key pressed.
Returns the left portion of a
L$ = LEFT$
string, N characters in length.
(A$,N)
Returns the length of a string.
A = LEN(N$)
Assigns value to a variable.
LET A=4
(Optional).
Lists specified lines or whole
LIST I00
program.
LIST
LIST 50-80
Space bar stops listing.
Lists specified lines or whole
LLIST 100
program to printer.
LLIST
Returns natural logarithm.
A=LN(X-2)
Returns base ten logarithm.
B = LOG(Y + 1)
Switches to low-resolution mode. LORES 0
TEXT screen is set to background
black. When N = 0, the standard
character set is used.
When N = 1, the alternate character set is used.
Returns a substring starting at
A$ = MID$
character A, of length L.
(Z$,A,L)
See Sound chapter.
Deletes current program and all NEW
variables.
Branches to subroutine at Nth line ON N GOSUB
number specified.
2000,3000
Branches to Nth line number spe- ON N GOT0
cified.
1000,2000
PAPER N
Changes background colour of
whole screen. N is an integer 0-7.
Chapter 15 ORIC Basic
PATTERN
PEEK
PI
PING
PLAY
PLOT
POINT
POKE
POP
POS
PRINT
PULL
READ
RELEASE
REM
Sets the pattern register for
PATTERN X
DRAW commands.
X is an integer O-255.
Returns the contents of memory A = PEEK(X)
location X.
Returns the value 3.14159265.
PRINT 2*PI
Produces predefined sound.
PING
See Sound chapter.
Plots a character on the LORES PLOT X,Y ,“X”
or TEXT screen using X + Y co- PLOTX,Y,A$
ordinates.
Returns 0 if the specified pixel is POINT(X,Y)
background and - 1 if the pixel is
foreground.
X is absolute X value (0-239)
Y is absolute Y value (O -199)
Stores value V in memory location POKE N,V
N. V is an integer 0-255.
Causes one RETURN address to POP
leave the stack of RETURN
addresses. The next RETURN
encountered after the POP branches to one statement beyond the
second most recently executed
GOSUB.
Returns the current horizontal
A=POS
position of the cursor.
Prints numbers, variables and
PRINT
strings on the screen.
“HELLO”
? may be used instead of PRINT.
PRINT N;A$
Pulls one address from the stack PULL
in REPEAT loops.
See POP.
Reads next item in DATA list,
READ A$,N
and assigns it to specified variable.
Assigns area described in GRAB RELEASE
command to the HIRES screen.
Allows comments to be put in pro- REM IGNORE
gram lines. Everything after REM THIS
statement is ignored.
141
ORIC Manual
REPEAT
RESTORE
RETURN
RIGHT$
RND
RUN
SCRN(X,Y)
SGN
SHOOT
SIN
SOUND
SPC
SQR
STOP
STR$
142
Creates a loop to repeat all program lines up to UNTIL
statement. Tests statement in
UNTIL statement.
If false, repeats loop. If true, continues execution at next program
line.
Sets READ pointer to first item on RESTORE
DATA lines.
RETURN
Returns the computer to the
statement immediately after the
most recent GOSUB.
Returns the right portion of a
R$ = RIGHT$
string, N characters in length.
(A$,N)
A = RND(l)*6
Returns a pseudo-random
number.
If X> = 1, then number is between
0 and 1
If X = 0, then most recently
generated number is produced.
If X< 0 then number produced is
the same for each X.
Executes a BASIC program from RUN 200
line N, or from lowest line if N is
not specified. Also clears all variables.
Returns the ASCII code for the
character at position X,Y in
LORES and TEXT modes.
Z = SGN(X - Y)
Returns - 1 if the argument is
negative, 0 if zero and 1 if positive.
Produces predefined sound.
SHOOT
A = SIN(N)
Returns sine of angle N.
N must be in radians.
See Sound chapter.
Prints N spaces on the screen. N is PRINT “HO”
an integer O-255.
SPC(N) “HUM”
Returns the square root of N.
A = SQR(N)
Stops execution of a program.
STOP
Converts a numerical expression N$ = STR$(N)
into a string.
Chapter 15 ORIC Basic
TAB
TAN
TEXT
TROFF
TRON
TRUE
USR
VAL
WAIT
ZAP
Moves PRINT position N places PRINT TAB(N)
“HELLO”
from left of screen.
A = TAN(N)
Returns tangent of angle N.
N must be in radians.
TEXT
Switches to text mode.
TROFF
Switches off trace function.
TRON
Switches on trace function.
Returns a value of - 1.
USR(N)
Passes value in brackets to a
floating-point subroutine.
See Chapter 13.
A = VAL(N$)
Returns the numerical value of
string N$.
Conditional pause. N = 10 msecs. WAIT (N)
ZAP
Produces predefined sound.
143
Appendix B
Control Characters - all available from the keyboard or through
PRINT statements.
1. Toggle action on/off
CTRL T - Caps lock
CTRL P - Printer
CTRL F - Keyclick
CTRL D - Auto double height
CTRL Q - Cursor
CTRL S - V.D.U.
CTRL I- Protected column (far left)
2. Screen format characters
CTRL J - Line feed
CTRL L - Clear return
CTRL M- Carriage return
CTRL N - Clear row
To use in Print statements use
PRINT CHR$(x)
where x is a number, A = 1, B = 2, etc., e.g.
CTRL D = CHR$(4)
146
Appendix G
Derived Functions
These functions are not directly available on Oric, but can be defined
using DEF FN. e.g:
DEF FN SC(X) = l/COS(X)
defines the secant.
Secant:
SEC(X) = l/COS(X)
Cosecant:
CSC(X) = l/SIN(X)
Cotangent:
COT(X) = l/TAN(X)
Inverse sine:
ARCSIN(X) = ATN(X/SQR( - X*X + 1))
Inverse cosine:
ARCCOS(X) = - ATN(X/SQR( - X*X + 1)) + 1.5708
Inverse secant:
ARCSEC(X) = ATN(SQR(X*X - 1)) + (SGN(X) - 1)*1.5708
Inverse cosecant:
ARCCSC(X) = ATN(l/SQR(X*X - 1)) + (SGN(X) - 1)*1.5708
Inverse cotangent:
ARCCOT(X) = - ATN(X) + 1.5708
Hyperbolic sine:
SINH(X) = (EXP(X) - EXP( - X))/2
Hyperbolic cosine:
COSH(X) = (EXP(X) + EXP( - X))/2
Hyperbolic tangent:
TANH(X) = - EXP( - X)/(EXP(X) + EXP( - X))*2 + 1
Hyperbolic secant:
SECH(X) = 2/(EXP(X) + EXP( - X))
152
Appendix G
Hyperbolic cosecant:
CSCH(X) = 2/(EXP(X) - EXP( - X))
Hyperbolic cotangent:
COTH(X) = EXP( - X)/(EXP(X) - EXP( - X))*2 + 1
Inverse hyperbolic sine:
ARGSINH(X) = LOG(X + SQR(X*X + 1))
Inverse hyperbolic cosine:
ARGCOSH(X) = LOG(X + SQR(X*X - 1))
Inverse hyperbolic tangent:
ARGTANH(X) = LOG((l+ X)/l - X))/2
Inverse hyperbolic secant:
ARGSECH(X) = LOG((SQR( - X*X + 1) + 1)/X
Inverse hyperbolic cosecant :
ARGCSCH(X) = LOG(SGN(X)*SQR(X*X + 1) + 1)/X
Inverse hyperbolic cotangent:
ARGCOTH(X) = LOG((X + 1)/(x - 1))/2
A Mod B:
MOD(A) = INT((A/B - INT(A/B))*B + 0.05)*SGN(A/B)
153
Appendix J
Error Codes
If ORIC cannot handle a command or some information, then an
error message will result. It will be followed by the line number where
the error occurred if it was in a program. These are the possible codes
and their meanings.
1.) CAN’T CONTINUE
2.)
3.)
4.)
5.)
10.)
11.)
12.)
156
Attempt to continue a program after a line has been added or
deleted.
DISP TYPE MISMATCH
Attempt to DRAW in TEXT mode or similar problem.
DIVISION BY ZERO
Difficult, even for ORIC!
FORMULA TOO COMPLEX
More than two IF/THEN statements in the same line.
ILLEGAL DIRECT
A statement such as DATA or INPUT has been used as a direct
command from the keyboard.
ILLEGAL QUANTITY
Out of range parameter, e.g. SQR( - 1)
NEXT WITHOUT FOR
Self-explanatory (one hopes!)
OUT OF DATA
Trying to READ past the end of the DATA list
OUT OF MEMORY
Self-explanatory, but might also be caused by more than 16 nested
FOR..NEXT/TO loops or sub-routines.
OVERFLOW
38
A number larger than 1.70141* 10 has occurred during a
calculation.
REDIM’D ARRAY
Attempt to redimension an array previously dimensioned.
RETURN WITHOUT GOSUB
Self-explanatory.
Appendix J
13 .) STRING TOO LONG
Strings must be less than 255 characters in length.
14.) BAD SUBSCRIPT
An attempt has been made to reference an array element that does
not exist. e.g. LET A(24,25) =Z when A has been dimensioned
using DIM A(4,4)
15.) SYNTAX ERROR
Incorrect punctuation or missing bracket, etc.
16.) TYPE MISMATCH
An attempt has been made to assign a string to a numeric variable
or vice versa.
17.) UNDEF’D STATEMENT
An attempt has been made to access a non-existent line number
using GOTO, THEN or GOSUB.
18.) UNDEF’D FUNCTION
Attempt to use a function that has not been previously defined.
19.) REDO FROM START
Attempt to enter a string when a number was requested. Goes back to
INPUTcommand.
20.) BAD UNTIL
Control has reached an UNTIL without previously encountering
a REPEAT statement.
157