1
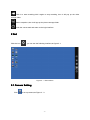
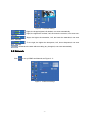
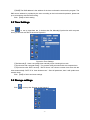
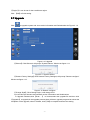
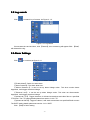
Win8-windows User Manual
Version 1.0
Content
1 The introduction of win8-windows.....................................................................................................- 1 2 Set..........................................................................................................................................................- 2 2.1 Camera Setting.........................................................................................................................- 2 2.2 Network......................................................................................................................................- 3 2.2.1 DDNS..............................................................................................................................- 4 2.2.2 Network Settings........................................................................................................... - 4 2.3 Time Settings............................................................................................................................ - 5 2.4 Storage settings........................................................................................................................- 5 2.5 Privacy Covered....................................................................................................................... - 6 2.6 Motion Detect............................................................................................................................- 6 2.7 Upgrade..................................................................................................................................... - 7 2.8 Log search.................................................................................................................................- 8 2.9 Alarm Settings...........................................................................................................................- 8 2.10 Image Settings........................................................................................................................- 9 2.10.1 Video Settings............................................................................................................. - 9 2.10.2 OSD.............................................................................................................................. - 9 2.11 Users...................................................................................................................................... - 10 2.12 Service................................................................................................................................... - 10 2.12.1 SMTP.......................................................................................................................... - 11 2.12.2 FTP..............................................................................................................................- 11 2.12.3 Port Setting................................................................................................................ - 12 3 Frequently Asked Questions............................................................................................................ - 12 3.1 Why can not access the camera by IE?............................................................................. - 12 3.2 Why can not switch the data? ........................................................................................... - 13 3.3 Why can not access the camera after update? .............................................................. - 13 -
I
1 The introduction of win8-windows
Click “Change Style” in the win8-pad interface,download and allow it to install,after installing,
refresh IE ,it will go to the login interface below,as Figure1- 1:
Figure1- 1 Login interface
Please input your user name and Password,the default username is admin ,password is admin.If
you want to skip this interface next time,please select 【Remember Me】and click 【Login】,below
is Main Interface,as Figure1- 2:
Figure3- 2 Main Interface
:Click this icon ,you can browse live video.
-1-
:Click it to start recording,click it again to stop recording ,then it will pop up the video
storage folder.
:Start to snapshot ,then it will pop up the picture storage folder.
:Finish the current task and return to the login interface.
2 Set
Click the icon
,you can see the following interface,as figure 2-1:
Figure 2 - 1 Set Interface
2.1 Camera Setting
Click
to set up camera,as Figure 2 - 2:
-2-
Figure 2 - 2 Camera Setting
:Right, the image brighter;Left,darker,it can save automatically.
:Right, the higher the contrast; Left, the lower the contrast ,it can save automatically.
:Right, the higher the saturation; Left, the lower the saturation,it can save
auto- matically.
:To the right, the higher the sharpness; Left, lower sharpness,it can save
auto- matically.
:Restored to the state without making any changes,it can save automatically.
2.2 Network
Click
to set up DDNS and Network,as Figure 2- 3 :
Figure 2 - 3 Network Settings
-3-
2.2.1 DDNS
Figure 2 - 4 DDNS Settings
【DDNS Type】:Choose DDNS Type .Such as Oray/3322.org.
【Site Name】:According to domain integrated address.
【DDNS Account】:One account can apply different domain name,the provider request not same.
【DDNS Password】The related password when you apply the domain name.
【Connection status】:The current state of the connection with the DDNS server.
【Service Type】: The service type registered on the DDNS server.
Note: Before using this function, please go to the website to register the domain names , obtain
the domain name, account number and password.
Click 【OK】to finish setting and updating.
When connect successfully,you can visit the IPC with your site name.
2.2.2 Network Settings
As Figure 2-5:
Figure 2-5 Network Settings
【 IP Address 】 :The camera address,it use to login a camera through network.Legal IP
address can be set successfully and save, the system will restart after the new IP saved, you
must use the new IP address to login again after the change, the illegal IP can't be saved, and will
prompt error.
【Netmask】:Net mask is combined with IP address .Set the correct net mask can be saved,
and take effect after settings . False or illegal net mask cannot be saved, and will prompt error.
【Default Gateway】:Ensure that the default gateway of the camera is the same with PC.
-4-
【DNS】:The DNS address is the address of the host run domain name service program. The
DNS server address is provided by the user according to the local network operators, please set
up in accordance with the DNS routing.
Click 【OK】to finish setting.
2.3 Time Settings
Click
to set up time.there are 3 choices that Set Manually,Synchronize with computer
time,Synchronize with SNTP server.As Figure2-6.
Figure 2-6 Time Settings
【Set Manually】
:Users can update time manually when choosing this mode.
【Synchronize with computer time】:The camera will Synchronize with the computer time.
【 Synchronize with SNTP server 】 :“SNTP Server” will choose a same time zone with the
client automatically. SNTP IP is “time.windows.com”. Save all parameter, then it will update as a
network clock.
Click 【OK】to finish and save settings.
2.4 Storage settings
Click
to set up the Storage.As the figure2-7.
-5-
Figure 2-7 Storage Settings Interface
It can be set up the record according to users' personal schedule .
Capture and record Save path are in the schedule below ,they can be set manually
according to user's individual requirements.
2.5 Privacy Covered
Click here
,you will see the following interface,as figure 2-8:
Figure 2-8 Privacy Covered Settings
Pressing the left mouse button and drag to select area in the region.Region 1、Region 2、
Region 3 bellow will show the corresponding coordinates, width, and height of the region .If you
want to delete a region, click on the corresponding 【Delete】 button,Click 【OK】 to complete
the setting.
Note:Max 3 areas allowed.
2.6 Motion Detect
Click
,as Figure 2-9:
Figure 2-9 Motion Detect Settings
【 Sensitivity 】 :Set up the sensitivity of motion detection,There are 3 Level Selectable :
LOW/MEDIUM/HIGH.You also can set it according your need.
【Select All】:You can choose all the video screen.
【Clear All】:Remove all the selected region.
【Restore】:Return to the last saved state.
-6-
【Region】:It can be set for the surveillance region.
Click 【OK】to finish setting.
2.7 Upgrade
Click
to upgrade system and view version information and Serialnumber.As Figure 2- 10.
Figure 2-10 Upgrade
【Reboot】:Click Reboot,it will prompt “System Reboot” Window as figure 4-11:
Figure 4-11 System Reboot
【Restore Factory Settings】:Click Restore Factory Settings,it will prompt “Restore configure”
Window as figure 4-12:
Figure 4-12 Restore configure
【Change Style】:Click Change Style ,it will change OCX.
You can view the firmware and software version information and Serialnumber.
To Upgrade Firmware,click 【 Scan ... 】 to browse,select the upgrade file and then click
【Upgrade】 to upgrade,in the upgrade process,there will be an upgrade progress bar shows the
completion of the upgrade, when it finished, click【OK】to complete and save the setting.
-7-
2.8 Log search
Click
to search log of camera .As Figure 2- 13:
Figure 2-13 Log Search
Choose start time and end time ,click 【Search】,then camera log will appear.Click 【Clear】
will delete all the log.
2.9 Alarm Settings
Click
to set Alarm,as figure 2-14:
Figure 2-14 Alarm Settings
【Enable Alarm】:Select it to start alarm.
【Alarm Duration】:The alarm lasts time .
【 Motion Detection 】: It can be set up alarm linkage action. Tick when motion detect
happened, it will trigger the alarm linkage.
【 Ethernet Lost 】: It can be set up alarm linkage action. Tick when net disconnection
happened, it will trigger the alarm linkage.
【Upload via FTP】:Trigger the alarm, it will send screenshots and video files to a specified
FTP server. The FTP setting details please see section 2.12.2 FTP.
【Upload via SMTP】
:Trigger the alarm, it will send screenshots to a specified Email account.
The SMTP setting details please see section 2.12.1 SMTP.
Click 【OK】to finish setting.
-8-
2.10 Image Settings
Click
to set Images,as Figure 2-15:
Figure 2-15 Image Settings
2.10.1 Video Settings
Allow setting camera name,stream type,mirror,codec,framerate,bit rate,rate control,as Figure
2-16:
Figure 2-16 Video Settings
【Camera】:Your camera name.
【Stream Type】:Double-stream.
【Mirror】:OFF/HORIZONTAL/VERTICAL/BOTH.
【Codec】:Choose coding and resolution.
【Frame rate】:Range is 1~25.
【Bit rate】:The rate of code-stream,the higher the bit rate the better video quality.
【Rate Control】:Fixed or dynamic.Fixed on suitable for fixed bandwidth.Dynamic suitable for
record.
2.10.2 OSD
As Figure 2-17:
-9-
Figure 2-17 Overlay Setting
OSD is “on screen display”,mean the info accompany with the image.Allow setting Time
Format,OSD Position and OSD Text.
2.11 Users
User management is use to add,delete or modify user name and password,and setup
corresponding authority.User name should have min-number of 4 characters and max-number of
31 characters.Password should have min number 4 characters and max-number of 16
characters.
Users are separated into three classes:
� Admin:Authorized to setup device and manage users.
� Operator:Admit to setup device, no authority to manage user.
� Viewer:Admit to brown monitor image,no authority to setup device and manage user.
The default user name is admin ,password is admin ,you can’t edit or delete user name and
password.
Click
to manage users,as Figure 4- 18:
Figure 2-18 User Management
Input the user name and password,then input the password to confirm password.Select
authority,then click【OK】to add user.Click”Delete”to delete users.
2.12 Service
Click
to set up network service.As Figure2- 18:
- 10 -
Figure 2-18 Network Service
2.12.1 SMTP
As Figure 2-19:
Figure 2- 19 SMTP Set
【A/C.Name】:It can be set according to user’s demands.
【Password】:The password you’ve set up.
【Sender】:You can send Email from it,it should be effective.
【 SMTP Server 】 :Log mailbox to mailbox settings to inquire the entry method of SMTP
server .
【Server requires authentication】:Enable or disable.
【Port】SMTP Server port.Generally the default port number is 25.
【Email】: The e-mail address can be the same with sender,it should be effective.
Note:Ensuring the mailbox supports for SMTP mail function.
2.12.2 FTP
As Figure 2-20:
- 11 -
Figure 2- 20 FTP Settings
【FTP Server】:The address of FTP server.
【Port】:Default port is 21.
【Username】:The name you registered form FTP server .
【Password】:The password you registered from FTP server.
【 FileUpload 】 :You can create four directory as “alarm”, “log”, “set”, “update” or other
directory name, also you can enter “./” then the entire document will be save in the root of the
FTP server.
2.12.3 Port Setting
As Figure 4-21:
Figure 2-21 Port Setting
【HTTP port】:The HTTP port is used to visit the camera through the IE browser.The default
is 80.
【RTSP port 】 :RTSP port is used to visit the camera through supporting RTSP streaming
media player (likes VLC Player), the port, can be configured. If the viewer and the device in the
same local area network, do not need to be on the decline for the port mapping; If you look
through a remote access, this port need to have a map on the route.
【Mobile port】:Mobile port is used for visit the camera through mobile phone client, this port
can be configured. If mobile phones and devices in the same local area network (LAN), do not
need to make a mobile port mapping on the routing. If mobile phone remote access access
equipment, the need on the routing for the port mapping.
3 Frequently Asked Questions
?
3.1 Why can not access the camera by IE
IE?
Answer: There maybe 4 reasons, Details are as follows:
a.The network unreasonable?
Solution: First you can connect network by PC, check the network cable if it is good. And check
the network between the camera and the PC is good.
b.The IP address of the camera is occupied by other device or PC?
Solution: You can connect the camera with your PC directly, and modify the IP address or use
the IP search tool.
c.The camera maybe in other network segment?
Solution: Check the IP address and net mask.
d.Unknown?
Solution: You can restore the camera to default configuration.
- 12 -
?
3.2 Why can not switch the data
data?
Answer: There maybe 3 reasons, Details are as follows:
a.Two-Switches. Whether the IP address is correct or not?
Solution: Check the connection between the camera and PC with the command “Ping
Address”,which used in CMD.exe.
IP
b.Three-Switches. Whether port and physical address bindings?
Solution: If the IP and MAC address is bind. It needs to conduct such Settings in the switch
and add a new binding for the camera's IP address and MAC address .
c.Firewall?
Solution: Re-set the firewall.
?
3.3 Why can not access the camera after update
update?
Answer: Clean browser cache.
Steps: open IE, click “Tools” and select “Internet Options”, then you can see “Temporary Internet
files” and click “Delete Files”, it will prompt a dialog you need to check “Delete all offline content”
and click “OK”.
Also you can click “Start” and select “Run” then enter “cmd”, enter “arp -d” in “Command Prompt”
interface. Re-access the camera.
- 13 -