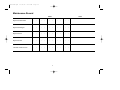
1
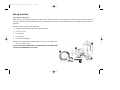
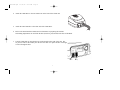
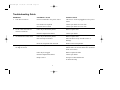
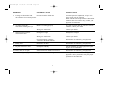
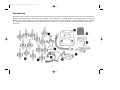
7400-00B.QXD
10/21/99
8:03 AM
Page 1
The Respironics Tranquility Quest Plus is a medical device prescribed by
a physician to assist breathing.
Compact CPAP System
Compact
Nasal CPAP
Model 7400
System
Patient Operating Instructions
7400-00B.QXD
10/21/99
8:03 AM
Page 2
Glossary of Symbols
Symbol Description
Attention, consult accompanying documents (such as, manuals). Read thoroughly and understand this manual
before attempting to use this CPAP system.
O
Power switch Off (Disconnection from the mains)
I
Power switch On (Connection to the mains)
~
Alternating current
Ramp
Class II equipment (Double insulated)
IPX1
Protected against vertically falling water
Type BF applied part
1
7400-00B.QXD
10/21/99
8:03 AM
Page 3
User/Owner Responsibility
This Respironics CPAP (Continuous Positive Airway Pressure) system and authorized accessories are designed to work as described in
this manual. You should not use parts that have failed, exhibit excessive wear, are contaminated, damaged or otherwise ineffective. Read
this entire manual before using this CPAP system.
The user/owner of this system shall have the sole responsibility and liability for any injury to persons or damage to property (including
this equipment) resulting from:
1.
Operation not in accordance with supplied operating instructions;
2.
Maintenance not in accordance with authorized maintenance instructions;
3.
Maintenance by anyone other than a factory-authorized service representative;
4.
Modification of the system or accessories; or
5.
Use of damaged or unauthorized components or accessories.
The Scope of this Manual
This manual is intended to show you how to operate the Respironics Tranquility Quest Plus Model 7400 nasal CPAP system to provide
positive pressure to the breathing passages. Read thoroughly and understand this manual before attempting to use this system.
Introduction
Nasal CPAP devices produce small amounts of air pressure that can be applied using a nasal mask. This pressure opens the breathing passages to prevent blockages and to allow normal breathing. The Tranquility Quest Plus system provides one level of pressure. This pressure is controlled by a microprocessor and a pressure transducer to provide accuracy and comfort and adjust to changes in elevation
The Tranquility Quest Plus (Model 7400) system from Respironics, is a medical device that includes a blower controller. The blower
controller adjusts the blower to deliver the pressure that has been prescribed for you. Additionally, this compact unit features a linear
ramp, a convenient handle, an easily replaceable or washable filter.
2
7400-00B.QXD
10/21/99
8:03 AM
Page 4
Warnings and Cautions
WARNING-indicates a potentially harmful situation
1. This is a continuous positive airway pressure device and is intended be used in the treatment of adult obstructive sleep apnea.
2.
Do not use this CPAP unit in the presence of flammable anesthetics.
3.
Do not use the CPAP unit around water in any way, with the exception of water contained in a Respironics Humidifier.
4.
If this unit should come in contact with water, unplug the unit.
5.
This unit should never be turned on and left unattended.
6.
Never operate this unit if the power cord or plug is damaged.
7.
If this unit has been dropped or damaged, contact your distributor or Respironics at once.
8.
Adjusting the pressure without a physicianÕs instruction could be harmful.
9.
The CPAP device should only be used with a nasal interface or mask and patient circuit that are supplied by Respironics. Never,
under any circumstances, use the nasal interface or patient circuit unless the Tranquility Quest Plus is turned on and operating properly.
10. Do not block or obstruct the vent hole located on the front of the nasal mask or interface.
11. Make sure that all breathing connections are properly secured.
12. For 12VDC operation, do not use any DC to AC inverter other than that supplied or recommended by Respironics.
13. Check and verify fuse rating before replacement.
14. When using supplemental oxygen with this system, make sure that this CPAP system is switched on before the oxygen source is
turned on. When you wish to stop using this CPAP system, turn off the oxygen flow first before turning this CPAP unit off.
15. Oxygen quickly accelerates fire. If you are using supplemental oxygen, this CPAP system as well as the oxygen source must be kept
away from heat or open flame. Smoking in the area of use must not occur.
3
7400-00B.QXD
10/21/99
8:03 AM
Page 5
16. As with any electrical device, do not use this CPAP unit during an electrical storm.
17. Do not use this Bilevel unit with a portable electrical generator.
18. At low pressures, the flow through the exhalation port may not be enough to clear all of the exhaled gases from the hose. As a
result, you may breathe in some of the air that you have breathed out.
19. Be aware that interference with the operation of this device can occur from external sources. Even though this device contains methods and techniques that can provide protection from external sources of interference, you should take the following precaution: Keep
the device at least three feet away from all electrical appliances such as TV sets, electric blankets, air conditioners, cordless telephones and cellular telephones.
20. The air flow for breathing produced by the Quest Plus can be as much as 1.8oF (1.0oC) higher than the temperature of the room.
Exercise caution if the room temperature is warmer than 90oF (32oC).
CAUTION: FEDERAL (USA) LAW RESTRICTS THIS DEVICE TO SALE BY, OR ON THE ORDER OF, A LICENSED
PHYSICIAN. THIS CPAP UNIT SHOULD BE USED ONLY UNDER THE SUPERVISION OF A LICENSED
PHYSICIAN.
CAUTION-indicates a condition that may lead to equipment damage, malfunction, or inaccurate operation.
1.
Do not use a room humidifier within six feet of this unit. Dampness may affect device parts.
2.
Do not use attachments that are not recommended by Respironics.
3.
This CPAP system is to be used in the manner described in this manual.
4.
Never drop or insert any objects into the connecting hose or air outlets or inlets.
5.
Operating the unit with a dirty filter may keep the CPAP unit from working properly.
6.
Do not use extension cords or electrical adapters.
7.
Do not sterilize this unit.
4
7400-00B.QXD
10/21/99
8:03 AM
Page 6
Set-up and Use
Unpacking and Inspection
When you get your Tranquility Quest Plus CPAP system, carefully open the box and unpack the system, making sure that you have the
following components and that nothing appears to be damaged. Accessories are not included in this basic package and can be ordered
separately.
Included with this system are the following:
1.
Tranquility Quest Plus (Model 7400) nasal CPAP unit
2.
AC Power Cord
3.
Six-foot Hose
4.
Carrying Case
5.
User Instruction Manual
You will need a Nasal Interface (Nasal Mask or other type of interface) in
order to use this system.
IF ANY OF THESE COMPONENTS ARE MISSING OR DAMAGED,
CONTACT RESPIRONICS AT ONCE.
5
7400-00B.QXD
10/21/99
8:03 AM
Page 7
Initial Use
1. Prior to each use, inspect this unit for any signs of damage, failure or worn parts. Contact Respironics or your Home Care Dealer
immediately to replace these parts. Check to see if there is any moisture in the area of this CPAP unit. Also check the air inlets and
outlets for any blockage or the presence of any dust or dirt. If you notice any moisture, dry the area completely before use. Remove
any blockage and/or dust or dirt from the air inlets or outlets before each use. Do not use a room humidifier within six feet of this
CPAP unit.
2.
Place the CPAP unit in a clean, dry place near an electrical outlet not controlled by a wall switch. Do not use extension cords or
electrical adapters. Place this unit in an upright position on a nightstand or other suitable surface with the front facing you. Position
this CPAP unit so that the vents are never blocked. Never allow the CPAP unit to be placed on a table or nightstand that cannot safely support the CPAP unit. For example, a table or nightstand without good support will turn over if it is accidentally bumped.
3.
Connect the power cord to the AC power connector on the rear of the unit. After checking to be sure that the Power switch is in the
OFF position, plug the other end of the power cord into the electrical outlet.
6
7400-00B.QXD
10/21/99
8:03 AM
Page 8
4.
Attach the CPAP Hose to the Air Outlet Port on the front of the CPAP unit.
5.
Attach the Nasal Interface to the other end of the CPAP Hose.
6.
Refer to the Nasal Interface Instruction for information on preparing the interface
and making adjustments. Do not block the hole (bias flow port) located at the base of the Mask.
7.
Turn the CPAP unit on using the Power switch located on the front of the unit. The
set pressure will be delivered by the unit once the mask is in place and flow will begin
to move through the hose.
Power
7
Ramp
7400-00B.QXD
10/21/99
8:03 AM
Page 9
8.
Place the Nasal Interface on and adjust it to get rid of any leaks while maintaining comfort. Do
not overtighten the interface.
9.
As you breathe in, you will find that the airflow will increase slightly. The unitÕs pressure controller adjusts to constantly deliver the set pressure.
10. The Ramp button on the front of the CPAP unit may be used to decrease the pressure to about 3
cm H2O and then increase it to the set pressure over the period of time that has been set by the
Home Care Dealer. The ramp indicator will remain lit during the ramp period. The ramp is helpful
in making the CPAP more comfortable as you fall asleep.
11. In the morning or whenever you wish to stop using the unit you can switch the unit off by switching the Power switch to the OFF
position and removing the Nasal Mask.
Routine Use
Regular use of the Tranquility Quest Plus System involves a simple, brief routine that is detailed here.
1.
Switch the Power switch to the ON position. The Power indicator light will come on. Airflow will be felt coming out of the hose.
The pressure will come up to the level set by the Home Care Dealer once the mask is in place.
2.
Place the Nasal Mask, with the Headgear and Hose attached, on and adjust the Headgear straps as needed. Check the mask for any
leaks and adjust as needed.
3.
Press the ramp button to begin the Ramp period. The Ramp light will come on and the pressure will be reduced.
4.
If the Hose becomes disconnected from either the Nasal Mask or the CPAP unit, the unit may go into a Flow Limit mode. In this
mode the pressure will be reduced to prevent any damage to the unit. When the connection is reestablished, the pressure will return
to the level set by the Home Care Dealer.
5.
If you need to get up during the night, turn the Power switch to the OFF position and remove the Mask. When you wish to start
using the CPAP unit again, replace the Nasal Interface and Headgear and turn the unit ON. Make sure to check for leaks as you
have done previously.
8
7400-00B.QXD
10/21/99
8:03 AM
Page 10
6.
In the morning or when you are through using the unit, turn the Power switch OFF and remove the Mask.
7.
The nasal mask, headgear, and hose should be removed from the system for cleaning.
Humidifier Use
An optional Humidifier is available through Respironics for use with the system. The Humidifier is a
reservoir that fits under your unit. When properly filled with distilled water, it adds moisture to the airflow and reduces nasal dryness and irritation. Do not leave water in the Humidifier when the hose is disconnected. Small amounts of water may be blown out of the Humidifier if the blower accidentally
comes on. Follow the instructions included with the Humidifier regarding cleaning.
CONTACT YOUR DEALER FOR FURTHER INFORMATION.
Using Oxygen With This System
It is important that you read, understand and carefully follow these instructions regarding the use
of oxygen with your Tranquility Quest Plus CPAP system.
CAUTION: Oxygen is a prescription gas and should be used only under the supervision/direction of a licensed physician. While
using oxygen, the CPAP system and oxygen source must be kept away from heat and open flame. Smoking by anyone in the presence
of oxygen must not occur.
1. Set-up
Attach the oxygen tubing to the hose using the loops included with the Oxygen
Administration Kit. Thread the oxygen tubing through the holes in the loops. Attach the Tadapter between the mask and the hose. Attach one end of the tubing to the T-adapter and the
other end to the oxygen source.
2. Oxygen Use
Turn on the CPAP unit so that air flow will begin prior to turning on the flow of oxygen. When turning the CPAP unit off, always
turn the oxygen flow off first and then the CPAP unit.
NEVER TURN THE CPAP UNIT ON OR OFF WITH OXYGEN FLOWING INTO THE UNIT.
9
7400-00B.QXD
10/21/99
8:03 AM
Page 11
AC Fuse
If the CPAP unitÕs power indicator does not light up when the unit is plugged in and turned on, the fuse
may need to be replaced. When replacing the fuse, make sure that the power cord is not plugged into
the electrical outlet. Remove the power cord from the receptacle on the rear of the unit. Remove the
fuse holder by pressing the two tabs together and pulling out. The fuse must be replaced with an identically rated fuse. The correct fuse is a T1A, 250V, (1 Amp, 5mm x 20mm, 250 Volt Slo-Blo). After
replacing the fuses in the fuse holder, press the holder back into the receptacle and replace the power
cord.
Traveling With Your CPAP System
The Tranquility Quest Plus will operate on a range of voltages from 100 VAC to 240 VAC and on 50 or 60 cycles. You do not need to
switch from one voltage setting to another. You will need to use a plug adapter in some locations in order to connect the power cord into
the available wall outlet. When traveling by airplane, do not check your CPAP system as baggage because it may be damaged. Always
carry this manual with your CPAP system when you travel, both for reference and for the notice that this is a medical device that requires
regular use. This notice may be helpful in dealing with Customs agents.
DC Operation
Operating the Tranquility Quest Plus CPAP system from a DC power source will require the use of a Respironics DC to AC Inverter
(Part Number 7304). When connecting the DC to AC Inverter, turn the CPAP system Power switch OFF. Connect the AC power cord to
the AC receptacle of the Inverter. Then, plug the DC to AC Inverter into a cigarette lighter-type connector as found in cars, trucks, boats,
etc. Under normal conditions, this unit will typically draw less than 3 amperes. The maximum draw for the inverter is listed in the DC
to AC Inverter manual. For 10 hours of DC to AC Inverter use, this unit will typically consume less than 30 Amp hours.
10
7400-00B.QXD
10/21/99
8:03 AM
Page 12
Altitude Compensation
The Tranquility Quest Plus unit features a pressure transducer that measures pressure delivered to you and a microprocessor that makes
the needed adjustments if you travel to a different elevation. The unit will automatically adjust the blower speed to compensate for the
new elevation and deliver the prescribed pressures.
Maintenance
Changing the Filter
The Tranquility Quest Plus is supplied with a reusable filter. This filter can be removed
from the rear of the unit by pulling it directly out of the filter receptacle. The filter
should be washed thoroughly with a mild soap and water solution, rinsed thoroughly
with clear water and allowed to dry completely before use. Return the filter to the unit
by pressing it against the filter receptacle and tucking the edges into place. An optional
disposable filter is available for removal of smaller particles.
Check the condition of the filter prior to each use.
Cleaning The System
The CPAP unit can be cleaned using a cloth moistened with water and a mild soap solution. Caution: Unplug the unit before cleaning
it. Do not place the unit in water. Do not use alcohol or other organic solvents to clean this unit. Let the unit dry completely
before plugging it in or operating it.
Routine Maintenance
Other than the cleaning detailed above, no other maintenance is required by the user. NOTE: You should not attempt to open the unitÕs
enclosure; there are no user serviceable components inside. Unauthorized tampering with the unitÕs enclosure or unauthorized servicing
will void the warranty and could result in damage and or personal injury
11
7400-00B.QXD
10/21/99
8:03 AM
Page 13
Troubleshooting Guide
PROBLEM
POSSIBLE CAUSES
INSTRUCTIONS
1.
Unit not connected to live power source
Check to see if unit is plugged into a live power
source
Fuse needs to be replaced
Contact your dealer for a new fuse
Incorrect fuse was used
Contact your dealer for a new fuse
Filter may be blocked by debris
Wash or replace filter
Internal component has failed
Contact your dealer
Filter may be blocked by debris
Wash or replace filter
Inlet vent may be blocked
Move the device away from the source of
blockage
Room air temperature has increased.
Reduce room air temperature
Leak in the system
Verify that the mask is not allowing air to leak
and that there are no leaks in the hose. (Pressure
check at zero flow)
Filter may be clogged
Wash or replace the filter
Internal component has failed
Contact your dealer
Ramp is active
Turn power OFF and then ON
to deactivate ramp
2.
3.
4.
Unit does not turn on
No air comes out of device
when it is turned on
Air from device seems warm
Feeling that the pressure is
too high or too low
12
7400-00B.QXD
10/21/99
8:03 AM
PROBLEM
5.
POSSIBLE CAUSES
INSTRUCTIONS
Feelings of discomfort from
Pressure from the CPAP unit
the sensation of too much pressure
6. Air leaks around the
nasal mask irritating the eyes
7.
Page 14
Skin becomes red where
mask touches skin
An initial period of adjustment, of up to two
-three weeks, may be required
Relax and take slow deep breaths. If discomfort
continues after two to three days, contact your
physician for assistance
Mask is not fitting properly
Try again to fit the mask to your face. If leaks
continue, contact your dealer
Wrong size nasal mask
Contact your dealer
Headgear too tight
Readjust the headgear
Wrong size nasal mask
Contact your dealer
General irritation or allergic
reaction to the mask material
Discontinue use and notify your physician
8.
Runny nose
Reaction to air flow
Discontinue use and notify your physician
9.
Dryness of throat or nose
Inadequate humidity
Increase humidity or contact physician regard
ing the use of a humidifier
10. Nasal, sinus, or ear pain
Sinus infection or middle ear infection
Discontinue use and notify your physician
11. Return of original symptoms
Physical condition has changed
You may need to be retested. Notify your
physician. Have your dealer verify the proper
operation of the CPAP unit
13
7400-00B.QXD
10/21/99
8:03 AM
Page 15
Maintenance Record
Dates
Notes
Replaced Nasal Mask
/
/
/
/
/
/
/
/
/
/
Replaced Headgear
/
/
/
/
/
/
/
/
/
/
Replaced Hose
/
/
/
/
/
/
/
/
/
/
Replaced Filter
/
/
/
/
/
/
/
/
/
/
Checked CPAP Pressure
/
/
/
/
/
/
/
/
/
/
14
7400-00B.QXD
10/21/99
8:03 AM
Page 16
Patient Checklist
As you and your Home Care Dealer go through the operation of your CPAP system, make sure that you thoroughly understand the following:
❑
Why your physician has prescribed the CPAP system.
❑
The importance of using your CPAP System each and every night.
❑
How to properly connect the Hose to the device and to the Nasal Mask.
❑
How to put on the Nasal Mask and Headgear to achieve a good fit.
❑
The importance of not blocking the Inlet Vent on the CPAP unit.
❑
How to operate the Ramp feature.
❑
How to care for the Nasal Mask, Headgear, and Hose.
❑
How to clean and/or replace the filter.
❑
How to check the operation of the nasal CPAP unit.
❑
What to do if symptoms of obstructive sleep apnea reappear.
❑
What to do if you experience any ear, nose or sinus pain.
Annual Inspection
It is recommended that a routine inspection of the nasal CPAP system be performed at least once each year. This service should include:
1. Visually inspecting for any damage; 2. Replacing the filter; 3. Verifying the pressure setting; 4. Checking the condition of the Mask
and Headgear.
** Contact your authorized dealer for further information **
15
7400-00B.QXD
10/21/99
8:03 AM
Page 17
Specifications
CPAP Pressure
Approx. 3 to 20 cm H2O
Weight
4.8 lbs. (2.3 kg)
Height
5.0Ó (12.3 cm)
Length
9.5Ó (23.6 cm)
Width
7.75Ó (18.9 cm)
Electrical Requirements
100-120/ 200-240 VAC
50/60 Hz, 75VA
Warranty
1 year limited
Classification
IEC Class II
Type BF applied part
Protected against vertically falling water (drip proof)
Not suitable for use in the presence of a flammable anesthetic mixture with oxygen or nitrous oxide
Continuous mode of operation
16
7400-00B.QXD
10/21/99
8:03 AM
Page 18
Storage and Transport
Temperature
-25¡C to 60¡ C
Humidity
10 - to 95% noncondensing
Atmospheric Pressure
790-523mm Hg
Operating
Temperature
5¡ C to 40¡ C
Humidity
10 - to 95% noncondensing
Atmospheric Pressure
790-523mm Hg
Electromagnetic Compatibility
The Tranquility Quest Plus (model 7400) is designed to comply with EN 60601-1-2: 1995, Electromagnetic Compatibility Requirements and Tests. Move the CPAP unit away from other electronic equipment if you suspect the electronic equipment is interfering with the operation of the CPAP or if the CPAP is interfering with the operation of other electronic equipment.
17
7400-00B.QXD
10/21/99
8:03 AM
Page 19
Accessories
Respironics offers a full line of accessories and replacement parts for use with the Tranquility Quest Plus. These accessories include our
standard (1) and Soft Series (2) nasal masks, each available in seven different sizes; a bridge support (3);the Nasal Seal (6), two styles of
Headgear (4); and a chin strap (5). Also available are high grade disposable filters and replacements for the standard filter (10); a humidifier (9); and an oxygen administration kit (8) and the DC to AC Inverter (7). Contact your Home Care Dealer in order to obtain these
accessories.
18
7400-00B.QXD
10/21/99
8:03 AM
Page 20
Limited Warranty
Respironics Inc. (Respironics) warrants each new and unused Tranquility Quest Plus CPAP system (Model 7400) (hereinafter referred as
CPAP system or Unit) to be free from defects in material or workmanship for a period of twelve (12) months from the initial date of purchase from Respironics. For the purpose of this Limited Warranty, the initial date of purchase from Respironics shall be the date of shipment from Respironics to the initial owner of record. Should the Unit be defective in material or workmanship during the term of this
Limited Warranty, Respironics, at its option, will repair or replace the defective system or component parts. Replacement Units and/or
parts do not carry a new warranty and shall only be warranted for the unexpired portion of the original Limited Warranty.
Specifically excluded from this Limited Warranty are ancillary items, including but not limited to, tubing, filters, nasal masks and headgear. This Limited Warranty does not cover the CPAP system or any component part thereof (i) which is not operated in accordance with
the operating instructions contained in the operating instructions contained in the Patient Manual, as amended from time to time by
Respironics, or (ii) which is not maintained in accordance with the all applicable service manuals, regardless of whether such maintenance is designated as required or recommended maintenance.
This Limited Warranty shall be void and not apply:
A. If the CPAP system is not installed and connected in accordance with the instructions furnished by Respironics;
B. If the serial number or letter identification of the Unit or any component part thereof has been altered, defaced or removed, or if purchaser cannot produce a bill of sale or other evidence to verify the initial purchase of the Unit.
C. To defects arising from misuse, abuse, negligence or accident or from repair, maintenance, adjustment, modification or replacement
made by anyone other than authorized Respironics Personnel; and
D. To any charges for labor or expenses for making field replacement of warranted component parts.
THIS LIMITED WARRANTY IS IN LIEU OF ANY AND ALL OTHER WARRANTIES, EXPRESS OR IMPLIED, INCLUDING
WITHOUT LIMITATION IMPLIED WARRANTIES OF MERCHANTABILITY AND FITNESS FOR A PARTICULAR PURPOSE;
TO THE EXTENT THAT STATE OR FEDERAL LAW PROHIBITS EXCLUSIONS OF IMPLIED WARRANTIES, ANY SUCH
IMPLIED WARRANTY IMPOSED BY LAW SHALL BE LIMITED TO A PERIOD OF NINETY (90) DAYS FROM THE DATE OF
INITIAL PURCHASE FROM RESPIRONICS.
19
7400-00B.QXD
10/21/99
8:03 AM
Page 21
RespironicsÕ responsibilities hereunder are limited to repair and replacement only. Respironics shall have no obligations or liabilities in
connection with the CPAP system other than as provided herein, including without limitation any and all obligations and/or liabilities for
alleged negligence or for strict liability. In no event shall Respironics be liable of any incidental or consequential damages, either direct
or contingent.
NOTE: Some states do not allow limitations on how long an implied warranty lasts, so the above limitation may not apply to you.
This Limited Warranty gives you specific rights, and you may also have other rights which vary from state to state.
The terms of this Limited Warranty may not be varied by any person, whether or not purporting to represent or act on behalf of
Respironics.
To obtain service under this warranty, the owner of the CPAP system must promptly notify Respironics of any defect in materials or
workmanship and the serial number and date of purchase of the CPAP system by calling the toll-free number: (800)345-6443. If
Respironics determines that repair is required under this Limited Warranty, Respironics shall provide the owner with a Return
Authorization Number. The owner must return the Bilevel system or designated parts to RespironicsÕ factory or an authorized service
center designated by Respironics. All items returned must be properly packaged, insured and shipped to Respironics, transportation
charges prepaid. The costs associated with the return of the CPAP system or component parts to Respironics for warranty services are
not included in the Limited Warranty.
20
7400-00B.QXD
10/21/99
8:03 AM
Page 22
7400-00B.QXD
10/21/99
8:03 AM
Page 23
577-7400-00
JBM 10/19/99
7400-00B.QXD
10/21/99
8:03 AM
Page 24