1
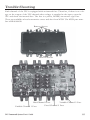
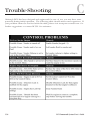
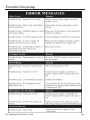
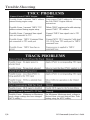
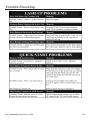
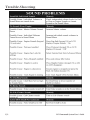
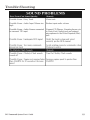
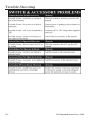
Trouble-Shooting
STEP I - Establish communication between the remote and the TIU
A. Power up both the DCS Remote and the TIU by turning on a transformer hooked to
the fixed input 1 channel and pressing the S5 On/Off button on the remote.
B. Press the READ button on the remote.
1. If the remote says FOUND TIU ADDRESS # WITH # AIU BOXES
CONNECTED that means that your remote is communicating with the TIU Proceed to STEP II.
2. If the remote says TIU ADDRESS # NOT FOUND that means that your
remote is not communicating with the TIU - keep following this step.
a. Power up the TIU and count the number of times the red LED
blinks, this number is the actual address of the TIU. Compare that
number to the TIU address that the remote did not find.
1. If the numbers do not match then you must add the correct TIU address in
to the remote and delete any unused TIU addresses that may be in the remote
already. After you're finished, power up the TIU and the remote and press the
READ button again.
· If the remote finds the TIU then proceed to STEP II.
2. If the numbers match but the remote still will not find the TIU that means
you most likely have a loose RF Module in either the remote or the TIU. Open
up both and make sure that the RF Modules are pushed all the way in to their
respective sockets. After you finished power up the TIU and remote and press
the READ button again.
a. If the remote finds the TIU proceed to STEP II.
b. If the remote still does not find the TIU that means that you most
likely have a bad RF module in one or the other. If available use a
known good DCS system to check which RF module is bad and order
the correct RF module from us.
3. If the red LED does not light at all then check for a blown fuse in the TIU.
4. If the red LED in the TIU comes on but does not blink at all that usually
means that the software was not loaded correctly in the TIU, try re-loading the
software.
136
DCS Command System User’s Guide
Trouble-Shooting
Each channel of the TIU is equipped with an internal fuse. Therefore, if there is no voltage on the output of the TIU channel when voltage is supplied to the input, open the
TIU and check the internal fuse. The fuse is a yellow, 20AMP, automotive type fuse.
These are available at local automotive stores and also from MTH. The MTH part number is BB-0000030.
Remove Screws
Remove Screws
Fixed Channel 1 Fuse
Variable Channel 1 Fuse
DCS Command System User’s Guide
Variable Channel 2 Fuse
Fixed Channel 2 Fuse
135
Trouble-Shooting
STEP II - Establish communication between the TIU and a PS2 Engine
A. Place one PS2 equipped engine on a track hooked to the Fixed 1 output of the TIU.
B. Power up the transformer that is hooked to the Fixed input 1 of the TIU.
C. Press the READ button. - If the remote does not find the TIU go back to STEP I
D. Try to add the PS2 engine in to the remote by pressing the MENU button, then
selecting System, then Engine Setup, Add Engine, Add MTH Engine.
1. If the engine adds in to the remote that means that channel seems to be
working properly - do a track signal test to make sure.
2. If the engine does not add in to the remote:
a. Make sure that the engine is not already in the remotes engine list.
If the engine is already in the remote then select the engine from the
list and start it up - if the engine starts up that means that channel on
the TIU seems to be working ok - do a track signal test to make sure.
b. Make sure there is in fact power on the track by placing a lighted
car on the track by the engine or checking any lighted lock-ons that
may be hooked to that particular track.
-If there is no power to the track then check the wiring from the out
put of the TIU to the track. If that looks ok then you may open the
TIU and check for either a blown fuse in the TIU or a loose wire
connecting the PCB to one of the input/output terminals.
c. Make sure that the DCS signal is turned on to that track by pressing
the Menu button, then selecting System, then DCS Setup, then press
the S3 soft key it will say AON above it on the LCD. Try to add the
engine again. If the engine adds in to the remote that means that
channel is now working properly - do a track signal test to make sure.
d. Rule out the layout/wiring as being the problem. You can do that
by hooking up just a test track to the output of the channel and
placing one PS2 equipped engine on it. Power everything back up and
try to add the engine again.
1. If the engine adds on the test track that means the problem most likely lies
in the layout/wiring. Do a track signal test while the engine is on the test track you should have no less than a 10.
2. If the engine does not add on the test track or you have a poor track signal
strength then it is recommended to return the TIU for repair.
E. Test all other channels on the TIU to be sure they can communicate with a PS2
engine. Be sure to power up either Fixed 1 or AUX power when using Fixed 2, VAR 1,
or VAR 2. If you can not get any voltage out of one or both of the variable channels
then proceed to STEP III.
DCS Command System User’s Guide
137
Trouble-Shooting
STEP III - Ensure that the Variable voltage channels are working
correctly
A. Hook up a track to the output of VAR 1 making sure you have either a lighted lockon or a lit passenger car on the track.
B. Power up the TIU using either Fixed input 1 or AUX power.
C. Connect a MTH recommended transformer to the input side of VAR 1 and raise the
throttle to MAX.
D. Using the DCS remote press the TR button and make sure there are variable tracks
added in to the remote. They should come up as TIU # VAR 1 and TIU # VAR 2.
· If no tracks come up in the remote or the tracks that do come up are named something
different and you don't know which TIU and VAR channel they may be linked to then
you must *add the correct tracks in to the remote. (ie. if when you press the TR button
the tracks come up with names of top and bottom and your not sure if top is VAR 1 or
VAR 2). *See the owner's manual for directions on how to do this.
E. Select TIU # VAR 1 from the list - you should now have a screen that says VOLTS:
0.0. Using the thumb wheel scroll the voltage up to 10V - check to see if there is in fact
voltage on the track by looking at the lighted lock-on or the lit passenger car on the track.
-If there is voltage on the track try scrolling the voltage up and down a couple times
making sure the light in the lock-on/passenger car gets dimmer and brighter. If it does
that means everything seems to be working ok on VAR 1 - proceed to checking the VAR
2 channel.
F. Make sure the tracks added in to the track menu are for the correct TIU (ie. if your
TIU is on address 3 and the tracks come up TIU 1 VAR 1 and TIU 1 VAR 2 they will
not work).
- If the tracks are pointing to an incorrect TIU address delete them and add in the correct tracks.
G. Open the TIU and check for a blown fuse and/or a loose wire connecting the PCB
to the input/output terminals.
1. If there is in fact a blown fuse or a loose wire then correct the problem and
try again.
2. If there are no fuses or the fuses are ok and the wires connecting the PCB
to the input/output terminals are all intact then you most likely have a
component problem in the TIU.
H. If none of the above measures correct the problem then it would be best to send
the DCS system in for repair.
138
DCS Command System User’s Guide
Trouble-Shooting
STEP IV - Operating Issues while running a Lash-up
A. Whenever an operating problem occurs when running a lash-up, check the TIU and
Remote code revisions. The code revision in the TIU and Remote must match. Power
up the remote by pressing the S5 On/Off button on the remote. Record the Remote
code Version ## displayed in the LCD screen as the remote powers up.
B. Power up the TIU by turning on a transformer hooked to the fixed input 1 channel
or AUX power. Using the Remote, select Menu, System, TIU Set-up, TIU Version to
display the TIU code revision. Compare the Remote and TIU code version, they must
match. If they do not or there is a later version, go to M.T.H’s website and download
new code. See DCS Dealer Loader Instruction on the PS2 section of the M.T.H’s
Website by selecting the PS2 icon on the lower section of the homepage.
DCS Command System User’s Guide
139
Trouble-Shooting
C
Although DCS has been designed and engineered for ease of use, you may have some
questions during initial operation. The following table should answer most questions. If
your problem cannot be resolved with this table, please visit www.protosound2.com for
further suggestions or contact M.T.H. for assistance.
128
DCS Command System User’s Guide
Trouble-Shooting
DCS Command System User’s Guide
129
Trouble-Shooting
130
DCS Command System User’s Guide
Trouble-Shooting
DCS Command System User’s Guide
131
Trouble-Shooting
132
DCS Command System User’s Guide
Trouble-Shooting
DCS Command System User’s Guide
133
Trouble-Shooting
134
DCS Command System User’s Guide