1
SPELL GUI User Manual
SPELL version 2.4.4
Distribution list
Full Report:
SES-SSO-SOE
For Information Purposes:
Open Source
Reference:
SES-SSO-SOE-SPELL-2015/04
Date issued:
February 2015
SPELL version 2.4.4
Acronyms
CV
Command Verification
GCS
Ground Control System
GDB
Ground Database
GUI
Graphical User Interface
HMI
Human Machine Interface (equivalent to GUI)
IDE
Integrated Development Environment
MMD
Manoeuvre Message Database
OOL
Out-of-limits
PDF
Portable Document Format
PROC
Automated SPELL procedure
RCP
Rich Client Platform
S/C
Spacecraft
SCDB
Spacecraft Database
SDE
SPELL Development Environment
SEE
SPELL Execution Environment
SES
Société Européenne des Satellites
SPELL
Satellite Procedure Execution Language and Library
TC
Telecommand
TM
Telemetry
URI
Uniform Resource Identifier
USL
Unified Scripting Language
UTC
Coordinated Universal Time
SPELL version 2.4.4
Table of Contents
1
Introduction
4
2
Framework architecture
5
3
SPELL GUI components
6
4
Startup and configuration
30
5
Procedure Execution
38
6
Other features
46
7
Monitoring mode
49
8
Editing Data Containers
51
9
Manipulating the blackboard of shared variables
53
10
Getting help
54
03 February, 2015
SPELL GUI User Manual
Page 4 of 54
File: SPELL - GUI User Manual - 2.4.4.doc
1 Introduction
1.1 Purpose of this document
This document is the software user manual for the SPELL GUI client application. The SPELL GUI allows
SPELL users to connect to a SPELL server in order to load and control the execution of satellite automated
procedures. In a nutshell, the operations that can be performed on the SPELL GUI are:
-
Connect to a SPELL server
Connect to and manage SPELL contexts
Load, close, schedule or kill SPELL procedures
Control and monitor procedure execution
The SPELL GUI is a Java / Eclipse RCP application, available in both GNU/Linux and Windows® platforms.
03 February, 2015
SPELL GUI User Manual
Page 5 of 54
File: SPELL - GUI User Manual - 2.4.4.doc
2 Framework architecture
The SPELL architecture can be divided in two parts, the SPELL execution environment (SEE) and the
SPELL development environment (SDE). They can be also seen as the on-line and the off-line part of the
SPELL framework. In this document we focus on the SEE components.
The execution environment includes all the real-time elements needed for executing procedures. It is composed of:
(a) the SPELL server, core of the environment, in charge of executing the procedures. It coordinates all tasks, sets up the binding with the ground control system, etc.
(b) the SPELL GUI clients, graphical interfaces through which the procedure executions are controlled and supervised by S/C controllers and engineers.
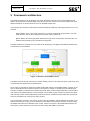
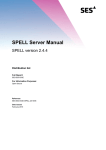
The SEE architecture is based on a TCP client-server philosophy. The diagram hereafter summarizes the
overall structure of the SPELL:
Figure 1: Structure of the SPELL server
The SPELL GUI clients first connect to the SPELL listener process. This is the entry point of the server, and
it coordinates and registers all connected clients.
Once a GUI is connected, the listener provides the GUI with the list of all available SPELL contexts. A context is a dedicated process (colored in green in the picture) in charge of controlling and coordinating the
execution of SPELL procedures for a specific spacecraft. Each context encapsulates data, communication
and control for that spacecraft only. The procedures running within a given context can interact and share
data, but they cannot communicate with procedures running on a different context. Data files are also hidden from procedures not running in the same context.
The current status (running or not) of each of the context is indicated in the list displayed in the GUI. If the
desired context is not running, it can be started from the SPELL GUI interface. Once the context is ready,
the SPELL GUI needs to be attached to the context. A direct connection is then established between the
GUI and the context. At this point, the GUI can start working with SPELL procedures.
03 February, 2015
SPELL GUI User Manual
Page 6 of 54
File: SPELL - GUI User Manual - 2.4.4.doc
3 SPELL GUI components
The SPELL GUI is an Eclipse RCP-based application. Its design therefore follows the Eclipse IDE guidelines and concepts, and its appearance is identical to the Eclipse IDE. The main GUI components are views.
A view is an inner and independent window which shows specific information and allows the user to work
with specific parts of the application. The GUI also provides a menu and a toolbar, as well as some dialogs
for feature configuration or for performing contextual tasks.
The GUI is composed of the following views:
-
Navigation view
Master view
Call-stack view
Outline view
Variables view
Procedure views
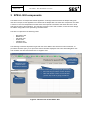
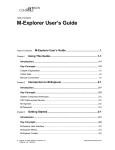
The following screenshot represents a general view of the SPELL GUI. Note that in this screenshot, no
procedure has been open yet; no procedure view is therefore displayed. Also notice both Navigation view
and call stack view are both stacked in the navigation area.
System status
and connection
information.
Navigation View
presents all the
available procedures.
Procedure control view (currently open procedures):
Start and stop procedure monitor sessions.
Take and release control of, send to background, stop or kill on going procedures.
Utility views.
Figure 2: General view of the SPELL GUI
03 February, 2015
SPELL GUI User Manual
Page 7 of 54
File: SPELL - GUI User Manual - 2.4.4.doc
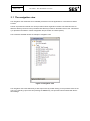
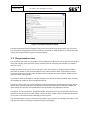
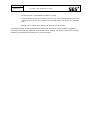
3.1 The navigation view
The navigation view shows the set of available procedures once the application is connected to a SPELL
Context.
The list of procedures consists on a list of procedure names organized in folders. The folder structure reflects the directory structure of the procedure base directory located on the SPELL server host. This directory is specified in the SPELL context configuration file (its location is context-specific).
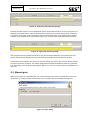
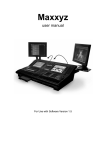
The screenshot hereafter shows an example of navigation view.
Figure 3: Navigation view
The navigation view is the fastest way to start a procedure by double-clicking on the procedure name in the
view, or by selecting a procedure and pressing the ENTER key. The procedure will be loaded with the default settings.
03 February, 2015
SPELL GUI User Manual
Page 8 of 54
File: SPELL - GUI User Manual - 2.4.4.doc
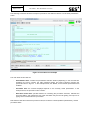
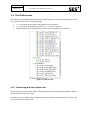
Alternatively it is possible to select a procedure from this list, and then go to the menu Procedures and select one of the available options:
Figure 4: Procedure menu
-
Open selected procedure: will load the procedure selected in the navigation view.
Open selected procedure in background: will load the procedure selected in the navigation view in
background mode (no controlling client, and will start running immediately).
Open with arguments: load the procedure selected and provide argument values for it.
Schedule selected procedure: will open the selected procedure in scheduling mode. The user may
then specify a time or telemetry condition for the procedure to start running.
Whenever procedure files are added or removed on the SPELL server side, the "Refresh procedure list"
button or menu command (in the Procedures menu) will refresh the list of procedures on the navigation
view. Please note that refreshing the list of procedures is not needed when existing procedure files are
modified: the system will always take the latest file versions available on the server side. The refresh list
feature is to be used when procedures are added or removed.
3.1.1 Procedure properties
Procedure source files define properties in the header section, such as the author, the versioning information or the change history. This information can be accessed by right-clicking on the procedure title on
the Navigation View, and selecting "Procedure properties". The procedure information will then appear in a
popup dialog.
03 February, 2015
SPELL GUI User Manual
Page 9 of 54
File: SPELL - GUI User Manual - 2.4.4.doc
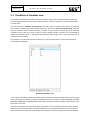
Figure 5. Procedure properties dialog
The General properties tab of the dialog shows general information about the procedure, such as the author, description or target spacecraft this procedure was created for, while the History of changes tab helps
tracking the changes made along the procedure’s lifetime.
3.2 The procedure view
The procedure view is the most important one of the application. It allows the user to watch what is going on
during the execution of the procedure. It also provides means for controlling the execution, provided the
GUI is in control.
Multiple procedure views can be concurrently open. Each view is linked to a single procedure instance.
Note that it is possible to open several instances of the same procedure within a given SPELL Context;
each view is linked to one of the instances. Each instance is identified by the procedure identifier plus an
instance number, starting at zero.
All procedure views are arranged on the GUI workspace area (initially showing the Master view), and they
are selectable by clicking on their corresponding title tab.
Procedure views contain one or more different procedure presentations. A presentation is the way the procedure status, data and notifications are displayed. The two basic presentations available in SPELL are
called Tabular and Text, but more presentations could be added to the application if desired.
The Tabular, or code presentation, presents the SPELL procedure source code and beside of which is displayed a set of three columns for item names, values and status. These columns are filled with the telemetry mnemonic and value whenever a telemetry point is acquired.
The Text presentation is a plain, console-like text output of the procedure. All messages (information, warnings and errors) issued during the procedure execution are displayed.
03 February, 2015
SPELL GUI User Manual
Page 10 of 54
File: SPELL - GUI User Manual - 2.4.4.doc
The following screenshot shows an example of procedure view with the Tabular or Code View presentation
active:
Figure 6: Procedure view example
The main areas of this view are:
-
Presentations area: contains the presentation selection buttons (depending on the ones that are
available), the zoom controls, the main message display and some indicators including the
spacecraft name in big font. In the example above, the Tabular, Text and Shell presentations are
installed.
-
Procedure area: the contents displayed depend on the currently active presentation. In the
example above, the procedure code is shown.
-
Execution control area: provides buttons for controlling the procedure execution, indicates the
procedure status, and contains the user input area which may be used for getting user input or for
typing control commands for the procedure .
Note that the view title contains the procedure name, the instance number (between parentheses), and the
procedure status.
03 February, 2015
SPELL GUI User Manual
Page 11 of 54
File: SPELL - GUI User Manual - 2.4.4.doc
3.2.1 The Tabular presentation
Also known as "Code View" or "Code Presentation", the Tabular presentation shows the SPELL procedure
source code and a set of three data columns. The background color of the presentation changes depending on the Procedure status.
Source code lines are numbered. At runtime they are marked as they are executed to show the execution
coverage. In parallel, the currently executed line is highlighted in bright blue color.
Also, this view allows controlling the execution in a number of ways, by means of breakpoints, manual gotos, and so forth. This will be explained in following sections.
The SPELL language is syntax-highlighted in this view in order to improve readability. Also, two columns on
the right side of the lines of code are used to show extra information about the execution of the SPELL
statement, if relevant.
This information normally consists in:
-
Item name (TM parameter name, telecommand name, etc)
Item value (TM parameter value, telecommand execution phase, etc)
Item status (Indicates if the statement succeeded, is in progress, has timed-out, has failed, etc)
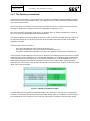
The information actually displayed in these columns depends on the statement being executed: for complex
statements that contain several items (i.e. a multiple TM verification), the information displayed will consist
in the overall status code and item count for the compound statement: e.g. “IN PROGRESS (5/7)” would
mean that the statement information is composed of 7 items, and there are 5 items already processed.
Since there are 2 items still in progress, the overall status of the statement is in progress. In these cases the
"Data" column will be left blank.
Figure 7: Tabular presentation sample
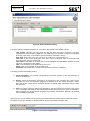
Complex statements only provide a summarized status of the execution in the code view. The detailed information is nevertheless provided on the Item Information Dialog, which is accessible by double-clicking on
the corresponding source code line on the Code View. See below an example of this information dialog:
03 February, 2015
SPELL GUI User Manual
Page 12 of 54
File: SPELL - GUI User Manual - 2.4.4.doc
Figure 8: Item information dialog
The dialog splits the detailed information for each item of the statement into several columns:
-
-
"EX" column: indicates how many times the item has been executed or evaluated. The figure
represents the actual number of iterations. The global amount of iterations for a given line appears
at the top of the dialog. In the example, the line has been "executed 1 time(s)".
Item name: is the name of the item, which can be a TM point, a telecommand, etc.
Item value: is the current value of the item, which can be a TM point value, or a telecommand
execution stage, amongst other things.
Item status: is the status of the item, which can be SUCCESS, IN PROGRESS, FAILED, or other
values for command execution stages.
Time: is the timestamp of the latest change in the row.
Stack: is the unique identifier of the procedure line.
Comments: when applicable, contains extra information about the notification.
The dialog provides three display modes:
1) Latest information: only the data corresponding to the latest execution of the associated procedure line is displayed
2) History: shows the information associated to all executions of the procedure line. If the line was
executed only once, the information displayed is identical as for the "Latest information" option.
Note that the EX column can be used as a reference to identify which data items beling to which
line execution.
3) Full: this mode is meant for analysis and debugging, and does not bring much help to the regular
user. It will display the totality of data messages processed by the GUI for the given procedure line,
without applying any of the internal merging and processing mechanisms. Basically, all raw data
that is available is displayed.
Since version 2.4.3, the tabular view is providing information about the opened sub-procedures by a main
procedure but also the capability to navigate between them in a procedure navigation bar:
Figure 9: Procedure navigation bar
03 February, 2015
SPELL GUI User Manual
Page 13 of 54
File: SPELL - GUI User Manual - 2.4.4.doc
The procedure navigation bar informs which is the sub-procedure to which the current presented code on
the tabular view belongs to. Also it is showing the number of subprocedures levels and the current level i.e.
1 to 3 levels means that there are 3 levels opened, the main procedure and 2 more sub-procedures, but
currently the code from the main procedure is being presented on the code view.
The user could move between the diferent levels using the arrows icon, in order: move to the top level,
move one level up, move on level down, move to the bottom level.
On the other hand, the combobox is presenting the name of the current level but also allows to select the
level to be presented.
In the Code view preferences page (System/Preferences menu) it is possible to configure some options for
this presentation:
Figure 10: System preferences
Show datetime: if enabled, there result column will show the status of the executed line in a short
form ( "S" for success, "F" for failed, etc.) , combined with the time of the latest notification.
Figure 11: Datetime sample
03 February, 2015
SPELL GUI User Manual
Page 14 of 54
File: SPELL - GUI User Manual - 2.4.4.doc
Fields in data column: it is possible to choose which contents to display on the Data column: only
the item names, only the item values, or both:
.
Figure 12: Fields in data column sample
Line history: whenever a procedure generating many notifications is extensively used, the GUI
model may accumulate big amounts of data in memory unnecessarily. In these cases this option
can be used, so that the models will store the indicated number of notifications in memory as a
maximum. This helps saving memory.
Note: changing these code view preferences does not have effect on currently open procedures. Only the
procedures loaded after a preference change will reflect the new configuration.
3.2.2 The Text presentation
The text presentation only displays progress messages regarding the procedure execution, without the
source code. All messages displayed by the procedure are displayed in the text area. The background
colour of the message changes, depending on its type (prompt, warning or error message).
The foreground colour indicates the scope of the message (according to the preferences selected by the
user - see Scope styles on section 4.2.2). The different scopes are: SPELL procedure, the SPELL core and
drivers, step instructions, prompts, and others.
Messages are prefixed with a icon in order to easily identify them.
Figure 13: the Text presentation
As in the Tabular presentation, the background colour of the text area changes depending on the status of
the procedure, in a consistent way with the Code presentation.
03 February, 2015
SPELL GUI User Manual
Page 15 of 54
File: SPELL - GUI User Manual - 2.4.4.doc
A message timestamp can be optionally displayed in order to see the time where each message was issued by the procedure:
Figure 14: Show message timestamp checkbox
03 February, 2015
SPELL GUI User Manual
Page 16 of 54
File: SPELL - GUI User Manual - 2.4.4.doc
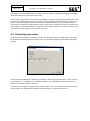
3.2.3 The Shell presentation
The shell presentation allows the user to execute SPELL statements within the procedure scope. It looks
like an operating system console where the user can input SPELL statements on the prompt line. The
prompt is represented by the symbol ">>>". When a valid statemnt is entered, the executor processes it and
the resulting output is right it.
Figure 15: Shell presentation
Any SPELL code, including functions calls, can be executed, put apart the goto statement which is not supported at shell level. Multi-line statements such as if clauses, for loops, function definitions and so on are
accepted too. The shell is able to detect multi-line statements, and will help the user with automatic indentation. The prompt symbol will then change into "…". To finish a multi-line statement, a blank line shall be
entered.
Command history is browsable via the CTRL+Up and CTRL+Down key combination. The user can thus
recover previously written commands.
It is possible to clean up the view by double-clicking on the shell window.
Note 1: the statements executed from the shell interact with the procedure instance. For example, if the
procedure execution is stopped within a function call, the code executed from the shell accesses (to get and
even modify) the function local variables. Python scope rules apply as if the manual statements were placed
inside that procedure function.
Note 2: the statements executed on this shell have some limitations. They are executed in what is called
"manual context", meaning that the notifications and messages will not be displayed in the other presentations and will not be stored by the models.
03 February, 2015
SPELL GUI User Manual
Page 17 of 54
File: SPELL - GUI User Manual - 2.4.4.doc
3.2.4 Presentations control area
The presentations control area is the fixed frame constantly visible on top of the presentation area itself. It
provides the presentation control buttons and displays some indicators.
Figure 16: Presentations control area
The parts of this area are the following:
-
-
-
-
-
Current step information: on the upper-left corner. The name an description of the current
procedure step are displayed here. This information is controlled by the procedure itself. If the
procedure does not set any step description, this field shows the string "Step (None): None".
Presentation selection buttons: allow the user to switch between procedure presentations.
In the screenshot three presentations are available: Tabular, Text and Shell.
Zoom controls: allow the user to increase or decrease the font size of the GUI controls and
presentations.
Spacecraft indicator: displayes the name or acronym of the current spacecraft in big font. In
the example it reads "STD".
Commanding confirmation flag: in the screenshot it reads "Normal TC".
When the commanding confirmation is enabled by the user, this indicator
becomes yellow and shows "TC Confirm". This means that the system
will ask for confirmation every time a telecommand is about to be injected
into the GCS:
Mode indicator: in the screenshot it reads "CTRL" and has green
background. It indicates the mode of the GUI client regarding this procedure. Two modes are
currently available: CONTROLLING (CTRL) and MONITORING (MON). See the monitoring
mode section for details.
Additional execution controls: three check boxes next to the indicators allow controlling the
behavior of the presentations as well as the procedure execution flow.
-
Auto-scroll: enables or disables the auto-scroll feature in all the presentations of the
selected procedure. The actual effect of the option depends on the presentation: in the
Tabular one, the auto-scroll option makes the executed line always appear in the middle of
the area. If the option is disabled, the source code stops scrolling. In the Text presentation,
the auto-scroll option makes the text area always scroll down to the end of the area on
new line.
-
Run Into: configures the GUI to follow the execution flow by stepping into all functions and
sub-procedures. If the run-into option is disabled, the system will step over function calls,
so that the code inside these functions is executed as a black box. The run-into feature
has no effect on the Text presentation.
-
By step: will make the procedure execution to automatically pause every time a Step
instruction is executed in the code.
Message display: finally, the message display in the middle of the are shows the latest message
issued by the procedure during the execution.
03 February, 2015
SPELL GUI User Manual
Page 18 of 54
File: SPELL - GUI User Manual - 2.4.4.doc
3.2.5 The Procedure Control Panel
The procedure control panel is a fixed area visible on all the presentations, allowing the user to control the
procedure execution.
Figure 17: Procedure Control Area
It provides a set of buttons for commanding the selected procedure, like run, step, abort and so forth. It also
shows the current procedure execution status in a colorized text field.
The text input area at the bottom can be used to enter the very same commands to control the procedure
via the keyboard instead of using the mouse. The information icon on its left provides help for typing the
commands.
The buttons on this panel, their position and the text displayed can be configured. In the GUI preferences:
Figure 18: Procedure control panel
Note that it is not possible to make changes in this preference pages if there is any procedure currently
open in the GUI, as these configuration parameters affect the way a procedure is controlled. In this preference page the order of the buttons can be selected. In this SPELL version to configure the text displayed,
and to indicate if a button is available or not, the configuration file of the GUI needs to be manually edited.
03 February, 2015
SPELL GUI User Manual
Page 19 of 54
File: SPELL - GUI User Manual - 2.4.4.doc
3.2.6 Prompt Inputs
The prompt area appears below the procedure control panel. This area is hidden when no user input is
required and is replaced by the black text box where procedure commands can be typed (e.g. "run",
"pause", etc.). Once a prompt is requested, this area changes in order to the prompt the user for input.
Figure 19: Prompt
Note that the prompt message appears above the text field, and that the text field background turns yellow.
An input hint is displayed in the text field when applicable.
For prompts of LIST type, the available answers are displayed below the text field as a set of radio buttons.
The answer can be either typed or selected via the radio buttons.
The answer must be validated by clicking the "Confirm" button. The response is then submitted to the procedure and the execution goes on.
The "Reset" button will clear all the prompt area fields so that no answer or option is selected.
GUI prompts have a programmable delay. If set, after a certain amount of time, the prompt area starts blinking with yellow background and a warning sound is optionally played.
The wave file to be played can be set up on the preference pages.
For the active procedure on the Procedure view the execution delay can be updated at the "Execution"
menu item on the menu bar by selecting the "Configure execution…" option.
Figure 20: Procedure execution configuration
It is also possible to configure the default "Prompt warning delay" for the context, so next started procedures
will take the default value from the context. The executor defaults menu could be opened at the "Execution"
menu item on the menu bar by selecting the "Configure defaults…" option.
03 February, 2015
SPELL GUI User Manual
Page 20 of 54
File: SPELL - GUI User Manual - 2.4.4.doc
Figure 21: Executor defaults
Note that when the SPELL server is restared the default prompt warning delay will be take again from the
SPELL server configuration file.
3.2.7 Other features
Procedure views can be detached from the GUI main window in order to have two windows (or more) of the
procedure view at the same time. To do this, right-click on the procedure view title and select “Detached” in
the appearing pop-up menu, as shown on Figure 22.
Figure 22: Detaching a procedure view
Once detached, the view appears in a separate window. Note that the procedure can be controlled from that
standalone view.
To reattach the view to the main GUI window, simply deselect “Detached” in the same pop-up menu of the
view's title tab. The standalone view then goes back to its original place.
A procedure view (or any of the views of the GUI) can be maximized or restored, by double-clicking on its
title tab.
Minimization is not allowed for procedure views but for some other GUI areas:
-
The master view and shared variables view
The navigation view
The utility views
Once minimized, it is possible to restore these areas by clicking on the corresponding minimized icons.
Figure 23: Restore view area icons
03 February, 2015
SPELL GUI User Manual
Page 21 of 54
File: SPELL - GUI User Manual - 2.4.4.doc
3.3 The master view
The master view is permanently open (cannot be closed) and contains the procedure control area.
Figure 24: Master view for controlled procedures
When the GUI client is not connected to any context, this area displays just an information message:
Figure 25: Master view when not attached to a context
03 February, 2015
SPELL GUI User Manual
Page 22 of 54
File: SPELL - GUI User Manual - 2.4.4.doc
3.3.1 Procedure control area
This area provides information on all the procedure instances of the current SPELL Context. These instances do not need to belong to the current GUI. They may be controlled or monitored by any other client working within the same context.
Note that in previous versions of SPELL, this procedure control area appeared as the "Executors Control
Dialog". As of the current SPELL version, this dialog was merged into the Master View for usability purposes. The list of procedures shows the following information for each of the procedure instances currently
open in the context. The information displayed includes
-
-
The procedure name (with instance number).
The status of the execution.
The execution flags:
[C] Procedure is controlled by a user.
[M] Procedure is monitored by a user.
[B] Procedure is being executed in background without the control of a user.
The origin from which the procedure was started (GUI or an External Application).
The current procedure step.
By double-clicking on any of the procedures in the table, more detailed information about the current clients
is displayed:
Figure 26: Procedure properties
The following actions can be carried out from this control area:
-
To take control of an ongoing procedure execution: provided that there is no other client
already controlling it (see “Controlled” column)
-
To release the control of a procedure. This can only be done if the procedure is authorized
to run in background mode and if the GUI is in control.
-
To put a currently controlled procedure to background: the procedure will become
"headless", that is, will keep running alone, without a controlling client attached to it.
-
To start monitoring a procedure: the GUI will show the execution information but it will not
be possible to issue any command to the procedure or to provide any user input.
-
To stop monitoring a procedure, if the GUI is monitoring it.
03 February, 2015
SPELL GUI User Manual
Page 23 of 54
File: SPELL - GUI User Manual - 2.4.4.doc
-
To stop execution: only available if the GUI is in control.
-
To kill execution: forces the procedure closure in any case, provided that the GUI is the
controlled client. This is not a graceful stop and might leave the GCS in a inconsistent
state.
-
Refresh: force a refresh of the status of all currently open procedures.
It is possible to select several procedures at the same time. The buttons are then enabled or grayed out
according to the overall characteristics of the procedures. For example, the release control button would be
enabled only if all selected procedures are in control of the GUI.
03 February, 2015
SPELL GUI User Manual
Page 24 of 54
File: SPELL - GUI User Manual - 2.4.4.doc
3.4 The Outline view
The outline view of the SPEL-GUI describes the code displayed in the currently selected Procedure View.
This contents includes source code elements like:
Step instructions, showing all the step definitions in the procedure.
Goto instructions, showing all the calls to the Goto function in the code.
Function declarations, indicating all the function names and where they are declared.
Figure 27. Outline view
3.4.1 Interacting with the outline view
Double clicking any element of the outline view will automatically scroll the Code Presentation to the corresponding element of the source code.
This feature is only enabled when the procedure execution is paused. Double clicking on the outline view
has no effect while in running mode.
03 February, 2015
SPELL GUI User Manual
Page 25 of 54
File: SPELL - GUI User Manual - 2.4.4.doc
3.5 The Watch of Variables view
The Variables view displays information about the variables existing in the current execution scope of the
currently selected procedure. During a procedure execution, users can observe the current variable values
or modify them.
This view can work in automatic refresh mode if the "Auto" option is enabled. In this mode, any change to
the procedure variables will be automatically reflected on this view. It should be noted though, that enabling this automatic refresh feature does have an impact on the procedure execution speed, as additional
operations per-line need to be done in order to monitor variable changes. Therefore it is not advisable to
enable the automatic refresh in real spacecraft operations where timing may be more important than in
development environments.
The activation of the automatic refresh mechanism is configured in the SPELL server configuration files
(context XML configuration).
Figure 28. Variables view
In any case it is possible to refresh the variable data on demand by using the refresh button on the top-right
corner of the view. The update on demand is possible when the procedure is in status PAUSED, PROMPT,
FINISHED, ABORTED or INTERRUPTED. Note that the automatic refresh will happen independently of the
status of the procedure.
The watch of variables view presents two types of variables: the local variables, which have been declared
inside the current execution frame, and global variables, which have been declared in the main scope but
can be accessed from anywhere. Local variables are displayed in this view using normal font, whilst global
03 February, 2015
SPELL GUI User Manual
Page 26 of 54
File: SPELL - GUI User Manual - 2.4.4.doc
variables are in bold. Users can choose whether to show or hide local and global variables by changing the
selection of the buttons labeled "Globals" and "Locals".
3.5.1 Checking variable values
During the procedure execution, users can update the variable values of the Variables view by clicking the
refresh button.
Figure 29. Refresh button icon
If the length of the variable's value is too long to fit in the available area, the symbol "[…]" is then displayed
and users may see the details by double clicking on the variable name. A new dialog with the contents of
the variable will appear.
Figure 30. Variables detail dialog
3.5.2 Modifying variable values
During the procedure execution, variable values can be adjusted to tune up the execution to make the procedure successfully evaluate an "if" condition and execute the statements within it for instance. There are
several ways of changing the value of a variable. This can be done directly from the variables view, or from
the shell view.
Note: modifying variable values is only possible when the procedure is in the status PAUSED, PROMPT,
FINISHED, ABORTED or INTERRUPTED.
If the procedure status is paused, users can modify a value by clicking on the value field. A text editor then
appears at the value's location. If the value is modified and confirmed by pressing ENTER, the variable's
value is then updated. Pressing the ESC key will leave the variable's value unchanged.
It is possible to set a new value for a given variable in different ways:
By typing the value directly. Valid values are for instance 1, ‘String’, [1,2,3,4], {‘key’ :
‘value’}. It is similar as setting Python variables with an explicit value.
By calling functions. For instance range(0,10) would create a list of 10 elements starting from 0.
When set this way, the value column in the variables view displays the result of the evaluated
function. In the given example, the Value column would contain the list [0,1,2,3,4,5,6,7,8,9]
03 February, 2015
SPELL GUI User Manual
Page 27 of 54
File: SPELL - GUI User Manual - 2.4.4.doc
3.6 The status bar
The status bar is visible next to the toolbar, on top of the GUI:
Figure 31: Status bar
It shows information about:
-
The Server: the current SPELL server being used
The Context: the current context being used
The GUI mode: commanding or monitoring
The Domain: the spacecraft name
The Family: when applicable, depending on the GCS, PRIME or BACKUP
The Driver: the name of the SPELL driver being used.
Memory left for the GUI application: becomes red if the GUI is close to the memory limit
Key: the client key assigned to the GUI application (unique identifier)
Fields that appear with a green background are nominal. A yellow color indicates a pending status and the
red color a failure.
03 February, 2015
SPELL GUI User Manual
Page 28 of 54
File: SPELL - GUI User Manual - 2.4.4.doc
3.7 The connection dialog
The connection dialog is used to manage the GUI connections with the SPELL server. It is divided in two
sections: one for the Listener and the second for the Contexts.
Connection to a listener can be done either by selecting it into a predefined list, or manually by specifying
the address and port of the target listener and clicking the “Connect” button to establish it. Upon successful
connection, the information area just above the buttons becomes green and displays the name of the listener being used.
Figure 32: Connection dialog
03 February, 2015
SPELL GUI User Manual
Page 29 of 54
File: SPELL - GUI User Manual - 2.4.4.doc
Once connected to the listener, the list of available SPELL contexts appears. Each context is presented with
the following information:
-
The context name
The context status (AVAILABLE / RUNNING)
The corresponding spacecraft
The GCS host name
The SPELL driver
The GCS host role or family (PRIME/BACKUP)
The yellow background indicates that the context is already running. The GUI can attach or detach to these
contexts by selecting them and clicking the buttons “Attach to context” or “Detach from context”.
The GUI can only attach to a started context. If it is not running, this can be performed by selecting it and
clicking the “Start context” button. On the other hand, it is only possible to stop a context if nobody is attached to it by using the “Stop context” button. The “Current context” area turns green as soon as the GUI is
attached to a valid context.
The "Destroy context" button can be used to kill a context process in case of hang-up. Note that this is not a
graceful stop and may leave the GCS in an inconsistent state.
03 February, 2015
SPELL GUI User Manual
Page 30 of 54
File: SPELL - GUI User Manual - 2.4.4.doc
4 Startup and configuration
4.1 Startup
The application needs to be started using launcher scripts. These scripts can be found in the
<SPELL_HOME>/bin directory. This directory contains several GUI launchers that depending on the platform
where the application is being run (Windows or Linux):
-
SPELL-GUI for Linux platforms
SPELL-GUI.bat for Windows platforms
The SPEL-GUI application then runs with the default configuration, using the following configuration file:
<SPELL_HOME>/config/gui/config.xml
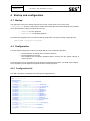
4.2 Configuration
The GUI default configuration is stored in a single XML file. This configuration specifies:
-
The GUI behavior at startup (auto-connection features)
The GUI appearance (colors)
The predefined list of listeners (available SPELL servers) with the specific settings to
connect to them.
These properties can be changed through the preferences management system. The SPEL-GUI configuration and preferences management are explained in the following sections.
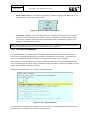
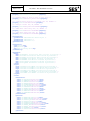
4.2.1 Configuration file
The XML code below corresponds to the GUI typical configuration file:
<?xml version="1.0"?>
<configuration>
<property name="AppName">SPELL</property>
<!-- YES, NO -->
<property name="ConnectAtStartup">YES</property>
<!-- NO, ALL, CHILDREN -->
<property name="AutomaticClose">CHILDREN</property>
<property name="InitialServer">LOCAL</property>
<property name="InitialContext">STD</property>
<property name="ResponseTimeout">8000</property>
<property name="OpenTimeout">22000</property>
<property name="ProceduresEditor"></property>
<property name="LastServerConnected"></property>
<property name="LastHostConnected"></property>
<property name="LastPortConnected"></property>
<property name="LastConnectionManual">NO</property>
<property name="PromptSoundFile"></property>
<!-- YES, NO -->
<property name="PreferencesEnabled">YES</property>
<!-- YES, NO -->
<property name="ShowDateLine">NO</property>
<!-- NAME, VALUE, BOTH -->
<property name="DisplayData">BOTH</property>
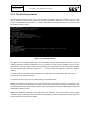
03 February, 2015
SPELL GUI User Manual
Page 31 of 54
File: SPELL - GUI User Manual - 2.4.4.doc
<!-- Number: -1 means no limit -->
<property name="LineHistoryItems">-1</property>
<!-- Maximum number of lines to keep in text view -->
<property name="TextHistoryItems">1000</property>
<!-- Confirm before aborting a procedure: YES, NO, PROMPT -->
<property name="ConfirmAbort">NO</property>
<!-- Multiple attach: YES, NO, PROMPT -->
<property name="MultipleAttach">PROMPT</property>
<!-- ASRUN when controlling: YES, NO, PROMPT -->
<property name="AsRunControl">PROMPT</property>
<!-- ASRUN when monitoring: YES, NO, PROMPT -->
<property name="AsRunMonitor">PROMPT</property>
<presentations>
<presentation name="Tabular" default="yes" />
<presentation name="Text" />
<presentation name="Shell" />
</presentations>
<connectivity>
<user>spell/<user>
<pwd>password</pwd>
<key>path-to-ssh-key-file</key>
</connectivity>
<appearance>
<fonts>
<font id="MASTERC" face="Courier New" size="10" style="norm" />
<font id="CODE" face="Courier New" size="9" style="norm" />
<font id="TEXT" face="Courier New" size="9" style="norm" />
<font id="HEADER" face="Sans" size="12" style="norm" />
<font id="BANNER" face="Arial" size="25" style="bold" />
<font id="GUI_BOLD" face="Sans" size="9" style="bold" />
<font id="GUI_NOM" face="Sans" size="10" style="norm" />
</fonts>
<styles>
<style id="PROC" font="TEXT" color="0:0:0" style="norm" />
<style id="SYS" font="TEXT" color="90:90:90" style="norm" />
<style id="CFG" font="TEXT" color="0:0:0" style="norm" />
<style id="STEP" font="TEXT" color="0:0:0" style="bold" />
<style id="PROMPT" font="TEXT" color="0:0:0" style="norm" />
<style id="OTHER" font="TEXT" color="0:0:0" style="norm" />
</styles>
<colors>
<statuscolors>
<color id="SUCCESS">60:220:100</color>
<color id="WARNING">245:230:20</color>
<color id="ERROR">255:115:115</color>
<color id="FAILED">255:115:115</color>
<color id="SUPERSEDED">60:220:100</color>
<color id="IN PROGRESS">0:128:200</color>
<color id="SKIPPED">245:230:20</color>
<color id="TIMEOUT">245:230:20</color>
<color id="CANCELLED">245:230:20</color>
<color id="WAITING">245:230:20</color>
<color id="UNKNOWN">255:255:255</color>
</statuscolors>
<guicolors>
<color id="TEXTVIEW_FG">0:0:0</color>
<color id="TEXTVIEW_BG">225:235:240</color>
<color id="CONSOLE_FG">255:255:255</color>
<color id="CONSOLE_BG">0:0:0</color>
<color id="CONTEXT_ON">245:230:20</color>
<color id="CONTEXT_ERROR">255:115:115</color>
<color id="TABLE_BG">255:255:255</color>
<color id="TABLE_BG2">230:240:230</color>
<color id="ITEMS">0:0:0</color>
<color id="HIGHLIGHT">80:165:255</color>
</guicolors>
03 February, 2015
SPELL GUI User Manual
Page 32 of 54
File: SPELL - GUI User Manual - 2.4.4.doc
<proccolors>
<color id="UNINIT">255:255:255</color>
<color id="LOADED">235:235:235</color>
<color id="RUNNING">185:255:215</color>
<color id="WAITING">255:255:179</color>
<color id="PROMPT">255:255:179</color>
<color id="PAUSED">225:255:185</color>
<color id="ERROR">255:185:185</color>
<color id="ABORTED">255:185:185</color>
<color id="FINISHED">220:185:255</color>
<color id="RELOADING">225:255:185</color>
<color id="INTERRUPTED">255:255:179</color>
<color id="UNKNOWN">255:255:255</color>
</proccolors>
</colors>
</appearance>
<procpanel>
<component
<component
<component
<component
<component
<component
<component
<component
<component
</procpanel>
id="CMD_RUN">Run</component>
id="CMD_STEP">Step</component>
id="CMD_STEP_OVER">Step Over</component>
id="CMD_PAUSE">Pause</component>
id="CMD_SKIP">Skip</component>
id="CMD_GOTO">Goto</component>
id="CMD_ABORT">Abort</component>
id="CMD_RECOVER">Recover</component>
id="STATUS">Status</component>
<servers>
<server>
<name>SERVER NAME</name>
<host>100.99.99.99</host>
<port>9988</port>
<role>COMMANDING</role>
<!-- This connectivity section is optional.
If not given, the main one above is taken -->
<connectivity>
<user>spell/<user>
<pwd>password</pwd>
<key>path-to-ssh-key-file</key>
</connectivity>
</server>
<server>
<name>SERVER 2 NAME</name>
<host>100.99.99.88</host>
<port>9988</port>
<role>MONITORING</role>
</server>
</servers>
</configuration>
The name of the root element is “configuration”. A set of “property” tags appear directly under this
tag.
These properties are global options for the GUI application:
AppName: The application name to use
ConnectAtStartup: enables or disables the auto-connection feature
InitialServer: if auto-connection is used, this identifies the SPELL server that the GUI will try
to connect to automatically
InitialContext: if auto-connection is set, this property identifies the SPELL context to which the
GUI will attempt to attach to after connecting to the SPELL server. This option may be disabled by
setting the value to “NONE”. Once the SPELL server connected, the GUI will then not try to
connect to any context
ResponseTimeout: timeout in milliseconds for the GUI-SPELL server TCP communications.
OpenTimeout: timeout in milliseconds for opening and loading a procedure.
03 February, 2015
SPELL GUI User Manual
Page 33 of 54
File: SPELL - GUI User Manual - 2.4.4.doc
ProceduresEditor: The path to an external tool used for procedures edition.
LastServerConnected: The server the GUI connected on a previous session.
LastHostConnected: The host the GUI connected on a previous session.
LastPortConnected: The port used to connect to a host on a previous session.
LastConnectionManual: Specifies if the connection during a previous session was done
manually. Otherwise it was done automatically using the servers specified in this file.
PromptSoundFile: The path to the sound file to use on prompts
PreferencesEnabled: Enables or disables the preferences management system in the GUI
AutomaticClose: specify if the GUI should automatically close procedures in FINISHED status. If
the value is CHILDREN, only those procedures started by another one via StartProc will be closed.
ShowDateLine: relevant for the code view only. If value is YES, the status column shows the date
of the latest update.
DisplayData: relevant for code view only. Indicates if the item name, value or both elements
should be displayed on the Data column.
LineHistoryItems: relevant for code view only. Establishes the maximum amount of
notifications to store on each line of the procedure model. If the value is -1 there is no limit.
TextHistoryItems: relevant for text view only. Establishes the maximum amount of lines that
the view model will keep in memory. If the value is -1 there is no limit.
ConfirmAbort: if set to YES, a confirmation dialog will be displayed when the ABORT command
button is clicked.
MultipleAttach: if set to YES, when taking control or monitoring a procedure, its parent and
children, if any, will be controlled or monitored as well. If set to PROMPT, the user will be asked to
decide.
AsRunControl: if set to YES, the ASRUN file will be downloaded and processed when taking
control of a procedure. Note that without ASRUN the operation will be very fast but it will not work
in PROMPT status. If set to PROMPT, the user will be asked to decide.
AsRunMonitor: if set to YES, the ASRUN file will be downloaded and processed when monitoring
of a procedure. Note that without ASRUN the operation will be very fast but it will not work in
PROMPT status. If set to PROMPT, the user will be asked to decide.
The LastServerConnected, LastHostConnected, LastHostConnected, LastConnectionManual
properties are only set at preferences export. The preferences exporting and importing mechanism is presented in section 4.2.3.
4.2.1.1 Connectivity
The GUI requires SSH connections to interact with the SPELL server in order to download files. The settings for these connections are taken from the connectivity section. There is a main connectivity section
providing a user name, a password and a SSH key file for authentication. The user element is mandatory,
and at least one of the two authentication methods (password OR key) must be provided. If there is a password provided it will be used regardless also a key file is provided.
The server elements in the servers section can optionally contain another connectivity section. In these
cases, the connectivity settings for that particular server are taken from that specific section and not from
the main connectivity section.
03 February, 2015
SPELL GUI User Manual
Page 34 of 54
File: SPELL - GUI User Manual - 2.4.4.doc
4.2.1.2 Presentations
A presentation is made available for the application in two steps: (1) install the corresponding RCP plug-in in
the SPELL GUI plug-ins directory, and (2) add a presentation tag in the configuration file.
The presentation tag specifies the presentation name as defined in the plug-in. Only one of the presentations in this section can have the default property set to "yes". This presentation will be the one selected by
default when procedure views are open.
4.2.1.3 Appearance
The appearance tag contains three subsections: (1) The fonts to use inside the application, (2) The styles to
used for the scoped messages, (3) and the system colors. System colours are splitted into three groups: (1)
the status colors, the ones used to represent the status of a SPELL statement being executed; (2) the GUI
item colors, used in some GUI controls and views, and (3) the procedure colors, the ones used to represent
the status of a SPELL procedure.
4.2.1.4 Servers
The servers tag contains a set of “server” items. Each server is composed of a name, a host name, a role
and a port number. The name field may be used in the InitialServer property for auto-connection purposes.
The role value can be either COMMANDING or MONITORING. The former makes the GUI that is connecting to
this server be able to open and monitor procedures. The latter restricts the GUI to monitor procedures only.
Optionally a connectivity section may be included if a particular server requires authentication settings different from the ones given in the main connectivity section.
03 February, 2015
SPELL GUI User Manual
Page 35 of 54
File: SPELL - GUI User Manual - 2.4.4.doc
4.2.1.5 Procedure panel
The procpanel section details which control command buttons will appear in the procedure views. The options determine the text of the button and the order of appearance. Note that the identifiers like "CMD_RUN"
shall NOT be modified. In order to remove a button from the procedure panel, just remove the corresponding element in this section.
Note also the STATUS element, that should be always included.
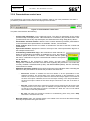
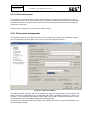
4.2.2 Preferences management
The properties presented in the previous section can be changed via the preferences management system.
This is accessed through the System menu at the top of the main application window.
Figure 33. Preferences dialog
The dialog presents 11 pages, that can be selected by clicking on page name on the left side of the
dialog. Each page corresponds to one configuration file section, and allows changing its values in an
easy way. The two buttons at the bottom of each page can be used to store the new values or restoring the defaults, respectively labeled Apply and Restore Defaults.
The OK and Cancel button at the very bottom of the dialog either store the values of the dialog or not,
before closing the dialog.
03 February, 2015
SPELL GUI User Manual
Page 36 of 54
File: SPELL - GUI User Manual - 2.4.4.doc
The available pages of the preferences dialog are:
General: Allows configuring server communication settings, tracing and prompting
sound.
Servers: Allows editing configuration files servers, as well as adding new ones.
Presentations: Allows enabling or disabling presentation, as well as setting the default
presentation.
Status colors: To let users change the status colors.
GUI colors: To let users change the GUI colors.
Procedure colors: To let users change the Procedure status colors.
Fonts: To change the application fonts.
Scope styles: To change the scope message styles.
Procedure panels: Allows configuring the components allocation.
Code View Preferences: To set up the preferences for the procedure tabular view.
Text View Preferences: to set up the preferences for the procedure text view.
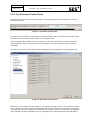
4.2.3 Exporting and importing preferences
SPELL GUI allows to export its configuration to an external file as well as to import a configuration file from
another SPELL GUI instance. This is performed through the preferences dialog.
Three different buttons are available on the General preferences page:
Save to current file: The file used for loading preferences will be overwritten with the current
preference values.
Save to external file: The current preference values are stored in a file specified in the file dialog
prompt that pops up. If the selected file already exists, the user is prompted for confirmation to
overwrite that file.
Load from external file: Loads a file specified in the file dialog prompt. The current preferences
are overwritten with the values stored in the file.
Figure 34. Import/Export preferences section
03 February, 2015
SPELL GUI User Manual
Page 37 of 54
File: SPELL - GUI User Manual - 2.4.4.doc
4.3 Start using the GUI
In order to prepare a SPELL execution session:
a)
b)
c)
d)
e)
f)
Open the connection dialog
Connect to a listener
Select and start the desired context, if not already running
Select and attach to the context
Close the connection dialog
Load procedures from the navigation view
03 February, 2015
SPELL GUI User Manual
Page 38 of 54
File: SPELL - GUI User Manual - 2.4.4.doc
5 Procedure Execution
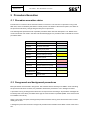
5.1 Procedure execution status
Procedures run in what is call an execution session or executor. The executor is a process running in the
SEE host, and is controlled by the SPELL context process. The status of the executor (that is, the status of
the procedure execution), change along the lifecycle of a procedure.
The following table presents the list of possible procedure status with their description. The “Default color”
column shows the color used in the GUI code and textual pages of a procedure view to indicate the current
procedure status.
Status
Description
UNINIT
Unknown state
LOADED
Procedure code loaded
RUNNING
Executing in play mode
WAITING
Execution waiting for event
PROMPT
Execution waiting for prompt
PAUSED
Execution paused
ERROR
Load, system or syntax error
ABORTED
Aborted by user
FINISHED
Execution finished successfully
RELOADING
Procedure loading is ongoing
INTERRUPTED
UNKNOWN
Default Color
Procedure has been paused while
waiting
Unknown status
5.2 Foreground and background procedures
Most procedures are executed in foreground. This means that there is always one SPELL client controlling
the procedure execution. However, it is possible to authorize a procedure to run in background mode.
A procedure running in background mode does not require a GUI controlling it. All procedure messages will
be directly sent to the GCS, provided that this type of communication is possible (SPELL event service must
be available in the driver).
When a user input is required, a background procedure raises a warning event and the execution is immediately put on hold.
A background procedure becomes a foreground procedure when a SPELL client takes control of the execution.
03 February, 2015
SPELL GUI User Manual
Page 39 of 54
File: SPELL - GUI User Manual - 2.4.4.doc
5.3 Procedure execution control
Procedure execution is controlled using the control area buttons.
The following actions or commands are available:
-
-
Run: executes the procedure without pausing.
Step: also known as step-into. Executes one statement only, pausing at the first one of the
function in the case of a function call. If the executed statement calls a function provided
by a sub-procedure, the procedure code will be substituted by the sub-procedure code.
When returning from the sub-procedure's function, the caller's procedure code will be
displayed again. This applies to the Code Page only.
Step Over: same as step, but pauses at the next statement of the current function. If the
executing the last statement of the current function, the caller's source code is displayed.
Skip: skips the statement and pauses at the next one.
Pause: pauses the procedure execution. Applies in running mode.
Goto: goes to a given Step or line of the procedure.
Reload: reloads the procedure.
Abort: aborts the procedure execution.
Recover: recovers the procedure from an abnormal ending due to Python error.
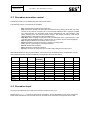
Note that depending on the procedure status, some buttons may be disabled since not applicable. The following table shows the command availability with regards to the execution status:
Command
RUNNING
PAUSED
WAITING
INTERRUPTED
ABORTED
FINISHED
X
X
ERROR
& PROMPT
Run
X
Step
X
Step Over
X
Skip
X
X
X
Goto
Pause
X
Interrupt
X
X
Reload
X
Abort
X
X
X
Recover
X(*)
(*) Only if the error is not fatal (e.g. an executor process crash or a syntax error)
5.4 Procedure input
As previously explained, the control area is used to prompt for user input.
Whenever the Prompt() function is executed in a procedure, the prompt appears in this area. The figures
below show examples of how the input area may look like when a selection or text prompt is executed.
03 February, 2015
SPELL GUI User Manual
Page 40 of 54
File: SPELL - GUI User Manual - 2.4.4.doc
Figure 35: Input area with selection prompt
Selection prompts consist on a list of predefined choices at procedure's level for the user. The options are
displayed using radio buttons under the text field of the input area (a scroll bar appears when necessary).
The answer can be given via the keyboard as well. The text field provides a hint regarding the expected
answers. In the example below, the prompt provides “O,C” as a hint. Only those letters will be accepted.
Figure 36: Input area with text prompt
Text prompts accept any alphanumerical input. Only the text field is displayed. The procedure can also
specify restrict the valid answers to a given list. Numerical prompts only accept decimal numbers.
Three buttons are available in the input area: “Commit”,”Reset” and “Abort”. The “Commit” button submits
the user's input to the procedure. The “Reset” button deselects all the elements and clears any typed text.
The “Abort” button cancels the prompt operation. Note that to cancel a prompt implies an immediate execution abort.
5.5 Manual goto
When the procedure is in PAUSED state, the current execution line can be moved with the manual goto
mechanism, by clicking the Goto control button in the procedure view. A Goto dialog then appears:
Figure 37: Goto dialog
03 February, 2015
SPELL GUI User Manual
Page 41 of 54
File: SPELL - GUI User Manual - 2.4.4.doc
The target line can be identified either by a label or by a line number. Valid labels correspond to the Step
statements defined in the procedure source code.
Due to Python scope rules, it is nevertheless not possible to perform a go-to jump to an arbitrary line. If the
current line is located within the scope of a function, the go-to target must remain within the scope of that
function. The same rule applies when the current line is outside a function (e.g. in the main procedure
code): the go-to target shall remain within the original scope, that is, outside any function. Put another way,
go-to jumps are not possible between functions, from main code into a function, or from one function to the
main code. The same applies for cross-procedures jumps..
5.6 Scheduling procedures
It is also possible to postpone procedures execution, by selecting it from the navigation view and clicking
the Procedures/Schedule selected procedure menu. The procedure scheduling configuration dialog then
appears:
Figure 38: Schedule condition dialog
There are three possibilities for scheduling a procedure: to wait for a given relative time , to wait until a given absolute time , or to wait for a set of telemetry conditions to be fulfilled before starting execution. By
default, the relative time option is selected.
The relative time condition is specified giving number of days, hours, etc. to wait before starting the procedure execution. The absolute time condition requires selection of a specific date and time:
03 February, 2015
SPELL GUI User Manual
Page 42 of 54
File: SPELL - GUI User Manual - 2.4.4.doc
Figure 39: Scheduling with absolute time condition
The telemetry condition is set selecting a set of TM points and indicating the conditions that must be
fulfilled to start the procedure execution:
Figure 40: Telemetry scheduling condition
The data provided for telemetry conditions are similar to the data provided to the WaitFor SPELL language
function (please refer to the language reference for details).
Once the condition set, the procedure view appears and the procedure remains in WAITING state, until the
scheduling condition is fulfilled. The procedure then automatically switches to RUNNING mode.
03 February, 2015
SPELL GUI User Manual
Page 43 of 54
File: SPELL - GUI User Manual - 2.4.4.doc
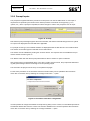
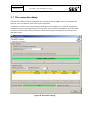
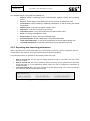
5.7 Procedure files
Some files are being generated during the procedure execution, located on the SPELL server side.
5.7.1 As-Run files
The As-Run file provides an operational log of the procedure execution. It records all the operations being
carried out by the procedure during the execution. Telemetry value acquisitions, command executions,
prompt answers - all the relevant data is logged into the As-Run file.
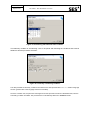
The As-Run file can be inspected from within the SPELL GUI by selecting the procedure view in the GUI
and selecting the Procedures/View procedure As-Run file menu. A new view appears next to the procedure
view, showing the contents of the As-Run file.
This view is static, meaning that the information is not refreshed while the procedure is executing . The user
needs to deselect and select the As Run view again (e.g. the procedure view tab is selected, then the AsRun view tab is selected again).
Figure 41: As-Run view
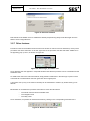
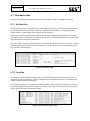
5.7.2 Log files
The procedure log file provides a development point of view log of the procedure execution. It does not
record the procedure operations in a clean, summarized way as does the As-Run file. It is intended to be
used for software support and debugging.
The procedure log file can be inspected from within the SPELL GUI by selecting the procedure view in the
GUI and selecting the Procedures/View procedure log file menu. A new view then appears next to the procedure view, showing the contents of the log file.
Figure 42: Procedure log file view
03 February, 2015
SPELL GUI User Manual
Page 44 of 54
File: SPELL - GUI User Manual - 2.4.4.doc
This view is static, meaning that it is not refreshed while the procedure goes on running. As for the As Run
view, the user needs to deselected and selected the log view again (e.g. the procedure view tab is selected,
then the log view tab is selected again).
5.8 Breakpoints
This feature is linked to, and works only with the Code Presentation.
The breakpoint mechanism allows setting checkpoints in the source code where the procedure execution
automatically pauses
As described in the next sections, there are two different types of breakpoints: the permanent and the temporary breakpoints. The permanent breakpoint remains active when the reached. Once reached and
switched to paused state, the temporary breakpoint is discarded.
Only permanent breakpoints can be explicitly set by the user.
5.8.1 Adding or removing permanent breakpoints
Breakpoints can be added or removed from the contextual menu of the Code Presentation. The contextual
menu provides different options including three breakpoint operations:
Add/Remove a breakpoint: to set a breakpoint at the selected line
Remove all breakpoints: to discard all the breakpoints of the procedure
To add a breakpoint, select the “Add breakpoint at this line” option. A red bullet then appears at the beginning of the line. To remove the breakpoint, select the “Remove breakpoint” option from the same menu.
Figure 43: Line with a breakpoint
Note that all the defined breakpoints are automatically discarded when the procedure is reloaded.
03 February, 2015
SPELL GUI User Manual
Page 45 of 54
File: SPELL - GUI User Manual - 2.4.4.doc
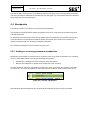
5.8.2 Executing a procedure until a line is reached (temporary
breakpoints)
It is possible to run a procedure until a selected line. To do this, select the “Run until this line” option of the
Code view contextual menu. A yellow bullet appears at the beginning of the line, indicating the temporary
breakpoint. The procedure then starts running, until the line with temporary breakpoint is reached; it then
pauses and the temporary breakpoint is discarded.
Figure 44: Execution will pause at line 38
03 February, 2015
SPELL GUI User Manual
Page 46 of 54
File: SPELL - GUI User Manual - 2.4.4.doc
6 Other features
6.1 Printing
Several printing options are available:
-
Print the procedure As-Run file
Print the procedure log file
Print the procedure source code with notifications (code view)
Print the procedure messages (text view)
These options are available from the Procedures/Print… menu.
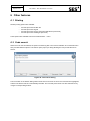
6.2 Code search
When the code view is selected, the option for searching text in the code is available. The contextual menu
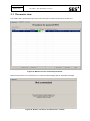
then provides different options. The Search option pops up a dialog allowing the user provide the text to
search.
Figure 45: Text search dialog
The Find button in the Search dialog makes all the text occurrences in the source code become highlighted,
and the line with the first hit is automatically selected. The next and previous hits can also searched for by
using the corresponding buttons.
03 February, 2015
SPELL GUI User Manual
Page 47 of 54
File: SPELL - GUI User Manual - 2.4.4.doc
Figure 46: Search results are highlighted
The clear search close option in the dialog is selected, the dialog is closed and the search highlighting disappears. If the user only closes the dialog, the search highlighting remains. It can be removed later on selecting the Clear search close option, or selecting the Clear search option in the context menu.
6.3 Copy source code
In the code view, users can selected a source code line and copy it to make it available for pasting in an
external editor. The copy options is accessible via the code view contextual menu.
6.4 Additional options in code view
Additionally to the brekapoints, copy, search and go-to options, two more are provided:
-
Refresh: perform a refresh of all the item information displayed on the right columns
Reset column widths: reset the size of the columns in the code view to their defaults.
Figure 47: Additional options in code view
03 February, 2015
SPELL GUI User Manual
Page 48 of 54
File: SPELL - GUI User Manual - 2.4.4.doc
6.5 Communication failure protection
This is a safety mechanism ensuring that procedures being controlled by a GUI client will go immediately to
PAUSED state in case of losing the connection with the controller application.
Users are informed, whenever possible, of the communication failure:
Figure 48: Communication failure sample
A connection outage can be temporary (a glitch) or definitive and can be caused by a number of reasons
out of the control of SPELL:
The host where the GUI client runs gets too loaded or its network interface is affected
Failures in firewall, router and in general network appliances
Controlling GUI is killed by an user or system process
In many cases it is possible to re-gain control of a procedure by re-opening a GUI client and taking control
of it from the Master View.
6.6 Remark on commands
By design, a SPELL executor process will not process the commands immediately meanwhile a driver operation (TM acquisition, TC injection, etc) is being performed. That is, if the user tries to pause a procedure
meanwhile a long TC sequence is being injected, the command will NOT take effect until the injection is
finished. In this case, a warning will be displayed informing about this situation:
Figure 49: Command warning sample
03 February, 2015
SPELL GUI User Manual
Page 49 of 54
File: SPELL - GUI User Manual - 2.4.4.doc
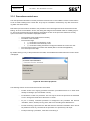
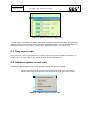
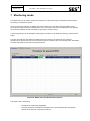
7 Monitoring mode
The SPELL GUI can be used to monitor the execution of a procedure being controlled by somebody else,
for training or inspection purposes.
To start a monitoring session, the SPELL GUI client needs to be connected to the same SPELL server
where the procedure execution is taking place. Once connected to the server and attached to the appropriate context, the Master View should show the procedure currently running.
A monitoring session can be initiated by selecting the procedure on the table and clicking on "Start monitor"
button.
The GUI client will then download some data files from the server (note that the Scp connectivity
preferences are paramount for this to work) and will open a procedure view in monitoring mode. The Master
View will reflect that the procedure is being monitored:
Figure 50: Master View for Monitored procedures
The master view is presenting:
-
The Monitor procedure flag highlighted.
Once the procedure is selected in the Master View only the Stop Monitor and Refresh
buttons are enabled for monitored procedures.
03 February, 2015
SPELL GUI User Manual
Page 50 of 54
File: SPELL - GUI User Manual - 2.4.4.doc
On the other hand, the status of some GUI controls in a procedure view is different when in a monitoring
session:
-
The mode indicator shows MON and it has a blue background color
The execution command buttons are disabled
The ByStep and RunInto options are disabled
The input area will display the prompt information, but no actual input can be provided
To stop a monitoring session, there are two ways:
1) Close the procedure view, and select "Stop monitor" on the appearing dialog
2) Go to the Master View, select the monitored procedure, and click the "Stop monitor" button
03 February, 2015
SPELL GUI User Manual
Page 51 of 54
File: SPELL - GUI User Manual - 2.4.4.doc
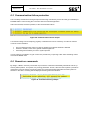
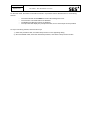
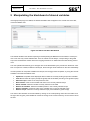
8 Editing Data Containers
As exlpained in the Language Reference Manual, the SPELL frameworks provides two built-in data containers on each procedure (ARGS and IVARS). These data containers provide SPELL dictionaries with extra
safety checks:
Detect uninitialized variables
Value type checking
Value ranges and lists of expected values
Use confirmation (issue a confirmation prompt when a variable is read)
The containers are filled with keys and values by the procedure, but they can be inspected and modified at
any time from the SPELL GUI client. To do so, the Data Container Editor dialog needs to be open.
This dialog can be open through the menu options "Execution/Edit Calling Arguments" and "Execution/Edit
Internal Vars". Please note that these options are active only when a procedure view is selected, and the
procedure associated to it is in PAUSE or PROMPT status.
The Data Container Editor dialog looks like follows:
Figure 51: Data container editor dialog
03 February, 2015
SPELL GUI User Manual
Page 52 of 54
File: SPELL - GUI User Manual - 2.4.4.doc
It is vertically divided in two sections. The upper section contains a table displaying all the variables defined
within the container. These variables must be created by the procedure at the startup (see Language Reference for details).
In this upper table, the variable values can be edited manually by clicking on the Value column. Note that
the variable types, format and expected ranges/lists of values are fixed and cannot be modified.
For the data container ARGS, but not for IVARS, a second lower section of the dialog is provided. On this
section, it is possible to load a data file (IMP extension) in order to load a set of new variable values. When
a file is loaded in the dialog, the lower table displays the variables available in the file.
The user is then able to select some or all of them, and perform a merge operation: doing this, the values of
the variables in the lower table are copied to the variables in the upper table, that is, the values in the file
are used to override the values inside the data container.
If the option "Prompt before overwrite" is active, a confirmation dialog containing with the changes about to
be done will be displayed before doing the actual merge.
If the option "Merge new variables as well" is active, the variables existing in the file but that do not exist in
the data container will be also created and initialized.
Note that the variables that get modified either manually or via file merge become yellow on the upper table.
Only by clicking on the "Apply and close" button, the changes will be in effect applied to the procedure: until
doing that, the data container is not modified.
As already mentioned, the ability to load and merge files is not provided for the IVARS data container, only
for ARGS.
03 February, 2015
SPELL GUI User Manual
Page 53 of 54
File: SPELL - GUI User Manual - 2.4.4.doc
9 Manipulating the blackboard of shared variables
If the appropriate plugin is installed, the Shared Variables view will appear in the central area of the GUI,
next to the Master View.
Figure 52: Shared variables blackboard
The Shared Variables view allows inspecting and manipulating the Blackboard of the SPELL Context process. This view may contain different tabs. There is at least one tab always, corresponding to the global
scope of the blackboard. Please refer to the language reference for details about this data sharing mechanism.
The view updates automatically upon changes done to the blackboard by the procedures. Whenever variables or scopes are created, modified or destroyed, these changes will be reflected on the view immediately.
It is also possible to manipulate variables and scopes, and to trigger manual updates, by using the controls
available in the Shared Variables view:
Update all: will update all the displayed data to reflect the currently existing scopes and variables
Clear all: will erase all scopes (except the global) and all variables (including in the global scopes)
Add new scope: create a new scope from the GUI
New variable: create a new variable with value in the currently selected scope
Delete variable: delete the variable currently selected on the table
Remove all variables: delete all variables present in the currently selected scope
Refresh variables: refresh the value of the variables in the currently selected scope
Remove scope: delete the currently selected scope (not available for global scope)
The value of the variables can be also edited by clicking on the corresponding value cell in the table. Once
the right value is typed, press ENTER to commit the change to the context. ESC key can be used to cancel
the edit.
03 February, 2015
SPELL GUI User Manual
Page 54 of 54
File: SPELL - GUI User Manual - 2.4.4.doc
10 Getting help
The top menu Help is available in SPEL-GUI, which allows checking the SPELL GUI version in use, the
current release information, and gives access to the documentation.
When selecting this menu, four options are available:
About: Like in any Eclipse RCP-based application, the About section shows SPELL GUI
installation information. This low-level information reports about which components are installed,
and the configuration parameters which are being used. It also gives access to the RCP log file.
Release information: When this option is selected, a dialog describing the new features added in
the on use SPELL GUI instance pops up.
SPELL Language manual: This option launches an external PDF document viewer displaying the
SPELL language document, which describes all the SPELL functions and their behavior.
SPELL GUI manual: This option launches an external PDF document viewer, displaying this
document.