1
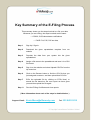
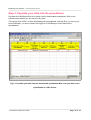
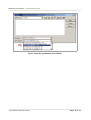
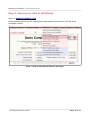
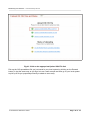
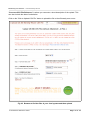
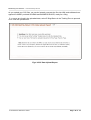
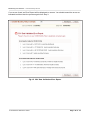
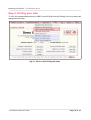
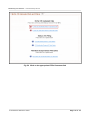
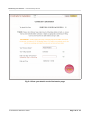
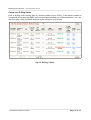
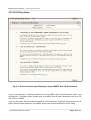
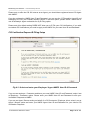
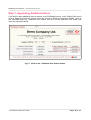
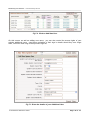
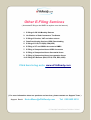
Table of Contents
Key Summary of the E-filing Process ........................................................... 1
Step 1. Sign Up / Sign In ................................................................................ 5
Sign Up : ............................................................................................................. 6
How to Appoint Additional Users : ...................................................................... 7
Sign In : .............................................................................................................. 8
Step 2. Download Spreadsheet ..................................................................... 9
Step 3. Populate your data into the spreadsheet ...................................... 13
Step 4. Upload your data to eFileReady ...................................................... 15
Step 5. E-File your data ................................................................................ 20
Check your E-filing Status ................................................................................ 27
Step 6. E-Filing Multiple Company Details .................................................. 29
Step 7. Appointing Additional Users ........................................................... 31
Key Summary of the E-Filing Process
This summary shows you the steps involved to e-file your data.
Whatever you are e-filing, the steps involved are the same.
• CIS300, CIS Subcontractor verifications
• PAYE P14, P35, P45 etc data,
Step 1
Sign Up / Sign In.
Step 2
Download the given spreadsheet template from our
website
Step 3
Populate the data from your system into the given
spreadsheet.
Step 4
Assign a file name to the spreadsheet and save it in a CSV
file format.
Step 5
Sign in to the website and select Upload CSV File from the
top menu bar.
Step 6
Click on the Browse button to find the CSV file that you
just assigned a name to, and then upload that CSV file.
Step 7
E-file the uploaded file by clicking on E-File Now!, or
amend the file based on the error report we have given
you and then upload the file again.
Step 8
Print the E-filing Certificate and view reports.
( More information about each of the steps is detailed below. )
Support Email:
[email protected]
Tel:
020 8452 9516
EfileReady User Manual – How EfileReady Works?
© Intersoftware Solutions Limited.
Page 4 of 34
EfileReady User Manual – How EfileReady Works?
The following steps explain how you can use www.efileready.com to e-file your returns.
Step 1. Sign Up / Sign In
Sign Up :
If you have not yet got an account to sign in to, simply go to www.efileready.com and click on 'Sign
Up' to create one now. It is very easy to do - as easy as signing up to an email account such as
hotmail, yahoo mail, or Google mail etc.
Before you start the sign up process, please ensure you have the following details to hand. They
will need to be entered to complete the sign up:Accounts Office Reference and PAYE Reference Number (optional)
All employers who register with the HMRC are issued with an Accounts Office Reference and a
PAYE Reference Number. They can be found on any documents or correspondence received from
your tax office. For example, on your yellow paying-in book and your P35 form.
This sign up process is carried out only once.
© Intersoftware Solutions Limited.
Page 5 of 34
EfileReady User Manual – How EfileReady Works?
Fig 1.1 Home Page – Sign Up
Important Note to Additional Users: if you are an additional user of an organisation which has
already signed up with us, you must sign up via a link emailed to you by your organisation's system
administrator. You should not sign up for a fresh account from our home page.
© Intersoftware Solutions Limited.
Page 6 of 34
EfileReady User Manual – How EfileReady Works?
How to Appoint Additional Users :
If you are a system administrator and wish to allow other people in your organisation to have
access to the e-filing service, please follow the steps detailed below.
In the Tasking Zone menu click on Employer/Contractor, then further select the sub-menu
Employer/Contractor Details. Click on the 'View/Edit' button for Additional User Details, then click
on the 'Add New User' button.
For more details please refer to the eFileReady Sign Up / Sign In manual.
Fig 1.2 Add Additional Users
© Intersoftware Solutions Limited.
Page 7 of 34
EfileReady User Manual – How EfileReady Works?
Sign In :
You must sign in each time you need to e-file.
For more details please refer to our separate eFileReady Sign Up / Sign In manual.
Fig 1.3 Home Page – Sign In
© Intersoftware Solutions Limited.
Page 8 of 34
EfileReady User Manual – How EfileReady Works?
Step 2. Download Spreadsheet
Download the CIS300 spreadsheet, or any other document spreadsheet as required, to your local
system.
Fig 2.1 Go to Download Spreadsheet in the Tasking Zone, then click on the appropriate
sub-menu
© Intersoftware Solutions Limited.
Page 9 of 34
EfileReady User Manual – How EfileReady Works?
Fig 2.2 Click on the required spreadsheet
© Intersoftware Solutions Limited.
Page 10 of 34
EfileReady User Manual – How EfileReady Works?
Fig 2.3 Click to download the required spreadsheet
Note: Full instructions for entering your data in the spreadsheet are provided and can be
downloaded. We recommend you read these instructions before filling in the actual spreadsheet.
© Intersoftware Solutions Limited.
Page 11 of 34
EfileReady User Manual – How EfileReady Works?
Fig 2.4 Download and Save the spreadsheet to your local system
© Intersoftware Solutions Limited.
Page 12 of 34
EfileReady User Manual – How EfileReady Works?
Step 3. Populate your data into the spreadsheet
Populate the CIS300 data from your system into the downloaded spreadsheet. Refer to the
instructions provided if you are unsure of any field.
This can be done off-line, so after downloading the spreadsheets, and help files, you can log out
from eFileReady. You do not need to be logged in to eFileReady to enter data into the
spreadsheets.
Fig 3.1 Populate your data into the downloaded spreadsheet Now save your data in the
spreadsheet in a CSV format.
© Intersoftware Solutions Limited.
Page 13 of 34
EfileReady User Manual – How EfileReady Works?
Fig 3.2 Save the spreadsheet as a CSV file
© Intersoftware Solutions Limited.
Page 14 of 34
EfileReady User Manual – How EfileReady Works?
Step 4. Upload your data to eFileReady
Sign in to WWW.EFILEREADY.COM
Select Upload Data File from the Tasking Zone menu and then further select CIS 300 & CIS
Verification Upload.
Fig 4.1 Click on the Upload Data File sub-menu
© Intersoftware Solutions Limited.
Page 15 of 34
EfileReady User Manual – How EfileReady Works?
Fig 4.2 Click on the appropriate Upload CSV File link
Pick up the CIS spreadsheet file you just saved in your local system by clicking on the 'Browse'
button (in just the same way as you sign in to an e-mail account and then go to your local system
to pick up a file you prepared previously to attach to an e-mail).
© Intersoftware Solutions Limited.
Page 16 of 34
EfileReady User Manual – How EfileReady Works?
“Your own CSV File Reference” is where you can enter a short description of the upload. This
can also include the date of submission.
Click on the 'Click to Upload CSV File' button to upload the file to the efileready.com server.
Fig 4.3 Browse to find the files in your local system and then upload
© Intersoftware Solutions Limited.
Page 17 of 34
EfileReady User Manual – How EfileReady Works?
As you upload your CSV files, our service instantly converts the files into XML and validates them
against the HMRC provided SCHEMA and BUSINESS RULES, ready for e-filing.
If no errors are found in the uploaded data, select E-filing/Status in the Tasking Zone to proceed
on to e-file the uploaded file.
Fig 4.4 CSV Data Upload Report
© Intersoftware Solutions Limited.
Page 18 of 34
EfileReady User Manual – How EfileReady Works?
If errors are found, an Error Report will be displayed on screen. You should amend the errors as
indicated and then start the process again from Step 3.
Fig 4.5 CSV Data Validation Error Report
© Intersoftware Solutions Limited.
Page 19 of 34
EfileReady User Manual – How EfileReady Works?
Step 5. E-Filing your data
To e-file the uploaded data directly to HMRC, select E-filing from the Tasking Zone, then select the
appropriate sub-menu.
Fig 5.1 Click on the E-Filing sub-menu
© Intersoftware Solutions Limited.
Page 20 of 34
EfileReady User Manual – How EfileReady Works?
Fig 5.2 Click on the appropriate E-File Document link
© Intersoftware Solutions Limited.
Page 21 of 34
EfileReady User Manual – How EfileReady Works?
Fig 5.3 View the data to be E-filed
Before e-filing your data to the HMRC you should double check to ensure that the data you have
uploaded is correct. If it is correct, select those details you wish to e-file by ticking the appropriate
tick boxes, then click on the 'E-file Now!' button.
© Intersoftware Solutions Limited.
Page 22 of 34
EfileReady User Manual – How EfileReady Works?
Fig 5.4 Enter your details on the Declaration page
© Intersoftware Solutions Limited.
Page 23 of 34
EfileReady User Manual – How EfileReady Works?
Fig 5.5 Click on the 'E-file Now!' button to e-file your data to the HMRC
© Intersoftware Solutions Limited.
Page 24 of 34
EfileReady User Manual – How EfileReady Works?
Fig 5.6 E-Filing in progress
The above diagram will be displayed as you data is being sent to the HMRC. There may be a time
delay before you receive a response from the HMRC, especially at peak times.
During this time you can either carry out other processes in the system, or sign out and sign back
in later to check on the status of your e-filing.
© Intersoftware Solutions Limited.
Page 25 of 34
EfileReady User Manual – How EfileReady Works?
Fig 5.7 E-Filing process initiated
© Intersoftware Solutions Limited.
Page 26 of 34
EfileReady User Manual – How EfileReady Works?
Check your E-filing Status.
Click on E-filing in the Tasking Zone to check the status of your e-filing. If the status is shown as
'Completed', this means the HMRC have received and accepted your e-filed submission. You can
then print your e-filing Certificate as proof of your e-filing for your records.
Fig 5.8 E-Filing / Status
© Intersoftware Solutions Limited.
Page 27 of 34
EfileReady User Manual – How EfileReady Works?
Fig 5.9 E-Filing Acceptance Certificate
© Intersoftware Solutions Limited.
Page 28 of 34
EfileReady User Manual – How EfileReady Works?
Step 6. E-Filing as an Agent / Company / Employer – HMRC
Credentials Set up
If you are an agent / pension scheme administrator / company using our service, you have to
enter your Agent / company details to file the returns online to HMRC. To do this select Employer /
Contractor from the Tasking Zone menu, further select the HMRC E-File Credentials Setup, then
click on the appropriate link for E-filing Setup.
Fig 6.0 E-Filing Setup
© Intersoftware Solutions Limited.
Page 29 of 34
EfileReady User Manual – How EfileReady Works?
CIS 300 E-Filing Setup
Fig 6.1 Select and enter your Employer / Agent HMRC User ID & Password
If you are an employer / Contractor and have your own HMRC User ID and Password, select I am
an Employer / Contractor option. Please enter your HMRC User ID and Password to efile your CIS
300 returns to HMRC
If you are an Agent / Bureau acting on behalf of a CIS Contractor / Employer client, select I am an
Agent / Bureau option and enter your HMRC Agent User ID and Password for CIS E-Filing.
© Intersoftware Solutions Limited.
Page 30 of 34
EfileReady User Manual – How EfileReady Works?
Please note, to efile the CIS 300 returns as an Agent, you should have registered as an CIS Agent
with HMRC.
If you do not have the HMRC User ID and Password, you can use the E-Fileready's Agent ID and
Password to E-File your CIS300 monthly returns.To use this option, please select I would like to
use eFileReady's Agent credentials for my E-Filing option.
Please note, this default setting DOES NOT allow you to E-File your CIS Verifications. If you wish
to conduct CIS Verifications you need to apply to the HMRC for your own User ID and Password.
CIS Verification Request E-Filing Setup
Fig 6.2 Select and enter your Employer / Agent HMRC User ID & Password
If you are an employer / Contractor and have your own HMRC User ID and Password, select I am
an Employer / Contractor option. Please enter your HMRC User ID and Password to efile your
Verification Requests to HMRC.
If you are an Agent / Bureau acting on behalf of a CIS Contractor / Employer client, select I am an
Agent / Bureau option and enter your HMRC Agent User ID and Password for your client's CIS
Verification Requests.
© Intersoftware Solutions Limited.
Page 31 of 34
EfileReady User Manual – How EfileReady Works?
Step 7. Appointing Additional Users
If you wish to allow additional users to access your eFileReady account, in the Tasking Zone menu
click on Employer/Contractor, further select the sub-menu Employer/Contractor Details. Click on
the 'View/Edit' button for Additional User Details, then click on the 'Add New User' button and
enter the requested details.
Fig 7.1 Click on the Additional User Details button
© Intersoftware Solutions Limited.
Page 32 of 34
EfileReady User Manual – How EfileReady Works?
Fig 7.2 Click on Add New User
On this screen, as well as adding new users, you can also control the access rights of your
existing additional users, send them reminders of their sign in details should they ever forget
them, and even view a log of their previous sign ins.
Fig 7.3 Enter the details of your Additional User
© Intersoftware Solutions Limited.
Page 33 of 34
Other E-Filing Services
( Automated E-filing to the HMRC at anytime over the Internet )
1. E-filing of CIS 300 Monthly Returns
2. Verification of Sub-Contractors' Tax Status
3. E-filing of Pension, VAT and other returns
4. Data Provisioning Services (DPS) Downloading
5. E-filing of P11D, P11D(B), P46(CAR)
6. E-Filing of CT and iXBRL Accounts to HMRC
7. E-Filing of Companies House iXBRL Accounts
8. E-Filing of Companies House Secretarial forms
9. E-Filing of Companies House Incorporation forms
10. E-Filing RTI Returns (EAS, FFPS, FPS, EPS, NVR)
Click here to log on to www.eFileReady.com
( For more information about our products and services, please contact our Support Team. )
Support Email:
[email protected]
Tel: 020 8452 9516