1
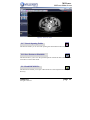
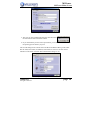
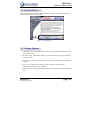
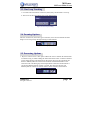
MiViewer
User Manual
MillensysDicom Viewer
Ver 6.8.1 & Above
User Manual
© Copyright 2000-2006 by Millensys
©Millensys
All rights reserved
page 1
MiViewer
Contacts
Millensys Contacts
Main Office
Address: 36 Ahmed El Zommor St. Nasr City – Cairo
Tel / Fax: +20 2 22713860 - +20 2 22754867 - +20 2 22879403
Web site
www.Millensys.com
Email
Sales: [email protected]
Support : [email protected]
All material contained in this document is copyright Millensys 2000.
Millensysand MillensysDicom Viewer Logo are trademarks of Millensys in Egypt and other countries.
Microsoft and Windows are trademarks of Microsoft Corporation in the United States and other countries.
The information presented in this document is correct at time of going to press. However, it is subject to
change without notice.
This document may not be photocopied, reproduced or translated into another language, in whole or in
part, without the consent of Millensys.
MillensysDicom Viewer User Guide.
©Millensys
All rights reserved
page 2
MiViewer
Table of Contents
Table of Contents
TABLE OF CONTENTS.......................................................................................... 3
TABLE OF FIGURES.............................................................................................. 4
1. SAFETY AND REGULATORY INFORMATION .......................................... 6
1.1 CAUTIONS..................................................................................................... 6
1.2 NOTES ............................................................................................................ 7
2. MILLENSYSDICOM VIEWER MAIN SCREEN ............................................ 9
2.1 MAIN BUTTONS......................................................................................... 10
2.1.1 VIEW ONE IMAGE............................................................................. 10
2.1.2 VIEW FOUR IMAGES........................................................................ 10
2.1.3 VIEW ALL STUDY ON ONE SCREEN............................................ 10
2.1.4 VIEW PATIENTS DATABASE.......................................................... 10
2.1.5 OPEN DICOM CD ............................................................................... 11
2.1.6 OPEN FOLDER.................................................................................... 11
2.1.7 CANCEL OPENING FOLDER .......................................................... 12
2.1.8 SAVE PATIENT TO HARDDISK...................................................... 12
2.1.9 LOAD DICOM FILE ........................................................................... 12
2.1.10 LOAD AVI FILE ................................................................................ 13
2.1.11 LOAD IMAGE.................................................................................... 13
2.1.12 SAVE CURRENT IMAGE/CINE LOOP TO FILE........................ 13
2.1.13 COPY IMAGE TO CLIPBOARD .................................................... 13
2.1.14 SETTINGS .......................................................................................... 13
2.1.15 ABOUT MILLENSYS........................................................................ 15
2.2 VIEWING OPTIONS .................................................................................. 15
2.3 CINE LOOP TRACKING........................................................................... 16
2.4 ZOOMING OPTIONS................................................................................. 16
2.5 PROCESSING OPTIONS ........................................................................... 16
2.6 DISPLAYING OPTIONS ............................................................................ 17
2.7 PRINTING OPTIONS ................................................................................. 17
2.8 DRAWING OPTIONS................................................................................. 18
2.9 VIDEO SCREEN.......................................................................................... 19
©Millensys
All rights reserved
page 3
MiViewer
Table of Figures
Table of Figures
Figure 1: Dicom Viewer Main Screen ..................................................................... 9
Figure 2: Main Buttons Form ................................................................................ 10
Figure 3: Select DICOM CD Path ......................................................................... 11
Figure 4: Tree View Form ...................................................................................... 12
Figure 5: Settings Form-1....................................................................................... 14
Figure 6: Settings Form-2....................................................................................... 14
Figure 7: About Millensys ...................................................................................... 15
Figure 8: Cine Loop Tracking................................................................................ 16
Figure 9: Zooming Options .................................................................................... 16
Figure 10: Processing Options ............................................................................... 16
Figure 11: Displaying Options ............................................................................... 17
Figure 12: Printing Options ................................................................................... 18
Figure 13: Drawing Options................................................................................... 18
©Millensys
All rights reserved
page 4
MiViewer
This Page is Left Blank Intentionally
©Millensys
All rights reserved
page 5
MiViewer
Safety and Regulatory Information
1. Safety and Regulatory Information
There are many points considering MillensysDicom Viewer (MiViewer) that the user
should take care about and others should be aware of to make the system work with
maximum efficiency and to get the most satisfying output.
1.1 Cautions
•
MiViewer is intended to supplement, not to replace the traditional methods
for examining Radiological Images. No diagnostic or treatment decisions
should be based exclusively on MiViewer.
•
MiViewer is intended for use by appropriately qualified personnel who are
aware of the inheret limitations of the imaging modalities.In addition to
applying this professional knowledge, it is essential that users familiarize
themselves with all supplied user documentation and training materials.
•
The visualization settings in the MiViewer may cause some features to be
completely transparent and therefore invisible. Users should satisfy
themselves that the settings applied adequately display the features
currently of interest.
•
MiViewer provides the facility to hide regions of data in order to expose
anatomy of interest. When interpreting the displayed images, it is important
to take into account any such operations which have been performed.
•
MiViewer allows the user to generate colored views of the original data.
Users who are already confident in interpreting black and white images
should consider some further issues involved in the interpretation of color
images.
•
There is no guaranteed level of accuracy for measurements made with
MiViewer. Accuracy is influenced by a number of factors, many beyond the
control of the software like the accuracy of the user in calibrating the
measurement.
©Millensys
All rights reserved
page 6
MiViewer
Safety and Regulatory Information
1.2 Notes
•
When the images produced with MiViewer are printed or viewed on other
computers, the precise appearance of the image is dependent on the
characteristics and settings of the hardware used. Images exported in this
way should not be exclusively relied upon, particularly in cases where
resolution level or exact coloration are important.
•
If the computer’s display settings are configured to provide less than the
recommended resolution and color depth, the quality of the displayed
images will be degraded. MiViewer should only be run on machines whose
display settings are configured appropriately
•
There is a possibility that MiViewer may adversely affect or be affected by
other software which is running at the same time. For this reason, it is
recommended that other software be shut down while MiViewer are in use.
•
All notes and cautions in this material ragarding interpretation of the
displayed images apply equally to images exported from MiViewer via any
media. Users should ensure that recipients of exported images are familiar
with this material.
©Millensys
All rights reserved
page 7
MiViewer
This Page is Left Blank Intentionally
©Millensys
All rights reserved
page 8
MiViewer
MiViewer Main Screen
2. MillensysDicom Viewer Main Screen
The Main Screen is the screen which the program begins with and from which the
user can reach any tool that can be used in the program from zooming, processing,
displaying, printing and drawing.
Figure 1: Dicom Viewer Main Screen
The upper figure shows:
1. Main Buttons.
2. Viewing Options.
3. Cine Loop Tracking.
4. Zooming Options.
5. Processing Options.
6. Displaying Options
7. Printing Options.
8. Drawing Options.
9. Video Screen.
©Millensys
All rights reserved
page 9
MiViewer
MiViewer Main Screen
2.1 Main Buttons
These are considered the buttons used in the main
Operations like open dicom CD, load dicom file,
view patients database, save patient to hard disk,
copy image to clipboard, load AVI file, load image,
save current image or cine loop to file, settings,
about Millensysand exit.
Figure 2: Main Buttons Form
2.1.1 View One Image
This button enables you to view only one image inside MiViewer Video Screen.
2.1.2 View Four Images
This button enables you to view four images inside MiViewer Video Screen.
2.1.3 View All Study on One Screen
This button enables you to view all of the study images inside MiViewer Video
screen.
2.1.4 View Patients Database
This button opens to you the patients’ database form, which contains the Patient
Name, ID, Date, Time, Doctor and the Directory in which the patients are located.
1. This button allows you to delete the selected patient from your
database.
©Millensys
All rights reserved
page 10
MiViewer
MiViewer Main Screen
2. This button allows you to delete all the patients in the directory.
3. This group of buttons helps you to change the way of
viewing your database.
2.1.5 Open DICOM CD
This button enables you to open a Dicom CD but you have to select a Dicom CD
path first then press ok.
Figure 3: Select DICOM CD Path
2.1.6 Open Folder
This button enables you to open any Dicom directory. When clicking on this button,
the Browse for Folder form will appear.
After selecting the desired folder, a Tree View will appear at the top indicating all
the Patients in this folder, below them will be all of their Studies which in turn will
contain below them all the Series and finally the Images that are present in each of
these Series will be displayed. If you want to display the contents of any level of the
tree, double click on it.
©Millensys
All rights reserved
page 11
MiViewer
MiViewer Main Screen
Figure 4: Tree View Form
2.1.7 Cancel Opening Folder
This button enables you to cancel the opening the selected Dicom directory.
2.1.8 Save Patient to Harddisk
This button allows you to save the specified patient with all his data to the hard disk
to be able to reuse it afterwards.
2.1.9 Load DICOM File
This button will enable you to open a Dicom file of a selected patient from any
directory.
©Millensys
All rights reserved
page 12
MiViewer
MiViewer Main Screen
2.1.10 Load AVI File
This button will enable you to open a cine loop of a selected patient from any
directory.
2.1.11 Load Image
This button will enable you to open an image of any Non-Dicom image format of a
selected patient from any directory and view it before being loaded.
2.1.12 Save Current Image/Cine Loop to File
This option allows the user to choose the exact location in which he wants to save
the patient’s image or cine loop.
2.1.13 Copy Image to Clipboard
This option enables you to make a copy of the selected image into the clipboard to
allow you to use this image in other applications.
2.1.14 Settings
1. This form enables the user to set the Name, Header, Footer and the Logo that he
wants them to appear when viewing or printing.
2. In the Patients folder: The user can specify the default directory on which any
saved image is saved in.
3. Print Title: By checking it you will be able to print the Name, Header, Footer
and Logo.
4. Convert Image to 24bit color must be checked to be able to perform the drawing
and annotations options otherwise it will only work as window width and
window level adjustments.
©Millensys
All rights reserved
page 13
MiViewer
MiViewer Main Screen
Figure 5: Settings Form-1
5. The user can also predetermine the Print Title Font and
the Annotations Font from these buttons.
6. If you checked the preview before print button you would be able to determine
the printing options before you print.
The second settings form contains the Local Host and Remote Host (printer) data
like the AET, Host Name, IP Address, and TCP Port. The user can also choose
whether a white frame would be drawn behind each image or not.
Figure 6: Settings Form-2
©Millensys
All rights reserved
page 14
MiViewer
MiViewer Main Screen
2.1.15 About Millensys
This option will inform the user about MillensysCompany, the program name, the
version name and the version number.
Figure 7: About Millensys
2.2 Viewing Options
1. Load All Images: This button enables you to open all images sequentially in the
active video screen.
2. Previous Image: This button enables you to open the previous image inside the
selected window.
3. Next Image: This button enables you to open the next image inside the selected
window.
4. View As Cine: This button enables you to view all the images played
sequentially inside the active window.
5. Image Inset (ON / OFF): This button enables you to apply inset if this image has
one.
©Millensys
All rights reserved
page 15
MiViewer
MiViewer Main Screen
2.3 Cine Loop Tracking
1. It contains the main buttons to Rewind, Pause, Play and Forward a cine loop.
2. The arrows at the right indicate the Frame Rate/Second.
Figure 8: Cine Loop Tracking
2.4 Zooming Options
The user can Zoom In, Zoom Out, get Actual Size, Fit to Screen and Pan Zoomed
Image or Cine Loop easily through clicking on these buttons.
Figure 9: Zooming Options
2.5 Processing Options
1. Reference Measurement: This option enables the user to calibrate th measurement
tool before using it. While holding the left mouse button select a reference distance
on the image like the scale displayed on the image, then type the equivalent real
distance. MillensysDicom Viewer measurements will take the distance as the
reference when calculating any measured parameter. Reference measurement is
saved once MillensysDicom Viewer is closed. The next time the user uses
MillensysDicom Viewer he will not need to set the reference measurement.
Figure 10: Processing Options
©Millensys
All rights reserved
page 16
MiViewer
MiViewer Main Screen
2. Measure Distance: This option enables the user to measure the distance between
two points.
3. Emboss Filter: It adds an emboss effect on the image or cine loop (equivalent to
subtracting).
4. Invert: This option will invert the selected image.
2.6 Displaying Options
Figure 11: Displaying Options
1. Brightness and Contrast: This option enables the user to change the brightness
and contrast of the image. After choosing this option the mouse cursor will change to
the B/C curve shape, left click on the image and move in horizontal (B) and vertical
(C) directions on the image while holding left key pressed. The user can access this
function through the B/C button on the toolbar. In case of multi-image selection, the
changes will be applied to the selected images.
2. Gamma Correction: This option enables the user to adjust the gamma curve for
selected image. This option works with colored images.
2.7 Printing Options
1. Store Images to Printer: This option will add the selected image to the active
film.
2. Erase Image from Printer: This option will delete the selected image from the
active film.
3. Print: This option prints the active film you can preview printing by marking it in
the settings.
©Millensys
All rights reserved
page 17
MiViewer
MiViewer Main Screen
4. Print to DICOM Printer: This option is used to print the stored images to a film
using Dicom 3.0 print protocol.
5. The buttons at the bottom of the figure show the number of images that you want
per film.
Figure 12: Printing Options
2.8 Drawing Options
Figure 13: Drawing Options
1. Undo Last Draw: This option deletes the last draw the user done on the image.
2. Draw Arrow: This option will draw an arrow on the image. Determine the first
point of the arrow by holding the left mouse button clicked on it then drag the
mouse from the start point to the end point. Release the left mouse button, and
then an arrow is drawn between the two points.
3. Text Annotation: This option enables the user to write a text on the image.
4. Draw Line: This option will draw a line on the image. Determine the first point
of the line by holding the left mouse button clicked on it then drag the mouse
from the start point to the end point. Release the left mouse button, and then a
line is drawn between the two points.
5. Draw Rectangle: This option will draw a rectangle on the image. Determine the
first corner of the rectangle by holding the left mouse button clicked on it then
drag the mouse from the start point to the end point. Release the left mouse
button, and then a rectangle is drawn between the two points.
6. Draw Circle: This option will draw a circle on the image. Determine the first
pint of the circle by holding the left mouse button clicked on it then drag the
mouse from the start point to the end point. Release the left mouse button, and
then a circle is drawn between the two points.
©Millensys
All rights reserved
page 18
MiViewer
MiViewer Main Screen
2.9 Video Screen
The Video Screen Shows the live motion on the remote machine monitor, the
captured images and cine loops.
©Millensys
All rights reserved
page 19
MiViewer
This Page is Left Blank Intentionally
Note: Any updates will be added on the website and in the Manuals CD if available.
©Millensys
All rights reserved
page 20