1
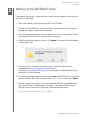
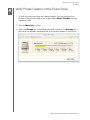
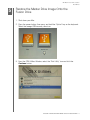
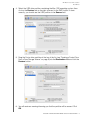
WD BLACK² ™ Fusion Drive Creation for MacBook Pro Installation Guide Table of Contents 1 Getting Started . . . . . . . . . . . . . . . . . . . . . . . . . . . . . . 1 2 Setting Up the Fusion Drive . . . . . . . . . . . . . . . . . . . . 3 3 Creating a Fusion Drive From a Core Storage Volume . . . . . . . . . . . . . . . . . . . . . . . . . . . . . 5 4 Verify Proper Creation of the Fusion Drive . . . . . . . . 7 5 Restore the Master Drive Image Onto the Fusion Drive. . . . . . . . . . . . . . . . . . . . . . . . . . . . . . . . . . . . . 8 TABLE OF CONTENTS – i WD Black² Fusion Drive Creation User Manual 1 Getting Started This guide is intended to guide you through the process of creating an Apple Mac Fusion drive using a WD Black² Dual Drive. Note: Fusion drives are only supported on Mountain Lion OSX 10.8.2 and higher. Items needed to perform this process: A Phillips screwdriver with “0” tip head SATA to USB Adapter Cable WDMac_XLBA Tool (download at http://support.wd.com/product/download.asp?groupid=2301&lang=en) Image Backup of MacBook System drive Refer to your Apple system documentation for information on using Time Machine. Remove your existing MacBook internal hard drive and replace it with the WD Black² Dual Drive Refer to your Apple system documentation for hard drive removal and installation instructions. GETTING STARTED – 1 WD Black² Fusion Drive Creation User Manual 2 Setting Up the WD Black² Drive Follow these instructions to boot the Mac system from the original system drive via the SATA to USB cable. 1. Attach the original system drive to the SATA to USB cable. 2. To boot from the USB drive, press the power button followed by pressing and holding the “Option” button on the keyboard. 3. After the Apple logo appears, you will see the drive icons on the screen. Select the orange USB drive icon to continue the boot process. 4. When the following dialog box opens, click Ignore. The drive will be initialized in a subsequent step. 5. Once the system completes the boot process, locate the utility that you downloaded from http://support.wd.com/product/ download.asp?groupid=2301&lang=en (as indicated in Getting Started above), and unzip it on your desktop. 6. Proceed by opening a terminal window and dragging the XLBA tool on top of the terminal Window. Press the spacebar, enter -d=0 -enable, then press ENTER. 7. See the sample output below. If you unzipped the XLBA file somewhere other than your desktop, a different path will display. User1 below should be your desktop name. See also the Output from Terminal example below. /Users/User1/Desktop/xlba -d=0 –enable SETTING UP THE WD BLACK² DRIVE – 2 WD Black² Fusion Drive Creation User Manual Output from Terminal M acint osh: xlba _v1.3 _Mac o359 g$ / User s/o35 9g/D eskto p/xl ba_v1 .3_M ac/x lba -en able X LBA V ersi on 1 .3_ma c E nable /Dis able Hybr id's iSSD C opyri ght (C) 2012- 2013 West ern Digi tal C orpo ratio n E xecut ing: /Us ers/o 359g /Desk top/ xlba _v1.3 _Mac /xlba -d= 0 -en able D rive #0 - ----- -M odel: S erial : F irmwa re: L BAs: E nable SSD : N ew LB As: W DC WD 1001 X06X- 00SJ VT0 W D-WXX XXXX XX 0 1.01A 01 0 x8269 b960 S ucces sful 0 x8269 b960 8. Reboot the system from the from the original system drive to allow Mac OSX to display the extended combined SSD and HDD drive capacity. 9. From a terminal window, issue the command below to list all attached disks. diskutil list Output from Terminal 10. Create two partitions on the WD Black² Dual Drive by issuing the command below. The disk number below may be different, depending on your system configuration, and should point to the Endeavor’s drive path. SETTING UP THE WD BLACK² DRIVE – 3 WD Black² Fusion Drive Creation User Manual diskutil partitiondisk /dev/disk0 2 JHFS+ SSD 119824388096b JHFS+ HDD 1000G Note: The SSD value shown above (119824388096b) is an absolute value and must not be changed. It ensures that the partitions are created within the SSD and HDD boundaries. Output from Terminal Finished partitioning on disk0\ /dev/disk0\ #: TYPE NAME 0: GUID_partition_scheme 1: EFI 2: Apple_HFS SSD 3: Apple_HFS HDD SIZE *1.1 TB 209.7 MB 119.7 GB 1.0 TB IDENTIFIER\ disk0\ disk0s1\ disk0s2\ disk0s3\ 11. If you only want to use the SSD as the main OS partition and the HDD as a storage partition, and are not interested in using the WD Black² Dual Drive as a core storage fusion drive volume, you can skip the next steps and go to “Restore the Master Drive Image Onto the Fusion Drive” on page 8 to restore your original image drive onto the SSD volume partition. Note: It is not recommended to use the fully expanded WD Black² Dual Drive as a single, non-fused partition, as this will create a single partition that spans across the virtual boundary between the SSD and HDD. Performance degradation caused by the OS trying to access a nonexistent drive location will result. SETTING UP THE WD BLACK² DRIVE – 4 WD Black² Fusion Drive Creation User Manual 3 Creating a Fusion Drive From a Core Storage Volume 1. To create a core storage volume, issue the command below to merge the two partitions that were created in section 1 (the disk numbers below may be different depending on your system configuration). You must use the path to the SSD and HDD partitions that were created by the diskutil partition command. /Users/Desktop/xlba_v1.3_Mac/diskutil cs create MacBookProFusion disk0s2 disk0s3 Output From Terminal Creating Core Storage Logical Volume Group\ Switching disk0s2 to Core Storage\ Switching disk0s3 to Core Storage\ Waiting for Logical Volume Group to appear\ Discovered new Logical Volume Group "780497B3-8F6E-4A70-A4FE-781FB9D23F54"\ Core Storage LVG UUID: 780497B3-8F6E-4A70-A4FE-781FB9D23F54\ Finished CoreStorage operation\ diskutil cs list CoreStorage logical volume groups (1 found)\ |\ +-- Logical Volume Group 780497B3-8F6E-4A70-A4FE-781FB9D23F54\ =========================================================\ Name: MacBookProFusion\ Status: Online\ Size: 1119760818176 B (1.1 TB)\ Free Space: 1111254499328 B (1.1 TB)\ |\ +-< Physical Volume E6C27861-79E1-462D-A95F-DEE0F464AF0B\ | ----------------------------------------------------\ | Index: 0\ | Disk: disk0s2\ | Status: Online\ | Size: 119690170368 B (119.7 GB)\ |\ +-< Physical Volume BA6B7E32-E4A8-43BB-B676-8E31A1FA54DE\ ----------------------------------------------------\ Index: 1\ Disk: disk0s3\ Status: Online\ Size: 1000070647808 B (1.0 TB)\ Note: You will need the Core Storage LVG UUID number above for the next step. CREATING A FUSION DRIVE FROM A CORE STORAGE VOLUME – 5 WD Black² Fusion Drive Creation User Manual 2. To create the fusion drive from the core storage volume, issue the command below (enter the createVolume number, which is the Core Storage LVG UUID numberfrom step one). /Users/Desktop/xlba_v1.3_Mac/diskutil cs createVolume 780497B3-8F6E4A70-A4FE-781FB9D23F54 JHFS+ MacBookPro-Fusion 100% Output From Terminal Started CoreStorage operation\ Waiting for Logical Volume to appear\ Formatting file system for Logical Volume\ Initialized /dev/rdisk2 as a 1 TB HFS Plus volume with a 90112k journal\ Mounting disk\ Core Storage LV UUID: 946ADCA0-4D33-4B1F-AB27-604E8704F498\ Core Storage disk: disk2\ Finished CoreStorage operation\ CREATING A FUSION DRIVE FROM A CORE STORAGE VOLUME – 6 WD Black² Fusion Drive Creation User Manual 4 Verify Proper Creation of the Fusion Drive 1. To verify that the fusion drive was created properly, click on the Apple icon located on the top left corner of the screen. Select About This Mac from the dropdown menu. 2. Click the More Info... button. 3. Select the Storage tab. If everything was done correctly in the Storage tab, a hard drive icon appears underneath the drive capacity labelled “Fusion Drive.” VERIFY PROPER CREATION OF THE FUSION DRIVE – 7 WD Black² Fusion Drive Creation User Manual 5 Restore the Master Drive Image Onto the Fusion Drive 1. Shut down your Mac. 2. Press the power button, then press and hold the “Option” key on the keyboard. Select the orange USB recovery drive icon. 3. From the OSX Utilities Window, select the “Disk Utility” icon and click the Continue button. RESTORE THE MASTER DRIVE IMAGE ONTO THE FUSION DRIVE – 8 WD Black² Fusion Drive Creation User Manual 4. Select the USB drive partition containing the Mac OSX operating system, then click on the Restore tab on the right side next to the RAID button. If done correctly, you should see the USB partition in the Source field. 5. Drag the Fusion drive partition at the top of the list (see “Creating a Fusion Drive From a Core Storage Volume” on page 5) into the Destination field and click the Restore button. 6. You will receive a warning informing you that the partition will be erased. Click OK. RESTORE THE MASTER DRIVE IMAGE ONTO THE FUSION DRIVE – 9 WD Black² Fusion Drive Creation User Manual 7. Wait for the restore process to finish. 8. Shut down your Mac and disconnect the original USB attached drive. You are now done and can begin using your Mac. Information furnished by WD is believed to be accurate and reliable; however, no responsibility is assumed by WD for its use nor for any infringement of patents or other rights of third parties which may result from its use. No license is granted by implication or otherwise under any patent or patent rights of WD. WD reserves the right to change specifications at any time without notice. Western Digital, WD, and the WD logo are registered trademarks of Western Digital Technologies, Inc. in the U.S. and other countries: and WD Black² is a trademark of Western Digital Technologies, Inc. in the U.S. and other countries. Other marks may be mentioned herein that belong to other companies. © 2014 Western Digital Technologies, Inc. All rights reserved. Western Digital 3355 Michelson Drive, Suite 100 Irvine, California 92612 U.S.A. 2779-800001-A02 Feb 2014 RESTORE THE MASTER DRIVE IMAGE ONTO THE FUSION DRIVE – 10