1
CoGen Personal Firewall Online Manual
●
Install and Uninstall
●
Quick Start
●
Functions
●
Detailed Settings
●
Update
Your Security, Our Concern. ©2007 CoGen Media All rights reserved.
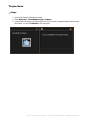
Install & Uninstall
●
●
●
System Requirements & Languages
Install CoGen Personal Firewall
Uninstall CoGen Personal Firewall
Your Security, Our Concern. ©2007 CoGen Media All rights reserved.
Quick Start
●
●
●
●
●
Start Firewall
Main Window
Menus
Buttons
Tabs
Your Security, Our Concern. ©2007 CoGen Media All rights reserved.
Functions
●
●
●
●
●
●
●
●
●
●
●
Start Firewall
Set Security Level
Switch Mode
Select Language
Select Skin
View Log
Trojan Scan
PassWatcher
Enable / Disable Firewall
Connect / Disconnect
Exit
Your Security, Our Concern. ©2007 CoGen Media All rights reserved.
Detailed Settings
From the CoGen Personal Firewall main window, select Settings > Detailed Settings.
●
●
●
Standard settings
Advanced settings
Rules settings
Your Security, Our Concern. ©2007 CoGen Media All rights reserved.
Update
●
●
●
Connection
User ID
SmartUpdate
Your Security, Our Concern. ©2007 CoGen Media All rights reserved.
System Requirements & Languages
Operating System
●
Windows: Windows 98/Me/NT/2000/XP/2003
Hardware
●
●
●
●
CPU: Pentium III, 500 MHz or higher
RAM: 64 MB or above
Display: Standard VGA, 24-bit true color
Other: CD-ROM drive, mouse
Languages
CoGen Personal Firewall is currently available only in English language. More languages will be
supported in the near future.
Your Security, Our Concern. ©2007 CoGen Media All rights reserved.
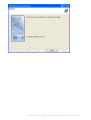
Install CoGen Personal Firewall
Step 1: Boot your computer and start Windows (98/Me/NT/2000/XP/2003). Close all other applications.
Step 2: Insert the CoGen CD into the CD-ROM drive. If the opening screen does not appear, double-click Autorun.exe in the root
directory of the CD. If you downloaded the CoGen Personal Firewall installation program from the Internet, double-click the
installation package to begin. Select "Install CoGen Personal Firewall".If you download installation file from CoGen website ,please
run “CoGen_FW.exe” .If you download installation file from CoGen website ,please run “CoGen_FW.exe” .
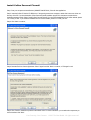
Step 3: Click "Next" to continue;
Step 4: Read the End User License Agreement. Select "I Agree" and click "Next" to continue, or "I Disagree" to exit.
Step 5: Click "Finish" to install all components in the default mode. For custom installation, you can select the components you
wish to install and click "Next".
Your Security, Our Concern. ©2007 CoGen Media All rights reserved.
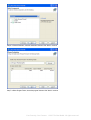
Step 6: In Choose Destination, select the destination folder and click "Next" to continue.
Step 7: In Select Program Folder, choose the program folder and click "Next" to continue.
Your Security, Our Concern. ©2007 CoGen Media All rights reserved.
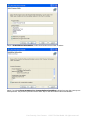
Step 8: In Installation Information, confirm the information and click "Next" to continue.
Step 9: If you selected Scan memory for viruses before installing in the previous step, then a memory scan
will be performed. This process may take 3-5 minutes. Select "Skip" to abort the scan and continue the installation.
Your Security, Our Concern. ©2007 CoGen Media All rights reserved.
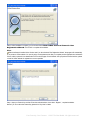
Step 10: After installation is complete, you can choose either to Run CoGen Personal Firewall or Run
Registration Wizard. Click "Finish" to complete the installation.
More
After the software is installed for the first time and if you have checked "Run Registration Wizard", the program will automatically
try to connect to CoGen website. You can only enjoy normal update service after you complete product registration and activate the
User ID, which is printed in User Identification Card on the first page of User's Manual. After you purchase CoGen Antivirus, please
connect to CoGen website for registration as soon as possible.
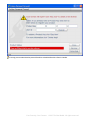
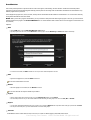
Step 11:Input your Product Key and User ID into the reminded window , then select “ Register” , complete installation.
Notice: if you do not have the License Key, please click “ Buy Now” to obtain.
Your Security, Our Concern. ©2007 CoGen Media All rights reserved.
It is strongly recommended that other personal firewalls be uninstalled before this software is installed.
Your Security, Our Concern. ©2007 CoGen Media All rights reserved.
Uninstall CoGen Personal Firewall
You can easily uninstall all files, program groups, shortcuts and the registry of CoGen Personal Firewall.
Method 1:
●
●
Boot the computer and start Windows (98/Me/NT/2000/XP/2003);
In the Windows Start menu, select Programs > CoGen Personal Firewall > Add or
Remove Components, select Uninstall and click Next.
Method 2:
●
●
●
Boot the computer and start Windows (98/Me/NT/2000/XP/2003);
Open the Control Panel and double click Add/Remove Programs.
Select CoGen Personal Firewall in Change/Remove Programs, then click the
Change/Remove button to uninstall.
After uninstall is complete, click Finish. If Delete installation directory is checked, the
firewall installation directory will be deleted.
Your Security, Our Concern. ©2007 CoGen Media All rights reserved.
Your Security, Our Concern. ©2007 CoGen Media All rights reserved.
Start Firewall
There are three ways to start CoGen Personal Firewall:
Method 1:
●
In the Windows Start menu, select Programs > CoGen Personal Firewall > CoGen
Personal Firewall
Method 2:
●
Double click the shortcut icon
on the desktop to start CoGen Personal Firewall
Method 3:
●
Click the icon
in the Quick Launch area of the taskbar
You can set CoGen Personal Firewall to launch automatically at startup (refer to Standard Settings). You
can double click the icon in the system tray (or right click the icon and select "Open Main Menu") to
display the main window.
Your Security, Our Concern. ©2007 CoGen Media All rights reserved.
Main Window
Contents
●
●
●
●
●
Menu Bar: Shortcuts to menu actions, including Actions, Settings and Help. For more
information, refer to Menus.
Buttons: Buttons are located on the right side of main window, including Enable / Disable,
Connect / Disconnect, Update and View Log. For more information, refer to Buttons.
Tabs: Tabs are located in the main interface, and include Firewall Status, Activity, Startup,
PassWatcher and Vulnerability. For more information, refer to Tabs.
Security Level: The Security Level setting is at the bottom-right of the window. Drag the sliding block to
the preferred level. For more information, refer to Set Security Level.
Current Version and Updated Date: Current version and date last updated are displayed near
the bottom of the main window.
Your Security, Our Concern. ©2007 CoGen Media All rights reserved.
Menus
Menus include:
●
●
●
Actions (O)
Settings (T)
Help (H)
Your Security, Our Concern. ©2007 CoGen Media All rights reserved.
Buttons
Buttons are located on the right side of the main window, and include "Enable / Disable", "Connect /
Disconnect", "Update" and "View Log".
Icon
Function
●
●
●
●
●
●
●
●
●
●
●
Disables firewall protection. Selecting this will turn off firewall protection.
If firewall protection is already stopped, this button will switch into Enable. Click it to
enable firewall protection again.
You can also select Actions > Disable Firewall
Disconnects your PC from the network just like unplugging the network cable or
switching off the modem. Other people cannot access your computer, but you cannot
access the network either.
After disconnecting, this icon will change to Connect. Click it to restore network
connection.
You can also select Actions > Disconnect
Starts SmartUpdate to update the program
You can also select Actions > SmartUpdate
For more information, refer to Update
Opens the log files. For more information, refer to View Log
You can also select Actions > View Log
Your Security, Our Concern. ©2007 CoGen Media All rights reserved.
Tabs
Tabs are located at the top of main window. The selected tab will be highlighted.
There are six tabs:
●
●
●
●
Firewall Status
Activity
Startup
PassWatcher
Your Security, Our Concern. ©2007 CoGen Media All rights reserved.
Set Security Level
Steps
1. Open the CoGen Personal Firewall main window (refer to Start Firewall)
2. Drag the sliding block at the bottom right of the window to the preferred security level
Definitions and rules for the security levels:
●
●
●
Low: This setting is appropriate when your computer is connected to a local network without Internet
access. All network access is allowed unless otherwise specified in Rules.
Medium: This setting is appropriate when your computer is connected to a local network with Internet
access. Sharing is allowed by default, but some risky ports will be denied access.
High: This setting is appropriate when your computer is connected to the Internet directly through a
modem, ISDN, DSL, cable modem, T1 line, or another direct connection. Only programs specified in Rules
will be permitted access.
Your Security, Our Concern. ©2007 CoGen Media All rights reserved.
Switch Mode
CoGen Personal Firewall has three preset modes you can select: Standard Mode, Shopping Mode, and
Silent Mode. The Screen Saver, Locked, and Logged Out modes are enabled automatically when your
computer is in these respective states. PassWatcher Mode will be enabled automatically when a program
specified in the PassWatcher tab is running.
There are two ways to change the mode:
Method 1:
1. Open the CoGen Personal Firewall main window (refer to Start Firewall)
2. Select Actions > Switch Mode and click the preferred mode
Method 2:
1. Right-click the CoGen Personal Firewall icon in the system tray
2. Select Switch Mode in the pop-up menu, then select the preferred mode
For more information, refer to Menus, General Settings.
Your Security, Our Concern. ©2007 CoGen Media All rights reserved.
Select Language
If your edition of CoGen Personal Firewall includes support for multiple languages, you can select the
language as follows:
1. Open CoGen Personal Firewall main window
2. Select Settings > Select Language
3. Choose your preferred language in the pop-up window, then click OK
Your Security, Our Concern. ©2007 CoGen Media All rights reserved.
Select Skin
Steps
1. Open the CoGen Personal Firewall main window
2. Select Settings > Select Skin and choose the preferred skin
Your Security, Our Concern. ©2007 CoGen Media All rights reserved.
View Log
There are three ways to open the Log file:
●
●
●
Click the View Log button in the main window. Refer to Buttons.
Select Actions > View Log in the main window
Right-click the CoGen Personal Firewall icon in the system tray and click View Log in the pop-up menu
Notes on Logs
There are ten types of Logs:
●
●
●
●
●
●
●
●
●
System Events: This log records events such as system attack, firewall enabled/disabled, disconnect
IP Events: This log records IP information on firewall records requested by rules
TCP Events: This log records TCP information on firewall records requested by rules
UDP Events: This log records UDP information on firewall records requested by rules
PassWatcher Events: This log records information on PassWatcher events
IP Rules Events: This log records IP rules edited by the user
Firewall Settings Events: This log records firewall settings configured by the user
PassWatcher Edits: This log records event information of firewall rules edited by the user
Trojan Scan Events: This log records event information of Trojan scans in the memory
Operation:
●
●
●
Backup All: This will automatically create a backup of all log data and clear the screen. To load the old
data, click the Log History button and load the file.
Clear All: This will clear all logs without saving a backup.
Log History: Allows you to select previously saved logs (*.dat) and import then into the list for view.
Your Security, Our Concern. ©2007 CoGen Media All rights reserved.
Trojan Scan
Steps
1. Open CoGen Personal Firewall main window
2. Select Actions > Scan Memory for Trojans
3. A scan window will appear in the bottom right corner of your screen. A prompt will appear when the scan
has finished. You can click Details to view the results.
Your Security, Our Concern. ©2007 CoGen Media All rights reserved.
PassWatcher
Steps
1. Open firewall main window
2. Select Settings > PassWatcher
For more information, refer to PassWatcher
Your Security, Our Concern. ©2007 CoGen Media All rights reserved.
Enable / Disable Firewall
There are three ways to enable or disable firewall protection.
Method 1:
1. Open the CoGen Personal Firewall main window
2. Click the Enable / Disable button on the right side of the main window
Method 2:
1. Open the CoGen Personal Firewall main window
2. In the main window, select Actions > Enable Firewall / Disable Firewall.
Method 3:
1. Right-click the CoGen Personal Firewall icon in the system tray, then select Enable / Disable
Firewall.
For more information, refer to Menus.
Your Security, Our Concern. ©2007 CoGen Media All rights reserved.
Connect / Disconnect
Steps
Method 1:
1. Open CoGen Personal Firewall
2. Click the Connect / Disconnect button on the right side of main window
Method 2:
1. Open CoGen Personal Firewall
2. In the main window, select Actions > Connect / Disconnect
Method 3:
1. Right click the firewall tray icon, then select Connect / Disconnect in the pop-up menu
For more information, refer to Menus.
Your Security, Our Concern. ©2007 CoGen Media All rights reserved.
Exit CoGen Personal Firewall
Steps
1. Right click the firewall tray icon, then select Exit.
2. Click OK.
This operation will completely close the personal firewall, and your computer will lose firewall
protection.
Your Security, Our Concern. ©2007 CoGen Media All rights reserved.
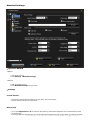
Standard Settings
Operation Method
Method 1:
1. Open firewall main menu.
2. Select Settings > Detailed Settings.
Method 2:
1. Right click the firewall tray icon
2. Select Detailed Settings in the pop-up menu
Settings
Launch firewall
●
●
Automatically: Firewall will start automatically upon system startup. This is a default setting.
Manually: Firewall doesn't start upon system startup.
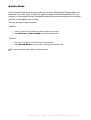
Rule priority
●
●
You can select Applications or IP for rule priority. When there's any conflict between Applications and IP, the firewall will proceed with
the selected option.
For example, Applications allows
IE program
to access
theConcern.
network while IP©2007
prohibits the
access toMedia
CoGen website.
If you select
the rule priority
Your
Security,
Our
CoGen
All rights
reserved.
as Applications, then it can access CoGen website. If you select IP, you cannot access CoGen website even if Applications allows IE to
access the website.
Sound alert
●
●
Set whether the computer produces sound alert when it is under attack.
You can click Browse to select the sound file (*.wav) for alert.
Show status balloon
●
Configure whether the balloon is displayed for firewall status. It is selected in default.
Create Logs
●
Define which types of events will be recorded in logs, including Scan memory for Trojans, Activity, Options,
Application denial, Rule edits.
Click "Settings" for more detailed settings.
●
●
●
●
●
Log size: Set log size. Default size is 5M.
Show __ items per pages: Set the number of items shown per pages. Default number is 500.
Backup when maximum size reached: It is checked in default.
Backup limit: Set the maximum size of backup files. Default size is 100M.
Backup to: The destination to save backup files. Click Browse to change the path.
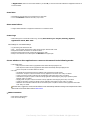
Choose whether to allow applications to connect to the network in the following modes:
●
●
Three default actions:
❍ Deny: Request for network access by applications will be denied without prompting the user.
❍ Allow: Request for network access by applications will be allowed automatically without prompting the user.
❍ Ask me: Prompt the user to select whether it is allowed.
Six modes:
❍ The firewall executes different rules based on different modes and different computer statuses.
❍ Screen Saver: The option of request for network access by applications under screen saver. "Deny" is in default.
❍ Locked: The option of request for network access by applications under locked screen. "Deny" is in default.
❍ Online Game: The option of request for network access by applications after entering the game program specified by Game
Protection. "Deny" is in default.
❍ Shopping Mode: The option of request for network access by applications under shopping mode. "Deny" is in default.
❍ Logged Out: The option of request for network access by applications under logged-out mode. "Deny" is in default.
❍ Silent Mode: The mode without interaction with the user and the option of request for network access by applications under silent
mode. "Deny" is in default.
Screen Saver, Logged Out, Locked and Online Game can be automatically switched according to the computer status. Other
three modes are in manual switch. Refer to Switch Mode.
Other Functions
●
●
Reset: Revert to default settings
Save: Save current settings
Your Security, Our Concern. ©2007 CoGen Media All rights reserved.
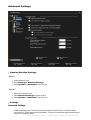
Advanced Settings
Opening Detailed Settings
Method 1:
1. Open firewall main menu
2. Select Settings > Detailed Settings
3. Select Options > Advanced in the left column
Method 2:
1. Right click the firewall tray icon
2. Select Detailed Settings in the pop-up menu
3. Select Options > Advanced in the left column
Settings
Advanced Settings
●
●
Enable firewall before login: The system is under firewall protection without login. It is checked in default.
Scan memory for Trojans before entering PassWatcher: Trojan scan is automatically performed when starting
the game. It is checked in default.
Your Security, Our Concern. ©2007 CoGen Media All rights reserved.
●
●
●
Scan memory for Trojans at startup: Trojan scan is automatically performed when the firewall starts up. It is not
checked in default.
Check if files in Application Rules have been modified: It can check if the file is modified. If any setting is to be
made upon the file under protection, you need to make settings in Applications. For more information, refer to
Applications. It is unchecked in default.
Password Protection: You can select "Password required to modify settings" and "Password required to exit
program". This option can prevent unauthorized people from modifying firewall settings or close the firewall. It is
unchecked in default.
When Password Protection is enabled, a "Enter password" window will pop up for you to input the
password.
Prompt Display Time
●
●
●
When applications attempt network: Enter the prompt display time when applications attempt network. The
default time is 60 seconds.
When IP data packets arrive: Enter the prompt display time when IP data packets arrive. The default time is 30
seconds.
Popup balloon notices: Enter the prompt display time when popup balloon notices. The default time is 10
seconds.
Vulnerability Check
●
●
Set Remind me to run next Vulnerability in days. The default time is 5 days.
If you don't perform the vulnerability check beyond the specified prompt time, it will display the prompt to remind
you at Risks in Firewall Status page.
Other Functions
●
●
Reset: Revert to default settings
Save: Save current settings
Your Security, Our Concern. ©2007 CoGen Media All rights reserved.
Rules
You can create rules to customize CoGen Personal Firewall.
●
●
●
●
●
●
Blacklist: Specified IP addresses will always be denied communication with your computer
Whitelist : Specified IP addresses will always be permitted to communicate with your computer
Ports: Allow or deny communication with specific ports; turn on/off ports between local and remote ports
Trusted Zone: You can differentiate your local network from the Internet via Trusted Zone settings
IP: Set up IP layer filter rules
Application: Choose whether to allow or deny specified programs to access the network
Your Security, Our Concern. ©2007 CoGen Media All rights reserved.
Connection
Steps
1. Open CoGen Personal Firewall
2. In the main window, select Settings > Connection to open the Connection window.
Choose how SmartUpdate will access the Internet ("Use Internet Explorer connection settings" is the
default setting).
3. If Access Internet via proxy server is selected, the server's IP address, port, and ID
authentication (if necessary) must be entered.
4. Click OK to save changes.
Please ensure your network settings are correct, so that SmartUpdate can download program
updates.
The Access Internet via dial-up network option only appear if you have dial-up
Internet access.
Your Security, Our Concern. ©2007 CoGen Media All rights reserved.
User ID
The User ID verifies that you are using a valid copy of CoGen Personal Firewall. A valid User ID is
needed for program updates.
Steps
1. Open CoGen Personal Firewall main window
2. Select Settings > User ID to open the User ID window
3. Input your User ID (this may already have been entered)
4. Click OK to confirm
Your Security, Our Concern. ©2007 CoGen Media All rights reserved.
SmartUpdate
SmartUpdate checks for and downloads any updates to CoGen Personal Firewall. There are three ways
to begin SmartUpdate.
●
●
●
Method 1: Click the Update button on the right side of the main window
Method 2: In the main window, click Actions > SmartUpdate
Method 3: Right-click the firewall icon in the system tray and select SmartUpdate Now in the popup menu
Before you begin SmartUpdate, please make sure your computer is connected to the Internet and
Connection is configured.
Your Security, Our Concern. ©2007 CoGen Media All rights reserved.
Actions
Disable Firewall
●
●
Disables all firewall protection. This option is the same as the Disable button in the main window.
When the firewall has been disabled, this option will be changed into Enable Firewall. Click it to
restart firewall protection.
Disconnect
●
●
This function disconnects your computer from the network, just as if the cable is pulled out or the modem is
turned off. If someone is continuously attacking your computer via different methods, this will be the most
direct and effective deterrent. This option is the same as the Disconnect button in the main window.
After the network is disconnected, this option will change to Connect. Click it to resume network
connection.
Switch Mode
●
●
CoGen Personal Firewall has three default modes: Shopping Mode, Silent Mode and Standard Mode. The
mode will determine whether the firewall will allow or deny a program network access. Specific settings for
individual programs can be set in Application Rules. Detailed settings can be configured for each mode in
the Settings window. (Refer to Standard Settings and Applications)
Default applications for three modes are as follows:
❍ Shopping Mode: Deny network access for any programs not listed in Application Rules
❍ Silent Mode: Deny network access for any programs not listed in Application Rules without
prompting the user
❍ Standard Mode: Ask the user whether to allow or deny access for any programs not listed in
Application Rules
You can also right click on the firewall tray icon to switch modes
View Log
●
Opens the log window. This option is the same as the View Log button in the main window.
Scan Memory for Trojans
Your Security, Our Concern. ©2007 CoGen Media All rights reserved.
●
Starts performing Trojan scan. After the scan finishes, results will be displayed.
SmartUpdate
●
●
Begins SmartUpdate, which will check for any program updates. This function is the same as the
Update button in the main window.
For more information on SmartUpdate, refer to Update.
Exit
●
Closes the main window. Note that only the main window will close, and firewall protection will still be
active. If you want to fully exit the program and disable all firewall protection, right-click the CoGen Personal
Firewall in the system tray and choose Exit.
Your Security, Our Concern. ©2007 CoGen Media All rights reserved.
Settings
Detailed Settings
●
Opens the Detailed Settings window.
PassWatcher
●
PassWatcher provides protection for passwords that are used in online games, online banking, and other
situations. CoGen Personal Firewall protects passwords by using process wall technology that effectively
prevents passwords from being stolen and transmitted. PassWatcher can be enabled for many different
programs that use passwords. For more information, see PassWatcher.
Connection
●
This allows you to adjust the connection settings for SmartUpdate. For more information, refer to
Connection.
User ID
●
Set the User ID to enable SmartUpdate. For more information, refer to User ID.
Your Security, Our Concern. ©2007 CoGen Media All rights reserved.
Help
Help Topics
●
Takes you to the Help file, where you can find answers to common questions
CoGen Website
●
Choose this to connect to the CoGen homepage
About CoGen
●
View CoGen Personal Firewall copyright and version information
Your Security, Our Concern. ©2007 CoGen Media All rights reserved.
Firewall Status
This is the tab that appears when you first open CoGen Personal Firewall.
System Status
●
This displays the mode in which CoGen Personal Firewall is currently operating, along with the default
action when applications not specified in Application Rules attempt network access. Refer to "Switch Mode".
Attack Status
●
This section displays information on any attempted attacks upon your computer. Following an attack, click
Locate IP to determine the attacker's IP address. Click Details to view the log recording the attack.
Active
●
This displays the icons of programs running on your computer. If the program is busy, its icon will be
flashing.
Risks
●
●
This will display any vulnerabilities detected in your computer, including Critical Updates that have not been
installed and Potential Security Risks.
You can ask to be reminded to run Vulnerability Check. Refer to "Advanced Settings".
Data Flow Curve
●
●
●
The graph near the bottom of the window is the Data Flow Curve and contains two lines. The above curve
is for Received bytes and the bottom one is for Sent bytes.
To the left of the graph, you can manually adjust the highest peak for the data packet curves (set at 10K by
default and unnecessary to change under normal circumstances).
To the right of the graph, the number of received and sent bytes is displayed.
Your Security, Our Concern. ©2007 CoGen Media All rights reserved.
Activity
The Activity tab allows you to check network activities as well as processes, network access, module
information, etc. You can switch between Network and Processes. The default page shows
Network activities.
Network
Display
All TCP/UDP connection information is displayed here, including all TCP/UDP monitors.
●
●
Connections are listed according to processes and sorted by program name.
For each application program, program name, PID and program path are listed. Program command, TCP/
UDP monitor and connection information (address, port, port information) are shown below.
Show Example
●
Take Ravmond.exe for example, you can see that the application program is Ravmond.exe, PID is 1220,
the path is C:\Program Files\CoGen\Rav\Ravmond.exe, command line is "C:\Program Files\CoGen\Rav
\Ravmond.exe". The program monitors TCP 6059 port of all local addresses.
Icon
TCP monitor port
Set up TCP connection
UDP data transmission
Operation
Right click the item to show a pop-up window for further actions as follows:
●
●
●
Trojan Scan: This performs a Trojan scan upon the selected processes
Go to Directory: Opens the directory where the process program is located
Properties: View properties of the item
Processes
Display
This displays information on processes and organizes all processes into a tree structure with hierarchy.
●
●
Each process shows map name, process ID, full path and command line. (Note that you may need to move
the scroll bar to see the last item.)
The process icon, if any, will be displayed before the map name.
Operation
Your Security, Our Concern. ©2007 CoGen Media All rights reserved.
Right-click the process to choose further actions as follows:
●
●
●
●
●
●
●
●
Suspend process: This will suspend the process - the process is displayed in gray and becomes invalid.
Then it changes into "Resume process" and you can click it to resume the process.
End process: This forces the process to end.
Trojan Scan: This performs a Trojan scan upon selected processes.
Go to directory: Opens the directory where the process program is located.
Properties: View properties of the item.
View Modules: View the module list loaded by the process, including module name, company and path.
Highlight Microsoft Signed Items: This will highlight Microsoft signed items to be differentiated from other
processes.
Highlight CoGen Signed Items: This will highlight CoGen signed items to be differentiated from other
processes.
Some processes such as Explorer.exe cannot be suspended or ended. Related options will be
disabled.
Suspicious processes in the system will be marked in red. Be careful when dealing with these
processes.
Stop Refreshing
●
●
By default, the system automatically refreshes network activities and processes. Click this button to stop
Refresh.
When Refresh is turned off, this button will change to Refresh On. Click it to resume Refresh.
You can also right click the firewall tray icon, then select System Status in the pop-up menu to
enter this tab.
Your Security, Our Concern. ©2007 CoGen Media All rights reserved.
Startup
The Startup tab allows you to manage applications and registry keys that will launch at startup. These
include programs in the Windows Startup folder, Run or RunOnce keys in the system registry and other
system keys. Be careful when enabling or disabling items in this tab.
Display
●
●
You will see a list of all items that run automatically upon system startup, including the item, description,
company and path. You may need to scroll the bar to see all pages depending on the screen size.
Items are grouped by category. Click the item for more detailed information, or double-click the item to
locate it on your computer.
Operation
●
●
●
●
●
●
●
Display Settings: Right-click anywhere in the list to choose what items to display. Checked
items are selected. Contents in the settings include:
❍ Show AutoRun
❍ Show Services
❍ Show Drivers
❍ Show Explorer Plugins
❍ Show Internet Explorer Plugins
❍ Show System Image Hijacks
❍ Show AppInit DLLs
❍ Show Winlogon Notifications
❍ Show Winsock Providers
❍ Show Known DLLs
❍ Show ShellExecute
❍ Show Empty Items
❍ Hide Signed Microsoft Items
❍ Hide Signed CoGen Items
Delete: Right click the item, select Delete Selected Items in the menu and click it.
Copy: Right click the item, select Copy in the menu, which can copy the item information to the clipboard.
You can also use the shortcut "Ctrl + C" to copy.
Refresh: Right click the item and select Refresh in the menu, or directly press F5 to refresh.
Go to: Right click the item and select Go to... in the menu to find the corresponding location of the
program (probably the shortcut in the Windows Startup folder, or the corresponding item in the registry),
where you can modify it manually.
Properties: Right click the item and select Properties in the menu to check properties.
Disable: Uncheck the item to disable it at system startup.
Some registry items cannot be disabled or deleted.
Your Security, Our Concern. ©2007 CoGen Media All rights reserved.
PassWatcher
This function provides protection for passwords that are used in online games, online banking, and other situations. CoGen Personal Firewall protects
passwords by using process wall technology that effectively prevents passwords from being stolen and transmitted. PassWatcher can be enabled for many
different programs that use passwords.
The list displays the program name, version, shortcut, directory and files. PassWatcher will be enabled for all checked items. You can add rules to the list by
clicking the PassWatcher tab in the main window.
NOTE: When you first add a program to PassWatcher, you may not be able to enter passwords while using the program. In this case, you need to add the
relevant modules for the program to the Trusted Modules list. You should determine which modules need to access the program and add them to the
list (see below).
Operation:
Add
●
Click the Add button to show the Edit PassWatcher rules window.
Input the program name and version, and click Browse to find the program's shortcut. Directory and Files will be filled in automatically.
●
If a new file is to be added, click Add to add the file. You can press Ctrl to select multiple files at one time.
●
Edit
●
Right click and highlight the rule, then select Edit to edit the rule.
You can also double click the rule to edit.
Delete
●
Select and highlight the rule to delete, then click Delete and confirm.
You can also select the rule and press "Delete" key to delete it.
Import
●
●
Click the "Import" button and choose the rules file (*.fwr) in the Choose file window, then click Open.
If the rule already exists in the list, you will be asked whether to delete the existing rule during import. You can choose Yes, No or Cancel.
Export
●
●
You can export self-defined PassWatcher rule(s) to the rule file (*.fwr) by clicking the Export button. Input the file name in the pop-up window and click Save.
If the file you select already exists, you will be asked whether to overwrite it during export.
Trusted
Trusted Modules refer to modules which are sure to be secure, or modules for different programs that will be allowed access.
Your Security, Our Concern. ©2007 CoGen Media All rights reserved.
●
●
You can add trusted modules by either of the two methods below:
❍ Click the Trusted button and click Add in the pop-up window, then add the modules that will be permitted to access the program into the trusted
module list.
❍ When a listed program is running and a module is attempting access, a pop-up prompt will appear. Click Details in the pop-up prompt, then check the
boxes next to the trusted modules. Check Allow the selected module to access the procress and click OK.
To delete the trusted module, please click Trusted button and click the module to be deleted in the pop-up window, then click Delete button and press Yes
to confirm.
Trusted can only be applied by clicking the button. Edit can only be used through the right-click menu. Other functions can be used by either
method.
Your Security, Our Concern. ©2007 CoGen Media All rights reserved.
Application Rules
You can adjust filter rules for programs which access the network in the local computer.
Display
●
●
Your computer's applications and their status are given in the list.
Checked items take effect.
Related Operation
Add
1. Click Add button, or right click the item and select Add in the popup menu to open Add Application Rule
window.
2. Click Browse to locate the application program. The interface automatically shows the name, computer and version
information.
3. Select type, application in standard mode, whether email transmission is allowed.
4. Check if files in Application Rules have been modified. If you check this item, the firewall will check if it is modified when the
application program accesses the network.
5. Click Next button, or click Advanced on the left to enter Advanced Settings interface, you can then set application
rules under various modes.
Your Security, Our Concern. ©2007 CoGen Media All rights reserved.
6. Set whether it can Run as server.
7. Click Finish to save and exit.
Edit
1. Select and highlight the rule to be edited. Right click the rule, and select Edit in the popup menu to open Edit window.
2. Edit the item where basic items are as same as in Add. Click Save to finish, or click Exit to give up the edit.
You can also double click the item to open Edit window.
Delete
1. Select and highlight the rule to be deleted, then click Delete button, or right click the item and select Delete in the
popup menu.
2. Confirm to delete.
You can also select the item, then press "Delete" key to delete the rule.
When rules are selected, you can select multiple items by pressing "Ctrl" key and "Shift" key.
Import
1. Click "Import" button and select rule files (*.fwr) in the popup menu, then click Open.
2. If there are rules already in the list, you will be asked whether to delete the existing rules during import. You can choose
Yes, No, or Cancel.
Export
1. Click Export and input the file name in the popup menu, then click Save.
2. If the file you select already exits, you will be asked whether to overwrite during export.
Your Security, Our Concern. ©2007 CoGen Media All rights reserved.
Blacklist
Specified computers on the list will be denied communication with your computer.
Display
●
●
The list displays Rule, IP Address, Created by and Duration
Checked items take effect
Related Operation
Add
1. Click Add button, or right click the item to select Add in the pop-up menu, then "Add Blacklist Rule"
prompt opens.
2. Input name, IP type, Specific or Address range, Enter IP, then click Save.
Duration can be skipped, which is automatically completed when the attacker's information is
added into the blacklist.
Edit
1. Select and highlight the rule to edit, then select Edit to open Edit Blacklist Rule prompt.
2. Edit the items, then click Save to complete this edit, or click Cancel to give up this edit.
You can also double click the item to open Edit Blacklist Rule prompt.
Delete
1. Select and highlight the rule to delete, then select Delete button, or right click the item and select
Delete in the pop-up window.
2. Select OK to delete.
You can also press "Delete" key to delete the selected rule.
With "Ctrl" and "Shift" keys, multiple rules can be selected.
Your Security, Our Concern. ©2007 CoGen Media All rights reserved.
Whitelist
Whitelist Rules specify IP addresses that are always permitted communication with and have full access
to the local computer. For example, a VPN server can be added to this list. Use caution when editing this
list.
Display
●
●
The list displays Rule and IP Address.
Checked items take effect.
Operation
Add
1. Click Add button, or right click the item to select Add in the pop-up menu, then Add Whitelist
Rule prompt opens.
2. Input name, IP Address, Specific or Address range, Enter IP, then click Save.
Edit
1. Select and highlight the rule to edit, then select Edit to open Edit Whitelist Rule prompt.
2. Edit the items, then click Save to complete this edit, or click Cancel to give up this edit.
You can also double click the item to open Edit Whitelist Rule prompt.
Delete
1. Select and highlight the rule to delete, then select Delete button, or right click the rule and select
Delete in the pop-up window.
2. Select OK to delete.
You can also press "Delete" key to delete the selected rule.
With "Ctrl" and "Shift" keys, multiple rules can be selected.
Your Security, Our Concern. ©2007 CoGen Media All rights reserved.
Ports
You can allow or deny communications with selected ports by creating rules.
Display
●
●
The list displays the port, permission, protocol and computer for the selected rule
Checked items will take effect
Related Operation
Add
1. Click Add button, or right click the item and select Add to open Add Port Rule window.
2. Input port, protocol, computer, permission, then click OK.
When the port numbers are input, several ports can be separated by commas, e.g. 2,4-8,10.
Edit
1. Select and highlight the rule to be edited. Right click the rule, and select Edit in the popup menu to open
Edit Port Rule window.
2. Edit the item, then click Save to finish, or click Exit to give up the edit.
You can also double click the item to open Edit Port Rule window.
Delete
1. Select and highlight the rule to be deleted, then click Delete button, or right click the item and select
Delete in the popup menu.
2. Confirm to delete.
You can also select the item, then press "Delete" key to delete the rule.
When rules are selected, you can select multiple items by pressing "Ctrl" key and "Shift" key.
Your Security, Our Concern. ©2007 CoGen Media All rights reserved.
Trusted Zone
You can create Trusted Zones for local networks that do not pose a great risk to your computer.
You can set the list of Trusted Zones and adjust settings. If you create a Trusted Zone with your local
area network's IP address, the settings will apply to all computers in that network. By default, remote
computers are not in a Trusted Zone. If your computer is directly connected to Internet, use caution when
setting up a Trusted Zone.
Display
●
The list displays the Name, Local IP and Remote IP for the Trusted Zones
Operation
Add
1. Click Add button, or right click the item to select Add in the pop-up menu, then Trusted
Zone Rule prompt opens.
2. Input Name, Local / Remote IP, then click OK.
When Local IP is Specific address, click Browse to select a local IP.
Edit
1. Select and highlight the rule to edit, then select Edit to open Trusted Zone Rule
prompt.
2. Edit the items, then click Save to complete this edit, or click Cancel to give up this edit.
You can also double click the item to open Trusted Zone Rule prompt.
Delete
1. Select and highlight the rule to delete, then select Delete button, or right click the rule and
select Delete in the pop-up window.
2. Select OK to delete.
You can also press "Delete" key to delete the selected rule.
Choose settings for the selected Trusted Zone:
1. Select a relevant rule, then check Allow inbound/outbound ping, Allow
inbound connection from remote high-risk ports when Security Level is
set at Medium, Allow outbound connection from remote high-risk
ports when Security Level is set at Medium".
Your Security, Our Concern. ©2007 CoGen Media All rights reserved.
IP Rules
IP Rules can be customized to provide security for your system.
The more rules there are, the lower overall system performance will be. There is no need to add rules
related to applications since the firewall will open the port when the application needs it. Also, you should
not add preventive rules, since such rules are built inside the system and will be updated automatically.
Display
●
●
●
The list displays the IP rules currently used, including rule name, status, protocol, remote port, local port
and alert.
Rules are sorted based on filter sequence.
Checked items take effect.
Related Operation
Add
1. Click Add button, or right click the item and select Add in the popup menu to open Add IP Rule
window.
2. Add rule name, and select the action after a match is found.
3. Click Address in the left menu or click Next, then input the local address and remote address. If the
local address is specified, click Browse to select a local address.
4. Click Protocol in the left menu or click Next, then configure the protocol. For more information, refer
to Protocol Settings.
5. Click Alert Mode in the left menu, or click Next, then select the alert mode after a match is found:
●
●
●
Balloon notice: Notify the user by balloon notice
Popup menu: Notify the user by popup menu
Record in log: whether to record it in the log
Insert
1.
2.
3.
4.
Select one item with existing rules.
Click Insert button to show Add IP Rule window.
Other actions are as same as those in Add.
Inserted rules are listed before the selected rule in the first step.
Edit
1. Select and highlight the rule to be edited. Right click the rule, and select Edit in the popup menu to open
Edit window.
2. Edit the item where basic items are as same as in Add. Click Save to finish, or click Exit to give up
the edit.
You can also double click the item to open Edit window.
Delete
Your Security, Our Concern. ©2007 CoGen Media All rights reserved.
1. Select and highlight the rule to be deleted, then click Delete button, or right click the item and select
Delete in the popup menu.
2. Confirm to delete.
You can also select the item, then press "Delete" key to delete the rule.
When rules are selected, you can select multiple items by pressing "Ctrl" key and "Shift" key.
Import
1. Click Import button and select rule files (*.fwr) in the popup menu, then click Open.
2. If there are rules already in the list, you will be asked whether to delete the existing rules during import. You
can choose Yes, No, or Cancel.
Export
1. Click Export and input the file name in the popup menu, then click Save.
2. If the file you select already exits, you will be asked whether to overwrite during export.
Move
1. Select and highlight the rule to be moved.
2. Right click it, then choose "Move Up" / "Move Down" in the popup menu, then the rule can be moved up /
down.
After the item is selected, you can also move the file by pressing "Ctrl" key + "Up" / "Down" key.
Your Security, Our Concern. ©2007 CoGen Media All rights reserved.
Protocol Settings
Protocol Type
●
●
Protocols can be categorized into 11 types, such as ALL, TCP, UDP, TCP OR UDP, ICMP, IGMP, ESP,
AH, GRE, RDP, SKIP.
Different protocol types will affect the following options.
Port
●
●
This function sets remote and local ports.
The user may select Any Port, Specific Port, Port Range or Specific Port.
ICMP
It will only be displayed when the protocol type is "ICMP".
●
●
●
Specific type: Specify a single filter type.
Select types: Specify multiple types for combination and control direction. Click Select to enter detailed
settings and select the types to be controlled. Then check Inbound, Outbound, and click the
Apply button to take effect.
Any type: Effective to all ICMP types.
Characteristics
●
●
●
●
Check Check characteristics, click the Edit button to open the Define Data Packet
Characteristics window.
Input the offset. Press Insert key in Content box. Insert a byte when you press the key each time.
The characteristics string can support 27 types at the most. In the content box, hexadecimal numbers are
shown on the left and ASCII are displayed on the right.
When you click OK to exit, it will automatically calculate the length according to the string you've input.
TCP Flags
These are only shown when the protocol type is "TCP" or "TCP OR UDP".
●
●
●
Select Check TCP flags and click the Edit button to open the Check the Following
TCP Flags window.
Check the items you wish to set into allow, and click OK to take effect.
TCP flags include:
❍ URG: Effective for urgent packet(s). This is used to prevent TCP data stream disruption.
❍ ACK: Acknowledge serial number is effective. This prompts the remote system when it has
successfully received all data.
Your Security, Our Concern. ©2007 CoGen Media All rights reserved.
❍
❍
❍
❍
PSH: Submission to the application layer as soon as possible. This means requested data
segment can be directly sent to the application program after the segment is obtained by the
recipient. It is unnecessary to send until the buffer is full.
RST: Reset connection. This is used to reset any wrong connection and/or to refuse illegal data
and request(s).
SYN: Synchronize the connection. This is effective only when TCP connection is set and will
prompt the TCP connection client to check the serial number.
FIN: Finish transmission. Data packet with this flag bit is used to finish a TCP dialog, but the
corresponding port still remains open, ready to receive any subsequent data.
Your Security, Our Concern. ©2007 CoGen Media All rights reserved.