1
TruSeq® Stranded Total RNA
Sample Preparation Guide
FOR RESEARCH USE ONLY
ILLUMINA PROPRIETARY
RS-122-9007DOC
Part # 15031048 Rev. E
October 2013
This document and its contents are proprietary to Illumina, Inc. and its affiliates ("Illumina"), and are intended solely for the contractual use of
its customer in connection with the use of the product(s) described herein and for no other purpose. This document and its contents shall not
be used or distributed for any other purpose and/or otherwise communicated, disclosed, or reproduced in any way whatsoever without the
prior written consent of Illumina. Illumina does not convey any license under its patent, trademark, copyright, or common-law rights nor
similar rights of any third parties by this document.
The instructions in this document must be strictly and explicitly followed by qualified and properly trained personnel in order to ensure the
proper and safe use of the product(s) described herein. All of the contents of this document must be fully read and understood prior to using
such product(s).
FAILURE TO COMPLETELY READ AND EXPLICITLY FOLLOW ALL OF THE INSTRUCTIONS CONTAINED HEREIN MAY RESULT IN
DAMAGE TO THE PRODUCT(S), INJURY TO PERSONS, INCLUDING TO USERS OR OTHERS, AND DAMAGE TO OTHER PROPERTY.
ILLUMINA DOES NOT ASSUME ANY LIABILITY ARISING OUT OF THE IMPROPER USE OF THE PRODUCT(S) DESCRIBED HEREIN
(INCLUDING PARTS THEREOF OR SOFTWARE) OR ANY USE OF SUCH PRODUCT(S) OUTSIDE THE SCOPE OF THE EXPRESS
WRITTEN LICENSES OR PERMISSIONS GRANTED BY ILLUMINA IN CONNECTION WITH CUSTOMER'S ACQUISITION OF SUCH
PRODUCT(S).
FOR RESEARCH USE ONLY
© 2012–2013 Illumina, Inc. All rights reserved.
Illumina, IlluminaDx, BaseSpace, BeadArray, BeadXpress, cBot, CSPro, DASL, DesignStudio, Eco, GAIIx, Genetic Energy, Genome
Analyzer, GenomeStudio, GoldenGate, HiScan, HiSeq, Infinium, iSelect, MiSeq, Nextera, NuPCR, SeqMonitor, Solexa, TruSeq,
TruSight, VeraCode, the pumpkin orange color, and the Genetic Energy streaming bases design are trademarks or registered trademarks of
Illumina, Inc. All other brands and names contained herein are the property of their respective owners.
Limited Use Label License: This product and its use are the subject of one or more issued and/or pending U.S. and foreign patent applications
owned by Max Planck Gesellschaft, exclusively licensed to New England Biolabs, Inc. and sublicensed to Illumina, Inc. The purchase of this
product from Illumina, Inc., its affiliates, or its authorized resellers and distributors conveys to the buyer the non-transferable right to use the
purchased amount of the product and components of the product by the buyer (whether the buyer is an academic or for profit entity). The
purchase of this product does not convey a license under any claims in the foregoing patents or patent applications directed to producing the
product. The buyer cannot sell or otherwise transfer this product or its components to a third party or otherwise use this product for the
following COMMERCIAL PURPOSES: (1) use of the product or its components in manufacturing; or (2) use of the product or its components
for therapeutic or prophylactic purposes in humans or animals.
Read Before Using this Product
This Product, and its use and disposition, is subject to the following terms and conditions. If Purchaser does not agree to these
terms and conditions then Purchaser is not authorized by Illumina to use this Product and Purchaser must not use this Product.
1
ii
Definitions. "Application Specific IP" means Illumina owned or controlled intellectual property rights that pertain to
this Product (and use thereof) only with regard to specific field(s) or specific application(s). Application Specific IP
excludes all Illumina owned or controlled intellectual property that cover aspects or features of this Product (or use
thereof) that are common to this Product in all possible applications and all possible fields of use (the "Core IP").
Application Specific IP and Core IP are separate, non-overlapping, subsets of all Illumina owned or controlled intellectual
property. By way of non-limiting example, Illumina intellectual property rights for specific diagnostic methods, for
specific forensic methods, or for specific nucleic acid biomarkers, sequences, or combinations of biomarkers or
sequences are examples of Application Specific IP. "Consumable(s)" means Illumina branded reagents and consumable
items that are intended by Illumina for use with, and are to be consumed through the use of, Hardware.
"Documentation" means Illumina's user manual for this Product, including without limitation, package inserts, and any
Part # 15031048 Rev. E
other documentation that accompany this Product or that are referenced by the Product or in the packaging for the Product
in effect on the date of shipment from Illumina. Documentation includes this document. "Hardware" means Illumina
branded instruments, accessories or peripherals. "Illumina" means Illumina, Inc. or an Illumina affiliate, as applicable.
"Product" means the product that this document accompanies (e.g., Hardware, Consumables, or Software). "Purchaser"
is the person or entity that rightfully and legally acquires this Product from Illumina or an Illumina authorized dealer.
"Software" means Illumina branded software (e.g., Hardware operating software, data analysis software). All Software is
licensed and not sold and may be subject to additional terms found in the Software's end user license agreement.
"Specifications" means Illumina's written specifications for this Product in effect on the date that the Product ships from
Illumina.
2
Research Use Only Rights. Subject to these terms and conditions and unless otherwise agreed upon in writing by an
officer of Illumina, Purchaser is granted only a non-exclusive, non-transferable, personal, non-sublicensable right under
Illumina's Core IP, in existence on the date that this Product ships from Illumina, solely to use this Product in Purchaser's
facility for Purchaser's internal research purposes (which includes research services provided to third parties) and solely
in accordance with this Product's Documentation, but specifically excluding any use that (a) would require rights or a
license from Illumina to Application Specific IP, (b) is a re-use of a previously used Consumable, (c) is the disassembling,
reverse-engineering, reverse-compiling, or reverse-assembling of this Product, (d) is the separation, extraction, or
isolation of components of this Product or other unauthorized analysis of this Product, (e) gains access to or determines
the methods of operation of this Product, (f) is the use of non-Illumina reagent/consumables with Illumina's Hardware
(does not apply if the Specifications or Documentation state otherwise), or (g) is the transfer to a third-party of, or sublicensing of, Software or any third-party software. All Software, whether provided separately, installed on, or embedded
in a Product, is licensed to Purchaser and not sold. Except as expressly stated in this Section, no right or license under
any of Illumina's intellectual property rights is or are granted expressly, by implication, or by estoppel.
Purchaser is solely responsible for determining whether Purchaser has all intellectual property rights that are
necessary for Purchaser's intended uses of this Product, including without limitation, any rights from third
parties or rights to Application Specific IP. Illumina makes no guarantee or warranty that purchaser's specific
intended uses will not infringe the intellectual property rights of a third party or Application Specific IP.
3
Regulatory. This Product has not been approved, cleared, or licensed by the United States Food and Drug
Administration or any other regulatory entity whether foreign or domestic for any specific intended use, whether
research, commercial, diagnostic, or otherwise. This Product is labeled For Research Use Only. Purchaser must ensure it
has any regulatory approvals that are necessary for Purchaser's intended uses of this Product.
4
Unauthorized Uses. Purchaser agrees: (a) to use each Consumable only one time, and (b) to use only Illumina
consumables/reagents with Illumina Hardware. The limitations in (a)-(b) do not apply if the Documentation or
Specifications for this Product state otherwise. Purchaser agrees not to, nor authorize any third party to, engage in any of
the following activities: (i) disassemble, reverse-engineer, reverse-compile, or reverse-assemble the Product, (ii) separate,
extract, or isolate components of this Product or subject this Product or components thereof to any analysis not expressly
authorized in this Product's Documentation, (iii) gain access to or attempt to determine the methods of operation of this
Product, or (iv) transfer to a third-party, or grant a sublicense, to any Software or any third-party software. Purchaser
further agrees that the contents of and methods of operation of this Product are proprietary to Illumina and this Product
contains or embodies trade secrets of Illumina. The conditions and restrictions found in these terms and conditions are
bargained for conditions of sale and therefore control the sale of and use of this Product by Purchaser.
5
Limited Liability. TO THE EXTENT PERMITTED BY LAW, IN NO EVENT SHALL ILLUMINA OR ITS
SUPPLIERS BE LIABLE TO PURCHASER OR ANY THIRD PARTY FOR COSTS OF PROCUREMENT OF
SUBSTITUTE PRODUCTS OR SERVICES, LOST PROFITS, DATA OR BUSINESS, OR FOR ANY INDIRECT,
SPECIAL, INCIDENTAL, EXEMPLARY, CONSEQUENTIAL, OR PUNITIVE DAMAGES OF ANY KIND ARISING
OUT OF OR IN CONNECTION WITH, WITHOUT LIMITATION, THE SALE OF THIS PRODUCT, ITS USE,
ILLUMINA'S PERFORMANCE HEREUNDER OR ANY OF THESE TERMS AND CONDITIONS, HOWEVER
TruSeq Stranded Total RNA Sample Preparation Guide
iii
ARISING OR CAUSED AND ON ANY THEORY OF LIABILITY (WHETHER IN CONTRACT, TORT
(INCLUDING NEGLIGENCE), STRICT LIABILITY OR OTHERWISE).
6
ILLUMINA'S TOTAL AND CUMULATIVE LIABILITY TO PURCHASER OR ANY THIRD PARTY ARISING OUT
OF OR IN CONNECTION WITH THESE TERMS AND CONDITIONS, INCLUDING WITHOUT LIMITATION,
THIS PRODUCT (INCLUDING USE THEREOF) AND ILLUMINA'S PERFORMANCE HEREUNDER, WHETHER
IN CONTRACT, TORT (INCLUDING NEGLIGENCE), STRICT LIABILITY OR OTHERWISE, SHALL IN NO
EVENT EXCEED THE AMOUNT PAID TO ILLUMINA FOR THIS PRODUCT.
7
Limitations on Illumina Provided Warranties. TO THE EXTENT PERMITTED BY LAW AND SUBJECT TO THE
EXPRESS PRODUCT WARRANTY MADE HEREIN ILLUMINA MAKES NO (AND EXPRESSLY DISCLAIMS
ALL) WARRANTIES, EXPRESS, IMPLIED OR STATUTORY, WITH RESPECT TO THIS PRODUCT,
INCLUDING WITHOUT LIMITATION, ANY IMPLIED WARRANTY OF MERCHANTABILITY, FITNESS FOR A
PARTICULAR PURPOSE, NONINFRINGEMENT, OR ARISING FROM COURSE OF PERFORMANCE,
DEALING, USAGE OR TRADE. WITHOUT LIMITING THE GENERALITY OF THE FOREGOING, ILLUMINA
MAKES NO CLAIM, REPRESENTATION, OR WARRANTY OF ANY KIND AS TO THE UTILITY OF THIS
PRODUCT FOR PURCHASER'S INTENDED USES.
8
Product Warranty. All warranties are personal to the Purchaser and may not be transferred or assigned to a third-party,
including an affiliate of Purchaser. All warranties are facility specific and do not transfer if the Product is moved to
another facility of Purchaser, unless Illumina conducts such move.
a
Warranty for Consumables. Illumina warrants that Consumables, other than custom Consumables, will conform to
their Specifications until the later of (i) 3 months from the date of shipment from Illumina, and (ii) any expiration
date or the end of the shelf-life pre-printed on such Consumable by Illumina, but in no event later than 12 months
from the date of shipment. With respect to custom Consumables (i.e., Consumables made to specifications or
designs made by Purchaser or provided to Illumina by, or on behalf of, Purchaser), Illumina only warrants that the
custom Consumables will be made and tested in accordance with Illumina's standard manufacturing and quality
control processes. Illumina makes no warranty that custom Consumables will work as intended by Purchaser or for
Purchaser's intended uses.
b
Warranty for Hardware. Illumina warrants that Hardware, other than Upgraded Components, will conform to its
Specifications for a period of 12 months after its shipment date from Illumina unless the Hardware includes Illumina
provided installation in which case the warranty period begins on the date of installation or 30 days after the date it
was delivered, whichever occurs first ("Base Hardware Warranty"). "Upgraded Components" means Illumina
provided components, modifications, or enhancements to Hardware that was previously acquired by Purchaser.
Illumina warrants that Upgraded Components will conform to their Specifications for a period of 90 days from the
date the Upgraded Components are installed. Upgraded Components do not extend the warranty for the Hardware
unless the upgrade was conducted by Illumina at Illumina's facilities in which case the upgraded Hardware shipped
to Purchaser comes with a Base Hardware Warranty.
c
Exclusions from Warranty Coverage. The foregoing warranties do not apply to the extent a non-conformance is
due to (i) abuse, misuse, neglect, negligence, accident, improper storage, or use contrary to the Documentation or
Specifications, (ii) improper handling, installation, maintenance, or repair (other than if performed by Illumina's
personnel), (iii) unauthorized alterations, (iv) Force Majeure events, or (v) use with a third party's good not provided
by Illumina (unless the Product's Documentation or Specifications expressly state such third party's good is for use
with the Product).
d
Procedure for Warranty Coverage. In order to be eligible for repair or replacement under this warranty Purchaser
must (i) promptly contact Illumina's support department to report the non-conformance, (ii) cooperate with Illumina
in confirming or diagnosing the non-conformance, and (iii) return this Product, transportation charges prepaid to
Illumina following Illumina's instructions or, if agreed by Illumina and Purchaser, grant Illumina's authorized repair
personnel access to this Product in order to confirm the non-conformance and make repairs.
iv
Part # 15031048 Rev. E
e
f
9
Sole Remedy under Warranty. Illumina will, at its option, repair or replace non-conforming Product that it
confirms is covered by this warranty. Repaired or replaced Consumables come with a 30-day warranty. Hardware
may be repaired or replaced with functionally equivalent, reconditioned, or new Hardware or components (if only a
component of Hardware is non-conforming). If the Hardware is replaced in its entirety, the warranty period for the
replacement is 90 days from the date of shipment or the remaining period on the original Hardware warranty,
whichever is shorter. If only a component is being repaired or replaced, the warranty period for such component is
90 days from the date of shipment or the remaining period on the original Hardware warranty, whichever ends later.
The preceding states Purchaser's sole remedy and Illumina's sole obligations under the warranty provided
hereunder.
Third-Party Goods and Warranty. Illumina has no warranty obligations with respect to any goods originating
from a third party and supplied to Purchaser hereunder. Third-party goods are those that are labeled or branded
with a third-party's name. The warranty for third-party goods, if any, is provided by the original manufacturer.
Upon written request Illumina will attempt to pass through any such warranty to Purchaser.
Indemnification.
a
Infringement Indemnification by Illumina. Subject to these terms and conditions, including without limitation,
the Exclusions to Illumina's Indemnification Obligations (Section 9(b) below), the Conditions to Indemnification
Obligations (Section 9(d) below), Illumina shall (i) defend, indemnify and hold harmless Purchaser against any
third-party claim or action alleging that this Product when used for research use purposes, in accordance with these
terms and conditions, and in accordance with this Product's Documentation and Specifications infringes the valid
and enforceable intellectual property rights of a third party, and (ii) pay all settlements entered into, and all final
judgments and costs (including reasonable attorneys' fees) awarded against Purchaser in connection with such
infringement claim. If this Product or any part thereof, becomes, or in Illumina's opinion may become, the subject of
an infringement claim, Illumina shall have the right, at its option, to (A) procure for Purchaser the right to continue
using this Product, (B) modify or replace this Product with a substantially equivalent non-infringing substitute, or
(C) require the return of this Product and terminate the rights, license, and any other permissions provided to
Purchaser with respect this Product and refund to Purchaser the depreciated value (as shown in Purchaser's official
records) of the returned Product at the time of such return; provided that, no refund will be given for used-up or
expired Consumables. This Section states the entire liability of Illumina for any infringement of third party
intellectual property rights.
b
Exclusions to Illumina Indemnification Obligations. Illumina has no obligation to defend, indemnify or hold
harmless Purchaser for any Illumina Infringement Claim to the extent such infringement arises from: (i) the use of
this Product in any manner or for any purpose outside the scope of research use purposes, (ii) the use of this Product
in any manner not in accordance with its Specifications, its Documentation, the rights expressly granted to Purchaser
hereunder, or any breach by Purchaser of these terms and conditions, (iii) the use of this Product in combination
with any other products, materials, or services not supplied by Illumina, (iv) the use of this Product to perform any
assay or other process not supplied by Illumina, or (v) Illumina's compliance with specifications or instructions for
this Product furnished by, or on behalf of, Purchaser (each of (i) – (v), is referred to as an "Excluded Claim").
c
Indemnification by Purchaser. Purchaser shall defend, indemnify and hold harmless Illumina, its affiliates, their
non-affiliate collaborators and development partners that contributed to the development of this Product, and their
respective officers, directors, representatives and employees against any claims, liabilities, damages, fines, penalties,
causes of action, and losses of any and every kind, including without limitation, personal injury or death claims, and
infringement of a third party's intellectual property rights, resulting from, relating to, or arising out of (i) Purchaser's
breach of any of these terms and conditions, (ii) Purchaser's use of this Product outside of the scope of research use
purposes, (iii) any use of this Product not in accordance with this Product's Specifications or Documentation, or (iv)
any Excluded Claim.
d
Conditions to Indemnification Obligations. The parties' indemnification obligations are conditioned upon the
party seeking indemnification (i) promptly notifying the other party in writing of such claim or action, (ii) giving the
other party exclusive control and authority over the defense and settlement of such claim or action, (iii) not admitting
TruSeq Stranded Total RNA Sample Preparation Guide
v
e
vi
infringement of any intellectual property right without prior written consent of the other party, (iv) not entering into
any settlement or compromise of any such claim or action without the other party's prior written consent, and (v)
providing reasonable assistance to the other party in the defense of the claim or action; provided that, the party
reimburses the indemnified party for its reasonable out-of-pocket expenses incurred in providing such assistance.
Third-Party Goods and Indemnification. Illumina has no indemnification obligations with respect to any goods
originating from a third party and supplied to Purchaser. Third-party goods are those that are labeled or branded
with a third-party's name. Purchaser's indemnification rights, if any, with respect to third party goods shall be
pursuant to the original manufacturer's or licensor's indemnity. Upon written request Illumina will attempt to pass
through such indemnity, if any, to Purchaser.
Part # 15031048 Rev. E
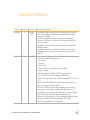
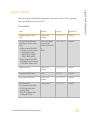
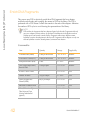
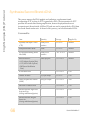
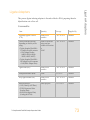
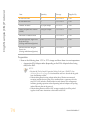
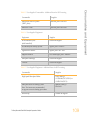
Revision History
Part #
Revision
Date
15031048
E
October
2013
15031048
D
April 2013
Description of Change
• Clarified PDP plate type options for LS protocol are a 0.3 ml PCR
plate when pooling ≤ 40 samples or a 96-well MIDI plate when
pooling > 40 samples
• Created new appendix of Supporting Information containing
Acronyms, Kit Contents, Consumables and Equipment, and Indexed
Adapter Sequences
• Replaced Best Practices section with a reference to content on the
Illumina website
• Replaced Adapter Options and Pooling Guidelines sections with a
reference to the TruSeq Sample Preparation Pooling Guide (part #
15042173)
• Added new TruSeq Stranded Total RNA plant and globin kit
information in the following sections.
• Introduction
• Acronyms
• Kit Contents
• Ribo-Zero Deplete and Fragment RNA procedures
• Usage Guidelines
• Added bioanalyzer and DNA 1000 Kit to equipment list.
• Corrected Kit Contents box 1 shipping temperature.
• Corrected storage temperature of rRNA Binding Buffer to -15°C to
-25°C.
• Removed the SIP and RIP plate transfer steps from the Ribo-Zero
Deplete and Fragment RNA procedures
• In Clean Up PCR HS protocol, added centrifuge step to mixing
procedures to make mixing consistent throughout protocol
• Clarified in protocol steps that the PDP plate is a 0.3 ml PCR plate
in the LS protocol and an HSP plate in the HS protocol
• In the Alternate Fragmentation Protocols Appendix, added an elution
step for intact RNA with an insert length of 130–350 bp
• Moved Usage Guidelines to an Appendix
TruSeq Stranded Total RNA Sample Preparation Guide
vii
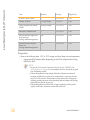
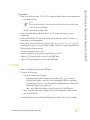
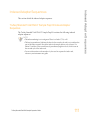
Part #
Revision
Date
15031048
C
September
2012
15031048
B
July 2012
15031048
A
April 2012
viii
Description of Change
• Added New England Biolabs, Inc. licensing to notices
• Corrected PCR Primer Cocktail part number in LT Kit Contents
• Corrected kit name with 96 Sample, cDNA Synthesis-PCR Box
• Reformatted the consumables list at the start of each procedure to
a table
• After initial thaw, for each process that uses Resuspension Buffer,
added a preparation step to remove it from 2°C to 8°C storage
• Added TruSeq Stranded Total RNA HT Sample Prep Kit content
and functionality to the following sections:
• Usage Guidelines
• Kit Contents
• Indexed Adapter Sequences
• Adapter Options
• Pooling Guidelines
• Ligate Adapters procedures
• Enrich DNA Fragments procedures
• Normalize and Pool Libraries procedures
• Added reagent volume table to Usage Guidelines
• Revised Tracking Tools documentation download information
• Removed detailed Sample Sheet description from Tracking Tools
• Added instructions for which assay to select when using the
Illumina Experiment Manager
• Corrected storage temperature for rRNA Binding Buffer and
Elution Buffer as 2° to 8°C
• Added optional Agilent RNA 6000 Nano or Pico kits for alternative
fragmentation to Consumables and Equipment list
• Specified storage temperature for Resuspension Buffer at 2° to 8°C
after initial thaw
• Make RRP - Added steps to transfer supernatant from RIP to SIP
plate and incubate
Initial Release
Part # 15031048 Rev. E
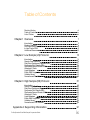
Table of Contents
Revision History
Table of Contents
List of Tables
Chapter 1 Overview
Introduction
Protocol Features
RNA Input Recommendations
In-Line Control DNA
Additional Resources
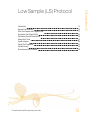
Chapter 2 Low Sample (LS) Protocol
Introduction
Sample Prep Workflow
Ribo-Zero Deplete and Fragment RNA
Synthesize First Strand cDNA
Synthesize Second Strand cDNA
Adenylate 3' Ends
Ligate Adapters
Enrich DNA Fragments
Validate Library
Normalize and Pool Libraries
Chapter 3 High Sample (HS) Protocol
Introduction
Sample Prep Workflow
Ribo-Zero Deplete and Fragment RNA
Synthesize First Strand cDNA
Synthesize Second Strand cDNA
Adenylate 3' Ends
Ligate Adapters
Enrich DNA Fragments
Validate Library
Normalize and Pool Libraries
Appendix A Supporting Information
TruSeq Stranded Total RNA Sample Preparation Guide
vii
ix
xi
1
2
4
6
8
10
13
14
16
17
25
28
32
35
42
46
48
51
52
54
55
63
66
70
73
81
86
88
91
ix
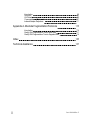
Introduction
Acronyms
Kit Contents
Consumables and Equipment
Indexed Adapter Sequences
Appendix A Alternate Fragmentation Protocols
Introduction
Modify RNA Fragmentation Time for Intact RNA
Modify RNA Fragmentation Time for Degraded RNA
92
93
96
107
111
115
116
117
119
Index
125
Technical Assistance
127
x
Part # 15031048 Rev. E
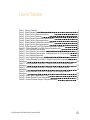
List of Tables
Table 1 Protocol Features
Table 2 Kit and Sample Number Recommendations
Table 3 Kit and Protocol Recommendations
Table 4 In-Line Control Functions
Table 5 Kit and Sample Number Recommendations
Table 6 Kit and Protocol Recommendations
Table 7 Kit and Sample Number Recommendations
Table 8 Kit and Protocol Recommendations
Table 9 TruSeq Stranded Total RNA Sample Preparation Acronyms
Table 10 TruSeq Stranded Total RNA Sample Preparation Kits
Table 11 User-Supplied Consumables
Table 12 User-Supplied Consumables - Additional Items for LS Processing
Table 13 User-Supplied Consumables - Additional Items for HS Processing
Table 14 User-Supplied Equipment
Table 15 User-Supplied Equipment - Additional Items for HS Processing
Table 16 TruSeq Stranded Total RNA LT Sample Prep Kit Set A Indexed Adapter
Sequences
Table 17 TruSeq Stranded Total RNA LT Sample Prep Kit Set B Indexed Adapter
Sequences
Table 18 TruSeq Stranded Total RNA HT Sample Prep Kit Indexed Adapter 1
Sequences
Table 19 TruSeq Stranded Total RNA HT Sample Prep Kit Indexed Adapter 2
Sequences
Table 20 Library Insert Fragmentation Time
Table 21 Illumina General Contact Information
Table 22 Illumina Customer Support Telephone Numbers
TruSeq Stranded Total RNA Sample Preparation Guide
4
4
5
9
14
14
52
52
93
96
107
108
109
109
109
112
112
113
113
117
127
127
xi
xii
Part # 15031048 Rev. E
Chapter 1 Overview
Introduction
Protocol Features
RNA Input Recommendations
In-Line Control DNA
Additional Resources
TruSeq Stranded Total RNA Sample Preparation Guide
2
4
6
8
10
1
Chapter 1
Overview
Overview
Introduction
This protocol explains how to convert total RNA into a library of template molecules of
known strand origin and suitable for subsequent cluster generation and DNA sequencing
using the reagents provided in the Illumina® TruSeq® Stranded Total RNA Sample
Preparation kits. TruSeq Stranded Total RNA with Ribo-Zero™ Human/Mouse/Rat, TruSeq
Stranded Total RNA with Ribo-Zero Gold, and TruSeq Stranded Total RNA with Ribo-Zero
Globin support human, mouse, and rat organisms, whereas TruSeq Stranded Total RNA
with Ribo-Zero Plant supports plant species.
All TruSeq Stranded Total RNA kits follow the same workflow. The first step involves the
removal of ribosomal RNA (rRNA) using biotinylated, target-specific oligos combined with
Ribo-Zero rRNA removal beads. The Ribo-Zero Human/Mouse/Rat kit depletes samples of
cytoplasmic rRNA and the Ribo-Zero Gold kit depletes samples of both cytoplasmic and
mitochondrial rRNA. Ribo-Zero Globin kit depletes globin-encoding mRNA in addition to
the rRNA species targeted with Ribo-Zero Gold. Ribo-Zero Plant kit targets cytoplasmic and
chloroplast rRNA. Following purification, the RNA is fragmented into small pieces using
divalent cations under elevated temperature. The cleaved RNA fragments are copied into
first strand cDNA using reverse transcriptase and random primers, followed by second
strand cDNA synthesis using DNA Polymerase I and RNase H. These cDNA fragments
then have the addition of a single 'A' base and subsequent ligation of the adapter. The
products are purified and enriched with PCR to create the final cDNA library.
This sample preparation protocol offers:
} Strand information on RNA transcript
} Library capture of both coding RNA, as well as multiple forms of non-coding RNA
} Degraded RNA can be used with minor adjustments to fragmentation procedures
} Reduced total assay time
} Optimized workflows for processing low sample (LS) and high sample (HS) numbers
in parallel
} Compatibility with low-throughput (LT) and high-throughput (HT) kit configurations
} The TruSeq Stranded Total RNA LT Sample Prep Kit contains adapter index tubes
recommended for preparing and pooling 24 or fewer samples for sequencing
} The TruSeq Stranded Total RNA HT Sample Prep Kit contains a 96-well plate with 96
uniquely indexed adapter combinations designed for manual or automated preparation
of 96 uniquely indexed samples
The protocol is compatible with no indexing or a lower indexing pooling level. The
libraries generated do not require PCR amplification to enable cluster generation, although
2
Part # 15031048 Rev. E
TruSeq Stranded Total RNA Sample Preparation Guide
3
Introduction
PCR is recommended in the standard protocol to robustly meet the yield requirements of
most standard applications.
Overview
Protocol Features
This guide documents the sample preparation protocol using the Illumina TruSeq Stranded
Total RNA LT Sample Prep Kit or TruSeq Stranded Total RNA HT Sample Prep Kit.
} Chapter 2 Low Sample (LS) Protocol explains how to perform the TruSeq Stranded
Total RNA Sample Preparation using the Low Sample Protocol
} Chapter 3 High Sample (HS) Protocol explains how to perform the TruSeq Stranded
Total RNA Sample Preparation using the High Sample Protocol
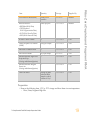
Equivalent results can be expected from either protocol and their distinguishing elements
are as follows:
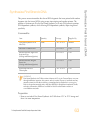
Table 1 Protocol Features
LT Kit - Number of samples
processed at one time
HT Kit - Number of samples
processed at one time
Plate Type
Low Sample
≤ 48 with indexed
adapter tubes
High Sample
> 48 with indexed
adapter tubes
≤ 24 with indexed
adapter plate
> 24 with indexed
adapter plate
96-well 0.3 ml PCR
96-well MIDI
96-well HSP
96-well MIDI
96-well thermal cycler
Microheating system
Microplate shaker
Incubation Equipment
96-well thermal cycler
Mixing Method
Pipetting
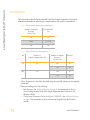
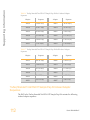
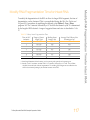
Illumina recommends the following kit, sample number, and protocol combinations:
Table 2 Kit and Sample Number Recommendations
4
Number of Samples
Processed
At One Time
Recommended
Kit
<24
LT
24–48
LT or HT
>48
HT
Part # 15031048 Rev. E
Protocol Features
Table 3 Kit and Protocol Recommendations
Kit
Number of
Samples
Supported
Number of Samples Processed At One
Time
LT
48
≤48
LS
>48
HS
≤24
LS
>24
HS
HT
96
TruSeq Stranded Total RNA Sample Preparation Guide
Protocol
5
Overview
RNA Input Recommendations
It is important to follow the TruSeq Stranded Total RNA Sample Preparation input
recommendations.
Total RNA Input
} This protocol is optimized for 0.1–1 µg of total RNA.
• Lower amounts might result in inefficient ligation and low yield.
} The protocol has been tested using 0.1–1 µg of high-quality universal human reference
total RNA as input.
• Use of RNA from other species, tissues, or qualities might require further
optimization regarding the initial input amount.
} The protocol recommends diluting the in-line controls for tracking the steps involved
in converting dsDNA into libraries.
• The dilution is optimized for 0.1–1 µg of high-quality input RNA.
• When using less RNA or highly degraded RNA, these controls might need further
dilution.
• If no controls are added, use Resuspension Buffer in place of the controls in the
protocol.
} It is important to know the quality of the RNA starting material. The fragmentation
conditions were optimized for high-quality RNA.
• Degraded RNAs are shorter than full length RNA. If the same fragmentation
conditions for degraded RNAs are used, it will cause the libraries to be shorter and
can result in low yield or failure of the protocol.
• If starting with degraded RNA, the fragmentation time must be adjusted to avoid
over fragmentation of the RNA samples. For more information, see Appendix A
Alternate Fragmentation Protocols.
• RNA that has DNA contamination will result in an underestimation of the amount
of RNA used.
6
Part # 15031048 Rev. E
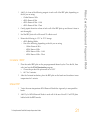
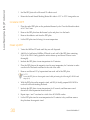
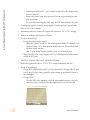
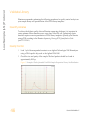
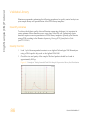
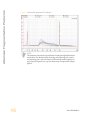
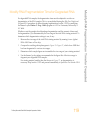
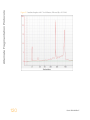
RNA Input Recommendations
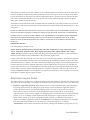
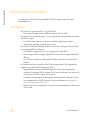
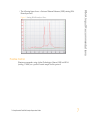
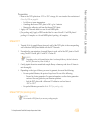
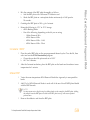
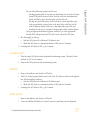
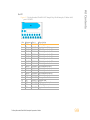
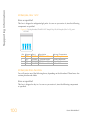
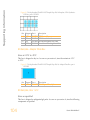
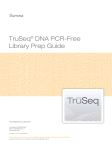
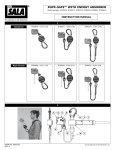
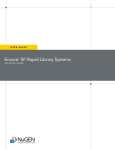
} The following figure shows a Universal Human Reference (UHR) starting RNA
Bioanalyzer trace.
Figure 1 Starting RNA Bioanalyzer Trace
Positive Control
Illumina recommends using Agilent Technologies Human UHR total RNA
(catalog # 740000) as a positive control sample for this protocol.
TruSeq Stranded Total RNA Sample Preparation Guide
7
Overview
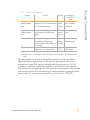
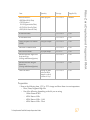
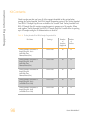
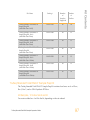
In-Line Control DNA
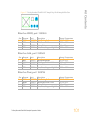
The End Repair Control, A-Tailing Control, and Ligation Control reagents contain DNA
fragments used as controls for the enzymatic activities of the Second Strand Marking
Master Mix, A-Tailing Mix, and Ligation Mix, respectively. Each reagent contains dsDNA
fragments designed to report the success or failure of a specific enzymatic activity used in
the library preparation process. Sequencing determines the readout. If the sequence of an inline control is in the final sequencing data viewed in the Sequence Analysis Viewer (SAV),
it indicates that its corresponding step was successful. If it does not, or if it is in
substantially diminished numbers, it indicates the step failed. The controls are intended for
troubleshooting and are useful for identifying the specific mode of failure, but are
uninformative in cases where sequencing data are not generated from a library.
NOTE
The use of these controls is optional and they can be replaced with the same volume of
Resuspension Buffer.
The control molecules work through the design of their ends. Controls are added to the
reactions before their corresponding step in the protocol. Their end structures match those
of a DNA molecule that has not gone through the step. If the step is successful, the control
molecule will be modified to participate in downstream reactions of library generation and
resulting in sequencing data. If the step fails, the control molecule will not go forward in
the process and no sequencing data will be generated. Using 100 ng of starting material,
the controls yield approximately 0.2% of clusters, although this can vary based on library
yield.
8
Part # 15031048 Rev. E
Second Strand
Marking Master
Mix
Second Strand
Marking Master
Mix
A-Tailing Mix
Ligation Mix
Control
End repair: Generate blunt ended
End
fragments by 3'–>5' exonuclease and Repair
5'–>3' polymerase activities
Control
1*
End repair: Add 5'-phosphate
End
groups needed for downstream
Repair
ligation
Control
2*
A-tailing: Make fragments
Acompatible with adapters and
Tailing
prevent self-ligation by adding a 3'- Control
A overhang
Ligation: Join 3'-T overhang
Ligation
adapters to 3'-A overhang inserts
Control
In-Line Control DNA
Table 4 In-Line Control Functions
Reagent
Function
Structure of
Control DNA
Ends
5' overhang at one
end, 3' overhang
at other end
Blunt with 5'-OH
group
Blunt with 5'phosphate group
Single-base 3' 'A'
base overhang
*End Repair Control 1 and End Repair Control 2 are separate controls included in the End Repair Control
reagent
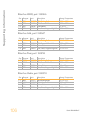
The control reagents can be used for various library insert sizes. Each is provided in
ladders ranging from approximately 150–850 bp in 100 bp increments. Each control
molecule has a unique DNA sequence, indicating both its function and size. The RTA
software (v1.9, and later) recognizes these sequences and isolates the control sequences
from the main body of sequencing reads. RTA reports the control sequences counts per lane
in the controls tab of the RTA status.html page. For more information regarding the control
read-out in the SAV, see the Sequence Analysis Viewer User Guide (part # 15020619).
TruSeq Stranded Total RNA Sample Preparation Guide
9
Overview
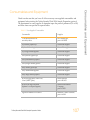
Additional Resources
The following resources are available for TruSeq Stranded Total RNA Sample Preparation
protocol guidance and sample tracking. Access these and other resources on the Illumina
website at support.illumina.com/sequencing/kits.ilmn. Then, select TruSeq Stranded Total
RNA LT Sample Prep Kit Support or TruSeq Stranded Total RNA HT Sample Prep
Kit Support.
Resource
Description
Training
Illustrates elements of the TruSeq Stranded Total RNA Sample
Preparation process. Viewing these videos is recommended
for new and less experienced users before starting sample
preparation.
• Click Training on TruSeq Stranded Total RNA LT Sample
Prep Kit Support or
• Click Training on TruSeq Stranded Total RNA HT Sample
Prep Kit Support
Best Practices
Provides best practices specific to this protocol. Review these
best practices before starting sample preparation. Topics
include:
• Handling Liquids
• Handling Master Mix Reagents
• Handling Magnetic Beads
• Avoiding Cross-Contamination
• Potential DNA Contaminants
• Temperature Considerations
• Equipment
• Click Best Practices on TruSeq Stranded Total RNA LT
Sample Prep Kit Support or
• Click Best Practices on TruSeq Stranded Total RNA HT
Sample Prep Kit Support
10
Part # 15031048 Rev. E
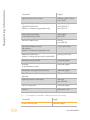
Description
TruSeq Stranded Total RNA
Sample Preparation Low
Sample Experienced User Card
and Lab Tracking Form
(part # 15031060)
Provides LS protocol instructions, but with less detail than
what is provided in this user guide. New or less experienced
users are advised to follow this user guide and not the EUC
and Lab Tracking Form.
• Click Documentation & Literature on TruSeq Stranded
Total RNA LT Sample Prep Kit Support or
• Click Documentation & Literature on TruSeq Stranded
Total RNA HT Sample Prep Kit Support
TruSeq Stranded Total RNA
Sample Preparation High
Sample Experienced User Card
and Lab Tracking Form
(part # 15031059)
Provides HS protocol instructions, but with less detail than
what is provided in this user guide. New or less experienced
users are advised to follow this user guide and not the EUC
and Lab Tracking Form.
• Click Documentation & Literature on TruSeq Stranded
Total RNA LT Sample Prep Kit Support or
• Click Documentation & Literature on TruSeq Stranded
Total RNA HT Sample Prep Kit Support
TruSeq Sample Preparation
Pooling Guide (part # 15042173)
Provides TruSeq pooling guidelines for sample preparation.
Review this guide before beginning library preparation.
• Click Documentation & Literature on TruSeq Stranded
Total RNA LT Sample Prep Kit Support or
• Click Documentation & Literature on TruSeq Stranded
Total RNA HT Sample Prep Kit Support
Illumina Experiment Manager
(IEM)
Enables you to create and edit appropriate sample sheets for
Illumina sequencers and analysis software and record
parameters for your sample plate.
To download the software:
• Click Downloads on TruSeq Stranded Total RNA LT
Sample Prep Kit Support or
• Click Downloads on TruSeq Stranded Total RNA HT
Sample Prep Kit Support
To download the documentation:
• Click Documentation & Literature on TruSeq Stranded
Total RNA LT Sample Prep Kit Support or
• Click Documentation & Literature on TruSeq Stranded
Total RNA HT Sample Prep Kit Support
TruSeq Stranded Total RNA Sample Preparation Guide
11
Additional Resources
Resource
12
Part # 15031048 Rev. E
Chapter 2 Low Sample (LS) Protocol
Introduction
Sample Prep Workflow
Ribo-Zero Deplete and Fragment RNA
Synthesize First Strand cDNA
Synthesize Second Strand cDNA
Adenylate 3' Ends
Ligate Adapters
Enrich DNA Fragments
Validate Library
Normalize and Pool Libraries
TruSeq Stranded Total RNA Sample Preparation Guide
14
16
17
25
28
32
35
42
46
48
13
Chapter 2
Low Sample (LS) Protocol
Low Sample (LS) Protocol
Introduction
This chapter describes the TruSeq Stranded Total RNA Sample Preparation LS protocol.
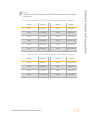
Illumina recommends the following kit, sample number, and protocol combinations:
Table 5 Kit and Sample Number Recommendations
Number of Samples
Processed
At One Time
Recommended
Kit
<24
LT
24–48
LT or HT
>48
HT
Table 6 Kit and Protocol Recommendations
Kit
Number of
Samples Supported per Kit
Number of Samples
Processed
At One Time
Protocol
LT
48
≤48
LS
>48
HS
≤24
LS
>24
HS
HT
96
} Follow the protocol in the order described, using the specified volumes and incubation
parameters.
} Before proceeding review the following:
• Best Practices—See Additional Resources on page 10 for information on how to
access TruSeq Stranded Total RNA Sample Preparation Best Practices on the
Illumina website.
• TruSeq Sample Preparation Pooling Guide (part # 15042173)—See Additional Resources
on page 10 for information on how to download the guide from the Illumina
website.
14
Part # 15031048 Rev. E
TruSeq Stranded Total RNA Sample Preparation Guide
15
Introduction
• Appendix A Supporting Information—Confirm your kit contents and make sure
that you have obtained all of the requisite equipment and consumables for the
LS protocol.
Low Sample (LS) Protocol
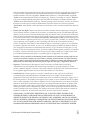
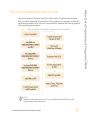
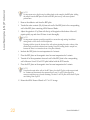
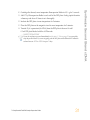
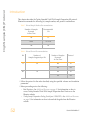
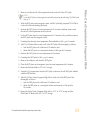
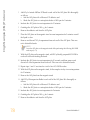
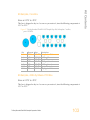
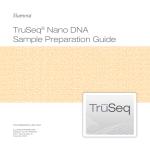
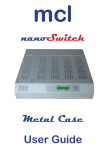
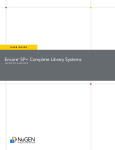
Sample Prep Workflow
The following illustrates the processes of the TruSeq Stranded Total RNA Sample
Preparation LS protocol to prepare templates using 24 indexed adapter tubes or a RAP.
Figure 2 TruSeq Stranded Total RNA Sample Preparation LS Workflow
16
Part # 15031048 Rev. E
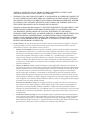
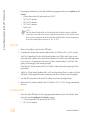
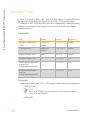
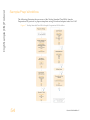
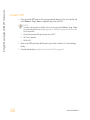
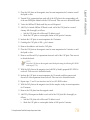
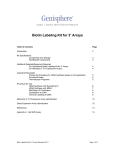
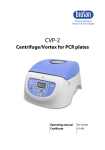
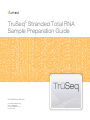
This process depletes rRNA from total RNA. After the rRNA is depleted, the remaining
RNA is purified, fragmented, and primed for cDNA synthesis. It is important to follow this
purification procedure exactly to be sure of reproducibility. Reference the following diagram
while performing the procedures:
Figure 3 TruSeq Stranded Total RNA Sample Preparation Purification Workflow
NOTE
Illumina recommends that you use 0.1–1 µg of total RNA and use PCR plates with a
magnetic plate stand for this process.
TruSeq Stranded Total RNA Sample Preparation Guide
17
Ribo-Zero Deplete and Fragment RNA
Ribo-Zero Deplete and Fragment RNA
Low Sample (LS) Protocol
NOTE
Allow the rRNA Removal Beads and the RNAClean XP Beads to fully pellet against the
magnetic stand for 1 minute and 5 minutes, respectively. Remove the supernatant from the
beads immediately while the beads are still pelleted against the magnetic stand. Do not allow
the rRNA Removal Bead pellets to dry.
NOTE
The RNAClean XP bead wash steps use 70% Ethanol, while 80% Ethanol is used for AMPure
XP bead washes.
Consumables
18
Item
Quantity
Storage
Supplied By
Elute, Prime, Fragment High
Mix (EPH)
1 tube per 48
reactions
-15°C to -25°C
Illumina
Elution Buffer (ELB)
1 tube per 48
reactions
2°C to 8°C
Illumina
One of the following,
depending on the kit you are
using:
• Globin Removal Mix (GRM)
(Ribo-Zero Globin kit
contents)
• rRNA Removal Mix (RRM)
(Ribo-Zero
Human/Mouse/Rat kit
contents)
• rRNA Removal Mix - Gold
(RRM G) (Ribo-Zero Gold kit
contents)
• rRNA Removal Mix - Plant
(RRM P) (Ribo-Zero Plant kit
contents)
1 tube per 48
reactions
-15°C to -25°C
Illumina
Resuspension Buffer (RSB)
1 tube
-15°C to -25°C
Illumina
rRNA Binding Buffer (RBB)
1 tube per 48
reactions
-15°C to -25°C
Illumina
Part # 15031048 Rev. E
Quantity
Storage
Supplied By
rRNA Removal Beads (RRB)
1 tube per 48
reactions
2°C to 8°C
Illumina
Barcode labels for:
• BRP (Bind rRNA Plate)
• DFP (Depleted
RNA Fragmentation Plate)
• RCP (RNA Clean Up Plate)
• RRP (rRNA Removal Plate)
1 label per plate
15°C to 30°C
Illumina
96-well 0.3 ml PCR Plates
4
15°C to 30°C
User
Freshly Prepared 70% Ethanol
(EtOH)
200 µl per sample
15°C to 30°C
User
Microseal ‘B’ Adhesive Seals
2
15°C to 30°C
User
RNAClean XP Beads
99 µl per sample
2°C to 8°C
User
RNase/DNase-free Eight-Tube
Strips and Caps
(if using multichannel pipettes)
6
15°C to 30°C
User
RNase/DNase-free Reagent
Reservoirs
(if using multichannel pipettes)
6
15°C to 30°C
User
Ultra Pure Water
Enough to dilute
each total RNA
sample to a final
volume of 10 µl
15°C to 30°C
User
Preparation
} Remove the following from -15°C to -25°C storage and thaw them at room temperature:
• Elute, Prime, Fragment High Mix
TruSeq Stranded Total RNA Sample Preparation Guide
19
Ribo-Zero Deplete and Fragment RNA
Item
Low Sample (LS) Protocol
• One of the following, depending on the kit you are using:
— Globin Removal Mix
— rRNA Removal Mix
— rRNA Removal Mix - Gold
— rRNA Removal Mix - Plant
• rRNA Binding Buffer
• Resuspension Buffer
NOTE
The Resuspension Buffer can be stored at 2°C to 8°C after the initial thaw.
} Remove the following from 2°C to 8°C storage and let stand to bring to room
temperature:
• Elution Buffer
• rRNA Removal Beads
} Remove the RNAClean XP beads from 2°C to 8°C storage and let stand for at least
30 minutes to bring them to room temperature.
} Pre-program the thermal cycler with the following programs:
• Choose the pre-heat lid option and set to 100°C
• 68°C for 5 minutes – save as RNA Denaturation
• 94°C for 8 minutes, 4°C hold – save as Elution 2 - Frag - Prime
NOTE
For inserts larger than 120–200 bp with a median size of 150 bp or if starting with
degraded total RNA, see Appendix A Alternate Fragmentation Protocols for the
appropriate Elution 2 - Frag - Prime program settings.
}
}
}
}
}
Set the centrifuge to 15°C to 25°C, if refrigerated.
Apply a BRP barcode label to a new 96-well 0.3 ml PCR plate.
Apply a DFP barcode label to a new 96-well 0.3 ml PCR plate.
Apply an RCP barcode label to a new 96-well 0.3 ml PCR plate.
Apply an RRP barcode label to a new 96-well 0.3 ml PCR plate.
Make BRP
20
1
Dilute the total RNA with nuclease-free ultra pure water to a final volume of 10 µl in
the new 96-well 0.3 ml PCR plate labeled with the BRP barcode.
2
Add 5 µl of rRNA Binding Buffer to each well of the BRP plate.
Part # 15031048 Rev. E
Add 5 µl of one of the following reagents to each well of the BRP plate, depending on
the kit you are using:
• Globin Removal Mix
• rRNA Removal Mix
• rRNA Removal Mix - Gold
• rRNA Removal Mix - Plant
4
Gently pipette the entire volume of each well of the BRP plate up and down 6 times to
mix thoroughly.
5
Seal the BRP plate with a Microseal ‘B’ adhesive seal.
6
Return the following to -15°C to -25°C storage:
• rRNA Binding Buffer
• One of the following, depending on the kit you are using:
— Globin Removal Mix
— rRNA Removal Mix
— rRNA Removal Mix - Gold
— rRNA Removal Mix - Plant
Incubate 1 BRP
1
Place the sealed BRP plate on the pre-programmed thermal cycler. Close the lid, then
select and run the RNA Denaturation program.
a Choose the pre-heat lid option and set to 100°C
b 68°C for 5 minutes
2
After the 5 minute incubation, place the BRP plate on the bench and incubate at room
temperature for 1 minute.
Make RRP
1
Vortex the room temperature rRNA Removal Bead tube vigorously to resuspend the
beads.
2
Add 35 µl of rRNA Removal Beads to each well of the new 96-well 0.3 ml PCR plate
labeled with the RRP barcode.
TruSeq Stranded Total RNA Sample Preparation Guide
21
Ribo-Zero Deplete and Fragment RNA
3
Low Sample (LS) Protocol
NOTE
It is important not to skip this step by adding beads to the sample in the BRP plate. Adding
the sample from the BRP plate to beads in the RRP plate in step 3 will ensure optimal
performance.
3
Remove the adhesive seal from the BRP plate.
4
Tansfer the entire contents (20 µl) from each well of the BRP plate to the corresponding
well of the RRP plate containing rRNA Removal Beads.
5
Adjust the pipette to 45 µl, then with the tip of the pipette at the bottom of the well,
pipette quickly up and down 20 times to mix thoroughly.
NOTE
It is important to pipette up and down quickly to ensure thorough mixing. Insufficient
mixing leads to lower levels of rRNA depletion.
Pipetting with the tips at the bottom of the well and not pipetting the entire volume of the
solution help prevent the solution from foaming. Excessive foaming leads to sample loss,
because the foam is not transferred out of the plate efficiently.
6
Incubate the RRP plate at room temperature for 1 minute.
7
Place the RRP plate on the magnetic stand at room temperature for 1 minute.
8
Transfer all of the supernatant from each well of the RRP plate to the corresponding
well of the new 96-well 0.3 ml PCR plate labeled with the RCP barcode.
9
Place the RCP plate on the magnetic stand at room temperature for 1 minute.
NOTE
If any beads remain in the wells of the RCP plate, place the RCP plate on the magnet stand
for 1 minute and then transfer the supernatant to a new 0.3 ml PCR plate. Repeat as
necessary until there are no beads remaining. The last 0.3 ml PCR plate will be the RCP plate
used during Clean Up RCP.
10 Return the rRNA Removal Beads to 2°C to 8°C storage.
22
Part # 15031048 Rev. E
1
Vortex the RNAClean XP beads until they are well dispersed, then add 99 µl of wellmixed RNAClean XP beads to each well of the RCP plate containing ribosomal
depleted RNA. Gently pipette the entire volume up and down 10 times to mix
thoroughly.
NOTE
If starting with degraded total RNA, add 193 µl of well-mixed RNAClean XP beads to
each well of the RCP plate containing ribosomal depleted RNA.
2
Incubate the RCP plate at room temperature for 15 minutes.
3
Place the RCP plate on the magnetic stand at room temperature, for 5 minutes to make
sure that all of the beads are bound to the side of the wells.
4
Remove and discard all of the supernatant from each well of the RCP plate.
NOTE
Leave the RCP plate on the magnetic stand while performing the following 70% EtOH wash
steps (5–6).
5
With the RCP plate on the magnetic stand, add 200 µl freshly prepared 70% EtOH to
each well without disturbing the beads.
6
Incubate the RCP plate at room temperature for 30 seconds, and then remove and
discard all of the supernatant from each well.
7
Let the RCP plate stand at room temperature for 15 minutes to dry, and then remove
the plate from the magnetic stand.
8
Centrifuge the thawed, room temperature Elution Buffer to 600 × g for 5 seconds.
9
Add 11 µl Elution Buffer to each well of the RCP plate. Gently pipette the entire volume
up and down 10 times to mix thoroughly.
10 Incubate the RCP plate at room temperature for 2 minutes.
11 Place the RCP plate on the magnetic stand at room temperature for 5 minutes.
12 Return the Elution Buffer to 2°C to 8°C storage.
13 Transfer 8.5 µl supernatant from the RCP plate to the new 96-well 0.3 ml PCR plate
labeled with the DFP barcode.
TruSeq Stranded Total RNA Sample Preparation Guide
23
Ribo-Zero Deplete and Fragment RNA
Clean Up RCP
Low Sample (LS) Protocol
14 Add 8.5 µl Elute, Prime, Fragment High Mix to each well of the DFP plate. Gently
pipette the entire volume up and down 10 times to mix thoroughly.
15 Seal the DFP plate with a Microseal ‘B’ adhesive seal.
16 Return the Elute, Prime, Fragment High Mix to -15°C to -25°C storage and the
RNAClean XP Beads tube to 2°C to 8°C storage.
Incubate 1 DFP
1
Place the sealed DFP plate on the pre-programmed thermal cycler. Close the lid, then
select and run the Elution 2 - Frag - Prime program.
NOTE
For inserts larger than 120–200 bp with a median size of 150 bp or if starting with degraded
total RNA, make sure the appropriate Elution 2 - Frag - Prime program settings have been
set. See Appendix A Alternate Fragmentation Protocols for more information.
a
b
c
24
Choose the pre-heat lid option and set to 100°C
94°C for 8 minutes
Hold at 4°C
2
Remove the DFP plate from the thermal cycler when it reaches 4°C and centrifuge
briefly.
3
Proceed immediately to Synthesize First Strand cDNA on page 25.
Part # 15031048 Rev. E
This process reverse transcribes the cleaved RNA fragments that were primed with random
hexamers into first strand cDNA using reverse transcriptase and random primers. The
addition of Actinomycin D to the First Stand Synthesis Act D mix (FSA) prevents spurious
DNA-dependent synthesis, while allowing RNA-dependent synthesis, improving strand
specificity.
Consumables
Item
Quantity
Storage
Supplied By
First Strand Synthesis Act D
Mix (FSA)
1 tube per 48
reactions
-15°C to -25°C
Illumina
Microseal ‘B’ Adhesive Seal
1
15°C to 30°C
User
RNase/DNase-free Eight-Tube
Strips and Caps
(if using multichannel pipettes)
1
15°C to 30°C
User
RNase/DNase-free Reagent
Reservoirs
(if using multichannel pipettes)
1
15°C to 30°C
User
SuperScript II Reverse
Transcriptase
1 tube
-15°C to -25°C
User
WARNING
First Strand Synthesis Act D Mix contains Actinomycin D, a toxin. Personal injury can occur
through inhalation, ingestion, skin contact, and eye contact. Dispose of containers and any
unused contents in accordance with the governmental safety standards for your region.
Refer to the product material safety data sheet (MSDS) for detailed environmental, health,
and safety information. MSDSs are available for this kit on the Illumina website at
www.illumina.com/msds.
Preparation
} Remove one tube of First Strand Synthesis Act D Mix from -15°C to -25°C storage and
thaw it at room temperature.
TruSeq Stranded Total RNA Sample Preparation Guide
25
Synthesize First Strand cDNA
Synthesize First Strand cDNA
Low Sample (LS) Protocol
} Pre-program the thermal cycler with the following program and save as Synthesize 1st
Strand:
• Choose the pre-heat lid option and set to 100°C
• 25°C for 10 minutes
• 42°C for 15 minutes
• 70°C for 15 minutes
• Hold at 4°C
NOTE
The First Strand Synthesis Mix Act D with SuperScript II added is stable to additional
freeze-thaw cycles and can be used for subsequent experiments. If more than six freezethaw cycles are anticipated, divide the First Strand Synthesis Mix Act D and SuperScript
II mix into smaller aliquots and store at -15°C to -25°C.
Add FSA
1
Remove the adhesive seal from the DFP plate.
2
Centrifuge the thawed First Strand Synthesis Mix Act D tube to 600 × g for 5 seconds.
3
Add 50 µl SuperScript II to the First Strand Synthesis Act D Mix tube. If you are not
using the entire contents of the First Strand Synthesis Act D Mix tube, add SuperScript
II at a ratio of 1 µl SuperScript II for each 9 µl First Strand Synthesis Act D Mix. Mix
gently, but thoroughly, and centrifuge briefly.
Label the First Strand Synthesis Mix Act D tube to indicate that the SuperScript II has
been added.
4
Add 8 µl of First Strand Synthesis Mix Act D and SuperScript II mix to each well of the
DFP plate. Gently pipette the entire volume up and down 6 times to mix thoroughly.
5
Seal the DFP plate with a Microseal ‘B’ adhesive seal and centrifuge briefly.
6
Return the First Strand Synthesis Mix Act D tube to -15°C to -25°C storage immediately
after use.
Incubate 2 DFP
1
26
Place the sealed DFP plate on the pre-programmed thermal cycler. Close the lid, then
select and run the Synthesize 1st Strand program.
a Choose the pre-heat lid option and set to 100°C
b 25°C for 10 minutes
Part # 15031048 Rev. E
2
42°C for 15 minutes
70°C for 15 minutes
Hold at 4°C
When the thermal cycler reaches 4°C, remove the DFP plate from the thermal cycler
and proceed immediately to Synthesize Second Strand cDNA on page 28.
TruSeq Stranded Total RNA Sample Preparation Guide
27
Synthesize First Strand cDNA
c
d
e
Low Sample (LS) Protocol
Synthesize Second Strand cDNA
This process removes the RNA template and synthesizes a replacement strand,
incorporating dUTP in place of dTTP to generate ds cDNA. The incorporation of dUTP
quenches the second strand during amplification, because the polymerase does not
incorporate past this nucleotide. AMPure XP beads are used to separate the ds cDNA from
the second strand reaction mix. At the end of this process, you have blunt-ended cDNA.
Consumables
28
Item
Quantity
Storage
Supplied By
(Optional) End Repair Control
(CTE)
1 tube per 48
reactions
-15°C to -25°C
Illumina
Resuspension Buffer (RSB)
1 tube
2°C to 8°C
Illumina
Second Strand Marking Master
Mix (SMM)
1 tube per 48
reactions
-15°C to -25°C
Illumina
ALP (Adapter Ligation Plate)
Barcode Label
1 label per plate
15°C to 30°C
Illumina
96-well 0.3 ml PCR Plate
1
15°C to 30°C
User
AMPure XP Beads
90 µl per sample
2°C to 8°C
User
Freshly Prepared 80% Ethanol
(EtOH)
400 µl per sample
15°C to 30°C
User
Microseal ‘B’ Adhesive Seals
2
15°C to 30°C
User
RNase/DNase-free Eight-Tube
Strips and Caps
(if using multichannel pipettes)
5
15°C to 30°C
User
RNase/DNase-free Reagent
Reservoirs
(if using multichannel pipettes)
5
15°C to 30°C
User
Part # 15031048 Rev. E
} Remove the following from -15°C to -25°C storage and thaw them at room temperature:
• End Repair Control
NOTE
The use of the End Repair Control is optional and it can be replaced with the same
volume of Resuspension Buffer.
• Second Strand Marking Master Mix
} Remove the Resuspension Buffer from 2°C to 8°C storage and bring it to room
temperature.
} Remove the AMPure XP beads from storage and let stand for at least 30 minutes to
bring them to room temperature.
} Review Best Practices for Handling Magnetic Beads. See Additional Resources on page 10
for information on how to access TruSeq Stranded Total RNA Sample Preparation Best
Practices on the Illumina website.
} Pre-heat the thermal cycler to 16°C.
} Choose the thermal cycler pre-heat lid option and set to 30°C
} Apply an ALP barcode label to a new 96-well 0.3 ml PCR plate.
Add SMM
1
Remove the adhesive seal from the DFP plate.
2
Do one of the following:
• If using the in-line control reagent:
— Centrifuge the thawed End Repair Control tube to 600 × g for 5 seconds.
— Dilute the End Repair Control to 1/50 in Resuspension Buffer (For example,
2 µl End Repair Control + 98 µl Resuspension Buffer) before use. Discard the
diluted End Repair Control after use.
— Add 5 µl of diluted End Repair Control to each well of the DFP plate.
• If not using the in-line control reagent, add 5 µl of Resuspension Buffer to each
well of the DFP plate.
3
Centrifuge the thawed Second Strand Marking Master Mix to 600 × g for 5 seconds.
4
Add 20 µl of thawed Second Strand Marking Master Mix to each well of the DFP plate.
Gently pipette the entire volume up and down 6 times to mix thoroughly.
TruSeq Stranded Total RNA Sample Preparation Guide
29
Synthesize Second Strand cDNA
Preparation
Low Sample (LS) Protocol
5
Seal the DFP plate with a Microseal ‘B’ adhesive seal.
6
Return the Second Strand Marking Master Mix tube to -15°C to -25°C storage after use.
Incubate 3 DFP
1
Place the sealed DFP plate on the pre-heated thermal cycler. Close the lid and incubate
at 16°C for 1 hour.
2
Remove the DFP plate from the thermal cycler and place it on the bench.
3
Remove the adhesive seal from the DFP plate.
4
Let the DFP plate stand to bring it to room temperature.
Clean Up DFP
1
Vortex the AMPure XP beads until they are well dispersed.
2
Add 90 µl of well-mixed AMPure XP beads to each well of the DFP plate containing
50 µl of ds cDNA. Gently pipette the entire volume up and down 10 times to mix
thoroughly.
3
Incubate the DFP plate at room temperature for 15 minutes.
4
Place the DFP plate on the magnetic stand at room temperature, for 5 minutes to make
sure that all of the beads are bound to the side of the wells.
5
Remove and discard 135 µl supernatant from each well of the DFP plate.
NOTE
Leave the DFP plate on the magnetic stand while performing the following 80% EtOH wash
steps (6–8).
30
6
With the DFP plate on the magnetic stand, add 200 µl freshly prepared 80% EtOH to
each well without disturbing the beads.
7
Incubate the DFP plate at room temperature for 30 seconds, and then remove and
discard all of the supernatant from each well.
8
Repeat steps 6 and 7 one time for a total of two 80% EtOH washes.
9
Let the DFP plate stand at room temperature for 15 minutes to dry, and then remove
the plate from the magnetic stand.
Part # 15031048 Rev. E
11 Add 17.5 µl Resuspension Buffer to each well of the DFP plate. Gently pipette the entire
volume up and down 10 times to mix thoroughly.
12 Incubate the DFP plate at room temperature for 2 minutes.
13 Place the DFP plate on the magnetic stand at room temperature for 5 minutes.
14 Transfer 15 µl supernatant (ds cDNA) from the DFP plate to the new 96-well
0.3 ml PCR plate labeled with the ALP barcode.
SAFE STOPPING POINT
If you do not plan to proceed immediately to Adenylate 3' Ends on page 32, you can safely
stop the protocol here. If you are stopping, seal the ALP plate with a Microseal ‘B’ adhesive
seal and store at -15°C to -25°C for up to 7 days.
TruSeq Stranded Total RNA Sample Preparation Guide
31
Synthesize Second Strand cDNA
10 Centrifuge the thawed, room temperature Resuspension Buffer to 600 × g for 5 seconds.
Low Sample (LS) Protocol
Adenylate 3' Ends
A single ‘A’ nucleotide is added to the 3’ ends of the blunt fragments to prevent them from
ligating to one another during the adapter ligation reaction. A corresponding single
‘T’ nucleotide on the 3’ end of the adapter provides a complementary overhang for ligating
the adapter to the fragment. This strategy ensures a low rate of chimera (concatenated
template) formation.
Consumables
Item
Quantity
Storage
Supplied By
(Optional) A-Tailing Control
(CTA)
1 tube per 48
reactions
-15°C to -25°C
Illumina
A-Tailing Mix (ATL)
1 tube per 48
reactions
-15°C to -25°C
Illumina
Resuspension Buffer (RSB)
1 tube
2°C to 8°C
Illumina
Microseal ‘B’ Adhesive Seal
1
15°C to 30°C
User
RNase/DNase-free Eight-Tube
Strips and Caps
(if using multichannel pipettes)
3
15°C to 30°C
User
RNase/DNase-free Reagent
Reservoirs
(if using multichannel pipettes)
3
15°C to 30°C
User
Preparation
} Remove the following from -15°C to -25°C storage and thaw them at room temperature:
• A-Tailing Control
NOTE
The use of the A-Tailing Control is optional and it can be replaced with the same
volume of Resuspension Buffer.
• A-Tailing Mix
32
Part # 15031048 Rev. E
Add ATL
1
Do one of the following:
• If using the in-line control reagent:
— Centrifuge the thawed A-Tailing Control tube to 600 × g for 5 seconds.
— Dilute the A-Tailing Control to 1/100 in Resuspension Buffer (For example, 1 µl
A-Tailing Control + 99 µl Resuspension Buffer) before use. Discard the diluted
A-Tailing Control after use.
— Add 2.5 µl of diluted A-Tailing Control to each well of the ALP plate.
• If not using the in-line control reagent, add 2.5 µl of Resuspension Buffer to each
well of the ALP plate.
2
Add 12.5 µl of thawed A-Tailing Mix to each well of the ALP plate. Gently pipette the
entire volume up and down 10 times to mix thoroughly.
3
Seal the ALP plate with a Microseal ‘B’ adhesive seal.
TruSeq Stranded Total RNA Sample Preparation Guide
33
Adenylate 3' Ends
} Remove the Resuspension Buffer from 2°C to 8°C storage and bring it to room
temperature.
} Remove the ALP plate from -15°C to -25°C storage, if it was stored at the conclusion of
Clean Up DFP on page 30.
• Let it thaw at room temperature.
• Centrifuge the thawed ALP plate to 280 × g for 1 minute.
• Remove the adhesive seal from the ALP plate.
} Pre-program the thermal cycler with the following program and save as ATAIL70:
• Choose the pre-heat lid option and set to 100°C
• 37°C for 30 minutes
• 70°C for 5 minutes
• Hold at 4°C
Low Sample (LS) Protocol
Incubate 1 ALP
34
1
Place the sealed ALP plate on the pre-programmed thermal cycler. Close the lid, then
select and run the ATAIL70 program.
a Choose the pre-heat lid option and set to 100°C
b 37°C for 30 minutes
c 70°C for 5 minutes
d Hold at 4°C
2
When the thermal cycler temperature is 4°C, remove the ALP plate from the thermal
cycler, then proceed immediately to Ligate Adapters on page 35.
Part # 15031048 Rev. E
This process ligates multiple indexing adapters to the ends of the ds cDNA, preparing
them for hybridization onto a flow cell.
Consumables
Item
Quantity
Storage
Supplied By
(Optional) Ligation Control
(CTL)
1 tube per 48
reactions
-15°C to -25°C
Illumina
Choose from the following
depending on the kit you are
using:
• TruSeq Stranded Total RNA
LT Sample Prep Kit contents:
• RNA Adapter Indices
(AR001–AR016, AR018–
AR023, AR025, AR027)
• TruSeq Stranded Total RNA
HT Sample Prep Kit contents:
• RAP (RNA Adapter Plate)
1 tube of each index
being used, per
column of 8 reactions
or
1 RAP
-15°C to -25°C
Illumina
Ligation Mix (LIG)
1 tube per 48
reactions
-15°C to -25°C
Illumina
Resuspension Buffer (RSB)
1 tube
2°C to 8°C
Illumina
Stop Ligation Buffer (STL)
1 tube per 48
reactions
-15°C to -25°C
Illumina
Barcode labels for:
• CAP (Clean Up ALP Plate)
• PCR (Polymerase Chain
Reaction Plate)
• RAP (RNA Adapter Plate)
(if using the HT kit)
1 label per plate
15°C to 30°C
Illumina
TruSeq Stranded Total RNA Sample Preparation Guide
35
Ligate Adapters
Ligate Adapters
Low Sample (LS) Protocol
Item
Quantity
Storage
Supplied By
96-well 0.3 ml PCR Plates
2
15°C to 30°C
User
AMPure XP Beads
92 µl per sample
2°C to 8°C
User
Freshly Prepared 80% Ethanol
(EtOH)
800 µl per sample
15°C to 30°C
User
Microseal ‘B’ Adhesive Seals
2
15°C to 30°C
User
RNase/DNase-free Eight-Tube
Strips and Caps
(if using multichannel pipettes)
4–28
15°C to 30°C
User
RNase/DNase-free Reagent
Reservoirs
(if using multichannel pipettes)
4–28
15°C to 30°C
User
Preparation
} Remove the following from -15°C to -25°C storage and thaw them at room temperature:
• Appropriate RNA Adapter tubes (depending on the RNA Adapter Indices being
used) or the RAP.
NOTE
• Review the TruSeq Sample Preparation Pooling Guide (part # 15042173). See
Additional Resources on page 10 for information on how to download the guide
from the Illumina website.
• When indexing libraries using adapter index tubes, Illumina recommends
arranging samples that are going to be combined into a common pool in the
same row. Also, include a common index in each column. This arrangement
facilitates pipetting operations when dispensing indexed adapters and pooling
indexed libraries later in the protocol.
• When indexing libraries with the RAP, arrange samples that will be pooled
together in the same orientation as the indices in the RAP.
36
Part # 15031048 Rev. E
• Stop Ligation Buffer
NOTE
Do not remove the Ligation Mix tube from -15°C to -25°C storage until instructed
to do so in the procedures.
• Ligation Control
NOTE
The use of the Ligation Control is optional and it can be replaced with the same
volume of Resuspension Buffer.
} Remove the Resuspension Buffer from 2°C to 8°C storage and bring it to room
temperature.
} Remove the AMPure XP Beads from storage and let stand for at least 30 minutes to
bring them to room temperature.
} Review Best Practices for Handling Magnetic Beads. See Additional Resources on page 10
for information on how to access TruSeq Stranded Total RNA Sample Preparation Best
Practices on the Illumina website.
} Pre-heat the thermal cycler to 30°C.
} Choose the thermal cycler pre-heat lid option and set to 100°C
} Apply a CAP barcode label to a new 96-well 0.3 ml PCR plate.
} Apply a PCR barcode label to a new 96-well 0.3 ml PCR plate.
Add LIG
1
Do one of the following:
• If using RNA Adapter tubes, centrifuge the thawed tubes to 600 × g for 5 seconds.
• If using a RAP:
— Thaw the plate for 10 minutes at room temperature on the benchtop. Visually
inspect the wells to make sure that they all are thawed.
— Remove the adapter plate tape seal.
TruSeq Stranded Total RNA Sample Preparation Guide
37
Ligate Adapters
NOTE
When indexing libraries with the RAP:
• Review Handling Adapter Plate in the TruSeq Sample Preparation Pooling Guide (part
# 15042173). See Additional Resources on page 10 for information on how to
download the guide from the Illumina website.
• Illumina recommends that the RAP does not undergo more than four freezethaw cycles. To maximize the use of the RAP, process more than 24 samples at a
time. These samples can then be pooled in any supported configuration.
Low Sample (LS) Protocol
— Centrifuge the plate to 280 × g for 1 minute to collect all of the adapter to the
bottom of the well.
— Remove the plastic cover. Save the cover if you are not processing the entire
plate at one time.
— If it is the first time using this RAP, apply the RAP barcode label to the plate.
2
Centrifuge the Ligation Control (if using Ligation Control) and Stop Ligation Buffer
tubes to 600 × g for 5 seconds.
3
Immediately before use, remove the Ligation Mix tube from -15°C to -25°C storage.
4
Remove the adhesive seal from the ALP plate.
5
Do one of the following:
• If using the in-line control reagent:
— Dilute the Ligation Control to 1/100 in Resuspension Buffer (For example, 1 µl
Ligation Control + 99 µl Resuspension Buffer) before use. Discard the diluted
Ligation Control after use.
— Add 2.5 µl of diluted Ligation Control to each well of the ALP plate.
• If not using the in-line control reagent, add 2.5 µl of Resuspension Buffer to each
well of the ALP plate.
6
Add 2.5 µl of Ligation Mix to each well of the ALP plate.
7
Return the Ligation Mix tube to -15°C to -25°C storage immediately after use.
8
Do one of the following:
• If using RNA Adapter tubes, add 2.5 µl of the thawed RNA Adapter Index to each
well of the ALP plate. Gently pipette the entire volume up and down 10 times to
mix thoroughly.
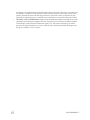
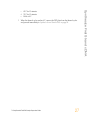
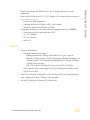
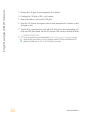
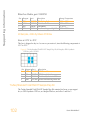
• If using a RAP:
— Place the RAP on the benchtop so that the part number barcode, on the long
side of the plate, is facing you and the clipped corner is on the lower left.
Figure 4 Correct RAP Orientation
38
Part # 15031048 Rev. E
9
Seal the ALP plate with a Microseal ‘B’ adhesive seal.
10 Centrifuge the ALP plate to 280 × g for 1 minute.
Incubate 2 ALP
1
Place the sealed ALP plate on the pre-heated thermal cycler. Close the lid and incubate
at 30°C for 10 minutes.
2
Remove the ALP plate from the thermal cycler.
1
Remove the adhesive seal from the ALP plate.
2
Add 5 µl of Stop Ligation Buffer to each well of the ALP plate to inactivate the ligation.
Gently pipette the entire volume up and down 10 times to mix thoroughly.
Add STL
Clean Up ALP
1
Vortex the AMPure XP Beads for at least 1 minute or until they are well dispersed.
2
Add 42 µl of mixed AMPure XP Beads to each well of the ALP plate. Gently pipette the
entire volume up and down 10 times to mix thoroughly.
3
Incubate the ALP plate at room temperature for 15 minutes.
4
Place the ALP plate on the magnetic stand at room temperature for 5 minutes or until
the liquid is clear.
TruSeq Stranded Total RNA Sample Preparation Guide
39
Ligate Adapters
— Do one of the following to pierce the foil seal:
— If using the entire plate at one time, use the bottom of a clean 96-well semiskirted PCR plate to pierce a hole in all of the well seals simultaneously.
Gently, but firmly, press the clean plate over the foil seal.
— If using only part of the plate, use the bottom of a clean eight-tube strip,
with caps attached, to pierce holes in the seals of the wells that will be
used for ligation. Repeat with a new, clean eight-tube strip, with caps
attached, for each row or column of adapters that will be used for ligation.
— Using an eight-tip multichannel pipette, transfer 2.5 µl of the thawed RNA
Adapter from the RAP well to each well of the ALP plate. Gently pipette the
entire volume up and down 10 times to mix thoroughly.
Low Sample (LS) Protocol
5
Remove and discard 79.5 µl supernatant from each well of the ALP plate. Take care
not to disturb the beads.
NOTE
Leave the ALP plate on the magnetic stand while performing the following 80% EtOH
wash steps (6–8).
6
With the ALP plate on the magnetic stand, add 200 µl freshly prepared 80% EtOH to
each well without disturbing the beads.
7
Incubate the ALP plate at room temperature for 30 seconds, and then remove and
discard all of the supernatant from each well. Take care not to disturb the beads.
8
Repeat steps 6 and 7 one time for a total of two 80% EtOH washes.
9
With the ALP plate on the magnetic stand, let the samples air-dry at room temperature
for 15 minutes.
10 Remove the ALP plate from the magnetic stand.
11 Add 52.5 µl Resuspension Buffer to each well of the ALP plate. Gently pipette the entire
volume up and down 10 times to mix thoroughly or until the beads are fully
resuspended.
12 Incubate the ALP plate at room temperature for 2 minutes.
13 Place the ALP plate on the magnetic stand at room temperature for 5 minutes or until
the liquid is clear.
14 Transfer 50 µl supernatant from each well of the ALP plate to the corresponding well
of the new 0.3 ml PCR plate labeled with the CAP barcode. Take care not to disturb the
beads.
15 Vortex the AMPure XP Beads until they are well dispersed.
16 Add 50 µl of mixed AMPure XP Beads to each well of the CAP plate for a second
cleanup. Gently pipette the entire volume up and down 10 times to mix thoroughly.
17 Incubate the CAP plate at room temperature for 15 minutes.
18 Place the CAP plate on the magnetic stand at room temperature for 5 minutes or until
the liquid is clear.
19 Remove and discard 95 µl supernatant from each well of the CAP plate. Take care not
to disturb the beads.
40
Part # 15031048 Rev. E
20 With the CAP plate on the magnetic stand, add 200 µl freshly prepared 80% EtOH to
each well. Take care not to disturb the beads.
21 Incubate the CAP plate at room temperature for 30 seconds, and then remove and
discard all of the supernatant from each well. Take care not to disturb the beads.
22 Repeat steps 20 and 21 one time for a total of two 80% EtOH washes.
23 With the CAP plate on the magnetic stand, let the samples air-dry at room temperature
for 15 minutes, and then remove the plate from the magnetic stand.
24 Add 22.5 µl Resuspension Buffer to each well of the CAP plate. Gently pipette the
entire volume up and down 10 times to mix thoroughly or until the beads are fully
resuspended.
25 Incubate the CAP plate at room temperature for 2 minutes.
26 Place the CAP plate on the magnetic stand at room temperature for 5 minutes or until
the liquid is clear.
27 Transfer 20 µl supernatant from each well of the CAP plate to the corresponding well
of the new 0.3 ml PCR plate labeled with the PCR barcode. Take care not to disturb the
beads.
SAFE STOPPING POINT
If you do not plan to proceed immediately to Enrich DNA Fragments on page 42, you can
safely stop the protocol here. If you are stopping, seal the PCR plate with a Microseal ‘B’
adhesive seal and store at -15°C to -25°C for up to seven days.
TruSeq Stranded Total RNA Sample Preparation Guide
41
Ligate Adapters
NOTE
Leave the CAP plate on the magnetic stand while performing the following 80% EtOH
wash steps (20–22)
Low Sample (LS) Protocol
Enrich DNA Fragments
This process uses PCR to selectively enrich those DNA fragments that have adapter
molecules on both ends and to amplify the amount of DNA in the library. The PCR is
performed with a PCR Primer Cocktail that anneals to the ends of the adapters. Minimize
the number of PCR cycles to avoid skewing the representation of the library.
NOTE
PCR enriches for fragments that have adapters ligated on both ends. Fragments with only
one or no adapters on their ends are by-products of inefficiencies in the ligation reaction.
Neither species can be used to make clusters. Fragments without any adapters cannot
hybridize to surface-bound primers in the flow cell. Fragments with an adapter on only one
end can hybridize to surface bound primers, but cannot form clusters.
Consumables
42
Item
Quantity
Storage
Supplied By
PCR Master Mix (PMM)
1 tube per 48 reactions
-15°C to -25°C
Illumina
PCR Primer Cocktail (PPC)
1 tube per 48 reactions
-15°C to -25°C
Illumina
Resuspension Buffer (RSB)
1 tube
2°C to 8°C
Illumina
TSP1 (Target Sample Plate)
Barcode Label
1 label per plate
15°C to 30°C
Illumina
96-well 0.3 ml PCR Plate
1
15°C to 30°C
User
AMPure XP Beads
50 µl per sample
2°C to 8°C
User
Freshly Prepared 80%
Ethanol (EtOH)
400 µl per sample
15°C to 30°C
User
Microseal ‘B’ Adhesive Seals
2
15°C to 30°C
User
RNase/DNase-free EightTube Strips and Caps
(if using multichannel
pipettes)
5
15°C to 30°C
User
Part # 15031048 Rev. E
Quantity
Storage
Supplied By
RNase/DNase-free Reagent
Reservoirs
(if using multichannel
pipettes)
5
15°C to 30°C
User
Preparation
} Remove the PCR Master Mix and PCR Primer Cocktail from -15°C to -25°C storage and
thaw them at room temperature.
} Centrifuge the thawed PCR Master Mix and PCR Primer Cocktail tubes to 600 × g for
5 seconds.
} Remove the Resuspension Buffer from 2°C to 8°C storage and bring it to room
temperature.
} Remove the AMPure XP Beads from 2°C to 8°C storage and let stand for at least
30 minutes to bring them to room temperature.
} Review Best Practices for Handling Magnetic Beads. See Additional Resources on page 10
for information on how to access TruSeq Stranded Total RNA Sample Preparation Best
Practices on the Illumina website.
} Remove the PCR plate from -15°C to -25°C storage, if it was stored at the conclusion of
Clean Up ALP on page 39.
• Let it thaw at room temperature.
• Centrifuge the thawed PCR plate to 280 × g for 1 minute.
• Remove the adhesive seal from the thawed PCR plate.
} Pre-program the thermal cycler with the following program and save as PCR:
• Choose the pre-heat lid option and set to 100°C
• 98°C for 30 seconds
• 15 cycles of:
— 98°C for 10 seconds
— 60°C for 30 seconds
— 72°C for 30 seconds
• 72°C for 5 minutes
• Hold at 4°C
} Apply a TSP1 barcode label to a new 96-well 0.3 ml PCR plate.
TruSeq Stranded Total RNA Sample Preparation Guide
43
Enrich DNA Fragments
Item
Low Sample (LS) Protocol
Make PCR
1
Add 5 µl of thawed PCR Primer Cocktail to each well of the PCR plate.
2
Add 25 µl of thawed PCR Master Mix to each well of the PCR plate. Gently pipette the
entire volume up and down 10 times to mix thoroughly.
3
Seal the PCR plate with a Microseal ‘B’ adhesive seal.
Amp PCR
1
Place the sealed PCR plate on the pre-programmed thermal cycler. Close the lid, then
select and run PCR to amplify the plate.
a Choose the pre-heat lid option and set to 100°C
b 98°C for 30 seconds
c 15 cycles of:
— 98°C for 10 seconds
— 60°C for 30 seconds
— 72°C for 30 seconds
d 72°C for 5 minutes
e Hold at 4°C
Clean Up PCR
44
1
Remove the adhesive seal from the PCR plate.
2
Vortex the AMPure XP Beads until they are well dispersed.
3
Do one of the following, depending on the adapter type used:
• If using the RNA Adapter tubes, add 50 µl of the mixed AMPure XP Beads to each
well of the PCR plate containing 50 µl of the PCR amplified library. Gently pipette
the entire volume up and down 10 times to mix thoroughly.
• If using the RAP, add 47.5 µl of the mixed AMPure XP Beads to each well of the
PCR plate containing 50 µl of the PCR amplified library. Gently pipette the entire
volume up and down 10 times to mix thoroughly.
4
Incubate the PCR plate at room temperature for 15 minutes.
Part # 15031048 Rev. E
Place the PCR plate on the magnetic stand at room temperature for 5 minutes or until
the liquid is clear.
6
Remove and discard 95 µl supernatant from each well of the PCR plate.
NOTE
Leave the PCR plate on the magnetic stand while performing the following 80% EtOH
wash steps (7–9).
7
With the PCR plate on the magnetic stand, add 200 µl freshly prepared 80% EtOH to
each well without disturbing the beads.
8
Incubate the PCR plate at room temperature for 30 seconds, and then remove and
discard all of the supernatant from each well.
9
Repeat steps 7 and 8 one time for a total of two 80% EtOH washes.
10 With the PCR plate on the magnetic stand, let the samples air-dry at room temperature
for 15 minutes, and then remove the plate from the magnetic stand.
11 Add 32.5 µl Resuspension Buffer to each well of the PCR plate. Gently pipette the entire
volume up and down 10 times to mix thoroughly.
12 Incubate the PCR plate at room temperature for 2 minutes.
13 Place the PCR plate on the magnetic stand at room temperature for 5 minutes or until
the liquid is clear.
14 Transfer 30 µl supernatant from each well of the PCR plate to the corresponding well
of the new 0.3 ml PCR plate labeled with the TSP1 barcode.
SAFE STOPPING POINT
If you do not plan to proceed immediately to Validate Library on page 46, you can safely stop
the protocol here. If you are stopping, seal the TSP1 plate with a Microseal ‘B’ adhesive seal
and store at -15°C to -25°C for up to 7 days.
TruSeq Stranded Total RNA Sample Preparation Guide
45
Enrich DNA Fragments
5
Low Sample (LS) Protocol
Validate Library
Illumina recommends performing the following procedures for quality control analysis on
your sample library and quantification of the DNA library templates.
Quantify Libraries
To achieve the highest quality data on Illumina sequencing platforms, it is important to
create optimum cluster densities across every lane of the flow cell. Optimizing cluster
densities requires accurate quantitation of DNA library templates. Quantify your libraries
using qPCR according to the Illumina Sequencing Library qPCR Quantification Guide
(part # 11322363).
Quality Control
1
Load 1 µl of the resuspended construct on an Agilent Technologies 2100 Bioanalyzer
using a DNA-specific chip such as the Agilent DNA 1000.
2
Check the size and purity of the sample. The final product should be a band at
approximately 260 bp.
Figure 5 Example of TruSeq Stranded Total RNA Sample Preparation Library Size Distribution
46
Part # 15031048 Rev. E
Validate Library
Figure 6 TruSeq Stranded Total RNA Sample Preparation 260 bp PCR Product
TruSeq Stranded Total RNA Sample Preparation Guide
47
Low Sample (LS) Protocol
Normalize and Pool Libraries
This process describes how to prepare DNA templates for cluster generation. Indexed DNA
libraries are normalized to 10 nM in the DCT plate and then pooled in equal volumes in
the PDP plate. DNA libraries not intended for pooling are normalized to 10 nM in the DCT
plate.
Consumables
48
Item
Quantity
Storage
Supplied By
Barcode labels for:
• DCT (Diluted Cluster
Template)
• PDP (Pooled DCT Plate)
(for pooling only)
1 label per plate
15°C to 30°C
Illumina
96-well MIDI plates
2
(second plate for
pooling only, if
pooling > 40 samples)
15°C to 30°C
User
96-well 0.3 ml PCR plate
(for pooling only, if pooling
≤ 40 samples)
1
15°C to 30°C
User
Microseal ‘B’ Adhesive Seals
2
15°C to 30°C
User
Tris-HCl 10 mM, pH8.5
with 0.1% Tween 20
Enough to normalize
the concentration of
each sample library
to 10 nM
15°C to 30°C
User
Part # 15031048 Rev. E
} Remove the TSP1 plate from -15°C to -25°C storage, if it was stored at the conclusion of
Clean Up PCR on page 44.
• Let it thaw at room temperature.
• Centrifuge the thawed TSP1 plate to 280 × g for 1 minute.
• Remove the adhesive seal from the thawed TSP1 plate.
} Apply a DCT barcode label to a new 96-well MIDI plate.
} [For pooling only] Apply a PDP barcode label to a new 96-well 0.3 ml PCR plate if
pooling ≤ 40 samples or a 96-well MIDI plate if pooling > 40 samples.
Make DCT
1
Transfer 10 µl of sample library from each well of the TSP1 plate to the corresponding
well of the new MIDI plate labeled with the DCT barcode.
2
Normalize the concentration of sample library in each well of the DCT plate to 10 nM
using Tris-HCl 10 mM, pH 8.5 with 0.1% Tween 20.
NOTE
Depending on the yield quantification data of each sample library, the final volume in
the DCT plate can vary from 10–400 µl.
3
Gently pipette the entire normalized sample library volume up and down 10 times to
mix thoroughly.
4
Depending on the type of library you want to generate, do one of the following:
• For non-pooled libraries, the protocol stops here. Do one of the following:
— Proceed to cluster generation. For more information, see the cluster generation
section of the user guide for your Illumina platform.
— Seal the DCT plate with a Microseal ‘B’ adhesive seal and store at
-15°C to -25°C.
• For pooled libraries, proceed to Make PDP (for pooling only).
Make PDP (for pooling only)
NOTE
Do not make a PDP plate if you are not pooling samples.
TruSeq Stranded Total RNA Sample Preparation Guide
49
Normalize and Pool Libraries
Preparation
Low Sample (LS) Protocol
1
Determine the number of samples to be combined together for each pool.
NOTE
Note the sample that is in each well, to avoid pooling two samples with the same index.
50
2
Do one of the following:
• If pooling 2–24 samples:
— Transfer 10 µl of each normalized sample library to be pooled from the DCT
plate to one well of the new 0.3 ml PCR plate labeled with the PDP barcode.
The total volume in each well of the PDP plate is 10 X the number of combined
sample libraries and 20–240 µl (2–24 libraries). For example, the volume for 2
samples is 20 µl, the volume for 12 samples is 120 µl, or the volume for 24
samples is 240 µl.
• If pooling 25–96 samples:
— Using a multichannel pipette, transfer 5 µl of each normalized sample library
in column 1 of the DCT plate to column 1 of the new 0.3 ml PCR or MIDI plate
labeled with the PDP barcode.
— Transfer 5 µl of each normalized sample library in column 2 of the DCT plate
to column 1 of the PDP plate.
— Repeat the transfer for as many times as there are remaining columns in the
DCT plate. The result is a PDP plate with pooled samples in column 1. Gently
pipette the entire volume of each well of column 1 up and down 10 times to
mix thoroughly.
— Combine the contents of each well of column 1 into well A2 of the PDP plate
for the final pool.
3
Gently pipette the entire volume up and down 10 times to mix thoroughly.
4
Do one of the following:
• Proceed to cluster generation. For more information, see the user guide for your
Illumina sequencer.
• Seal the PDP plate with a Microseal ‘B’ adhesive seal and store at -15°C to -25°C.
Part # 15031048 Rev. E
Chapter 3 High Sample (HS) Protocol
Introduction
Sample Prep Workflow
Ribo-Zero Deplete and Fragment RNA
Synthesize First Strand cDNA
Synthesize Second Strand cDNA
Adenylate 3' Ends
Ligate Adapters
Enrich DNA Fragments
Validate Library
Normalize and Pool Libraries
TruSeq Stranded Total RNA Sample Preparation Guide
52
54
55
63
66
70
73
81
86
88
51
Chapter 3
High Sample (HS) Protocol
High Sample (HS) Protocol
Introduction
This chapter describes the TruSeq Stranded Total RNA Sample Preparation HS protocol.
Illumina recommends the following kit, sample number, and protocol combinations:
Table 7 Kit and Sample Number Recommendations
Number of Samples
Processed
At One Time
Recommended
Kit
<24
LT
24–48
LT or HT
>48
HT
Table 8 Kit and Protocol Recommendations
Kit
Number of
Samples Supported per Kit
Number of Samples
Processed
At One Time
Protocol
LT
48
≤48
LS
>48
HS
≤24
LS
>24
HS
HT
96
} Follow the protocol in the order described, using the specified volumes and incubation
parameters.
} Before proceeding review the following:
• Best Practices—See Additional Resources on page 10 for information on how to
access TruSeq Stranded Total RNA Sample Preparation Best Practices on the
Illumina website.
• TruSeq Sample Preparation Pooling Guide (part # 15042173)—See Additional Resources
on page 10 for information on how to download the guide from the Illumina
website.
52
Part # 15031048 Rev. E
TruSeq Stranded Total RNA Sample Preparation Guide
53
Introduction
• Appendix A Supporting Information—To confirm your kit contents and make sure
that you have obtained all of the requisite equipment and consumables for the
HS protocol.
High Sample (HS) Protocol
Sample Prep Workflow
The following illustrates the processes of the TruSeq Stranded Total RNA Sample
Preparation HS protocol to prepare templates using 24 indexed adapter tubes or a RAP.
Figure 7 TruSeq Stranded Total RNA Sample Preparation HS Workflow
54
Part # 15031048 Rev. E
This process depletes rRNA from total RNA. After the rRNA is depleted, the remaining
RNA is purified, fragmented, and primed for cDNA synthesis. It is important to follow this
purification procedure exactly to be sure of reproducibility. Reference the following diagram
while performing the procedures:
Figure 8 TruSeq Stranded Total RNA Sample Preparation Purification Workflow
NOTE
Illumina recommends that you use 0.1–1 µg of total RNA and use PCR plates with a
magnetic plate stand for this process.
TruSeq Stranded Total RNA Sample Preparation Guide
55
Ribo-Zero Deplete and Fragment RNA
Ribo-Zero Deplete and Fragment RNA
High Sample (HS) Protocol
NOTE
Allow the rRNA Removal Beads and the RNAClean XP Beads to fully pellet against the
magnetic stand for 1 minute and 5 minutes, respectively. Remove the supernatant from the
beads immediately while the beads are still pelleted against the magnetic stand. Do not allow
the rRNA Removal Bead pellets to dry.
NOTE
The RNAClean XP bead wash steps use 70% Ethanol, while 80% Ethanol is used for AMPure
XP bead washes.
56
Item
Quantity
Storage
Supplied By
Elute, Prime, Fragment High
Mix (EPH)
1 tube per 48
reactions
-15°C to -25°C
Illumina
Elution Buffer (ELB)
1 tube per 48
reactions
2°C to 8°C
Illumina
One of the following,
depending on the kit you are
using:
• Globin Removal Mix (GRM)
(Ribo-Zero Globin kit
contents)
• rRNA Removal Mix (RRM)
(Ribo-Zero
Human/Mouse/Rat kit
contents)
• rRNA Removal Mix - Gold
(RRM G) (Ribo-Zero Gold kit
contents)
• rRNA Removal Mix - Plant
(RRM P) (Ribo-Zero Plant kit
contents)
1 tube per 48
reactions
-15°C to -25°C
Illumina
Resuspension Buffer (RSB)
1 tube
-15°C to -25°C
Illumina
rRNA Binding Buffer (RBB)
1 tube per 48
reactions
-15°C to -25°C
Illumina
rRNA Removal Beads (RRB)
1 tube per 48
reactions
2°C to 8°C
Illumina
Part # 15031048 Rev. E
Quantity
Storage
Supplied By
Barcode labels for:
• BRP (Bind rRNA Plate)
• DFP (Depleted
RNA Fragmentation Plate)
• RCP (RNA Clean Up Plate)
• RRP (rRNA Removal Plate)
1 label per plate
15°C to 30°C
Illumina
96-well HSP Plates
2
15°C to 30°C
User
96-well MIDI Plates
2
15°C to 30°C
User
Freshly Prepared 70% Ethanol
(EtOH)
200 µl per sample
15°C to 30°C
User
Microseal ‘B’ Adhesive Seals
5
15°C to 30°C
User
RNAClean XP Beads
99 µl per sample
2°C to 8°C
User
RNase/DNase-free Eight-Tube
Strips and Caps
(if using multichannel pipettes)
6
15°C to 30°C
User
RNase/DNase-free Reagent
Reservoirs
(if using multichannel pipettes)
6
15°C to 30°C
User
Ultra Pure Water
Enough to dilute
each total RNA
sample to a final
volume of 10 µl
15°C to 30°C
User
Preparation
} Remove the following from -15°C to -25°C storage and thaw them at room temperature:
• Elute, Prime, Fragment High Mix
• One of the following, depending on the kit you are using:
— Globin Removal Mix
— rRNA Removal Mix
— rRNA Removal Mix - Gold
— rRNA Removal Mix - Plant
TruSeq Stranded Total RNA Sample Preparation Guide
57
Ribo-Zero Deplete and Fragment RNA
Item
High Sample (HS) Protocol
• rRNA Binding Buffer
• Resuspension Buffer
NOTE
The Resuspension Buffer can be stored at 2°C to 8°C after the initial thaw.
} Remove the following from 2°C to 8°C storage and let stand to bring to room
temperature:
• Elution Buffer
• rRNA Removal Beads
} Remove the RNAClean XP beads from 2°C to 8°C storage and let stand for at least
30 minutes to bring them to room temperature.
} Pre-program the thermal cycler with the following programs:
• Choose the pre-heat lid option and set to 100°C
• 68°C for 5 minutes – save as RNA Denaturation
• 94°C for 8 minutes, 4°C hold – save as Elution 2 - Frag - Prime
NOTE
For inserts larger than 120–200 bp with a median size of 150 bp or if starting with
degraded total RNA, see Appendix A Alternate Fragmentation Protocols for the
appropriate Elution 2 - Frag - Prime program settings.
}
}
}
}
}
Set the centrifuge to 15°C to 25°C, if refrigerated.
Apply a BRP barcode label to a new 96-well HSP plate.
Apply a DFP barcode label to a new 96-well HSP plate.
Apply an RCP barcode label to a new 96-well MIDI plate.
Apply an RRP barcode label to a new 96-well MIDI plate.
Make BRP
58
1
Dilute the total RNA with nuclease-free ultra pure water to a final volume of 10 µl in
the new 96-well HSP plate labeled with the BRP barcode.
2
Add 5 µl of rRNA Binding Buffer to each well of the BRP plate.
3
Add 5 µl of one of the following reagents to each well of the BRP plate, depending on
the kit you are using:
• Globin Removal Mix
• rRNA Removal Mix
• rRNA Removal Mix - Gold
• rRNA Removal Mix - Plant
Part # 15031048 Rev. E
Mix the contents of the BRP plate thoroughly as follows:
a Seal the BRP plate with a Microseal ‘B’ adhesive seal.
b Shake the BRP plate on a microplate shaker continuously at 1600 rpm for
20 seconds.
5
Centrifuge the BRP plate to 280 × g for 1 minute.
6
Return the following to -15°C to -25°C storage:
• rRNA Binding Buffer
• One of the following, depending on the kit you are using:
— Globin Removal Mix
— rRNA Removal Mix
— rRNA Removal Mix - Gold
— rRNA Removal Mix - Plant
Incubate 1 BRP
1
Place the sealed BRP plate on the pre-programmed thermal cycler. Close the lid, then
select and run the RNA Denaturation program.
a Choose the pre-heat lid option and set to 100°C
b 68°C for 5 minutes
2
After the 5 minute incubation, place the BRP plate on the bench and incubate at room
temperature for 1 minute.
Make RRP
1
Vortex the room temperature rRNA Removal Bead tube vigorously to resuspend the
beads.
2
Add 35 µl of rRNA Removal Beads to each well of the new 96-well MIDI plate labeled
with the RRP barcode.
NOTE
It is important not to skip this step by adding beads to the sample in the BRP plate. Adding
the sample from the BRP plate to beads in the RRP plate in step 3 will ensure optimal
performance.
3
Remove the adhesive seal from the BRP plate.
TruSeq Stranded Total RNA Sample Preparation Guide
59
Ribo-Zero Deplete and Fragment RNA
4
High Sample (HS) Protocol
4
Transfer the entire contents (20 µl) from each well of the BRP plate to the
corresponding well of the RRP plate containing rRNA Removal Beads.
5
Mix the contents of the RRP plate thoroughly as follows:
a Seal the RRP plate with a Microseal ‘B’ adhesive seal.
b Shake the RRP plate on a microplate shaker continuously at 1000 rpm for
1 minute.
6
Remove the adhesive seal from the RRP plate.
7
Place the RRP plate on the magnetic stand at room temperature for 1 minute.
8
Transfer all of the supernatant from each well of the RRP plate to the corresponding
well of the new 96-well MIDI plate labeled with the RCP barcode.
9
Place the RCP plate on the magnetic stand at room temperature for 1 minute.
NOTE
If any beads remain in the wells of the RCP plate, place the RCP plate on the magnet stand
for 1 minute and then transfer the supernatant to a new MIDI plate. Repeat as necessary until
there are no beads remaining. The last MIDI plate will be the RCP plate used during Clean
Up RCP.
10 Return the rRNA Removal Beads to 2°C to 8°C storage.
Clean Up RCP
1
Vortex the RNAClean XP beads until they are well dispersed, then add 99 µl of wellmixed RNAClean XP beads to each well of the RCP plate containing ribosomal
depleted RNA. Mix thoroughly as follows:
NOTE
If starting with degraded total RNA, add 193 µl of well-mixed RNAClean XP beads to each
well of the RCP plate containing ribosomal depleted RNA.
a
b
60
Seal the RCP plate with a Microseal ‘B’ adhesive seal.
Shake the RCP plate on a microplate shaker at 1800 rpm for 2 minutes.
2
Incubate the RCP plate at room temperature for 15 minutes.
3
Remove the adhesive seal from the RCP plate.
4
Place the RCP plate on the magnetic stand at room temperature, for 5 minutes to make
sure that all of the beads are bound to the side of the wells.
Part # 15031048 Rev. E
Remove and discard all of the supernatant from each well of the RCP plate.
NOTE
Leave the RCP plate on the magnetic stand while performing the following 70% EtOH wash
steps (6–7).
6
With the RCP plate on the magnetic stand, add 200 µl freshly prepared 70% EtOH to
each well without disturbing the beads.
7
Incubate the RCP plate at room temperature for 30 seconds, and then remove and
discard all of the supernatant from each well.
8
Let the RCP plate stand at room temperature for 15 minutes to dry, and then remove
the RCP plate from the magnetic stand.
9
Centrifuge the thawed, room temperature Elution Buffer to 600 × g for 5 seconds.
10 Add 11 µl Elution Buffer to each well of the RCP plate. Mix thoroughly as follows:
a Seal the RCP plate with a Microseal ‘B’ adhesive seal.
b Shake the RCP plate on a microplate shaker at 1800 rpm for 2 minutes.
11 Incubate the RCP plate at room temperature for 2 minutes.
12 Centrifuge the RCP plate to 280 × g for 1 minute.
13 Remove the adhesive seal from the RCP plate.
14 Place the RCP plate on the magnetic stand at room temperature for 5 minutes.
15 Return the Elution Buffer to 2°C to 8°C storage.
16 Transfer 8.5 µl supernatant from the RCP plate to the new 96-well HSP plate labeled
with the DFP barcode.
17 Add 8.5 µl Elute, Prime, Fragment High Mix to each well of the DFP plate. Mix
thoroughly as follows:
a Seal the DFP plate with a Microseal ‘B’ adhesive seal.
b Shake the DFP plate on a microplate shaker continuously at 1600 rpm for
20 seconds.
18 Return the Elute, Prime, Fragment High Mix to -15°C to -25°C storage and the
RNAClean XP Beads tube to 2°C to 8°C storage.
TruSeq Stranded Total RNA Sample Preparation Guide
61
Ribo-Zero Deplete and Fragment RNA
5
High Sample (HS) Protocol
Incubate 1 DFP
1
Place the sealed DFP plate on the pre-programmed thermal cycler. Close the lid and
select Elution 2 - Frag - Prime to fragment and prime the RNA.
NOTE
If starting with degraded total RNA, make sure the appropriate Elution 2 - Frag - Prime
program settings have been set. See Appendix A Alternate Fragmentation Protocols for
more information.
a
b
c
62
Choose the pre-heat lid option and set to 100°C
94°C for 8 minutes
Hold at 4°C
2
Remove the DFP plate from the thermal cycler when it reaches 4°C and centrifuge
briefly.
3
Proceed immediately to Synthesize First Strand cDNA on page 63.
Part # 15031048 Rev. E
This process reverse transcribes the cleaved RNA fragments that were primed with random
hexamers into first strand cDNA using reverse transcriptase and random primers. The
addition of Actinomycin D to the First Stand Synthesis Act D mix (FSA) prevents spurious
DNA-dependent synthesis, while allowing RNA-dependent synthesis, improving strand
specificity.
Consumables
Item
Quantity
Storage
Supplied By
First Strand Synthesis Act D
Mix (FSA)
1 tube
-15°C to -25°C
Illumina
Microseal ‘B’ Adhesive Seal
1
15°C to 30°C
User
RNase/DNase-free Eight-Tube
Strips and Caps
(if using multichannel pipettes)
1
15°C to 30°C
User
RNase/DNase-free Reagent
Reservoirs
(if using multichannel pipettes)
1
15°C to 30°C
User
SuperScript II Reverse
Transcriptase
1 tube
-15°C to -25°C
User
WARNING
First Strand Synthesis Act D Mix contains Actinomycin D, a toxin. Personal injury can occur
through inhalation, ingestion, skin contact, and eye contact. Dispose of containers and any
unused contents in accordance with the governmental safety standards for your region.
Refer to the product material safety data sheet (MSDS) for detailed environmental, health,
and safety information. MSDSs are available for this kit on the Illumina website at
www.illumina.com/msds.
Preparation
} Remove one tube of First Strand Synthesis Act D Mix from -15°C to -25°C storage and
thaw it at room temperature.
TruSeq Stranded Total RNA Sample Preparation Guide
63
Synthesize First Strand cDNA
Synthesize First Strand cDNA
High Sample (HS) Protocol
} Pre-program the thermal cycler with the following program and save as Synthesize 1st
Strand:
• Choose the pre-heat lid option and set to 100°C
• 25°C for 10 minutes
• 42°C for 15 minutes
• 70°C for 15 minutes
• Hold at 4°C
} Make sure that the microplate shaker is properly calibrated to 1000 rpm using a
stroboscope.
NOTE
The First Strand Synthesis Mix Act D with SuperScript II added is stable to additional
freeze-thaw cycles and can be used for subsequent experiments. If more than six freezethaw cycles are anticipated, divide the First Strand Synthesis Mix Act D and SuperScript
II mix into smaller aliquots and store at -15°C to -25°C.
Add FSA
64
1
Remove the adhesive seal from the DFP plate.
2
Centrifuge the thawed First Strand Synthesis Mix Act D tube to 600 × g for 5 seconds.
3
Add 50 µl SuperScript II to the First Strand Synthesis Act D Mix tube. Mix gently, but
thoroughly and centrifuge briefly. If you are not using the entire contents of the First
Strand Synthesis Act D Mix tube, add SuperScript II at a ratio of 1 µl SuperScript II for
each 9 µl First Strand Synthesis Act D Mix.
Label the First Strand Synthesis Mix Act D tube to indicate that the SuperScript II has
been added.
4
Add 8 µl of First Strand Synthesis Mix Act D and SuperScript II mix to each well of the
DFP plate. Mix thoroughly as follows:
a Seal the DFP plate with a Microseal ‘B’ adhesive seal.
b Shake the DFP plate on a microplate shaker continuously at 1600 rpm for
20 seconds.
5
Return the First Strand Synthesis Mix Act D tube to -15°C to -25°C storage immediately
after use.
Part # 15031048 Rev. E
1
Place the sealed DFP plate on the pre-programmed thermal cycler. Close the lid and
select Synthesize 1st Strand.
a Choose the pre-heat lid option and set to 100°C
b 25°C for 10 minutes
c 42°C for 15 minutes
d 70°C for 15 minutes
e Hold at 4°C
2
When the thermal cycler reaches 4°C, remove the DFP plate from the thermal cycler
and proceed immediately to Synthesize Second Strand cDNA on page 66.
TruSeq Stranded Total RNA Sample Preparation Guide
65
Synthesize First Strand cDNA
Incubate 2 DFP
High Sample (HS) Protocol
Synthesize Second Strand cDNA
This process removes the RNA template and synthesizes a replacement strand,
incorporating dUTP in place of dTTP to generate ds cDNA. The incorporation of dUTP
quenches the second strand during amplification, because the polymerase does not
incorporate past this nucleotide. AMPure XP beads are used to separate the ds cDNA from
the second strand reaction mix. At the end of this process, you have blunt-ended cDNA.
Consumables
66
Item
Quantity
Storage
Supplied By
(Optional) End Repair Control
(CTE)
1 tube per 48
reactions
2°C to 8°C
Illumina
Resuspension Buffer (RSB)
1 tube
2°C to 8°C
Illumina
Second Strand Marking Master
Mix (SMM)
1 tube per 48
reactions
-15°C to -25°C
Illumina
Barcode labels for:
• ALP (Adapter Ligation Plate)
• CCP (cDNA Clean Up Plate)
• IMP (Insert Modification
Plate)
1 label per plate
15°C to 30°C
Illumina
96-well MIDI Plates
2
15°C to 30°C
User
AMPure XP Beads
90 µl per sample
2°C to 8°C
User
Freshly Prepared 80% Ethanol
(EtOH)
400 µl per sample
15°C to 30°C
User
Microseal ‘B’ Adhesive Seals
4
15°C to 30°C
User
RNase/DNase-free Eight-Tube
Strips and Caps
(if using multichannel pipettes)
5
15°C to 30°C
User
RNase/DNase-free Reagent
Reservoirs
(if using multichannel pipettes)
5
15°C to 30°C
User
Part # 15031048 Rev. E
} Remove the following from -15°C to -25°C storage and thaw them at room temperature:
• End Repair Control
NOTE
The use of the End Repair Control is optional and it can be replaced with the same
volume of Resuspension Buffer.
• Second Strand Marking Master Mix
} Remove the Resuspension Buffer from 2°C to 8°C storage and bring it to room
temperature.
} Remove the AMPure XP beads from storage and let stand for at least 30 minutes to
bring them to room temperature.
} Review Best Practices for Handling Magnetic Beads. See Additional Resources on page 10
for information on how to access TruSeq Stranded Total RNA Sample Preparation Best
Practices on the Illumina website.
} Pre-heat the thermal cycler to 16°C.
} Choose the thermal cycler pre-heat lid option and set to 30°C
} Apply an ALP barcode label to a new 96-well MIDI plate.
} Apply a CCP barcode label to a new 96-well MIDI plate.
Add SMM
1
Remove the adhesive seal from the DFP plate.
2
Do one of the following:
• If using the in-line control reagent:
— Centrifuge the thawed End Repair Control tube to 600 × g for 5 seconds.
— Dilute the End Repair Control to 1/50 in Resuspension Buffer (For example,
2 µl End Repair Control + 98 µl Resuspension Buffer) before use. Discard the
diluted End Repair Control after use.
— Add 5 µl of diluted End Repair Control to each well of the DFP plate.
• If not using the in-line control reagent, add 5 µl of Resuspension Buffer to each
well of the DFP plate.
3
Centrifuge the thawed Second Strand Marking Master Mix to 600 × g for 5 seconds.
TruSeq Stranded Total RNA Sample Preparation Guide
67
Synthesize Second Strand cDNA
Preparation
High Sample (HS) Protocol
4
Add 20 µl of thawed Second Strand Marking Master Mix to each well of the DFP plate.
Mix thoroughly as follows:
a Seal the DFP plate with a Microseal ‘B’ adhesive seal.
b Shake the DFP plate on a microplate shaker continuously at 1600 rpm for
20 seconds.
5
Return the Second Strand Marking Master Mix tube to -15°C to -25°C storage after use.
Incubate 3 DFP
1
Place the sealed DFP plate on the pre-heated thermal cycler. Close the lid and incubate
at 16°C for 1 hour.
2
Remove the DFP plate from the thermal cycler and place it on the bench.
3
Remove the adhesive seal from the DFP plate.
4
Let the DFP plate stand to bring it to room temperature.
Clean Up DFP
68
1
Vortex the AMPure XP beads until they are well dispersed.
2
Add 90 µl of well-mixed AMPure XP beads to each well of the new MIDI plate labeled
with the CCP barcode.
3
Transfer the entire contents from each well of the DFP plate to the corresponding well
of the CCP plate containing AMPure XP beads. Mix thoroughly as follows:
a Seal the CCP plate with a Microseal ‘B’ adhesive seal.
b Shake the CCP plate on a microplate shaker at 1800 rpm for 2 minutes.
4
Incubate the CCP plate at room temperature for 15 minutes.
5
Centrifuge the CCP plate to 280 × g for 1 minute.
6
Remove the adhesive seal from the CCP plate.
7
Place the CCP plate on the magnetic stand at room temperature, for 5 minutes to make
sure that all of the beads are bound to the side of the wells.
8
Remove and discard 135 µl supernatant from each well of the CCP plate.
Part # 15031048 Rev. E
9
With the CCP plate on the magnetic stand, add 200 µl freshly prepared 80% EtOH to
each well without disturbing the beads.
10 Incubate the CCP plate at room temperature for 30 seconds, and then remove and
discard all of the supernatant from each well.
11 Repeat steps 9 and 10 one time for a total of two 80% EtOH washes.
12 Let the CCP plate stand at room temperature for 15 minutes to dry, and then remove
the CCP plate from the magnetic stand.
13 Centrifuge the thawed, room temperature Resuspension Buffer to 600 × g for 5 seconds.
14 Add 17.5 µl Resuspension Buffer to each well of the CCP plate. Mix thoroughly as
follows:
a Seal the CCP plate with a Microseal ‘B’ adhesive seal.
b Shake the CCP plate on a microplate shaker at 1800 rpm for 2 minutes.
15 Incubate the CCP plate at room temperature for 2 minutes.
16 Centrifuge the CCP plate to 280 × g for 1 minute.
17 Remove the adhesive seal from the CCP plate.
18 Place the CCP plate on the magnetic stand at room temperature for 5 minutes.
19 Transfer 15 µl supernatant (ds cDNA) from the CCP plate to the new MIDI plate
labeled with the ALP barcode.
SAFE STOPPING POINT
If you do not plan to proceed immediately to Adenylate 3' Ends on page 70, you can safely
stop the protocol here. If you are stopping, seal the ALP plate with a Microseal ‘B’ adhesive
seal and store at -15°C to -25°C for up to 7 days.
TruSeq Stranded Total RNA Sample Preparation Guide
69
Synthesize Second Strand cDNA
NOTE
Leave the CCP plate on the magnetic stand while performing the following 80% EtOH wash
steps (9–11).
High Sample (HS) Protocol
Adenylate 3' Ends
A single ‘A’ nucleotide is added to the 3’ ends of the blunt fragments to prevent them from
ligating to one another during the adapter ligation reaction. A corresponding single
‘T’ nucleotide on the 3’ end of the adapter provides a complementary overhang for ligating
the adapter to the fragment. This strategy ensures a low rate of chimera (concatenated
template) formation.
Consumables
70
Item
Quantity
Storage
Supplied By
(Optional) A-Tailing Control
(CTA)
1 tube per 48
reactions
-15°C to -25°C
Illumina
A-Tailing Mix (ATL)
1 tube per 48
reactions
-15°C to -25°C
Illumina
Resuspension Buffer (RSB)
1 tube
2°C to 8°C
Illumina
Ice
As needed to place a
plate on
-15°C to -25°C
User
Microseal ‘B’ Adhesive Seal
1
15°C to 30°C
User
RNase/DNase-free Eight-Tube
Strips and Caps
(if using multichannel pipettes)
3
15°C to 30°C
User
RNase/DNase-free Reagent
Reservoirs
(if using multichannel pipettes)
3
15°C to 30°C
User
Part # 15031048 Rev. E
} Remove the following from -15°C to -25°C storage and thaw them at room temperature:
• A-Tailing Control
NOTE
The use of the A-Tailing Control is optional and it can be replaced with the same
volume of Resuspension Buffer.
• A-Tailing Mix
} Remove the Resuspension Buffer from 2°C to 8°C storage and bring it to room
temperature.
} Remove the ALP plate from -15°C to -25°C storage, if it was stored at the conclusion of
Clean Up DFP on page 68.
• Let it thaw at room temperature.
• Centrifuge the thawed ALP plate to 280 × g for 1 minute.
• Remove the adhesive seal from the ALP plate.
} Pre-heat two microheating systems: system 1 to 37°C and system 2 to 70°C.
} Prepare ice to cool the plate.
Add ATL
1
Do one of the following:
• If using the in-line control reagent:
— Centrifuge the thawed A-Tailing Control tube to 600 × g for 5 seconds.
— Dilute the A-Tailing Control to 1/100 in Resuspension Buffer (For example, 1 µl
A-Tailing Control + 99 µl Resuspension Buffer) before use. Discard the diluted
A-Tailing Control after use.
— Add 2.5 µl of diluted A-Tailing Control to each well of the ALP plate.
• If not using the in-line control reagent, add 2.5 µl of Resuspension Buffer to each
well of the ALP plate.
2
Add 12.5 µl of thawed A-Tailing Mix to each well of the ALP plate. Mix thoroughly as
follows:
a Seal the ALP plate with a Microseal ‘B’ adhesive seal.
b Shake the ALP plate on a microplate shaker at 1800 rpm for 2 minutes.
3
Centrifuge the ALP plate to 280 × g for 1 minute.
TruSeq Stranded Total RNA Sample Preparation Guide
71
Adenylate 3' Ends
Preparation
High Sample (HS) Protocol
Incubate 1 ALP
72
1
Place the sealed ALP plate on the pre-heated microheating system 1. Close the lid and
incubate at 37°C for 30 minutes.
2
Immediately after the 37°C incubation, remove the ALP plate from system 1 and place
the plate on the pre-heated microheating system 2. Close the lid and incubate at 70°C
for 5 minutes.
3
Set the microheating system 1 to 30°C in preparation for Ligate Adapters.
4
Immediately remove the ALP plate from the microheating system 2 and place the plate
on ice for 1 minute.
5
Proceed immediately to Ligate Adapters on page 73.
Part # 15031048 Rev. E
This process ligates indexing adapters to the ends of the ds cDNA, preparing them for
hybridization onto a flow cell.
Consumables
Item
Quantity
Storage
Supplied By
(Optional) Ligation Control
(CTL)
1 tube per 48
reactions
-15°C to -25°C
Illumina
Choose from the following
depending on the kit you are
using:
• TruSeq Stranded Total RNA
LT Sample Prep Kit contents:
• RNA Adapter Indices
(AR001–AR016, AR018–
AR023, AR025, AR027)
• TruSeq Stranded Total RNA
HT Sample Prep Kit contents:
• RAP (RNA Adapter Plate)
1 tube of each index
being used, per
column of 8 reactions
or
1 RAP
-15°C to -25°C
Illumina
Ligation Mix (LIG)
1 tube per 48
reactions
-15°C to -25°C
Illumina
Resuspension Buffer (RSB)
1 tube
2°C to 8°C
Illumina
Stop Ligation Buffer (STL)
1 tube per 48
reactions
-15°C to -25°C
Illumina
Barcode labels for:
• CAP (Clean Up ALP Plate)
• PCR (Polymerase Chain
Reaction Plate)
• RAP (RNA Adapter Plate)
(if using the HT kit)
1 label per plate
15°C to 30°C
Illumina
TruSeq Stranded Total RNA Sample Preparation Guide
73
Ligate Adapters
Ligate Adapters
High Sample (HS) Protocol
Item
Quantity
Storage
Supplied By
96-well HSP Plate
1
15°C to 30°C
User
96-well MIDI Plate
1
15°C to 30°C
User
AMPure XP Beads
92 µl per sample
2°C to 8°C
User
Freshly Prepared 80% Ethanol
(EtOH)
800 µl per sample
15°C to 30°C
User
Microseal ‘B’ Adhesive Seals
7
15°C to 30°C
User
RNase/DNase-free Eight-Tube
Strips and Caps
(if using multichannel pipettes)
4–28
15°C to 30°C
User
RNase/DNase-free Reagent
Reservoirs
(if using multichannel pipettes)
4–28
15°C to 30°C
User
Preparation
} Remove the following from -15°C to -25°C storage and thaw them at room temperature:
• Appropriate RNA Adapter tubes (depending on the RNA Adapter Indices being
used) or the RAP.
NOTE
• Review the TruSeq Sample Preparation Pooling Guide (part # 15042173). See
Additional Resources on page 10 for information on how to download the guide
from the Illumina website.
• When indexing libraries using adapter index tubes, Illumina recommends
arranging samples that are going to be combined into a common pool in the
same row. Also, include a common index in each column. This arrangement
facilitates pipetting operations when dispensing indexed adapters and pooling
indexed libraries later in the protocol.
• When indexing libraries with the RAP, arrange samples that will be pooled
together in the same orientation as the indices in the RAP.
74
Part # 15031048 Rev. E
• Stop Ligation Buffer
NOTE
Do not remove the Ligation Mix tube from -15°C to -25°C storage until instructed
to do so in the procedures.
• Ligation Control
NOTE
The use of the Ligation Control is optional and it can be replaced with the same
volume of Resuspension Buffer.
} Remove the Resuspension Buffer from 2°C to 8°C storage and bring it to room
temperature.
} Remove the AMPure XP Beads from storage and let stand for at least 30 minutes to
bring them to room temperature.
} Review Best Practices for Handling Magnetic Beads. See Additional Resources on page 10
for information on how to access TruSeq Stranded Total RNA Sample Preparation Best
Practices on the Illumina website.
} Pre-heat the microheating system 1 to 30°C.
} Apply a CAP barcode label to a new 96-well MIDI plate.
} Apply a PCR barcode label to a new 96-well HSP plate.
Add LIG
1
Do one of the following:
• If using RNA Adapter tubes, centrifuge the thawed tubes to 600 × g for 5 seconds.
• If using a RAP:
— Thaw the plate for 10 minutes at room temperature on the benchtop. Visually
inspect the wells to make sure that they all are thawed.
— Remove the adapter plate tape seal.
TruSeq Stranded Total RNA Sample Preparation Guide
75
Ligate Adapters
NOTE
When indexing libraries with the RAP:
• Review Handling Adapter Plate in the TruSeq Sample Preparation Pooling Guide (part
# 15042173). See Additional Resources on page 10 for information on how to
download the guide from the Illumina website.
• Illumina recommends that the RAP does not undergo more than four freezethaw cycles. To maximize the use of the RAP, process more than 24 samples at a
time. These samples can then be pooled in any supported configuration.
High Sample (HS) Protocol
— Centrifuge the plate to 280 × g for 1 minute to collect all of the adapter to the
bottom of the well.
— Remove the plastic cover. Save the cover if you are not processing the entire
plate at one time.
— If it is the first time using this RAP, apply the RAP barcode label to the plate.
2
Centrifuge the Ligation Control (if using Ligation Control) and Stop Ligation Buffer
tubes to 600 × g for 5 seconds.
3
Immediately before use, remove the Ligation Mix tube from -15°C to -25°C storage.
4
Remove the adhesive seal from the ALP plate.
5
Do one of the following:
• If using the in-line control reagent:
— Dilute the Ligation Control to 1/100 in Resuspension Buffer (For example, 1 µl
Ligation Control + 99 µl Resuspension Buffer) before use. Discard the diluted
Ligation Control after use.
— Add 2.5 µl of diluted Ligation Control to each well of the ALP plate.
• If not using the in-line control reagent, add 2.5 µl of Resuspension Buffer to each
well of the ALP plate.
6
Add 2.5 µl of Ligation Mix to each well of the ALP plate.
7
Return the Ligation Mix tube to -15°C to -25°C storage immediately after use.
8
Do one of the following:
• If using RNA Adapter tubes, add 2.5 µl of the thawed RNA Adapter Index to each
well of the ALP plate.
• If using a RAP:
— Place the RAP on the benchtop so that the part number barcode, on the long
side of the plate, is facing you and the clipped corner is on the lower left.
Figure 9 Correct RAP Orientation
76
Part # 15031048 Rev. E
9
Mix thoroughly as follows:
a Seal the ALP plate with a Microseal ‘B’ adhesive seal.
b Shake the ALP plate on a microplate shaker at 1800 rpm for 2 minutes.
10 Centrifuge the ALP plate to 280 × g for 1 minute.
Incubate 2 ALP
1
Place the sealed ALP plate on the pre-heated microheating system. Close the lid and
incubate at 30°C for 10 minutes.
2
Remove the ALP plate from the microheating system.
1
Remove the adhesive seal from the ALP plate.
2
Add 5 µl of Stop Ligation Buffer to each well of the ALP plate to inactivate the ligation
mix. Mix thoroughly as follows:
a Seal the ALP plate with a Microseal ‘B’ adhesive seal.
b Shake the ALP plate on a microplate shaker at 1800 rpm for 2 minutes.
3
Centrifuge the ALP plate to 280 × g for 1 minute.
Add STL
Clean Up ALP
1
Remove the adhesive seal from the ALP plate.
2
Vortex the AMPure XP Beads for at least 1 minute or until they are well dispersed.
TruSeq Stranded Total RNA Sample Preparation Guide
77
Ligate Adapters
— Do one of the following to pierce the foil seal:
— If using the entire plate at one time, use the bottom of a clean 96-well semiskirted PCR plate to pierce a hole in all of the well seals simultaneously.
Gently, but firmly, press the clean plate over the foil seal.
— If using only part of the plate, use the bottom of a clean eight-tube strip,
with caps attached, to pierce holes in the seals of the wells that will be
used for ligation. Repeat with a new, clean eight-tube strip, with caps
attached, for each row or column of adapters that will be used for ligation.
— Using an eight-tip multichannel pipette, transfer 2.5 µl of the appropriate
thawed RNA Adapter from the RAP well to each well of the ALP plate.
High Sample (HS) Protocol
3
Add 42 µl of mixed AMPure XP Beads to each well of the ALP plate. Mix thoroughly
as follows:
a Seal the ALP plate with a Microseal ‘B’ adhesive seal.
b Shake the ALP plate on a microplate shaker at 1800 rpm for 2 minutes.
4
Incubate the ALP plate at room temperature for 15 minutes.
5
Centrifuge the ALP plate to 280 × g for 1 minute.
6
Remove the adhesive seal from the ALP plate.
7
Place the ALP plate on the magnetic stand at room temperature for 5 minutes or until
the liquid is clear.
8
Remove and discard 79.5 µl supernatant from each well of the ALP plate. Take care
not to disturb the beads.
NOTE
Leave the ALP plate on the magnetic stand while performing the following 80% EtOH
wash steps (9–11).
9
With the ALP plate on the magnetic stand, add 200 µl freshly prepared 80% EtOH to
each well without disturbing the beads.
10 Incubate the ALP plate at room temperature for 30 seconds, and then remove and
discard all of the supernatant from each well. Take care not to disturb the beads.
11 Repeat steps 9 and 10 one time for a total of two 80% EtOH washes.
12 With the ALP plate on the magnetic stand, let the samples air-dry at room temperature
for 15 minutes.
13 Remove the ALP plate from the magnetic stand.
14 Add 52.5 µl Resuspension Buffer to each well of the ALP plate. Mix thoroughly as
follows:
a Seal the ALP plate with a Microseal ‘B’ adhesive seal.
b Shake the ALP plate on a microplate shaker at 1800 rpm for 2 minutes.
15 Incubate the ALP plate at room temperature for 2 minutes.
16 Centrifuge the ALP plate to 280 × g for 1 minute.
17 Remove the adhesive seal from the ALP plate.
78
Part # 15031048 Rev. E
19 Transfer 50 µl supernatant from each well of the ALP plate to the corresponding well
of the new MIDI plate labeled with the CAP barcode. Take care not to disturb the beads.
20 Vortex the AMPure XP Beads until they are well dispersed.
21 Add 50 µl of mixed AMPure XP Beads to each well of the CAP plate for a second
cleanup. Mix thoroughly as follows:
a Seal the CAP plate with a Microseal ‘B’ adhesive seal.
b Shake the CAP plate on a microplate shaker at 1800 rpm for 2 minutes.
22 Incubate the CAP plate at room temperature for 15 minutes.
23 Centrifuge the CAP plate to 280 × g for 1 minute.
24 Remove the adhesive seal from the CAP plate.
25 Place the CAP plate on the magnetic stand at room temperature for 5 minutes or until
the liquid is clear.
26 Remove and discard 95 µl supernatant from each well of the CAP plate. Take care not
to disturb the beads.
NOTE
Leave the CAP plate on the magnetic stand while performing the following 80% EtOH
wash steps (27–29)
27 With the CAP plate on the magnetic stand, add 200 µl freshly prepared 80% EtOH to
each well. Take care not to disturb the beads.
28 Incubate the CAP plate at room temperature for 30 seconds, and then remove and
discard all of the supernatant from each well. Take care not to disturb the beads.
29 Repeat steps 27 and 28 one time for a total of two 80% EtOH washes.
30 With the CAP plate on the magnetic stand, let the samples air-dry at room temperature
for 15 minutes.
31 Remove the CAP plate from the magnetic stand.
32 Add 22.5 µl Resuspension Buffer to each well of the CAP plate. Mix thoroughly as
follows:
a Seal the CAP plate with a Microseal ‘B’ adhesive seal.
b Shake the CAP plate on a microplate shaker at 1800 rpm for 2 minutes.
TruSeq Stranded Total RNA Sample Preparation Guide
79
Ligate Adapters
18 Place the ALP plate on the magnetic stand at room temperature for 5 minutes or until
the liquid is clear.
High Sample (HS) Protocol
33 Incubate the CAP plate at room temperature for 2 minutes.
34 Centrifuge the CAP plate to 280 × g for 1 minute.
35 Remove the adhesive seal from the CAP plate.
36 Place the CAP plate on the magnetic stand at room temperature for 5 minutes or until
the liquid is clear.
37 Transfer 20 µl supernatant from each well of the CAP plate to the corresponding well
of the new HSP plate labeled with the PCR barcode. Take care not to disturb the beads.
SAFE STOPPING POINT
If you do not plan to proceed immediately to Enrich DNA Fragments on page 81, you can
safely stop the protocol here. If you are stopping, seal the PCR plate with a Microseal ‘B’
adhesive seal and store at -15°C to -25°C for up to seven days.
80
Part # 15031048 Rev. E
This process uses PCR to selectively enrich those DNA fragments that have adapter
molecules on both ends and to amplify the amount of DNA in the library. The PCR is
performed with a PCR Primer Cocktail that anneals to the ends of the adapters. Minimize
the number of PCR cycles to avoid skewing the representation of the library.
NOTE
PCR enriches for fragments that have adapters ligated on both ends. Fragments with only
one or no adapters on their ends are by-products of inefficiencies in the ligation reaction.
Neither species can be used to make clusters. Fragments without any adapters cannot
hybridize to surface-bound primers in the flow cell. Fragments with an adapter on only one
end can hybridize to surface bound primers, but cannot form clusters.
Consumables
Item
Quantity
Storage
Supplied By
PCR Master Mix (PMM)
1 tube per 48
reactions
-15°C to -25°C
Illumina
PCR Primer Cocktail (PPC)
1 tube per 48
reactions
-15°C to -25°C
Illumina
Resuspension Buffer (RSB)
1 tube
2°C to 8°C
Illumina
Barcode labels for:
• CPP (Clean Up PCR Plate)
barcode label
• TSP1 (Target Sample Plate)
barcode label
1 label per plate
15°C to 30°C
Illumina
96-well HSP Plate
1
15°C to 30°C
User
96-well MIDI Plate
1
15°C to 30°C
User
AMPure XP Beads
50 µl per sample
2°C to 8°C
User
Freshly Prepared 80% Ethanol
(EtOH)
400 µl per sample
15°C to 30°C
User
TruSeq Stranded Total RNA Sample Preparation Guide
81
Enrich DNA Fragments
Enrich DNA Fragments
High Sample (HS) Protocol
Item
Quantity
Storage
Supplied By
Microseal ‘A’ Film
1
15°C to 30°C
User
Microseal ‘B’ Adhesive Seals
3
15°C to 30°C
User
RNase/DNase-free Eight-Tube
Strips and Caps
(if using multichannel pipettes)
5
15°C to 30°C
User
RNase/DNase-free Reagent
Reservoirs
(if using multichannel pipettes)
5
15°C to 30°C
User
Preparation
} Remove the PCR Master Mix and PCR Primer Cocktail from -15°C to -25°C storage and
thaw them at room temperature.
} Centrifuge the thawed PCR Master Mix and PCR Primer Cocktail tubes to 600 × g for
5 seconds.
} Remove the Resuspension Buffer from 2°C to 8°C storage and bring it to room
temperature.
} Remove the AMPure XP Beads from 2°C to 8°C storage and let stand for at least
30 minutes to bring them to room temperature.
} Remove the PCR plate from -15°C to -25°C storage, if it was stored at the conclusion of
Clean Up ALP on page 77.
• Let it thaw at room temperature.
• Centrifuge the thawed PCR plate to 280 × g for 1 minute.
• Remove the adhesive seal from the thawed PCR plate.
82
Part # 15031048 Rev. E
Enrich DNA Fragments
} Pre-program the thermal cycler with the following program and save as PCR:
• Choose the pre-heat lid option and set to 100°C
• 98°C for 30 seconds
• 15 cycles of:
— 98°C for 10 seconds
— 60°C for 30 seconds
— 72°C for 30 seconds
• 72°C for 5 minutes
• Hold at 4°C
} Apply a CPP barcode label to a new 96-well MIDI plate.
} Apply a TSP1 barcode label to a new 96-well 0.3 ml PCR plate.
Make PCR
1
Add 5 µl of thawed PCR Primer Cocktail to each well of the PCR plate.
2
Add 25 µl of thawed PCR Master Mix to each well of the PCR plate.
a Seal the PCR plate with a Microseal ‘A’ film.
WARNING
Follow vendor instructions for applying Microseal "A" sealing films. Improper use could
lead to inefficient sealing (evaporation of sample or cross-contamination) or too efficient
sealing (parts of the seal remain in the well after removing the whole seal).
b
3
Shake the PCR plate on a microplate shaker at 1600 rpm for 20 seconds.
Centrifuge the PCR plate to 280 × g for 1 minute.
Amp PCR
1
Place the sealed PCR plate on the pre-programmed thermal cycler. Close the lid, then
select and run PCR to amplify the plate.
a Choose the pre-heat lid option and set to 100°C
b 98°C for 30 seconds
c 15 cycles of:
— 98°C for 10 seconds
— 60°C for 30 seconds
— 72°C for 30 seconds
TruSeq Stranded Total RNA Sample Preparation Guide
83
High Sample (HS) Protocol
d
e
72°C for 5 minutes
Hold at 4°C
Clean Up PCR
1
Remove the adhesive seal from the PCR plate.
2
Vortex the AMPure XP Beads until they are well dispersed.
3
Do one of the following, depending on the adapter type used:
• If using the RNA Adapter tubes, add 50 µl of the mixed AMPure XP Beads to each
well of the new MIDI plate labeled with the CPP barcode.
• If using the RAP, add 47.5 µl of the mixed AMPure XP Beads to each well of the
new MIDI plate labeled with the CPP barcode.
4
Transfer the entire contents from each well of the PCR plate to the corresponding well
of the CPP plate containing 50 µl of mixed AMPure XP Beads. Mix thoroughly as
follows:
a Seal the CPP plate with a Microseal ‘B’ adhesive seal.
b Shake the CPP plate on a microplate shaker at 1800 rpm for 2 minutes.
5
Incubate the CPP plate at room temperature for 15 minutes.
6
Centrifuge the CPP plate to 280 × g for 1 minute.
7
Remove the adhesive seal from the CPP plate.
8
Place the CPP plate on the magnetic stand at room temperature for 5 minutes or until
the liquid is clear.
9
Remove and discard 95 µl supernatant from each well of the CPP plate.
NOTE
Leave the CPP plate on the magnetic stand while performing the following 80% EtOH
wash steps (10–12).
10 With the CPP plate on the magnetic stand, add 200 µl freshly prepared 80% EtOH to
each well without disturbing the beads.
11 Incubate the CPP plate at room temperature for 30 seconds, and then remove and
discard all of the supernatant from each well.
12 Repeat steps 10 and 11 one time for a total of two 80% EtOH washes.
84
Part # 15031048 Rev. E
14 Add 32.5 µl Resuspension Buffer to each well of the CPP plate. Mix thoroughly as
follows:
a Seal the CPP plate with a Microseal ‘B’ adhesive seal.
b Shake the CPP plate on a microplate shaker at 1800 rpm for 2 minutes.
15 Incubate the CPP plate at room temperature for 2 minutes.
16 Centrifuge the CPP plate to 280 × g for 1 minute.
17 Remove the adhesive seal from the CPP plate.
18 Place the CPP plate on the magnetic stand at room temperature for 5 minutes or until
the liquid is clear.
19 Transfer 30 µl supernatant from each well of the CPP plate to the corresponding well of
the new HSP plate labeled with the TSP1 barcode.
SAFE STOPPING POINT
If you do not plan to proceed immediately to Validate Library on page 86, you can safely stop
the protocol here. If you are stopping, seal the TSP1 plate with a Microseal ‘B’ adhesive seal
and store at -15°C to -25°C for up to 7 days.
TruSeq Stranded Total RNA Sample Preparation Guide
85
Enrich DNA Fragments
13 With the CPP plate on the magnetic stand, let the samples air-dry at room temperature
for 15 minutes, and then remove the plate from the magnetic stand.
High Sample (HS) Protocol
Validate Library
Illumina recommends performing the following procedures for quality control analysis on
your sample library and quantification of the DNA library templates.
Quantify Libraries
To achieve the highest quality data on Illumina sequencing platforms, it is important to
create optimum cluster densities across every lane of the flow cell. Optimizing cluster
densities requires accurate quantitation of DNA library templates. Quantify your libraries
using qPCR according to the Illumina Sequencing Library qPCR Quantification Guide
(part # 11322363).
Quality Control
1
Load 1 µl of the resuspended construct on an Agilent Technologies 2100 Bioanalyzer
using a DNA-specific chip such as the Agilent DNA 1000.
2
Check the size and purity of the sample. The final product should be a band at
approximately 260 bp.
Figure 10 Example of TruSeq Stranded Total RNA Sample Preparation Library Size Distribution
86
Part # 15031048 Rev. E
Validate Library
Figure 11 TruSeq Stranded Total RNA Sample Preparation 260 bp PCR Product
TruSeq Stranded Total RNA Sample Preparation Guide
87
High Sample (HS) Protocol
Normalize and Pool Libraries
This process describes how to prepare DNA templates for cluster generation. Indexed DNA
libraries are normalized to 10 nM in the DCT plate and then pooled in equal volumes in
the PDP plate. DNA libraries not intended for pooling are normalized to 10 nM in the DCT
plate.
Consumables
Item
Quantity
Storage
Supplied By
Barcode labels for:
• DCT (Diluted Cluster
Template)
• PDP (Pooled DCT Plate)
(for pooling only)
1 label per plate
15°C to 30°C
Illumina
96-well HSP Plate
(for pooling only)
1
15°C to 30°C
User
96-well MIDI Plate
1
15°C to 30°C
User
Microseal ‘B’ Adhesive Seals
5
15°C to 30°C
User
Tris-HCl 10 mM, pH8.5 with
0.1% Tween 20
Enough to normalize
the concentration of
each sample library
to 10 nM
15°C to 30°C
User
Preparation
} Remove the TSP1 plate from -15°C to -25°C storage, if it was stored at the conclusion of
Clean Up PCR on page 84.
• Let it thaw at room temperature.
• Centrifuge the thawed TSP1 plate to 280 × g for 1 minute.
• Remove the adhesive seal from the thawed TSP1 plate.
} Apply a DCT barcode label to a new 96-well MIDI plate.
} [For pooling only] Apply a PDP barcode label to a new 96-well HSP plate.
88
Part # 15031048 Rev. E
1
Transfer 10 µl of sample library from each well of the TSP1 plate to the corresponding
well of the new MIDI plate labeled with the DCT barcode.
2
Normalize the concentration of sample library in each well of the DCT plate to 10 nM
using Tris-HCl 10 mM, pH 8.5 with 0.1% Tween 20.
NOTE
Depending on the yield quantification data of each sample library, the final
volume in the DCT plate can vary from 10–400 µl.
3
Mix the DCT plate as follows:
a Seal the DCT plate with a Microseal ‘B’ adhesive seal.
b Shake the DCT plate on a microplate shaker at 1000 rpm for 2 minutes.
4
Centrifuge the DCT plate to 280 × g for 1 minute.
5
Remove the adhesive seal from the DCT plate.
6
Depending on the type of library you want to generate, do one of the following:
• For non-pooled libraries, the protocol stops here. Do one of the following:
— Proceed to cluster generation. For more information, see the cluster generation
section of the user guide for your Illumina platform.
— Seal the DCT plate with a Microseal ‘B’ adhesive seal and store at
-15°C to -25°C.
• For pooled libraries, proceed to Make PDP (for pooling only).
Make PDP (for pooling only)
NOTE
Do not make a PDP plate if you are not pooling samples.
1
Determine the number of samples to be combined together for each pool.
NOTE
Make a note of which sample goes into which well, to avoid pooling two samples with
the same index.
TruSeq Stranded Total RNA Sample Preparation Guide
89
Normalize and Pool Libraries
Make DCT
High Sample (HS) Protocol
90
2
Do one of the following:
• If pooling 2–24 samples:
— Transfer 10 µl of each normalized sample library to be pooled from the DCT
plate to one well of the new HSP plate labeled with the PDP barcode.
— The total volume in each well of the PDP plate should be 10X the number of
combined sample libraries and 20–240 µl (2–24 libraries). For example, the
volume for 2 samples is 20 µl, the volume for 12 samples is 120 µl, or the
volume for 24 samples is 240 µl.
• If pooling 25–96 samples:
— Using a multichannel pipette, transfer 5 µl of each normalized sample library
in column 1 from the DCT plate to column 1 of the new HSP plate labeled with
the PDP barcode.
— Transfer 5 µl of each normalized sample library in column 2 from the DCT
plate to column 1 of the PDP plate.
— Repeat the transfer for as many times as there are remaining columns in the
DCT plate. The result is a PDP plate with pooled samples in column 1. Mix the
PDP plate as follows:
— Seal the PDP plate with a Microseal ‘B’ adhesive seal.
— Shake the PDP plate on a microplate shaker at 1800 rpm for 2 minutes.
— Centrifuge the PDP plate to 280 × g for 1 minute.
— Remove the adhesive seal from the PDP plate.
— Combine the contents of each well of column 1 into well A2 of the PDP plate
for the final pool.
3
Mix the PDP plate as follows:
a Seal the PDP plate with a Microseal ‘B’ adhesive seal.
b Shake the PDP plate on a microplate shaker at 1800 rpm for 2 minutes.
4
Centrifuge the PDP plate to 280 × g for 1 minute.
5
Do one of the following:
• Proceed to cluster generation. For more information, see the cluster generation
section of the user guide for your Illumina platform.
• Store the sealed PDP plate at -15°C to -25°C.
Part # 15031048 Rev. E
Appendix A Supporting Information
Introduction
Acronyms
Kit Contents
Consumables and Equipment
Indexed Adapter Sequences
TruSeq Stranded Total RNA Sample Preparation Guide
92
93
96
107
111
91
Appendix A
Supporting Information
Supporting Information
Introduction
The protocols described in this guide assume that you have reviewed the contents of this
appendix, confirmed your kit contents, and obtained all of the requisite consumables and
equipment.
92
Part # 15031048 Rev. E
Acronyms
Acronyms
Table 9 TruSeq Stranded Total RNA Sample Preparation Acronyms
Acronym
Definition
ALP
Adapter Ligation Plate
ATL
A-Tailing Mix
BRP
Bind rRNA Plate
CAP
Clean Up ALP Plate
CCP
cDNA Clean Up Plate
cDNA
Complementary DNA
CPP
Clean Up PCR Plate
CTA
A-Tailing Control
CTE
End Repair Control
CTL
Ligation Control
DCT
Diluted Cluster Template
DFP
Depleted RNA Fragmentation Plate
ds cDNA
Double-Stranded Complimentary DNA
ELB
Elution Buffer
EPH
Elute, Prime, Fragment High Mix
EUC
Experienced User Card
FFPE
Formalin-Fixed, Paraffin-Embedded
FSA
First Strand Synthesis Act D Mix
TruSeq Stranded Total RNA Sample Preparation Guide
93
Supporting Information
Acronym
GRM
H/M/R
94
Definition
Globin Removal Mix
Human/Mouse/Rat
HS
High Sample
HSP
Hardshell Plate
HT
High Throughput
IEM
Illumina Experiment Manager
LIG
Ligation Mix
LS
Low Sample
LT
Low Throughput
LTF
Lab Tracking Form
PCR
Polymerase Chain Reaction
PDP
Pooled Dilution Plate
PMM
PCR Master Mix
PPC
PCR Primer Cocktail
RAP
RNA Adapter Plate
RBB
rRNA Binding Buffer
RCP
RNA CleanUp Plate
RRB
rRNA Removal Beads
RRM
rRNA Removal Mix
RRM G
rRNA Removal Mix - Gold
RRM P
rRNA Removal Mix - Plant
Part # 15031048 Rev. E
rRNA
Definition
Ribosomal RNA
RRP
rRNA Removal Plate
RSB
Resuspension Buffer
SMM
Acronyms
Acronym
Second Strand Marking Master Mix
STL
Stop Ligation Buffer
TSP
Target Sample Plate
TruSeq Stranded Total RNA Sample Preparation Guide
95
Supporting Information
Kit Contents
Check to make sure that you have all of the reagents identified in this section before
starting the TruSeq Stranded Total RNA Sample Preparation protocol. The TruSeq Stranded
Total RNA LT Sample Prep Kits are available as Set A and B. Each TruSeq Stranded Total
RNA LT Sample Prep Kit contains enough reagents to prepare up to 24 samples. When
used together, TruSeq Stranded Total RNA LT Sample Prep Kits A and B allow for pooling
up to 24 samples using the 12 different indices in each kit.
Table 10 TruSeq Stranded Total RNA Sample Preparation Kits
Kit Name
96
Catalog #
Number
of
Samples
Supported
Number
of
Indices
TruSeq Stranded Total RNA LT
Sample Prep Kit - Set A
(with Ribo-Zero
Human/Mouse/Rat)
RS-122-2201
48
12
TruSeq Stranded Total RNA LT
Sample Prep Kit - Set B
(with Ribo-Zero
Human/Mouse/Rat)
RS-122-2202
48
12
TruSeq Stranded Total RNA HT
Sample Prep Kit
(with Ribo-Zero
Human/Mouse/Rat)
RS-122-2203
96
96
TruSeq Stranded Total RNA LT
Sample Prep Kit - Set A
(with Ribo-Zero Gold)
RS-122-2301
48
12
TruSeq Stranded Total RNA LT
Sample Prep Kit - Set B
(with Ribo-Zero Gold)
RS-122-2302
48
12
Part # 15031048 Rev. E
Catalog #
Number
of
Samples
Supported
Number
of
Indices
TruSeq Stranded Total RNA HT
Sample Prep Kit
(with Ribo-Zero Gold)
RS-122-2303
96
96
TruSeq Stranded Total RNA LT
Sample Prep Kit - Set A
(with Ribo-Zero Plant)
RS-122-2401
48
12
TruSeq Stranded Total RNA LT
Sample Prep Kit - Set B
(with Ribo-Zero Plant)
RS-122-2402
48
12
TruSeq Stranded Total RNA HT
Sample Prep Kit
(with Ribo-Zero Plant)
RS-122-2403
96
96
TruSeq Stranded Total RNA LT
Sample Prep Kit - Set A
(with Ribo-Zero Globin)
RS-122-2501
48
12
TruSeq Stranded Total RNA LT
Sample Prep Kit - Set B
(with Ribo-Zero Globin)
RS-122-2502
48
12
TruSeq Stranded Total RNA HT
Sample Prep Kit
(with Ribo-Zero Globin)
RS-122-2503
96
96
Kit Contents
Kit Name
TruSeq Stranded Total RNA LT Sample Prep Kit
The TruSeq Stranded Total RNA LT Sample Prep Kit contains four boxes: an A or B box,
Box 1, Box 2, and a cDNA Synthesis PCR box.
48 Samples, 12 Index Set A and B
You receive either box A or B in the kit, depending on the set ordered.
TruSeq Stranded Total RNA Sample Preparation Guide
97
Supporting Information
Store at -15°C to -25°C
These boxes are shipped on dry ice. As soon as you receive your kit, store the following
components at -15°C to -25°C.
Set A
Figure 12 TruSeq Stranded Total RNA LT Sample Prep Kit 48 Samples, 12 Index Set A,
part # 15032612
Slot
1
2
3
4
5
6
7
8
9
10
11
12
13
14
15
16
17
18
19
98
Reagent
LIG
ATL
STL
AR013
AR014
AR015
AR016
AR018
AR019
AR002
AR004
AR005
AR006
AR007
AR012
RSB
CTE
CTA
CTL
Part #
15026773
15012495
15012546
15024655
15024656
15024657
15024658
15024660
15024661
15026634
15026636
15026637
15026638
15026640
15026645
15026770
15026774
15026775
15026776
Description
Ligation Mix
A-Tailing Mix
Stop Ligation Buffer
RNA Adapter Index 13
RNA Adapter Index 14
RNA Adapter Index 15
RNA Adapter Index 16
RNA Adapter Index 18
RNA Adapter Index 19
RNA Adapter Index 2
RNA Adapter Index 4
RNA Adapter Index 5
RNA Adapter Index 6
RNA Adapter Index 7
RNA Adapter Index 12
Resuspension Buffer
End Repair Control
A-Tailing Control
Ligation Control
Part # 15031048 Rev. E
Kit Contents
Set B
Figure 13 TruSeq Stranded Total RNA LT Sample Prep Kit 48 Samples, 12 Index Set B,
part # 15032613
Slot
1
2
3
4
5
6
7
8
9
10
11
12
13
14
15
16
17
18
19
Reagent
ATL
STL
AR020
AR021
AR022
AR023
AR025
AR027
AR001
AR003
AR008
AR009
AR010
AR011
RSB
LIG
CTE
CTA
CTL
Part #
15012495
15012546
15024662
15024663
15024664
15024665
15024667
15024668
15026633
15026635
15026641
15026642
15026643
15026644
15026770
15026773
15026774
15026775
15026776
Description
A-Tailing Mix
Stop Ligation Buffer
RNA Adapter Index 20
RNA Adapter Index 21
RNA Adapter Index 22
RNA Adapter Index 23
RNA Adapter Index 25
RNA Adapter Index 27
RNA Adapter Index 1
RNA Adapter Index 3
RNA Adapter Index 8
RNA Adapter Index 9
RNA Adapter Index 10
RNA Adapter Index 11
Resuspension Buffer
Ligation Mix
End Repair Control
A-Tailing Control
Ligation Control
TruSeq Stranded Total RNA Sample Preparation Guide
99
Supporting Information
48 Samples, Box 1 of 2
Store as specified
This box is shipped on refrigerated gel packs. As soon as you receive it, store the following
components as specified.
Figure 14 TruSeq Stranded Total RNA LT Sample Prep Kit, 48 Samples (Box 1 of 2), part #
15032615
Slot
1
2
3
4
Reagent
DTE
DTA
DTL
RRB
Part #
15026766
15026805
15026807
15031727
Description
CTE Dilution Tube
CTA Dilution Tube
CTL Dilution Tube
rRNA Removal Beads
Storage Temperature
Room Temperature
Room Temperature
Room Temperature
2°C to 8°C
48 Samples Ribo-Zero Box
You will receive one of the following boxes, depending on the kit ordered. These boxes also
contain plate barcode labels.
Store as specified
This box is shipped on dry ice. As soon as you receive it, store the following components
as specified.
100
Part # 15031048 Rev. E
Kit Contents
Figure 15 TruSeq Stranded Total RNA LT Sample Prep Kit 48 Samples Ribo-Zero
Ribo-Zero H/M/R, part # 15032618
Slot
1
2
3
4
Reagent
RBB
RRM
ELB
EPH
Part #
15031737
15031738
15026780
15029211
Description
rRNA Binding Buffer
rRNA Removal Mix
Elution Buffer
Elute, Prime, Fragment High Mix
Storage Temperature
-15°C to -25°C
-15°C to -25°C
2°C to 8°C
-15°C to -25°C
Ribo-Zero Gold, part # 15032619
Slot
1
2
3
4
Reagent
RBB
RRM G
ELB
EPH
Part #
15031737
15033133
15026780
15029211
Description
rRNA Binding Buffer
rRNA Removal Mix - Gold
Elution Buffer
Elute, Prime, Fragment High Mix
Storage Temperature
-15°C to -25°C
-15°C to -25°C
2°C to 8°C
-15°C to -25°C
Ribo-Zero Plant, part # 15035748
Slot
1
2
3
4
Reagent
RBB
RRM P
ELB
EPH
Part #
15031737
15033135
15026780
15029211
Description
rRNA Binding Buffer
rRNA Removal Mix - Plant
Elution Buffer
Elute, Prime, Fragment High Mix
TruSeq Stranded Total RNA Sample Preparation Guide
Storage Temperature
-15°C to -25°C
-15°C to -25°C
2°C to 8°C
-15°C to -25°C
101
Supporting Information
Ribo-Zero Globin, part # 15035750
Slot
1
2
3
4
Reagent
RBB
GRM
ELB
EPH
Part #
15031737
15037137
15026780
15029211
Description
rRNA Binding Buffer
Globin Removal Mix
Elution Buffer
Elute, Prime, Fragment High Mix
Storage Temperature
-15°C to -25°C
-15°C to -25°C
2°C to 8°C
-15°C to -25°C
48 Samples, cDNA Synthesis PCR Box Store at -15°C to -25°C
This box is shipped on dry ice. As soon as you receive it, store the following components at
-15°C to -25°C.
Figure 16 TruSeq Stranded Total RNA LT Sample Prep Kit, 48 Samples, cDNA Synthesis
PCR Box, part # 15032611
Slot
1
2
3
4
Reagent
PMM
PPC
FSA
SMM
Part #
15026785
15031748
15031094
15031098
Description
PCR Master Mix
PCR Primer Cocktail
First Strand Synthesis Act D Mix
Second Strand Marking Master Mix
TruSeq Stranded Total RNA HT Sample Prep Kit
The TruSeq Stranded Total RNA HT Sample Prep Kit contains five boxes: a core reagent
box, a cDNA Synthesis- PCR box, an Adapter Plate box, and a Box 1 and Box 2.
102
Part # 15031048 Rev. E
Store at -15°C to -25°C
This box is shipped on dry ice. As soon as you receive it, store the following components at
-15°C to -25°C.
Figure 17 TruSeq Stranded Total RNA HT Sample Prep Kit, 96 Samples, Core Box,
part # 15032620
Slot
1–2
3–4
5–6
7–8
9–10
11–12
13–14
Reagent
RSB
ATL
LIG
CTE
CTA
CTL
STL
Part #
15026770
15012495
15026773
15026774
15026775
15026776
15012546
Description
Resuspension Buffer
A-Tailing Mix
Ligation Mix
End Repair Control
A-Tailing Control
Ligation Control
Stop Ligation Buffer
96 Samples, cDNA Synthesis-PCR Box
Store at -15°C to -25°C
This box is shipped on dry ice. As soon as you receive it, store the following components at
-15°C to -25°C.
TruSeq Stranded Total RNA Sample Preparation Guide
103
Kit Contents
96 Samples, Core Box
Supporting Information
Figure 18 TruSeq Stranded Total RNA HT Sample Prep Kit, 96 Samples, cDNA SynthesisPCR Box, part # 15032621
Slot
1–2
3–4
5–6
7–8
Reagent
PMM
PPC
FSA
SMM
Part #
15026785
15031748
15031094
15031098
Description
PCR Master Mix
PCR Primer Cocktail
First Strand Synthesis Act D Mix
Second Strand Marking Master Mix
96 Samples- Adapter Plate Box
Store at -15°C to -25°C
This box is shipped on dry ice. As soon as you receive it, store the contents at -15°C
to -25°C.
Figure 19 TruSeq Stranded Total RNA HT Sample Prep Kit, 96, Adapter Plate Box, part #
15032622
Slot
1
Reagent
RAP
Part #
Description
15016427 RNA Adapter Plate, 96plex
96 Samples, Box 1 of 2
Store as specified
This box is shipped on refrigerated gel packs. As soon as you receive it, store the following
components as specified.
104
Part # 15031048 Rev. E
Slot
1–2
3
4
5
Reagent
RRB
DTL
DTE
DTA
Part #
15031727
15026807
15026766
15026805
Description
rRNA Removal Beads
CTL Dilution Tube
CTE Dilution Tube
CTA Dilution Tube
Storage Temperature
2°C to 8°C
Room Temperature
Room Temperature
Room Temperature
96 Samples Ribo-Zero Box
You will receive one of the following boxes, depending on the kit ordered. These boxes also
contain plate barcode labels.
Store as specified
This box is shipped on dry ice. As soon as you receive it, store the following components
as specified.
Figure 21 TruSeq Stranded Total RNA HT Sample Prep Kit, 96 Samples Ribo-Zero
TruSeq Stranded Total RNA Sample Preparation Guide
105
Kit Contents
Figure 20 TruSeq Stranded Total RNA HT Sample Prep Kit, 96 Samples (Box 1 of 2), part #
15032625
Supporting Information
Ribo-Zero H/M/R, part # 15032626
Slot
1–2
3–4
5–6
7–8
Reagent
RBB
RRM
ELB
EPH
Part #
15031737
15031738
15026780
15029211
Description
rRNA Binding Buffer
rRNA Removal Mix
Elution Buffer
Elute, Prime, Fragment High Mix
Storage Temperature
-15°C to -25°C
-15°C to -25°C
2°C to 8°C
-15°C to -25°C
Ribo-Zero Gold, part # 15032627
Slot
1–2
3–4
5–6
7–8
Reagent
RBB
RRM G
ELB
EPH
Part #
15031737
15033133
15026780
15029211
Description
rRNA Binding Buffer
rRNA Removal Mix - Gold
Elution Buffer
Elute, Prime, Fragment High Mix
Storage Temperature
-15°C to -25°C
-15°C to -25°C
2°C to 8°C
-15°C to -25°C
Ribo-Zero Plant, part # 15035749
Slot
1–2
3–4
5–6
7–8
Reagent
RBB
RRM P
ELB
EPH
Part #
15031737
15033135
15026780
15029211
Description
rRNA Binding Buffer
rRNA Removal Mix - Plant
Elution Buffer
Elute, Prime, Fragment High Mix
Storage Temperature
-15°C to -25°C
-15°C to -25°C
2°C to 8°C
-15°C to -25°C
Ribo-Zero Globin, part # 15035751
Slot
1–2
3–4
5–6
7–8
106
Reagent
RBB
GRM
ELB
EPH
Part #
15031737
15037137
15026780
15029211
Description
rRNA Binding Buffer
Globin Removal Mix
Elution Buffer
Elute, Prime, Fragment High Mix
Storage Temperature
-15°C to -25°C
-15°C to -25°C
2°C to 8°C
-15°C to -25°C
Part # 15031048 Rev. E
Check to make sure that you have all of the necessary user-supplied consumables and
equipment before starting the TruSeq Stranded Total RNA Sample Preparation protocol.
The requirement for some supplies is dependent upon the protocol performed (LS or HS)
and these items are specified in separate tables.
Table 11 User-Supplied Consumables
Consumable
Supplier
1.5 ml RNase/DNase-free
non-sticky tubes
Life Technologies,
part # AM12450
10 µl barrier pipette tips
General lab supplier
10 µl multichannel pipettes
General lab supplier
10 µl single channel pipettes
General lab supplier
1000 µl barrier pipette tips
General lab supplier
1000 µl multichannel pipettes
General lab supplier
1000 µl single channel pipettes
General lab supplier
200 µl barrier pipette tips
General lab supplier
200 µl multichannel pipettes
General lab supplier
200 µl single channel pipettes
General lab supplier
96-well storage plates, round well,
0.8 ml (“MIDI” plate)
Fisher Scientific,
part # AB-0859
96-well 2 ml deep well plates
(Optional - to aliquot reagents)
Thomson Instrument
Company,
part # 951652
Agencourt AMPure XP 60 ml kit
Beckman Coulter Genomics,
part # A63881
TruSeq Stranded Total RNA Sample Preparation Guide
107
Consumables and Equipment
Consumables and Equipment
Supporting Information
Consumable
Supplier
Agencourt RNAClean XP 40 ml kit
Beckman Coulter Genomics,
part # A63987
Agilent RNA 6000 Nano Kit or
Agilent RNA 6000 Pico Kit
(Optional - for alternative fragmentation only)
Agilent Technologies,
part # 5067-1511 or
part # 5067-1513
Ethanol 200 proof (absolute)
for molecular biology (500 ml)
Sigma-Aldrich,
part # E7023
Microseal ‘B’ adhesive seals
Bio-Rad,
part # MSB-1001
MicroTube (6x16mm), AFA fiber
with crimp-cap
(Optional - for alternative fragmentation only)
Covaris, part # 520052
MinElute Gel Extraction Kit
(Optional - if starting with previously isolated mRNA)
QIAGEN, part # 28604
Nuclease-free ultra pure water
General lab supplier
RNaseZap
(to decontaminate surfaces)
General lab supplier
RNase/DNase-free eight-tube strips and caps
General lab supplier
RNase/DNase-free multichannel reagent reservoirs,
disposable
VWR, part # 89094-658
SuperScript II Reverse Transcriptase
Invitrogen,
part # 18064-014
Tris-HCl 10 mM, pH8.5
General lab supplier
Tween 20
Sigma, part # P7949
Table 12 User-Supplied Consumables - Additional Items for LS Processing
108
Consumable
Supplier
96-well 0.3 ml PCR plates
General lab supplier
Part # 15031048 Rev. E
Consumables and Equipment
Table 13 User-Supplied Consumables - Additional Items for HS Processing
Consumable
Supplier
Microseal 96-well PCR plates
(“HSP” plate)
Bio-Rad, part # HSP-9601
Microseal ‘A’ film
Bio-Rad, part # MSA-5001
Table 14 User-Supplied Equipment
Equipment
Supplier
96-well thermal cycler
(with heated lid)
General lab supplier
2100 Bioanalyzer Desktop System
Agilent, part # G2940CA
Agilent DNA 1000 Kit
Agilent, part # 5067-1504
Magnetic stand-96
Life Technologies, part # AM10027
Microplate centrifuge
General lab supplier
Vortexer
General lab supplier
Table 15 User-Supplied Equipment - Additional Items for HS Processing
Consumable
Supplier
High-Speed Microplate Shaker
VWR, catalog # • 13500-890 (110 V/120 V) or
• 14216-214 (230 V)
MIDI plate insert for heating system
Note: Two inserts are recommended
to support successive heating procedures.
Illumina, catalog # BD-60-601
Stroboscope
General lab supplier
TruSeq Stranded Total RNA Sample Preparation Guide
109
Supporting Information
Consumable
Supplier
One of the following:
Note: Two systems are recommended
to support successive heating procedures.
• SciGene TruTemp Heating System
• Hybex Microsample Incubator
110
• Illumina, catalog #
• SC-60-503 (115 V) or
• SC-60-504 (220 V)
• SciGene, catalog #
• 1057-30-0 (115 V) or
• 1057-30-2 (230 V)
Part # 15031048 Rev. E
This section details the indexed adapter sequences.
TruSeq Stranded Total RNA LT Sample Prep Kit Indexed Adapter
Sequences
The TruSeq Stranded Total RNA LT Sample Prep Kit contains the following indexed
adapter sequences.
NOTE
• The index numbering is not contiguous. There is no Index 17, 24, or 26.
• The base in parentheses () indicates the base for the seventh cycle and is not considered as
part of the index sequence. Record the index in the sample sheet as only six bases. For
indices 13 and above, the seventh base (in parentheses) might not be A, which is seen in
the seventh cycle of the index read.
• For more information on the number of cycles used to sequence the index read,
reference your instrument user guide.
TruSeq Stranded Total RNA Sample Preparation Guide
111
Indexed Adapter Sequences
Indexed Adapter Sequences
Supporting Information
Table 16 TruSeq Stranded Total RNA LT Sample Prep Kit Set A Indexed Adapter
Sequences
Adapter
Sequence
Adapter
Sequence
AR002
CGATGT(A)
AR013
AGTCAA(C)
AR004
TGACCA(A)
AR014
AGTTCC(G)
AR005
ACAGTG(A)
AR015
ATGTCA(G)
AR006
GCCAAT(A)
AR016
CCGTCC(C)
AR007
CAGATC(A)
AR018
GTCCGC(A)
AR012
CTTGTA(A)
AR019
GTGAAA(C)
Table 17 TruSeq Stranded Total RNA LT Sample Prep Kit Set B Indexed Adapter
Sequences
Adapter
Sequence
Adapter
Sequence
AR001
ATCACG(A)
AR020
GTGGCC(T)
AR003
TTAGGC(A)
AR021
GTTTCG(G)
AR008
ACTTGA(A)
AR022
CGTACG(T)
AR009
GATCAG(A)
AR023
GAGTGG(A)
AR010
TAGCTT(A)
AR025
ACTGAT(A)
AR011
GGCTAC(A)
AR027
ATTCCT(T)
TruSeq Stranded Total RNA HT Sample Prep Kit Indexed Adapter
Sequences
The RAP in the TruSeq Stranded Total RNA HT Sample Prep Kit contains the following
indexed adapter sequences:
112
Part # 15031048 Rev. E
Table 18 TruSeq Stranded Total RNA HT Sample Prep Kit Indexed Adapter 1 Sequences
Adapter
Sequence
Adapter
Sequence
D701
ATTACTCG
D707
CTGAAGCT
D702
TCCGGAGA
D708
TAATGCGC
D703
CGCTCATT
D709
CGGCTATG
D704
GAGATTCC
D710
TCCGCGAA
D705
ATTCAGAA
D711
TCTCGCGC
D706
GAATTCGT
D712
AGCGATAG
Table 19 TruSeq Stranded Total RNA HT Sample Prep Kit Indexed Adapter 2 Sequences
Adapter
Sequence
Adapter
Sequence
D501
TATAGCCT
D505
AGGCGAAG
D502
ATAGAGGC
D506
TAATCTTA
D503
CCTATCCT
D507
CAGGACGT
D504
GGCTCTGA
D508
GTACTGAC
TruSeq Stranded Total RNA Sample Preparation Guide
113
Indexed Adapter Sequences
NOTE
The Index recorded in the sample sheet is the full 8 bases and 8 bases are sequenced per
indexed read.
114
Part # 15031048 Rev. E
Appendix A Alternate Fragmentation Protocols
Introduction
Modify RNA Fragmentation Time for Intact RNA
Modify RNA Fragmentation Time for Degraded RNA
TruSeq Stranded Total RNA Sample Preparation Guide
116
117
119
115
Appendix A
Alternate Fragmentation
Protocols
Alternate Fragmentation Protocols
Introduction
Fragmentation of the nucleic acids is required for optimal library preparation, clustering,
and sequencing. When starting with intact RNA, the TruSeq Stranded Total RNA
fragmentation protocol for transcriptome analysis is performed on the RNA after rRNA
depletion using elevated temperatures. This results in libraries with inserts ranging in size
from 120–200 bp with a median size of 150 bp. The TruSeq Stranded Total RNA
fragmentation protocol ensures the best coverage of the transcriptome with efficient library
production.
Illumina recognizes that some customers have different purposes for their sequencing
experiments. The need for larger inserts is greater than the need for the best coverage for
applications such as splice variant analysis studies. To vary the insert size of your library,
see Modify RNA Fragmentation Time for Intact RNA on page 117.
Illumina also recognizes that it is not always possible to extract intact total RNA. For
instance, RNA extracted from FFPE samples is typically degraded. To vary the
fragmentation time for degraded RNA, see Modify RNA Fragmentation Time for Degraded
RNA on page 119.
116
Part # 15031048 Rev. E
To modify the fragmentation of the RNA to allow for longer RNA fragments, the time of
fragmentation can be shortened. This is accomplished during the Ribo-Zero Deplete and
Fragment RNA procedures by modifying the thermal cycler Elution 2 - Frag - Prime
program: 94°C for X minutes followed by a 4°C hold for the thermal cycler. X is determined
by the length of RNA desired. A range of suggested times and sizes is described in Table
20.
Table 20 Library Insert Fragmentation Time
Time at 94°C
Range of Insert
Median Insert
(minutes)
Lengtha (bp)
Lengtha (bp)
b
0
130–350
200
1
130–310
190
2
130–290
185
3
125–250
165
4
120–225
160
8
120–210
155
12
115–180
140
Average Final Library Size
(Bioanalyzer bp)
467
439
410
366
326
309
272
a. Insert length determined after clustering, and sequencing with a paired-end sequencing run.
b. Instead of a 94°C incubation, incubate at 65°C for 5 minutes, followed by a 4°C hold. This will elute
the mRNA from the beads without fragmentation. The resulting cDNA fragments are smaller than the
mRNA due to internal priming by the random hexamers in the EPH.
TruSeq Stranded Total RNA Sample Preparation Guide
117
Modify RNA Fragmentation Time for Intact RNA
Modify RNA Fragmentation Time for Intact RNA
Alternate Fragmentation Protocols
Figure 22 Shortened Fragmentation Time Results
NOTE
The discrepancy between the reported insert size using the Agilent Bioanalyzer
and the insert size determined after clustering, and sequencing with a pairedend sequencing run is due to the bias towards clustering smaller fragments. To
target a specific fragment size, a gel size selection step is required after adapter
ligation.
118
Part # 15031048 Rev. E
For degraded RNA samples, the fragmentation time must be adjusted to avoid over
fragmentation of the RNA samples. This is accomplished during the Ribo-Zero Deplete and
Fragment RNA procedures by either skipping fragmentation Incubate 1 DFP) or modifying
the thermal cycler Elution 2 - Frag - Prime program to 94°C for X minutes, followed by a
4°C hold.
Whether or not the samples should undergo fragmentation and the amount of time used
for fragmentation (X) is determined by the size range of the total RNA starting material. To
determine which fragmentation settings to use, if any:
1
Measure the size range of the total RNA starting material by running it on a Agilent
RNA 6000 Nano or Pico chip.
2
Compare the resulting electropherogram to Figure 23–Figure 27, which show UHR that
has been fragmented to various size ranges.
3
Determine which sample figure most resembles the size range of your starting material.
4
Use the thermal cycler settings recommended in the figure title of that size range to
fragment your degraded RNA samples.
For starting material smaller than that shown in Figure 27, no fragmentation is
necessary. Skip Incubate 1 DFP and proceed immediately to Synthesize First Strand cDNA.
TruSeq Stranded Total RNA Sample Preparation Guide
119
Modify RNA Fragmentation Time for Degraded
Modify RNA Fragmentation Time for Degraded RNA
Alternate Fragmentation Protocols
Figure 23 Incubate Samples at 94°C for 8 Minutes, Followed By a 4°C Hold
120
Part # 15031048 Rev. E
Modify RNA Fragmentation Time for Degraded
Figure 24 Incubate Samples at 94°C for 7 Minutes, Followed By a 4°C Hold
TruSeq Stranded Total RNA Sample Preparation Guide
121
Alternate Fragmentation Protocols
Figure 25 Incubate Samples at 94°C for 6 Minutes, Followed By a 4°C Hold
122
Part # 15031048 Rev. E
Modify RNA Fragmentation Time for Degraded
Figure 26 Incubate Samples at 94°C for 4 Minutes, Followed By a 4°C Hold
TruSeq Stranded Total RNA Sample Preparation Guide
123
Alternate Fragmentation Protocols
Figure 27 No Fragmentation Necessary. Skip Incubate 1 DFP and Proceed to Synthesize First
Strand cDNA
124
Part # 15031048 Rev. E
A
Acronyms 93
Actinomycin D 26
Add ATL 33, 71
Add LIG 37, 75
Add SMM 29, 67
Add STL 39, 77
ALP 28, 66
Amp PCR 44, 83
AMPure XP Beads 28, 36, 42, 66, 74, 81
ATL 32, 70
B
Best Practices 10
BRB 19, 57
Index
Index
E
ELB 18, 56
Elution 2 - Frag - Prime 117
EPH 18, 56
experienced user card (EUC) 11
F
FFPE 20, 23, 58, 60, 116, 119
first strand cDNA 2
fragmentation time 116
FSA 25, 63
G
GRM 18, 56
C
H
CAP 35, 73
CCP 66
cDNA synthesis 17, 55
Clean Up ALP 39, 77-78
Clean Up DFP 30, 68
Clean Up PCR 44, 84
Clean Up RCP 23, 60
cluster generation 2, 50, 90
CPP 81
CTA 32, 70
CTE 28, 66
CTL 35, 73
customer support 127
help, technical 127
High Sample (HS) 4
HSP 4
D
DCT 48, 88
degraded RNA 20, 23, 58, 60, 116, 119
DFP 19, 57
documentation 127
ds cDNA 28, 66
TruSeq Stranded Total RNA Sample Preparation Guide
I
IEM 11
IMP 66
in-line control DNA 8
Incubate 1 ALP 34, 72
Incubate 1 BRP 21, 59
Incubate 1 DFP 24, 62
Incubate 2 ALP 39, 77
Incubate 2 DFP 26, 65
Incubate 3 DFP 30, 68
index adapter 2
indexed adapter 111-112
L
LIG 35, 73
Low Sample (LS) 4
125
Index
M
Make BRP 20, 58
Make DCT 49, 89
Make PCR 44, 83
Make PDP vii, 50, 89
Make RRP 21, 59
micro plate shaker 4
microheating system 4
MIDI 4
mRNA Denaturation 21, 59
strip tubes and caps 19, 25, 28, 32, 36,
42, 57, 63, 66, 70, 74, 82
SuperScript II 25, 63
T
technical assistance 127
thermal cycler 4
total RNA 2
Training 10
Tris-HCl 48, 88
TSP1 42, 49, 81, 88
P
U
PCR 3, 35, 73
PDP 48, 88
PMM 42, 81
pooled sample volumes 50, 90
pooling guidelines 11
PPC 42, 81
ultra pure water 19, 57
W
workflow diagram 16, 54
Q
quality control 46, 86
quantify libraries 46, 86
R
RAP 35, 73
RBB 18, 56
RCP 19, 57
Reagent Reservoirs 19, 25, 28, 32, 36,
43, 57, 63, 66, 70, 74, 82
Ribo-Zero 2, 17-18, 21, 55-56, 58, 96,
100, 105
RNA Adapter Indices 35, 73
RNAClean XP Beads 19, 57
RRB 19, 56
RRM 18, 56
RRM G 18, 56
RRM P 18, 56
RRP 19, 57
RSB 18, 28, 32, 35, 42, 56, 66, 70, 73, 81
S
SAV 8-9
second strand cDNA 2
SMM 28, 66
STL 35, 73
126
Part # 15031048 Rev. E
For technical assistance, contact Illumina Technical Support.
Table 21 Illumina General Contact Information
Illumina Website
Email
www.illumina.com
[email protected]
Table 22 Illumina Customer Support Telephone Numbers
Region
Contact Number
Region
North America
1.800.809.4566
Italy
Austria
0800.296575
Netherlands
Belgium
0800.81102
Norway
Denmark
80882346
Spain
Finland
0800.918363
Sweden
France
0800.911850
Switzerland
Germany
0800.180.8994
United Kingdom
Ireland
1.800.812949
Other countries
Contact Number
800.874909
0800.0223859
800.16836
900.812168
020790181
0800.563118
0800.917.0041
+44.1799.534000
MSDSs
Material safety data sheets (MSDSs) are available on the Illumina website at
www.illumina.com/msds.
Product Documentation
Product documentation in PDF is available for download from the Illumina website. Go
to www.illumina.com/support, select a product, then click Documentation & Literature.
TruSeq Stranded Total RNA Sample Preparation Guide
127
Technical Assistance
Technical Assistance
Illumina
San Diego, California 92122 U.S.A.
+1.800.809.ILMN (4566)
+1.858.202.4566 (outside North America)
[email protected]
www.illumina.com