1
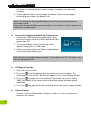
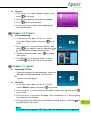
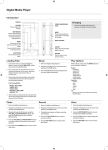
User Manual 1 For your Safety Warning To prevent electric shock or other injury, please do not disassemble or repackage this product. To prevent a fire, electric shock, or device malfunction, please do not use this product in a wet environment such as a bathroom. If the product gets wet, do not turn it on. Contact a Service Center. Do not leave the player in areas above 40oC (104oF). Such as inside a sauna or parked car. This product is an electronic device; please avoid dropping it or subjecting it to other severe shock. For your safety and the safety of others, do not use headphones while driving, cycling or conducting any other similar activities. Please do not overcharge the battery as it may cause damage. Avoid using your player at high volume levels, as it may result in permanent hearing damage. If you experience ringing in your ears while using the earphones, remove the earphones immediately and lower the volume. Notice Do not dismantle the player personally or use alcohol, thinner or benzene to clean the surface of the player. Do not disconnect the player while formatting, uploading or downloading, otherwise it may cause a program error When transferring files, do not turn the power off or restart this device. No responsibility is provided for any damage to or loss of any program, data, or other information stored on any media or any part of this device serviced hereunder. Battery service life may vary according to actual using conditions, manufacturer and manufacturing date. We suggest you to charge the battery through NB/ PC USB port. The player begins recharging once it is connected to the USB port of a standard computer, whether it is powered on or not. Please recharge the device when: A. Battery electricity icon displays no electricity. B. Player refuses to power on. C. Player functions normally, but it quickly powers off automatically. D. There is no response when pressing the keys. 2 Table of contents For your Safety Chapter 1. Introduction.......................................................................................5 Chapter 2. Product Features ..............................................................................5 Chapter 3. Diagram of the player .......................................................................6 Chapter 4. Package Contents.............................................................................6 Chapter 5. Screen Description ...........................................................................7 Music Playing Mode......................................................................................... 7 Chapter 6. Basic Functions ................................................................................7 Power On/Off ................................................................................................... 7 Hold On/Off...................................................................................................... 7 Charging the Battery........................................................................................ 7 Connect to Computer and Data File Transmission .......................................... 8 A-B Repeat Function ....................................................................................... 8 Volume Control ................................................................................................ 8 Chapter 7. System Menu ....................................................................................9 Main Menu ....................................................................................................... 9 Chapter 8. Listening to Music ............................................................................9 Play/Stop ......................................................................................................... 9 Lyrics Display................................................................................................... 9 Music Settings ............................................................................................... 10 Repeat Mode ................................................................................................. 10 EQ Select....................................................................................................... 10 Play Rate ....................................................................................................... 10 Folder ............................................................................................................ 10 Classified....................................................................................................... 11 Play List ......................................................................................................... 11 Chapter 9. FM ....................................................................................................12 FM Radio ....................................................................................................... 12 To save the channel: ..................................................................................... 12 Auto Search ................................................................................................... 12 Listen to saved FM channels......................................................................... 12 Deleting a channel ......................................................................................... 12 Record ........................................................................................................... 13 Chapter 10. Picture ...........................................................................................13 Picture Browsing............................................................................................ 13 Chapter 11. eBook.............................................................................................13 Download TXT File ........................................................................................ 13 Read File ....................................................................................................... 13 Chapter 12. Record ...........................................................................................14 Recording Mode ............................................................................................ 14 Chapter 13. Setup..............................................................................................14 Power Saving................................................................................................. 14 Language....................................................................................................... 14 3 4 Display ........................................................................................................... 15 Record ........................................................................................................... 15 Sys Tools ....................................................................................................... 15 Storage .......................................................................................................... 16 Chapter 14. Voice ..............................................................................................16 Chapter 15. Convert and Play Video File ........................................................16 Install the Media Converter Tool .................................................................... 16 Play Video...................................................................................................... 17 Chapter 16. Troubleshooting ...........................................................................18 Chapter 17. Service and Support.....................................................................19 Chapter 18. Product Specifications.................................................................19 Chapter 1. Introduction Congratulations on your purchase of the Apacer Audio Steno MP4 Player. Before operating the unit, please read this manual thoroughly and keep it for future reference. This manual will help you learn to use many of the exciting features of this device and make your experience more enjoyable. This manual contains important safety measurements and operational information, so please read all the information carefully before you use the device in order to avoid any unexpected accidents. We make no representation for the errors, omissions or updates of this document. We also make no representation for the data or music files lost of the player. Microsoft Windows Media and Windows are trademarks of Microsoft Corporation. Trademarks of other products mentioned in this user's manual are owned by their respective companies or organizations. Chapter 2. Product Features Ultra-slim Touchpad Interface control design. Video/Photo playback with 2.4” TFT LCD Screen MP3/WMA playback with 7 EQ modes. Supports FM/Recording function. High storage capacity and expandability: supports microSDHC. 5 Chapter 3. Diagram of the player 6 9 4 3 2 10 5 7 8 1 1. : Play/Pause/Stop 2. : F.REV/Previous 3. : F.FWD/Next 4. +: VOL + 5. -: VOL 6. : Menu 7. USB port 8. ON/Off : Power on/Power off/Lock 9. Earphone Jack 10.microSD card slot Chapter 4. Package Contents 6 Audio Steno AU851 MP4 Player x1 Earphones x1 USB cable x1 Installation CD x1 Quick Start Guide x1 Carrying Bag x1 Chapter 5. Screen Description Music Playing Mode 2 7 4 9 1 10 8 11 12 3 6 1. 2. 3. 4. 5. 6. 7. Play / Pause / Stop Equalizer ID3 Tag (artist, album, title) Volume level Elapsed Time/ Track Time Time Play mode 5 8. Music Mode 9. Battery Indicator 10. Current track number / Totaltrack number 11. Music information (Bit rate and Sampling rate) 12. Play Rate Chapter 6. Basic Functions Power On/Off Power On: Press and hold “ON/OFF” key for 3 seconds, Power is turned on. Power Off: Press and hold “ON/OFF” key for 3 seconds, Power is turned off. Hold On/Off Follow the below steps to enable the Hold function to avoid accidental key presses and operation. Hold On: Press“ON/OFF” key to lock the player. Hold Off: Press “ON/OFF” key again to unlock the player. Charging the Battery 1. Connect the USB cable to your MP4 player, then connect the other end of the USB cable to the USB port on your PC. 2. The screen displays “Charging” which indicates the player is in the USB mode. 3. The battery indicator on the top right corner of 7 the screen is scrolling. When it shows full grids, the battery has been fully charged. 4. It takes about 3.5 hours to fully charge the battery. Excessive charging or discharging may shorten the battery’s life. Note: Fully charge the rechargeable battery for the first time or for he long-time unused for a while. Please fully charge the battery every two months if you don’t use it for a long time to avoid failure in powering on. Connect to Computer and Data File Transmission 1. Connect the USB cable to your MP4 player, then connect the other end of the USB cable to the USB port on your PC. 2. The screen displays “Data Transferring” which indicates the player is in USB mode. 3. Select and organize files and folders in preparation for transfer to your MP4 player. Note: All keys are disabled when the player is connected to the PC. Don’t press any keys during data transfer A-B Repeat Function 1. Play a file of your choice 2. Press the key at the beginning of the section you want to repeat. The starting point is set and the “A-” icon will appear in the screen display window. 3. Press the key again to set the ending of the section you want to repeat. “A-B” will appear in the screen and the specified section will begin to play repeatedly. 4. Press the key again during the section to cancel the section repeat function. Volume Control In Music, Voice or Video mode, short press the+ + or - keys to increase or decrease the volume. 8 Chapter 7. System Menu Main Menu 1. In the main menu, press +or - key to select your desired option among [Music] / [Video] / [Record] / [Voice] / [FM] / [Photo] / [Setup] / [EBook]. 2. Press the key to enter the submenu, press and hold the the main menu. key to return to Chapter 8. Listening to Music Play/Stop 1. Connect the earphones, then turn on the player, and check the battery. 2. Press the + or - key to select the “Music” option in the main menu, press key to enter. 3. Press key to pause music, press key again to unpause music. Play Pasue or key to select previous or next track. 4. In playing mode, press the 5. In playing mode, press and hold the this track. or key to fast rewind or fast forward Lyrics Display 1. Save the lyrics files into your MP4 player with same name as the music file, in *.LRC format. 2. Refer to the above operation to operate the Lyric Synchronous Display. The player only supports the Lyric Synchronous Display of files that share the same name as the MP3 format file, e.g., the music file is named “Angel.mp3”, the LRC file must be named “Angel.Irc”, they must also be in the same directory. 9 Music Settings 1. In Pasue/Stope mode , press submenu . key to enter Music 2. Press + or - key to select your desired option among [Repeat] / [Equalizer] / [Play Rate] / [Folder] /[Classified]/ [Play LIST ]. 3. Press the key to enter the submenu, press the key to exit the submenu. Press and Hold key to return to the main menu Repeat Mode 1. Press + or - key to select your desired option among [No Repeat] / [Repeat One] / [Repeat All] / [Random All] / [Folder Normal]/ /[Folder Repeat]/ [Folder Random ]. 2. Press the exit . key to confirm, or press the key to EQ Select There are 7 EQ selections including: Normal, Pop,Rock, Classic, Jazz,Bass, Custom EQ. Custom EQ In this mode, you can manually optimize your EQ. 1. Press or key to shift horizontally, and press+ + or - key to adjust vertically. 2. Press the key to confirm, or press the key to exit . Play Rate 1. Press + or - key to select your desired speed among [1.00X] / [1.14X] / [1.33X] / [0.67X] / [0.08X]. 2. Press the exit . 10 key to confirm, or press the key to Folder 1. Press + or - key to select your desired track or folder. 2. Press the key to playback the track or press the key to exit . Add to My List / Delete 1. Press+ + or - key to select your desired track , then press the “ Menu “ submenu . 2. Press or 3. Press key to enter key to select your desired option among [Add to List] / [Delete]. key to confirm, or press the key to exit . Classified 1. Press + or - key to select your desired option among [Yes] / [No]. 2. Press the exit . key to confirm or press the key to Play List 1. In “ Add to List “ mode of “Folder” option , select and organize your desired track to my list. 2. Press + or - key to enter “ My List “ folder and select your desired track. 3. Press the key to playback the track , or press the key to exit . 11 Chapter 9. FM FM Radio 1. Select the “FM” option in the Main Menu. 2. Press or key to select your desired stations. key to enter FM submenu . 4. Press 5. Press + or - key to select your desired option among [Save present] / [Auto Scan] / [Record]. 6. Press the key to enter, or press the key to exit . To save the channel: 1. Press or then press key to select your desired stations , key to enter, 2. Select “Save present ” option and press enter. key to 3. Press+ + or - key to select desired channel, then press key to save the channels in sequence. 4. Press to exit . Note: This player can save a maximum of 30 channels. Auto Search 1. Press + or - to select “Auto Scan ” option, and press key to enter. 2. The MP4 player will search and save channels automatically in sequence. Listen to saved FM channels 1. Under the “ Normal “ mode , press 2. Press or 3. Press to enter “ Normal “ mode . to enter “ Present “ mode . key to select the saved channels to listen. Note: There is must more channels saving for selecting. Deleting a channel 1. Under the “ Present “ mode , Press key to enter FM submenu . 2. Press + or - to select “Delete ” option, and press 12 key to enter. 3. Press + or - key to select the channel you want to delete. 4. Press key to confirm and press key to exit. Record 1. Press + or - to select “Record ” option, and press key to enter. 2. Press 3. Press key to pause or continue recording. key to save and exit. 4. In the main menu, select Voice mode to play FM recording file. Chapter 10. Picture Picture Browsing 1. In the main menu, press the + or - key to select the “Photo” option, then press key to enter . 2. Press the + or - key to select a picture, then press key to display, now you can press or key to browse through other pictures. 3. In picture browing mode , press slide show . key to play 4. Press key to exit browing mode , or press and hold key to return to the main menu. Chapter 11. eBook Download TXT File 1. Connect the player to your computer, select the desired file to download and save the file as TXT format in the MP4 player. Read File 1. In the Main menu, press the + or - key to select “EBook” option, then press key to enter . 2. Press the + or - key to select the desired file to be read, and then press key to read. 3. Press the + or - key to turn the page. Press and hold + or - key to quickly fast rewind or fast forward. 4. Press key to exit and return to the EBook catalog, or press and hold to return to the main menu. key 13 Note: This player only supports TXT files, other file formats are not supported. Chapter 12. Record Recording Mode 1. In the Main menu, press the + or - key to select “Record” option, and then press key to enter into the “Record” window. 2. Press save. key to record and press key again to stop , then press key to 3. In the main menu, select Voice mode to play recording file. Chapter 13. Setup 1. In the Main menu, press + or - key to select “Setup” option, and then press key to enter. 2. Press + or - key to select your desired option among [Power Saving ]/ [Language] / [Display] / [Record] / [Sys Tools] / [Storage]. 3. Press the key to enter, or press and hold the key to return to the main menu. Power Saving 1. Press + or - key to select “Power Saving ” option, then press key to enter. 2. Press the press the key to enter “ Auto off “ option, or key to exit. Auto off 1. Press + or - key to select your desired option among [15 minutes ]/ [30 minutes ]/ [60 minutes ]/ [90 minutes ]/ [120 minutes ]/ [Close ]. 2. Press the to exit. 14 key to confirm, or press the key Language 1. Press + or - key to select “Language” option, then press key to enter. 2. Press + or - key to select your desired language. 3. Press the exit. key to confirm, or press the key to Display 1. Press + or - key to select “ Display ” option, then press key to enter. 2. Press + or - key to select your desired option among [Backlight ]/ [Brightness]. 3. Press the exit. key to confirm, or press the key to Backlight 1. Press + or - key to select your desired option among [15 Seconds ]/ [30 Seconds ]/ [1 minutes ] / [Close ]. 2. Press the key to confirm, or press the key to exit. Brightness 1. Press + or - key to select your desired option among [Low]/ [Medium]/ [High]/ [Maximum]. 2. Press the exit. key to confirm, or press the key to Record 1. Press + or - key to select “ Record ” option, then press 2. Press the key to enter “ Quality “ option, or press the key to enter. key to exit. Quality 1. Press + or - key to select your desired option among [Long time]/ [Normal Quality] / [High Quality] . 2. Press the to exit. key to confirm, or press the key Sys Tools 1. Press + or - key to select “ Sys Tools ” option, then press key to enter. 2. Press + or - key to select your desired option among [Fotmat] / [Reset] / [Sys Info.]. key to confirm, or press the 3. Press the key to exit. 15 Storage 1. Select “Storage” option in the Setup menu, press the key to enter. 2. Press the + or - key to select music files from internal or microSD card . 3. Press key save and exit. Chapter 14. Voice 1. In the Main menu, press the + or - key to select “Voice” option, then press key to enter . 2. Press the or key to select the desired recording file, then press key to play. 3. Press and hold the fast forward. or key to fast backwind or 4. In Pasue/Stope mode , press key to enter Voice submenu . 5. Press + or - key to select your desired option among [Repeat]/ [Equalizer] / [Play Rate] / [Folder]. 6. Press the key to enter, or press key to exit. Folder 1. Press + or - key to select your desired recording file. 2. Press the key to play , or press the 3. Press the key to confirm. key to delete . Chapter 15. Convert and Play Video File Install the Media Converter Tool 1. Insert the installation CD into the CD-ROM, select and click “VideoConvert.exe” to setup the program. 2. Follow the process as follows: 3. Click “Input Video” column to select the video file you wish to convert for use on the MP4 player. 4. Select the “output frame size”( Advised is 320X240) 5. Select “Output Video Quality”( Advised is Good). 16 6. Video converter allows the user to replace the video clip audio track with an audio file of their own choice. 7. Video converter allows the user to convert a segment of the selected video clip rather than the whole clip. To do this, enter the starting time of the desired segment on the left of the “Time selection to convert” section and the finish time on the right side. 8. To convert the whole input video file, go straight to step 9 . To preview how the converted video file will appear, click on the MTV preview check box and then click “Start Preview. 9. Click “Start Conversion” button to convert video file . Play Video 1. In the Main menu, press the + or - key to select “Video” option, then press key to enter. 2. Press the + or - key to select your desired .mtv file, and press key to play . 3. In the playing mode , press key again to stop. 4. Press and hold the fast forward . or key to fast backwind or 5. In the playing mode, press submenu. 6. Press the exit. key to play or press key to enter key to enter, or press the key to Repeat: 1. Press + or - key to select your desired option among [No Repeat ] / [Repeat One] / [Repeat All] / [Random All] / [Folder Normal] / [Folder Repeat ] / [Folder Random]. 2. Press key to confirm, or press to exit . 17 Chapter 16. Troubleshooting If you experience a problem, please check the following chart for help. Problem Power will not turn on Causes Power will not turn on if the battery is fully discharged. Recharge the battery and turn the power on again. Power automatically turs off The power is automatically turned off when the batter is fully discharged. Recharge the battery. The screen will not turn on The screen may not be visible under direct sunlight. Check if you have selected the “Power Save” setting. Check if the desired file has been saved in the memory. Check if the music file is correct or the format is not supported. Check if there is enough battery power. Playing is disabled No music or sound Check if the volume is not reduced to the 0 level. Check that the earphones are connected well and keep the earphones clean. Corrupted music files may result in unplayability, please confirm the integrity of the files. Reformat the disk. Connection to PC is disabled Insert the USB cable well after the power is turned on, or plug in the player again via USB cable. Correctly reinstall the driver again. Check if that the file is in VBR (Variable Bit Rate) format Small discrepancies are due to different file formats and algorithms used by various operating systems. Abnormal Play Time Displayed while playing Actual memory capacity is different from what is listed on package Abnormal wording or file name display The product is hot 18 Make sure that you have selected the correct language. Heat may be generated during recharging. This has no effect on product life or functions. Chapter 17. Service and Support Please contact our local distributor or our customer service center, if you have any technical problems. Customer Service Center: http://www.apacer.com Chapter 18. Product Specifications USB interface Built-in Memory capacity Display User interface Music file supported format EQ modes S/N ratio FM frequency Record file supported format Picture file supported format Video file supported format Power source EBook file supported format Battery life Certification Dimensions / Weight Operating temperature Operating humidity Support O/S Supported file system Accessories USB 2.0 2GB/ 4GB/8GB/16GB 2.4”, color TFT display, Diagram (320 X 240 ) 14 languages (ID3 display supported) MP3/ WMA Normal , Pop , Rock , Classic , Jazz , Bass , Custom EQ > 85 dB 87.5MHz – 108MHz WAV JPEG , BMP , GIF WMV, AVI,MPEG I , MPEG IV (should be converted) Built-in 450 mAh Li-Polymer battery txt Video play: < 4 hours Music play: < 8 hours CE, FCC (L)86 x (W)50 x (H)7.8 mm / 42g -10°C ~ 40°C (14°F ~ 104°F) 10 % ~ 75% Windows 98(SE)/ME/2000/XP/Vista ; Mac OS X 10.4 or above FAT16, FAT32 Earphones, USB Cable, Quick Start Guide, Carring Bag, Installation CD (Win98 driver & User Manual inside) Note: Battery life will vary depending on temperature and usage. The contents of this Manual are subject to change without prior notice for further improvement. 19 20 The copyright on this user manual remains with out company. No part of this user manual may be transmitted, reproduced or changed. The product specifications, design and this user manual’s content are subject to change without notice. 21