1
www.novell.com/documentation
Administration Guide
Dynamic File Services 2.2
September 2014
Legal Notices
Novell, Inc., makes no representations or warranties with respect to the contents or use of this documentation, and specifically
disclaims any express or implied warranties of merchantability or fitness for any particular purpose. Further, Novell, Inc.,
reserves the right to revise this publication and to make changes to its content, at any time, without obligation to notify any
person or entity of such revisions or changes.
Further, Novell, Inc., makes no representations or warranties with respect to any software, and specifically disclaims any
express or implied warranties of merchantability or fitness for any particular purpose. Further, Novell, Inc., reserves the right
to make changes to any and all parts of Novell software, at any time, without any obligation to notify any person or entity of
such changes.
Any products or technical information provided under this Agreement may be subject to U.S. export controls and the trade
laws of other countries. You agree to comply with all export control regulations and to obtain any required licenses or
classification to export, re-export or import deliverables. You agree not to export or re-export to entities on the current U.S.
export exclusion lists or to any embargoed or terrorist countries as specified in the U.S. export laws. You agree to not use
deliverables for prohibited nuclear, missile, or chemical biological weaponry end uses. See the Novell International Trade
Services Web page (http://www.novell.com/info/exports/) for more information on exporting Novell software. Novell assumes
no responsibility for your failure to obtain any necessary export approvals.
Copyright © 2009–2014 Novell, Inc. All rights reserved. No part of this publication may be reproduced, photocopied, stored
on a retrieval system, or transmitted without the express written consent of the publisher.
Novell, Inc.
1800 South Novell Place
Provo, UT 84606
U.S.A.
www.novell.com
Online Documentation: To access the latest online documentation for this and other Novell products, see the Novell
Documentation Web page (http://www.novell.com/documentation).
Novell Trademarks
For Novell trademarks, see the Novell Trademark and Service Mark list (http://www.novell.com/company/legal/trademarks/
tmlist.html).
Third-Party Materials
All third-party trademarks are the property of their respective owners.
This product includes Amazon Web Services (AWS) Software Developers Kit (SDK) for Microsoft .NET open source software
that is developed by AWS. For information, see Amazon Web Services (http://aws.amazon.com/sdkfornet/).
This product includes Apache Tika toolkit open source software that is developed by the Apache Tika project. For
information, see Apache Tika (http://tika.apache.org/) on The Apache Software Foundation Web site at Apache.org (http://
www.apache.org).
This product includes DotNetZip open source software that is developed by the DotNetZip Library open source project. For
information, see DotNetZip Library (http://dotnetzip.codeplex.com/) on CodePlex.com.
This product includes Glacial ListView open source software that is developed by Glacial Components Software and the C#
ListView open source project. For information, see C# ListView (http://www.codeproject.com/KB/list/aa_listview.aspx) on
CodeProject.com.
This product includes Hammock open source software that is developed by the Hammock open source project. For
information, see Hammock (https://github.com/danielcrenna/hammock) on GitHub.com.
This product includes IKVM.NET open source software that is developed by the IKVM.NET open source project. For
information, see the IKVM.NET Wiki (http://sourceforge.net/apps/mediawiki/ikvm/index.php?title=Main_Page) on
SourceForge.net.
This product includes the Newtonsoft.Json.dll library in the Json.NET open source software that is developed by the
Json.NET open source project. For information, see Json.NET (http://json.codeplex.com) on CodePlex.com.
This product includes log4net open source software that is developed as part of the Apache Logging Services open source
project. For information, see log4net (http://logging.apache.org/log4net/) on Apache.org.
This product includes Plossum open source software that is developed by the Plossum open source project. For information,
see Plossum (http://sourceforge.net/projects/plossum) on SourceForge.net.
This product includes SharpBox open source software that is developed by SharpBox open source project. For information,
see SharpBox (http://sharpbox.codeplex.com/) on CodePlex.com.
This product includes TweetSharp open source software that is developed by Apitize and the TweetSharp open source project.
For information, see TweetSharp (https://github.com/danielcrenna/tweetsharp) on GitHub.com.
This product includes ZedGraph open source software that is developed by the ZedGraph open source project. For
information, see ZedGraph (http://sourceforge.net/projects/zedgraph/) on SourceForge.net.
Contents
About This Guide
15
1 Overview of Dynamic File Services
1.1
1.2
1.3
17
Benefits of Dynamic File Services . . . . . . . . . . . . . . . . . . . . . . . . . . . . . . . . . . . . . . . . . . . . . . . . . . . 19
1.1.1
Store Data Efficiently by Tiering Data . . . . . . . . . . . . . . . . . . . . . . . . . . . . . . . . . . . . . . . . . 19
1.1.2
Offload Retention Data to Less Expensive Storage . . . . . . . . . . . . . . . . . . . . . . . . . . . . . . 20
1.1.3
Integrate Network Attached Storage with Ease . . . . . . . . . . . . . . . . . . . . . . . . . . . . . . . . . . 20
1.1.4
Store Retention Data in the Cloud . . . . . . . . . . . . . . . . . . . . . . . . . . . . . . . . . . . . . . . . . . . . 20
1.1.5
Tier Data across Local Storage, Filers, and Cloud Storage . . . . . . . . . . . . . . . . . . . . . . . . 20
1.1.6
Access Files in a Merged View Securely and Transparently . . . . . . . . . . . . . . . . . . . . . . . . 22
1.1.7
Review Retention Data to Keep, Purge, or Restore Files . . . . . . . . . . . . . . . . . . . . . . . . . . 23
1.1.8
Move Data Seamlessly between the Two Paths . . . . . . . . . . . . . . . . . . . . . . . . . . . . . . . . . 23
1.1.9
Run Policies Whenever You Want. . . . . . . . . . . . . . . . . . . . . . . . . . . . . . . . . . . . . . . . . . . . 23
1.1.10 Reduce Backup Time . . . . . . . . . . . . . . . . . . . . . . . . . . . . . . . . . . . . . . . . . . . . . . . . . . . . . 24
Deployment Scenarios . . . . . . . . . . . . . . . . . . . . . . . . . . . . . . . . . . . . . . . . . . . . . . . . . . . . . . . . . . . . 24
1.2.1
Students: Essential versus Non-Essential Files . . . . . . . . . . . . . . . . . . . . . . . . . . . . . . . . . 24
1.2.2
Healthcare: Active versus Historical Files . . . . . . . . . . . . . . . . . . . . . . . . . . . . . . . . . . . . . . 25
1.2.3
Social Networks: Collaboration Applications . . . . . . . . . . . . . . . . . . . . . . . . . . . . . . . . . . . . 26
1.2.4
Business: Retaining Inactive Files . . . . . . . . . . . . . . . . . . . . . . . . . . . . . . . . . . . . . . . . . . . . 27
Key Components of Dynamic File Services . . . . . . . . . . . . . . . . . . . . . . . . . . . . . . . . . . . . . . . . . . . . 28
2 What’s New for Pairs and Policies Management
2.1
2.2
2.3
2.4
33
What’s New for Dynamic File Services 2.2 . . . . . . . . . . . . . . . . . . . . . . . . . . . . . . . . . . . . . . . . . . . . 33
What’s New for Dynamic File Services 2.1 . . . . . . . . . . . . . . . . . . . . . . . . . . . . . . . . . . . . . . . . . . . . 33
2.2.1
Administration . . . . . . . . . . . . . . . . . . . . . . . . . . . . . . . . . . . . . . . . . . . . . . . . . . . . . . . . . . . 34
2.2.2
Service. . . . . . . . . . . . . . . . . . . . . . . . . . . . . . . . . . . . . . . . . . . . . . . . . . . . . . . . . . . . . . . . . 34
2.2.3
Pairs. . . . . . . . . . . . . . . . . . . . . . . . . . . . . . . . . . . . . . . . . . . . . . . . . . . . . . . . . . . . . . . . . . . 34
2.2.4
Policies . . . . . . . . . . . . . . . . . . . . . . . . . . . . . . . . . . . . . . . . . . . . . . . . . . . . . . . . . . . . . . . . 35
2.2.5
Cloud . . . . . . . . . . . . . . . . . . . . . . . . . . . . . . . . . . . . . . . . . . . . . . . . . . . . . . . . . . . . . . . . . . 35
2.2.6
Retention Reviews . . . . . . . . . . . . . . . . . . . . . . . . . . . . . . . . . . . . . . . . . . . . . . . . . . . . . . . . 35
2.2.7
Notification Service . . . . . . . . . . . . . . . . . . . . . . . . . . . . . . . . . . . . . . . . . . . . . . . . . . . . . . . 35
2.2.8
Audit Tracking Service . . . . . . . . . . . . . . . . . . . . . . . . . . . . . . . . . . . . . . . . . . . . . . . . . . . . . 36
What’s New for Dynamic File Services 2.0 . . . . . . . . . . . . . . . . . . . . . . . . . . . . . . . . . . . . . . . . . . . . 36
2.3.1
Administration . . . . . . . . . . . . . . . . . . . . . . . . . . . . . . . . . . . . . . . . . . . . . . . . . . . . . . . . . . . 36
2.3.2
Service. . . . . . . . . . . . . . . . . . . . . . . . . . . . . . . . . . . . . . . . . . . . . . . . . . . . . . . . . . . . . . . . . 37
2.3.3
Pairs. . . . . . . . . . . . . . . . . . . . . . . . . . . . . . . . . . . . . . . . . . . . . . . . . . . . . . . . . . . . . . . . . . . 37
2.3.4
Policies . . . . . . . . . . . . . . . . . . . . . . . . . . . . . . . . . . . . . . . . . . . . . . . . . . . . . . . . . . . . . . . . 37
2.3.5
Policy Schedules . . . . . . . . . . . . . . . . . . . . . . . . . . . . . . . . . . . . . . . . . . . . . . . . . . . . . . . . . 38
2.3.6
Retention Reviews . . . . . . . . . . . . . . . . . . . . . . . . . . . . . . . . . . . . . . . . . . . . . . . . . . . . . . . . 38
2.3.7
Notification Service . . . . . . . . . . . . . . . . . . . . . . . . . . . . . . . . . . . . . . . . . . . . . . . . . . . . . . . 38
2.3.8
Auditing . . . . . . . . . . . . . . . . . . . . . . . . . . . . . . . . . . . . . . . . . . . . . . . . . . . . . . . . . . . . . . . . 38
2.3.9
Repair Tool . . . . . . . . . . . . . . . . . . . . . . . . . . . . . . . . . . . . . . . . . . . . . . . . . . . . . . . . . . . . . 38
2.3.10 Filter Driver Diagnostics. . . . . . . . . . . . . . . . . . . . . . . . . . . . . . . . . . . . . . . . . . . . . . . . . . . . 38
What’s Next . . . . . . . . . . . . . . . . . . . . . . . . . . . . . . . . . . . . . . . . . . . . . . . . . . . . . . . . . . . . . . . . . . . . 39
3 Getting Started
3.1
3.2
3.3
41
Installing and Setting Up Dynamic File Services . . . . . . . . . . . . . . . . . . . . . . . . . . . . . . . . . . . . . . . . 41
Connecting to the Dynamic File Services Server . . . . . . . . . . . . . . . . . . . . . . . . . . . . . . . . . . . . . . . . 42
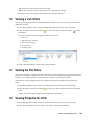
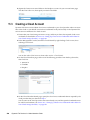
Creating a Dynamic File Services Pair. . . . . . . . . . . . . . . . . . . . . . . . . . . . . . . . . . . . . . . . . . . . . . . . 42
Contents
5
3.4
3.5
3.6
3.7
3.8
3.9
3.10
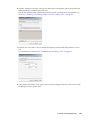
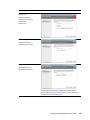
Creating a Policy . . . . . . . . . . . . . . . . . . . . . . . . . . . . . . . . . . . . . . . . . . . . . . . . . . . . . . . . . . . . . . . . 43
Associating the Pair and Policy . . . . . . . . . . . . . . . . . . . . . . . . . . . . . . . . . . . . . . . . . . . . . . . . . . . . . 44
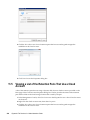
Creating More Policies and Pairs . . . . . . . . . . . . . . . . . . . . . . . . . . . . . . . . . . . . . . . . . . . . . . . . . . . . 44
Enforcing Policies. . . . . . . . . . . . . . . . . . . . . . . . . . . . . . . . . . . . . . . . . . . . . . . . . . . . . . . . . . . . . . . . 45
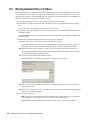
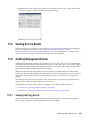
Viewing the Merged File Tree for a Standard Pair . . . . . . . . . . . . . . . . . . . . . . . . . . . . . . . . . . . . . . . 47
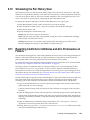
Reviewing Retained Data in a Retention Pair . . . . . . . . . . . . . . . . . . . . . . . . . . . . . . . . . . . . . . . . . . 48
Backing Up Files in the Pair . . . . . . . . . . . . . . . . . . . . . . . . . . . . . . . . . . . . . . . . . . . . . . . . . . . . . . . . 49
4 Planning for Pairs and Policies
4.1
4.2
4.3
4.4
4.5
4.6
4.7
4.8
4.9
4.10
4.11
4.12
4.13
4.14
4.15
4.16
4.17
4.18
6
51
Server-Centric Management . . . . . . . . . . . . . . . . . . . . . . . . . . . . . . . . . . . . . . . . . . . . . . . . . . . . . . . 52
Management Groups . . . . . . . . . . . . . . . . . . . . . . . . . . . . . . . . . . . . . . . . . . . . . . . . . . . . . . . . . . . . . 52
Reviewers for Retention Pairs . . . . . . . . . . . . . . . . . . . . . . . . . . . . . . . . . . . . . . . . . . . . . . . . . . . . . . 52
Active Directory Domain Configuration for Remote Shares . . . . . . . . . . . . . . . . . . . . . . . . . . . . . . . . 53
4.4.1
Default Domain Configuration . . . . . . . . . . . . . . . . . . . . . . . . . . . . . . . . . . . . . . . . . . . . . . . 53
4.4.2
Dynamic File Services Storage Rights Domain Group . . . . . . . . . . . . . . . . . . . . . . . . . . . . 54
4.4.3
NDFS-servername Domain Proxy User. . . . . . . . . . . . . . . . . . . . . . . . . . . . . . . . . . . . . . . . 55
4.4.4
Security Implications of the Default Domain Configuration . . . . . . . . . . . . . . . . . . . . . . . . . 56
Server Configuration Requirements . . . . . . . . . . . . . . . . . . . . . . . . . . . . . . . . . . . . . . . . . . . . . . . . . . 56
4.5.1
SMB . . . . . . . . . . . . . . . . . . . . . . . . . . . . . . . . . . . . . . . . . . . . . . . . . . . . . . . . . . . . . . . . . . . 56
4.5.2
UTF-8. . . . . . . . . . . . . . . . . . . . . . . . . . . . . . . . . . . . . . . . . . . . . . . . . . . . . . . . . . . . . . . . . . 56
Storage Requirements . . . . . . . . . . . . . . . . . . . . . . . . . . . . . . . . . . . . . . . . . . . . . . . . . . . . . . . . . . . . 57
4.6.1
File Systems . . . . . . . . . . . . . . . . . . . . . . . . . . . . . . . . . . . . . . . . . . . . . . . . . . . . . . . . . . . . 57
4.6.2
Local Storage. . . . . . . . . . . . . . . . . . . . . . . . . . . . . . . . . . . . . . . . . . . . . . . . . . . . . . . . . . . . 57
4.6.3
Remote Storage. . . . . . . . . . . . . . . . . . . . . . . . . . . . . . . . . . . . . . . . . . . . . . . . . . . . . . . . . . 57
4.6.4
Cloud Storage . . . . . . . . . . . . . . . . . . . . . . . . . . . . . . . . . . . . . . . . . . . . . . . . . . . . . . . . . . . 58
Pair Requirements . . . . . . . . . . . . . . . . . . . . . . . . . . . . . . . . . . . . . . . . . . . . . . . . . . . . . . . . . . . . . . . 58
4.7.1
Only 16 Pairs Per Server . . . . . . . . . . . . . . . . . . . . . . . . . . . . . . . . . . . . . . . . . . . . . . . . . . . 58
4.7.2
Primary and Secondary Paths . . . . . . . . . . . . . . . . . . . . . . . . . . . . . . . . . . . . . . . . . . . . . . . 58
4.7.3
Administrator Access . . . . . . . . . . . . . . . . . . . . . . . . . . . . . . . . . . . . . . . . . . . . . . . . . . . . . . 59
4.7.4
User Access. . . . . . . . . . . . . . . . . . . . . . . . . . . . . . . . . . . . . . . . . . . . . . . . . . . . . . . . . . . . . 60
Access Rights for a Standard Pair . . . . . . . . . . . . . . . . . . . . . . . . . . . . . . . . . . . . . . . . . . . . . . . . . . . 60
Using Remote Shares in an Active Directory Domain . . . . . . . . . . . . . . . . . . . . . . . . . . . . . . . . . . . . 60
4.9.1
Server Requirements in a Domain. . . . . . . . . . . . . . . . . . . . . . . . . . . . . . . . . . . . . . . . . . . . 60
4.9.2
Remote Share Requirements in a Domain . . . . . . . . . . . . . . . . . . . . . . . . . . . . . . . . . . . . . 61
4.9.3
Remote Path Requirements in a Domain . . . . . . . . . . . . . . . . . . . . . . . . . . . . . . . . . . . . . . 61
Using Remote Shares in a Workgroup. . . . . . . . . . . . . . . . . . . . . . . . . . . . . . . . . . . . . . . . . . . . . . . . 61
4.10.1 Server Requirements in a Workgroup . . . . . . . . . . . . . . . . . . . . . . . . . . . . . . . . . . . . . . . . . 62
4.10.2 Workgroup Configuration Requirements . . . . . . . . . . . . . . . . . . . . . . . . . . . . . . . . . . . . . . . 62
4.10.3 Remote Share Requirements in a Workgroup . . . . . . . . . . . . . . . . . . . . . . . . . . . . . . . . . . . 63
4.10.4 Remote Path Requirements in a Workgroup . . . . . . . . . . . . . . . . . . . . . . . . . . . . . . . . . . . . 63
Using Cloud Storage as the Secondary Path in a Retention Pair . . . . . . . . . . . . . . . . . . . . . . . . . . . 63
4.11.1 Supported Cloud Storage Providers . . . . . . . . . . . . . . . . . . . . . . . . . . . . . . . . . . . . . . . . . . 63
4.11.2 Cloud Credentials . . . . . . . . . . . . . . . . . . . . . . . . . . . . . . . . . . . . . . . . . . . . . . . . . . . . . . . . 64
4.11.3 Maximum Storage Size for Cloud Storage . . . . . . . . . . . . . . . . . . . . . . . . . . . . . . . . . . . . . 64
4.11.4 Maximum File Size for Uploads to Cloud Storage . . . . . . . . . . . . . . . . . . . . . . . . . . . . . . . . 64
Naming Conventions for Pairs and Policies . . . . . . . . . . . . . . . . . . . . . . . . . . . . . . . . . . . . . . . . . . . . 65
File Name Path Length . . . . . . . . . . . . . . . . . . . . . . . . . . . . . . . . . . . . . . . . . . . . . . . . . . . . . . . . . . . 65
Merged View for Standard Pairs . . . . . . . . . . . . . . . . . . . . . . . . . . . . . . . . . . . . . . . . . . . . . . . . . . . . 65
File and Folder Attributes and ACL Permissions in a Standard Pair . . . . . . . . . . . . . . . . . . . . . . . . . 66
Duplicate Folders in a Standard Pair . . . . . . . . . . . . . . . . . . . . . . . . . . . . . . . . . . . . . . . . . . . . . . . . . 66
Duplicate Files in a Standard Pair . . . . . . . . . . . . . . . . . . . . . . . . . . . . . . . . . . . . . . . . . . . . . . . . . . . 67
4.17.1 Restoring Files from Backup Media . . . . . . . . . . . . . . . . . . . . . . . . . . . . . . . . . . . . . . . . . . . 67
4.17.2 Accessing Files Outside the Merged View . . . . . . . . . . . . . . . . . . . . . . . . . . . . . . . . . . . . . 67
4.17.3 Losing a Media Connection when Moving Files . . . . . . . . . . . . . . . . . . . . . . . . . . . . . . . . . 68
Orphan (Ownerless) Files . . . . . . . . . . . . . . . . . . . . . . . . . . . . . . . . . . . . . . . . . . . . . . . . . . . . . . . . . 68
4.18.1 Moving Ownerless Files. . . . . . . . . . . . . . . . . . . . . . . . . . . . . . . . . . . . . . . . . . . . . . . . . . . . 68
Dynamic File Services 2.2 Administration Guide
4.19
4.20
4.21
4.22
4.23
4.24
4.25
4.26
4.27
4.28
4.29
4.30
4.31
4.18.2 How Ownerless Files Are Managed in a Retention Pair . . . . . . . . . . . . . . . . . . . . . . . . . . . 69
4.18.3 How in Ownerless Files Are Handled in Workgroups . . . . . . . . . . . . . . . . . . . . . . . . . . . . . 70
System Files and Other Files that Are Not Moved . . . . . . . . . . . . . . . . . . . . . . . . . . . . . . . . . . . . . . . 70
Policy Schedules . . . . . . . . . . . . . . . . . . . . . . . . . . . . . . . . . . . . . . . . . . . . . . . . . . . . . . . . . . . . . . . . 71
Time Displays. . . . . . . . . . . . . . . . . . . . . . . . . . . . . . . . . . . . . . . . . . . . . . . . . . . . . . . . . . . . . . . . . . . 72
Event Logging . . . . . . . . . . . . . . . . . . . . . . . . . . . . . . . . . . . . . . . . . . . . . . . . . . . . . . . . . . . . . . . . . . 72
Using Antivirus Software with Pairs . . . . . . . . . . . . . . . . . . . . . . . . . . . . . . . . . . . . . . . . . . . . . . . . . . 72
Using Backup Software with Pairs . . . . . . . . . . . . . . . . . . . . . . . . . . . . . . . . . . . . . . . . . . . . . . . . . . . 72
Using Compression with Pairs . . . . . . . . . . . . . . . . . . . . . . . . . . . . . . . . . . . . . . . . . . . . . . . . . . . . . . 72
Using Disk Quotas with Pairs . . . . . . . . . . . . . . . . . . . . . . . . . . . . . . . . . . . . . . . . . . . . . . . . . . . . . . . 72
Disk Space Availability and Moving Files . . . . . . . . . . . . . . . . . . . . . . . . . . . . . . . . . . . . . . . . . . . . . . 73
Using Encryption with Pairs . . . . . . . . . . . . . . . . . . . . . . . . . . . . . . . . . . . . . . . . . . . . . . . . . . . . . . . . 73
4.28.1 Windows File and Folder Encryption . . . . . . . . . . . . . . . . . . . . . . . . . . . . . . . . . . . . . . . . . . 73
4.28.2 Hardware-Level Disk Encryption . . . . . . . . . . . . . . . . . . . . . . . . . . . . . . . . . . . . . . . . . . . . . 73
Using Microsoft Distributed File System with Pairs . . . . . . . . . . . . . . . . . . . . . . . . . . . . . . . . . . . . . . 74
4.29.1 Example: Single-Server MS-DFS Namespace with Links to DynamicFS Pairs on
Different Servers . . . . . . . . . . . . . . . . . . . . . . . . . . . . . . . . . . . . . . . . . . . . . . . . . . . . . . . . . 75
4.29.2 Example: Single-Server DFS Namespace with Links to DynamicFS Pairs on the
Same Server . . . . . . . . . . . . . . . . . . . . . . . . . . . . . . . . . . . . . . . . . . . . . . . . . . . . . . . . . . . . 77
4.29.3 Example: MS-DFS Namespace and Replication with DynamicFS Pairs . . . . . . . . . . . . . . . 78
Using Dynamic File Services in a Windows Cluster. . . . . . . . . . . . . . . . . . . . . . . . . . . . . . . . . . . . . . 80
4.30.1 Management Console . . . . . . . . . . . . . . . . . . . . . . . . . . . . . . . . . . . . . . . . . . . . . . . . . . . . . 80
4.30.2 Service Controller . . . . . . . . . . . . . . . . . . . . . . . . . . . . . . . . . . . . . . . . . . . . . . . . . . . . . . . . 80
4.30.3 Merged View . . . . . . . . . . . . . . . . . . . . . . . . . . . . . . . . . . . . . . . . . . . . . . . . . . . . . . . . . . . . 80
4.30.4 Executable Files . . . . . . . . . . . . . . . . . . . . . . . . . . . . . . . . . . . . . . . . . . . . . . . . . . . . . . . . . 81
4.30.5 Standard Policy Engine and Registry Information . . . . . . . . . . . . . . . . . . . . . . . . . . . . . . . . 81
4.30.6 Moving the Service Cluster Resource Between Nodes . . . . . . . . . . . . . . . . . . . . . . . . . . . . 81
Using Dynamic File Services in Windows Safe Mode . . . . . . . . . . . . . . . . . . . . . . . . . . . . . . . . . . . . 82
5 Using the Management Tools
5.1
5.2
5.3
5.4
5.5
83
Service Controller. . . . . . . . . . . . . . . . . . . . . . . . . . . . . . . . . . . . . . . . . . . . . . . . . . . . . . . . . . . . . . . . 83
5.1.1
Accessing the Service Controller . . . . . . . . . . . . . . . . . . . . . . . . . . . . . . . . . . . . . . . . . . . . . 83
5.1.2
Service Controller Tasks Quick Reference . . . . . . . . . . . . . . . . . . . . . . . . . . . . . . . . . . . . . 85
5.1.3
Starting the Service Controller . . . . . . . . . . . . . . . . . . . . . . . . . . . . . . . . . . . . . . . . . . . . . . . 85
5.1.4
Stopping the Service Controller . . . . . . . . . . . . . . . . . . . . . . . . . . . . . . . . . . . . . . . . . . . . . . 86
Management Console . . . . . . . . . . . . . . . . . . . . . . . . . . . . . . . . . . . . . . . . . . . . . . . . . . . . . . . . . . . . 86
5.2.1
Accessing the Management Console . . . . . . . . . . . . . . . . . . . . . . . . . . . . . . . . . . . . . . . . . 86
5.2.2
Management Console Wizards . . . . . . . . . . . . . . . . . . . . . . . . . . . . . . . . . . . . . . . . . . . . . . 87
5.2.3
Management Console Tasks Quick Reference . . . . . . . . . . . . . . . . . . . . . . . . . . . . . . . . . . 88
Repair Tool. . . . . . . . . . . . . . . . . . . . . . . . . . . . . . . . . . . . . . . . . . . . . . . . . . . . . . . . . . . . . . . . . . . . . 95
Filter Driver Diagnostics . . . . . . . . . . . . . . . . . . . . . . . . . . . . . . . . . . . . . . . . . . . . . . . . . . . . . . . . . . . 95
Command Line Interface and Utilities . . . . . . . . . . . . . . . . . . . . . . . . . . . . . . . . . . . . . . . . . . . . . . . . 95
6 Configuring and Managing the Service
6.1
6.2
6.3
6.4
97
Requirements for Administering the Service . . . . . . . . . . . . . . . . . . . . . . . . . . . . . . . . . . . . . . . . . . . 97
Registering the License Key . . . . . . . . . . . . . . . . . . . . . . . . . . . . . . . . . . . . . . . . . . . . . . . . . . . . . . . 97
6.2.1
Obtaining a License Key . . . . . . . . . . . . . . . . . . . . . . . . . . . . . . . . . . . . . . . . . . . . . . . . . . . 98
6.2.2
Using the Controller to Register a License Key . . . . . . . . . . . . . . . . . . . . . . . . . . . . . . . . . . 98
6.2.3
Using the Management Console to Remotely Register a License Key . . . . . . . . . . . . . . 100
6.2.4
Using the Command Line to Register the Key. . . . . . . . . . . . . . . . . . . . . . . . . . . . . . . . . . 101
Configuring Administrators for Pair Management . . . . . . . . . . . . . . . . . . . . . . . . . . . . . . . . . . . . . . 102
6.3.1
Understanding the Dynamic File Services Group . . . . . . . . . . . . . . . . . . . . . . . . . . . . . . . 102
6.3.2
Setting Up Administrators in a Domain . . . . . . . . . . . . . . . . . . . . . . . . . . . . . . . . . . . . . . . 104
6.3.3
Setting Up Administrators in a Workgroup. . . . . . . . . . . . . . . . . . . . . . . . . . . . . . . . . . . . . 104
Starting and Stopping the Service . . . . . . . . . . . . . . . . . . . . . . . . . . . . . . . . . . . . . . . . . . . . . . . . . . 105
Contents
7
6.5
6.6
6.7
6.8
6.9
6.10
6.11
6.12
6.4.1
Viewing the Service Status . . . . . . . . . . . . . . . . . . . . . . . . . . . . . . . . . . . . . . . . . . . . . . . . 105
6.4.2
Starting the Dynamic File Service . . . . . . . . . . . . . . . . . . . . . . . . . . . . . . . . . . . . . . . . . . . 106
6.4.3
Stopping the Dynamic File Service . . . . . . . . . . . . . . . . . . . . . . . . . . . . . . . . . . . . . . . . . . 106
Configuring Audit Tracking Events . . . . . . . . . . . . . . . . . . . . . . . . . . . . . . . . . . . . . . . . . . . . . . . . . . 108
Configuring the Notification Service . . . . . . . . . . . . . . . . . . . . . . . . . . . . . . . . . . . . . . . . . . . . . . . . . 108
6.6.1
Understanding Notification and Audit Events . . . . . . . . . . . . . . . . . . . . . . . . . . . . . . . . . . 109
6.6.2
Setting Up Email Notifications . . . . . . . . . . . . . . . . . . . . . . . . . . . . . . . . . . . . . . . . . . . . . . 110
Configuring the Logging Level for Engines . . . . . . . . . . . . . . . . . . . . . . . . . . . . . . . . . . . . . . . . . . . 114
Configuring a Certificate for Secure Remote Management Sessions . . . . . . . . . . . . . . . . . . . . . . . 116
6.8.1
Understanding the Certificate . . . . . . . . . . . . . . . . . . . . . . . . . . . . . . . . . . . . . . . . . . . . . . 116
6.8.2
Viewing the Dynamic File Services SSL Certificate. . . . . . . . . . . . . . . . . . . . . . . . . . . . . . 117
6.8.3
Prerequisites for Creating, Modifying, or Unbinding the Certificate . . . . . . . . . . . . . . . . . . 118
6.8.4
Creating a Dynamic File Services Self-Signed Certificate . . . . . . . . . . . . . . . . . . . . . . . . . 118
6.8.5
Configuring a Signed Certificate for Dynamic File Services . . . . . . . . . . . . . . . . . . . . . . . 119
6.8.6
Unbinding a Signed Certificate from Dynamic File Services . . . . . . . . . . . . . . . . . . . . . . . 120
6.8.7
Handling Expiring Certificates . . . . . . . . . . . . . . . . . . . . . . . . . . . . . . . . . . . . . . . . . . . . . . 121
Configuring Firewall Access for the Service Port . . . . . . . . . . . . . . . . . . . . . . . . . . . . . . . . . . . . . . . 122
6.9.1
Understanding Remote Access . . . . . . . . . . . . . . . . . . . . . . . . . . . . . . . . . . . . . . . . . . . . . 122
6.9.2
Enabling or Disabling the Windows Firewall Access . . . . . . . . . . . . . . . . . . . . . . . . . . . . . 123
Configuring Ports for the Service and Retention Review . . . . . . . . . . . . . . . . . . . . . . . . . . . . . . . . . 124
Viewing the Product Version and Build Information . . . . . . . . . . . . . . . . . . . . . . . . . . . . . . . . . . . . . 125
What’s Next . . . . . . . . . . . . . . . . . . . . . . . . . . . . . . . . . . . . . . . . . . . . . . . . . . . . . . . . . . . . . . . . . . . 126
7 Managing Servers in the Management Console
7.1
7.2
7.3
7.4
7.5
7.6
7.7
7.8
7.9
7.10
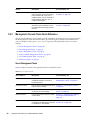
Setting Up a Server in the Management Console . . . . . . . . . . . . . . . . . . . . . . . . . . . . . . . . . . . . . . 127
7.1.1
Understanding the Server List . . . . . . . . . . . . . . . . . . . . . . . . . . . . . . . . . . . . . . . . . . . . . . 128
7.1.2
Prerequisites for Connecting to a Server . . . . . . . . . . . . . . . . . . . . . . . . . . . . . . . . . . . . . . 128
7.1.3
Setting Up the Server . . . . . . . . . . . . . . . . . . . . . . . . . . . . . . . . . . . . . . . . . . . . . . . . . . . . 129
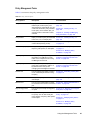
Accepting a Dynamic File Services Certificate. . . . . . . . . . . . . . . . . . . . . . . . . . . . . . . . . . . . . . . . . 130
7.2.1
Importing a Certificate to the Default Location. . . . . . . . . . . . . . . . . . . . . . . . . . . . . . . . . . 130
7.2.2
Importing the Certificate to a Specified Location . . . . . . . . . . . . . . . . . . . . . . . . . . . . . . . . 131
Connecting to a Server . . . . . . . . . . . . . . . . . . . . . . . . . . . . . . . . . . . . . . . . . . . . . . . . . . . . . . . . . . 131
Viewing a List of Servers and Their Connection Status . . . . . . . . . . . . . . . . . . . . . . . . . . . . . . . . . . 132
Viewing Server Properties . . . . . . . . . . . . . . . . . . . . . . . . . . . . . . . . . . . . . . . . . . . . . . . . . . . . . . . . 132
7.5.1
Accessing the Server Properties . . . . . . . . . . . . . . . . . . . . . . . . . . . . . . . . . . . . . . . . . . . . 132
7.5.2
Viewing General Server Information . . . . . . . . . . . . . . . . . . . . . . . . . . . . . . . . . . . . . . . . . 133
7.5.3
Viewing Disk Details for the Server . . . . . . . . . . . . . . . . . . . . . . . . . . . . . . . . . . . . . . . . . . 133
7.5.4
Viewing Log Files for the Server . . . . . . . . . . . . . . . . . . . . . . . . . . . . . . . . . . . . . . . . . . . . 134
7.5.5
Viewing Logging Levels for the Server . . . . . . . . . . . . . . . . . . . . . . . . . . . . . . . . . . . . . . . 135
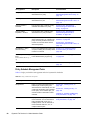
Disconnecting from a Server . . . . . . . . . . . . . . . . . . . . . . . . . . . . . . . . . . . . . . . . . . . . . . . . . . . . . . 135
Recovering a Lost Connection to a Server . . . . . . . . . . . . . . . . . . . . . . . . . . . . . . . . . . . . . . . . . . . 135
Exporting and Importing a Server List . . . . . . . . . . . . . . . . . . . . . . . . . . . . . . . . . . . . . . . . . . . . . . . 136
7.8.1
Exporting a Server List . . . . . . . . . . . . . . . . . . . . . . . . . . . . . . . . . . . . . . . . . . . . . . . . . . . 136
7.8.2
Importing a Server List. . . . . . . . . . . . . . . . . . . . . . . . . . . . . . . . . . . . . . . . . . . . . . . . . . . . 136
Removing a Server from the List . . . . . . . . . . . . . . . . . . . . . . . . . . . . . . . . . . . . . . . . . . . . . . . . . . . 137
What’s Next . . . . . . . . . . . . . . . . . . . . . . . . . . . . . . . . . . . . . . . . . . . . . . . . . . . . . . . . . . . . . . . . . . . 137
8 Creating and Managing Pairs
8.1
8.2
8.3
8
127
139
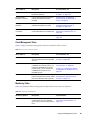
Understanding Pairs. . . . . . . . . . . . . . . . . . . . . . . . . . . . . . . . . . . . . . . . . . . . . . . . . . . . . . . . . . . . . 139
8.1.1
Pair Paths . . . . . . . . . . . . . . . . . . . . . . . . . . . . . . . . . . . . . . . . . . . . . . . . . . . . . . . . . . . . . 140
8.1.2
Standard Pairs . . . . . . . . . . . . . . . . . . . . . . . . . . . . . . . . . . . . . . . . . . . . . . . . . . . . . . . . . . 140
8.1.3
Retention Pairs . . . . . . . . . . . . . . . . . . . . . . . . . . . . . . . . . . . . . . . . . . . . . . . . . . . . . . . . . 141
Creating a Pair . . . . . . . . . . . . . . . . . . . . . . . . . . . . . . . . . . . . . . . . . . . . . . . . . . . . . . . . . . . . . . . . . 142
Preparing Remote Shares for Use in a Pair . . . . . . . . . . . . . . . . . . . . . . . . . . . . . . . . . . . . . . . . . . . 146
8.3.1
Creating a Network Share on the Remote Device . . . . . . . . . . . . . . . . . . . . . . . . . . . . . . . 146
Dynamic File Services 2.2 Administration Guide
8.4
8.5
8.6
8.7
8.8
8.9
8.10
8.11
8.12
8.13
8.14
8.3.2
Publishing the Remote Share . . . . . . . . . . . . . . . . . . . . . . . . . . . . . . . . . . . . . . . . . . . . . . 146
8.3.3
Adding the Dynamic File Services Storage Rights Group to the Remote Share . . . . . . . . 147
Providing Users with a Merged View of the Files in a Standard Pair . . . . . . . . . . . . . . . . . . . . . . . 147
Including or Excluding Folders from a Pair’s Policy Runs . . . . . . . . . . . . . . . . . . . . . . . . . . . . . . . . 147
Viewing a List of Pairs . . . . . . . . . . . . . . . . . . . . . . . . . . . . . . . . . . . . . . . . . . . . . . . . . . . . . . . . . . . 149
Viewing the Pair Status . . . . . . . . . . . . . . . . . . . . . . . . . . . . . . . . . . . . . . . . . . . . . . . . . . . . . . . . . . 149
Viewing Properties for a Pair . . . . . . . . . . . . . . . . . . . . . . . . . . . . . . . . . . . . . . . . . . . . . . . . . . . . . . 149
Moving Selected Files or Folders . . . . . . . . . . . . . . . . . . . . . . . . . . . . . . . . . . . . . . . . . . . . . . . . . . . 152
Scheduling the Pair History Scan. . . . . . . . . . . . . . . . . . . . . . . . . . . . . . . . . . . . . . . . . . . . . . . . . . . 153
Reporting Conflicts for Attributes and ACL Permissions on Folders . . . . . . . . . . . . . . . . . . . . . . . . 153
Reporting Conflicts for Duplicate Files . . . . . . . . . . . . . . . . . . . . . . . . . . . . . . . . . . . . . . . . . . . . . . . 154
8.12.1 Viewing Errors in the Policy Execution History . . . . . . . . . . . . . . . . . . . . . . . . . . . . . . . . . 154
8.12.2 Generating a Duplicate Files Report . . . . . . . . . . . . . . . . . . . . . . . . . . . . . . . . . . . . . . . . . 154
Unlinking the Paths in a Pair . . . . . . . . . . . . . . . . . . . . . . . . . . . . . . . . . . . . . . . . . . . . . . . . . . . . . . 155
What’s Next . . . . . . . . . . . . . . . . . . . . . . . . . . . . . . . . . . . . . . . . . . . . . . . . . . . . . . . . . . . . . . . . . . . 155
9 Creating and Managing Policies
9.1
9.2
9.3
9.4
9.5
9.6
9.7
9.8
9.9
9.10
9.11
9.12
9.13
9.14
157
Understanding Policies . . . . . . . . . . . . . . . . . . . . . . . . . . . . . . . . . . . . . . . . . . . . . . . . . . . . . . . . . . 157
9.1.1
Policy Name and Description. . . . . . . . . . . . . . . . . . . . . . . . . . . . . . . . . . . . . . . . . . . . . . . 158
9.1.2
Policy Direction . . . . . . . . . . . . . . . . . . . . . . . . . . . . . . . . . . . . . . . . . . . . . . . . . . . . . . . . . 158
9.1.3
Policy Filter Options . . . . . . . . . . . . . . . . . . . . . . . . . . . . . . . . . . . . . . . . . . . . . . . . . . . . . . 159
9.1.4
Schedule to Policy Association . . . . . . . . . . . . . . . . . . . . . . . . . . . . . . . . . . . . . . . . . . . . . 162
9.1.5
Pair to Policy Associations. . . . . . . . . . . . . . . . . . . . . . . . . . . . . . . . . . . . . . . . . . . . . . . . . 162
Creating a Policy . . . . . . . . . . . . . . . . . . . . . . . . . . . . . . . . . . . . . . . . . . . . . . . . . . . . . . . . . . . . . . . 162
9.2.1
Creating a Policy with the Policy Wizard . . . . . . . . . . . . . . . . . . . . . . . . . . . . . . . . . . . . . . 162
9.2.2
Creating a Policy with the Setup Wizard . . . . . . . . . . . . . . . . . . . . . . . . . . . . . . . . . . . . . . 165
Customizing the File Types Filter . . . . . . . . . . . . . . . . . . . . . . . . . . . . . . . . . . . . . . . . . . . . . . . . . . . 167
9.3.1
Viewing MIME Types and Perceived Types for Installed Applications in the Windows
Registry . . . . . . . . . . . . . . . . . . . . . . . . . . . . . . . . . . . . . . . . . . . . . . . . . . . . . . . . . . . . . . . 167
9.3.2
Configuring File Extensions and Categories for the File Types Filter . . . . . . . . . . . . . . . . 168
9.3.3
Configuring MIME Types and Categories for the Content Filter . . . . . . . . . . . . . . . . . . . . 169
9.3.4
Using Apache Tika to Find the MIME Type of a File . . . . . . . . . . . . . . . . . . . . . . . . . . . . . 172
Viewing a List of Policies . . . . . . . . . . . . . . . . . . . . . . . . . . . . . . . . . . . . . . . . . . . . . . . . . . . . . . . . . 172
Viewing Properties for a Policy . . . . . . . . . . . . . . . . . . . . . . . . . . . . . . . . . . . . . . . . . . . . . . . . . . . . 173
Associating or Disassociating Pairs and Policies . . . . . . . . . . . . . . . . . . . . . . . . . . . . . . . . . . . . . . . 174
9.6.1
Viewing a List of Pairs Associated with a Policy . . . . . . . . . . . . . . . . . . . . . . . . . . . . . . . . 174
9.6.2
Viewing a List of Policies Associated with a Pair . . . . . . . . . . . . . . . . . . . . . . . . . . . . . . . . 174
9.6.3
Associating or Disassociating Pairs with a Policy . . . . . . . . . . . . . . . . . . . . . . . . . . . . . . . 174
9.6.4
Associating or Disassociating Policies with a Pair . . . . . . . . . . . . . . . . . . . . . . . . . . . . . . . 175
Modifying Policy Filters . . . . . . . . . . . . . . . . . . . . . . . . . . . . . . . . . . . . . . . . . . . . . . . . . . . . . . . . . . 177
Starting a Policy Run . . . . . . . . . . . . . . . . . . . . . . . . . . . . . . . . . . . . . . . . . . . . . . . . . . . . . . . . . . . . 178
9.8.1
Scheduling a Policy Run . . . . . . . . . . . . . . . . . . . . . . . . . . . . . . . . . . . . . . . . . . . . . . . . . . 178
9.8.2
Running a Policy on Demand for a Selected Pair . . . . . . . . . . . . . . . . . . . . . . . . . . . . . . . 178
Previewing a Policy Run . . . . . . . . . . . . . . . . . . . . . . . . . . . . . . . . . . . . . . . . . . . . . . . . . . . . . . . . . 179
9.9.1
Starting a Policy Preview . . . . . . . . . . . . . . . . . . . . . . . . . . . . . . . . . . . . . . . . . . . . . . . . . . 179
9.9.2
Viewing the Preview Results . . . . . . . . . . . . . . . . . . . . . . . . . . . . . . . . . . . . . . . . . . . . . . . 180
Stopping an In-Progress Policy Run . . . . . . . . . . . . . . . . . . . . . . . . . . . . . . . . . . . . . . . . . . . . . . . . 180
Exporting and Importing Policies on a Dynamic File Services Server . . . . . . . . . . . . . . . . . . . . . . . 180
9.11.1 Exporting a Policy . . . . . . . . . . . . . . . . . . . . . . . . . . . . . . . . . . . . . . . . . . . . . . . . . . . . . . . 181
9.11.2 Importing a Policy . . . . . . . . . . . . . . . . . . . . . . . . . . . . . . . . . . . . . . . . . . . . . . . . . . . . . . . 181
9.11.3 Importing a Policy from a Previous Release . . . . . . . . . . . . . . . . . . . . . . . . . . . . . . . . . . . 181
Deleting a Policy . . . . . . . . . . . . . . . . . . . . . . . . . . . . . . . . . . . . . . . . . . . . . . . . . . . . . . . . . . . . . . . 181
Troubleshooting Policy Conflicts . . . . . . . . . . . . . . . . . . . . . . . . . . . . . . . . . . . . . . . . . . . . . . . . . . . 182
Examples of Policy Rules. . . . . . . . . . . . . . . . . . . . . . . . . . . . . . . . . . . . . . . . . . . . . . . . . . . . . . . . . 182
9.14.1 Example: Moving All Files Larger than 10 Megabytes. . . . . . . . . . . . . . . . . . . . . . . . . . . . 183
9.14.2 Example: Moving All MP3 Files Larger than 10 Megabytes . . . . . . . . . . . . . . . . . . . . . . . 183
Contents
9
9.14.3
9.15
Example: Moving All MP3 Files Larger than 10 Megabytes That Were Last Modified
More than 6 Months Ago . . . . . . . . . . . . . . . . . . . . . . . . . . . . . . . . . . . . . . . . . . . . . . . . . . 184
9.14.4 Example: Moving All Files . . . . . . . . . . . . . . . . . . . . . . . . . . . . . . . . . . . . . . . . . . . . . . . . . 184
9.14.5 Example: Separating Files Based on Last Modified Dates . . . . . . . . . . . . . . . . . . . . . . . . 185
9.14.6 Example: Moving All Files from Older to Newer Storage. . . . . . . . . . . . . . . . . . . . . . . . . . 186
What’s Next . . . . . . . . . . . . . . . . . . . . . . . . . . . . . . . . . . . . . . . . . . . . . . . . . . . . . . . . . . . . . . . . . . . 187
10 Creating and Managing Policy Schedules
10.1
10.2
10.3
10.4
10.5
10.6
10.7
Understanding Policy Schedules . . . . . . . . . . . . . . . . . . . . . . . . . . . . . . . . . . . . . . . . . . . . . . . . . . . 189
10.1.1 Scheduled or Unscheduled Policies . . . . . . . . . . . . . . . . . . . . . . . . . . . . . . . . . . . . . . . . . 189
10.1.2 Schedule Frequency Options . . . . . . . . . . . . . . . . . . . . . . . . . . . . . . . . . . . . . . . . . . . . . . 190
Creating a Policy Schedule . . . . . . . . . . . . . . . . . . . . . . . . . . . . . . . . . . . . . . . . . . . . . . . . . . . . . . . 192
Viewing Properties for a Schedule . . . . . . . . . . . . . . . . . . . . . . . . . . . . . . . . . . . . . . . . . . . . . . . . . . 193
Modifying Policy Schedules . . . . . . . . . . . . . . . . . . . . . . . . . . . . . . . . . . . . . . . . . . . . . . . . . . . . . . . 193
10.4.1 Understanding How Changes Affect the Scheduled Run Interval . . . . . . . . . . . . . . . . . . . 193
10.4.2 Modifying a Policy Schedule . . . . . . . . . . . . . . . . . . . . . . . . . . . . . . . . . . . . . . . . . . . . . . . 195
Unscheduling Policies . . . . . . . . . . . . . . . . . . . . . . . . . . . . . . . . . . . . . . . . . . . . . . . . . . . . . . . . . . . 195
10.5.1 Removing a Schedule from Multiple Policies. . . . . . . . . . . . . . . . . . . . . . . . . . . . . . . . . . . 196
10.5.2 Removing a Schedule from a Single Policy . . . . . . . . . . . . . . . . . . . . . . . . . . . . . . . . . . . . 196
10.5.3 Disabling the Schedule for Selected Pairs. . . . . . . . . . . . . . . . . . . . . . . . . . . . . . . . . . . . . 196
Associating or Disassociating Schedules and Policies . . . . . . . . . . . . . . . . . . . . . . . . . . . . . . . . . . 196
10.6.1 Viewing the Schedule Associated with a Policy. . . . . . . . . . . . . . . . . . . . . . . . . . . . . . . . . 197
10.6.2 Viewing a List of Policies Associated with a Schedule . . . . . . . . . . . . . . . . . . . . . . . . . . . 197
10.6.3 Associating or Disassociating a Schedule with a Policy . . . . . . . . . . . . . . . . . . . . . . . . . . 197
10.6.4 Associating or Disassociating Policies with a Schedule . . . . . . . . . . . . . . . . . . . . . . . . . . 198
Deleting a Schedule . . . . . . . . . . . . . . . . . . . . . . . . . . . . . . . . . . . . . . . . . . . . . . . . . . . . . . . . . . . . . 198
11 Creating and Managing Cloud Accounts
11.1
11.2
11.3
11.4
11.5
11.6
11.7
12.2
10
199
Understanding Cloud Storage . . . . . . . . . . . . . . . . . . . . . . . . . . . . . . . . . . . . . . . . . . . . . . . . . . . . . 199
11.1.1 Supported Cloud Storage Providers . . . . . . . . . . . . . . . . . . . . . . . . . . . . . . . . . . . . . . . . . 199
11.1.2 Maximum Storage Size for Cloud Storage . . . . . . . . . . . . . . . . . . . . . . . . . . . . . . . . . . . . 200
11.1.3 Maximum File Size for Uploads to Cloud Storage . . . . . . . . . . . . . . . . . . . . . . . . . . . . . . . 200
11.1.4 Cloud Credentials . . . . . . . . . . . . . . . . . . . . . . . . . . . . . . . . . . . . . . . . . . . . . . . . . . . . . . . 200
11.1.5 Types of Cloud Access Authentication Credentials . . . . . . . . . . . . . . . . . . . . . . . . . . . . . . 201
Setting Up Cloud Access Credentials and Folders for Your Cloud Storage Provider . . . . . . . . . . . 201
11.2.1 Setting Up Cloud Storage for Amazon S3 . . . . . . . . . . . . . . . . . . . . . . . . . . . . . . . . . . . . . 202
11.2.2 Setting Up Cloud Storage for CloudMe . . . . . . . . . . . . . . . . . . . . . . . . . . . . . . . . . . . . . . . 204
11.2.3 Setting Up Cloud Storage for Dropbox . . . . . . . . . . . . . . . . . . . . . . . . . . . . . . . . . . . . . . . 204
Creating a Cloud Account . . . . . . . . . . . . . . . . . . . . . . . . . . . . . . . . . . . . . . . . . . . . . . . . . . . . . . . . 206
Viewing Properties for a Cloud Account. . . . . . . . . . . . . . . . . . . . . . . . . . . . . . . . . . . . . . . . . . . . . . 209
Viewing a List of the Retention Pairs That Use a Cloud Account . . . . . . . . . . . . . . . . . . . . . . . . . . 210
Modifying the Access Credentials for a Cloud Account . . . . . . . . . . . . . . . . . . . . . . . . . . . . . . . . . . 211
11.6.1 Modifying Access Credentials for Amazon S3 and CloudMe Cloud Accounts . . . . . . . . . 211
11.6.2 Modifying Access Credentials for Dropbox Cloud Accounts . . . . . . . . . . . . . . . . . . . . . . . 212
Deleting a Cloud Account. . . . . . . . . . . . . . . . . . . . . . . . . . . . . . . . . . . . . . . . . . . . . . . . . . . . . . . . . 212
12 Managing Retention Reviews
12.1
189
213
Understanding the Retention Repository . . . . . . . . . . . . . . . . . . . . . . . . . . . . . . . . . . . . . . . . . . . . . 213
12.1.1 Managing Policies for Retention Pairs . . . . . . . . . . . . . . . . . . . . . . . . . . . . . . . . . . . . . . . . 214
12.1.2 Configuring Non-Administrator Reviewers. . . . . . . . . . . . . . . . . . . . . . . . . . . . . . . . . . . . . 214
12.1.3 Reviewing Retained Data . . . . . . . . . . . . . . . . . . . . . . . . . . . . . . . . . . . . . . . . . . . . . . . . . 214
12.1.4 Navigating the Retention Repository . . . . . . . . . . . . . . . . . . . . . . . . . . . . . . . . . . . . . . . . . 214
12.1.5 Supported Web Browsers . . . . . . . . . . . . . . . . . . . . . . . . . . . . . . . . . . . . . . . . . . . . . . . . . 215
Configuring Reviewers for a Retention Pair . . . . . . . . . . . . . . . . . . . . . . . . . . . . . . . . . . . . . . . . . . . 215
Dynamic File Services 2.2 Administration Guide
12.2.1
12.2.2
12.3
12.4
12.5
12.6
12.7
12.8
12.9
Adding or Removing Reviewers for a Retention Pair . . . . . . . . . . . . . . . . . . . . . . . . . . . . 216
Adding or Removing Reviewers to the Dynamic File Services Retention Review
Group. . . . . . . . . . . . . . . . . . . . . . . . . . . . . . . . . . . . . . . . . . . . . . . . . . . . . . . . . . . . . . . . . 217
Configuring Reviewers to Receive Email Notifications. . . . . . . . . . . . . . . . . . . . . . . . . . . . . . . . . . . 220
Scheduling Notification Reviews for a Retention Pair . . . . . . . . . . . . . . . . . . . . . . . . . . . . . . . . . . . 220
12.4.1 Understanding the Notification Review Schedule . . . . . . . . . . . . . . . . . . . . . . . . . . . . . . . 221
12.4.2 Configuring the Notification Review Schedule . . . . . . . . . . . . . . . . . . . . . . . . . . . . . . . . . . 222
Configuring the Review Notification Check Timer . . . . . . . . . . . . . . . . . . . . . . . . . . . . . . . . . . . . . . 223
Reviewing Files in the Retention Repository . . . . . . . . . . . . . . . . . . . . . . . . . . . . . . . . . . . . . . . . . . 223
12.6.1 Understanding the Review Process. . . . . . . . . . . . . . . . . . . . . . . . . . . . . . . . . . . . . . . . . . 224
12.6.2 Accessing the Retention Review Service . . . . . . . . . . . . . . . . . . . . . . . . . . . . . . . . . . . . . 224
12.6.3 Deleting Files or Folders . . . . . . . . . . . . . . . . . . . . . . . . . . . . . . . . . . . . . . . . . . . . . . . . . . 225
12.6.4 Restoring Files or Folders . . . . . . . . . . . . . . . . . . . . . . . . . . . . . . . . . . . . . . . . . . . . . . . . . 226
12.6.5 Ending a Review Session . . . . . . . . . . . . . . . . . . . . . . . . . . . . . . . . . . . . . . . . . . . . . . . . . 226
Viewing the Review Transaction History . . . . . . . . . . . . . . . . . . . . . . . . . . . . . . . . . . . . . . . . . . . . . 226
Generating a Report for Retention Review Logs . . . . . . . . . . . . . . . . . . . . . . . . . . . . . . . . . . . . . . . 227
Archiving the Retention Review Logs . . . . . . . . . . . . . . . . . . . . . . . . . . . . . . . . . . . . . . . . . . . . . . . 227
13 Monitoring Pairs and Policies
229
13.1
13.2
13.3
13.4
13.5
13.6
Viewing the Pair Statistics . . . . . . . . . . . . . . . . . . . . . . . . . . . . . . . . . . . . . . . . . . . . . . . . . . . . . . . . 229
Viewing the Policy Execution History for a Pair . . . . . . . . . . . . . . . . . . . . . . . . . . . . . . . . . . . . . . . . 230
Viewing a Policy Run History of Files Moved . . . . . . . . . . . . . . . . . . . . . . . . . . . . . . . . . . . . . . . . . . 232
Viewing a Policy Run History of Files that Failed to Move . . . . . . . . . . . . . . . . . . . . . . . . . . . . . . . . 234
Viewing the Pair History . . . . . . . . . . . . . . . . . . . . . . . . . . . . . . . . . . . . . . . . . . . . . . . . . . . . . . . . . . 235
Viewing the Server Disk Capacity and Used Space History . . . . . . . . . . . . . . . . . . . . . . . . . . . . . . 237
13.6.1 Viewing Disk Details and History . . . . . . . . . . . . . . . . . . . . . . . . . . . . . . . . . . . . . . . . . . . . 237
13.6.2 Sample Disk History for a Primary Disk . . . . . . . . . . . . . . . . . . . . . . . . . . . . . . . . . . . . . . . 238
13.6.3 Sample Disk History for a Secondary Disk . . . . . . . . . . . . . . . . . . . . . . . . . . . . . . . . . . . . 239
13.7 Viewing Logged Events . . . . . . . . . . . . . . . . . . . . . . . . . . . . . . . . . . . . . . . . . . . . . . . . . . . . . . . . . . 239
13.8 Viewing Service Events . . . . . . . . . . . . . . . . . . . . . . . . . . . . . . . . . . . . . . . . . . . . . . . . . . . . . . . . . . 241
13.9 Auditing Management Events . . . . . . . . . . . . . . . . . . . . . . . . . . . . . . . . . . . . . . . . . . . . . . . . . . . . . 241
13.9.1 Viewing Audit Log Events . . . . . . . . . . . . . . . . . . . . . . . . . . . . . . . . . . . . . . . . . . . . . . . . . 241
13.9.2 Detecting and Resolving a Corrupted Audit Log . . . . . . . . . . . . . . . . . . . . . . . . . . . . . . . . 242
13.10 Generating a DynamicFs Configuration Report . . . . . . . . . . . . . . . . . . . . . . . . . . . . . . . . . . . . . . . . 242
14 Repairing the Pair, Policy, and Schedule Databases
14.1
14.2
14.3
14.4
14.5
245
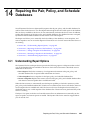
Understanding Repair Options . . . . . . . . . . . . . . . . . . . . . . . . . . . . . . . . . . . . . . . . . . . . . . . . . . . . . 245
14.1.1 What Are the Database Files? . . . . . . . . . . . . . . . . . . . . . . . . . . . . . . . . . . . . . . . . . . . . . . 246
14.1.2 Taking Daily Snapshots of the Database Files . . . . . . . . . . . . . . . . . . . . . . . . . . . . . . . . . 247
14.1.3 What Causes Errors in the Database Files? . . . . . . . . . . . . . . . . . . . . . . . . . . . . . . . . . . . 247
14.1.4 Automatically Repairing the Database Files at Service Start . . . . . . . . . . . . . . . . . . . . . . 248
14.1.5 Manually Repairing the Database Files . . . . . . . . . . . . . . . . . . . . . . . . . . . . . . . . . . . . . . . 248
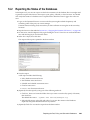
Reporting the Status of the Databases . . . . . . . . . . . . . . . . . . . . . . . . . . . . . . . . . . . . . . . . . . . . . . 249
Taking a Snapshot of the Databases . . . . . . . . . . . . . . . . . . . . . . . . . . . . . . . . . . . . . . . . . . . . . . . . 250
Restoring a Snapshot of the Databases . . . . . . . . . . . . . . . . . . . . . . . . . . . . . . . . . . . . . . . . . . . . . 251
Troubleshooting Repair Issues . . . . . . . . . . . . . . . . . . . . . . . . . . . . . . . . . . . . . . . . . . . . . . . . . . . . 252
14.5.1 What If a Pair’s Secondary Data Location Appears to Be Missing After a Snapshot
Rollback Repair? . . . . . . . . . . . . . . . . . . . . . . . . . . . . . . . . . . . . . . . . . . . . . . . . . . . . . . . . 252
14.5.2 What If an Old Pair’s Secondary Data Appears After a Snapshot Rollback Repair?. . . . . 252
14.5.3 What If Policies Run or Don’t Run as Expected After a Snapshot Rollback Repair? . . . . 253
14.5.4 What If Review Notifications Are Sent or Not Sent as Expected After a Snapshot
Rollback Repair? . . . . . . . . . . . . . . . . . . . . . . . . . . . . . . . . . . . . . . . . . . . . . . . . . . . . . . . . 253
14.5.5 What If a Pair Database Error Cannot Be Fixed? . . . . . . . . . . . . . . . . . . . . . . . . . . . . . . . 254
14.5.6 What If a Policy Database Error Cannot Be Fixed?. . . . . . . . . . . . . . . . . . . . . . . . . . . . . . 254
14.5.7 What If a Schedule Database Error Cannot Be Fixed? . . . . . . . . . . . . . . . . . . . . . . . . . . . 255
Contents
11
15 Security Considerations
15.1
15.2
15.3
15.4
15.5
15.6
15.7
257
Security Features . . . . . . . . . . . . . . . . . . . . . . . . . . . . . . . . . . . . . . . . . . . . . . . . . . . . . . . . . . . . . . . 257
15.1.1 Authentication . . . . . . . . . . . . . . . . . . . . . . . . . . . . . . . . . . . . . . . . . . . . . . . . . . . . . . . . . . 258
15.1.2 User Access to Pairs . . . . . . . . . . . . . . . . . . . . . . . . . . . . . . . . . . . . . . . . . . . . . . . . . . . . . 259
15.1.3 Retention Reviewer Access to Pairs . . . . . . . . . . . . . . . . . . . . . . . . . . . . . . . . . . . . . . . . . 259
15.1.4 SSL Certificate . . . . . . . . . . . . . . . . . . . . . . . . . . . . . . . . . . . . . . . . . . . . . . . . . . . . . . . . . . 259
15.1.5 Service Port . . . . . . . . . . . . . . . . . . . . . . . . . . . . . . . . . . . . . . . . . . . . . . . . . . . . . . . . . . . . 260
15.1.6 Windows Firewall Access . . . . . . . . . . . . . . . . . . . . . . . . . . . . . . . . . . . . . . . . . . . . . . . . . 261
15.1.7 Dynamic File Services Group . . . . . . . . . . . . . . . . . . . . . . . . . . . . . . . . . . . . . . . . . . . . . . 261
15.1.8 Dynamic File Services Retention Review Group . . . . . . . . . . . . . . . . . . . . . . . . . . . . . . . . 261
15.1.9 Reviewers for a Retention Pair . . . . . . . . . . . . . . . . . . . . . . . . . . . . . . . . . . . . . . . . . . . . . 261
15.1.10 Windows User Account Control . . . . . . . . . . . . . . . . . . . . . . . . . . . . . . . . . . . . . . . . . . . . . 262
15.1.11 Network Connections. . . . . . . . . . . . . . . . . . . . . . . . . . . . . . . . . . . . . . . . . . . . . . . . . . . . . 262
15.1.12 Network Shares . . . . . . . . . . . . . . . . . . . . . . . . . . . . . . . . . . . . . . . . . . . . . . . . . . . . . . . . . 262
15.1.13 Remote Shares . . . . . . . . . . . . . . . . . . . . . . . . . . . . . . . . . . . . . . . . . . . . . . . . . . . . . . . . . 262
15.1.14 Auditing Management Events . . . . . . . . . . . . . . . . . . . . . . . . . . . . . . . . . . . . . . . . . . . . . . 262
15.1.15 Event Logging . . . . . . . . . . . . . . . . . . . . . . . . . . . . . . . . . . . . . . . . . . . . . . . . . . . . . . . . . . 263
Registry Settings . . . . . . . . . . . . . . . . . . . . . . . . . . . . . . . . . . . . . . . . . . . . . . . . . . . . . . . . . . . . . . . 263
Service Configuration File . . . . . . . . . . . . . . . . . . . . . . . . . . . . . . . . . . . . . . . . . . . . . . . . . . . . . . . . 263
Server Management Configuration File . . . . . . . . . . . . . . . . . . . . . . . . . . . . . . . . . . . . . . . . . . . . . . 263
Database Files . . . . . . . . . . . . . . . . . . . . . . . . . . . . . . . . . . . . . . . . . . . . . . . . . . . . . . . . . . . . . . . . . 263
Notification Service Configuration Files . . . . . . . . . . . . . . . . . . . . . . . . . . . . . . . . . . . . . . . . . . . . . . 264
Log Files and Logging Control Files. . . . . . . . . . . . . . . . . . . . . . . . . . . . . . . . . . . . . . . . . . . . . . . . . 264
16 FAQs and Troubleshooting
267
16.1
16.2
16.3
16.4
16.5
16.6
16.7
16.8
16.9
16.10
16.11
16.12
16.13
16.14
Why can’t I log in to the Dynamic File Services server? . . . . . . . . . . . . . . . . . . . . . . . . . . . . . . . . . 267
Can I cancel a policy that is running? . . . . . . . . . . . . . . . . . . . . . . . . . . . . . . . . . . . . . . . . . . . . . . . 268
How do I configure a policy to not run without disassociating it from the pair? . . . . . . . . . . . . . . . . 268
How do I see what policies are running or what files have been moved? . . . . . . . . . . . . . . . . . . . . 268
What can I do if the Service is not running?. . . . . . . . . . . . . . . . . . . . . . . . . . . . . . . . . . . . . . . . . . . 268
Why can’t I start the Service after using the Repair tool? . . . . . . . . . . . . . . . . . . . . . . . . . . . . . . . . 268
Why can’t users see the data on a remote share?. . . . . . . . . . . . . . . . . . . . . . . . . . . . . . . . . . . . . . 269
Access Denied error when modifying a file at the root of a secondary path . . . . . . . . . . . . . . . . . . 269
Path Too Long Exception error in the Standard Policy log . . . . . . . . . . . . . . . . . . . . . . . . . . . . . . . 269
Pair Is Busy error for pair with a remote share as secondary . . . . . . . . . . . . . . . . . . . . . . . . . . . . . 269
File Transfer Size Exceeded Error . . . . . . . . . . . . . . . . . . . . . . . . . . . . . . . . . . . . . . . . . . . . . . . . . . 269
Certificate error for the Retention Review Service . . . . . . . . . . . . . . . . . . . . . . . . . . . . . . . . . . . . . . 270
Invalid File Handle error for a policy run . . . . . . . . . . . . . . . . . . . . . . . . . . . . . . . . . . . . . . . . . . . . . 270
How do I find event ID information? . . . . . . . . . . . . . . . . . . . . . . . . . . . . . . . . . . . . . . . . . . . . . . . . . 270
16.14.1 Where are event IDs reported? . . . . . . . . . . . . . . . . . . . . . . . . . . . . . . . . . . . . . . . . . . . . . 270
16.14.2 Reporting error events to Novell . . . . . . . . . . . . . . . . . . . . . . . . . . . . . . . . . . . . . . . . . . . . 270
16.14.3 Event ID categories and sources . . . . . . . . . . . . . . . . . . . . . . . . . . . . . . . . . . . . . . . . . . . . 271
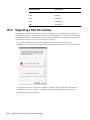
16.15 Diagnosing a Filter Driver failure . . . . . . . . . . . . . . . . . . . . . . . . . . . . . . . . . . . . . . . . . . . . . . . . . . . 272
A Using iSCSI Targets in a Cloud Storage Environment
A.1
A.2
A.3
A.4
12
273
Guidelines for Using iSCSI Targets in the Cloud . . . . . . . . . . . . . . . . . . . . . . . . . . . . . . . . . . . . . . . 274
A.1.1
Secure Connections in the Cloud . . . . . . . . . . . . . . . . . . . . . . . . . . . . . . . . . . . . . . . . . . . 274
A.1.2
Secure Access to iSCSI Target Devices . . . . . . . . . . . . . . . . . . . . . . . . . . . . . . . . . . . . . . 274
A.1.3
Backup in the Cloud. . . . . . . . . . . . . . . . . . . . . . . . . . . . . . . . . . . . . . . . . . . . . . . . . . . . . . 274
A.1.4
Costs for Cloud Services . . . . . . . . . . . . . . . . . . . . . . . . . . . . . . . . . . . . . . . . . . . . . . . . . . 274
Don’t Have an Existing Amazon EC2 Account? . . . . . . . . . . . . . . . . . . . . . . . . . . . . . . . . . . . . . . . 275
Already Have an Existing Amazon EC2 Account? . . . . . . . . . . . . . . . . . . . . . . . . . . . . . . . . . . . . . . 275
Launching an openSUSE Linux VM Instance . . . . . . . . . . . . . . . . . . . . . . . . . . . . . . . . . . . . . . . . . 276
Dynamic File Services 2.2 Administration Guide
A.5
A.6
A.7
A.8
A.9
A.10
A.11
A.12
A.13
A.14
Setting Up an Elastic IP Address . . . . . . . . . . . . . . . . . . . . . . . . . . . . . . . . . . . . . . . . . . . . . . . . . . . 276
Creating an Elastic Block Store Volume . . . . . . . . . . . . . . . . . . . . . . . . . . . . . . . . . . . . . . . . . . . . . 277
Opening Ports for iSCSI Communications . . . . . . . . . . . . . . . . . . . . . . . . . . . . . . . . . . . . . . . . . . . . 277
Connecting to the iSCSI Target Virtual Machine via SSH . . . . . . . . . . . . . . . . . . . . . . . . . . . . . . . . 278
A.8.1
Getting the SSH Syntax Information . . . . . . . . . . . . . . . . . . . . . . . . . . . . . . . . . . . . . . . . . 278
A.8.2
Using SSH on Windows. . . . . . . . . . . . . . . . . . . . . . . . . . . . . . . . . . . . . . . . . . . . . . . . . . . 278
A.8.3
Using SSH on Linux. . . . . . . . . . . . . . . . . . . . . . . . . . . . . . . . . . . . . . . . . . . . . . . . . . . . . . 281
Installing the iSCSI Target Software on the openSUSE Linux VM . . . . . . . . . . . . . . . . . . . . . . . . . 281
Configuring the iSCSI Target Device . . . . . . . . . . . . . . . . . . . . . . . . . . . . . . . . . . . . . . . . . . . . . . . . 282
Configuring the iSCSI Initiator Software on a Windows Server . . . . . . . . . . . . . . . . . . . . . . . . . . . . 283
Formatting the iSCSI Device as NTFS on the Windows Server. . . . . . . . . . . . . . . . . . . . . . . . . . . . 284
Creating a Dynamic File Services Pair with the Cloud-Based iSCSI Device . . . . . . . . . . . . . . . . . . 284
Additional Information . . . . . . . . . . . . . . . . . . . . . . . . . . . . . . . . . . . . . . . . . . . . . . . . . . . . . . . . . . . 285
A.14.1 openSUSE 11 SP2 Linux. . . . . . . . . . . . . . . . . . . . . . . . . . . . . . . . . . . . . . . . . . . . . . . . . . 285
A.14.2 Linux iSCSI Target Software Documentation . . . . . . . . . . . . . . . . . . . . . . . . . . . . . . . . . . 285
A.14.3 PuTTY . . . . . . . . . . . . . . . . . . . . . . . . . . . . . . . . . . . . . . . . . . . . . . . . . . . . . . . . . . . . . . . . 285
A.14.4 Microsoft iSCSI Software Initiator Version 2.08 . . . . . . . . . . . . . . . . . . . . . . . . . . . . . . . . . 285
A.14.5 IETF RFC 3220: Internet Small Computer Systems Interface . . . . . . . . . . . . . . . . . . . . . . 285
A.14.6 Amazon EC2 Cloud Services Costs . . . . . . . . . . . . . . . . . . . . . . . . . . . . . . . . . . . . . . . . . 286
B Setting Up a Merged View for Collaboration Applications: Novell Vibe OnPrem
B.1
B.2
B.3
B.4
B.5
B.6
B.7
Verify that the Application can support using a Microsoft network share to store files. . . . . . . . . . . 287
Understand how the application stores, names, and versions files so useful policies can be
created . . . . . . . . . . . . . . . . . . . . . . . . . . . . . . . . . . . . . . . . . . . . . . . . . . . . . . . . . . . . . . . . . . . . . . . 288
Create a Microsoft Share for the application to use . . . . . . . . . . . . . . . . . . . . . . . . . . . . . . . . . . . . . 288
Configure the application to use the Microsoft Networking share . . . . . . . . . . . . . . . . . . . . . . . . . . 288
Install Dynamic File Services on the Windows Server where the share will be created for the
primary path . . . . . . . . . . . . . . . . . . . . . . . . . . . . . . . . . . . . . . . . . . . . . . . . . . . . . . . . . . . . . . . . . . . 289
Create a pair . . . . . . . . . . . . . . . . . . . . . . . . . . . . . . . . . . . . . . . . . . . . . . . . . . . . . . . . . . . . . . . . . . 289
Create a policy . . . . . . . . . . . . . . . . . . . . . . . . . . . . . . . . . . . . . . . . . . . . . . . . . . . . . . . . . . . . . . . . . 289
C Keyboard Shortcuts
C.1
C.2
C.3
287
291
Using Keyboard Shortcuts . . . . . . . . . . . . . . . . . . . . . . . . . . . . . . . . . . . . . . . . . . . . . . . . . . . . . . . . 291
Quick Reference for Keyboard Shortcuts. . . . . . . . . . . . . . . . . . . . . . . . . . . . . . . . . . . . . . . . . . . . . 291
Navigating with Keyboard Shortcuts . . . . . . . . . . . . . . . . . . . . . . . . . . . . . . . . . . . . . . . . . . . . . . . . 292
C.3.1
Toolbars . . . . . . . . . . . . . . . . . . . . . . . . . . . . . . . . . . . . . . . . . . . . . . . . . . . . . . . . . . . . . . . 292
C.3.2
Wizards . . . . . . . . . . . . . . . . . . . . . . . . . . . . . . . . . . . . . . . . . . . . . . . . . . . . . . . . . . . . . . . 292
C.3.3
Dialog Boxes . . . . . . . . . . . . . . . . . . . . . . . . . . . . . . . . . . . . . . . . . . . . . . . . . . . . . . . . . . . 293
D Sample Event Notification Messages
295
E Documentation Updates
303
Contents
13
14
Dynamic File Services 2.2 Administration Guide
About This Guide
This guide describes how to create and manage Novell Dynamic File Services (DynamicFS) 2.2 pairs
and policies in a Microsoft Windows Workgroup or an Active Directory Domain environment.
Chapter 1, “Overview of Dynamic File Services,” on page 17
Chapter 2, “What’s New for Pairs and Policies Management,” on page 33
Chapter 3, “Getting Started,” on page 41
Chapter 4, “Planning for Pairs and Policies,” on page 51
Chapter 5, “Using the Management Tools,” on page 83
Chapter 6, “Configuring and Managing the Service,” on page 97
Chapter 7, “Managing Servers in the Management Console,” on page 127
Chapter 8, “Creating and Managing Pairs,” on page 139
Chapter 9, “Creating and Managing Policies,” on page 157
Chapter 10, “Creating and Managing Policy Schedules,” on page 189
Chapter 11, “Creating and Managing Cloud Accounts,” on page 199
Chapter 12, “Managing Retention Reviews,” on page 213
Chapter 13, “Monitoring Pairs and Policies,” on page 229
Chapter 14, “Repairing the Pair, Policy, and Schedule Databases,” on page 245
Chapter 15, “Security Considerations,” on page 257
Chapter 16, “FAQs and Troubleshooting,” on page 267
Appendix A, “Using iSCSI Targets in a Cloud Storage Environment,” on page 273
Appendix B, “Setting Up a Merged View for Collaboration Applications: Novell Vibe OnPrem,”
on page 287
Appendix C, “Keyboard Shortcuts,” on page 291
Appendix D, “Sample Event Notification Messages,” on page 295
Appendix E, “Documentation Updates,” on page 303
Audience
This guide is designed to help storage solutions administrators understand how to do the following:
Make planning decisions for implementing pairs and policies as part of the overall storage
solution strategy.
Configure and manage the Service.
Create and manage pairs and policies.
Monitor the pair statistics, policy execution history, and disk history for each pair.
Monitor the review transaction history for each retention pair.
The Security Considerations section provides information of interest for security administrators or
administrator users who are responsible for the security of the system.
About This Guide
15
Some background knowledge of the host operating system, file system, Workgroup, and Active
Directory is assumed.
Feedback
We want to hear your comments and suggestions about this manual and the other documentation
included with this product. Please use the User Comments feature at the bottom of each page of the
online documentation.
Documentation Updates
For the most recent version of the Novell Dynamic File Services Administration Guide, visit the Novell
Dynamic File Services 2.2 documentation Web site (http://www.novell.com/documentation/
dynamic_file_services/).
Additional Documentation
See the following guides at the Novell Dynamic File Services 2.2 documentation Web site (http://
www.novell.com/documentation/dynamic_file_services/):
Readme
Installation Guide
Retention Review Quick Start
Client Commands and Utilities Reference
16
Dynamic File Services 2.2 Administration Guide
1
Overview of Dynamic File Services
1
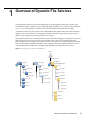
Novell Dynamic File Services is an information life-cycle management technology. It makes your
essential data readily available to users, while tiering files efficiently across a pair of paths, referred to
as a pair. You create policies to control how the files are distributed between the two paths.
A Dynamic File Services pair consists of two independent share paths in the same Active Directory
domain, or on the same server in a Workgroup. Dynamic File Services provides two pair types to
address your storage needs: standard pair and retention pair.
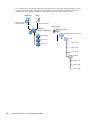
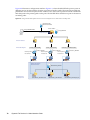
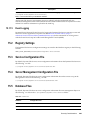
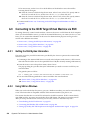
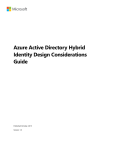
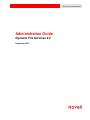
The Dynamic File Services standard pair allows you to efficiently manage your storage across a pair of
paths while giving users access to files on both. When users connect to a network share on the
primary path, they see merged view of files. Users are not aware of where the files physically reside.
Files on both paths are equally accessible to users. Dynamic File Services pulls data directly to the
user from the primary path or the secondary path, depending on where the file is located.
Figure 1-1 Merged View Access to Files in a Standard Pair
Users
\\server1\primary
C:\primary
Primary on
server1.example.com
F:\secondary
music
music
music
song-2.wav
song-1.mp3
song-1.mp3
classical
song-3.mp3
song-2.wav
classical
song-3.mp3
song-4.wav
documents
song-5.mp3
project-A
song-6.mp3
project-B
classical
song-4.wav
song-5.mp3
song-6.mp3
documents
project-A
project-B
Overview of Dynamic File Services
17
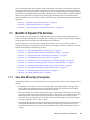
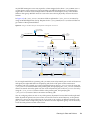
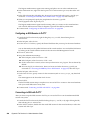
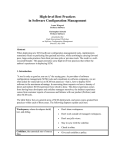
The Dynamic File Services retention pair allows you to keep data that is actively used on the primary
path, and to move static data that might occasionally need to be accessed to a retention repository on
the secondary path. For example, the repository can store files that are not needed for everyday
operations but must be retained for historical reference, or to comply with contractual or legal
requirements. Files in the repository are not generally available to users. Only designated reviewers
can access them via a Web-based Retention Review tool. You can schedule retention review events
and notify multiple recipients about them. Reviewers determine the disposition of retained files in
accordance with your company’s data retention policy. All retention review actions are audited.
Figure 1-2 Reviewer and User Access to Files in a Retention Pair
Reviewers
Retention Data
Review Web UI
Users
\\server1\primary
HTTPS
Retention Data
Primary on
server1.example.com
F:\secondary
PolicyRun_20110815_10.35
documents
music
project-A
project-B
song-1.mp3
song-2.wav
song-3.mp3
classical
song-4.wav
song-5.mp3
song-6.mp3
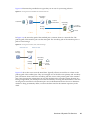
Depending on the type of Dynamic File Services pair, you can combine paths on local, remote, and
cloud locations:
Local drives: Local drives are the devices mounted as a drive letter on the DynamicFS server.
Remote shares: Remote shares reside on network attached storage (such as NetApp and EMC
filers) and on supported Windows server platforms. Shares must be located in the same Active
Directory domain or Workgroup as the Dynamic FS server.
Cloud storage: Cloud storage resides on your storage account on a supported cloud provider
site, such as Amazon Simple Storage Service, CloudMe, or Dropbox.
A standard pair combines a local drive as the primary path with a local drive or remote share as the
secondary path. A retention pair combines a local drive or remote share as the primary path with a
local drive, remote share, or cloud storage as the secondary path.
A Dynamic File Services policy determines what files are moved between the two paths. A policy
schedule determines when the files are moved. You can specify one or more conditions to be met,
such as frequency of use, file name patterns, file types, file size, and file owners. Policy enforcement is
automated with scheduled and on-demand policy runs. You can run multiple policies concurrently
on a pair. You can also specify a list of files or folders to be moved during a one-time move from the
primary path to the secondary path in a pair.
18
Dynamic File Services 2.2 Administration Guide
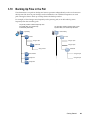
You can separately back up each path of a pair, which helps to narrow the time window needed for
backing up critical data. For example, Dynamic File Services can seamlessly tier files between highperformance and lower-performance storage devices. You can establish policies that keep frequently
used mission-critical data on high-performance storage devices, and move seldom-used less-essential
data to lower-performance storage devices. Backing up essential files takes less time because the
seldom-used files are stored on the secondary path, where they can be backed up separately and less
frequently.
Section 1.1, “Benefits of Dynamic File Services,” on page 19
Section 1.2, “Deployment Scenarios,” on page 24
Section 1.3, “Key Components of Dynamic File Services,” on page 28
1.1
Benefits of Dynamic File Services
Unstructured data is growing faster, consuming more space, and being retained longer than ever
before. Novell Dynamic File Services enables you to manage your unstructured data with intelligent
tiering in Microsoft Active Directory and Workgroup environments.
Dynamic File Services can help reduce storage infrastructure costs, save work hours, enhance
existing investments in storage hardware and software, and improve retention compliance. Its many
benefits are described in the following sections:
Section 1.1.1, “Store Data Efficiently by Tiering Data,” on page 19
Section 1.1.2, “Offload Retention Data to Less Expensive Storage,” on page 20
Section 1.1.3, “Integrate Network Attached Storage with Ease,” on page 20
Section 1.1.4, “Store Retention Data in the Cloud,” on page 20
Section 1.1.5, “Tier Data across Local Storage, Filers, and Cloud Storage,” on page 20
Section 1.1.6, “Access Files in a Merged View Securely and Transparently,” on page 22
Section 1.1.7, “Review Retention Data to Keep, Purge, or Restore Files,” on page 23
Section 1.1.8, “Move Data Seamlessly between the Two Paths,” on page 23
Section 1.1.9, “Run Policies Whenever You Want,” on page 23
Section 1.1.10, “Reduce Backup Time,” on page 24
1.1.1
Store Data Efficiently by Tiering Data
A standard pair allows you to tier data between two storage locations. Users access a merged view of
the files.
Frequently accessed data is stored on the primary path. Its high-performance storage system
ensures that users remain productive. You can define policies to move data to the secondary
path based on the date the file was last modified or accessed.
Store your mission-critical data on the primary path. Store less-important data on the secondary
path. For example, if users store personal music files on the system, you can define policies that
transparently move files based on their file extension or file type to the secondary location,
where the cost to store the data is less. The file content can be scanned to ensure that file types
are moved regardless of how a file is named.
Allocate files between the primary and secondary paths based on their file size. This allows you
to distribute files between two disks to make the most of the storage capacity that you have.
Large files that rarely or never change can be available to users without consuming expensive
storage.
Overview of Dynamic File Services
19
1.1.2
Offload Retention Data to Less Expensive Storage
A retention pair allows you to tier data between an active storage location and a retention repository.
Users access only the files on the primary location. Reviewers can view retained data by using a
Retention Review Service.
Store active data on the primary path that resides on your high-performance storage. Store files
that do not change, but need to be retained for historical or legal reasons in a retention
repository on the secondary path.
Create policies to relocate files to the retention repository based on the date it was last modified.
You can further narrow the selection by applying other filters such as the file owner or file type.
1.1.3
Integrate Network Attached Storage with Ease
Dynamic File Services supports using remote paths in a pair, such as published shares on network
attached storage (NAS).
Create a standard pair with a secondary path on a remote device such as a network filer. You can
take advantage of lower-cost secondary storage solutions and seamlessly expand storage
capacity without affecting users. Users see a merged view of the files.
Create a retention pair on the DynamicFS server that uses a primary path and secondary path on
different remote network filers. You can move files into a retention repository while allowing
users to access files on the primary path.
1.1.4
Store Retention Data in the Cloud
Dynamic File Services supports using a path on your cloud storage account as the secondary path in
a retention pair. You set up credentials to authorize Dynamic File Services to access files stored there
on your behalf. Supported cloud providers include Amazon Simple Storage Service (Amazon S3),
CloudMe, and Dropbox.
1.1.5
Tier Data across Local Storage, Filers, and Cloud Storage
Pair tiering can be used to move data from local storage to filers to cloud storage at different stages of
its life cycle. Dynamic File Services allows you to tier your storage solution by using the secondary
path of a standard pair as the primary path of a retention pair, as shown in Figure 1-3. The standard
pair and retention pair can reside on the same or different server.
For a tiered data solution, the first tier is the primary path of a standard pair. The second tier is the
secondary path of the standard pair. The same share is also used as the primary path of a retention
pair. The third tier is the secondary path of the retention pair. A tiered solution can use any
combination of supported devices for the standard pair and retention pair.
20
Dynamic File Services 2.2 Administration Guide
Figure 1-3 illustrates the possible device types that you can use for your tiering solution.
Figure 1-3 Tiering Data with a Standard Pair and a Retention Pair
Primary
Storage
Secondary
Storage
Local or
Remote Disk
Local Disk
Secondary
Storage
Local or
Remote Disk
Primary
Storage
Cloud
Tier 1
Tier 2
Tier 3
In Figure 1-4, the secondary path of the standard pair is a remote share on a network filer. The
primary path of the retention pair uses the same path. The secondary path of the retention pair is a
path on cloud storage.
Figure 1-4 Tiering Data with Local, Filer, and Cloud Storage
Standard Pair
Primary
Storage
Retention Pair
Secondary
Storage
Secondary
Storage
Primary
Storage
Tier 1
Tier 2
Cloud
Provider
Tier 3
Figure 1-5 shows how users view the tiered data. Typically, all users access files via a share on the
primary path of the standard pair. They see a merged view of the files on its primary and secondary
path. The remote share used on the secondary path also serves as the primary path of the retention
pair. Users accessing the remote share can see only the data on the secondary storage location. In a
tiering configuration, you should prevent users from directly accessing the remote share. Users who
are assigned as reviewers for the retention pair can use the Retention Review Service to determine
whether to keep, permanently delete, or restore the data stored in the retention repository in the
cloud.
Overview of Dynamic File Services
21
Figure 1-5 User View of Tiered Pairs
Reviewers
Retention
Repository
Web View
Retention
Review
Service
Dynamic File Services
--Service and Management
Users
HTTPS
Microsoft Networking
Share
Windows
CIFS Client
Primary
Path View
Windows
Server
Windows
CIFS Client
Merged
View
Standard Pair
Primary
Storage
Retention Pair
Secondary
Storage
Secondary
Storage
Primary
Storage
Tier 1
Tier 2
Cloud
Provider
Tier 3
As files on the first tier age, you can execute policies on the standard pair to move the older files to
the second tier of storage on a network filer. When files in the second tier are rarely used, you can
execute policies on the retention pair to move the files to a retention repository in cloud storage. Files
moved from the second tier into the repository are no longer available to users via the merged view
of the standard pair. The files in the retention repository are at the end of their life cycle. Reviewers
determine how long files are retained in the repository.
1.1.6
Access Files in a Merged View Securely and Transparently
Dynamic File Services allows you to manage storage without impacting users.
Users can transparently access files on both paths of a standard pair via a network share on the
primary path.
The native access control for the underlying file systems controls user access to the data.
In a merged file view, all access to the secondary path is made via DynamicFS as if the data were
located on the primary path. DynamicFS does not need to relocate the data to give the user
access to data on the secondary path.
Administrators can access the merged view of the data to configure user access to files and
directories on both locations in a standard pair.
22
Dynamic File Services 2.2 Administration Guide
1.1.7
Review Retention Data to Keep, Purge, or Restore Files
A reviewer can be granted review rights on all retention pairs, or only on specified pairs.
Data in the repository is retained indefinitely. The Retention Review Service allows authorized
reviewers to keep, purge, or restore retained files. Reviewers cannot read or modify a file’s
contents.
A reviewers’ actions are guided by external constraints as defined in your company’s data
retention policy. All actions taken during a review session are audited.
1.1.8
Move Data Seamlessly between the Two Paths
Dynamic File Services allows you to create policies that automatically move unstructured files
between the two paths.
A single policy can move data in one direction: from the primary path to the secondary path, or
from the secondary path to the primary path.
You can include paths or exclude paths for a pair’s primary path. Including folders allows you to
apply policies only to some folders in a pair. Excluding folders allows you to apply policies to all
folders except the excluded ones. The include or exclude setting applies to all policies for a pair.
Policy rules are based on the file size, last modified date, last accessed date, file name patterns,
file type, and file owner (by user or group).
You can apply a policy to multiple pairs.
You can apply multiple policies to a pair.
You can define one-time moves of files or folders from the primary path to the secondary path.
You can use policies and one-time moves to help migrate data to new storage with minimal enduser impact.
1.1.9
Run Policies Whenever You Want
Policies allow you to control what type of files are moved and when they are moved.
Every policy runs independently and has its own schedule. A policy’s schedule applies to all
pairs associated with it.
You can run a single policy at a time on a pair to enforce the policy’s rules for moving data. A file
is moved if it meets all of the filter options specified in the rule.
You can configure multiple policies to run at the same time on a pair to enforce alternative rules
for moving data. A file is moved if it satisfies the rules in any one of the concurrently scheduled
policies.
You can schedule the window of time when you want a policy to run by specifying the start time
and duration of the run.
You can schedule a policy to run hourly, daily, weekly, monthly, quarterly, yearly, or on custom
dates.
You can start and stop policies manually. Scheduled and unscheduled policies can be run
manually for one or more of their associated pairs.
Overview of Dynamic File Services
23
1.1.10
Reduce Backup Time
By moving inactive or little used data to a secondary location, you reduce the time necessary to back
up the system.
Less data needs to be scanned for the daily backup of the primary path.
You can back up the secondary path less frequently, without affecting user access to the data
they use most often.
1.2
Deployment Scenarios
Novell Dynamic File Services can help solve key storage problems. The scenarios in this section are
intended as examples to represent a few ways that DynamicFS can be applied in your environment.
Section 1.2.1, “Students: Essential versus Non-Essential Files,” on page 24
Section 1.2.2, “Healthcare: Active versus Historical Files,” on page 25
Section 1.2.3, “Social Networks: Collaboration Applications,” on page 26
Section 1.2.4, “Business: Retaining Inactive Files,” on page 27
1.2.1
Students: Essential versus Non-Essential Files
Abraham works for a large university system with thousands of students each semester. Students
have home directories to use as a central storage location for their personal files and homework. The
storage device is nearing capacity. Abraham needs to expand capacity for students without
disrupting access to their essential academic files.
“Understanding the Data” on page 24
“The Dynamic File Services Solution” on page 24
Understanding the Data
The student home directories contain numerous media files for music and photos that consume large
portions of the available storage. The files have a variety of file extensions.
The Dynamic File Services Solution
Abraham creates a Dynamic File Services standard pair on the server where the primary path is a
folder that contains all user home directories. As the secondary path in the pair, he uses a UNC path
on a remote filer storage device. He creates a policy that moves certain file types from the primary
path to the secondary path every night between 2:00 a.m. to 4:00 a.m. Abraham specifies the file types
as audio, video, and images, in order to move a broad range of files based on a file extension’s MIME
file type or perceived file type.
Relocating the media files helps free the needed space on the primary path while allowing users to
access their media files via a merged view of the data. Users are not aware of the physical location of
their files.
24
Dynamic File Services 2.2 Administration Guide
1.2.2
Healthcare: Active versus Historical Files
Joe works for a research hospital that recently completed a multiple-year effort to digitize its patient
records from 1900 to the present. Joe wants to assure that there is sufficient storage capacity for the
current and future patient records while still making the older records available to researchers in the
hospital and its affiliated university.
“Understanding the Data” on page 25
“The Dynamic File Services Solution” on page 25
Understanding the Data
The patient records are generated in the regular course of health care delivery. The individual patient
files contain a broad spectrum of documents, including patient histories, diagnostic test results,
inpatient and outpatient notes, operative notes, discharge summaries, follow-up reports, patient
photographs, medical drawings, graphs, and treatment-related correspondence.
Since 1975, all patient records from the hospital’s specialty clinics and units are merged in a
centralized record-keeping system. Prior to 1975, each specialty clinic separately maintained its own
patient record system, and the hospital units maintained their own centralized patient record system.
Current and active patient records from all specialty clinics and hospital units must be available on
demand. The historical records should be available to medical researchers in the hospital and its
affiliated university, but these records do not require the same immediate availability as the records
for the hospital’s current patients.
The Dynamic File Services Solution
Joe plans a solution that is responsive to the access needs of the healthcare users for active files and
the needs of the research users for the historical files.
“Historical Files” on page 25
“Active Files” on page 26
Historical Files
Joe creates a Dynamic File Services standard pair for each of the pre-1975 records for the specialty
clinics and hospital. A policy for each pair is tailored to move the largest image files daily between
12:15 a.m and 5:30 a.m. After the large files are migrated, Joe modifies the policy to move other file
types and sizes. Over time, the entire file set is migrated to the secondary location. Users are able to
access the files throughout the process and afterwards without being aware of the physical location
of the data.
Relocating the historical files helps free needed space on the primary storage location to allow for the
growth of current and active medical records, which have a higher frequency of use and higher
performance requirements. Both old and current medical records are easily available to users via a
merged view of the files.
Overview of Dynamic File Services
25
Active Files
Joe studies the current centralized patient record system to understand the types of files and their
usage. Working with the medical staff, he determines that the image files that are more than a year
old can be moved to a secondary storage location. He creates a Dynamic File Services standard pair
where the secondary location is used to store the less frequently accessed images.
Joe creates a policy that moves images to the secondary location if they have not been modified in
more than one year. Initially, the policy runs daily in non-peak hours between 1:00 a.m. and 4:00 a.m.
After the desired files have been relocated, Joe modifies the policy to run monthly.
Relocating the images helps free more space for the primary storage area. The reduced size of the
data on the primary location helps shorten the needed backup window for weekly and incremental
backups. The secondary storage area can use less expensive storage and be backed up monthly after
the policy run. The users are able to access files throughout the migration process and are not aware
of the physical location of the files.
1.2.3
Social Networks: Collaboration Applications
Hiroko works for an international marketing firm that provides employees a dynamic collaboration
environment. She needs to manage the growing storage needs without disrupting the collaborative
environment.
“Understanding the Data” on page 26
“The Dynamic File Services Solution” on page 26
“Additional Information” on page 27
Understanding the Data
The company uses a collaboration application that allows team workspaces to be created
dynamically as teams are formed to work on a variety of marketing projects. Users upload
documents and images to their team sites for projects. The files are stored as unstructured data in the
application’s file repository.
The Dynamic File Services Solution
Hiroko studies the collaboration application’s unstructured file repositories to understand the types
of files and where the application stores them. She creates a Dynamic File Services standard pair
where the primary path is the folder for the application’s image file repository. She modifies the
application to access the files via a network share so that the application accesses the files via a
merged view of the files in the pair.
Hiroko creates a policy that moves image files to the secondary location. Thumbnail images for the
files remain on the primary location. Initially, the policy runs daily in non-peak hours between 1:00
a.m. and 4:00 a.m. After most of the images have been moved, Hiroko modifies the policy to run
weekly during non-peak hours.
The application accesses the files via the merged view and presents the view to users. When a user
clicks a thumbnail image to open the file, the file is transparently retrieved from the secondary
location and displayed in the collaboration environment. The application and the users are not aware
of the physical location of the data.
This Dynamic File Services solution allows Hiroko to better control the storage environment and
backup requirements for the collaboration application.
26
Dynamic File Services 2.2 Administration Guide
Additional Information
An example of how to set up a merged view for applications is available in Appendix B, “Setting Up
a Merged View for Collaboration Applications: Novell Vibe OnPrem,” on page 287.
1.2.4
Business: Retaining Inactive Files
Samuel works for a small business. He needs to manage the growing storage needs, while retaining
inactive files for administrative, fiscal, legal, or historical reasons.
“Understanding the Data” on page 27
“The Dynamic File Services Solution” on page 27
Understanding the Data
The company has active records for the organization’s current functions, projects, and initiatives.
Generally, active files are referred to often in the regular course of business, such as creation,
distribution, and use. The files become inactive when they are no longer needed to carry out current
activities. However, these files must be kept as long as required to meet the organization’s
administrative, fiscal, legal, and historical requirements.
Managing inactive files is a question of space, value, and use. Generally, inactive files are no longer
required to carry out the administrative or operational functions for which they were created. It is not
efficient to retain the files on premium storage space. As the volume of files increases, performance
suffers, and timely retrieval of active files becomes increasingly difficult and time-consuming.
Routine disposition of inactive files to lower-cost storage is a cost-effective solution to file bloat.
The Dynamic File Services Solution
Samuel studies the organization’s data to understand the types of files and their usage. Working with
managers, he determines what files need to be retained and when they are considered inactive. He
creates a Dynamic File Services retention pair where the secondary location is used store inactive files
in a retention repository.
Samuel creates a policy that moves inactive files to the retention repository on the secondary location
if they have not been modified in more than one year. The policy runs monthly on the last day of the
month, during non-peak hours. Users see the files disappear from their file space.
Samuel sets up reviewers for the retained data. He schedules a review reminder to be sent to
reviewers on the first day of each month. Reviewers can access the retention repository via the
Dynamic File Services Retention Review Web tool. The tool allows them to review all files that were
moved during a policy run. They can delete a file from the repository (which purges it from storage),
restore a file to its original location on the primary storage (which removes it from the repository), or
leave a file in the repository for later consideration.
Relocating the inactive files helps free more space for the primary storage area, which improves
performance for the users. The reduced size of the data on the primary location helps shorten the
needed backup window for weekly and incremental backups.
This Dynamic File Services solution allows Samuel to better control the storage environment and
backup requirements for the active data. It allows files to be retained in a secure data retention
repository where they can be reviewed periodically by designated reviewers to determine when
inactive files are no longer needed and can be purged. Or, if a file needs to be returned to the active
data, it can be restored to its original file location on the primary storage.
Overview of Dynamic File Services
27
1.3
Key Components of Dynamic File Services
Novell Dynamic File Services has two major components as illustrated in Figure 1-6:
Management: The Management component provides the graphical user interface and client
command line tools for managing pairs and policies on DynamicFS servers.
Service: The Service component provides the main engine for DynamicFS. It provides several
features that enforce policies, provide users with a merged view of files, provides reviewers
with a way to manage files in a retention repository, and provide utilities for configuring and
controlling the Service.
Figure 1-6 Dynamic File Services Software Components
Reviewers
Retention
Repository
Web View
Retention
Review
Service
Dynamic File Services
--Management
Dynamic File Services
--Service and Management
Users
HTTPS
HTTPS
Windows
Computer
Primary
Path View
Windows
CIFS Client
Microsoft Networking
Share
Windows
Server
Merged
View
Windows
CIFS Client
Service Controller GUI Tools
Management
Console
Command
Line Interface
Dynamic
File
Service
Certificate
Firewall
Port
Registration
Audit
Notification
Filter Driver Diagnostics
Microsoft .NET Framework
Repair
Utilities
Pair Check
Config Dump
Microsoft .NET Framework
Standard Pair
(Merged View)
Primary
Storage
File Protocol
Secondary
Storage
Mini Filter Driver
Local or
Remote Disk
File System
Local Disk
Policies
Retention Pair
(Primary + Retention Repository)
Primary
Storage
Local or
Remote Disk
File Protocol
Dynamic File Services 2.2 Administration Guide
Local or
Remote Disk
File System
Policies
28
Secondary
Storage
Cloud
Table 1-1 describes the subcomponents that run automatically after the install.
Table 1-1 Dynamic File Services Components That Run Automatically
Component
Description
Dynamic File Services
software
The software is installed in the C:\Program Files\Dynamic File Services
folder by default.
Service
The Dynamic File Service is the engine for all of the Dynamic File Services
components. On a server, the Service automatically starts and runs in the
background.
You can verify that the Service is running by viewing the Service status in the
Dynamic File Service Controller. You can also look for the DswService.exe
process in the Windows Task Manager.
Service Controller
The Service Controller allows the Administrator user or users with Administrator
privileges to enable, disable, or configure the Dynamic File Service or use the
Repair tool. You can also launch the Management Console.
The Service Controller icon ( ) is displayed in the Windows notification area of
the server desktop. It starts automatically when a user logs in to the server
desktop. The application is DswServiceController.exe.
Filter Driver
The Filter Driver is a Windows File System filter driver that is managed by the
Dynamic File Service. It runs whenever the Service is running, and works with the
network share on the primary path to provide a merged view to users of the files in
both paths of a standard pair.
The Filter Driver is installed in the C:\Dynamic File Services\dswflt folder.
Management Console
The Management Console is a GUI management tool that allows the Administrator
user and members of the Dynamic File Services group to create, manage,
and monitor pairs and policies.
You can open the Management Console from the Install tool to immediately begin
setting up pairs and policies.
A shortcut to the Management Console is placed on the desktop, in the Control
Panel, and in the Start menu in Dynamic File Services > Dynamic File Services
Management Console. It launches the DswMgmtConsole.exe application.
Retention Review Service The Retention Review Service gives designated reviewers access to the retention
repository of a retention pair. The Retention Review Web view of the retention
repository is available after you create a retention pair.
For information about using the tool, see Section 12.6, “Reviewing Files in the
Retention Repository,” on page 223.
Overview of Dynamic File Services
29
Table 1-2 describes other Dynamic File Services components that run when they are called by the
Service or Service Controller. Commands and utilities can be run as needed.
Table 1-2 Dynamic File Services Components that Run as Needed
Component
Description
Certificate Configuration
tool
The Dynamic File Services Certificate Configuration utility automatically creates a
self-signed SSL (Secure Sockets Layer) certificate during the install. The
Certificate Configuration option in the Service Controller menu provides a way to
create and manage the certificate after the install.
You can also use a signed certificate that you have obtained from a certification
authority. For information, see Section 6.8.5, “Configuring a Signed Certificate for
Dynamic File Services,” on page 119.
Access this utility only through the Service Controller menu. The application is
DswCert.exe.
CLI
The Dynamic File Services Command Line Interface (CLI) application allows you to
create and manage pairs and policies on the server by issuing commands in the
Windows command prompt console. The application runs only when you issue the
command.
For information, see “Using Client Commands for Pair and Policy Management” in
the Dynamic File Services 2.2 Client Commands and Utilities Reference.
The application is DswCLI.exe.
Cloud engine
The Cloud engine runs policies for a retention pair that is using a cloud-based
storage location as the secondary path. You can configure accounts for supported
cloud providers. Afterwards, you can specify paths on cloud-based storage as the
secondary path in a retention pair.
The Dynamic File Service controls when the Cloud engine runs. The application is
DswCloudEngine.exe.
For information, see Chapter 11, “Creating and Managing Cloud Accounts,” on
page 199.
Configuration Dump tool
The Dynamic File Services Configuration Dump utility aggregates information
about the current server settings for pairs, policies, and logs, and outputs the
information to a file. This tool is available to help with record keeping and
troubleshooting when working with Novell Support.
For information, see “Dynamic File Services Configuration Dump Utility” in the
Dynamic File Services 2.2 Client Commands and Utilities Reference.
The application is DswDump.exe.
File System Inventory
The Dynamic File Services File System Inventory utility automatically runs a Pair
History Scan on a pair each day at 4:00 a.m. by default. It scans the pairs to gather
statistics about the data stored on the primary and secondary locations, such as
the file sizes, number of files, and file types.
The time and frequency of pair history scanning is configurable. For information,
see Section 8.10, “Scheduling the Pair History Scan,” on page 153.
For information on the utility, see “Dynamic File Services File System Inventory
Utility” in the Dynamic File Services 2.2 Client Commands and Utilities Reference.
The Dynamic File Service controls when the File System Inventory runs. The
application is DswInventory.exe.
30
Dynamic File Services 2.2 Administration Guide
Component
Description
Notification Service
The notification service allows you to configure notifications to be sent about
DynamicFS events via email. Events are configured separately for each email
address.
For information, see Section 6.6, “Configuring the Notification Service,” on
page 108.
Pair Check utility
The Dynamic File Services Pair Check utility detects duplicate files in the pair
structure or detects folders with attribute or ACL permission differences. It can
generate reports in CSV and XML format.
The files in the primary and secondary locations are rarely duplicated. Such
conditions might occur, for example, after recovering files in the two locations of a
standard pair from backup media. For information, see Section 4.17, “Duplicate
Files in a Standard Pair,” on page 67.
For information about running the utility, see “Dynamic File Services Pair Check
Utility” in the Dynamic File Services 2.2 Client Commands and Utilities Reference.
The application is DswPairCheck.exe.
Registration tool
The Register License Key allows you to enter a key code and create a license for
the DynamicFS server.
For information, see Section 6.2, “Registering the License Key,” on page 97.
Repair tool
The Dynamic File Services Repair utility verifies that the databases are valid. It
runs automatically each time the Service is started. The repair tool can be run as
needed to repair corrupted databases.
You can start the Repair tool from the Service Controller menu when the Service is
not running. The application is DswRepair.exe.
For information, see Chapter 14, “Repairing the Pair, Policy, and Schedule
Databases,” on page 245.
Retention engine
The Retention engine runs selected policies for a retention pair when you select
Execute Now or when the policy is scheduled to run. It also provides an option to
preview policy run results without actually moving the files.
The Dynamic File Service controls when the Retention engine runs. The
application is DswRetentionEngine.exe.
Standard engine
The Standard engine runs selected policies for a standard pair when you select
Execute Now or when the policy is scheduled to run. It also provides an option to
preview policy run results without actually moving the files.
The Dynamic File Service controls when the Standard engine runs. The application
is DswStandardEngine.exe.
Overview of Dynamic File Services
31
32
Dynamic File Services 2.2 Administration Guide
2
What’s New for Pairs and Policies
Management
2
This section describes the new features and changes for managing the Service, pairs, and policies in
Novell Dynamic File Services (DynamicFS) since version 2.0.
Section 2.1, “What’s New for Dynamic File Services 2.2,” on page 33
Section 2.2, “What’s New for Dynamic File Services 2.1,” on page 33
Section 2.3, “What’s New for Dynamic File Services 2.0,” on page 36
Section 2.4, “What’s Next,” on page 39
2.1
What’s New for Dynamic File Services 2.2
For the version 2.2. release, Novell did the following:
Made bug fixes.
Added support for the following:
The Management Console on Window 8 and 8.1.
The Service and Management console on Windows Server 2012 R2 and Windows Server
2012 R2 with update.
Added code to assist Novell’s compliance team with usage tracking.
Added code to not allow more than 16 standard pairs to be created.
Updated the UI with the new Novell look and feel.
Removed support for the following:
32-bit platforms
Box.net Cloud connections
Twitter notifications
Windows XP
Windows Server 2003
2.2
What’s New for Dynamic File Services 2.1
In addition to bug fixes, Novell Dynamic File Services 2.1 provides the following new features and
changes for the Service and management tools:
Section 2.2.1, “Administration,” on page 34
Section 2.2.2, “Service,” on page 34
Section 2.2.3, “Pairs,” on page 34
What’s New for Pairs and Policies Management
33
Section 2.2.4, “Policies,” on page 35
Section 2.2.5, “Cloud,” on page 35
Section 2.2.6, “Retention Reviews,” on page 35
Section 2.2.7, “Notification Service,” on page 35
Section 2.2.8, “Audit Tracking Service,” on page 36
2.2.1
Administration
Dynamic File Services Group: The user that installs Dynamic File Services is automatically
added to the Dynamic File Services group. This allows the user to create and manage pairs,
policies, and schedules. Other user names can be added to the group. For information, see
Section 6.3, “Configuring Administrators for Pair Management,” on page 102.
Retention Reviewers: The Dynamic File Services Retention Review group is automatically
assigned as a reviewer of a retention pair. You can remove it from the Reviewers list, if desired.
For information, see Section 12.2.1, “Adding or Removing Reviewers for a Retention Pair,” on
page 216.
2.2.2
Service
Cloud Engine: You can use your cloud storage as the secondary path of a retention pair. The
Cloud Engine allows Dynamic File Services to read and write files to cloud storage, while
preserving the ACLs and metadata for the files. See Section 4.11, “Using Cloud Storage as the
Secondary Path in a Retention Pair,” on page 63
Cloud Database: The Cloud database stores information about the cloud accounts you have
defined on the Dynamic File Services server, including credentials and retention pair
associations. See “Cloud Database Files” on page 247.
Cloud Engine Logging Levels: You can configure the logging levels for the Cloud Engine. See
Section 6.7, “Configuring the Logging Level for Engines,” on page 114.
Policy Database: The policy database definitions and associations are now managed in a single
database file. The default location is:
C:\Program Data\Dynamic File Services\Policies\DswPolicyDatabase_v2.xml
See “Policy Database Files” on page 246.
Pair Check Utility: The Synchronize Pair utility was renamed as the Pair Check utility. For
information, see “Dynamic File Services Pair Check Utility” in the Dynamic File Services 2.2 Client
Commands and Utilities Reference.
2.2.3
Pairs
Pair Tiering: Dynamic File Services allows you to tier your storage solution by using the
secondary path of a standard pair as the primary path of a retention pair. The standard pair and
retention pair can reside on the same or different server. Previously, tiering was allowed only if
the standard pair and retention pair were on different Dynamic File Services servers.
Pair tiering can be used to move data from local storage to filers to cloud storage at different
stages of its life cycle. See Section 1.1.5, “Tier Data across Local Storage, Filers, and Cloud
Storage,” on page 20.
Cloud Storage: You can specify a path on cloud storage as the secondary path of a retention pair.
34
Dynamic File Services 2.2 Administration Guide
Retention Pair Reviewers: You can use the Reviewers tab in a retention pair’s Properties dialog
box to add and remove reviewers for pair. See Section 12.2.1, “Adding or Removing Reviewers
for a Retention Pair,” on page 216.
2.2.4
Policies
Policy Database: The policy database definitions and associations are now managed in a single
database file. The default location is:
C:\Program Data\Dynamic File Services\Policies\DswPolicyDatabase_v2.xml
When you upgrade to version 2.1, your existing policy database files are consolidated into this
single file. Any policies saved in the Snapshots folder are also converted to the new database
format.
Use File Content to Determine Type: For a File Types policy, you can determine file types based
on actual file content format. See “File Types” on page 160.
Moving Ownerless Files: A {No owners} entry is available in the Select a User browser dialog
box for the File Owners policy option. See “File Owners” on page 161.
File Types Configuration File: The following changes were made to the definitions in the
DswFileTypes.cfg file:
The application category is used for non-binary application files.
The octet-stream category is used for binary, executable files, such as .dll, .exe, and
.bin.
MIME Types Configuration File: The DswMimeTypes.cfg file allows you to add, remove, or
modify MIME type mappings to file extensions. For information, see Section 9.3.3, “Configuring
MIME Types and Categories for the Content Filter,” on page 169.
2.2.5
Cloud
You can set up your cloud storage provider as a cloud account in Dynamic File Services. See
Chapter 11, “Creating and Managing Cloud Accounts,” on page 199.
You can specify a path on a cloud account as the secondary path for a retention pair. See
Section 4.11, “Using Cloud Storage as the Secondary Path in a Retention Pair,” on page 63.
2.2.6
Retention Reviews
Performance enhancements were made for the Web-based Retention Review Service.
The Reviewers tab on the Pair Properties page allows you to specify users and groups as
reviewers of a specific retention pair. See Section 12.2.1, “Adding or Removing Reviewers for a
Retention Pair,” on page 216.
2.2.7
Notification Service
The following event types have been added to the Notification Service events:
Pair Modified
Cloud Account Created
Cloud Account Deleted
Cloud Account Modified
What’s New for Pairs and Policies Management
35
Cloud Path Included in a Pair
Change Logging Options
If you upgrade, these events are deselected by default. After the server restart, you can configure
these events for email addresses and Twitter accounts. For information, see Section 6.6, “Configuring
the Notification Service,” on page 108.
2.2.8
Audit Tracking Service
The following event types have been added to Audit Tracking events:
Pair Modified
Cloud Account Created
Cloud Account Deleted
Cloud Account Modified
Cloud Path Included in a Pair
Change Logging Options
If you upgrade, these events are deselected by default. After the server restart, you can configure
these events for audit tracking. For information, see Section 6.5, “Configuring Audit Tracking
Events,” on page 108.
2.3
What’s New for Dynamic File Services 2.0
In addition to bug fixes, Novell Dynamic File Services 2.0 provides the following new features and
changes for the Service and management tools:
Section 2.3.1, “Administration,” on page 36
Section 2.3.2, “Service,” on page 37
Section 2.3.3, “Pairs,” on page 37
Section 2.3.4, “Policies,” on page 37
Section 2.3.5, “Policy Schedules,” on page 38
Section 2.3.6, “Retention Reviews,” on page 38
Section 2.3.7, “Notification Service,” on page 38
Section 2.3.8, “Auditing,” on page 38
Section 2.3.9, “Repair Tool,” on page 38
Section 2.3.10, “Filter Driver Diagnostics,” on page 38
2.3.1
Administration
The Dynamic File Services Retention Review group is used to configure reviewers to manage
the retained data in a retention pair. For information, see Section 12.2, “Configuring Reviewers for a
Retention Pair,” on page 215.
36
Dynamic File Services 2.2 Administration Guide
2.3.2
Service
License Key registration is required to create multiple pairs and policies. A single pair and
policy are available in evaluation mode. See Section 6.2, “Registering the License Key,” on
page 97.
C:\ProgramData\Dynamic File Services is used as the default location for storing program
data files on the Windows Server 2008/2008 R2 and Windows Vista/7 operating systems.
2.3.3
Pairs
Pairs that provide a merged view are now referred to as standard pairs.
Retention pairs are a new type of pair that allows you to specify a primary path that contains
active files, and a secondary path where a retention repository is used to store inactive files. Files
can be moved from the primary path to the repository by using policies, the Execute Now option,
and the Manual Move option for a pair. For information, see Section 12.1, “Understanding the
Retention Repository,” on page 213.
The following new capabilities support retention pairs:
Policy engine creates a retention repository on the secondary path
Remote primary path and secondary path support
Non-administrator reviewers via the Dynamic File Services Retention Review group
Retention Review events
Notification review schedule
Retention Review Service provides a Web UI for retention data review
Review Transaction History records delete and restore actions during retention reviews
Export review actions as reports in .csv and .html format
UserName-SID database so files do not become orphaned if owners become invalid
2.3.4
Policies
The Frequency option for policies is replaced by the Schedule feature. A schedule can be
associated with and disassociated from a policy. For information, see Chapter 10, “Creating and
Managing Policy Schedules,” on page 189.
An identity-based filter option is available for Groups. For information, see “File owners” on
page 164.
The File Types filter option has been expanded to include a list of perceived type associations
that are defined in the ..\Dynamic File Services\DswFiletypes.cfg file. For information,
see “File Types” on page 160.
Policy names can be modified.
What’s New for Pairs and Policies Management
37
2.3.5
Policy Schedules
Policy schedules are now available as a separate manageable unit. Schedules determine when
automated policy runs are executed. A schedule can be associated with and disassociated from a
policy. You can use the same schedule for multiple policies. For information, see Chapter 10,
“Creating and Managing Policy Schedules,” on page 189.
Policy schedule frequency has been expanded to include quarterly and custom dates. See
Section 10.1.2, “Schedule Frequency Options,” on page 190.
2.3.6
Retention Reviews
The Retention Review Web interface is available for viewing and managing data that has been moved
to the retention repository in a retention pair. For information, see Section 12.6, “Reviewing Files in
the Retention Repository,” on page 223. Instructions for non-administrator reviewers are available in
the Novell Dynamic File Services 2.0 Retention Review Quick Start (http://www.novell.com/
documentation/dynamic_file_services/dynamic_review_win/data/dynamic_review_win.html).
2.3.7
Notification Service
The Twitter notification add-on for the Notification Service allows you to Tweet notifications to
configured Twitter accounts.
Events can be configured separately for each email address and Twitter account. Previously,
events were set globally for all recipients. See Section 12.3, “Configuring Reviewers to Receive
Email Notifications,” on page 220.
Retention review events are available in the Notification Service. See “Retention Review Events”
on page 110.
Schedule events are available in the Notification Service. See “Policy Schedule Management
Events” on page 109.
Registration events are available in the Notification Service. See “Registration Events” on
page 110.
2.3.8
Auditing
The Audit Configuration option in the Controller allows you to specify which Dynamic File Services
events are audited. For information, see Section 6.5, “Configuring Audit Tracking Events,” on
page 108.
2.3.9
Repair Tool
The Repair tool was revised to allow you to apply the last-known-to-be-valid snapshot of the
databases. You can also manually take a snapshot of the databases. SeeChapter 14, “Repairing the
Pair, Policy, and Schedule Databases,” on page 245.
2.3.10
Filter Driver Diagnostics
The Filter Driver Diagnostics tool allows you to capture information about your configuration and
runtime errors to help troubleshoot merged view problems. See Section 16.15, “Diagnosing a Filter
Driver failure,” on page 272.
38
Dynamic File Services 2.2 Administration Guide
2.4
What’s Next
For information to help you plan your Dynamic File Services deployment, see Chapter 4, “Planning
for Pairs and Policies,” on page 51.
For information about installing or upgrading to Dynamic File Services 2.2, see the Dynamic File
Services 2.2 Installation Guide.
What’s New for Pairs and Policies Management
39
40
Dynamic File Services 2.2 Administration Guide
3
Getting Started
3
Novell Dynamic File Services (DynamicFS) is a powerful and dependable tool to help you effectively
manage your storage. Getting started is easy! This section describes common tasks to help you
quickly set up and use DynamicFS.
Section 3.1, “Installing and Setting Up Dynamic File Services,” on page 41
Section 3.2, “Connecting to the Dynamic File Services Server,” on page 42
Section 3.3, “Creating a Dynamic File Services Pair,” on page 42
Section 3.4, “Creating a Policy,” on page 43
Section 3.5, “Associating the Pair and Policy,” on page 44
Section 3.6, “Creating More Policies and Pairs,” on page 44
Section 3.7, “Enforcing Policies,” on page 45
Section 3.8, “Viewing the Merged File Tree for a Standard Pair,” on page 47
Section 3.9, “Reviewing Retained Data in a Retention Pair,” on page 48
Section 3.10, “Backing Up Files in the Pair,” on page 49
3.1
Installing and Setting Up Dynamic File Services
The Dynamic File Service and the Management Console are installed on the servers where you want
to create pairs and policies. You can also install the Management Console on workstations. You can
manage the pairs and policies on multiple servers from any computer where the Management
Console is installed.
Dynamic File Services
Software
Service
and
Management Console
Management
Console
The Dynamic File Service controls the pairs and policies that you create on a server. After the install
or after a server restarts, the Service automatically starts and runs in the background. Each server’s
pairs and policies are unique on the server, and their related configuration files are stored locally.
The Dynamic File Services group is created when the Service is installed, but no members are
automatically assigned to it. Before you can manage DynamicFS, you must log in to the DynamicFS
server as a user with Administrator privileges (server Administrator, Domain Admin, or a user with
equivalent privileges) to add members to the Dynamic File Services group. Only the
Administrator user and members of the Dynamic File Services group can manage the Service.
Getting Started
41
On DynamicFS servers, the Service Controller starts automatically when the Administrator user or a
member of the Dynamic File Services group logs in. The Service Controller allows you to
manually start and stop the Dynamic File Service. You can manage the Service settings, such as the
Service Port Access, Windows Firewall Access, Certificate Configuration, Audit Configuration, and
Notification Configuration. You can also use it to launch the Management Console or Repair Tool.
3.2
Connecting to the Dynamic File Services Server
Open the Dynamic File Services Management Console, then set up the server you want to manage.
You can set up multiple servers to be managed in the same console. To connect to a server, provide
the login credentials of the Administrator user or a member of the Dynamic File Services group
on the target server.
You can run the Management Console on the server, or from another computer where the
Management Console is installed. For remote connections, the Dynamic File Services Windows
Firewall Access option must be enabled on the target server so that an exception in the Windows
Firewall is allowed for the configured port. Remote management communications are secured with
SSL (HTTPS).
IP or DNS: localhost
Dyn
File amic
Serv
ices
Username: Administrator
Password: password
Port: 8999
Local
Management
Service and
Management Console
Dynamic File Services
Management Console
Remote
Management
IP or DNS: server1.example.com
Username: Administrator
Password: password
Port: 8999
Dynamic File Services
Server
3.3
Creating a Dynamic File Services Pair
A Dynamic File Services pair consists of two independent paths on different disks, referred to as the
primary path and secondary path. You can use a remote share as the secondary path. Initially, the
primary path contains files and the secondary path is empty. Pair names must be unique on the
server.
Create a pair on the server by specifying the primary path and the secondary path to use for the pair.
If no pairs exist on the target server, the Setup Wizard automatically opens and guides you through
the process of creating a pair and creating a policy. The wizard automatically associates the pair and
the policy. Other pairs can be created with the Pair Wizard.
After you create a pair, you can specify folders in the primary location that can be included or
excluded from policy runs. You can include folders or exclude folders, but not both.
42
Dynamic File Services 2.2 Administration Guide
A Windows network share must be set up on the primary path so that users can access data on the
pair. For a standard pair, users see data on both paths in a merged view. Use the Windows Network
Sharing feature to set up the network share before or after you create the pair. The merged view is
also shown if you begin your access from other network shares above and below the share on the
primary path. To ensure that users access files on the secondary path only via the merged view, do
not create a network share that gives users direct access to files on the secondary path of a standard
pair.
C:\primary
F:\secondary
music
song-1.mp3
song-2.wav
song-3.mp3
classical
song-4.wav
song-5.mp3
song-5.mp3
documents
project-A
project-B
MyPair
3.4
Creating a Policy
A policy specifies the rules that determine what files are moved between the primary path and the
secondary path, the direction files are moved, and when the policy is enforced.
Create a policy that determines what data to move and when to move it. A rule defines the direction
to move files and at least one of the following filter options:
File size
Last accessed time
Last modified time
File name patterns
Getting Started
43
File types (MIME types and perceived types)
File owners (users or groups)
A policy can have no schedule, or it can be scheduled to run hourly, daily, weekly, monthly, quarterly,
yearly, or on custom dates. Scheduled and unscheduled policies can be run manually.
If no pairs exist on the target server, the Setup Wizard automatically opens and guides you through
the process of creating a pair and creating a policy. The wizard automatically associates the pair and
the policy. Other policies can be created with the Policy Wizard. Policy names must be unique on the
server.
Direction to Move Files
Primary
Storage
Secondary
Storage
P to S
S to P
3.5
Filter Options
• File size
• Last accessed
• Last modified
• File patterns
• File types
• File owners
(user or group)
Name and Description
Associate the
Policy with One
Schedule
Associate the
Policy with One
or More Pairs
MyPolicy
A brief description
Associating the Pair and Policy
An association links a Dynamic File Services pair and policy so that the policy is enforced for the pair.
No files are moved between the primary path and secondary path in a pair until a policy is associated
with the pair. Policy runs are enforced against all pairs that are associated with the policy.
An association between a policy and a pair occurs automatically when you use the Setup Wizard to
create a pair and a policy at the same time. The Policy Wizard allows you to select the pairs you want
to associate with a new policy. The Pair Wizard allows you to select the policies you want to associate
with a new pair. You can also associate (or disassociate) pairs and policies at any time by selecting the
Properties dialog box of the pair or policy, and modifying its associations.
MyPair
3.6
MyPolicy
Creating More Policies and Pairs
You can create additional Dynamic File Services pairs and policies and associate them. A pair can be
associated with multiple policies. A policy can be associated with multiple pairs.
Associate one or more policies
with a given pair of any type.
44
Dynamic File Services 2.2 Administration Guide
Associate one or more pairs
of any type with a given policy.
Use any of the following methods to create additional pairs and policies and associate them:
Pair: Right-click Pairs under the server in the left panel, then select Pair Wizard.
Policy: Right-click Policies under the server in the left panel, then select Policy Wizard.
Pair and Policy: Right-click the server in the left panel, then select Setup Wizard.
Use either of the following methods to associate existing pairs and policies:
Select a policy and associate it to one or more pairs.
Select a pair and associate it to one or more policies.
3.7
Enforcing Policies
In a policy run, a policy is enforced separately for each of the pairs associated with the policy. A
policy can run on demand or when it is scheduled. Each policy is associated to a schedule. Multiple
policies can be scheduled to run at the same time. Scheduled and unscheduled policies can be run
manually.
Run a single policy at a time on a pair to enforce the policy’s rules for moving data. A file is moved if
it meets all of the filter options specified in the rule.
Configure multiple policies to run at the same time on a pair to enforce alternative rules for moving
data. When the group of policies moves files in both directions, the primary-to-secondary policies are
grouped and enforced, then the secondary-to-primary policies are grouped and enforced. A file is
moved if it meets the rules for any one of the policies that are run together.
For example, a policy run for a standard pair might move all files with extensions of .mp3 from the
primary location to the secondary location.
Example: Move *.mp3 files from Primary –> Secondary.
C:\primary
F:\secondary
music
music
song-2.wav
song-1.mp3
classical
song-3.mp3
song-4.wav
classical
documents
song-5.mp3
project-A
song-6.mp3
project-B
Getting Started
45
For a retention pair, policies move data only from primary to a repository on the secondary. A folder
is created and named with “PolicyRun” a time stamp, such as PolicyRun_20110815_10.35. Files are
moved to the folder, keeping the data structure relatve to the root of the primary location.
Reviewers
Retention Data
Review Web UI
Users
\\server1\primary
HTTPS
Retention Data
Primary on
server1.example.com
F:\secondary
PolicyRun_20110815_10.35
documents
music
project-A
project-B
song-1.mp3
song-2.wav
song-3.mp3
classical
song-4.wav
song-5.mp3
song-6.mp3
46
Dynamic File Services 2.2 Administration Guide
3.8
Viewing the Merged File Tree for a Standard Pair
Users access the primary path on a standard pair via a network share (\\servername\sharename).
They see a merged view of the data on both paths as if the files are all stored on a single device.
The native access control of the underlying file systems determines the user access to the data. All
access to the secondary path is made via DynamicFS as if the data were located on the primary path.
DynamicFS does not need to relocate the data to give the user access to data on the secondary path.
To set ACLs and attributes on files and folders, you should access the merged view of the data via the
network share on the primary path, then set the access control for files and folders as you normally
would. If direct access to the path is necessary to set ACLs, make the changes to the folder instance
that resides on the primary path.
In a merged view, the users are not aware that the .mp3 files are now located on a different disk than
their other files. There is no performance impact for the user.
\\server1\primary
Users
Primary on
server1.example.com
music
song-1.mp3
song-2.wav
song-3.mp3
classical
song-4.wav
song-5.mp3
song-6.mp3
documents
project-A
project-B
Getting Started
47
3.9
Reviewing Retained Data in a Retention Pair
The Novell Dynamic File Services Retention Review Service provides a Web interface for reviewing
files in a retention repository. Reviewers determine the disposition of retained files in accordance
your company’s data retention policy. A reviewer can take no action, delete files from the repository,
or move files from the repository back to their original location.
Members of the Dynamic File Services Retention Review group can review retention data by
using the Retention Review Web interface. Administrator privileges on the server are not required for
membership. When reviewers work in the Web interface, they have all of the file access privileges
necessary to access the retained files.
48
Dynamic File Services 2.2 Administration Guide
3.10
Backing Up Files in the Pair
The administrator can perform backup and restore operations independently on the two locations in
the Dynamic File Services pair. Backups can be scheduled to run at different frequencies on each
path. Having less data to back up can help shorten the backup window.
For example, if data changes more frequently on the primary path, it can be backed up more
frequently than the secondary path.
The primary location contains frequently used
and volatile files, so it is backed up
incrementally and weekly.
C:\primary
The secondary location contains static or less
important files, so it is backed up less often.
F:\secondary
music
music
song-2.wav
song-1.mp3
classical
song-3.mp3
song-4.wav
classical
documents
song-5.mp3
project-A
song-6.mp3
project-B
Getting Started
49
50
Dynamic File Services 2.2 Administration Guide
4
Planning for Pairs and Policies
4
Novell Dynamic File Services (DynamicFS) pairs and policies are easy to set up and manage. Before
you begin, it is important to take time to plan and design your overall storage solution. This section
provides information to help you plan an effective implementation in your Windows environment.
IMPORTANT: For information about supported configurations and installation requirements, see
“Planning the Installation” in the Dynamic File Services 2.2 Installation Guide.
Section 4.1, “Server-Centric Management,” on page 52
Section 4.2, “Management Groups,” on page 52
Section 4.3, “Reviewers for Retention Pairs,” on page 52
Section 4.4, “Active Directory Domain Configuration for Remote Shares,” on page 53
Section 4.5, “Server Configuration Requirements,” on page 56
Section 4.6, “Storage Requirements,” on page 57
Section 4.7, “Pair Requirements,” on page 58
Section 4.8, “Access Rights for a Standard Pair,” on page 60
Section 4.9, “Using Remote Shares in an Active Directory Domain,” on page 60
Section 4.10, “Using Remote Shares in a Workgroup,” on page 61
Section 4.11, “Using Cloud Storage as the Secondary Path in a Retention Pair,” on page 63
Section 4.12, “Naming Conventions for Pairs and Policies,” on page 65
Section 4.13, “File Name Path Length,” on page 65
Section 4.14, “Merged View for Standard Pairs,” on page 65
Section 4.15, “File and Folder Attributes and ACL Permissions in a Standard Pair,” on page 66
Section 4.16, “Duplicate Folders in a Standard Pair,” on page 66
Section 4.17, “Duplicate Files in a Standard Pair,” on page 67
Section 4.18, “Orphan (Ownerless) Files,” on page 68
Section 4.19, “System Files and Other Files that Are Not Moved,” on page 70
Section 4.20, “Policy Schedules,” on page 71
Section 4.21, “Time Displays,” on page 72
Section 4.22, “Event Logging,” on page 72
Section 4.23, “Using Antivirus Software with Pairs,” on page 72
Section 4.24, “Using Backup Software with Pairs,” on page 72
Section 4.25, “Using Compression with Pairs,” on page 72
Section 4.26, “Using Disk Quotas with Pairs,” on page 72
Section 4.27, “Disk Space Availability and Moving Files,” on page 73
Section 4.28, “Using Encryption with Pairs,” on page 73
Planning for Pairs and Policies
51
Section 4.29, “Using Microsoft Distributed File System with Pairs,” on page 74
Section 4.30, “Using Dynamic File Services in a Windows Cluster,” on page 80
Section 4.31, “Using Dynamic File Services in Windows Safe Mode,” on page 82
4.1
Server-Centric Management
Management of Dynamic File Services servers, pairs, policies, and schedules is server-centric.
DynamicFS does not use a centralized LDAP directory repository. The pair, policy, and schedule
configuration files are stored in subfolders in the C:\ProgramFiles\Dynamic File Services folder
on the server where the Service is installed and running. Import and export features of DynamicFS
make it possible to copy a policy to multiple servers.
The Service login can validate the administrator user identity in Workgroup environments and in
Active Directory domain environments.
4.2
Management Groups
The Administrator user of the server and the Domain Admin users in the same Active Directory
domain are automatically allowed to manage all aspects of Dynamic File Services. Two management
groups are created automatically at install time to allow you to set up non-administrator users to
perform management tasks. It is not necessary to explicitly add the Administrator user and Domain
Admin users to these groups, but it is okay to add them.
Table 4-1 Dynamic File Services Management Groups
Management Group
Description
To add or remove members, see
Dynamic File Services group Group members can manage pairs, Section 6.3, “Configuring
policies, schedules, and cloud
accounts on a DynamicFS server.
The user identity used when you
install Dynamic File Services is
automatically added to this group.
You can assign other members
after the installation.
Dynamic File Services
Retention Review group
4.3
Administrators for Pair
Management,” on page 102.
Group members can review
Section 12.2, “Configuring
retained data in all retention pairs. Reviewers for a Retention Pair,” on
The group has no default members. page 215
The group is automatically
assigned as a reviewer when the
retention pair is created.
Reviewers for Retention Pairs
Members of the Dynamic File Services Retention Review group can review the retained data
for all pairs. You can also assign individual users and groups to be reviewers for a given retention
pair by using the Reviewers tab on the pair’s Properties page. For information, see Section 12.2,
“Configuring Reviewers for a Retention Pair,” on page 215.
52
Dynamic File Services 2.2 Administration Guide
4.4
Active Directory Domain Configuration for Remote Shares
In an Active Directory environment, Dynamic File Services configures a special domain group and
user in order to support the use of remote shares in a pair.
Section 4.4.1, “Default Domain Configuration,” on page 53
Section 4.4.2, “Dynamic File Services Storage Rights Domain Group,” on page 54
Section 4.4.3, “NDFS-servername Domain Proxy User,” on page 55
Section 4.4.4, “Security Implications of the Default Domain Configuration,” on page 56
4.4.1
Default Domain Configuration
When you install the Service component on a domain controller or member server in an Active
Directory environment, the installation sets up the following security features:
Creates a domain user called NDFS-servername.
Creates a domain group called Dynamic File Services Storage Rights.
Adds the NDFS-servername user to the Dynamic File Services Storage Rights group.
Gives the NDFS-servername user the Log on as a service right.
Sets up the Dynamic File Service to log on as the NDFS-<servername> user.
Makes the Dynamic File Services Storage Rights group a Member of the Domain Admins
group.
This setup requires that the installation is done by a domain user that has local Administrator
privileges and Domain Administrator rights.
Planning for Pairs and Policies
53
4.4.2
Dynamic File Services Storage Rights Domain Group
The Dynamic File Services Storage Rights group is an Active Directory domain group that is
used to allow Dynamic File Services to manage traffic between the Service running on the server and
the remote share. In Active Directory, you must add the group to the primary share and secondary
share, and grant it all permissions.
The Dynamic File Services Storage Rights group is created automatically during the
installation of the Service component if the computer is a domain controller or a member server in an
Active Directory environment. The group scope is Global and the group type is Security.
Members of the Dynamic File Services Storage Rights group include the NDFS-servername
proxy users for the Dynamic File Services servers in the same Active Directory domain/forest. The
members are automatically added to the group when the Service component is installed on a server
in the domain.
54
Dynamic File Services 2.2 Administration Guide
A server's NDFS-servername proxy user is automatically removed as a member of the Dynamic File
Services Storage Rights group if Dynamic File Services is uninstalled from the server. The group
is not deleted by the uninstall unless the server’s proxy user is the only member of the group.
The Dynamic File Services Storage Rights group is a member of the Domain Admins group.
This gives the group equivalent rights to the Domain Admins group. Alternatives to the default
domain configuration are described in “Security Implications of the Default Domain Configuration”
on page 56.
4.4.3
NDFS-servername Domain Proxy User
The NDFS-servername user is an Active Directory domain user that serves as a proxy user in
communications between the Service on a server that is running Dynamic File Services and a remote
share that is being used as the secondary path in a pair on that server. The user is created
automatically during the installation of the Service component if the computer is a domain controller
or a member server in an Active Directory environment.
The NDFS-servername proxy user is automatically added as a member of the Dynamic File
Services Storage Rights group in the same domain as the server. The user is given the Log on as a
service right. As a group member, this user automatically has the same access rights granted to the
group.
The password for the NDFS-servername user is created automatically, and can be modified by using
the Active Directory tool for modifying user passwords.
Planning for Pairs and Policies
55
4.4.4
Security Implications of the Default Domain Configuration
The default configuration gives the Dynamic File Services Storage Rights domain group
equivalent rights to the Domain Admins group. In some situations, this can be undesirable. The
following describes two options to tighten security:
Remove the Dynamic File Services Storage Rights group from the Domain Admins group,
and give only the specific rights needed to the Dynamic File Services Storage Rights
group. Then give the group share-level rights or the NTFS security rights to the share used for
the primary path and the share used for the secondary path.
Delete the Dynamic File Services Storage Rights group, and add only the specific rights
needed directly to the NDFS-servername proxy user. Then give the NDFS-servername user
share-level rights or the NTFS security rights to the share used for the primary path and the
share used for the secondary path.
Whichever approach you use, ensure that you grant the group or user the same access rights to the
primary share and the secondary share.
You can manage domain groups and users by using the Active Directory Users and Computers snapin the Microsoft Management Console. The specific rights needed are as follows:
Allow log on locally
Restore file and directories
Backup files and directories
Load and unload device drivers
Log on as a service
Manage auditing and security log
Take ownership of files or other objects
4.5
Server Configuration Requirements
Consider the server configuration requirements in this section when using Dynamic File Services:
Section 4.5.1, “SMB,” on page 56
Section 4.5.2, “UTF-8,” on page 56
4.5.1
SMB
Dynamic File Services supports SMB2 and SMB1. You should use the same SMB version on the
server, clients, and remote file systems.
4.5.2
UTF-8
The servers and filers used with Dynamic File Services must be Unicode capable and must be set up
for UTF-8 (8-bit Unicode Transformation Format) encoding and character sets.
56
Dynamic File Services 2.2 Administration Guide
4.6
Storage Requirements
Consider the requirements in this section before you configure Dynamic File Services pairs:
Section 4.6.1, “File Systems,” on page 57
Section 4.6.2, “Local Storage,” on page 57
Section 4.6.3, “Remote Storage,” on page 57
Section 4.6.4, “Cloud Storage,” on page 58
4.6.1
File Systems
Dynamic File Services supports the NTFS file system for the primary and secondary locations in
pairs.
For cloud storage, Dynamic File Services works with the native storage technology used by the
provider. It maintains information about the ACLs and other metadata for files stored on secondary
cloud storage locations in retention pairs.
4.6.2
Local Storage
Devices that the system considers to be native storage devices can be used for the primary path and
the secondary path. This includes Fibre Channel, iSCSI, and direct-attached storage devices (internal
or external). The devices must be online and available to the Dynamic File Services server when you
create, manage, and use the pair.
For iSCSI devices that are hosted in a cloud, we recommend that the device be used only for
secondary paths.
The native storage devices used in a pair must have a static drive letter assigned so that the drive
letter remains the same through server restarts. If you plan to change the drive letters or modify
paths, you must unlink the paths by removing the pair definition, and create a new pair that uses the
new locations.
Dynamic File Services does not support using CDs, DVDs, floppy drives, or flash drives in a pair. It
also does not support using mapped drives.
4.6.3
Remote Storage
Remote storage is supported for the following pair configurations:
Standard Pair: Secondary path. A local path is required for the primary in order to provide
merged access to the files.
Retention Pair: Primary path or secondary path.
The remote path can be a network share on either of the following target storage locations. It is not
necessary for Dynamic File Services to be running on the target location.
Any Windows Server running an operating system that is supported by DynamicFS
Network attached storage or a network filer (such as NetApp and EMC)
IMPORTANT: To avoid potential data loss and conflicts, use only dedicated volumes when using
remote paths.
Planning for Pairs and Policies
57
A remote share must be online and available to the Dynamic File Services server when you create,
manage, and use the pair.
For an Active Directory environment, the remote share must be published in Active Directory and
must reside in the same domain/forest as the Dynamic File Services server. For configuration
requirements, see Section 4.9, “Using Remote Shares in an Active Directory Domain,” on page 60.
For a Workgroup environment, the remote share must exist in the same workgroup as the Dynamic
File Services server. For configuration requirements, see Section 4.10, “Using Remote Shares in a
Workgroup,” on page 61.
4.6.4
Cloud Storage
Cloud storage is supported as the secondary path in a retention pair. You must set up an account with
your preferred cloud provider and authorize the Dynamic File Services software to interact with the
files stored there on your behalf. For information, see Chapter 11, “Creating and Managing Cloud
Accounts,” on page 199.
4.7
Pair Requirements
A Dynamic File Services pair consists of a primary path and a secondary path that DynamicFS
manages as a unit through its filter driver.
Before forming a pair, ensure that you have prepared the storage areas that you want to use as the
primary and secondary locations by verifying that your storage setup meets the requirements in this
section. Then gather the information you need about the paths that you want to use as the primary
path and secondary path.
Section 4.7.1, “Only 16 Pairs Per Server,” on page 58
Section 4.7.2, “Primary and Secondary Paths,” on page 58
Section 4.7.3, “Administrator Access,” on page 59
Section 4.7.4, “User Access,” on page 60
4.7.1
Only 16 Pairs Per Server
The filter driver only supports 16 standard pairs per server. (There is no limit to retention pairs.)
To see a list of pairs that the filter driver is managing, do the following:
1 Right click on the Novell Dynamic File Services Controller
2 Select Filter Driver Diagnostics > Save Filter Driver Configuration.
The saved file contains a list of pairs that are currently managed by the filter driver.
4.7.2
Primary and Secondary Paths
Consider the following guidelines when choosing paths to use for pairs:
“Paths for Standard Pairs” on page 59
“Paths for Retention Pairs” on page 59
“Using Remote Paths” on page 59
“Using Cloud Paths” on page 59
58
Dynamic File Services 2.2 Administration Guide
Paths for Standard Pairs
A standard pair’s primary path can reside on any local device. The path should be unique among the
pairs defined on the same Dynamic File Services server.
A standard pair’s secondary path can reside on a local device or a remote share. Avoid conflicts
related to primary paths for the same or different pairs on the same server. The file structure that is
built under the secondary path’s folder is the same as the file structure under the primary path’s
folder.
IMPORTANT: Do not nest the paths used by standard pairs. That is, when creating a standard pair,
do not specify a path that contains or is contained by any path that is used by another standard pair.
The secondary path is usually empty when you create a standard pair. Both paths can contain data,
but if there are duplicate files, only the instance of the file in the primary path is available to the user
in the merged view. As an Administrator user (or as a user with Administrator privileges) on the
server, you can access the secondary path to rename the duplicate file, which makes it available to
users in the merged view.
Paths for Retention Pairs
A retention pair’s primary path can reside on any local device or on a remote share. Avoid conflicts
related to primary paths for the same or different pairs on the same server. You can tier files from a
standard pair to a retention pair by using the secondary path of a standard pair as the primary path
of a retention pair.
A retention pair’s secondary path can reside on any local device, a remote share, or in cloud storage.
The path should be unique among the pairs defined on all Dynamic File Services servers in the same
tree. The path is a destination folder for the files that are moved to the retention repository via
policies or via a manual move. The file structure built under the destination folder is different than
that for the pair’s primary path.
Using Remote Paths
The pair setup does not prevent you from using the paths on one Dynamic File Services server as
remote share paths for pairs that you create on a different Dynamic File Services server. If you re-use
paths, ensure that users can see only the data you intend them to see.
Using Cloud Paths
The cloud storage provider’s site must be available when you create a retention pair, and when
policies and manual moves are run for the pair.
4.7.3
Administrator Access
The Administrator user that creates and manages pairs must have the same file access permissions
and credentials on both the primary path and secondary path in each pair.
Planning for Pairs and Policies
59
4.7.4
User Access
All user access to a pair must be made through a network share on the pair’s primary path. Use
Microsoft Network Sharing to create the share.
For standard pairs, users see a merged view of files in both locations. You can add network shares on
the primary device above or below the network share on the primary path. The merged view for a
standard pair works from the primary path and downward in the file tree structure. Do not give
users direct access to the secondary path, or to any shares on, above, or below the secondary path.
For retention pairs, users see files only on the primary location. The retention data reviewers manage
files in the retention repository by using the Web-based Retention Review Service. For information,
see Section 12.2, “Configuring Reviewers for a Retention Pair,” on page 215.
4.8
Access Rights for a Standard Pair
For a standard pair, access rights settings must be the same for the primary path and the secondary
path. After the pairs are linked, the Administrator manages the access rights by accessing the files via
the merged view. When the standard policy engine moves files from the primary location to the
secondary location, the engine automatically sets the access rights that are needed on the secondary
path and files.
4.9
Using Remote Shares in an Active Directory Domain
In an Active Directory domain, you can specify UNC (Universal Naming Convention) paths when
you create a pair. This allows a remote storage target to be a network share on third-party network
filers (such as EMC and NetApp) or Windows Server 2008/2008 R2 servers. The remote share must be
published in the same Active Directory domain and forest as the Dynamic File Services server.
A UNC path describes the location of a volume or folder. The format for a UNC path is
\\server\volume\folder and is case-sensitive. For example:
\\my_iscsi_svr1\Engineering\ProjectA
Ensure that your setup meets the requirements in the following sections:
Section 4.9.1, “Server Requirements in a Domain,” on page 60
Section 4.9.2, “Remote Share Requirements in a Domain,” on page 61
Section 4.9.3, “Remote Path Requirements in a Domain,” on page 61
4.9.1
Server Requirements in a Domain
The pair must be hosted on a Dynamic File Services server that is located in the same Active
Directory domain and forest as the remote shares.
Install Dynamic File Services on a supported Windows server in an Active Directory domain. The
server can be a domain controller or a member server. For information, see “Supported Platforms” in
the Dynamic File Services 2.2 Installation Guide.
60
Dynamic File Services 2.2 Administration Guide
An Active Directory domain user that has Domain Admin rights must perform the installation. The
following user and group are created in the domain to allow remote shares to be used:
NDFS-servername proxy user
Dynamic File Services Storage Rights group
For details and alternate security setup options, see Section 4.4, “Active Directory Domain
Configuration for Remote Shares,” on page 53.
In addition the DynamicFS management groups are created on the server, as described in Section 4.2,
“Management Groups,” on page 52. To add members to the Dynamic File Services group on the
server, see Section 6.3.2, “Setting Up Administrators in a Domain,” on page 104.
4.9.2
Remote Share Requirements in a Domain
The remote shares must hosted in the same Active Directory domain/forest as the Dynamic File
Services server that hosts the pair.
You must publish the remote share in Active Directory. The remote share can be published in any
container in the domain where the NDFS-<servername> proxy user or Dynamic File Services
Storage Rights group has browse rights.
Use Microsoft Networking to create a share on the remote location, and then publish the network
share in Active Directory. For information, see Section 8.3, “Preparing Remote Shares for Use in a
Pair,” on page 146.
You must add the Dynamic File Services Storage Rights group to the remote share in Active
Directory, and grant it all permissions to the share. For information, see Section 4.4, “Active Directory
Domain Configuration for Remote Shares,” on page 53.
Users must not have direct access to the files in a remote share that is used as the secondary path in a
pair.
4.9.3
Remote Path Requirements in a Domain
The remote path can be a network share on either of the following target storage locations. It is not
necessary for Dynamic File Services to be running on the remote location.
Any Windows Server running an operating system that is supported by DynamicFS
Network attached storage or a network filer (such as NetApp and EMC)
To avoid potential data loss and conflicts, use only dedicated volumes when using remote paths.
Users must access files in the pair via a network share on the primary path. Users must not have
direct access to the files in a path that is used as a remote path in a pair.
4.10
Using Remote Shares in a Workgroup
In a Windows Workgroup, you can specify UNC paths when you create a pair. This allows a remote
storage target to be a network share on third-party network filers (such as EMC and NetApp) or
Windows Server 2008/2008 R2 servers. The remote share must be created in the same Workgroup as
the Dynamic File Services server.
A UNC path describes the location of a volume or folder. The format for a UNC path is
\\server\volume\folder and is case-sensitive. For example:
Planning for Pairs and Policies
61
\\my_iscsi_svr1\Engineering\ProjectA
Ensure that your setup meets the requirements in the following sections:
Section 4.10.1, “Server Requirements in a Workgroup,” on page 62
Section 4.10.2, “Workgroup Configuration Requirements,” on page 62
Section 4.10.3, “Remote Share Requirements in a Workgroup,” on page 63
Section 4.10.4, “Remote Path Requirements in a Workgroup,” on page 63
4.10.1
Server Requirements in a Workgroup
The pair must be hosted on a Dynamic File Services server that is located in the same Windows
Workgroup as the remote shares.
In a Windows Workgroup, install Dynamic File Services on a supported Windows server. For
information, see “Supported Platforms” in the Dynamic File Services 2.2 Installation Guide.
The installation must be done by a user that has Administrator rights on the server. This allows the
DynamicFS management groups to be created on the server, as described in Section 4.2,
“Management Groups,” on page 52. To add members to the Dynamic File Services group on the
server, see Section 6.3.3, “Setting Up Administrators in a Workgroup,” on page 104.
4.10.2
Workgroup Configuration Requirements
Your Workgroup setup must meet the following requirements:
The host name of each computer in the Workgroup must be unique.
On the Dynamic File Services server, the Service must be run as the Administrator user. The
Administrator user password must be the same on each participating computer or filer. This
user must have all file system rights to the primary share and the secondary share.
On a Windows XP computer, all computers in the workgroup must have the same user account
with the same password. The user account must have all share access rights to all of the shares
that you plan to use. The Service must run as this user account. The user must be granted the
Logon as a Service right. If you set the Service to run as a user, then the Windows service
controller sets this right for you.
On Windows Server 2008 and 2008 R2, the following services must be running and be
configured to start for every boot in order for Dynamic File Services to work with remote paths:
Function Discovery Resource Publication
Simple Service Discovery Protocol (SSDP)
Universal Plug and Play (UPnP)
Computer Browser
After these services are started, go to the Control Panel > Network and Internet > Network and
Sharing Center > Sharing and Discovery option, then turn on Network Discovery.
62
Dynamic File Services 2.2 Administration Guide
4.10.3
Remote Share Requirements in a Workgroup
The remote shares must be in the same Windows Workgroup as the Dynamic File Services server that
hosts the pair.
Use Microsoft Networking to create a share on the remote location. You must make the share
available to the DynamicFS server, and give rights to the Administrator user as described in
Section 4.10.2, “Workgroup Configuration Requirements,” on page 62.
Users must not have direct access to the files in a remote share that is used as the secondary path in a
pair.
4.10.4
Remote Path Requirements in a Workgroup
The remote path can be a network share on either of the following target storage locations. It is not
necessary for Dynamic File Services to be running on the remote location.
Any Windows Server running an operating system that is supported by DynamicFS
Network attached storage or a network filer (such as NetApp and EMC)
To avoid potential data loss and conflicts, use only dedicated volumes when using remote paths.
Users must access files in the pair via a network share on the primary path. Users must not have
direct access to the files in a path that is used as a remote path in a pair.
4.11
Using Cloud Storage as the Secondary Path in a Retention
Pair
Dynamic File Services supports the use of cloud storage as the secondary location in a retention pair.
Your cloud storage must be configured and available to the retention pair whenever actions are
performed that involve the secondary path, such as the initial setup of the pair, policy moves, manual
moves, and retention reviews.
Section 4.11.1, “Supported Cloud Storage Providers,” on page 63
Section 4.11.2, “Cloud Credentials,” on page 64
Section 4.11.3, “Maximum Storage Size for Cloud Storage,” on page 64
Section 4.11.4, “Maximum File Size for Uploads to Cloud Storage,” on page 64
4.11.1
Supported Cloud Storage Providers
Dynamic File Services 2.2 supports the following cloud storage providers. You create an account with
the provider.
Amazon Simple Storage Service (http://aws.amazon.com/s3/) (Amazon S3)
CloudMe (http://www.cloudme.com/)
Dropbox (http://www.dropbox.com/)
Planning for Pairs and Policies
63
4.11.2
Cloud Credentials
On the DynamicFS server, you set up cloud accounts to store your credentials for the cloud locations
that you want to use in retention pairs. The credentials are stored securely. The Service uses the
credentials to connect to the cloud when it performs actions on the files on your behalf, such as for
policy moves, manual moves, and retention reviews.
For information about the types of credentials used by cloud providers, see Section 11.1.5, “Types of
Cloud Access Authentication Credentials,” on page 201.
For information about how to get credentials and allow Dynamic File Services to access the account,
see Section 11.2, “Setting Up Cloud Access Credentials and Folders for Your Cloud Storage
Provider,” on page 201.
4.11.3
Maximum Storage Size for Cloud Storage
The maximum amount of space that your files can consume in the cloud is governed by the service
level agreement with your cloud storage provider. The storage quota is enforced by your provider. If
you reach the set quota, files cannot be uploaded until you remove files to make space available, or
unless you increase the quota. For example, you can remove files from the retention repository by
using the Delete and Restore features of the Retention Review Service. For information, see
Section 12.6, “Reviewing Files in the Retention Repository,” on page 223.
4.11.4
Maximum File Size for Uploads to Cloud Storage
The maximum size per file that can be uploaded to cloud storage is governed by the service level
agreement with your cloud storage provider. The storage quota and file size limit is enforced by your
provider. In addition, a file must be smaller than the remaining available space below your quota.
Table 4-2 provides information about the known file size restrictions for the supported cloud
providers. Refer to your cloud storage provider’s documentation for information about the
maximum file size allowed for uploads.
Table 4-2 Cloud Provider Upload File Size Restrictions
Cloud Provider
Upload File Size Restrictions
Amazon S3
Amazon S3 allows upload file sizes from 1 byte to 5 terabytes per file. For information,
see FAQs: How much data can I store? (http://aws.amazon.com/s3/faqs/
#How_much_data_can_I_store).
CloudMe
Cloudme limits the upload file size for free and basic accounts to 150 MB per file. For
information see CloudMe Price Plan and Accounts (http://www.cloudme.com/en/
pricing).
Dropbox
Dropbox limits the upload file size for developer applications to 150 MB per file. For
information, see the developer documentation for Dropbox REST APIs (https://
www.dropbox.com/developers/reference/api#files_put).
Larger file sizes require the Dropbox client application or the Dropbox Web browser
interface. For information, see Help Center: Is there a limit or maximum to how big my
files can be? (https://www.dropbox.com/help/5).
64
Dynamic File Services 2.2 Administration Guide
4.12
Naming Conventions for Pairs and Policies
Dynamic File Services pair names and policy names can be up to 32 characters long. The characters in
the name must be compatible with the share naming scheme for the file system. Character restrictions
for the pair or policy name exclude the following:
"*\/[]:|<>+=;,?
Control characters (less then 0x20) are also invalid. All other ASCII characters, including extended
ASCII, are valid.
If a policy name or pair name contains a space, you must delimit multiple entries with a comma
when working from the command line interface.
4.13
File Name Path Length
Dynamic File Services uses the .NET Framework, which has length restrictions for folder paths and
file names. It allows a maximum of 248 characters in a folder name. The fully qualified file name
must be less than 260 characters. For information, see Long Paths in .NET (http://blogs.msdn.com/
bclteam/archive/2007/02/13/long-paths-in-net-part-1-of-3-kim-hamilton.aspx) in Microsoft
Developers Network Blogs. If a file’s folder path or fully qualified file name is too long, the Policy
Engine cannot move the file during a policy run, and logs a PathTooLongException error.
4.14
Merged View for Standard Pairs
Dynamic File Services leverages Microsoft Network Sharing to provide the merged view of a
standard pair to users. See the official Microsoft Windows documentation in the Microsoft TechNet
Library (http://technet.microsoft.com/en-us/library/cc732793.aspx) for information about how to set
up network sharing on the computers where the Service is running.
To see the merged view of the two storage locations in a standard pair, users access the files through
a Windows network share that you set up on the pair’s primary path. You can have additional
network shares nested above and below the primary path. When a user navigates the file tree by
using a share above the primary path, the merged view is shown when the primary folder is opened
to access the files in the pair. When a user navigates the file tree by using a share below the primary
path, the merged view is automatically shown.
For secure access and authentication, users should access the data in the pair only via the network
shares that are set up on the primary path. If users directly access files on the primary path or
secondary path, potential issues can arise with duplicate files or with access rights and attributes
being out of synchronization between primary and secondary folders.
To avoid these potential conflicts:
Restrict direct access to the primary path and secondary path to administrative activities such as
backup and restore.
Use the merged view when changing ACL permissions and attributes for files and folders
whenever possible as described in Section 4.15, “File and Folder Attributes and ACL
Permissions in a Standard Pair,” on page 66.
Remove (or strictly limit access to) network shares for the secondary path.
Do not create nested shares above or below the secondary path.
Planning for Pairs and Policies
65
In a Windows cluster, always use the Windows cluster management tool and not Windows Explorer
to manage file shares to folders on shared drives. Otherwise, changes to share information made by
using Windows Explorer are lost when these file shares fail over to other nodes in the cluster.
Workstations should be in an Active Directory domain to access the cluster-managed file shares.
4.15
File and Folder Attributes and ACL Permissions in a
Standard Pair
For a standard pair, Dynamic File Services automatically synchronizes the attributes and ACL (access
control list) permissions on files and folders that it moves, whether the move is triggered by a policy
or by a user that accesses the data via the merged view.
After creating a standard pair, ensure that you use the merged view of the pair’s file tree when
modifying the attributes and ACL permissions on files and folders in the pair. To make changes,
access the pair via the network share on the primary path, then modify the settings.
Files: When a file’s ACLs are modified via the merged view, DynamicFS sets the permissions for
the file on the primary path or secondary path, depending on where the file is currently stored.
Folders: When a folder’s attributes or ACLs are modified via the merged view, DynamicFS sets
the permissions for a folder on both the primary and secondary paths, because folders have an
instance in both locations.
To add user name entries to a folder’s ACL list, you must make the changes directly for the instance
of the folder on the primary path. Windows does not allow user names to be added to the ACL list
when you are working in the merged view. DynamicFS monitors for security changes on the primary
path and automatically synchronizes the ACL settings on the instance of the folder on the secondary
path.
WARNING: Modifying the attributes and ACLs on folders when you are working outside of a
merged view can cause conflicts for these values between the two folder instances on the primary
path and secondary path.
To identify conflicts caused by mismatched attributes or ACL settings on a folder, you can run the
DynamicFS Pair Check utility (DswPairCheck.exe) to manually detect and report the attribute and
ACL differences between the two instances of the folder. For information, see Section 8.11,
“Reporting Conflicts for Attributes and ACL Permissions on Folders,” on page 153.
4.16
Duplicate Folders in a Standard Pair
In a Dynamic File Services standard pair, a second instance of a folder is created on a target path as
files are moved between the primary and secondary locations. In a merged view, users are not aware
that two instances of a folder exist. If a folder is empty in one of the locations, the empty folder is not
removed. If a user deletes a folder, both instances of the folder are removed.
Dynamic File Services automatically synchronizes the metadata information (such as ACLs and
attributes) from the primary location instance of the folder to its secondary instance when the folders
are accessed via the merged view or during a policy run. Because some metadata cannot be modified
through a network share, DynamicFS also monitors instances of folders on the primary path for
changes to metadata. For information about setting ACLs and attributes for folders, see Section 4.15,
“File and Folder Attributes and ACL Permissions in a Standard Pair,” on page 66.
66
Dynamic File Services 2.2 Administration Guide
The attributes and ACL settings for the two folder instances can become out of synchronization if you
modify a folder’s metadata by accessing a folder directly instead of via the merged view. Accessing a
folder instance directly on the secondary path creates a conflict because the attributes or permissions
are changed only on that instance of the folder, but not on its matching instance on the primary path.
For information about detecting and reporting conflicts in metadata on folders, see Section 8.11,
“Reporting Conflicts for Attributes and ACL Permissions on Folders,” on page 153.
4.17
Duplicate Files in a Standard Pair
In a Dynamic File Services standard pair, each file is intended to have a single instance on either the
primary path or the secondary path. When a file is created, modified, or deleted through the merged
view, DynamicFS automatically manages the file so that a single instance of a file exists. When
policies are enforced, DynamicFS moves the single instance of a file between the two paths, and
deletes the original copy of the file after the move is successfully completed.
Duplicate files are those where two instances the file have the same name and relative path in both
locations. The content of the files might differ. If two instances of a file occurs only the file instance on
the primary is visible and accessible to the user. Users are not aware if duplicate files are present.
However, a message is logged for the administrator. If a policy run attempts to move a file that has a
duplicate in the target location, the move fails, and the error is logged in the Statistics > Policy
execution history > Files not moved report.
Duplicate files are not intended to occur, but the situation can arise when you restore files from
backup media, if files are accessed outside the merged view, or if the media becomes unavailable
during a policy run and a file move is incomplete. Each of these situations is described in more detail
below. For information about detecting and reporting duplicate files, see Section 8.12, “Reporting
Conflicts for Duplicate Files,” on page 154.
Section 4.17.1, “Restoring Files from Backup Media,” on page 67
Section 4.17.2, “Accessing Files Outside the Merged View,” on page 67
Section 4.17.3, “Losing a Media Connection when Moving Files,” on page 68
4.17.1
Restoring Files from Backup Media
Duplicate files can occur when you restore files from backup media if different instances of a file are
copied to the primary storage location and the secondary storage location. Backups for the primary
and secondary are typically made at different times. Whether a file is captured in both backups
depends on which policies were run in between the two backups. If you back up the primary path
more frequently than the secondary path, the instance of the file that is restored on the primary
storage area should be the most current of the two instances of the file.
4.17.2
Accessing Files Outside the Merged View
Duplicate files can also occur if users are allowed to access files directly instead of via the merged
view. For example, a duplicate file can be created if a user has direct access to the two paths and
manually copies a file from one path to the other. Users should always use the merged view of files in
the pair when performing actions on them.
Planning for Pairs and Policies
67
4.17.3
Losing a Media Connection when Moving Files
Duplicate files might occur if the source location or the target location of a file move becomes
unavailable during a policy run. For example, if a connection is lost between the server and the
secondary storage media, the file move that is in progress at that time cannot be completed, and the
policy run is stopped. An Invalid File Handle error for the file is reported in the policy move log
in the Statistics > Policy execution history > Files not moved > Comment field.
For file moves, Windows creates a sparse file in the target location that has the same file name and
size as the original, and then copies the bits to the file. The original instance of the file is not deleted
until all bits have been successfully copied to the new file instance. If the file move is interrupted, the
information in the target location might be incomplete, and two instances of the file remain, which
creates a duplicate file.
When duplicate files are caused by an incomplete move, the valid file is the instance on the source
location of the move, and the invalid file is the instance on the target location. If the incomplete file
resides on the primary location, users see only the corrupted file. However, the valid file instance
remains on the secondary location, and no data is actually lost.
To resolve this duplicate file situation, you must identify the duplicate files and delete the invalid
instance of the file. Your knowledge of the policy direction setting for the policy run where the
duplicate file was created can help to determine which instance of the file is valid. You can review the
Statistics > Policy execution history > Files not moved report for the policy run to identify the duplicate
file and the target location of the policy run. You can also run the Pair Check (dswPairCheck.exe)
utility to find the duplicate file. For information about using the Pair Check utility to identify
duplicate files, see “Dynamic File Services Pair Check Utility” in the Dynamic File Services 2.2 Client
Commands and Utilities Reference.
4.18
Orphan (Ownerless) Files
In a Windows server or Active Directory domain, a unique value called a Security Identifier (SID) is
associated with a user name. When a user creates a file, the default owner is normally the SID for the
user that creates the file. If the user is a member of the Administrators group or the Domain Admins
group, the default owner is the SID for the group, not the SID for the individual user account. If a
user’s user name is deleted from the server or Active Directory, the user name becomes invalid. The
user’s files contain the user’s SID, but the SID is no longer associated with a valid user name. This
document refers to those files as orphan files, or ownerless files.
Section 4.18.1, “Moving Ownerless Files,” on page 68
Section 4.18.2, “How Ownerless Files Are Managed in a Retention Pair,” on page 69
Section 4.18.3, “How in Ownerless Files Are Handled in Workgroups,” on page 70
4.18.1
Moving Ownerless Files
To move orphan files between paths in a pair, you can use any policy rule, including File Owners.
Dynamic File Services adds a {No owners} user that you can select when you set up a File Owners
policy. In a policy with a File Owner rule, the policy engine checks that the users and groups in the
policy are valid each time the policy runs. It also checks the current membership of the valid groups.
The File Owner policy normally moves only those files associated with valid user names, valid group
names, and current members of valid groups. It can also move ownerless files if you select the user
{No owner} for the policy.
The manual move process moves any file that you specify in the list of files to be moved. The owner is
not a consideration in whether the file is moved.
68
Dynamic File Services 2.2 Administration Guide
4.18.2
How Ownerless Files Are Managed in a Retention Pair
For retention pairs, Dynamic File Services keeps a UserName-SID database (DswUserDB.xml) that
contains information about the user names or group names associated with the file owners’ SIDs. The
file is located in the C:\Program Files\Dynamic File Services\ directory, or in the custom install
location.
As a file is moved to a retention repository, an entry is added to the UserName-SID database if the
name is valid. For example, the following is an entry for a local Administrators group’s SID in the
DswUserDB.xml file:
<TrackerEntry>
<SID>S-1-5-32-544</SID>
<Name>Administrators</Name>
<IsValid>true</IsValid>
</TrackerEntry>
An entry is kept until there are no more files with the SID in any repositories of the retention pairs on
the server. Because the user name is known to Dynamic File Services, the user’s files do not become
orphaned in the repository if the user name is deleted from the server or from Active Directory, even
though the files might be orphaned from the file system point of view.
The user names and group names in the database are validated daily (at 0030 hours by default)
against the users and groups for the server and for the Active Directory domain (if present). The
name’s validity status is set to false if a name becomes invalid. If an invalid user name becomes valid
again (such as through an Active Directory restore action), the validity setting is set to true when the
database is next validated.
Dynamic File Services validates the user names and group names against the information stored in
the Active Directory domain controller for the server. After you remove a user name or group name
from Active Directory, the following must occur before Dynamic File Services is aware of the change:
1. Active Directory synchronizes the invalid status of the name with the domain controller for the
Dynamic File Services server. When this update occurs depends on Active Directory.
2. Dynamic File Services runs the daily validation check for the Username-SID database on the
server.
During a retention review, a reviewer sees the name as valid until the Username-SID database has
been updated. The Retention Review Service displays a file owner’s name with a strikethrough if the
name is marked as invalid in the Username-SID database. This allows you to sort files by file owners,
even if user names become invalid.
If an orphan file is moved to the repository, a new entry for its SID cannot be created in the
UserName-SID database file because the user name is unknown to the file system. The Retention
Review Service displays the file owner as Unknown. However, if other files in any repository on the
server were moved there when the user name was valid, an entry exists for that relationship in the
database, and the Retention Review Service can display the file owner’s name with a strikethrough.
If you restore an orphan file to the primary location, the owner information is not known to the NTFS
file system. Only the SID is known from the file’s metadata. If the restored orphan file is the last file
with that SID in any of the pairs’ repositories, its SID information is also removed from the
UserName-SID database. If you move the orphan file back to the repository, the user name is now
unknown to the Retention Review Service.
When a SID is not found for any of the remaining files in any of the pairs’ retention repositories, the
SID’s entry is removed from the UserName-SID database. The entry is removed whether the user
name information is valid or invalid at that time.
Planning for Pairs and Policies
69
4.18.3
How in Ownerless Files Are Handled in Workgroups
In a Windows Workgroup, each individual server maintains its own list of user names. Each server
assigns a unique Security Identifier to the user name. Even though a user is given the same user name
on different servers, the user’s files show different SIDs as the file owner, depending on which server
is hosting them. This is not an issue in an Active Directory domain, because a user’s user name and
SID are the same for all servers in the same tree or forest.
When you use Dynamic File Services in a Windows Workgroup, a file owner’s user name is lost when
a file is moved from one server (primary or secondary) to another server (secondary or primary) for
any type of pair. The file owner is the SID that is associated with the user name on the server where
the file was created, or where the file ownership was last set. The relocated file is considered
ownerless on the destination server, because the system cannot find a matching user name for the
SID. The original SID is stored with the file. If the file is moved back to its original server, such as
through a policy run or a retention review restore, the file owner is known on that server, assuming
that the user name is still valid.
Although SIDs are unique on a given server (or across all servers in the same domain or forest), it is
remotely possible (if statistically unlikely) that two servers in a Workgroup might generate the same
SID. In that case, the SID on the original server might match a SID for a user name on the destination
server, but it is highly unlikely that the SID represents the same user name or user.
4.19
System Files and Other Files that Are Not Moved
The policy engine ignores files in the Windows system folder and other system files in the root folder,
such as the System Volume Information and Recycling Bin folders. The system files are not
moved.
The policy engine also ignores files with the following file attributes:
System: The file is part of the operating system, or is used exclusively by it.
Device: The file is reserved for system use. It indicates the file is an interface for a device driver
for peripheral devices, such as printers (PRN) and serial ports (COM).
Encrypted: The folder or file is encrypted by the NTFS Encrypting File System (EFS). For a file,
this means that all data in the file is encrypted. For a folder, this means that encryption is the
default for newly created files and subdirectories.
Offline: The data of the file is not immediately available. This attribute indicates that the file
data has been physically moved to offline storage, such as by hierarchical storage management
(HSM) software.
Temporary: The file is being used for temporary storage. File systems attempt to keep all of the
data in memory for quicker access rather than flushing the data back to mass storage. A
temporary file is usually deleted by the application as soon as it is no longer needed.
70
Dynamic File Services 2.2 Administration Guide
4.20
Policy Schedules
Policies can be scheduled, unscheduled, and executed on demand. A policy run scans the pair’s path,
then moves the files that satisfy the criteria for the move. While policy runs are in progress,
performance is slower. It is best to schedule policy runs in off-peak hours so that the user experience
is not adversely affected.
Multiple policies can be scheduled to run at the same time. The policies are grouped for the run
according to the direction files are to be moved: Primary to Secondary, then Secondary to Primary.
When policies are run in combination, a file is moved if its conditions meet the rules defined in any
one of the policies. That is, the different policies are enforced with an OR condition. The rules within
an individual policy are enforced as an AND condition.
Only one scanning action can be performed on a pair at any given time. Actions include the
following:
Running one or more policies on a pair.
Previewing one or more policies on a pair by doing a test run that reports what files would be
moved if the policy were enforced at that time.
Scanning the pair to collect file statistics for the pair history. The history scan runs once daily by
default. You can set it to run hourly or weekly. For information, see Section 8.10, “Scheduling the
Pair History Scan,” on page 153.
Dynamic File Services does not queue the requests for activities. If the pair is busy, the pending action
might not run.
For interval-based policies, the policy can start whenever the pair is available during the specified
interval. If the pair is busy at the beginning of the interval, the pending action retries to start itself
until the end of the interval. After it starts, the policy runs until complete, or until the end of the
interval, depending on which event occurs first.
For policies that begin at a given start time and run until complete, if the pair is busy at the scheduled
start time, the pending action retries to start itself for up to 20 minutes beyond the scheduled start
time. If you schedule the policies to start at the same time, they can run concurrently. If you schedule
policies to begin at different times, there must be sufficient time available for one policy to complete
before another is scheduled to begin.
For example, if PolicyA and PolicyB are scheduled to run on the same pair at 12:00 a.m. and 12:05
a.m. respectively, and each policy takes 30 minutes to complete, PolicyB probably never runs.
However, if you schedule the two policies to start at the same time, both policies are run in
combination.
To avoid scheduling conflicts, we recommend that you use one of the following approaches when
scheduling policies for a pair:
Same Schedule: Schedule the pair’s assigned policies to start and stop at the same time. This
allows the Standard Policy engine to run them concurrently, which is the most efficient way to
enforce policies. Policies can be run manually at other times if needed.
Non-Overlapping Schedule: Schedule the pair’s policies so that each policy runs in its own
window of time, making sure that the start times and stop times do not overlap. Policies can be
run manually as needed at unscheduled times. This approach makes it more difficult to predict
idle times to run policies manually on the pair.
For information about how scheduling works, see Section 10.4.1, “Understanding How Changes
Affect the Scheduled Run Interval,” on page 193.
Planning for Pairs and Policies
71
4.21
Time Displays
All time stamps are stored and displayed in the server’s time zone, regardless of where the client is
located. That is, all time stamp viewing and configuration is relative to the Dynamic File Services
server you are managing.
4.22
Event Logging
Dynamic File Services uses the Microsoft Event Viewer for logging the Dynamic File Service start/
stop events and fatal errors such as application exceptions.
4.23
Using Antivirus Software with Pairs
Dynamic File Services can be used on servers running antivirus software. There are two common
scenarios:
Map a drive to the network share for the primary path, and run your antivirus software on the
share. This scans both primary and secondary files through the merged view.
Run your antivirus software separately on each drive, or run it separately on the primary path
and secondary path.
4.24
Using Backup Software with Pairs
Dynamic File Services can be used with backup software. The administrator separately backs up the
primary path and secondary path. Backup frequency typically differs between the two locations,
with the frequency determined by data volatility and importance. The primary location is typically
backed up more often than the secondary.
4.25
Using Compression with Pairs
Dynamic File Services supports using compression in a pair. DynamicFS behavior complies with the
expected behavior for copying or moving compressed files:
If the user copies or moves a compressed file to an uncompressed folder, the file is
decompressed.
If the user copies or moves an uncompressed file to a compressed folder, the file is compressed.
4.26
Using Disk Quotas with Pairs
Dynamic File Services supports using disk quotas on the primary path, secondary path, or both
paths. If the primary and secondary locations are on the same disk, the disk quota applies across both
areas. Quotas are enforced by the NTFS file system.
In a typical configuration, different disks are used for the primary and secondary locations. If the
disk quota is enforced on the primary disk and a user reaches the set quota, the user is no longer able
to create new files. DynamicFS also cannot move the user’s files from the secondary disk to the
primary disk. However, if a policy moves some or all of the user’s files to the secondary location, the
freed space on the primary location is again available to the user.
72
Dynamic File Services 2.2 Administration Guide
If you also apply a disk quota on the secondary disk, you are dealing with two separate quotas: one
for the primary path, and one for the secondary path. There are two conditions to consider:
User Reaches the Primary Quota: If the user reaches the quota on the primary path but not on
the secondary path, the effect is the same as if the second quota does not exist.
User Reaches the Secondary Quota: If the user reaches the quota on the secondary path but not
on the primary path, the user can create files because new files are created on the primary
location. However, DynamicFS cannot enforce policies to move the user’s files from the primary
to the secondary.
Depending on where the user’s files are located, the user’s effective quota is somewhere between the
minimum quota you set on the primary or secondary path up to the potential maximum, which is the
sum of the two quotas.
4.27
Disk Space Availability and Moving Files
For policy runs and manual file moves, a file can be moved only if there is enough free space
available in the destination location. For retention pairs, a policy run’s manifest is saved on the
secondary path at the end of the run. If the secondary disk if full at the time that the manifest is being
written out, the write fails, and the manifest cannot be saved.
4.28
Using Encryption with Pairs
Dynamic File Services treats all files and folders as if they are not encrypted.
WARNING: If an encrypted file or folder is moved by a policy, the encryption key changes and the
data is no longer accessible to the user. The data is effectively lost.
Section 4.28.1, “Windows File and Folder Encryption,” on page 73
Section 4.28.2, “Hardware-Level Disk Encryption,” on page 73
4.28.1
Windows File and Folder Encryption
Dynamic File Services does not support using file or folder encryption for pairs.
To prevent possible data loss, ensure that your pair does not use file and folder encryption by doing
the following:
Choose nonencrypted folders for the primary path and secondary path for the pair. The folders
should not contain encrypted files or folders.
Do not encrypt files or folders in the primary path and the secondary path of the pair.
Do not encrypt parent folders above the pair’s primary path and secondary path.
4.28.2
Hardware-Level Disk Encryption
Dynamic File Services supports using some third-party hardware-level disk encryption for drives
that are used in pairs. The file moves are not affected by hardware-level disk encryption because the
encryption operates at a level beneath the file system.
Planning for Pairs and Policies
73
4.29
Using Microsoft Distributed File System with Pairs
Dynamic File Services supports using Microsoft Distributed File System (MS-DFS) to connect to a
pair. The target folder of an MS-DFS link should be the network share on the primary path of the pair.
Pairs should not be created for the MS-DFS namespace or links therein. Both single-server and
domain-based MS-DFS Namespace configurations are supported. The primary path in a pair can be
set up in an MS-DFS Replication configuration on multiple servers.
Users can map a drive on their workstations to the MS-DFS Namespace share. The target link takes
users to the network share on the pair’s primary path. The users see the same merged view of the pair
as if they connect directly to the network share on the pair’s primary path. This does not prohibit
other users from mapping directly to the network share on the pair’s primary path. It is up to you
which share path you give to your users.
It does not matter in which order you create pairs and MS-DFS links. The target share path of an
existing MS-DFS link can be the primary path for a new pair. The network share on the primary path
of an existing pair can be the target of a new MS-DFS link.
In a Windows cluster, you must select the cluster resource group that contains the file system instead
of selecting the server when you set up the MS-DFS namespace and MS-DFS links to shares on that
resource. The cluster resource group contains the folder that is used as the primary path in the pair.
Do not create a pair for the MS-DFS Namespace folder and its contents. The MS-DFS Namespace
folder should not be nested above or below any path that contains a DynamicFS primary path or
secondary path.
IMPORTANT: For all issues related to configuring and managing Microsoft Distributed File System,
see the official Microsoft documentation for your Windows Server operating system in the Microsoft
TechNet Library (http://technet.microsoft.com/en-us/library/cc753479(WS.10).aspx).
The deployment scenarios in the following sections provide general guidelines for using Dynamic
File Services and Microsoft Distributed File System in a Windows environment.
Section 4.29.1, “Example: Single-Server MS-DFS Namespace with Links to DynamicFS Pairs on
Different Servers,” on page 75
Section 4.29.2, “Example: Single-Server DFS Namespace with Links to DynamicFS Pairs on the
Same Server,” on page 77
Section 4.29.3, “Example: MS-DFS Namespace and Replication with DynamicFS Pairs,” on
page 78
74
Dynamic File Services 2.2 Administration Guide
4.29.1
Example: Single-Server MS-DFS Namespace with Links to DynamicFS
Pairs on Different Servers
Figure 4-1 illustrates a configuration in an Active Directory environment where the Microsoft
Distributed File System server links to the primary share paths for Dynamic File Services pairs on
different servers. DynamicFS is installed on the servers where you create the pairs, but it is not
installed on the MS-DFS Server. Users connect to the MS-DFS namespace shares, which link to the
shares on the primary path of the pairs.
Figure 4-1 Using MS-DFS with Dynamic File Services Pairs on Different Servers
Active Directory
Domain Controller
Share “Public”
\\DFS_SERVER\Public
DFS_SERVER
DFS Namespace
E:\Public
Users
DFS Link Folders
DFS Folder Targets
HOME
DATA
\\HOME_SERVER\HOME
\\DATA_SERVER\DATA
HOME_SERVER
Novell Dynamic
File Services
PROJECT
DATA_SERVER
Novell Dynamic
File Services
PROJECT_SERVER
Novell Dynamic
File Services
R:\home2
K:\home
\\PROJECT_SERVER\PROJECT
S:\data2
L:\data
T:\project2
M:\project
Planning for Pairs and Policies
75
Figure 4-2 illustrates a configuration similar to Figure 4-1, where the MS-DFS links point to pairs on
different servers. In this example, the pairs use remote secondary paths. The remote share paths are
published in Active Directory, but are not visible to users. All access to pair data is made via MS-DFS
links that point to the primary paths on the pairs. The MS-DFS links should never point to the remote
secondary paths.
Figure 4-2 Using MS-DFS with Dynamic File Services Pairs on Different Servers with Remote Secondary Paths
Active Directory
Domain Controller
Share “Public”
\\DFS_SERVER\Public
DFS_SERVER
DFS Namespace
E:\Public
Users
DFS Link Folders
DFS Folder Targets
HOME
DATA
\\HOME_SERVER\HOME
\\DATA_SERVER\DATA
HOME_SERVER
Novell Dynamic
File Services
Remote Secondary
Shares for Pairs
Remote shares
published in AD
76
R:\home2
\\SECONDARY_SERVER\home2
Dynamic File Services 2.2 Administration Guide
\\PROJECT_SERVER\PROJECT
DATA_SERVER
Novell Dynamic
File Services
C:\home
PROJECT
PROJECT_SERVER
Novell Dynamic
File Services
C:\data
C:\project
SECONDARY_SERVER
S:\data2
\\SECONDARY_SERVER\data2
T:\project2
\\SECONDARY_SERVER\project2
4.29.2
Example: Single-Server DFS Namespace with Links to DynamicFS
Pairs on the Same Server
Figure 4-3 illustrates a configuration where the Microsoft Distributed File System links point to
shares on the same server. In this case, DynamicFS is installed on the MS-DFS Server. The MS-DFS
links point to the network shares on the primary paths of the pairs. The MS-DFS Namespace folder is
not configured as a pair, and it is not nested with any of the primary paths and secondary paths that
are used in the pairs. Users connect to the MS-DFS namespace shares, which link to the shares on the
primary path of the pairs.
Figure 4-3 Using MS-DFS and Dynamic File Services on the Same Server
Share “Public”
\\DFS_SERVER\Public
DFS_SERVER
DFS Namespace
E:\Public
Users
Novell Dynamic
File Services
DFS Link Folders
DFS Folder Targets
HOME
DATA
\\DFS_SERVER\HOME
\\DFS_SERVER\DATA
R:\home2
K:\home
PROJECT
\\DFS_SERVER\PROJECT
S:\data2
L:\data
T:\project2
M:\project
Planning for Pairs and Policies
77
Figure 4-4 illustrates a configuration similar to Figure 4-3, where the MS-DFS links point to shares on
the same server. In this example, the pairs use remote secondary paths. The remote share paths are
published in Active Directory, but are not visible to users. All access to pair data is made via MS-DFS
links that point to the primary paths on the pairs. The MS-DFS links should never point to the remote
secondary paths.
Figure 4-4 Using MS-DFS with Dynamic File Services Pairs on the Same Server with Remote Secondary Paths
Active Directory
Domain Controller
Share “Public”
\\DFS_SERVER\Public
DFS_SERVER
DFS Namespace
E:\Public
Users
Novell Dynamic
File Services
DFS Link Folders
DFS Folder Targets
HOME
DATA
\\DFS_SERVER\HOME
\\DFS_SERVER\DATA
K:\home
Remote Secondary
Shares for Pairs
Remote shares
published in AD
4.29.3
R:\home2
\\SECONDARY_SERVER\home2
L:\data
PROJECT
\\DFS_SERVER\PROJECT
M:\project
SECONDARY_SERVER
S:\data2
\\SECONDARY_SERVER\data2
T:\project2
\\SECONDARY_SERVER\project2
Example: MS-DFS Namespace and Replication with DynamicFS Pairs
Dynamic File Services supports using Microsoft Distributed File System links to DynamicFS pairs on
different servers where the pair’s primary path is replicated between the two servers by MS-DFS
Replication. DynamicFS is installed only on the servers where you create pairs. In this configuration,
78
Dynamic File Services 2.2 Administration Guide
any MS-DFS namespace server can respond to a client mapped to the share \\DFS_DOMAIN\Public
or other shares in the namespace. The target folder uses MS-DFS Replication to synchronize the
target folder’s contents across multiple servers. MS-DFS can send requests to any of the member
folders in that group. MS-DFS connects a user to the server that is physically closest to the user’s
location.
In Figure 4-5, the \\DFS_Server1\PROJECTS folder is replicated to \\DFS_Server3\PROJECTS by
using an MS-DFS Replication Group. Requests for the \\DFS_DOMAIN\Public\PROJECTS folder can
go to either of the replicated folders.
Figure 4-5 Using an MS-DFS Namespace and Replication with Dynamic File Services
Active Directory
Domain Controller
DFS_SHARE
DFS
Namespace
Server
\\DFS_DOMAIN\Public
DFS Root Folder
Users
\\DFS_DOMAIN\Public
DFS Link Folders
DFS Link Folders
PROJECTS
BUDGETS
\\DFS_DOMAIN\PROJECTS
\\DFS_DOMAIN\BUDGETS
Site A Primary Shares
Novell Dynamic
File Services
Novell Dynamic
File Services
DFS_Server2
DFS_Server1
\\DFS_Server1\PROJECTS
\\DFS_Server2\BUDGETS
DFS
Replication
DFS
Replication
Site B Primary Shares
Novell Dynamic
File Services
Novell Dynamic
File Services
DFS_Server4
DFS_Server3
\\DFS_Server3\PROJECTS
\\DFS_Server4\BUDGETS
Remote Secondary Shares
\\DFS_Server5\PROJECTS
DFS_Server5
\\DFS_Server5\BUDGETS
To use a replicated folder as a primary path, you must create a DynamicFS pair on each of the servers
and specify the replicated folder as the primary path. Each of the pairs use the same remote
secondary path. For example, you create a DynamicFS pair on the DFS_Server1 server by using the
\\DFS_Server1\PROJECTS folder as the primary path, and specifying the \\DFS_Server5\PROJECTS
share as its remote secondary path. You also create a DynamicFS pair on the DFS_Server3 server by
using the \\DFS_Server3\PROJECTS folder as the primary path, and specifying the
\\DFS_Server5\PROJECTS share as its remote secondary path.
You can configure policies on one or any of the primary DynamicFS servers that host the replicated
folder. DynamicFS policies are server-centric and are not stored in Active Directory, so the policies
defined on a server run only on that server. If you want to run a policy on different instances of the
pair, you must create or import the policy on each server in the replication group. It is not necessary
to use the same policies on each of the servers.
IMPORTANT: Ensure that you run policies on only one instance of the pair at a time.
Planning for Pairs and Policies
79
When a policy runs on one of the servers, the MS-DFS Replication service automatically synchronizes
the policy actions made to that server’s primary folder with the other folders in the replication group.
When a DynamicFS policy run moves a file from the primary path to the secondary path, it is a copythen-delete action. MS-DFS Replication sees the deletion and automatically deletes the file on the
other primary paths. When a policy run moves a file from the secondary path to the primary path,
MS-DFS Replication sees a new file and automatically copies the file to the other primary paths.
4.30
Using Dynamic File Services in a Windows Cluster
Dynamic File Services supports using pairs and policies in a Windows failover cluster. However, the
software is not cluster aware.
This section describes known issues for using Dynamic File Services in a Windows cluster. For
information about installing Dynamic File Services in a cluster, see the Dynamic File Services 2.2
Installation Guide.
Section 4.30.1, “Management Console,” on page 80
Section 4.30.2, “Service Controller,” on page 80
Section 4.30.3, “Merged View,” on page 80
Section 4.30.4, “Executable Files,” on page 81
Section 4.30.5, “Standard Policy Engine and Registry Information,” on page 81
Section 4.30.6, “Moving the Service Cluster Resource Between Nodes,” on page 81
4.30.1
Management Console
When you use the Management Console to manage the Dynamic File Service in a cluster, use the
cluster resource IP address of the Service to connect to the cluster instead of the server node’s IP
address.
When you create pairs and policies, ensure that the primary path and secondary path of each pair
reside on shared storage that can be failed over together between the cluster nodes.
4.30.2
Service Controller
The Service Controller starts automatically at the beginning of each session when you log in to the
active node where the disk that contains the Novell Dynamic File Services software is currently
mounted. The controller does not start if you log in to the failover node because the shared disk is not
mounted there.
4.30.3
Merged View
In a Windows cluster, always use the Windows cluster management tool and not Windows Explorer
to manage file shares to folders on shared drives. Otherwise, changes to share information made by
using Windows Explorer are lost when these file shares fail over to other nodes in the cluster.
Workstations should be in an Active Directory domain to access the cluster-managed file shares.
80
Dynamic File Services 2.2 Administration Guide
4.30.4
Executable Files
The Dynamic File Service is started automatically by the Windows cluster management tool when it
brings the Dynamic File Service cluster resource online. The Service is stopped when the Windows
cluster management tool brings the resource offline. Ensure that you use the Windows cluster
management tool to start and stop the Service, and not the Dynamic File Service Controller.
Other DynamicFS executable files are called from the Service, or can be started manually when you
are logged in on the active nodes as user in the Dynamic File Services group (or as the
Administrator user on that node). Conversely, you cannot start the executable files on the failover
node because the cluster drive resource that contains the files is not attached to it.
4.30.5
Standard Policy Engine and Registry Information
Policy moves and previews should work correctly on the active node, regardless of which node is
active, if the installation location is correct in the registry. If policy runs and preview runs do not
work after you set up your DynamicFS cluster resource group, ensure that the node’s registry
contains the right installation location.
4.30.6
Moving the Service Cluster Resource Between Nodes
Before initiating a non-failover move of the Dynamic File Service cluster resource from the active
node to a failover node, ensure that you have quiesced the Service as described in “Prerequisites for
Stopping or Restarting the Service” on page 106.
If a policy is running when the move is initiated, the resource enters an Offline Pending state until
DynamicFS can gracefully complete the in-progress file copies, shut down the policy run, and go
offline for the move. This process can take up to 10 minutes. During this time, the failover cluster File
Server and IP address for the Service are unavailable, and users are unable to access the files.
If the active node crashes when a policy run is in progress, the Service also crashes. The Service
cluster resource immediately goes offline and fails over to the failover node. The following issues
must be addressed after the Service cluster resource is back online:
The policy run does not automatically resume or start over after the failover.
There is no ability to gracefully complete any file copies that are in progress for the policy run.
There is no data loss, but duplicate files might exist, where the original file is good but the
instance of the file in the target location is only a sparse file.
To resolve this problem:
1. Check for duplicate files in the pairs where the policy was running by running the Pair
Check utility on each pair. For information, see Section 8.12, “Reporting Conflicts for
Duplicate Files,” on page 154.
2. For each reported duplicate file conflict, delete the instance of the file in the target location
of the policy move.
3. After all duplicate file conflicts have been resolved, the policy run can be started manually,
or the policy runs at its next scheduled time.
Planning for Pairs and Policies
81
4.31
Using Dynamic File Services in Windows Safe Mode
The Dynamic File Service does not load or run in Windows Safe Mode.
The Service Controller can be used in Windows Safe Mode to modify the Service settings. However,
you cannot start the Service while the computer is in Safe Mode.
The DswDump.exe and DswPairCheck.exe utilities can be used in Safe Mode to gather and report
information from the Dynamic File Services databases. For details about using these commands, see
the Dynamic File Services 2.2 Client Commands and Utilities Reference.
If networking is enabled in Safe Mode, the Dynamic File Services Management Console can be used
to connect to and manage other Dynamic File Services servers.
82
Dynamic File Services 2.2 Administration Guide
5
Using the Management Tools
5
Novell Dynamic File Services (DynamicFS) provides management tools to help you manage the
service, create and manage pairs and policies, and repair the pair, policy, and schedule databases.
This section describes how to access the tools and where to find information about the tasks you can
perform with them.
Section 5.1, “Service Controller,” on page 83
Section 5.2, “Management Console,” on page 86
Section 5.3, “Repair Tool,” on page 95
Section 5.4, “Filter Driver Diagnostics,” on page 95
Section 5.5, “Command Line Interface and Utilities,” on page 95
5.1
Service Controller
The Service Controller allows the Administrator user or users with Administrator privileges to view
or configure the settings for the Dynamic File Service and to start or stop the Service. It displays the
current Service status (enabled or disabled). You can launch the Management Console to create and
manage pairs on the same server or on different DynamicFS servers.
The Service Controller can be used in Windows Safe Mode to modify the Service settings. However,
you cannot start the Service while the computer is in Safe Mode.
Section 5.1.1, “Accessing the Service Controller,” on page 83
Section 5.1.2, “Service Controller Tasks Quick Reference,” on page 85
Section 5.1.3, “Starting the Service Controller,” on page 85
Section 5.1.4, “Stopping the Service Controller,” on page 86
5.1.1
Accessing the Service Controller
The Service Controller attempts to start automatically when any user logs in to the desktop of a
server where the Service component is installed. Administrator privileges are required to start the
Service Controller. When the Service Controller is running, an icon (
notification area (the lower right corner of the computer screen).
) is displayed in the Windows
1 Log in to the DynamicFS server.
IMPORTANT: You must log in as a user with Administrator privileges to configure the Service
settings, to start or stop the Service, and to use the Repair Tool.
Using the Management Tools
83
2 If the login user name is other than the Administrator user, the Service Controller is blocked
from starting. Do the following to unblock the program and allow it to run as Administrator:
2a Click the “Windows has blocked some startup programs” message that appears in the
Notification area, or click or its Blocked Program icon (
) to open the menu.
2b In the Blocked Program menu, select Run Blocked Program.
2c From the list of blocked startup programs, select DswServiceController.
2d In the Windows permission window, click Allow to confirm that you want to run the
program as Administrator.
The Service Controller starts and displays the Service Controller icon (
area.
) in the notification
3 Right-click the Service Controller icon to access the menu.
For information about the options, see Section 5.1.2, “Service Controller Tasks Quick Reference,”
on page 85.
84
Dynamic File Services 2.2 Administration Guide
5.1.2
Service Controller Tasks Quick Reference
Use the quick reference in this section to find information about the tasks you can perform from the
Service Controller. Administrator privileges are required to start and stop the Service, to modify the
configuration of the Service, or to use the Repair Tool.
Table 5-1 Service Controller Menu Options
5.1.3
Menu Option
For information, see
Management Console
Section 5.2, “Management Console,” on page 86
Repair Tool
Chapter 14, “Repairing the Pair, Policy, and Schedule Databases,” on
page 245
Windows Firewall Access
Section 6.9, “Configuring Firewall Access for the Service Port,” on page 122
Port Configuration
Section 6.10, “Configuring Ports for the Service and Retention Review,” on
page 124
Certificate Configuration
Section 6.8, “Configuring a Certificate for Secure Remote Management
Sessions,” on page 116
Audit Configuration
Section 6.5, “Configuring Audit Tracking Events,” on page 108
Notification Configuration
> Email
Section 6.6, “Configuring the Notification Service,” on page 108
Service Enabled or Service
Disabled
Section 6.4.1, “Viewing the Service Status,” on page 105
Start Service
Section 6.4.2, “Starting the Dynamic File Service,” on page 106
Stop Service
Section 6.4.3, “Stopping the Dynamic File Service,” on page 106
Filter Driver Diagnostics
Section 16.15, “Diagnosing a Filter Driver failure,” on page 272
Register License Key
Section 6.2, “Registering the License Key,” on page 97
About
Section 6.11, “Viewing the Product Version and Build Information,” on
page 125
Exit
Section 5.1.4, “Stopping the Service Controller,” on page 86
Section 6.6.2, “Setting Up Email Notifications,” on page 110
Starting the Service Controller
If the Dynamic File Service component is installed on the computer, the Service Controller should
start automatically when you log in to the computer. If the Service Controller is not running, the
Service Controller icon ( ) is not displayed in the notification area. The most common reasons that
the Service Controller might not be running are that you exited the tool, or that it was blocked from
starting automatically when you logged in as a user other than the Administrator user.
You can log out and log back in to the DynamicFS server as a user with Administrator privileges:
1 Log out of the DynamicFS server.
2 Log in to the DynamicFS server.
Using the Management Tools
85
The Service Controller starts automatically if you are logged in as the Administrator user. The
program is blocked if you log in as any other user. Follow the instructions in Step 2 in
Section 5.1.1, “Accessing the Service Controller,” on page 83 to start the program.
The Service Controller starts and its icon (
) appears in the Windows notification area.
You can also manually start the Service Controller. Administrator privileges are required.
1 In a Windows Explorer browser, navigate to the folder where you installed the Dynamic File
Services software.
The default location is the C:\Program Files\Dynamic File Services folder.
2 Right-click the DswServiceController.exe file, then select Run as Administrator.
If you are prompted for permission to run the program, click Allow.
The Service Controller starts and its icon (
5.1.4
) appears in the Windows notification area.
Stopping the Service Controller
The Dynamic File Service runs independently of the Service Controller. Although it is not necessary
to do so, you can stop the Service Controller during a login session if you are not modifying the
configuration or status of the Dynamic File Service at that time.
1 Right-click the Service Controller icon in the Windows notification area.
2 Select Exit.
5.2
Management Console
The Dynamic File Services Management Console is a GUI-based management tool that allows you to
configure and manage pairs, policies, and schedules on servers in the same local area network. In an
Active Directory environment, the computer must also be in the same domain as the servers you
want to manage.
The Management Console can be installed on a server or workstation. For information, see
“Supported Platforms” in the Dynamic File Services 2.2 Installation Guide.
You use the Manage Console to manage pairs, policies, and schedules on one or more servers where
the Dynamic File Service is installed and running. Each server’s pairs and policies are unique to that
server, and the related pair, policy, and schedule configuration files are stored locally in the
..\Dynamic File Services folder on the server that is being managed. This folder also contains the
history and statistics information about policy runs on the server.
Section 5.2.1, “Accessing the Management Console,” on page 86
Section 5.2.2, “Management Console Wizards,” on page 87
Section 5.2.3, “Management Console Tasks Quick Reference,” on page 88
5.2.1
Accessing the Management Console
When you installed Dynamic File Services, a Management Console icon was placed in the following
locations:
The computer desktop
86
Dynamic File Services 2.2 Administration Guide
The Start menu under Dynamic File Services > Dynamic File Services Management Console
The Control Panel menu under Additional Options
An option to launch the tool is also included in the Service Controller menu.
To access the Management Console:
1 Log in to the DynamicFS server or client where the Management Console is installed.
2 Use any of the following methods to launch the Management Console:
Double-click the Management Console icon on the desktop.
In the Start menu, select All Programs > Dynamic File Services > Dynamic File Services
Management Console.
In the Start menu, select Control Panel, then select Additional Options > Novell Dynamic File
Services in the Control Panel dialog box.
Right-click the Service Controller icon in the desktop notification area, then select
Management Console.
3 If you have not already done so, set up the Dynamic servers you want to manage as described in
Section 7.1, “Setting Up a Server in the Management Console,” on page 127.
If different administrator users log in to the same computer to use the Management Console,
each user must configure a list of servers to manage.
5.2.2
Management Console Wizards
The Management Console provides the following configuration wizards to help you set up servers to
manage and to create pairs, policies, schedules, and cloud accounts on them:
Table 5-2 Configuration Wizard Descriptions
Wizard
Description
For information, see
Server Wizard
Helps you set up a DynamicFS server
that you want to manage.
Section 7.1, “Setting Up a Server in the
Management Console,” on page 127
Setup Wizard
Helps you create a pair and a policy, and Section 8.2, “Creating a Pair,” on
associates them automatically.
page 142
Section 9.2, “Creating a Policy,” on
page 162
Pair Wizard
Helps you create a standard pair or a
Section 8.2, “Creating a Pair,” on
retention pair. You can associate the pair page 142
with none, one, or multiple policies. You
can associate a retention pair with a
review schedule.
Policy Wizard
Helps you create a policy and associate Section 9.2, “Creating a Policy,” on
it with none, one, or multiple pairs. You page 162
can associate the policy with a policy
schedule.
Using the Management Tools
87
5.2.3
Wizard
Description
For information, see
Policy Schedule Wizard
Helps you create a policy schedule or a
review schedule. You can associate a
policy schedule with none, one, or
multiple policies. You can associate a
review schedule with none, one, or
multiple retention pairs.
Section 10.2, “Creating a Policy
Schedule,” on page 192
Cloud Wizard
Helps you create a cloud account to
store the access credentials for your
preconfigured cloud storage provider
account.
Section 11.3, “Creating a Cloud
Account,” on page 206
Management Console Tasks Quick Reference
You can use the following quick reference to find information about the tasks you can perform from
the Management Console. You must be able to provide the login credentials of the Administrator
user or a member of the Dynamic File Services group on the DynamicFS server you want to
manage.
“Server Management Tasks” on page 88
“Pair Management Tasks” on page 89
“Policy Management Tasks” on page 91
“Policy Schedule Management Tasks” on page 92
“Cloud Management Tasks” on page 93
“Monitoring Tasks” on page 93
Server Management Tasks
Table 5-3 helps you find the management tasks for DynamicFS servers:
Table 5-3 Server Task Descriptions
88
Server Options
Description
For information, see
Server Wizard
Lets you provide the authentication
credentials needed to connect to a
DynamicFS server.
Section 7.1, “Setting Up a Server in the
Management Console,” on page 127
Connect to a server
Lets you log in to the DynamicFS server Section 7.3, “Connecting to a Server,”
that you want to manage.
on page 131
Disconnect from a server
Lets you disconnect from a DynamicFS
server that you are managing.
Section 7.6, “Disconnecting from a
Server,” on page 135
Servers container
Lets you view a list of servers and their
current status.
Section 7.4, “Viewing a List of Servers
and Their Connection Status,” on
page 132
Export a server list
Lets you export a list of servers that are
configured in the Management Console
to an XML file in a local folder.
Section 7.8, “Exporting and Importing a
Server List,” on page 136
Dynamic File Services 2.2 Administration Guide
Server Options
Description
For information, see
Import a server list
Lets you import a previously exported
list of servers from a local folder to add
the servers to the Management
Console.
Section 7.8, “Exporting and Importing a
Server List,” on page 136
Register license key
Lets you remotely register a license key
for a server.
Section 6.2.3, “Using the Management
Console to Remotely Register a License
Key,” on page 100
Remove a server
Lets you remove a server from the list
Section 7.9, “Removing a Server from
the List,” on page 137
Server Properties
Lets you view information about a
DynamicFS server.
Section 7.5, “Viewing Server
Properties,” on page 132
Server Properties > Disk
details
Lets you view disk details and the disk
capacity and used space history for
server disks on a DynamicFS server
Section 13.6, “Viewing the Server Disk
Capacity and Used Space History,” on
page 237
Server Properties > Log
files
Lets you view the logged events for the
Service, Standard Policy engine, and
other components.
Section 13.7, “Viewing Logged Events,”
on page 239
Server Properties >
Logging levels
Lets you set the logging levels for the
Service and Standard Policy engine
components.
Section 6.7, “Configuring the Logging
Level for Engines,” on page 114
Pair Management Tasks
Table 5-4 summarizes the pair management tasks:
Table 5-4 Pair Task Descriptions
Pair Options
Description
For Information
Setup Wizard
Helps you create a standard pair or a
retention pair, create a policy, and
associates them automatically. You can
create and associate a policy schedule
for the policy. For a retention pair, you
can also create or associate a review
schedule.
Section 8.2, “Creating a Pair,” on
page 142
Section 9.2, “Creating a Policy,” on
page 162
Chapter 10, “Creating and Managing
Policy Schedules,” on page 189
Pair Wizard
Helps you configure a pair on a specified Section 8.2, “Creating a Pair,” on
server, and associate it with none, one, page 142
or multiple policies.
Pairs container
Lets you view a list of pairs and their
current status (Running or Idle).
Section 8.6, “Viewing a List of Pairs,” on
page 149
Section 8.7, “Viewing the Pair Status,”
on page 149
Pair Properties
Lets you view configuration information
for a pair.
Section 8.8, “Viewing Properties for a
Pair,” on page 149
Modify description
Lets you modify the description for a
pair.
Section 8.8, “Viewing Properties for a
Pair,” on page 149
Using the Management Tools
89
Pair Options
Description
For Information
Pair Properties > Policies
Lets you view, add, or remove policy
associations for a pair.
Section 9.6.4, “Associating or
Disassociating Policies with a Pair,” on
page 175
Policy Properties > Pairs
Lets you view, add, or remove pair
associations for a policy.
Section 9.6.3, “Associating or
Disassociating Pairs with a Policy,” on
page 174
Retention Pair Properties
> Notification Review
Lets you specify the frequency for
triggering retention review events.
Section 12.4, “Scheduling Notification
Reviews for a Retention Pair,” on
page 220
The Notification Service and
notifications must be set up separately.
90
Section 6.6, “Configuring the Notification
Service,” on page 108
Retention Pair Properties
> Reviewers
Lets you specify the users and groups
that review the retained data.
Section 12.2, “Configuring Reviewers for
a Retention Pair,” on page 215
Pair Properties > Include/
Exclude
Lets you specify whether to include
folders or exclude folders from policy
runs on a pair, and add or remove
folders from the list.
Section 8.5, “Including or Excluding
Folders from a Pair’s Policy Runs,” on
page 147
Pair Properties > Pair
history
Lets you schedule the pair history scan
on a pair.
Section 8.10, “Scheduling the Pair
History Scan,” on page 153
Pair Statistics
Lets you view statistics about a pair’s
status and last policy run. You can also
add or remove associated policies.
Section 13.1, “Viewing the Pair
Statistics,” on page 229
Section 9.6.4, “Associating or
Disassociating Policies with a Pair,” on
page 175
Pair Statistics > Pair
history
Lets you view statistics about the disk
Section 13.5, “Viewing the Pair History,”
space consumed over time for each path on page 235
in a pair.
Pair Statistics > Policy
execution history
Lets you view statistics about policy runs Section 13.2, “Viewing the Policy
on a pair, including the run history of files Execution History for a Pair,” on
moved or not moved.
page 230
Preview now
Lets you preview the results of a policy
run on a selected pair without running
the policy.
Section 9.9, “Previewing a Policy Run,”
on page 179
Execute now
Lets you run a policy on demand for a
selected pair.
Section 9.8, “Starting a Policy Run,” on
page 178
Manual move
Lets you move selected files or folders
Section 8.9, “Moving Selected Files or
for a one-time move event on a selected Folders,” on page 152
pair.
Stop running process
Lets you stop a currently running policy
on a pair.
Server Properties > Disk
details
Lets you view disk details and the disk
Section 13.6, “Viewing the Server Disk
capacity history for server disks that are Capacity and Used Space History,” on
used in a pair on a DynamicFS server
page 237
that you are managing.
Unlink the paths in a pair
Lets you remove a pair relationship
between two paths.
Dynamic File Services 2.2 Administration Guide
Section 9.10, “Stopping an In-Progress
Policy Run,” on page 180
Section 8.13, “Unlinking the Paths in a
Pair,” on page 155
Policy Management Tasks
Table 5-5 summarizes the policy management tasks:
Table 5-5 Policy Task Descriptions
Policy Options
Description
For Information
Setup Wizard
Helps you create a standard pair or a
retention pair, create a policy, and
associates them automatically. You can
create and associate a policy schedule
for the policy. For a retention pair, you
can also create or associate a review
schedule.
Section 8.2, “Creating a Pair,” on
page 142
Section 9.2, “Creating a Policy,” on
page 162
Chapter 10, “Creating and Managing
Policy Schedules,” on page 189
Policy Wizard
Helps you create a policy and associate Section 9.2, “Creating a Policy,” on
it with none, one, or multiple pairs.
page 162
Policies container
Lets you view a list of policies and their
current status (Running or Idle).
Section 9.4, “Viewing a List of Policies,”
on page 172
Edit or modify a policy
Lets you modify the policy direction,
frequency, filter options, or description.
Section 9.7, “Modifying Policy Filters,”
on page 177
Section 10.4, “Modifying Policy
Schedules,” on page 193
Export a policy
Lets you export a policy’s configuration
information to an XML file in a local
folder on the computer that is running
the Management Console.
Section 9.11, “Exporting and Importing
Policies on a Dynamic File Services
Server,” on page 180
Import a policy
Lets you import a previously exported
policy from a local folder to add it to a
DynamicFS server that you are
managing in the Management Console.
Section 9.11, “Exporting and Importing
Policies on a Dynamic File Services
Server,” on page 180
Preview now
Lets you preview the results of a policy
run on a selected pair without running
the policy.
Section 9.9, “Previewing a Policy Run,”
on page 179
Execute now
Lets you run a policy on demand for a
selected pair.
Section 9.8, “Starting a Policy Run,” on
page 178
Manual move
Lets you move selected files or folders
Section 8.9, “Moving Selected Files or
for a one-time move event on a selected Folders,” on page 152
pair.
Stop running process
Lets you stop a currently running policy
on a pair.
Policy Properties
Lets you view configuration information Section 9.5, “Viewing Properties for a
for a policy. You can also modify the
Policy,” on page 173
policy direction, frequency, filter options,
Section 9.7, “Modifying Policy Filters,”
or description.
on page 177
Section 9.10, “Stopping an In-Progress
Policy Run,” on page 180
Section 10.4, “Modifying Policy
Schedules,” on page 193
Using the Management Tools
91
Policy Options
Description
For Information
Policy Properties > Pairs
Lets you view, add, or remove pair
associations for a policy.
Section 9.6.3, “Associating or
Disassociating Pairs with a Policy,” on
page 174
Pair Properties > Policies
Lets you view, add, or remove policy
associations for a pair.
Section 9.6.4, “Associating or
Disassociating Policies with a Pair,” on
page 175
Policy Properties >
Schedule
Lets you view, add, or remove a policy
schedule association for a policy.
Section 10.6.3, “Associating or
Disassociating a Schedule with a
Policy,” on page 197
Policy Schedule
Properties > Policies
Lets you view, add, or remove policy
associations for a policy schedule.
Section 10.6.4, “Associating or
Disassociating Policies with a
Schedule,” on page 198
Pair Statistics
Lets you view statistics about a pair’s
status and last policy run, including the
policy run history of files moved or not
moved. You can also add or remove
associated policies.
Section 13.1, “Viewing the Pair
Statistics,” on page 229
Section 9.6.4, “Associating or
Disassociating Policies with a Pair,” on
page 175
Pair Statistics > Policy
execution history
Lets you view statistics about policy runs Section 13.2, “Viewing the Policy
on a pair, including the run history of files Execution History for a Pair,” on
moved or not moved.
page 230
Server Properties > Log
files >
Lets you view the events for policy runs
in the Standard Policy engine’s log.
Section 13.7, “Viewing Logged Events,”
on page 239
Lets you remove a policy.
Section 9.12, “Deleting a Policy,” on
page 181
DswStandardPolicy.l
og
Delete a policy
Policy Schedule Management Tasks
Table 5-6 helps you find the management tasks for DynamicFS schedules:
Table 5-6 Policy Schedule Task Descriptions
Server Options
Description
For information, see
Setup Wizard
Helps you create a standard pair or a
retention pair, create a policy, and
associates them automatically. You can
create and associate a policy schedule
for the policy. For a retention pair, you
can also create or associate a review
schedule.
Section 8.2, “Creating a Pair,” on
page 142
Helps you create a policy schedule or a
review schedule. You can associate a
policy schedule with none, one, or
multiple policies. You can associate a
review schedule with none, one, or
multiple retention pairs.
Chapter 10, “Creating and Managing
Policy Schedules,” on page 189
Schedule Wizard
92
Dynamic File Services 2.2 Administration Guide
Section 9.2, “Creating a Policy,” on
page 162
Chapter 10, “Creating and Managing
Policy Schedules,” on page 189
Server Options
Description
For information, see
Schedule Properties
Lets you view information about a
DynamicFS schedule.
Section 10.3, “Viewing Properties for a
Schedule,” on page 193
Policy Schedule
Properties > Policies
Lets you view and modify a list of the
policies associated with a policy
schedule.
Section 10.6.3, “Associating or
Disassociating a Schedule with a
Policy,” on page 197
Policy Properties >
Schedule
Lets you view, add, or remove a policy
schedule association for a policy.
Section 10.6.4, “Associating or
Disassociating Policies with a
Schedule,” on page 198
Retention Pair Properties
> Schedule
Lets you view, schedule or unschedule
review notifications for a retention pair.
Section 12.4, “Scheduling Notification
Reviews for a Retention Pair,” on
page 220
Delete a policy schedule
Lets you delete a schedule.
Section 9.12, “Deleting a Policy,” on
page 181
Cloud Management Tasks
Table 5-7 helps you find the management tasks for DynamicFS cloud accounts:
Table 5-7 Cloud Account Task Descriptions
Server Options
Description
For information, see
Cloud Wizard
Helps you create a cloud account to
store credentials for the cloud provider
account.
Section 11.3, “Creating a Cloud
Account,” on page 206
Cloud Properties
Lets you view the provider type and
credentials for a cloud account. If you
modify the credentials on the cloud
provider’s site, you can specify new
credentials for an Amazon S3 or
CloudMe account.
Section 11.4, “Viewing Properties for a
Cloud Account,” on page 209
Cloud Properties > Pairs
Section 11.6, “Modifying the Access
Credentials for a Cloud Account,” on
page 211
Lets you view a list of the retention pairs Section 11.5, “Viewing a List of the
that are using the cloud account, and the Retention Pairs That Use a Cloud
path of the subfolder used by the pair.
Account,” on page 210
Monitoring Tasks
Table 5-8 summarizes the monitoring tasks for DynamicFS servers, pairs, and policies:
Table 5-8 Monitoring Task Descriptions
Monitoring Options
Description
For Information
Servers container
Lets you view a list of servers and their
current status, such as Connected
(green icon) or Disconnected (dimmed
icon).
Section 7.4, “Viewing a List of Servers
and Their Connection Status,” on
page 132
Using the Management Tools
93
Monitoring Options
Description
For Information
Pairs container
Lets you view a list of pairs and their
current status (Running or Idle).
Section 8.6, “Viewing a List of Pairs,” on
page 149
Section 8.7, “Viewing the Pair Status,”
on page 149
Policies container
Lets you view a list of policies and their
current status (Running or Idle).
Section 9.4, “Viewing a List of Policies,”
on page 172
Server Properties
Lets you view information about a
DynamicFS server that you are
managing.
Section 7.5, “Viewing Server
Properties,” on page 132
Pair Properties
Lets you view configuration information
for a pair.
Section 8.8, “Viewing Properties for a
Pair,” on page 149
Policy Properties
Lets you view configuration information Section 9.5, “Viewing Properties for a
for a policy. You can also modify the
Policy,” on page 173
policy direction, frequency, filter options,
Section 9.7, “Modifying Policy Filters,”
or description.
on page 177
Section 10.4, “Modifying Policy
Schedules,” on page 193
94
Pair Statistics
Lets you view statistics about a pair’s
status and last policy run, including the
policy run history of files moved or not
moved.
Pair Statistics > Pair
history
Lets you view statistics about the disk
Section 13.5, “Viewing the Pair History,”
space consumed over time for each path on page 235
in a pair.
Pair Statistics > Policy
execution history
Lets you view statistics about policy runs Section 13.2, “Viewing the Policy
on a pair, including the run history of files Execution History for a Pair,” on
moved or not moved.
page 230
Pair Statistics > Review
transaction history
Lets you view statistics about the delete Section 12.7, “Viewing the Review
and restore actions made during reviews Transaction History,” on page 226
of the retained data on retention pairs
Server Properties > Disk
details
Lets you view disk details and the disk
capacity history for server disks on a
DynamicFS server that you are
managing.
Section 13.6, “Viewing the Server Disk
Capacity and Used Space History,” on
page 237
Viewing Service events
Lets you view error events for the
Dynamic File Service.
Section 13.8, “Viewing Service Events,”
on page 241
Viewing logged events
Lets you view the logged events for the
Service, Standard Policy engine, and
other components.
Section 13.7, “Viewing Logged Events,”
on page 239
Audit log
Lets you view the logged management
events for the Service, pairs, policies,
and repair.
Section 13.9, “Auditing Management
Events,” on page 241
Dynamic File Services 2.2 Administration Guide
Section 13.1, “Viewing the Pair
Statistics,” on page 229
5.3
Repair Tool
The Dynamic File Services Repair tool is used to restore a corrupted database by rolling back to the
last known-to-be-valid copy of the pair, policy, and schedule database files. For information, see
Chapter 14, “Repairing the Pair, Policy, and Schedule Databases,” on page 245.
5.4
Filter Driver Diagnostics
The Dynamic File Services Filter Driver Diagnostics tool is used to capture information about current
pairs to help troubleshoot issues with the merged view of standard pairs. For information, see
Section 16.15, “Diagnosing a Filter Driver failure,” on page 272.
5.5
Command Line Interface and Utilities
Dynamic File Services provides a command line interface (CLI) that can be used to create and
manage pairs and policies. The CLI is a text interface that can be used in scripts. DynamicFS also
provides utilities for troubleshooting, such as for synchronizing files and folders in a pair and for
dumping the current configuration settings. For information, see the Dynamic File Services 2.2 Client
Commands and Utilities Reference.
Using the Management Tools
95
96
Dynamic File Services 2.2 Administration Guide
6
Configuring and Managing the Service
6
An administrator can configure and manage the Dynamic File Service by logging in to the server
where the Service is installed. This section describes the Service configuration options.
Section 6.1, “Requirements for Administering the Service,” on page 97
Section 6.2, “Registering the License Key,” on page 97
Section 6.3, “Configuring Administrators for Pair Management,” on page 102
Section 6.4, “Starting and Stopping the Service,” on page 105
Section 6.5, “Configuring Audit Tracking Events,” on page 108
Section 6.6, “Configuring the Notification Service,” on page 108
Section 6.7, “Configuring the Logging Level for Engines,” on page 114
Section 6.8, “Configuring a Certificate for Secure Remote Management Sessions,” on page 116
Section 6.9, “Configuring Firewall Access for the Service Port,” on page 122
Section 6.10, “Configuring Ports for the Service and Retention Review,” on page 124
Section 6.11, “Viewing the Product Version and Build Information,” on page 125
Section 6.12, “What’s Next,” on page 126
6.1
Requirements for Administering the Service
The Administrator user and users with Administrator privileges on the Dynamic File Services server
have all the permissions necessary to administer the Dynamic File Service configuration. The user
logs in to the server desktop in order to administer the Service.
For information about managing pairs, policies, and schedules, see Section 6.3, “Configuring
Administrators for Pair Management,” on page 102.
6.2
Registering the License Key
Registering a Dynamic File Services License Key allows you to use all of the product features. A user
with Administrator privileges must register a license key on each computer where the Service
component is installed.
A License Key is not required to evaluate Dynamic File Services. Most product features will function
normally. However, you are restricted to using one pair and one policy at a time until a License Key is
registered on the system.
You can enter a License Key at any time after you install Dynamic File Services. After a successful key
registration, all features of the product are immediately available. You do not need to reinstall the
product. The policy and pair created during evaluation remain in effect, as do any configuration
settings you have made to the Service.
Configuring and Managing the Service
97
6.2.1
Obtaining a License Key
You can obtain a License Key from the Novell Customer Center (http://www.novell.com/
customercenter/). The key code is delivered via a Web link in a file named <GUID>.html, such as
4add-adf2-62b8-4296-ab0e-ce6f-1234-1234.html.
1 In a Web browser, go to the Novell Customer Center (http://www.novell.com/customercenter/)
and obtain a License Key.
The file contains the serial number (the GUID in the file name) and the complete key code. The
complete key code includes the series of equal signs that precede the Begin Key label to the end of
the series of equal signs that follow the End Key label.
2 Save a copy of the <GUID>.html file.
The default file name is the key’s GUID, but you can assign a friendly name. The GUID is stored
in the file as the serial number. You can also copy the displayed information to a text file.
6.2.2
Using the Controller to Register a License Key
1 Log in to the Dynamic File Services server as a user with Administrator privileges.
2 Save your License Key file to a location on the server.
3 Open the key file in a text editor or Web browser, then copy the complete key code from the file
to the computer clipboard.
You can copy the entire contents of the file. At a minimum, you must copy the complete key
code, which includes the series of equal signs that precede the Begin Key label to the end of the
series of equal signs that follow the End Key label.
98
Dynamic File Services 2.2 Administration Guide
4 Right-click the Service Controller icon, then select Register License Key to open the dialog box.
If a license key is already registered on the server, the information on the page states “This
product is already registered”. Continue only if you want to use a different license key or to reregister a key.
5 In the Register License Key dialog box, right-click anywhere in the License key field, then select
Paste from the pop-up menu.
6 Click OK to register the license key.
A confirmation message lets you know whether the registration succeeded or failed.
Configuring and Managing the Service
99
7 Click OK to dismiss the confirmation message.
If the registration is successful, all product features are now available to you.
If the registration is not successful, check that the key is valid and that you transferred the
complete key code to the box, then try again.
8 Right-click the Service Controller icon, then select Register License Key to view the number of pairs
and policies supported by the installed license.
6.2.3
Using the Management Console to Remotely Register a License Key
The Register License Key option is also available as a server action in the Management Console. This
allows you to remotely register a license key for a Dynamic File Services server. You can perform the
registration on only one server at a time.
1 Log in to a computer where the Dynamic File Service Management component is installed.
2 Save your License Key file to a location on the computer.
3 Launch the Management Console.
4 In the left panel, right-click the Dynamic File Services server (
) that you want to manage, click
Connect, then log in as a user with Administrator privileges.
If you have not set up the server in the Management Console, you must set up the server and log
in as described in Section 7.1, “Setting Up a Server in the Management Console,” on page 127.
5 After you are successfully connected to the server (
), select the server name again.
6 In the toolbar, select Actions > Register License Key to open the dialog box.
You can also right-click the server name and select Register License Key.
100
Dynamic File Services 2.2 Administration Guide
If a license key is already registered on the server, the information on the page states “This
product is already registered”. Continue only if you want to use a different license key or to reregister a key.
7 Open the key file in a text editor or browser, then copy the complete key code to the computer
clipboard.
You can copy the entire contents of the file. At a minimum, you must copy the complete key
code, which includes the series of equal signs that precede the Begin Key label to the end of the
series of equal signs that follow the End Key label.
8 In the Register License Key dialog box, right-click anywhere in the License key field, then select
Paste from the pop-up menu.
9 Click OK to register the license key.
A confirmation message lets you know whether the registration succeeded or failed.
10 Click OK to dismiss the confirmation message.
If the registration is successful, all product features are now available to you.
If the registration is not successful, check that the key is valid and that you transferred the
complete key code to the box, then try again.
6.2.4
Using the Command Line to Register the Key
You can register the Dynamic File Services License Key from the command line by using the
DswCLI.exe -registration command. For details about the command options, see “Registration
Actions” in the Dynamic File Services 2.2 Client Commands and Utilities Reference.
1 Log in to the Dynamic File Services server as a user with Administrator privileges.
2 Save your License Key file to a location on the computer.
3 Open a Windows Command Prompt console, then navigate to the Dynamic File Services
folder where you installed the software.
4 At the console prompt, enter
DswCli.exe
-registration
-regfilepath="\path\<key_file_name>.html"
[-servername={"ip_address" | "DNS_name"}]
[-port=<"portnumber">]
[-username=<"admin_user_name">]
[-password=<"admin_user_password">]
Replace key_file_name with the actual file name that you used when you saved the key file.
Provide the authentication parameters if needed. For information, see “Authentication
Parameters” in the Dynamic File Services 2.2 Client Commands and Utilities Reference.
For example, if the c2f0-4875-bf83-45d4-8a4f-5ebb-b329-1234.html file is located on the
G: drive and you need to provide the authentication credentials, enter the command with all
parameters:
DswCli.exe
-registration
-keyfilepath="G:\c2f0-4875-bf83-45d4-8a4f-5ebb-b329-1234.html"
-servername="10.10.10.102"
-port="8999"
-username="Administrator"
-password="novell"
Configuring and Managing the Service
101
5 To verify that the key is registered, enter
DswCli.exe
-registration
[-servername={"ip_address" | "DNS_name"}]
[-port=<"portnumber">]
[-username=<"admin_user_name">]
[-password=<"admin_user_password">]
6.3
Configuring Administrators for Pair Management
Pair management refers to the management actions taken on Dynamic File Services objects, such as
pairs, policies, schedules, and cloud accounts. Any user with sufficient rights can manage the objects.
The Administrator user of the server automatically has rights to manage any aspect of Dynamic File
Services. In an Active Directory domain, Domain Admins also have these rights across all servers in
the domain.
You can allow administrator and non-administrator users to manage pairs, policies, and schedules by
adding them as members of the Dynamic File Services group. Any user that is a member of this
group has all rights that are needed to create, delete, and manage pairs, policies, schedules, and cloud
accounts. The user that installs Dynamic File Services software on the computer is automatically
added to the group.
This section describes the Dynamic File Services group and how to add and remove members.
Section 6.3.1, “Understanding the Dynamic File Services Group,” on page 102
Section 6.3.2, “Setting Up Administrators in a Domain,” on page 104
Section 6.3.3, “Setting Up Administrators in a Workgroup,” on page 104
6.3.1
Understanding the Dynamic File Services Group
You can set up a group of users to manage pairs and policies on Dynamic File Services servers by
adding them as a member of the Dynamic File Services group. The nature of the group and its
setup are different, depending on whether the server is located in an Active Directory domain or in a
Workgroup. This section describes their purpose and differences.
“How is the group created?” on page 102
“Who controls membership in the group?” on page 103
“Who can be a member of the group?” on page 103
“How is the group removed?” on page 103
How is the group created?
The Dynamic File Services group is created automatically during the installation of Dynamic File
Services. The user that installs Dynamic File Services software on the computer is automatically
added to the group.
Active Directory Domain: The group is created in the Active Directory Users area when
Dynamic File Services is first installed on a server that is a domain controller or member server
in an Active Directory domain. The group is used by all DynamicFS servers that are
subsequently installed in the same domain.
102
Dynamic File Services 2.2 Administration Guide
The user that installs the first instance of Dynamic File Services in the domain must have
sufficient domain privileges to create groups and manage members of groups. Otherwise, the
group creation fails and a user with Domain Admin privileges must set up the group manually.
Workgroup: The group is created locally in the Windows Local Users and Groups > Groups area.
The user that installs Dynamic File Services must have sufficient Administrator privileges to
create groups on the server. Otherwise, the group creation fails and a user with Administrator
privileges must set up the group manually in the appropriate location.
Who controls membership in the group?
The login identity of the user who installs Dynamic File Services is automatically added to the
Dynamic File Services group. After the installation, administrators control which users are added
or removed as members of the Dynamic File Services group.
Active Directory Domain: The Domain Admin user or a domain user with Domain Admin
privileges can add or remove members. Launch the Active Directory Users and Computers tool,
then add or remove members for the group in the Users folder. For information, see Section 6.3.2,
“Setting Up Administrators in a Domain,” on page 104.
Workgroup: The Administrator user or a local user with Administrator privileges can add or
remove members. Launch the Microsoft Management Console on the server, then add or remove
members for the group in the Users and Groups > Groups folder. For information, see Section 6.3.3,
“Setting Up Administrators in a Workgroup,” on page 104.
Who can be a member of the group?
The Dynamic File Services group has one default member, which is the user who installs the
Dynamic File Services software on the computer. Other users can be members in the group,
depending on whether the DynamicFS server is in an Active Directory or Workgroup environment:
Active Directory Domain: Members of the Domain Admins group automatically have rights to
manage Dynamic File Services on any server in the same tree or forest. Any domain user in the
same tree or forest as the DynamicFS server can be added to the group. A domain user does not
need Domain Admin privileges in order to be a member, and it is not necessary to explicitly add
a Domain Admin user to the group. The members can manage pairs, policies, and schedules on
any DynamicFS server in the same domain.
Workgroup: The Administrator user and members of the Administrators group automatically
have rights to manage Dynamic File Services on the server. Any local user an be added to the
group. A local user does not need Administrator privileges in order to be a member, and it is not
necessary to explicitly add the Administrator user to the group. The members can manage pairs,
policies, and schedules on the DynamicFS server.
How is the group removed?
The Dynamic File Services group should not be removed while the product is installed. The
following sections describe how the group is removed in an Active Directory or Workgroup
environment:
Active Directory The group is used by all DynamicFS servers that are subsequently installed in
the same domain. The group is removed when you uninstall the last instance of Dynamic File
Services in the domain.
Configuring and Managing the Service
103
The user that uninstalls Dynamic File Services must have sufficient domain privileges to delete
groups. Otherwise, the group deletion fails and a user with Domain Admin privileges must
manually remove the group.
Workgroup The group is automatically removed from the server if you uninstall Dynamic File
Services.
The user that uninstalls Dynamic File Services must have sufficient Administrator privileges to
delete groups on the server. Otherwise, the group deletion fails and a user with Administrator
privileges must manually remove the group.
6.3.2
Setting Up Administrators in a Domain
In a domain environment, members of the Dynamic File Services group can manage pairs,
policies, and schedules on any of the DynamicFS servers in the domain.
To add or remove domain users as members of the domain-based Dynamic File Services group:
1 Log in to the DynamicFS server as a Domain Admin.
2 Open the Active Directory Users and Computers utility by selecting Administrator Tools > Users
and Computers.
3 Select the domain, then select Users > Groups.
4 Open the group’s Properties dialog box by double-clicking the Dynamic File Services group.
You can also right-click the group and select Properties. Current domain users that are members
of the group appear in the list.
5 In the Properties dialog box, click the Members tab.
6 Configure the members of the group by doing either or both of the following tasks:
Add a member: Click Add, use the Enter the object names to select field to specify the users
you want to manage DynamicFS in the domain, then click OK to save and apply your
changes.
Remove a member: Select one or more user names from the member list, click Remove, then
click OK to save and apply your changes.
7 Click OK to close the Dynamic File Services group Properties dialog box.
6.3.3
Setting Up Administrators in a Workgroup
In a Workgroup environment, members of the server-based Dynamic File Services group can
manage pairs, policies, and schedules for a Dynamic File Services server.
To add or remove local users as members of the server-based Dynamic File Services group:
1 Log in to the DynamicFS server as the Administrator user or as a user with Administrator
privileges.
2 Open the Windows Computer Management tool.
Right-click the Computer icon on the desktop, then select Manage.
3 Select Local Users and Groups > Groups, then double-click the Dynamic File Services group to
open the group’s Properties dialog box.
Current members appear in the list.
104
Dynamic File Services 2.2 Administration Guide
4 Configure the members of the group by doing either or both of the following tasks:
Add a member: Click Add, use the Enter the object names to select field to specify the users
you want to manage DynamicFS on that server, then click OK to save and apply your
changes.
Remove a member: Select one or more user names from the member list, click Remove, then
click OK to save and apply your changes.
5 Click OK to close the Dynamic File Services group Properties dialog box.
6.4
Starting and Stopping the Service
The Dynamic File Service is the engine that manages the various components. It starts automatically
after the install and on system boot in Windows Normal Mode. The Service does not run in Windows
Safe Mode. A user with Administrator privileges on the DynamicFS server can also start and stop the
Dynamic File Service as needed by using the Service Controller.
The Service component must be installed and running on the server in order to connect to the server
from the Management Console, or to use commands and some utilities. The DswDump.exe and
DswPairCheck.exe utilities can be used when the service is running or not running in order to gather
and report information from the Dynamic File Services databases. The Repair Tool can be used only
when the service is not running.
Section 6.4.1, “Viewing the Service Status,” on page 105
Section 6.4.2, “Starting the Dynamic File Service,” on page 106
Section 6.4.3, “Stopping the Dynamic File Service,” on page 106
6.4.1
Viewing the Service Status
The Dynamic File Service has two possible states: Enabled (running) and Disabled (not running). Its
current status is displayed in the Service Controller menu. The Service status is also displayed in the
Microsoft Management Console.
1 Log in to the DynamicFS server.
The Service Controller starts automatically and places an icon in the notification area.
2 In the notification area, right-click the Service Controller icon (
) to display the menu.
3 View the status of the Service.
The following combinations of options convey the current status and options to start or stop the
Service accordingly:
Service Enabled and Stop Service
Service Disabled and Start Service
Configuring and Managing the Service
105
6.4.2
Starting the Dynamic File Service
1 Log in to the DynamicFS server as the Administrator user or as a user with Administrator
privileges.
2 Right-click the Service Controller icon (
) in the notification area, then select Start service from
the pop-up menu.
3 Verify that the Service is running by right-clicking the Service Controller icon.
In the pop-up menu, the options are now Service enabled and Stop service.
6.4.3
Stopping the Dynamic File Service
Special steps should be taken before you stop the service in order to ensure a graceful shutdown of
the Service and user actions on the pairs. You must stop the Dynamic File Service before taking the
following management actions:
Modifying, repairing, or uninstalling the Dynamic File Services software.
Modifying the Service configuration settings. The Service is automatically restarted if you
modify the configuration settings for its ports and certificate.
Performing system maintenance on the DynamicFS server.
It is also a good idea to stop the Service if you are performing maintenance on a remote server or filer
with paths used in pairs on the DynamicFS server. Alternatively, you can unlink the pair, and recreate it when the remote storage is back online.
“Prerequisites for Stopping or Restarting the Service” on page 106
“Stopping the Service” on page 107
Prerequisites for Stopping or Restarting the Service
Do not stop or restart the Dynamic File Service while the Service is busy processing data. Use Table 61as a checklist for making sure the Service is not processing data so that you can stop it without
introducing potential data loss. After the Service activities are quiescent, you can continue with
stopping the Service or with activities that automatically restart the Service, such as changing the
port or certificate.
Table 6-1 Checklist for Quiescing the Dynamic File Service
Service
Verify the following to quiesce activity in the Service
Policy runs
You should wait until all pairs on the server are in the Idle state. If the pair state is
Running, wait until the policy run is complete, or you can manually stop the run by
using the Actions > Stop running process option from the pair’s Statistics dialog box.
Scans
You should consider the schedules for the daily snapshots of the pair and policy
databases, the pair history scan, and the retention review check timer to avoid
stopping the Service when a pair is busy with a scan. If a scan is in progress, wait
until the scan is complete.
If the Service is disabled at the scan’s scheduled start time, the scan is not run for
that day.
106
Dynamic File Services 2.2 Administration Guide
Service
Verify the following to quiesce activity in the Service
Merged View
All clients accessing files through the merged view must log out. Gracefully close
user connections to each of the standard pairs so that the merged view is inactive.
This allows users time to save their changes and close the files.
Retention Review
Service
All users accessing retained data through the Retention Review Service must log
out. Gracefully close user connections and allow sufficient time for the queued
actions to run.
Management sessions
Discontinue use of any Management Console sessions, client commands, and
utilities.
Stopping the Service
IMPORTANT: Before you begin, ensure that you have met the requirements in “Prerequisites for
Stopping or Restarting the Service” on page 106.
1 Log in to the DynamicFS server as the Administrator user or as a user with Administrator
privileges.
2 In the notification area, right-click the Service Controller icon (
), then select Stop service from the
menu.
3 If you are prompted to confirm the Service stop, click Yes to continue.
4 Verify that the Service has stopped by right-clicking the Service Controller icon in the notification
area.
When the service has stopped, Service Controller menu displays Service disabled and Start service
options.
Configuring and Managing the Service
107
6.5
Configuring Audit Tracking Events
The Dynamic File Services Audit Configuration tool allows you to configure which events are
audited and logged for the Service. The settings apply globally to all pairs, policies, and schedules on
the Dynamic File Services server. All events are logged by default. For a list of event types, see
Section 6.6.1, “Understanding Notification and Audit Events,” on page 109.
1 Log in to the DynamicFS server as the Administrator user or as a user with Administrator
privileges.
2 In the notification area, right-click the Service Controller icon (
), then select Audit Configuration
to open the Audit Tracking Events dialog box.
3 Select the check boxes next to the events that you want to track in the audit log.
4 Deselect the check boxes next to the events that you do not want to track in the audit log.
5 Click Apply to save your changes, or click OK to save your changes and close the dialog box.
6.6
Configuring the Notification Service
Storage or system administrators might want to receive notices for Dynamic File Services pair and
policy management events or for policy run events. The Notification Service allows you to configure
which events trigger notifications and where the notification messages are sent. The notification
messages include information about the event, such as the server name, pair name, policy name, a
brief description of the event, and the event time stamp.
The Email notification add-on lets you set up one or more email addresses, then separately configure
which events trigger messages to be sent for the address.
The selected notification events apply globally to all of the pairs and policies on a server.
The Dynamic File Service can be running or not running when you configure notifications. It is not
necessary to restart the Service to apply the changes.
Section 6.6.1, “Understanding Notification and Audit Events,” on page 109
Section 6.6.2, “Setting Up Email Notifications,” on page 110
108
Dynamic File Services 2.2 Administration Guide
6.6.1
Understanding Notification and Audit Events
You can specify which event types trigger notifications to be sent for each configured recipient.
Notification messages for the selected events are sent to the configured recipients only when the
Notification Service is enabled.
“Pair Management Events” on page 109
“Policy Management Events” on page 109
“Policy Schedule Management Events” on page 109
“Cloud Account Management Events” on page 110
“Retention Review Events” on page 110
“Registration Events” on page 110
“Service Events” on page 110
Pair Management Events
The following pair management events can be configured for notification and auditing:
Pair Created
Pair Modified
Pair Unlinked
Added Exclude/Include Folders to Pair
Removed Exclude/Include Folders from Pair
Stop Running Processes on Pair
Manual Move on Pair
Policy Management Events
The following policy management events can be configured for notification and auditing:
Policy Created
Policy Modified
Policy Delete
Policy Associated to Pair
Policy Disassociated from Pair
Policy Execute Now on Pair
Policy Preview Now on Pair
Policy Scheduled to Run on Pair
Policy Ran on Pair
Policy Schedule Management Events
The following policy schedule management events can be configured for notification and auditing:
Schedule Created
Schedule Modified
Schedule Delete
Schedule Associated to Policy
Schedule Disassociated from Policy
Configuring and Managing the Service
109
Cloud Account Management Events
The following cloud account management events can be configured for notification and auditing:
Cloud Account Created
Cloud Account Deleted
Cloud Account Modified
Cloud Path Included in a Pair
Retention Review Events
The following retention review management events can be configured for notification and auditing:
Retention Review Notification
Retention Review Check (Audit only)
Retention Review Delete on Pair
Retention Review Move Files Back to Primary
Retention Pair Review Modification
Registration Events
The following registration event can be configured for notification and auditing:
Registration
Service Events
The following service event can be configured for notification and auditing:
Change Logging Options
6.6.2
Setting Up Email Notifications
The Email add-on for the Dynamic File Services Notification Service allows you to set up email
addresses where you want to send notifications about pair and policy events. For each address, you
configure which events trigger a message.
“Setting Up the Outgoing Mail Server” on page 110
“Setting Up the Email Address and Events to Send” on page 112
“Removing or Modifying an Email Address” on page 114
“Viewing or Modifying the Events for an Email Address” on page 114
Setting Up the Outgoing Mail Server
Before you configure email notifications, the following setup is required:
Outgoing Mail Service: You must have an outgoing email service to relay email alerts and
notifications.
110
Dynamic File Services 2.2 Administration Guide
The Email add-on supports the Simple Mail Transfer Protocol (SMTP), a standard server-toserver protocol that is used to transfer mail between computers. You need the DNS name of the
SMTP mail server to use. You can also use an IPv4 IP address if your mail service provider
allows it. The SMTP server must have Internet access if you want to send messages to external
email addresses.
Mail Relay: You must configure the outgoing email service to support and allow mail relay.
The Email add-on supports using either authenticated or anonymous SMTP relay. Your email
service provider must support and allow the method you choose.
When you use authenticated mail relay, you must provide a valid email address and password
to use for the notification sender. The email address does not need to be the address of a specific
individual. It can be a friendly address that is recognizable to recipients, such as
[email protected].
The email address is authenticated against the authentication mechanisms each time notification
emails are sent. If the password changes for this account, you must update the password in the
Email add-on.
Port: You must specify the port number of the message submission port to use for the outgoing
email service. Typical outgoing ports are 25 and 587. If you have a firewall protecting your
perimeter network, you must enable an exception for the port to ensure that the traffic is allowed
to pass.
SSL: Determine if your outgoing email service provider requires SSL. Security-enhanced
communication uses SSL to encrypt the SMTP session, including the user name, the password,
and the message data.
1 Log in to the DynamicFS server as the Administrator user or as a user with Administrator
privileges.
2 Right-click the Service Controller icon (
) in the notification area, then select Notification
Configuration > Email.
3 In the Mail Configuration dialog box, click the Enable check box to enable the add-on.
4 Specify the Outgoing Mail Server settings.
Use the following sample values as a guide. Ensure that you use the values for your outgoing
mail server.
Mail Server Parameter
Description
Sample Value
Mail (SMTP) server
Specify the DNS name or IP address (IPv4 format)
of the outgoing SMTP mail server used by your
email service provider.
smtp.example.com
Configuring and Managing the Service
111
Mail Server Parameter
Description
Sample Value
Use anonymous
You can use anonymous mail relay only if it is
supported by your mail service provider. The Use
Anonymous option disables the fields for using an
authenticated email address.
Select the Use
Anonymous check box.
Account name and
password
If you use authenticated mail relay, specify an email [email protected]
address and password for a valid account with the
email service provider. This address is used as the password
sender of outgoing email messages.
Port
Specify the port number to use for outgoing email
587
messages. The number is required by your outgoing
email service provider. (Default: 587)
Enable SSL
Specify this option if your service provider requires
SSL.
Select the Enable SSL
check box.
Subject
Specify the text to use as the default portion of the
subject in your outgoing email notification
messages. The server name and notification event
type are automatically appended to this text.
(Default: NDFS Notification)
SiteA NDFS Notification
5 Click Apply or OK to save and apply the changes.
The changes take effect without restarting the Service.
6 To configure notifications, continue with “Setting Up the Email Address and Events to Send” on
page 112.
Setting Up the Email Address and Events to Send
After you have enabled Email notifications and set up the outgoing mail server information, you can
set up email addresses and events to send.
1 Log in to the DynamicFS server as the Administrator user or as a user with Administrator
privileges.
2 Right-click the Service Controller icon (
Configuration > Email.
112
Dynamic File Services 2.2 Administration Guide
) in the notification area, then select Notification
3 Under Send To, specify one to nine email addresses that receive email notifications:
Add: Type an email address (such as [email protected]), then click Add.
Remove: Select an email address in the list, then click Remove.
4 For each recipient, use the Events dialog box to set which events trigger messages to be sent to
the user. No events are configured by default.
4a After you have entered the email addresses, click Events.
4b Select an email address.
4c Select the check box next to the events that will trigger messages to be sent to the selected
address, or click Select all to choose all events.
Configuring and Managing the Service
113
4d Click Apply to save the settings.
4e Repeat this process for each email address.
5 (Optional) Select an email address in the list, then click Email Test to send a test message.
6 Click Apply or OK to save and apply the changes.
The changes take effect without restarting the Service.
Removing or Modifying an Email Address
You can remove an email address from the Notification Service by using the Email Configuration
dialog box. You cannot modify an email address for a user. To use a different email address for the
user, you must remove the old email address, then configure the new email address and assign
events for it.
1 Log in to the DynamicFS server as an Administrator user or Domain Admin user.
2 Right-click the Service Controller icon, then select Notifications > Email.
3 In the Email Configuration dialog box, select the old email address, then click Remove.
4 Specify the new email address, click Add, then click Apply to accept the changes.
5 Click Events, select the new email address, set the events for the address, then click OK.
6 (Optional) Select an email address in the list, then click Email Test to send a test message.
7 Click Apply or OK to save and apply the changes.
The changes take effect without restarting the Service.
Viewing or Modifying the Events for an Email Address
You can modify the events selected for an email address by using the Events option in the Email
Configuration dialog box.
1 Log in to the DynamicFS server as an Administrator user or Domain Admin user.
2 Right-click the Service Controller icon, then select Notifications > Email.
3 In the Email Configuration dialog box, select Events.
4 In the Email Event Selection dialog box, select an email address, then view or change the events
that are selected.
5 Click OK to accept the changes and return to the Email Configuration dialog box.
6 Click Apply or OK to save and apply the changes.
The changes take effect without restarting the Service.
6.7
Configuring the Logging Level for Engines
Log level settings determine the type of events that are logged. The Server Properties dialog box
allows you to set the logging levels for the following log files:
Service (DswMcpCore.log)
Standard Engine (DswStandardEngine.log)
Retention Engine (DswRetentionEngine.log)
Cloud Engine (DswCloudEngine.log)
114
Dynamic File Services 2.2 Administration Guide
The settings are written to the corresponding log configuration files:
Service (DswMcpCore.config.xml)
Standard Engine (DswStandardEngine.config.xml)
Retention Engine (DswRetentionEngine.config.xml)
Cloud Engine (DswCloudEngine.config.xml)
The log level options are listed in order from the most information reported to no information
reported. Each level includes the events specified, plus the events of the levels below it. The messages
are listed from bottom to top in the order of increasing priority.
Log Level Option
Description
All
Records all events in the specified log file. (This is the same output as for the DEBUG
level.)
DEBUG
Records debug, information, warning, error, and fatal events in the specified log file.
INFO
Records information, warning, error, and fatal events in the specified log file.
WARN
(Default) Records warning, error, and fatal events in the specified log file.
ERROR
Records error and fatal events in the specified log file.
FATAL
Records fatal events in the specified log file.
OFF
No events are recorded in the specified log file.
To view or change the Log Levels options:
1 In the Management Console, connect to the DynamicFS server that you want to manage.
2 Right-click the server, then select Properties to open the Server Properties dialog box.
3 Click the Log options tab.
4 From the DswMcpCore.config.xml drop-down list, select a logging level for the Service log.
5 From the DswStandardEngine.config.xml drop-down list, select a logging level for the Standard
Engine log.
Configuring and Managing the Service
115
6 From the DswRetentionEngine.config.xml drop-down list, select a logging level for the Retention
Engine log.
7 From the DswCloudEngine.config.xml drop-down list, select a logging level for the Cloud Engine
log.
8 Click OK to apply the changes.
9 Close the Server Properties dialog box.
6.8
Configuring a Certificate for Secure Remote Management
Sessions
A Dynamic File Services Secure Sockets Layer (SSL) certificate is required to support secure remote
sessions between a DynamicFS server and a computer running the Management Console. A selfsigned certificate is automatically configured. You can also use the Certificate Configuration option in
the Serviced Controller to create a new self-signed SSL certificate, or to specify your own signed
certificate that you have acquired from a certification authority and added to the Local Computer
Personal Store.
Section 6.8.1, “Understanding the Certificate,” on page 116
Section 6.8.2, “Viewing the Dynamic File Services SSL Certificate,” on page 117
Section 6.8.3, “Prerequisites for Creating, Modifying, or Unbinding the Certificate,” on page 118
Section 6.8.4, “Creating a Dynamic File Services Self-Signed Certificate,” on page 118
Section 6.8.5, “Configuring a Signed Certificate for Dynamic File Services,” on page 119
Section 6.8.6, “Unbinding a Signed Certificate from Dynamic File Services,” on page 120
Section 6.8.7, “Handling Expiring Certificates,” on page 121
6.8.1
Understanding the Certificate
During remote management sessions, a Dynamic File Services SSL certificate is required in order for
successful authentication to occur when connecting from the client to the server. The certificate helps
assure the client that the server is the intended target. Dynamic File Services supports using selfsigned and signed certificates. The remote connection uses standard RSA SHA-1 encryption with a
2048-bit key size.
“Self-Signed Certificate” on page 116
“Signed Certificate” on page 117
Self-Signed Certificate
Dynamic File Services automatically creates a self-signed certificate during the install, and provides a
Certificate Configuration option where you can create a new self-signed certificate.
The Dynamic File Services installation automatically sets up SSL support by doing the following:
Creates a Dynamic File Services self-signed certificate
(servername-DynamicFileServicesSSLCertificate).
Stores the certificate in the My personal certificate store on the local machine.
Binds the certificate for SSL use to the configured Dynamic File Service port (default 8999).
116
Dynamic File Services 2.2 Administration Guide
Configures the following Windows Registry keys for Dynamic File Services in the
HKEY_LOCAL_MACHINE/Software/Novell/Dynamic File Services/Setup/ folder:
Windows Registry Key
Description
DswSelfSignedCertEnabled
Indicates to the Dynamic File Service whether a signed
DynamicFS SSL certificate is in use (value of 0), or if a
DynamicFS self-signed SSL certificate is in use (value of 1). Valid
values are 0 or 1. The default value is 1.
DswSSLCertThumbprint
Indicates to the Dynamic File Service the current configured
certificate. Valid values are a 20-character hex value associated
to the certificate. No spaces are permitted. This thumbprint must
match the thumbprint of the certificate bound to the configured
Dynamic File Service port.
DswSSLEnabled
Indicates to the Dynamic File Service whether SSL is enabled or
disabled for the configured Dynamic File Service port. Valid
values are 0 (disabled) or 1 (enabled). The default value is 1.
Signed Certificate
Dynamic File Services also supports using a signed certificate that you have acquired from a
certification authority and added to the Local Computer Personal Store.
6.8.2
Viewing the Dynamic File Services SSL Certificate
You can view the Dynamic File Services SSL certificate
(servername-DynamicFileServicesSSLCertificate) by using the Certificates snap-in for the
Microsoft Management Console (MMC).
1 Log in to the DynamicFS server as an Administrator user or as a user with Administrator
privileges.
2 From the Start menu, click Run, then type mmc and click OK to launch the MMC.
3 Add the Certificates snap-in to the MMC console and configure it to manage Computer Account
certificates:
3a On the Console menu, click Add/Remove Snap-in.
3b Select Certificates in the Snap-in list, click Add, select Computer Account as the type of
certificate you want to manage, then click Finish or Close.
3c Click OK to close the Add/Remove Snap-in dialog box.
The Certificates folder is now added to the MMC console.
4 In the Certificates management console, expand the certificate store, then click the Certificates
folder to see the list of certificates in the store.
5 Right-click servername-DynamicFileServicesSSLCertificate, then click Open to open the
Certificate dialog box.
You can also view a certificate by double-clicking it.
Configuring and Managing the Service
117
6 The Certificate dialog box is organized into three tabs:
Tab
Description
General
Identifies the certificate’s intended use.
Details
Displays the ITU-T X.509 standard fields, extensions, and properties of the
certificate.
Certification Path
The certification path to the source where the certificate was issued.
7 Close the MMC console when you are done.
6.8.3
Prerequisites for Creating, Modifying, or Unbinding the Certificate
The Service is automatically restarted to apply changes made to the Dynamic File Services certificate.
Before you attempt to create a new self-signed certificate, modify a signed certificate, or unbind a
certificate, ensure that you have satisfied all of the requirements for stopping the Service in
“Prerequisites for Stopping or Restarting the Service” on page 106.
6.8.4
Creating a Dynamic File Services Self-Signed Certificate
You can use the Dynamic File Services Certificate Configuration option to create a new Dynamic File
Services self-signed SSL certificate to replace the one created during the install. You might need to do
this in the following situations:
The current certificate is expiring.
You unbind a signed certificate and want to replace it with a self-signed certificate.
IMPORTANT: The Service is automatically restarted to apply certificate changes. Before you begin,
ensure that you have met the requirements in “Prerequisites for Stopping or Restarting the Service”
on page 106.
To generate a self-signed certificate:
1 Log in to the DynamicFS server as the Administrator user or as a user with Administrator
privileges.
2 Ensure that no policy runs are in progress on the server, then stop the Dynamic File Service by
right-clicking the Service Controller icon in the notification area and selecting Stop Service.
For information, see Section 6.4.3, “Stopping the Dynamic File Service,” on page 106.
3 Confirm that the Dynamic File Service is stopped by right-clicking the Service Controller icon and
verifying that the Service option reads Service disabled.
118
Dynamic File Services 2.2 Administration Guide
4 Open the Certificate Configuration dialog box by right-clicking the Service Controller icon and
selecting Certificate Configuration.
5 In the Certificate Configuration dialog box, select Create a new self-signed certificate.
6 Click OK to save and apply your changes.
The Service restarts automatically to apply the changes.
7 If you are prompted to confirm the Service restart, ensure that all users accessing files with the
merged view have logged out, then click Yes to continue with the Service restart.
If you click No, the certificate is not created.
8 View the message that confirms whether the configuration succeeded or failed, then click OK to
close the message.
9 After a successful configuration, start the Dynamic File Service by right-clicking the Service
Controller icon in the notification area, then selecting Start Service.
10 (Optional) Verify that the certificate was successfully bound to a particular port by using the
Microsoft Management Console (MMC) to view the certificate as described in Section 6.8.2,
“Viewing the Dynamic File Services SSL Certificate,” on page 117.
You can also enter one of the following Windows commands in a command prompt console that
has administrator privileges. Select Start > All Programs > Accessories, right-click Command
Prompt, then select Run as Administrator.
Windows Server 2008:
netsh http show sslcert
If the certificate was successfully bound to the port, there is an entry for the certificate in the
output response from this command.
6.8.5
Configuring a Signed Certificate for Dynamic File Services
You can use the Dynamic File Services Certificate Configuration option to replace the DynamicFS selfsigned SSL certificate with one that you have obtained from a certification authority. Use this option
if your enterprise security policy requires this level of security.
Additional steps are required when using a signed certificate. You must first generate a certificate
signing request, import the certificate from the certification authority into the Local Computer
Personal store, then assign the signed certificate to Dynamic File Services.
Configuring and Managing the Service
119
IMPORTANT: The Service is automatically restarted to apply certificate changes. Before you begin,
ensure that you have met the requirements in “Prerequisites for Stopping or Restarting the Service”
on page 106.
After you have obtained the certificate from the certification authority and imported it into the Local
Computer Personal store:
1 Log in to the DynamicFS server as the Administrator user or as a user with Administrator
privileges.
2 Ensure that no policy runs are in progress on the server, then stop the Dynamic File Service by
right-clicking the Service Controller icon in the notification area and selecting Stop Service.
For information, see Section 6.4.3, “Stopping the Dynamic File Service,” on page 106.
3 Confirm that the Dynamic File Service is stopped by right-clicking the Service Controller icon and
verifying that the Service option reads Service disabled.
4 Open the Certificate Configuration dialog box by right-clicking the Service Controller icon and
selecting Certificate Configuration.
5 In the Certificate Configuration dialog box, select Use your own SSL certificate from the local
computer personal store, select a certificate thumbprint from the drop-down list.
6 Click OK to save and apply your changes.
The Service restarts automatically to apply the changes.
7 If you are prompted to confirm the Service restart, ensure that all users accessing files with the
merged view have logged out, then click Yes to continue with the Service restart.
If you click No, the certificate change is not done.
8 View the message that confirms whether the configuration succeeded or failed, then click OK to
close the message.
9 After a successful configuration, start the Dynamic File Service by right-clicking the Service
Controller icon in the notification area, then selecting Start Service.
10 (Optional) Verify that the certificate was successfully bound to a particular port by using the
Microsoft Management Console (MMC) to view the certificate.
You can also enter one of the following Windows commands in a command prompt console that
has administrator privileges. Select Start > All Programs > Accessories, right-click Command
Prompt, then select Run as Administrator.
Windows Server 2008:
netsh http show sslcert
If the certificate was successfully bound to the port, there is an entry for the certificate in the
output response from this command.
6.8.6
Unbinding a Signed Certificate from Dynamic File Services
You can use the Certificate Configuration option in the Dynamic File Service Controller to unbind a
signed certificate from the Service. You can create a new self-signed certificate or specify another
signed certificate to replace the one currently in use.
120
Dynamic File Services 2.2 Administration Guide
IMPORTANT: The Service is automatically restarted to apply certificate changes. Before you begin,
ensure that you have met the requirements in “Prerequisites for Stopping or Restarting the Service”
on page 106.
1 Log in to the DynamicFS server as the Administrator user or as a user with Administrator
privileges.
2 Ensure that no policy runs are in progress on the server, then stop the Dynamic File Service by
right-clicking the Service Controller icon in the notification area and selecting Stop Service.
For information, see Section 6.4.3, “Stopping the Dynamic File Service,” on page 106.
3 Confirm that the Dynamic File Service is stopped by right-clicking the Service Controller icon and
verifying that the Service option reads Service disabled.
4 Open the DynamicFS Certificate Configuration dialog box by right-clicking the Service Controller
icon and selecting Certificate Configuration.
5 In the DynamicFS Certificate Configuration dialog box, do one of the following:
Select Create a new self-signed certificate.
Select Use your own SSL certificate from the local computer personal store, select a different
certificate thumbprint from the drop-down list.
6 Click OK to save and apply your changes.
The Service restarts automatically to apply the changes.
7 If you are prompted to confirm the Service restart, ensure that all users accessing files with the
merged view have logged out, then click Yes to continue with the Service restart.
If you click No, the certificate change is not done.
8 View the message that confirms whether the configuration succeeded or failed, then click OK to
close the message.
9 After a successful configuration, start the Dynamic File Service by right-clicking the Service
Controller icon in the notification area, then selecting Start Service.
10 (Optional) Verify that the certificate was successfully bound to a particular port by using the
Microsoft Management Console (MMC) to view the certificate.
You can also use one of the following Windows commands in a command prompt console that
has administrator privileges. Select Start > All Programs > Accessories, right-click Command
Prompt, then select Run as Administrator.
Windows Vista or Windows Server 2008:
netsh http show sslcert
If the certificate was successfully bound to the port, there will be an entry for the certificate in the
output response from this command.
6.8.7
Handling Expiring Certificates
A Dynamic File Services self-signed SSL certificate is valid for five years from its creation date. As the
date of expiration for a configured certificate nears, DynamicFS provides a notification message as
you log in to the server from the Management Console. To replace the expiring certificate, use the
Certificate Configuration option in the Service Controller to create a new self-signed certificate, or to set
up a signed certificate that you have obtained from a certification authority.
Configuring and Managing the Service
121
6.9
Configuring Firewall Access for the Service Port
Dynamic File Services allows you to manage the pairs and policies on a server from a different
computer when the Windows Firewall Access option is enabled (the default). When the option is
enabled, Dynamic File Services configures an exception for the configured Service port in the
Windows Firewall. When the option is disabled, it removes the firewall exception and the Service
cannot be accessed remotely. Firewall access is not required for local management of pairs and
policies.
Section 6.9.1, “Understanding Remote Access,” on page 122
Section 6.9.2, “Enabling or Disabling the Windows Firewall Access,” on page 123
6.9.1
Understanding Remote Access
The Windows Firewall allows you to specify exceptions to allow programs to communicate through
the firewall. Inbound connections that do not have an exception are blocked. Exceptions to the
Windows Firewall allow unsolicited inbound communications through the firewall. Use the Dynamic
File Service Controller > Windows Firewall Access option to control whether an exception for the
configured Service port is allowed in the firewall.
“Allowing Remote Management” on page 122
“Denying Remote Management” on page 123
Allowing Remote Management
You enable the Windows Firewall Access option to allow remote management of pairs and policies.
This is the default setting after install. DynamicFS automatically adds an exception for the configured
Dynamic File Service port to the Windows Firewall > Exceptions list. The Windows Firewall allows
unsolicited inbound communications through the firewall on the configured port. This allows you to
manage pairs and policies from another computer through the firewall on the configured Service
port.
IMPORTANT: On Windows Server 2008 or later, DynamicFS creates a firewall exception for the
Domain and Private network profiles. The network should be marked as Private, or both computers
need to be part of a single domain.
For example, in the Windows Firewall with Advanced Security > Inbound Rules, the entry might look like
this:
DswAccessPort
Profile: Domain
Enabled: Yes
Action: Allow
Override: No
DswAccessPort
Profile: Private
Enabled: Yes
Action: Allow
Override: No
To mark the network as Private, log in as a user with Administrator privileges on the machine, go to
the Network and Sharing Center, click Customize, select Private, then click OK.
122
Dynamic File Services 2.2 Administration Guide
Dynamic File Services uses TCP communications over the configured Service port. You must specify
the configured port when connecting to the server. If you modify the port number, DynamicFS
automatically updates the firewall exception settings to use the new port. For information about
changing the port to use, see Section 6.10, “Configuring Ports for the Service and Retention Review,”
on page 124.
By default, Dynamic File Services sets the scope of the port exception to Any computer (including on the
Internet). You can modify the scope option by going to the Windows Firewall > Exceptions page, doubleclicking the Dynamic File Services exception, then selecting Change Scope. Alternative manual settings
are My network (subnet) only and Custom list.
To allow remote management, enable the Windows Firewall Access option as described in Section 6.9.2,
“Enabling or Disabling the Windows Firewall Access,” on page 123.
Denying Remote Management
You disable the Windows Firewall Access option to deny remote management of pairs and policies.
DynamicFS automatically removes any firewall exceptions from the Windows Firewall > Exceptions list
that it created for the configured Dynamic File Service port. When the exception is removed,
Windows Firewall denies unsolicited inbound communications on the configured port. This prevents
you from connecting to the server for remote management sessions.
For security reasons, you might want to disable the exception when you are not actively managing
the Dynamic File Service from another computer.
To deny remote management, disable the Windows Firewall Access option as described in Section 6.9.2,
“Enabling or Disabling the Windows Firewall Access,” on page 123.
6.9.2
Enabling or Disabling the Windows Firewall Access
IMPORTANT: Before you disable the Windows Firewall Access, close any remote Management
Console or command line management sessions with the server.
Configuring and Managing the Service
123
To enable or disable the firewall exception for the configured Dynamic File Service port:
1 Log in to the DynamicFS server as the Administrator user or as a user with Administrator
privileges.
2 In the notification area, right-click the Service Controller icon, then select Windows Firewall Access
to open the Firewall Access dialog box.
3 In the Firewall Access dialog box, select one of the following:
On (default): Adds and enables an exception for the configured Dynamic File Service port
via TCP. The exception applies only when the Windows Firewall is enabled and exceptions
are unblocked.
Off: Removes the exception for the configured Dynamic File Service port. This disallows
remote management of this server. You can still manage pairs and policies locally.
4 Click OK to save and apply your changes.
6.10
Configuring Ports for the Service and Retention Review
The Dynamic File Service communicates via TCP with management and retention review
applications through the Service port. The default port number is 8999.
You can modify the ports used by the Service. If you reconfigure the port number, any current
connections with the Service on the old port number are automatically terminated. You must provide
credentials and the new port number to re-connect.
IMPORTANT: The Service is automatically restarted to apply changes to the Management port
setting. Before you modify the port, ensure that you have quiesced the Service as described in
“Prerequisites for Stopping or Restarting the Service” on page 106.
1 Log in to the DynamicFS server as the Administrator user or as a user with Administrator
privileges.
2 If you plan to modify the Management port, close the user connections to the data in the pairs on
the server as described in “Prerequisites for Stopping or Restarting the Service” on page 106.
124
Dynamic File Services 2.2 Administration Guide
3 In the notification area, right-click the Service Controller icon, then select Port Configuration.
4 Select Use the default port, or click Use this port and specify the port number you want to use.
5 Click OK to save and apply your changes.
The Service restarts automatically to apply the changes.
6 If you are prompted to confirm the Service restart, ensure that all users accessing files with the
merged view have logged out, then click Yes to continue.
If you click No, the port change is not made.
7 After a successful port change, the next time that you connect to the DynamicFS server from the
Management Console or the command line interface, you must use the new configured port
number when logging in.
The new configured port is saved in the server’s settings.
6.11
Viewing the Product Version and Build Information
The About box contains information about the software version and build.
1 Log in to the DynamicFS server.
2 Right-click the Service Controller icon in the notification area.
3 Select About.
4 View the following information:
Company
Company link
Product
Build number
Installation directory
Language
Product version
License
Copyright
Configuring and Managing the Service
125
6.12
What’s Next
Configure and log in to a DynamicFS server. For information, see Chapter 7, “Managing Servers
in the Management Console,” on page 127.
Configure pairs on the server. For information, see Chapter 8, “Creating and Managing Pairs,”
on page 139.
Configure policies to run on the pair. For information, see Chapter 9, “Creating and Managing
Policies,” on page 157.
Configure policy schedules and associate them with policies. This determines when policies run
on the pairs. For information, see Chapter 10, “Creating and Managing Policy Schedules,” on
page 189.
Review retained data for retention pairs and monitor the review transaction history. For
information, see Chapter 12, “Managing Retention Reviews,” on page 213.
Monitor the health and history of server disks that are used in pairs, the pairs, and the policy run
history for pairs. For information, see Chapter 13, “Monitoring Pairs and Policies,” on page 229.
126
Dynamic File Services 2.2 Administration Guide
7
Managing Servers in the Management
Console
7
You can set up one or more Novell Dynamic File Services (DynamicFS) servers in the Management
Console. The Management Console can be running on the same or different computer than the server
you want to manage. The configuration settings for the Service, pairs, and policies are stored locally
on the server that you are managing. The information is available through the Management Console
after you connect to the target server.
This section describes how to set up and manage the DynamicFS servers in the Management Console.
Section 7.1, “Setting Up a Server in the Management Console,” on page 127
Section 7.2, “Accepting a Dynamic File Services Certificate,” on page 130
Section 7.3, “Connecting to a Server,” on page 131
Section 7.4, “Viewing a List of Servers and Their Connection Status,” on page 132
Section 7.5, “Viewing Server Properties,” on page 132
Section 7.6, “Disconnecting from a Server,” on page 135
Section 7.7, “Recovering a Lost Connection to a Server,” on page 135
Section 7.8, “Exporting and Importing a Server List,” on page 136
Section 7.9, “Removing a Server from the List,” on page 137
Section 7.10, “What’s Next,” on page 137
7.1
Setting Up a Server in the Management Console
The Dynamic File Services Management Console is used to manage pairs and policies for the servers
where the Dynamic File Service is installed. The console can run on the same computer or a different
computer in the same local area network.
Section 7.1.1, “Understanding the Server List,” on page 128
Section 7.1.2, “Prerequisites for Connecting to a Server,” on page 128
Section 7.1.3, “Setting Up the Server,” on page 129
Managing Servers in the Management Console
127
7.1.1
Understanding the Server List
The Management Console keeps a list of the DynamicFS servers that you manage from a computer. If
different administrator users log in to the same computer to use the Management Console, each user
configures a list of servers to manage.
The list of configured servers (DswUIServers.xml file) is stored in the local application data folder
for the currently logged-in user on the computer where the Management Console is running. This
folder location is based on the operating system as follows:
Operating System
Server List Location
Windows Server 2008
Windows 7
Windows 8
Windows 8.1
C:\Users\username\AppData\Local\Dynamic File
Services\DswUIServers.xml
You can use the import and export features of the Management Console to set up the same server list
for multiple administrator users on the same computer, or to set up the same list on different
computers. For information, see Section 7.8, “Exporting and Importing a Server List,” on page 136.
7.1.2
Prerequisites for Connecting to a Server
In order to connect to a Dynamic File Services server that you want to manage:
The Dynamic File Service must be installed and running on the server you want to manage.
For information, see Section 6.4, “Starting and Stopping the Service,” on page 105.
You must be able to provide the following information:
Authentication Credentials: You must log in to the server as a user that is a member of the
Dynamic File Services group on the target DynamicFS server, or log in as the
Administrator user on that server.
For information about assigning users to the Dynamic File Services group, see
Section 6.3.3, “Setting Up Administrators in a Workgroup,” on page 104.
DNS Name or IP Address: You must provide the DNS name or IP address of the server.
For local management, you can use localhost or 127.0.0.1 (the loop-back address).
Service Port: You must specify the port number that is configured on the server you want to
manage. The default is port 8999.
For remote management, an exception for the Dynamic File Service port must be enabled in the
Windows Firewall on the server you want to manage.
For information, see Section 6.9, “Configuring Firewall Access for the Service Port,” on page 122.
128
Dynamic File Services 2.2 Administration Guide
7.1.3
Setting Up the Server
Use the Server Wizard to set up the connection and credentials information for the DynamicFS
servers you want to manage.
1 In the Management Console, select Servers in the left panel, then click Actions > Server Wizard.
You can also right-click Servers and select Server Wizard, or select Servers, then click File > New >
Dynamic File Services Server.
2 In the Server Wizard, provide the credentials of the Administrator user or a user that is a
member of the Dynamic File Services group on the DynamicFS server that you want to
manage.
Option
Description
IP/DNS
Specify the IP address or the Domain Name Service (DNS) name of the
DynamicFS server where you want to create a pair. The IPv4 format is
supported for the IP address. DNS names are case sensitive.
User name
Specify the user name of the Administrator user or a user that is a member of
Dynamic File Services group on the target server.
Password
Specify the password of the user you specified in the User name field.
Passwords are case sensitive.
Port
Specify the port number that is configured for the server that you want to
manage. The default Dynamic File Service port is 8999.
3 Click Connect to connect to the server.
4 If you are prompted to accept the Dynamic File Services SSL certificate, view the certificate, then
accept it if it is valid.
For information, see Section 7.2, “Accepting a Dynamic File Services Certificate,” on page 130.
Managing Servers in the Management Console
129
5 Verify that the server appears in the left panel under the Servers container.
You can disconnect from the server when you are not actively managing it. The server remains in
the list.
7.2
Accepting a Dynamic File Services Certificate
The default name of the Dynamic File Services self-signed SSL certificate is
servername-DynamicFileServicesSSLCertificate. A self-signed certificate is valid for five years
from the date it is created.
The first time that you connect to a target DynamicFS server from the Management Console, you are
prompted to accept the certificate for the target server. If the server is in a Windows cluster, you are
prompted the first time that a connection is made to each node in the cluster.
The accepted certificate is added to your personal local computer certificates on the management
computer.
Each user that manages pairs and policies on the target server is prompted to accept the certificate
when connecting for the first time to the server.
Section 7.2.1, “Importing a Certificate to the Default Location,” on page 130
Section 7.2.2, “Importing the Certificate to a Specified Location,” on page 131
7.2.1
Importing a Certificate to the Default Location
By default, the SSL certificate is imported to the current user’s Personal local computer store.
1 In the Certificate Validation dialog box, view the issuer information:
Issued to
Issued by
Valid from MM/DD/YYYY to MM/DD/YYYY
2 Click View to view detailed information about the certificate.
3 In the Certificate Information dialog box, review the information on the General, Details, and
Certification Path tabs.
4 Close the Certificate Information dialog box.
5 In the Certificate Validation dialog box, click Accept to automatically install the certificate to your
Personal local computer store.
130
Dynamic File Services 2.2 Administration Guide
7.2.2
Importing the Certificate to a Specified Location
You can specify an alternate location to store the SSL certificate.
1 In the Certificate Validation dialog box, view the issuer information:
Issued to
Issued by
Valid from MM/DD/YYYY to MM/DD/YYYY
2 Click View to view detailed information about the certificate.
3 In the Certificate Information dialog box, review the information on the General, Details, and
Certification Path tabs.
4 If the certificate is valid, on the General tab, click Install certificate to import the certificate on the
local computer.
5 In the Certificate Import Wizard, follow the on-screen instructions to import the certificate.
6 Click OK to dismiss the Certificate Information dialog box.
7 Click Accept to close the Certificate Validation dialog box.
7.3
Connecting to a Server
After you set up a Dynamic File Services server to be managed as described in Section 7.1, “Setting
Up a Server in the Management Console,” on page 127, you can connect to the server whenever you
want to manage its pairs and policies. Only one administrator at a time should be logged in to a
DynamicFS server to manage its pairs and policies.
1 In the Management Console under Servers, select the IP address or DNS name of the server that
you want to manage, then select Actions > Connect. You can also right-click the server name and
select Connect, or double-click the server name.
The DynamicFS Login dialog box opens for the server.
2 If the configured Dynamic File Service port has changed on the target server, specify the
configured port.
3 Specify the user name and password of the Administrator user or a user that is a member of the
Dynamic File Services group on the target server.
4 Click OK to connect to the server.
When the server is connected, the Server icon (
) has a green glow in the upper half of the icon.
Managing Servers in the Management Console
131
7.4
Viewing a List of Servers and Their Connection Status
The Servers container in the left panel of the Management Console lists all of the servers that you have
previously set up on the computer where the Management Console is running. If different
administrator users log in to the same computer to use the Management Console, each user
configures a personal list of servers to manage. You might see different computers in the list,
depending on the user name you use when you log in to the desktop.
1 In the Management Console, select the Servers container (
) in the left panel to expand the list.
You must log in to a server to view the pairs and policies listed below an individual server’s
container.
2 View the current connection status of the servers.
The Server icon next to a server’s IP address or DNS name indicates its connection status:
Server Connection State
7.5
Icon
Description
Disconnected
A gray server icon indicates that you are currently
disconnected from the target DynamicFS server.
Connected
A green glow on the upper half of the server icon indicates that
you are currently connected to the target DynamicFS server.
Connection is lost
A red glow on the lower half of the server icon indicates that
you were connected to the server, but the connection has been
lost. You must disconnect from the server, then connect to the
server again.
Viewing Server Properties
The Server Properties dialog box in the Management Console retrieves and displays information
about the Dynamic File Services servers that you are managing.
Section 7.5.1, “Accessing the Server Properties,” on page 132
Section 7.5.2, “Viewing General Server Information,” on page 133
Section 7.5.3, “Viewing Disk Details for the Server,” on page 133
Section 7.5.4, “Viewing Log Files for the Server,” on page 134
Section 7.5.5, “Viewing Logging Levels for the Server,” on page 135
7.5.1
Accessing the Server Properties
1 In the Management Console, connect to the DynamicFS server you want to manage.
2 In the left panel, select the server, then select Actions > Properties. You can also right-click the
server, then select Properties.
The Server Properties dialog box opens.
3 Continue with Section 7.5.2, “Viewing General Server Information,” on page 133.
132
Dynamic File Services 2.2 Administration Guide
7.5.2
Viewing General Server Information
1 In the Server Properties dialog box, select the General tab to view information about the server
operating system and hardware:
Property
Description
System
The operating system and server time zone of the server.
Computer
Server processor and RAM on the server.
Domain
The fully distinguished name of the Active Directory domain, if the server is a
member server or controller server in an Active Directory environment. For
example: DC=novell,DC=com
Version
The release version of the Dynamic File Services software.
2 Continue with Section 7.5.3, “Viewing Disk Details for the Server,” on page 133.
7.5.3
Viewing Disk Details for the Server
1 In the Server Properties dialog box, select the Disk Details tab to view a list of disks on the server
and the Used Space, Free Space, and Capacity of each disk.
Managing Servers in the Management Console
133
2 (Optional) For each disk, select the disk, then click History to view the history of the disk
capacity and used space.
3 (Optional) Save the graphic display by right-clicking anywhere in a graphical area and selecting
any of the following options:
Copy: Copies the selected graph as an image to the clipboard. Open a graphics editor, paste
the image, and save the file.
Save Image As: Opens a Windows Save As dialog box where you can specify a location and
file name for the image, select a file format, then save the file.
Page Setup: Set up the page orientation (portrait or landscape) and printer information for
printing the graph.
Print: Print the selected graph.
4 Continue with Section 7.5.4, “Viewing Log Files for the Server,” on page 134.
7.5.4
Viewing Log Files for the Server
1 In the Server Properties dialog box, select the Log Files tab to view log information for the
following components on the target server:
Dynamic File Service component (DswMpcCore.log)
Standard Policy engine component (DswStandardPolicy.log)
Install utility (install.log)
Pair Check utility (DswPairCheck.exe)
File Inventory utility (DswInventory.exe)
Logs for the utilities are available after the utility has been run manually at least one time.
134
Dynamic File Services 2.2 Administration Guide
2 (Optional) Search for words in messages by using the Search feature. Type the word or
characters, then click the Search icon to jump to each instance of the word in the log file.
3 Continue with Section 7.5.5, “Viewing Logging Levels for the Server,” on page 135.
7.5.5
Viewing Logging Levels for the Server
1 In the Server Properties dialog box, select the Logging options tab to view the logging level
settings for the Service and Standard Policy logs on the server.
2 If you want to modify the logging levels, continue with Section 6.7, “Configuring the Logging
Level for Engines,” on page 114.
7.6
Disconnecting from a Server
You can disconnect the Dynamic File Services Management Console from the target servers when
you are not actively monitoring or managing pairs and policies on them. You might also need to
disconnect from a server in order to reconnect to it if the connection is lost during a management
session.
1 In the Management Console, if a wizard is open, complete the setup or click Cancel to gracefully
close the in-progress setup process.
2 In the Management Console under Servers, select the DynamicFS server that you want to
manage.
3 Select Actions > Disconnect. You can also right-click the server name and select Disconnect.
When the server is disconnected, the Server icon is dimmed (
Statistics windows for that server are automatically closed.
7.7
). All open Properties or
Recovering a Lost Connection to a Server
If a connection is lost while you are managing a Dynamic File Services server, the server status
changes from Connected (with a green glow on the server icon
glow on the server icon
) to Connection Lost (with a red
). Possible reasons for a lost connection are:
The Service is disabled on the target server.
The configured Service port is modified on the target server.
Managing Servers in the Management Console
135
The Windows Firewall exception is disabled on the target server, which denies remote
connections.
A network outage occurs for a remote connection.
The user name that was used to establish the connection is removed from the Dynamic File
Services group on the target server.
You must disconnect from the server, then connect to the server again to start a new management
session. Restart any management tasks that were in progress.
1 In the Management Console under Servers, select the DynamicFS server that you want to
manage.
2 Select Actions > Disconnect. You can also right-click the server name and select Disconnect.
When the server is disconnected, the Server icon is dimmed (
Statistics windows for that server are automatically closed.
). All open Properties or
3 Select Actions > Connect. You can also right-click the server name and select Connect.
4 Provide the login credentials, then click OK.
7.8
Exporting and Importing a Server List
The Dynamic File Services Management Console allows you to export and import a server list. This
allows you to set up the same list of servers on multiple computers or for multiple administrator
users on the same computer.
The Export server list option allows you to export a server list to an .xml file in a local folder. The
default file name is DswServersList.xml.
The Import server list option allows a currently logged-in administrator user to import an exported
server list to add the servers to a server list that is stored in the user’s personal local application data
folder. You can also copy an exported list to another computer where the Management Console is
installed, then import the server list for use on that computer.
Section 7.8.1, “Exporting a Server List,” on page 136
Section 7.8.2, “Importing a Server List,” on page 136
7.8.1
Exporting a Server List
1 In the left panel of the Management Console, select the Servers container.
2 Select File > Import/Export > Export server list.
3 Browse to the location on the computer where you want to save the file, specify a name for the
file, then click Save.
By default, the list of servers is exported in the DswServersList.xml file.
4 (Optional) Copy the file to portable storage media that can be used on different computers, then
continue with Section 7.8.2, “Importing a Server List,” on page 136to use the list as a different
user on the same computer or on a different computer.
7.8.2
Importing a Server List
1 Log in to the Windows server or client where the Management Console is installed.
Log in with the same user name that you will use to log in to the Management Console.
136
Dynamic File Services 2.2 Administration Guide
2 Place a copy of the exported servers list (DswServersList.xml) on the computer where you are
managing DynamicFS.
3 In the left panel of the Management Console, select the Servers container.
4 Select File > Import/Export > Import server list.
5 Browse to the location on the computer where you placed the DswServersList.xml file, then
click Open.
The list of imported servers is added to the Servers container in the left panel. The servers are
added to the server list (DswUIServers.xml file) that is stored in the local application data folder
for the currently logged-in user.
7.9
Removing a Server from the List
You can remove DynamicFS servers from the Servers list. You might need to remove a server from the
list if the target server is no longer running Dynamic File Services, or if you are no longer responsible
for managing pairs and policies on the server.
1 In the Management Console, if a wizard is open, complete the setup or click Cancel to gracefully
close the in-progress setup process.
2 In the Management Console under Servers, select the DynamicFS server that you want to
manage.
3 If you are connected to the server, disconnect from it by selecting Actions > Disconnect. You can
also right-click the server name and select Disconnect.
When the server is disconnected, the Server icon is dimmed (
).
4 Select the server, then select Actions > Remove server. You can also right-click the server name and
select Remove server.
The server no longer appears in Servers list for the currently-logged-in user.
7.10
What’s Next
Configure pairs on the server. For information, see Chapter 8, “Creating and Managing Pairs,”
on page 139.
Configure policies to run on the pair. For information, see Chapter 9, “Creating and Managing
Policies,” on page 157.
Monitor the health and history of server disks that are used in pairs, the pairs, and the policies.
For information, see Chapter 13, “Monitoring Pairs and Policies,” on page 229.
Managing Servers in the Management Console
137
138
Dynamic File Services 2.2 Administration Guide
8
Creating and Managing Pairs
8
Novell Dynamic File Services (DynamicFS) transparently manages two storage locations as a single
logical data storage repository referred to as a pair. This section describes how to create and manage
pairs.
Section 8.1, “Understanding Pairs,” on page 139
Section 8.2, “Creating a Pair,” on page 142
Section 8.3, “Preparing Remote Shares for Use in a Pair,” on page 146
Section 8.4, “Providing Users with a Merged View of the Files in a Standard Pair,” on page 147
Section 8.5, “Including or Excluding Folders from a Pair’s Policy Runs,” on page 147
Section 8.6, “Viewing a List of Pairs,” on page 149
Section 8.7, “Viewing the Pair Status,” on page 149
Section 8.8, “Viewing Properties for a Pair,” on page 149
Section 8.9, “Moving Selected Files or Folders,” on page 152
Section 8.10, “Scheduling the Pair History Scan,” on page 153
Section 8.11, “Reporting Conflicts for Attributes and ACL Permissions on Folders,” on page 153
Section 8.12, “Reporting Conflicts for Duplicate Files,” on page 154
Section 8.13, “Unlinking the Paths in a Pair,” on page 155
Section 8.14, “What’s Next,” on page 155
8.1
Understanding Pairs
A Dynamic File Services pair is a logical combination of two independent storage locations that are
managed as one. There are two pair types to address your storage needs: a standard pair and a
retention pair. These concepts are described in more detail below.
Section 8.1.1, “Pair Paths,” on page 140
Section 8.1.2, “Standard Pairs,” on page 140
Section 8.1.3, “Retention Pairs,” on page 141
Creating and Managing Pairs
139
8.1.1
Pair Paths
A pair consists of two independent share paths. The two paths in a pair are referred to as primary and
secondary. The primary location typically contains the most important and most used files. The
secondary location typically contains less critical or seldom-used files, very large files, or files that
change infrequently. The administrator determines what files should reside in each location.
Paths are supported on the following devices:
Pair Type
Primary Path
Secondary Path
Standard pair
Local device
Local device
Remote share
Retention pair
Local device
Remote share
Local device
Remote share
Cloud storage
The primary location typically resides on higher-performance storage hardware than the secondary
location. The secondary path can even be connected over lower-speed connections such as cloudbased iSCSI. Retention pairs also support cloud storage for the secondary location. Local devices
include drives that are attached directly to the server or are attached via Fibre Channel and iSCSI
connections. Remote shares can reside on network attached storage (such as NetApp and EMC filers)
and supported Windows server platforms. Remote shares must reside in the same Active Directory
domain or the same workgroup as the DynamicFS server. Cloud storage involves your accounts with
a cloud provider that you have configured to allow the Dynamic File Services application to access
files.
8.1.2
Standard Pairs
The Dynamic File Services standard pair allows you to efficiently manage your storage across a pair
of paths while giving users access to files on both. When users connect to a network share on the
primary path, they see merged view of files. Users are not aware of where the files physically reside.
Files on both paths are equally accessible to users. Dynamic File Services pulls data directly to the
user from the primary path or the secondary path, depending on where the file is located.
For the standard pair, the Dynamic File Services filter driver works with a network share on the
primary path to give users a merged view of the files on both the primary and secondary locations.
140
Dynamic File Services 2.2 Administration Guide
For example, Figure 8-1shows a primary path of C:\primary, a secondary path of F:\secondary,
and the merged view of the files in the pair as seen by the users via the network share.
Figure 8-1 Merged View of the Primary and Secondary Paths
Users
\\server1\primary
C:\primary
Primary on
server1.example.com
F:\secondary
music
music
music
song-2.wav
song-1.mp3
song-1.mp3
classical
song-3.mp3
song-2.wav
classical
song-3.mp3
song-4.wav
documents
song-5.mp3
project-A
song-6.mp3
project-B
classical
song-4.wav
song-5.mp3
song-6.mp3
documents
project-A
project-B
The merged view is not automatically presented to users of a pair. To enable users to see the merged
view, you must use the Microsoft Network Share tool to create a network share on the primary path.
For requirements and guidelines, see Section 4.14, “Merged View for Standard Pairs,” on page 65.
8.1.3
Retention Pairs
The Dynamic File Services retention pair allows you to keep data that is actively used on the primary
path, and to move static data that you rarely need to access to a retention repository on the secondary
path. For example, you can use the repository to store files that are not needed for everyday
operations but must be retained for historical reference, or to comply with contractual or legal
requirements. Files in the repository are not generally available to users. Only designated reviewers
Creating and Managing Pairs
141
can access them via a Web-based Retention Review Service. You can schedule retention review events
and notify multiple recipients about them. Reviewers determine the disposition of retained files in
accordance with your company’s data retention policy. All retention review actions are audited.
For example, Figure 8-2shows a primary path of C:\primary, a secondary path of F:\secondary.
The retention repository contains folders with files that were moved during a particular policy run or
pair Move Files option.
Figure 8-2 Retention Repository as the Secondary Path
Reviewers
Retention Data
Review Web UI
Users
\\server1\primary
HTTPS
Retention Data
Primary on
server1.example.com
F:\secondary
PolicyRun_20110815_10.35
documents
music
project-A
project-B
song-1.mp3
song-2.wav
song-3.mp3
classical
song-4.wav
song-5.mp3
song-6.mp3
8.2
Creating a Pair
Two wizards are available for configuring Dynamic File Services pairs:
Setup Wizard: Sets up a new pair, a new policy, and a new policy schedule. It automatically
associates the pair to the policy, and the policy schedule to the policy. The pair, policy, and
schedule are configured when you click Finish. The associated policy is enforced for the pair at
its next scheduled run, or you can start policy runs manually by using Execute now.
The Setup Wizard opens automatically when you connect to a DynamicFS server if there are no
pairs or policies currently defined for the server. The Setup Wizard is convenient to use when
you want to create a new pair and its policy at the same time. You can associate additional
policies at any time.
142
Dynamic File Services 2.2 Administration Guide
Pair Wizard: Sets up a new pair and allows you to select none, one, or multiple existing policies
to associate with the pair. The associated policies are enforced for the pair at their next scheduled
runs, or you can start policy runs manually by using Execute now. You can associate additional
policies at any time.
IMPORTANT: No data is moved between the primary and secondary locations in a pair until you set
up policies to do so. You can also use the Manual Move option for the pair.
1 If you plan to use a remote share when creating a pair, create the share in the secondary location.
Shares in an Active Directory Domain: You must publish the share as described in Section 8.3,
“Preparing Remote Shares for Use in a Pair,” on page 146. Ensure that your system meets the
requirements in Section 4.9, “Using Remote Shares in an Active Directory Domain,” on page 60.
Shares in a Workgroup: Ensure that your system meets the requirements in Section 4.10, “Using
Remote Shares in a Workgroup,” on page 61.
2 Launch the Management Console, then connect to the DynamicFS server that you want to
manage.
3 Launch the Setup Wizard or the Pair Wizard:
Setup Wizard: Select the server, then select Actions > Setup Wizard. You can also right-click
the server, then select Setup Wizard.
If no pairs or policies exist on the server when you connect to it, the Setup Wizard opens
automatically to an overview of benefits. Review them, then click Start.
Pair Wizard: Select the Pairs folder, then select Actions > Pair Wizard. You can also right-click
the Pairs folder, then select Pair Wizard.
The wizard opens to the Pair Type page.
4 Specify the pair type as Standard pair or Retention pair, then click Next.
5 On the Pair Paths page, specify the primary and secondary paths to use for the pair:
5a Browse to select the primary path, then click OK:
Local path:
Browse the local drives on the DynamicFS server. You can right-click a folder, then
select Create Folder to add a folder if the path is on a local device, and not on a remote
share.
Remote share path:
Remote shares are available if you are specifying the primary path for a retention pair.
Browse the remote shares that have been published in Active Directory. For
information, see Section 8.3, “Preparing Remote Shares for Use in a Pair,” on page 146.
Creating and Managing Pairs
143
You can alternately type the UNC path of a local or remote share. The path name entry
is case-insensitive for local paths, but it is case-sensitive for remote paths.
5b Browse to select a secondary path, then click OK:
Local path:
Browse the local drives on the DynamicFS server. You can right-click a folder, then
select Create Folder to add a folder if the path is on a local device, and not on a remote
share.
Remote share path:
Browse the remote shares that have been published in Active Directory. For
information, see Section 8.3, “Preparing Remote Shares for Use in a Pair,” on page 146.
You can alternately type the UNC path of a local or remote share. The path name entry
is case-insensitive for local paths, but it is case-sensitive for remote paths.
Cloud storage path:
For a retention pair, if you have predefined the cloud account, you can browse the
cloud accounts to select a path in your cloud storage.
5c Click Next to continue.
6 If a network share does not exist on the primary path of a standard pair, a message pops up to
remind you that the share is required for users to access files on the pair via the merged view.
Click OK to dismiss the message.
144
Dynamic File Services 2.2 Administration Guide
You can create the share at any time before you give users access to the files. For information, see
Section 8.4, “Providing Users with a Merged View of the Files in a Standard Pair,” on page 147.
7 On the Pair Name page, specify a unique name (up to 32 characters) for the pair on the selected
server, then click Next.
For information, see Section 4.12, “Naming Conventions for Pairs and Policies,” on page 65.
8 If you are using the Setup Wizard, create a policy for the pair and a schedule for the policy.
Otherwise, skip this step and go to Step 9.
8a Create a new policy.
For details, see Section 9.2, “Creating a Policy,” on page 162. The new policy is
automatically associated with the pair.
8a1 On the Policy Direction page, specify the direction that files are to be moved, then click
Next.
Retention pairs are allowed to move files only from primary to secondary.
8a2 On the Policy Filters page, specify one or more filter options to apply for this policy,
then click Next.
8a3 On the Policy Name and Description page, specify a unique name for the policy on the
selected DynamicFS server, optionally add a more detailed description for the policy,
then click Next to continue.
8b Create a new policy schedule.
For details, see Section 10.2, “Creating a Policy Schedule,” on page 192. The new schedule is
automatically associated with the policy.
8b1 On the Policy Schedule page, select a frequency option from the drop-down list.
8b2 Specify when the policy will run, then click Next.
8b3 On the Schedule Name and Description page, specify a unique name for the schedule
on the selected DynamicFS server, optionally add a more detailed description for the
schedule, then click Next.
8c Review the setup summary for the Pair, Policy, and Policy Schedule, then click Finished.
In the Management Console, the newly created pair, policy, and schedule are listed under
the appropriate folders under the server. The policy is automatically associated with the
pair. The schedule is automatically associated with the policy. The policy rules are enforced
for the pair at the next scheduled run time of the policy. You can also run the policy
manually by using the Execute Now option.
8d Skip Step 9, and continue with Step 10.
9 If you are using the Pair Wizard, click Add to select one or more existing policies to associate
them with the pair, click OK, then click Finished.
The pair is created and appears in the Pairs list for the server. The selected policies are associated
with the pair. If the policy is associated with a schedule, the policy rules are enforced for the pair
at the next scheduled run time of the policy. Unscheduled and scheduled policies can be run
manually by using the Execute Now option.
10 (Optional) After you have configured the pair, you can use any of the following methods to
associate the pair with other policies:
Policy Wizard: Use the Policy Wizard to create a new policy and associate it with the pair.
Pair Properties > Policies: Use the Pair Properties > Policies tab to select one or more policies
to associate with a selected pair. For information, see Section 9.6.4, “Associating or
Disassociating Policies with a Pair,” on page 175.
Creating and Managing Pairs
145
Policy Properties > Pairs: Use the Policy Properties > Pairs tab to select one or more pairs to
associate with a selected policy. For information, see Section 9.6.3, “Associating or
Disassociating Pairs with a Policy,” on page 174.
11 If a network share does not exist on the primary path of a standard pair, continue with
Section 8.4, “Providing Users with a Merged View of the Files in a Standard Pair,” on page 147.
8.3
Preparing Remote Shares for Use in a Pair
In an Active Directory environment, Dynamic File Services allows you to use a remote share as the
secondary path in a file. A remote share must be published in Active Directory before you can specify
it as the secondary path in a pair. To do this, you must share the folder as a network share, publish the
remote share in Active Directory, then add the Dynamic File Services Storage Rights group to the
share and grant it all permissions.
IMPORTANT: For requirements and guidelines for using remote pairs, see Section 4.9, “Using
Remote Shares in an Active Directory Domain,” on page 60.
Section 8.3.1, “Creating a Network Share on the Remote Device,” on page 146
Section 8.3.2, “Publishing the Remote Share,” on page 146
Section 8.3.3, “Adding the Dynamic File Services Storage Rights Group to the Remote Share,” on
page 147
8.3.1
Creating a Network Share on the Remote Device
1 On the remote device, locate the folder you want to use as the secondary path.
2 Right-click the folder, then choose Sharing.
3 Configure the share properties as needed to control access to the share.
4 If the share resides on an NTFS volume, configure the NTFS permissions for the share and any
subfolders to fine-tune security as needed.
5 Continue with Section 8.3.2, “Publishing the Remote Share,” on page 146.
8.3.2
Publishing the Remote Share
After the folder is shared on the remote device, you can publish it in Active Directory.
1 Open the Active Directory Users And Computers tool on the server that will host your primary
path.
2 Select the Computers link to view the member servers in your Active Directory environment.
3 Locate the container in which you want to publish the folder, right-click the container, and
choose New > Shared Folder.
4 Specify the resource name.
The resource name is the name by which the shared folder is listed in the folder and the name
Dynamic File Services sees when it accesses the folder.
5 Specify the share name in UNC form, such as \\servername\sharename.
6 Verify that publishing the share worked:
Net Use a drive to the server with the remote share.
146
Dynamic File Services 2.2 Administration Guide
net use * \\servername\sharename
7 Continue with Section 8.3.3, “Adding the Dynamic File Services Storage Rights Group to the
Remote Share,” on page 147.
8.3.3
Adding the Dynamic File Services Storage Rights Group to the Remote
Share
After you create the remote share and publish it in Active Directory, you must add the Dynamic File
Services Storage Rights group to the remote share and grant the group all permissions.
Alternately, you can use the NDFS-<servername> proxy user described in Section 4.4.4, “Security
Implications of the Default Domain Configuration,” on page 56.
1 In the Active Directory Users and Computers tool, add the Dynamic File Services Storage
Rights group to the remote share.
2 Grant the group all permissions.
8.4
Providing Users with a Merged View of the Files in a
Standard Pair
Dynamic File Services allows users to access files on both the primary and secondary paths via a
network share that you create for the primary path. When users access the share, they see a merged
view of the file trees for the primary path and the secondary path. The merged view gives users
access to all of their files in a pair.
Use Windows Network Sharing and Security to create a network share on a Dynamic File Services pair’s
primary storage location. When users map a drive on their computers to the share, they can see a
merged view of the files stored on the pair.
A network share is needed on the primary path in order to provide a merged view of the pair.
You can add shares above or below the network share for the primary path.
Network shares on, above, or below the secondary path must be removed, or restricted from
direct access by users.
To create a network share:
1 Use Windows Network Sharing and Security to create a network share on the primary storage
location.
See the Microsoft Windows documentation for information about how to set up network sharing
on the computers where DynamicFS is running.
2 Map a drive to the network share, and verify that the users can see a merged view of the two
locations that make up the pair.
8.5
Including or Excluding Folders from a Pair’s Policy Runs
For a Dynamic File Services pair, you can specify one or more folders in the pair’s primary path that
you want to include or to exclude from the policy runs. For a given pair, you can include folders, or
you can exclude folders, but not both. The Include/Exclude setting should be set on subfolders and
not the root of the primary path.
Creating and Managing Pairs
147
IMPORTANT: The primary path must reside on a device that is attached to the Dynamic File
Services server. The Include/Exclude option does not support remote primary paths.
The Include/Exclude setting applies only to the policies for the pair that are run against the primary
path. That is, the Include/Exclude feature applies to policies that are moving data with a Direction
setting of Primary to Secondary.
1 In the Management Console, connect to the DynamicFS server that you want to manage.
2 Right-click the pair that you want to manage, then select Properties to open the Pair Properties
dialog box.
3 Select the Include/Exclude tab.
4 In Options, select only one of the following restriction options per pair:
The options are dimmed and not selectable if the pair has a remote primary path.
None: The Include/Exclude option is disabled for the pair. Existing paths in the Include/Exclude list
are not deselected, and remain available if you later re-enable Include or Exclude.
Exclude: Enable the Exclude option. Policies that run on the primary path (primary to secondary)
do not act on content in the specified folders on the primary path.
Include: Enable the Include option. Policies that run on the primary path (primary to secondary)
act only on content in the specified folders on the primary path.
5 Create a list of folders where you want to apply the Include/Exclude setting when it is enabled.
5a Click Add/Remove to open a file browser dialog box.
5b Select the check box next to a folder to add it to the list.
5c Click OK to return to the Include/Exclude tab.
5d On the Include/Exclude tab, click Apply to save and apply the changes.
In the following example, the Include setting is enabled. Primary-to-secondary policies
apply only to the C:\primary1\includeme folder.
6 (Optional) Remove folders from the Include/Exclude list.
6a Click Add/Remove to open a file browser dialog box.
6b Deselect the check box next to a folder to remove it from the list.
148
Dynamic File Services 2.2 Administration Guide
6c Click OK to return to the Include/Exclude tab.
6d On the Include/Exclude tab, click Apply to save and apply the changes.
7 Click OK to save your changes and close the Pair Properties dialog box.
8.6
Viewing a List of Pairs
You can use the Dynamic File Services Management Console to view a list of all of the pairs that are
defined for a server.
1 In the Management Console, connect to the DynamicFS server that you want to manage.
2 In the left panel, select the Pairs folder (
) for the server, then view the list of pairs (
) in the
right panel.
The Pairs list reports the following information for each pair:
Pair name
Type (Retention, Standard)
Status (Idle, Running)
Primary Path
Secondary Path
3 Click a column heading to sort the list by that parameter.
8.7
Viewing the Pair Status
The pair status indicates whether a Dynamic File Services file scan is being run against the pair at that
time. Status conditions are reported as Idle or Running. Scans that might be in progress include scans
for policy runs and the disk history. Only one scan at a time can be run against a pair.
Some actions, such as stopping the Service, require that all pairs be idle before you perform the
action.
1 In the Management Console, connect to the DynamicFS server that you want to manage.
2 In the left panel, select the Pairs folder (
) for the server, then view the list of pairs in the right
panel.
A pair’s status (Idle, Running) appears to the right of the pair name.
8.8
Viewing Properties for a Pair
1 In the Management Console, connect to the DynamicFS server that you want to manage.
2 Select the Pairs folder for the server, then view the list of pairs that are defined.
Creating and Managing Pairs
149
3 Right-click a pair, then select Properties.
The Properties dialog box opens to the General tab. It reports the following information:
Pair name
Primary
Type (the device type)
Primary path
Share name
Secondary
Type (the device type)
Secondary path
4 Click the Policies tab to view a list of the policies that are currently associated with the pair.
Select a policy to view information about it. You can also add and remove policies from the
Associated policies list.
5 Click the Notification Review tab to specify a schedule for notifications to be sent.
This requires that the Notification Service has already been configured. You must also have
selected Review Events to be sent to an email address. Otherwise, notifications are not sent.
150
Dynamic File Services 2.2 Administration Guide
6 Click the Include/Exclude tab to view a list of directories on the primary path of the pair that are
either included or excluded from policy runs.
You can also add and remove directories from the include or exclude list. For information, see
Section 8.5, “Including or Excluding Folders from a Pair’s Policy Runs,” on page 147.
7 Click the Pair history tab to view or modify the frequency and time that the pair history scan is
run.
For information, see Section 8.10, “Scheduling the Pair History Scan,” on page 153.
8 If you modify the settings, click Apply or OK to save the settings. Otherwise, click Cancel to close
the dialog box when you are done.
Creating and Managing Pairs
151
8.9
Moving Selected Files or Folders
The Manual Operations option for a pair allows you to build a list of files and folders that you want
to move between the two paths. The specified files or folders are moved immediately. This is a onetime selection and move of the specified files. The display for selection supports up to 50,000 files in a
folder, and shows them in groups of 10,000 at a time.
1 In the Management Console, connect to the server you want to manage.
2 In the Pairs list, right-click the pair, then select Manual move to open the Manual Move dialog
box.
You can also select the pair, then select Actions > Manual move.
3 At the top of the page, specify the direction that you want to move the files and folders that you
will add to the list.
The manual operation moves for a retention pair moves files only from the primary path to the
secondary path.
4 Create a list of the files and folders that you want to move manually:
4a Click Add to open a file browser interface for the selected pair.
If you selected Primary to Secondary as the direction, only files on the primary path are
presented. For Secondary to Primary, only files on the secondary path are presented.
4b Browse to locate a file or folder you want to move, then select the check box next to it.
You can select multiple files and folders. If you select a folder, the folder’s entire contents
are moved, including any subfolders in it.
4c Click OK to add the selected folders to the list.
The selected files and folders are appended to the list as you add them.
4d You can remove files or folders from the move list by selecting the entry in the list, then
clicking Remove files.
4e Review the compiled list of files and folders to ensure that it is accurate, and repeat the Add
and Remove options as needed.
5 Do one of the following:
OK: Click OK to move the specified files and folders now. A one-time policy is created for
the manual move, and it is queued to run at the earliest available time.
Cancel: Click Cancel to abandon the procedure. The list you created is not retained.
152
Dynamic File Services 2.2 Administration Guide
8.10
Scheduling the Pair History Scan
The Dynamic File Services File System Inventory utility scans each pair on the server to collect file
statistics for the pair history. History scans can be run hourly, daily, or weekly. By default, the history
scan runs once daily at 4:00 a.m. The scans run until completion. You can configure the scan to run
more or less often on a given pair by configuring the pair’s Pair History Scan.
To change the frequency and time of day for the Pair History Scan on a given pair:
1 In the Management Console, connect to the server you want to manage.
2 Select the pair, then select Actions > Properties to open the Pair Properties dialog box.
3 Select the Pair History tab.
4 Specify the frequency and the time to run.
Hourly: The scan runs every hour on the hour.
Daily: The scan runs once daily at the specified starting hour. Select a time between midnight
and 11:00 p.m. The default is 4:00 a.m.
Weekly: The scan runs once weekly on the specified day and starting hour. Select a time
between midnight and 11:00 p.m. The default is Sunday at 4:00 a.m.
8.11
Reporting Conflicts for Attributes and ACL Permissions on
Folders
You should use the merged view when setting attributes and ACL (access control list) permissions on
folders in a Dynamic File Services pair. In a pair, an instance of each folder is stored in both the
primary path and the secondary path as files are moved between the two paths.
For information about how metadata on the two folder instances can become out of synchronization,
see Section 4.16, “Duplicate Folders in a Standard Pair,” on page 66.
To identify conflicts for attributes and ACL settings on folders, you can run the DynamicFS Pair
Check utility (DswPairCheck.exe) with the -folders option to detect the metadata differences
between the two instances of a folder and report them. You must log in as a user with rights to all of
the paths in the pair. For information, see “Dynamic File Services Pair Check Utility” in the Dynamic
File Services 2.2 Client Commands and Utilities Reference.
The Pair Check utility is typically used for standard pairs to verify ACLs folders in the two paths. The
Pair Check utility does not support being run on a retention pair that uses cloud storage as the
secondary path. In the cloud, the ACLs metadata is stored in a database and not with the files.
1 Log in to the DynamicFS server as a user with file system rights on the primary and secondary
paths in the pair you want to manage.
If remote shares are being used, ensure that you have sufficient access rights on the secondary
locations.
2 Open the Management Console, select the pair, then verify that the pair status is in the Idle state.
Policies must not be running against the pair when you start the Pair Check utility. If policies are
running, wait until they are done, or stop them manually. Wait until the pair status is idle before
continuing.
3 Open an Administrator Command Prompt console. Select Start > All Programs > Accessories,
right-click Command Prompt, then select Run as Administrator.
4 Change directory to go to the C:\Program Files\Dynamic File Services folder (or the folder
where you installed Dynamic File Services).
Creating and Managing Pairs
153
5 At the command prompt, enter:
DswPairCheck.exe -pair="<pairname | guid>" -folders [-xml="reportname"]
[-csv="reportname"]
For example, to identify mismatches for the attributes and ACLs for the folders in a pair named
MyPair and to create an output report named myXmlReport in XML format, enter the following
command:
DswPairCheck.exe -pair="MyPair" -folders -xml="myXmlReport"
This command looks in the pair database for the source and target paths of the pair named
MyPair. It checks for folders that have mismatched attributes and ACLs on the source and target
paths. It produces a report in XML format in the myXmlReport.folders.xml file.
6 When you are prompted, enter the user name of a user with rights to all of the paths in the pair.
8.12
Reporting Conflicts for Duplicate Files
You should always use the merged view when creating, modifying, or deleting files in a pair.
Dynamic File Services manages a file so that a single instance of it exists on either the primary or
secondary location.
For information about how duplicate files can occur and how Dynamic File Services handles them,
see Section 4.17, “Duplicate Files in a Standard Pair,” on page 67.
Section 8.12.1, “Viewing Errors in the Policy Execution History,” on page 154
Section 8.12.2, “Generating a Duplicate Files Report,” on page 154
8.12.1
Viewing Errors in the Policy Execution History
If a policy run is interrupted because one or both of the media become unavailable during the policy
run, you can check the policy run history to find out which file move might not have been completed.
An Invalid File Handle error is reported in the policy move log in the Statistics > Policy execution
history > Files not moved > Comment field for the file. The valid file is the instance on the source location
of the move.
8.12.2
Generating a Duplicate Files Report
The Pair Check utility is typically used for standard pairs to detect duplicate files that are hidden by
the merged view. Duplicate files do not occur in a retention pair because the retention repository in
the secondary location has a different file structure than the primary path.
To identify duplicate file conflicts, you can run a duplicate files report by using the Dynamic File
Services Pair Check utility (DswPairCheck.exe). The -files option detects duplicate instances of a
file that exist on the primary and secondary paths, and reports them. You must log in as a user with
rights to all of the paths in the pair. For information, see “Dynamic File Services Pair Check Utility” in
the Dynamic File Services 2.2 Client Commands and Utilities Reference.
To generate a duplicate files report:
1 Log in to the Dynamic File Services server as a user with file system rights on the primary and
secondary paths in the pair you want to manage.
If remote shares are being used, ensure that you have sufficient access rights on the secondary
locations.
154
Dynamic File Services 2.2 Administration Guide
2 Open the Management Console, select the pair, then verify that the pair status is in the Idle state.
Policies must not be running against the pair when you start the Pair Check utility. If policies are
running, wait until they are done, or stop them manually. Wait until the pair status is idle before
continuing.
3 Open an Administrator Command Prompt console. Select Start > All Programs > Accessories,
right-click Command Prompt, then select Run as Administrator.
4 Change directory to go to the C:\Program Files\Dynamic File Services folder (or the folder
where you installed Dynamic File Services).
5 At the command prompt, enter:
DswPairCheck.exe -pair="<pairname | guid>" -files [-xml="reportname"]
[-csv="reportname"]
For example, to identify duplicate files in a pair named MyPair and to create an output report
named myXmlReport in XML format, enter the following command:
DswPairCheck.exe -pair="MyPair" -files -xml="myXmlReport"
This command looks in the pair database for the source and target paths of the pair named
MyPair. It checks for files that have same path and file name in the source and target paths. It
produces a report in XML format in the myXmlReport.files.xml file.
6 When you are prompted, enter the user name of a user with rights to all of the paths in the pair.
8.13
Unlinking the Paths in a Pair
Unlinking a Dynamic File Services pair removes the pair relationship between the primary path and
the secondary path. When the two locations are unlinked, the files in the two locations remain where
they are on the primary path or secondary path. Removing the link automatically disassociates the
policies from the pair; it does not delete the policies.
You might want to unlink a pair for any of the following reasons:
You no longer need the pair.
You want to modify one of the paths used in the pair.
You cannot modify the paths that define the pair. Instead, you unlink the current pair, and create
a new pair that uses the desired paths.
To unlink the paths in a pair:
1 In the Management Console, connect to the DynamicFS server that you want to manage.
2 Create one or more policies to move data between the primary and secondary locations so that
the data is where you want it to be when you remove the link between the two locations.
3 Run the policies, then verify that the files have moved by viewing the Statistics > Policy Execution
History > Run History, or by using the Windows Explorer to browse the file paths.
4 Select Pairs, right-click the pair, then select Unlink.
8.14
What’s Next
Configure policies to run on the pair. For information, see Chapter 9, “Creating and Managing
Policies,” on page 157.
Creating and Managing Pairs
155
For retention pairs, manage reviews of the retained data. For information, see Chapter 12,
“Managing Retention Reviews,” on page 213.
Monitor the health and history of the pairs, the policies, and the server disks that are used in
pairs. For information, see Chapter 13, “Monitoring Pairs and Policies,” on page 229.
156
Dynamic File Services 2.2 Administration Guide
9
Creating and Managing Policies
9
Novell Dynamic File Services (DynamicFS) policies control which data is moved, what direction the
data moves, and when the policy is enforced. No data is moved between the primary and secondary
location for a pair unless you assign a policy to it. The policy can be scheduled to run automatically,
or you can run it on demand. You can assign multiple policies to a pair. A policy can be assigned to
multiple pairs.
Section 9.1, “Understanding Policies,” on page 157
Section 9.2, “Creating a Policy,” on page 162
Section 9.3, “Customizing the File Types Filter,” on page 167
Section 9.4, “Viewing a List of Policies,” on page 172
Section 9.5, “Viewing Properties for a Policy,” on page 173
Section 9.6, “Associating or Disassociating Pairs and Policies,” on page 174
Section 9.7, “Modifying Policy Filters,” on page 177
Section 9.8, “Starting a Policy Run,” on page 178
Section 9.9, “Previewing a Policy Run,” on page 179
Section 9.10, “Stopping an In-Progress Policy Run,” on page 180
Section 9.11, “Exporting and Importing Policies on a Dynamic File Services Server,” on page 180
Section 9.12, “Deleting a Policy,” on page 181
Section 9.13, “Troubleshooting Policy Conflicts,” on page 182
Section 9.14, “Examples of Policy Rules,” on page 182
Section 9.15, “What’s Next,” on page 187
9.1
Understanding Policies
Policies define what files to move and the direction to move them. You can associate a policy
schedule with a policy to specify an automatic run time. You can also run the policy manually by
using the Execute now option.
You can associate a policy with one or more pairs. You can associate a pair with none, one, or more
policies. Dynamic File Services moves files between the primary path and the secondary path when
its associated policies are enforced. When a file is moved, it remains in the destination location until a
policy moves it in the other direction.
The rules defined in the policy are enforced when the policy is run. By creating different policies for a
pair, you can move files that meet different conditions. If you configure multiple policies for a pair to
run at the same time, the policy engine does the following:
1. Groups the policies according to the direction that the data is being moved: From primary to
secondary or from secondary to primary.
Creating and Managing Policies
157
2. Scans the primary path, and enforces policies that move files to the secondary path.
3. Scans the secondary path, and enforces policies that move files to the primary path.
The following sections describe the policy settings:
Section 9.1.1, “Policy Name and Description,” on page 158
Section 9.1.2, “Policy Direction,” on page 158
Section 9.1.3, “Policy Filter Options,” on page 159
Section 9.1.4, “Schedule to Policy Association,” on page 162
Section 9.1.5, “Pair to Policy Associations,” on page 162
9.1.1
Policy Name and Description
Each policy name must be unique to the DynamicFS server. If you plan to export a policy for use
across multiple DynamicFS servers, the name should be unique across all of the servers.
Table 9-1 Policy Name and Description Options
Option
Description
Policy Name
Policy names can be up to 32 characters.
For information about naming restrictions, see Section 4.12, “Naming Conventions
for Pairs and Policies,” on page 65.
Description
9.1.2
If desired, you can add a more detailed human-interpretable description of the
policy.
Policy Direction
The Policy Direction option determines whether the policy is enforced against files on the primary
path or the secondary path. The policy run scans the original location to discover files that meet the
filter criteria, then moves those files to the destination location. If all of the specified filter options in
the policy are true for a file, the file is moved in the specified direction.
For example, if you are moving data from primary to secondary, the policy is enforced against the
files on the primary path. If all of the selected filter options are true for a file, the file is moved from
the primary path to the secondary path.
Table 9-2 Policy Direction Options
158
Option
Description
Primary to Secondary
The policy is enforced against the files in the primary location. Files that match the
policy rules are moved from the primary path to the secondary path. This is the
default.
Secondary to Primary
The policy is enforced against the files in the secondary location. Files that match
the policy rules are moved from the secondary path to the primary path.
Dynamic File Services 2.2 Administration Guide
At run time, the policies for a pair are grouped by direction. The primary-to-secondary group of
policies are run on the primary location, and then the secondary-to-primary group of policies are run
on the secondary location. It is possible for a file to move from primary to secondary based on rules
in the first group of policies, then move from secondary to primary based on rules in the second
group of policies.
9.1.3
Policy Filter Options
The Policy Filter options specify the rules that determine which files are to be moved by the policy.
The filters in a policy apply to all files unless you enable the File patterns option or the File types
option.
When a policy is enforced, a file is moved only if it satisfies all of the filter options set for that policy.
(That is, the filters in a given policy are enforced as AND operations.)
When multiple policies are enforced in a single run, a file is moved if it satisfies the rules in any one
of the policies in that group. (That is, multiple concurrently scheduled policies are enforced as OR
operations.)
There are no default policy filters. You must enable and configure at least one of the following filter
options in each policy. For examples of how to create policy rules to achieve your storage goals, see
Section 9.14, “Examples of Policy Rules,” on page 182.
“File Size” on page 159
“Last Accessed” on page 159
“Last Modified” on page 159
“File Patterns” on page 159
“File Types” on page 160
“File Owners” on page 161
File Size
You can use the File size option to move a file only if its size is greater than or less than the specified
file size. File size is specified in bytes, kilobytes, megabytes, or gigabytes.
Last Accessed
You can use the Last accessed option to move a file only if the elapsed time since it was last accessed is
greater than or less than the specified time period. Time is specified in days, weeks, months, or years.
Last Modified
You can use the Last modified option to move a file only if the elapsed time since it was last modified is
greater than or less than the specified time period. Time is specified in days, weeks, months, or years.
File Patterns
You can use the File patterns option to evaluate the file name and extension of files in the pair. The rule
moves a file only if the file matches any one of the specified file patterns. If you specify other filter
options, only files that satisfy the pattern and that also meet the other criteria are moved.
Creating and Managing Policies
159
IMPORTANT: The File patterns option and the File types option cannot be used together.
Regular expressions that you use in the File patterns field work like expressions you might use in the
dir function on the Windows command line. The asterisk (*) is a wildcard character can be used to
represent a sequence of any number of characters in the name. The question mark (?) character can be
used to represent a single character.
The pattern search is case insensitive.
Separate multiple file patterns with a comma and no spaces. If you include spaces in a pattern, the
spaces are interpreted as part of the pattern you seek.
Examples
These two search patterns find the same files:
*aBa_*
*ABA_*
In the following patterns, spaces within a pattern are considered part of the file name. The spaces
after a comma are part of the next pattern.
test many files*, many*, 12??*,dsw*.?2*
In the following patterns, the asterisk is used for the file name to indicate that files with a specified
extension should be moved:
*.mp3,*.png,*.jpg
To move all files with and without extensions, specify All files (*.*) in the File patterns field.
To move files with no extension, specify “*.” in the File patterns field.
Table 9-3 shows examples of regular expressions that are used as file patterns and the files found:
Table 9-3 Sample File Patterns
File Pattern
File Found
*jpg*
testjpg.txt
test.?
test.1
proc*test.jpg
procisatest.jpg
*_?.text
p_1.text
*ap*.???
apache.aaa
File Types
Applications typically use different file extensions for the same logical types of file content, such as
videos, images, and documents. The File types option allows you to move files based on a file type
rather than exhaustively listing every file extension that fits that profile. You can specify one or more
file types in a policy.
IMPORTANT: The File types option and the File patterns option cannot be used together.
160
Dynamic File Services 2.2 Administration Guide
A file types policy moves a file only if the file’s extension matches one of the extensions associated
with any one of the specified types. Because an extension can be altered by a user to avoid detection,
you can alternatively read the file’s content information to determine its type by selecting the Use file
content to determine type check box.
IMPORTANT: Checking the file content increases the time needed to process the files during a
policy run.
In Dynamic File Services, the File Types filter uses categories based on MIME types and Microsoft
perceived types. You can also define categories to suit your environment. When a policy is run,
Dynamic File Services considers the following resources to identify the file type categories and their
related file extensions:
Windows Registry: Server applications store information in the Windows Registry about the
MIME types and perceived types for their file extensions. For information, see Section 9.3.1,
“Viewing MIME Types and Perceived Types for Installed Applications in the Windows
Registry,” on page 167.
File Types Configuration File: Dynamic File Services maps well-known file extensions to file
type categories in the File Types configuration file (..\Dynamic File
Services\DswFileTypes.cfg). You can customize the file to add, remove, or modify the
extensions and their associated file type categories to suit your environment. For information,
see Section 9.3.2, “Configuring File Extensions and Categories for the File Types Filter,” on
page 168.
MIME Types Configuration file: Dynamic File Services maps well-known MIME types to file
extensions in the MIME Types configuration file (..\Dynamic File
Services\DswMimeTypes.cfg). You can customize the file to add, remove, or modify the MIME
types and their associated file type categories to suit your environment. For information, see
Section 9.3.3, “Configuring MIME Types and Categories for the Content Filter,” on page 169.
File Owners
You can move files based on file ownership. In the Users and Groups browse view, you can select the
user names and group names to add to the policy. The user names, group names, and group
memberships are verified before each run. Only user names and group names that are valid when the
run begins are used for the run. For groups, only user names that are members of the group when the
run begins are used for the run.
Dynamic File Services can also move ownerless files. Files are considered to be ownerless if the user
name or group name has been removed from the Active Directory domain or the server’s Users and
Groups list. A file retains the Security Identifier (SID) of that user or group even after the associated
name becomes invalid. You can move ownerless files by selecting the {No owners} entry in the Select
Users > Users or Groups dialog box.
In the pre-run check, Dynamic File Services uses the metadata status that is known to the NTFS file
system at that time to verify which names are valid, and then uses the valid names for the policy run.
It does not re-verify the names during the run. If name and membership changes are synchronized to
NTFS while the policy is running, the changes are not considered until the next policy run.
Creating and Managing Policies
161
9.1.4
Schedule to Policy Association
The policy can be scheduled to run periodically, or you can execute it on demand. A single policy can
be associated with single schedule. A single schedule can be associated with multiple policies. When
multiple policies are scheduled to run at the same time, they are enforced as a group for each pair
that is associated with them.
For information about creating policy schedules and associating them with policies, see Chapter 10,
“Creating and Managing Policy Schedules,” on page 189.
9.1.5
Pair to Policy Associations
No data is moved between the primary and secondary locations in a pair until you associate it with at
least one policy. A policy must be associated with at least one pair before it can be run. A policy is
enforced only for its associated pairs. A single policy can be associated with multiple pairs. A single
pair can be associated with multiple policies. For instructions, see Section 9.6, “Associating or
Disassociating Pairs and Policies,” on page 174.
IMPORTANT: A retention pair can be associated with a policy only if the direction is Primary to
Secondary. You must use the Review Service to restore a file from the retention repository on the
secondary path to its original location on the primary path.
You can configure the Include Folders setting for a pair to specify folders in the pair where its
associated policies apply. You can configure the Exclude Folders setting for a pair to specify folders in
the pair where its associated policies do not apply. For a given pair, you can include folders or
exclude folders, but not both. For information, see Section 8.5, “Including or Excluding Folders from
a Pair’s Policy Runs,” on page 147.
9.2
Creating a Policy
The policy must be associated with at least one pair before it can be run. A policy is enforced only for
its associated pairs. For information on the policy parameters, see Section 9.1, “Understanding
Policies,” on page 157.
You can configure a policy by using the Policy Wizard or the Setup Wizard. The Setup Wizard allows
you to create a pair, a policy, and a policy schedule at the same time that are automatically associated.
Section 9.2.1, “Creating a Policy with the Policy Wizard,” on page 162
Section 9.2.2, “Creating a Policy with the Setup Wizard,” on page 165
9.2.1
Creating a Policy with the Policy Wizard
1 In the Management Console, connect to the DynamicFS server that you want to manage.
2 Right-click the Policies folder, then select Policy Wizard.
You can also select the Policies folder, then select Actions > Policy Wizard from the toolbar.
3 On the Policy Direction page, specify which direction to move files.
Primary to secondary
Secondary to primary
For information about each option, see Section 9.1.2, “Policy Direction,” on page 158.
162
Dynamic File Services 2.2 Administration Guide
4 On the Policy Filter page, specify the search criteria to use to identify the files to be moved when
the policy is enforced.
You must enable and configure at least one of the following filter options. For information about
each option, see Section 9.1.3, “Policy Filter Options,” on page 159.
Filter Option
Description
File size
Select the check box, then create a rule that moves a file only if its size is
greater than or less than the specified file size.
Last accessed
Select the check box, then create a rule that moves a file only if the elapsed
time since it was last accessed is greater than or less than the specified time
period.
Last modified
Select the check box, then create a rule that moves a file only if the elapsed
time since it was last modified is greater than or less than the specified time
period.
File patterns
Select the check box, then create a rule that moves a file only if its file name
uses one of the specified file patterns. Separate multiple file patterns with a
comma and no spaces. If you include spaces in a pattern, the spaces are
interpreted as part of the pattern you seek.
Restriction: The File patterns option cannot be used in combination with the
File types option
File types
Select the check box to enable the option, then create a rule that moves a file
based on file types.
Add: Click Add, select one or more file types from the File types list, then
click OK.
Remove: Select a file type from the list, then click Remove.
Use file content to determine type: (Optional) Select the Use file
content to determine type check box to move files only if the file content
matches one of the specified file types. This option increases the run time
of the policy.
Restriction: The File types option cannot be used in combination with the File
patterns option
Creating and Managing Policies
163
Filter Option
Description
File owners
Specify one or more user names or group names. Only files owned by the
specified users or groups are moved. User names or group names that are
invalid at run time are ignored.
Add: Click Add, select one or more user names or group names from the
Users and Groups list, then click OK.
You can move ownerless files by selecting the {No owners} entry in the
Select Users > Users or Groups dialog box.
Remove: Select a user name or group name from the list, then click
Remove.
5 On the Policy Name and Description page, specify the following parameters, then click Next.
Name Option
Description
Name
Specify a unique name for the policy on the DynamicFS server.
A policy name can be up to 32 characters. For information about naming
restrictions, see Section 4.12, “Naming Conventions for Pairs and Policies,” on
page 65.
If you plan to export the policy, the name must be unique on all of the servers.
Description
Optionally specify a more detailed description for the policy. This is a friendly
description that provides context and meaning to the administrators.
6 On the Policy Schedule page, click Add, select an available schedule, click OK, then click Next.
Only one schedule can be associated to a policy at a time. To remove an associated schedule
from the policy, select it, then click Remove.
You can click Next to skip this step if you do not want to schedule the policy or if the schedule
has not been created. You can create a schedule later and associate it with the policy.
For information about managing schedule and policy associations, see Section 10.6, “Associating
or Disassociating Schedules and Policies,” on page 196.
7 On the Pair to Policy Association page, click Add to view a list of the available pairs, select one or
more pairs to associate with the policy, then click OK.
The policy must be associated with at least one pair to be able to run. The policy is enforced only
for its associated pairs. To remove an associated pair from the policy, select it, then click Remove.
164
Dynamic File Services 2.2 Administration Guide
You can click Next to skip this step if you do not want to associate the policy with pairs at this
time or if the pairs have not been created. You can create pairs later and associate them with the
policy.
For information about managing pair and policy associations, see Section 9.6, “Associating or
Disassociating Pairs and Policies,” on page 174.
8 Click Finished to create the policy, or click Cancel exit without creating the policy.
If a pair and schedule are associated with the policy, the policy is enforced at its next scheduled
run time, or you can run it at any time by using Execute now.
9.2.2
Creating a Policy with the Setup Wizard
1 In the Management Console, connect to the DynamicFS server that you want to manage.
2 Right-click the Server folder, then select Setup Wizard.
You can also select the Server folder, then select Actions > Setup Wizard from the toolbar. If no
pairs or policies exist on the server when you connect to it, the Setup Wizard opens
automatically.
3 On the Pair Type page, select the pair type, then follow the steps to create a pair, then click Next.
4 On the Policy Direction page, specify which direction to move files.
Primary to secondary
Secondary to primary
This direction is not available (dimmed) if the specified pair type is a retention pair.
For information about each option, see Section 9.1.2, “Policy Direction,” on page 158.
5 On the Policy Filter page, specify the search criteria to use to identify the files to be moved when
the policy is enforced.
You must enable and configure at least one of the following filter options. For information about
each option, see Section 9.1.3, “Policy Filter Options,” on page 159.
Filter Option
Description
File size
Select the check box, then create a rule that moves a file only if its size is
greater than or less than the specified file size.
Last accessed
Select the check box, then create a rule that moves a file only if the elapsed
time since it was last accessed is greater than or less than the specified time
period.
Last modified
Select the check box, then create a rule that moves a file only if the elapsed
time since it was last modified is greater than or less than the specified time
period.
File patterns
Select the check box, then create a rule that moves a file only if its file name
uses one of the specified file patterns. Separate multiple file patterns with a
comma and no spaces. If you include spaces in a pattern, the spaces are
interpreted as part of the pattern you seek.
Restriction: The File patterns option cannot be used in combination with the
File types option
Creating and Managing Policies
165
Filter Option
Description
File types
Select the check box to enable the option, then create a rule that moves a file
based on file types.
Add: Click Add, select one or more file types from the File types list, then
click OK.
Remove: Select a file type from the list, then click Remove.
Use file content to determine type: (Optional) Select the Use file
content to determine type check box to move files only if the file content
matches one of the specified file types. This option increases the run time
of the policy.
Restriction: The File types option cannot be used in combination with the File
patterns option
File owners
Specify one or more user names or group names. Only files owned by the
specified users or groups are moved. User names or group names that are
invalid at run time are ignored.
Add: Click Add, select one or more user names or group names from the
Users and Groups list, then click OK.
You can move ownerless files by selecting the {No owners} entry in the
Select Users > Users or Groups dialog box.
Remove: Select a user name or group name from the list, then click
Remove.
6 On the Policy Name and Description page, specify the following parameters, then click Next.
Name Option
Description
Name
Specify a unique name for the policy on the DynamicFS server.
A policy name can be up to 32 characters. For information about naming
restrictions, see Section 4.12, “Naming Conventions for Pairs and Policies,” on
page 65.
If you plan to export the policy, the name must be unique on all of the servers.
Description
Optionally specify a more detailed description for the policy. This is a friendly
description that provides context and meaning to the administrators.
7 On the Policy Schedule page, create the schedule, then click Next.
The schedule is automatically associated with the policy.
166
Dynamic File Services 2.2 Administration Guide
8 On the Summary page, review the settings for the pair, policy, and policy schedule, the click
Finished to create them, or click Cancel exit without creating them.
If a pair and schedule are associated with the policy, the policy is enforced at its next scheduled
run time, or you can run it at any time by using Execute now.
9.3
Customizing the File Types Filter
The File Types filter considers the MIME type and perceived types defined on the Dynamic File
Services server in the Windows Registry, the File Types configuration file (DswFileTypes.cfg), and
the MIME Types configuration file (DswMimeTypes.cfg). This section explains how these files are
used, and how to customize them to improve the effectiveness of the File Type filter.
Section 9.3.1, “Viewing MIME Types and Perceived Types for Installed Applications in the
Windows Registry,” on page 167
Section 9.3.2, “Configuring File Extensions and Categories for the File Types Filter,” on page 168
Section 9.3.3, “Configuring MIME Types and Categories for the Content Filter,” on page 169
Section 9.3.4, “Using Apache Tika to Find the MIME Type of a File,” on page 172
9.3.1
Viewing MIME Types and Perceived Types for Installed Applications in
the Windows Registry
The Windows Registry contains information about each installed application’s file extensions and the
related perceived type or MIME type. The types vary, depending on what applications are installed
on a server. Before you use the File Types filter, ensure that you understand what file types are in use
on the server and what file extensions are associated with them in the server’s Windows Registry.
An application maps file extensions to content types by adding an entry in the server’s Windows
Registry under the HKEY_CLASSES_ROOT\<file_extension> key. For example:
HKEY_CLASSES_ROOT\.gif
Content Type = "image/gif"
Content types are also listed in the Windows Registry under HKEY_CLASSES_ROOT\MIME\Content
Type\<type>\<subtype> key.
Applications can also specify a Perceived_Type parameter for the file extensions it uses.
Common file types and a list of the file extensions that are typically associated with them are
provided in Table 9-4. The list is not intended to be exhaustive.
Table 9-4 Common MIME Types and Their Associated File Extensions
MIME Type
Sample of the Associated File Extensions
application
.accdb
.ai
.ani
.csv
.doc
.docx
.gz
.odp
.odt
.pdf
.pps
.ppt
.pptx
.xls
.zip
audio
.aiff
.mid
.mmv
.mp3
.wav
.wma
Creating and Managing Policies
167
9.3.2
MIME Type
Sample of the Associated File Extensions
compressed (perceived type)
.arc
.cab
.zip
image
.bmp
.gif
.jpeg
.jpg
.png
.tiff
message
.mht
.mhtml
.nws
model
.iges
.mesh
.vrml
system
.386
.chk
text
.css
.htm
.html
.rtf
.sgm
.sgml
.txt
.xml
.xms
video
.avi
.mp3
.mp4
.mpeg
.qt
.wmv
Configuring File Extensions and Categories for the File Types Filter
Perceived file types provide a similar function as the standard MIME types, except that they refer to
broad categories of file format types rather than specific file types. They are defined by use and
general acceptance.
Dynamic File Services uses the C:\Program Files\Dynamic File Services\DswFileTypes.cfg
file to associate well-known file extensions for the following Microsoft Perceived Types (http://
msdn.microsoft.com/en-us/library/cc144150(v=vs.85).aspx):
application
audio
certificate
compressed
document
image
message
model
octet-stream
system
text
video
Each line in the DswFileTypes.cfg file contains a file extension and its perceived type or category in
following format:
.<file_extension>/<file_type_category>
For example:
.doc/document
You can customize the file to add, remove, or modify the file extension entries. This allows you to
define new file extensions and categories, or to associate a file extension with your preferred
category. Ensure that each file extension is associated with only one category. The entries can be listed
in any order.
168
Dynamic File Services 2.2 Administration Guide
To customize the DswFileTypes.cfg file:
1 Log in to the Dynamic File Services server as a user with Administrator privileges.
2 In a file browser, navigate to the folder where you installed Dynamic File Services.
The default installation location is C:\Program Files\Dynamic File Services.
3 Make a copy of the default DswFileTypes.cfg file, and give it a different name.
4 Open the working copy of the DswFileTypes.cfg file in a text editor.
5 Add, remove, or modify the definitions.
Place each entry on a separate line in following format. The entries can appear in any order.
.<file_extension>/<file_type_category>
For example:
.ext/example
6 Save the file.
The revised definitions are applied for the next run of a file types policy.
After you modify the file, you can expect the following changes in the policies and wizards:
New or modified file extensions are considered in future policy runs for the specified category.
New or modified categories appear as options in the File Types dialog box when you create or
modify a file types policy.
For example, if you add the following line to the DswFiletypes.cfg file, other appears as a
valid category the next time you edit or add file types for a policy:
.new/other
If a file extension is removed from the file and it is not otherwise defined in the server’s
Windows Registry, a file types policy does not move files with that extension.
If all instances of a category are removed from the file and the category is not otherwise defined
as a MIME type or perceived type in the server’s Windows Registry, the category no longer
appears as an option in the File Types dialog box when you create or modify a file types policy.
For existing policies, the category is considered an invalid category in future policy runs, and a
file types policy does not move files based on the category.
9.3.3
Configuring MIME Types and Categories for the Content Filter
Dynamic File Services uses the C:\Program Files\Dynamic File Services\DswMimeTypes.cfg
file to associate well-known MIME content types with file extensions.
Each line in the DswMimeTypes.cfg file contains a MIME content type and file extension in following
format:
<mime_type>/<mime_subtype>:.<file_extension>
For example:
application/msword:.doc
When the file content is used to determine the type, the file content filter reads the file content from
each file, ignoring the file’s extension.
Creating and Managing Policies
169
Continuing the example, if a file’s content type is the MIME type/subtype of application/msword,
then the file is the same as a .doc file. The filter looks up the .doc file extension in the
DswFileTypes.cfg file to determine its assigned category, such as .doc/document. The file is moved
if the category is specified in the file types policy.
You can customize the DswMimeTypes.cfg file to add, remove, or modify the MIME Type definitions.
This allows you to define new MIME types and associate them with file extensions, or to associate a
file extension with your preferred MIME type. Ensure that each MIME type is associated with only
one file extension. The entries can be listed in any order. Ensure that the new or modified MIME
types have been mapped to a file extension in the DswMimeTypes.cfg file, and the file extension is
mapped to a file type category in the DswFileTypes.cfg file.
To customize the DswMimeTypes.cfg file:
1 Log in to the Dynamic File Services server as a user with Administrator privileges.
2 In a file browser, navigate to the folder where you installed Dynamic File Services.
The default installation location is C:\Program Files\Dynamic File Services.
3 Make a copy of the default DswMimeTypes.cfg file, and give it a different name.
4 Open the working copy of the DswMimeTypes.cfg file in a text editor.
5 Add, remove, or modify the definitions.
Place each entry on a separate line in following format. The entries can appear in any order.
<mime_type>/<mime_subtype>:.<file_extension>
For example:
other/x-new:.new
6 Save the file.
7 Edit the DswFileTypes.cfg file to ensure that the file extension is assigned to a category, then
save the file.
For example:
.new/custom
After you modify the files, you can expect the following changes in the policies and wizards:
Files with a content type that matches the new or modified MIME types can be moved by
content filter policies that use the category mapped to its file extension.
If a MIME type definition is removed from the file and it is not otherwise defined in the server’s
Windows Registry, a content filter policy does not move the file.
See the following examples for how the MIME Type settings affect your file types policies:
“Example 1: New MIME Type” on page 171
“Example 2: Files with No Extensions” on page 171
“Example 3: Unexpected MIME Types” on page 171
170
Dynamic File Services 2.2 Administration Guide
Example 1: New MIME Type
If a file is not being moved as expected, you can assess its file content type by using the Apache Tika
open source application as described in Section 9.3.4, “Using Apache Tika to Find the MIME Type of
a File,” on page 172. If Tika returns a new file content type, you should modify the
DswMimeTypes.cfg file to add a new <mime_type>/<mime_subtype>:.<file_extension> entry,
then add the file extension and category to the DswFileTypes.cfg file.
Assume that Tika returns a content type of other/x-new for a file with the .new extension. You
modify the DswMimeTypes.cfg file to add the following line:
other/x-new:.new
You modify the DswFileTypes.cfg file to add an entry for the new file extension with a category
called custom:
.new/custom
The next time that you edit or create a file types policy, the custom category appears as an option in
the File Types dialog box. If you select the option, the category is applied the next time you run the
policy.
Example 2: Files with No Extensions
In this example, the following line is in the DswFileTypes.cfg file:
.pdf/document
The following line is in the DswMimeTypes.cfg file:
application/pdf:.pdf
Suppose that a file named unknown has no extension, but it is really a PDF file.
You create a file types policy with document as one of the categories. The following outcome is
expected, depending on whether you enable the Use file content to determine type option:
Do not enable Use File Content to Determine Type: The filter matches the category based on a
file’s file extension. Since the file has no file extension, the file does not match the document
category.
Enable Use File Content to Determine Type: The filter looks at the file content to determine the
files type and returns application/pdf as its MIME type. Based on the matching entry in the
DswMimeTypes.cfg file, the unknown file is treated the same as if it has a .pdf extension. Since
the file extension is mapped to the document category, the filter matches the file to the category,
and moves the file.
Example 3: Unexpected MIME Types
Assume that Apache Tika returns a file content type of application/x-document-special for a file
with no extension that you think is a document file type. You modify the DswMimeType.cfg file to
add the following line that maps the MIME type to the .doc file extension.
application/x-document-special:.doc
Since .doc is already mapped to the document category with the following line in the
DswFileTypes.cfg file, you do not need to modify that file.
.doc/document
Creating and Managing Policies
171
9.3.4
Using Apache Tika to Find the MIME Type of a File
To effectively use the File Types filter option with the Use file content to determine type option, you
should know the MIME type of the files you are trying to move. Choose a representative file, then use
any available utility to determine it’s actual MIME type based on its content. Use this information to
choose the appropriate File Types category in the policy.
Apache Tika 1.1 provides a standalone, runnable application jar (tika-app-1.1.jar) that you can
use to discover the MIME type that Tika will identify for a file.
To download the Tika 1.1 application jar file to a Dynamic File Services server:
1 Dynamic File Services 2.2 supports Apache Tika 1.1.
Go to the Tika archives (http://archive.apache.org/dist/tika/) and download the Tika 1.1 version
of the application file.
2 Ensure that a version of Java is installed on the Windows server.
For information about running the Tika 1.1 application with Java, see “Using Tika as a Command
Line Utility” on the Getting Started with Apache Tika documentation Web page (http://tika.apache.org/
1.1/gettingstarted.html).
To use the Apache Tika application jar file with Java to determine the MIME type of a sample file:
1 On the Dynamic File Services server, open an Administrator Command Prompt console (right-
click the Command Prompt icon, then select Run as Administrator).
2 At the prompt, navigate to the folder where you downloaded the Apache Tika application.
3 Start the Apache Tika application by entering
java -jar tika-app-1.1.jar -g
4 Drag and drop the sample file on the Apache Tika GUI.
5 Select View > Metadata to view the file’s metadata information.
The Content-Type line shows the file’s MIME type based on content. For example, the following
is an example of the file’s metadata:
Content-Length: 15898
Content-Type: application/vnd.oasis.opendocument.spreadsheet
Creation-Date: 2011-09-20T10:31:00.43
Edit-Time: P38DT9H18M1S
Object-Count: 0
Table-Count: 3
date: 2012-01-04T16:49:10.35
editing-cycles: 44
generator: LibreOffice/3.4$Win32 LibreOffice_project/340m1$Build-1219
nbObject: 0
nbTab: 3
resourceName: Intlab IPaddress assignments.ods
9.4
Viewing a List of Policies
You can view a list of all of the policies that are defined for a server by using the Dynamic File
Services Management Console.
1 In the Management Console, connect to the DynamicFS server that you want to manage.
2 In the left panel, select the Policies folder (
that are defined.
172
Dynamic File Services 2.2 Administration Guide
) for the server, then view the list of policies (
)
The Policies list reports the following information for each policy:
Policy name
Status (Idle, Running)
Direction (Primary to Secondary, Secondary to Primary)
Frequency (None (not scheduled), Hourly, Daily, Weekly, Monthly, Yearly)
3 (Optional) Click a column heading to sort the list by that parameter.
9.5
Viewing Properties for a Policy
You can view the settings for an existing policy in its Policy Properties dialog box.
1 In the Management console, connect to the DynamicFS server that you want to manage.
2 In the left panel, select the Policies folder (
) for the server, then view the list of policies that are
defined.
3 Right-click a policy, then select Properties.
You can also double-click the policy to open its Policy Properties dialog box.
4 View the information on the General tab. If you make changes, click Apply before continuing, or
click OK to save changes and exit.
The General tab in the Policy Properties dialog box reports the following information:
Policy name
Direction
Filter options
Unused filter options are dimmed and marked as n/a.
Description
For information about the fields, see Section 9.1, “Understanding Policies,” on page 157.
5 View the policy schedule information on the Schedule tab. If you make changes, click Apply
before continuing, or click OK to save changes and exit.
The Schedule tab lists the schedule that is currently associated with the policy. You can also
remove the schedule, then add a new one. Only one schedule can be associated with the policy
at a time.
6 View the pair information on the Pairs tab. If you make changes, click Apply before continuing,
or click OK to save changes and exit.
The Pairs tab lists the pairs that are currently associated with the policy. You can also add and
remove pairs from the list.
7 Click OK to save your changes and exit, or click Cancel to abandon changes on the currently
displayed page.
Creating and Managing Policies
173
9.6
Associating or Disassociating Pairs and Policies
Dynamic File Services pairs and policies must be associated before any data can be moved between
the primary and secondary paths. A single pair can be associated with multiple policies. A single
policy can be associated with multiple pairs.
IMPORTANT: A retention pair can be associated with a policy only if the direction is Primary to
Secondary. You must use the Review Service to restore a file from the retention repository on the
secondary path to its original location on the primary path. For information, see Section 12.6.4,
“Restoring Files or Folders,” on page 226.
Section 9.6.1, “Viewing a List of Pairs Associated with a Policy,” on page 174
Section 9.6.2, “Viewing a List of Policies Associated with a Pair,” on page 174
Section 9.6.3, “Associating or Disassociating Pairs with a Policy,” on page 174
Section 9.6.4, “Associating or Disassociating Policies with a Pair,” on page 175
9.6.1
Viewing a List of Pairs Associated with a Policy
You can view a list of the pairs associated with a policy in the Policy Properties dialog box.
1 In the Management console, connect to the DynamicFS server that you want to manage.
2 Click the Policies folder under the server to view the list of policies for the server in the right
panel.
3 Right-click a policy, then select Properties.
4 Click the Pairs tab to view a list of the pairs that are currently associated with the policy.
5 Click OK or Cancel to exit.
9.6.2
Viewing a List of Policies Associated with a Pair
You can view a list of the policies associated with a pair in the Pair Properties dialog box or in the
Statistics dialog box.
1 In the Management console, connect to the DynamicFS server that you want to manage.
2 Click the Pairs folder under the server to view the list of pairs for the server in the right panel.
3 Use either of the following methods to see a list of policies associated with a pair:
Right-click a pair, select Properties, then select the Policies tab to view a list of the policies
that are currently associated with the pair.
Right-click a pair, select Statistics, then view a list of the policies that are currently
associated with the pair in the Policies associated to pair area.
This view has the added benefit of showing the current state of the policy and information
about the last time the policy was run.
4 Click OK or Cancel to exit.
9.6.3
Associating or Disassociating Pairs with a Policy
You can associate or disassociate pairs with a selected policy by using the Policy Properties dialog
box.
174
Dynamic File Services 2.2 Administration Guide
IMPORTANT: When you disassociate a pair from a policy, the policy must not be running on the
pair.
1 In the Management console, connect to the DynamicFS server that you want to manage.
2 Click the Policies folder under the server to view the list of policies for the server in the right
panel.
3 Right-click a policy and select Properties to open its Policy Properties dialog box, then select the
Pairs tab.
4 (Optional) Associate one or more pairs to the selected policy:
4a On the Pairs tab, click Add to open the Select Pairs dialog box.
The Select Pairs dialog box displays a list of all pairs that are defined on the server that are
not already associated with the selected policy.
4b Select one or more pairs that you want to add to the Pairs list, then click OK.
4c Click Apply.
5 (Optional) Disassociate one or more pairs from the selected policy:
5a Ensure that the selected policy is not currently running on any of the pairs you want to
disassociate from it.
The policy should both report an Idle state in the Management Console window. You can
wait until the policy run ends, or you can manually stop the running process.
5b Select one or more pairs that you want to remove from the Pairs list for the policy, then click
Remove.
5c Click Apply.
6 Click OK to save changes made on the current page, or click Cancel to exit.
The policy is enforced for its associated pairs at the policy’s next scheduled run time. Scheduled
and unscheduled policies that are associated with a pair can be run manually by using the
Execute now option.
9.6.4
Associating or Disassociating Policies with a Pair
You can associate or disassociate policies with a pair by using the Pair Properties dialog box or the
Statistics dialog box.
IMPORTANT: When you disassociate a policy from a pair, the policy must not be running on the
pair.
“Using the Pair Properties Dialog Box to Add or Remove Policy Associations” on page 175
“Using the Pair Statistics Dialog Box to Add or Remove Policy Associations” on page 176
Using the Pair Properties Dialog Box to Add or Remove Policy Associations
1 In the Management console, connect to the DynamicFS server that you want to manage.
2 Click the Pairs folder under the server to view the list of pairs for the server in the right panel.
3 Right-click a pair and select Properties to open its Pair Properties dialog box, then select the
Policies tab.
Creating and Managing Policies
175
4 (Optional) Associate one or more policies to the selected pair:
4a On the Pairs tab, click Add to open the Select Policies dialog box.
The Select Policies dialog box displays a list of all policies that are defined on the server that
are not already associated with the selected pair.
4b Select one or more policies that you want to add to the Pairs list, then click OK.
4c Click Apply.
5 (Optional) Disassociate one or more policies from the selected pair:
5a Ensure that the policies that you want to disassociate from the pair are not currently
running on the pair.
The policy should both report an Idle state in the Management Console window. You can
wait until the policy run ends, or you can manually stop the running process.
5b Select one or more policies that you want to remove from the Pairs list for the pair, then click
Remove.
5c Click Apply.
6 Click OK to save changes made on the current page, or click Cancel to exit.
The policies associated with the pair are enforced at each policy’s next scheduled run time.
Scheduled and unscheduled policies that are associated with a pair can be run manually by
using the Execute now option.
Using the Pair Statistics Dialog Box to Add or Remove Policy Associations
1 In the Management console, connect to the DynamicFS server that you want to manage.
2 Click the Pairs folder under the server to view the list of pairs for the server in the right panel.
3 Double-click the pair to open its Statistics dialog box.
4 (Optional) Add a new policy association:
4a Use either of the following methods to open the Select Policies dialog box:
In the Statistics dialog box toolbar, select Actions > Add policy association.
Right-click in the Policies associated to pair area, then select Add policy association from
the pop-up menu.
The Select Policies dialog box displays a list of all policies that are defined on the server that
are not already associated with the selected pair.
4b In the Select Policies dialog box, select one or more policies to associate with the pair, then
click OK.
The policies are enforced for the selected pair at the each policy’s next scheduled run time.
Scheduled and unscheduled policies that are associated with a pair can be run manually by
using the Execute now option.
5 (Optional) Remove a policy association:
5a Ensure that the policy is not currently running on the pair.
You can wait until the policy run ends, or you can manually stop the running process.
5b In the Policies associated to pair area, select one or more idle policies that you want to
disassociate from the pair.
176
Dynamic File Services 2.2 Administration Guide
5c Use either of the following methods to remove the association between the selected policies
and the selected pair:
In the Statistics dialog box toolbar, select Actions > Remove policy association
Right-click and select Remove policy association.
6 When you are done, close the Statistics dialog box.
9.7
Modifying Policy Filters
Policy rules govern what files are moved and in which direction. You configure the policy rules when
you create the policy. You can modify the policy rules and policy name later.
For information the different fields in the policy, see Section 9.1, “Understanding Policies,” on
page 157.
1 In the Management console, connect to the DynamicFS server that you want to manage.
2 Select the Policies folder for the server, then view the list of policies that are defined.
3 Right-click the policy that you want modify, then select Properties.
4 On the General tab under Direction, specify the direction to move data by selecting Primary to
Secondary or Secondary to Primary, then click Apply to save the change.
The direction determines whether the policy is enforced against files on the primary location or
the secondary location.
If retention pairs are associated with the policy, changing the direction from Primary to Secondary
to Secondary to Primary automatically disassociates the retention pair from the policy.
5 On the General tab under Filter options, click Edit to open the Modify filter dialog box.
6 Specify one or more filter options to apply for this policy.
For details, see Section 9.1.3, “Policy Filter Options,” on page 159.
Filter Option
Description
File size
Select the check box, then create a rule that moves a file only if its size is
greater than or less than the specified file size.
Last accessed
Select the check box, then create a rule that moves a file only if the elapsed
time since it was last accessed is greater than or less than the specified time
period.
Last modified
Select the check box, then create a rule that moves a file only if the elapsed
time since it was last modified is greater than or less than the specified time
period.
File patterns
Select the check box, then create a rule that moves a file only if its file name
uses one of the specified file patterns. Separate multiple file patterns with a
comma and no spaces. If you include spaces in a pattern, the spaces are
interpreted as part of the pattern you seek.
Restriction: The File patterns option cannot be used in combination with the
File types option
Creating and Managing Policies
177
Filter Option
Description
File types
Select the check box to enable the option, then create a rule that moves a file
based on the specified file types.
Add: Click Add, select one or more file types from the File types list, then
click OK.
Remove: Select a file type from the list, then click Remove.
Use File Content: (Optional) Select the Use file content check box to
move files only if the file content matches one of the specified file types.
This option increases the run time of the policy.
Restriction: The File types option cannot be used in combination with the File
patterns option
File owners
Specify one or more user names or group names. Only files owned by the
specified users or groups are moved. User names or group names that are
invalid at run time are ignored.
Add: Click Add, select one or more user names or group names from the
Users and Groups list, then click OK. You can also move ownerless files
by selecting the {No owners} entry in the Users and Groups browse
view.
Remove: Select a user name or group name from the list, then click
Remove.
7 Click OK to save your changes and close the Modify filter dialog box, then click OK to save your
changes.
The policy rule changes apply when the policy runs at its next scheduled interval. For
information, see Section 10.4.1, “Understanding How Changes Affect the Scheduled Run
Interval,” on page 193.
9.8
Starting a Policy Run
Policies can be enforced automatically based on the schedule that is associated with the policy, or
they can be run on demand.
Section 9.8.1, “Scheduling a Policy Run,” on page 178
Section 9.8.2, “Running a Policy on Demand for a Selected Pair,” on page 178
9.8.1
Scheduling a Policy Run
For information about scheduling a policy to run, see Section 10.6, “Associating or Disassociating
Schedules and Policies,” on page 196.
9.8.2
Running a Policy on Demand for a Selected Pair
To manually start a policy run for a selected pair:
1 In the Management Console, connect to the DynamicFS server that you want to manage.
2 Click the Pairs folder under the server to view the list of pairs for the server in the right panel.
3 Ensure that the pair is in the Idle state.
178
Dynamic File Services 2.2 Administration Guide
If other policies are running, you can wait until the policy run ends, or you can manually stop
the policy run.
4 Double-click the pair name to open the Statistics dialog box.
5 Select one or more policies, then right-click and select Execute now.
To select multiple policies, hold down the Shift key or Control key while selecting policies. The
policy run applies only for the selected pair.
6 Monitor the policy run by viewing the progress in the Scan Progress bar.
7 After the run is complete, you can view statistical information about the run by clicking the
Policy Execution History tab and pressing F5 to refresh the screen.
You can also close the Statistics dialog box and re-open it to get the updated view of the policy
run.
9.9
Previewing a Policy Run
The Preview now option allows you to test a policy run against a Dynamic File Services pair without
moving any files. It scans the files to determine which files would be moved if the policy were to be
enforced. It reports statistics about the move, such as how many megabytes would be moved and a
list of files that would be moved.
Section 9.9.1, “Starting a Policy Preview,” on page 179
Section 9.9.2, “Viewing the Preview Results,” on page 180
9.9.1
Starting a Policy Preview
1 In the Management Console, connect to the DynamicFS server that you want to manage.
2 Click the Pairs folder under the server to view the list of pairs for the server in the right panel.
3 Ensure that the pair is in the Idle state.
If other policies are running, you can wait until the policy run ends, or you can manually stop
the policy run.
4 Use either of the following methods to start the preview:
Double-click the pair you want to manage to open its Statistics dialog box, select one or
more policies, then select Preview now.
Under the Pairs folder, right-click the pair name, select Preview now, then select one or more
policies to run for the preview. The Status for the policies changes to Running, but the pair’s
Statistics dialog box does not open automatically.
5 When the preview run is completed, double-click the pair to open the Statistics dialog box, then
click View > Preview results to open the Preview dialog box.
If the Statistics dialog box is already open, press F5 to refresh the page.
6 Click the Files to be moved link to see a list of the files.
7 Use the left-arrow and right-arrow to page through the list of files. You can also specify a
sequence of letters in the Filter field to find a specific file.
8 Close the Preview dialog box when you are done.
Creating and Managing Policies
179
9.9.2
Viewing the Preview Results
The latest run of a policy preview for a pair can be viewed until another policy preview is started for
the same pair.
1 In the Management Console, connect to the DynamicFS server that you want to manage.
2 Double-click the pair you want to manage to open its Statistics dialog box.
3 Select View > Preview results to see information about the last preview results.
4 Click the Files to be moved link to see a list of the files.
5 Use the left-arrow and right-arrow to page through the list of files. You can also specify a
sequence of letters in the Filter field to find a specific file.
6 Close the Preview dialog box when you are done.
9.10
Stopping an In-Progress Policy Run
You can stop a policy run that is in progress by using the Actions > Stop running process option from
the pair’s Statistics dialog box. This gracefully stops all policy runs that are currently in progress on
the pair. After a policy run is stopped, the data that has already moved remains in the new location.
The unmoved data remains in the old location. The next time the policy runs, the scan begins the
policy enforcement process at the beginning.
To stop a policy run that is in progress:
1 In the Management Console, connect to the DynamicFS server that you want to manage.
2 Select the pair you want to manage to open its Statistics dialog box.
3 Select the policy, then select Actions > Stop running process.
To ensure that a policy is not run again, go to the policy’s Properties dialog box and unschedule it by
removing the schedule that is currently associated with it. For information, see:
Section 10.5.2, “Removing a Schedule from a Single Policy,” on page 196
Section 10.5.3, “Disabling the Schedule for Selected Pairs,” on page 196.
9.11
Exporting and Importing Policies on a Dynamic File
Services Server
Dynamic File Services allows you to export and import a policy configuration to make it easier to set
up management on multiple computers. You can set up multiple policies in the Management Console
on one computer, then export them to .xml files. The default name of the exported file is the same as
the policy name.
You can import a policy on another computer to automatically set it up there. If you manage the two
computers from the same Management Console, the file is easily exported and imported between the
multiple computers by exporting to a local folder. You can also copy the exported .xml file to a
different computer and import it there.
Section 9.11.1, “Exporting a Policy,” on page 181
Section 9.11.2, “Importing a Policy,” on page 181
Section 9.11.3, “Importing a Policy from a Previous Release,” on page 181
180
Dynamic File Services 2.2 Administration Guide
9.11.1
Exporting a Policy
1 In the Management Console, connect to the DynamicFS server that you want to manage.
2 Under the Policies folder for the server, right-click the policy, then select Export.
You can also select the policy, then select File > Import/Export > Export policy.
3 Browse to the location on the local computer where you want to save the file, specify a name for
the file, then click Save.
By default, the policy is exported as a .xml file and the file name is the same as the policy name.
4 Continue with Section 9.11.2, “Importing a Policy,” on page 181.
9.11.2
Importing a Policy
1 Place a copy of the exported policy on the computer where you are managing DynamicFS.
For information, see Section 9.11.1, “Exporting a Policy,” on page 181.
2 In the Management Console, connect to the DynamicFS server where you want to import the
policy.
3 Right-click the Policies folder for the server, then select Import policy.
You can also select the Policies folder, then select File > Import/Export > Import policy.
4 Browse to the locate and select the exported policy file, then click Open.
The Policy Wizard opens to the Policy Rules page.
5 On the Policy Rules page, verify or modify the Direction and Filter options settings, then click
Next.
6 On the Policy Schedule page, verify or modify the schedule Frequency and When settings, then
click Next.
7 On the Policy Name and Description page, specify a unique name for the policy on this server,
then click Next.
8 On the Pair to Policy Association page, select one or more pairs on the selected server that you
want to associate with the policy, then click Finished.
The policy is added to the Policies list for the selected server.
9.11.3
Importing a Policy from a Previous Release
You can import policies that were created in an earlier major release, such as from Dynamic File
Services 1.6 to 2.0. Policy schedules are configured separately in Dynamic File Services 2.0 and later
versions. The Frequency settings for an imported policy are ignored. After you import the policy,
ensure that you assign a policy schedule to it if you want the policy to run automatically.
9.12
Deleting a Policy
You can delete policies when you no longer need them.
IMPORTANT: A policy must be idle before it can be deleted.
1 In the Management Console, connect to the DynamicFS server that you want to manage.
2 Open the Policies folder for the server.
Creating and Managing Policies
181
3 If the policy is in a Running state, do one of the following:
Wait until the policy completes the run and returns to the Idle state.
Stop the policy run on each of the pairs that are associated with the policy.
For instructions, see Section 9.10, “Stopping an In-Progress Policy Run,” on page 180.
4 After the policy is in the Idle state, right-click the policy, then select Delete.
9.13
Troubleshooting Policy Conflicts
There is no automated check to determine if the policies associated with a pair are moving files back
and forth in the same or different runs. When you plan policies for a pair, consider the file extensions
and types that occur in the pair and how the filter options are enforced. Ensure that the policies
assigned to a pair move files where you expect them to be moved, and that they are not counterproductive.
For example, if one policy moves files to the secondary path based on the file extension, and another
policy moves files to the primary path based on the last modified time, some files might move both
ways.
You can use the following methods to understand what files are moved during a policy run:
Preview Now: You can use the Preview Now option to view the files that would be moved in a
run without actually moving any files. For information, see Section 9.9, “Previewing a Policy
Run,” on page 179.
Policy Execution History: You can inspect the Policy Execution History for a pair to examine
lists that show what files were moved in the last several runs. For information, see Section 13.2,
“Viewing the Policy Execution History for a Pair,” on page 230.
Use this information to refine the policies as needed to achieve your storage goals.
9.14
Examples of Policy Rules
The examples in this section can help you understand how to configure policy rules to achieve your
desired outcome for moving data in a pair:
Section 9.14.1, “Example: Moving All Files Larger than 10 Megabytes,” on page 183
Section 9.14.2, “Example: Moving All MP3 Files Larger than 10 Megabytes,” on page 183
Section 9.14.3, “Example: Moving All MP3 Files Larger than 10 Megabytes That Were Last
Modified More than 6 Months Ago,” on page 184
Section 9.14.4, “Example: Moving All Files,” on page 184
Section 9.14.5, “Example: Separating Files Based on Last Modified Dates,” on page 185
Section 9.14.6, “Example: Moving All Files from Older to Newer Storage,” on page 186
182
Dynamic File Services 2.2 Administration Guide
9.14.1
Example: Moving All Files Larger than 10 Megabytes
In this example, the filter identifies files with sizes of at least 10 megabytes. All files that meet this file
size criterion are moved in a specified direction, such as from primary to secondary. The file access
and modification times and file patterns are not considered.
Table 9-5 Policy to Move All Files Larger than 10 Megabytes
Option
Setting
Direction
Primary to secondary
File size
1. Select the check box.
2. Select Greater than (>) from the drop-down list.
3. Specify 10 in the unit field.
4. Select Megabytes from the drop-down list.
9.14.2
Last accessed
Not selected.
Last modified
Not selected.
File patterns
Not selected.
File types
Not selected.
File owners
Not selected.
Example: Moving All MP3 Files Larger than 10 Megabytes
In this example, the filter identifies files with sizes of at least 10 megabytes and with a file extension
of .mp3. Only the files that meet both the size and extension criteria are moved in the specified
direction, such as from primary to secondary. The file access and modification times are not
considered.
Table 9-6 Policy to Move All MP3 Files Larger than 10 Megabytes
Option
Setting
Direction
Primary to secondary
File size
1. Select the check box.
2. Select Greater than (>) from the drop-down list.
3. Specify 10 in the unit field.
4. Select Megabytes from the drop-down list.
Last accessed
Not selected.
Last modified
Not selected.
File patterns
1. Select the check box.
2. Specify *.mp3 in the field.
File types
Not selected.
File owners
Not selected.
Creating and Managing Policies
183
9.14.3
Example: Moving All MP3 Files Larger than 10 Megabytes That Were
Last Modified More than 6 Months Ago
In this example, the filter identifies files with sizes of at least 10 megabytes, with a Last Modified
setting that is at least 6 months ago, and with a file extension of .mp3. Only the files that meet all three
criteria are moved in a specified direction, such as from primary to secondary. The file modification
times are not considered.
Table 9-7 Policy to Move All MP3 Files Larger than 10 Megabytes That Were Last Modified More than 6 Months Ago
Option
Setting
Direction
Primary to secondary
File size
1. Select the check box.
2. Select Greater than (>) from the drop-down list.
3. Specify 10 in the unit field.
4. Select Megabytes from the drop-down list.
Last accessed
Last modified
Not selected.
1. Select the check box.
2. Select Greater than (>) from the drop-down list.
3. Specify 6 in the unit field.
4. Select Months from the drop-down list.
File patterns
1. Select the check box.
2. Specify *.mp3 in the field.
9.14.4
File types
Not selected.
File owners
Not selected.
Example: Moving All Files
In this example, the filter identifies all files with any extension and moves them in the specified
direction, such as from primary to secondary. All files are moved because there are no other filters to
be considered.
Table 9-8 Policy to Move All Files
Option
Setting
Direction
Primary to secondary
File size
Not selected.
Last accessed
Not selected.
Last modified
Not selected.
File patterns
1. Select the check box.
2. Specify *.* in the field to move all files with and without file extensions.
To move only files with no extensions, specify *. in the field.
184
Dynamic File Services 2.2 Administration Guide
9.14.5
Option
Setting
File types
Not selected.
File owners
Not selected.
Example: Separating Files Based on Last Modified Dates
In this example, assume that you want to keep recently modified files on the faster storage where the
primary path resides. You separate the files in a pair based on the file Last Modified dates, with
recently modified files on the primary path and the static files on the secondary path. As noted
elsewhere, files are served to users directly from whichever location the file resides when the file is
accessed via the network share on the primary path. If a file is modified on the secondary path, its
Last Modified date changes, but it is not automatically moved back to the primary path.
To achieve the goal, you set up one policy to move static files from the primary path to the secondary
path, and one policy to recently modified files from the secondary path to the primary path.
“Moving Files That Were Last Modified More than 1 Year Ago from Primary to Secondary” on
page 185
“Moving Files That Were Last Modified Less than 1 Week Ago from Secondary to Primary” on
page 186
Moving Files That Were Last Modified More than 1 Year Ago from Primary to
Secondary
In this policy, specify a direction of primary to secondary, and a last modified date of greater than 1
year. Run this policy monthly (or at a preferred frequency) during non-peak hours (such as Sunday at
12:00 a.m. until complete) to locate and move static files to the secondary path.
Table 9-9 Policy to Move Files That Were Last Modified More than 1 Year Ago from Primary to Secondary
Option
Setting
Direction
Primary to secondary
File size
Not selected.
Last accessed
Not selected.
Last modified
1. Select the check box.
2. Select Greater than (>) from the drop-down list.
3. Specify 1 in the unit field.
4. Select Years from the drop-down list.
File patterns
Not selected.
File types
Not selected.
File owners
Not selected.
Creating and Managing Policies
185
Moving Files That Were Last Modified Less than 1 Week Ago from Secondary to
Primary
In this policy, specify a direction of secondary to primary, and a last modified date of less than 1
week. Run this policy weekly during non-peak hours (such as Sunday at 12:00 a.m. until complete) to
move recently modified files back to the primary path.
Table 9-10 Policy to Move Files That Were Last Modified Less than 1 Week Ago from Secondary to Primary
Option
Setting
Direction
Secondary to primary
File size
Not selected.
Last accessed
Not selected.
Last modified
1. Select the check box.
2. Select Less than (<) from the drop-down list.
3. Specify 1 in the unit field.
4. Select Weeks from the drop-down list.
9.14.6
File patterns
Not selected.
File types
Not selected.
File owners
Not selected.
Example: Moving All Files from Older to Newer Storage
In this example, suppose that you have existing storage and you want to move all files to a newer,
faster storage disk. You do not plan to keep the existing storage after the move.
To achieve the goal, you set up a pair where the primary path is on the new disk, and the secondary
path is on the old disk. The network share is configured (or reconfigured) for the primary path,
which gives users access to all of the files via the merged view while DynamicFS migrates the files in
off-peak hours.
You set up a policy with *.* (Move all files) in the File patterns filter option, and specify a
direction of secondary to primary. This moves files with and without file extensions. Run the policy
nightly during non-peak hours (such as at 12:00 a.m. for 4 hours). After all of the files have been
moved to the primary location, the pair can be unlinked.
Table 9-11 Policy to Move All Files from Older to Newer Storage
186
Option
Setting
Direction
Secondary to primary
File size
Not selected.
Last accessed
Not selected.
Last modified
Not selected.
Dynamic File Services 2.2 Administration Guide
Option
File patterns
Setting
1. Select the check box.
2. Specify *.* in the field.
9.15
File types
Not selected.
File owners
Not selected.
What’s Next
For information about monitoring the health and history of server disks that are used in pairs, the
pairs, and the policies, see Chapter 13, “Monitoring Pairs and Policies,” on page 229.
Creating and Managing Policies
187
188
Dynamic File Services 2.2 Administration Guide
10
Creating and Managing Policy
Schedules
10
Novell Dynamic File Services allows you to create and manage policy schedules separately from
policies.
Section 10.1, “Understanding Policy Schedules,” on page 189
Section 10.2, “Creating a Policy Schedule,” on page 192
Section 10.3, “Viewing Properties for a Schedule,” on page 193
Section 10.4, “Modifying Policy Schedules,” on page 193
Section 10.5, “Unscheduling Policies,” on page 195
Section 10.6, “Associating or Disassociating Schedules and Policies,” on page 196
Section 10.7, “Deleting a Schedule,” on page 198
10.1
Understanding Policy Schedules
A policy schedule specifies the frequency, start time, and stop time or duration that a policy runs. It
can be associated with none, one, or multiple policies. A policy can have only one policy schedule
associated with it at a time. When the schedule is created, an administrator specifies a unique
descriptive name for the schedule, and Dynamic File Services allocates a GUID for the life of the
schedule.
IMPORTANT: For information about planning policy schedules, see Section 4.20, “Policy
Schedules,” on page 71.
Section 10.1.1, “Scheduled or Unscheduled Policies,” on page 189
Section 10.1.2, “Schedule Frequency Options,” on page 190
10.1.1
Scheduled or Unscheduled Policies
Associating a schedule with a policy causes it to be scheduled for periodic policy enforcement.
Disassociating a schedule from a policy unschedules the policy. The policy schedule applies for all
pairs that are associated with the policy. Unscheduled policies are not enforced unless you run them
manually by using Execute now. Scheduled and unscheduled policies can be run at any time by using
Execute now.
The policies associated with a given pair can use all use the same schedule or different schedules. If
policies are not run together, ensure that you allow sufficient time for a policy run to complete before
the start time of another policy.
Creating and Managing Policy Schedules
189
10.1.2
Schedule Frequency Options
For each policy schedule, you must specify its frequency, start time, and stop time or duration. A
policy can be enforced hourly, daily, weekly, monthly, quarterly, yearly, or on custom dates. Select one
frequency option, then specify when to run it.
Table 10-1 Policy Schedule Frequency Options
Frequency Option
Description
Hourly
Runs the policy every hour at hh:00:00.
Daily
Runs the policy once a day at the specified the time.
Start determines at what time on that day the run should begin. Start times are
available in 15-minute increments (hh:00, hh:15, hh:30, hh:45). The default is
12:00 a.m.
Duration specifies how long to run the policy in one-hour increments, or until
complete. The default is Until complete.
Weekly
Runs the policy once a week on the specified day of the week, start time, and
duration.
Day determines which day of the week to enforce the policy. The default is Sunday.
Start determines at what time on that day the run should begin. Start times are
available in 15-minute increments (hh:00, hh:15, hh:30, hh:45). The default is
12:00 a.m.
Duration specifies how long to run the policy in one-hour increments, or until
complete. The default is Until complete.
Monthly
Runs the policy monthly on the specified calendar day of the month, start time, and
duration.
Day determines which calendar day of the month to enforce the policy. Options are
1 to 31. The default is day 15. Specify Last day of the month to run the policy on the
last calendar day of each month, including February 29th in leap years.
Start determines at what time on that day the run should begin. Start times are
available in 15-minute increments (hh:00, hh:15, hh:30, hh:45). The default is
12:00 a.m.
Duration specifies how long to run the policy in one-hour increments, or until
complete. The default is Until complete.
190
Dynamic File Services 2.2 Administration Guide
Frequency Option
Description
Quarterly
Runs the policy quarterly, beginning in the specified month, on the calendar day of
the month, start time, and duration.
Month determines in which calendar month is the first month to begin the policy.
Options are the 12 months of the Gregorian calendar year. You must specify the
month; no default is defined.
Day determines which calendar day of the month to enforce the policy. Options are
1 to 31. The default is day 15. Specify Last day of the month to run the policy on the
last calendar day of each quarter, including February 29th in leap years, beginning
with the specified month.
Start determines at what time on that day the run should begin. Start times are
available in 15-minute increments (hh:00, hh:15, hh:30, hh:45). The default is
12:00 a.m.
Duration specifies how long to run the policy in one-hour increments, or until
complete. The default is Until complete.
Yearly
Runs the policy yearly in the month, on the calendar day of the month, start time,
and duration.
Month determines in which calendar month to enforce the policy. Options are the
12 months of the Gregorian calendar year. You must specify the month; no default
is defined.
Day determines which calendar day of the month to enforce the policy. Options are
1 to 31. You must specify the day; no default is defined.
Start determines at what time on that day the run should begin. Start times are
available in 15-minute increments (hh:00, hh:15, hh:30, hh:45). The default is
12:00 a.m.
Duration specifies how long to run the policy in one-hour increments, or until
complete. The default is Until complete.
Custom
Runs the policy on the custom dates at the specified start time, and duration. Only
future dates can be specified.
Click a day once to add it to the list of dates. Click it again to remove it from the list.
Click the calendar year to select years and months, or to jump around through the
calendar. You can also use the right-arrow to navigate forward from the current
month to future months, then use the left-arrow to navigate back one month at a
time.
Start determines at what time on that day the run should begin. Start times are
available in 15-minute increments (hh:00, hh:15, hh:30, hh:45). The default is
12:00 a.m.
Duration specifies how long to run the policy in one-hour increments, or until
complete. The default is Until complete.
Creating and Managing Policy Schedules
191
10.2
Creating a Policy Schedule
1 In the Management Console, connect to the DynamicFS server that you want to manage.
2 Use either of the following methods to launch the Schedule Wizard.
Select Schedules, then select Actions > Schedule Wizard.
Right-click Schedules, then select Schedule Wizard.
3 From the Frequency drop-down list, select the schedule frequency, then specify the required
calendar day, start time, and duration values as required for the frequency. For information, see
Section 10.1, “Understanding Policy Schedules,” on page 189.
Frequency Option
Description
Hourly
Select Hourly from the Frequency drop-down menu to run the policy every hour
at hh:00:00.
Daily
Select Daily from the Frequency drop-down menu, then specify the time of day
to start the policy and how long you want it to run.
Weekly
Select Weekly from the Frequency drop-down menu, then specify the day of the
week, the start time, and duration to run the policy.
Monthly
Select Monthly from the Frequency drop-down menu, then specify the calendar
day of the month, the start time, and duration to run the policy.
Quarterly
Select Quarterly from the Frequency drop-down menu, then specify the starting
month, the calendar day of the month, the start time, and duration to run the
policy.
Yearly
Select Yearly from the Frequency drop-down menu, then specify the month, the
calendar day of the month, the start time, and duration to run the policy. The
month and day are required to be set.
Custom
Select Custom from the Frequency drop-down menu, then select dates from the
calendar and specify the start time and duration to run the policy.
4 On the Schedule Name and Description page, specify the following parameters, then click Next.
Name Option
Description
Name
Specify a unique name for the schedule on the DynamicFS server.
Description
Optionally specify a more detailed description for the schedule. This is a
friendly description that provides context and meaning to the administrators.
5 On the Policy Associations page, click Add, select one or more available policies, click OK, then
click Next.
Any number of policies can be associated to a schedule at a time. To remove an associated policy
from the schedule, select the policy, then click Remove.
You can click Next to skip this step if you do not want to associate the schedule with policies at
this time, or if policies have not been created. You can create a policy later and associate it with
the schedule.
6 Click Finished to create the schedule, or click Cancel to exit the wizard without creating the
schedule.
192
Dynamic File Services 2.2 Administration Guide
10.3
Viewing Properties for a Schedule
You can view the settings for an existing policy in its Schedule Properties dialog box.
1 In the Management Console, connect to the DynamicFS server that you want to manage.
2 In the left panel, select the Schedules folder (
) for the server, then view the list of schedules that
are defined.
3 Right-click a schedule, then select Properties.
You can also double-click the schedules to open its Schedule Properties dialog box.
4 View the information on the General tab. If you make changes, click Apply before continuing, or
click OK to save changes and exit.
The General tab in the Schedule Properties dialog box reports the following information:
Schedule name
Frequency
Month, Day, Start Time, Duration
Description
For information about the fields, see Section 10.1, “Understanding Policy Schedules,” on
page 189.
5 View the policy associations on the Policies tab. If you make changes, click Apply before
continuing, or click OK to save changes and exit.
6 Click OK to save your changes and exit, or click Cancel to abandon changes on the currently
displayed page.
10.4
Modifying Policy Schedules
You can use the Dynamic File Services Management Console to modify how often a policy runs.
Schedule changes do not affect any currently running instances of the policy. If a schedule is enabled,
the policy runs at its next scheduled interval for each pair. You can also use Execute Now to run the
edited policy as needed for its associated pairs.
Section 10.4.1, “Understanding How Changes Affect the Scheduled Run Interval,” on page 193
Section 10.4.2, “Modifying a Policy Schedule,” on page 195
10.4.1
Understanding How Changes Affect the Scheduled Run Interval
When you change the schedule that is associated with a policy, the next scheduled run interval
depends on the current run state for the policy and the frequency setting.
For example, a policy runs daily at 10:00 a.m. At 10:15 a.m., you modify the policy to run daily at
11:00 a.m. The policy has already run for that day, so its next scheduled run occurs the following day
at 11:00 a.m.
For another example, a policy runs monthly on day 15 at 2:00 a.m. At 8:00 a.m. you modify the policy
to run monthly on day 30. The policy has already run for that month, so its next scheduled run occurs
the following month at 2:00 a.m on day 30. If you need to run the policy a second time in the current
month, you can manually run the policy on day 30 of the current month by using Execute Now.
Creating and Managing Policy Schedules
193
Table 10-2 describes the behavior of DynamicFS when determining the next scheduled interval for
the policy.
Table 10-2 Determining the Next Scheduled Run Interval
Run State
Next Scheduled Run Interval
The run is in progress.
The current run finishes. The next scheduled run is:
Hourly: The next hour.
Daily: Tomorrow at the new time.
Weekly: The new time and day of the week in the following week.
Monthly: The new time and day of the month in the following month.
Yearly: The new time and day of the year in the following year.
The run is completed for the
current hour or day.
The next scheduled run is:
Hourly: The next hour.
Daily: Tomorrow at the new time.
Weekly: The new time and day of the week in the following week.
Monthly: The new time and day of the month in the following month.
Yearly: The new time and day of the year in the following year.
The run has not started, and it The next scheduled run is:
is within 20 minutes after the
Hourly: The current hour if possible. If the pair is busy, the run is scheduled for
scheduled start time.
the next hour.
Daily: As scheduled if possible. If the pair is busy, the run is scheduled for
tomorrow at the new time.
Weekly: As scheduled if possible. If the pair is busy, the next run is scheduled
for the new time and day of the week in the following week.
Monthly: As scheduled if possible. If the pair is busy, the next run is scheduled
for the new time and day of the month in the following month.
Yearly: As scheduled if possible. If the pair is busy, the next run is scheduled
for the new time and day of the year in the following year.
The run has not started, and it The next scheduled run is:
is more than 20 minutes after
Hourly: The next hour.
the scheduled start time.
Daily: Tomorrow at the new time.
Weekly: The new time and day of the week in the following week.
Monthly: The new time and day of the month in the following month.
Yearly: The new time and day of the year in the following year.
194
Dynamic File Services 2.2 Administration Guide
10.4.2
Modifying a Policy Schedule
Modifying the schedule applies the changes for all policies associated with it. The associated policies
run at their next scheduled time.
For information about the different fields in the policy, see Section 10.1, “Understanding Policy
Schedules,” on page 189.
1 In the Management Console, connect to the DynamicFS server that you want to manage.
2 Select Schedules in the left panel to view a list of schedules in the right panel.
3 Right-click the schedule you want modify, then select Properties to open its Schedule Properties
dialog box.
You can also double-click the schedule to open its Schedule Properties dialog box.
4 On the General tab, view the current frequency and other schedule information.
5 (Optional) From the Frequency drop-down list, select the new schedule frequency, then specify
the required calendar day, start time, and duration values as required for the frequency.
You can also modify any of the settings for the current frequency.
Option
Description
Hourly
Runs the policy every hour at hh:00:00.
Daily
Runs the policy once a day at the specified the time.
Weekly
Runs the policy once a week on the specified day of the week, start time, and
duration.
Monthly
Runs the policy monthly on the specified calendar day of the month, start time,
and duration.
Quarterly
Runs the policy quarterly, beginning in the specified month, on the calendar
day of the month, start time, and duration.
Yearly
Runs the policy yearly in the month, on the calendar day of the month, start
time, and duration.
Custom
Runs the policy on the custom dates at the specified start time, and duration.
Only future dates can be specified.
6 (Optional) In the Name field, rename the schedule.
7 Click Apply or OK to save your changes.
The policy runs at its next scheduled interval. For information, see Section 10.4.1,
“Understanding How Changes Affect the Scheduled Run Interval,” on page 193.
10.5
Unscheduling Policies
To unschedule a policy, disassociate the policy from the schedule. Other options are available
depending on your intended outcome.
When you disassociate a policy and schedule from each other, the policy does not run again until you
associate a schedule with it, or unless you run it manually.
Creating and Managing Policy Schedules
195
Disassociating a schedule from a policy does not stop an in-progress policy run. To stop an inprogress policy run, see Section 9.10, “Stopping an In-Progress Policy Run,” on page 180.
Section 10.5.1, “Removing a Schedule from Multiple Policies,” on page 196
Section 10.5.2, “Removing a Schedule from a Single Policy,” on page 196
Section 10.5.3, “Disabling the Schedule for Selected Pairs,” on page 196
10.5.1
Removing a Schedule from Multiple Policies
You can disassociate one or more policies from a schedule by using the Schedule Properties dialog
box.
1 In the Management Console, connect to the DynamicFS server that you want to manage.
2 Click the Schedules folder under the server to view the list of schedules for the server in the right
panel.
3 Right-click a schedule and select Properties to open its Schedule Properties dialog box, then select
the Policies tab.
4 Disassociate the policies from the schedule by selecting the policies, then clicking Remove.
5 Click Apply or OK to save and apply your changes.
The policies are now unscheduled. You can run them manually by using the Execute now option.
10.5.2
Removing a Schedule from a Single Policy
You disable a policy’s schedule for all of its associated pairs by disassociating the policy schedule
from the policy.
1 In the Management Console, connect to the DynamicFS server that you want to manage.
2 Right-click the policy you want modify, then select Schedule.
3 Select the associated policy schedule, then click Remove.
4 Click OK to save your changes.
The policy does not run automatically. You can use Execute Now option to run the policy as
needed. For information, see Section 9.8, “Starting a Policy Run,” on page 178.
10.5.3
Disabling the Schedule for Selected Pairs
To disable the policy’s schedule from running on some pairs, you can disassociate the pair from the
policy. Re-associate the pair and policy when you are ready for the policy to run on the pair again.
For information, see Section 9.6.3, “Associating or Disassociating Pairs with a Policy,” on page 174.
10.6
Associating or Disassociating Schedules and Policies
Dynamic File Services schedules and policies must be associated in order to enable policies to run
automatically. A single schedule can be associated with multiple policies. A single policy can be
associated with only one schedule at a time.
Section 10.6.1, “Viewing the Schedule Associated with a Policy,” on page 197
Section 10.6.2, “Viewing a List of Policies Associated with a Schedule,” on page 197
196
Dynamic File Services 2.2 Administration Guide
Section 10.6.3, “Associating or Disassociating a Schedule with a Policy,” on page 197
Section 10.6.4, “Associating or Disassociating Policies with a Schedule,” on page 198
10.6.1
Viewing the Schedule Associated with a Policy
You can view the schedule associated with a policy in the Policy Properties dialog box.
1 In the Management Console, connect to the DynamicFS server that you want to manage.
2 Click the Policies folder under the server to view the list of policies for the server in the right
panel.
3 Right-click a policy, then select Properties.
4 Click the Schedule tab to view the schedule that is currently associated with the policy.
5 Click Cancel to close the dialog box.
10.6.2
Viewing a List of Policies Associated with a Schedule
You can view a list of the policies associated with a schedule in the schedule’s Properties dialog box.
1 In the Management Console, connect to the DynamicFS server that you want to manage.
2 Click the Schedules folder under the server to view the list of schedules for the server in the right
panel.
3 Use either of the following methods to see a list of policies associated with a schedule:
Right-click a schedule, select Properties, then select the Policies tab to view a list of the
policies that are currently associated with it.
Double-click a schedule to open the Properties dialog box, then select the Policies tab to
view a list of the policies that are currently associated with it.
4 Click Cancel to close the dialog box.
10.6.3
Associating or Disassociating a Schedule with a Policy
You can associate or disassociate a schedule with a policy by using the policy’s Properties dialog box.
1 In the Management Console, connect to the DynamicFS server that you want to manage.
2 Click the Policies folder under the server to view the list of policies for the server in the right
panel.
3 Right-click a policy and select Properties to open its Policy Properties dialog box, then select the
Schedule tab.
4 (Optional) Disassociate the current schedule from the policy. Select the schedule in the Schedule
list, click Remove, then click Apply.
5 (Optional) Associate a schedule with the policy:
5a Click Add to open the Select Schedule dialog box.
The Select Schedule dialog box displays a list of all schedules that are defined on the server.
5b Select the schedule that you want to add, then click OK.
5c Click Apply.
6 Click OK to save and exit.
Creating and Managing Policy Schedules
197
10.6.4
Associating or Disassociating Policies with a Schedule
You can associate or disassociate multiple policies with a schedule by using the schedule’s Properties
dialog box.
1 In the Management Console, connect to the DynamicFS server that you want to manage.
2 Click the Schedules folder under the server to view the list of schedules for the server in the right
panel.
3 Right-click a schedule and select Properties to open its Schedule Properties dialog box, then select
the Policies tab.
4 (Optional) Associate one or more policies to the schedule:
4a On the Policies tab, click Add to open the Select Policies dialog box.
The Select Policies dialog box displays a list of all policies that are defined on the server that
are not already associated with the schedule.
4b Select one or more policies that you want to add to the Policies list, then click OK.
4c Click Apply.
5 (Optional) Disassociate one or more policies from the schedule:
5a On the Policies tab, select one or more policies that you want to remove from the Policies list
for the schedule, then click Remove.
5b Click Apply.
6 Click OK to save and exit.
10.7
Deleting a Schedule
You can delete schedules when you no longer need them. Deleting a schedule automatically
disassociates the schedule from its associated policies. A policy does not run automatically until you
associate it with a schedule.
1 In the Management Console, connect to the DynamicFS server that you want to manage.
2 Open the Schedules folder for the server.
3 Right-click the schedule, then select Delete.
198
Dynamic File Services 2.2 Administration Guide
11
Creating and Managing Cloud Accounts
1
Novell Dynamic File Services allows you to use cloud storage as the secondary location for retention
pairs. This section describes how to set up a cloud account in Dynamic File Services that enables it to
access files stored in the cloud on your behalf.
Section 11.1, “Understanding Cloud Storage,” on page 199
Section 11.2, “Setting Up Cloud Access Credentials and Folders for Your Cloud Storage
Provider,” on page 201
Section 11.3, “Creating a Cloud Account,” on page 206
Section 11.4, “Viewing Properties for a Cloud Account,” on page 209
Section 11.5, “Viewing a List of the Retention Pairs That Use a Cloud Account,” on page 210
Section 11.6, “Modifying the Access Credentials for a Cloud Account,” on page 211
Section 11.7, “Deleting a Cloud Account,” on page 212
11.1
Understanding Cloud Storage
Dynamic File Services supports the use of cloud storage as the secondary location in a retention pair.
Your cloud storage must be configured and available to the retention pair whenever actions are
performed that involve the secondary path, such as the initial setup of the pair, policy moves, manual
moves, and retention reviews.
Section 11.1.1, “Supported Cloud Storage Providers,” on page 199
Section 11.1.2, “Maximum Storage Size for Cloud Storage,” on page 200
Section 11.1.3, “Maximum File Size for Uploads to Cloud Storage,” on page 200
Section 11.1.4, “Cloud Credentials,” on page 200
Section 11.1.5, “Types of Cloud Access Authentication Credentials,” on page 201
11.1.1
Supported Cloud Storage Providers
Dynamic File Services 2.2 supports the following cloud storage providers. You create an account with
the provider.
Amazon Simple Storage Service (http://aws.amazon.com/s3/) (Amazon S3)
CloudMe (http://www.cloudme.com/)
Dropbox (http://www.dropbox.com/)
Creating and Managing Cloud Accounts
199
11.1.2
Maximum Storage Size for Cloud Storage
The maximum amount of space that your files can consume in the cloud is governed by the service
level agreement with your cloud storage provider. The storage quota is enforced by your provider. If
you reach the set quota, files cannot be uploaded until you remove files to make space available, or
unless you increase the quota. For example, you can remove files from the retention repository by
using the Delete and Restore features of the Retention Review Service. For information, see
Section 12.6, “Reviewing Files in the Retention Repository,” on page 223.
11.1.3
Maximum File Size for Uploads to Cloud Storage
The maximum size per file that can be uploaded to cloud storage is governed by the service level
agreement with your cloud storage provider. The storage quota and file size limit is enforced by your
provider. In addition, a file must be smaller than the remaining available space below your quota.
Table 11-1 provides information about the known file size restrictions for the supported cloud
providers. Refer to your cloud storage provider’s documentation for information about the
maximum file size allowed for uploads.
Table 11-1 Cloud Provider Upload File Size Restrictions
Cloud Provider
Upload File Size Restrictions
Amazon S3
Amazon S3 allows upload file sizes from 1 byte to 5 terabytes per file. For information,
see FAQs: How much data can I store? (http://aws.amazon.com/s3/faqs/
#How_much_data_can_I_store).
CloudMe
Cloudme limits the upload file size for free and basic accounts to 150 MB per file. For
information see CloudMe Price Plan and Accounts (http://www.cloudme.com/en/
pricing).
Dropbox
Dropbox limits the upload file size for developer applications to 150 MB per file. For
information, see the developer documentation for Dropbox REST APIs (https://
www.dropbox.com/developers/reference/api#files_put).
Larger file sizes require the Dropbox client application or the Dropbox Web browser
interface. For information, see Help Center: Is there a limit or maximum to how big my
files can be? (https://www.dropbox.com/help/5).
11.1.4
Cloud Credentials
On the DynamicFS server, you set up cloud accounts to store your credentials for the cloud locations
that you want to use in retention pairs. The credentials are stored securely. The Service uses the
credentials to connect to the cloud when it performs actions on the files on your behalf, such as for
policy moves, manual moves, and retention reviews.
For information about the types of credentials used by cloud providers, see Section 11.1.5, “Types of
Cloud Access Authentication Credentials,” on page 201.
For information about how to get credentials and allow Dynamic File Services to access the account,
see Section 11.2, “Setting Up Cloud Access Credentials and Folders for Your Cloud Storage
Provider,” on page 201.
200
Dynamic File Services 2.2 Administration Guide
11.1.5
Types of Cloud Access Authentication Credentials
The Dynamic File Services application must provide credentials to your cloud provider when it
accesses files on your behalf. Table 11-2 describes the types of credentials that you might be asked to
provide. The values should conform to the format rules that are set by your cloud provider. For
information about which credentials are required by your provider, see Section 11.2, “Setting Up
Cloud Access Credentials and Folders for Your Cloud Storage Provider,” on page 201.
Table 11-2 Types of Cloud Access Credentials
Cloud Parameter
Description
Account name
Your login user name for the cloud provider’s site.
Account password
The password for the login user name that you provided as the cloud
account name.
Application key
A text string that uniquely identifies the Dynamic File Services application
to your Dropbox cloud storage account.
Application secret
A secret character string that is used as a password for the application key
that is used to access your DropBox cloud storage account.
Application secret token
A text string that is retrieved from your Dropbox cloud provider by Dynamic
File Services as part of a two-phase OAuth authentication process. The
token helps to form a URL where you log in to authorize Dynamic File
Services to access your files.
Access key ID
An alphanumeric secret text string that uniquely identifies the user who
owns the Amazon S3 account. The ID is 20 characters long.
Secret access key
A secret character string that is used as a password for the access key ID
for your Amazon S3 account. The key is 40 characters long.
Bucket name
A container for objects stored in Amazon S3. A single account can have
multiple buckets.
For example, if the object named photos/puppy.jpg is stored in the
johnsmith bucket, then it is addressable by using the URL http://
johnsmith.s3.amazonaws.com/photos/puppy.jpg.
Region name
11.2
Select the region the bucket was created in.
Setting Up Cloud Access Credentials and Folders for Your
Cloud Storage Provider
Before you can use cloud storage as the secondary location in a retention pair, you must set up the
cloud storage with any of the supported cloud providers. You can use the root of the cloud storage
area, or create subfolders to use as secondary locations in retention pairs. Use the cloud provider’s
Web interface to create subfolders in the account, as desired. Ensure that you have your access
Creating and Managing Cloud Accounts
201
credentials when you set up the cloud account instance on the Dynamic File Services server. If you
want to use subfolders as secondary locations, you must create them before you attempt to create the
retention pair.
The following sections identify the cloud access credentials that are required by each of the
supported cloud providers, and information about how to set up folders for that provider.
Section 11.2.1, “Setting Up Cloud Storage for Amazon S3,” on page 202
Section 11.2.2, “Setting Up Cloud Storage for CloudMe,” on page 204
Section 11.2.3, “Setting Up Cloud Storage for Dropbox,” on page 204
11.2.1
Setting Up Cloud Storage for Amazon S3
For each cloud account instance that you set up for your Amazon Simple Storage Service (Amazon
S3) (http://aws.amazon.com/s3/) cloud storage, Dynamic File Services requires the following
authentication credentials:
Cloud access key ID
Cloud secret access key
Bucket name
Region name
The access key ID and secret access key that Dynamic File Services uses to authenticate to Amazon S3
are your Amazon Web Services (AWS) identifiers.
A bucket is a container for objects stored in Amazon S3. The secondary path of a retention pair can be
at the root of a bucket, or it can be on a folder in the bucket. You can access multiple buckets in a
single Amazon S3 cloud storage service by creating a cloud account instance in Dynamic File Services
for each bucket. A cloud account for a single bucket can use unique paths in the bucket for each
retention pair.
It is possible that your Amazon S3 cloud storage account can have one access key ID and more than
one secret access key so that the account can be accessed by other administrator users, to whom the
subscriber wants to give access permissions. If multiple Amazon S3 users can access the same bucket,
you can specify the access credentials (key ID and secret key) for only one of those users in a given
cloud account instance in Dynamic File Services. Only the folders created with the specified access
credentials are visible when Dynamic File Services accesses data on your behalf.
Use the following procedures to set up Amazon S3 cloud storage:
“Getting the Access Credentials for Amazon S3” on page 202
“Creating a Bucket and Folder in Amazon S3” on page 203
Getting the Access Credentials for Amazon S3
To find your AWS identifiers:
1 Log in to your Amazon S3 account by providing the email address and password for Amazon S3
account, then clicking Sign in using our secure server.
If you have multiple users set up in the Amazon S3 account, ensure that you log in as the user
identity that matches the access credentials that you provide to Dynamic File Services.
202
Dynamic File Services 2.2 Administration Guide
2 From the Account page, select Security Credentials in the left panel, then scroll down to view your
Access Credentials.
3 Click Show to view the Secret Access Key.
4 Make a note of the Access Key ID and the Secret Access Key.
These are the access credentials you need to set up a cloud account in Dynamic File Services.
Creating a Bucket and Folder in Amazon S3
In a retention pair, the secondary path can be at the root of a bucket, or it can be on a subfolder in the
bucket. The bucket must exist in Amazon S3 before you can set up a cloud account for it in Dynamic
File Services. A subfolder (if used) must exist in Amazon S3 before you can use it as a secondary path
in a retention pair.
You use the Amazon Web Services (AWS) Management Console to create buckets and folders (if
desired) in your Amazon S3 cloud storage account, as described in the following procedure:
1 Log in to your Amazon S3 account by providing the email address and password for Amazon S3
account, then clicking Sign in using our secure server.
If you have multiple users set up in the Amazon S3 account, ensure that you log in as the user
identity that matches the access credentials that you provide to Dynamic File Services.
2 In the left panel, click AWS Management Console.
3 Select the Amazon S3 tab.
4 Create one or more buckets in your Amazon S3 account.
4a In the left panel, click Create Bucket, then specify a unique name for the bucket.
The bucket name must be unique across all existing bucket names in Amazon S3. One way
to do that is to prefix your bucket names with your company’s name, such as XYZNDFS_TEST1.
Creating and Managing Cloud Accounts
203
4b Select the region from the drop-down list, such as US Standard.
The bucket’s assigned region controls the geographical or political region where Amazon S3
physically stores your files in the cloud. You can choose a region to optimize for latency,
minimize costs, or address regulatory requirements. For information, see the Amazon S3
Working with Amazon S3 Buckets documentation (http://docs.amazonwebservices.com/
AmazonS3/latest/dev/UsingBucket.html?r=3588).
4c Click Create.
4d (Optional) Repeat Step 4a to Step 4c to create additional buckets.
5 (Optional) Create one or more folders in a bucket.
5a In the left panel, select the bucket you want to manage.
5b Click Create Folder.
5c Specify a name for the folder that is unique within the bucket.
5d (Optional) Repeat Step 5a to Step 5c to create another folder in the bucket.
11.2.2
Setting Up Cloud Storage for CloudMe
CloudMe (http://www.cloudme.com/) requires the following authentication credentials:
Cloud account name
Cloud account password
Use your CloudMe account user name and password.
To create one or more folders in your CloudMe account:
1 Log in to your CloudMe account, then click the Cloud Drive tab.
2 Click the New Folder icon, specify a name for the folder, then click OK.
11.2.3
Setting Up Cloud Storage for Dropbox
Dropbox (https://www.dropbox.com/) requires the following authentication credentials:
Cloud application key
204
Dynamic File Services 2.2 Administration Guide
Cloud application secret
Cloud application secret token (retrieved by Dynamic File Services)
Dropbox uses a two-phase OAuth authorization process to establish a connection between Dynamic
File Services and your Dropbox account. When you set up the cloud account in Dynamic File
Services, the Cloud Account Wizard uses the application key and secret to retrieve a secret token. The
token is part of a URL where you go to confirm the access authorization for Dynamic File Services.
To get an OAuth application key and secret for Dynamic File Services to use:
1 Go to Dropbox Developers (https://www.dropbox.com/developers/apps), then log in to your
Dropbox account.
You can also log in, scroll to the bottom of the page, then click Developers to go to the API Home
page.
2 In the left panel, click My Apps.
3 On the My Apps page, click Create an App, then set up an application entry for Dynamic File
Services, granting it Full Dropbox access.
4 Make a note of the App Key and App Secret that are created for Dynamic File Services.
Creating and Managing Cloud Accounts
205
5 (Optional) Create one or more folders in the Dropbox account. On your account home page,
click the New Folder icon, then specify a name for the folder.
11.3
Creating a Cloud Account
Dynamic File Services must submit cloud access credentials to your cloud provider when it accesses
files in the cloud on your behalf. It stores these credentials locally and securely on the Dynamic File
services server as attributes of a cloud account.
1 Ensure that your cloud storage account is set up, and that you know the required cloud access
credentials as described in Section 11.2, “Setting Up Cloud Access Credentials and Folders for
Your Cloud Storage Provider,” on page 201.
2 In the Management Console, launch the Cloud Wizard by right-clicking Cloud accounts, then
selecting Cloud Wizard.
You can also select Cloud Accounts, then select Actions > Cloud Wizard.
3 On the Cloud Providers page, select one of the following providers from the drop-down list,
then click Next.
Amazon S3
CloudMe
Dropbox
4 On the Cloud Provider Details page, specify the cloud access credentials that are required by the
cloud provider that you selected in Step 3.
Your account on the cloud provider’s site must already exist, and the specified credentials must
be valid. For information, see Section 11.2, “Setting Up Cloud Access Credentials and Folders for
Your Cloud Storage Provider,” on page 201.
206
Dynamic File Services 2.2 Administration Guide
Cloud Provider
Cloud Provider Details
Amazon S3:
Cloud access key ID
Cloud secret access key
Bucket name
Region name
CloudMe:
Cloud account name
Cloud account password
Dropbox:
Cloud application key
Cloud application secret
This is the first phase of the two-phase OAuth authentication
process. After you name the cloud account, you are prompted to
complete the second phase in Step 6.
Creating and Managing Cloud Accounts
207
5 On the Cloud Name and Description page, specify a name and description (optional) for the
cloud account.
The name must be unique on the Dynamic File Services server.
6 If Dropbox is the specified cloud provider, perform the following manual steps to authorize
Dynamic File Services to access your account:
6a On the Cloud Authorization page, click the Click here link to open a Web browser and go to
your cloud account.
The URL includes a secret token that Dynamic File Services has retrieved from Dropbox as
part of the two-phase OAuth authentication process.
6b On the Dropbox login page, type the email address that is associated with your Dropbox
account, type your password for the Dropbox account, then click Login.
208
Dynamic File Services 2.2 Administration Guide
6c On the Dropbox Application Authorization page, click Allow to authorize Dynamic File
Services to connect to your account.
6d On the confirmation page, verify that the connection succeeded.
The authorization might fail if the application key and secret have expired. You must create
a new application instance in your Dropbox account in order to generate a new key and
secret. For information, see Section 11.2.3, “Setting Up Cloud Storage for Dropbox,” on
page 204.
In the Cloud Account Wizard, go back to the Cloud Provider Details page to specify the
new key and secret, then repeat Step 6a to Step 6d.
6e After you have successfully authorized access for Dynamic File Services in your Dropbox
account, go to the Cloud Account Wizard’s Cloud Authorization page in Step 6a, click the
check box to confirm that you have completed the manual authorization steps.
7 Click Finished to create the cloud account.
The cloud account is listed on the Cloud accounts page in the Management Console.
11.4
Viewing Properties for a Cloud Account
You can view information about a Dynamic File Services cloud account on its Properties page.
1 In the Management Console, click Cloud accounts in the left panel to view a list of cloud accounts
on the server.
2 Right-click the cloud account name, then select Properties.
3 On the General tab, you can view the account’s name, cloud provider, access credentials, and
description.
Creating and Managing Cloud Accounts
209
4 Click the Pairs tab to view a list of retention pairs that have secondary paths assigned to
subfolders in the cloud account.
5 Click Cancel to exit the Properties dialog box.
11.5
Viewing a List of the Retention Pairs That Use a Cloud
Account
A list of the retention pairs that are using a Dynamic File Services cloud account is provided on the
Pairs page of the Cloud Account Properties dialog box. The list provides the name of the retention
pair and the folder in the cloud storage location that is used by the pair.
1 In the Management Console, click Cloud accounts in the left panel to view a list of cloud accounts
on the server.
2 Right-click the cloud account name, then select Properties.
3 Click the Pairs tab to view a list of retention pairs that have secondary paths assigned to
subfolders in the cloud account.
210
Dynamic File Services 2.2 Administration Guide
4 Click Cancel to exit the Properties dialog box.
11.6
Modifying the Access Credentials for a Cloud Account
You might need to modify the access credentials that are stored for a cloud account if you change the
password or application access keys and secrets on your cloud provider’s site. For example, if the
administrator who set up the cloud account leaves the company, you might change the account
credentials for security reasons.
If you modify the credentials on the cloud storage provider’s site, Dynamic File Services can no
longer access the files stored there. Policy runs, manual moves, and retention reviews cannot be
performed on the retention pair until you update the credentials for the cloud account on the
Dynamic File Services server. You can use the Cloud Account Properties page to update the
credentials for the cloud provider.
IMPORTANT: Modifying the credentials for a Cloud Account in Dynamic File Services does not
modify the credentials on the cloud provider’s site.
Do not use the Cloud Account Properties page to change the account to a different cloud provider. To
configure a retention pair’s secondary location for a different cloud provider’s site, you must unlink
the retention pair from the old cloud account, and create a new retention pair with the new cloud
account.
Section 11.6.1, “Modifying Access Credentials for Amazon S3 and CloudMe Cloud Accounts,”
on page 211
Section 11.6.2, “Modifying Access Credentials for Dropbox Cloud Accounts,” on page 212
11.6.1
Modifying Access Credentials for Amazon S3 and CloudMe Cloud
Accounts
1 In the Management Console, click Cloud accounts in the left panel to view a list of cloud accounts
on the server.
2 Right-click the cloud account name, then select Properties.
3 On the General tab, specify the new credentials, including the Region name.
Creating and Managing Cloud Accounts
211
4 Click Apply or OK to apply and save the changes.
The new credentials are used when a new connection is started for a policy run, a manual move,
or a retention review.
11.6.2
Modifying Access Credentials for Dropbox Cloud Accounts
Because Dropbox uses a two-phase OAuth authentication process to connect the Dynamic File
Services application to your Dropbox account, you cannot modify the cloud account’s App Key and
App Secret values. You must create a new cloud account with the new settings.
1 Create a new cloud account for the Dropbox account.
For information, see Section 11.2.3, “Setting Up Cloud Storage for Dropbox,” on page 204.
2 Unlink each of the retention pairs that use paths in the old Dropbox cloud account.
For information, see Section 8.13, “Unlinking the Paths in a Pair,” on page 155.
3 Re-create the retention pairs with the new Dropbox cloud account.
For information, see Section 8.2, “Creating a Pair,” on page 142.
11.7
Deleting a Cloud Account
Deleting a cloud account removes the locally stored credentials that are needed by Dynamic File
Services to access your cloud storage. It does not delete your service with the cloud storage provider.
It also does not delete any special account keys and secrets that you created for the application.
1 In the Management Console, right-click the cloud account, then click Properties.
2 In the Properties dialog box, select the Pairs tab to view a list of pairs that use the cloud account.
3 Unlink the retention pairs that are using a secondary location in the cloud account.
For information, see Section 8.13, “Unlinking the Paths in a Pair,” on page 155.
4 Right-click the cloud account, then click Delete.
212
Dynamic File Services 2.2 Administration Guide
12
Managing Retention Reviews
12
The Novell Dynamic File Services retention pair allows you to keep data that is actively used on the
primary path, and to move data to a retention repository on the secondary path that is not needed for
everyday operations but might occasionally need to be accessed. For example, retained files might be
kept for historical reference, or to comply with contractual or legal requirements.
Data in the repository is retained indefinitely. Only an authorized reviewer can determine whether to
keep a file in the repository, to purge a file from storage, or to restore a file to its original location. The
action is based external constraints set by your company’s data retention policy.
This section describes the retention repository and how to manage the data in it.
Section 12.1, “Understanding the Retention Repository,” on page 213
Section 12.2, “Configuring Reviewers for a Retention Pair,” on page 215
Section 12.3, “Configuring Reviewers to Receive Email Notifications,” on page 220
Section 12.4, “Scheduling Notification Reviews for a Retention Pair,” on page 220
Section 12.5, “Configuring the Review Notification Check Timer,” on page 223
Section 12.6, “Reviewing Files in the Retention Repository,” on page 223
Section 12.7, “Viewing the Review Transaction History,” on page 226
Section 12.8, “Generating a Report for Retention Review Logs,” on page 227
Section 12.9, “Archiving the Retention Review Logs,” on page 227
12.1
Understanding the Retention Repository
The Dynamic File Services retention pair consists of a primary path and a secondary path where files
are stored but are not visible to users via a merged view. You specify policies to move files between
the primary path and this repository. You determine how long to keep files for historical reference
and to comply with contractual or legal requirements.
Section 12.1.1, “Managing Policies for Retention Pairs,” on page 214
Section 12.1.2, “Configuring Non-Administrator Reviewers,” on page 214
Section 12.1.3, “Reviewing Retained Data,” on page 214
Section 12.1.4, “Navigating the Retention Repository,” on page 214
Section 12.1.5, “Supported Web Browsers,” on page 215
Managing Retention Reviews
213
12.1.1
Managing Policies for Retention Pairs
Policies for retention pairs can move files only from the primary path to the secondary path. The files
that are moved during a policy run are stored in a time-stamped folder. The data structure in a
policy-run folder is relative to the root of the primary path, and is structurally the same.
For information, see Chapter 9, “Creating and Managing Policies,” on page 157.
12.1.2
Configuring Non-Administrator Reviewers
Members of the Dynamic File Services Retention Review group can review retention data by
using the Web-based Retention Review Service. Administrator privileges on the server are not
required for membership. When reviewers work in the Web interface, they have all of the file access
privileges necessary to restore or delete the retained files. They cannot open or use the files from the
Web interface.
The Novell Dynamic File Services 2.2 Retention Review Quick Start (http://www.novell.com/
documentation/dynamic_file_services/dynamic_review_win/data/dynamic_review_win.html)
provides an overview of the review process for non-administrator reviewers. It familiarizes them
with the Retention Review Service and the review process without requiring them to understand
Dynamic File Services and how the retention pair is created or managed.
12.1.3
Reviewing Retained Data
You can schedule reviews for the repository that meet your company’s compliance needs, such as
monthly, quarterly, yearly, or by custom dates. Reviewers access the retained files via the Web-based
Retention Review Service. Reviewers can delete files, keep files, and generate a report about the
review. All retention review actions are audited.
12.1.4
Navigating the Retention Repository
A Dynamic File Services retention pair stores retained data in retention review folders. Each folder
contain a set of files that were moved in a single policy run or a manual run for the primary location
in a retention pair. A review folder’s name includes the date and time of that policy run.
The data structure in a review folder is relative to the root of the primary path, and is structurally the
same. You can click a folder’s name link to navigate down through the file tree. The path for the
Review Folder is displayed at the top of the page to help you keep track of where you are in the
structure. You can click a previous directory in the path to navigate back up the tree, or you can click
any directory in the path to jump directly to it. Click the pair name to return to the top of its
repository.
Folders and files in the structure are paged to display 1000 entries at a time. The files are listed
alphabetically as you might see them in a Windows Explorer browser, with the folders grouped
above the files. Use the Next and Previous buttons to move from page to page. Click a page number to
jump directly to a page.
For example, the first page displays the first 1000 storage objects in the folder, according to the
alphabetical listing in the source folder. The second page displays the second 1000 storage objects,
and so on.
On each page, the list provides information about the files and folders. Each row includes the name,
the type as file extension or folder, the last date modified, the file owner, and the file size. Folder sizes
are not reported (that is, the cell contains dashes (---) instead of a value).
214
Dynamic File Services 2.2 Administration Guide
Dynamic File Services keeps a database of user names and their Security Identifiers (SIDs) as files are
moved to a retention repository. A strikethrough for an owner name indicates that the user name is
invalid and no longer exists as a user or group on the server or in the Active Directory domain (if
present). If the file is restored to its original location, the NTFS file system sees the SID, but the file is
an orphan file without a valid owner. An owner name of Unknown indicates that the file was an
orphan file when it was moved to the repository, and the SID is unknown to the UserName-SID
database.
The default sort order per page is alphabetical by the File or Folder Name column. You can click a
column heading to sort the displayed files in ascending order (click once) or descending order (click
again). The sort order changes only for the files and folders that are currently displayed on the page.
Numbers in file names are sorted as text, not as numbers.
A subfolder is automatically removed from the repository and display when all of the files in it have
been permanently deleted or have been restored to the primary. A policy run or manual move folder
is also removed when it no longer contains files.
12.1.5
Supported Web Browsers
The Dynamic File Services Retention Review Service has been tested with the latest versions of the
following Web browsers:
Microsoft Internet Explorer 9
Mozilla Firefox 12
Google Chrome 19
12.2
Configuring Reviewers for a Retention Pair
Reviewers are designated users who review files in the retention repository to determine which files
to delete, keep, or restore to the primary location. The Administrator user of the server has the
necessary permissions to review files in the retention repository on the secondary location. In an
Active Directory domain, Domain Admin users also have these rights across all servers in the
domain.
Reviewers have the permissions needed to perform reviews, but they do not have rights to perform
any other administrative actions. They automatically have file system rights to all paths in a retention
repository when they access the files via the Retention Review Web UI.
Managing Retention Reviews
215
You can assign users and groups as reviewers of a given retention pair. You can also add reviewers to
the Dynamic File Services Retention Review group to allow them to review multiple pairs. The
Retention Review group is automatically added as the default reviewer for a retention pair at create
time. You can remove the group if you want to restrict review tasks to a few specific users and
groups.
Section 12.2.1, “Adding or Removing Reviewers for a Retention Pair,” on page 216
Section 12.2.2, “Adding or Removing Reviewers to the Dynamic File Services Retention Review
Group,” on page 217
12.2.1
Adding or Removing Reviewers for a Retention Pair
You can use the Reviewers tab on the Pair Properties dialog box to add users and groups as reviewers
of the retained data in a retention pair. The Dynamic File Services Retention Review group is a
assigned as a default reviewer when you create the pair. You can remove the group if you want to
restrict access to a few specific users or groups.
1 In the Management Console, right-click the pair, then select Properties.
2 In the Pair Properties dialog box, click the Reviewers tab.
The Dynamic File Services Retention Review group is a default reviewer.
3 Add reviewers by clicking Add, then browse to select the desired users and groups.
4 Remove reviewers by selecting the user or group name, then clicking Remove.
5 Click Apply or OK to save your changes.
216
Dynamic File Services 2.2 Administration Guide
12.2.2
Adding or Removing Reviewers to the Dynamic File Services Retention
Review Group
You can more conveniently allow users to review the retention data for multiple pairs by adding
them as members of the Dynamic File Services Retention Review group.
When you create a retention pair, the Dynamic File Services Retention Review group is
automatically added as a reviewer for the pair. You can remove the group if you want to restrict
review tasks to a few specific users and groups.
This section describes the Dynamic File Services Retention Review group and how to add and
remove members.
“Understanding the Dynamic File Services Retention Review Group” on page 217
“Setting Up Members for the Retention Review Group in a Domain” on page 219
“Setting Up Members for the Retention Review Group in a Workgroup” on page 219
Understanding the Dynamic File Services Retention Review Group
You can set up a group of users to review the retention data for multiple pairs by adding them as a
member of the Dynamic File Services Retention Review group. The nature of the group and its
setup are different, depending on whether the server is located in an Active Directory domain or in a
Workgroup.
“How is the group created?” on page 217
“Who controls membership in the group?” on page 218
“Who can be a member of the group?” on page 218
“How is the group removed?” on page 218
How is the group created?
The Dynamic File Services Retention Review group is created automatically during the
installation of Dynamic File Services.
Active Directory Domain: The group is created in the Active Directory Users area when
Dynamic File Services is first installed on a server that is a domain controller or member server
in an Active Directory domain. The group is used by all DynamicFS servers that are
subsequently installed in the same domain.
The user that installs the first instance of Dynamic File Services in the domain must have
sufficient domain privileges to create groups. Otherwise, the group creation fails and a user with
Domain Admin privileges must manually set up the group in the appropriate location.
Workgroup: The group is created locally in the Windows Local Users and Groups > Groups area.
The user that installs Dynamic File Services must have sufficient Administrator privileges to
create groups on the server. Otherwise, the group creation fails and a user with Administrator
privileges must manually set up the group in the appropriate location.
Managing Retention Reviews
217
Who controls membership in the group?
Administrators control which users are added or removed as members of the Dynamic File
Services Retention Review group.
Active Directory Domain: The Domain Admin user or a domain user with Domain Admin
privileges can add or remove members. For information, see Section 6.3.2, “Setting Up
Administrators in a Domain,” on page 104.
Workgroup: The Administrator user or a local user with Administrator privileges can add or
remove members. For information, see Section 6.3.3, “Setting Up Administrators in a
Workgroup,” on page 104.
Who can be a member of the group?
The Dynamic File Services Retention Review group has no default members. Other users can be
members of the group:
Active Directory Domain: For a domain group, any domain user can be added to the group. A
domain user does not need Domain Admin privileges in order to be a member, and it is not
necessary to explicitly add a Domain Admin user to the group. The members can review the
retained data on any retention pair on any DynamicFS server in the same domain by using the
Retention Review Web UI.
Workgroup: Any local user can be added to the group. A local user does not need Administrator
privileges in order to be a member, and it is not necessary to explicitly add the Administrator
user to the group. The members can review the retained data on any retention pair on the
DynamicFS server by using the Retention Review Web UI.
How is the group removed?
The Dynamic File Services group is removed as follows:
Active Directory: The group is used by all DynamicFS servers that are subsequently installed in
the same domain. The group is removed when you uninstall the last instance of Dynamic File
Services in the domain, and select the option to Remove all files created by Dynamic File Services.
The user that uninstalls Dynamic File Services must have sufficient domain privileges to delete
groups. Otherwise, the group deletion fails and a user with Domain Admin privileges must
manually remove the group.
Workgroup: The group is automatically removed from the server if you uninstall Dynamic File
Services and select the option to Remove all files created by Dynamic File Services.
The user that uninstalls Dynamic File Services must have sufficient Administrator privileges to
delete groups on the server. Otherwise, the group deletion fails and a user with Administrator
privileges must manually remove the group.
218
Dynamic File Services 2.2 Administration Guide
Setting Up Members for the Retention Review Group in a Domain
In a domain environment, members of the Dynamic File Services Retention Review group can
review the retained data on any of the DynamicFS servers in the domain by using the Retention
Review Web UI.
To add or remove domain users as members of the domain-based Dynamic File Services
Retention Review group:
1 Log in to the DynamicFS server as a Domain Admin.
2 Open the Active Directory Users and Computers utility by selecting Administrator Tools > Users
and Computers.
3 Select the domain, then select Users > Groups.
4 Open the group’s Properties dialog box by double-clicking the Dynamic File Services
Retention Review group.
You can also right-click the group and select Properties. Current domain users that are members
of the group appear in the list.
5 In the Properties dialog box, click the Members tab.
6 Configure the members of the group by doing either or both of the following tasks:
Add a member: Click Add, use the Enter the object names to select field to specify the users
you want to manage DynamicFS in the domain, then click OK to save and apply your
changes.
Remove a member: Select one or more user names from the member list, click Remove, then
click OK to save and apply your changes.
7 Click OK to close the Dynamic File Services Retention Review group’s Properties dialog
box.
Setting Up Members for the Retention Review Group in a Workgroup
In a workgroup environment, members of the server-based Dynamic File Services Retention
Review group can review the retained data in any pair on the DynamicFS server by using the
Retention Review Web UI.
To add or remove local users as members of the server-based Dynamic File Services Retention
Review group:
1 Log in to the DynamicFS server as the Administrator user or as a user with Administrator
privileges.
2 Open the Windows Computer Management tool. Right-click the Computer icon on the desktop
and select Manage.
3 Select Local Users and Groups > Groups, then double-click the Dynamic File Services
Retention Review group to open the group’s Properties dialog box.
Current members appear in the list.
4 Configure the members of the group by doing either or both of the following tasks:
Add a member: Click Add, use the Enter the object names to select field to specify the users
you want to manage DynamicFS on that server, then click OK to save and apply your
changes.
Managing Retention Reviews
219
Remove a member: Select one or more user names from the member list, click Remove, then
click OK to save and apply your changes.
5 Click OK to close the Dynamic File Services Retention Review group’s Properties dialog
box.
12.3
Configuring Reviewers to Receive Email Notifications
You can configure the following retention review management events to send messages to the email
addresses that are configured in the Notification Service:
Retention Review Notification
Retention Review Delete on Pair
Retention Review Move Files Back to Primary
For information about setting up email notifications, setting up email addresses, and configuring
events for it, see Section 6.6.2, “Setting Up Email Notifications,” on page 110
12.4
Scheduling Notification Reviews for a Retention Pair
Dynamic File Services allows you to automatically notify multiple recipients that a scheduled review
is needed for a retention pair’s retained data. In order for notifications to be sent:
If the reviewer is a non-administrator user, you must add the user name to the Dynamic File
Services Retention Review group. It is not necessary to add the server Administrator user
and Domain Admins to this group.
For information, see Section 12.2, “Configuring Reviewers for a Retention Pair,” on page 215.
The Notification Service must be enabled, and the reviewers (or notification recipients) must be
configured to receive Retention Review Notification events by using the Notifications tool. Each
reviewer can be configured separately to receive notifications by email.
For information, see Section 12.3, “Configuring Reviewers to Receive Email Notifications,” on
page 220.
The retention pair must be configured with a Notification Review schedule that specifies when
to trigger the Retention Review Notification events. This section describes this task.
The following sections describe the how the notification review schedule works and how to enable or
disable the schedule.
Section 12.4.1, “Understanding the Notification Review Schedule,” on page 221
Section 12.4.2, “Configuring the Notification Review Schedule,” on page 222
220
Dynamic File Services 2.2 Administration Guide
12.4.1
Understanding the Notification Review Schedule
For a retention pair, the Notification Review schedule specifies when review notification events are
triggered. The ability to trigger review events can be enabled for a retention pair by setting the
schedule, or disabled by setting the frequency to Never. Notices are sent only to users that are
configured in the Notification Service to be notified about the Retention Review events.
The review notification schedule can be set to one of the following frequencies:
Frequency
When Notification Review Events Are Triggered
Never
Disables events. This effectively unschedules review notifications for the retention
pair.
Monthly
Every month on the specified day. The interval begins on the specified month and
day, and continues indefinitely.
Quarterly
Every three months on the specified day. The interval begins on the specified month
and day, and continues indefinitely.
Yearly
Every year on the specified month and day. The interval begins on the specified
month and day, and continues indefinitely.
Custom dates
Each day specified in the list. After the specified dates are past, no more events are
triggered.
The 12-month Gregorian calendar is used. Months and days are considered to be future dates beyond
the day the policy is created. If the day has passed in the current month, set the values for the next
expected interval.
You can configure notifications to be triggered on the last day of any month by choosing Last day as
the Day value. The trigger occurs on day 28, 29, 30, or 31, depending on the month and whether it is a
leap year.
Setting days to values of 29, 30, and 31 has the following effect:
Day
Actual Days
29
Day 29 in all months except February, which is day 28 in non-leap years.
30
Day 30 in all months except February, which is day 28 in non-leap years, and 29 in
leap years.
31
Day 28, 29, 30, or 31, depending on the month and whether it is a leap year. Same
as choosing Last day.
No run time is associated with these schedules. The time of day that the review notification is sent is
controlled by the Retention Review Check Timer settings in the DswCore.xml config file, which runs
by default daily at 0010 hours (00:10 a.m.). For information, see Section 12.5, “Configuring the
Review Notification Check Timer,” on page 223.
Managing Retention Reviews
221
12.4.2
Configuring the Notification Review Schedule
1 Prepare to send notifications:
1a Add reviewers to the Dynamic File Services Retention Review group.
For information, see Section 12.2, “Configuring Reviewers for a Retention Pair,” on
page 215.
1b Enable the Notification Service, and configure users to receive notifications via email.
For information, see Section 6.6, “Configuring the Notification Service,” on page 108.
1c For each user, configure the user to receive Review Notification events.
For information, see Section 6.6.2, “Setting Up Email Notifications,” on page 110.
2 In the Management Console, connect to the DynamicFS server, then open the Pairs folder.
3 Right-click the retention pair, then select Properties.
4 Select the Notification review tab.
The schedule options are available only if you completed Step 1.
5 Select the Frequency, then specify when to trigger review notification events:
Frequency
When
Never
Disables the schedule so that review notifications are not triggered.
Monthly
Specify the month and day. The review notification events are triggered every
month on the same day.
Quarterly
Specify the month and day to start the intervals. Review notification events are
triggered on the same day of every third month.
Yearly
Specify the month and day. Review notification events are triggered on the
same month and day each year.
Custom
Specify one or more dates by selecting days in the calendar. Use the arrows to
navigate month-by-month through the calendar. Click the year, then select a
year to jump to it. Click the month, then select a month to jump directly to it.
Only future dates can be selected.
6 Click OK to save and apply the changes.
222
Dynamic File Services 2.2 Administration Guide
12.5
Configuring the Review Notification Check Timer
The Retention Notification Check Timer checks each retention pair to see if a review notification is
scheduled for the current day. If the condition is true for a pair, a review event is triggered for the
Notification Service. Notifications are emailed or Tweeted to users that are configured to be notified
about review events.
The check timer runs by default at 0010 hours daily. The run time for the Retention Notification
Check Timer is set in the DswCore.xml configuration file in the C:\Program Files\Dynamic File
Services\ directory, or the custom installation directory. An Administrator user (or user with
Administrator privileges) can change the check time by stopping the Service, editing the XML file,
and then restarting the Service.
1 Log in to the DynamicFS server as a user with Administrator privileges.
2 Stop the Service gracefully as described in Section 6.4.3, “Stopping the Dynamic File Service,” on
page 106.
3 In a text editor, open the DswCore.xml file, and modify the following settings:
<RetentionReviewHour>0</RetentionReviewHour>
<RetentionReviewMinute>10</RetentionReviewMinute>
<RetentionReviewInterval>30</RetentionReviewInterval>
4 Save the file.
5 Right-click the Service Controller icon, then select Start service.
If the Check Timer has already run for the current day, the Check Timer runs the next day at the
new scheduled time.
12.6
Reviewing Files in the Retention Repository
The Novell Dynamic File Services Retention Review Service provides a Web interface for reviewing
files in a retention repository. Reviewers determine the disposition of retained files in accordance
your company’s data retention policy. A reviewer can take no action, delete files from the repository,
or move files from the repository back to their original location.
The Novell Dynamic File Services 2.2 Retention Review Quick Start (http://www.novell.com/
documentation/dynamic_file_services/dynamic_review_win/data/dynamic_review_win.html)
provides an overview of the review process for non-administrator reviewers. It familiarizes them
with the Retention Review Service and the review process without requiring them to understand
Dynamic File Services and how the retention pair is created or managed.
Section 12.6.1, “Understanding the Review Process,” on page 224
Section 12.6.2, “Accessing the Retention Review Service,” on page 224
Section 12.6.3, “Deleting Files or Folders,” on page 225
Section 12.6.4, “Restoring Files or Folders,” on page 226
Section 12.6.5, “Ending a Review Session,” on page 226
Managing Retention Reviews
223
12.6.1
Understanding the Review Process
The Retention Review group can have any number of members. Each reviewer assesses retained files
independently of the other reviewers. If multiple reviewers concurrently access the repository, their
actions are processed on a first-come, first-served basis.
A reviewer’s restore and delete actions are not executed immediately. The Retention Review Service
creates a one-time action job for the selected files and folders, then queues the job to be executed in
turn with any other actions taken for the retained data. The files are removed immediately from the
reviewer’s display when the page refreshes, but the action might not be processed until several
seconds or minutes later.
Because the review actions are queued, it is possible that a prior action in the queue can override a
subsequent action or some portion of an action. For example, if one reviewer deletes a file, and
another restores the same file at almost the same time, the resulting action depends on which request
is processed first.
The review page is refreshed every 10 seconds to display the current status of the repository. The
following states are reported:
Idle: No policies are running. New actions are queued to run within seconds.
Policy run (or Manual Move) is in progress: A normal policy run or a manual move is in
progress, which can take several minutes to several hours. Any number of previous actions
might be queued behind it.
Restore/Move file job (or Delete file job) is in progress: A restore action job is busy moving
files from the repository to their original location in the primary path, or a delete action is
deleting files from the repository. The job might be one that was submitted by any of the current
or previous reviewers.
When the repository status returns to an idle state, the reviewer knows that all action jobs are
complete.
It is not necessary to remain logged in after your actions are queued. It is not possible to stop queued
actions.
12.6.2
Accessing the Retention Review Service
The Retention Review Service is available on the server where Dynamic File Services is installed and
running. Reviewers can access the review site via a Web browser. The Retention Review Service has
been tested with the latest versions of these browsers:
Microsoft Internet Explorer 9
Mozilla Firefox 12
Google Chrome 19
Before you begin a retention review session, modify your Web browser settings to allow pop-up
messages for the target site.
The Retention Review Notification message provides a link to the Web interface for a specific
retention pair. The connection is made via the secure HTTP protocol (HTTPS). The URL is in the
form:
https://<ndfs_ip_or_dns_name>:<ndfs_port>/folders.html?pair=<retention_pair_name>
Administrators or users with Administrator privileges on the server can initiate a review session
from the Management Console.
224
Dynamic File Services 2.2 Administration Guide
To access the Retention Review site:
1 Use any of the following methods to initiate your Retention Review session:
Users with Administrator privileges can use the Management Console. Right-click the
server and select Retention Review to view a list of all retention pairs on the server. Rightclick the retention pair and select Retention Review to go directly to the pair’s retained data.
Members of the Dynamic File Services Retention Review group can follow the link in
their notification messages. Launch a Web browser, then click the link in the Review
Notification message to open the Retention Review Web interface.
You can also copy the URL and paste it in the Location field of your Web browser.
2 If you are prompted to do so, accept and install the Dynamic File Services certificate in your
Local Computer certificate store.
3 In the Login dialog box, type your user name and password, then click OK.
In an Active Directory domain, use your domain credentials. In a Workgroup, use your server
credentials for the target server.
On successful login, the Retention Review Folders list is displayed.
Access is denied if the login identity is not an authorized reviewer. Ensure that your user name
is added as a reviewer in the Dynamic File Services Retention Review group, then try
again. To log in with a different identity, clear the browser cache to remove your old credentials,
then refresh the Retention Review page to access the Login dialog box.
12.6.3
Deleting Files or Folders
The Delete function purges selected files or folders from a selected retention review folder. The file is
no longer available on the storage media, and you cannot use the Restore function to restore it.
A reviewer can delete one or more files, folders, or review folders at a time. Deleting a folder also
recursively deletes its contents. It can take a few minutes to completely delete the contents of a folder,
depending on how many files and folders it contains.
1 On a page in the Retention Review Web interface, select the check box next to one or more files,
folders, or review folders.
2 Click Delete Selected.
3 When you are prompted, click OK to confirm the deletion, or click Cancel to abandon the action.
All delete actions are logged in the Review Transaction History for the retention pair. The history is
available to the Dynamic File Services administrators. Contact your administrator if you need a copy
of the log files.
Managing Retention Reviews
225
12.6.4
Restoring Files or Folders
The Restore function moves selected files or folders from a retention review folder back to the
original path on the primary location. The restored file or folder is no longer available in the review
folder.
A reviewer can restore one or more files or folders at a time. Each object returns to its original path on
the primary location. Restoring a folder also recursively restores its contents. It can take a few
minutes to complete the move, depending on how many files and folders are involved, and the size
of the files to be moved.
1 On a page in the Retention Review Web interface, select the check box next to one or more files,
folders, or review folders.
2 Click Restore Selected.
3 When you are prompted, click OK to confirm the restore, or click Cancel to abandon the action.
All restore actions are logged in the Review Transaction History for the retention pair. The history is
available to the Dynamic File Services administrators. Contact your administrator if you need a copy
of the log files.
12.6.5
Ending a Review Session
When you are done with a retention review.
1 Click Log out to end the session with the Retention Review Service.
2 Close the browser window to ensure that your login information is not cached.
Firefox and Chrome do not automatically close the browser.
12.7
Viewing the Review Transaction History
In addition to normal pair statistics described in Chapter 13, “Monitoring Pairs and Policies,” on
page 229, each retention pair has statistics available for the review transaction history. Each Restore or
Delete action is logged to a file that contains information, such as the user name of the reviewer that
performed the action, the date and time, the size, and the full path of each file that was acted upon.
If files cannot be moved in a restore action, a matching entry is created as a Files Failed to Move action.
For example, files are not restored if a file with the same name exists in the original folder on the
primary path. To restore the older version, you must rename the file in the target folder, then try
again.
1 In the Management Console, connect to the DynamicFS server that you want to manage.
2 Click the Pairs folder under the server to view the list of pairs for the server in the right panel.
3 Double-click the retention pair to open its Statistics dialog box.
4 Click the Review Transaction History tab to view a list of the Retention Review log files.
The list contains logs of the Restore actions, Delete actions, or failed actions that were made by
all reviewers of the retained data for the retention pair.
5 Click the number of files link for an entry to view a list of folders and files that were involved in
a single action.
6 (Optional) From an open log file, select File > Save as to save the file in .csv format.
226
Dynamic File Services 2.2 Administration Guide
7 (Optional) Generate a report of one or more actions taken by selecting the actions and exporting
them in .csv or .html format. See Section 12.8, “Generating a Report for Retention Review
Logs,” on page 227.
8 (Optional) Archive the oldest actions and remove them from the active history. See Section 12.9,
“Archiving the Retention Review Logs,” on page 227.
12.8
Generating a Report for Retention Review Logs
You can generate a report of the actions performed during review sessions by using the Export option
on Review Transaction History tab of the retention pair’s Statistics dialog box. Select one or more
entries in the list that you want to include in a report. The contents of the selected entries are exported
together in .html (default) or .csv format. The default save location is at the root of the C:\ drive.
The default file name is review_transaction.html or review_transaction.csv. You can specify a
different location or file name when you export the report.
To generate a report for one or more Retention Review log entries:
1 In the Management Console, connect to the DynamicFS server that you want to manage.
2 Click the Pairs folder under the server to view the list of pairs for the server in the right panel.
3 Double-click the retention pair to open its Statistics dialog box.
4 Click the Review Transaction History tab to view a list of the Retention Review log files.
5 Select one or more logs that you want to include in the report, then click Export.
You can customize the report by choosing files by dates, reviewers, or the delete and restore
actions.
Only the contents of the log files are exported to the report. The entries are not removed from the
Retention Review log.
6 In the pop-up browser, specify the following options, then click Save:
Export format: Choose .html (default) or .csv.
Location: Browse to the location on the computer where you want to save the file.
The default save location is at the root of the C:\ drive.
File name: Specify a name for the file.
The default file name is review_transaction.html or review_transaction.csv.
7 (Optional) In an file browser, go to the location you specified to verify that the file was exported.
12.9
Archiving the Retention Review Logs
You can archive the logs of Retention Review actions by using the Archive option on Review
Transaction History tab of the retention pair’s Statistics dialog box. You might want to archive the logs
in order to free disk space. Archived logs are saved in a compressed .zip format.
The selected log files are zipped together, and the archive file is stored in the
C:\ProgramData\Dynamic File Services\Pairs\<guid>\Reviews\ folder. The default file name
is ReviewHistoryArchive plus a time stamp of when the archive file is created:
ReviewHistoryArchiveYYYYMMDD-hh.mm.ss.zip
The time stamp gives the year, month, day, hour, minute, and second information. The year is based
on the Gregorian calendar of 12 months. Time is given in a 24-hour clock based on the computer time.
Managing Retention Reviews
227
To archive one or more Retention Review log files:
1 In the Management Console, connect to the DynamicFS server that you want to manage.
2 Click the Pairs folder under the server to view the list of pairs for the server in the right panel.
3 Double-click the retention pair to open its Statistics dialog box.
4 Click the Review Transaction History tab to view a list of the Retention Review log files.
5 Select one or more logs that you want to archive, then click Archive.
The archive file is automatically created and saved. The log entries no longer appear in the
Review Transaction History list.
6 (Optional) In a file browser, go to the C:\ProgramData\Dynamic File
Services\Pairs\<guid>\Reviews\ folder to verify that the .zip file was created.
You can restore an archived log file to the C:\ProgramData\Dynamic File
Services\Pairs\<guid>\Reviews\ folder in order to make the log available for viewing again on
the Review Transaction History tab of the Statistics dialog box. Export the desired log from the .zip file
to the C:\ProgramData\Dynamic File Services\Pairs\<guid>\Reviews\ folder. To view the log
file’s information, open the retention pair’s Statistics dialog box and go to the Review Transaction
History tab, then select the number-of-files link for the log.
228
Dynamic File Services 2.2 Administration Guide
13
Monitoring Pairs and Policies
13
Novell Dynamic File Services (DynamicFS) provides several monitoring features that can help you
understand the current and historical status of pairs and policies. This section describes the statistics,
history, logging, and auditing features and how to use the information they provide to monitor your
DynamicFS solution.
Section 13.1, “Viewing the Pair Statistics,” on page 229
Section 13.2, “Viewing the Policy Execution History for a Pair,” on page 230
Section 13.3, “Viewing a Policy Run History of Files Moved,” on page 232
Section 13.4, “Viewing a Policy Run History of Files that Failed to Move,” on page 234
Section 13.5, “Viewing the Pair History,” on page 235
Section 13.6, “Viewing the Server Disk Capacity and Used Space History,” on page 237
Section 13.7, “Viewing Logged Events,” on page 239
Section 13.8, “Viewing Service Events,” on page 241
Section 13.9, “Auditing Management Events,” on page 241
Section 13.10, “Generating a DynamicFs Configuration Report,” on page 242
13.1
Viewing the Pair Statistics
The Dynamic File Service scans each pair hourly and reports information about the pair’s status, such
as statistics for the last policy that was run and the status of policies assigned to a pair. This
information can be viewed in the pair’s Statistics dialog box. Each pair’s Statistics dialog box opens in
a separate window.
1 In the Management Console, connect to the DynamicFS server that you want to manage.
2 In the left panel, select the Pairs folder to view the list of pairs in the right panel.
3 Double-click the pair name to open its Statistics dialog box.
4 On the General tab, view the status of the pair and the statistics for the last policy run.
The Pair Status area reports the following information. If a scan is currently running, the Current
Status bar shows activity for that policy run.
Statistic
Description
Current status
Provides the status of whether a scan is currently running against the pair, or if
it is idle.
Last run task
Indicates whether the last scan was initiated by a health check, a manual policy
run of selected policies, or a scheduled run of selected policies.
Start time
Specifies the date and time that the last scan was started.
Elapsed time
Specifies the time elapsed for the scan in hours, minutes, and seconds.
Monitoring Pairs and Policies
229
Statistic
Description
Files scanned
Specifies the number of files scanned across both the primary and secondary
locations.
Files moved
Specifies the number of files that are waiting to be moved.
Total KB moved
Specifies the combined size of the files that are waiting to be moved.
5 View information about the policies that are associated with the pair.
The Policies associated to pair area lists the policies that are associated with the pair and reports
the following information about them:
Statistic
Description
Name
Specifies the name given to the policy by the administrator.
Status
Indicates the current status of the policy, such as Idle or Running.
Last run
Specifies the date (MM/DD/YYYY) and time (HH:MM:SS AM or PM) that the
policy was last run.
Elapsed time
Specifies the elapsed time for the scan in hours, minutes, and seconds.
6 Continue with the following tasks to view more statistical information for the pair:
Section 13.2, “Viewing the Policy Execution History for a Pair,” on page 230
Section 13.3, “Viewing a Policy Run History of Files Moved,” on page 232
Section 13.4, “Viewing a Policy Run History of Files that Failed to Move,” on page 234
Section 13.5, “Viewing the Pair History,” on page 235
13.2
Viewing the Policy Execution History for a Pair
The Policy Execution History tab in a pair’s Statistics dialog box provides information about the mostrecent 16 runs of policies on the pair. You can examine which policies were run and when. For each
policy run, you can view lists of which files were moved and which files should have moved but did
not move. This helps you to understand if policies are moving the files you expect to be moved.
When policies are run at the same time, the policies are grouped and run together by direction:
Primary to Secondary and Secondary to Primary. Statistics for a policy run are aggregated based on the
two direction categories, not by individual policies.
To view and explore the policy execution history for a pair:
1 In the Management Console, connect to the DynamicFS server that you want to manage.
2 In the left panel, select the Pairs folder to view a list of pairs in the right panel.
230
Dynamic File Services 2.2 Administration Guide
3 Double-click the pair name to open its Statistics dialog box, then select the Pair execution history
tab.
4 In the Date and Time area at the bottom of the page, use the left-arrow and right-arrow to select
the run you want to explore.
The selected run is highlighted with a red disk at the top of its bar in the graph.
5 View the summary on the left that shows the policies that were run and the number of files that
were moved or not moved.
Statistic
Description
History of bytes moved
The History of bytes moved area graphically displays the statistics for the last
policy run, highlighted in red at the top of the bar. The bar charts display the
number of megabytes moved from Primary to Secondary and Secondary to
Primary by the policies being enforced in each policy run.
Date and time
The Date and time area shows when the policy run occurred. Use the left-arrow
and right-arrow to navigate between the runs. Information about the currently
selected policy run is displayed in the left panel.
Policies executed
The Policies executed area lists the policies that were enforced in that run.
Primary to secondary
The Primary to secondary area shows information about the files moved from
the primary path to the secondary path for the specified policies. This area is
dimmed if no policies in that run were configured to move data in that direction.
Secondary to primary
The Secondary to primary area shows information about the files moved from
the secondary path to the primary path for the specified policies. This area is
dimmed if no policies in that run were configured to move data in that direction.
Monitoring Pairs and Policies
231
Statistic
Description
Total files moved
The Total files moved field provides a link that opens the Run History dialog box
if the value is non-zero. The run history lists each file that was moved in the
specified direction. It provides the full path of the file name, the file extension,
the file size, and any error messages for each file.
For information, see Section 13.3, “Viewing a Policy Run History of Files
Moved,” on page 232.
Total files failed to move The Total files failed to move field provides a link that opens the Run History
dialog box if the value is non-zero. The run history lists each file that should
have moved in the specified direction, but did not move. It provides the full path
of the file name, the file extension, the file size, and any error messages for each
file.
For information, see Section 13.4, “Viewing a Policy Run History of Files that
Failed to Move,” on page 234.
6 (Optional) Save the graphic display by right-clicking anywhere in a graphical area and selecting
any of the following options:
Copy: Copies the selected graph as an image to the clipboard. Open a graphics editor, paste
the image, and save the file.
Save Image As: Opens a Windows Save As dialog box where you can specify a location and
file name for the image, select a file format, then save the file.
Page Setup: Set up the page orientation (portrait or landscape) and printer information for
printing the graph.
Print: Print the selected graph.
7 (Optional) Click the link for Total files moved to open the Run History dialog box where you can
view a list of the files moved in a particular direction.
For information, see Section 13.3, “Viewing a Policy Run History of Files Moved,” on page 232.
8 (Optional) Click the link for Total files failed to move to open the Run History dialog box where
you can view a list of the files that should have moved in a particular direction, but that failed to
move.
For information, see Section 13.4, “Viewing a Policy Run History of Files that Failed to Move,”
on page 234.
13.3
Viewing a Policy Run History of Files Moved
During a policy run, the Standard Policy engine records information about any file that is moved
between the primary and secondary locations in a pair. A file is moved if it meets all of the filter
options in a policy.
When policies are run at the same time, the policies are grouped and run together by direction:
Primary to Secondary and Secondary to Primary. Statistics about the files that moved are aggregated
based on the two direction categories, and not by the individual policies in the same policy run.
The Total files moved run history statistics for a policy run lists the files that moved in a given
direction. For each file, the Run History report includes the full path of the file name, the file
extension, the file size, and a comment for any error messages.
232
Dynamic File Services 2.2 Administration Guide
A file can appear to not move if you schedule policies to run at the same time that move a file in
opposite directions. If the file is not listed in the Total files failed to move run history, look for it in the
Total files moved run histories for the Primary to secondary and Secondary to primary statistics for the
policy run.
To view the run history for files that moved in a policy run:
1 In the Management Console, connect to the DynamicFS server that you want to manage.
2 In the left panel, select the Pairs folder to view a list of pairs in the right panel.
3 Double-click the pair name to open the pair’s Statistics dialog box, then select the Pair execution
history tab.
4 In the Date and Time area at the bottom of the Pair Execution History page, use the left-arrow and
right-arrow to select the run you want to explore.
The selected run is highlighted with a red disk at the top of its bar in the graph.
5 In the left panel under Primary to secondary or Secondary to primary, click the link for Total files
moved.
The Run History dialog box opens with a list of files that were moved in the selected direction.
6 Use any of the following options to view information or to locate a file of interest:
Scroll: The list is paged to show up to 1000 files at a time. On each page, scroll down to see up to
1000 file names listed.
Page: Click the left-arrow and right-arrow to move page-by-page through the run history. You
can also use the Page drop-down list to jump directly to a page.
Sort: Click the heading of a column to sort the list by file name, file extension, file size, or
comment.
IMPORTANT: The sorting is text-based, so it lists the information alphabetically, not
numerically.
Filtering: Use the filter option in the upper right corner to type a sequence of letters to find
specific files in the list. Specify the sequence in the field, then click the magnifying glass to apply
the filter.
In the example below, the files are sorted by file name, and the search has filtered out files that
do not contain the sequence of characters “test118”.
7 When you are done viewing the list, close the Run History dialog box. (Click the X in the upper
right corner, or press Alt+F4.)
Monitoring Pairs and Policies
233
13.4
Viewing a Policy Run History of Files that Failed to Move
During a policy run, the Standard Policy engine records information about any file that should move
but fails to move. A file should move if it meets all of the filter options in a policy. Reasons that a file
might fail to move during a policy run include the following:
The source file is open and in use.
Free space on the target disk is insufficient for the file size.
A file with the same file name is present in the same folder on the target location.
The source location or the target location of a file move becomes unavailable.
The Dynamic File Services Storage Rights group or NDFS-servername proxy user has
insufficient permissions on the remote share or file system in a pair.
Exceptions caused by timing issues with the Windows file system.
When policies are run at the same time, the policies are grouped and run together by direction:
Primary to Secondary and Secondary to Primary. Statistics about the files that failed to move are
aggregated based on the two direction categories, and not by the individual policies in the same run.
The Total files failed to move run history statistics for a policy run lists the files that failed to move in a
given direction. For each file, the Run History report includes the full path of the file name, the file
extension, the file size, and a comment for any error messages.
A file can appear to fail to move if you schedule policies to run at the same time that move files in
opposite directions. If the file is not listed in the Total files failed to move run history, look for it in the
Total files moved run histories for the Primary to secondary and Secondary to primary statistics for the
policy run as described in Section 13.3, “Viewing a Policy Run History of Files Moved,” on page 232.
To view the run history for files that failed to move in a policy run:
1 In the Management Console, connect to the DynamicFS server that you want to manage.
2 In the left panel, select the Pairs folder to view a list of pairs in the right panel.
3 Double-click the pair name to open the pair’s Statistics dialog box, then select the Pair execution
history tab.
4 In the Date and Time area at the bottom of the Pair Execution History page, use the left-arrow and
right-arrow to select the run you want to explore.
The selected run is highlighted with a red disk at the top of its bar in the graph.
234
Dynamic File Services 2.2 Administration Guide
5 In the left panel under Primary to Secondary or Secondary to Primary, click the link for Total files
failed to move.
The Run History dialog box opens with a list of files that should have moved in the selected
direction but did not move.
6 Use any of the following options to view information or locate a file of interest:
Scroll: The list is paged to show up to 1000 files at a time. On each page, scroll down to see up to
1000 file names listed.
Page: Click the left-arrow and right-arrow to move page-by-page through the run history. You
can also use the Page drop-down list to jump directly to a page.
Sort: Click the heading of a column to sort the list by file name, file extension, file size, or
comment.
IMPORTANT: The sorting is text-based, so it lists the information alphabetically, not
numerically.
Filter: Use the filter option in the upper right corner to type a sequence of letters to find specific
files in the list. Specify the sequence in the field, then click the magnifying glass to apply the
filter.
7 When you are done viewing the list, close the Run History dialog box. (Click the X in the upper
right corner, or press Alt+F4.)
13.5
Viewing the Pair History
The Pair History tab in a pair’s Statistics dialog box shows the amount of space consumed over time
on the devices that are used in a pair. You can view a summary of a particular scan event by the file
extension, file size, last modified, and creation time. You can display each of these graphs by total size
consumed or by the number of files. Each scan event opens in a separate window so that you view
and compare multiple events. Sizes are reported in binary units (for example, 1 MB is 1024 bytes).
By default, the pair history scan runs once daily at 4:00 a.m. This setting is configurable. For
information, see Section 8.10, “Scheduling the Pair History Scan,” on page 153.
For information about the storage status and history for the disks that are used in a pair, see
Section 13.6, “Viewing the Server Disk Capacity and Used Space History,” on page 237.
1 In the Management Console, connect to the DynamicFS server that you want to manage.
2 Under the Pairs folder, double-click the pair name to open the Statistics dialog box, then select
the Pair history tab.
Monitoring Pairs and Policies
235
The Pair History graph shows the total file size over time for the primary location (a dark blue
square icon) and the secondary location (a light blue circle icon). A scan event is recorded for
each time that the Pair History scan is run.
3 Double-click the scan event for the primary (a dark blue square icon) location or the secondary
location (a light blue circle icon) to open a graphical summary of the scan in a separate dialog
box.
A graph of the scan is displayed by file extension and total file size of all the files moved in that
category.
4 In a Summary dialog box, modify the display parameters to view the information of interest:
4a Select Total Size (default) to view the information organized by file size in the categories.
4b Select Number of Files to view the information organized by number of files in the categories.
4c In the Graph Option drop-down box, select one of the following parameters to modify the
information that is displayed:
Creation
Accessed
Modified
File Size
Extension (default)
5 (Optional) Save a graphic display by right-clicking anywhere in a graphical area and selecting
one of the following options:
Copy: Copies the selected graph as an image to the clipboard. Open a graphics editor, paste
the image, and save the file.
Save Image As: Opens a Windows Save As dialog box where you can specify a location and
file name for the image, select a file format, then save the file.
Page Setup: Set up the page orientation (portrait or landscape) and printer information for
printing the graph.
Print: Print the selected graph.
6 (Optional) Compare multiple scan events by opening their Summary dialog boxes side-by-side.
236
Dynamic File Services 2.2 Administration Guide
13.6
Viewing the Server Disk Capacity and Used Space History
You can view the capacity and used space information about the disks on a Dynamic File Services
server. Viewing the server’s disk history can help you understand space usage patterns for a disk for
planning purposes. Sizes are reported in binary units (for example, 1 MB is 1024 bytes).
IMPORTANT: You can view the pair history (as described in Section 13.5, “Viewing the Pair
History,” on page 235) for each pair to determine how much space is being used by the primary path
or secondary path on a disk.
You can also view the policy run history for a pair (as described in Section 13.2, “Viewing the Policy
Execution History for a Pair,” on page 230) to determine how much data is being moved by different
policy runs on the pair.
Section 13.6.1, “Viewing Disk Details and History,” on page 237
Section 13.6.2, “Sample Disk History for a Primary Disk,” on page 238
Section 13.6.3, “Sample Disk History for a Secondary Disk,” on page 239
13.6.1
Viewing Disk Details and History
1 In the Management Console, connect to the DynamicFS server you want to manage.
2 Right-click the server, then select Properties.
3 Select the Disk Details tab to view the following information for local disks on the target server:
Property
Description
Disks
List of the disks attached as local drives on the server. It shows their capacity,
free space in gigabytes, and free space as a percentage.
File system
The file system type, such as NTFS.
Graphical display
A graph of the used space and free space on the selected disk.
Information is displayed by default about the C:\ drive.
4 Select a disk to view its file system, capacity, and used space information.
Monitoring Pairs and Policies
237
5 Select a disk and click History to view information about how the used space has changed over
time.
6 (Optional) Save the graphic display by right-clicking anywhere in a graphical area and selecting
any of the following options:
Copy: Copies the selected graph as an image to the clipboard. Open a graphics editor, paste
the image, and save the file.
Save Image As: Opens a Windows Save As dialog box where you can specify a location and
file name for the image, select a file format, then save the file.
Page Setup: Set up the page orientation (portrait or landscape) and printer information for
printing the graph.
Print: Print the selected graph.
13.6.2
Sample Disk History for a Primary Disk
The following sample Local Drive History graph displays the capacity history for a disk that is
managed by Dynamic File Services, where the disk contains one or more primary paths of pairs.
Policies were scheduled to run during non-peak hours so that the data could be moved over a period
of days or weeks, depending on the amount of data to be moved, while allowing users to continue
working with the data.
Initially, policies were run daily during non-peak traffic times on each pair to move files by type, size,
or date last modified from the primary disk to a secondary disk (not pictured). Thereafter, the policy
schedule was modified to run weekly during non-peak traffic times to move any new files that match
the specified criteria from the primary disk to the secondary disk.
238
Dynamic File Services 2.2 Administration Guide
13.6.3
Sample Disk History for a Secondary Disk
The following sample Local Drive History graph shows a disk that contains one or more secondary
paths of pairs. Initially, the disk contained little or no data. Over time, the disk capacity is being
consumed by files that are moved by policies from primary paths on one or more other disks (not
pictured) to their secondary paths on this disk.
Because the disk capacity is near its maximum, you might need to take one or more of the following
actions:
Stop some policies from running by disabling their schedules, or by disassociating them from
some pairs.
Create new policies to move some data back to the primary paths.
Stop using the disk as the secondary location for some pairs. This involves the following tasks:
1. Disassociate a pair from its current policies.
2. Create a new policy for the pair to move all of the files on the secondary path to the primary
path. The policy can be scheduled to run in non-peak hours over several days or weeks,
depending on how much data needs to be moved.
3. After all of the data has been returned to the primary location, unlink the primary path and
the secondary path to remove the pair relationship between the two locations. This
automatically disassociates the pair from any policies.
4. Create a new pair that links the primary path to a secondary path on a different disk.
5. Associate the pair with one or more policies to move specified file types to the new
secondary location.
To help determine which pairs need to be modified, you can view the pair history (as described in
Section 13.5, “Viewing the Pair History,” on page 235) for each pair to determine how much space is
being consumed by each pair’s secondary path. You can also view the policy run history for the pair
(as described in Section 13.2, “Viewing the Policy Execution History for a Pair,” on page 230) to
determine if a policy is moving more data than you intended to be moved, and to understand how
the policy might be modified to better meet your goals.
13.7
Viewing Logged Events
Event logs for the following Dynamic File Services components can be viewed in the Server Properties
> Log Files page in the Management Console:
Monitoring Pairs and Policies
239
Event Log File
Component
Description
DswMpcCore.log
Dynamic File Service
Logs events for the core engine.
DswStandardEngine.log
Standard pair engine
Logs events for the creation, deletion, modification,
and policy runs for standard pairs.
DswRetentionEngine.log Retention pair engine
Logs events for creation, deletion, modification, and
policy runs for retention pairs.
DswCloudEngine.log
Cloud engine
Logs events for policy runs on retention pairs with
cloud storage as the secondary.
install.log
Installation
Logs events during the install about setting up the
Dynamic File Services group and Dynamic
File Services Retention Review group on
the local server or in Active Directory. It also logs
the creation of the Dynamic File Services Storage
Rights group in Active Directory.
DswPairCheck.log
Pair Check utility
Logs events each time you manually run the Pair
Check utility. The log is created the first time the
utility runs.
DswInventory.log
File Inventory utility
Logs events each time you manually run the File
Inventory utility. The log file is created the first time
the utility runs.
You can modify the logging level for the Service, Standard, Retention, and Cloud logs to change the
types of events that are logged. For information, see Section 6.7, “Configuring the Logging Level for
Engines,” on page 114.
1 In the Management Console, connect to the DynamicFS server you want to manage.
2 Right-click the server, then select Properties.
3 Select the Log files tab.
The available log files are listed in the drop-down list.
4 From the drop-down list, select a log file to view its messages.
Messages are listed in chronological order in the display window. Scroll down to view the most
recent messages.
240
Dynamic File Services 2.2 Administration Guide
5 (Optional) In the Search field, type a sequence of characters that you want to find, then click the
Search icon to jump to instances of those characters in the log.
13.8
Viewing Service Events
Dynamic File Services uses Microsoft Event Viewer for logging events like starting and stopping the
Service, and application execution errors. See the Microsoft TechNet Library (http://
technet.microsoft.com/en-us/library/ee624055(WS.10).aspx) for documentation on viewing events
with the Event Viewer snap-in for Microsoft Management Console (MMC).
13.9
Auditing Management Events
Auditing the management events for the Dynamic File Service, pairs, and policies is integrated with
DynamicFS and is provided as a basic benefit. The purpose of the audit log is to record which loggedin user performs major management operations, such as create, delete, and modify (which includes
association and disassociation of the policies with pairs).
All Dynamic File Services management actions are audited. All authentication and authorization
events are audited, including both authorized and non-authorized management actions. No sensitive
information is placed in the audit log. The audit log also reports when the Service is stopped and
started.
The audit log reports the user’s IP address, name, and the time of access for management events. It
reports System as the user when scheduled policies are run.
The audit file is protected so that it cannot be deleted or accessed by unauthorized users.
Section 13.9.1, “Viewing Audit Log Events,” on page 241
Section 13.9.2, “Detecting and Resolving a Corrupted Audit Log,” on page 242
13.9.1
Viewing Audit Log Events
Dynamic File Services automatically audits the management tasks for creating and managing the
Service, pairs, and policies. The following files are used for auditing:
Monitoring Pairs and Policies
241
File
Description
C:\ProgramData\Dynamic File
Services\audit\DswAuditLog.xml
Logs the management events for the Dynamic File
Service, pairs, and policies.
AuditAndNotificationControl.xml in the
C:\Program Files\Dynamic File
Services\ folder, or in the folder where you
Controls the logging behavior for the audit log.
installed the software.
There is no special way to view this DswAuditLog.xml file. It is an XML file, and most HTTP
browsers can display well-formed XML in a readable form. You can also view the file in a text editor.
It is necessary to review information about the audited management events in combination with
information reported in the Service log (DswMpcCore.log). There might be related Service events that
are automatically generated from a single management task. For information about viewing the
Service log, see Section 13.8, “Viewing Service Events,” on page 241.
For example, if a pair is deleted, the deletion event is recorded in the audit log, and the related
automatic disassociations of policies from the deleted pair are recorded in the Service log. The logged
disassociation message lists all of the policies with a Boolean true or false indication for each of
whether the disassociation occurred for that policy. You would expect a previously associated policy
to report a value of true after a successful disassociation.
13.9.2
Detecting and Resolving a Corrupted Audit Log
If the audit log file becomes corrupted so that it contains malformed XML, scheduled policies might
not run or the local drive history might not function.
Dynamic File Services automatically checks that the audit log file contains well-formed XML
whenever an audited event is added to the Audit log file. If malformed XML is detected, the
following events automatically occur:
1. The corrupted audit log is renamed by adding a GUID to the end of the file name.
This allows for multiple instances of the file to be saved in the …\Dynamic File Services
folder.
2. A new audit log file is started.
3. An entry is added in the new log stating that the audit log was detected to have a problem and a
new one was started.
4. An event is sent to the Windows Event Logger stating that an improperly formatted audit log
file was detected, and providing the name of the renamed log file.
5. The audited event is written to the new audit log file.
If you are notified of a corrupted audit log event in the Windows Event Logger, you can view the old
renamed audit log file in a text editor to assess the extent of the corruption. No further administrator
action is required.
13.10
Generating a DynamicFs Configuration Report
To help with record-keeping and troubleshooting, you can generate a report about the Dynamic File
Services configuration on the server. The Configuration Dump utility (DswDump.exe command)
collects information about the settings for the Service, pairs, policies, schedules, and logs on a server,
242
Dynamic File Services 2.2 Administration Guide
and dumps the information to a file called Config.txt in the C:\Program Files\Dynamic File
Services folder (or the folder where you installed DynamicFS). The command can be run at any
time, whether the Service is running or not running.
1 Log in to the DynamicFS server as the Administrator user, or as a user in the Dynamic File
Services group.
2 Open a command prompt console. Select Start > All Programs > Accessories, then click Command
Prompt.
3 Use the Change Directory (cd) command to go to the C:\Program Files\Dynamic File
Services folder (or the folder where you installed Dynamic File Services).
4 At the command prompt, enter
dswDump.exe
The results are written to the Config.txt file in the C:\Program Files\Dynamic File
Services folder (or the folder where you installed Dynamic File Services).
The following progress messages are output to the screen:
... starting
... output file = Config.txt
...
...
...
...
...
...
...
...
...
...
...
...
...
Configuration Information
Active Directory Information
Files Information
Pairs Information
Policies Information
Schedules Information
Cloud Information
Audit Information
Microsoft Event Logger
Log Files
flushing output file
perform cleanup
finished
5 View the Config.txt report in a text editor such as Notepad.
Monitoring Pairs and Policies
243
244
Dynamic File Services 2.2 Administration Guide
14
Repairing the Pair, Policy, and Schedule
Databases
14
Novell Dynamic File Services (DynamicFS) requires that the pair, policy, and schedule databases be
valid in order for the Service to run. The Repair feature helps ensure that valid copies of the database
files are always available to the Service. It runs automatically each time the Service starts. In addition,
it takes daily snapshots of the pair, policy, and schedule databases. If a database becomes corrupted,
DynamicFS rolls the database back to its last known-to-be-valid snapshot.
The Repair tool allows you to manually check the validity of the databases, create snapshots, and
restore snapshots. You can access the Repair tool from the Service Controller menu when the Service is
not running.
Section 14.1, “Understanding Repair Options,” on page 245
Section 14.2, “Reporting the Status of the Databases,” on page 249
Section 14.3, “Taking a Snapshot of the Databases,” on page 250
Section 14.4, “Restoring a Snapshot of the Databases,” on page 251
Section 14.5, “Troubleshooting Repair Issues,” on page 252
14.1
Understanding Repair Options
The Dynamic File Service Repair feature provides the following options to help ensure that a valid
copy of the database files are available to the Service. Each of these functions is described in more
detail later in this section.
Run a Report: Checks the consistency of configuration information in the pair, policy, and
schedule database files. It reports health information and errors.
Take a Snapshot: Saves a snapshot of valid pair, policy, and schedule database files.
Restore a Snapshot: Replaces the current versions of the pair, policy, and schedule database files
with the most recent snapshot that is available and valid.
When the Service starts, it automatically uses the Report capability to check the consistency of the
pair, policy, and schedule database files. If fatal errors are detected, the Service rolls back to the most
recent snapshot that is available and valid. The Service also runs the Snapshot function daily at a
scheduled time to save a valid snapshot of the database files. These actions are performed only if the
Service is running.
The Repair Tool option in the Service Controller menu allows an administrator to manually run the
report, snapshot, and restore options as needed. The Dynamic File Service must be stopped before
you can use the tool.
Repairing the Pair, Policy, and Schedule Databases
245
See the following sections to understand how the repair capability is used to detect problems in the
pair, policy, and schedule database files.
Section 14.1.1, “What Are the Database Files?,” on page 246
Section 14.1.2, “Taking Daily Snapshots of the Database Files,” on page 247
Section 14.1.3, “What Causes Errors in the Database Files?,” on page 247
Section 14.1.4, “Automatically Repairing the Database Files at Service Start,” on page 248
Section 14.1.5, “Manually Repairing the Database Files,” on page 248
14.1.1
What Are the Database Files?
The Dynamic File Services database files contain configuration information about the pairs, policies,
schedules, and cloud accounts that you create on a server. The schedule information for the daily
snapshot is also verified with the database files. Database files are stored by default in the
C:\ProgramData\Dynamic File Services folder.
“Pair Database Files” on page 246
“Policy Database Files” on page 246
“Schedule Database Files” on page 246
“Cloud Database Files” on page 247
“Database Snapshot Schedule File” on page 247
Pair Database Files
The Pairs folder contains the pairs database file (DswPairDatabase.xml) and a separate subfolder
for each pair that you create on the server. The database file contains the configuration information
for all of the pairs on the server. Each pair’s information begins with the <DswPairEntry> XML tag
and ends with the </DswPairEntry> XML tag.
The subfolder for each pair is named with the pair’s GUID (globally unique identifier), such as
f59058ea-ae9a-4352-bf3c-cc3a7d7fc443. In this subfolder, a PairSummaryHistoryTable.xml
file and the PairRunHistoryTable.xml file store historical information for the individual pair. The
repair capability does not check or repair a pair’s folder and historical information files.
Policy Database Files
The Policies folder contains the policy database file (DswPolicyDatabase_v2.xml). The database
contains the configuration information for all of the policies that you create on the server. It also
contains the configuration files for two global policies that you should not alter: the Global Conflict
policy and the Global Remove Pair policy. Each policy’s configuration information appears between
the <DswPolicyEntry> XML tag and </DswPolicyEntry> XML tag.
Schedule Database Files
The Schedules folder contains the schedule database file (DswScheduleDatabase.xml).
The database contains the configuration information for all of the policy schedules on the server.
Each schedule’s information begins with the <DswScheduleEntry> XML tag and ends with the </
DswScheduleEntry> XML tag.
246
Dynamic File Services 2.2 Administration Guide
Cloud Database Files
The Clouds folder contains the cloud account database file (DswCloudDatabase.xml).
The database contains the configuration information for all of the cloud accounts on the server. Each
schedule’s information begins with the <DswCloudEntry> XML tag and ends with the </
DswCloudEntry> XML tag.
Database Snapshot Schedule File
The ..\Program Files\Dynamic File Services\DswCore.xml file contains the schedule
information for the repair Snapshot function that is run daily by the Dynamic File Service. The
default time is 23:30 hours (11:30 p.m.).
14.1.2
Taking Daily Snapshots of the Database Files
Dynamic File Services provides the Snapshot function as a precautionary measure to help resolve
fatal errors that might rarely occur in the pair, policy, or schedule database files. If it is necessary, the
Repair function can roll back the files to the most recent set of known-to-be-valid set of snapshot files.
The Dynamic File Service has all of the permissions and rights necessary to run the Snapshot
function.
The snapshots are taken by default between 11:30 p.m. and midnight daily. The time values for when
the snapshot is taken are stored in the ..\Dynamic File Services\DswCore.xml file. There is no
graphical interface option to change the time when the snapshots are taken. The Service must be
running in order for the snapshot service to be called at its scheduled time and while the snapshot is
being taken.
Each day at the scheduled time, the Dynamic File Service automatically calls the Snapshot function to
take a snapshot of the pair database file, the policy database file the individual policy configuration
files, and the schedule database file. For information about which files comprise the set of files that
are saved in a snapshot, see Section 14.1.1, “What Are the Database Files?,” on page 246.
Before a snapshot is taken, the database files are checked for consistency to ensure that they are valid.
The known-to-be-valid set of files are stored in the C:\ProgramData\Dynamic File
Services\SnapShot\day_of_the_week folder. If any one of the database files is found to have fatal
errors, a snapshot is not saved.
Only one snapshot for each day of the week is kept at any given time. The snapshots are retained on
a seven-day rotation.
14.1.3
What Causes Errors in the Database Files?
Errors in the database files are expected to occur rarely, if at all. Common causes for corruption might
be:
If a connection to the server is lost when you are creating a pair, a policy, or a schedule
If the server crashes while you are creating a pair, a policy, or a schedule
If the server crashes while you are modifying a policy or a schedule
If the file system where the database files are stored becomes corrupted
If you introduce errors by attempting to manually modify the content of a database file
Repairing the Pair, Policy, and Schedule Databases
247
14.1.4
Automatically Repairing the Database Files at Service Start
When the Dynamic File Service starts, it automatically uses the repair capability to check the
consistency of the pair, policy, schedule, and cloud account database files. The Service has all of the
permissions and rights necessary to roll back to the last known-to-be-valid snapshot if necessary.
The database check on Service start performs the following tasks:
1. The Report function opens the pair, policy, and schedule database files and checks the
consistency of information in them.
2. If errors are detected, all databases automatically roll back to the last known-to-be-valid
snapshot.
The restore checks for recent database files in the same day’s folder first in case snapshots have
been taken manually, or the Service is starting between 2300 and 0000 hours.
For information about the database snapshot process, see Section 14.1.2, “Taking Daily
Snapshots of the Database Files,” on page 247.
3. If a snapshot rollback repair effort fails, the Service does not start. An error message is logged in
the Windows Event Logger.
Two failure events trigger an entry in the Windows Event Logger:
The repair capability does not respond when it is called by the Service to begin the database
check.
A snapshot rollback fails because there is no snapshot available to roll back to.
14.1.5
Manually Repairing the Database Files
The Repair tool allows you to manually run a report, take a snapshot, and restore the databases. The
Service must be stopped in order to run the Repair tool.
When it is running, the Service keeps a copy of each of the databases in memory, and writes them to
the database files when the Service stops. You stop the Service to access the Repair tool, which allows
the changes to be made in the files, and not in memory. The changes apply when you restart the
Service.
The Repair tool runs with the identity of the user that is logged in to the server’s desktop. This user
needs file permissions on the Dynamic File Services software and data paths, including any remote
shares used in pairs. If the user does not have access to all of the paths necessary, you get errors.
IMPORTANT: Typically, the user has Administrator privileges on the DynamicFS server, rights on
the remote share, and NTFS file system access rights on the primary path and secondary path.
Otherwise, the secondary location is reported as missing. One way to give the user the necessary
rights is to add the user name as a member of the Dynamic File Services Storage Rights group.
It does not matter if the user is also a member of the Dynamic File Services group.
248
Dynamic File Services 2.2 Administration Guide
14.2
Reporting the Status of the Databases
In the Repair tool, you can run a report to check the consistency of the database files. You might need
to generate a report if the Service cannot open a pair, policy, schedule, or cloud account. You should
also verify their status if a database error is reported in the Windows Event Logger after a Service
start.
1 Log in to the DynamicFS server as a user with file system rights on both the primary and
secondary paths of the pair you want to manage.
If remote shares are being used, ensure that you have sufficient access rights on the secondary
locations.
2 Stop the Service as described in Section 6.4.3, “Stopping the Dynamic File Service,” on page 106.
3 On the server, start the Repair tool by right-clicking the Service Controller icon in the notification
area and selecting Repair Tool from the menu.
4 Select Run a Report, then click Run.
The output of the report is printed to the data window.
5 View the report.
A full report includes the following:
Policy database status and errors
Pair database status and errors
Schedule and schedule association errors
Cloud account errors
DswCore.xml file status and errors
6 (Optional) Save the report by using one of the following methods:
Click Save, browse to locate the folder where you want to save the file, specify a file name,
then click Save.
The default file name is ..\Dynamic File Services\dswrepair.log.
Select the file output, right-click and select Copy to save the content to the Windows
clipboard, then paste the information in any text file.
7 (Optional) Click Clear to erase the report from the data window.
Repairing the Pair, Policy, and Schedule Databases
249
8 When you are done, click Close to close the Repair tool.
You cannot restart the Service while the Repair tool dialog box is open.
9 Right-click the Service Controller icon, select Start Service, then click Yes to run Service as
Administrator.
14.3
Taking a Snapshot of the Databases
In the Repair tool, you can manually take a snapshot at any time. You might want to take a snapshot
after you have completed several configuration additions or changes to the pair, policy, schedule, or
cloud account databases. This ensures that those changes are immediately saved to a snapshot.
Otherwise, the snapshot is not taken until the next scheduled time.
1 Log in to the DynamicFS server as a user with Administrator privileges.
2 Stop the Service as described in Section 6.4.3, “Stopping the Dynamic File Service,” on page 106.
3 On the server, start the Repair tool by right-clicking the Service Controller icon in the notification
area and selecting Repair Tool from the menu.
4 Select Take a Snapshot, then click Run.
A confirmation is printed to the data window. The snapshot data is saved by default to
C:\ProgramData\Dynamic File Services\SnapShot\<day_of_the_week>.
5 (Optional) In a file browser, navigate to the Snapshot\<day_of_the_week> folder, and visually
verify that the snapshot files have been saved.
250
Dynamic File Services 2.2 Administration Guide
6 When you are done, click Close to close the Repair tool.
You cannot restart the Service while the Repair tool dialog box is open.
7 Right-click the Service Controller icon, select Start Service, then click Yes to run Service as
Administrator.
14.4
Restoring a Snapshot of the Databases
In the Repair tool, you can restore the most recent snapshot of the database. You might want to
restore a snapshot of the databases if a report indicates that the current database contains errors. For
information about the rights needed to perform this action, see Section 14.1.5, “Manually Repairing
the Database Files,” on page 248.
1 Log in to the DynamicFS server as a user with Administrator privileges.
2 Stop the Service as described in Section 6.4.3, “Stopping the Dynamic File Service,” on page 106.
3 On the server, start the Repair tool by right-clicking the Service Controller icon in the notification
area and selecting Repair Tool from the menu.
4 Select Restore a Snapshot, then click Run.
A confirmation is printed to the data window. The last known-to-be-valid version of the
databases are restored to the Pairs, Policies, and Schedules folders.
5 When you are done, click Close to close the Repair tool.
You cannot restart the Service while the Repair tool dialog box is open.
6 Right-click the Service Controller icon, select Start Service, then click Yes to run Service as
Administrator.
Repairing the Pair, Policy, and Schedule Databases
251
14.5
Troubleshooting Repair Issues
If a snapshot rollback repair occurs, you should use the Management Console to review the
recovered pairs, policies, schedules, and cloud accounts to ensure that they reflect any recent
configuration changes that you made. This section provides information about what to do after a
snapshot rollback repair.
Section 14.5.1, “What If a Pair’s Secondary Data Location Appears to Be Missing After a
Snapshot Rollback Repair?,” on page 252
Section 14.5.2, “What If an Old Pair’s Secondary Data Appears After a Snapshot Rollback
Repair?,” on page 252
Section 14.5.3, “What If Policies Run or Don’t Run as Expected After a Snapshot Rollback
Repair?,” on page 253
Section 14.5.4, “What If Review Notifications Are Sent or Not Sent as Expected After a Snapshot
Rollback Repair?,” on page 253
Section 14.5.5, “What If a Pair Database Error Cannot Be Fixed?,” on page 254
Section 14.5.6, “What If a Policy Database Error Cannot Be Fixed?,” on page 254
Section 14.5.7, “What If a Schedule Database Error Cannot Be Fixed?,” on page 255
14.5.1
What If a Pair’s Secondary Data Location Appears to Be Missing After
a Snapshot Rollback Repair?
When a rollback repair occurs, the pair database file rolls back to the latest known-to-be-valid version
of the file. The recovered file might not contain pair information for a recently created pair. When
users access the share on the primary location, they see only the data on the primary location because
the pair definition is not available.
To resolve this problem, you can create the pair again as described in Section 8.2, “Creating a Pair,”
on page 142. This adds the pair configuration information to the recovered pair database file. The
merged view begins to work, and users see data on both the primary and secondary locations.
14.5.2
What If an Old Pair’s Secondary Data Appears After a Snapshot
Rollback Repair?
When a rollback repair occurs, the pair database file rolls back to the latest known-to-be-valid version
of the file. The recovered file might not contain pair information for a recently unlinked pair. When
users access a share on the primary location, they see a merged view that includes the old pair’s
secondary location.
To resolve this problem, you can unlink the pair again as described in Section 8.13, “Unlinking the
Paths in a Pair,” on page 155. This removes the pair configuration information from the recovered
pair database file. Users see data only on the primary location.
252
Dynamic File Services 2.2 Administration Guide
14.5.3
What If Policies Run or Don’t Run as Expected After a Snapshot
Rollback Repair?
When a rollback repair occurs, the policy database file and the related policy files and schedule files
roll back to the latest known-to-be-valid version of the files. The recovered files might not contain
recent changes that were made to the policies or their associations. As a result, policies might run or
not run as expected.
After a rollback repair occurs, you should review the recovered policies in the Management Console
to verify that the recovered policies reflect any recent changes, such as the following:
New policy
Deleted policy
Added or removed pair-to-policy association
Added or removed policy-schedule-to-policy association
Modified filter options
Modified direction
Renamed policy
To resolve this problem, you can make the changes again.
14.5.4
What If Review Notifications Are Sent or Not Sent as Expected After a
Snapshot Rollback Repair?
When a full rollback repair occurs, the pair, policy, and schedule databases roll back to their latest
known-to-be-valid versions. The recovered files might not contain recent changes that were made to
schedules and their associations. As a result, review notifications might run or not run as expected.
After a rollback repair occurs, you should review the recovered schedules in the Management
Console to verify that the recovered schedules reflect any recent changes, such as the following:
New schedule
Deleted schedule
Added or removed review-schedule-to-retention-pair association
Added or removed policy-schedule-to-policy association
Modified frequency
Renamed schedule
To resolve this problem, you can make the changes again.
Repairing the Pair, Policy, and Schedule Databases
253
14.5.5
What If a Pair Database Error Cannot Be Fixed?
If the fatal errors in the pair database file cannot be repaired because no snapshot files are available,
you can try to clean up the database file, then re-create the pair. However, if the pairs database file is
totally corrupted, you must delete the …\Dynamic File Services\Pairs\DswPairDatabase.xml
file and re-create all pairs.
To clean up the pairs database file and re-create selected pairs:
1 Identify where the pair errors occurred:
1a Open the …\Dynamic File Services\DswRepair.log in a text editor.
1b From the log, note the GUID and name of each pair where fatal errors occurred.
1c Close the file.
2 Clean up the pair database file:
2a Open the …\Dynamic File Services\Pairs\DswPairDatabase.xml file in an XML editor.
A pair’s information begins with the <DswPairEntry> XML tag and ends with the </
DswPairEntry> XML tag. Remove the tags and the information about the pair in between
them.
2b Save the edited file.
3 In the Pairs folder, delete the pair history subfolders that correspond to the pairs you deleted
from the database.
You need the pair’s GUID to recognize which subfolder belongs to a pair.
4 Re-create the pair as described in Section 8.2, “Creating a Pair,” on page 142.
5 Associate each re-created retention pair with a review schedule.
6 Associate each re-created pair to one or more policies.
14.5.6
What If a Policy Database Error Cannot Be Fixed?
If the fatal errors in the policy database files cannot be repaired because no snapshot files are
available, you can clean up the policy database and individual policy files, then re-create the policies.
However, if the files are totally corrupted, you must delete the …\Dynamic File
Services\Policies\DswPolicyDatabase_v2.xml file and re-create all policies.
To clean up the policies database files and re-create selected policies:
1 Identify where the policy errors occurred:
1a Open the …\Dynamic File Services\DswRepair.log in a text editor.
1b From the log, note the GUID and name of each policy where fatal errors occurred.
1c Close the file.
2 Clean up the policy database files:
2a Open the …\Dynamic File Services\Policies\DswPolicyDatabase_v2.xml file in an
XML editor.
2b For each policy that has corrupted information, remove the policy’s configuration
information from the file.
2c Save the edited file.
254
Dynamic File Services 2.2 Administration Guide
3 Use either of the following methods to re-create the policy:
Re-create the policy as described in Section 9.2, “Creating a Policy,” on page 162.
If you previously exported a policy, you can import the policy to add it back in the database.
4 Associate a policy schedule to the re-created policy if you want it to run automatically.
5 Associate one or more pairs to the policy.
14.5.7
What If a Schedule Database Error Cannot Be Fixed?
If the fatal errors in the schedule database files cannot be repaired because no snapshot files are
available, you can clean up the database file, then re-create the schedules and associate them again
with policies. However, if the file is totally corrupted, you must delete the …\Dynamic File
Services\Schedules\DswScheduleDatabase.xml file and re-create all of the schedules.
To clean up the schedules database files and re-create selected schedules:
1 Identify where the schedule errors occurred:
1a Open the …\Dynamic File Services\DswRepair.log in a text editor.
1b From the log, note the GUID and name of each schedule where fatal errors occurred.
1c Close the file.
2 Clean up the schedule database files:
2a Open the …\Dynamic File Services\Schedules\DswSchedulesDatabase.xml file in an
XML editor.
2b For each schedule that has corrupted information, remove its information from the file.
2c Save the edited file.
3 Re-create the schedule as described in Chapter 10, “Creating and Managing Policy Schedules,”
on page 189.
4 Associate each of the re-created policy schedules with one or more policies.
Repairing the Pair, Policy, and Schedule Databases
255
256
Dynamic File Services 2.2 Administration Guide
15
Security Considerations
15
This section describes security issues and recommendations for Novell Dynamic File Services
(DynamicFS). It is intended for security administrators or anyone who is responsible for the security
of the system. It requires a basic understanding of DynamicFS. It also requires the organizational
authorization and the administrative rights to carry out the configuration recommendations.
Section 15.1, “Security Features,” on page 257
Section 15.2, “Registry Settings,” on page 263
Section 15.3, “Service Configuration File,” on page 263
Section 15.4, “Server Management Configuration File,” on page 263
Section 15.5, “Database Files,” on page 263
Section 15.6, “Notification Service Configuration Files,” on page 264
Section 15.7, “Log Files and Logging Control Files,” on page 264
15.1
Security Features
There are a number of security measures available in Dynamic File Services, such as user access via
the primary path and enforcement of user access there.
Section 15.1.1, “Authentication,” on page 258
Section 15.1.2, “User Access to Pairs,” on page 259
Section 15.1.3, “Retention Reviewer Access to Pairs,” on page 259
Section 15.1.4, “SSL Certificate,” on page 259
Section 15.1.5, “Service Port,” on page 260
Section 15.1.6, “Windows Firewall Access,” on page 261
Section 15.1.7, “Dynamic File Services Group,” on page 261
Section 15.1.8, “Dynamic File Services Retention Review Group,” on page 261
Section 15.1.9, “Reviewers for a Retention Pair,” on page 261
Section 15.1.10, “Windows User Account Control,” on page 262
Section 15.1.11, “Network Connections,” on page 262
Section 15.1.12, “Network Shares,” on page 262
Section 15.1.13, “Remote Shares,” on page 262
Section 15.1.14, “Auditing Management Events,” on page 262
Section 15.1.15, “Event Logging,” on page 263
Security Considerations
257
15.1.1
Authentication
Consider the authentication requirements in this section for setting up and managing Novell
Dynamic File Services.
“Installing Dynamic File Services in an Active Directory Environment” on page 258
“Configuring and Managing the Service” on page 258
“Creating Pairs and Policies” on page 258
“Using Remote Shares in a Pair” on page 258
“Using a Cloud Account as the Secondary Path in a Retention Pair” on page 259
“Using the Repair Tool GUI and Pair Check Utility” on page 259
Installing Dynamic File Services in an Active Directory Environment
In Active Directory domains, the installation must be done by a domain user that has local
Administrator privileges and Active Directory Administrator rights. This allows the setup of the
Dynamic File Services Storage Rights domain group and the NDFS-servername domain user.
For information, see Section 4.4, “Active Directory Domain Configuration for Remote Shares,” on
page 53.
The domain user is automatically removed if you uninstall the Service component. The domain
group is also removed if the domain user is the last member of the group.
Configuring and Managing the Service
In order to modify the configuration settings for the Dynamic File Service or to stop and start the
Service, you must be logged in to the server desktop as the Administrator user or as a user with
Administrator privileges. It does not matter if the user is a member of the Dynamic File Services
group.
Creating Pairs and Policies
To connect to a Dynamic File Services server from the Management Console or when issuing pair,
policy, and schedule commands at the command line, you must provide the login credentials (user
name and password) of a user that is a member of the Dynamic File Services group on the target
server, or as the Administrator user account of that server. Users with Administrator privileges (not
the Administrator user account) must be added to the Dynamic File Services group. You can add
the Administrator user account as a member of the group.
The DynamicFS administrator user identity can be validated in Workgroup and Active Directory
Domain environments.
Using Remote Shares in a Pair
In an Active Directory environment, Dynamic File Services supports the use of remote shares as the
secondary location in a pair. The remote share must be published in Active Directory. In addition,
you must allow the default setup of the Dynamic File Services Storage Rights domain group and the
NDFS-servername domain user, or manually set up an equivalent secure domain configuration. For
information, see Section 4.4, “Active Directory Domain Configuration for Remote Shares,” on
page 53.
258
Dynamic File Services 2.2 Administration Guide
Using a Cloud Account as the Secondary Path in a Retention Pair
Dynamic File Services supports the use of cloud storage as the secondary location in a retention pair.
The cloud account must be configured and available to the retention pair whenever actions are
performed that involve the secondary path, such as the initial setup of the pair, policy moves, manual
moves, and retention reviews.
The authentication credentials that are required by the cloud provider are stored securely by
Dynamic File Services so that the software can access the files stored in the cloud on your behalf. For
information about the supported cloud providers and the credentials required, see Section 4.11,
“Using Cloud Storage as the Secondary Path in a Retention Pair,” on page 63.
Using the Repair Tool GUI and Pair Check Utility
The Repair Tool GUI and Pair Check utility require that you be logged in as the Administrator user or
as a user with Administrator privileges. If remote shares are used in pairs, the administrator user
must also have access rights on the remote share and file system permissions on the secondary
storage location. Otherwise, the secondary location is reported as missing. One way to assign the
necessary rights is to add the administrator user as a member of the Dynamic File Services
Storage Rights group.
15.1.2
User Access to Pairs
In order to see the merged view of the two storage locations, users access the Dynamic File Services
pair through a Windows network share that you set up on the primary location. Access to data is
governed by file system access rights that are set by an administrator while viewing the merged view
of the data.
Users should not access data stored in the pair via the secondary location, so you must not allow
users to access the secondary location directly or via a network share. Network shares on, above, or
below the secondary path should be removed, or they must be restricted from access by users.
In a Windows cluster, use cluster-managed network shares instead of server-based network shares.
15.1.3
Retention Reviewer Access to Pairs
Retention reviewers have rights to read all files on the secondary path. For example, assume that a
file on server A is moved to server B by a policy run on the retention pair. The reviewer can view the
file at server B during a Retention Review, even if that individual never had rights to access the file on
server A.
15.1.4
SSL Certificate
The Dynamic File Services remote connection feature supports server-side SSL certificates. You can
use a self-signed certificate (the default) or a signed certificate from a certification authority.
“Self-Signed Certificates” on page 260
“Signed Certificates” on page 260
“Self-Signed Certificates in a Cluster” on page 260
“Accepting Certificates” on page 260
Security Considerations
259
Self-Signed Certificates
By default, remote communications between the Management Console running on a client and the
Dynamic File Service running on a server are secured by using the SSL protocol. During the
installation, DynamicFS creates and configures a self-signed certificate
(servername-DynamicFileServicesSSLCertificate) for SSL communications to use. The
DynamicFS SSL connection uses standard RSA SHA1 encryption with a 2048-bit key size. It binds the
SSL connection to the configured Dynamic File Service port (default 8999).
You can also generate a new self-signed certificate after the install by using the Certificate
Configuration option in the Dynamic File Service Controller. For information, see Section 6.8.4,
“Creating a Dynamic File Services Self-Signed Certificate,” on page 118.
Signed Certificates
Signed SSL certificates that you acquire through a certification authority are also supported. Use this
option if your enterprise security policy requires this level of security. You can set up a signed
certificate by using the Certificate Configuration option in the Dynamic File Service Controller after the
install. For information, see Section 6.8.5, “Configuring a Signed Certificate for Dynamic File
Services,” on page 119.
Self-Signed Certificates in a Cluster
When you install DynamicFS on a cluster node, a self-signed SSL certificate is created for the
Dynamic File Service on that node. You do not associate the SSL certificate with the Dynamic File
Service cluster resource because each node of the cluster has a different self-signed SSL certificate.
When the Management Console connects to a Dynamic File Service cluster resource for remote
management, DynamicFS uses the SSL certificate that is configured on the active node in the cluster.
You are prompted to accept the certificate for the active server if it has not been previously accepted.
Accepting Certificates
The first time that an authorized administrator connects to a target DynamicFS server from the
Management Console, the user is prompted to accept the DynamicFS SSL certificate for the target
server. If the server is in a Windows cluster, the user is prompted the first time that a connection is
made to each node in the cluster.
The accepted certificate is added to the user’s personal local computer certificates on the
management computer.
Each user that manages DynamicFS on a target server is prompted to accept the certificate when
connecting for the first time to the server.
15.1.5
Service Port
During the install, Dynamic File Services provides an option to modify the port to use for remote
management of the Dynamic File Service. By default, DynamicFS uses port 8999. This port can be
modified during or after the install. For information, see Section 6.10, “Configuring Ports for the
Service and Retention Review,” on page 124.
260
Dynamic File Services 2.2 Administration Guide
15.1.6
Windows Firewall Access
During the install, Dynamic File Services provides an option to enable an exception in the server
firewall for the configured Dynamic File Service port (default 8999). The firewall exception is enabled
by default. Disabling the firewall exception effectively disables the remote management capability
for the Dynamic File Service. You can also enable and disable the firewall exception after the install.
For information, see Section 6.9, “Configuring Firewall Access for the Service Port,” on page 122.
When the Windows Firewall Access option is enabled, DynamicFS automatically configures an
exception for the configured Dynamic File Service port (default 8999) in the Windows Firewall. By
default, the scope of the exception is set as Any computer (including on the Internet). You can modify
this manually by using the Windows Firewall dialog box. Other scope options can be found by going
to the Windows Firewall > Exceptions page, double-clicking the exception to edit it, then selecting
Change Scope. The alternative manual settings are My network (subnet) only and Custom list.
15.1.7
Dynamic File Services Group
During the install, a new administrator user group called Dynamic File Services is created on
computers where you install Service component, or in Active Directory in a Domain. The user name
you use to log in to the server when you install the software is automatically assigned as a member of
the group. Other members can be added after the installation. Only members of the Dynamic File
Services group and the Administrator user account on the machine are allowed to manage
DynamicFS. In an Active Directory Domain, Domain Admins can also manage DynamicFS for the
server. For information, see Section 4.2, “Management Groups,” on page 52.
In a Workgroup, if you use Dynamic File Services in a Windows cluster, ensure that you assign the
same users in the Dynamic File Services group on each node so they can log in on whatever node
is active.
Logins to the Dynamic File Service are authenticated by using Kerberos in a Windows domain, or by
using NTLM (NT LAN Manager) if a Windows domain is not present.
15.1.8
Dynamic File Services Retention Review Group
During the install, a group called Dynamic File Services Retention Review is created on
computers where you install Service component, or in Active Directory in a Domain. Initially, there
are no members assigned to the group. Members of the Dynamic File Services Retention
Review group are allowed to perform reviews of data in the retention repository of all retention pairs.
For information, see Section 4.2, “Management Groups,” on page 52.
In a Workgroup, if you use Dynamic File Services in a Windows cluster, ensure that you assign the
same users in the Dynamic File Services Retention Review group on each node so they can log
in on whatever node is active.
Logins to the Dynamic File Service are authenticated by using Kerberos in a Windows domain, or by
using NTLM (NT LAN Manager) if a Windows domain is not present.
15.1.9
Reviewers for a Retention Pair
You can assign individual users and groups to be reviewers of a given retention pair. Use the
Reviewers tab on the pair’s Properties page. It is not necessary for the reviewers assigned to a pair to
also be members of the Dynamic File Services Retention Review group. The Dynamic File
Services Retention Review group is assigned to the Reviewers list by default when you create the
retention pair. You can remove the group from the list in order to restrict access to a few specific users
and groups.
Security Considerations
261
15.1.10
Windows User Account Control
Windows User Account Control is available on some Windows platforms. If it is enabled, Windows
User Account Control typically prompts you for permission to run an application when the
application starts. If you are prompted for an administrator password or confirmation, specify the
user name and password of the Administrator user or a user with Administrator privileges.
15.1.11
Network Connections
You can run the Management Console on the same server where you are configuring pairs, or from a
different Windows server or workstation. If you use a different computer to manage pairs, you must
have an IP-based network connection set up between the two computers.
DynamicFS supports connections for IP addresses that use the IPv4 format. It also supports the use of
DNS (Domain Name Service) names.
15.1.12
Network Shares
You must create a single network share on the primary folder of the pair in order to give users a
merged view of the data. Users map a drive on their computers to the network share.
For secure access and authentication, users should access the data in the pair only via the network
share that is set up on the primary path. If users directly access the primary path or secondary path,
potential issues can arise with duplicate files or with access rights and attributes being out of
synchronization between primary and secondary folders.
To prevent these issues, ensure that you remove network shares for the secondary path. In addition,
shares must not be nested above or below the primary path or secondary path.
In an Windows cluster, always use the Windows cluster management tool and not Windows Explorer
to manage file shares to folders on shared drives. Otherwise, changes made by using Windows
Explorer are lost when these file shares fail over to other nodes in the cluster. Workstations should be
in an Active Directory domain to access the cluster-managed file shares.
15.1.13
Remote Shares
You must publish a remote share in Active Directory in order to use it as the secondary location in a
pair. For requirements, see Section 4.9, “Using Remote Shares in an Active Directory Domain,” on
page 60. For setup information, see Section 8.3, “Preparing Remote Shares for Use in a Pair,” on
page 146.
15.1.14
Auditing Management Events
Auditing of the management of the Dynamic File Service, pairs, and policies is integrated with
DynamicFS and is provided as a basic benefit. The following files are used for auditing:
Table 15-1 Auditing Log File and Logging Control File
262
File
Description
C:\ProgramData\Dynamic File
Services\audit\DswAuditLog.xml
Logs the management events for the Dynamic File
Service, pairs, and policies
Dynamic File Services 2.2 Administration Guide
File
Description
AuditAndNotificationControl.xml in the
C:\Program Files\Dynamic File Services\
Controls the logging behavior for the audit log
folder, or in the folder where you installed the software.
All Dynamic File Services management actions are audited, including authorized and nonauthorized management actions. All authentication and authorization events for DynamicFS are also
audited. No sensitive information is placed in the audit log.
15.1.15
Event Logging
DynamicFS uses Microsoft Event Viewer for logging the Dynamic File Service start/stop events and
fatal errors such as application exceptions. See the Microsoft TechNet Library (http://
technet.microsoft.com/en-us/library/ee624055(WS.10).aspx)for documentation on viewing events
with the Event Viewer snap-in for Microsoft Management Console (MMC).
15.2
Registry Settings
The Dynamic File Services configuration settings are stored in the Windows registry in the following
location:
HKEY_LOCAL_MACHINE\Software\Novell\Dynamic File Services
15.3
Service Configuration File
By default, Dynamic File Services stores configuration information about the Dynamic File Service in
the following .xml file:
C:\Program Files\Dynamic File Services\DswCore.xml
15.4
Server Management Configuration File
By default, Dynamic File Services stores configuration information about the servers set up in the
Management Console in the following .xml file:
C:\Program Files\Dynamic File Services\DswServers.xml
15.5
Database Files
By default, Dynamic File Services stores configuration information about its management objects in
the following .xml files in the C:\ProgramData\Dynamic File Services folder:
Table 15-2 Database Files
Database
Configuration File
Cloud accounts
..\Clouds\DswCloudDatabase.xml
Pairs
..\Pairs\DswPairDatabase.xml
Security Considerations
263
Database
Configuration File
Policies
..\Policies\DswPolicyDatabase_v2.xml
Schedules
..\Schedules\DswScheduleDatabase.xml
Snapshots of the pair, policy, schedule, and cloud account database files are saved in the
..\Snapshots\<day_of_the_week> folder. The schedule for taking snapshots of the database files is
stored in the C:\Program Files\Dynamic File Services\DswCore.xml file.
15.6
Notification Service Configuration Files
By default, Dynamic File Services stores configuration information about the email notification set up
in the following .xml file:
C:\Program Files\Dynamic File Services\Plugins\EmailConfig.xml
15.7
Log Files and Logging Control Files
Dynamic File Services provides log files for monitoring the software, management, and policy
enforcement events. The default location of log files is the C:\Program Files\Dynamic File
Services folder.
Table 15-3 Component Log Files and Logging Control Files
Component
Log File
Logging Control File
Cloud Engine
DswCloudEngine.log
DswCloudEngine.config.xml
File System Inventory
DswInventory.log
DswInventory.config.xml
Pair Check
DswPairCheck.log
DswPairCheck.config.xml
Retention Policy
DswRetentionEngine.log
DswRetentionEngine.config.xml
Service
DswMcpCore.log
DswMcpCore.config.xml
Standard Policy
DswStandardEngine.log
DswStandardEngine.config.xml
DynamicFS uses Apache log4net open source software to provide logging for the Service. It is
installed automatically with DynamicFS.
DynamicFS automatically configures the recommended logging settings for each of the logging
control files with the information contained in the <log4net></log4net> XML tags within each file.
The default logging level is the WARN level.
IMPORTANT: If you modify the log4net settings in a logging control file, do not modify information
that is outside of the <log4net></log4net> XML tags.
The log4net software supports the following logging levels in order of increasing priority:
ALL
DEBUG
INFO
264
Dynamic File Services 2.2 Administration Guide
WARN (default setting for the Dynamic File Services logs)
ERROR
FATAL
OFF
For information about log4net software and the logging levels, see the Apache Logging Services: log4net
Manual (http://logging.apache.org/log4net/release/manual/configuration.html).
Security Considerations
265
266
Dynamic File Services 2.2 Administration Guide
16
FAQs and Troubleshooting
16
This section answers frequently asked questions about Novell Dynamic File Services (DynamicFS). It
also describes workarounds for any known issues.
Section 16.1, “Why can’t I log in to the Dynamic File Services server?,” on page 267
Section 16.2, “Can I cancel a policy that is running?,” on page 268
Section 16.3, “How do I configure a policy to not run without disassociating it from the pair?,”
on page 268
Section 16.4, “How do I see what policies are running or what files have been moved?,” on
page 268
Section 16.5, “What can I do if the Service is not running?,” on page 268
Section 16.6, “Why can’t I start the Service after using the Repair tool?,” on page 268
Section 16.7, “Why can’t users see the data on a remote share?,” on page 269
Section 16.8, “Access Denied error when modifying a file at the root of a secondary path,” on
page 269
Section 16.9, “Path Too Long Exception error in the Standard Policy log,” on page 269
Section 16.10, “Pair Is Busy error for pair with a remote share as secondary,” on page 269
Section 16.11, “File Transfer Size Exceeded Error,” on page 269
Section 16.12, “Certificate error for the Retention Review Service,” on page 270
Section 16.13, “Invalid File Handle error for a policy run,” on page 270
Section 16.14, “How do I find event ID information?,” on page 270
Section 16.15, “Diagnosing a Filter Driver failure,” on page 272
16.1
Why can’t I log in to the Dynamic File Services server?
If you are having trouble logging in to the Dynamic File Services server from the Management
Console, check the following configuration settings that are required for login:
Dynamic File Services Group: The Administrator user account and users that have been added
as members of the Dynamic File Services group are the only authorized administrators for
pairs and policies on the target server. See Section 6.3, “Configuring Administrators for Pair
Management,” on page 102
Service Port: The port number (default 8999) must match the configured port on the target
server. See Section 6.10, “Configuring Ports for the Service and Retention Review,” on page 124.
Windows Firewall Access: For remote sessions, the Windows Firewall Access option must be
enabled on the target server to allow an exception in the Windows Firewall for the configured
Dynamic File Service port. See Section 6.9, “Configuring Firewall Access for the Service Port,” on
page 122.
FAQs and Troubleshooting
267
SSL Certificate: For remote sessions, you must accept the valid DynamicFS certificate for the
target server in order to set up a secure SSL connection between the client and the target server.
See Section 7.2, “Accepting a Dynamic File Services Certificate,” on page 130.
The DynamicFS certificate on the target server must be a valid certificate. See Section 6.8,
“Configuring a Certificate for Secure Remote Management Sessions,” on page 116.
16.2
Can I cancel a policy that is running?
You can stop a running policy by selecting the pair in the Management Console, then selecting
Actions > Stop running process. This stops all policies currently running on the pair.
To ensure that a policy does not run at its next scheduled time, go to the policy’s Properties dialog
box and unschedule it. For information, see Section 10.5.2, “Removing a Schedule from a Single
Policy,” on page 196.
To stop the policy from running for a given pair, you can disassociate the policy from the pair. For
information, see Section 9.6, “Associating or Disassociating Pairs and Policies,” on page 174.
16.3
How do I configure a policy to not run without
disassociating it from the pair?
You can modify the policy’s schedule to change the schedule for all pairs without disassociating the
policy from the pairs. For information, see Section 10.5.2, “Removing a Schedule from a Single
Policy,” on page 196.
16.4
How do I see what policies are running or what files have
been moved?
In the Management Console, double-click the Dynamic File Services pair to open the Statistics dialog
box to see information about what policies are running, the policy execution history, and what files
were moved or not moved by each run. For information, see Section 13.2, “Viewing the Policy
Execution History for a Pair,” on page 230.
16.5
What can I do if the Service is not running?
The Dynamic File Service must be running before you can connect to and manage the server with the
Management Console and the DswCLI.exe command. The Service starts automatically after the
install and when you restart the server, except when the server starts in Windows Safe Mode. You can
verify that the Service is running by viewing the status displayed in the Service Controller menu in
the notification area or by looking for the DswService.exe process in the Windows Task Manager or
the Windows Computer Management tool.
To start the Service, see Section 6.4, “Starting and Stopping the Service,” on page 105.
16.6
Why can’t I start the Service after using the Repair tool?
The Service cannot run while the Repair tool is open. Close the Repair tool dialog box, then try again
to start the Service.
268
Dynamic File Services 2.2 Administration Guide
16.7
Why can’t users see the data on a remote share?
If you are using a remote share as a secondary location in a pair and users cannot see the data on the
secondary location, it might be because you have not properly set up the remote share.
To troubleshoot the problem, verify the following settings:
The correct UNC path for the remote share is published in Active Directory.
The Dynamic File Services Storage Rights group has all share permissions on the remote
share.
The Dynamic File Services Storage Rights group has all NTFS file system rights to the
remote share location.
The Service is running as the NDFS-servername proxy user that was created during the install,
and this user is a member of the Dynamic File Services Storage Rights group.
The Dynamic File Services Storage Rights group is a member of the Domain Admins
group.
As a Domain Admins user, you can access the UNC path to the secondary location from the
DynamicFS server.
16.8
Access Denied error when modifying a file at the root of a
secondary path
For a standard pair, a user can get an Access Denied error when modifying a file at the root of the
secondary path if the CreateFiles/WriteData right is not set on the secondary path. For information, see
Section 4.8, “Access Rights for a Standard Pair,” on page 60.
16.9
Path Too Long Exception error in the Standard Policy log
The Standard Policy engine gives a PathTooLongException error if a specified path, file name, or
both are too long. It cannot move the file during a policy run if this error occurs. For information, see
Section 4.13, “File Name Path Length,” on page 65.
16.10
Pair Is Busy error for pair with a remote share as secondary
If a pair uses a remote share as the secondary path, you might get a message that the pair is busy if
the Dynamic File Services Storage Rights group has not been added as a user and granted all
permissions for the remote share. For information, see Section 4.9, “Using Remote Shares in an Active
Directory Domain,” on page 60.
16.11
File Transfer Size Exceeded Error
A File Transfer Size Exceeded error can occur if a policy or manual move attempts to upload a
file that exceeds the maximum file size allowed by your cloud provider.
The maximum size per file that can be uploaded to cloud storage is governed by the service level
agreement with your cloud storage provider. The storage quota and file size limit is enforced by your
provider. In addition, a file must be smaller than the remaining available space below your quota. For
information, see Section 4.11.4, “Maximum File Size for Uploads to Cloud Storage,” on page 64.
FAQs and Troubleshooting
269
16.12
Certificate error for the Retention Review Service
When you connect to the Retention Review Service, some Web browsers report a certificate error if
the Dynamic File Service uses a self-signed certificate. The error might continue to be reported even if
the reviewers accept and install the certificate on their computers. This is a function of the Web
browser and is unrelated to Dynamic File Services.
You can avoid getting this error by using a signed certificate that you have acquired from a
certification authority. For information, see Section 6.8.5, “Configuring a Signed Certificate for
Dynamic File Services,” on page 119.
16.13
Invalid File Handle error for a policy run
An Invalid File Handle error is reported for a policy run if the connection to either of the storage
locations is lost when a file move is in progress. The move is incomplete. Two instances of the file
appear in both locations, but only the file instance in the original location is valid. You must delete
the invalid instance of the file.
To resolve this duplicate file situation, you can review the Statistics > Policy execution history > Files not
moved report for the policy run to identify the duplicate file and the target location of the policy run.
You can also run the Pair Check (dswPairCheck.exe) utility to find the duplicate file. Your
knowledge of the policy direction setting for the policy run where the duplicate file was created can
be used to determine which instance of the file is valid.
For information about how this occurs, see Section 4.17.3, “Losing a Media Connection when Moving
Files,” on page 68. For information about reporting and resolving duplicate files, see Section 8.12,
“Reporting Conflicts for Duplicate Files,” on page 154.
16.14
How do I find event ID information?
Dynamic File Services provides event identification codes (event IDs) to help the administrator
understand the event that occurred. For error events, you can use event IDs to help identify possible
sources and actions for a resolution or for a workaround.
Section 16.14.1, “Where are event IDs reported?,” on page 270
Section 16.14.2, “Reporting error events to Novell,” on page 270
Section 16.14.3, “Event ID categories and sources,” on page 271
16.14.1
Where are event IDs reported?
Event IDs are currently reported for events for Dynamic File Services that are logged in the Microsoft
Event Viewer. When an error event is reported, it usually indicates that a software or hardware error
has occurred that does not allow a component of Dynamic File Services to continue processing.
16.14.2
Reporting error events to Novell
To improve the information that Novell has about resolving error events, we need to know when and
how users are seeing them occur. Please help us gather this information by doing the following:
1 Record the event ID number.
2 Record the circumstances in which the error event occurred.
270
Dynamic File Services 2.2 Administration Guide
3 If you were able to resolve the error event on your own, record what you did to resolve the
problem, and share the information with us.
Get It Documented
You can post your resolution by using the User Comments feature at the bottom of this online
page, or go to www.novell.com/documentation/feedback.html and enter your comments
there.
Report the Bug
If the event is one that needs to be fixed in the product, you can also report the problem and your
resolution in Novell Bugzilla (https://bugzilla.novell.com).
Before filing a bug, use the Search option to see if the problem has already been reported.
To create a new bug, select New, select Novell Products from the Classification (Product Line) dropdown list, select Dynamic Storage Technology from the Product drop-down list, click Use This
Product, then complete the report form and submit it.
4 Search the Novell Support Knowledgebase (http://www.novell.com/support/) for more
information about the error.
You can also find answers to your problem in the Novell Product Support Forum for Novell
Dynamic File Services (https://forums.novell.com/novell-product-discussions/file-networkingservices/dynamic-file-services/). The forums provide free peer-to-peer and volunteer technical
support for Novell Products.
5 If you are unable to resolve the problem and need technical support, please contact a Novell
Support Provider (http://support.novell.com/support_options.html).
16.14.3
Event ID categories and sources
Event ID Category
Event Source
100
DswApi
200
DswBuiltIn
300
DswCertificateLib
400
DswCLI
500
DswStandardPolicy
600
DswIoctlsLib
700
DswIpcClient
800
DswIpcCore
900
DswIpcListener
1000
DswLib
1100
DswMcpCore
1200
DswMcpDatabase
1300
DswMcpService
1400
DswMcpServiceController
1500
DswRepair
FAQs and Troubleshooting
271
16.15
Event ID Category
Event Source
1600
DswPairCheck
1700
DswCert
1800
DswDump
1900
DswUpgrade
3000
DswInventory
Diagnosing a Filter Driver failure
The Dynamic File Services filter driver provides the merged view for Standard pairs. If the driver
fails, the merged view is not available. Use the Filter Driver Diagnostics tool to save information that
can help you diagnose a driver failure. Be prepared to provide the driver configuration and runtime
log files to Novell Support (http://www.novell.com/support/).
1 Log in to the DynamicFS server as an Administrator user or Domain Admin user.
2 Right-click the Service Controller icon in the notification area, then select Filter Driver Diagnostics.
3 Click Save filter driver configuration, navigate to a location, specify a file name, then click OK.
4 Click Save filter driver runtime log, navigate to a location, specify a file name, then click OK.
5 Click OK to close the dialog box.
272
Dynamic File Services 2.2 Administration Guide
A
Using iSCSI Targets in a Cloud
Storage Environment
A
You can use a cloud-based iSCSI target device as the secondary location for Novell Dynamic File
Services pairs. Novell supports multiple cloud storage and IaaS (Infrastructure as a Service) solution
providers.
IMPORTANT: Refer to the third-party vendor documentation for detailed information about how to
subscribe to and use cloud-based computing and storage resources.
This section provides one example of how to set up a Linux iSCSI Target server and storage devices
in the cloud. The iSCSI target devices are connected to a Windows Server 2008 server running iSCSI
Initiator software in your local network. After you attach the iSCSI devices to your local server, you
can use them as the secondary storage location in a Dynamic File Services pair.
The example iSCSI target solution is based on the following components:
Amazon Elastic Compute Cloud (Amazon EC2) environment, including the following:
A Linux virtual machine instance (http://aws.amazon.com/ec2/#instance)
An Elastic Block Store volume (http://aws.amazon.com/ebs/)
An Elastic IP address (http://aws.amazon.com/ec2/#features)
openSUSE 11 SP2 Linux server operating system on the virtual machine
Linux iSCSI Target software installed on the virtual machine
Microsoft iSCSI Software Initiator Version 2.08 installed on your Windows Server 2008 computer
Microsoft iSCSICLI command line tool
Use the following procedures to set up the cloud-based Linux iSCSI Target server and target devices:
Section A.1, “Guidelines for Using iSCSI Targets in the Cloud,” on page 274
Section A.2, “Don’t Have an Existing Amazon EC2 Account?,” on page 275
Section A.3, “Already Have an Existing Amazon EC2 Account?,” on page 275
Section A.4, “Launching an openSUSE Linux VM Instance,” on page 276
Section A.5, “Setting Up an Elastic IP Address,” on page 276
Section A.6, “Creating an Elastic Block Store Volume,” on page 277
Section A.7, “Opening Ports for iSCSI Communications,” on page 277
Section A.8, “Connecting to the iSCSI Target Virtual Machine via SSH,” on page 278
Section A.9, “Installing the iSCSI Target Software on the openSUSE Linux VM,” on page 281
Section A.10, “Configuring the iSCSI Target Device,” on page 282
Section A.11, “Configuring the iSCSI Initiator Software on a Windows Server,” on page 283
Section A.12, “Formatting the iSCSI Device as NTFS on the Windows Server,” on page 284
Using iSCSI Targets in a Cloud Storage Environment
273
Section A.13, “Creating a Dynamic File Services Pair with the Cloud-Based iSCSI Device,” on
page 284
Section A.14, “Additional Information,” on page 285
A.1
Guidelines for Using iSCSI Targets in the Cloud
Consider the following guidelines for your cloud-based iSCSI target solution:
Section A.1.1, “Secure Connections in the Cloud,” on page 274
Section A.1.2, “Secure Access to iSCSI Target Devices,” on page 274
Section A.1.3, “Backup in the Cloud,” on page 274
Section A.1.4, “Costs for Cloud Services,” on page 274
A.1.1
Secure Connections in the Cloud
In this example, access to files occurs across the public Internet. A production environment typically
requires a more secure cloud solution. Other IaaS cloud environments provide secure solutions.
For example, the Amazon Virtual Private Cloud (Amazon VPC) extends your own network segment
into the cloud across a VPN (virtual private network) connection. This allows you to use your own IP
address ranges and keeps all communications secure in a VPN tunnel as files travel across the public
Internet.
In a production environment, you should use IPSec for connections (or use a secure solution like the
Amazon VPC) to ensure that your data cannot be snooped on the wire.
A.1.2
Secure Access to iSCSI Target Devices
In this example, authentication is not configured for the iSCSI target device. In a production
environment, you should configure and require authentication for each iSCSI target device so no one
else can attach to your iSCSI target.
A.1.3
Backup in the Cloud
The Amazon EBS solution provides a snapshot option that you can enable to create snapshots in the
cloud for your EBS volume.
You can also create a snapshot of your configured VM instance. It is easier to restore the VM from a
snapshot than to re-create it.
A.1.4
Costs for Cloud Services
Refer to the pricing information on the Amazon EC2 Web site (http://aws.amazon.com/ec2/#pricing)
to determine your potential costs for the cloud-based openSUSE Linux VM, EBS volumes, and the
related traffic.
274
Dynamic File Services 2.2 Administration Guide
A.2
Don’t Have an Existing Amazon EC2 Account?
If you do not have an Amazon EC2 account, you need to sign up for one. You must provide credit
card information, provide a phone number where you can enter a confirmation PIN number, and
sign up for an Amazon Web Services (AWS) account. You must also create an X.509 certificate. AWS
uses the private certificate and key to verify and authenticate your identity as you manage your cloud
resources.
1 In a Web browser, go to the Amazon EC2 Web Services page (http://aws.amazon.com/ec2/), then
select Sign up for an Amazon EC2.
2 Provide your identity information.
3 Provide your credit card information.
4 Provide your phone contact information.
5 When you receive an automated phone call that asks you for a confirmation PIN number, enter
the number that appears on the computer screen.
6 Follow the on-screen instructions to sign up for an Amazon Web Services account.
When the sign-up is complete, you receive the following message on the screen, and you receive
an email stating that you have signed up for the Service.
Thank you for signing up for Amazon EC2.
We will email you a confirmation when the web services are available for you to
use. In order to begin using this service, you will need a X.509 certificate.
You can Create a New X.509 Certificate or Upload Your X.509 Certificate on the
Security Credentials page.
7 On the Thank You page, select Create a New X.509 Certificate, then click Yes to create the new
certificate and key files.
You can access this page later by opening the Amazon EC2 Web Services page (http://
aws.amazon.com/ec2/) in a Web browser, logging in to your account, then selecting Account >
Security Credentials > Access Credentials > X.509 Certificates > Create a New X.509 Certificate.
8 On the Certificate page, save the certxxxxxxx.pem and pk-xxxxxxxxxxxx.pem files to a secure
location on your local computer.
9 Continue with Section A.3, “Already Have an Existing Amazon EC2 Account?,” on page 275
A.3
Already Have an Existing Amazon EC2 Account?
1 In a Web browser, go to the Amazon Web Services console (https://console.aws.amazon.com/
ec2/home), then log in with your AWS identity and credentials.
2 Create a key pair:
2a In the left pane under Networking and Security, click Key Pairs.
2b Click Create a Key Pair.
2c Type a name for the key (such as xxxkey), then click Create.
2d Save the xxxkey.pem file to a secure location on your local computer.
This key is used later to connect via SSH (Secure Shell) to the Linux iSCSI Target virtual
machine.
3 Continue with Section A.4, “Launching an openSUSE Linux VM Instance,” on page 276.
Using iSCSI Targets in a Cloud Storage Environment
275
A.4
Launching an openSUSE Linux VM Instance
1 Continuing in the Amazon Web Services console, in the left pane under Instances, click Instances.
2 Click Launch Instance to start the Request Instances Wizard.
3 Under Community AMIs, search all images for openSUSE AMIs. (Select All Images, type SUSE in
the Search field, then press Enter.)
4 Click Select next to an AMI for the openSUSE 11 SP2 Linux virtual machine that you want to use.
For example, we selected AMI 37b9555e, which created the following instance:
ID= "ami-37b9555e" Manifest= elihullc/ami/openSuSE-11.2-ec2-server.i3861.0.0.ami.manifest
5 In Number of Instances, select 1.
6 Specify the Availability Zone. For example, select us-east-1b.
IMPORTANT: Ensure that you choose the same availability zone later for the volume you create
for the iSCSI NTFS file system.
7 Select the Instance Type. For example, select Small(m1.small,1.7GB).
8 Select Launch Instances, then click Continue.
9 Specify the following settings for the openSUSE Linux Server VM instance, then click Continue:
Instance Settings
Sample Value
Kernel ID
Select Use Default.
RAM Disk ID
Select Use Default.
10 Select Choose from your existing key pairs, choose the key you created (xxxkey.pem) from the drop-
down menu, then click Continue.
11 In Security Groups, select Default or your preferred setting, then click Continue.
12 Click Launch.
13 Close the Request Instances Wizard, then wait until the instance of your openSUSE 11 SP2 Linux
virtual machine is started and running.
14 Continue with Section A.5, “Setting Up an Elastic IP Address,” on page 276.
A.5
Setting Up an Elastic IP Address
An Elastic IP address is a public IP address that allows you to access this virtual machine via the
public Internet.
1 Continuing in the Amazon Web Services console, in the left pane under Networking and Security,
click Elastic IPs.
2 Click Allocate New Address, then click Yes, allocate.
A newly assigned public IP address appears in the list. Keep a record of this IP address.
3 Select the check box next to the new IP address, then click Associate.
4 Select the instance ID for the openSUSE Linux VM (the currently running AMI instance), then
click Associate.
5 Continue with Section A.6, “Creating an Elastic Block Store Volume,” on page 277.
276
Dynamic File Services 2.2 Administration Guide
A.6
Creating an Elastic Block Store Volume
1 Continuing in the Amazon Web Services console, in the left pane under Elastic Block Store, click
Volumes.
2 Click Create Volume, then specify the volume settings:
Volume Setting
Sample Value
Size
Specify 100 GiB (gibibyte, the IEC standard unit).
Availability Zone
From the drop-down menu, select us-east-1b.
IMPORTANT: Use the same same value that you specified for the virtual
machine.
Snapshot
Select No Snapshot.
3 Click Create, then wait for the volume to be created.
This might take several minutes. The time varies according to the size of the EBS volume. The
volume appears in the list with a status of creating (yellow icon). Click Refresh periodically until
the volume status shows a status of available (blue icon)
4 Select the check box next to the newly created volume.
5 Click Attach Volume.
6 Select the openSUSE Linux VM (the currently running AMI instance).
7 In Device, specify the device path.
The default path is /dev/sdf. You can use the default path if it is the first volume you are
attaching to the VM. If you add more EBS volumes, specify a different path for each one.
8 Click Attach.
The EBS volume is attached to the openSUSE Linux VM (the running AMI instance). The status
changes to in use (green icon).
9 Continue with Section A.7, “Opening Ports for iSCSI Communications,” on page 277.
A.7
Opening Ports for iSCSI Communications
1 Continuing in the Amazon Web Services console, in the left pane under Networking and Security,
click Security Groups, then click Default.
2 Scroll to the bottom of the page to view the Connection Methods table.
3 From the Connection Methods drop-down menu, select SSH, specify 22 as the From Port and the To
Port, set the Source IP to 0.0.0.0/0, then click Save.
The 0.0.0.0/0 setting for the Source IP leaves the SSH connection open to access from any IP
address. To be more secure, set the Source IP to the IP address of the Windows server from which
you use SSH to access the VM.
4 Create a custom port 3260 for the iSCSI communications.
Using iSCSI Targets in a Cloud Storage Environment
277
To be more secure, set the Source IP to the IP address of the Windows server that will be
accessing the iSCSI targets.
4a From the Connection Methods drop-down menu, select Custom, select TCP, specify 3260 as
the From Port and the To Port, set the Source IP to 0.0.0.0/0, then click Save.
4b From the Connection Methods drop-down menu, select Custom, select UDP, specify 3260 as
the From Port and the To Port, set the Source IP to 0.0.0.0/0, then click Save.
5 Continue with Section A.8, “Connecting to the iSCSI Target Virtual Machine via SSH,” on
page 278.
A.8
Connecting to the iSCSI Target Virtual Machine via SSH
To manage the newly created virtual machine, connect to the server via SSH from the local computer
where you downloaded the xxxkey.pem file. In the initial SSH session, you connect as the root user.
Later, you can create other identities on the server for administration purposes and log in to the
session with a different user name.
Section A.8.1, “Getting the SSH Syntax Information,” on page 278
Section A.8.2, “Using SSH on Windows,” on page 278
Section A.8.3, “Using SSH on Linux,” on page 281
A.8.1
Getting the SSH Syntax Information
The syntax to use for your SSH connection is provided by the Instances option in the Amazon Web
Services console.
1 Continuing in the Amazon Web Services console, in the left pane under Instances, click Instances,
then select the check box next to the openSUSE Linux VM (the currently running AMI instance).
2 From the Instance Actions drop-down menu, select Connect.
The pop-up dialog box provides the syntax information you need to connect via SSH to your
virtual machine.
The general syntax to SSH is:
ssh -i xxxkey.pem [email protected]
3 Use one of the following methods to connect via SSH to the virtual machine:
3a Section A.8.2, “Using SSH on Windows,” on page 278
3b Section A.8.3, “Using SSH on Linux,” on page 281
A.8.2
Using SSH on Windows
When you work with the key file (xxxkey.pem) on a Windows machine, you need to convert the key
to use a file format that is compatible with the SSH connection method you plan to use.
This section describes how to use PuTTY software for the SSH connection. PuTTY cannot directly
open PEM key files. You must convert the key file to PPK format. The setup is a one-time process.
After you set up an SSH session in PuTTY, you can easily connect to the VM at any time.
“Downloading the PuTTY Software” on page 279
“Converting the PEM Key File to PPK Format” on page 279
“Setting Up the Key File and Passphrase in the Pageant Authentication Agent” on page 279
278
Dynamic File Services 2.2 Administration Guide
“Configuring an SSH Session in PuTTY” on page 280
“Connecting via SSH with PuTTY” on page 280
Downloading the PuTTY Software
1 In a Web browser, go to the PuTTY Download page (http://www.chiark.greenend.org.uk/
~sgtatham/putty/download.html).
2 Download the following software to your Windows machine:
Software
File Name
Description
PuTTY
putty.exe
A Telnet and SSH client
PuTTYgen
puttygen.exe
An RSA and DSA key generation utility
Pageant
pageant.exe
An SSH authentication agent for PuTTY
3 Continue with “Converting the PEM Key File to PPK Format” on page 279.
Converting the PEM Key File to PPK Format
1 Launch the PuTTYgen software by double-clicking the puttygen.exe file, or by right-clicking
the file and selecting Run as administrator.
2 In the PuTTY Key Generator window, click Load, then select the xxxkey.pem file that you
downloaded to your local computer in Section A.3, “Already Have an Existing Amazon EC2
Account?,” on page 275.
3 After the key information is loaded, specify a key comment and passphrase.
The Key passphrase and Confirm passphrase fields allow you to choose a passphrase for your key
that is used to encrypt the key on the disk. Use a strong passphrase for a more secure solution.
Do not forget your passphrase. There is no way to recover it.
You must enter the passphrase when you use the key to connect via SSH to the virtual server. To
avoid entering the passphrase each time you start an SSH session, you can set up the key and
passphrase in Pageant, as described in “Setting Up the Key File and Passphrase in the Pageant
Authentication Agent” on page 279.
4 Save the private key in .ppk format.
The converted key is saved as xxxkey.ppk. Ensure that you store the xxxkey.pem and
xxxkey.ppk key files in a secure location on your local computer.
5 Continue with “Setting Up the Key File and Passphrase in the Pageant Authentication Agent” on
page 279.
Setting Up the Key File and Passphrase in the Pageant Authentication Agent
Pageant is an SSH authentication agent. It holds an authentication key in memory, already decoded,
so that you can start SSH sessions often, without needing to type a passphrase each time. PuTTY
automatically retrieves the decoded key from Pageant when you start your SSH session with the
virtual machine. When you stop the Pageant from running, the decoded key is removed from
memory.
1 Launch the Pageant software by double-clicking the pageant.exe file, or by right-clicking the
file and selecting Run as administrator.
Using iSCSI Targets in a Cloud Storage Environment
279
The Pageant authentication agent starts running and places an icon in the notification area.
2 In the notification area, right-click the Pageant PuTTY authentication agent icon, then select Add
Key.
3 In the Select Private Key File dialog box, browse to locate and select the xxxkey.ppk file you
created in “Converting the PEM Key File to PPK Format” on page 279, then click Open.
4 When you are prompted, specify the passphrase for the xxxkey.ppk file.
The key appears in the Pageant Key List.
The Pageant authentication agent must be running when you connect to the virtual machine
with a PuTTY SSH session in order for Pageant to provide decoded key information.
5 Continue with “Configuring an SSH Session in PuTTY” on page 280.
Configuring an SSH Session in PuTTY
1 Launch the PuTTY software by right-clicking the putty.exe file, then selecting Run as
Administrator.
2 In the left pane, select Session.
3 In Host Name (or IP address), specify the Elastic IP address that you set up for the virtual machine.
You can alternately use the public DNS name of the virtual machine. You can find the DNS name
by looking at the virtual machine instance in the Amazon AWS Management Console.
4 In Protocol, select SSH.
5 Set up the authentication settings:
5a In the left pane, select Connection > SSH.
5b In the left pane, select Connection > SSH > Auth.
5c Under Authentication methods, select Attempt authentication using Pageant. This is selected by
default.
5d In Private key file for authentication, browse to locate and select the xxxkey.ppk file you
converted in “Converting the PEM Key File to PPK Format” on page 279, then click Open.
6 In the left pane, select Session.
7 Under Saved Sessions, specify a name for this connection (such as iSCSI_Target_VM), then click
Save.
The name appears in the list under Saved Sessions.
8 Close PuTTY.
The PuTTY SSH session setup is complete. You can use PuTTY to connect to the virtual machine
with your saved SSH session at any time.
9 Continue with “Connecting via SSH with PuTTY” on page 280.
Connecting via SSH with PuTTY
After you have set up the SSH session in PuTTY, you can use PuTTY to run the authenticated SSH
session at any time.
1 Launch the PuTTY software by double-clicking the putty.exe file, or by right-clicking the file,
then selecting Run as Administrator.
2 In the PuTTY window, double-click the saved SSH session for the virtual machine, or select the
session and click Open.
280
Dynamic File Services 2.2 Administration Guide
If you are not running Pageant, you are prompted for the passphrase for the authentication key.
Provide the passphrase to continue.
A Login dialog box pops up for your OpenSSH session.
3 When you are prompted, log in as the root user.
After you are successfully connected, you are presented with a terminal console prompt for the
virtual machine.
4 Continue with Section A.9, “Installing the iSCSI Target Software on the openSUSE Linux VM,”
on page 281.
A.8.3
Using SSH on Linux
1 On the local machine, open a terminal console, then log in as the root user.
2 Go to the folder where you saved the xxxkey.pem file. At the terminal console prompt, enter
cd /path_to_key_file_folder
3 Connect via SSH to the virtual machine.
The general syntax to SSH is:
ssh -i xxxkey.pem [email protected]
4 Click Yes to connect to the virtual machine.
5 Keep the console open and do not terminate the SSH session.
6 Continue with Section A.9, “Installing the iSCSI Target Software on the openSUSE Linux VM,”
on page 281.
A.9
Installing the iSCSI Target Software on the openSUSE Linux
VM
Use YaST2 to install the iSCSI Target software. This step is done only once to set up the software on
the VM.
1 Continuing in your SSH session with the virtual machine, launch YaST2 by entering
yast2
The AMI image instance has no GUI installed by default.
2 Go to Software Management.
3 If you are prompted with the Update License message, select Import to accept and import the
GNUI Key.
4 Wait until the Package Manager is loaded.
It takes a few minutes to load the Package Manager and to download the package list.
5 In the Package Manager, search for the iSCSI packages. (In the Search field, type iscsi, then
press Enter.)
6 From the list of iSCSI packages, select the following iSCSI Target software packages:
iscsitarget
yast2-iscsi-server
7 Select Accept (lower right corner), then select OK to continue with the install.
Using iSCSI Targets in a Cloud Storage Environment
281
Wait until the install is complete.
8 Select Quit to exit YaST, which allows the installation of the iSCSI Target management plug-in to
YaST2.
9 Keep the console open and do not terminate the SSH session.
10 Continue with Section A.10, “Configuring the iSCSI Target Device,” on page 282.
A.10
Configuring the iSCSI Target Device
1 Continuing in your SSH session with the virtual machine, launch YaST2 by entering
yast2
2 In YaST2, go to Network Services > iSCSI Target.
YaST opens to the iSCSI Target Overview page with the Service tab selected.
3 Under Service Start, select When booting.
This option is needed to automatically start the Linux iSCSI Initiator service on subsequent
server restarts.
4 Press Alt+G to go to the Global section.
5 In the Global section, leave the target device open for anonymous connections by selecting No
Authentication.
In a production environment, you can set credentials to make the connection more secure.
6 Press Alt+T to go to the Target section.
7 In the Target section, press Alt+A to select Add.
An example iSCSI target device (iqn.2001-04.com.example:storage.disk2.sys1.xyz)
appears in the list. This is not your device. Each iSCSI target device has a unique IQN (iSCSI
qualified name).
8 Press Alt+A to add a new iSCSI target.
9 Specify the LUN settings for the iSCSI target device:
9a Specify the LUN value. The default is 0.
9b Specify Type as fileio. This is the default.
9c Specify the Path as /dev/sdf (or the path value you specified in the EBS setup).
9d Select OK to continue.
10 Select Next, select OK, then select Yes when you are prompted to restart the iSCSI Target service
with the following command:
rciscsitarget restart
11 Select Quit to exit YaST.
12 Use either of the following methods to view the IQN for the iSCSI device you created:
Launch YaST2, and go to Network Services > iSCSI Target.
View the device entry in the /etc/ietd.conf file by using the cat command.
The target device’s IQN has a fixed syntax that looks like the following:
iqn.yyyy-mm.<reversed domain name>:unique_id
13 (Optional) Modify the IQN by opening the /etc/ietdf.conf file in a vi text editor to specify a
unique_id value that satisfies your company naming conventions. The name must be globally
unique within your network.
282
Dynamic File Services 2.2 Administration Guide
For example:
iqn.2010-04.com.amazonaws.xxxxxx-1.ec2-xxx-xxx-xxx-xxx-xx.:storage.disk2.sys1.xyz
14 Record the IQN of the target device.
You need the IQN later to connect the target device to the Windows server.
15 Exit the SSH session.
16 Continue with Section A.11, “Configuring the iSCSI Initiator Software on a Windows Server,” on
page 283.
A.11
Configuring the iSCSI Initiator Software on a Windows
Server
1 On a Windows Server 2008 server, open a Web browser and go to the Microsoft Downloads
Center (http://www.microsoft.com/downloads/details.aspx?familyid=12cb3c1a-15d6-4585-b385befd1319f825&displaylang=en), then download and install the Microsoft iSCSI Software Initiator
Version 2.08.
2 Launch the iSCSI Initiator.
3 Open a command prompt console with administrator privileges. Select Start > All Programs >
Accessories, right-click Command Prompt, then select Run as Administrator.
4 At the command prompt, use the iSCSICLI command to add a target device by entering:
iscsicli QAddTarget iqn_target_device elastic_ip_address
Parameter
Description
iqn_target_device
Use the IQN of the iSCSI target device that you set up in Section A.10,
“Configuring the iSCSI Target Device,” on page 282.
elastic_ip_address
Use the public Elastic IP address that you set up for the openSUSE Linux VM
in Section A.5, “Setting Up an Elastic IP Address,” on page 276.
You must use the command line method to set up the cloud-based iSCSI target device rather
than the iSCSI Initiator GUI. This step is required because of the address translation that occurs
between the public Elastic IP address and private IP address on the openSUSE Linux VM behind
the Amazon AWS firewall. The Discovery option in the iSCSI Initiator GUI finds the Amazon
AWS private IP address for the openSUSE Linux VM, and not the public IP address that you set
up for it. If the private IP address is associated with the target device, you are unable to connect
to the device across the public Internet.
5 Close the command prompt console.
6 In the iSCSI Initiator Properties window, click the Targets tab.
7 Select the IQN of the target device, then click Connect.
8 Select the check box next to Add this connection to the Favorites List to enable the automatic restart.
9 Click Advanced.
10 On the General tab of the Advanced Settings page, from the Target portal IP drop-down list, select
the IP address you entered in Step 4, which is the Elastic IP address for the iSCSI Target server in
the cloud.
11 Click OK to apply the changes.
12 Click OK to connect to the target device.
Using iSCSI Targets in a Cloud Storage Environment
283
13 Click OK again to exit the iSCSI Initiator Properties page.
14 Continue with Section A.12, “Formatting the iSCSI Device as NTFS on the Windows Server,” on
page 284.
A.12
Formatting the iSCSI Device as NTFS on the Windows
Server
1 On the Windows server, launch the iSCSI Initiator software.
2 In the iSCSI Initiator Properties page, click the Volume and Devices tab.
3 Click Auto Configure.
4 Click OK to apply the changes and exit.
5 Go to the Windows Disk Management to view the disk.
6 Select the disk and set it to Online.
7 Initialize the disk.
For information, see “Overview of Disk Management” (http://technet.microsoft.com/en-us/
library/dd163558.aspx) in the Microsoft TechNet Library.
8 Create a volume on the disk and format it as NTFS.
For information, see “Partitions and Volumes” (http://technet.microsoft.com/en-us/library/
dd163559.aspx) in the Microsoft TechNet Library.
The target device is ready to use on your local server. You can use the disk as if it is a local disk.
9 Continue with Section A.13, “Creating a Dynamic File Services Pair with the Cloud-Based iSCSI
Device,” on page 284.
A.13
Creating a Dynamic File Services Pair with the Cloud-Based
iSCSI Device
You can use the volume for the secondary path in a Dynamic File Services pair. Because of potential
latency issues with the public Internet, cloud-based devices should not be used as the primary
location in a pair.
1 On a Windows server or workstation, launch the Dynamic File Services Management Console.
2 Connect to the Windows Server 2008 server where you attached the cloud-based iSCSI target
device.
For information, see Section 7.3, “Connecting to a Server,” on page 131.
3 Select the server, then create a pair as described in Section 8.2, “Creating a Pair,” on page 142.
Specify the primary path as a location on a device running in the local network (non-cloudbased device). Specify the secondary path as a location on the cloud-based iSCSI target device
that is attached to the Windows server.
4 Associate the pair with one or more existing policies by using the methods described in
Section 9.6, “Associating or Disassociating Pairs and Policies,” on page 174.
284
Dynamic File Services 2.2 Administration Guide
A.14
Additional Information
Section A.14.1, “openSUSE 11 SP2 Linux,” on page 285
Section A.14.2, “Linux iSCSI Target Software Documentation,” on page 285
Section A.14.3, “PuTTY,” on page 285
Section A.14.4, “Microsoft iSCSI Software Initiator Version 2.08,” on page 285
Section A.14.5, “IETF RFC 3220: Internet Small Computer Systems Interface,” on page 285
Section A.14.6, “Amazon EC2 Cloud Services Costs,” on page 286
A.14.1
openSUSE 11 SP2 Linux
Refer to the openSUSE Linux 11 SP2 documentation (http://www.novell.com/documentation/
opensuse112/) for information about how to manage the Linux operating system.
A.14.2
Linux iSCSI Target Software Documentation
For information about using iSCSI Target software on openSUSE Linux, see “Mass Storage over IP
Networks: iSCSI” (http://www.novell.com/documentation/sles11/stor_admin/data/
cha_inst_system_iscsi.html) in the SUSE Linux Enterprise Server 11 Storage Administration Guide (http:/
/www.novell.com/documentation/sles11/stor_admin/data/bookinfo.html).
A.14.3
PuTTY
To download PuTTY products, go to the PuTTY Download page (http://
www.chiark.greenend.org.uk/~sgtatham/putty/download.html).
For information about using PuTTY, see the PuTTY User Manual (http://the.earth.li/~sgtatham/putty/
0.58/htmldoc/index.html).
A.14.4
Microsoft iSCSI Software Initiator Version 2.08
For information about the Microsoft iSCSI Software Initiator Version 2.08, see the Microsoft
Downloads Center (http://www.microsoft.com/downloads/details.aspx?familyid=12cb3c1a-15d64585-b385-befd1319f825&displaylang=en).
For information about using the Microsoft iSCSI Initiator software, see Microsoft iSCSI Initiator Stepby-Step Guide (http://technet.microsoft.com/en-us/library/ee338476(WS.10).aspx) in the Microsoft
TechNet Library (http://technet.microsoft.com/en-us/library/default.aspx).
For information about using the iSCSI command line interface (iSCSICLI.exe) for the Microsoft
iSCSI Initiator software, open a command prompt console on your Windows desktop, then enter
iscsicli.exe help
A.14.5
IETF RFC 3220: Internet Small Computer Systems Interface
For information about the iSCSI protocol, see the IETF RFC 3220: Internet Small Computer Systems
Interface (http://www.ietf.org/rfc/rfc3720.txt).
Using iSCSI Targets in a Cloud Storage Environment
285
A.14.6
Amazon EC2 Cloud Services Costs
For current pricing for your cloud-based iSCSI Target server and storage device implementation,
refer to the Amazon EC2 Web site (http://aws.amazon.com/ec2/#pricing).
286
Dynamic File Services 2.2 Administration Guide
B
Setting Up a Merged View for
Collaboration Applications: Novell
Vibe OnPrem
B
Novell Dynamic File Services 1.6 can also be used with applications that store unstructured files to
the file system. One example application environment is Novell Vibe OnPrem (formerly named
Novell Teaming). This section describes how to set up Dynamic File Services pairs and policies for
Novell Vibe OnPrem so that users see the merged view of files stored in an application environment.
Steps and requirements to use the merged view with Novell Dynamic File Services are:
Section B.1, “Verify that the Application can support using a Microsoft network share to store
files,” on page 287
Section B.2, “Understand how the application stores, names, and versions files so useful policies
can be created,” on page 288
Section B.3, “Create a Microsoft Share for the application to use,” on page 288
Section B.4, “Configure the application to use the Microsoft Networking share,” on page 288
Section B.5, “Install Dynamic File Services on the Windows Server where the share will be
created for the primary path,” on page 289
Section B.6, “Create a pair,” on page 289
Section B.7, “Create a policy,” on page 289
B.1
Verify that the Application can support using a Microsoft
network share to store files
Novell Vibe OnPrem supports Microsoft network shares on the same Windows Server that the
product is installed on. To enable the application to use a share, you must edit the ssfext.properties file. By default, Novell Vibe OnPrem creates a folder called C:\Novell\Teaming to
store files.
IMPORTANT: The file structure for the initial release of Novell Vibe OnPrem uses the same file
structure as previous releases of Novell Teaming.
Setting Up a Merged View for Collaboration Applications: Novell Vibe OnPrem
287
B.2
Understand how the application stores, names, and
versions files so useful policies can be created
The more you understand about how an application stores files, the more opportunities you can
create for integrating the application with Dynamic File Services.
This example focuses on one way that Novell Vibe OnPrem stores photos. When you upload a photo
to Vibe OnPrem, it creates a thumbnail file for the photo in the cachefilestore subfolder structure
and places the photo image in the filerepository subfolder structure. Because photos can be large,
we want to set up a pair and policy so that photos are moved to a secondary storage location.
1 Create a pair where the primary path is on the filerepository folder.
B.3
Create a Microsoft Share for the application to use
By default, Novell Vibe OnPrem creates a folder called C:\Novell\Teaming to store files. This is
where you should create the network share for Vibe OnPrem to use.
1 Use the Microsoft Network Sharing feature to create a share to be used by Novell Vibe OnPrem.
For this example, the share is called NovellTeaming and the Share path should be on the
C:\Novell path.
B.4
Configure the application to use the Microsoft Networking
share
1 Stop the Novell Vibe OnPrem application.
2 Modify the C:\Program Files\Novell\Teaming\apache-tomcat-6.0.18\webapps\ssf\WEBINF\classes\config\ssf-ext.properties file as follows:
##data.root.dir=C:/Novell/Teaming
##data.simplefilerepository.root.dir=C:/Novell/Teaming
##data.simplefilerepository.root.dir=C:/Novell/Teaming
##data.jackrabbitrepository.root.dir=C:/Novell/Teaming
##data.extension.root.dir=C:/Novell/Teaming
##data.archivestore.root.dir=C:/Novell/Teaming
##data.luceneindex.root.dir=C:/Novell/Teaming
##cache.file.store.dir=C:/Novell/Teaming/cachefilestore
##temp.dir=C:/Novell/Teaming/temp
##filtering.failed.dir=C:/Novell/Teaming/filteringfailed
##fi.work.dir=C:/Novell/Teaming/fi/work
data.root.dir=//<ServerIP>/NovellTeaming/teaming
data.simplefilerepository.root.dir=//<ServerIP>/NovellTeaming/teaming
data.jackrabbitrepository.root.dir=//<ServerIP>/NovellTeaming/teaming
data.extension.root.dir=//<ServerIP>/NovellTeaming/teaming
data.archivestore.root.dir=//<ServerIP>/NovellTeaming/teaming
data.luceneindex.root.dir=//<ServerIP>/NovellTeaming/teaming
cache.file.store.dir=//<ServerIP>/NovellTeaming/teaming/cachefilestore
temp.dir=//<ServerIP>/NovellTeaming/teaming/temp
filtering.failed.dir=//<ServerIP>/NovellTeaming/teaming/filteringfailed
fi.work.dir=//<ServerIP>/NovellTeaming/teaming/fi/work
3 Restart the Novell Vibe OnPrem application.
288
Dynamic File Services 2.2 Administration Guide
B.5
Install Dynamic File Services on the Windows Server where
the share will be created for the primary path
1 Install Dynamic File Services on the Windows Server that is running Novell Vibe OnPrem where
you have created the share.
B.6
Create a pair
1 Create another Microsoft network share at C:\Novell\Teaming\filerepository and call it
filerepository.
2 Add a Novell Dynamic File Services pair with C:\Novell\Teaming\filerepository as the
primary path and set the secondary path where you prefer.
B.7
Create a policy
1 Create a policy to move all JPG files.
2 Associate a policy schedule with the policy.
3 When the policy runs, the JPG files move to the secondary path.
Now when the Novell Vibe OnPrem Application uses the NovellTeaming share to read files from
filerepository, the Vibe OnPrem application gets a merged view instead of showing that the files
are at two different storage locations.
Setting Up a Merged View for Collaboration Applications: Novell Vibe OnPrem
289
290
Dynamic File Services 2.2 Administration Guide
C
Keyboard Shortcuts
C
If your mouse is unavailable or if you prefer to use your keyboard, you can use keyboard shortcuts to
navigate within the Novell Dynamic File Services (DynamicFS) Management Console and the Repair
tool.
Section C.1, “Using Keyboard Shortcuts,” on page 291
Section C.2, “Quick Reference for Keyboard Shortcuts,” on page 291
Section C.3, “Navigating with Keyboard Shortcuts,” on page 292
C.1
Using Keyboard Shortcuts
For keyboard shortcuts in which you press two or more keys simultaneously, the keys to press are
separated by a plus sign (+). For keyboard shortcuts in which you press one key immediately
followed by another key, the keys to press are separated by a greater-than symbol (>).
NOTE: The keyboard shortcuts that are described in this section refer to the U.S. keyboard layout.
Keys on other layouts might not correspond exactly to the keys on a U.S. keyboard.
C.2
Quick Reference for Keyboard Shortcuts
To do this
Press
Cancel changes.
Esc
Close a dialog box or wizard without saving changes.
Alt+F4
Close a selected drop-down list.
Display a selected drop-down list.
Alt+Down-arrow
Display Help.
F1
Display the Actions menu in the toolbar.
Alt+A
Display the File menu in the toolbar.
Alt+F
Display the Help menu in the toolbar.
Alt+H
Finished; apply the changes and close the wizard.
Alt+F
Go back to the previous pane in a wizard.
Alt+B
Go to the next pane in a wizard.
Alt+N
Apply the changes and close the wizard (when there is no
Next button).
Keyboard Shortcuts
291
To do this
Press
Jump to the beginning of a list.
Ctrl+Home
Jump to the end of a list.
Ctrl+End
Move between options in an open menu, drop-down list, or
between options in a group of options.
Arrow keys
Move down one topic in a displayed menu.
Down-arrow
Move down to the next option in a radio-button selection.
Move to the next option or option group in a pane.
Tab
Move to the previous option or option group in a pane
Shift+Tab
Move up one topic in a displayed menu.
Up-arrow
Move up to the previous option in a radio-button selection.
Select (check) or deselect (clear) a check box.
Spacebar
Perform the action assigned to the selected button.
C.3
Refresh the display in Statistics dialog boxes.
F5
Run the selected command or action.
Enter
Scroll through a displayed list.
Up-arrow or Downarrow
Select an option.
Alt+ the letter
underlined in an option
Switch to the next tab in the dialog box.
Ctrl+Tab
Switch to the previous tab in the dialog box.
Ctrl+Shift+Tab
Underscore the keyboard shortcut options for items in the
toolbar.
Alt
Navigating with Keyboard Shortcuts
Section C.3.1, “Toolbars,” on page 292
Section C.3.2, “Wizards,” on page 292
Section C.3.3, “Dialog Boxes,” on page 293
C.3.1
Toolbars
Pressing Alt underlines a character in each toolbar option to open the option’s menu. For example,
pressing Alt+F opens the File menu in the toolbar. In an open menu, use the Up-arrow and Downarrow keys to select an item from the menu, then press Enter to execute the action.
C.3.2
Wizards
In the Dynamic File Services wizards, use the following keyboard navigation methods:
Press the Tab key to navigate to the different fields and buttons on each page in the wizard.
292
Dynamic File Services 2.2 Administration Guide
For a check box, press the Spacebar like a toggle switch to select or deselect the option.
For a radio button, press the Up-arrow or Down-arrow key to select a different radio button,
then press Tab to continue to the next option.
For a drop-down list, press Alt+Down-arrow key to open a drop-down box, use the Up-arrow or
Down-arrow key to select an item in the list, then press Enter to select it.
In a data field, type the information, then tab to the next field.
When you are done on a page, tab to the appropriate button (such as Next, OK, Apply, or Finish)
then press Enter.
Press Esc to exit the wizard without applying unsaved changes. You can also tab to the Cancel
button and press Enter to close without saving.
C.3.3
Dialog Boxes
To open the Pair Statistics dialog box, use the Tab key to navigate to the pair, then press Enter.
To open the Pair Properties dialog box, use the Tab key to navigate to the pair, press Alt+A to open
the Actions menu, use the Down-arrow key to navigate to Properties, then press Enter to choose the
option.
To open the Policy Properties dialog box, use the Tab key to navigate to the policy, press Alt+A to
open the Actions menu, use the Down-arrow key to navigate to Properties, then press Enter to choose
the option.
In a dialog box, press Ctrl+Tab to navigate between the page tabs, and press the Tab key to navigate
within a page.
Keyboard Shortcuts
293
294
Dynamic File Services 2.2 Administration Guide
D
Sample Event Notification
Messages
D
This section provides example notification messages for the Email add-on to the Novell Dynamic File
Services Notification Services.
NOTE: If a Description field is empty, the Description line is omitted from the message.
“Event: Pair Created” on page 296
“Event: Pair Unlinked” on page 296
“Event: Policy Created” on page 297
“Event: Policy Modified” on page 297
“Event: Policy Delete” on page 297
“Event: Policy Associated to Pair” on page 297
“Event: Policy Disassociated from Pair” on page 298
“Event: Added Exclude/Include Folders to Pair” on page 298
“Event: Removed Exclude/Include Folders from Pair” on page 298
“Event: Policy Execute Now on Pair” on page 298
“Event: Policy Preview Now on Pair” on page 299
“Event: Policy Scheduled to Run on Pair” on page 299
“Event: Policy Ran on Pair” on page 299
“Event: Stop Running Processes on Pair” on page 300
“Event: Manual Move on Pair” on page 300
“Event: Schedule Created” on page 300
“Event: Schedule Modified” on page 300
“Event: Schedule Delete” on page 300
“Event: Schedule Associated to Policy” on page 301
“Event: Schedule Disassociated from Policy” on page 301
“Event: Notification Review Modification” on page 301
“Event: Retention Review Notification” on page 301
“Event: Registration” on page 302
“Event: Log Level Change on Pair” on page 302
Sample Event Notification Messages
295
Event: Pair Created
Standard Pair Example
Subject: NDFS Notification - EXAMPLE-SERVER1: Pair Created
Operation Successful
Date/Time: 05/02/2011 12:34:29 PM
Identity: EXAMPLE-SERVER1\Administrator
Pair Name: HOMEPAIR
Pair Type: Standard
Primary Path: F:\home
Secondary Path: \\nas1\home_secondary
Description: Home folders on server1 to nas1 appliance.
Retention Pair Example
Subject: NDFS Notification - EXAMPLE-SERVER2: Pair Created
Operation Successful
Date/Time: 5/02/2011 12:35:30 PM
Identity: EXAMPLE=SERVER2\Administrator
Pair Name: MyRetentionPair
Pair Type: Retention
Primary Path: G:\finance
Secondary Path: \\server44\finance_retention
Description: Description of MyRetentionPair.
Use the following URL to complete the retention review: https://
server44.example.com:8999/folders.html?pair=MyRetentionPair
Event: Pair Unlinked
Standard Pair Example
Subject: NDFS Notification –EXAMPLE-SERVER1: Pair Unlinked
Operation Successful
Date/Time: 10/30/2011 12:41:22 PM
Identity: EXAMPLE-SERVER1\Administrator
Pair Name: HOMEPAIR
Pair Type: Standard
Primary Path: F:\home
Secondary Path: \\nas1\home_secondary
Description: Home folders on server1 to nas1 appliance.
Retention Pair Example
Subject: NDFS Notification –EXAMPLE-SERVER2: Pair Unlinked
Operation Successful
Date/Time: 10/30/2011 12:41:22 PM
Identity: EXAMPLE-SERVER2\Administrator
Pair Name: MyRetentionPair
Pair Type: Retention
Primary Path: G:\finance
Secondary Path: \\server44\finance_retention
Description: Description of MyRetentionPair.
296
Dynamic File Services 2.2 Administration Guide
Event: Policy Created
Subject: NDFS Notification - EXAMPLE-SERVER1: Policy Created
Operation Successful
Date/Time: 6/28/2011 12:34:30 PM
Identity: EXAMPLE-SERVER1\Administrator
Policy Name: BigFiles
Policy Direction: PrimaryToSecondary
Description: Files GT 1GB.
Event: Policy Modified
Subject: NDFS Notification - EXAMPLE-SERVER1: Policy Modified
Operation Successful
Date/Time: 6/28/2011 12:34:30 PM
Identity: EXAMPLE-SERVER1\Administrator
Policy Name: BigFiles
Policy Direction: PrimaryToSecondary
Description: Files GT 2GB.
Event: Policy Delete
Subject: NDFS Notification - EXAMPLE-SERVER1: Policy Delete
Operation Successful
Date/Time: 6/28/2011 12:34:30 PM
Identity: EXAMPLE-SERVER1\Administrator
Policy Name: BigFiles
Policy Direction: PrimaryToSecondary
Description: Files GT 2GB.
Event: Policy Associated to Pair
Subject: NDFS Notification - EXAMPLE-SERVER1: Policy Associated to Pair
Operation Successful
Date/Time: 10/28/2011 1:01:21 AM
Identity: EXAMPLE-SERVER1\Administrator
Policy Name: BigFiles
Policy Direction: PrimaryToSecondary
Description: Files GT 2GB.
Pair Name: HOMEPAIR
Pair Type: Standard
Primary Path: F:\home
Secondary Path: \\nas1\home_secondary
Description: Home folders on server1 to nas1 appliance.
Sample Event Notification Messages
297
Event: Policy Disassociated from Pair
Subject: NDFS Notification - EXAMPLE-SERVER1: Policy Disassociated from Pair
Operation Successful
Date/Time: 10/28/2011 1:01:21 AM
Identity: EXAMPLE-SERVER1\Administrator
Policy Name: BigFiles
Policy Direction: PrimaryToSecondary
Description: Files GT 2GB.
Pair Name: HOMEPAIR
Pair Type: Standard
Primary Path: F:\home
Secondary Path: \\nas1\home_secondary
Description: Home folders on server1 to nas1 appliance.
Event: Added Exclude/Include Folders to Pair
Subject: NDFS Notification - EXAMPLE-SERVER1: Added Exclude/Include Folders to
Pair
Operation Successful
Date/Time: 10/28/2011 1:01:21 AM
Identity: EXAMPLE-SERVER1\Administrator
Pair Name: HOMEPAIR
Pair Type: Standard
Primary Path: F:\home
Secondary Path: \\nas1\home_secondary
Description: Home folders on server1 to nas1 appliance.
Current Exclude List:
F:\home\bob\project1;F:\home\bob\project2
Event: Removed Exclude/Include Folders from Pair
Subject: NDFS Notification - EXAMPLE-SERVER1: Removed Exclude/Include Folders
from Pair
Operation Successful
Date/Time: 10/28/2011 1:01:21 AM
Identity: EXAMPLE-SERVER1\Administrator
Pair Name: HOMEPAIR
Pair Type: Standard
Primary Path: F:\home
Secondary Path: \\nas1\home_secondary
Description: Home folders on server1 to nas1 appliance.
Current Include/Exclude is set to None
Event: Policy Execute Now on Pair
Subject: NDFS Notification - EXAMPLE-SERVER1: Policy Execute Now on Pair
Operation Successful
Date/Time: 10/28/2011 1:01:21 AM
Identity: EXAMPLE-SERVER1\Administrator
Policy Name: BigFiles
Policy Direction: PrimaryToSecondary
Description: Files GT 2GB.
Pair Name: HOMEPAIR
Pair Type: Standard
Primary Path: F:\home
Secondary Path: \\nas1\home_secondary
Description: Home folders on server1 to nas1 appliance.
298
Dynamic File Services 2.2 Administration Guide
Event: Policy Preview Now on Pair
Subject: NDFS Notification - EXAMPLE-SERVER1: Policy Preview Now on Pair
Operation Successful
Date/Time: 10/28/2011 1:01:21 AM
Identity: EXAMPLE-SERVER1\Administrator
Policy Name: BigFiles
Policy Direction: PrimaryToSecondary
Description: Files GT 2GB.
Pair Name: HOMEPAIR
Pair Type: Standard
Primary Path: F:\home
Secondary Path: \\nas1\home_secondary
Description: Home folders on server1 to nas1 appliance.
Event: Policy Scheduled to Run on Pair
Subject: NDFS Notification - EXAMPLE-SERVER1: Policy Scheduled to Run on Pair
Operation Successful
Date/Time: 10/28/2011 1:01:21 AM
Identity: Dswservice
Policy Name: BigFiles
Policy Direction: PrimaryToSecondary
Description: Files GT 2GB.
Pair Name: HOMEPAIR
Pair Type: Standard
Primary Path: F:\home
Secondary Path: \\nas1\home_secondary
Description: Home folders on server1 to nas1 appliance.
Event: Policy Ran on Pair
Subject: NDFS Notification - EXAMPLE-SERVER1: Policy Ran on Pair
Operation Successful
Date/Time: 10/28/2011 1:01:21 AM
Identity: EXAMPLE-SERVER1\Administrator
Policy Name: BigFiles
Policy Direction: PrimaryToSecondary
Description: Files GT 2GB.
Pair Name: HOMEPAIR
Pair Type: Standard
Primary Path: F:\home
Secondary Path: \\nas1\home_secondary
Description: Home folders on server1 to nas1 appliance.
Total
Total
Total
Total
Files
Files
Files
Files
Moved to Primary = 2022
of Files Failed to Move to Primary = 0
Moved to Secondary = 0
Failed to Move to Secondary = 0
Sample Event Notification Messages
299
Event: Stop Running Processes on Pair
Subject: NDFS Notification - EXAMPLE-SERVER1: Stop Running Processes on Pair
Operation Successful
Date/Time: 10/28/2011 1:01:21 AM
Identity: EXAMPLE-SERVER1\Administrator
Pair Name: HOMEPAIR
Pair Type: Standard
Primary Path: F:\home
Secondary Path: \\nas1\home_secondary
Description: Home folders on server1 to nas1 appliance.
Event: Manual Move on Pair
Subject: NDFS Notification - EXAMPLE-SERVER1 Manual Move on Pair
Operation Successful
Date/Time: 10/28/2011 1:01:21 AM
Identity: EXAMPLE-SERVER1\Administrator
Pair Name: HOMEPAIR
Pair Type: Standard
Primary Path: F:\home
Secondary Path: \\nas1\home_secondary
Description: Home folders on server1 to nas1 appliance.
Event: Schedule Created
Subject: NDFS Notification - EXAMPLE-SERVER1: Schedule Created
Operation Successful
Date/Time: 10/28/2011 1:01:21 AM
Identity: EXAMPLE-SERVER1\Administrator
Schedule Name: Weekly on Sunday
Review Frequency: Weekly
Description: Every Sunday at 12:00 AM until complete
Event: Schedule Modified
Subject: NDFS Notification - EXAMPLE-SERVER1: Schedule Modified
Operation Successful
Date/Time: 10/28/2011 1:01:21 AM
Identity: EXAMPLE-SERVER1\Administrator
Schedule Name: Weekly on Saturday
Review Frequency: Weekly
Description: Every Saturday at 2:00 AM until complete
Event: Schedule Delete
Subject: NDFS Notification - EXAMPLE-SERVER1: Schedule Delete
Operation Successful
Date/Time: 10/28/2011 1:01:21 AM
Identity: EXAMPLE-SERVER1\Administrator
Schedule Name: Weekly on Saturday
Review Frequency: Weekly
Description: Every Saturday at 2:00 AM until complete
300
Dynamic File Services 2.2 Administration Guide
Event: Schedule Associated to Policy
Subject: NDFS Notification - EXAMPLE-SERVER1: Schedule Associated to Policy
Operation Successful
Date/Time: 10/28/2011 1:01:21 AM
Identity: EXAMPLE-SERVER1\Administrator
Schedule Name: Weekly on Saturday
Review Frequency: Weekly
Description: Every Saturday at 2:00 AM until complete
Policy Name: BigFiles
Policy Direction: PrimaryToSecondary
Description: Files GT 2GB.
Event: Schedule Disassociated from Policy
Subject: NDFS Notification - EXAMPLE-SERVER1: Schedule Disassociated from
Policy
Operation Successful
Date/Time: 10/28/2011 1:01:21 AM
Identity: EXAMPLE-SERVER1\Administrator
Schedule Name: Weekly on Saturday
Review Frequency: Weekly
Description: Every Saturday at 2:00 AM until complete
Policy Name: Big Files
Policy Direction: PrimaryToSecondary
Description: Files GT 2GB.
Event: Notification Review Modification
Subject: NDFS Notification - EXAMPLE-SERVER1: Notification Review Modified
Operation Successful
Date/Time: 10/28/2011 1:01:21 AM
Identity: EXAMPLE-SERVER1\Administrator
Review Frequency: Quarterly
Event: Retention Review Notification
Subject: NDFS Notification - EXAMPLE-SERVER2: Retention Review Notification
Use the following URL to complete the retention review: https://
server2.example.com:8999/folders.html?pair=MyRetentionPair
Operation Successful
Date/Time: 10/28/2011 1:01:21 AM
Identity: EXAMPLE-SERVER1\Administrator
Schedule Name: Qtrly-Jan-lastday
Review Frequency: Quarterly
Pair Name: MyRetentionPair
Pair Type: Retention
Primary Path: G:\finance
Secondary Path: \\server44\finance_retention
Description: Description of MyRetentionPair.
Sample Event Notification Messages
301
Event: Registration
Subject: NDFS Notification - EXAMPLE-SERVER2: Registration
Operation Successful
Date/Time: 10/28/2011 1:01:21 AM
Identity: Dynamic File Services Controller
Event: Log Level Change on Pair
Subject: NDFS Notification - EXAMPLE-SERVER1: Log Level Change on Pair
Operation Successful
Date/Time: 10/28/2011 1:01:21 AM
Identity: EXAMPLE-SERVER1\Administrator
Pair Name: HOMEPAIR
Pair Type: Standard
Primary Path: F:\home
Secondary Path: \\nas1\home_secondary
Description: Home folders on server1 to nas1 appliance.
Current Log Level on DswMcpCore: Debug
Current log level on DswStandardEngine: Debug
302
Dynamic File Services 2.2 Administration Guide
E
Documentation Updates
E
There have been no changes made to the Novell Dynamic File Services Administration Guide since the
initial version 2.2 release.
Documentation Updates
303
304
Dynamic File Services 2.2 Administration Guide