1
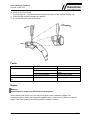
User's Manual
Air Ionizer
TopGun 3
Wolfgang Warmbier
Untere Gießwiesen 21
D-78247 Hilzingen
www.warmbier.com
User's manual TopGun 3
Part No. 7500.TG3
_
Table of contents
INTRODUCTION ..................................................................................................................3
SAFETY ...............................................................................................................................3
USE AND OPERATION .......................................................................................................3
TECHNICAL SPECIFICATIONS ..........................................................................................3
INSTALLATION ...................................................................................................................3
Checks ................................................................................................................................3
Mounting .............................................................................................................................4
ÿ
Power unit mounting .................................................................................................4
ÿ
Gun holder mounting ................................................................................................4
Compressed air connection ..............................................................................................4
Mains voltage connection..................................................................................................4
PUTTING INTO USE ............................................................................................................4
Blow-off power adjustment ...............................................................................................4
FUNCTIONAL CHECK.........................................................................................................5
REMOTE CONTROL INSTALLATION .................................................................................5
Summary.............................................................................................................................5
Installation ..........................................................................................................................5
MAINTENANCE ...................................................................................................................5
Emitter point .......................................................................................................................5
Replacing the filter nozzle .................................................................................................5
FAULTS ...............................................................................................................................6
REPAIR................................................................................................................................6
Seite 2 von 6
V0503
User's manual TopGun 3
Part No. 7500.TG3
_
Introduction
Read this manual completely before you install and put this product into use.
Follow the instructions set out in this manual to ensure proper operation of the product and
to be able to invoke guarantee.
Safety
•
•
•
•
•
Electrical installation and repairs shall be performed by a skilled electrical engineer.
When carrying out work on the equipment: De-energise the equipment.
Make sure that the equipment is properly earthed.
Earthing is needed to ensure proper operation and to avoid electrical shocks upon
contact.
If changes, adjustments, etc. have been made without prior consent in writing, or if no
original parts have been used for repairs, CE approval for the equipment will be
withdrawn and the equipment will no longer be under guarantee.
Use and operation
The TopGun3 ionizing air gun allows you to simultaneously clean and neutralize
electrostatically charged parts and to prevent the blown-away particles from being reattracted. The TopGun3 produces an air flow which is rich in positive and negative ions.
When this air flow is pointed to an electrostatically charged area, electrons are exchanged
so that the area is neutralized and cleaned.
Technical specifications
Mains voltage:
Current:
Connector:
Pressure:
Max. pressure:
Air connection:
Air consumption:
Filter:
Noise level:
230 V AC, 50 Hz
5 mA (standby), 50 mA (in operation)
IEC 320
medium Air (or nitrogen)
7 bar (100 PSI),
1/8 NPT female
68 l/min at 2 bar, 130 l/min at 4 bar, 210 l/min at 7 bar
0.01 micron
76 dB at 2 bar, 89 dB at 4 bar, 97 dB at 7 bar, measured at 60 cm
distance from the nozzle
Ozone production: < 0.001 ppm measured at 45 cm from the nozzle at a
pressure of 1 bar
Ion balance:
0 +/- 15 volts
Operating temperature: 0 - 40°C
Operating conditions: Light industrial
Installation
Checks
•
•
Check that the TopGun3 is undamaged and that you have received the correct version.
Check that the data on the packing slip corresponds with the data shown on the product
received.
If you have any problems and/or in the case of ambiguity: Please contact us.
Seite 3 von 6
V0503
User's manual TopGun 3
Part No. 7500.TG3
_
Mounting
ÿ
Power unit mounting
Mount the power unit in the position you like against a wall or on/under a work table.
ÿ
Gun holder mounting
Mount the gun holder in the position you like against a wall, on or at the side of the worktop
or on the power unit. Use the holes at the top of the cover for mounting the holder on the
power unit.
Compressed air connection
Warning:
The compressed air must be clean, dry and free of oil.
The maximum permissible compressed air pressure is 7 bar (100 PSI).
Use an external filter and pressure regulator for this purpose.
The compressed air is connected to the power unit via an 1/8” NPT female nipple. An
adapter nipple (1/8 x ¼ BSP) is included in the supply. Connect the compressed air via a
flexible or rigid line. The line diameter depends on the air consumption. The minimum inside
line diameter must be 4 mm.
Mains voltage connection
Warning:
Make sure that the equipment is properly earthed.
The wall socket to be used must be easily accessible.
1. Check that the mains voltage corresponds with the value shown on the rating plate.
2. Plug the connection lead into the connector of the power unit.
3. Insert the plug into an earthed wall socket.
Putting into use
Warning:
If the gun is used for a long period of time and/or frequently, it is recommended to
wear ear protection.
•
•
Point the gun to the object to be cleaned (distance: 5 to 30 cm).
Pull the trigger (LED lights up more brightly).
Attention:
If the TopGun3 will not be used for a longer period: Remove the plug from the wall
socket.
Blow-off power adjustment
The air supply can be adjusted using the screw in the grip.
• Screw counter clockwise: blow-off power increases.
• Screw clockwise: blow-off power decreases.
Seite 4 von 6
V0503
User's manual TopGun 3
Part No. 7500.TG3
_
Functional check
The gun has a built-in LED with 2 light intensity levels. When the (mains) voltage is on, the
LED will be dimly lit. After the gun has been put into operation, the LED will light up more
brightly.
An electrostatic field meter must be used to measure the efficiency of the TopGun3 ionizing
air gun. Measure the charge on the object before and after the TopGun3 has been used for
the blowing-off job. The charge measured should have disappeared afterwards.
Remote control installation
Warning:
When carrying out work on the equipment: De-energise the equipment. Electrical
installation and repairs shall be performed by a skilled electrical engineer.
Summary
The power unit can be equipped with the switch (relay) for remote control (not wireless).
The voltage on this circuit is 100 V DC. The power unit is switched on by making the
contacts.
Installation
1. Remove the 2 screws from the side and open the box.
2. Remove the press-out plate beside the IEC connector.
3. Fit a gland and feed the wiring through it.
4. Connect the flat-pin plugs to the wiring.
5. Fit the flat-pin plugs on tabs J4 and J5.
6. Close the box and fit the 2 screws into the side.
Attention:
The LED in the gun indicates “standby” (The Led will be dimly lit) if the remote control
is used.
Maintenance
Warning:
When carrying out work on the equipment: De-energise the equipment.
Emitter point
The emitter point must be clean and sharp.
Regularly clean the emitter point with a cotton tip or a soft cloth, slightly soaked in alcohol.
Make sure that:
− no lint remains on the emitter point.
− the point is entirely dry before switching on the TopGun3 again.
Replacing the filter nozzle
The filter turns red as a result of fouling. Replace the filter nozzle when it is discoloured.
1. De-energise the TopGun3.
2. Disconnect the compressed air supply.
Seite 5 von 6
V0503
User's manual TopGun 3
Part No. 7500.TG3
_
3. Remove the filter nozzle.
For this purpose, insert a screwdriver between the filter nozzle and the locking ring.
4. Push the filter nozzle forwards (see sketch).
5. Fit a new filter and press it into place.
Faults
Problem
Gun is not blowing
No ionisation
(LED in gun does not light
up)
Table 1: faults
Cause
No (mains) voltage
No compressed air
Filter nozzle clogged
No (mains) voltage
Defective power unit
Remedy
Restore (mains) voltage
Restore compressed air
supply
Replace filter nozzle
Restore (mains) voltage
Repair the power unit
Repair
Warning:
Repairs shall be made by a skilled electrical engineer.
When opening the power unit, you may touch parts under hazardous voltage. We
recommend you to return the complete installation (gun + power unit) if there is a need for
repair. Pack them properly and clearly state the reason for return.
Seite 6 von 6
V0503