1
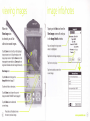
The eyemodule* digital camera
turns your Handspring* Visor*
handheld into a convenient
image capture device.
Snap the eyemodule digital
camera into the Springboard*
expansion slot and you're ready
to capture and view images,
label them, and beam them
to other Palm0S@ devices.
lnstall the included conduit
software and you can email
and print your eyemodule
images from your computer.
Its fast and simple.
(
)
)
lnsert the eyemodule digital camera into
the Springboard expansion slot. After a brief
introductory screen, your handheld will
display a Iive image.
Up button
Down button
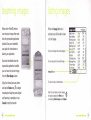
freeze an image, press the Capture
button next to the lens once. (You may also
press the Up button on the Visor handheld
to perform the same function.)
lf you want to save the frozen image, press
the Capture (or Up) button again. lf you don't
want t0 save it, press the Down button. Your
handheld will again display a live image.
To
When the Capture icon is selected,
The Gapture Timer gives you two
you are ready to capture images.
ways to capture timed images. ln
,:],:F,trtre 1 imoqe in 'lu ie,:':nd:
t:_!,.gal
addition to the familiar ten-second
self-timer, the eyemodule digital
Press here to capture an image.
Tap here to change the current image
a series of images. This allows you
Timr, betr,Jeerr roFt xrE
to create your own time-lapse
Capture icon.
change these numbers to set up your own
image-capture sequence. The eyemodule
digital camera willturn the Visor handheld
back on if the time between captures
exceeds Visor Auto-0ff time. (lf your Visor
handheld runs 0ut of memory during the
sequence, the eyemodule digital camera
will stop taking images.)
Tap here to set the Capture Timer.
You can also press the Up button to
capture an image.
@
e rnultiple irriog*s
l'lrrnbErdf ,:,rFtur"r,
capture format:
- 0ne dot indicates small black & white
- Two dots indicate large black & white
- Three dots indicate large color
The image format can also be changed
in Prelerences (page 10).
Tap here to hide or show icons.
nr rot,tu:
camera gives you a way to capture
I oTo
l=
ETO
E f
:: :
[ oTn
l,ft
Iil +
photography.
Tap here to capture one image
after a ten second pause.
o
I
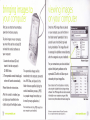
When the
View lmage icon
J
is selected, you will be
able to view saved images.
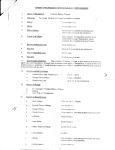
Tapping on the Info icon from the
View lmage screen will send you
to the lmage Details window.
You can change the image name
when it is highlighted.
Tap the Zoom icon or directly on the displayed
image to zoom in on it. Drag the stylus on the
image to pan across it. Tap the Zoom icon or the
image again to zoom back out. Zoom applies to
large black & white and color image formats only.
Dr.tretrrionr: 320 s 240
Type: B&lV
Size:38K
Creoted:2/l l/00
Tap here to set image category.
Tap here to set privacy.
Tap here to attach a note to the
current image.
View lmage icon.
to bring up the
lmage lnfo window (page 7).
Tap the lnfo icon
I
Tap here to hide or show icons.
Tap the Beam icon
to beam the current
image to another Palm0S'o device (page
Tap the Delete icon
B).
l
to delete the
current image.
@
Press the scroll buttons to view
the next or previous image.
o
Before other Palm0S devices
can view your images, they
must
When the lmage List icon is
:
selected, you will be able to view
Hiqh
a list of images.
Fut l,linq iF,uc'rr:
['ielr building
Lr-,bbi'tt'0
l,ieetinq rrr':rr
Dnorr of 17?
Fronr nf Bit
installed. See your handheld's
user guide for instructions on
Tap here to change the current category.
1
beaming an application.
VE:ndnri
0nce both handhelds have the
51ro!Egir rnop
ir,'leeting Ph,:to
Tap an image name to view that image.
Prr-'duct plan
eyemodule application installed,
you can beam the current image
Frot,rt
E i lll
(-ol'rr
i lLl
Ei[.t
E i trt
E l. l^l
E n tnt
E
{':l,ir
EEi'/{
i.t.'.t
E
En
tlt
a'?Lj
1E:?l.l
i'lL'
nP
nL.
'-,?L'
t?u
l.q7H
tTti D
t:
Lr
nL.
lmage List icon.
from the View lmage screen.
Align the infrared ports as shown
and tap the Beam icon
Tap here to view an attached note.
.rt
to begin
transmission. Keep the ports aligned
until beaming is complete, or tap
d'r
Note: You can delete an entire category
of images by tapping the Menu
YD
and selecting Delete lmages under Options.
icon
Gancel to stop the transfer.
@
@
.
When the Preferences icon is
selected, you will be able to edit
t:n Egti '+;.
!iLliii{D Eglil l:lll.i..
your preferences.
Tap here to change the format of
images being captured.
i:DFturE
,:nFiurE
Tap here to change the capture category.
Preferences icon.
By default, all images will be backed up
on HotSynco operation. (See page l2for
more details.)
lf your handheld's data gets lost, you
can restore all your backed up images
upon HotSync operation. You should
restore your lost images before
capturing new ones.
@
.
i,rtEq,lrI
:
v
EurinErr
.
i:nntirnl
::!!E irnnqE:E
Selecting this gives you the option to
view the image before saving.
Tap here to change the back up settings.
.
torrn,tt:v
i:!F'ture !oun,l:v
Tap here to change the capture sound.
.
Fe*lrr,s"ttir'-,r-J
.r !l
:=
.
.
.
Hold the Visor handheld as strll as possible
while taking the picture.
Make sure the lighting around your subjects
is adequate. Don't backlight your subjects.
Adjust your contrast level correctly.
Before you start capturing images, set
your Capture Category in Preferences.
To conserve the memory on your Visor
handheld, select one of the two B&W
formats. If you plan to bring color
images to your computer, select the
color image format.
Expect backing up images to extend your
HotSync time. You can minimize this by
removing larger sized images.
You can use the Up/Down buttons to freeze
images and confirm saving them.
To be ready to capture images at any time,
press the Capture button on the eyemodule
digital camera (see page 4).
lf the eyemodule digital camera doesn't work:
Be sure the eyemodule digital camera is
.
.
.
fully inserted.
Be sure the Visor handheld is working
pro pe rly.
Befer to the Visor handheld user guide.
For
further assistance:
URL: www.eyemodule.com
Email: supportoeyemodule.com
Call:650-322-1776
6i)
0nce the JPEG image files are placed
on your computer, you can find them in
First, be sure that the Visor HotSync
operation functions properly.
the folder named "eyemodule" that is
To place images on your computer,
placed in your hard drive's top level
you must first use the enclosed CD
to install the conduit software on
your computer:
1. Locate
during installation. The image files will
be arranged in subfolders named directly
after the categories on your handheld.
the enclosed CD and
Windowso Explorer
For
insert it into the computer's
CD-R0M drive.
2. The eyemodule conduit install appli-
cation will launch automatically.
Please follow the instructions.
The eyemodule images will be
transferred to the computer, converted
into JPEG files, and placed in the
folder that was specified during the
conduit installation process. (JPEG
After the conduit is installed, you
can place your handheld in the
cradle and push the HotSync button.
@
is a popular image format that can
be read by many applications.)
The conduit does not bring JPEG images from
your computer to your handheld.
your convenience, we have included
:a Mncintorh HD,,
2! iiem3 45G88vrilBbl€
optional third-party software on the
eyemodule CD which will allow you to
view and print your image files.
See enclosed card for instructions on installing
and using the included third-party image viewing
software. The JPEG images files can also be viewed
individually on your computer using your Web
browser or any other software that views image files.
Windows is a registered trademark 0f lvlicrosoft Corporation.
Mac is a reqistered trademark of Apple C0mputer, lnc.
e itr elemodule
-
L
D
D
D
&llllE
l
i{
;l
,I
8J3rie3s
reruorrl
Intitled
Yscslion
Today
Trdsv
TLJry
Tlday
Tlday
Tod6y
foldir
rDrdsr
fllder
folder
folder
folder
Maco Finder