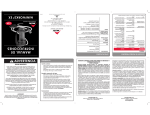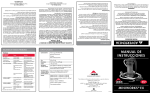
1
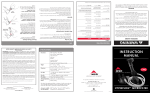
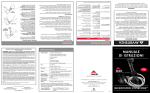
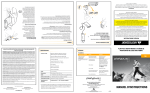
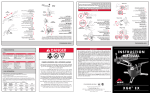
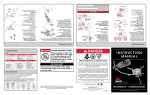
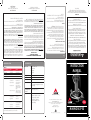
Clear Inlet Hose
UK – GB Reg. Design No. 2011749
Clogged Inlet Foam
Clean Inlet Foam
Germany - Patent No. M9008212
Replace Ceramic Element
Pump Assembly Life
(excluding Ceramic
Element)
~10 years (depends on environmental
conditions, frequency of use, etc.)
Patents
Printed on recycled paper containing 30% post-consumer waste.
31-966_EN
RECYCLED | RECYCLABLE
M I NI WORKS ® EX
4 0 0 0 F i r s t A v e n u e S o u t h , S e a t t l e , WA 9 8 1 3 4 U S A
1-800-531-9531 or 206-505-9500
w w w. m s r g e a r. c o m
[email protected]
M O U N TA I N S A F E T Y R E S E A R C H
Cascade Designs, Inc.
ENG
F o r p ro d u c t i nf o r m a t i o n a nd s er v i c e c o nt a c t
M O U N TA I N S A F E T Y R E S E A R C H
30 to 60 estimated cleanings (depends on force used
to clean cartridge)
Ceramic Element Life
Up to 2000 liters (depends on water conditions)
Collected particles
Clean Ceramic Element
Scrubbing Pad
Little/no water flow
Collected particles
Clean Ceramic Element
Storage Sack
Decreased flow rate
Collected particles
Clean Ceramic Element
Limp Handle (PULL stroke)
Debris under Umbrella Valve
Clean surface under Umbrella Valve
Limp Handle (PUSH stroke)
Debris in Relief Valve
Clear Relief Valve Assembly
WARNING
Replace Piston O-ring
Kinked/blocked Inlet Hose
Broken Ceramic Element
1 liter per min.
Clogged filter
INSTRUCTION
MA NUAL
BIOLOGICAL HAZARD
Lubricate Piston O-ring
Cracked/worn Piston O-ring
Other Patents Pending
US – Patent No. 5,266,196 / 5,925,309
US – Patent No. 5,558,762 / 5,656,220
Check parts and placement in
Relief Valve Assembly
7.5 x 2.75 in. / 19 x 7 cm
Flow Rate
Instruction Manual
There are hazards associated with backcountry travel and the use of water
filters. Drinking untreated water can result in exposure to harmful microorganisms and an increased risk of gastrointestinal illness. Using this filter improperly
increases your risk of exposure to harmful microorganisms and increases your
risk of gastrointestinal illness. Reduce your chances of becoming sick by
following the warnings and instructions in this manual and educating yourself
on backcountry water safety.
Clean Ceramic Element
Dry Piston O-ring
Empty water from Housing and
resume pumping (See Step 1)
Lubricate Piston O-ring
Missing Relief Valve part
Dimensions
Solution
MiniWorks® EX Water Filter
TIPS
LIMITED LIFETIME WARRANTY/LIMITATIONS OF
REMEDIES AND LIABILITY
USA and Canada
Ceramic Element
Clean the element whenever flow is noticeably reduced to maintain 1L/min. output.
Avoid excessive or uneven rubbing during cleaning because it may cause surface
grooves. Measure the element for wear after each cleaning.
CAUTION: Handle the element carefully to avoid damage or breakage.
On extended trips, bring along a spare element.
Water Collection and Preparation
Use the cleanest, clearest water available.
Avoid filtering silty, cloudy, muddy, or glacial stream water or tea-colored water that
contains visible tannins because these sources will quickly clog the filter.
YOU ARE RESPONSIBLE FOR YOUR OWN SAFETY AND THE SAFETY OF
THOSE IN YOUR GROUP. PLEASE USE GOOD JUDGMENT.
If clear water is not available, then let particles settle before filtering. If possible, fill a
container with water and let it stand until particles have settled to the bottom.
Filter mid-container water and discard bottom sediments. Alternately, collect and strain
water through a bandana or coffee filter to remove particles.
Never use the MiniWorks EX to filter seawater or chemically contaminated
water, such as water from mining tailing ponds or near large agricultural
operations. The MiniWorks EX does not make drinkable water from these
sources and does not remove all viruses, chemicals and radioactive materials,
or particles smaller than 0.2 microns.
Keep the Inlet Hose and other potentially contaminated parts away from filtered
water to prevent cross contamination.
Collected particles
To treat water with suspected waterborne viruses, use an approved disinfectant/purifier
and follow the manufacturer’s recommendations for use. To see MSR’s purification
options visit www.msrgear.com. Further information on disinfectant use can be found
on the Centers for Disease Control website: www.cdc.gov.
Operation
To maximize pumping performance, air must exist in the Housing and should be visible
through the clear gray shell when not pumping.
The Clean Side Cover can be threaded onto a Nalgene bottle cap to keep it and the
cap clean when filtering water.
No Airspring in Housing
Australia - Design Patent No. 114171
Dry Piston O-ring
Replace Lower End Cap O-ring
Tighten Inlet Hose Barb
16 oz. / 456 g
Cause
Kit Contents
SPECIFICATIONS
READ, UNDERSTAND, AND FOLLOW ALL instructions and warnings in this
manual before using this filter. Failure to follow warnings and instructions may
result in gastrointestinal illness.
Please refer to Filter Cleaning and Maintenance section for more information.
Leaking Piston O-ring seal
Dragging Handle (PUSH stroke)
Dragging Handle (PULL stroke)
WARNING: Never use filter if
Lower End Cap O-ring is missing.
Missing Lower End Cap O-ring
WARNING: Never use filter if
Ceramic Element is broken or
damaged.
Loose Inlet Hose Barb
Weight
Poor Performance
Problem
Limited Warranty. Cascade Designs, Inc. (“Cascade”), to the original owner
(“Owner”), under intended use and maintenance, warrants the enclosed
product (“Product”) to be free from defects in materials and workmanship
for the life of the Product. No warranty against defects in materials and workmanship will apply if Product is (i) altered in any way, (ii) used for purposes inconsistent with
Product’s intended purpose or design, or (iii) improperly maintained. Warranty will furthermore be voided where Owner/user (i) failed to follow Product instructions or warnings or
(ii) subjected Product to misuse, abuse, or neglect.
During the warranty period, original Product parts determined by Cascade to be defective in materials or workmanship will be repaired or replaced as Owner’s sole remedy.
Cascade reserves the right to replace any discontinued product with a new product of
comparable value and function. A returned product deemed irreparable becomes the
property of Cascade and will not be returned.
EXCLUDING THE LIMITED WARRANTY PROVIDED ABOVE, CASCADE, ITS AFFILIATES
AND THEIR SUPPLIERS, TO THE MAXIMUM EXTENT PERMITTED BY LAW, MAKE NO
WARRANTIES, EXPRESSED OR IMPLIED, AND DISCLAIM ALL WARRANTIES, DUTIES
AND CONDITIONS, WHETHER EXPRESSED, IMPLIED OR STATUTORY, WITH RESPECT
TO THE PRODUCT, INCLUDING WITHOUT LIMITATION ANY IMPLIED WARRANTIES OF
MERCHANTABILITY, AGAINST LATENT DEFECTS, FITNESS FOR A PARTICULAR PURPOSE,
OR CORRESPONDENCE TO DESCRIPTION.
Warranty Service. To obtain service under this warranty, the warranty-eligible Product must
be presented to a Cascade authorized dealer. In the United States and Canada, warranty
service may also be obtained by calling 1.800.531.9531[M-F, 8:00-4:30, PDT].
TROUBLESHOOTING
Owner is responsible for all costs associated with returning Product to Cascade for
service. Where at its sole discretion Cascade deems Product eligible for warranty repair
or replacement, Cascade will pay the shipping and handling associated with returning
repaired or replaced Product to Owner. In instances where Cascade deems a returned
product ineligible for warranty service, Cascade will, if possible, repair product for a
reasonable charge that includes return shipping and handling. For warranty return service
details, please go to www.msrgear.com.
Limitation of Remedies. Should a court of competent jurisdiction find the limited warranty set forth above breached, Cascade’s only obligation will be to, at its option, either
repair or replace Product. Should the aforementioned remedy fail of its essential purpose,
Cascade will, in exchange for return of Product, refund to Owner Product’s original purchase price. THE FOREGOING REMEDY IS THE SOLE AND EXCLUSIVE REMEDY OF THE
PURCHASER AGAINST CASCADE, ITS AFFILIATES AND THEIR SUPPLIERS, REGARDLESS
OF LEGAL THEORY.
Limitation of Liability. Cascade’s, its affiliates’ and their suppliers’ maximum liability is
limited to incidental damages not to exceed the original purchase price of the Product.
CASCADE, ITS AFFILIATES AND THEIR SUPPLIERS HEREBY DISCLAIM AND EXCLUDE
ANY LIABILITY FOR ANY CONSEQUENTIAL OR OTHER DAMAGES RESULTING FROM
ANY REASON WHATSOEVER. THIS EXCLUSION AND LIMITATION APPLIES TO ALL
LEGAL THEORIES UNDER WHICH DAMAGES MAY BE SOUGHT, AND WILL APPLY EVEN
IF ANY REMEDY FAILS OF ITS ESSENTIAL PURPOSE.
This limited warranty gives Owner specific legal rights; Owner may have additional rights,
which may vary state to state.
Always completely follow safety, use, operation, and maintenance instructions for this or
any other Cascade product.
European Union customer statutory rights are not affected.
In swift water, place a small rock on the Inlet Cage to keep it submerged below the
water surface.
IMPORTANT
Read and understand this entire manual carefully before assembling or using this
water filter. Keep this manual for future reference. If you do not understand
this manual or have any questions, please call Cascade Designs at
1-800-531-9531.
Cascade Designs, Inc.
4000 First Avenue South, Seattle, WA 98134 USA
1-800-531-9531 or 206-505-9500
Cascade Designs, Ltd.
Dwyer Road, Midleton, County Cork, Ireland
(+353) 21-4621400
www.msrgear.com
KNOW YOUR MSR ® MINIWORKS ® EX FILTER
MINIWORKS ® EX OPERATING INSTRUCTIONS
FILTER WATER
Inlet Hose
Barb
Inlet Hose
Handle
Inlet Float
Inlet
Funnel
Tube Clip
Inlet Cage
Lower End
Cap O-ring
PREPARE FILTER
Pump
Head
1. Unscrew the Clean Side Cover from the Housing.
2. Connect open end of Inlet Hose to Inlet Hose Barb.
Before first use, pump 1-2 liters of water through filter (1-2 minutes) to purge
residual carbon dust before attaching to a clean water container.
3. Put Inlet Cage under water.
Adjust Inlet Float to keep Inlet Cage between bottom sediments and
water surface.
4. Begin pumping until water enters Pump Head and flows out of Housing.
NOTE: Airspring design provides best performance when air is visible in
Housing. Do not invert filter to purge air out.
PACK AND STORE FILTER
1. Place a clean container under the filter OR attach an MSR® Dromedary™
Bag onto the bottom of the filter.
2. Begin pumping until water enters Pump Head, fills Housing, and begins to
flow out of filter.
3. Pump the Handle to filter water (about 70 to 80 strokes/minute for
optimal performance).
1.
2.
3.
4.
Remove Inlet Cage from water.
Pump the Handle to purge filter of any remaining water.
Rinse and air dry Ceramic Element completely (3-5 days) before storage.
Attach Clean Side Cover onto the bottom of the filter to prevent
contamination.
5. Wind Inlet Hose around Housing.
Secure Inlet Hose with Tube Clip on Handle.
Place filter inside Storage Sack.
Ceramic
Element
Inlet Foam
Housing
PURGE
1-2 MIN
WARNING
Scrubbing Pad
Always wash and dry filter parts thoroughly before long-term storage
to prevent the growth of mold, mildew, and bacteria. Never use a dishwasher to wash parts because the high heat may damage or melt them.
Clean Side
Cover
Ceramic
Gauge
FILTER CLEANING AND MAINTENANCE
STERILIZE CERAMIC ELEMENT
Sterilize the Ceramic Element if the filter has been used for more than seven
consecutive days. Also, sterilize it before or after long-term storage, especially
if Ceramic Element was stored wet.
1. Remove Ceramic Element from Housing.
2. Remove Lower End Cap O-ring.
3. Place Ceramic Element in large pot. Cover the Ceramic Element completely
with water (room temperature) and allow room for the water to reach a
rolling boil without spilling over.
4. Bring water to a boil and allow element to remain in rolling boil for
5 minutes.
5. Turn off stove and allow water to cool before removing element.
6.Air dry Ceramic Element completely (3-5 days).
7. Wash and dry completely all other filter parts.
8. Reassemble filter.
IMPORTANT: Remember to reinstall Lower End Cap O-ring.
The MiniWorks EX requires regular cleaning and maintenance to function properly.
Cleaning and maintenance depends on frequency of use and water quality.The
Ceramic Element will clog gradually during use, especially when filtering from
glacial streams or cloudy water. If necessary, replacement parts can be found in
the MSR Water Filter Maintenance Kit, purchased separately from a local or online
MSR dealer.
CLEANING THE CERAMIC ELEMENT - AFTER EACH USE
1.
2.
3.
4.
Unscrew Pump Head from Housing.
Unscrew Clean Side Cover from Housing.
Hold Housing and push Ceramic Element out from bottom.
Wet Scrubbing Pad with clean water and gently rub the element.
Use even, uniform strokes to clean around the element.
5. Rinse Ceramic Element with clean water and reassemble filter.
WARNING: Check installation of Lower End Cap O-ring to ensure element is
sealed in the Housing.
REMOVE
CERAMIC ELEMENT
CLEAN
CERAMIC ELEMENT
REMOVE
LOWER END CAP O-RING
NOTE: MSR recommends measuring the
Ceramic Element after each cleaning.
1. Remove Ceramic Gauge from Clean Side
Cover.
2. Remove Ceramic Element from Housing.
(See “Cleaning the Ceramic Element.”)
3. Gently lay gauge on surface of Ceramic
Element and slide along its length.
(DO NOT FORCE gauge over element.
Permanent damage can occur.)
4. Replace Ceramic Element if gauge fits
easily over Ceramic Element at any point.
(See “Replacing the Ceramic Element.”)
Ceramic
Gauge
Lower End
Cap O-ring
1. Unscrew Inlet Hose Barb from the
Pump Head.
2. Rinse Duck Bill and reassemble.
Ensure sequence of Inlet Hose Barb,
Inlet Hose O-ring, Relief Valve
Spring, Duck Bill Washer, and
Duck Bill.
Inlet Hose
Barb
1. Slide Inlet Cage up the Inlet Hose.
2. Remove Inlet Foam from the Inlet
Funnel.
3. Rinse foam in clear water and
reinstall parts.
LUBRICATING THE PISTON
O-RING
CLEAN
UMBRELLA VALVE
1. Pull out Pump Head Pin and Pump
Head Bushing.
2. Remove Handle and Piston.
3. Lubricate Piston O-ring and
reassemble.
Use MSR Silicone Lubricant, lip
balm or petroleum jelly.
1. Unscrew Pump Head.
2. Pinch and pull gently to remove
Umbrella Valve.
3. Rinse Pump Head and Umbrella Valve
thoroughly with clean water.
4. Press Umbrella Valve firmly back into
place and reassemble.
Umbrella
Valve
Duck Bill
Washer
Duck Bill
Relief Valve
Spring
CLEAR RELIEF
VALVE ASSEMBLY
CLEANING THE INLET FOAM
REPLACING THE CERAMIC ELEMENT
CLEANING THE UMBRELLA VALVE
Inlet Hose
O-ring
CLEARING THE RELIEF VALVE
ASSEMBLY
MEASURE
CERAMIC ELEMENT
Follow removal and reinstallation steps
in “Cleaning the Ceramic Element.”
BOIL 5
MINUTES
REMOVE
CERAMIC ELEMENT
MEASURING THE CERAMIC ELEMENT
Pump Head
Bushing
Pump Head
Pin
Piston
O-ring
Piston
LUBRICATE
PISTON O-RING