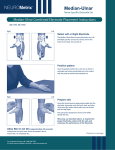
1
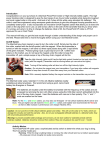
Troubleshooting Display Light Description Possible Causes Solution • Incorrect limb setting on device. 1. Ensure that the limb setting on the device is correct. 2. If incorrect, re-select the limb on the device by pressing the button down for 1-2 seconds until correct limb is selected (l = left; r = right). 3. Retest. Lb Data quality issue Pn Data quality issue • Adequate signal could not be recorded. 1. Confirm placement and retest. Pr Stimulation issue • Insufficient gel on probes. • Poor contact of probes with skin. • Inadequate skin preparation in probe contact area. • Probe movement during test. • Gel smeared between the probes. 1. Re-do skin preparation and device placement. • Clean probes and re-apply gel. • Vigorously scrub the ankle area. • Reposition the device on the patient with firm pressure to both probes and on biosensor. 2. Retest with constant force to limit device movement during test. Sn Biosensor disconnected during test • Biosensor disconnected during test. 1. Re-insert biosensor with tail traces facing outward. • Entire biosensor tail must be inserted. 2. If problem persists, replace biosensor. Sn Data quality issue • Biosensor backing not removed. • Incomplete biosensor contact. • Skin in biosensor contact area inadequately prepared. 1. Remove biosensor backing and retest. • Check for good contact on both sides of the foam. 2. If problem persists, re-prepare skin and replace with new biosensor. 3. Retest. Ec Data quality issue • Signal contamination due to patient movement or excessive muscle contraction. 1. Confirm that the patient is relaxing leg muscles. 2. Reposition patient if necessary. 3. Retest. Ec oC Data quality issue • Biosensor backing not removed. 1. Remove biosensor backing and retest. Patient ankle cold • Temperature detector field of view obstructed. • Patient’s ankle temperature <23°C. 1. Ensure that tester’s hand does not obstruct temperature detector. 2. Warm patient’s lower leg by: • putting a sock on and elevating the leg. - If unsuccessful: º instruct the patient to put on their shoes and socks then walk around for 1-2 minutes if able. OR the patient’s lower leg and ankle º wrap with a blanket or heating pad. OR rub the patient’s lower ankle. º briskly (Note: Although it is not an ideal approach, this technique can be used if the tester is in a hurry.) 3. Retest. Lo Hd Low battery • Battery is low. 1. Replace battery. Device hardware issue • Device hardware issue. 1. Contact Customer Service. Ub Excessive biosensor reuse detected. Device is disabled • Excessive biosensor reuse detected. • Excessive repeat testing. 1. Contact Customer Service. NC-stat DPNCheck ® Reference Guide • Device Use • Testing Protocol • Test Results • Troubleshooting Always remember to perform the test away from electrical equipment that may cause interference. If you continue to experience issues, please call Customer Service at (888) 786-7287. NEUROMetrix® NEUROMetrix® 62 Fourth Avenue, Waltham, MA 02451 (888) 786-7287 www.neurometrix.com © 2012 NeuroMetrix, Inc. All Rights Reserved. PN2203591 Rev. C ™ Device Use Step 6: Remove the backing from the biosensor. Step 1: Lay the patient on an exam table and prepare the testing area with a Preparation Pad. Step 2: Power on the device. The display will show -- and the or red light will turn amber when the battery needs to be replaced. Tip: Both the outer ankle bone (lateral malleolus) and Achilles tendon should be easily accessible as shown at left. Please reference the User Manual for alternative patient positions. Step 3: Fully insert the biosensor into once the port. The light will turn green the biosensor has been properly inserted. Align to foam. The display will show to set the leg to be tested. |r Tip: Align the biosensor with the foam on all sides; “remove backing” label side faces up. Step 4: Set the leg to be tested. The device display screen will blink with the leg selected (l = left; r = right). To switch the leg, hold the button down for 1-2 seconds and the selection will change to the opposite leg. Tip: Whenever possible, test the same leg in all patients. Step 5: Apply a small amount of conductive gel to each probe. The head of the probe should be covered with gel. A C • B • Tip: Remove excess gel that may lead to gel smearing between the two probes. Step 7: Locate the patient’s outer ankle bone to align the long probe just behind it. The test area should be vigorously scrubbed with the Preparation Pad provided. Tip: The anode (short probe, A ) and cathode (long probe, C ) should be aligned to the outer ankle bone, B. The cathode should be adjacent to the middle (central prominence) of the ankle bone. The nerve is stimulated only under the cathode. • • Step 8: Align the device on the lower calf by pushing down firmly on the foam. The device should point towards the back side of the knee with the inner edge of the biosensor placed next to the midline (Achilles tendon). Ensure that the device is aligned to but does not cross over the midline as shown by the dashed line in the image above. Tip: The probes should be placed behind but not over the outer ankle bone. Tip: Check for good contact on both sides of the foam. Step 9: Press the button to start the test. The light will blink with each stimulation. Limb selected will be displayed. Tip: During test, maintain: a.) Firm pressure on probes b.) Firm pressure on biosensor c.) Steady positioning Testing Protocol 1. Testing a single leg is usually clinically sufficient. • Whenever possible, the same leg should be tested first in all patients. 2. The test will provide a nerve conduction result the first time in most patients. 3. If the first test does not provide a result or to confirm the result, the test should be repeated. • Pressing the test button again is usually all that is required (see Troubleshooting). Tip: In certain circumstances it may be beneficial to confirm the results. Examples include: - Confirm CV if amplitude is ≤ 4 µV - Confirm undetectable response - Confirm result inconsistent with clinical findings - If the leg setting on the device was incorrect, then the test should be repeated 4. If the repeat test does not provide a result or for further confirmation of the results, the opposite leg should be tested. • The same biosensor may be used on both legs. This protocol is intended only as a guide. It is the responsibility of the provider to determine the clinical necessity of nerve conduction testing. Step 10: Maintain constant force throughout the test. The test time may vary per patient, but normally lasts for 10-15 seconds. The results will display once completed. Test Results Display Example Result Actions 40 Conduction Velocity – meters/second Record and interpret result. 4 Amplitude – microvolts* Record and interpret result. Undetectable Response; no Conduction Velocity displayed Record and interpret result. Test Unsuccessful Note displayed code and refer to Troubleshooting on back. 0 Pn Pr Sn Lb Ec oC Hd * Note: If the device displays an Amplitude > 0 but does not display a CV, the CV could not be reported on this individual. Record Amplitude and interpret result. To recall test results after the device powers down, press and hold the button for 3 seconds and you will see the results appear on the display. Results will display for 10 seconds and then the device will power off. This mode can only be accessed when the device is powered off.