1
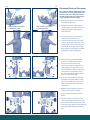
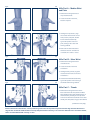
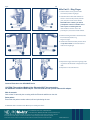
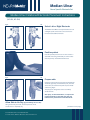
Median-Ulnar
Nerve-Specific Electrode Set
Median-Ulnar Combined Electrode Placement Instructions
(NC-S93, NC-S94)
Right
Left
Select Left or Right Electrode
The Median-Ulnar Motor-Sensory Electrodes are Left
and Right specific. Choose the correct one for the
hand to be tested. One size fits all.
Position patient
Have the patient position his or her arm so that it is
extended and resting comfortably on a firm surface
with the palm up and thumb extended out.
Right
Left
Prepare skin
Using the alcohol pumice prep pad provided with the
electrode, vigorously scrub the front, back, and sides
of the wrist, the entire thenar palm area, the thumb
and the ring finger.
The prep pad is designed to cleanse and mildly
abrade the skin.
Skin prep, as described above, is required for
proper Electrode contact with the skin and
enhances the performance of the Electrode.
Allow Skin to Air Dry
(approximately 30 seconds)
Using the back of your hand, check the patient’s skin to
ensure that it is completely dry.
For Customer Service call 1.888.786.7287
62 Fourth Avenue, Waltham, MA 02451 www.neurometrix.com
(Continued on next page)
Right
Left
Distal Wrist
Crease
Distal Wrist
Crease
Determine Electrode Placement
It is critical to determine Electrode placement before removing the backing. The
adhesive side of the Electrode should
contact the skin only once and should
not be repositioned once affixed.
1. Locate the distal wrist crease by having
the patient flex their wrist.
Mark Palmaris Longus tendon
at Distal Wrist Crease
Mark Palmaris Longus tendon
at Distal Wrist Crease
2. Identify the Palmaris Longus tendon by
having the patient place their thumb and
pinky finger together while flexing the
hand at the wrist.
3. Use a skin marker to mark the location
of the tendon at the wrist crease.
4. Locate and mark the Flexor Carpi Ulnaris
tendon at the patient’s distal wrist crease
by aligning the notch on the wrist portion
of Part B with the middle of the 5th digit
(pinky). Make sure the fingers are extended straight and positioned together.
5. With the backing still on the Electrode,
take Part A of the Electrode and place
the tip of the notch marked “wrist
crease” on the Palmaris Longus tendon
mark, aligning the patient’s wrist crease
with the dotted line. Both top and bottom
notches of Part A should point toward
the center of the middle finger when the
fingers are extended straight.
6. Ensure that the thumb is fully extended
and fingers are together before continuing. The notch of the thenar part of the
Electrode should point toward the base
of the thumb.
7. Mark the location of the two remaining
notches on the forearm and palm.
8. Locate and mark the distal joint on the
thumb.
9. Slide the Electrode over so that the wrist
notch of Part B aligns with the Flexor Carpi
Ulnaris tendon mark. Position Part B so that
both notches align with the center of the 5th
digit (pinky). Mark the forearm notch location.
Right
Left
Affix Part A – Median Wrist
and Palm
1. Remove the backing from Part A
only of the Electrode.
2. Locate the marks on the wrist,
forearm and palm.
3. Holding Part A by the tabs, align
the notches with the marks on the
wrist, forearm, and palm. Smooth
Part A of the Electrode firmly
against the patient’s wrist and
palm, starting at the center and
working outward.
4. Make sure the entire Electrode is
adhered to the skin. Smooth and
consistent skin contact is critical.
Right
Left
Affix Part B – Ulnar Wrist
1. Remove the backing from Part B
of the Electrode.
2. Locate the marks on the wrist
and forearm.
3. Holding Part B by the tab, align the
notches with the marks on the wrist
and forearm.*
Right
Left
4. Smooth Part B of the Electrode firmly
against the patient’s wrist starting at
the middle and working outward.
Affix Part C – Thumb
1. Remove the backing from Part C of the
Electrode. Ensure that the patient’s thumb is
fully extended and straight. Holding Part C of
the Electrode by the tab, place the tip of the
arrow on the mark that was made on the distal
thumb joint. Wrap Part C snugly around thumb.
(Continued on back page)
*Please note that for small wrists, correct positioning of the ulnar wrist portion may mean that the edge of Part B touches the
edge of Part A. Parts A and B should not overlap. Adjust Part B if necessary. The connectors between Part A and B are flexible;
fold to accommodate Part B correctly on skin.
Right
Left
Affix Part D – Ring Finger
1. Stretch taut the sensory portion of the
tail over the patient’s ring finger.
2. Determine which of the four numbers on
the tail is closest to the patient’s proximal
joint, and place a mark at that number.
Remember this number, you will be
prompted to enter this number on the
device prior to initiating the test.
If two numbers are both close to the
proximal joint, choose the smaller number.
3. Remove backing from Part D of the Electrode.
Ensure that the patient’s ring
finger is straight.
4. Hold Part D of the Electrode by the tabs. Place
the tip of the arrow on the mark that was
made on the ring finger.
5. Wrap Part E snugly around the ring finger, making sure that the Electrode is wrapped on top of
itself.
6. Wrap Part F in the same manner.
Connect Electrode to the ADVANCE Device
CAUTION: The combined Median-Ulnar Electrode MUST be connected to
the ADVANCE Combined NSE Adapter. This Electrode will not operate without this adapter.
Wait 30 seconds
Wait at least 30 seconds prior to testing while the Electrode stabilizes on the skin.
Relax patient
Ensure that the patient remains relaxed, still and quiet during the test.
ATTENTION: Refer to the Device User Manual prior to utilizing the Device.
For Customer Service call 1.888.786.7287
62 Fourth Avenue, Waltham, MA 02451 www.neurometrix.com
©2011 NeuroMetrix, Inc. All rights reserved. The use of any devices or administration of any therapies discussed or referred to
in this publication should always be consistent with indications and prescribing information approved by the FDA.
US Patent No. 5,851,191; 5,976,094; 6,132,386; 6,132,387; 6,146,335; 6,266,558; 6,379,313; 6,507,755; 6,692,444.
PN 2203375 Rev. B