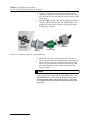
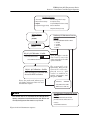
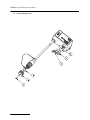
1
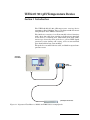
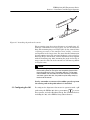
TIENet® 301 pH/Temperature Device Installation and Operation Guide ® Manual Body #69-4303-071 Copyright © 2012. All rights reserved, Teledyne Isco Revision D, April 2015 Foreword This instruction manual is designed to help you gain a thorough understanding of the operation of the equipment. Teledyne Isco recommends that you read this manual completely before placing the equipment in service. Although Teledyne Isco designs reliability into all equipment, there is always the possibility of a malfunction. This manual may help in diagnosing and repairing the malfunction. If a problem persists, call or e-mail Teledyne Isco technical support for assistance. Simple difficulties can often be diagnosed over the phone. For faster service, please have your serial number ready. If it is necessary to return the equipment to the factory for service, please follow the shipping instructions provided by technical support, including the use of the Return Merchandise Authorization (RMA) specified. Be sure to include a note describing the malfunction. This will aid in the prompt repair and return of the equipment. Teledyne Isco welcomes suggestions that would improve the information presented in this manual or enhance the operation of the equipment itself. Teledyne Isco is continually improving its products and reserves the right to change product specifications, replacement parts, schematics, and instructions without notice. Contact Information Customer Service Phone: (800) 228-4373 (USA, Canada, Mexico) (402) 464-0231 (Outside North America) Fax: (402) 465-3022 Email: [email protected] Technical Support Phone: Toll Free (866) 298-6174 (Samplers, Flow Meters and Multi-parameter Probes) Toll Free (800) 775-2965 (Syringe Pumps and Liquid Chromatography) Email: [email protected] Return equipment to: 4700 Superior Street, Lincoln, NE 68504-1398 Other Correspondence Mail to: P.O. Box 82531, Lincoln, NE 68501-2531 Email: [email protected] Revised April 2014 TIENet™ 301 pH/Temperature Device Safety TIENet™ 301 pH/Temperature Device Safety General Warnings Before installing, operating, or maintaining this equipment, it is imperative that all hazards and preventive measures are fully understood. While specific hazards may vary according to location and application, take heed of the following general warnings: WARNING Avoid hazardous practices! If you use this instrument in any way not specified in this manual, the protection provided by the instrument may be impaired. AVERTISSEMENT Éviter les usages périlleux! Si vous utilisez cet instrument d’une manière autre que celles qui sont specifiées dans ce manuel, la protection fournie de l’instrument peut être affaiblie; cela augmentera votre risque de blessure. Hazard Severity Levels This manual applies Hazard Severity Levels to the safety alerts, These three levels are described in the sample alerts below. CAUTION Cautions identify a potential hazard, which if not avoided, may result in minor or moderate injury. This category can also warn you of unsafe practices, or conditions that may cause property damage. WARNING Warnings identify a potentially hazardous condition, which if not avoided, could result in death or serious injury. DANGER DANGER – limited to the most extreme situations to identify an imminent hazard, which if not avoided, will result in death or serious injury. iii TIENet™ 301 pH/Temperature Device Safety Hazard Symbols The equipment and this manual use symbols used to warn of hazards. The symbols are explained below. Hazard Symbols Warnings and Cautions The exclamation point within the triangle is a warning sign alerting you of important instructions in the instrument’s technical reference manual. The lightning flash and arrowhead within the triangle is a warning sign alerting you of “dangerous voltage” inside the product. Symboles de sécurité Ce symbole signale l’existence d’instructions importantes relatives au produit dans ce manuel. Ce symbole signale la présence d’un danger d’électocution. Warnungen und Vorsichtshinweise Das Ausrufezeichen in Dreieck ist ein Warnzeichen, das Sie darauf aufmerksam macht, daß wichtige Anleitungen zu diesem Handbuch gehören. Der gepfeilte Blitz im Dreieck ist ein Warnzeichen, das Sei vor “gefährlichen Spannungen” im Inneren des Produkts warnt. Advertencias y Precauciones Esta señal le advierte sobre la importancia de las instrucciones del manual que acompañan a este producto. Esta señal alerta sobre la presencia de alto voltaje en el interior del producto. iv TIENet® 301 pH/Temperature Device Table of Contents Section 1 Introduction 1.1 1.2 1.3 1.4 Operation . . . . . . . . . . . . . . . . . . . . . . . . . . . . . . . . . . . . . . . . . . . . . . . . . . . . . . . . . . Design . . . . . . . . . . . . . . . . . . . . . . . . . . . . . . . . . . . . . . . . . . . . . . . . . . . . . . . . . . . . Technical Specifications . . . . . . . . . . . . . . . . . . . . . . . . . . . . . . . . . . . . . . . . . . . . . . Replacement Parts and Accessories . . . . . . . . . . . . . . . . . . . . . . . . . . . . . . . . . . . . . 1.4.1 TIENet 301 Device . . . . . . . . . . . . . . . . . . . . . . . . . . . . . . . . . . . . . . . . . . . . . 1-2 1-2 1-3 1-4 1-4 Section 2 Installation and Setup for Signature 2.1 Installation . . . . . . . . . . . . . . . . . . . . . . . . . . . . . . . . . . . . . . . . . . . . . . . . . . . . . . . . 2-1 2.1.1 Connecting the Cable . . . . . . . . . . . . . . . . . . . . . . . . . . . . . . . . . . . . . . . . . . . 2-1 2.1.2 Connecting to Signature Portable via a TIENet Receptacle . . . . . . . . . . . . 2-5 2.1.3 pH Probe Installation Considerations . . . . . . . . . . . . . . . . . . . . . . . . . . . . . 2-6 2.1.4 Mounting the pH Probe in the Stream . . . . . . . . . . . . . . . . . . . . . . . . . . . . . 2-6 2.2 Configuring the 301. . . . . . . . . . . . . . . . . . . . . . . . . . . . . . . . . . . . . . . . . . . . . . . . . . 2-7 2.2.1 Updating the Device List . . . . . . . . . . . . . . . . . . . . . . . . . . . . . . . . . . . . . . . . 2-7 2.3 pH Probe Life. . . . . . . . . . . . . . . . . . . . . . . . . . . . . . . . . . . . . . . . . . . . . . . . . . . . . . 2-10 2.4 pH Probe Calibration . . . . . . . . . . . . . . . . . . . . . . . . . . . . . . . . . . . . . . . . . . . . . . . 2-10 2.4.1 Frequency . . . . . . . . . . . . . . . . . . . . . . . . . . . . . . . . . . . . . . . . . . . . . . . . . . . 2-10 2.4.2 Procedure . . . . . . . . . . . . . . . . . . . . . . . . . . . . . . . . . . . . . . . . . . . . . . . . . . . 2-10 2.5 Firmware Updates . . . . . . . . . . . . . . . . . . . . . . . . . . . . . . . . . . . . . . . . . . . . . . . . . 2-12 2.6 Probe Storage and Maintenance . . . . . . . . . . . . . . . . . . . . . . . . . . . . . . . . . . . . . . 2-12 2.7 Contact Teledyne Isco . . . . . . . . . . . . . . . . . . . . . . . . . . . . . . . . . . . . . . . . . . . . . . . 2-12 Appendix A Replacement Parts A.1 Replacement Parts . . . . . . . . . . . . . . . . . . . . . . . . . . . . . . . . . . . . . . . . . . . . . . . . . . A-1 A.1.1 301 pH Temperature . . . . . . . . . . . . . . . . . . . . . . . . . . . . . . . . . . . . . . . . . . . A-2 List of Figures 1-1 Signature Flow Meter w/ Model 301 TIENet device and pH probe . . . . . . . . . . . . 1-1 2-1 TIENet Device terminal strips . . . . . . . . . . . . . . . . . . . . . . . . . . . . . . . . . . . . . . . . 2-1 2-2 Installing cable with a cord-grip fitting . . . . . . . . . . . . . . . . . . . . . . . . . . . . . . . . . 2-2 2-3 TIENet Device terminal connections . . . . . . . . . . . . . . . . . . . . . . . . . . . . . . . . . . . 2-3 2-4 Attach wired terminal strip to case board socket . . . . . . . . . . . . . . . . . . . . . . . . . . 2-3 2-5 Position and secure the cable . . . . . . . . . . . . . . . . . . . . . . . . . . . . . . . . . . . . . . . . . . 2-4 2-6 How to connect a TIENet plug to the Signature Portable . . . . . . . . . . . . . . . . . . . 2-5 2-7 Attaching the probe to the carrier . . . . . . . . . . . . . . . . . . . . . . . . . . . . . . . . . . . . . . 2-7 2-8 Character grid . . . . . . . . . . . . . . . . . . . . . . . . . . . . . . . . . . . . . . . . . . . . . . . . . . . . . 2-8 2-9 Menu Tree: 301 Configuration . . . . . . . . . . . . . . . . . . . . . . . . . . . . . . . . . . . . . . . . . 2-9 2-10 301 Calibration sequence . . . . . . . . . . . . . . . . . . . . . . . . . . . . . . . . . . . . . . . . . . . 2-11 v TIENet® 301 pH/Temperature Device Table of Contents vi TIENet® 301 pH/Temperature Device Section 1 Introduction The TIENet® Model 301 pH/temperature sensing device transmits acidity/alkalinity data to the Signature® flow meter using Teledyne Isco’s TIENet connectivity. The 301 device consists of a wall-mountable isolated interface with a 10 or 23m cable, that attaches to the flow meter. Attached to the device is a stainless steel, submersible probe with combination-type electrodes. The probe has a porous PTFE liquid junction to resist fouling and coating, and a steam-sterilized glass hemi-bulb for long- term stability. The probe has a standard 25-foot cable, and built-in exposed temperature sensor. Signature Flow Meter TIENet 301 Device pH /Temperature Probe Figure 1-1 Signature Flow Meter w/ Model 301 TIENet device and pH probe 1-1 TIENet® 301 pH/Temperature Device Section 1 Introduction For greater distances, external connection via conduit, and connection of additional TIENet devices, the TIENet Expansion Box is available. Bulk TIENet cable may also be used for greater distances. The maximum distance between the 301 and the flow meter is 1,000 ft. (304.8 m). 1.1 Operation The pH probe measures the acidity or alkalinity of an aqueous solution by determining the relative quantity of dissociated hydrogen ions, H + (actually H 3 O + ) in the solution. A larger quantity of H+ ions indicates acidity, while a smaller quantity of H+ ions indicates alkalinity. The H in pH stands for Hydrogen and the p stands for power. The normal scale for pH runs from 0 to 14, with 0 being most acidic and 14 being most alkaline. Distilled water at 25° C is neutral at 7, based on the fact that the dissociation constant (number of H+ and OH - [hydroxyl] ions present) for pure water at that temperature is 10-7. The dissociation constant is a number indicating the degree of ionic dissociation for a substance after it is dissolved in water. Dissociation constants vary widely for substances, depending on the nature of the substance’s chemical bonds. Ionic salts tend to have higher constants. Each number on the pH scale between 7 and 0 equals a tenfold increase in H + ion. Each number between 7 and 14 equals a tenfold decrease of H+ ion. pH measurements of wastewater are commonly made to monitor the effect of treatment chemicals added to raise or lower the pH. Water that has been used for various industrial processes may deviate substantially from 7. Chemicals are often added to the water to bring the pH close to that of neutral water, which is 7. For example, if the effluent has a concentration of heavy metal ions, they must be removed before discharge. Raising the pH of solutions containing transition-metal ions will cause them to precipitate, where they can easily be removed as sludge. The resultant solution will be high in pH and will require acid to neutralize it. 1.2 Design The pH probe is a combination of two electrochemical half-cells. Together they provide a low-voltage signal that corresponds to the hydrogen-ion concentration of a solution. The bulb at the end of the probe is called the glass mono electrode. The glass is of special composition, sensitive only to hydrogen ions, and is exposed to the solution to be measured. The specific sensitivity to the hydrogen ion prevents interference from other ions that may be present in the solution. It is essential to prevent grease from fouling this membrane. The glass membrane produces an electrical potential proportional to hydrogen ion activity. The other electrode, called the reference electrode, completes the circuit between the glass electrode and the solution. 1-2 TIENet® 301 pH/Temperature Device Section 1 Introduction The Isco pH probe combines both electrodes in a single housing and also contains an amplifier to reduce the extremely high impedance of the circuit. This improves the reaction of the probe to stray capacitance and reduces interference caused by electrical noise in the vicinity. Like any other chemical reaction, pH measurement is affected significantly by temperature. Consequently, temperature compensation is provided in the 301. The pH probe has a built-in temperature sensor that is exposed for faster response. When the ion-selective electrode and the reference electrode are connected to a high-impedance voltmeter and submerged in solution, ions move to the surface of the membrane. The electrical charge on the ions creates a potential difference across the barrier between the solution and the membrane. This potential, or voltage difference, is proportional to the activity of the ions in solution. The potential, when read by a sensitive voltmeter, translates into a reading of pH. With the Signature flow meter, the voltage is sent first to a preamplifier inside the probe to reduce the impedance of the circuit and improve the signal-to-noise ratio, and then on to the 301 to allow greater operating distance from the flow meter. Note that pH probes are a consumable item, and not covered under the standard one year warranty. CAUTION Never allow the pH glass bulb to dry out. When storing the probe, always protect the bulb by covering the end with the plastic cap with a moistened sponge or cloth inside. 1.3 Technical Specifications Table 1-1 Technical Specificationsa TIENet 301 Device 301 Weight (w/o sensor) w/ 10m cable: 3.5 lb Ambient Operating Temperature -20 to 50 °C (-4 to 122 °F) pH Measurement Range 0 to 14 pH units Temperature Compensation Performed by the 301 device pH Accuracy ±0.1 pH units (new probe, freshly calibrated within range) pH Probe Dimensions 1.12" ; 6" long, 3/4 NPT; Cable 25ft Body Material 316SST pH Electrode Junction Double porous Temperature Measurement Range 0 to 80°C (32 to 176°F) a. All specifications are subject to change without notice. 1-3 TIENet® 301 pH/Temperature Device Section 1 Introduction 1.4 Replacement Parts and Accessories Parts and accessories can be purchased by contacting Teledyne Isco’s Customer Service Department. Teledyne Isco Customer Service Dept. P.O. Box 82531 Lincoln, NE 68501 USA Phone: 800 228-4373 402 464-0231 FAX: 402 465-3022 E-mail: [email protected] 1.4.1 TIENet 301 Device 301 pH/Temperature Device with Signature connection ending in unterminated leads. For use with Signature 6 position plug-in (green) terminal strip. Includes cord grip, combination pH probe with built-in exposed temperature probe and 25 ft. probe cable, and one package of each buffer and rinse solution for probe calibration. 10 m cable* ............................................................................................................................... 60-4307-018 23 m cable* ............................................................................................................................... 60-4307-019 Cut-to-length*........................................................................................................................... 60-4307-025 *Cable lengths from Signature to TIENet 301 device 301 pH/Temperature Device with Signature connection ending in TIENet plug. For use with portable Signature TIENet receptacle. Includes combination pH probe with built-in exposed temperature probe and 25 ft. probe cable and one package of each buffer and rinse solution for probe calibration 10 m cable* ............................................................................................................................... 60-4307-070 23 m cable* ............................................................................................................................... 60-4307-071 Cut-to-length*........................................................................................................................... 60-4307-072 *Cable lengths from Signature to TIENet 301 device CA Assembly TIENet Y w/ connector ...................................................................................... 60-4304-066 TIENet Expansion Box (includes 10 ft TIENet cable and 2 cord grips). 60-4307-023TIENet Expansion Box (includes 10 ft TIENet cable and 2 cord grips) ................................................................ 60-4307-023 Cord grip fitting, 3/4" NPT, for TIENet cable........................................................................... 209-0073-12 Bulk TIENet Cable, cut-to-length, order by the foot .............................................................. 60-4304-050 pH Probe (only)......................................................................................................................... 60-9004-126 Probe Carrier for pH probe ...................................................................................................... 60-3208-001 Note Teledyne Isco uses FreeRTOS version 5.4.2 in its TIENet devices. In accordance with the FreeRTOS license, FreeRTOS source code is available on request. For more information, visit www.FreeRTOS.org. 1-4 TIENet® 301 pH/Temperature Device Section 2 Installation and Setup for Signature 2.1 Installation 2.1.1 Connecting the Cable External TIENet devices such as the 301 are all electrically connected to the Signature flow meter in the same manner, usually using conduit or cord-grip cable fittings. Multiple external TIENet devices can be connected simultaneously. Refer to your Signature flow meter manual for instructions on accessing the instrument’s interior components. WARNING Before proceeding, ensure that the flow meter has been disconnected from mains power. Note The steps that follow include instructions for installing cord-grip fittings. Some applications will use user-supplied 3/4" ID conduit for cable routing. 1. Remove one of the 6-position plug-in terminal strip connectors from the case board. Figure 2-1 TIENet Device terminal strips 2-1 TIENet® 301 pH/Temperature Device Section 2 Installation and Setup for Signature 2. If using a cord-grip fitting, install the cable nut in the appropriate opening on the bottom of the Signature enclosure, securing it to the wall with the lock nut (concave side facing wall). 3. Feed the TIENet device cable end through the sealing nut and seal, and through the cable nut. Lightly tighten the sealing nut, just enough to hold the cable in place while installing the connector. Lock Nut (concave side facing wall) Sealing Nut Cable Nut Seal (color may vary) Figure 2-2 Installing cable with a cord-grip fitting 4. Attach the wire ends to the terminal strip as shown in Figure 2-3, then press the terminal strip back down into its socket on the case board, as shown in Figure 2-4, taking care not to strain any wire connections. Gently tug each wire when finished, to verify secure connection to the screw terminals. Note The SHIELD wire is the bare drain emerging from the foil s h i e l d a r o u n d t h e YE L L OW a n d B ROW N w i r e s. T h e BRAID-DRAIN wire is the bare drain emerging from the surrounding braided shield inside the cable jacket. It is not necessary to prevent the two braids from coming into contact with each other. 2-2 TIENet® 301 pH/Temperature Device Section 2 Installation and Setup for Signature Shield Braid-Drain Figure 2-3 TIENet Device terminal connections Figure 2-4 Attach wired terminal strip to case board socket 2-3 TIENet® 301 pH/Temperature Device Section 2 Installation and Setup for Signature Figure 2-5 Position and secure the cable 5. Gently tug the cable downward, to remove any slack within the enclosure, taking care not to put any stress on the connection. 6. Tighten the cord grip sealing nut. 7. Close the front panel and fasten it shut with the two Phillips screws. CAUTION If you are using conduit instead of the cord-grip fitting, the conduit must be sealed to prevent harmful gases and moisture from entering the Signature enclosure. Failure to seal conduit could reduce equipment life. 2-4 TIENet® 301 pH/Temperature Device Section 2 Installation and Setup for Signature 2.1.2 Connecting to Signature Portable via a TIENet Receptacle The optional external TIENet devices compatible with the Signature Portable (and Signature) all scan into the hardware in the same manner. A scan is required anytime a new TIENet device is added. Multiple TIENet devices can be connected simultaneously to the same Signature Portable Flow Meter. The following TIENet devices will attach to the TIENet receptacle: • Ultrasonic Level Sensor • Area Velocity Sensor • 301 pH Interface • LaserFlow Connecting a TIENet plug to the Signature Portable • 306 Sampler Interface To connect the TIENet plug from the sensor to the TIENet Receptacle: 1. Align the connectors and push together (Figure 2-6). 2. The sensor release will “click” when the sensor connector is fully seated. 3. Connect the two caps together. 4. After the physical connection is made, a scan must be performed for the device to be recognized. For additional TIENet connections, use the TIENet Y-cable or alternately an Expansion Box. O-Ring and Lubrication for the TIENet receptacle 1. Coat the O-ring’s sealing surface with a silicone lubricant. CAUTION Do not use petroleum-based lubricants. Petroleum-based lubricants will cause the O-ring to swell and eventually deteriorate. Aerosol silicone lubricant sprays often use petroleum-based propellents. If you are using an aerosol spray, allow a few minutes for the propellent to evaporate before proceeding. 2. The sensor release will “click” when the sensor connector is fully seated. 3. Connect the two caps together. Figure 2-6 How to connect a TIENet plug to the Signature Portable 2-5 TIENet® 301 pH/Temperature Device Section 2 Installation and Setup for Signature 2.1.3 pH Probe Installation Considerations Install the probe only in streams that have continuous flow. The sensing end of the probe must always remain wet. For proper operation, there must be enough flow to submerge the sensing end of the probe completely. Note For best results, calibrate the probe before each installation. For calibration steps, refer to Section 2.4. If flow is intermittent (dry for periods of time), the pH sensing bulb will dry out, and its response time will slow, becoming especially problematic in situations where pH changes rapidly. If the probe is dry long enough, it will first lose sensitivity, then be slow to respond, and finally become inoperable. Never let the sensing end of the probe dry out completely. Always mount the probe in an easily-accessible location, as periodic cleaning of the probe will be necessary. Also, you will eventually need to replace it. The probe can be mounted facing either upstream or downstream, but the carrier mounting is more secure if the probe is facing upstream, due to the stop tabs on the back end. Remember to unscrew the plastic guard cap from the sensing end of the probe when you install it, or the probe will be unable to sense the flow stream. Installation in streams with high grease content will result in poor performance and require frequent cleaning and recalibration. Greasy substances, being nonconductors of electricity, weaken the electrical potentials formed between the glass mono-electrode and the solution, slowing or halting the response altogether. The pH probe operates satisfactorily mounted either horizontally or vertically in the stream. However, horizontal mounting is more secure, and presents less of a debris trap. Simple suspension of the probe is not recommended, particularly in streams of high velocity, or those that carry debris. 2.1.4 Mounting the pH Probe in the Stream If you mount the pH probe vertically, mount it securely. Do not hang it by its cable. Suspending the probe in the stream is not stable. For horizontal mounting, the probe fastens to a sensor carrier that snaps to an Isco mounting ring. The carrier has spring clamps that hold the probe in place. Press the probe between the clamps, then push it backward until it stops. 2-6 TIENet® 301 pH/Temperature Device Section 2 Installation and Setup for Signature Figure 2-7 Attaching the probe to the carrier The mounting rings fit various diameters of round pipes 15" diameter and smaller. For larger pipes, use the Isco Scissors Ring. The mounting rings are held in place by the outward force of spring pressure in the smaller sizes and by a scissors arrangement in the larger sizes. For more detailed information about mounting rings and associated hardware, refer to the Isco Mounting Rings user manual, and the instruction sheet supplied with the mounting ring. After mounting the probe in the ring or strap, route the cable out of the stream so it will not trap debris or clog the sewer. Note When installing the pH probe and its sensor carrier, make sure the mounting slots on the carrier are completely pressed into the mating tabs on the ring. The probe relies on a full engagement between tabs and slots for secure mounting. If the slots are loose against the tabs, the probe may be swept away by the force of the stream. Lastly, remember to unscrew the rubber guard cap from the sensing end of the probe when it is installed. 2.2 Configuring the 301 To configure the Signature flow meter for operation with a pH probe using the TIENet 301 device, press MENU ( ) to access the top menu, and select Hardware Setup. For all TIENet devices including the 301, select TIENet Setup (Smart Sensor). 2-7 TIENet® 301 pH/Temperature Device Section 2 Installation and Setup for Signature 2.2.1 Updating the Device List When the 301 is physically added to the system, select Perform Scan so that the flow meter detects it. When the scan is complete, the 301 appears in the list of connected devices, ready to be configured with the steps shown in Figure 2-9 on the following page. Note From the Hardware Setup menu, “Configure” refers to defining and selecting the parameters for each connected device. The default parameters that will appear for the 301 device are: 301 pH – pH reading 301 Temperature – Degrees C The name of any parameter can be changed by highlighting it and pressing Enter ( ) to display the character grid. Navigate the grid using the arrow keys. Select characters with Enter and clear characters with Delete ( ). 301 pH Done A B O P c d q r @# > ? Figure 2-8 Character grid 2-8 Cancel C Q e s $ , D R f t % . E S g u ^ F T h v & G U i w * H V j x ( I W k y ) J X l z - K L M N Y Z a b m n o p / : ! _ + = < TIENet® 301 pH/Temperature Device Section 2 Installation and Setup for Signature Select Operation 1. Hardware Setup 2. Configure 3. Administration 4. Home Hardware Setup 1. Smart Sensor Setup (TIENet) 2. SDI-12 Setup 3. MODBUS Input Setup 4. MODBUS Output Setup 5. Modem Setup TIENet Setup (Smart Sensor) With initial connection, begin • Perform Scan • Configure Measurements by performing a hardware scan to add the 301. Configure Measurements 1 - XXX XXX Parameter XXX Parameter Press Enter for a list of sensors. Scroll to the 301 and press Enter to select. XXX Parameter Configure Measurements 2 - 301 301 pH 301 Temperature Scroll with arrow keys to highlight / select / deselect any displayed parameter or edit its name. Press NEXT to confirm configuration. There may be a slight delay. TIENet Configuration The sensors are being configured. Please wait... TIENet Setup (Smart Sensor) The sensors have been configured. Figure 2-9 Menu Tree: 301 Configuration 2-9 TIENet® 301 pH/Temperature Device Section 2 Installation and Setup for Signature 2.3 pH Probe Life pH probes are consumable items, meaning that they will eventually have to be replaced. During the life of the probe you will have to clean and recalibrate it periodically (For calibration instructions, refer to the next section). Grease and debris will interfere with the probe's ability to accurately measure pH. Because grease is an insulator, it will keep the ions from reaching the glass membrane and porous liquid junction, thus hindering the creation of a voltage potential and slowing or stopping response time. An indication that the probe is nearing the end of its service life is an increasing time period to stabilize during calibration. This can present a problem in applications with a rapidly changing pH. Consider replacing the probe when delays become apparent. 2.4 pH Probe Calibration 2.4.1 Frequency The Signature flow meter provides a calibration procedure for the pH probes using commercially prepared buffer solutions. For accurate readings, you must clean and re-calibrate the probe on a regular basis. Calibration intervals typically range from weekly to monthly, depending on the application. Note For pH probe calibration, Teledyne Isco recommends that you use a glass container for the buffer solutions, and ensure that the following conditions are met: The probe must be properly submerged in solution, and there must be no air trapped under the probe membrane, or the reading may become incorrect and/or erratic. 2.4.2 Procedure 2-10 Rinse the probe. From the Home screen, press the MENU softkey and then follow the sequence shown in Figure 2-10. When the sequence is completed, the buffer list will reappear. Rinse the probe and select the next buffer calibration point or Done. Measurement will resume after five minutes. TIENet® 301 pH/Temperature Device Section 2 Installation and Setup for Signature Configure Options 1. Site Setup 2. Measurement Setup 3. Adjust 4. Equation/Trigger Setup Adjust Options Level pH (301) pH Calibration 301 pH 5. Data Storage/Push Setup 6. Sampler Setup 7. Inputs/Outputs/Alarms Setup 8. Reset Totalizers 9. Reports/History Setup Perform pH Calibration of sensor 301 pH Select pH calibration buffer or Done 1. 4 buffer 2. 7 buffer 3. 10 buffer 4. Done 4 1, 2, or 3 301 pH - pH Calibration - 4 buffer Enter exact buffer value: X.XX Select NEXT to continue. 301 pH - pH Calibration - 4 buffer Place the probe in the pH buffer and then select NEXT to continue. Rinse the probe and submerge in the buffer solution at least one inch beneath the surface. Note The actual value displayed for “pH counts” is insignificant to the user. It is a function of the voltage-to-frequency conversion transmitted from the 301 device and read by the Signature flow meter as a pH value. If the pH buffer is not the exact value, enter the value printed on the side of the container. Th e s c r e e n w i l l c y c l e repeatedly. Wait for the numerical value displayed next to “pH counts” to stabilize to within ±10 counts, and then press NEXT. pH Counts: XXXXXXX Select NEXT when stable (Difference less than 10) pH Calibration Complete for sensor 301 pH Place pH probe back into the flow. pH measurements will resume in 5 minutes. Select NEXT to continue. Figure 2-10 301 Calibration sequence 2-11 TIENet® 301 pH/Temperature Device Section 2 Installation and Setup for Signature 2.5 Firmware Updates The TIENet device’s firmware is updated via the USB port on the front panel of the Signature Flow Meter. Step-by-step instructions for updating the firmware can be found in Section 2 of the Signature user manual. 2.6 Probe Storage and Maintenance If you remove the pH probe from operation, be careful to keep the glass sensor bulb wet. Exposure to air causes the glass membrane on the sensor bulb to dry out. This makes it very slow to respond in solution. Prolonged or repeated dehydration of the bulb will ruin the probe. The guard cap is to protect the probe during shipment and storage and to keep the glass membrane and liquid junction from drying out. If you remove the probe for any reason, clean it and replace the cap after filling with 4.0 buffer solution. Never store the probe dry or without the cap in place. The pH-sensitive glass can also become “conditioned” to its environment, especially when it is continuously exposed to high pH (10 and above) solutions. The glass does have a memory and will respond slowly when exposed to a lower pH solution after having been in a high pH solution for any significant period of time. Storage of a pH probe in a 4.0 buffer solution is recommended, as this has a regenerative effect on the glass and does not put a memory on it. Tap water will work if 4.0 buffer solution is not available. Deionized water is good for quick rinses to clean the element, but not for prolonged storage of an electrode. Continuous exposure of the ion-sensitive membrane to a wetted, but non-ionic solution will improperly condition the membrane. The reference electrode is also adversely affected when allowed to dry out. Salt crystals from the electrolyte or precipitates of the solution measured will form salt bridges either within or on the surfaces of the liquid junction, causing the reference to be less conductive and resulting in a higher reference impedance. This condition will typically worsen until the unit no longer functions. Soaking the reference electrode in a 4.0 pH solution, or tap water if the buffer is not readily available, may bring the reference back to life. Boiling the electrode in 4.0 buffer solution or tap water could revive the electrode in more severe situations. If none of these solutions work, it may be necessary to replace the probe. 2.7 Contact Teledyne Isco If you have further questions about the installation, operation, and maintenance of your TIENet device, please contact our service department at: Teledyne Isco 4700 Superior St. Lincoln, NE 68504 Phone: 866 298-6174 or 402 464-0231 Fax: 402 465-3022 E-mail: [email protected] 2-12 TIENet® 301 pH/Temperature Device Appendix A Replacement Parts A.1 Replacement Parts Replacement parts are called out in the following illustrations. Refer to the call-out in the adjacent table to determine the part number for the item. Replacement parts can be purchased by contacting Teledyne Isco’s Customer Service Department. Teledyne Isco Customer Service Department P.O. Box 82531 Lincoln, NE 68501 USA Phone: (800) 228-4373 (402) 464-0231 FAX:(402) 465-3022 E-mail:[email protected] A-1 TIENet® 301 pH/Temperature Device A.1.1 301 pH Temperature A-2 TIENet® 301 pH/Temperature Device A-3 TIENet® 301 pH/Temperature Device A-4 Compliance Statements ℶ❐₼㦘㹡㦘⹂䓸德㒥⏒侯䤓⚜䱿♙⚺摞 Name and amount of Hazardous Substances or Elements in the product 㻭 (Hg) 柘 (Cd) ⏼ↆ杻 (Cr(VI)) ⮩䅃勣啾 (PBB) ⮩䅃ℛ勣啾 (PBDE) 兎恾㨎 Circuit Boards X O O O O O 㣍䯉 Display X O O O O O 㘴兎 Wiring O O O O O X ␔捷䟄冕 Internal Cables O O O O O X 䦃㿐䟄㧉 DC Motor X O O O m O X 㘴⯃ Connectors O O X O O O 䟄㻯 Battery X 䟄䭐梏 Solenoid valve X of C on fo r ity 杔 (Pb) D ec la ra ti o n 捷ↅ⚜䱿 Component Name 㦘㹡㦘⹂䓸德㒥⏒侯 Hazardous Substances or Elements X O O O O O O O X C E X ℶ❐₼㦘㹡㦘⹂䓸德㒥⏒侯䤓⚜䱿♙⚺摞᧶Name and amount of Hazardous Substances or Elements in the product O: 嫷䯉年㦘㹡㦘⹂䓸德⦷年捷ↅ㓏㦘⧖德㧟㠨₼䤓⚺摞⧖⦷ST/ 㪖屓⸩䤓棟摞尐㻑ⅴₚᇭ O: Represent the concentration of the hazardous substance in this component’s any homogeneous pieces is lower than the ST/ standard limitation. X᧶嫷䯉年㦘㹡㦘⹂䓸德咂⺠⦷年捷ↅ䤓㩟⧖德㧟㠨₼䤓⚺摞怔⒉ST/ 㪖屓⸩䤓棟摞尐㻑ᇭ (←₩♾⦷㷳⮓᧨㫈㗽⸭棔㍔⑄⺈ₙ嫷₼㓢“X” 䤓㔏㦾☮⥯扪嫛扪㷴広㢝ᇭ) X: Represent the concentration of the hazardous substance in this component’s at least one homogeneous piece is higher than the ST/ standard limitation. (Manufacturer may give technical reasons to the “X”marks) 䘾≬∎䞷㦮䟀兞洛䫽⸩ᇭ The Environmentally Friendly Use Period (EFUP) was determined through experience. 䞮ℶ㡴㦮嬺冥䪐⦷侊⒦⚆䪐₼ᇭⓜₘ⇜㟿ⷦ䞮ℶ(207 ⅲ嫷 2007 ) ᇭ椞⚝䤓₹ⷦ㹜ⅲ嫷㦗᧶ A 㦗᧨B ℛ㦗᧨䷘䷘ᇭ The date of Manufacture is in code within the serial number. The first three numbers are the year of manufacture (207 is year 2007) followed by a letter for the month. "A" is January, "B" is February and so on. Hazmat Table Signature Meter, Sensors and Accessories 60-4302-091 Rev.A Warranty Teledyne Isco One Year Limited Factory Service Warranty* This warranty exclusively covers Teledyne Isco instruments, providing a one-year limited warranty covering parts and labor. Any instrument that fails during the warranty period due to faulty parts or workmanship will be repaired at the factory at no charge to the customer. Teledyne Iscos exclusive liability is limited to repair or replacement of defective instruments. Teledyne Isco is not liable for consequential damages. Teledyne Isco will pay surface transportation charges both ways within the 48 contiguous United States if the instrument proves to be defective within 30 days of shipment. Throughout the remainder of the warranty period, the customer will pay to return the instrument to Teledyne Isco, and Teledyne Isco will pay surface transportation to return the repaired instrument to the customer. Teledyne Isco will not pay air freight or customers packing and crating charges. This warranty does not cover loss, damage, or defects resulting from transportation between the customers facility and the repair facility. The warranty for any instrument is the one in effect on date of shipment. The warranty period begins on the shipping date, unless Teledyne Isco agrees in writing to a different date. Excluded from this warranty are normal wear; expendable items such as pH sensors, charts, ribbon, lamps, tubing, and glassware; fittings and wetted parts of valves; and damage due to corrosion, misuse, accident, or lack of proper maintenance. This warranty does not cover products not sold under the Teledyne Isco trademark or for which any other warranty is specifically stated. No item may be returned for warranty service without a return authorization number issued by Teledyne Isco. This warranty is expressly in lieu of all other warranties and obligations and Teledyne Isco specifically disclaims any warranty of merchantability or fitness for a particular purpose. The warrantor is Teledyne Isco, 4700 Superior, Lincoln, NE 68504, U.S.A. * This warranty applies to the USA and countries where Teledyne Isco does not have an authorized dealer. Customers in countries outside the USA, where Teledyne Isco has an authorized dealer, should contact their Teledyne Isco dealer for warranty service. Before returning any instrument for repair, please call, fax, or e-mail the Teledyne Isco Service Department for instructions. Many problems can often be diagnosed and corrected over the phone, or by e-mail, without returning the instrument to the factory. Instruments needing factory repair should be packed carefully, and shipped to the attention of the service department. Small, non-fragile items can be sent by insured parcel post. PLEASE BE SURE TO ENCLOSE A NOTE EXPLAINING THE PROBLEM. Shipping Address: Mailing Address: Phone: Fax: Email: Teledyne Isco - Attention Repair Service 4700 Superior Street Lincoln, NE 68504 USA Teledyne Isco PO Box 82531 Lincoln, NE 68501 USA Repair service: (800) 775-2965 (lab instruments) (866) 298-6174 (samplers & flow meters) Sales & General Information: (800) 228-4373 (USA & Canada) (402) 465-3001 [email protected] October 11, 2013 P/N 60-1002-040 Rev H