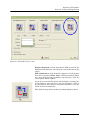
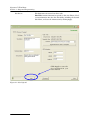
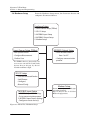
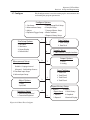
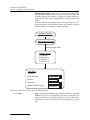
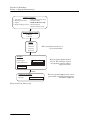
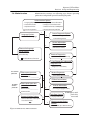
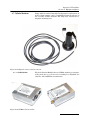
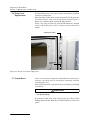
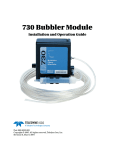
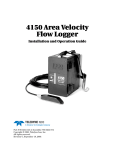
1
Installation and Operation Guide Manual #69-4303-070 of Assembly #60-4304-036 Copyright © 2012. All rights reserved, Teledyne Isco Revision A, June 15, 2012 Foreword This instruction manual is designed to help you gain a thorough understanding of the operation of the equipment. Teledyne Isco recommends that you read this manual completely before placing the equipment in service. Although Teledyne Isco designs reliability into all equipment, there is always the possibility of a malfunction. This manual may help in diagnosing and repairing the malfunction. If the problem persists, call or e-mail the Teledyne Isco Technical Service Department for assistance. Simple difficulties can often be diagnosed over the phone. If it is necessary to return the equipment to the factory for service, please follow the shipping instructions provided by the Customer Service Department, including the use of the Return Authorization Number specified. Be sure to include a note describing the malfunction. This will aid in the prompt repair and return of the equipment. Teledyne Isco welcomes suggestions that would improve the information presented in this manual or enhance the operation of the equipment itself. Teledyne Isco is continually improving its products and reserves the right to change product specifications, replacement parts, schematics, and instructions without notice. Contact Information Customer Service Phone: (800) 228-4373 (USA, Canada, Mexico) (402) 464-0231 (Outside North America) Fax: (402) 465-3022 Email: [email protected] Technical Support Phone: Email: (800) 775-2965 (Analytical) (866) 298-6174 (Samplers and Flow Meters) [email protected] Return equipment to: 4700 Superior Street, Lincoln, NE 68504-1398 Other Correspondence Mail to: P.O. Box 82531, Lincoln, NE 68501-2531 Email: [email protected] Web site: www.isco.com Revised March 17, 2009 Signature Flow Meter Safety Signature Flow Meter Safety General Warnings Before installing, operating, or maintaining this equipment, it is imperative that all hazards and preventive measures are fully understood. While specific hazards may vary according to location and application, take heed of the following general warnings: WARNING Avoid hazardous practices! If you use this instrument in any way not specified in this manual, the protection provided by the instrument may be impaired. AVERTISSEMENT Éviter les usages périlleux! Si vous utilisez cet instrument d’une manière autre que celles qui sont specifiées dans ce manuel, la protection fournie de l’instrument peut être affaiblie; cela augmentera votre risque de blessure. Hazard Severity Levels This manual applies Hazard Severity Levels to the safety alerts, These three levels are described in the sample alerts below. CAUTION Cautions identify a potential hazard, which if not avoided, may result in minor or moderate injury. This category can also warn you of unsafe practices, or conditions that may cause property damage. WARNING Warnings identify a potentially hazardous condition, which if not avoided, could result in death or serious injury. DANGER DANGER – limited to the most extreme situations to identify an imminent hazard, which if not avoided, will result in death or serious injury. v Signature Flow Meter Safety Hazard Symbols The equipment and this manual use symbols used to warn of hazards. The symbols are explained below. Hazard Symbols Warnings and Cautions The exclamation point within the triangle is a warning sign alerting you of important instructions in the instrument’s technical reference manual. The lightning flash and arrowhead within the triangle is a warning sign alerting you of “dangerous voltage” inside the product. Symboles de sécurité Ce symbole signale l’existence d’instructions importantes relatives au produit dans ce manuel. Ce symbole signale la présence d’un danger d’électocution. Warnungen und Vorsichtshinweise Das Ausrufezeichen in Dreieck ist ein Warnzeichen, das Sie darauf aufmerksam macht, daß wichtige Anleitungen zu diesem Handbuch gehören. Der gepfeilte Blitz im Dreieck ist ein Warnzeichen, das Sei vor “gefährlichen Spannungen” im Inneren des Produkts warnt. Advertencias y Precauciones Esta señal le advierte sobre la importancia de las instrucciones del manual que acompañan a este producto. Esta señal alerta sobre la presencia de alto voltaje en el interior del producto. vi Signature™ Flow Meter Section 1 Introduction 1.1 1.2 1.3 1.4 1.5 1.6 Quick Start . . . . . . . . . . . . . . . . . . . . . . . . . . . . . . . . . . . . . . . . . . . . . . . . . . . . . . . . Data Integrity . . . . . . . . . . . . . . . . . . . . . . . . . . . . . . . . . . . . . . . . . . . . . . . . . . . . . . Security . . . . . . . . . . . . . . . . . . . . . . . . . . . . . . . . . . . . . . . . . . . . . . . . . . . . . . . . . . . Compatible Equipment . . . . . . . . . . . . . . . . . . . . . . . . . . . . . . . . . . . . . . . . . . . . . . . Identifying Signature Components . . . . . . . . . . . . . . . . . . . . . . . . . . . . . . . . . . . . . Controls and Indicators . . . . . . . . . . . . . . . . . . . . . . . . . . . . . . . . . . . . . . . . . . . . . . 1.6.1 Keypad . . . . . . . . . . . . . . . . . . . . . . . . . . . . . . . . . . . . . . . . . . . . . . . . . . . . . . 1.6.2 Display and LED . . . . . . . . . . . . . . . . . . . . . . . . . . . . . . . . . . . . . . . . . . . . . . 1.6.3 Display Contrast . . . . . . . . . . . . . . . . . . . . . . . . . . . . . . . . . . . . . . . . . . . . . . 1.7 Technical Specifications . . . . . . . . . . . . . . . . . . . . . . . . . . . . . . . . . . . . . . . . . . . . . . 1-2 1-3 1-3 1-3 1-5 1-6 1-6 1-7 1-7 1-7 Section 2 Setup and Programming 2.1 User Interface . . . . . . . . . . . . . . . . . . . . . . . . . . . . . . . . . . . . . . . . . . . . . . . . . . . . . . 2-1 2.1.1 Keypad Functions . . . . . . . . . . . . . . . . . . . . . . . . . . . . . . . . . . . . . . . . . . . . . 2-1 2.1.2 Connecting to the Signature with Flowlink . . . . . . . . . . . . . . . . . . . . . . . . . 2-2 2.2 The Home Screen . . . . . . . . . . . . . . . . . . . . . . . . . . . . . . . . . . . . . . . . . . . . . . . . . . . 2-7 2.3 Shortcuts . . . . . . . . . . . . . . . . . . . . . . . . . . . . . . . . . . . . . . . . . . . . . . . . . . . . . . . . . . 2-7 2.3.1 Level Adjustment . . . . . . . . . . . . . . . . . . . . . . . . . . . . . . . . . . . . . . . . . . . . . . 2-7 2.3.2 Histograph . . . . . . . . . . . . . . . . . . . . . . . . . . . . . . . . . . . . . . . . . . . . . . . . . . . 2-7 2.3.3 Report View . . . . . . . . . . . . . . . . . . . . . . . . . . . . . . . . . . . . . . . . . . . . . . . . . . 2-7 2.4 Programming. . . . . . . . . . . . . . . . . . . . . . . . . . . . . . . . . . . . . . . . . . . . . . . . . . . . . . . 2-8 2.4.1 Off-Screen Content . . . . . . . . . . . . . . . . . . . . . . . . . . . . . . . . . . . . . . . . . . . . 2-8 2.4.2 Character Grid . . . . . . . . . . . . . . . . . . . . . . . . . . . . . . . . . . . . . . . . . . . . . . . . 2-8 2.4.3 Pull Down Menus . . . . . . . . . . . . . . . . . . . . . . . . . . . . . . . . . . . . . . . . . . . . . . 2-9 2.5 Program Steps (Menu Trees) . . . . . . . . . . . . . . . . . . . . . . . . . . . . . . . . . . . . . . . . . . . . . . . . . . . . . . . 2-9 2.6 Hardware Setup . . . . . . . . . . . . . . . . . . . . . . . . . . . . . . . . . . . . . . . . . . . . . . . . . . . 2-10 2.6.1 Smart Sensor Setup (TIENet) . . . . . . . . . . . . . . . . . . . . . . . . . . . . . . . . . . . 2-11 2.6.2 SDI-12 Setup . . . . . . . . . . . . . . . . . . . . . . . . . . . . . . . . . . . . . . . . . . . . . . . . 2-12 2.6.3 Modbus Input Setup . . . . . . . . . . . . . . . . . . . . . . . . . . . . . . . . . . . . . . . . . . 2-13 2.6.4 Modbus Output Setup . . . . . . . . . . . . . . . . . . . . . . . . . . . . . . . . . . . . . . . . . 2-16 2.6.5 Modem Setup . . . . . . . . . . . . . . . . . . . . . . . . . . . . . . . . . . . . . . . . . . . . . . . . 2-16 2.7 Configure . . . . . . . . . . . . . . . . . . . . . . . . . . . . . . . . . . . . . . . . . . . . . . . . . . . . . . . . . 2-17 2.7.1 Site Setup . . . . . . . . . . . . . . . . . . . . . . . . . . . . . . . . . . . . . . . . . . . . . . . . . . . 2-18 2.7.2 Measurement Setup . . . . . . . . . . . . . . . . . . . . . . . . . . . . . . . . . . . . . . . . . . . 2-18 2.7.3 Adjust . . . . . . . . . . . . . . . . . . . . . . . . . . . . . . . . . . . . . . . . . . . . . . . . . . . . . . 2-20 2.7.4 Equation/Trigger Setup . . . . . . . . . . . . . . . . . . . . . . . . . . . . . . . . . . . . . . . . 2-21 2.7.5 Data Storage/Push Setup . . . . . . . . . . . . . . . . . . . . . . . . . . . . . . . . . . . . . . 2-22 2.7.6 Sampler Setup . . . . . . . . . . . . . . . . . . . . . . . . . . . . . . . . . . . . . . . . . . . . . . . 2-23 2.7.7 Outputs/Alarms Setup . . . . . . . . . . . . . . . . . . . . . . . . . . . . . . . . . . . . . . . . . 2-23 2.7.8 Reset Totalizers . . . . . . . . . . . . . . . . . . . . . . . . . . . . . . . . . . . . . . . . . . . . . . 2-26 2.7.9 Reports/History Setup . . . . . . . . . . . . . . . . . . . . . . . . . . . . . . . . . . . . . . . . . 2-26 2.8 Administration . . . . . . . . . . . . . . . . . . . . . . . . . . . . . . . . . . . . . . . . . . . . . . . . . . . . 2-27 2.8.1 Language Options . . . . . . . . . . . . . . . . . . . . . . . . . . . . . . . . . . . . . . . . . . . . 2-28 2.8.2 Set New Passcode . . . . . . . . . . . . . . . . . . . . . . . . . . . . . . . . . . . . . . . . . . . . 2-28 2.8.3 Update Firmware . . . . . . . . . . . . . . . . . . . . . . . . . . . . . . . . . . . . . . . . . . . . . 2-28 2.8.4 Sensor Diagnostics . . . . . . . . . . . . . . . . . . . . . . . . . . . . . . . . . . . . . . . . . . . . 2-28 2.8.5 Display Signature Information . . . . . . . . . . . . . . . . . . . . . . . . . . . . . . . . . . 2-28 2.8.6 Display License Information . . . . . . . . . . . . . . . . . . . . . . . . . . . . . . . . . . . . 2-28 2.8.7 Gather Fault Data . . . . . . . . . . . . . . . . . . . . . . . . . . . . . . . . . . . . . . . . . . . . 2-28 2.8.8 Restore to Factory Defaults . . . . . . . . . . . . . . . . . . . . . . . . . . . . . . . . . . . . . 2-28 vii Signature™ Flow Meter 2.9 Home . . . . . . . . . . . . . . . . . . . . . . . . . . . . . . . . . . . . . . . . . . . . . . . . . . . . . . . . . . . . 2.10 USB Options . . . . . . . . . . . . . . . . . . . . . . . . . . . . . . . . . . . . . . . . . . . . . . . . . . . . . 2.10.1 Retrieve Text Reports . . . . . . . . . . . . . . . . . . . . . . . . . . . . . . . . . . . . . . . . 2.10.2 Retrieve Data . . . . . . . . . . . . . . . . . . . . . . . . . . . . . . . . . . . . . . . . . . . . . . . 2.10.3 Update Firmware . . . . . . . . . . . . . . . . . . . . . . . . . . . . . . . . . . . . . . . . . . . . 2.10.4 Save Current Program . . . . . . . . . . . . . . . . . . . . . . . . . . . . . . . . . . . . . . . 2.10.5 Load Existing Program . . . . . . . . . . . . . . . . . . . . . . . . . . . . . . . . . . . . . . . 2.10.6 Save Signature Information . . . . . . . . . . . . . . . . . . . . . . . . . . . . . . . . . . . 2.10.7 Gather Fault Data . . . . . . . . . . . . . . . . . . . . . . . . . . . . . . . . . . . . . . . . . . . 2.10.8 None of the above . . . . . . . . . . . . . . . . . . . . . . . . . . . . . . . . . . . . . . . . . . . . 2.11 Signature Data in Flowlink . . . . . . . . . . . . . . . . . . . . . . . . . . . . . . . . . . . . . . . . . 2.11.1 Event Viewer . . . . . . . . . . . . . . . . . . . . . . . . . . . . . . . . . . . . . . . . . . . . . . . 2.11.2 Verifying Exported Reports . . . . . . . . . . . . . . . . . . . . . . . . . . . . . . . . . . . . 2-29 2-29 2-30 2-30 2-30 2-31 2-31 2-31 2-31 2-31 2-31 2-31 2-32 Section 3 Installation 3.1 Accessing the Interior . . . . . . . . . . . . . . . . . . . . . . . . . . . . . . . . . . . . . . . . . . . . . . . . 3-1 3.2 Case Bottom Cable Entries. . . . . . . . . . . . . . . . . . . . . . . . . . . . . . . . . . . . . . . . . . . . 3-3 3.2.1 Cable Fittings . . . . . . . . . . . . . . . . . . . . . . . . . . . . . . . . . . . . . . . . . . . . . . . . . 3-5 3.3 Connecting TIENet Devices . . . . . . . . . . . . . . . . . . . . . . . . . . . . . . . . . . . . . . . . . . . 3-7 3.4 Power . . . . . . . . . . . . . . . . . . . . . . . . . . . . . . . . . . . . . . . . . . . . . . . . . . . . . . . . . . . . 3-10 3.4.1 Connecting Mains Power . . . . . . . . . . . . . . . . . . . . . . . . . . . . . . . . . . . . . . . 3-10 3.5 Mounting the Signature . . . . . . . . . . . . . . . . . . . . . . . . . . . . . . . . . . . . . . . . . . . . . 3-11 3.6 Outdoor Recommendations. . . . . . . . . . . . . . . . . . . . . . . . . . . . . . . . . . . . . . . . . . . 3-12 3.7 Level Calibration. . . . . . . . . . . . . . . . . . . . . . . . . . . . . . . . . . . . . . . . . . . . . . . . . . . 3-15 Section 4 Equipment Options 4.1 4.2 4.3 4.4 AC Power Cord Kit . . . . . . . . . . . . . . . . . . . . . . . . . . . . . . . . . . . . . . . . . . . . . . . . . . 4-2 Battery Backup . . . . . . . . . . . . . . . . . . . . . . . . . . . . . . . . . . . . . . . . . . . . . . . . . . . . . 4-4 Mechanical Totalizer. . . . . . . . . . . . . . . . . . . . . . . . . . . . . . . . . . . . . . . . . . . . . . . . . 4-6 TIENet™ Devices . . . . . . . . . . . . . . . . . . . . . . . . . . . . . . . . . . . . . . . . . . . . . . . . . . 4-10 4.4.1 Ultrasonic Level Sensor . . . . . . . . . . . . . . . . . . . . . . . . . . . . . . . . . . . . . . . . 4-10 4.4.2 Bubbler Level Sensor . . . . . . . . . . . . . . . . . . . . . . . . . . . . . . . . . . . . . . . . . . 4-10 4.4.3 Sampler Interface . . . . . . . . . . . . . . . . . . . . . . . . . . . . . . . . . . . . . . . . . . . . 4-10 4.4.4 pH and Temperature Device . . . . . . . . . . . . . . . . . . . . . . . . . . . . . . . . . . . . 4-10 4.4.5 TIENet Expansion Box . . . . . . . . . . . . . . . . . . . . . . . . . . . . . . . . . . . . . . . . 4-11 4.4.6 Analog Current Output . . . . . . . . . . . . . . . . . . . . . . . . . . . . . . . . . . . . . . . . 4-12 4.5 Isco Flowlink Software . . . . . . . . . . . . . . . . . . . . . . . . . . . . . . . . . . . . . . . . . . . . . . 4-16 4.6 Ethernet Modem . . . . . . . . . . . . . . . . . . . . . . . . . . . . . . . . . . . . . . . . . . . . . . . . . . . 4-16 4.6.1 Ethernet Modem Configuration . . . . . . . . . . . . . . . . . . . . . . . . . . . . . . . . . 4-19 4.6.2 Network Firewall Settings . . . . . . . . . . . . . . . . . . . . . . . . . . . . . . . . . . . . . 4-20 4.7 Cellular Modems . . . . . . . . . . . . . . . . . . . . . . . . . . . . . . . . . . . . . . . . . . . . . . . . . . . 4-21 4.7.1 CDMA Modem . . . . . . . . . . . . . . . . . . . . . . . . . . . . . . . . . . . . . . . . . . . . . . . 4-21 4.7.2 GSM Modem . . . . . . . . . . . . . . . . . . . . . . . . . . . . . . . . . . . . . . . . . . . . . . . . . 4-22 4.7.3 Installing the Cellular Modem . . . . . . . . . . . . . . . . . . . . . . . . . . . . . . . . . . 4-22 4.7.4 Cellular Modem Configuration . . . . . . . . . . . . . . . . . . . . . . . . . . . . . . . . . . 4-24 Section 5 Maintenance and Servicing 5.1 Cleaning. . . . . . . . . . . . . . . . . . . . . . . . . . . . . . . . . . . . . . . . . . . . . . . . . . . . . . . . . . . 5.2 Firmware Updates . . . . . . . . . . . . . . . . . . . . . . . . . . . . . . . . . . . . . . . . . . . . . . . . . . 5.3 Desiccant . . . . . . . . . . . . . . . . . . . . . . . . . . . . . . . . . . . . . . . . . . . . . . . . . . . . . . . . . . 5.3.1 Internal Desiccator . . . . . . . . . . . . . . . . . . . . . . . . . . . . . . . . . . . . . . . . . . . . 5.4 Troubleshooting. . . . . . . . . . . . . . . . . . . . . . . . . . . . . . . . . . . . . . . . . . . . . . . . . . . . . 5.4.1 Signature Flow Meter . . . . . . . . . . . . . . . . . . . . . . . . . . . . . . . . . . . . . . . . . . 5.4.2 TIENet 300 Connector Case . . . . . . . . . . . . . . . . . . . . . . . . . . . . . . . . . . . . . 5.4.3 TIENet 301 pH/Temp . . . . . . . . . . . . . . . . . . . . . . . . . . . . . . . . . . . . . . . . . . viii 5-1 5-1 5-2 5-3 5-3 5-4 5-6 5-6 Signature™ Flow Meter 5.5 5.6 5.7 5.8 5.4.4 TIENet 306 Sampler Interface . . . . . . . . . . . . . . . . . . . . . . . . . . . . . . . . . . . 5-7 5.4.5 TIENet 308 Analog Output . . . . . . . . . . . . . . . . . . . . . . . . . . . . . . . . . . . . . . 5-7 5.4.6 TIENet 310 USLS . . . . . . . . . . . . . . . . . . . . . . . . . . . . . . . . . . . . . . . . . . . . . 5-8 330 Bubbler Installation . . . . . . . . . . . . . . . . . . . . . . . . . . . . . . . . . . . . . . . . . . . . . 5-10 Front Cover Replacement . . . . . . . . . . . . . . . . . . . . . . . . . . . . . . . . . . . . . . . . . . . . 5-14 System Reset . . . . . . . . . . . . . . . . . . . . . . . . . . . . . . . . . . . . . . . . . . . . . . . . . . . . . . 5-14 Service and Repair . . . . . . . . . . . . . . . . . . . . . . . . . . . . . . . . . . . . . . . . . . . . . . . . . 5-15 Appendix A Replacement Parts A.1 How to Order. . . . . . . . . . . . . . . . . . . . . . . . . . . . . . . . . . . . . . . . . . . . . . . . . . . . . . . A-1 A.2 Signature Flow Meter. . . . . . . . . . . . . . . . . . . . . . . . . . . . . . . . . . . . . . . . . . . . . . . . A-2 Appendix B Options and Accessories B.1 B.2 B.3 B.4 B.5 Ordering Information . . . . . . . . . . . . . . . . . . . . . . . . . . . . . . . . . . . . . . . . . . . . . . . . B-1 Signature Flow Meter Accessories. . . . . . . . . . . . . . . . . . . . . . . . . . . . . . . . . . . . . . B-1 TIENet Devices and Accessories . . . . . . . . . . . . . . . . . . . . . . . . . . . . . . . . . . . . . . . B-2 Modems . . . . . . . . . . . . . . . . . . . . . . . . . . . . . . . . . . . . . . . . . . . . . . . . . . . . . . . . . . . B-3 Sensor Mounting Rings . . . . . . . . . . . . . . . . . . . . . . . . . . . . . . . . . . . . . . . . . . . . . . B-3 B.5.1 Spring Rings . . . . . . . . . . . . . . . . . . . . . . . . . . . . . . . . . . . . . . . . . . . . . . . . . B-3 B.5.2 Scissor Rings . . . . . . . . . . . . . . . . . . . . . . . . . . . . . . . . . . . . . . . . . . . . . . . . . B-3 B.6 Manuals. . . . . . . . . . . . . . . . . . . . . . . . . . . . . . . . . . . . . . . . . . . . . . . . . . . . . . . . . . . B-3 Appendix C Material Safety Data Sheets List of Figures 1-1 Signature Flow Meter . . . . . . . . . . . . . . . . . . . . . . . . . . . . . . . . . . . . . . . . . . . . . . . 1-1 1-2 Multiple options can be used in any combination . . . . . . . . . . . . . . . . . . . . . . . . . 1-4 1-3 Front and exterior component identification . . . . . . . . . . . . . . . . . . . . . . . . . . . . . 1-5 1-4 Home screen and basic keypad functions . . . . . . . . . . . . . . . . . . . . . . . . . . . . . . . . 1-6 2-1 Flowlink Connect screen . . . . . . . . . . . . . . . . . . . . . . . . . . . . . . . . . . . . . . . . . . . . . 2-3 2-2 Site Info tab . . . . . . . . . . . . . . . . . . . . . . . . . . . . . . . . . . . . . . . . . . . . . . . . . . . . . . . 2-4 2-3 Devices tab . . . . . . . . . . . . . . . . . . . . . . . . . . . . . . . . . . . . . . . . . . . . . . . . . . . . . . . . 2-5 2-4 Program tab: Accessing the browser . . . . . . . . . . . . . . . . . . . . . . . . . . . . . . . . . . . . 2-6 2-5 Home screen (normal operating mode) . . . . . . . . . . . . . . . . . . . . . . . . . . . . . . . . . . 2-7 2-6 Character grid . . . . . . . . . . . . . . . . . . . . . . . . . . . . . . . . . . . . . . . . . . . . . . . . . . . . . 2-8 2-7 Menu Tree: Top menu . . . . . . . . . . . . . . . . . . . . . . . . . . . . . . . . . . . . . . . . . . . . . . . 2-9 2-8 Menu Tree: Hardware Setup . . . . . . . . . . . . . . . . . . . . . . . . . . . . . . . . . . . . . . . . . 2-10 2-9 Measurement parameters for each TIENet device . . . . . . . . . . . . . . . . . . . . . . . . 2-12 2-10 Modbus Input Setup . . . . . . . . . . . . . . . . . . . . . . . . . . . . . . . . . . . . . . . . . . . . . . . 2-14 2-11 Editing Modbus device parameters . . . . . . . . . . . . . . . . . . . . . . . . . . . . . . . . . . . 2-15 2-12 Modbus Output Setup . . . . . . . . . . . . . . . . . . . . . . . . . . . . . . . . . . . . . . . . . . . . . 2-16 2-13 Menu Tree: Configure . . . . . . . . . . . . . . . . . . . . . . . . . . . . . . . . . . . . . . . . . . . . . 2-17 2-14 Menu Tree: Flow measurement setup . . . . . . . . . . . . . . . . . . . . . . . . . . . . . . . . . 2-19 2-15 Menu Tree: Volume Input Setup (total flow) . . . . . . . . . . . . . . . . . . . . . . . . . . . 2-20 2-16 Defining conditions & building equations. . . . . . . . . . . . . . . . . . . . . . . . . . . . . . 2-22 2-17 Local alarm setup . . . . . . . . . . . . . . . . . . . . . . . . . . . . . . . . . . . . . . . . . . . . . . . . . 2-24 2-18 SMS and Server alarm setup (modem required) . . . . . . . . . . . . . . . . . . . . . . . . 2-25 2-19 Menu Tree: Administration . . . . . . . . . . . . . . . . . . . . . . . . . . . . . . . . . . . . . . . . . 2-27 2-20 Menu Tree: USB Options . . . . . . . . . . . . . . . . . . . . . . . . . . . . . . . . . . . . . . . . . . . 2-29 2-21 Event Viewer in Flowlink . . . . . . . . . . . . . . . . . . . . . . . . . . . . . . . . . . . . . . . . . . 2-32 2-22 Report file verifier . . . . . . . . . . . . . . . . . . . . . . . . . . . . . . . . . . . . . . . . . . . . . . . . 2-33 3-1 Open door and front panel to access interior . . . . . . . . . . . . . . . . . . . . . . . . . . . . . 3-2 3-2 Connector case, connectors, and fuses . . . . . . . . . . . . . . . . . . . . . . . . . . . . . . . . . . 3-2 ix Signature™ Flow Meter 3-3 Connector Case cable entries for power and external devices . . . . . . . . . . . . . . . . 3-4 3-4 Strain relief 3/4 NPT Cord-grip fitting for TIENet devices . . . . . . . . . . . . . . . . . . 3-5 3-5 Cord-grip fittings installed . . . . . . . . . . . . . . . . . . . . . . . . . . . . . . . . . . . . . . . . . . . 3-5 3-6 Diameter-seal plugs for unused ports . . . . . . . . . . . . . . . . . . . . . . . . . . . . . . . . . . . 3-6 3-7 TIENet Device terminal strips . . . . . . . . . . . . . . . . . . . . . . . . . . . . . . . . . . . . . . . . 3-7 3-8 Installing TIENet cable with a cord-grip fitting . . . . . . . . . . . . . . . . . . . . . . . . . . . 3-7 3-9 TIENet Device terminal connections . . . . . . . . . . . . . . . . . . . . . . . . . . . . . . . . . . . 3-8 3-10 Attach wired terminal strip to connector case socket . . . . . . . . . . . . . . . . . . . . . 3-9 3-11 Position and secure the cable . . . . . . . . . . . . . . . . . . . . . . . . . . . . . . . . . . . . . . . . . 3-9 3-12 Location of power supply . . . . . . . . . . . . . . . . . . . . . . . . . . . . . . . . . . . . . . . . . . . 3-10 3-13 Signature Flow Meter mounted on wall . . . . . . . . . . . . . . . . . . . . . . . . . . . . . . . 3-11 3-14 Panel shield - recommended for outdoor installations . . . . . . . . . . . . . . . . . . . . 3-12 3-15 Specification drawing: Signature Flow Meter, 1 of 2 . . . . . . . . . . . . . . . . . . . . . 3-13 3-16 Specification drawing: Signature Flow Meter, 2 of 2 . . . . . . . . . . . . . . . . . . . . . 3-14 3-17 Level adjustment and calibration . . . . . . . . . . . . . . . . . . . . . . . . . . . . . . . . . . . . 3-15 4-1 Installing AC line cord with a cord-grip fitting . . . . . . . . . . . . . . . . . . . . . . . . . . . 4-2 4-2 Access terminals and connect line cord . . . . . . . . . . . . . . . . . . . . . . . . . . . . . . . . . . 4-3 4-3 Re-seating the power supply . . . . . . . . . . . . . . . . . . . . . . . . . . . . . . . . . . . . . . . . . . 4-3 4-4 Battery backup kit contents . . . . . . . . . . . . . . . . . . . . . . . . . . . . . . . . . . . . . . . . . . 4-4 4-5 Attach extension cable to the connector case . . . . . . . . . . . . . . . . . . . . . . . . . . . . . 4-5 4-6 Installing the battery backup mounting plate . . . . . . . . . . . . . . . . . . . . . . . . . . . . 4-5 4-7 Backup battery, installed . . . . . . . . . . . . . . . . . . . . . . . . . . . . . . . . . . . . . . . . . . . . . 4-6 4-8 Remove totalizer window cover . . . . . . . . . . . . . . . . . . . . . . . . . . . . . . . . . . . . . . . . 4-7 4-9 Optional non-resettable totalizer installation . . . . . . . . . . . . . . . . . . . . . . . . . . . . 4-9 4-10 TIENet Expansion box . . . . . . . . . . . . . . . . . . . . . . . . . . . . . . . . . . . . . . . . . . . . . 4-11 4-11 Analog output channel identification and terminal connections . . . . . . . . . . . . 4-12 4-12 TIENet 308 Analog output card installed (two shown) . . . . . . . . . . . . . . . . . . . 4-13 4-13 308 Device configuration . . . . . . . . . . . . . . . . . . . . . . . . . . . . . . . . . . . . . . . . . . . 4-14 4-14 Analog output setup . . . . . . . . . . . . . . . . . . . . . . . . . . . . . . . . . . . . . . . . . . . . . . . 4-15 4-15 Ethernet modem kit contents . . . . . . . . . . . . . . . . . . . . . . . . . . . . . . . . . . . . . . . 4-17 4-16 Ethernet modem installation . . . . . . . . . . . . . . . . . . . . . . . . . . . . . . . . . . . . . . . . 4-18 4-17 Ethernet modem setup: Communication settings (default settings shown) . . . 4-19 4-18 Locating the NODE ID (MAC address) on the ethernet modem . . . . . . . . . . . . 4-20 4-19 Magnetic-mount cellular antenna . . . . . . . . . . . . . . . . . . . . . . . . . . . . . . . . . . . . 4-21 4-20 CDMA Cellular modem . . . . . . . . . . . . . . . . . . . . . . . . . . . . . . . . . . . . . . . . . . . . 4-21 4-21 GSM Cellular modem . . . . . . . . . . . . . . . . . . . . . . . . . . . . . . . . . . . . . . . . . . . . . . 4-22 4-22 Cellular modem kit contents . . . . . . . . . . . . . . . . . . . . . . . . . . . . . . . . . . . . . . . . 4-22 4-23 Cellular modem installation . . . . . . . . . . . . . . . . . . . . . . . . . . . . . . . . . . . . . . . . 4-23 4-24 Cellular modem setup: Communication settings . . . . . . . . . . . . . . . . . . . . . . . . 4-24 5-1 Locating firmware updates . . . . . . . . . . . . . . . . . . . . . . . . . . . . . . . . . . . . . . . . . . . 5-1 5-2 USB Micro adaptor cable (flash drive not included) . . . . . . . . . . . . . . . . . . . . . . . 5-2 5-3 Removing the internal desiccant bag . . . . . . . . . . . . . . . . . . . . . . . . . . . . . . . . . . . 5-3 5-4 Remove non-bubbler shield . . . . . . . . . . . . . . . . . . . . . . . . . . . . . . . . . . . . . . . . . . 5-10 5-5 Remove bubbler module . . . . . . . . . . . . . . . . . . . . . . . . . . . . . . . . . . . . . . . . . . . . . 5-11 5-6 330 Bubbler assembly installation . . . . . . . . . . . . . . . . . . . . . . . . . . . . . . . . . . . . 5-12 5-7 Routing and connections of 330 bubbler tubing . . . . . . . . . . . . . . . . . . . . . . . . . . 5-13 5-8 Front cover (door) replacement . . . . . . . . . . . . . . . . . . . . . . . . . . . . . . . . . . . . . . . 5-14 List of Tables 1-1 1-2 2-1 5-1 5-2 5-3 x Signature Flow Meter Technical Specifications . . . . . . . . . . . . . . . . . . . . . . . . . . . 1-7 TIENet 330 Bubbler Module Technical Specifications . . . . . . . . . . . . . . . . . . . . . . 1-8 Example Modbus Input Settings . . . . . . . . . . . . . . . . . . . . . . . . . . . . . . . . . . . . . . 2-13 Troubleshooting: Signature Flow Meter . . . . . . . . . . . . . . . . . . . . . . . . . . . . . . . . . 5-6 Troubleshooting: TIENet 300 Connector Case . . . . . . . . . . . . . . . . . . . . . . . . . . . . 5-8 Troubleshooting: TIENet 301 pH/Temperature Device . . . . . . . . . . . . . . . . . . . . . 5-8 Signature™ Flow Meter 5-4 5-5 5-6 5-7 Troubleshooting: TIENet 306 Sampler Interface . . . . . . . . . . . . . . . . . . . . . . . . . . 5-9 Troubleshooting: TIENet 308 4-20mA Analog Output . . . . . . . . . . . . . . . . . . . . . . 5-9 Troubleshooting: TIENet 310 Ultrasonic Level Sensor . . . . . . . . . . . . . . . . . . . . 5-10 Troubleshooting: TIENet 330 Bubbler Module . . . . . . . . . . . . . . . . . . . . . . . . . . . 5-11 xi Signature™ Flow Meter xii Signature™ Flow Meter Section 1 Introduction The Signature Flow Meter is designed for open channel flow monitoring applications using any combination of flow and parameter measurement technologies and sampling, depending on what is required at the measurement site. The Signature has built-in standard level-to-flow conversions that cover the majority of open channel flow measurement situations. Flow measurement is usually a calculation based on a known relationship between liquid level and flow rate. The Signature can calculate flow using standard open channel level-to-flow conversions, as well as equations, or data points, depending upon the measurement device(s) attached to the meter and the program specified by the user. Included with the Signature meter is a laminated Quick Start Guide, reproduced on the following page. Attach the quick start guide somewhere close to where the Signature meter is mounted for quick reference. Figure 1-1 Signature Flow Meter 1-1 Signature™ Flow Meter Section 1 Introduction 1.1 Quick Start , Numerical: , Enter: ... • Enter values • Type characters Arrows: , • Open list • Confirm selection • Activate field ... • Navigate up, down, left, right • = Pull down list available • = Character grid available Soft Keys: Delete / Exit: • Current displayed function • Back •Clear last entry • Exit list • Close window = Return to last menu Home: • Next = Confirm & advance to next step • Return to Home Screen from anywhere Hardware Setup Configure Administration TIENet Devices Site: Clock, Name, Display, Units Language SDI-12 Setup Set New Passcode Modbus In Measurement Setup: Level, Flow, Volume Modbus Out Adjust: Level, pH Sensor Diagnostics Modem Equation / Trigger System Information Update Firmware Data Storage Rate / Data Push License Information Sampler Interface Setup Gather Fault Data Outputs: Alarm, Analog Reset Totalizers Reports / History 1-2 Restore Defaults Signature™ Flow Meter Section 1 Introduction 1.2 Data Integrity What makes the Signature Flow Meter unique is its ability to verify data integrity. This is accomplished by logging four special event data types that cannot be altered, and are designed to alert the user to any trends or anomalies, and to assess compliance. This data can be downloaded from the flow meter and observed in tabular or graphical format alongside regular site data, using Flowlink software (see Section 2.11 Signature Data in Flowlink). The data can also be downloaded onto a flash drive via the USB port on the front panel of the flow meter, and imported into a spreadsheet or other viewing application (refer to Section 2.10 USB Options for more information). The four event data types are: Program Report – Tracks changes to the Signature Meter’s configuration Summary Report – Documents summaries of data measurements (e.g. Min/Max/Avg) Diagnostic Report – Tracks results from diagnostic tests History Report – Tracks user and meter events (i.e., level adjustments, calibration, data push, etc.) 1.3 Security The Signature Flow Meter can be secured shut with a padlock with the hasp on the right side of the housing (refer to Figure 1-3). The program settings and recorded data can be protected by a user-selected passcode (refer to Section 2.8.2 Set New Passcode. 1.4 Compatible Equipment The Signature Flow Meter can interface with a variety of measurement devices and other system components, depending on site requirements. Measurement devices for flow and water quality can be connected to the same Signature and run simultaneously with TIENet™ connectivity (up to 9 TIENet devices). The flow meter can also communicate with an optional Teledyne Isco wastewater sampler. For descriptions of interfacing and parameter sensing TIENet devices, refer to Section 4 Equipment Options. Each external TIENet device comes with its own user manual. The Signature is capable of receiving data from devices using Modbus ASCII or Modbus RTU protocol. A variety of application-specific accessories are available from Teledyne Isco. Refer to Appendix B Options and Accessories for a complete list with ordering information. A basic Signature system has one or more TIENet devices for flow and/or parameter measurement connected to the Signature Flow Meter (up to nine possible TIENet devices at once). Other 1-3 Signature™ Flow Meter Section 1 Introduction configurations may include an enclosure and additional internal or external devices, including analog output cards, a modem, up to two SDI-12 inputs, and Modbus devices. When connected remotely via modem, the Signature Flow Meter’s own browser provides remote control and data access. Figure 1-2 Multiple options can be used in any combination 1-4 Signature™ Flow Meter Section 1 Introduction 1.5 Identifying Signature Components Figure 1-3 identifies key components of the Signature Flow Meter. Injection molded UV protected sturdy enclosure Mounting Bracket USB Connector Desiccant Holder (only used with TIENet 330 bubbler systems) to bubbler air supply Padlock Hasp to reference port Connection ports for power, TIENet devices, antenna, bubble line hose barb Figure 1-3 Front and exterior component identification 1-5 Signature™ Flow Meter Section 1 Introduction 1.6 Controls and Indicators Before programming and operating the Signature Flow Meter, become familiar with the keypad and standard screens. 1.6.1 Keypad Keys are identified with summary in Figure 1-4; keypad functions are detailed in Section 2.1.1. Status line Softkey functions Non-resettable totalizer (optional) Numerical keys (12) Site Name Here Flow Meter Additional data types ™ Main data type (Default = Total Flow) User-programmed name of measurement site Total Flow 12345678 gal Scroll bar Flow: 8.55 cfs Level B: 2.00 ft pH: 7.00 pH [ Status: 10/01/2011 15:20 ] SHORTCUTS MENU LED indicator HELP Arrow keys (4) for screen navigation USB port indicator Softkeys (3) Home (Run screen) Enter (Return key) Delete (Undo) Figure 1-4 Home screen and basic keypad functions Below the display are three software configured function keys (softkeys) that are used to make selections and navigate through menus. Their specific functions are dependent upon what operation you are performing, and will appear in the display window. 1-6 Signature™ Flow Meter Section 1 Introduction 1.6.2 Display and LED The LED on the front panel is aligned next to the Status line on the display screen. A green light indicates that new information is available for viewing in the Status line. A red light indicates a warning or a user-defined alarm condition, with further details viewable by pressing the Alarm softkey (C). Figure 1-4 shows the standard home screen, or run screen. Displayed menus and programming steps are explained in Section 2 Setup and Programming. 1.6.3 Display Contrast The contrast of the LCD screen can be adjusted using the keypad. To adjust the contrast, hold down the ± key and repeatedly press the down arrow (softer) or the up arrow (sharper) to achieve the desired appearance. 1.7 Technical Specifications Table 1-1 provides technical specifications for the Signature Flow Meter. Table 1-1 Signature Flow Meter Technical Specifications Size (HxWxD) 22.6 x 31.0 x 20.9 cm (8.9 x 12.2 x 8.2 in) with mounting bracket & external desiccator Weight Flow Meter, No Bubbler Signature w/o options: 4.5 kg (10 lbs) Signature w/ all interior options: 4.9 kg (10.7 lbs) Signature w/ all int. options + mounted battery backup: 7.8 kg (17.3 lbs) Bubbler Flow Meter Signature w/o options: 5.9 kg (13 lbs) Signature w/ all interior options: 6.1 kg (13.5 lbs) Signature w/ all int. options + mounted battery backup: 9.1 kg (20 lbs) Materials Housing Window Hardware PPO Plastic (Noryl) Polycarbonate Stainless Steel Enclosure NEMA4X/IP66 Power 100 to 240 VAC, 50/60Hz, 1.3A; Disconnect Device = Line Cord 12VDC (optional battery backup) Connections to Signature Flow Meter External TIENet devices Bottom Cable entry, 1 to 4 position (3/4" NPT user-supplied conduit or optional cord grips); Pluggable screw terminals, 6-position; Power supply Parameter inputs Analog output card(s) Cellular Modems Ethernet 330 Bubbler module Screw terminal, Wire 14-22 AWG Fixed terminals, 3-pin, Wire 14-30 AWG Pluggable screw terminal, 3-position, Wire 16-26 AWG Antenna Custom SMB connector RJ-45 connector Internal, factory-installed Flow Measurement Technologies Ultrasonic (TIENet 310) Bubbler (TIENet 330) 1-7 Signature™ Flow Meter Section 1 Introduction Table 1-1 Signature Flow Meter Technical Specifications (Continued) Flow Conversions Weir, Flume, British Flume, Metering Insert, Manning Formula, Equation, LTF Data Points (up to 50 pairs) Data Storage Non-volatile flash; retains stored data during program updates. Interval: 15 or 30 seconds; 1,2, 5,15, or 30 minutes; or 1, 2, 4, 12, or 24 hrs Capacity: 512 Kbytes (180 days with 5 parameters logged at 1 minute intervals, reports at 24-hour intervals) Setup and Data Retrieval Serial connection to PC via USB; Cellular or Ethernet modem Ambient Temperature Range (Operation and Storage) -20 to 60 °C (-4 to 140 °F) NOTE — The operating ambient temperature range of the optional mechanical totalizer (see Section 4.3) is -10 to 60 °C (14 to 140 °F). NOTE — The operating ambient temperature range of the optional ethernet modem (see Section 4.6) is -20 to 40 °C (-4 to 104 °F). Optional Teledyne Isco Sampler Interfacing TIENet 306 device Output: Flow pacing, Enabling on trigger Input: Event and bottle information Optional 308 TIENet analog output: Range Isolation Maximum Load Outputs per card 4 to 20 mA Monolithic air core transformer technology 500 Industry Standard Inputs Two SDI-12, RS485 Modbus ASCII & RTU Industry Standard Outputs 4-20 mA Analog, Modbus ASCII & RTU Communication Options Direct USB Serial Connection, CDMA (1XRTT), GSM (GPRS), and Ethernet 1-8 Signature™ Flow Meter Section 2 Setup and Programming The Signature Flow Meter is shipped from the factory with a default program already installed. Your particular installation will normally require different program settings, specific to your monitoring site and application. This section of the manual explains the Signature’s operating modes, and provides instructions for site setup and programming. Programming may be performed before transportation to the installation site. 2.1 User Interface The Signature Flow Meter can be set up, programmed, and interrogated directly through the keypad and display screen, or remotely using a computer equipped with Teledyne Isco’s Flowlink® software, with either a USB cable or optional modem. The Signature Flow Meter has its own browser, accessed via Flowlink, that mirrors the physical keypad and display. 2.1.1 Keypad Functions The following briefly explains the basic function of each key. The numerical keys are for entering values during setup/programming. The large softkeys (A, B, and C) perform whatever function is currently displayed above them. Note that pressing the BACK softkey (A) will discard any changes you have made without saving. The arrow keys are for navigating to different areas onand off-screen. The up/down arrows navigate a single line at a time. From the home screen, the Enter key is used to adjust or configure the currently highlighted parameter. From programming screens, the Enter key confirms selections and entries you have made, opens the setup/programming screen for a highlighted parameter, displays the character grid for alphanumeric entry, displays a calendar for date selection, or displays the pull down menu for a highlighted field. Note Enter is for selection only. The NEXT softkey is for selection and advancement to a subsequent step. 2-1 Signature™ Flow Meter Section 2 Setup and Programming The home key returns the flow meter to the home screen from any other screen. The delete key clears the last character entry, exits a pull down list, or closes an open window. In addition to typing the decimal/period, this key can be used to navigate up one screen at a time. The ± key can be used to navigate down one screen at a time, and also to adjust screen contrast, when used with the up/down arrow keys. 2.1.2 Connecting to the Signature with Flowlink USB Driver for Signature With Flowlink software version 5.1.510 or later, you can set up, program, and download data from the flow meter through its browser. Connection between the flow meter can be direct, through the USB port on the front panel, or remote, with an internal cellular or ethernet modem. In order for your computer to connect to the Signature flow meter through the USB port, you must have the correct driver installed. USB drivers for both 32-bit and 64-bit operating systems are included with your flowlink program. To install the driver: After installing Flowlink, navigate to its program directory, and then to the USB Driver folder, typically at C:\Program Files\Flowlink 5.1\USB Driver. Here you will find two drivers: 4300Driver_x64.msi for 64-bit operating systems and 4300Driver_x86.msi for 32-bit operating systems. Without the Signature connected to your computer, begin running the appropriate file for your operating system. When prompted, connect the Signature to your computer’s USB port. You should see a message in the lower right corner stating that new hardware has been found at the appropriate com port number. Ensure that the Signature flow meter is connected to the computer before launching Flowlink. Connect window You can connect with the Connect window, or if you have connected with this site before, highlight the Signature site file in the workspace (left column in Flowlink) and select Item > Connect. In the Connect window, select the Type of connection. 2-2 Signature™ Flow Meter Section 2 Setup and Programming Figure 2-1 Flowlink Connect screen Direct connection is made through the USB port. From the COM Port pull down list, select the port associated with the Signature. TCP connection is made from the computer to the Signature flow meter’s optional CDMA, GSM, or Ethernet modem. Enter the correct static IP and port number, separated by a colon, the correct public domain address. If you do not want the flow meter matched with an existing site in the database, select the Create new site check box. (If this is the first time the flow meter is connected to Flowlink, a new site will be created automatically.) Then click the large button under the heading Signature Series. 2-3 Signature™ Flow Meter Section 2 Setup and Programming Site Screen The Signature site screen has three tabs: Site Info contains information specific to this site. Enter all relevant information into the Site Info fields, including the desired Site Name, and save the information by clicking Apply. Click Apply to save the site information you have entered. Figure 2-2 Site Info tab 2-4 Signature™ Flow Meter Section 2 Setup and Programming Devices lists the name, software version, and hardware version of the flow meter for offline viewing of the site file. This information, along with that of any connected TIENet devices, can be viewed from the specific flow meter’s firmware (refer to Sensor Diagnostics, on page 2-28). Figure 2-3 Devices tab 2-5 Signature™ Flow Meter Section 2 Setup and Programming Program is the portal through which you access the Signature browser. The programming functions and displayed data in the browser are functions of the flow meter firmware, not Flowlink. The Browser Window view (above) mirrors t h e C o n t r o l Pa n e l display (at left) Figure 2-4 Program tab: Accessing the browser 2-6 Signature™ Flow Meter Section 2 Setup and Programming 2.2 The Home Screen The home screen, or run screen, is displayed when the flow meter is in normal operating mode. This screen shows the current parameter readings and system status or alarm conditions. A scroll bar on the right of the screen indicates there are more parameters off-screen that can be viewed by scrolling up or down. Site Name Here Total Flow 12345678 gal Flow: 8.55 cfs Level B: 2.00 ft pH: 7.00 pH [ Status: 02/06/2012 15:20 ] SHORTCUTS MENU HELP A B C Figure 2-5 Home screen (normal operating mode) 2.3 Shortcuts The Shortcuts menu provides quicker access to most commonly used commands, such as level adjustment or viewing data recorded over a period of time. Not all menu items described in this section will necessarily appear in your Shortcuts menu. The selections available in the Shortcuts menu are determined by what connected devices have been detected by the Signature flow meter. To access your shortcuts, press SHORTCUTS ( ). 2.3.1 Level Adjustment To set a new level, enter the value in the field next to Level, and select Adjust. To update the current reading, select Update. 2.3.2 Histograph The histograph displays the measurements taken of up to three selected parameters in graphical format, beginning at your selected date/time, and spanning one to 48 hours. Enter a value in the Threshold field for a reference line. The measurements available for graphing are determined by what measurements are set up for data storage. 2.3.3 Report View Reporting is set up from the Configure menu. Summary displays summaries of data measurements (i.e., Min/Max/Avg). History tracks user and meter events. Program tracks changes made to the flow meter’s program configuration. 2-7 Signature™ Flow Meter Section 2 Setup and Programming 2.4 Programming To access the setup/program menus, press MENU ( ). When you press MENU, the four top menu options appear: Hardware Setup detects all devices connected to the flow meter, establishes proper communication with them, and allows configuration of each device. Configure sets up the measurement site and program parameters. Administration dictates operating preferences and perform general housekeeping tasks. Home returns to the home screen. Additionally, USB Options appears when a flash drive is connected to the USB port in the lower left corner of the control panel. The program menus consist of steps and substeps. During programming, available subordinate menu content and steps will be determined by what you have previously entered, and what optional equipment is connected to the Signature flow meter. 2.4.1 Off-Screen Content An arrow in the lower right corner of the flow meter’s screen (see symbols at left) indicates that there is additional content on this screen in the direction the arrow is pointing. Use the arrow keys to access this content. 2.4.2 Character Grid A small grid symbol in the lower right corner of the flow meter’s screen (see symbol at left) indicates that the character grid is available. Whenever you need to enter characters, such as letters, numbers, or punctuation, press Enter to display the character grid (Figure 2-6). Use the arrow keys to navigate to the desired character and press Enter to select. When you are finished editing, select DONE and press Enter. I s c o Te s t S i t e Done A B O P c d q r @# > ? Figure 2-6 Character grid 2-8 Cancel C Q e s $ , D R f t % . E S g u ^ F T h v & G U i w * H V j x ( I W k y ) J X l z - K L M N Y Z a b m n o p / : ! _ + = < Signature™ Flow Meter Section 2 Setup and Programming 2.4.3 Pull Down Menus Total Flow pull down arrow 2.5 Program Steps (Menu Trees) Fields with a pull down arrow next to them (see example at left) indicate a pull down list. Use the arrow keys to navigate between fields on the screen; when you highlight a pull down field, press Enter to display the items on the list. Then use the arrow keys and Enter to select from the list. The program steps in Figures 2-7 through 2-20 show the overall menu sequencing. An explanation of each program step, and information specific to connected devices, is provided in Sections 2.6 Hardware Setup, 2.7 Configure, 2.8 Administration, and 2.10 USB Options. This information can also be viewed by pressing the Help softkey on your Signature flow meter or its browser screen. Menu 1. Hardware Setup 2. Configure 3. Administration 4. Home Hardware Setup Administration Options 1. Smart Sensor Setup (TIENet) 2. SDI-12 Setup 3. MODBUS Input Setup 4. MODBUS Output Setup 5. Modem Setup 1. Language Options 2. Set New Passcode 3. Update Firmware 4. Sensor Diagnostics 5. Display Signature Information 6. Display License Information 7. Gather Fault Data 8. Restore To Factory Defaults Configure Options 1. Site Setup 2. Measurement Setup 3. Adjust 4. Equation/Trigger Setup 5. Data Storage/Push Setup 6. Sampler Setup 7. Outputs/Alarms Setup 8. Reset Totalizers 9. Reports/History Setup (Home) Returns to Home screen Figure 2-7 Menu Tree: Top menu 2-9 Signature™ Flow Meter Section 2 Setup and Programming 2.6 Hardware Setup From the Hardware Setup menus, the flow meter detects and configures all connected devices. Hardware Setup 1. Smart Sensor Setup (TIENet) 2. SDI-12 Setup 3. MODBUS Input Setup 4. MODBUS Output Setup 5. Modem Setup Smart Sensor Setup (TIENet) MODBUS Output Setup • View System Devices • Configure Measurements • Enter MODBUS address from 1 to 247 • Perform Scan • Configure communication protocol All TIENet devices detected by the most recent scan will be listed under S m a r t S e n s o r S e t u p, b y S e r i a l Number and Device Type. SDI-12 Setup • Scan for Connected Sondes • Add/Remove • Configure/ Manual Config Modem Setup MODBUS Input Setup 1. MODBUS Input COM Settings • Set up communication protocol 2. MODBUS Input Device Settings • Configure or create device(s) Figure 2-8 Menu Tree: Hardware Setup 2-10 Screen content determined by type of modem installed. Refer to Section 4.7.4 Cellular Modem Configuration. Signature™ Flow Meter Section 2 Setup and Programming 2.6.1 Smart Sensor Setup (TIENet) This selection will display the most recently detected TIENet devices connected to the Signature flow meter. Perform Scan If TIENet devices have been added or removed from the system, highlight Perform Scan and press Enter to detect the current system configuration. Sensor Differences If there are any differences in the device configuration since the last scan, a list of Sensor Differences will appear. Missing Sensors – The Missing Sensors list will indicate any previously connected devices that are no longer detected. Select Retain to keep the identification information for a previous device; select Remove to delete it. Replaced Sensors – The Replaced Sensors list displays any newly added sensors that have replaced Missing Sensors that have been Retained. Additional Sensors – Displays any newly detected devices. Following a scan, selecting NEXT from Sensor Differences will navigate to Configure Measurements. Configure Measurements Navigate to Configure Measurements to begin setting up measurement parameters for each TIENet device detected. To activate a measurement, highlight the radio button next to it and press Enter. To change the name of the measurement, highlight the name and press Enter. Regardless of what you name them, the measurement parameters for each device remain the same. For your reference, Figure 2-9 on the following page shows the position of each measurement for each type of TIENet device. 2-11 Signature™ Flow Meter Section 2 Setup and Programming 300 Case Board: Input Voltage Sense Voltage Charge Voltage Charge Current Case Humidity Reference Humidity AC Power 301 pH / Temperature Device: pH Temperature 306 Sampler Interface: Sample Event / Bottle # Input Voltage 308 Analog Output Card(s): Ch1 Current (Amps) Ch1 Percent of Scale (%) Ch2 Current (Amps) Ch2 Percent of Scale (%) 310 Ultrasonic Level Sensor: Distance Ultrasonic Level Air Temperature Signal Strength 330 Bubbler Level Sensor: Bubbler Level Bubble Air Humidity Figure 2-9 Measurement parameters for each TIENet device 2.6.2 SDI-12 Setup 2-12 Sondes detected since the last scan are displayed, with the activated sondes in the top box. If SDI-12 devices have been added or removed from the system, select Scan to detect the current system configuration. Following the scan, add/remove sondes from the Active list by selecting the sonde and clicking Add or Remove. To begin using an Isco-Ready sonde with its configured parameters, select Configure. Signature™ Flow Meter Section 2 Setup and Programming 2.6.3 Modbus Input Setup Table 2-1 below provides an example of Modbus settings for a connected DGH analog converter. The letters in the left column correspond to the entry fields shown in Figures 2-10 and 2-11. The multiplier and offset are used to scale the raw number coming from the Modbus register(s) to represent the data in the units of measure you specify, as expressed in the following equation: H in units of measure = (register value * J) + K. In this example, the current input represents a flow rate where: 4mA = 0cfs, and 20mA = 10,000cfs The D1252M documentation states that it produces a register value of 0 at 0mA, and 65535 at 25mA. This means that at 4mA the register will report 10485, and at 20mA it will report 52428. The multiplier (J) is calculated as follows: 10,000/(52428 – 10485) = -2500 Before setting up the Modbus input function, it is recommended that you print this page and use the empty columns provided on the right to fill in your own Modbus information. Table 2-1 Example Modbus Input Settings Manufacturer DGH Manufacturer Manufacturer Model D1252M Model Model ASCII Protocol (ASCII/RTU) Protocol (ASCII/RTU) A Protocol (ASCII/RTU) B Baud Rate 9600 Baud Rate Baud Rate C Data Bits 8 Data Bits Data Bits D Parity None Parity Parity E Stop Bits 1 Stop Bits Stop Bits F Device Name D1252M Device Name Device Name G Address 11 Address Address H Parameter Flow Rate X Parameter Parameter (Register) 30001 Address (Register) Address (Register) b .238422 Multiplier Multiplier -2500 Offset Offset Little Byte Order (Endian) Byte Order (Endian) I Addressa J Multiplier K Offsetb L Byte Orderc (Endian) M Data Size (Format) Unsigned Word Data Size (Format) Data Size (Format) N Data Type Flow Rate Data Type Data Type O Units m3/s Units Units a. For 2100 update interval in seconds must be written to register 26. b. For assistance in calculating a multiplier and offset, contact Teledyne Isco. c. Big Endian = Most significant register first; Little Endian = Least significant register first. 2-13 Signature™ Flow Meter Section 2 Setup and Programming To begin configuring Modbus communication protocol and devices, select MODBUS Input COM Settings and use the pull down menus. Add/Edit Device Select Modbus Input Device Settings. Enter the device name, and the device address. For Request Timeout, enter a connection retry interval in milliseconds, and the number of attempts before a connection failure is determined. Configure Modbus communication protocol using the pull down menus. To add/edit parameter(s) for the device, select Edit Parameters. Hardware Setup 1. Smart Sensor Setup (TIENet) 2. SDI-12 Setup 3. MODBUS Input Setup 4. MODBUS Output Setup 5. Modem Setup 3. MODBUS Input Setup 1. MODBUS Input COM Settings 2. MODBUS Input Device Settings 1. MODBUS Input Devices MODBUS Input COM Settings Protocol Type: ASCII Baud: 9600 Bits: 8 Parity: NONE Stop Bits: 1 2. 1. D1252M (device you have already created) A 2. Create New Device (2400 bps to 115200) B C (8, 7, or 6) (ASCII or RTU) (none, even, or odd) (1 or 2) D E MODBUS Device - Create New Device [or select existing device] Select NEXT to save device and parameter changes. Continued in Figure 2-11 Device Name D1252M Address 1 Request Timeout 10 Retries 3 Edit Parameters Figure 2-10 Modbus Input Setup 2-14 Remove (Rename or F Enter New) G ms Only appears for existing devices Signature™ Flow Meter Section 2 Setup and Programming Note External Modbus RTU devices cannot use addresses 1 through 10. Add/Edit Parameters Select an existing parameter to edit, or select Add to add a new parameter for the device. Enter a name (such as a data type), and the register address. Use the pull down menus to select other parameters. Select Little if a multiple register parameter has the low-order data in the first register; select Big if high-order. Select data size. The available Units of Measure are determined by the data type you select. If necessary, enter a Multiplier and Offset so the register reports a value in the units specified. Edit Device Parameters - [parameter name] Go BACK to the Modbus Device page in order to save changes. 1. [Existing parameter] 2. Add Edit Parameter Name Flow Rate X H Address 30001 I Multiplier .238422 Offset -2500 Byte Order LITTLE (to scale the register) (offset applied to scaled register) Data Type (little or big) (bit, bytes, signed, Unsigned Word unsigned, float) Flow Rate Units m3/s Data Size (available UOM determined by data type selected) J K L M N O Figure 2-11 Editing Modbus device parameters 2-15 Signature™ Flow Meter Section 2 Setup and Programming 2.6.4 Modbus Output Setup The Modbus 485 output function enables a SCADA system to retrieve site data from the flow meter. Enter the Signature’s address (from 1 to 247) and configure the communication protocol. For Modbus register numbers and definitions, contact the factory. Hardware Setup 1. Smart Sensor Setup (TIENet) 2. SDI-12 Setup 3. MODBUS Input Setup 4. MODBUS Output Setup 5. Modem Setup 4. MODBUS Output Setup Device ID: Protocol Type: ASCII (ASCII or RTU) Baud: 115200 (2400 bps to 115200) Bits: 8 (8, 7, or 6) Parity: NONE Stop Bits: 1 (none, even, or odd) (1 or 2) Figure 2-12 Modbus Output Setup 2.6.5 Modem Setup 2-16 The menu choices displayed for modem setup depend on which modem option is installed in the flow meter. For detailed information about installation and operation of Ethernet, GSM, and CDMA modems, refer to Sections 4.6 Ethernet Modem and 4.7 Cellular Modems. Signature™ Flow Meter Section 2 Setup and Programming 2.7 Configure The Configure menu is used for setting up the measurement site and setting the program parameters. Configure Options 5. Data Storage/Push Setup 6. Sampler Setup 7. Outputs/Alarms Setup 1. Site Setup 2. Measurement Setup 3. Adjust 4. Equation/Trigger Setup 8. Reset Totalizers 9. Reports/History Setup Site Setup Options 1. Data Options 5. 1. Set Clock 2. Site Name 3. Home Display 4. Default Units Measurement Setup 6. 2. 7. Bubbler - Set purge interval Ultrasonic - Set blanking distance 8. 3. 1. Level 2. pH (301) 1. [Edit existing equation] 2. Create New Equation 1. 306 <serial #> Sampler Interface 1. Alarm 2. Analog Reset Totalizers 2. Flow Rate Input Setup 3. Volume Input Setup Equations Setup Sampler Setup Output Options 1. Level Input Setup Adjust Options 1. Data Storage 2. Data Push 1. Total Flow 2. Total Flow 2 3. Total Flow 3 4. Total Flow 4 Report/History Setup 4. 9. 2. History 1. Reports Report Setup 1. View History 1. Report 1 2. Graphical 2. Report 2 Historical Display Figure 2-13 Menu Tree: Configure 2-17 Signature™ Flow Meter Section 2 Setup and Programming 2.7.1 Site Setup The Site Setup menu sets some basic operating characteristics specific to the site. Set Clock – Enter Year, Month, Day, Hour, Minute. Site Name – Press Enter to display the character grid. Select one character at a time to create the desired site name. Home Display – The Home Display determines how current measurement data is displayed on the Home screen. From the Measurements Setup screen, select all measurement parameters to be displayed. The parameters available in the pull down menus will be determined by what devices are connected to the Signature meter. Default Units – To set units of measure for each parameter, first select the parameter from the menu list. The available units of measure that appear will be determined by the parameter you have selected. Under Units, highlight the units of measure and press NEXT. When finished, press NEXT again to save and exit. 2.7.2 Measurement Setup This menu is for setting up the level measurement (Level Input Setup), flow conversion (Flow Input Setup), and flow volume totalizer(s) (Volume Input Setup). Menu items that appear are dependent on what equipment is connected to the Signature flow meter. Level Input Setup – Under Level Setup, select the level input. Usually there will only be one listed, unless your system is using more than one level measurement device. For the TIENet 310 ultrasonic device, the minimum blanking distance refers to the maximum water level, and the maximum blanking distance refers to zero water level in the channel. For detailed instructions about 310 setup, refer to the TIENet 310 Installation and Operation Guide. Flow Rate Input Setup – Measurement settings and flow conversion are programmed for the flow rate(s) from this menu (refer to Figure 2-14 on the following page). If more than one flow rate data set is being calculated, these settings are programmed separately for each one. 1. Select the flow rate to set up. 2. From Measurement Settings, select the Level Input to be used in the flow calculation and the Measurement Rate (interval). Enter the name for this flow rate. 3. Select the flow conversion type to be used (Weir, Flume, Metering Inserts, Manning Formula, Equation, or Data Points); then set up the conversion. Note Additional information about flow conversions can be found in the Isco Flow Measurement Handbook included with the Signature Flow Meter. 2-18 Signature™ Flow Meter Section 2 Setup and Programming Configure Options 2. Measurement Setup Flow Rate Input Setup 1. Flow Rate-X 2. Flow Rate-Y (example name) Flow Settings Flow Rate-X 1. Measurement Settings 2. Flow Conversion Measurement Settings Flow Conversion Flow Rate-X 1. Weir 2. Flume 3. Flow Metering Insert (Select level input, Interval, & Flow measurement name.) 4. 3. 1. Metering Insert Flow Conversion Weir Flow Conversion Flow Rate-X 1. V-Notch 2. Rectangular w/ End Contractions 3. Rectangular w/o End Contractions 4. Cipolleti 5. Thel-Mar 4. Manning Formula 5. Flow Equation 6. Level to Flow Data Points Flow Rate-X 1. V-Notch 2. Round Orifice (enter size) 6. Manning Formula Channel Flow Conversion Edit Data Points • Level to Flow (Select units of measure, add/remove points. Up to 50 pairs of points may be used.) 1. Round 2. U Shaped 3. Rectangular 4. Trapezoidal (enter dimensions) 5. (enter size) Flow Equation 2. Flow Rate-X (Select units of measure, enter one- or two-term polynomial equation.) Flume Flow Conversion Flow Rate-X 1. Parshall 2.Palmer-Bowlus 3. Leopold-Lagco 4. HS 5. H 6. HL 7. Trapezoidal (enter size) 8. British Flume British Flume Flow Conversion 1. Standard 2. Venturi 3. Khafagi (enter size) Figure 2-14 Menu Tree: Flow measurement setup 2-19 Signature™ Flow Meter Section 2 Setup and Programming Volume Input Setup – You can set up one to four Total Flow measurements. Select the flow rate(s) used for total volume, the totalizing method (Net, Positive, or Negative), and the interval at which the total flow will be updated (between 30 seconds and 24 hours). From the Resolution pull down menu, select the degree of resolution required for your total flow (lower = fewer digits to right of decimal; higher = more digits to right of decimal). Configure Options 2. Measurement Setup 3. Volume Input Setup Volume Setup 1. Total Flow 2. Total Flow 2 3. Total Flow 3 4. Total Flow 4 Total Flow VOLUME Input Flow Rate: Flow Rate-A Totalizer: Net Resolution: 9999999.99 Update Total Flow Every: 30 Seconds Figure 2-15 Menu Tree: Volume Input Setup (total flow) 2.7.3 Adjust 2-20 Adjust levels and/or calibrate measurement values for connected TIENet devices. Level adjustment can only be performed following installation at the measuring site. Level adjustment instructions can be found in Section Level Calibration, on page 3-15. Signature™ Flow Meter Section 2 Setup and Programming Note For detailed instructions on calibration of a connected TIENet 301 pH device through this menu selection, refer to the 301 user manual. 2.7.4 Equation/Trigger Setup Conditions are sets of site-specific, user-defined parameters. Refer to Figure 2-16 on the following page. Equations are created from various site conditions that can be used to generate alarms, log or push data at secondary rates, trigger a connected sampler, or conserve power by turning on equipment only when needed. Types of conditions There are five types of conditions provided: Range – TRUE when a measured parameter value is inside or outside specified upper and lower limits. Rate of Change – TRUE when a measured parameter changes by a specified amount over a specified time duration. Sensor Error – TRUE when a sensor error is present for a specified time duration. Threshold – TRUE when a measured parameter reaches or exceeds a user-defined setpoint. Time Table – TRUE when the flow meter’s internal clock is within a defined time duration. This may be a weekly, daily, or specific one-time stop/start time. Defining conditions To define a condition: 1. Highlight the desired condition in the lower left corner of the screen (Conditions A-F). 2. Highlight Edit Condition and press Enter. 3. Scroll down and press Enter to select the type of condition (listed above). Press NEXT to go to the configuration screen for that condition type. Press NEXT when complete. The condition in the left-hand corner of the screen will now show the condition type. Building equations Build or modify the equation by navigating to the desired conditions and operators. Highlight Select Condition and press Enter again to add it to the equation. Press Enter to add a highlighted operator. Press NEXT when complete. 2-21 Signature™ Flow Meter Section 2 Setup and Programming Configure Options 1. Site Setup 2. Measurement Setup 3. Adjust 4. Equation/Trigger Setup 5. Data Storage/Push Setup 6. Sampler Setup 7. Outputs/Alarms Setup 8. Reset Totalizers 9. Reports/History Setup Equations Setup Equation that you have already created. 1. Equation XYZ 2. Create New Equation 1. Modify Equation XYZ Edit Delete 2. Modify the equation. Name: XYZ A or B ( ) Bksp AND & OR | NOT ! (example) Condition A (Sensor Error) Condition B (Threshold) Condition C Condition D Condition E Condition F Measurement Interval: 5 minutes Select Condition Edit Condition Figure 2-16 Defining conditions & building equations. 2.7.5 Data Storage/Push Setup Data Storage – Set up data storage rates for a group of measurements, or separately for individual measurements. Scroll to the bottom of the screen to set up the primary storage rate, and a secondary one, if needed, with its trigger equation. Data Push – Set up the flow meter to push data to a server running Isco Flowlink Professional software (internal modem required). 2-22 Signature™ Flow Meter Section 2 Setup and Programming 2.7.6 Sampler Setup Program the flow meter to trigger and pace a sampler, and receive sampling information from the sampler. Note For detailed instructions on configuring a connected TIENet 306 Sampler Interface through this menu selection, refer to the 306 user manual. 2.7.7 Outputs/Alarms Setup Alarm – Configure Local, SMS text, or Server alarms based on user-defined site conditions. Under Alarm, select an alarm from the list or set up a new alarm. Next, select an Alarm Trigger from the pull down list. Note The trigger(s) listed in the Alarm Trigger pull down list consist of equations you have already created based on your defined site conditions (refer to Section 2.7.4 Equation/Trigger Setup). Alarms: Local Local alarms are viewed on the Signature Flow Meter itself. When a programmed alarm condition becomes true, the LED on the front panel glows red. To view the alarm message, press the Alarm softkey ( ). For local alarm setup, refer to Figure 2-17 on the following page. Alarms: SMS / Server SMS and Server alarms require an optional internal modem. To configure your modem for communication, refer to Section 4.6 Ethernet Modem or Section 4.7 Cellular Modems. Note Server alarms notify a specified list of contacts in the event that a server running Flowlink Pro fails to receive pushed data from a site within a specified duration. For SMS and Server alarm setup, refer to Figure 2-18. 2-23 Signature™ Flow Meter Section 2 Setup and Programming Configure Options 1. Site Setup 2. Measurement Setup 3. Adjust 5. Data Storage/Push Setup 6. Sampler Setup 7. Outputs/Alarms Setup 4. Equation/Trigger Setup 8. Reset Totalizers 9. Reports/History Setup 7. Outputs/Alarms Setup 1. Alarm 2. Analog Alarm 1. Alarm 1 2. Alarm 2 Select an alarm from the list or set up a new alarm. 3. Alarm 3 4. Alarm 4 ALARM 1 ALARM 1 Alarm Trigger: Alarm Notification: Local Select a trigger (equation) from the list. You must have at least one equation saved in order to trigger an alarm. Delete Alarm LOCAL Configure ALARM 1 LCL Message: message here Figure 2-17 Local alarm setup 2-24 Your message will appear on the screen if the alarm is triggered and you press the Alarm softkey (C). Signature™ Flow Meter Section 2 Setup and Programming Configure Options 1. Site Setup 2. Measurement Setup 3. Adjust 4. Equation/Trigger Setup 5. Data Storage/Push Setup 6. Sampler Setup 7. Outputs/Alarms Setup 8. Reset Totalizers 9. Reports/History Setup Output Options 1. Alarms 2. Analog Select an alarm from the list or set up a new alarm. Alarm 1. Alarm Select a trigger (equation) from the list. You must have at least one equation saved in order to trigger an alarm. ALARM ALARM Alarm Trigger: Alarm Notification: SMS 1 SMS SERVER Configure ALARM SMS Message: message here Retry Interval: 0 Retries: 0 Configure ALARM SERVER Minutes Phone #1: Phone #2: Phone #3: Phone #4: Message: message here Retry Interval: 0 Retries: 0 Server Group: 1 Phone #5: Figure 2-18 SMS and Server alarm setup (modem required) 2-25 Signature™ Flow Meter Section 2 Setup and Programming Analog – Select the output to configure, then select and configure the measurement the output will represent. TIENet 308 option card required (see Section 4.4.6 Analog Current Output). 2.7.8 Reset Totalizers Select the flow volume totalizer(s) to be reset. Selection resets the totalizer to zero. 2.7.9 Reports/History Setup Reports – Set up report interval and measurements to include for one or two reports. History – Display user and meter events (i.e., log-ins, adjustments, data push, etc.), and/or set up the graphical display for selected measurements over a period of time. 2-26 Signature™ Flow Meter Section 2 Setup and Programming 2.8 Administration Administrative settings (see following page) dictate operating preferences and perform general housekeeping tasks. Administration Options 1. Language Options 5. Display Signature Information 2. Set New Passcode 3. Update Firmware 6. Display License Information 7. Gather Fault Data / USB Options 4. Sensor Diagnostics 8. Restore To Factory Defaults 1. Sensor Diagnostic Options Language Options 4. 1. Retrieve Diagnostics 2. Review Diagnostics 1. Select Device Language Device Information Sensor Information 5. (Firmware & Serial #s) Choose the language for this device. Retrieve Diagnostics (Select from list.) (select TIENet device from list) Set default units of measure x - 3xx Diagnostics Information Diagnostic Text (diagnostic results shown) If no current passcode: Review Diagnostics Please enter your new passcode. (select TIENet device from list) New Passcode: ____________ 2. (TIENet Device Name) (select time from list) To change current passcode: Please enter your new passcode. License Information 6. (Licensing & copyright details) Old Passcode: ____________ New Passcode: ___________ Fault Data Options Firmware Update Options Connect flash drive to front panel to use this function. 3. 7. 8. 1. Display Fault Data (USB Options with flash drive connected) About to restore factory defaults (Erases all data; press Back to cancel) Figure 2-19 Menu Tree: Administration 2-27 Signature™ Flow Meter Section 2 Setup and Programming 2.8.1 Language Options Select Device Language – From the list, select the default language to be displayed by the Signature flow meter. Available languages include: English (USA) Dansk Português (Brasil) English (International) Nederlands Español (México) Français Türk Svenskt From this screen, you may also set general default Units Of Measure to USA or International. You may still select units of measure for individual measurements through Configure Options > Site Setup. 2.8.2 Set New Passcode A numerical passcode can be set to protect access to prog r a m m i n g a nd d a t a . B y d e f a u l t , t h e f l o w m e t e r i s n o t passcode-protected. To change an existing passcode, enter the current passcode, and then the new passcode. To remove the passcode requirement, enter a new passcode of 0 (zero). 2.8.3 Update Firmware To use this function, first connect a flash drive loaded with the correct firmware update file(s) to the USB port. Refer to Section 2.10 USB Options for complete instructions. 2.8.4 Sensor Diagnostics The Signature provides operating data for each connected TIENet device upon request, for site evaluation or troubleshooting purposes. To generate a new diagnostic report, select Retrieve Diagnostics. The available devices can then be selected from a list. When the diagnostic data is available, press Enter to view it. To view past diagnostic reports, select Review Diagnostics and select from the list of devices. 2.8.5 Display Signature Information Select this option to view the serial number, model number, software revision, and hardware revision of the Signature flow meter and any connected TIENet devices. 2.8.6 Display License Information This selection displays open-source licensing and copyright information for the Signature firmware. 2.8.7 Gather Fault Data Fault data is a term describing the capture of any user and/or flow meter activity prior to and during a system error or failure. This data can be displayed to assist in troubleshooting. To download the data to a flash drive, connect a flash drive to the USB port on the front panel of the Signature and select Gather Fault Data from the USB Options menu that appears (refer to Section 2.10 USB Options). 2.8.8 Restore to Factory Defaults This function returns the Signature Flow Meter to the program that was installed the factory. This is an example program that can be used for reference when designing your own program. Be sure to record your own program settings and save all data before restoring the factory defaults. 2-28 Signature™ Flow Meter Section 2 Setup and Programming 2.9 Home HOME returns to the home screen. 2.10 USB Options The USB Options menu will only appear when you connect a flash drive to the USB port on the front panel of the Signature. USB Options Please choose the operation you want to perform: 1. Retrieve Text Reports 2. Retrieve Data 3. Update Firmware 4. Save Current Program 5. Load Existing Program 6. Save Signature Information 7. Gather Fault Data 8. None of the above 1. Select the reports you want to retrieve • All reports • All reports since: [Enter date] • All reports in range: [Enter dates] 2. Select the data you want to retrieve • All data • All data since: [Enter date] • All data in range: [Enter dates] 4. Save Current Program Saves the Signature’s current program settings to your flash drive. Press NEXT when prompted. 5. Load Existing Program Select program to load and press Enter. Overwrites current Signature program. 6. The information was stored as 1:/device.htm Saves device firmware version(s) and serial number(s). 7. Fault Data Options 1. Display Fault Data 2. Retrieve Fault Data (saves fault data to flash drive) 3. Firmware Update Options 1. Update Signature Firmware 2. Update Smart Sensor (TIENet) Firmware Firmware Update File 1. 2. (select firmware file from pull down list and press NEXT) Smart Sensor (TIENet) Firmware Update 8 Returns to top menu. USB Options menu still accessible through Administration menu. Note To view all Administration menu selections, refer to Figure 2-19. (select all TIENet devices to update and press NEXT) Figure 2-20 Menu Tree: USB Options 2-29 Signature™ Flow Meter Section 2 Setup and Programming 2.10.1 Retrieve Text Reports Select this function to download the Signature data text reports for verification of data integrity. The four event data types are: Program Report – Tracks changes to the Signature Meter’s configuration Summary Report – Documents summaries of data measurements (e.g. Min/Max/Avg) Diagnostic Report – Tracks the occurrence of, and results from, diagnostic tests History Report – Tracks user and meter events (e.g. level adjustments, calibration, data push, etc.) Select “All reports,” or specify a start date or date range, and press NEXT. The reports will be stored on the connected flash drive, in text format, in a folder called “reports.” This folder contains two sub-folders, named 1 and 2. 2.10.2 Retrieve Data The program settings and flow data can be downloaded onto your flash drive in .ddp (data dump) format. Select “All data,” or specify a start date or date range, and press NEXT. The data will be stored on the connected flash drive in a folder called “ISCO.” This file can then be imported later into Flowlink, where it can be viewed in regular site file format, with the recorded data and report/graphing capability. 2.10.3 Update Firmware With the flash drive connected, the firmware update functionality becomes available from the Administration menu. Update Signature Firmware – Connect a flash drive containing the proper bin file in a top directory folder labeled BINFILE, to the USB port on the front panel of the Signature flow meter. Select Update Firmware > Update Signature Firmware. Press Enter to open the pull-down menu and select the appropriate .bin file you want to install. The update will run for approximately three minutes. When the firmware has been downloaded to the flow meter, remove the flash drive when prompted. An automatic reboot then occurs over a period of approximately five minutes, during which the green LED signals that an internal operation is in progress. Do not unplug the flow meter or press any keys until the home screen appears. Update Smart Sensor (TIENet) Firmware – Connect a flash drive containing the proper bin files for your TIENet device(s) in a top directory folder labeled BINFILE, to the USB port on the front panel of the flow meter. Select Update Firmware > Update Smart Sensor (TIENet) Firmware. Select the radio button next to each device to be updated and press Next. 2-30 Signature™ Flow Meter Section 2 Setup and Programming The flow meter will display the progress of the sensor firmware update(s). A confirmation screen will appear when the update is complete. 2.10.4 Save Current Program Select this option to save a copy of the Signature’s current program to your flash drive. 2.10.5 Load Existing Program Select this option to load a saved program from your flash drive. Note that selecting this option will cause the current program to be overwritten with the one from the flash drive. In order for the Signature to load the correct program, the program file must be stored on the flash drive in a folder whose name is the same as that of the instrument. 2.10.6 Save Signature Information This option saves a snapshot of the firmware version(s) and serial number(s) of the Signature and any connected TIENet devices. 2.10.7 Gather Fault Data Fault data is a term describing the capture of any user and/or flow meter activity prior to and during a system error or failure. This data can be viewed and/or downloaded as a file to your flash drive to assist in troubleshooting. 2.10.8 None of the above This item returns the screen to the top menu. However, as long as the flash drive remains connected, the USB Options menu will still be active, and can be reopened from the Administration menu. 2.11 Signature Data in Flowlink To download flow and event data from the Signature Flow Meter into the database with Flowlink, connect to the flow meter and select Interrogate (F8), or Import ddp (data dump). 2.11.1 Event Viewer By default, Flowlink’s Event Viewer displays the four event data types in tabular format, with a time stamp and short description of the event for each entry (refer to Figure 2-21). Each event type is represented by a graphical symbol, located in the first column: Program Summary Reports 1 & 2 Diagnostic History (User / Meter Actions) Meter Actions include Data Push - start/fail/complete, and Power Up/Down; all other events are user events (i.e., calibration, changes to the program, totalizer reset, etc.). 2-31 Signature™ Flow Meter Section 2 Setup and Programming If the data for that event is unaltered, a green check mark appears next to it. If the data cannot be verified as authentic, a red slash appears next to it. Figure 2-21 Event Viewer in Flowlink Printing reports Select one or more rows in the viewer to be printed and then select the Print button. Exporting reports To save event data as a text report for future verification, highlight the desired row(s) in the Event Viewer table and click Export (or right-click and select Export). The default destination is your My Documents folder; however, you can change this to another preferred destination, including a USB drive, if preferred. A message window will notify you when the export is complete. The files you exported are saved using the following hierarchy: SITENAME \ MODULENAME \ DATE. 2.11.2 Verifying Exported Reports Flowlink will only export already verified reports; they can also be verified after being exported. Verification of exported data reports is done using the Report Verification tool, a small application installed separately when Flowlink was installed. This tool is located in the Flowlink program folder, normally at C:\Program Files\Flowlink 5.1, and is identified with a traffic light icon . Note that this tool can also be used to verify data exported directly to a USB drive using the USB Options menu (refer to Section 2.10). Use the top Browse... button to navigate to the desired report (*.txt) file. Use the bottom Browse... button to navigate to its corresponding authentication (*.ath) file. Click Verify. The application will quickly return a message showing the verification result. 2-32 Signature™ Flow Meter Section 2 Setup and Programming Data is authentic. Data has been altered. Figure 2-22 Report file verifier 2-33 Signature™ Flow Meter Section 2 Setup and Programming 2-34 Signature™ Flow Meter Section 3 Installation This section contains physical preparation procedures and mounting methods for the Signature Flow Meter and associated Teledyne Isco equipment. WARNING The installation and use of this product may expose you to hazardous working conditions that can cause serious or fatal injury. Take all necessary precautions before entering a worksite. Install and operate this product in accordance with all applicable safety and health regulations and local ordinances. 3.1 Accessing the Interior External device cables and mains line cord are passed, usually via conduit or cord-grip fittings, through the port holes in the bottom of the case and wired directly to the connector case. Tinning unterminated wires prior to installation is recommended. Tools Required: Small flat screwdriver (3.5mm) #2 Phillips screwdriver Channel locks Soldering iron (for tinning wires) DANGER Before opening the case, first ensure that mains power is disconnected from the unit. CAUTION Before opening the case, disconnect the optional battery backup power, if used. Note Before restoring mains power, ensure that the flow meter’s USB connector does not have a cable attached. 3-1 Signature™ Flow Meter Section 3 Installation Open the door to access the two large screws holding the front panel on the connector case. Remove the two screws. Figure 3-1 Open door and front panel to access interior Open the front panel to access the connector case. Connectors on the board are identified in Figure 3-2. External TIENet Devices/ A A Modbus In (D1 = Yellow; D0 = Brown) I G K H I J L A J B B C K A J K Figure 3-2 Connector case, connectors, and fuses 3-2 D E F B SDI-12 Input C Modbus RS485 Out D TTL Serial E Battery Backup F 12.8 VDC G Ethernet Modem H Ethernet Port I Cellular Modem (power & serial) J 4-20mA Output K Fuse "T" 3.15A L Fuse "T" 4.00A Signature™ Flow Meter Section 3 Installation Note The three TIENet terminal strips (A) are interchangeable; any of the devices can be connected at any of the three locations. 3.2 Case Bottom Cable Entries The connections made through the cable entries depend on the application, but their most common uses, in accordance with the connector case layout, are depicted below. All optional cable entries must use appropriate ID conduit connections or cord-grip fittings to retain the IP68 rating. If you are using non-TIENet or non-Signature cables, you must supply the appropriate ID conduit connections or cord-grip fittings. CAUTION If you are using conduit instead of the cord-grip fitting, the conduit and wires must be sealed to prevent harmful gases and moisture from entering the Signature enclosure. Failure to seal conduit could reduce equipment life. 3-3 Signature™ Flow Meter Section 3 Installation Cellular Modem Antenna See Section 4.7.3 for cellular modem installation instructions. TIENet Bubble Line Device/ Fitting (if using Modbus a bubbler) In TIENet Device/ Modbus In/ Battery Backup See Section 4.2 for battery backup installation instructions. See Section 5.5 for bubbler installation/replacement instructions. Figure 3-3 Connector Case cable entries for power and external devices 3-4 Mains Power Signature™ Flow Meter Section 3 Installation 3.2.1 Cable Fittings Cord-grip fittings for TIENet devices, line cord, and battery backup option are available from Teledyne Isco (see Appendix B for ordering information). The fitting for the line cord is a special strain-relief fitting, as shown in Figure 3-5. Figure 3-4 Strain relief 3/4 NPT Cord-grip fitting for TIENet devices Figure 3-5 Cord-grip fittings installed 3-5 Signature™ Flow Meter Section 3 Installation Any unused cable entry holes should be sealed with plugs. Do not overtighten the plugs. When a plug is flush against the outside of the case and held in place by the metal nut inside, the hole is sealed. O-Ring Plug is flush against outer wall. Figure 3-6 Diameter-seal plugs for unused ports 3-6 Signature™ Flow Meter Section 3 Installation 3.3 Connecting TIENet Devices The optional external TIENet devices compatible with the Signature flow meter all connect in the same manner. Multiple TIENet devices can be connected simultaneously to the same Signature Flow Meter. Note The steps that follow include instructions for installing cord-grip fittings. Some applications will use user-supplied 3/4" ID conduit for cable routing. 1. Remove one of the 6-position plug-in terminal strip connectors from the connector case. Figure 3-7 TIENet Device terminal strips 2. If using a cord-grip fitting, install the cable nut in the appropriate opening on the bottom of the Signature enclosure, securing it to the wall with the lock nut (concave side facing wall). Lock Nut (concave side facing wall) Sealing Nut Cable Nut Seal (color may vary) Figure 3-8 Installing TIENet cable with a cord-grip fitting 3-7 Signature™ Flow Meter Section 3 Installation 3. Feed the TIENet device cable end through the sealing nut and seal, and through the cable nut. Lightly tighten the sealing nut, just enough to hold the cable in place while installing the connector. 4. Attach the wire ends to a TIENet connector, then plug the connector into its mating socket, as shown in Figure 3-10. Gently tug each wire when finished, to verify secure connection to the screw terminals. Note The shield wire is the bare braid emerging from the foil with the yellow and brown wires. The drain wire is the bare braid emerging from the wire mesh inside the cable jacket. It is not necessary to prevent the two braids from coming into contact with each other. 5. Press the terminal strip back down into its socket on the connector case, as shown in Figure 3-11, taking care not to strain any wire connections. 6. Gently pull the cable, to remove any slack within the enclosure, taking care not to put any stress on the connection. 7. Tighten the cord grip sealing nut. CAUTION If you are using conduit instead of the cord-grip fitting, the conduit and wires inside must be sealed to prevent harmful gases and moisture from entering the Signature enclosure. Failure to seal conduit could reduce equipment life. 8. Close the front panel and fasten it shut with the two Phillips screws. Shield Braid-Drain D1 YELLOW D0 BROWN Shield SHIELD VP RED Common BLACK Chassis BRAID DRAIN All optional cable entries must use appropriate ID conduit connections or cord-grip fittings to retain the IP68 rating. If you are using non-TIENet or non-Signature cables, you must supply the appropriate ID conduit connections or cord-grip fittings. Figure 3-9 TIENet Device terminal connections 3-8 Signature™ Flow Meter Section 3 Installation Figure 3-10 Attach wired terminal strip to connector case socket Figure 3-11 Position and secure the cable 3-9 Signature™ Flow Meter Section 3 Installation 3.4 Power The Signature is in compliance with North American and International safety standards while the input voltage remains within 100-240VAC (50/60Hz). AC line wiring to the Signature power supply should use twisted pair cabling for optimal electromagnetic compatibility (EMC) with the surrounding environment. External current protection between mains power and the flow meter must allow for up to 40A inrush current at power up. If the instrument has been fitted with a line cord, ensure that its installation is near a mains outlet for easy access to remove power in the event of an emergency. If the instrument has been hard-wired for power using conduit, ensure that a switch or mains circuit breaker is installed near the instrument for easy access to remove power in the event of an emergency. 3.4.1 Connecting Mains Power The flow meter comes with the power supply wired to the connector case, and held in place by a screw (see Figure 3-12 below). Mains power is wired into the Signature’s internal power supply, normally via a standard three-wire line cord. Power Supply Mounting Screw Mains Power Cord Connector Case Figure 3-12 Location of power supply Teledyne Isco offers an AC line cord kit that is installed at the factory when ordered with the Signature. It is also sold separately, and is easily installed by the user. For installation instructions, refer to Section 4.1 AC Power Cord Kit. Note that these instructions can also be used as guidance for installing a user-supplied line cord. 3-10 Signature™ Flow Meter Section 3 Installation 3.5 Mounting the Signature The Signature can lie flat on a horizontal surface, or be attached to a wall using the stainless steel bracket on the back of the case. It can also be installed inside a console enclosure with other system components. If a console enclosure is used, ensure that it provided proper sealing to protect the flow meter and other equipment from harsh environments and/or moisture. Because it uses a bubble line, the Signature does not have to be mounted directly above the primary device, or even particularly close to the flow stream. You will need to mount the unit within 25 feet (7.6 m), or 50 feet (15.3 m) if you are using the 100 foot bubble line. Distances greater than 100 feet are not recommended. The mounting location should allow for easy removal and reinstallation in the event that cleaning, testing, or replacement is required. Refer to the dimensional drawings on the following pages for physical installation specifications. Figure 3-13 Signature Flow Meter mounted on wall 3-11 Signature™ Flow Meter Section 3 Installation 3.6 Outdoor Recommendations Where the Signature Flow Meter is mounted outdoors, a panel shield for protection from direct sunlight and rain is recommended. The shield should accommodate the flow meter’s dimensions of 8.88 x 12.22 x 8.22 inches. USABlueBook’s Model 49474 fiberglass shield, for example, has been used in this type of application. Figure 3-14 Panel shield - recommended for outdoor installations 3-12 Signature™ Flow Meter Section 3 Installation Figure 3-15 Specification drawing: Signature Flow Meter, 1 of 2 3-13 Signature™ Flow Meter Section 3 Installation Figure 3-16 Specification drawing: Signature Flow Meter, 2 of 2 3-14 Signature™ Flow Meter Section 3 Installation 3.7 Level Calibration Although all other programming steps can be performed off-site, the liquid level must be set at the measurement site following installation. Once the 330 bubble line is installed in the flow stream, or the 310 sensor is installed over the flow stream, measure the present liquid level and enter this value for Level, under Configure > Adjust Options. Then highlight “Adjust” and press Enter to confirm. From this screen, you can also update the display to show the current level of the stream. Adjust Options 1. Level Display depends on connected TIENet devices Adjust Level Setup 1. 330 Level 2. 310 Level 330 Level LEVEL ADJUSTMENT ft Level: Last reading: X.XXX ft Time of last adjustment: MM/DD/YYYY TT:TT:TT Adjust Update Reset/calibrate level Display current real-time level Figure 3-17 Level adjustment and calibration 3-15 Signature™ Flow Meter Section 3 Installation 3-16 Signature™ Flow Meter Section 4 Equipment Options Optional equipment is designed to be user-installable. Internal options, when ordered at time of purchase, are installed in the Signature meter at the factory. This section describes each option and provides instructions for its installation and operation. All optional cable entries must use appropriate ID conduit connections or cord-grip fittings to retain the IP68 rating. If you are using non-TIENet or non-Signature cables, you must supply the appropriate ID conduit connections or cord-grip fittings. Note Installation and operation of exterior TIENet devices is covered in detail in the user manual for that technology. Most options require interior access for installation. For connector case interior access and TIENet device wiring instructions, refer to Accessing the Interior, on page 3-1 and Connecting TIENet Devices, on page 3-7. DANGER Before opening the case, first ensure that mains power is disconnected from the unit. CAUTION Before opening the case, disconnect the optional battery backup power, if used. Pa rt numbers for ordering accessories ar e provided in Appendix B Options and Accessories. Optional equipment from Teledyne Isco includes: AC Power Cord Kit, on page 4-2 TIENet Expansion Box, on page 4-11 Battery Backup, on page 4-4 Analog Current Output, on page 4-12 Mechanical Totalizer, on page 4-6 Isco Flowlink Software, on page 4-16 Ultrasonic Level Sensor, on page 4-10 Isco Flowlink Software, on page 4-16 Bubbler Level Sensor, on page 4-10 Ethernet Modem, on page 4-16 Sampler Interface, on page 4-10 Cellular Modems, on page 4-21 pH and Temperature Device, on page 4-10 4-1 Signature™ Flow Meter Section 4 Equipment Options 4.1 AC Power Cord Kit The AC power cord kit includes a line cord with a strain relief cord-grip fitting. If ordered with the Signature Flow Meter, it will be shipped from the factory already installed. Instructions for user installation are provided in this section, and can also be used for installation of user-supplied line cords. Note The steps that follow include instructions for installing cord-grip fittings. Some applications will use user-supplied 3/4" ID conduit for cable routing. 1. Remove the mounting screw and lift the power supply out of its molded niche, taking care not to strain the wires going to the board. 2. For access to the terminals on the power supply, remove the clear plastic shield protecting them (Figure 4-2). The Signature ground wire ends in a ring terminal so that the line cord ground wire can easily be connected to the same terminal. 3. Remove the lock nut from the cable nut. 4. Install the cable nut through the line cord cable entry (closest to power supply location) in the bottom of the connector case and secure it to the Signature case wall with the lock nut. 5. Feed the line cord end through the sealing nut and then through the cable nut, into the case. Lock Nut Sealing Nut Cable Nut & O-Ring Figure 4-1 Installing AC line cord with a cord-grip fitting 6. Lightly tighten the sealing nut, just enough to hold the line cord in place while connecting it to the power supply. 7. Connect the line cord wires to the power supply, as shown in Figure 4-2, and then reinstall the plastic protective shield. 4-2 Signature™ Flow Meter Section 4 Equipment Options Plastic shield Without line cord Line cord installed Figure 4-2 Access terminals and connect line cord 8. When seating the power supply into its niche, guide the attached wires around in front of the mounting standoff and through the molded slot, so they are not strained or damaged. Figure 4-3 Re-seating the power supply 9. Gently tug the line cord to remove any slack within the enclosure, taking care not to stress the connection. 10. Tighten the cord grip sealing nut. CAUTION If you are using conduit instead of the cord-grip fitting, the conduit and wires in the conduit must be sealed to prevent harmful gases and moisture from entering the Signature enclosure. Failure to seal conduit could reduce equipment life. 11. Close the front panel and fasten it shut with the two Phillips screws. 4-3 Signature™ Flow Meter Section 4 Equipment Options 4.2 Battery Backup The battery backup option consists of a Teledyne Isco Model 946 lead-acid battery pack and extension cable, with special hardware to mount it on the top of the Signature Flow Meter, or on a wall. The unterminated power cable normally enters the connector case through the second port from the right. DANGER Before opening the case, first ensure that mains power is disconnected from the unit. CAUTION Before opening the case, disconnect the optional battery backup power, if used. CAUTION Do not substitute another battery type for this option. Use only the Model 946 Lead-Acid battery. T15 Torx screws (3) Figure 4-4 Battery backup kit contents CAUTION If you are using conduit instead of the cord-grip fitting, the conduit and wires must be sealed to prevent harmful gases and moisture from entering the Signature enclosure. Failure to seal conduit could reduce equipment life. 4-4 Signature™ Flow Meter Section 4 Equipment Options Installation 1. Remove line power from the Signature Flow Meter and open the case as previously described in Section 3.1. CAUTION Do not connect the extension cable to the battery cable until all other steps are completed. 2. At the LEAD-ACID BATTERY terminal strip, connect the extension cable’s black wire to the +12 terminal, and the white wire to the ground terminal. Figure 4-5 Attach extension cable to the connector case 3. Install the mounting plate, either on top of the flow meter case using the Torx screws provided, or on the wall nearby. Mounting screw holes Figure 4-6 Installing the battery backup mounting plate 4-5 Signature™ Flow Meter Section 4 Equipment Options 4. Place the 946 battery on the mounting plate and secure it in place using the two black rubber draw catches. 5. Connect the battery cable to the extension cable. Figure 4-7 Backup battery, installed Note Be sure to unplug the battery when intentionally disconnecting from AC power. 4.3 Mechanical Totalizer The mechanical totalizer is a seven-digit, non-resettable mechanical counter installed in the front panel. It increments according to programmed totalizer resolution and units of measure. The volume represented by the mechanical totalizer is always the primary Total Flow programmed in Measurement Setup > Volume Input Setup (refer to Configure, on page 2-17). The mechanical totalizer increments with the third significant digit of the selected resolution (see Figure 2-15 Menu Tree: Volume Input Setup (total flow)), e.g.: Resolution 999999999 = Increment every 100 units; Resolution 99999999.9 = Increment every 10 units; Resolution 9999999.99 = Increment every 1 unit, etc. The Signature permits a maximum 300 counts per minute; if totalized flow exceeds this rate, remaining volume will be buffered until it can be counted, although buffering over extended time periods is not recommended. 4-6 Signature™ Flow Meter Section 4 Equipment Options Installation 1. Remove line power from the Signature Flow Meter and open the case as previously described in Section 3.1. 2. Remove the four mounting screws holding the metal shield in place and set it aside. 3. Using a razor blade or utility knife, carefully cut the six tabs in the control panel label to detach the totalizer window cover. Note Be sure to cut all six tabs. Pulling on the cover with some of the tabs still attached will damage the control panel label. Figure 4-8 Remove totalizer window cover Referring to Figure 4-9: 4-7 Signature™ Flow Meter Section 4 Equipment Options 4. Remove the two screws above the totalizer cutout provided in the CPU board. These screws will be used for mounting the totalizer. 5. Install the totalizer in the cutout, attaching the two mounting tabs with the two screws, so that the numbers appear in the window. View the totalizer through the window and adjust the position, if necessary, before tightening the screws. 6. Plug the totalizer connector into P10 on the CPU board. 4-8 Signature™ Flow Meter Section 4 Equipment Options Before installation After installation Figure 4-9 Optional non-resettable totalizer installation 4-9 Signature™ Flow Meter Section 4 Equipment Options 4.4 TIENet™ Devices 4.4.1 Ultrasonic Level Sensor Teledyne Isco’s proprietary TIENet connectivity allows for the combination of multiple flow measurement technologies and other devices with the Signature flow meter. The TIENet 310 Ultrasonic Level Sensor mounts directly over the flow stream. The sensor measures level by transmitting an ultrasonic pulse toward the liquid surface and then measuring the time it takes for the echo to return. The 310 is normally used with some type of primary device (typically a weir or flume) to measure flow in an open channel. For complete installation and operation procedures, refer to the TIENet 310 sensor’s user manual, part #69-4313-010. 4.4.2 Bubbler Level Sensor The factory-installed TIENet 330 Bubbler is normally used with some type of primary device (typically a weir or flume) to measure flow in an open channel. The amount of pressure required to force bubbles from the end of a submerged bubble line is directly dependent on the hydrostatic pressure of the flow stream over the end of the bubble line. A pressure transducer inside the module senses this pressure and converts it into a level signal that the flow meter uses to calculate flow rate and total flow. Because the 330 Bubbler is a standard component in bubbler Signature meters, installation instructions are located in Section 5 Maintenance and Servicing, under 330 Bubbler Installation. 4.4.3 Sampler Interface The TIENet 306 Sampler Interface connects the Signature Flow Meter to a Teledyne Isco wastewater sampler. Through this connection, the Signature can enable the sampler based on user-specified conditions, pace the sampling routine based on flow volume, and receive sample and bottle information from the sampler. For complete installation and operation procedures, refer to the TIENet 306 device’s user manual, part #69-4303-072. 4.4.4 pH and Temperature Device The TIENet 301 pH sensor measures the acidity or alkalinity of an aqueous solution by determining the relative quantity of dissociated hydrogen ions in the solution. The normal scale for pH runs from 0 to 14, with 0 being most acidic and 14 being the most alkaline. For complete installation and operation procedures, refer to the TIENet 301 device’s user manual, part #69-4303-071. 4-10 Signature™ Flow Meter Section 4 Equipment Options 4.4.5 TIENet Expansion Box The water-tight expansion box connects to a TIENet terminal strip like other TIENet devices, and contains three additional strips inside, for connecting more devices. Additionally, the expansion box contains a TIENet connection for an option card (such as the 308 Analog Output option, Section 4.4.6). Note The expansion box is not rated for use in hazardous locations. Enclosure Rating: IP67 (NEMA 4X, 6) All optional cable entries must use appropriate ID conduit connections or cord-grip fittings to retain the IP67 rating. If you are using non-TIENet or non-Signature cables, you must supply the appropriate ID conduit connections or cord-grip fittings. TIENet device terminals Desiccant bag Option card location Mounting plate (cord-grip fittings ordered separately) Figure 4-10 TIENet Expansion box 4-11 Signature™ Flow Meter Section 4 Equipment Options 4.4.6 Analog Current Output Analog outputs convert digital information from the flow meter to a variable analog output current ranging from 4 to 20 milliamperes. When a condition measured by the flow meter is converted into an analog output, 4 mA becomes the 0%, or baseline, for the condition, while 20 mA becomes the 100%, or full-scale, of the c o n d i t i o n . Fo r b a s i c p r o g r a m m i n g s t e p s , r e f e r t o Figures 4-13 and 4-14. The Signature accepts up to three internal, user-installable TIENet 308 option cards, with two scalable 4-20mA outputs apiece, for connection between the Signature meter and non-Isco process control equipment or other equipment that accepts a 4-20mA current signal. CAUTION Use proper static dissipation when handling circuit boards. Programming menus and data display distinguish each output by serial number and channel number. Tools required T-15 Torx driver To install a card: 1. Remove power from the Signature flow meter and open the case, as previously described in Accessing the Interior, on page 3-1. 2. The option card includes a mounting screw. Remove the tubing retainer from the screw. 3. Remove the 3-pin header clip from its socket on the board. 4. Connect the receiving wires to the terminals according to their labeling (positive and ground). Note that Channel 1 and Channel 2 are identified on the back of the board. Back of board CH1 CH2 Terminal labeling Figure 4-11 Analog output channel identification and terminal connections 4-12 Signature™ Flow Meter Section 4 Equipment Options 5. Gently press the card down so that the 4-pin connector P4 plugs into one of the three analog output jacks on the board (Item ‘J’ in Figure 3-2). 6. Secure the card in place by tightening its mounting screw with the T-15 Torx driver. Do not overtighten. Two 308 cards are shown h e r e. T h e S i g n a t u r e accepts up to three cards at once, for a possible six simultaneous output channels. Figure 4-12 TIENet 308 Analog output card installed (two shown) 7. Feed the clip with receiving wires through the appropriate port on the bottom of the meter, and press the clip down into its socket on top of the card. Note Cabling is user-supplied. Shielded cable is recommended. For cord-grip fitting options, refer to Appendix B, Section B.2. If conduit is used, the conduit and wiring must be sealed to prevent entry of harmful gases and/or moisture. Configuration The 308 measurement configuration screen includes both a current reading in amperes and a scale percentage of the parameter represented. For basic programming steps, refer to Figures 4-13 and 4-14. Home display If only Current is selected under Hardware Setup (see Figure 4-13 on the following page), the analog reading displayed on the Home screen will be in amperes (amps) or milliamperes (mA), whichever you have selected for units of measure (refer to Site Setup, on page 2-18). If Percent is selected, regardless of whether or not Current is also selected, the analog reading will be displayed on the Home screen as a Percentage (%). 4-13 Signature™ Flow Meter Section 4 Equipment Options Hardware Setup 1. Smart Sensor Setup (TIENet) 2. SDI-12 Setup 3. MODBUS Input Setup 4. MODBUS Output Setup 5. Modem Setup Smart Sensor Setup (TIENet) • Configure Measurements • Perform Scan With initial installation, begin by performing a hardware scan to add the 308. Configure Measurements 1 - XXX XXX Parameter XXX Parameter Press Enter for a list of sensors. Scroll to the 308 and press Enter to select. XXX Parameter Configure Measurements <serial #> Analog Output CH1 Current - A CH1 Percent - A CH2 Current - A CH2 Percent - A Scroll with arrow keys to highlight / select / deselect any displayed parameter or edit its name. Press NEXT to confirm configuration. There may be a slight delay. Smart Sensor Configuration The sensors are being configured... Figure 4-13 308 Device configuration 4-14 Smart Sensor Setup (TIENet) The sensors have been configured. Signature™ Flow Meter Section 4 Equipment Options Configure Options 1. Site Setup 5. Data Storage/Push Setup 2. Measurement Setup 3. Adjust 6. Sampler Setup 7. Outputs/Alarms Setup 4. Equation/Trigger Setup 8. Reset Totalizers 9. Reports/History Setup Output Options 1. Alarms 2. Analog Analog Ouput Setup 1. CH1 Percent 2. CH2 Percent 3. CH1 Percent 4. CH2 Percent CH1 Percent ANALOG OUTPUT Measurement Input: Press Enter for the list of parameters. 1 - XXX CH1 Percent ANALOG OUTPUT Measurement Input: 330 Level (example) Low Limit: 0 High Limit: 0 Channel Name: feet (ft) <serial # of 308 card> Channel # To edit units of measure, highlight and press Enter. Percent and humidity UOM are % only. Figure 4-14 Analog output setup 4-15 Signature™ Flow Meter Section 4 Equipment Options 4.5 Isco Flowlink Software Flowlink® is Teledyne Isco’s proprietary software system for data acquisition, storage, retrieval, and analysis. Using the interface of Microsoft Windows, Flowlink can be used to remotely program the Signature Flow Meter, retrieve data from the flow monitoring system, present site data graphically, and generate statistical information from the site data. Flowlink helps ensure data integrity by displaying the Signature’s tracked configuration changes, data measurement summaries, diagnostic test results, and user events in the program. With these tools, Flowlink provides assurance that the data has not been altered. USB drivers for computer direct connection to the Signature Flow Meter are included on the Flowlink CD, and must be loaded prior to direct connection between the computer and the Signature. See Section Connecting to the Signature with Flowlink, on page 2-2 for instructions on how to connect to the Signature meter with Flowlink software. From Flowlink, the event data can be exported and saved in the form of text reports on your computer, searchable by site name, m o d u l e, a n d d a t e. Fo r c o m p l e t e i n f o r m a t i o n , r e f e r t o Section Signature Data in Flowlink, on page 2-31. 4.6 Ethernet Modem Setup and data retrieval through the Signature’s web browser, as well as alarm outputs, can be accomplished remotely with the ethernet modem, using TCP/IP communication protocol with a static address. The ethernet modem is factory-installed on the connector case. The ethernet modem is also user-installable. Remove line and/or optional battery power from the Signature Flow Meter and open the case as previously described in Section 3.1. CAUTION Always use proper static dissipation methods when handling circuit boards. DANGER Before opening the case, first ensure that mains power is disconnected from the unit. CAUTION Before opening the case, disconnect the optional battery backup power, if used. 4-16 Signature™ Flow Meter Section 4 Equipment Options Ethernet modem Mounting hardware Figure 4-15 Ethernet modem kit contents 4-17 Signature™ Flow Meter Section 4 Equipment Options 1. Press the modem assembly down into its socket on the connector case (item G in Figure 3-2 Connector case, connectors, and fuses), with the row of dots along the bottom left and right edges aligned with the row of circles on the board to ensure proper orientation. 2. Place the plastic spacer over the screw hole by the bottom right corner of the modem. 3. Place the lock washer on top of the spacer. 4. Place the rectangular retainer over the lockwasher, with the countersink facing up, and attach with the screw. Figure 4-16 Ethernet modem installation 4-18 Signature™ Flow Meter Section 4 Equipment Options In order to communicate with the Signature Flow Meter using the ethernet modem, your network must have TCP/IP services installed. A static IP address must be reserved for the Signature, and client network computers must be allowed to access the static IP address. 4.6.1 Ethernet Modem Configuration When installation is complete and power restored, wait one minute for the Signature to recognize the modem before programming. When you select Modem Setup from the Hardware Setup menu, the type of modem installed determines what screen is displayed. To configure the Signature for ethernet communication, you must have the following information on hand prior to Hardware Setup: Static IP Address – This is the network address assigned to the Signature flow meter. TCP Port – The default port setting is 1700. This is the communication port associated with the static IP address on your network. Gateway Address – The gateway is the point of communication between different networks. Subnet Mask – This is the umbrella location that allows multiple nodes to communicate within the network. Special network access may be required to configure these network settings. For further assistance, contact your network administrator. Hardware Setup 1. Smart Sensor Setup (TIENet) 2. SDI-12 Setup 3. MODBUS Input Setup 4. MODBUS Output Setup 5. Modem Setup Modem Setup Modem Model: MULTITECH MT 100 SEM Static IP Address: 000.000.000.00 TCP Port: 1700 Gateway Address: 000.000.000.000 Subnet Mask: 255.255.255.0 Figure 4-17 Ethernet modem setup: Communication settings (default settings shown) 4-19 Signature™ Flow Meter Section 4 Equipment Options 4.6.2 Network Firewall Settings In order for your network administrator to identify the Signature in the network firewall setup, it must have a node ID (also known as the MAC address). This is the NODE ID printed on the ethernet modem’s serial tag (refer to Figure 4-18). Figure 4-18 Locating the NODE ID (MAC address) on the ethernet modem 4-20 Signature™ Flow Meter Section 4 Equipment Options 4.7 Cellular Modems Setup and data retrieval through the Signature’s web browser, as well as alarm outputs, can be accomplished remotely with one of the available cellular modems. The whip-style antenna has a magnetic mounting base. Figure 4-19 Magnetic-mount cellular antenna 4.7.1 CDMA Modem The Code Division Multiple Access (CDMA) modem can automatically push data to a secure server running Isco Flowlink Pro software, with 1xRTT data transmission. Figure 4-20 CDMA Cellular modem 4-21 Signature™ Flow Meter Section 4 Equipment Options 4.7.2 GSM Modem The Global System Mobile (GSM) modem can automatically push data to a secure server running Isco Flowlink Pro software, with GPRS data transmission. Your service parameters, or provider, can be changed by replacing the removable Subscriber Information Module (SIM) card in your modem. SIM card slot Figure 4-21 GSM Cellular modem 4.7.3 Installing the Cellular Modem The modem kit includes the modem, power cable, DB9 serial cable, and coaxial antenna plug cable. 1. Remove line power from the Signature Flow Meter and open the case as previously described in Section 3.1. Antenna Plug Cable Serial Cable Power Cable Modem Figure 4-22 Cellular modem kit contents 4-22 Signature™ Flow Meter Section 4 Equipment Options 2. Install the plug in the preferred port (far left most commonly used). Route the antenna plug cable under any other cabling, and install the plug in any open port. 3. Connect the three cables to the modem. 4. Remove the screw retainers and fasten the modem’s mounting bracket against the connector case, as shown below, using the two mounting screws. 5. Plug the serial and power cables into their respective connectors on the board. Figure 4-23 Cellular modem installation 4-23 Signature™ Flow Meter Section 4 Equipment Options 4.7.4 Cellular Modem Configuration When installation is complete and power restored, wait one minute for the Signature to recognize the modem before programming. When you select Modem Setup from the Hardware Setup menu, the type of modem installed determines what screen is displayed. To set up the Signature Flow Meter for cellular communication, select either internet (IP) or CSD for the connection. For the GSM modem, if an Access Point Name (APN) is used, select SINGLE for the operating mode and enter the name. Hardware Setup 1. Smart Sensor Setup (TIENet) 2. SDI-12 Setup 3. MODBUS Input Setup 4. MODBUS Output Setup 5. Modem Setup GSM Modem Setup Modem Setup Modem Model: WAVECOM FXT002 Modem Model: WAVECOM Q26 ELITE Connection Mode: IP Connection Mode: IP APN Operation Mode: NONE Incoming Port: 1700 Incoming Port: 1700 Access Point Name: User Name: Password: Figure 4-24 Cellular modem setup: Communication settings 4-24 CDMA Signature™ Flow Meter Section 5 Maintenance and Servicing Proper care and regular maintenance of the Signature Flow Meter and associated equipment help to maximize performance and ensure continued operation of the system. 5.1 Cleaning The Signature flow meter may be cleaned with water and a mild detergent. For hard to remove stains, isopropyl alcohol may be used. If the instrument is in an isolated area and the case is sealed closed, it may be cleaned using a water hose. 5.2 Firmware Updates Signature and TIENet device firmware updates are provided in the form of .bin files, which will be available for download from the Teledyne Isco website. Note that firmware updates do not remove any program settings or delete data. To f i n d u p d a t e s , g o t o w w w. i s c o . c o m a n d c l i c k o n Software/Firmware Updates in the lower left corner, then select Open Channel Flow Measurement. Figure 5-1 Locating firmware updates To install an update: 1. Create a folder in the top directory of a flash drive, and name it BINFILE. 2. Place the new .bin file(s) in the BINFILE folder. 5-1 Signature™ Flow Meter Section 5 Maintenance and Servicing 3. Connect the flash drive to a USB micro adaptor cable, and plug the cable into the USB port on the flow meter’s front panel. Figure 5-2 USB Micro adaptor cable (flash drive not included) 4. Once the flash drive is connected to the flow meter’s USB port, the USB Options menu will automatically appear on the display. Follow the steps shown in Figure 2-20 Menu Tree: USB Options. 5. When the update is complete, the flow meter will automatically restart. Note When the Signature displays a notification that it is rebooting, remove the USB cable. 5.3 Desiccant The inside of the flow meter housing must be kept dry at all times to prevent moisture damage to the internal components. All Signature flow meters have an internal desiccant bag to absorb moisture. Signature flow meters using a 330 bubbler also require an external desiccator. If increased humidity is indicated by either the humidity reading of the flow meter or the color of the external desiccant, the desiccant must be renewed or replaced before damage occurs. If this occurs more frequently than expected, inspect the seals of cord-grip fittings and conduit, if used. Humidity alarm The humidity of the case interior, reference (ambient) air, and bubble intake air (if a 330 bubbler is installed) are all parameters that can be selected as conditions to trigger an alarm, notifying you when it is time to renew or replace your desiccant. The suggested alarm setting is a threshold condition of 40%. For detailed instructions about setting up conditions and alarms, refer to Sections Equation/Trigger Setup, on page 2-21, and Outputs/Alarms Setup, on page 2-23. 5-2 Signature™ Flow Meter Section 5 Maintenance and Servicing 5.3.1 Internal Desiccator Saturated internal desiccant bags must be replaced; unlike the external desiccant, they are not renewable. DANGER Before opening the case, first ensure that mains power is disconnected from the unit. CAUTION Before opening the case, disconnect the optional battery backup power, if used. Open the case, as described in Section 3.1. The desiccant bag is held in place by a metal bracket. Remove the two screws holding the bracket. Figure 5-3 Removing the internal desiccant bag 5.4 Troubleshooting The tables in the following section provide troubleshooting information to help in determining the causes of problems that may occur with the Signature flow meter or TIENet devices. The troubleshooting tables cover the flow meter and each TIENet device separately. Note that the 300 TIENet device (Table 5-2) is the internal connector case. Note Any time a circuit board is replaced or a sensor disconnected, you MUST perform a hardware scan and SDI-12 scan (if connected) before resuming operation. 5-3 Signature™ Flow Meter Section 5 Maintenance and Servicing 5.4.1 Signature Flow Meter Table 5-1 Troubleshooting: Signature Flow Meter Symptom Blank Display but audible beep when a key is pressed Cause Action Contrast is out of adjustment Adjust the display contrast by repeatedly pressing the up or down arrow while holding down the +/- key. Faulty Display Replace with known good display. Check for proper AC voltage. If proper AC voltage is present, replace DC power supply. DC power supply not supplying 12.8 VDC output. Blank Display and no beep when a key is pressed 5-4 Parts Display 130-0602-06 DC Power Supply 60-4304-037 Service check: Disconnect the internal power supply wires (Red +/pos, Black –/neg) from the power terminals (Figure 3-2 Connector case, connectors, and fuses, Item F). Connect an Isco adaptor cable to the power termi- Isco Adaptor Cable 69-4304-034 nals (Black +/pos, White –/neg). Then connect an Isco power supply (Model 913, 914, 923, or 924) to the adaptor cable. If the Signature then functions properly, replace the internal power supply. Broken or loose wire from power supply module to the connector case. Repair connections (Red +/pos, Black –/neg). Open Fuse F3 Replace 4A/250V/5X20mm Slo Blo fuse (Figure 3-2 Connector case, connectors, and fuses, Item L). If the fuse opens again, check for devices that may be shorting the supply, such as a modem or option card. 4A Fuse 411-9901-84 CPU board faulty Substitute with known good CPU board. CPU Board 60-4304-042 Faulty or missing SD card Reinstall or replace SD card on CPU board. SD Card 250-3000-66 Defective keypad Substitute a known working keypad. Keypad 69-4303-009 Signature™ Flow Meter Section 5 Maintenance and Servicing Table 5-1 Troubleshooting: Signature Flow Meter (Continued) Symptom Cause Defective totalizer Nonresettable totalizer does not advance Action Parts Mechanical Totalizer 60-4304-015 Replace totalizer Programming error Check measurement configuration of level, flow rate, and volume Zero flow rate or asterinput for the Total Flow parameter. isk (*) Broken wire connection Check wire connections for the totalizer on the CPU board. Meter was booted up with USB adapter cable Remove USB adapter cable and reboot the meter connected. Meter was booted up with USB to computer cable connected. USB device not recognized - No USB Options Flash drive encrypted screen or defective USB port damaged Cannot update software / Read flash drive Remove USB to computer cable and reboot the meter Try a different USB Flash drive Replace port USB Port 60-4304-033 Adaptor cable defective Replace cable USB Adaptor Cable 480-2946-02 The necessary files are Load the firmware from our website onto the not on the flash drive. flash drive, into a folder named BINFILE. www.isco.com SD Card not functional Verify that the SD card includes a BINFILE folder with the approor missing files. priate .bin file(s) inside. Faulty CPU board Replace the CPU board. CPU Board 60-4304-042 5-5 Signature™ Flow Meter Section 5 Maintenance and Servicing 5.4.2 TIENet 300 Connector Case Table 5-2 Troubleshooting: TIENet 300 Connector Case Symptom Cause Action Part Device has not been scanned. Perform a hardware scan from Smart Sensor Setup or SDI-12 Setup. Refer to Sections 2.6.1 Smart Sensor Setup (TIENet) and 2.6.2 SDI-12 Setup. Device is not wired correctly. Rewire connector following label on the case circuit board. Open Fuse Check fuse F1, F4, F5. Replace if open. Refer to Figure 3-2 Connector case, connectors, and fuses, Item K. TIENet or SDI12 Defective TIENet or SDI12 devices not appear- device. ing on display for configuration 3.15A Fuse 411-0212-70 Substitute a known working device and rescan. If it now works, replace the faulty device. Refer to Device not configured for display Add the parameters to the Home Display. Refer to Section 2.6.1 Smart on the Home Display. Section 2.7.1 Site Setup. Sensor Setup (TIENet) 300 Connector Case circuit board faulty. Case 60-4304-041 Substitute with known working board. CPU Board CPU Board faulty. 60-4304-042 CPU to connector board ribbon cable damaged. Substitute with known working cable. Ribbon Cable 69-4304-032 Wired incorrectly. Repair/rewire per the label on the connector case. 5.4.3 TIENet 301 pH/Temp Table 5-3 Troubleshooting: TIENet 301 pH/Temperature Device Symptom Cause Probe defective Action Replace probe Part pH Probe 60-9004-126 Rescan device in Hardware Setup 301 module not recognized Check TIENet wire connections. Follow wiring code silkscreened on circuit board. No sensor connected to the 301 Connect pH probe TIENet connection fuse open Replace if open. pH Will not calibrate 5-6 3.15A Fuse 411-0212-70 Signature™ Flow Meter Section 5 Maintenance and Servicing Table 5-3 Troubleshooting: TIENet 301 pH/Temperature Device (Continued) Symptom Cause Action Buffers contaminated or wrong buffer used. Temperature is not being read. Incorrect pH readings / slow response Probe bulb is contaminated Calibrated before reading stabilized. Part Use new/correct pH buffer solution. Replace probe Clean probe and recalibrate. If readings are still incorrect, replace probe. pH Probe 60-9004-126 Recalibrate and allow the readings to stabilize before continuing with calibration. 5.4.4 TIENet 306 Sampler Interface Table 5-4 Troubleshooting: TIENet 306 Sampler Interface Symptom Cause Action Incorrect pacing Incorrect flow total selected for interval pacing Assign the correct sensor to the correct flow rate to the correct total flow. Example: Needed to pace from the 330 bubbler, but programmed to pace from the 310 USLS. No sampler pac- Sampler’s flow pulse input not ing working Connect a different sampler, or test the existing sampler by shorting pins A and C on the sampler’s Flow Meter port, while the program is running. The displayed pulse count should count down. 5.4.5 TIENet 308 Analog Output Table 5-5 Troubleshooting: TIENet 308 4-20mA Analog Output Symptom Cause Action Incorrect wiring Rewire per connector diagram Excessive load Disconnect external equipment and test the output with VOM. If OK then reduce load resistance (maximum 500 ) or add isolated power to the current loop. Analog circuit board failure Use the other output on the 308 circuit board. If current is still 0 mA, replace circuit board. If the VOM reads 4mA or greater, reprogram to use that output or replace the circuit board. Part #60-4304-006 4-20 output is missing, or zero current output 5-7 Signature™ Flow Meter Section 5 Maintenance and Servicing Table 5-5 Troubleshooting: TIENet 308 4-20mA Analog Output (Continued) Symptom Cause Action Wires on incorrect output (wired to output 2 instead of out- Move connector to proper output put 1) 4-20 only reads 4mA 4-20 reading incorrectly Analog percent is not selected in Reconfigure the TIENet 308 Refer to Sections 2.6.1 Smart Sensor Setup (TIENet) the TIENet sensor configure and 2.7.7 Outputs/Alarms Setup. options in Hardware setup Improper parameter set for the output. Verify/change the settings/range to the proper parameter. Excessive load Disconnect external equipment and test the output with VOM. If OK then reduce load resistance (maximum 500 ) or add isolated power to the current loop. Improper module/parameter set Verify/change the settings/range to the correct modfor the output ule/parameter. Connected to incorrect output; e.g., wired to output 2 instead of Move connector to proper output output 1 Analog is not available under Outputs menu TIENet 308 is not properly configured Verify the TIENet configuration contains analog percent readings Measurement error for analog current The output must have a load resistance (maximum No load applied to the output cir- 500 ). For verification, this can be accomplished by cuit, or open circuit wiring. connecting the current meter leads to the terminals of the 308 card. 5.4.6 TIENet 310 USLS Table 5-6 Troubleshooting: TIENet 310 Ultrasonic Level Sensor Symptom Cause Not scanned Action Perform a smart sensor scan Not able to achieve signal lock (misalignment, Adjust mounting or place over a solid loose mounting, turbulence, foam, or debris in surface. the water) Invalid level, display has asterisk (*) by level reading No level reading on the display 5-8 Level outside of the Blanking distances Adjust min/max blanking distances Not wired correctly Check/repair wiring Open fuse Replace fuse and rescan. Part #411-0212-70 Failed sensor Replace with known good sensor Parameter not selected to be displayed on Home Display Add the parameter to the Home Display. Refer to Section 2.7.1 Site Setup. Signature™ Flow Meter Section 5 Maintenance and Servicing Table 5-6 Troubleshooting: TIENet 310 Ultrasonic Level Sensor (Continued) Symptom Incorrect level reading Cause Action Level not adjusted properly Readjust level Sensor misaligned Realign sensor Objects in the path of the signal Adjust min/max blanking distances and/or reposition sensor. Sensor exposed to direct sunlight Install sunshade. Refer to Appendix B.3 TIENet Devices and Accessories. 5-9 Signature™ Flow Meter Section 5 Maintenance and Servicing 5.5 330 Bubbler Installation The TIENet 330 bubbler device is factory-installed for Signature bubbler flow meters. It can also be installed by the user to convert a Signature flow meter into a bubbler, or to replace an old 330 device. DANGER Before opening the case, first ensure that mains power is disconnected from the unit. CAUTION Before opening the case, disconnect the optional battery backup power, if used. Open the case, as described in Section 3.1. If no bubbler was previously installed, remove the cover shield over the main CBA. This will not be used again, since the 330 bubbler assembly includes its own cover shield. Shield Mounting Screws (4) Figure 5-4 Remove non-bubbler shield If you are replacing an existing 330 bubbler, to ensure that the bubble line tubing is reconnected correctly, label the tubing ends, then remove the four mounting screws holding the 330 bubbler module in place (see Figure 5-5). 5-10 Signature™ Flow Meter Section 5 Maintenance and Servicing 330 Mounting Screws (4) Figure 5-5 Remove bubbler module Installation Referring to Figures 5-6, and 5-7, perform the following steps. 1. Place the bubbler assembly on top of the main CBA, ensuring that the four screw holes line up in the case, and the 10-pin connector engages correctly in its socket. 2. Attach the bubbler board to the control panel using the four self-tapping screws previously (part #231-6149-07). Do not overtighten. 5-11 Signature™ Flow Meter Section 5 Maintenance and Servicing 10-pin connector Figure 5-6 330 Bubbler assembly installation Note There are three pieces of tubing on the bubbler that must be correctly connected for operation. If any tubing is damaged, please purchase 1 meter of part #029-1353-02 and cut to the length needed for replacement. For additional information about tubing connections, refer to Section in Appendix A Replacement Parts. 3. Replace the port plug in the bottom of the case (usually second from the left) with the bubble line fitting. 4. Route the reference line tubing (with fitting on the end) through the bushing and press the fitting into the reference connector on the connector case. 5-12 Signature™ Flow Meter Section 5 Maintenance and Servicing 5. Route the intake tubing (the shorter of the two open-ended tubes) through the bushing and behind the ribbon cable, and connect it to the intake port in the case wall. 6. Route the other end of the short tubing through the bushing and connect it to the humidity connector on the board. 7. Connect the bubble tubing (the longer of the two open-ended tubes) to the bubble line port in the bottom of the case. Reference line Intake Port Humidity Connector Reference Line Reference Port Bubble Tubing Figure 5-7 Routing and connections of 330 bubbler tubing 5-13 Signature™ Flow Meter Section 5 Maintenance and Servicing 5.6 Front Cover Replacement A replacement front cover (door) comes with latches attached, and two new hinge pins. Align the hinges of the front cover front panel. Press the pins into the hinge barrels, with each flange facing inward (refer to Figure 5-8), until it is flush against the hinge surface. Using a vice grip or other tool, spread and flatten the outward facing ends of the pins so they cannot be removed from the hinges. Spread ends of pins Pin flanges flush. Figure 5-8 Front cover (door) replacement 5.7 System Reset In the event that the Signature Flow Meter becomes unresponsive, operation may be restored by removing and then restoring line power. If the problem persists, operation may be restored by performing a hard reset. CAUTION A hard reset erases site data and restores the program to factory default settings. To perform a hard reset, first remove line power. Then, while holding down both the Home key and the Delete key, restore line power. 5-14 Signature™ Flow Meter Section 5 Maintenance and Servicing 5.8 Service and Repair Teledyne Isco Technical Service Dept. P.O. Box 82531 Lincoln, NE 68501 USA Phone: 866 298-6174 402 464-0231 FAX: 402 465-3085 Service tasks described in this manual may be performed on site by properly trained personnel. Other service and repairs must be performed at the factory. If you believe your Teledyne Isco equipment requires repair, contact Teledyne Isco’s Technical Service department. Speaking with a Teledyne Isco Technical Service representative can often resolve the problem without the need to return the item. If the issue cannot be resolved by phone or email, you will receive a Return Authorization Number (RAN) and information on returning the equipment to the factory. E-mail: [email protected] 5-15 Signature™ Flow Meter Section 5 Maintenance and Servicing 5-16 Signature™ Flow Meter Appendix A Replacement Parts Replacement parts are called out in illustrations in this section. Reference the call-outs in the accompanying tables to determine the part number for the item. A.1 How to Order Replacement parts can be purchased by contacting Teledyne Isco’s Customer Service Department. Teledyne Isco Customer Service Dept. P.O. Box 82531 Lincoln, NE 68501 USA Phone: 800 228-4373 402 464-0231 FAX: 402 465-3022 E-mail:[email protected] A-1 Signature™ Flow Meter A.2 Signature Flow Meter A-2 Signature™ Flow Meter A-3 Signature™ Flow Meter A-4 Signature™ Flow Meter A-5 Signature™ Flow Meter A-6 Signature™ Flow Meter A-7 Signature™ Flow Meter A-8 Signature™ Flow Meter Continued on following page. A-9 Signature™ Flow Meter A-10 Signature™ Flow Meter A-11 Signature™ Flow Meter A-12 Signature™ Flow Meter Appendix B Options and Accessories B.1 Ordering Information Options and accessories can be purchased by contacting Teledyne Isco’s Customer Service Department. Teledyne Isco Customer Service Dept. P.O. Box 82531 Lincoln, NE 68501 USA Phone: 800 228-4373 402 464-0231 FAX: 402 465-3022 E-mail: [email protected] B.2 Signature Flow Meter Accessories Cord grip fitting for TIENet cable ........................................................................................... 209-0073-12 3 /4" NPT .375/.437" OD Cord grip fitting for Battery backup cable .............................................................................. 209-0073-11 3 /4" NPT .250/.375" OD Cord grip fitting with flexible strain protection ..................................................................... 60-4307-022 Exterior desiccator - Required for use with 330 and 350 TIENet devices ............................ 60-4304-013 TIENet Expansion Box ............................................................................................................ 60-4307-023 Kit includes 10ft TIENet cable Bulk TIENet Cable, 23m.......................................................................................................... 60-4303-065 Battery Backup: 946 Lead-acid battery pack, connect cable, and battery mounting hardware..................................................................................................... 60-4307-015 Lead-acid connect cable............................................................................................................ 69-4304-034 117V Power cord kit ................................................................................................................. 60-4304-044 Includes strain relief cord-grip fitting 240V Power cord kit ................................................................................................................. 60-4304-045 Includes strain relief cord-grip fitting 117V Power cord ....................................................................................................................... 60-1683-216 240V Power cord ....................................................................................................................... 48-0124-101 USB Flash drive, 2GB .............................................................................................................. 250-3000-42 Adaptor cable, USB Micro to USB-A....................................................................................... 480-2946-02 USB connect cable, Signature to PC ....................................................................................... 480-2946-01 ProHanger SST Suspension bracket for 18 - 24in. manhole shaft ........................................ 69-2003-599 Spreader bar for suspension of sensor or flow meter in manhole shaft ................................ 60-3004-110 B-1 Signature™ Flow Meter Suspension harness.................................................................................................................. 60-1704-016 7-Digit, non-resettable mechanical totalizer........................................................................... 60-4304-015 Dri-Can Desiccant .................................................................................................................... 099-0012-00 8oz. Desiccant bag .................................................................................................................... 099-0002-00 Gore Filter ................................................................................................................................ 209-0093-93 B.3 TIENet Devices and Accessories 310 Ultrasonic sensor w/ 10m cable ........................................................................................ 60-4314-005 310 Ultrasonic sensor w/ 23m cable ........................................................................................ 60-4314-006 Sunshade for ultrasonic sensor ............................................................................................... 60-3004-142 Ultrasonic sensor cable clamp ................................................................................................. 60-3004-129 Ultrasonic sensor wall bracket for vertical surface ................................................................ 60-2443-092 Ultrasonic sensor floor mount for horizontal surfaces ........................................................... 60-2004-611 Ultrasonic sensor cable straightener for suspension over stream......................................... 60-3213-061 Ultrasonic calibration target ................................................................................................... 60-3004-143 306 Sampler Interface w/ 5m cable ......................................................................................... 60-4304-017 306 Sampler interface w/ 10m cable........................................................................................ 60-4304-007 306 Sampler interface w/ 23m cable........................................................................................ 60-4304-008 308 Two analog output interface card..................................................................................... 60-4304-006 301 pH/Temperature Device w/ 10m cable Includes combination pH probe with built-in exposed temperature probe and 25 ft. probe cable. Includes one package of each buffer and rinse solution for probe calibration. ...................... 60-4307-018 301 pH/Temperature Device w/ 23m cable Includes combination pH probe with built-in exposed temperature probe and 25 ft. probe cable. Includes one package of each buffer and rinse solution for probe calibration. ...................... 60-4307-019 pH Probe (only)......................................................................................................................... 60-9004-126 Probe Carrier for pH probe ...................................................................................................... 60-3208-001 330 Bubbler sensor ................................................................................................................... 60-4334-003 Bubble line, PTFE, 1/16" x 25ft ................................................................................................. 60-1873-051 Bubble line, vinyl, 1/8" x 50ft .................................................................................................... 60-1873-044 Bubble line, vinyl, 1/8" x 100ft .................................................................................................. 60-1700-003 SST Bubble tube, 4ft long - for PTFE, 1/16" Line .................................................................... 60-1704-018 SST Bubble tube, 4ft long - for PTFE, 1/8" Line ...................................................................... 60-1873-043 Bubble line carrier - attach to Isco Mounting Ring ................................................................ 60-3204-007 Reference port tubing kit ......................................................................................................... 60-4307-017 Note Teledyne Isco uses FreeRTOS version 5.4.2 in its TIENet devices. In accordance with the FreeRTOS license, FreeRTOS source code is available on request. For more information, visit www.FreeRTOS.org. B-2 Signature™ Flow Meter B.4 Modems CDMA Digital cellular modem (Cellular service not included.) ................................................................................................ 60-4307-020 Magnetic mount antenna for CDMA ....................................................................................... 60-2004-550 GSM Digital cellular modem (Cellular service not included.) ................................................................................................ 60-4307-021 Magnetic mount antenna for GSM.......................................................................................... 60-2004-551 Ethernet modem ....................................................................................................................... 60-4307-016 B.5 Sensor Mounting Rings B.5.1 Spring Rings Probe Mounting Ring for 6" pipe ............................................................................................. 68-3200-007 Probe Mounting Ring for 8" pipe ............................................................................................. 68-3200-008 Probe Mounting Ring for 10" pipe ........................................................................................... 68-3200-009 Probe Mounting Ring for 12" pipe ........................................................................................... 68-3200-010 Probe Mounting Ring for 15" pipe ........................................................................................... 68-3200-011 B.5.2 Scissor Rings Base Section (with tabs for mounting up to five probes) ........................................................ 60-3004-169 Scissors Assembly..................................................................................................................... 60-3004-170 Extension 1 (9.0") ..................................................................................................................... 60-3004-172 Extension 2 (21.5") ................................................................................................................... 60-3004-173 Extension 3 (31.5") ................................................................................................................... 60-3004-174 Extension 4 (41.5") ................................................................................................................... 60-3004-175 Note that Scissor Mounting Ring Assemblies will require a base and scissors section for all sizes. Sizes from 16" to 80" will also require two or more extension sections. B.6 Manuals Signature Flow Meter .............................................................................................................. 69-4303-070 Signature Bubbler Flow Meter ................................................................................................ 69-4333-004 TIENet 301 pH/Temperature Device....................................................................................... 69-4303-071 TIENet 306 Sampler Interface ................................................................................................ 69-4303-072 TIENet 310 Ultrasonic Sensor................................................................................................. 69-4313-010 Mounting Rings ........................................................................................................................ 60-3203-061 Flow Metering Insert ............................................................................................................... 60-3234-064 Flowlink 5.1 Software .............................................................................................................. 69-2543-213 Isco Open Channel Flow Measurement Handbook, 6th Ed. .................................................. 60-3003-041 B-3 Signature™ Flow Meter B-4 Signature™ Flow Meter Appendix C Material Safety Data Sheets This appendix provides Material Safety Data Sheets for the desiccant used by the Signature Flow Meter. Teledyne Isco cannot guarantee the accuracy of the data. Specific questions regarding the use and handling of the products should be directed to the manufacturer listed on the MSDS. C-1 Signature™ Flow Meter Indicating Silica Gel Material Safety Data Sheet Identity (Trade Name as Used on Label) Manufacturer : MSDS Number* : MULTISORB TECHNOLOGIES, INC. M75 (formerly Multiform Desiccants, Inc.) Address: CAS Number* : 325 Harlem Road Buffalo, NY 14224 Phone Number (For Information): 716/824-8900 Emergency Phone 716/824-8900 Date Prepared: July 6, 2000 G.E. McKedy Prepared By* : Number: Section 1 - Material Identification and Information Components - Chemical Name & Common Names (Hazardous Components 1% or greater; Carcinogens 0.1% or greater) %* OSHA PEL ACGIH TLV Silica Gel SiO2 98.0 Cobalt Chloride >2.0 6mg/m (total dust) 3 0.05mg/m (TWA cobalt metal dust & fume) 3 OTHER LIMITS RECOMMENDE D 3 10mg/m (total dust) 3 .05mg/m (Cobalt, TWA) Non-Hazardous Ingredients TOTAL 100 Section 2 - Physical/Chemical Characteristics Boiling N/A Point Vapor Pressure N/A (mm Hg and Temperature Vapor N/A Density (Air =1) Solubility Insoluble, but will adsorb moisture. in Water Appearance Purple crystals, no odor. and Odor Specific Gravity (H20 = 1) Melting Point Evaporation Rate (__________=1) Water Reactive 2.1 N/A N/A Not reactive, but will adsorb moisture. Section 3 - Fire and Explosion Hazard Data Flash Point and Auto-Ignition Flammability Limits in LEL UEL N/A N/A N/A Methods Used Temperature Air % by Volume Extinguisher Dry chemical, carbon dioxide and foam can be used. Media Special Fire Water will generate heat due to the silica gel which will adsorb water and liberate heat. Fighting Procedures Unusual Fire and When exposed to water, the silica gel can get hot enough to reach the boiling point of water. Flooding with Explosion Hazards water will reduce the temperature to safe limits. Section 4 - Reactivity Hazard Data Conditions STABILITY Moisture and high humidity environments. To Avoid Stable Unstable Incompatibility Water. (Materials to Avoid) Hazardous Carbon dioxide, carbon monoxide, water Decomposition Products Conditions HAZARDOUS POLYMERIZATION None. To Avoid May Occur *Optional C-2 Indicating Silica Gel Signature™ Flow Meter Page 2 Section 5 - Health Hazard Data PRIMARY ROUTES OF ENTRY HEALTH HAZARDS Inhalation Ingestion NTP CARCINOGEN LISTED IN Skin Absorption Not Hazardous IARC Monograph Acute May cause eye, skin and mucous membrane irritation. Chronic Prolonged inhalation may cause lung damage. OSHA Not Listed Signs and Symptoms Drying and irritation. of Exposure Medical Conditions Asthma. Generally Aggravated by Exposure EMERGENCY FIRST AID PROCEDURES - Seek medical assistance for further treatment, observation and support if necessary. Eye Contact Flush with water for at least 15 minutes. Skin Wash affected area with soap and water. Contact Inhalation Remove affected person to fresh air. Ingestion Drink at least 2 glasses of water. Section 6 - Control and Protective Measures Respiratory Protection Use NIOSH approved dust mask or respirator. (Specify Type) Protective Eye Protection Light cotton gloves. Safety glasses. Gloves VENTILATION Local Exhaust Mechanical (General) TO BE USED Special Other (Specify) Other Protective None. Clothing and Equipment Hygienic Work Avoid raising dust. Avoid contact with skin, eyes and clothing. Practices Section 7 - Precautions for Safe Handling and Use/Leak Procedures Steps to be Taken if Material Sweep or vacuum up and place the spilled material in a waste disposal container. Avoid raising dust. Is Spilled Or Released Waste Disposal Dispose in an approved landfill according to federal, state and local regulations. Methods Precautions to be Cover promptly to avoid blowing dust. Wash after handling. Taken In Handling and Storage Other Precautions and/or Special Keep in sealed containers away from moisture. The silica gel will readily adsorb moisture. Hazards *Optional Indicating Silica Gel C-3 Signature™ Flow Meter MATERIAL SAFETY DATA SHEET March 8, 2005 M163 Effective Date MSDS Number Section 1 Product and Company Information Product Name: Silica gel, indicating, yellow Product Use: Grades: Synonyms: Desiccant, absorbent Silica gel, indicating Amorphous silica gel, SiO2, silicon dioxide (amorphous) Company; Street Address: City, State, Zip, Country: Multisorb Technologies, Inc. 325 Harlem Road Buffalo, NY 14224-1893 USA Telephone Number: Fax Number: Website / E-Mail : (716) 824 8900 [USA] Monday - Friday (8:00 - 5:00 EDT) (716) 824 4091 [USA] multisorb.com Section 2 Composition / Information on Ingredients Component Name Synthetic amorphous silica gel (SiO2) Phenolphthalein CAS Number % by Weight 112926-00-8 100 77-09-08 100 ppm While this material is not classified, this MSDS contains valuable information critical to the safe handling and proper use of this product. This MSDS should be retained and available for employees and other users of this product. Section 3 Hazard Identification Emergency Overview: A yellow bead or granular material that poses little or no immediate hazard. This material is not combustible. Potential Health Effects: Dust and or product may cause eye discomfort and irritation seen as tearing and reddening. Eyes: Skin: The product dust may cause drying of the skin. Silica gel may get hot enough to burn skin when it adsorbs moisture rapidly. Use an excess of water to cool the silica gel. Ingestion: Material is not toxic and will pass through the body normally. Inhalation: Slight irritation is possible but none is expected. Medical Effects Generally Aggravated by Exposure: Chronic Effects/Carcinogenity: C-4 Respiratory ailments. May cause eye, skin and mucous membrane irritation and drying. Signature™ Flow Meter Section 4 First Aid Measures Eyes: Rinse the eyes well with water while lifting the eye lids. If irritation persists, consult a physician. Skin: Wash affected area with soap and water. Ingestion: Ingestion is unlikely, this material will pass through the body normally. Inhalation: Remove the affected person to fresh air and get medical attention if necessary. Notes to Physician: Not applicable Section 5 Fire Fighting Measures Flammable Properties: Not flammable Flash Point: Not applicable Flammable Limits: Method: Not applicable Not flammable Lower Flammability Limit: Not applicable Upper Flammability Limit: Autoignition Temperature: Not applicable Hazardous Combustion Products: Extinguishing Media: Not applicable Not applicable Use extinguishing media that is appropriate for the surrounding fire. Silica gel is not combustible. Fire Fighting Instructions: Not combustible Unusual Fire and Explosion Hazards: None Section 6 Accidental Release Measures Spill: Sweep or vacuum up and place the spilled material in a waste disposal container. Avoid raising dust. Wash with soap and water after handling. Section 7 Handling and Storage Handling: Avoid raising dust and minimize the contact between worker and the material. Practice good hygienic work practices. Storage: Store in a cool, dry location. Keep in sealed containers away from moisture. The silica gel will readily adsorb moisture. C-5 Signature™ Flow Meter Section 8 Exposure Controls/Personal Protection Use exhaust ventilation to keep the airborne concentrations below the exposure limits. Engineering Controls: Respiratory Protection: Use NIOSH approved respirator when the air quality levels exceed the TLV's. Skin Protection: Light gloves will protect against abrasion and drying of the skin. Eye Protection: Safety glasses. Component Name Silica gel Exposure Limits OSHA PEL ACGIH TLV Other Recommended Limits TWA 20 mppcf (80 mg / m3 % SiO2) TWA 10 mg / m3 NIOSH REL TWA 6 mg / m3 IDLH 3000 mg / m3 Not Applicable Not Applicable Not Applicable Phenolphthalein Section 9 Physical and Chemical Properties Appearance: Yellow beads or granules Vapor Density: Not applicable Odor: None Boiling Point: 4046q F (2230q C) Physical State: Solid bead Melting Point: 3110q F (1710q C) PH: Not applicable Solubility: Insoluble in water Vapor Pressure: Not applicable Specific Gravity: 2.1 Section 10 Stability and Reactivity Stability: Stable Conditions to avoid: Incompatibility: Moisture and high humidity environments. Water, fluorine, oxygen difluoride, chlorine trifluoride Hazardous Decomposition Products: Hazardous Polymerization: C-6 None Will not occur Signature™ Flow Meter Section 11 Toxicological Information This product and its components are not listed on the NTP or OSHA Carcinogen lists. Animal Toxicology Tests for DOT Hazard classification ( Tests Conducted on finely ground silica gel) 1 - hour LC50 (rat) > 2 mg / l 48 - hour oral LD50 (rat) est. > 31,600 mg / kg 48 - hour dermal LD50 (rabbit) est. > 2,000 mg / kg Considered an ocular irritant Human Toxicology Silica gel is a synthetic amorphous silica not to be confused with crystalline silica. Epidemiological studies indicate low potential for adverse health effects. In the activated form, silica gel acts as a desiccant and can cause a drying irritation of the mucous membranes and skin in cases of severe exposure. Multisorb Technologies Inc. knows of no medical conditions that are abnormally aggravated by exposure to silica gel. The primary route of entry is inhalation of dust. Section 12 Ecological Information Not known to have any adverse effect on the aquatic environment. Silica gel is insoluble and non-toxic. Section 13 Disposal Information Disposal Information If this product as supplied becomes a waste, it does not meet the criteria of a hazardous waste as defined under the Resource Conservation and Recovery Act (RCRA) 40 CFR 261. Materials of a hazardous nature that contact the product during normal use may be retained on the product. The user of the product must identify the hazards associated with the retained material in order to assess the waste disposal options. Dispose according to federal, state and local regulations. Section 14 Transportation Information U.S. Department of Transportation Shipping Name: Not classified as a hazardous material. Not regulated. Section 15 Regulatory Information (Not meant to be all inclusive - selected regulations represented) TSCA Listed: Yes DSL/NDSL (Canadian) Listed: Yes OSHA: TWA 20 mppcf (80 mg / m3 % SiO2) for Silica gel NIOSH: REL TWA 6 mg / m3 IDLH 3,000 mg / m3 for silica gel Animal tests conducted in 1976 - 1978. 18 month exposure at 15 mg / m3 showed silica deposition in respiratory macrophages and lymph nodes, minimum lung impairment, no silicosis. ACGIH: TLV - 10 mg / m3 for Silica gel DOT: Not classified as a hazardous material. C-7 Signature™ Flow Meter HMIS Hazardous Materials Identification System HMIS Rating Health Flammability Reactivity 0 0 0 0 - minimal hazard, 1 - slight hazard, 2 - moderate hazard, 3 - serious hazard, 4 - severe hazard This MSDS was prepared by: George E. Mckedy Senior Applications Development Specialist Multisorb Technologies, Inc. This data and recommendations presented in this data sheet concerning the use of our product and the materials contained therein are believed to be correct but does not purport to be all inclusive and shall be used only as a guide. However, the customer should determine the suitability of such materials for his purpose before adopting them on a commercial scale. Since the use of our products is beyond our control, no guarantee, expressed or implied, is made and no responsibility assumed for the use of this material or the results to be obtained therefrom. Information on this form is furnished for the purpose of compliance with Government Health and Safety Regulations and shall not be used for any other purposes. Moreover, the recommendations contained in this data sheet are not to be construed as a license to operate under, or a recommendation to infringe, any existing patents, nor should they be confused with state, municipal or insurance requirements, or with national safety codes. C-8 Signature™ Flow Meter Index Numerics 301 pH/temperature device, 4-10 306 sampler interface, 4-10 308 analog current output, 4-12 310 ultrasonic sensor, 4-10 330 bubbler module, 4-10 installation, 5-10 4-20 mA, 4-12 A accessories, B-1 adjust display, 1-7 adjust levels, 2-20, 3-15 administration, 2-27 display license information, 2-28 display signature information, 2-28 language options, 2-28 restore to factory defaults, 2-28 sensor diagnostics, 2-28 set new passcode, 2-28 update firmware, 2-28 alarm local, 2-23 SMS & server, 2-23 alarms, 2-23 alphanumerics, 2-8 analog output, 2-23, 4-12 programming, 4-13 B battery backup, 4-4 browser window, 2-6 bubbler, 4-10 C calibration, 2-20, 3-15 case board, 3-1 layout, 3-2 CDMA, 4-21 cellular modems, 4-21 installation, 4-22 setup, 4-24 character grid, 2-8 cleaning, 5-1 clock, 2-18 compatible equipment, 1-3 compliance, 2-32 components, 1-5 conditions, 2-21 configure measurements, 2-11 configure options, 2-17 adjust, 2-20 data storage/push, 2-22 equation/trigger setup, 2-21 flow settings, 2-19 measurement setup, 2-18 outputs, 2-23 reports/history, 2-26 reset totalizers, 2-26 sampler, 2-23 site, 2-18 connecting TIENet devices, 3-7 connecting via Flowlink, 2-2 connecting via USB, 2-2 connections, 3-1, 3-2, 3-3 power, 3-10 contact Teledyne Isco, 5-15 control panel display, 1-7 keypad, 1-7, 2-1 LED indicator, 1-7 cord-grip, 3-5 D data compliance, 1-3, 2-32 download, 2-31 dump, 2-30 events, 1-3 export, 2-32 integrity, 1-3, 2-30, 2-31, 2-32 push, 2-22 storage, 2-22 default settings, 2-28 default units, 2-18 description, 1-1 desiccant, 5-2 internal, 5-3 device info, 2-5 diagnostics, 2-28 display, 1-7 display contrast, 1-7 display equipment info, 2-28 display license info, 2-28 drop down menus, 2-9 dump data, 2-30 Index-1 Signature™ Flow Meter Index E M equations, 2-21 equipment options, 4-1 ethernet modem, 4-16 configuration, 4-19 MAC address, 4-20 event viewer, 2-31 export data, 2-32 events, 1-3 expansion box, 4-11 maintenance, 5-1 bubbler replacement, 5-10 cleaning, 5-1 desiccant, 5-2 firmware updates, 5-1 Material Safety Data Sheets, C-1 measurement setup flow input, 2-18 level input, 2-18 volume input, 2-18 measurements, 2-11 mechanical totalizer, 4-6 menus, 2-9 Modbus input setup, 2-13 Modbus output setup, 2-16 modem cellular, 4-21 ethernet, 4-16 modem setup, 2-16 mounting options, 3-11 MSDS, C-1 F factory defaults, 2-28 firmware, 2-28, 2-30 firmware updates, 5-1 flash drive, 2-29, 5-1 flow conversions, 2-19 flow measurement, 2-19 Flowlink, 2-31, 4-16 browser, 2-6 connecting, 2-2 devices, 2-5 event viewer, 2-31 program window, 2-6 site info, 2-4 G GSM, 4-22 H hardware scan, 2-11 hardware setup, 2-10 Modbus input, 2-13 Modbus output, 2-16 modem, 2-16 SDI-12, 2-12 smart sensor, 2-11 histograph, 2-7 history, 2-26 home display, 2-18 home screen, 2-7 I installation, 3-1 mounting, 3-11 outdoor, 3-12 interior, 3-1 introduction, 1-1 K keypad, 1-6, 1-7, 2-1 L language, 2-28 level adjustment, 2-7 level calibration, 3-15 Index-2 O off-screen content, 2-8 optional equipment, 4-1 options, 1-3, B-1 battery backup, 4-4 cellular modems, 4-21 ethernet modem, 4-16 expansion box, 4-11 Flowlink, 4-16 mechanical totalizer, 4-6 TIENet devices, 4-10 order parts, A-1, B-1 outputs alarm, 2-23 analog, 2-23, 4-12 P passcode, 2-28 pH/temperature device, 4-10 port holes, 3-1, 3-3 fittings, 3-5 plugs, 3-6 power, 3-10 battery backup, 4-4 wiring, 3-10 program window, 2-6 programming, 2-8 administration, 2-27 alphanumerics, 2-8 analog output, 4-13 cellular modem, 4-24 character grid, 2-8 configure, 2-17 general rules, 2-8 hardware setup, 2-10 Signature™ Flow Meter Index menus, 2-9 navigation, 2-8 pull down menus, 2-9 scrolling, 2-8 top menu, 2-9 USB options, 2-29 pull down menus, 2-9 pushed data, 2-22 Q quick start, 1-2 R repairs, 5-15 replacement parts, A-1 report view, 2-7 reports, 2-26, 2-30 export, 2-32 verification, 2-32 reset, 5-14 reset passcode, 2-28 S expansion box, 4-11 totalizer reset, 2-26 triggers, 2-21 typing characters, 2-8 U ultrasonic level sensor, 4-10 units, 2-18, 2-28 update firmware, 2-28, 2-30 USB drivers, 2-2 USB options, 2-29 dump data, 2-30 none of the above, 2-31 retrieve text reports, 2-30 update firmware, 2-30 user interface, 2-1 browser, 2-2, 2-6 Flowlink, 2-2 keypad, 2-1 V verification, 2-30, 2-32 verification tool, 2-32 safety, 1-v sampler interface, 2-23, 4-10 scan, 2-11 scrolling, 2-8 SDI-12, 2-12 security, 1-3 select operation, 2-9 sensor diagnostics, 2-28 sensor differences, 2-11 servicing, 5-1, 5-15 setup and programming, 2-1 shield, 3-12 shortcuts, 2-7 histograph, 2-7 level adjustment, 2-7 report view, 2-7 site information, 2-4 site name, 2-18 site setup, 2-18 smart sensor setup, 2-11 software, 2-2, 4-16 specifications, 1-7 system reset, 5-14 T Technical Service, 5-15 technical specifications, 1-7 TIENet devices, 4-10 301 pH/temperature device, 4-10 306 sampler interface, 2-23, 4-10 308 analog current output, 4-12 310 ultrasonic level sensor, 4-10 330 bubbler module, 4-10 connecting, 3-7 Index-3 Signature™ Flow Meter Index Index-4 Compliance Statements ℶ❐₼㦘㹡㦘⹂䓸德㒥⏒侯䤓⚜䱿♙⚺摞 Name and amount of Hazardous Substances or Elements in the product 柘 (Cd) ⏼ↆ杻 (Cr(VI)) ⮩䅃勣啾 (PBB) ⮩䅃ℛ勣啾 (PBDE) 兎恾㨎 Circuit Boards X O O O O O 㣍䯉 Display X O O O O O 㘴兎 Wiring O O O O X O ␔捷䟄冕 Internal Cables O O O O X O 䟄䄟兎 Line Cord O O O O X O 䦃㿐䟄㧉 DC Motor X O O O X O ⺞枽䥧 Keypad O O O O X O 㘴⯃ Connectors O O X O O O 䟄㻯 Battery X X X O O O 䟄䭐梏 Solenoid valve X O O O X O C E m ity 㻭 (Hg) D ec la ra ti o n 杔 (Pb) of C on fo r 捷ↅ⚜䱿 Component Name 㦘㹡㦘⹂䓸德㒥⏒侯 Hazardous Substances or Elements ℶ❐₼㦘㹡㦘⹂䓸德㒥⏒侯䤓⚜䱿♙⚺摞᧶Name and amount of Hazardous Substances or Elements in the product O: 嫷䯉年㦘㹡㦘⹂䓸德⦷年捷ↅ㓏㦘⧖德㧟㠨₼䤓⚺摞⧖⦷ST/ 㪖屓⸩䤓棟摞尐㻑ⅴₚᇭ O: Represent the concentration of the hazardous substance in this component’s any homogeneous pieces is lower than the ST/ standard limitation. X᧶嫷䯉年㦘㹡㦘⹂䓸德咂⺠⦷年捷ↅ䤓㩟⧖德㧟㠨₼䤓⚺摞怔⒉ST/ 㪖屓⸩䤓棟摞尐㻑ᇭ (←₩♾⦷㷳⮓᧨㫈㗽⸭棔㍔⑄⺈ₙ嫷₼㓢“X” 䤓㔏㦾☮⥯扪嫛扪㷴広㢝ᇭ) X: Represent the concentration of the hazardous substance in this component’s at least one homogeneous piece is higher than the ST/ standard limitation. (Manufacturer may give technical reasons to the “X”marks) 䘾≬∎䞷㦮䟀兞洛䫽⸩ᇭ The Environmentally Friendly Use Period (EFUP) was determined through experience. 䞮ℶ㡴㦮嬺冥䪐⦷侊⒦⚆䪐₼ᇭⓜₘ⇜㟿ⷦ䞮ℶ(207 ⅲ嫷 2007 ) ᇭ椞⚝䤓₹ⷦ㹜ⅲ嫷㦗᧶ A 㦗᧨B ℛ㦗᧨䷘䷘ᇭ The date of Manufacture is in code within the serial number. The first three numbers are the year of manufacture (207 is year 2007) followed by a letter for the month. "A" is January, "B" is February and so on. Hazmat Table Signature Meter, Sensors and Accessories 60-4302-029 Rev. DECLARATION OF CONFORMITY Application of Council Directive: 004/108/EC -The EMC Directive 002/96/EC – The WEEE Directive 006/95/EC– The Low Voltage Directive Manufacturer's Name: Teledyne Isco Manufacturer's Address: 4700 Superior Lincoln, Nebraska 68504 USA P.O. Box 82531, Lincoln, NE 68501 ity Equipment Type/Environment: Equipment for Light Industrial/Commercial Environments Year of Issue: 2011 nd edition Safety Requirements for Electrical Equipment for Measurement, Control, and Laboratory Use EN 61326-1:2003 EMC Requirements for Electrical Equipment for Measurement, Control, and Laboratory Use EN60529 Special Protection offered by the Signature’s Enclosure: IP-66 D ec la ra ti o n Harmonized Standards Conformity is Declared: EN 61010-1 2 of C on fo r m Trade Name/Model No: Signature with optional 310 Ultrasonic sensor, 330 Bubbler, 306 Sampler Interface, 301 Ph &Temperature Interface, 308 Analog Output, Ethernet Modem Description Electrostatic Discharge EN61000-4-3 Radiated RF Immunity EN61000-4-4 Electrical Fast Transient EN61000-4-5 Surge on AC Lines EN61000-4-6 Conducted RF on AC lines and I/O lines Voltage Dips/Interruptions EN61000-4-11 CISPR11/ EN 55011 EN61000-3-2, 3-3 C E Standard EN61000-4-2 RF Radiated Emissions Severity Applied 4kV contact discharge 8kV air discharge 80 mHz to 2.7gHz, 80% AM at 1kHz 10V/m to 1gHz, 3V/m to 2.7gHz 2kV on AC lines 1kV on I/O lines 2kV common mode, 1kVdifferential mode 150 kHz to 80 mHz, 3V rms, 80% modulated 100% drop, 0.5 cycle Group 1, Class A Industrial, Scientific, and Medical Equipment Power Factor Harmonics, Flicker Performance Criteria A A A A A A Pass Pass The undersigned, hereby declares that the design of the equipment specified above conforms to the above Directive(s) and Standards as of December 30, 2011. USA Representative _______________________________________ Vikas V. Padhye Ph, D Vice President and General Manager 4700 Superior Street Lincoln, Nebraska 68504 Phone: (402-464-0231 FAX: (402-464-0318 60-4302-021 Warranty Teledyne Isco One Year Limited Factory Service Warranty* This warranty exclusively covers Teledyne Isco instruments, providing a one-year limited warranty covering parts and labor. Any instrument that fails during the warranty period due to faulty parts or workmanship will be repaired at the factory at no charge to the customer. Teledyne Isco’s exclusive liability is limited to repair or replacement of defective instruments. Teledyne Isco is not liable for consequential damages. Teledyne Isco will pay surface transportation charges both ways within the 48 contiguous United States if the instrument proves to be defective within 30 days of shipment. Throughout the remainder of the warranty period, the customer will pay to return the instrument to Teledyne Isco, and Teledyne Isco will pay surface transportation to return the repaired instrument to the customer. Teledyne Isco will not pay air freight or customer’s packing and crating charges. This warranty does not cover loss, damage, or defects resulting from transportation between the customer’s facility and the repair facility. The warranty for any instrument is the one in effect on date of shipment. The warranty period begins on the shipping date, unless Teledyne Isco agrees in writing to a different date. Excluded from this warranty are normal wear; expendable items such as charts, ribbon, lamps, tubing, and glassware; fittings and wetted parts of valves; and damage due to corrosion, misuse, accident, or lack of proper maintenance. This warranty does not cover products not sold under the Teledyne Isco trademark or for which any other warranty is specifically stated. No item may be returned for warranty service without a return authorization number issued by Teledyne Isco. This warranty is expressly in lieu of all other warranties and obligations and Teledyne Isco specifically disclaims any warranty of merchantability or fitness for a particular purpose. The warrantor is Teledyne Isco, 4700 Superior, Lincoln, NE 68504, U.S.A. * This warranty applies to the USA and countries where Teledyne Isco does not have an authorized dealer. Customers in countries outside the USA, where Teledyne Isco has an authorized dealer, should contact their Teledyne Isco dealer for warranty service. Before returning any instrument for repair, please call, fax, or e-mail the Teledyne Isco Service Department for instructions. Many problems can often be diagnosed and corrected over the phone, or by e-mail, without returning the instrument to the factory. Instruments needing factory repair should be packed carefully, and shipped to the attention of the service department. Small, non-fragile items can be sent by insured parcel post. PLEASE BE SURE TO ENCLOSE A NOTE EXPLAINING THE PROBLEM. Shipping Address: Mailing Address: Phone: Fax: Email: Teledyne Isco - Attention Repair Service 4700 Superior Street Lincoln, NE 68504 USA Teledyne Isco PO Box 82531 Lincoln, NE 68501 USA Repair service: (800) 775-2965 (lab instruments) (866) 298-6174 (samplers & flow meters) Sales & General Information: (800) 228-4373 (USA & Canada) (402) 465-3001 [email protected] February 28, 2012 P/N 60-1002-040 Rev G