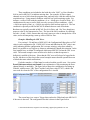
1
MICAS-X User Manual version 1.5.2 MICAS-X, the Multi-Instrument Control and Acquisition System – eXtended, is a LabVIEW data acquisition and control program designed for acquiring data from and controlling a wide range of instruments. MICAS-X is both configuration-based and custom-programmable, which is to say that many instruments and systems can be run in MICAS-X simply by configuring existing modules, but writing new LabVIEW components for more complex, custom situations can provide additional functionality. MICAS-X is designed to bridge the gap between using a pre-written, configuration-based program for data acquisition, and writing a complete, custom application. By providing a wide range of necessary functionality in its existing code base, MICAS-X can greatly accelerate the development of data acquisition software. But by allowing modular expansion, it can also accommodate a vast range of capabilities specific to many different situations. MICAS-X can be supplied as a compiled program, which does not need to have LabVIEW installed to run, or as LabVIEW source code. Since MICAS-X source code is available to the end-user, and the MICAS-X API's and interfaces are documented, a LabVIEW programmer of moderate-to-advanced abilities can create custom modules for MICAS-X. Note, however, that MICAS-X does require a hardware security key for it to be properly licensed and functional. Without a hardware key, the Limited Demo version of MICAS-X will operate fully for 20 minutes. Note that the full version of MICAS-X will continue to operate even if the hardware key is missing, but will periodically remind the operator of the need to license the software. In order to enforce the hardware key, a small amount of source code is password protected and unavailable to the end-user. MICAS-X is written in LabVIEW 2013 and is supported on the Windows 7 and Windows 8. Although not directly supported, MICAS-X has also been used successfully on Windows XP. The MICAS-X Drivers for NIDaq Devices (NIDaqAD, NIDaqDA, NIDaqDI, NIDaqDO, and NIDaqCounters) support any National Instruments Daq device that is supported by the National Instruments DAQmx hardware driver. Table of Contents Table of Contents 1 MICAS-X Overview .............................................................................................................................. 4 1.1 Program Structure ................................................................................................................ 4 © 2014 David Thomson, Original Code Consulting, [email protected] 1 1.2 Components ............................................................................................................................ 5 1.3 Channels ................................................................................................................................... 6 1.4 Acquisition .............................................................................................................................. 7 1.5 Data Types ............................................................................................................................... 8 1.6 Channel Lists .......................................................................................................................... 9 1.7 File Storage .............................................................................................................................. 9 1.8 History Data .......................................................................................................................... 10 1.9 Commands............................................................................................................................. 11 1.10 Program Versions ............................................................................................................ 12 2 Notes on Installation ........................................................................................................................ 12 3 Locating Directories on a Hard Drive........................................................................................ 13 3.1 Directories Used With the Executable Version of MICAS-X................................. 13 3.2 Directories Used with MICAS-X in Source Code ...................................................... 14 4 Configuration File Usage ................................................................................................................ 15 4.1 Shortcuts for MICAS-X.exe Executable......................................................................... 16 4.2 Shortcuts for MICAS-X.vi in Source Code ................................................................... 16 5 Configuration Editor........................................................................................................................ 17 5.1 Using the Configuration Editor ..................................................................................... 17 5.2 Configuration File CRC ...................................................................................................... 18 5.3 Backup Configuration File ............................................................................................... 19 5.4 Modules .................................................................................................................................. 19 5.4.1 MICAS ...................................................................................................................... 19 5.4.2 Instruments ........................................................................................................... 23 5.4.2.1 Broadcast.vit ..........................................................................................24 5.4.2.2 Command.vit ..........................................................................................25 5.4.2.3 Email.vi ....................................................................................................25 5.4.2.4 Ramp.vit ..................................................................................................27 5.4.2.5 SMPS Ramp.vit ......................................................................................29 5.4.3 Drivers ..................................................................................................................... 30 5.4.3.1 Array.vit ...................................................................................................30 5.4.3.2 Calculations.vit ......................................................................................31 5.4.3.3 Document ...............................................................................................31 5.4.3.4 Equations.vit ...........................................................................................31 5.4.3.5 Manual.vi .................................................................................................34 5.4.3.6 MOSDS.vit ...............................................................................................34 5.4.3.7 NIDaqAD.vit ...........................................................................................35 5.4.3.8 Sequences.vi ..........................................................................................37 5.4.3.9 Timers.vi ..................................................................................................37 5.4.3.10 Triggers.vi ............................................................................................37 5.4.3.11 Airmar.vit .............................................................................................38 5.4.3.12 Alicat.vit ................................................................................................38 5.4.3.13 Aries Drive.vit ......................................................................................39 5.4.3.14 NIDaqCounter.vit ...............................................................................40 © 2014 David Thomson, Original Code Consulting, [email protected] 2 5.4.3.15 NIDaqDA.vit .........................................................................................40 5.4.3.16 NIDaqDI.vit ..........................................................................................41 5.4.3.17 NIDaqDO.vit ........................................................................................41 5.4.3.18 NIMotion.vit ........................................................................................42 5.4.3.19 Omega.vit .............................................................................................42 5.4.3.20 Prime Scales.vit ...................................................................................43 5.4.3.21 System ....................................................................................................43 5.4.3.22 Vaisala HMT310 ..................................................................................44 5.4.3.23 Web Power Switch.vit .......................................................................45 5.4.4 Displays ................................................................................................................... 46 5.4.4.1 3Graphs.vit .............................................................................................46 5.4.4.2 Document ...............................................................................................47 5.4.4.3 Big Display.vit .........................................................................................47 5.4.4.4 Sequences Diplay.vi .............................................................................47 5.4.4.5 Multi Display.vit ....................................................................................47 5.4.4.6 XYZ Grpah.vit.........................................................................................48 5.4.5 Acquisition ............................................................................................................. 49 5.4.6 Channel Lists ......................................................................................................... 51 5.4.7 File Writer .............................................................................................................. 52 5.4.8 Control Tab ............................................................................................................ 54 5.4.9 Sequences .............................................................................................................. 56 5.4.10 Triggers ................................................................................................................ 58 5.4.11 Constants .............................................................................................................. 62 5.4.12 Globals ................................................................................................................... 62 5.4.13 Channels ............................................................................................................... 63 5.4.14 Rename Channels ............................................................................................. 64 5.4.15 Backup Config .................................................................................................... 64 5.4.16 Alert Calc............................................................................................................... 64 6 MICAS-X Operation........................................................................................................................... 65 6.1 Menus ..................................................................................................................................... 65 6.1.1 File Menu ................................................................................................................ 65 6.1.2 Utilities Menu........................................................................................................ 65 6.1.3 Help Menu .............................................................................................................. 65 6.2 Buttons ................................................................................................................................... 66 6.3 Tabs ......................................................................................................................................... 67 6.3.1 Control Tab ............................................................................................................ 68 6.3.2 Display Tab(s) ....................................................................................................... 68 6.3.3 Utility Tab ............................................................................................................... 68 6.3.4 MICAS-X Tab .......................................................................................................... 68 6.3.5 Debug Tab .............................................................................................................. 69 6.4 A Note on MICAS-X Window Size.................................................................................. 69 6.5 Time Series Graphs ........................................................................................................... 69 6.6 Modules and Features........................................................................................................ 70 © 2014 David Thomson, Original Code Consulting, [email protected] 3 6.6.1 Acquisition ............................................................................................................. 70 6.6.2 Channel Lists ......................................................................................................... 71 6.6.3 File Writer .............................................................................................................. 72 6.6.4 Sequences .............................................................................................................. 73 6.6.5 Triggers and Alarms ........................................................................................... 74 6.6.6 Drivers ..................................................................................................................... 75 6.6.7 Instruments ........................................................................................................... 79 6.6.8 Displays ................................................................................................................... 80 6.6.9 Calculations ............................................................................................................ 81 6.6.10 Timers .................................................................................................................. 81 6.6.11 Constants .............................................................................................................. 82 6.6.12 Globals ................................................................................................................... 82 6.6.13 Program State Variables ................................................................................. 83 6.6.14 Commands ........................................................................................................... 84 6.6.15 Constants .............................................................................................................. 86 6.6.16 OSDS ...................................................................................................................... 86 7 Utilities.................................................................................................................................................. 87 7.1 Configuration Editor ......................................................................................................... 87 7.2 Data Reader ........................................................................................................................... 88 7.3 TMDS File Reader ................................................................................................................ 88 7.4 Log Read ................................................................................................................................ 88 7.5 Command Interface ........................................................................................................... 88 8 MICAS-X Security Device ................................................................................................................ 88 9 Appendix A: Reserved Keywords ................................................................................................ 89 10 Appendix B: Commands .............................................................................................................. 91 11 Appendix C: Syntax for Equations............................................................................................ 97 12 Appendix D: Error Messages ................................................................................................... 100 13 Web Power Switch 7 Watchdog Function ........................................................................... 102 1 MICAS-X Overview 1.1 Program Structure The overall design of MICAS-X is based on the assumption that many instruments and systems share a common set of infrastructure needs. Typically, these include some slow (usually 1 Hz) monitoring of “housekeeping” data, logging that data to a file, sequencing through various states and modes of operation, setting outputs to the proper values for those states and modes, alarming off of conditions that are out of range, logging errors, and so on. In addition, many systems contain one or more processes that are far outside the range of these features. Often, there will be a core functionality that involves high speed data acquisition, highly-customized control or timing, complex data structures, or other complex operations. MICAS-X is intended to accelerate the © 2014 David Thomson, Original Code Consulting, [email protected] 4 development of these types of systems by providing a re-useable set of infrastructure, while also allowing the creation of customized modules that can handle the complex operations. Although this pattern of accelerated development of complex systems is the primary market for MICAS-X, the infrastructure that has been developed to support that goal results in a program that is applicable to many other experiments and systems as well. Many quick laboratory or prototype tests can be configured using just the components of MICAS-X that are already developed. Thus, due to its flexible nature, MICAS-X can be configured to accommodate many data acquisition, instrument monitoring, and experimental sequences with little or no custom programming needed. The MICAS-X program itself serves as the coordinating shell for various modules. The Configuration Editor is used to define what modules are included and how each of them is configured to operate. Multiple configuration files can be created, allowing MICAS-X to take on many different personalities for different situations. Once MICAS-X is run, it reads the selected configuration file and starts each of the needed modules. The Acquisition module contains one or more loops which acquire data from the selected Driver modules. The Triggers module continuously monitors the data acquired by the Acquisition module and executes any commands that are configured to be triggered by user-defined conditions based on the data. The Sequences module executes any predefined sequences, changing output channels as needed to step the system through various states. By only loading the modules specified in the configuration file, MICAS-X can support a huge amount of functionality, yet each configuration will load only those resources needed for the current situation. 1.2 Components MICAS-X includes numerous components, many of which are designed as plugin modules. With this architecture, new features can be added to a MICAS-X system simply by copying folders of source code to the appropriate destinations and then editing the configuration file to use the new components. MICAS-X.vi - the main control program. This VI controls the entire MICAS-X system, starts and stops modules, and provides the primary interface for the operator to interact with MICAS-X. Modules (5.2) - a set of functions that is always included in MICAS-X. New modules can only be added by creating a new version of MICAS-X. This is normally done only by OCC. Modules include Acquisition, Triggers, Sequences, File Writing, Commands, and others. Drivers (5.4.3)- software interfaces to hardware devices and other functionality for reading data and controlling outputs. Drivers are intended for handling "slow" data on the order of once per minute to 20 Hz, with 1 Hz being typical. © 2014 David Thomson, Original Code Consulting, [email protected] 5 Instruments (5.4.2)- components that incorporate specialized functions, often used for high-speed data acquisition or control, or other types of acquisition or control that do not fit into the Driver model. Each Instrument can also include its own Display. Displays (5.4.4)- components that display data to the end user or allow access to MICAS-X functionality, but which may not be directly tied to a specific Instrument or Driver. Calculations (5.4.3)- VI's that can be written by the end-user, according to a welldefined API, which can incorporate more complex calculations to create new Channels of data than can be created using the Equations Driver (which allows text calculations). Calculations are evaluated by the Calculations Driver. Utilities (7)- top-level programs that can be run inside or outside of MICAS-X and which provide additional functionality of a type that is not required for MICAS-X to run. Examples are programs that review data or log files or that edit the configuration file. Configuration File (5) - a text-based file that defines what modules will be included when MICAS-X runs and how MICAS-X is set up to run. 1.3 Channels Much of the predefined functionality of MICAS-X is focused on the data Channels. Triggers compare Channel values to trigger conditions, and can set Channels to new values if the condition is met. Sequences can operate on Channel values, as can Commands. It is important, then, to understand where these Channels come from, and what there features and limitations are. As described in section 1.5, all the MICAS-X Channel values are stored in a onedimensional array of double-precision reals. This buffer contains the most recent value of every channel. The historical record of these Channels' values is recorded in various data files, described in section 1.7. The Acquisition module (section 1.4) is in charge of keeping the buffer up-to-date. With a few exceptions, all Channels originate in MICAS-X from Drivers. Instruments, Displays, and Utilities cannot supply MICAS-X with Channels. Drivers, however, can operate on two types of Channels, Input Channels and Controllers, or Output Channels. (Note that the Controllers Driver refers to a way to implement PID and similar control loops, and does not refer to a Driver that handles all Controller Channels.) Input Channels are data that is read into MICAS-X, typically from a hardware device, but sometimes from another source (such as in the case of the Equations Driver and the © 2014 David Thomson, Original Code Consulting, [email protected] 6 Calculations Driver). Controller Channels are Channels that the operator or MICAS-X can write to. Typically these would be output channels of a hardware device, such as an analog output voltage. But Controller Channels also include things like Manual Driver Channels and Globals, both of which are simply types of program variables for MICASX. There are a few special Channels that do not come from Drivers. Globals (see section 6.6.12) are configured as a separate Module, not as a Driver. Program State Variables (section 6.6.13) are special Channels that MICAS-X always supplies, and are not configured in any Driver. Constants (section 6.6.15) can be used in a way similar to Input Channels, but are not logged to file, and are configured as a Module, not as a Driver. 1.4 Acquisition Many of the functions of MICAS-X are designed around the data acquired and controlled by the Driver modules. Although custom modules can be written to handle much more complex data requirements, the Driver data is intended to provide the information and control MICAS-X needs to operate the system. Any number of Drivers can be added to the MICAS-X configuration. Numerous Drivers are included in the base package, many more can be purchased separately, and custom Drivers can be created very cost-effectively. Many Drivers are written in a way that allows them to be instantiated more than once in a configuration. For example, the NIDaqAD Driver acquires analog data from most National Instruments Daq devices. It can be instantiated multiple times, once for each Daq device attached to the system. Within MICAS-X, the Drivers are controlled by the Acquisition module. The Acquisition module can dynamically create any number of Driver loops, and each loop can run at its own rate. Thus devices that each run at separate acquisition rates can all coexist within MICAS-X. Data from a GPS may be acquired at 1 Hz, while an NI Daq device might acquire data at 10 Hz. Each loop can also control the writing of one or more data files. Thus the data from the different frequency loops can all be archived with no loss. Drivers support three main forms of functionality: Aquire, Set, and Command. The Acquisition module calls the Acquire function of each Driver at the specified loop rate. This reads all the input channels that the Driver supports. The Set function can be called by numerous parts of the MICAS-X system, including Sequences, Triggers, and the user interface. The Set function controls the output channels that the Driver supports. The Command function allows the Driver to include additional functionality that doesn't fit in well to the paradigm of input and output channels. An example would be a motion control Driver. The Acquire function could read the current position of the motion device. The Set function would tell the device where to move to next. Then custom Commands would be used to start and stop the motion. Although many Drivers support only Acquire or only Set functions, Drivers can include any or all three of these functions. © 2014 David Thomson, Original Code Consulting, [email protected] 7 MICAS-X includes an Acquire Command, which is often mapped to a switch at the top of the screen. When Acquire is Off, the Drivers are not queried for new data. When Acquire is On, the Acquisition Loops are running and the Driver data is updated at the defined loop rates. The current design of the Driver interface does not include a way to stop and restart (reinitialize) the Drivers. Some Drivers (e.g. for streaming data, or data that is sent at a regular interval without the need for a query) may not behave well in MICAS-X when the Acquire mode is Off. In these cases, MICAS-X can be configured to start with Acquire True, and to not show an Acquire button so that Acquire is not turned off by the user. 1.5 Data Types For simplicity and flexibility, MICAS-X uses a single data type for the input and output data that the Acquisition module handles. This data is stored as a one-dimensional array of double-precision (8 byte) reals. When a device requires another numeric format (such as a 2 byte, unsigned integer), the data is coerced in or out of reals. For Boolean (true/false) data, MICAS-X uses the standard convention of False = 0, True = 1. In addition, any other non-zero value is also interpreted as True. The IEEE definition of reals allows for the special values of +Infinity, -Infinity, and NaN (Not-a-Number). MICAS-X therefore supports these values as well. +Infinity and -Infinity can be useful for moving the Thresholds of Triggers to a value that can never by attained, effectively turning the Trigger off until the Threshold is reset to another value. NaN is used in MICAS-X to indicate missing values. Some Drivers may return NaN within their data if communication to a device failed. In addition, all input channels for all Drivers are initialized to NaN when MICAS-X starts up. The value of NaN causes complications when channels that represent Boolean data are used, since the normal interpretation of <>0 (not equal to 0) will return a True if the channel value is NaN. It is often the case that an uninitialized Boolean channel should not default to True. Within MICAS-X, the test ( <>0 AND <>NaN ) is used to avoid this situation. In addition, Triggers and Sequences support several special conditions to enable the proper handling of NaN. Within MICAS-X, there is a buffer that includes all the most recent values of all the Driver channels. This buffer is updated by each Acquisition loop. In addition, any command to a Driver to Set an output channel updates that channel's value in the buffer when the channel is updated. (E.g. the output channels do not wait for the Acquisition loop to update the input channels before updating the output channels in the buffer.) Whenever MICAS-X needs to know a value of any of the Driver channels, the buffer is queried. For optimal performance, a query to the buffer for one channel also returns the entire array of channel values. Thus, when MICAS-X needs several channel values, one channel can be queried directly from the buffer, while the other channels are then pulled out of the full array of data that was returned. This allows the values numerous channels to be obtained while only making a single call to the buffer. © 2014 David Thomson, Original Code Consulting, [email protected] 8 By limiting the Driver data to a single data type, and by defining a universal Driver software interface, MICAS-X can take optimal advantage of the data acquired and set by the Drivers. Any Driver written to the MICAS-X specification will have its data fully integrated into the MICAS-X system. That data can be logged, displayed, and used within the Trigger and Sequence logic. Although the Acquisition module is limited to this single data type, the modular, customizable nature of MICAS-X readily allows for the handling of more complex data types. Custom Instruments can be added to MICAS-X which can handle a nearly unlimited scope of data types. 1.6 Channel Lists Since MICAS-X can include many Drivers, and each Driver can contain many channels, it is easy to create systems with dozens or hundreds of data channels. Having more than a few dozen channels can create user interface challenges. For instance, if there is a time-series graph for which the user can select a channel to display from a dropdown menu, it can be difficult to find the desired channel in a list of hundreds of channels. MICAS-X resolves this issue by allowing the operator to configure any number of Channel Lists. Key elements of MICAS-X then operate on a selected List. A time-series graph may be configured so that it only presents channels from one List. A data logging file can be configured to write only the channels from another list. In this way, MICAS-X streamlines the user interface and provides additional flexibility for dealing with large numbers of channels. 1.7 File Storage MICAS-X utilizes many different data files. As mentioned above, the configuration file (with an extension “.ini”) defines how MICAS-X will operate. The “Config to Load.txt” file tells MICAS-X which configuration file to load. When MICAS-X starts running, it immediately archives the configuration file in a date-named data folder. This way the data acquired will always be in the context of how the system was configured. MICAS-X automatically creates a log file in the date-named data folder. The log file notes various software events, such as when the main program and each module starts and stops, the version of each module, and any errors that MICAS-X encounters. In addition, many other events can be configured so that they are logged, such as Sequence steps, Alarms, and Triggers. Operator notes and messages from other programs can also be sent to the log file. The log file therefore can provide a valuable record of how an experiment operated, and can also be an invaluable debugging tool when developing new modules or setting up new configurations. Whenever MICAS-X is running, all the Driver data is automatically stored in a .tdms data file. (TDMS (Technical Data Management - Streaming) is an efficient, flexible, searchable file format created by National Instruments.) This data file serves as the ultimate archive of all the Driver data, and is used by MICAS-X for other purposes, © 2014 David Thomson, Original Code Consulting, [email protected] 9 including the History Data described below. In addition, a TDMS File Reader utility is included for reviewing the data in this file. It is important to note that the TDMS file is written by the default Acquisition Loop (Loop 0). Thus if multiple loops are configured, it is important to consider which device(s) are configured to use Loop 0. Putting the fastest loop rate in loop 0 will ensure that all the data from the fastest drivers is logged to the .tdms file, which could be desirable, but that also has the effect of increasing the disk space used by the .tdms file. Putting the fastest devices in another loop will result in loss of fast data in the .tdms file, but other file logging can be enabled in the faster loop such that only the fast device data is logged to a separate file. This configuration ensures that no fast data is lost, yet also prevents the .tdms file from growing unnecessarily. Finally, note that the .tdms file is automatically restarted every three hours. This prevents any one .tmds file from growing too large. Besides the .tmds file, it is possible to configure any number of additional textbased data files, or comma-separated-variable (.csv) files. Each .csv file can be configured to save a specific Channel List, and can be configured to be written by any Acquisition Loop. This allows precise control of how and when data is logged. MICAS-X includes a Record Command, which is often mapped to a switch at the top of the screen. Note that the Record Command only acts to turn file writing on and off for the .csv data files. The .tdms data file is always being written to when Acquire is On, regardless of the value of Record. MICAS-X also makes uses of several other types of data files. A menu option allows one to save screen shots of the MICAS-X display in .png graphics files. Sequences can be saved to and read from .seq files. Custom MICAS-X modules can create any other types of files that are needed as well. 1.8 History Data One of the primary uses of the .tdms data file is to provide history data for timeseries graphs. Time-series graphs are present in many places in MICAS-X, including the Control Tab and various Displays. Most time-series graphs allow the operator to select the channel(s) to display from a List of channels. Each time-series graph has a local data buffer associated with it. The program adds new data points for the selected channels to the data buffer every time the Acquisition module acquire new data. As long as the channels displayed are not changed, the time-series graph utilizes only the main data buffer for new data and its local buffer for history data. When the user changes the channel(s) being displayed, the time-series graph accesses the .tmds file to read the history data for the new channel(s). This history data is placed in the local buffer, and the graph proceeds as before. Several aspects of this history data mechanism deserve note. First of all, there is a configuration option that tells MICAS-X whether to read a single .tdms file or to gather history data from the two most recent .tdms files. Enabling two-file history can improve time-series graphs significantly. Since .tdms files are automatically restarted every 3 hours, if only one .tdms file is being used for history data, it is possible that a time-series © 2014 David Thomson, Original Code Consulting, [email protected] 10 graph might only have 2 minutes of data shown in it even though MICAS-X has run for 3 hours and 2 minutes. Enabling two .tdms file reading ensures that time-series graphs have a reasonable amount of history data available when channels are changed. Note that if the operator does not change the displayed channels, the local buffer for the time-series graph can grow much deeper than 3 hours. This depth is also controlled by a configuration parameter. Thus if very long time-series graphs are needed, it may be advisable to create a MICAS-X Display that predefines (in the configuration file) which channel(s) are being graphed, so that the operator cannot change the channel(s) and the history data can accumulate for a much longer period of time. It should also be noted that as the number of Driver channels gets large in a MICAS-X configuration, reading history data from even just a three hour .tdms file can incur a performance hit. Thus switching channels on a time-series graph could potentially impact the operation of the program. Again, using time-series graphs with predefined channels can be a way to avoid this situation. 1.9 Commands The Acquisition module of MICAS-X reads and writes to various devices, thus handling the input and output values of channels. MICAS-X makes use of these channels through a set of Commands. Several dozen Commands are built in to MICAS-X, and any Driver can add more custom Commands to the program. The Commands are all handled by a Command module that runs as a top level program in parallel to all the other MICAS-X modules. All Commands are sent to this module, which then calls the required functions of various MICAS-X modules to execute the Commands. The structure of a MICAS-X command is Command (string) : Parameter (string) : Value (numeric) Commands can be accessed in numerous ways in MICAS-X. There is a row of up to 8 buttons on the top of the main MICAS-X window that can be programmed to each execute a Command. Triggers and Alarms can execute one Command when turning from False to True, and another when turning from True to False. Sequences are made up of Commands, with additional parameters in each Sequence step that allow one to define conditional steps. Finally, the Command Interface Instrument can be used to have MICAS-X receive Commands from another instrument or program. The Commands allow the operator to define complex interactions, sequences, and conditions within MICAS-X. Often, the entire behavior of a complex system can be programmed in MICAS-X simply by configuring Triggers, Sequences, and other Commands. See for a list of Commands. 1.10 Program Versions MICAS-X is available in several versions. It can be supplied as source code and run within the LabVIEW environment, or it can be supplied as a compiled executable and be run without the need for a LabVIEW license. In addition, MICAS-X comes as the normal, licensed version and in a Limited Demo version. © 2014 David Thomson, Original Code Consulting, [email protected] 11 It is useful to purchase the LabVIEW source code version of MICAS-X if you plan to add your own modules to the system. With the source code version, you can see the source code of 90% of the MICAS-X system. (A small portion of the source code is password protected.) Thus you can use existing Drivers, Instruments, Displays, and Calculations as examples for how to write your own code. In addition, source code greatly enables better debugging of new MICAS-X modules. One major requirement for using the source code version is that you must also purchase a LabVIEW license from National Instruments. The compiled, executable version of MICAS-X is useful if you wish to deploy a system on a computer that does not have LabVIEW installed on it. It is often advisable to debug the system first in source code before deploying it this way. Both the source code and compiled, executable versions can be supplied as the normal, licensed version of MICAS-X. When MICAS-X is licensed, a small USB dongle is supplied by Original Code Consulting which must be attached to the computer running MICAS-X. This dongle verifies the licensing. If the dongle is not detected, the program will periodically switch to the Summary tab and display a message asking the operator to please ensure that the program is properly licensed. Other than switching tabs, no functionality of the program is impacted by the lack of a USB dongle, since it is imperative that experiments not be impacted by the possible accidental removal of the USB dongle or its possible failure. The Limited Demo version of MICAS-X is available for free. It does not come with a USB license dongle. It is available only as the compiled, executable version, not as source code. In addition, it is functional only for 20 minutes. After 20 minutes, acquisition and recording will stop and the program will no longer respond to most Commands. If you are using the Limited Demo version, you accept all risk regarding what may happen to your system if it is running when MICAS-X becomes disabled. Note that the Limited Demo version states that it is the Limited Demo version in the window title bar. Also note that if you are using the Limited Demo version and you DO plug in a USB license dongle, the 10 minute time limit will not be imposed, and that version can then be used with full functionality. However, if you have a USB license dongle, it is advised that you obtain the full version of MICAS-X so that if the dongle is removed or fails, the program will not become disabled. 2 Notes on Installation Hardware requirements for installation of MICAS-X are the same as those for installing LabVIEW. MICAS-X is currently supported for LabVIEW 2013, 32bit, running on Windows 7. It is generally compatible with Windows XP, Vista, and 8, but direct support for it on those OS's may be limited. Refer to the MICAS-X Installation Manual document for detailed instructions on installing MICAS-X either as LabVIEW source code to be used inside the LabVIEW environment or as an executable stand-alone program. Also refer to for information about the USB license key. © 2014 David Thomson, Original Code Consulting, [email protected] 12 In addition to installing MICAS-X and the USB security device, there are several other issues that should be considered when setting up your computer to run MICAS-X. If your computer is not connected to the internet, it may be worth considering disabling or uninstalling anti-virus software. Some anti-virus packages are known to interfere with data acquisition processes, though others have been used without any observed issues. You might also consider turning off Windows Auto-Updates, but do this at your own risk. If Auto-Updates are left on, it is important to configure your computer so that it does not automatically reboot after installing an update. A google search for terms such as “no reboot after automatic update” should return some useful links with instructions for disabling this annoying option. It is also very important to configure your computer's power options. It is recommended that you set the power scheme to never turn off your computer and never turn off the hard disk if the computer is plugged in (not on battery power). Having a data acquisition computer go to sleep when it is supposed to be taking data does no one any good. I also recommend turning off screen savers, though I have not observed any significant issue arising from their use. 3 Locating Directories on a Hard Drive Various parts of the MICAS-X system are stored in different places on your hard disk. If you are using the executable version of MICAS-X, read the section immediately below. If not skip to the section on source code. 3.1 Directories Used With the Executable Version of MICAS-X Under C:\, go to the folder labeled “OCC.” Inside are the following folders: MICAS-X Data – Where data collected by MICAS-X is stored by default. Folders within this folder will be titled in yyyymmdd format. MICAS-X Support – The configuration file is found in this folder. A text file named “Config to Load.txt” informs the program which file to used as the configuration file the next time the program is run. Both the text document and configuration file are in the first level of this folder. The configuration file has a .ini extension. If the file C:\OCC\MICAS-X Support\Config to Load.txt does not exist, then the MICAS-X program will automatically look for a configuration file named C:\OCC\MICAS-X Support\MICAS-X Configuration.ini This MICAS-X Support folder also contains the following folders: Defaults Displays Drivers Documents Documentation © 2014 David Thomson, Original Code Consulting, [email protected] 13 Editors Resources Utilities These folders contain various resources and source code that the program uses. Under C:\, go to the folder labeled “Program Files”. (This folder is labeled “Program Files (x86) on 64 bit operating systems). Open the folder labeled “MICAS-X.” This folder contains executable programs, including: MICAS-X Configuration Editor.exe MICAS-X Data Reader.exe MICAS-X Log Reader.exe MICAS-X mdoc Editor.exe MICAS-X TDMS File Reader.exe MICAS-X.exe 3.2 Directories Used with MICAS-X in Source Code Under C:\, go to the folder labeled “OCC.” Inside are the following folders: MICAS-X Data – Where data collected by MICAS-X is stored by default. Folders within this folder will be titled in yyyymmdd format. MICAS-X Support – The configuration file is found in this folder. A text file named “Config to Load.txt” informs the program which file to used as the configuration file the next time the program is run. Both the text document and configuration file are in the first level of this folder. The configuration file has a .ini extension. If the file C:\OCC\MICAS-X Support\Config to Load.txt does not exist, then the MICAS-X program will automatically look for a configuration file named C:\OCC\MICAS-X Support\MICAS-X Configuration.ini Under C:\, go to the folder labeled “MICAS-X.” Inside are the following folders: Acquisition Calculations Channel Lists Command Loop Common Configuration Defaults Development Documentation Displays Documents Drivers Editors File Writer © 2014 David Thomson, Original Code Consulting, [email protected] 14 FPGA Bitfiles (optional) Instruments KeyLok Log File Component Program Project Files Reporting Resources Sequencer Test Triggers Utilities Other files, including .alias and .lvlps files and LabVIEW Project files may also be present in the aforementioned folders. 4 Configuration File Usage MICAS-X can take on a wide range of personalities or functionality, as determined by the configuration file that is used. A single user or system can create multiple configuration files, and select which one is run depending on the experiment or process being carried out at the moment. The Configuration Editor (run either as a Utility inside MICAS-X or as a standalone program or VI) can be used to define the start-up configuration file. Pressing the button "Mark as Start-up File" will write the name of the configuration file currently being edited to the “Config to Load.txt” file, causing it to be used the next time MICASX is started. In addition to using the “Config to Load.txt” file to determine which configuration MICAS-X uses when it starts, it is also possible to create shortcuts to MICAS-X which tell the program to load a specific configuration, and which thus override the “Config to Load.txt” setting. The directions for creating shortcuts differ depending on whether MICAS-X is being run as an executable or in source code. Note that the configuration file name “MICAS-X RunTime Configuration.ini” is a reserved name and should not be used to name a user-defined configuration file. This file is used by MICAS-X to track dynamic configuration parameters, which can be changed, saved, and used while MICAS-X is running. (Normal configuration information is only read when MICAS-X starts, so changing those configuration parameters does not alter how MICAS-X operates while it is running, but only when it next starts.) Examples of dynamic configuration parameters include the location of the MICAS-X window on your computer desktop. As the user moves MICAS-X around, the program remembers where it has been placed by writing that location to the “MICAS-X RunTime Configuration.ini” so that it will be placed in that same position the next time it is run. Another difference © 2014 David Thomson, Original Code Consulting, [email protected] 15 between normal configuration parameters and those in the “MICAS-X RunTime Configuration.ini” are that the latter are used with any and all MICAS-X configurations, and hence they are more global parameters that define how MICAS-X acts in general, but not how any one configuration acts. As of version 1.5.0 of MICAS-X, a CRC check is placed in the configuration files by the configuration editor. This check can be used to identify configuration files that have become corrupt or were edited by hand outside of the Configuration Editor, as explained in section 5.2. It is also possible to configure a Backup Configuration file which will be automatically used if the Start-up configuration file is found to have an invalid CRC. The Backup Configuration file is described in section 5.3. This feature cannot be used when a shortcut is used to select a configuration file, as described above. It only works when the “Config to Load.txt” file is used to select the configuration file. 4.1 Shortcuts for MICAS-X.exe Executable To create a shortcut for the MICAS-X.exe program that loads a specific configuration file, use Windows Explorer to navigate to the MICAS-X.exe file, which should be located in C:\Program Files\MICAS-X Right click on the file and select "Create Shortcut". Drag this shortcut to the desktop or to some other desired location. Right click on the shortcut and select "Properties". The Target parameter must be edited according to the following format: "C:\Program Files\MICAS-X\MICAS-X.exe" "Configuration File.ini" E.g. the first parameter must be the full path to the MICAS-X.exe program, in quotes. The second parameter must be the name of the configuration file, in quotes. Note that for the second parameter, only the name of the configuration file should be used, not the full path. The configuration files must be located in C:\OCC\MICAS-X Support. 4.2 Shortcuts for MICAS-X.vi in Source Code To create a shortcut for the MICAS-X.vi VI and have it run inside LabVIEW and load a specific configuration file, use Windows Explorer to navigate to the main MICASX VI. This should be located at C:\MICAS-X\MICAS-X.vi. Right-click on the MICASX.vi and select "Create Shortcut". Then drag the resulting shortcut to the desktop or some other desired location. Right click on the shortcut and select "Properties". The Target parameter must be edited according to the following format: "C:\Program Files\National Instruments\LabVIEW 2012\LabVIEW.exe" "C:\MICASX\MICAS-X.vi" -- "Configuration File.ini" E.g. the first parameter must be the full path to LabVIEW, in quotes. The second parameter must be the full path to the MICAS-X.vi in quotes. The third parameter must © 2014 David Thomson, Original Code Consulting, [email protected] 16 start with two dashes, followed by a space, followed by the name of the desired configuration file, in quotes. For this shortcut to work, LabVIEW must not be started or loaded before the shortcut is run. (E.g. if LabVIEW is running, it must be exited first.) In addition, the "Run When Opened" option must be selected for the MICAS-X.vi in the Execution options tab of the VI properties. Note that for the third parameter, only the name of the configuration file should be used, not the full path. The configuration files must be located in C:\OCC\MICAS-X Support. 5 Configuration Editor Before using MICAS-X, you must have or create a Configuration File that defines what features MICAS-X will have. This section explains how to use the configuration editor to create your configuration files. Proceed to the “Using MICAS-X” section of the manual if you already have configuration files and are interested in using MICAS-X. To launch the configuration editor from within MICAS-X, go to the Utilities Menu and select “Configuration Editor”. The Configuration Editor.vi VI can also be launched within LabVIEW, or the Configuration Editor.exe program can be run directly from Windows. 5.1 Using the Configuration Editor In the top-left area of the window, select the gray “Read a File” button to select a file to open in the configuration editor. This will present a file dialog for the folder “MICAS-X Support.” To the right of the “Read a File” button, two gray boxes state the file path of the file being edited and the start-up file (the configuration file that will run the next time MICAS is used). Next to each of these boxes are options to “Mark as Start-up File” (which saves the current configuration as the start-up configuration) and “Read Start-up File” (which makes MICAS-X read the current start-up file given in the box to the left). The “Save As” button allows the operator to save the currently edited configuration under a new file name. The “New” button will create a clean configuration with only default values. When this button is pressed, a file dialog will be presented so that the operator can name the new configuration file. The “Version” box lists the version of MICAS-X configuration editor currently run on the computer. Finally, the “STOP” button will immediately stop and close the configuration editor window. Make sure to save all changes before pushing “STOP.” On the left-hand side of the screen, you can locate two lists of options. The first, labeled “Components,” allows you to select which part of the MICAS-X program you wish to edit. Your selection of either Modules, Instruments, Drivers or Displays will © 2014 David Thomson, Original Code Consulting, [email protected] 17 change the contents of the second list. The second list will allow you to select the specific module you wish to independently configure. Be sure to save all your changes in one component editor before clicking to select another component. When a component is selected in the list to the left, an editor window specific to that component is loaded within the large rectangle that occupies most of the window. A series of buttons near the upper right of that rectangle allows the operator to save changes to the configuration. The right most button is named “Save” and will flash orange if any changes have been made that have not yet been saved. If another component is chosen without first pressing this save button, any changes made will be lost. To the left of the Save button is a Revert button. Pressing this button will revert all the configuration parameters in the current window back to the values contained in the configuration file being edited. E.g. any changes that the operator has entered will be removed. Further to the left is a button labeled “Reset to Default”. If this button is pressed, all the displayed configuration parameters will be initialized to their default values. Those default values will not be saved to the configuration file until the Save button is pressed. Finally, if the configuration editor is being run inside MICAS-X, and if MICAS-X is in Debug mode, a fourth button appears even further to the left. This button is labeled “Save as Defaults”. When this button is pressed, the current values of the configuration parameters are saved to a special configuration file that defines what the default values for the component should be. This button is not intended for use in normal operation. 5.2 Configuration File CRC A Cyclic Redundancy Check (CRC) was added to MICAS-X configuration files in version 1.5.0. This value serves as a way to ensure the integrity of the configuration file. The presence of the CRC can detect when a configuration file has become corrupted, or when a configuration file was edited by hand (rather than by using the MICAS-X Configuration Editor). Since manual editing of a configuration file is error prone, being able to detect when someone has edited a configuration file can be a valuable form or insurance. Any configuration files created with version 1.5.0 or later of MICAX-X should have the “Require CRC” option (on the Security configuration page) set to True by default. Configuration files created with older versions of MICAS-X will not have this parameter, so when they are read in, it will default to False. The CRC will only be examined for configuration files for which this parameter is True. Thus, if you have a configuration file that was created in an older version of MICAS-X, and wish to apply this level of protection in version 1.5.0 or later, you should read the configuration file into the MICAS-X Configuration Editor and re-save it. This will apply a valid CRC to the configuration file. If MICAS-X is run with the “Require CRC” parameter True, and the CRC in the configuration file is valid, no action will be taken. If the CRC does not match the contents of the configuration file, or if it is missing, error 7033 will be generated. Note © 2014 David Thomson, Original Code Consulting, [email protected] 18 that even when error 7033 is generated, MICAS-X will continue to run. If you are concerned about the integrity of your configuration file and want to know if this error is present, it is recommended that you set up an Alarm that will post an Alert for error 7033. This Alarm could also be configured to turn off acquisition or even exit MICAS-X if so desired. See section 5.4.3.10 for information on Triggers and Alarms. 5.3 Backup Configuration File An additional safety mechanism that works in conjunction with the Configuration File CRC is the Backup Configuration File. This is defined in the Security page under the “Modules” section of the configuration editor. When a Backup Configuration File is defined, its name is stored in a file named “Backup Config.txt”. This file and the Backup Configuration File must both be located in the MICAS-X support directory. If a Backup Configuration File is defined, and the CRC of the Startup Configuration File is found to be invalid, the file name in the “Backup Config.txt” will be automatically copied to the “Config to Load.txt” file, and that configuration file will then be used. Error 7034 will be reported, so that the operator is aware of the configuration file substitution. This leaves the original Startup Configuration File intact, so that it can later be examined to determine why the CRC check failed. Also note that if the “Config to Load.txt” and “Backup Config.txt” files contain the same file name, no configuration file substitution is performed. Care should be taken when managing the Backup Configuration File. If the Backup Configuration File is not maintained and properly updated, then if the Startup Configuration File is unusable, MICAS-X will start with an out-dated and possibly incorrect Backup Configuration File. 5.4 Modules 5.4.1 MICAS The MICAS configuration page allows the configuration of much of the main functionality of the MICAX-X program. This configuration page allows the selection of which Displays and Instruments are included in the MICAS-X system, as well as how the options above the tab structure in MICAS-X are configured. In the top left-hand corner of the window, enter the name you wish to call the system you are editing under the “System name” box. This name will be used to label the first tab of the MICAS-X display, which is otherwise named “Control”. To the right of the “System Name” box, you can select the desired update time, listed in milliseconds. The default value of this parameter is 500ms, or ½ second. This parameter determines the rate at which the Control tab is updated with new data values. The proper value for this parameter depends on the rate at which Housekeeping data is acquired. © 2014 David Thomson, Original Code Consulting, [email protected] 19 Below the update time, you can determine where the collected data is stored in the “Data Folder” box. This is set to “C:\OCC\MICAS-X Data” by default. The “Acquire on Start Up” option allows you to turn on and off the ability to immediately acquire data upon start up of the program. The “Record on Start Up” option allows you to turn on and off the ability to immediately record data upon start up of the program. The “Max History Depth” option allows you to select the maximum size of the data buffer of data displayed on time-series graphs. The buffer size of data displayed in time series graphs depends on several parameters and conditions. See the section on the time-series graph on the Control tab for more information. Below the “Max History Depth” option is a switch labeled “Read 2 files of History data” or “Only read 1 file of History data.” This parameter affects how much data is available in time-series graphs, as described in the section on the time-series graph on the Control tab. The “Displays” section of the MICAS Module defines which Display modules are included in the current configuration. The “Available Displays” list to the far right shows all the Displays that can be added to the current configuration. Note that some Displays can be added more than once (those with the .vit extension), whereas others can only be added once (those with the .vi extension). Thus if a .vi Display is already added to the current configuration, it will no longer be listed in the Available Displays list. To add a Display to the current configuration, double-click on the desired Display in the Available Displays list. The Displays present in the current configuration are listed in the “Displays” list further to the left. To remove a Display from the current configuration, press the red button on its row. Note that if more than 5 Displays are present in the current configuration, the scroll bar on the “Displays” list can be used to scroll up or down through the list of Displays. Create a prefix for the Display by typing in the desired prefix into “Display Prefixes” in the appropriate row. Prefixes cannot contain spaces and should be kept short. Be sure to use prefixes if a Display module is being used more than once (e.g. a .vit Display). The prefix allows MICAS-X to distinguish between the multiple instances of the Display and keep track of which is which. The Display name is automatically used as the “Tab Name”, but this can be changed according to your preferences to give the Display tab in MICAS-X a specific label. © 2014 David Thomson, Original Code Consulting, [email protected] 20 If the “Outside?” check box is marked, the Display will be instantiated outside of the main MICAS-X window, and will appear as its own window rather than in a MICASX tab. The “Instruments” section of the MICAS Module defines which Instrument modules are included in the current configuration. The “Available Instruments” list to the far right shows all the Instruments that can be added to the current configuration. Note that some Instruments can be added more than once (those with the .vit extension), whereas others can only be added once (those with the .vi extension). Thus if a .vi Instruments is already added to the current configuration, it will no longer be listed in the Available Instruments list. To add an Instrument to the current configuration, double-click on the desired Instrument in the Available Instruments list. The Instruments present in the current configuration are listed in the “Instruments” list further to the left. To remove an Instrument from the current configuration, press the red button on its row. Note that if more than 5 Instruments are present in the current configuration, the scroll bar on the “Instruments” list can be used to scroll up or down through the list of Instruments. Create a prefix for the Instruments by typing in the desired prefix into “ Instrument Prefixes” in the appropriate row. Prefixes cannot contain spaces and should be kept short. Be sure to use prefixes if an Instrument module is being used more than once (e.g. a .vit Instrument). The prefix allows MICAS-X to distinguish between the multiple instances of the Instrument and keep track of which is which. The Instrument name is automatically used as the “Tab Name”, but this can be changed according to your preferences to give the Instrument tab in MICAS-X a specific label. Each Instrument can optionally have a Display of its own. The “Display?” check determines whether MICAS-X will open the Instrument VI's front panel as a Display. If the “Outside?” check box is marked, the Instrument Display will be instantiated outside of the main MICAS-X window, and will appear as its own window rather than in a MICAS-X tab. The section in the lower left-hand part of the window allows you to configure up to eight options that can appear along the top of MICAS-X. (Note that the 8th option will only be available if there are no Alarms configured, since the Alarm Status indicator appears in the same space as the 8th button.) To configure an option, select the number of the option you wish to edit using the arrows next to the “Option Number” control. Select the type of Option using the Option drop-down menu. Use “None” to have the program ignore that option. Other options that can be select are Command, Indicator, Controller, T/F Indicator, Switch (T/F Controller), Enum List Indicator, and Enum List Controller. Note that Indicators, Controllers, Enum List Indicators, and Enum List Controllers take up the space of two options, since they require space for their channel label. Thus these options are available only for option numbers 2, 4, 6, and 8. This is important to keep in © 2014 David Thomson, Original Code Consulting, [email protected] 21 mind when editing options 1, 3, 5, and 7. For example, if option 2 is set to Controller, the option 1 will be forced to be “none”. If you change option 1 to another type of option, it will automatically revert to “none”. The Command option creates a button which can issue any Command when it is Turned On and any other Command when it is turned Off. The left column of parameters determine how the button will act when it is turned from False to True, and the right column determines what will happen when it is turned from True to False. Check the “Auto-Reset” button if the button should automatically switch back from True to False after the program reads it. As an example, a button that controls whether the program is in Acquire mode would not use auto-reset, as the button would stay True or False until the operator changes it. A button that starts a Sequence could use the Auto-Reset function, since once the Sequence is started, the button would automatically revert back to False so that the operator could press it again when needed. “False Text” shows the text that will be shown when the button hasn’t been pushed, and “True Text” shows the text that will be shown when the button has been pushed. In these fields, add a short text string that indicates to the operator what the button will do. The remaining parameters are used to define the behavior of the button. Use these parameters to assign MICAS-X Commands to the False-to-True button push and the True-to-False button push. When a Command is selected, the string and value parameters below the Command are enabled or disabled depending on the parameters that the Command uses. Indicator options display the current value of any one channel. Controller options present the value of one controller (output) channel and allow the operator to change it. For both T/F Indicators and Switches, the associated channel name is used as the button label. T/F Indicator options are used to display the value of a channel when that channel naturally can have only two values. Normally a value of 0 is equated with False, and 1 (or any non-zero) is equated with True. However, the “False Value” option can be used to explicitly specify the value that will be displayed as False. A Switch option (T/F Controller) is similar and is used when a controller (output) channel naturally can take on only two values. The “False Value” and “True Value” parameters specify the numeric value assigned to the channel whenever it is set to False or True. If another value (besides the False or True Values) is assigned to the channel by another process within MICAS-X, the channel name displayed on the button is bracketed with asterisks to indicate that the channel currently has an out of range value. Enumerated Lists are used to assign a set of text labels to a finite number of channel values. For example, a “System State” channel might use the value 0 for Off, 1 for Stand-by, 2 for Running, and -1 for Error. Enum List Indicators and Enum List Controllers allow one to define enumerated lists for displaying the value of a channel © 2014 David Thomson, Original Code Consulting, [email protected] 22 (Indicators) or setting the value of a channel (Controllers). Use the array to define each specified channel value and its associated text. The Delete and Insert buttons can be used to edit the list of values. The scroll bar on the right or the index value on the upper left can be used to scroll down to additional values beyond the five that can be displayed. When the Enum Lists are displayed on the MICAS-X window, the numeric value associated with each text is added to the right of the text string, thus it is not necessary to explicitly add the numeric value to the text strings. Note that integers are usually used as the values in an Enum List, but MICAS-X does support the use of non-integer values as well. Due to rounding errors with non-integers, it is advised that non-integer values be used with care. Also note that the value “other” is automatically created for each Enum List, so that if another process in MICAS-X sets the associated channel to a value that is not in the Enum List, the option will display “other”. The “Require CRC” parameter determines whether or not the program will generate an error if it finds that the configuration file CRC (Cyclic Redundancy Check) value is invalid or is missing. This feature allows MICAS-X to detect when the configuration file has been corrupted accidentally or has been edited by hand, rather than with the MICAS-X Configuration Editor. Configuration files created with versions of MICAS-X earlier than 1.5.0 do not contain this feature, so this parameter should be set to False for such files. It is recommended that this parameter be set to True for configuration files created or edited with versions of 1.5.0 or later. See section 5.2 for more information. You can add notes about the configuration in the “Notes” section at the bottom of the window. These notes are for your own documentation purposes, to remind you of how you configured things and why. They are not used within MICASX and are only saved within the configuration file. Each configuration window for each module contains a Notes field that can be used to record notes about that module's configuration. 5.4.2 Instruments To read how to use instruments, see the Instruments section of this manual (6.6.7). In the Configuration Editor, to edit the configuration of these instruments, select the 'Instruments' tab in the 'Components' menu located on the upper-lefthand side of the window. Next, select the appropriate instrument in the menu directly below 'Components,' now labeled 'Instruments.' Currently, no Instruments are included with the MICAS-X base package. Below are instructions on how to configure instruments that are available at additional charge. 5.4.2.1 Broadcast.vit The Broadcast Instrument is a component of MICAS-X which allows the user to configure any list of Channels to be sent out from MICAS-X over various © 2014 David Thomson, Original Code Consulting, [email protected] 23 communications links, including serial and UDP over Ethernet. This allows for MICASX data to be accessed by other systems and software in real-time. Since this instrument is a .vit rather than a .vi, it can be instantiated multiple times within a MICAS-X configuration. In addition, the Broadcast Instrument can configure up to ten channels to be sent to Shared Variables that can be read by the Data Dashboard app for Android and iOS devices. Note that only one instance of the Broadcaset Instrument should be configured to use the Shared Variables, since only one set of ten Shared Variables is defined in MICAS-X for this purpose. Begin configuring the Broadcast Instrument by selecting which channel list will be broadcast by using the drop-down menu labeled 'Channel List.' Define which strings will be prepended and added to the end of each line of data by inserting the desired entries into the 'Prefix' and 'Suffix' parameters. The 'Format' parameter should contain the format specifier, which defines how the data will be written in the broadcast data stream. *%#g is recommended (automatic formatting). See LabVIEW help for more information and options on format specifiers. Select a delimiter (Comma, Space or Tab) using the arrows next to the 'Delimiter' parameter. Check the 'NO/YES Include ISO Timestamp' box if the user desires to add an ISO timestamp to the output stream, after the prefix and before the first channel. The format of this time string is YYYYMMDDThhmmss.sss. Note that the letter “T” separates date and time. The 'Bus' parameter defines which type of bus will be used to broadcast data. The options currently supported are Serial, UDP, and UDP Multicast. When the Serial Bus is selected, choose which serial port to use by entering the desired number into the 'Serial Port' parameter to the right of the previously-mentioned parameters. The 'Baud Rate' parameter allows the user to determine the Baud rate that a serial port device will use. When the 'UDP' bus is selected, the user can set the 'UDP Packet Size' parameter. The default of 0 means that the traditional packet size of 548 will be used. Note that nondefault sizes may cause problems on some networks or OS's. The 'UDP' option will also prompt the user to change 'UDP Local Port' (with a default of 1). This parameter determines which local port on which UDP is opened to broadcast the data. Selecting a 'UDP Multicast' bus will not only prompt the user to fill out 'UDP Packet Size' and 'UDP Local Port' as well, but also 'UDP Target Port,' 'Time-to-Live' and 'UDP MC IP Address.' The 'UDP Target Port' parameter determines the remote or target port to which UDP writes the broadcast data. The 'Time-to-Live' (TTL) parameter © 2014 David Thomson, Original Code Consulting, [email protected] 24 specifies the number of routers, minus 1, to forward a packet. The TTL value applies to all packets sent using this socket. Finally, the 'UDP MC IP Address' control specifies the IP address that the UDP MultiCast stream will be sent to. If this control is left as default and empty, the address 234.5.6.7 will be used. To configure the Shared Variables for the Data Dashboard, simply click on each of the Channel selection menus and choose the channel to assign to each variable. Up to ten Shared Variables can be used. The Shared Variable names, which will be needed when you configure the Data Dashboard, are shown to the right of the Channels list. For each active Channel, there will be one Shared Variable with the name “Channel n Name” which is a string and will contain the selected Channel name, and another Shared Variable with the name “Channel n Value” which is a double precision real and will contain the updated value of the Channel. 5.4.2.2 Command.vit The Command Instrument provides an interface for receiving commands in MICAS-X from another instrument or software package. The Command Interface Utility is one example of a program that can send commands to MICAS-X via the Command Instrument. Since this instrument is a .vit rather than a .vi, it can be instantiated more than once in a single MICAS-X configuration. Begin configuring the Command Instrument by selecting which bus will be used for receiving commands (Serial or UDP) by selecting an option in the 'Bus' parameter. If Serial is selected, enter the serial port number in the 'Serial Port' parameter to define which port is used to receive commands. Next, select the 'Baud Rate' parameter and insert the desired Baud rate that a serial port device will use. If UDP is selected, define the port that will be used to listen to commands by entering the desired number into 'UDP Local Port.' For either option, choose to log all individual commands by toggling the 'Log each Command received/Don't Log each Command' switch to the right of the other parameters. 5.4.2.3 Email.vi The Email Instrument allows one to configure Alerts that are sent automatically to one or more email addresses. In addition, it can be used to manually send short emails to the same list of recipients. Note that this Instrument has been tested to work with some email servers. However, the options for authentication that this modules supports are limited, and it may be the case that your email server will not work correctly with this Instrument. Configure the Email Instrument by entering the information required to connect to an email server. This includes the Sender's Email Address, the Outgoing Email Server name, the Port (often 587), and authentication information, including Username, Password, and whether or not to use TSL authentication. Note that if the Hide Password control is True, the password will not be displayed directly on the configuration page. © 2014 David Thomson, Original Code Consulting, [email protected] 25 When the Python version is selected, one must also enter the absolute path on the computer in use to the python program. This version also requires that a third-party installation of Python be present on the computer in use. Version 2.7.8 of ActiveState Python, found at www.activestate.com/activepython/downloads has been tested with MICAS-X. If the above link does not work, contact Original Code Consulting for an archived copy of this version. When this version of Python is installed, the path is usually C:\Python27\python.exe. In the Subject field, enter text that will appear as the subject line for every email sent by this module. Text identifying the source as MICAS-X and/or your particular experiment is suggested, such as “Alert from MICAS-X”. Finally, enter the addresses that you wish to have e-mails sent to in the Recipients' Addresses list. At least one address must be provided, but more than one can be used to enable a group of people to receive the email Alerts. Note that all emails sent by this Instrument will be sent to the entire list of recipients and will use the same Subject line. Note that the password used with the server is saved in the configuration file. It is saved in a scrambled format, making it very unlikely that it could be extracted and used outside of MICAS-X, but the use of this Instrument is at your own risk. Note that the configuration file is saved with the data, so the scrambled password will be archived in numerous places. The Version parameter determines which of several versions of code are used to send the emails. Each version has its own benefits and risks. It is also possible that some versions may work successfully with some email servers while other versions do not, so try using different versions if you have difficulty getting the email function to work. Currently, the available versions are: NI – This version uses routines written by National Instruments for sending emails. A serious drawback of this version is that it will hang the entire MICASX program when sending an email. The hang can be for as short as one second to as long as 5 seconds or more. If you use this version, it is advised that MICAS-X be configured to send e-mails only for very important notifications when the program or hardware is not working properly. You should avoid using the email function to send status messages when everything is working normally, as the action of sending the email will cause a loss of data. .NET – This version is based on an example found on the NI website. It makes use of a .NET interface to email functions built into the OS. This version does not appear to cause MICAS-X to hang. It should be noted, however, that this version can only send to one address at a time, so when multiple addresses are specified, this version is called multiple times. Python – This version uses a call to the Python language to send emails. This version supports servers that use the “SSL\TLS” protocol. The NI and .NET versions have been found to work with servers that use the STARTTLS protocol. In general, it is best to set the “TLS?” parameter True to work with © 2014 David Thomson, Original Code Consulting, [email protected] 26 these servers. The Python version works with servers that use the “SSL\TLS” protocol. Also set the “TLS?” parameter True to work with these servers as well. Set the “TLS?” parameter false to work with servers that do not use encryption. It can be challenging to configure an email server. It is a good idea to verify the server address, username, and password first by using them in another email program. Always double-check the spelling of these items. Then try the various versions and turn the “TLS?” parameter on and off to determine which combinations work with your server. If more than one setup is found to work, choose the one that hangs MICAS-X the least when it is sending an email. To have MICAS-X send an e-mail automatically, use the Alert Command, described in Section 10. The Alert Command can be used with a Trigger, a Sequence, a Button, or sent from an external system. Use the bit value 16, 32, 64, or 128 in the numeric parameter of the Alert Command to tell MICAS-X to send an e-mail alert when the command is executed. It is recommended that you create a dedicated email account for use with MICASX. Since MICAS-X will be sending e-mails only, and not receiving any, setting the incoming message space to 0B can prevent spam email from wasting disk space. If a dedicated account is created, then, in the unlikely event that the password is compromised, no one's personal email will be jeopardized. It is possible to create an email address for nearly any cell phone number. In this way, the Email module can be used to send sms text messages. Each cell phone carrier has a different format for such email addresses, so it is imperative that you know the carrier of the phone number you wish to text. Refer to the carrier's technical support for information on how to format the email address, or search the internet for information. Many websites list the common email-sms gateway addresses, including http://www.makeuseof.com/tag/email-to-sms/ 5.4.2.4 Ramp.vit The Ramp Instrument is a module that can be used to create a linear ramp over time of the value of one output (Controller) channel. This Instrument can be added to a configuration multiple times, so that multiple ramps can be defined. The ramps created with this instrument can have a time resolution of 10s of milliseconds, whereas Sequences can easily be used to create ramps with time resolution on the order of one second. Thus, if a very smooth ramp is required, the Ramp Instrument may be more useful than a Sequence. In addition, using the Ramp Instrument may be simpler than defining a Sequence for the same purpose. The Ramp Output Channel is used to select which MICAS-X Controller Channel will be ramped over time. The Ramp On Channel is optional. If it is left undefined (showing the value “--”), the Ramp can only be turned on and off manually using a switch on the Ramp display. (Note that the Ramp Instrument must be configured as Displayed in order to use this © 2014 David Thomson, Original Code Consulting, [email protected] 27 manual switch.) If this channel is defined, then the Ramp will turn on whenever the specified channel is non-zero. Changing that channel's value to 0 will turn the Ramp Off. If the Ramp mode selected is not one of the Repeated modes, then when the Ramp finishes its normal run, the Ramp On Channel will be changed to a value of 0 by the Ramp Instrument. Since the Ramp On Channel's value can be changed by the MICAS-X program, this Channel must be a Controller. An input Channel cannot be selected as the Ramp On Channel. The Ramp Initial Channel is optional. If it is left undefined (showing the value “-”), the initial value of the Ramp will be selected from the Initial Value parameter, which can only be changed manually by the operator, not programmatically. If the Ramp Initial Channel is defined, then other functions within MICAS-X can alter the value of the Ramp's initial value by changing the value of that Channel. The Initial Value parameter is therefore only used if the Ramp Initial Channel is undefined. The Ramp Final Channel is optional. If it is left undefined (showing the value “-”), the final value of the Ramp will be selected from the Final Value parameter, which can only be changed manually by the operator, not programmatically. If the Ramp Final Channel is defined, then other functions within MICAS-X can alter the value of the Ramp's final value by changing the value of that Channel. The Final Value parameter is therefore only used if the Ramp Final Channel is undefined. The Ramp Time Channel is optional. If it is left undefined (showing the value “-”), the scan time of the Ramp will be selected from the Ramp Time (s) parameter, which can only be changed manually by the operator, not programmatically. If the Ramp Time Channel is defined, then other functions within MICAS-X can alter the value of the Ramp's scan time by changing the value of that Channel. The Ramp Time (s) parameter is therefore only used if the Ramp Time Channel is undefined. The Ramp Mode is used to select what type of ramp will be created. The Instrument can ramp up from the Initial to Final Value, down from the Final to Initial Value, or Up and then Down, and each ramp type can be set for a single execution or continuously repeated execution. The Ramp Scaling parameter defines whether the Ramp will be linear in time or logarithmic. The Ramp Refresh Time (s) parameter defines how often the Ramp Output Channel will be updated. This parameter can be made as small as 10 ms, or can be multiple seconds or longer. If times less than 100 ms are used, it is advised that the program be tested carefully to ensure that it performs as expected. The minimum time that can be used depends on the performance of the computer on which the program is being run, the other items configured within MICAS-X, and the hardware associated with the Ramp Output Channel. Note that the ramp value is calculated by taking the elapsed ramp time (current time minus the time that the ramp started) divided by the Ramp Time to arrive at a fraction of the ramp completed. The span of the ramp (Final minus Initial Values) is then © 2014 David Thomson, Original Code Consulting, [email protected] 28 multiplied by the fraction completed, and added to the Initial Value to arrive at the Ramp Value at any particular time. Once the Ramp starts, the Initial and Final Values and the Ramp Time are saved in memory. If the Channels defining those values change after the Ramp has started, the changes are therefore ignored, and the Ramp is calculated only based on the values that were present when the Ramp started. 5.4.2.5 SMPS Ramp.vit The SMPS Ramp is an extension of the Ramp Instrument, hence many of the parameters have identical definitions and functionality. For explanations of the Ramp Output Channel, Ramp On Channel, Ramp Initial Channel, Ramp Final Channel, Ramp Time Channel, Scaling, Initial Value, Final Value, Ramp Time (s), Ramp Mode, and Ramp Refresh Time (s) parameters, see the section above on the Ramp Instrument. The SMPS Ramp Instrument is intended for acquiring data from a scanning DMA (Differential Mobility Analyzer). Hence in addition to the above parameters, it has parameters that define how the particle count data is acquired, and what the flow conditions are. These parameters include the Paricle Count Channel, which must be set to the data channel that contains particle counts. Note that the design of the SMPS Ramp Instrument is such that the Particle Count Channel should acquire data in its own loop at a 10 Hz loop rate. The Particle Count Time Channel must be set to the timestamp channel of the Driver that contains the Particle Count Channel. This channel is used by the Instrument to detect when new particle count data is available. The CPC Aerosol Flow Channel must be set to a data channel that contains the flow rate of the CPC particle counter, in uints of cm^3/s. The DMA Aerosol Flow Channel must be set to the data channel that contains the flow rate of the aerosol inlet of the DMA, and the DMA Sheath Flow Channel refers to the Sheath Flow of the DMA. Both DMA flows must be in units of LPM. The Temperature and Pressure Channels must be set to data channels that contain the values of the DMA column temperature and pressure, in units of degrees C and kPa. Note that the flow, temperature, and pressure channels can be from real measurements, if the required sensors exist, from Equation channels that rescale measurements that are in other units, or from Manual channels that are used just so that the operator can enter the appropriate values. Also, note that Globals 4, 5, and 6 must be set to the values of the DMA column length in cm, and the inner and outer DMA diameters (R1 and R2) in cm. The # of Bins parameter specifies how many bins the voltage scan is separated into and into which the particle counts are accumulated. The Plumbing Time (s) parameter specifies the delay due to plumbing length and flow rates between when a particle is transmitted by the DMA until it is detected by the CPC. © 2014 David Thomson, Original Code Consulting, [email protected] 29 5.4.3 Drivers To add drivers, see the Acquisition section (5.4.5). See that section also for information about using Prefixes with Drivers. Note that any time a single Driver is used more than once in a MICAS-X configuration, Prefixes are necessary to keep the instances of the Driver straight. Below are instructions on how to configure the drivers that come included with the purchase of every copy of MICAS-X software (drivers included with the base package). 5.4.3.1 Array.vit The Array driver allows one to implement a one dimensional array of data that can be used programmatically throughout the MICAS-X program. Multiple arrays can be created by using this driver repeatedly. This type of array can be used, for example, in sequences, to step through a set of process variable values which cannot be easily specified by an equation. For example, a voltage could be stepped through a 1,2,5,10,20,50,100 sequence by creating a seven element array of those values and incrementing the array index in the sequence, then reading the array values. Enter a name for the array in the “Array Name” parameter. This name will be used to read and write the array values. In addition, it will be used as the basis for several other channels that the driver creates. For an array with the name “ArrayName”, there will also be a channel called “ArrayName Index”, which will be used to specify the location within the array to read or write data. The “Array Name Time” is similar to the Time channel every driver has, and records the time when the Array values were recorded. If the “Include Size” parameter is checked, then another channel named “ArrayName Size” will be created that is a read-only channel and which returns the number of elements in the Array. (Note that the ArrayName Index channel can have values from 0 to ArrayName Size – 1.) If “Allow Array to Grow” is not checked, the array size will be fixed by the number of entries in the Values list in the configuration. Trying to set the ArrayName Index channel past the ArrayName Size – 1 will result in an error. If this parameter is checked, then setting the ArrayName Index to a value greater than ArrayName Size and then writing a value to the Array channel will cause the Array to be extended as needed, with zeros placed in any new elements between the end of the old array and the new value. Use the Delete and Insert buttons to remove and add values in the array list. The Import from File button can be used to read an array of data from a file. This file must be either a single column of numbers separated by returns, or a single row of numbers separated by commas. 5.4.3.2 Calculations.vit The calculations driver allows the user to calculate outputs based on one or more channels' data. To configure a calculation, begin by double-clicking on an option in the 'Available Calculations' box in the upper-lefthand part of the window. This list contains © 2014 David Thomson, Original Code Consulting, [email protected] 30 all the Calculations installed on your system. Any calculation labeled '.vit' can be used more than once. The selected Available Calculation will be moved to the box directly below, labeled 'Calculations.' Click on the Calculation in the 'Calculations' box to highlight it and edit its parameters. When a Calculation is highlighted, a Description will appear on the box to the right. This information will tell how many input and output channels the Calculation must have in order to work correctly, and what their order must be. The 'Channel Averager' calculation takes a single input and averages it over N samples to create a single output channel (where N is acquired from the 'Global 0', or first global variable found under Modules – Acquisition tabs). Select the desired input channel from the drop-down list labeled 'Input Chanel' below the description of the Averager. Name the output channel by typing the desired name in the first line of the Output Channels list. Make sure to set the Global 0 to a valid initial value in the Modules\Acquisition editor for this Calculation to work properly. The 'Previous Value” calculation provides a way to create memory of a channel's previous value. This calculation takes one channel as input and creates one output channel. The output channel will contain the value of the input channel on the previous iteration. This calculation can be used to create logic that looks for changes in a channel's value, or which measures the rate of change of a channel's value. This calculation is a .vit, so it can be instantiated any number of times. The 'Demo Calculation' calculation is a simple demonstration calculation that can be copied to create more complex calculations for use in various systems. To configure it select two input channels from the drop-down list. This calculation will sum the two channels to arrive at a single output channel. Name the output channel it creates by typing a new channel name in the first line of the Output Channels list. 5.4.3.3 Document The Document driver supplies additional functionality to the Document Display. By including the Document Driver, the Document Number and Section Number channels are created, which allow programmatic control of the document being displayed in the Document Display. See section 5.4.4.2 for information on the Document Display. 5.4.3.4 Equations.vit The equations driver allows the user to create new channels based on previously available channels. To create a new equation, press the insert button in the 'equations' section on the left side of the screen. To delete an equation, press the delete button next to the corresponding equation. Name the equation by typing the desired label into the 'Name' box. To create the equation, select the entirety of a channel name from the 'Channels' list in the center-right portion of the window, and press CTRL-C to copy this into your clipboard. Paste the © 2014 David Thomson, Original Code Consulting, [email protected] 31 name of the selected channel in the large 'Equation' box by clicking inside the Equation box and pressing CTRL-V. You can use any function (e.g. +, -,*,/...), and copy and paste any number of additional desired channels into the 'Equation' box to create the desired equation. If multiple Channel Lists have been created in the configuration that you are editing, a specific Channel List can be chosen with the Channel List control so that the Channels displayed are limited to those in that list. This sorting can make it easier to find specific channels when a configuration contains many channels. To confirm that the syntax of the equation is correct, copy and paste your new equation into the 'Test Equation' box located in the upper-right portion of the window. Select a channel value (the value selected in the Channel Value control will be the value for all channels in this equation, as it is only a test to confirm correct syntax). If functional, a result will appear in the 'Result' box found to the right of the 'Channel Value' input box. If there is an error in your test of the equation, the 'Test Equation Error' box in the lower-righthand portion of the window will indicate the error status (present or not), give the error code, and describe the error. lists all the functions available for use with Equations. Also note that the LabVIEW functions on which Equations are built do not support the numbers Inf, -Inf, or NaN. Therefore these numbers should not be used as constants within the equation text, and if any input channels have these values, the output of the equation will be set to NaN. Example: Using the Equations Driver The Equations Driver can be used for many purposes. One of the simplest examples would be to create a new channel that displays an existing channel's data in new units. For example, the equation: (9 * Chamber Temp (C) / 5 ) + 32 Could be used to create a new channel named Chamber Temp (F) which converts the channel Chamber Temp (C) to degrees Fahrenheit. A second, more complex example is from an instrument that measures wind direction. The direction output was sent out as an angle from 0 to 540 degrees. When a measured quantity was plotted versus wind direction, some of the data that should have shown up in the 0 to 180 degree range instead appeared over in the 360 to 540 degree range. Although the Equations syntax does not support IF/THEN commands, the following equation was used to resolve the issue: © 2014 David Thomson, Original Code Consulting, [email protected] 32 Angle -360 * (sign(Angle - 360) + 1 ) / 2 * abs( sign(Angle – 360)) The figure below shows how this Equation was configured in MICAS-X, including the use of the Test Equation to verify that the Angle of 365 was converted to 5. Figure 5.1 Configuring the Equations Driver to create a new channel that corrects an angle channel that overflows the 360 degree upper limit. Since the “sign” function returns a -1, 0, or 1 depending on the sign of its argument, the (sign(Angle - 360) + 1 ) / 2 part of the equation calculates a value of 0, ½, or 1 depending on if the Angle channel has a value below 360, equal to 360, or above 360. The abs( sign(Angle – 360) section of the equation set the ½ value equal to 0 for the special case in which the Angle = 360. An alternative resolution to this issue could have been to write a small Calculation VI that the Calculations Driver would use. Such a VI would have been trivial to write in LabVIEW, using a case structure to handle angles below and above 360 degrees. However, the Equation solution, though a bit convoluted, allows the resolution of the issue without having to program anything in LabVIEW. 5.4.3.5 Manual.vi The Manual driver allows the user to create additional channels that are not directly associated with any hardware inputs or outputs. The values of these channels can © 2014 David Thomson, Original Code Consulting, [email protected] 33 be set manually by the user as the program runs, to indicate the values of experimental parameters, or can be used programmatically by Commands, Sequences, Triggers, or other mechanisms. To create a manual channel, click the green 'Insert' button. Delete a channel by pressing the corresponding red 'Delete' button. Name the channel by entering the desired text in the 'Manual Controllers' field. Use the 'Initial Value' box to the right of the respective manual entry to define the value that the channel will have when the program first starts running. 5.4.3.6 MOSDS.vit The MOSDS Driver is an interface to the OSDS (OCC Streaming Data System) toolkit provided by Original Code Consulting. OSDS is a configuration-based system for acquiring data from a wide variety of instruments. Please refer to the previously-issued OSDS document, called 'OSDS Description' for additional information about how to use OSDS. A copy of this document can be found under MICAS-X/Development Documentation (for Source Code users) or under OCC/MICAS-X Support/Documentation (for Executable Version users). Note that OSDS Format Files are external to the MICAS-X configuration file. The Revert and Save buttons above relate only to the MICAS-X configuration file, which contains the file name of the OSDS format file and the 'Don't Use Missing Data' parameter. The Revert, Save and Save As buttons below allow you to edit the OSDS Format parameters themselves and save them to an OSDS Format File. To use an OSDS file in the MICAS-X MOSDS driver, click the browse button (a folder icon) above the box in the upper-lefthand corner of the window labeled 'OSDS Format File.' This box will show the file path of the selected document. Below this, make sure to check or leave blank the OFF/ON box labeled 'Don't Use Missing Data.' If this option is selected, then if the Driver encounters an error and does not get real data, it will not put NaN's into the data buffer, but will just leave the previous data in the buffer as the most recent. This can be useful for situations in which the device sends data at an unknown or variable rate. By running the Driver in a fast loop, this option will catch any data available but will not refresh the buffer with NaN's if no data is available. The gray box in the center of the window, labeled 'OSDS Format,' will populate with information from the selected OSDS Format File. Many OSDS Format Files already exist, though they often need to be edited to work in any given situation. New files can also be created for talking to many different instruments. By default, OSDS Format Files are stored in the C:\MICAS-X\Resources\OSDS\OSDS Format Files director when using source code, or the C:\OCC\MICAS-X Support\ Resources\OSDS\OSDS Format Files directory when using the executable version of MICAS-X. Because OSDS Format Files are external to the MICAS-X configuration, care must be taken when moving a configuration that uses the MSODS Driver from one © 2014 David Thomson, Original Code Consulting, [email protected] 34 computer to another. In addition to moving the MICAS-X configuration file, be sure to also copy the required OSDS Format Files between computers. 5.4.3.7 NIDaqAD.vit The NIDaqAD (National Instruments Data Acquisition, Analog to Digital) Driver acquires analog input voltages from a wide variety of National Instruments data acquisition devices. This Driver is a .vit, so it can be instantiated multiple times within a MICAS-X configuration. One instance of this Driver is needed for each NI Device to be used. Any one NI Device can only have one NIDaqAD Driver associated with it. To configure a device, enter the device name in the box in the upper-lefthand part of the window labeled 'Device.' This parameter must match the name of the NI Daq Device as it appears in MAX (Measurement and Automation Explorer) and how it appears in the table in the lower right corner of the window. The table displays the NI Devices that are currently visible to your computer, as well as how many A/D channels each device has. You can copy and paste a device name from this table to the Device parameter. The Single-Ended/Differential parameter directly under the Device name parameter is applied to all the channels on the device, and determines the input configuration for the channels. Note that when this is changed, the chart in the lower right is updated to reflect the number of channels available in that mode on each detected device. To name a given channel, type the desired label into the appropriate 'Name' box, inside of the array. To the right o the 'Name' parameter, select a type of scaling for the analog input channel. 'None' is a 1 to 1 ratio that simply displays the input voltage. 'Polynomial' allows the user to write simple equations using the subsequent polynomial coefficients (Offset, Linear, Quadratic and Cubic). Various thermocouple types are supported using specific Scalings, including E, J, K and T (ex. E Type TC). These work only with National Instruments Devices that directly support Thermocouple measurements, and are specifically designed for the NI 9213 CompactDAQ device. The 'TC Mode' box in the lower-righthand part of the window allows the user to select which Thermocouple mode should be used in the Analog to Digital conversion. The 'Lookup Table' options allow for complicated relationships between measured voltages and desired engineering units. The user can either fill these in manually inprogram (by inserting numbers in the 'Raw Value' and 'Scaled Value' fields in the boxes on the lefthand side of the window), or import data from an outside table from a text file. To do the latter, use a comma-delineated (no spaces) raw value followed by scaled value, with carriage returns after each pairing. To import, click the 'Import Table X' button at the bottom of the window. Similarly, to store a user-created table, click the 'Export Table X' button directly below the import button. Up to three Lookup Tables can be used in one instance of the NIDaqAD Driver. © 2014 David Thomson, Original Code Consulting, [email protected] 35 The Channel parameter specifies the channel number on the NI Daq Device that will be used for the MICAS-X Channel. Note that the chart to the lower right shows how many channels are available for each of the NI Daq Devices visible to your computer. The Range parameter specifies the voltage gain setting that will be used for the Channel. Not all Daq Devices support all the input Ranges available in this parameter. Refer to the documentation for your NI Daq Device to determine which input ranges are supported. Three Acquisition Mode are available for this Driver. Single Point is the default mode, and acquires a single measurement for each cycle of the Acquisition Loop that the Driver is in. Burst and Continuous are modes that allow for oversampling and averaging of the data for increased noise reduction. When either of these modes is used, the # of Samples to Avg and the Acq Rate (Hz) parameters must be configured. In Burst mode, the Driver takes a number of samples each time the Acquisition Loop cycles. The numer of samples times the sample rate should be smaller than the acquisition loop time. For example, with a 1000 ms (1 Hz) Acquisition Loop, one could set the # of Samples to Avg to 20 and the Acq Rate (Hz) to 20, so that the burst of acquisition would take 500 ms. This way the Acquisition Loop can keep up with its 1 Hz rate without any problem. Note that in Burst mode, all the acquisition happens when the Acquisition Loop polls the Driver. Thus in the above example, 500 ms of the loop time would be taken up by the single NIDaqAD Driver. If there are other Drivers in the same Acquisition Loop, it is possible that the loop may not keep up with its desired rate. For this reason, it may be a good idea to put the NIDaqAD Driver in its own Acquisition Loop. In Continuous mode, the NI board is configured to acquire data continuously. The Acquisition Loop will then read and average a number of samples on each iteration. For this to work, the Acquisition Loop time (e.g. 1000 ms for a 1 Hz loop) must be configured to be the same as the acquisition time. To average 20 samples in a 1 Hz acquisition loop, you would then set the Acq Rate to 20 Hz. The advantage of Continuous mode is that the acquisition is clocked by the NI Device in the background, and the samples are merely read by the driver each time the acquisition loop cycles. E.g. the Acquisition Loop does not need to wait for the data to be ready. However, a possible disadvantage is that this mechanisms ties the Acquisition Loop to the NI Device clock. It may therefore be advisable to put other Drivers in separate loops, particularly if they are tied to different hardware clocks. 5.4.3.8 Sequences.vi The Sequence Module allows the user to create sequences, or multi-step commands within MICAS-X. The Sequences Module can be used with or without the Sequences Driver or the Sequences Display. The Sequences Module Configuration is described in section 5.4.9. If the Sequence Driver is included in the MICAS-X configuration, additional sequence functionality is provided. By including the Driver, the system has access to two new sets of Channels. One set of Channels is created from the Sequences names, with © 2014 David Thomson, Original Code Consulting, [email protected] 36 the text “SeqStep “ prepended. This is an input channel, and it will contain the number of the step that the sequence was on when the channel was recorded. The second set of Channels has the text “SeqState “ prepended to the Sequence name. These are output or Controller channels, and they can be used to turn Sequences on and off. By using these Channels, the Set “channel” command can be used instead of the Start Sequence command, which provides an additional level of flexibility to the control of sequences 5.4.3.9 Timers.vi The Timers Driver allows the user to create any number of channels that act as timers. In addition to the user-created timer channels, whenever the timer driver is included in MICAS-S, the Timer's 'Run Time,' 'Acquire Time,' and 'Record Time' are always automatically included. (Do not add these channels additionally through the 'Timers' section on the lefthand side of the window.) All timers only count up, in seconds and start in their running state (but can be paused and unpaused via 'Commands'). To add a timer, click the green insert button. To delete a timer, click the respective red delete button. Name a timer by entering a label into the highlighted 'Timers' box. To determine the timer's starting value, select a number in the 'Initial Value' section, located to the right of the 'Timers' section. The Timers Driver supports several Commands, which are listed and described in section 10. 5.4.3.10 Triggers.vi The function of Triggers in MICAS-X is described in section 5.4.10. The Triggers Module is always included in MICAS-X and can be used with or without the Triggers Driver. If the Triggers Driver is include, it provides additional functionality which enhances the utility of the Triggers. By including Triggers Driver in a MICAS-X configuration, two additional sets of channels are created. One of the sets of channels created uses the text “TrigState ” prepended to the each Trigger name. These channels log the state of the Trigger (0-False, 1-Warning, 2True, 3-Alarm). The second set of channels uses the text “TrigThr “ prepended to the Trigger name. These channels can be used to control the trigger threshold. These threshold channels are output channels that can be changed while MICAS-X is running to alter how the triggers work. For example, a Trigger could be configured with an initial threshold of 10, such that if a channel exceeds that value, the Trigger will become True and execute a command. Some time after the program has started, the Trigger's threshold could be set to Inf, which would effectively disable the Trigger, since the Channel's value can never exceed that threshold. Drivers available for additional cost include: © 2014 David Thomson, Original Code Consulting, [email protected] 37 5.4.3.11 Airmar.vit The Airmar Driver allows acquisition of GPS, attitude, motion, wind, and meteorological data from the Airmar 200WX and similar weather stations. The Airmar 200WX supports a large number of data sentences. Currently, the MICAS-X Driver for the Airmar supports the GGA, ZDA, VTG, ROT, MDA, MWV, XDRB, and XDRA sentences, which also happen to be the sentences that are enabled by default. Support for additional sentences could easily be added in the future if the need arises. To configure the Airmar Driver, simply place an X in the box next to each sentence that you wish to acquire. Enter the number of the COM (serial) port that the Airmar is connected to on your computer, and enter the repetition rate in the Rate (sec) parameter. The repetition rate can have a resolution of 0.1 seconds. Note that this value is sent down to the Airmar during configuration, so that it streams data at this rate. It is important to make sure that the MICAS-X Acquisition Loop that the Airmar Driver is assigned to is configured to accommodate this acquisition rate. When the Airmar is powered on, it always begins communicating at 4800 baud. MICASX switches the Airmar automatically to 38400 baud, which improves communication latency and allows for more data to be transmitted at a give loop rate. Note that it is possible to select data sentences that send more data than fits into a selected loop rate. Using 38400 baud helps alleviate this problem, but care must be taken when configuring the Airmar to avoid this communication limitation. 5.4.3.12 Alicat.vit The Alicat Driver is used to interface to Alicat Flow Controllers. One instance of this Driver can communicate to any number of Alicat Flow Controllers that are on the same serial port. (Note that this multi-drop configuration has been tested with RS232 Alicat Flow Controllers connected to an Alicat multi-drop breakout box. It is expected that this Driver would function correctly with Alicat Flow Controllers that are on a multidrop RS485 network, but this has not yet been tested.) For Flow Controllers that are on separate, individual serial ports, multiple instances of this Driver can be used. Be sure to define an prefix for each instance when using multiple instances of any Driver or MICAS-X module. Note that MICAS-X communicates to the Flow Controllers in polled mode. If a Flow Controller is set to Streaming mode, it must be reconfigured following the procedure in the Alicat manual. Enter the serial port number to be used by the Flow Controller(s) in the COM Port field. For each Flow Controller on that serial port, enter the seven parameters in the Flow Controllers array. The ID is a one letter code that acts as an address for the Flow Controllers. This comes set to “A” as a factory default. If multiple Flow Controllers are configured on a single serial port, each one must have a unique ID. This ID can be set via hyperterminal or another serial communication program, or in many cases, by using the © 2014 David Thomson, Original Code Consulting, [email protected] 38 interface panel on the front of the flow controller itself. Refer to the Flow Controller documentation for more information. The Name field is used as a descriptive identifier within MICAS-X. This can be set to the same value as the ID, or, more usefully, to a short description of the function of the flow controller. This name is used as the root of all the channel names that the Driver creates for the Flow Controller. Each Flow Controller can be configured to control in mass flow or volume flow. This configuration must be done externally from MICAS-X according to the procedure documented in the Alicat manual. Regardless of which mode the Flow Controller is using, it will report its flow both in mass flow and volume flow units. The Vol Flow Units and Mass Flow Units fields allow the operator to enter these units as text, which is used in creating the relevant channel names. The Full Scale Flow parameter is used to specify the nominal full scale flow of the Flow Controller. This must match the specification of the Flow Controller, so that MICAS-X can control the set points appropriately. The units of this parameter must match the units that the Flow Controller specifications show for its full scale flow. The Mode parameter tells MICAS-X which flow mode the Flow Controller is configured to operate in. MICAS-X uses this information to create the name of the SetPoint channel and give it the correct units. The Initial SetPoint parameter tells MICAS-X what value to initialize the flow controller to when the program starts. The units of this value are those specified by the Mode control. 5.4.3.13 Aries Drive.vit The Aries Drive Driver works with a Aries IPA Motion Controller from Parker Hannefin. It is designed to operate a single axis. It is assumed that the IPA controller is configured with the Parker Hannefin software before it is used with MICAS-X. MICAS-X communicates with the motion controller via Ethernet. The IP Address field is used to specify the IP address of the IPA controller. The Initial Position (mm) and Initial Velocity (mm/min) parameters are used to set the values of the motor position and jog velocity. (Note that this is the velocity used when the motor is commanded to move. The motor is not commanded to move at initialization.) The Max Velocity (mm/min) is used to limit the commanded velocity. Any velocity set point sent to the Driver that is greater than this value will be limited to this value. The Counts/mm parameter specifies the calibration for the motor system from counts to mm. The Include Time? parameter is used to determine if the Driver prepends its data channels with a time-stamp channel. 5.4.3.14 NIDaqCounter.vit The NIDaqCounter (National Instruments Data Acquisition Counter) Driver is used acquire data from the counter channels on a wide variety of NI Daq devices. © 2014 David Thomson, Original Code Consulting, [email protected] 39 Each counter channel used by this Driver is configured separately. A single instance of this Driver can configure counters from more than one Daq device. Label each channel by clicking in the 'Name' box and entering the desired name. The 'Physical Channel' parameter specifies the counter channel of an NI Daq Device. This name must exactly match the name found in MAX (Measurement and Automation Explorer). For convenience, the chart near the lower left shows the NI Daq Devices currently visible to your computer. Physical channel names can be copied and pasted from this chart to the configuration parameters. The 'Edge' parameter specifies when the count will be triggered (either when signal level is rising or falling). 'Count Direction' specifies whether the counter will count up or down from its initial value. Insert the initial value of the counter in the 'StartVal' parameter. The units of measure (Hz, rpm or count) can be specified in the 'Units' parameter. To specify counter output type, select either elapsed (absolute) or delta (relative) in the 'CounterType' parameter. To delete or insert more counters, click the respective red and green buttons on the righthand side of the window. 5.4.3.15 NIDaqDA.vit The NIDaqDA (National Instruments Data Acquisition Digital to Analog) Driver is used to set output voltages using the DA channels on NI Daq devices. The 'Device' parameter must match the name of the NI Daq Device as it appears in MAX (Measurement of Automation Explorer) and it appears in the chart to the lower left. The chart shows the NI Daq Devices currently visible to your computer and how many channels are available for each Device. Device names can be copied and pasted from this chart into the Device parameter. To create a new channel, type the desired label into the 'Name' box. The Slope and Offset parameters can be used to apply a linear scaling to the data being passed to the output channel. Normally, set the Slope to 1 and the Offset to 0, and the output voltage will be equal to the value of the channel in MICAS-X. However, the Slope and Offset can be used to map engineering units of a MICAS-X channel into voltage. For example, if the channel was named Flow (cc/s) and a setting of 20 cc/s required a setting of 5 V, then a Slope of .25 and an Offset of 0 would map the channel's value of 20 to a voltage output of 5V. The 'Initial Value' is the value, in engineering units, used as a SetPoint when the program first starts. The 'Channel' parameter specifies the number of the analog output channel to be used for the MICAS-X channel. Note that the chart to the lower left shows how many analog output channels are available for each device that is detected. The 'Range' parameter defines the output voltage range for an analog output channel in the MICAS-X system. Note that not all NI A/D boards support all possible input ranges available in the selection. © 2014 David Thomson, Original Code Consulting, [email protected] 40 The red delete and green insert buttons to the right of the window can be used to delete and create new channels, respectively. 5.4.3.16 NIDaqDI.vit The NIDaqDI (National Instruments Data Acquisition Digital Input) is used to read digital inputs as channels using NI Daq hardware. The 'Device' parameter must match the name of the NI Daq Device as it appears in MAX (Measurement of Automation Explorer) and as it appears in the chart to the lower left of the window. The chart shows the NI Daq Devices that are currently present on your computer and the number of channels available on each one. A Device Name from that chart can be copied and pasted into the Device parameter if desired. To create a new digital output Channel used within the MICAS-X program, type the desired Channel name into the 'Name' box. The 'Channel' parameter defines the Channel number of a specific port on the National Instruments Digital IO Device which is to be used for the Digital Output bit. The 'Port' parameter defines the Port number on the National Instrument Digital IO Device. The chart to the lower left shows how many Ports are available on each NI Daq Device found on your computer, and how many bits (Channels) are available in each Port. The red delete and green insert buttons to the right of the window can be used to delete and create new channels, respectively. 5.4.3.17 NIDaqDO.vit The NIDaqDO (National Instruments Data Acquisition Digital Output) is used to create digital output channels using NI Daq hardware. The 'Device' parameter must match the name of the NI Daq Device as it appears in MAX (Measurement of Automation Explorer) and as it appears in the chart to the lower left of the window. The chart shows the NI Daq Devices currently found on your computer and the number of channels available on each Device. A Device Name can be copied and pasted from the chart to the Device parameter if desired. To create a new digital output Channel used within the MICAS-X program, type the desired Channel name into the 'Name' box. The 'Channel' parameter defines the Channel or bit number on the National Instruments Digital IO Device which is used for the Digital Output channel. The 'Port' parameter defines the Port number on the National Instrument Digital IO Device to which the bit belongs. The 'Initial Value' parameter defines which initial value that the digital output will be set to when the MICAS-X program starts. Note that the chart to the lower left shows how many bits (channels) and how many Ports are available for each of the NI Daq Devices currently found on your computer. The red delete and green insert buttons to the right of the window can be used to delete and create new channels, respectively. © 2014 David Thomson, Original Code Consulting, [email protected] 41 5.4.3.18 NIMotion.vit The NIMotion (National Instruments Motion) Driver allows the user to create one or more axis configurations compatible with the NI motion hardware. The 'Axis Name' parameter allows the user to create a label for the axis. 'Board ID' lists the board identification number for the NI Motion board in use. This parameter must be consistent with the board's configuration in MAX (Measurement and Automation Explorer). 'Axis' lists the hardware axis number. 'Position Mode' sets the absolute or relative positioning mode for the axis. 'Loop Mode' sets the Open or Closed-loop mode for the axis. 'Primary Feedback' associtates the proper feedback resource for the axis. 'Unit Type” defines the type of information, Counts, or Steps that will be used when referring to axis motion. 'Counts(Steps)/EngUnit' is a conversion scaling parameter which defines how many counts or steps equals one engineering unit. By scaling the motion with this parameter, MICAS-X can give commands in terms of mm or inches, for example, rather than steps or counts. 'Accel/Decel (100000)' describes the acceleration and deceleration value in Engineering units per second squared. 'Velocity (10000)' describes the velocity value in Engineering units per second. The red delete and green insert buttons to the right of the window can be used to delete and create new axis configurations, respectively. 5.4.3.19 Omega.vit The Omega Driver can be used to read a temperature measurement and set a temperature setpoint on an Omega CNi16 temperature controller. In addition, though not yet tested, this Driver is likely compatible with a wide range of Omega devices. At the very least, it can be altered to accommodate a wider range of Omega devices as well as a wider range of functionality within these devices. Use the COM Port control to select the serial port used to communicate with the Omega device. Use the Baud Rate parameter to set the baud rate for the driver to be the same as the baud rate selected on the Omega controller. All other communication parameters are assumed to be the default values that the CNi16 comes preset to. In addition, the Omega Driver assumes that the CNi16 is configured to use the standard ASCII protocol, not ModBus. 5.4.3.20 Prime Scales.vit The PrimeScales Driver reads the weight from a PS-IN202 industrial scales made by Prime Scales via a serial port. The COM Port parameter defines which serial port will be used by the scale. The Tare Weight parameter is used whenver the scale sends gross weight, as the Driver will then subtract the Tare Weight parameter to return net weight. The Include TimeStamp in Data paramter determines whether or not a timestamp will be prepended to the weight data whenever data is acquired from this Driver. © 2014 David Thomson, Original Code Consulting, [email protected] 42 5.4.3.21 System The System Driver allows one to include a wide variety of channels that are used to log the performance of the MICAS-X software and the computer on which it is running. Many of the channels provided by this Driver use the .NET interface. Thus .NET must be correctly installed on the target computer for this Driver to function properly. When MICAS-X is run inside LabVIEW, this is usually not an issue, since the LabVIEW installation ensures that .NET is installed. If MICAS-X is used as a compiled .exe program, it may be necessary to install the .NET framework before this Driver functions properly. Use the Drives parameters to define any hard drives for which you wish to monitor the disk free space. Use the Delete buttons to the right to remove a Drive from this list. The Channels to Include parameters allow one to select which of numerous additional predefined channels to include. These channels include: Sec Since Jan 1 - A time stamp formatted as seconds since midnight, January 1 of the current year, thus including month, day, and time in a single number. AC Power - This channel has a value of 1 if the computer is on AC power, a 0 if it is on battery power. This channel should work for laptops as well as systems with a properly-installed UPS. Battery Flag - This channel should work for laptops and systems with a properlyinstalled UPS. It returns the following codes for battery condition: 1 High, 2 Low, 4 Critical, 8 Charging, 128 No battery. These codes can be combined as needed. E.g. a code of 12 indicates a critical battery level and that the battery is charging. Battery Time Remaining (s) - This channel returns the estimated time in seconds that the computer will continue operating on battery power. This channel should work for laptops and systems with a properly-installed UPS. CPU Usage (%) - This channel returns the CPU Usage averaged over all cores. RAM Usage (GB) - This channel returns the RAM used in GB. Secured - This channel returns a 0 if the MICAS-X password is not currently enforced, a 1 when the password is in force. The Performance Channels allow one to add any of the .NET computer performance monitoring points to MICAS-X. To add a performance channel, select the proper Category, then the Instance, and if available, the Counter. Create a descriptive, unique Name for this channel, and the Add Channel button will become not-greyed-out, allowing you to press this button to add the defined channel to the list of Performance Channels. Use the Delete buttons to the right to remove a Performance Channel that is no longer desired. The System Driver allows one to monitor many computer performance parameters. The Drives list defines which hard disks' free space will be © 2014 David Thomson, Original Code Consulting, [email protected] 43 returned as MICAS-X channels. Enter a hard disk letter identifier in the left path space, or press the associated browse (folder) button to select a hard disk from a file dialog. Use the Delete buttons to the right to remove a hard disk selection from the list. 5.4.3.22 Vaisala HMT310 The Vaisala HMT310 Driver reads 11 channels of data over a serial port from the Vaisala HMT310 high precision humidity and temperature sensor. The COM Port parameter defines which serial port is used for communication. The Baud Rate parameter must be set to match the baud rate for which the HMT310 is configured. The Channels parameters allow one to select which of the eleven available channels is returned to MICAS-X. The Include Time? parameter determines whether or not the Vaisala data is prepended with a timestamp indicating when that data was acquired. 5.4.3.23 Web Power Switch.vit The Web Power Swith Driver is used to control a Web Power Switch 7 internetenabled power strip. This device has eight outlets which MICAS-X can turn on and off. The IP Address must be set to the IP address which the Web Power Switch has been configured to use. The User Name and Password parameters must contain the username and password used with the Web Power Switch in its own web interface. Note that these parameters are not encrypted within MICAS-X. The Initial Mode parameter determines whether MICAS-X reads the current state of each outlet when MICAS-X is started, and uses those states as the initial values of the channels, or if MICAS-X sets the outlets to the Initial Value parameters defined in the configuration. The Include Time? parameter determines whether or not MICAS-X prepends the Web Power Switch data with a timestamp. The Outlets array contains the definitions for each of the eight channels. The channels must be entered in order. If a channel is unused, leave the Outlet Name blank. The Initial Value determines if the outlet set On or Off when MICAS-X startes, but only if the Initial Mode is True (Use Configuration Initial Values). When the Enable Watchdog parameter is set to True, MICAS-X will run scripts on the Web Power Switch 7 such that one or more outlets will be automatically turned off if MICAS-X or the computer on which it is running should crash. See for information on configuring the Web Power Switch 7 to accommodate this functionality. Note that when MICAS-X stops, the Web Power Switch 7 stops the watchdog functionality, so the guarded outlet(s) will then remain in their current states indefinitely. The MICAS-X channels for the Web Power Switch are Controller, or Output, channels, since they are used to set the value of the outlet (On, 1 or Off, 0). However, since the outlets can be switched manually on the Web Power Switch itself, MICAS-X can also read the state of the outlets in during the Acquire command. (By comparison, most MICAS-X Drivers which set Controller channels only return their memory of the last values set when the Acquire command is used.) Because the outlets can be changed both by software and manually, there is a possibility of a race condition, wherein the © 2014 David Thomson, Original Code Consulting, [email protected] 44 value set by MICAS-X could be overwritten by a manually set value, or vice versa. To prevent this type of race condition, the Web Power Switch Driver imposes a wait of 400ms after any outlet value is set. (Note that this 400ms delay is only imposed when the Read Back parameter described below is set to True.) In addition to the delay imposed after setting an outlet value, the Web Power Switch Driver interacts with the Web Power Switch via http calls, which can be rather slow in certain situations. For both these reasons, it is advised that the Web Power Switch Driver be assigned to its own Acquisition Loop in MICAS-X. It may also be worthwhile to set the Acquisition Loop for this Driver to a slower rate, such as 5 or 10 seconds, in order to limit the Ethernet traffic resulting from the communications to this device. The Read Back parameter allows one more option for controlling the timing and functionality of the Web Power Switch. When set to True, Read Current Values from Device, every acquisition loop will read the switch states from the hardware itself, as described above. This read can take over one second, which is why it is recommended that this Driver be placed in its own acquisition loop with a cycle time of 2 seconds or more. When the Read Back parameter is False, however, the Web Power Switch Driver reports the state of the outlets based only on its memory of how it last set them. This option results in a very fast read, allowing the Web Power Switch Driver to be placed in a faster Acquisition Loop, but can potentially allow MICAS-X data to become out of sync with the states of the outlets if outlets are turned on or off manually at the device. To prevent this possibility, one should use the Web Power Switch configuration web page and lock out the hardware switches so that the outlets can only be changed by MICAS-X. 5.4.4 Displays To read about how to use Displays while MICAS-X is running, refer to the Displays section of this manual (6.6.8). For instructions on how to add Displays to the MICAS-X configuration, refer to section 5.4.1 To configure individual displays, select 'Displays' in the 'Components' menu in the upper-lefthand corner of the MICAS-X Configuration Editor. Then click the desired Display in the 'Displays' box that will appear below 'Components.' 5.4.4.1 3Graphs.vit The 3Graphs Display presents three time-series graphs, each with two traces, one on the left Y scale and one on the right. To configure the 3Graphs display, begin by selecting which channel list will supply the channels that will be viewable on the graphs. Although the channels being graphed on each graph can be changed while MICAS-X is running, only those channels that are part of the selected Channel List will be available. If it is important for the user to be able to access any and every Channel, the “All” List can be selected, though be aware that it can be difficult to find specific Channels in the list of All Channels when MICAS-X is configured with many Channels. © 2014 David Thomson, Original Code Consulting, [email protected] 45 Each graph (1, 2, and 3) has options to select what is displayed on the left ('GraphX Left') and right axes ('GraphX Right'). Use the drop down menus to select which channels are displayed on each graph when the program starts. Note that the user can change which Channels to display when the program is running. Each left and right axis also has options to select whether the axis starts in an auto-scaling mode or a manual scaling mode. Note that for Manual Scaling, there is currently no way to define the minimum and maximum values of the scale. These can be edited by the user when the program is running, to set them to appropriate values for the data being displayed. Click the 'Points?' buttons (options for left and right can be used independently of one another) to display points where each data point is collected, in addition to being connected with a line. This can be useful in certain situations, such as determining which periods of time data is missing from. On the righthand portion of the screen, select how much time history should be displayed in the trend graphs by selecting an option on the drop-down menu labeled 'History Length.' The value of this history length can be changed when the program is running. This parameter merely sets its initial value. Note that “Manual” and “From Pointer” are not allowed as initial values. Adjust the background color of the graph by clicking the shaded box labeled 'Graph Background' below the 'History Length' parameter. The 'Show Message Log' parameter in the bottom-lefthand portion of the window allows the user to determine if Message Log controls on the 3 Graphs display will be shown. If these are made visible, the operator can use them to enter notes into the log file directly from this Display. 5.4.4.2 Big Display The Big Display is designed to show a few key Channels in large fonts so as to allow them to be viewed at a distance. It allows for up to three Channels to be displayed as LEDs, and for up to three Channels to be displayed as numerics. The LED displays map a value of 0 to Off and any other value to On. Note that if any channels are left undefined (e.g. “--”), those indicators will be made invisible on the Big Display. It is often useful to configure this display to open up outside of the MICAS-X window so that it is always visible. (See section 5.4.1 for information on setting the “Outside?” parameter for a Display.) 5.4.4.3 Document Display.vit The Document Display is intended for providing instructions and information to the operator of MICAS-X. This information can be synchronized to the operation of the program. In the Document Editor, add documents to the list by clicking on the folder browse button to the right of the document list. Remove a document by pressing the Delete button to its right. © 2014 David Thomson, Original Code Consulting, [email protected] 46 Note that all documents used with the Document Display must be located in the “Documents” folder in the MICAS-X support folder. (When MICAS-X is used inside LaVIEW, the support folder is C:\MICAS-X. When used as an executable, the support folder is C:\OCC\MICAS-X Support.) Use the Initial Document and Initial Section parameters to determine what documentation will be displayed when MICAS-X starts. The “Include Time?” parameter applies only to the Document Driver. The Document Driver can be used in conjunction with the Document Display. It creates two channels, Document Number and Section Number, which can be used to programmatically control the display of the documentation. The Document Display can display several types of documentation. These include .txt files (simple text files), .mdoc files (a simple text file with a small amount of additional formatting), and .rtf files (rich text format files, such as can be created with WordPad, Word, or Open Office Writer). Rich text format files provide the most options for formatting the displayed text. .mdoc files allow MICAS-X to access and display subsections of a document, whereas .txt and .rtf files are only displayed as one section. The mdoc Editor Utility (see section 7.4) provided with MICAS-X can be used to create .mdoc files (which can also be created manually in any text editor). Since the Document Display uses a .NET accessor to display .rtf files, .NET must be properly installed on the target computer for this Display to function. When MICASX is run inside LabVIEW, this is usually not an issue, since the LabVIEW installation ensures that .NET is installed. If MICAS-X is used as a compiled .exe program, it may be necessary to install the .NET framework before this Display functions properly. When the Document Display is running, the user can access any section of any document by using the Document and Section controls at the top of the display. In addition, new documentation can be read in by pressing the Load A Document button. MICAS-X can also present documentation programmatically. To enable this, include the Document Driver in the MICAS-X configuration as well as the Document Display. Note that both the Document Driver and the Document Display must have the same prefix in order for them to work together. As an example, consider a Sequence that has been created which steps the operator through several actions to complete an experiment. The Sequence could use the Alert command to present the user with small amounts of information. The Ask and Ask(Num) commands can be used to obtain information from the operator as the Sequence progresses. In addition, the Document Display could be used to present larger amounts of text, such as instructions and explanations. The Sequence could use the Set command with the Document and Section channels to ensure that the proper information is presented to the operator at the appropriate times during the Sequence. Note that, as with any Display, the Document Display can be configured to be displayed inside MICAS-X in a tab of its own, or Outside of MICAS-X as its own window. When displayed Outside, the operator can position and size the Document © 2014 David Thomson, Original Code Consulting, [email protected] 47 Display window. MICAS-X will remember the most recent size and position of this window each time it is started. This allows the operator to place the instructional documentation in a convenient location on the computer screen, so that it is always accessible when needed, without having to move between tabs to see the documentation. It is important to keep in mind that the Document Display is intended for presenting short instructions and information. This module does not do any sophisticated memory management. When a document is loaded into the Display, the entire document is read from disk into memory It is therefore unwise to read especially large documents into this module, as performance issues could result. 5.4.4.4 Sequences Display.vi The Sequences Display provides a tab in MICAS-X that shows all the Sequences as well as their current running state. Sequences can be used in MICAS-X without including the Sequences Display. The Sequences Display is included in MICAS-X by adding it to the Displays list on the MICAS editor, as described in section 5.4.1. There is no additional configuration specifically for the Sequences Display. Displays available for additional cost include: 5.4.4.5 Multi Display.vit Tbe Multi Display is a single, flexible Display that can be configured to have up to six different Views. Each View defines a set of Channels to graph, a set of Buttons to use, and a set of Options. The Multi Display contains two time-series graphs, and each graph supports two Y axes, one on the left and one on the right. The Top Graph can have up to 8 Channels displayed on it, with any channel on either axis. The Bottom Graph can have up to 4 Channels displayed, again with any channel on either axis. For the graphs, the channels are preselected in the configuration, rather than being user-selectable at run time. Each Channel graphed also displays its current value, and the data can be displayed with or without points. Up to four Buttons can be defined for each View, which appear across the top of the Display. Each button can be configured to execute one Command when changing from False to True, and another when changing from True to False. The configuration of the Buttons is similar to those across the top of MICAS-X. Up to five Options can be defined for each View. An option can be a single Channel numeric indicator, a Controller Channel that can be changed by the user, a T/F Indicator, a Switch (T/F Controller), a Sequence, an Enumerated List Indicator, or an Enumerated List Controller. Controllers, Switches, and Sequences are configured just as they are for the Control Tab of MICAS-X, except that Sequences are displayed only with the Sequence name, not with custom text for when the Sequence is Off or On. A T/F Indicator shows the value of one channel as either True or False, where the False value is © 2014 David Thomson, Original Code Consulting, [email protected] 48 defined and any other value is interpreted as True. (Generally, the value of 0 should be used for False, as that is how MICAS-X interprets any channel when it is used as a T/F in other contexts.) An Enumerated List allows a list of text values to be associated with a list of numeric values. These lists can be useful for displaying the state of a system, when the state is represented as a defined list of integer values. E.g. 0 = Stopped, 1 = Stand-by, 2 = Running, 3 = Error. Enumerated List Indicators only display the value of a channel as a text value. Enumerated List Controllers allow the operator to set the value of a channel based on the text value, which is then converted to a numeric value within MICAS-X. Note that both types of Enumerated Lists automatically include a text value of “(other)”, which is used to display the channel if that channel gets a value, from another part of MICAS-X, which is not included in the list. Do not add the “(other)” value to the list in the configuration. MICAS-X will automatically add that value to every list. 5.4.4.6 XYZ Graph.vit The XYZ Graph Display is used to plot color-coded data vs both x and y axes. For example, one can use a Longitude channel for X, a Latitude channel for Y, and a temperature channel for Z to graph a geographic distribution of temperatures. Select which channel list to pick observed channels from by using the drop-down menu of the 'Channel List' box at the top of the screen. Although the channels being graphed can be changed while MICAS-X is running, only those channels that are part of the selected Channel List will be available. If it is important for the user to be able to access any and every Channel, the “All” List can be selected, though be aware that it can be difficult to find specific Channels in the list of All Channels when MICAS-X is configured with many Channels. Below, under the heading of 'Channels to Display', select which channel is to be displayed on each axis by selecting the desired channel in each of the drop-down menus of Channels. Select minimum and maximum values for this channel (when manually scaled) by entering the desired numbers in the '_ Min” and '_ Max' parameters. Complete this process for the X, Y and Z axes. Alse set the Auto-Scale/Manual Scale parameters to the scaling behavior that you wish the axes to have when the program starts. To define how much time history should be displayed in the XYZ graph, select the desired length of time from the 'History Length' drop-down menu in the upperrighthand portion of the screen. Note that “Manual” and “From Pointer” are not allowed as initial values for this parameter. The 'Marker' switch below this will, if clicked, enable the Marker functionality on the XYZ Graph while the Program is running. The Marker allows the operator to place one reference marker, either at the most recent (current) value, or at an arbitrary location specified by the operator. The 'Mark Current Value' switch, located below the 'Marker' switch, if clicked true, will mark the current X,Y,Z value with a bright green X. © 2014 David Thomson, Original Code Consulting, [email protected] 49 5.4.5 Acquisition The Acquisition Module allows the user to add more Drivers to use within MICAS-X. The “Available Drivers” list shows all the Drivers that can be added to the current configuration. Double-click on a Driver in this list to add it to the list of Drivers being used in the current configuration. Note that some Drivers can be used more than once in a configuration. For these Drivers, adding them to the configuration will not remove them from the Available Drivers list. If a Driver can only be used once in MICAS-X, then it will be removed from the Available Drivers list when it is added to the Drivers array. If a specific Driver is only used once in the MICAS-X configuration, the Prefix is optional. If the same Driver is used more than once in a configuration, each instance must have a unique Prefix. Prefixes should be short and cannot contain spaces. Create a prefix for the Driver by typing in the desired prefix into “Driver Prefixes” in the appropriate row. In addition to allowing MICAS-X to uniquely identify each instance of a Driver, the Prefix is prepended to each Channel of the Driver, so that the Channels from multiple instances of the same Driver are uniquely named. The “Acq Loop” array to the right of the Prefixes allows you to change the Acquisition Loop number assigned to the Driver. Assigning drivers to different acquisition loops allows asynchronous acquisition based on multiple different acquisition rates. Utilizing multiple loops can be helpful in several situations. If one Driver is reading data from a streaming device (e.g. one that continuously sends data at a fixed rate, without being asked) at, for example 10 Hz, and another Driver reads data from another device at 1 Hz, putting the two Drivers in different Acquisition Loops allows for each device to be read at the appropriate rate. Another example is when one Driver is reading data from a streaming device at 1 Hz, and another Driver is controlling a data acquisition card at 1 Hz. The first Driver's 1 Hz operation will be tied to the external device's 1 Hz clock, whereas the second Driver will be tied to the computer clock for timing the data acquisition device. These two clocks will inevitably drift relative to each other. Although they are both operating at close to 1 Hz, putting them in the same Acquisition Loop will eventually cause an error when the two devices become out of synchronization. You can delete any driver by pressing the red delete button in the appropriate row. Below “Drivers” are options to change cycle times. This control determines the timing of each Acquisition Loop. This array will have a number of elements determined by how many Acquisition Loops are defined in the Drivers configuration above it. If the Device Timed checkbox next to a Cycle Time is not checked, then the loop timing is determined by the MICAS-X software, and the Cycle Time is milliseconds per loop. If © 2014 David Thomson, Original Code Consulting, [email protected] 50 the Device Timed checkbox is checked, the Cycle Time is a millisecond delay, as discussed below. If the Device Timed checkbox next to the Cycle Time is marked, the specified loop cycle time will time will be determined by the device assigned to it, rather than by software timing by the MICAS-X program. Software timed Acquisition Loops should be used for devices and Drivers which respond to a request for data. E.g. if one is using the NIDaqDI Driver to acquire digital input data from an NI device, this Driver should be assigned to an Acquisition Loop that is software timed. If the Cycle Time is set to 1000, MICAS-X will ask for data from this Driver every 1000 ms. However, if a Driver is being used such as GPS, which streams data once a second without needing to have MICAS-X ask for the data, then the Device Timed check box should be marked. In this case, the Acquisition Loop cycle time will be determined by the rate at which the device sends data. Note that when the Device Timed check box is marked, the Cycle Time parameter is actually used as a Delay Time in milliseconds. Thus, for the example of a GPS sending data once every 1000 milliseconds, a Delay Time of 500 milliseconds may be appropriate. In this case, MICAS-X will ask for data from the GPS, wait until data is available, then wait 500 milliseconds before requesting more data. The delay time thus acts to make the loop more efficient, by not having the Acquisition Loop ask for data until it is almost time for the data to be available. Another way to view the difference between software-timed Acquisition Loops (Device Timed unchecked) and Device Timed Acquisition Loops is as follows. For a software-timed loop, MICAS-X uses its internal clock (the computer clock) to determine when it gathers data from the Driver(s) assigned to it. In the example of a 1000 ms Cycle Time, MICAS-X will note the time when the Acquisition Loop first starts, and will thereafter ask for data a 1000 ms intervals after that time. E.g. it will always try to request data at integer multiples of 1000 ms added to the time of its first acquisition. As an example, assume that the first data point was acquired at exactly 9:00 am and 0.0 seconds. MICAS-X will then try to acquire data at 9:00:01.0. If the Driver does not respond quickly enough, and data is not acquired until 9:00:01.5, the Driver will still schedule the next data point for 9:00:02.0, not for 9:00:02.5. E.g. it will always try to acquire data based on when the first data point was acquired, plus an integer number of acquisition cycle times. Device Timed Acquisition Loops defer instead to when the device or Driver makes data available. Take as an example a gas analyzer that streams data once every 2000 ms, without requiring MICAS-X to ask for the data. In this case, the Device Timed checkbox should be marked, and the Cycle Time (which is now used as a Delay Time) might be set to 1500. At 9:00:00.0, MICAS-X begins acquiring data. It waits until the gas analyzer presents data, which may happen at 9:00:00.2. It then waits for the Delay Time, or until 9:00:01.7. At that time, it again looks to the driver for data, which should arrive at 9:00:02.2. In this example, the Acquisition Loop timing is determined by the device, and the Delay Time is used to make MICAS-X more efficient by not looking for data during the entire cycle time. © 2014 David Thomson, Original Code Consulting, [email protected] 51 Only one streaming device should be assigned to any one Acquisition Loop. The Acquisition Loops for each streaming device should be set to Device Timed. Device Timed Acquisition Loops can include other Drivers that are not for streaming devices. E.g. a Device Timed Acquisition Loop for a GPS, acquiring data from the GPS every 1 second, could also acquire data from a NIDaqDI Driver once a second. Finally, it should be noted that some streaming devices will not respond well to having “Acquire” turned off in MICAS-X. E.g. MICAS-X has the ability to turn Acquire on and off, which determines whether or not the Drivers are queried for data. For most streaming devices, once the device starts sending data, turning Acquire off does not stop the device from sending further data. In this case, when Acquire is turned back on, there may be buffer overflows or other communication errors. If MICAS-X is configured to communicate with these types of devices, it may be advisable to configure it so that it is always in Acquire mode. To do this, the Acqurie at Start-up checkbox in the MICAS configuration should be checked, and any “Acquire” button that might be configured should be removed. 5.4.6 Channel Lists Channel Lists are lists of Housekeeping Channels and can be used for several purposes. Often, for a complex MICAS-X configuration, the number of Housekeeping Channels can become fairly large. When selecting a channel to display on a time-series graph, for example, it can become difficult to quickly find the desired channel amongst the list of all the channels. In this case, one can create a Channel List of just the important channels that one wants available on the time-series graph. Another use for Channel Lists is to define a set of channels that should be written to a .csv data file. The “Channel Lists” array lists the channel lists that have been created for the current configuration. You can delete a channel list by pressing the red delete button to the right of the appropriate channel list. To create a list, press the green “New” button located at the top and to the right of the delete buttons. The new channel list will be given a default name of “New List”. To edit the list’s name, highlight the name in the “List Name” box in the center of the window and type in a new name. Once a list has been created, you must define the Channels in that List. First, highlight the list in the Channels Lists box on the left. Any Channels already in this List will now be displayedi n the Channels array in the center. Existing Channels can be removed from the List by pressing the red Detete button to the right of the Channel. The Insert button will add another channel at the desired location. Once a new Channel has been inserted, click on the name of the new channel to see a drop-down menu of all available channels, from which the desired channel may be selected. Additional buttons to the right allow you to delete all the channels in the current list, set the current list to a list of all existing channels, or set to add all Controller (output) Channels to the current list. © 2014 David Thomson, Original Code Consulting, [email protected] 52 Further to the right are three controls that allow you to add Channels to the current List which are related to any specific Driver. Use the Driver control to select which Driver you want to add Channels from. Then press either the “Add All Driver Channels” or “Add All Driver Controllers” to add the relevant channels to the currentlyhighlighted Channel List. Note that, in addition to any lists you create, MICAS-X will always have a list named “All” which includes all MICAS-X channels. 5.4.7 File Writer The MICAS-X File Writer allows you to define any number of data files MICASX writes using the Housekeeping Channels. The Files cluster of parameters is an array of file definitions. A new File can be added by incrementing the number on the upper left hand side of this cluster, then entering the parameters in the new, blank definition. Change the Prefix (characters prepended to the file name) and Suffix (characters appended to the file name) of the file in question by entering the desired names into the “Prefix” and “Suffix” boxes, respectively. Enter the desired file extension in the “Extension” box. (Note that .csv is recommended for Delimited Text files, and .itx is recommended for Igor .itx files.) To choose how a file is delimited, select the option you prefer using the “Delimiter” parameter (comma, space or tab separations). (The “Delimiter” parameter is used only for Delimited Text files and is ignored for Igor .itx files.) The “Format” parameter acts as a format specifier, which defines how data will be written into the file. “%#g” is recommended, as this will use automatic formatting. See LabVIEW Help for more information on other types of specifiers. Note that when MICAS-X writes a value that it thinks is a LabVIEW time-stamp to a file, it over-rides the format specifier and uses “%.3f”, which ensures that the time-stamp is written with sufficient resolution to preserve sub-second information. This is applied to data values in the range 3.4e9 to 4.2e9, since LabVIEW stores time in seconds since 1904. The “Channel List” parameter determines which of your preset channel lists will be written to the file in question. Use the arrows to select which list will be used. The “Start a New File Every” parameter allows you to choose how often a new data file is created. Select a time between every minute and two days (or never, if you never want MICAS-X to automatically restart your data file). The “Acq Loop” parameter determines which acquisition loop writes the file in question. Different loops can run at different rates, but whenever a loop writes to a file, it gathers all the most recent Driver data for all the channels in its Channel List. © 2014 David Thomson, Original Code Consulting, [email protected] 53 Use the “File Type” parameter to define the file format used to write the data file. Currently-supported options are Delimited Text (e.g. .csv files) and Igor .itx. The .itx file type is used by the Igor data analysis program. Note that other File Writer parameters that are not relevant to the selected File Type will be greyed-out. When the Igor .itx file type is selected, the Channel names are written to the file as Wave names. In order to provide compatibility with Igor, Channel names will be altered in certain ways. The characters “!@#$%^&*(),.<>/?;':”\|” and the space, which are not allowed in Igor Wave names, are replaced with the underscore character “_”. In addition, certain Igor reserved words are altered by added “_X” to them. These include “Time”, “Debug”, and “Sec”. Note that not all Igor reserved words are currently filtered, so it is important to test your channel list by creating an Igor .itx file and reading it into Igor. You may need to alter some MICAS-X channel names in order to get this file to work properly. The “Wave Flags” and “Igor Commands” parameters are only used with the Igor .itx file type. “Wave Flags” can be used to set various Igor options. The most common flags to use are \O to have Igor overwrite any existing waves that are already loaded that have the same name as waves in the file, and \D to tell Igor to make the new waves as double-precision. See Igor documentation for additional flag information. Similarly, the “Igor Commands” is used to add Igor instructions at the end of the file. These can be used to automatically format and graph the data when it is loaded in Igor, for example. The “Custom Path” parameter allows you to define a specific destination for the file being configured. If this is left blank, the default data directory is used. Otherwise, the data file is written to a date-named directory inside the path specified here. Use the Write Frequency (Once Every n Loops) parameter to deteremine how often data is written to the file. Normally, this is set to 1, which causes data to be written on every iteration of the Acquisition Loop defined for the file. Setting this to 2 causes the data to be written every other time through the loop. As a further example, if the Acquisition Loop has a cycle time of 1000 ms (1 sec) and the Write Frequency is set to 60, the data will be written to the file once a minute. Note that these file writes are not synchronized to an even second or minute. E.g. in the above example, if the program starts at 5 seconds after a minute, data will be written to the file at every hr:mn:05 seconds, not at every hr:mn:00 seconds. Note that the .tdms file, which is continuously being saved in the background, is written by Acquisition Loop 0. Thus the .tdms file will have a sampling rate determined by the Acquisition Loop 0 cycle rate. If Acquisition Loop 0 is running at 1 Hz and one Driver is running in Acquisition Loop 1 at 10 Hz, it is important to realize that the .tdms file will only record 1 out of every 10 data points from that Driver. If it is necessary or useful to save all the data points for that Driver, two options are possible: 1) Reconfiguration the acquistion so that the fast (10 Hz) Driver is in Acquisition Loop 0 © 2014 David Thomson, Original Code Consulting, [email protected] 54 and configure that loop to run at 10 Hz, and configure the other, slower Drivers to run in another (or multiple) acquisition loops at their own rates. Using this method, the .tdms file will be written at 10 Hz and all the fast Driver data will be recorded therein. Note that all the 1 Hz Driver data from the other loops will be written to the .tdms file at 10 Hz, creating 10 duplicate values for each value read in. 2) Leave the 10 Hz Driver in Acquistion Loop 1, and set up a .csv file to write a Channel List of just this Driver's data, and configure that File to be written by Acquistion Loop 1. In this case, the .tdms file will only have 1 Hz data, which is likely sufficient for data review and time-series graphs, but the higher frequency 10 Hz Driver data will all be saved to the .csv file. The “Delete” Button to the right of the “Files” cluster will delete the File definition currently shown. 5.4.8 Control Tab The Control Tab module of MICAS-X Configuration Editor allows you to configure how the Control Tab looks and acts while the program is in use. The first box, “Control Tab Name,” allows you to rename how the Control Tab appears when MICASX is being run. The “Controllers” cluster is an array that defines which Controllers are available to use on the control tab. Use the Insert and Delete buttons to add and remove Controllers from the list. Click on the name of a controller to access the list of all available Controllers and select the one desired. Below the “Controllers” cluster, there is an option to “Set to All Controllers,” which will set the above list to all Controllers defined within MICAS-X. The “Delete All” button will remove everything you have added to the list. The “Switches” cluster, located to the right of the “Controllers” cluster, is an array that defines which Controllers are presented on the Control tab as switches. Controllers that logically have only two values (on/off, True/False, 1/0, etc.) are logical candidates for presentation as Switches on the Controllers tab. Add, remove, and select which controllers are used as Switches the same way as described above for Controllers. In addition, the Off Value and On Value need to be defined for Switches. The Off Value defines what value the Controller channel will be set to when the switch is turned to the Off (down) position. This is normally 0. The On Value determines the value the Controller channel will be set to when the switch is turned On. This is often 1, but other values could be used as appropriate. For example, an analog output channel could be used as a digital control channel by making the On Value 5, so that the Switch would change the channel between 0V and 5V. © 2014 David Thomson, Original Code Consulting, [email protected] 55 The “Sequences” cluster, located below the “Controllers” cluster, is an array that defines which sequences are presented on the Control tab. Add, remove, and select Sequences the same way as described above for Controllers. The “Triggers” cluster, located to the right of the “Sequences” cluster, is an array that defines which triggers are presented on the Control tab. Add, remove, and select Triggers the same way as described above for Controllers. The “Graph” parameters allow you to choose whether or not a time-series graph is displayed in the Control tab and how it is configured. Toggle “Show Graph” to determine if the graph will be shown in the tab. When the Graph is selected for the Control Tab, it will appear at the bottom of the tab, and the Controllers, Switches, Sequences and Triggers lists will only occupy the top half of the tab. If the Graph is not selected, those lists can extend all the way to the bottom of the tab, depending on how many items they contain. In either case, if they contain more items than fit in the allotted space, a scroll bar appears so that all the items in the list(s) can be viewed as needed. The “Left Axis” switch allows you to select Auto or Manual scaling on the left axis of the graph when MICAS-X first starts. The “Right Axis” switch functions like the “Left Axis switch.” “Graph Background” allows you to select the color of the background of the graph. “Left List” and “Right List” allow you to choose which lists of channels are are used to define the channels available to display on your graph’s left and right sides, respectively. “Left Channel” and “Right Channel” determine which channels initially appear on the left and right parts of the graph, respectively. “History Length” determines how far back the graph displays data. (Note that “Manual” and “From Pointer” cannot be selected as an initial value for this parameter. “All” will be used instead if “Manual” or “From Pointer” if either is the initial configuration value.) “Left Points” and “Right Points” determine whether points are displayed at each data point (as opposed to just plotting a line between the data points). 5.4.9 Sequences The Sequences Module allows the operator to define any number of sequences which can automate some of the MICAS-X functionality. Multiple sequences can run simultaneously. Sequences can use any of the MICAS-X commands listed in Appendix B, can reference any MICAS-X Housekeeping Channel as an input or condition channel, and can act on any MICAS-X Controller channel. Sequences can include branching (conditionals), looping, and timing. Note that sequence timing has sub-second resolution, but is intended for non-time-critical functions that typically operate on the time scale of seconds. Programmatic actions that require more precise timing should be implemented in MICAS-X in a custom-programmed Instrument module. As of version 1.5 of MICASX, Sequences can be paused, unpaused, and can be started at an arbitrary step. (Note that for the Start Sequence command, the step is specified by number. Specifying the step by its label is not currently supported.) Note that when a Sequence is paused, any Wait that © 2014 David Thomson, Original Code Consulting, [email protected] 56 may have been in process is considered finished when the Sequence is Unpaused. E.g. if a Sequence has a long wait that you wish to abort and have the Sequence continue without waiting the full time, you can Pause and then immediately Unpause the Sequence. The Sequence Module is built into MICAS-X and is always present, and can be used with or without the Sequences Driver or the Sequences Display. The Sequences Driver is an optional MICAS-X Driver that provides additional functionality for Sequences, as described in the Drivers section of this document. The Sequences Display provides a display tab that allows the operator to see all the sequences, review what each step of each sequence does, start and stop sequences, and view the current step of any sequence that is running. The Sequences editor allows the operator to defines all the sequences available in MICAS-X. In the “Sequences” list in the upper left, click on a sequence you wish to edit to highlight it. To add a new sequence, click “Insert.” Once a new sequences has been added, make sure it his highlighted, then the Sequence Name and other parameters can be edited. (Note that you cannot directly edit the Sequence Name in the Sequences list box.) To delete a sequence, click “Delete.” In the “Steps” list near the top center, insert and delete steps in a manner similar to how Sequences are inserted and deleted. To edit the sequence name, type in the desired name in the “Sequence Name” box. “Off Label” allows you to define the text that is visible on the sequence switch when it is in the off position. If left blank, the sequence name is used. “On Label” is used in a similar manner for the text on the switch when in the on position. Two switches below these buttons allow the user to include an Exit Step and to optionally Log each step of the sequence as it executes. An exit step is a single sequence instruction that is executed automatically whenever a Sequence stops. This step will execute regardless of why the Sequence is stopped – e.g. regardless of whether it ran its course and stopped normally, or the user clicked the Sequence button to stop it, another command stopped the Sequence, or the program stopped completely. If more than one command must be executed when a Sequences stops, it is possible to define another Sequence with all of those commands, and use the “Start Sequence” command as the Exit Step to call the other Sequence. Once a Sequence is highlighted in the Sequences list box, you can program each step of the sequence. Give a step a label by typing in the appropriate “Label” box. Labels are semi-optional, but it is good practice to give each step of each sequence a unique label. Labels server two purposes. They provide documentation to help understand what the sequence step is intended to do, and they provide a target for the Goto Sequence Command. Next to to the Label, select one of the available commands to execute by clicking the white “Command” box, or by cycling using the arrows to the left of the box. © 2014 David Thomson, Original Code Consulting, [email protected] 57 “Condition” defines what condition is applied to define a sequence step. A Condition of “True” (the default value) means that a step will always be executed when the Sequence comes to it. A condition of “False” is a way to disable a step without removing it, as it means that the step will never be executed. Other conditions compare the value of the Condition Channel to the Threshold to determine if the step will be executed. For example, the “>” Condition means that a step will only be executed if the value of the Condition Channel (at the time that the step is executed) is greater than the Threshold. Note that three special conditions are included that deal specifically with the value “NaN”, or Not-a-Number. Refer to section 5.4.10 for more information on these conditions. “Target” defines what the step will act on. The contents of the Target drop-down menu change depending on the Command selected. For example, if the Goto Command is selected, the Target drop-down list will contain all the Labels in the current Sequence. If the Set Command is selected (to Set a Controller Channel to a new value), the Target list will contain all the available Controller Channels. The “Value” parameter specifies the value that is used by the Command if the step is executed. The Target and Value parameters are greyed out for Commands that do not require a Target or Value. At the bottom of the window, “Minimum Sequence Time” allows you to select the time in milliseconds that the program must wait between each step in a sequence. The recommended time is 10 ms. Making it smaller can lead to more accurate sequence timing, but can potentially impact the overall performance of the program. “Startup Sequence” and “Shutdown Sequence” options allow you to select sequences which automatically run each time MICAS-X launches and finishes, respectively. If you want more than one sequence to run at start-up or shutdown, one can create a new Sequence with a list of “Start Sequence” Commands, then call this new Sequence as the Startup or Shutdown Sequence. Sequences can be exported and imported to .seq files for archiving, duplicating, or sharing. The Export button will write the currently selecte sequence to a .seq file named by the operator. The Import button will read a .seq file and incorporate the new sequence before the currently selected sequence. To import a sequence at the end of the list of existing sequences, use the Insert button to add a new, blank sequence at the end of the list, then import the desired sequence while the new sequence is selected. Finally, delete the unwanted blank sequence. The “Include Time?” parameter is used only for the Sequences Driver. It is ignored by the Sequencer module itself and by the Sequences Display. If this is set to True, the Sequences Driver channels are prepended with a timestamp channel so that the exact time that those channels were recorded is noted in the data file. © 2014 David Thomson, Original Code Consulting, [email protected] 58 5.4.10 Triggers The “Triggers” Module allows you to define Triggers and Alarms which will be used in MICAS-X. The Triggers Module is always part of MICAS-X, and can be used with or without the “Triggers” Driver. The Triggers Driver adds additional functionality to the Triggers and is described in the Drivers section of this document. A Trigger is a set of parameters that define an Command that will be executed whenever a Condition is met. MICAS-X continuously scans the defined Trigger Conditions and executes a Trigger whenever the Condition occurs. Alarms are a special type of Trigger that provide additional feedback to the operator. If any Alarms are defined, an Alarm indicator appears in the upper right corner of MICAS-X. The Alarm indicator is green (OK), yellow (Warning), or red (Alarm) depending on the highest state of all defined Alarms. The “Triggers” list displays the defined triggers. Click on a trigger and highlight it to edit it. Insert a trigger using “Insert,” and delete one by pressing “Delete.” Once a Trigger is highlighted, the various parameters for it can be edited. The “Trigger Name” allows you to change the name that describes the highlighted trigger by writing in the desired name in the box. The “Log” switch will allow you to choose whether or not the Trigger actions are logged when they occur. The “Alarm/Trigger” switch allows you to determine if the highlighted item will be a Trigger or an Alarm. “Min Time” specifies the minimum time in seconds that the trigger condition must be met before the trigger is set to true. Set this to 0 to make the trigger go off immediately upon recognizing a Condition. Setting higher can prevent noise from causing a trigger. If the Trigger Condition becomes True but the Min Time has not been met, the Trigger is set to the Warning condition. If the Condition remains True long enough for the Min Time to be met, the Trigger will go into the True or Alarm state. If the Condition becomes false before the Min Time is met, the Trigger state will revert back to false or OK. The “Condition Channel” box allows you to choose, from a drop-down menu, which channel is checked for the condition to determine the Trigger state. “Condition” determines which condition will cause the trigger to change. “Threshold” allows you to specify the value that the channel will be compared to, using the condition, to determine if the Trigger occurs. The “Hysteresis” parameter applies hysteresis to the trigger condition, to avoid noisy data from causing the trigger to oscillate. Note that if condition = is used, a positive, non-zero Hysteresis creates an “InRange” condition. E.g. for a Threshold of 10, a condition of =, and a Hysteresis of 2, any values between 8 and 12 will yield a true result. Similarly, for a < > (not equals) condition, non-zero Hysteresis creates an “Out of Range” condition. For both of these cases, the limits are inclusive of the values of the Threshold, plus or minus the Hysteresis. © 2014 David Thomson, Original Code Consulting, [email protected] 59 Three conditions are included to deal with the value “NaN”, or Not-a-Number. NaN is used in MICAS-X to indicate missing data. For example, all Driver input channels are set to NaN when the program starts, and only have valid data after the first acquisition loop. Using normal conditions with NaN can yield surprising results. For instance, a value of NaN with the conditions > 0 or < 0 both give a result of False. If a condition must be sure to test for NaN correctly, use one of these conditions: =NaN, <>NaN (not equal to Nan), or <>NaN,0 (not equal to NaN and not equal to 0). The last condition is especially useful for MICAS-X channels that are used as Booleans. Booleans are typically encoded in MICAS-X as 0 for False, and 1 for True, though any non-zero value is also interpreted as True. The last of the NaN conditions, by checking for both <>0 and <>NaN, ensures that only a truly non-zero value is interpreted as a True value, and avoid interpreting a start-up value of NaN as True. Example: Handling the CRC Error For versions 1.5.0 and later of MICAS-X, the Configuration Editor places a CRC value in each configuration file. If MICAS-X is run and finds that the CRC value is not valid, indicating that the configuration file is corrupt, missing, or has been edited by hand, it is possible to use Triggers or Alarms to automatically handle this situation. In the first example here, an Alarm is configured which stops MICAS-X when the CRC is not valid. The second example causes an Alert to be shown, so that the operator is definitively notified of the issue. (Note that the CRC error will always be logged in the log file, but the use of the alert in the second example ensures that the operator does not overlook that more subtle notification.) For both examples, a Global must be used to latch the specific error. See section Error! Reference source not found. for an explanation of why monitoring the Error channel directly is unreliable. The figure below shows the configuration for setting up Global 0 with the name “CRC Error” and the Latch Error value of 7033, which is the error code for when the CRC of the configuration file is invalid. The second step is to create a Trigger that watches the Global and exits MICAS-X if the error is detected. The configuration for this is shown in the Figure below. © 2014 David Thomson, Original Code Consulting, [email protected] 60 The combination of these to configuration steps will result in MICAS-X stopping automatically if the CRC error is present. For the second example, the Global is configured the same as above, but the Trigger is configured as shown below. Note that the Trigger/Alarm parameter has been set to Alarm, to give make the alarm condition more visible in MICAS-X. Also note that the FT Target string is not completely visible in the screenshot below, but is shown in full in the following figure where it appears in the Alert. The FT Value of 0 tells MICAS-X to create the default Alert dialog box. See section 10 for other options of the Alert Command. © 2014 David Thomson, Original Code Consulting, [email protected] 61 As a result of this configuration, when the CRC is detected as invalid, the user is presented with the following dialog box, which will not disappear until the user clicks on “OK”. The MICAS-X program will continue even while the dialog is open, however. 5.4.11 Constants The final entry in the Modules list in the Configuration Editor is “Constant”. This configuration screen allows you to define any number of constants to use in the MICASX system. Constants are similar to channels. They can be used in equations, calculations, sequences, triggers, and commands. Unlike channels, however, they are not written to data files, do not show up in the lists of channels that can be shown on graphs, and cannot change value while the program is running. The value of each constant is determined in the configuration file, and the archive of the configuration file serves as the record of the constant values. In the Constants configuration screen, enter names for constants in the “Constants” list, and enter the values of those constants in the Values list. The Delete and Insert buttons can be used to remove or add more constants to the list. 5.4.12 Globals © 2014 David Thomson, Original Code Consulting, [email protected] 62 “Globals” are optional channels that can be accessed by any part of the program, e.g. they have global scope throughout the program. If you do not assign a name to a global variable, it will not be used within MICAS-X. Globals can be used as program variables, memory for user-entered information, or inputs to Calculations or Equations, among other things. There are a special set of commands that allow Globals to be referenced by index number, which adds additional functionality to the Commands. Finally, the Globals can be used directly in Calculations or custom Displays or Instruments just as a normal LabVIEW global variable. This allows Calculations, for example, to have configurable parameters by using the Globals configuration page. The “Initial Values” list allows you to select the initial value of the Global when MICAS-X starts. The Latch Error list enables a special function of Globals. The Error Program State Variable automatically contains the error code number of the most recent error to occur. However, more than one error can happen during a data acquisition cycle, so the Error channel serves only as a snapshot to see if any error has happened. If you need logic that can identify a specific error without risk of missing it, use a Global with the Latch Error function. Set the Latch Error value to the numeric error code you wish to monitor, and assign a meaningful name to that Global. If that error ever happens, the associated Global will be set to that error code value and will not return to zero until it is explicitly set. Thus the Latch Error function can be used to enable Triggers or Sequences or other mechanisms to catch any particular error, even if many errors are rapidly occurring. 5.4.13 Channels The second to last entry in the Modules list in the Configuration Editor is “Channels”. The Channels screen is not an editor, but is a place to review and check all the Channels currently defined in the configuration being edited. The left-most array lists all the Channels in the configuration. The second array lists the input Channels, and the third array lists the Controllers, or output, Channels. To the far right on this screen are two additional arrays: Conflicting Channels and Partially Conflicting Channels. Conflicting Channels lists any Channels that were found to exist twice with the same spelling in the current configuration. Partially Conflicting Channels lists any Channels such that one Channel is a sub-string of another Channel. In addition to simply creating confusion, Conflicting Channels can be problematic in MICAS-X, since it is indeterminate which Channel would be set if a “Set” Command were executed with the duplicate Channel name as the target. Although Partially Conflicting Channels have unique names, they can cause problems if the Equations Driver is used and references a Channel with a Partially Conflicting name. Take for example the case where there is one channel named “Voltage” and another channel named “High Voltage”. Also assume that there is an Equation defined as: © 2014 David Thomson, Original Code Consulting, [email protected] 63 Output Volts = 10 x High Voltage When the Equations driver parses this equation, it could potentially find the word “Voltage” and replace that word with the value of the “Voltage” channel. It would be left with the word “High” which did not correspond to any operation or Channel, and would therefore cause an error in the parsing. Use the Channels screen to review your configuration and ensure that each Channel in your configuration is unique. Furthermore, if you are using the Equations Driver, use the Partially Conflicting Channels list to ensure that no Channels that are used in Equations have Partial Conflicts. Note that some Partially Conflicting Channels are unavoidable. For example, the Controllers Driver can be used to configure PID loops. In this case, a Mode Channel is automatically created for each SetPoint Channel, so that the loop can be changed between Manual and PID modes. The Mode Channel has the same name as the SetPoint Channel, but with the word “Mode” in front of it. Hence the SetPoint Channel and its Mode Channel will inevitably be Partially Conflicting Channels. 5.4.14 Rename Channels The Rename Channels option is not a traditional configuration page. It is used to rename Driver channels in more complex configurations. Sequences, triggers, and options reference channels by name. If any of these items have been configured, and then a channel name is changed within a Driver configuration, the new name will not be propagated to all the references throughout the configuration file. The Rename Channels page is intended for handling this situation. Here, you first select a Driver. The Editable Names list will than contain the names of the channels associated with that Driver which can be edited. (Some Drivers have pre-determined, hard-coded names which cannot be edited.) Select a Channel with the Editable Names menu, then enter the new name for that channel in the “New Name” option and press Change Name to update the configuration file so that all references to the channel are properly changed. The # of Instances displays how many changes will be made to the configuration file, which can be useful in verifying the change. Note that the Constants and Globals are not traditional Drivers, but are built in to MICAS-X at a lower level. Thus Constant and Global Channels cannot be renamed using this tool. If you rename a Constant or Global, you must manually find all references to it in the configuration file and change them as well. 5.4.15 Security This configuration panel allows you to define a backup configuration file and to set a password for MICAS-X. See section 5.3 for more information on the Backup Configuration file. © 2014 David Thomson, Original Code Consulting, [email protected] 64 The password feature of MICAS-X provides a mechanism for preventing unauthorized operation of selected features of MICAS-X by untrained individuals. It is not intended to provide security against malicious attack. The password used for MICAS-X is encrypted before it is stored. The current password is never displayed. If the configuration file itself is not password protected (as determined by the “Secure Config File” parameter), a new password can be assigned at any time. If the configuration file is secured, the password must be entered before the configuration file can be accessed, after which a new password can be supplied if desired. To enter a new password, type the new password into the “Password” and “Reenter Password” parameters. If the two entries match, the “Save Password” button will become available. Press that button to save the new password. Press the Clear Password button to remove a password that has previously been assigned. When a password is enforced, there will be a lock icon in the upper right of the MICAS-X window, and the File menu will have a Password entry that is checked. Clicking on the lock or selecting the Password menu item will cause a password dialog to appear. If the proper password is supplied, the lock icon will become unlocked, and the Password menu item will become unchecked. If the Time to Re-Secure parameter is non-zero, the password will be automatically put back in force after the designated number of seconds have expired. While this timer is counting down, the time remaining can be seen on the MICAS tab of the program in the Lock Time indicator. The Secure Options check boxes allow one to select any or all of the eight possible options along the top of the MICAS-X window for protection by the password. If an option is selected, it will be greyed-out and impossible to change until the password is entered. (This applies to options which control channels or commands only. Options which only indicate a channel value are not affected.) The Secure Exit checkbox determines whether or not MICAS-X can be stopped without entering the password. Note that this parameter only prevents the use of the Exit menu item and the “x” in the upper right corner of the MICAS-X window which stops the program. Even when this option is selected, it is still possible for MICAS-X to be stopped via a command, if the commands are accessible to the operator. The Tabs list allows each tab of the MICAS-X display to be secured. When a tab is selected, all controls and indicators on the tab are greyed out and cannot be changed until a password is entered. Note that Displays and Instruments that are configured to be Outside of MICAS-X cannot be secured using this mechanism. Also note that all Displays and Instruments should be configured into MICAS-X before selecting which tabs are secured, since the tabs are referenced by number, not name, and adding or removing Displays or Instruments could result in the wrong tabs being secured. © 2014 David Thomson, Original Code Consulting, [email protected] 65 5.4.16 Alert Calc This configuration panel allows you to determine the proper value to be used for the Alert Command, to achieve the desired functionality. See section 10 for an explanation of the values used with the Alert Command. This panel also lets you test the .wav files used for Alert sounds. Note that any desired .wav file can be renamed appropriately and placed in the Resources directory to use that sound with an Alert. 6 MICAS-X Operation Most of the functionality of the MICAS-X program is contained in a single window named “MICAS-X”. A series of tabs allows numerous displays to be presented within this window. Menu items and a row of buttons and indicators above the tabs provides certain functionality that is always present regardless of which tab is being viewed. Menus 6.1 6.1.1 File Menu The file menu contains four options: Open Support Folder – Selecting this menu item will open the MICAS-X support folder, located under C:\OCC\MICAS-X Support. Open Data Folder – This menu item will open the current data folder, located under C:\OCC\MICAS-X Data. Save Screen to JPEG – This menu item takes a screenshot of the current window and saves it as a .JPEG image on your computer in the current data folder. Password - This menu item is only present when a password has been defined for the configuation file in use. It is checked when the password is being enforced, and is unchecked when the password is not being enforced. Exit – Closes MICAS-X and quits the program. 6.1.2 Utilities Menu This menu includes options to run each of the Utilities that have been installed for MICAS-X. These typically include the Configuration Editor, Data Reader, Log Reader, and the TDMS File Reader, though other utilities may also be present. All utilities may be © 2014 David Thomson, Original Code Consulting, [email protected] 66 run either inside MICAS-X in the Utilities tab or independently, either in source code inside LabVIEW or as executables. 6.1.3 Help Menu Within this menu, the Open User Manual item opens the pdf copy of the MICASX User Manual, if it is installed in the correct location. The Help item provides information an links on where to find help for the MICAS-X program. Note that in addition to the resources mentioned on the Help window, MICAS-X provides context-sensitive help in many places. Context-sensitive help is a LabVIEW feature that is accessed by pressing CTRL-H to open the Context-sensitive help window. Once this floating window is open, position the mouse over a control or indicator in MICAS-X to view a short description of that item. Context-sensitive help is most useful in the Configuration Editor, since it provides brief explanations of how each parameter functions. Within MICAS-X itself, the context-sensitive help is frequently less useful, since the user interface of MICAS-X is, by its design, very general. A control or switch can be configured to work with any Controller channel, so the context-sensitive help for that control or switch cannot be specific to any particular channel or its function. The Context Help Window item in the Help menu functions similarly to pressing CTRL-H, and will open or close the context-sensitive help window. Use the Send Feedback menu item to send information about your experience with MICAS-X to Original Code Consulting. Please enter your name, affiliation, and contact information, especially if you would like a reply from OCC. Note that this function requires that the computer running MICAS-X have a connection to the internet. After pressing the Send button, MICAS-X will attempt to send the feedback to OCC, and will then tell you whether the information was sent successfully or not. If a reply is requested, OCC will try to respond to feedback within 48 hours. If you do not hear from OCC within that time, please send your feedback or a follow up message directly to OCC at [email protected]. The Send Bug Report menu item is similar to the Send Feedback described above, and like the Send Feedback function, this feature only works if the computer running MICAS-X has an active internet connection. In addition to including information submitted by the end-user, the Bug Report also allows the user to have the program automatically include a copy of the Configuration File and the last 20 entries of the Log file. Both these additional sources of information can be invaluable for determining the cause or fix for a bug or problem. OCC will try to respond to every bug report within 48 hours. If you do not hear back from OCC after successfully sending a bug report, pleace contact OCC directly at [email protected]. The About item provides information on the version of MICAS-X being run as well as on the security device that is currently detected. © 2014 David Thomson, Original Code Consulting, [email protected] 67 6.2 Buttons Below the file menu, there are up to eight configurable buttons. If any Alarms are configured, the Alarm indicator appears in place of the right-most of these buttons, so that only seven buttons should be configured for use. The labels and functions of these buttons is determined in the configuration file and can be customized for each specific application. Below are some common examples of how the buttons may be configured. Acquire – Begins data collection. Record – When Record is True, any .csv files defined in the configuration file will be recorded whenever data is being acquired. Note that the background .tdms master data file is being recorded whenever Acquire is True, regardless of the state of the Record button. Restart – Restarts the the program, loading any changes that have been made to the configuration file. Exit – Quits MICAS-X. If any Alarms have been defined in the configuration file, the Alarm Status is displayed where the 8th button normally would appear. The Alarm Status is either green (OK), yellow (Warning), or red (Alarm), depending on the highest state of any of the defined Alarms. E.g. if any one (or more) Alarm is in the Warning state but all others are in the OK state, the Alarm Status will be yellow. If any one (or more) Alarm is in the Alarm state, the Alarm Status will be red. The Alarm Status indicator gives the operator one place to look that is always visible, regardless of what tab is being displayed in MICAS-X, to see if any Alarms have been triggered. If the Alarm Status is not green, the operator can clock on the Control tab to view more detailed Alarm information, or on the MICAS-X tab to review the log of Alarms. To the right of up to eight buttons, there is an indicator that displays the current date and time. 6.3 Tabs Below the file menu and buttons, there are a number of tabs. More tabs than the following may be present, depending on the configuration being used. Up to 18 tabs may be used at once. Often included are the following: Control Displays (Up to 14 Displays can be configured to load in these tabs.) © 2014 David Thomson, Original Code Consulting, [email protected] 68 Utility (The Utility tab will not be visible until the first Utility is started.) MICAS-X Debug (The Debug tab will not be visible until the Debug mode is enabled.) Each tab and its functionality are described below. 6.3.1 Control Tab The Control tab is the first (leftmost) tab. Note that this tab can be given a different name than “Control” by editing the “Control Tab Name” parameter in the Control Tab editing window. This tab displays a list of Channels and their current values on the right. (The selection of channels that are shown here can be configured. See Channel Lists, in the Modules section of the Configuration Editor help.) The bottom of the tab can display an optional graph, which can display time series of any two Channels of data. If additional Channel Lists have been defined (besides the default “All” list), a two list selections will be visible above the channel table and the graph. These controls can be used to select which list of channels is shown on the data table and which list of channels are available for the graph. Above the graph (and continuing down into where the graph is displayed if the graph is disabled) are displayed numerous controls. These include Controllers (usersettable output channels), Switches (Controllers that toggle between two discreet values, such as digital outputs), Sequences, and Triggers. 6.3.2 Display Tab(s) To the right of the Control tab are up to 14 Display tabs. Displays can be configured to populate any number of these tabs. Displays can also be configured to open up as additional windows outside of the main MICAS-X program. 6.3.3 Utility Tab The Utility tab is to the right of the Display tabs. Only one Utility can be invoked at a time. Start Utilities by selecting them from the Utility menu. Selecting a new Utility will close any Utility that is already open. © 2014 David Thomson, Original Code Consulting, [email protected] 69 6.3.4 MICAS-X Tab The MICAS-X tab follows the Utility tab. This tab provides a summary/status view of the MICAS-X program. It displays the current configuration file, the names of any data files being written, a list of log file entries (errors and events), a list of all data channels, the status of the hardware security device, and the MICAS-X serial number and version. It also provides controls that allow any Sequence to be started or stopped, any Controller to be set to a new value, or a custom message to be sent to the log file. 6.3.5 Debug Tab The Debug tab appears on the far right when MICAS-X is in debug mode. This tab does not normally appear and is not needed for normal MICAS-X operation. This tab is useful for debugging MICAS-X when it is being run inside LabVIEW as source code. To enter debug mode and make the Debug tab appear, click on the small black square in the upper right corner of the MICAS-X tab. 6.4 A Note on MICAS-X Window Size Note that the MICAS-X program has many controls and indicators that are very carefully placed on the front panel, so that they can be made visible and invisible as required by the configuration. Because of the dynamic nature of this layout, the MICASX.vi window cannot be resized or maximized. MICAS-X is set to not allow resizing or maximizing for this reason. Disabling these settings is not recommended. One exception to this rule is that Displays can be configured to open in their own window. This allows for Displays to be designed with any window size. However, if a Display is designed with a window size other than that defined for operation within MICAS-X, it should always be configured to open in an external window and never configured to open in a MICAS-X tab. 6.5 Time Series Graphs Time series graphs of Housekeeping channels appear in several places in MICASX, including (optionally) at the bottom of the Control tab. All time-series graphs in MICAS-X have several common properties. In particular, MICAS-X uses a sophisticated buffering mechanism to provide a useful length of history data without the overhead of buffering all housekeeping channels in memory at once. Whenever MICAS-X is Acquiring data (regardless of whether or not it is set to Record data), the data acquired is stored in a special database-like file, using the .tdms file format. Furthermore, each graph has its own buffer of acquired data for the channels currently being displayed. If the operator changes any of the channels being displayed on the graph, MICAS-X reads the history for the newly-selected channel from the .tdms file(s). In this way, only the channels being displayed are buffered continuously in memory. At the same time, access © 2014 David Thomson, Original Code Consulting, [email protected] 70 of the .tdms file is minimized to reduce performance degredation related to parsing large data files. Every three hours, a new .tdms file will automatically be started. This three hour limit is imposed to keep each .tdms file from growing too large, which would impact performance when reading history data from it. In the MICAS section of the configuration, there is a parameter that determines whether 1 or 2 .tdms files are read when a new channel is selected to graph. If this is set to “Only read 1 file of History data”, then when a new channel is chosen for a time series graph, at most 3 hours of data will be available. If a new .tdms file has been started recently, the amount of history data could be much less. By setting this parameter to “Read 2 files of History data”, the timeseries graphs will be guaranteed to have between 3 and 6 hours of history data (except for the first three hours of run time, when less than 3 hours of history data has been accumulated.) If a large number of housekeeping channels are configured in MICAS-X, it may be advisable to set the above parameter to “Only read 1 file of History data”, since reading history data from two large files could affect system performance. If the operator does not change the channels being graphed on a time series graph, the history can accumulate much longer than the 3 or 6 hour limit. In this case, the maximum history depth is determined by the “Max History Depth” parameter on the MICAS configuration page. This parameter is set in “number of points”, not seconds, so that actual history time depends on both this parameter value and the acquisition rate of the housekeeping data. Another feature of time-series graphs in MICAS-X is a global per-channel memory of manual Y axis limits. Each time a graph channel is set to use a Manual Y scale, the selected Y axis limits are stored in a buffer. Whenever a new channel is selected for display with a manual Y axis limit, the buffer is scanned. If that channel is found in the buffer, the manual limits for that channel are automatically restored. Note that the buffer of channel limits is limited to between 90 and 100 channels. When more than 100 channel limits are stored in the buffer, the oldest 10 channels are removed from the buffer. This self-cleaning mechanism prevents the buffer from growing unbounded over long term use and thus degrading performance. Note that the manual channel limits buffer is used for the time-series graph on the Control tab and for the time-series graphs in the 3Graphs Display. It may be added to other graphs and Displays in the future, but it is generally not used for graphs that allow multiple channels on an axis. 6.6 Modules and Features As described in the “MICAS-X Components” section of the manual, Modules are sets of functionality that are built into MICAS-X. Modules are not deployed as plug-ins, so new modules are only available when a new version of MICAS-X is released. Most © 2014 David Thomson, Original Code Consulting, [email protected] 71 modules have their own configuration editor. Modules currently available in MICAS-X include, but are not limited to: 6.6.1 Acquisition The Acquisition module coordinates acquiring data from the Drivers. This module has one primary loop rate, but can include any number of additional acquisition loops. The various acquisition loops run in parallel and each acquires data from the Drivers assigned to it at its own rate, unsynchronized from the others. MICAS-X has a single buffer of all Housekeeping Channels (Input channels and Controller or Output channels) which each acquisition loop updates whenever new data is read. By using this single buffer, any part of MICAS-X can access the most current values of any channel. In addition, the primary Acquisition loop writes the contents of this buffer to the master .tdms database file on each iteration. Typically, the primary Acquisition loop will run at 1 Hz, providing 1 second data from all the Drivers. There are several reasons why additional acquisition loops may be desired. One example of this is a situation where one Driver is acquiring 1 Hz data from a National Instruments data acquisition card, while another Driver is acquiring 1 Hz data that is being sent by an external computer or instrument at a rate determined by the external device. Although both Drivers are operating at a nominal rate of 1 Hz, they are using two different clocks. Eventually, one of these clocks will lag the other to the extent that one instrument will not have data available on within the time limit of the loop, and an error will occur. By assigning these Drivers to separate loops in MICAS-X, the error condition will be avoided. The primary Acquisition loop will record the most recent data values for each Driver. Eventually, the Drivers will become out of sync such that the primary Acquisition loop will record the same value for one of the Drivers on two consecutive iterations, or possibly the primary Acquisition loop will miss one value of one Driver if the second loop's clock is faster than the primary Acquisition loop's clock. This type of stuttering is unavoidable when using devices with different clocks, but by using separate acquisition loops, no error condition is generated. Also note that when a Driver reports its channels, it prepends all the channel data with a time stamp channel indicating when that data was taken. Stuttering of the type described above can therefore be detected by analyzing the Driver time stamps. Another example of when multiple acquisition loops can be useful is when one Driver may be acquiring 1 Hz data from a digitizer or multi-function card, while another Driver needs to acquire data from an external instrument that sends data at a higher or lower rate. E.g.: if an external instrument sends data at 5 Hz, and can not be configured to run at 1 Hz, then two acquisition loops can be configured in MICAS-X so that one runs at 1 Hz, and the second runs at 5 Hz. The primary Acquisition loop will gather data from all the Drivers at its own rate, typically 1 Hz. Finally, separate acquisition loops are often required when some devices impose their own timing on the data. For a simple A/D voltage read from an NI device once a second, MICAS-X can determine when to ask for the data. However, for a streaming device such as a GPS, which sends data once a second based on its own clock, it is © 2014 David Thomson, Original Code Consulting, [email protected] 72 important to have a separate loop that is “Device Timed”, so that the acquisition rate of that loop is tied to the rate at which the device makes data available. For more information on Device Timed acquisition loops, refer to the configuration section. 6.6.2 Channel Lists Channel Lists are defined in the configuration. A list named “All” is always present and includes all the Housekeeping channels present in the configuration. As many additional Channel Lists can be created as the operator has use for. Channel Lists are a feature of MICAS-X that have several purposes. Channel Lists can be used to define which Channels appear in conjunction with various front panel display objects. Channel Lists can also be used to define which channels are written to data files, or which channels are broadcast to another system. By creating custom lists of channels, it is possible to provide a much more intuitive and navigable user interface, especially when the total number of Channels defined in MICAS-X begins to get large. When dozens or even hundreds of channels are present, selecting which channel to graph on a time-series graph from a list of all channels can be tedious and frustrating. Channel Lists provide a way to filter the channels so that only those relevant to a particular use case are present where they are needed. 6.6.3 File Writer Whenever MICAS-X is acquiring data, it writes the complete set of channels to a database-like .tdms file. This file is used as a fail-safe data archive as well as to provide history data for time-series graphs. This file is written by the main Acquisition Loop (loop 0). In addition to this data file, the File Writer module can be configured to create any number of text data files. Each data file can be configured to write a specific list of channels. In addition, other configuration parameters can be set that determine how the data file is formatted. Each file defined in the File Writer is assigned to an Acquisition Loop. Whenever the assigned loop acquires data from its drivers, it then also gathers the most current data from all the Drivers and writes any files that are assigned to it. Note that the ability to assign each file to a different acquisition loop can be used to significant advantage when there are Drivers that acquire data at different rates. As an example, assume that most drivers acquire data at 1 Hz, and that Loop 0 of the Acquisition Task is writing not only the .tdms file at 1 Hz, but also writing one or more text files at 1 Hz. Also assume that one particular device sends data at 10 Hz, and is set to be acquired using Loop 1. Only one of every 10 samples of this driver's data will be recorded in the .tdms file and in any text files written by Loop 0. However, a Channel List can be defined that includes just this Driver's channels (or possibly other channels as well), and assigned to a file definition that is associated with Loop 1. In this case, a text © 2014 David Thomson, Original Code Consulting, [email protected] 73 file will be written that includes the selected channels, and it will write all 10 samples per second, so that no data from the fast device is lost. The opposite case, creating data files with fewer entries than a loop time, can be handled with the Write Frequency (Once Every n Loops) parameter. E.g. a sparse data file with data written once a minute can be defined by associating it with an Acquisition Loop which runs once a second, and setting the Write Frequency to 60. The “All” channel list is always present in MICAS-X. The first channel in this list is named “--” and always has a value of “NaN”. This channel is used in several ways in MICAS-X. One example is that when selected as a graph channel, it prevents the graph from plotting any data for that channel, which can be an easy way to use a two-plot graph to only show one plot. Note that when the “All” channel is written to a userdefined file, the “--” channel is not included in the channels written to the file. In order to preserve sub-second information in time-stamps, the File Writer automatically uses a specific formatting when writing data that appears to be time-stamp data to a data file. Refer to section 5.4.7 for more information. 6.6.4 Sequences Sequences provide a powerful way to extend the functionality of the MICAS-X system. Sequences can be defined that can automate many processes. Sequences can loop and execute conditionally, and can act on any Controller (output) channel, based on the value of any channel. Sequences can use the many built-in MICAS-X Commands, as well as any Commands that are programmed into any of the Drivers. Sequences can be tied to various buttons in the MICAS-X interface, to Triggers or Alarms, and can be started via commands sent by another system. Since Sequences have no "Hysteresis" parameter, the In-Range and Out-of-Range comparisons that are described in the Triggers section below are not available for Sequence conditions. For information on the “NaN” conditions, see section 5.4.10. The Sequence Module can be used with or without the Sequences Driver. The Sequences Driver should only be used when the Sequences Module is used. The Sequences Driver adds additional functionality to the Sequences Module. When the Sequences Driver is included, new channels are created that are logged to the main data file. These channels are named “SeqStep” plus the name of each Sequence. These Controller (output) channels that can be used to start and stop Sequences. In addition, as a Sequence runs, the value of its SeqStep channel is updated with the step number that the Sequence is currently on. The StartSeq command can be used to start a Sequence. Normally, the Value parameter is set to 0, so that the Sequence starts at the beginning (step 0), but it is possible to use a non-zero value to start the Sequence at any step. The StopSeq command © 2014 David Thomson, Original Code Consulting, [email protected] 74 is used to stop a Sequence that is running. You can also use the "Set" command with one of the SeqStep channels to start and stop Sequences. Using the value of 0 with the Set command and a SeqStep channel will start that Sequence at its beginning (step 0). Using a positive integer value will start the Sequence at a step part way through the Sequence. Using the value “NaN” will stop the Sequence. Using the negative value of the current Sequence step will Pause the Sequence at its current step. (Any negative number will pause the sequence, after which the SeqStep channel will automatically take on the value of the negative of the step at which is was paused. E.g. you cannot force the Sequence to pause at a different step then the one it was executing.) The PauseSeq and UnpauseSeq commands can also be used with a Sequence name to pause and unpause a Sequence. The Sequence Module can be used with or without the Sequence Display. The Sequence Display provides a tab in MICAS-X that displays all the Sequences and their current state, and allows the user to turn them on and off. 6.6.5 Triggers and Alarms Triggers are actions that can be defined to occur based on the value of any Channel. Various programmable conditions can be used to determine when a Channel value causes a Trigger to be True. Once a Trigger becomes True, it can execute any of the MICAS-X Commands, including any custom commands defined in Drivers. An Alarm is a special case of a Trigger. Any Trigger can be configured to be an Alarm. Alarms are given special consideration on the MICAS-X user interface, so as to alert the operator whenever an Alarm becomes True, whereas Triggers can be used to provide functionality which might not be considered an Alarm condition. The Triggers Module can be used with or without the Triggers Driver. However, the Triggers Driver should only be used when the Triggers Module is used. The Triggers Driver adds additional functionality to the Triggers Module. When the Triggers Driver is included, new channels are created that are logged to the main data file. These include a channel for each Trigger (using the Trigger Name as the channel name) which logs the state of the Trigger (0 = False, 1 = Warning, 2 = True, 3 = Alarm), and a Controller (output) channel for each Trigger that allows the Trigger Threshold to be set. These are named using "TrigThr " prepended to the Trigger Name. Changing Trigger Thresholds while MICAS-X is running can be used to disable Triggers (e.g. set the threshold to Inf, so that > is never attained), or to fine-tune the Trigger's behavior. There are two ways to set Trigger Thresholds: using the SetTrigger command, or by using the "Set" command with the Triggers Driver channel. (The second is only available, of course, if the Triggers Driver is included in the MICAS-X configuration.) Note that the SetTrigger command can accept either the Trigger Name itself, or the Trigger Name prepended with "TrigThr ", e.g. the Trigger Threshold Controller channel. © 2014 David Thomson, Original Code Consulting, [email protected] 75 Triggers are only active when data is being acquired. When the program is not Acquiring data, the Alarm Status and the Triggers display on the Control tab are grayedout. Note that for the conditions = and <> (not equals), the Hysteresis parameter can be used to allow for "In Range" (for =) and "Not In Range" (for <>) comparisons. For =, a Hysteresis of 0 will enforce a strict = condition, whereas a positive, non-zero Hysteresis will create a "In Range" condition. E.g. if the Threshold is 10 and the Hysteresis is 2, the = condition will cause the Trigger to be True whenever the channel value is between 8 and 12. For <>, a Hysteresis of 0 will enforce a strict not-equal condition, whereas a positive, non-zero Hysteresis will create an “Not In Range” condition. E.g. if the threshold is 10 and the Hysteresis is 2, the <> comparison will be True whenever the channel value is < 8 or > 12. Three special conditions are included for dealing with NaN, or Not-a-Number. See section 5.4.10 for more information. 6.6.6 Drivers Drivers are at the heart of MICAS-X. A Driver obtains data from input channels and set the data values of output channels. Drivers are intended to operate on relatively slow data. 1 Hz "housekeeping" or instrument health data is typical, although Drivers can operate as fast as 20 or 25 Hz or much slower than 1 Hz. The channels from all the Drivers in MICAS-X are combined into an array of data this displayed and saved. Many of the functions of MICAS-X act on this data. Sequences can set output channels. Triggers and Alarms initiate action when a channel's data value matches some criteria. Although instruments provide a way to integrate complex hardware and data into MICAS-X, many systems can be implemented with just the data from Drivers. If a Driver is written correctly, it can be multiply instantiated within MICAS-X. This means that the same Driver source code can be called multiple times within MICASX, with each instance working with a different instance of hardware and creating a separate set of channels. The Prefix parameter, which can be set for each Driver, is a requirement when multiple copies of the same Driver are used within a configuration. The Prefix assigned to each instance allows MICAS-X to differentiate the instances and manage them properly. In addition, the Prefix is prepended to the channel names, so that each Driver instance has uniquely named channels. Drivers that are currently available for MICAS-X are listed below. Note that some of these Drivers are included with the MICAS-X base package, while others incur an additional charge. © 2014 David Thomson, Original Code Consulting, [email protected] 76 Airmar – This Driver can interface to the Airmar 200WX weather station, to acquire GPS, magnetic heading, winds, and meteorological data. This Driver can be multiply-instantiated. (additional charge) Alicat – The Alicat Driver can interface to multiple Alicat Flow Controllers and can be used to set the flow setpoint and read back the flow (in volume and mass flow) and the pressure and temperature. This Driver can be multiply-instantiated. (additional charge) Aries Drive - This Driver controls one axis of motion using an Aries IPA controller from Parker Hannefin. This Driver includes several commands, which are documented in . This Driver can be multiply-instantiated. (additional charge) Array – This Driver allows one to create a one dimensional array of values, which can then be read and written to programmatically throughout the MICAS-X program. Such an array could be used to direct a sequence to scan a process variable through a set of values that can not easily be written as an equation, such as a 1,2,5,10-type sequence. This Driver can be multiply-instantiated. (included in base package) Calculations – Each instance of this Driver can call a Calculation VI. A Calculation VI must adhere to the design specifications defined for MICAS-X in order to work in MICAS-X with the Calculations Driver. Such a VI can execute much more complicated algorithms than the scripted "Equations" Driver can handle. In general, a Calculations VI takes a number of channels as input and creates 1 or more channels of output data. A Calculations VI can be singly or multiply instantiable - e.g. if it is designed properly, a single Calculations VI can be instantiated multiple times within MICAS-X so that the same calculation can be performed on numerous sets of input channels. Likewise, the Calculations Driver can be multiply instantiated within MICAS-X. (included in base package) Controllers - This Driver creates control loops by taking an existing input channel as the process variable, an existing output channel as the control channel, and creating a new channel for the Set Point. Simple Controllers, PID loops, and Thermostatic Controllers are available options. In addition to those control loops, this Driver can also create new channels that scale an existing volume flow to a new mass flow channel, or an existing mass flow channel to a volume flow. Finally, this Driver allows the creation of “Follower” channels that output a voltage that is proportional to the value of any other existing channel. Follower channels can be used to send a channel value to another data system or program by encoding it as a voltage. (additional charge) Document - The Document Driver is only used in conjunction with the Document Display. It creates the channels “Document Number” and “Section Number” © 2014 David Thomson, Original Code Consulting, [email protected] 77 which allow MICAS-X commands to control the display of the information in the Document Display. (included in base package) Equations - This Driver executes a script-like equation on existing channel names, which result in a new channel of data. Multiple Equations can be configured within one Equations Driver, and the Equations Driver can be instantiated multiple times within the MICAS-X system. (included in base package) Manual - The Manual Driver allows one to create manual data channels. These are Controllers (output channels, e.g. channels that can be set) that are generally used to allow the operator to enter values directly from the user interface. These values are then recorded, and hence can be used to annotate an experiment with manually entered parameters, or they can be used as inputs to calculations or sequences, allowing the operator to tailor the operation of the program by altering these values. (included in base package) MOSDS - The OCC Streaming Data System is a shareware library of LabVIEW routines that allow one to acquire data from a wide variety of devices by simply editing a configuration file. OSDS supports serial and UDP (Ethernet) data buses, and includes a wide range of parsing options. MOSDS is a MICAS-X Driver that incorporates the OSDS system into MICAS-X. The MOSDS Driver can be multiply instantiated. Note that the OSDS definition file is stored outside of the MICAS-X configuration file. (included in base package) NIDaqAD - This Driver allows one to acquire analog input data from nearly any National Instruments multi-function device. It can be multiply-instantiated. (included in base package) NIDaqCounter - This driver allows acquisition of counter data from National Instruments multi-function devices. It can be multiply-instantiated. (additional charge) NIDaqDA - This Driver allows one to set output voltages on the analog output channels of nearly any National Instruments multi-function device. Note that this MICAS-X Driver is intended for setting slowly changing setpoints, and does not support any hardware-timed function generation. It can be multiply-instantiated. (additional charge) NIDaqDI - This Driver acquires data from digital inputs on National Instruments multi-function devices. It can be multiply-instantiated. (additional charge) NIDaqDO - This Driver allows MICAS-X to use digital output channels on National Instruments multi-function devices as Controller channels It can be multiply-instantiated. (additional charge) © 2014 David Thomson, Original Code Consulting, [email protected] 78 NIMotion - This Driver interfaces to National Instruments motion control systems. It can control an arbitrary number of motion axes. It provides input channels for reading position, velocity, and status. It provides output channels (Controllers) for setting the target position and velocity, and Commands for initiating movement, resets, etc. (additional charge) Omega – The Omega Driver reads one temperature value and sets one temperature setpoint on an Omega CNi16 temperature controller. Additional functionality can be added as needed, to handle more functions on the CNi16 or to work with other Omega products. This Driver can be multiply-instantiated. (additional charge) PrimeScales - This Driver reads the weight from a PS-IN202 industrial scale made by Prime Scales. Its output is the net weight (tared), either by reading the net weight from the scale or by reading the gross weight from the scale and using a tare weight from its configuration. It can be multiply-instantiated. (additional charge) Sequences - This Driver adds additional support to the Sequences module of MICAS-X. Sequences can be used without the Sequences Driver. However, if the Driver is included, two new channels are created for each Sequence that is defined. One of these channels records the step number that the Sequence is on. The second acts as a Controller channel that can be used to turn the Sequence on or off. (included in base package) System - The System Driver allows one to monitor the CPU and RAM usage, AC/Battery status, hard disk free space, and dozens of other computer resources. It also includes an optional timestamp channel that calculates time as seconds since January 1 of the current year. (additional charge) Timers - This Driver can be used to create an arbitrary set of Timer channels. These channels use the computer clock as their time basis (software timing), and are useful for timing things from seconds to hours or more. They have subsecond resolution, but MICAS-X is not designed to respond to Channels with better than about 0.1 second accuracy. Timers can be reset, disabled, and paused. In addition to the user defined timers, this Driver also creates three program timers, which track the total time MICAS-X has been running, acquiring data, and recording data. (included in base package) Triggers - This Driver adds additional support to the Triggers module of MICASX. Triggers can be used without the Triggers Driver. However, if the Driver is included, two new channels are created for each Trigger that is defined. One of © 2014 David Thomson, Original Code Consulting, [email protected] 79 these channels records the state of the Trigger. The second acts as a Controller channel that can be used to set the Trigger threshold. (included in base package) Vaisala HMT310 - This Driver reads 11 channels from the high-precision Vaisala HMT310 humidity sensor via the serial port. It can be multiply-instantiated. (additional charge) Web Power Switch - This Driver controls a Web Power Switch 7 internet-enabled AC power strip. By configuring a script on the Web Power Switch 7 (see ), MICAS-X can also use this device as a Watchdog, such that if MICAS-X or the computer on which is running crashes, one or more outlets of the Web Power Switch 7 will be automatically turned off. This Driver can be multiplyinstantiated. (additional charge) 6.6.7 Instruments Instruments are MICAS-X modules that are intended for interfacing to more complex hardware, instruments, timing, and data types than Drivers allow for. These instruments may deal with data that does not fit the Drivers format (which is a 1dimensional array of double-precision reals), or may involve data that has a much different time-scale, timing, triggering, or synchronization requirements than the Drivers can accommodate. A Display (see below) is an optional feature of an Instrument. Currently, no Instruments ship with the base package of MICAS-X. Existing Instruments available for MICAS-X at an additional charge currently include: Broadcast - This MICAS-X component provides a way for the operator to configure an arbitrary number of broadcast, or telemetry, data streams that MICAS-X can use to send data to other computer systems. It supports serial ports and UDP Ethernet communication. This instrument can be multiply-instantiated. It also allows the user to configure up to 10 channels to send to Shared Variables that can be read by the Data Dashboard application for Android or iOS devices. Command – Enables MICAS-X to listen for valid commands over a serial or UDP port, so that other programs can control and interact with MICAS-X. Includes the “MICAS-X Command Interface” Utility program for remote program control. Email – Allows Alerts to be sent to any number of email addresses. Also allows the user to manually send short email messages to the addresses configured. Note that this Instrument has been tested to work with some email servers, but the configuration options for authentication are limited, so not all email servers are guaranteed to work. Also note that all emails sent by this Instrument have the same Subject line (as specified in the configuration file) and are all sent to the same list of recipients. In addition to configuring an Alert to send an email (see © 2014 David Thomson, Original Code Consulting, [email protected] 80 the notes in Section 10), if the Instrument is configured to sppear in MICAS-X as a Display, one can also send short emails directly from that display by typing text into the Message box and pressing the Send button. Be sure to read the section on configuring the Email Instrument ( in Section 5.4.2) for caveats that must be kept in mind when using this functionality. Ramp – Can be used to create linear and logarithmic Ramps of the value of one channel over time. This module can create Ramps with a much finer time resolution than could be accomplished with a Sequence. It also provides a simpler interface than a Sequence would. This Instrument can be configured such that the Initial and Final Values of the Ramp, the Ramp Time, and the ability to turn on and off the Ramp can all be controlled by other Channels, or by manual controls on the Ramp Display. SMPS Ramp – This Instrument includes the same functionality as the Ramp Instrument, but extends it so as to acquire particle count data while the ramp is scanning. This allows the acquisition of data from a scanning DMA (Differential Mobility Analyzer). When the ramp is complete, the full particle spectrum is calculated and the relevant data is written to a text file. The path and name of the text file is displayed on the Instrument front panel. 6.6.8 Displays Displays are MICAS-X modules that can be instantiated inside a MICAS-X tab or as a separate window. A display can have nearly any functionality, but the primary purpose is to provide additional user interface elements for data or controls that are part of the MICAS-X system, e.g. that originate in a Driver, or that come from an Instrument. Each Instrument can have a Display module that presents the Instrument to the operator, but the generic Display is not tied to a specific instrument. Displays currently included in MICAS-X are: 3Graphs - This display contains three time-series graphs, each with a data channel graphed on the left axis and another graphed on the right axis. (included in base package) Big Display - This display allows for the user to specify a handful of important channels that will be displayed in a large font size. It is intended to provide a view of select items that can be more easily seen from a distance, e.g. from across a room. This display is designed to be used outside of the MICAS-X tabs, as a separate window. (included in base package) Document Display - The Document Display is used to present instructions and documentation to the operator. It can be controlled by the MICAS-X program, so © 2014 David Thomson, Original Code Consulting, [email protected] 81 that instructions relevant to the current process are automatically presented. See section 5.4.4.3 for more information. (included in base package) Multi Display - Each instance of this Display allows the creation of up to six views that the operator can quickly select from. Each view contains two timeseries graphs with up to 8 and 4 channels each, four buttons along the top which can be programmed with any command, and five options along the left side. Each option can be configured as a Command, control channel, indicator channel, or Sequence. (additional charge) Sequences Display - Sequences can be used with or without this Display, since Sequences can also be turned on and off via buttons on the Control tab and through other mechanisms. This Display presents a table that displays all the Sequences defined. This table provides a more detailed view of the Sequences than is available elsewhere, and includes the current step and the timer value for any Wait command that is being executed. Sequences can also be started and stopped from this Display. Finally, hovering the mouse over any step in a Sequence displays the detailed parameters for that step. (included in base package) XYZ Display - This Display creates a plot that uses two channels for the X and Y points, and a third channel is displayed by color at the coordinates of the first two channels. This Display is especially useful for geographic display of data, as Longitude and Latitude can be used for X and Y and any measured channel can be used as the color-coded Z channel. In addition, an optional Marker (black X) can be placed anywhere on the graph as a reference point. Note that for version 1.4.2 and later, the XYZ Display includes automatic data reduction. This algorithm ensures that a maximum of 2000 points will be displayed on the graph at any time. If a time-span is selected that includes more than 2000 points, the Display decimates the data, throwing out every other point, or every third point, or every n point, using whatever value of n is needed to ensure that only up to 2000 points are graphed. The amount of data recduction being used is displayed in the lower right-hand corner of the Display. This automatic data reduction ensures that the program performance does not suffer, as it could when displaying large amounts of data on this graph. (additional charge) 6.6.9 Calculations Calculations are VI's that are used with the Calculations Driver to provide calculated data channels based on other existing data channels. The Calculation VI's must adhere to the defined API exactly. It is also important to ensure that the resulting calculations can execute within the time allowed by the configuration of the acquisition © 2014 David Thomson, Original Code Consulting, [email protected] 82 loop rates. Calculation VIs can include sub-VIs. The user must have the correct version of LabVIEW installed to create new calculations, but the resulting VI's can be used when MICAS-X is run inside LabVIEW or as an .exe. MICAS –X currently includes the following Calculations: Demo Calculation serves as a template for the user to create their own calculations. It sums two input channels to result in a single new output channel. This Calculation can be multiply-instantiated. Channel Averager is a Calculation VI that takes one channel and creates an running average over the last N samples. N is defined by the value of Global 0. Since Calculation VIs don't have their own configuration editor, this example shows how the Globals can be used as configuration parameters for defining how a Calculation will work. Also note that this Calculation VI contains its own local memory, which it uses to hold the previous values used in the running average. This Calculation can be multiply-instantiated. Previous Value is a Calculation VI that returns the value that a specified channel had on the previous acquisition iteration. This memory allows for logic such as detecting when a channel has changed value, as well as for measuring the rate of change of a channel's value. This Calculation can be multiply-instantiated. 6.6.10 Timers The Timers Driver creates three predefined Timers as well as any number of userdefined Timer Channels. These Timers can be used in Sequences or with Triggers to create conditions for timing various functions. The Run Time Timer is created automatically and contains the total elapsed time in seconds since the program started or restarted. The Acquire Time and Record Time Timers track how long MICAS-X has been Acquiring and Recording data. These timers cannot be set by the user. They are Disabled (set to NaN) when the program is not Acquiring or Recording. User-defined Timers can be disabled (set to NaN) or paused. The Timer Driver includes the commands Disable, Pause, and Unpause for these purposes. To re-enable a Timer, write a new value to it with the Set command. To disable a timer write the value “NaN” with the Set command. Timers always count up. Timers can be configured to start disabled by using the value "NaN" for their initial value. They cannot be configured to be paused when the program starts. 6.6.11 Constants Constants are configurable, nameable channels that have a constant value while MICAS-X is running, but which can be assigned any value in the configuration file. This © 2014 David Thomson, Original Code Consulting, [email protected] 83 allows for convenience in creating calculations and equations, where Constants can be referenced just as a channel, but the constants do not appear in the data files or the lists of channels that can be graphed. 6.6.12 Globals Globals are a special kind of Controller, or output, channel available in MICASX. Twenty global channels are available. They care configured in the Acquisition module configuration window. If the name of the global is left blank, the global will not be used within MICAS-X. Globals act very similarly to Manual channels, with some additional functionality. Like a Manual channel, a global can be shown on the Control tab so that the operator can change its value directly, or its value can be set by a command, sequence, trigger, or other programmatic methods. The global's value can be read and used as a condition in a sequence step or a trigger, and the global's value can be an input to an Equation or Calculation. In addition to all these properties, globals provide several additional functions. Within LabVIEW, the global channels are implemented using traditional LabVIEW global variables. This means that they can be accessed, (read or written to) by any VI in the MICAS system. Thus custom Instruments, Displays, and Drivers can potentially use globals to communicate with other parts of MICAS-X. (Note that none of the standard MICAS-X Drivers, Displays, or Instruments use the globals in this way.) Another MICAS-X component that can take advantage of this property of Globals are the Calculations. Calculations are user-created LabVIEW VI's that can be directly incorporated in MICAS-X through the Calculations Driver. However, the Calculations Driver has limited configuration options, with no way to configure parameters specific to any particular Calculation. Globals provide a way to create configurable parameters for a Calculation. See the Calculations entry for more information, including how the “Channel Averager” Calculation uses a global to define the number of points to average. The second function that Globals provide above what Manual channels can do relates to how Commands are used in MICAS-X. Globals allow for a special set of Commands that can operate on two channels by referencing one channel by name and the global by index. See the Commands section for more information. A third special function of the Globals is to latch error codes so that they can be reliably detected. The Error Program State Variable automatically contains the error code of the most recent error to occur, and it is reset to 0 after each acquisition loop. If multiple errors occur during one acquisition loop, all but the last one are lost to the Error channel. The error channel therefore provides a snapshot of whether errors are occuring, but cannot guarantee that any specific error is identified. To allow specific error codes to be used in Trigger or Sequence conditions, the Latch Error function of the Globals can be used. If a specific error code is entered in a Globals Latch Error field, that Global will be © 2014 David Thomson, Original Code Consulting, [email protected] 84 set to that error code whenever the error occurs. The Global will never be automatically cleared, so any action (Sequence) that acts on the error will need to provide its own clearing mechanism if that is needed. 6.6.13 Program State Variables Several channels of data are always present in the MICAS-X system, regardless of which Drivers are included in the configuration. These Program State Variables are quantities which help indicate how the MICAS-X system is running. Except as indicated below, the Program State Variables are handled by Acquisition Loop 0, the default Acquisition Loop. The current Program State Variables are shown in the table below. Variable Definition and Purpose -- This is a default channel that always returns the value NaN (not a number). The inclusion of this channel in the MICAS-X design helps the program and the operator discern when a channel is undefined. (E.g. when a previously defined channel is removed from a configuration, the references to that channel will show up as “--”.) Time (sec) This channel returns the current computer time in seconds since midnight, Jan 1, 1904. This channel is updated automatically whenever it is accessed, not as part of any acquisition loop. Sec Since Midnight This channel returns the number of seconds since midnight of the current day. This channel is often easier to deal with than Time (sec), but if the program runs over midnight, this channel will not be monotonically increasing. This channel is updated automatically whenever it is accessed, not as part of any acquisition loop. Acquire This channel has a value of 1 when the program is acquiring Driver data, 0 otherwise. Record This channel has a value of 1 when the program is recording data to the user-defined files, 0 otherwise. Error This channel has the error code associated with the most recent error observed by the system. If more than one error occurs during an acquisition loop, only the most recent is recorded in this channel. Once an error has been recorded in this channel for one acquisition loop, the channel is automatically cleared and will report a value of 0 on the next acquisition loop unless another error occurs. Debug This channel has a value of 1 whenever the program is in Debug © 2014 David Thomson, Original Code Consulting, [email protected] 85 mode, 0 otherwise. Acq Time This channel has the time in seconds since midnight, Jan 1, 1904, of when the Acquisition Loop 0 last acquired data. Disk Space (GB) This channel contains the amount of free disk space, in GB, of the drive to which data is being written. This channel is updated automatically whenever it is accessed, not as part of any acquisition loop. 6.6.14 Commands Much of the MICAS-X functionality is designed around Commands. Sequences, Triggers, Buttons, and other mechanisms in MICAS-X all cause actions by sending Commands to the MICAS-X Command Loop. The list of standard Commands is shown in Appendix B. In addition, Drivers can implement custom commands. If a Driver is written correctly, any Commands that the Driver supports will be available throughout the MICAS-X system whenever that Driver is included in the current configuration. Commands in MICAS-X have the following structure: Command String Argument Numeric Argument The functionality of the String Argument and the Numeric Argument vary depending on the Command being used, and some Commands may not require one or either of these arguments. When a Command is being configured in the MICAS-X Configuration Editor, the program knows which arguments are needed for each Command, and presents the user with the relevant parameters. For example, the Set Command is used to set a Controller (output) channel to a new value. It therefore requires a valid Controller channel name as a string argument, and the new value of the channel as the numeric argument. Thus in the Configuration Editor, when the Set Command is chosen for a Sequence step or a Trigger, the string argument is automatically populated with a list of all available Controller channels, and the numeric argument is enabled. In contrast, the Restart Command requires no parameters, so when this Command is chosen in an editor, both the string and numeric arguments are disabled. The fact that Commands can only take one string and one numeric argument is a significant limitation of the MICAS-X Command structure. In particular, this makes it difficult to structure a Command that will operate on the values of two channels, such as adding them together. As a partial resolution to this limitation, a special set of © 2014 David Thomson, Original Code Consulting, [email protected] 86 Commands has been created that act on the Global Channels. All the Commands listed in Appendix B that contain the letters “Gbl” are part of this set of special commands. These commands act on a Channel and Global. The Channel is specified by the string parameter, and the Global is specified by its number. A more recent addition to MICAS-X to address this command limitation are a new set of five two-channel commands. For these commands, the two channels required are put into the same string, with a comma between them. The channels are referred to as the Source Channel and the Target Channel. The Target Channel is where the result of the operation goes. So for the command AddChToCh, the sum of the values of the Source Channel and the Target Channel ends up in the Target Channel. In the configuration editor, the Triggers and Buttons have direct entries for the Source and Target Channels. The Sequence Editor was not designed with room enough for an additional parameter, so a new Sequence Command (SourceCh) has been added. To use one of the two-channel commands, first use the SourceCh command to define a source channel, then use the two-channel command to define the target channel. (Note that the Source Channel for each Sequence in the current configuration is remembered, so if multiple two-channel commands are to be used that all have the same Source Channel, the Source Channel only needs to be set once. E.g. Global 0, though it may have been given a text name in the configuration, such as “Temp Setpoint”, is referenced by using a value of “0” for the numeric parameter. As a further example, assume that there is a Manual Channel named “Temp Increment” in which the operator can enter a increment value in degrees C, and that Global 0, which has been named “Temp Setpoint” is used to control a temperature. The Command “AddToGlb” can be used with the string argument “Temp Increment” and the numeric argument “0” (the Global index) to add these two channels together, with the result being placed in the Global Channel. The set of special global Commands includes commands to copy date from a Channel to a Global or from a Global to a Channel. It also includes commands to add, subtract, multiply, and divide two channels, where one is a standard channel and one is a global. Commands are available that place the result in either the normal channel or the global, as desired. Although this mechanism is admittedly round-about, it can be used to operate on any two normal channels through the use of Globals. For example, if one needed to add two normal channels and put the result into the second of the two channels, one could create a Global for temporary use, copy the first channel to the Global, then use the “AddGlbToCh” Command to add the value in the Global channel into the second normal channel. © 2014 David Thomson, Original Code Consulting, [email protected] 87 6.6.15 Constants Constants are much like Channels, but with several limitations. Constants are defined in the Configuration Editor and are given a value when configured. Their value cannot change while the program is running. Constants are not written to data files and do not show up in lists of channels to graph or select for other purposes. Thus constants can serve as experiment-specific parameters, but they help keep the data and user interface cleaner by not adding to the total number of Channels that the operator must deal with. The archived configuration file serves as the record of the value that the constants had when the data was taken. Constants can be useful for experiment-dependent values such as the dimensions of a piece of apparatus that is used in a calculation, a physical constant used in an equation, or an experimental identification number. An alternative to using constants for these functions is to use a Manual Channel. However, Manual Channels will be written to the main .tdms data file, possibly written to other data files, and will appear in lists of channels used for graphing and display. Having channels with unchanging values appear in these places clutters the data unnecessarily. 6.6.16 OSDS The OCC Streaming Data System (OSDS) is a LabVIEW software package produced by OCC and available to the LabVIEW community as open source software. A description of this package can be found on the OCC website (www.originalcode.com/OSDS.html). The purpose of OSDS is to abstract the reading and parsing of streaming data, so that streaming data sources (those which send data at regular intervals, without being queried) can easily be added to a LabVIEW program by simply creating a proper OSDS definition file. OSDS has been integrated into several data acquisition programs, including MICAS-X. OSDS supports reading data from serial ports and from Ethernet via UPD, UDP Multicast, TCP, and NTP. It also has several ways of reading the computer clock to yield timestamp data. MICAS-X uses OSDS in two ways. First, there is an OSDS Driver in MICAS-X, which allows any OSDS format file, either new or pre-existing from another application, to be used to read data from streaming data sources, such as aircraft navigation data, GPS's, laboratory scales, and other instruments. This MICAS-X OSDS Driver puts a MICAS-X compatible wrapper around all the existing OSDS functionality, and uses the existing OSDS Readers and Parsers. The OSDS Format Editor is included with the MICAS-X program so that OSDS Format files can be created and edited as necessary. The second use of OSDS in MICAS-X is that several MICAS-X Drivers which operate with streaming data sources have commands with start and stop the recording of the raw data stream into OSDS Stream files. OSDS Stream files are an extension of OSDS Format files. They include the OSDS Format information, indicating how the data was read, as well as time-stamped records of the raw data that the program saw on the specified port. This can be useful in debugging communication with an instrument. By capturing the raw data stream in an OSDS Format file, one can then use the OSDS © 2014 David Thomson, Original Code Consulting, [email protected] 88 Simulator to play the data back again in the future and test new OSDS Formats against it until the data is properly parsed. Drivers which currently allow the recording of OSDS Stream files include the Airmar, MOSDS, Omega, and Prime Scales. 7 Utilities Utilities are helper programs that work with MICAS-X. By definition, they include functionality that is not needed continuously while MICAS-X is running, but may be needed occasionally. Utilities can be used for reviewing data, editing the configuration files, or performing calibrations. Utilities can be run inside MICAS-X, by selecting them from the Utilities menu (in which case they appear in the Utility tab), or they can be run inside LabVIEW, or they can be run as compiled executable programs separate from MICAS-X. Several Utilities are included with the base copy of MICAS-X, as described below. 7.1 Command Interface The Command Interface is not included in the MICAS-X base package, but is included whenever the Command Instrument is purchased. The Command Instrument is a MICAS-X module that allows MICAS-X to receive commands from another system, either over UDP via Ethernet or over a serial line. The Command Interface is an example of how to send these types of commands to MICAS-X. It can be used to send commands to the same instance of MICAS-X that it is running in, as a test system, or it can send commands to another instance of MICAS-X. 7.2 Configuration Editor The Configuration Editor is a key element of the MICAS-X system. It is described in its own section of this manual. The Configuration Editor is used to create and maintain the configuration file(s) which define how MICAS-X works and what functionality it includes. 7.3 Data Reader The Data Reader Utility reads and presents the data saved in the .csv files that MICAS-X creates. With the Data Reader, you can graph any of the data channels vs time or vs any other channel. The format is simple enough that a .mdoc can be created with any text editor. However, the mdoc Editor Utility in MICAS-X can also be used as a quick and easy way to create .mdoc files. © 2014 David Thomson, Original Code Consulting, [email protected] 89 7.4 mdoc Editor The .mdoc file format is a simple text file which includes section names that are created in such a way that MICAS-X can parse the sections for display with the Document Display. The formatting required for the Document Display is simply that each Section must be preceeded with a line of text that starts with two asterisks, contains the section name, and ends with a line feed. Thus a section format line might look like this: **Introduction The mdoc Editor Utility provides a quick and convenient way to create and edit mdoc files. To create a new mdoc file, run the program and cancel any file dialog asking for a file to load. Click on the uppermost Insert button to create the first section. Then click on that section in the Sections list. Once the section is highlighted, you can edit its name in the Section Name parameter below the Sections list. Enter the text for that section in the Text box to the right. You can continue to Insert and Delete sections, and edit any section's name or text by first clicking on it in the Sections list. Use the Load A Document button to read in an existing mdoc file. Use the Save button to save the current document. If the document is new, the Save button will be greyed out. Use the Save As button to save the document to a new file. 7.5 Log Reader The Log Reader Utility presents a log file for review. If it is launched within MICAS-X, the current log file is automatically loaded, and will be updated in the Log File Reader whenever it changes. Any other log file can be loaded whenever desired, to review previous logs. 7.6 TMDS File Reader The TDMS File Reader allows you to review the data stored in the .tdms file that MICAS-X stores behind the scenes. It has numerous ways to view the data, including time-series charts and tables. 8 MICAS-X Security Device The MICAS-X license is protected through a USB hardware security device. The device is a blue USB dongle about the size of a USB thumb drive and will have labels with “MICAS-X” on one side and “SN xx” on the other. The serial number for the MICAS-X license is embedded in memory on this device. Note that there is no useraccessible memory on this device. © 2014 David Thomson, Original Code Consulting, [email protected] 90 If MICAS-X is run with no security device present, it will operate normally for 10 minutes in “demo” mode. After the 10 minutes are up, Recording and Acquiring will be turned off, and no new commands will be executed. There is an indicator on the MICAS-X tab that displays the status of the security device. In addition, if no security device is present, an error message will be logged to the log file, both when the program is first run and it enters the demo mode, and 10 minutes later when most functionality is inhibited. In certain licensing situations, an expiration date may be applied to the security device. If the expiration date has passed, MICAS-X will work for 10 minutes in demo mode before inhibiting most functionality. The About menu item in the Help menu can be used to view the status of the security device. The About window displays the current security device status, the MICAS-X serial number, and the expiration date, if one is set. 9 Appendix A: Reserved Keywords There are some keywords that are used internally within the MICAS-X system, and therefore should not be used as names for Channels, Sequences, Triggers, etc. Duplication of names should be avoided, including the use of names that contain other names within them. Note that the Channels window in the Configuration Editor under the Modules selection will help identify duplicate names and partially conflicting channel names. In addition to the Keywords listed below, the MICAS-X Commands are documented in a separate section. Reserved Keywords include: Reserve Keyword Effect Acquire This is a channel that is always created by MICAS-X (a Program State Variable) and which has a value of 1 if MICASX is acquiring data and a value of 0 if it is not. Acquire Time This is a Timer that is always included in MICAS-X whenever the Timers Driver is included. It contains the value of the time in seconds since MICAS-X started acquiring data. It has a value of -Inf if MICAS-X is not acquiring data. All This keyword is the name of a List of Channels that is always present. It contains all the Channels defined in MICAS-X. © 2014 David Thomson, Original Code Consulting, [email protected] 91 Debug This is a channel that is always created by MICAS-X (a Program State Variable) and which has a value of 1 if MICASX is in Debug Mode and a value of 0 if it is not. DisableTimer This is a command used by the Timers Driver. Error This is a channel that is always created by MICAS-X (a Program State Variable) and which has the value of the most recent error code reported by MICAS-X. Most of the error codes used in MICAS-X are defined within LabVIEW, though some custom error just for MICAS-X are defined and must be documented somewhere... Mode The word “Mode” is used as a prefix to names in the Controller Driver to create channels that are used to control the mode of PID and Simple Controller channels. The Mode channels switch between Manual and Auto (PID) modes. Record This is a channel that is always created by MICAS-X (a Program State Variable) and which has a value of 1 if MICASX is recording data to a file and a value of 0 if it is not. Record Time This is a Timer that is always included in MICAS-X whenever the Timers Driver is included. It contains the value of the time in seconds since MICAS -Xstarted recording data. It has a value of -Inf if MICAS-X is not recording data. Run Time This is a Timer that is always included in MICAS-X whenever the Timers Driver is included. It contains the value of the time in seconds since MICAS-X started running. Sec Since Midnight This is a channel that is always created by MICAS-X (a Program State Variable) and which contains the time in seconds since midnight of the day that MICAS-X was started. (Note that if MICAS-X is configured to restart data files automatically at midnight, this channel's value will also restart at 0 at midnight.) SeqState When the Sequences Driver is included in the MICAS-X configuration, "SeqState " is prepended to each Sequence Name to create a channel for each Sequence State (0 = Off, 1 = Running), so that they can be turned on and off using the "Set command. SeqStep When the Sequences Driver is included in the MICAS-X configuration, "SeqStep " is prepended to each Sequence Name to create a channel to record the step number each Sequence is currently in. These channels are set to a value of -1 for each Sequence that is not running. © 2014 David Thomson, Original Code Consulting, [email protected] 92 Time (sec) This is a channel that is always created by MICAS-X (a Program State Variable) and which contains the time and date in seconds in UTC Time since midnight, Jan 1, 1904. TrigState When the Triggers Driver is included in the MICAS-X configuration, "TrigState " is prepended to each Trigger Name to create a channel to record each Trigger State (0 = False, 1 = Warning, 2 = True, 3 = Alarm). TrigThr When the Triggers Driver is included in the MICAS-X configuration, "TrigThr " is prepended to each Trigger Name to create a channel for each Trigger Threshold, so that they can be set using the "Set" command. 10 Appendix B: Commands MICAS-X includes a set of Commands that can be used in Triggers, Sequences, Buttons, and Commands. In addition, Drivers can implement custom Commands. The custom Commands for Drivers are not documented here. They are listed in the documentation for each Driver and in the list of Driver Commands below. The standard MICAS-X Commands are: Command Parameters Description Log string to log Sends text to the log file. Alert string for alert text, numeric code Creates various kinds of user alerts. Acquire numeric (0 off, 1 on) Starts or stops the acquisition of Driver data. Record numeric (0 off, 1 on) Starts or stops the recording of files. Set channel, value to set Sets the value of a controller channel. Add channel, value to add Adds a constant value to a controller channel. Subtract channel, value to subtract Subtracts a constant value from a controller channel. Multiply channel, value to multiply by Multiplies a controller channel by a constant value. Divide channel, value to divide by Divides a controller channel by a constant value. Incr channel Increments a controller channel by 1. 1 © 2014 David Thomson, Original Code Consulting, [email protected] 93 Decr channel Decrements a controller channel by 1. AddChToCh2 channel,channel Adds a channel value to a controller channel. SubChFromCh2 channel,channel Subtracts a channel value from a controller channel. MultChByCh2 channel,channel Multiplies a controller channel by a channel value. DivChByCh2 channel,channel Divides a controller channel by a channel value. CopyChToCh2 channel,channel Copies a channel value into a controller channel. CopyToGlb3 channel, numeric address of global Copies a channel value into a global channel. CopyFromGlb3 channel, numeric address Copies a global channel value into a of global controller channel value. AddToGlb3 channel, numeric address Adds a channel value to a global of global channel. AddGlbToCh3 channel, numeric address Adds a global channel value to a of global controller channel. SubFromGlb3 channel, numeric address Subtracts a channel value from a of global global channel. SubGlbFromCh3 channel, numeric address Subtracts a global channel value from of global a controller channel. MultGlb3 channel, numeric address Multiplies a global channel by a of global channel value. MultChByGlb3 channel, numeric address Multiplies a controller channel by a of global global channel value. DivGlb3 channel, numeric address Divides a global channel by a channel of global value. DivChByGlb3 channel, numeric address Divides a controller channel by a of global global channel value. Abs channel Makes a controller channel value equal to its absolute value. Negate4 channel Makes a controller channel value equal to the negative of its value. Recip channel Makes a controller channel value © 2014 David Thomson, Original Code Consulting, [email protected] 94 equal to the reciprocal (1/x) of its value. Not4 channel Makes a controller channel value equal to its logical negation. (0 becomes 1, any non-zero value becomes 0.) SetTrigger channel, value Sets a Trigger Threshold channel to a value. StartSeq sequence, value Starts a sequence. Value specifies the step number to start at. This defaults to 0. StopSeq sequence Stops a sequence. PauseSeq sequence Pause a sequence that is running. UnpauseSeq sequence Resume a sequence that is paused. JPG none Stores a .jpg image of the current screen. Tab numeric of tab to go to Displays the requested tab. Launch path and name of a program or VI Starts a LabVIEW VI or Windows executable program. Exit none Stops MICAS-X CompReboot none Stops MICAS-X and reboots the computer. CompShutdown none Stops MICAS-X and shuts down the computer. Restart none Stops MICAS-X and immediately restarts it. Wait(Value) – only available in Sequences numeric value to wait in seconds Waits a constant number of seconds before executing the next Sequence step. Wait(Channel) – only channel available in Sequences Waits a number of seconds specified by the channel value before exectuing the next Sequence step. Goto – only available label in Sequences Directs the Sequence to move execution to the specified step. SourceCh – only available in Sequences Specifies the source channel for the following sequence step for commands that require both a source channel © 2014 David Thomson, Original Code Consulting, [email protected] 95 and a target channel3 Ask – only available text, source channel in Sequences Presents a dialog to the user asking for a Yes/No response, which is assigned to the channel Ask(Num) – only available in Sequences Presents a dialog to the user asking for a value, which is assigned to the channel text, source channel When any of the above Commands are configured in a Configuration Editor, the Editor knows what parameters the Command needs and presents the proper options. E.g. for the Set Command, it presents a list of Controller Channels and a Value field. When new Commands are added to new Drivers, the VI "MICAS-X Select Config Display Options.vi" can be edited to inform MICAS-X of what parameters each Command needs. However, if custom Driver Commands are added that are not supported by "MICAS-X Select Config Display Options.vi", the Editors do not know what parameters each Command requires. Hence the Editor will present a string parameter and a numeric parameter. The user must ensure that the string parameter (if the command requires it) is filled in with the proper item and that the item is spelled exactly correctly. 1) The Alert command can present an Alert in numerous ways. The numeric parameter is used to specify how the Alert is presented to the operator. The value of the numeric parameter is assembled in a bit-wise fashion. If bit 0 (value = 1) is set, the dialog is suppressed. If bit 1 (value = 2) is set, the Alert text will also be sent to the Log file. If bit 2 (value = 4) is set, a Sequence using the Alert Dialog will not continue until the Dialog is closed. If bit 3 (value = 8) is set, the program will beep when the Alert is issued. If bits 4, 5, 6, or 7 (value = 16, 32, 64, or 128) is set, the program will send the Alert text out via Email. The four different bits correspond to four different email groups, so that different recipients can be defined for different email messages. These bits only work if the Email Instrument is currently included in the configuration. If bit 12 is set, the program plays the Alert.wav file which must be located in the Resources directory. Similarly, if bits 13, 14, or 15 are set, the program plays the Alert1.wav, Alert2.wav, or Alert3.wav file from the Resources directory. Any desired .wav file can be renamed appropriately and placed in the Resources directory to create the desired alert sound. Note that multiple bits can be set to enable multiple behaviors. E.g. a value of 17 will suppress the dialog box and send the Alert out over Email, whereas a value of 10 will post the Alert to the dialog box, write it to the log file, and beep. Note that a value of 1 is not useful, as the Alert would take no action. Bit 0 is used in conjunction with other bits when no dialog is desired. The Alert Calc panel of the Configuration Editor can be used to help calculate the proper value for an Alert to achieve the desired functionality. © 2014 David Thomson, Original Code Consulting, [email protected] 96 2) MICAS-X was original designed for commands with only a single channel parameter. As of version 1.4.0, several commands have been added that require two channel parameters, a source channel and a target channel. These new commands include AddChtoCh – adds the source channel to the target channel and puts the result in the target channel. SubChFromCh – subtracts the source channel from the target channel and puts the result in the target channel. MultChByCh – multiplies the source channel by the target channel and puts the result in the target channel. DivChByCh – Divides the target channel by the source channel and puts the result in the target channel. CopyChToCh – Copies the value of the source channel into the target channel. Pay careful attention to the use of the source and target channels, especially for the SubChFromCh and DivChByCh commands. When writing a command as text, the channels are separated by commas. E.g. “AddChToCh OffsetValue,NewValue” When configuring Buttons or Triggers, there will be parameters visible for the source and target channels. For Sequences, however, the editor only allows for a target channel. To accommodate these two-channel commands, a new Sequence-only command has been added named “SourceCh”. Use this command to set the source channel before issuing a two-channel command. For the “SourceCh” command, use the Target Channel parameter to specify the Source Channel. Note that each Sequence has a memory for one source channel. Thus it is OK to specify a source channel only once at the beginning of a Sequence, if that is the only channel that will ever be used as a source channel in that Sequence. It is more common, however, to include a SourceCh command immediately before every two-channel command in a Sequence. 3) The command language of MICAS-X is limited to a command, a string parameter, and a numeric value. This limitation of the syntax makes it difficult to create a command that can act on two channels, such as adding one channel's value to that of another channel. In addition to the “SourceCh” option described above, another way to overcome this limitation uses a set of mathematical commands that was created that use the numeric value as an address to a global channel. Refer to the section on Globals 6.6.12 for more information. 4) The Negate command performs a mathematical negation (multiply by negative one) to a channel's value. The Not command performs a logical negation to a channels value, for which a value of 0 becomes 1, and any non-zero value becomes 0. In addition to the standard MICAS-X commands listed above, commands can be included in Drivers to extend their functionality. The Driver Commands below have been fully integrated into MICAS-X and are therefore reserved keywords. © 2014 David Thomson, Original Code Consulting, [email protected] 97 Command Driver Parameters Description AirmarOSDSOff Airmar none Turns off the recording of an OSDS streaming data file. AirmarOSDSOn Airmar none Turns on the recording of an OSDS streaming data file. AriesSetPosition Aries Drive value Sets the current axis position. AriesStart Aries Drive none Starts the axis motion. AriesStop Aries Drive none Stops the axis motion. AxisNDefineHome1 NIMotion none Sets the current axis position as Home. AxisNGoToHome1 NIMotion none Moves the axis to the defined Home position. AxisNMoveAbsolute1 ESP700 none Moves the axis to the absolution position stored in the Target Position channel. AxisNMoveRelative1 ESP700 none Moves the axis to the relative position stored in the Target Position channel. AxisNResetPosition1 NIMotion value Sets the axis's current position to the value. AxisNSetPosition1 ESP700 none Sets the current axis position to the value stored in the Target Position channel. AxisNStartMotion1 NIMotion none Starts the motion of the axis. AxisNStopMotion1 NIMotion none Stops any movement of the axis. AxisNStopMoving1 ESP700 none Stops any movement of the axis. CancelWarmup GAM Laser none Cancels the warm-up timer for the GAM Laser Driver, allowing the laser to be turned on. Useful if MICAS-X has been restarted but the GAM Laser is already warmedup. RampTo% Chamber Lighting Sets the lighing channel to ramp to the value specified, using the ramp time previously stored in the RampTime channel. channel (Chamber Lighting Channel only),value © 2014 David Thomson, Original Code Consulting, [email protected] 98 Command Driver Parameters Description DisableTimer Timer channel (Timer Sets the timer channel to Nan to Channel only) disable the timer. DownTimer Timer channel (Timer Sets the timer channel to Count Channel only) Down mode. MOSDSOSDSOff MOSDS none Turns off the recording of an OSDS streaming data file. MOSDSOSDSOn MOSDS none Turns on the recording of an OSDS streaming data file. OmegaOSDSOff Omega none Turns off the recording of an OSDS streaming data file. OmegaOSDSOn Omega none Turns on the recording of an OSDS streaming data file. PauseTimer Timer channel (Timer Pauses the specified timer channel. Channel only) ResetCounts GAM Laser none ReverseTimer Timer channel (Timer Changes the timer channel mode Channel only) from its current value to the other value: e.g. count up to countdown or down to up. SyncTurbo Turbo V none Sets the MICAS-X values of the Turbo V Driver to match those on the hardware. SyncXGS XGS none Sets the MICAS-X values of the XGS Driver to match those on the hardware. UnpauseTimer Timers channel (Timer Unpauses the specified timer Channel only) channel. UpTimer Timer channel (Timer Sets the timer channel to Count Channel only) Up mode. Sets to accumulated trigger counts to 0. Note that some of the Commands documented above support customerspecific Drivers that are not otherwise documented in this manual. 1) For “AxisNCommand” commands, the “N” is replaced by the axis number in actual use. © 2014 David Thomson, Original Code Consulting, [email protected] 99 11 Appendix C: Syntax for Equations The Equations Driver allows users to create and calculate their own channels by writing text equations involving existing channels. The table below describes the syntax for the available functions that can be used for these equations. Function Syntax Function Name Description abs(x) acos(x) AbsoluteCosine Value Inverse Returns thethe absolute of of x. x. Computes inversevalue cosine acosh(x) Inverse Hyperbolic Cosine Computes the inverse hyperbolic cosine of x in radians. Inverse Sine asin(x) Computes the inverse sine of x in radians. asinh(x) Inverse Hyperbolic Sine Computes the inverse hyperbolic sine of x in radians. atan(x) Inverse Tangent Computes the inverse tangent of x in radians. atanh(x) Inverse Hyperbolic Tangent ci(x) Cosine Integral Computes the inverse hyperbolic tangent of x in radians. Computes the cosine integral of x where x is any real number. ceil(x) Round to +Infinity Rounds x to the next higher integer (smallest integer >= x.) cos(x) Cosine Computes the cosine of x in radians. cosh(x) Hyperbolic Cosine Computes the hyperbolic cosine of x in radians. cot(x) Cotangent Computes the cotangent of x in radians (1/tan(x)). csc(x) Cosecant Computes the cosecant of x in radians (1/sin(x)). © 2014 David Thomson, Original Code Consulting, [email protected] 100 Function Syntax Function Name Description exp(x) Exponential Computes the value of e raised to the power x. expm1(x) Exponential(Arg)—1 Computes the value of e raised to the power of x— 1 (ex – 1). floor(x) Round to —Infinity Truncates x to the next lower integer (Largest integer <= x) gamma(x) Gamma Function Г(n + 1) = n! for all natural numbers n. getexp(x) Mantissa and exponent Returns the exponent of x. getman(x) Mantissa and exponent Returns the mantissa of x. int(x) Round to nearest integer Rounds its argument to the nearest even integer. intrz Round toward zero Rounds x to the nearest integer between x and zero. ln(x) Natural Logarithm Computes the natural logarithm of x (to the base e). Inpl(x) Natural Logarithm (Arg+1) Computes the natural logarithm of (x+1). Logarithm Base 10 Computes the logarithm of x (to the base 10). log(x) log2(x) pi(x) rand() Logarithm Base 2 Represents the value π = 3.14159 Random Number (0—1) Computes the logarithm of x (to the base 2). pi(x) = x * π pi(1)= π pi(2.4) = 2.4* π Produces a floating-point number between 0 and 1. © 2014 David Thomson, Original Code Consulting, [email protected] 101 Function Syntax Function Name Description sec(x) Secant Computes the secant of x (1/cos(x)). si(x) Sine Integral Computes the sine integral of x where x is any real number. sign(x) Sign Returns 1 if x is greater than 0. Returns 0 if x is equal to 0. Returns -1 if x is less than 0. sin(x) Sine Computes the sine of x in radians. sinc(x) Sinc Computes the sine of x divided by x in radians (sin(x)/x). sinh(x) Hyperbolic Sine Computes the hyperbolic sine of x in radians. spike(x) Spike function Returns: 1 if 0 <= x <= 1 0 for any other value of x. sqrt(x) Square Root Computes the square root of x. square(x) square(x) square (x) returns: 1 if 2n <= x <= (2n +1) 0 if 2n + 1 <= x <= (2n +2) where x is any real number and n is any integer. step(x) Step function step(x) returns: 0 if x < 0 1 if any other condition applies. tan(x) Tangent Computes the tangent of x in radians. tanh(x) Hyperbolic Tangent Computes the hyperbolic tangent of x in radians. The above table is excerpted from the G Math Toolkit Reference Manual produced by National Instruments. A complete version is available online. Note that the values Inf, -Inf, and NaN are not supported by the G Math Toolkit. If any input channels have these values, the output of the equation will be set to NaN. © 2014 David Thomson, Original Code Consulting, [email protected] 102 12 Appendix D: Error Messages Error codes reported in MICAS-X are generally those defined in LabVIEW. There are a few error codes, however, that were created specifically for the MICAS-X system. These error codes range from 7001 to 7999 and are documented here: Error Code Meaning 7001 Channel not found. 7002 Requested channel is not an output channel. 7003 Auto-Threshold algorithm returned a value of 0. Old threshold was used. (Specific to the SP2 Instrument.) 7004 Channel name is empty. Cannot set unknown channel. 7006 Auto Sampler error: Illegal or missing perameter. (Specific to the SP2 Instrument with Autosampler.) 7007 Auto Sample error: (Specific to the SP2 Instrument with AutoSampler) 7008 Unknown command. 7009 Function not yet implemented. 7010 Security Device not found. Cannot execute command. 7011 Requested List not found. 7012 The requested Command cannot act on the Requested Channel. 7013 Checksum Invalid. 7014 Turbo V communication error. 7015 No Security Device Detected. 7016 No Security Device detected. Now in unlicensed mode. 7017 Resource was not registered correctly. 7018 An XGS gauge set to Auto-On cannot be turned off or on. That must be done on the XGS hardware control panel. 7019 Cannot turn the GAM Excimer on until the warm-up time has expired. 7020 Security Device expiration date has passed. 7021 Security Device expiration date has passed. Now in unlicensed mode. 7022 Lost TCP connection. 7023 Incorrect number of controllers sent to UWyo UF RT.vi. (This error is specific to the UWyo UF Driver.) 7024 Programming error. Please contact Original Code Consulting. © 2014 David Thomson, Original Code Consulting, [email protected] 103 7025 The Array is not configured to allow itself to grow beyond its initial size. (This error occurs if “Allow Array to Grow” is not checked and the array is written to with an index greater than or equal to the initial array size.) 7026 Tab Command cannot be used for a Tab which is not visible. 7027 Email could not be sent. Check your email configuration. 7028 The requested Sequence cannot be started since it is already running. 7029 The requested Sequence cannot be stopped since it is not running. 7030 The requested Sequence cannot be paused since it is not running. 7031 The requested Sequence cannot be paused since it is already paused. 7032 The requested Sequence cannot be unpaused since it is not paused. 7033 Configuration File CRC is not valid or missing. 7034 Backup Configuration File has been defined as the Startup Configuration file due to CRC failure. 13 Web Power Switch 7 Watchdog Function MICAS-X can enable a watchdog function using the Web Power Switch 7. This creates a safety mechanism that can shut down the AC power to a device in the case that MICAS-X or the computer that it is on should crash or stop running unexpectedly. In order for this functionality to work, it is necessary to enable the watchdog function in the Web Power Switch 7 Driver configuration, as well as to configure several scripts on the Web Power Switch 7 itself. The required scripts are documented here. In addition to configuring the scripts below on the Web Power Switch 7, the Enable Watchdog parameter must also be set True in the Web Power Switch MICAS-X configuration. To program the scripts, one must open the Web Power Switch 7 (WPS7) interface from a web browser. To do this, enter the IP address of the WPS7 in the web browser address bar. For example, if the IP address of the device is 192.168.1.100, enter “http://192.168.1.100” in the address bar of your web browser. Click on the Scripting link on the left of the resulting page. On the Scripting page, you will need to enter two User Strings and several lines of Scripts, as shown below. Enter each item one at a time, then press the associated Edit button. Note that the Script items can not be edited if the “Enable Scripting” check box is set. If the “Enable Scripting” check box is marked, first uncheck it and press “Submit”. After editing all User Strings and Scripts, you must check the “Enable Scripting” button and press “Submit” again before the scripts are ready to run on the WPS7. © 2014 David Thomson, Original Code Consulting, [email protected] 104 The directions below assume that Plug or Outlet 1 is being guarded by the Watchdog scripts. You can customize the scripts to act on any of the plugs as desired. Under “User Strings”, enter “\f\1REFRESH %O\2%d” without the quotes, and press “Edit”. The \1 and \2 tokens instruct the WPS7 to write to the first and second lines of its display. %O causes it to display the current state of the eight outlets, and %d causes it to display the current date and time. For the second “User String”, enter “\f\1P1 OFF %O\2%d” without the quotes, and press “Edit”. In this case, the text “P1 OFF ” is displayed to indicate that plug 1 is being turned off. If you wish to guard a different plug(s) with the watchdog script, you can replace that text with other descriptive text as desired. However, it is best to limit this text to exactly seven characters, using spaces as necessary. For Script Line 10, enter “KILL 0” (without quotes) and press “Edit”. This script stops all other scripts. MICAS-X calls this script when it stops, so that the Watchdog functionality ends when MICAS-X stops. If this is not done, the guarded outlet(s) will be turned off shortly after MICAS-X stops running. If that is the desired behavior, leave line 10 with the default “End” entry. For Script Line 20, enter “KILL 0”. For Script Line 21, enter “DISPLAY 1” For Script Line 22, enter “GOTO 30” These three script lines are called by MICAS-X once per acquisition loop. This refreshes the Watchdog function and keeps the guarded plug(s) turned on (if they are already on). Note that the Watchdog functionality does not turn ever turn the guarded plug(s) on. That must be done by the user manually at the WPS7, or from within MICAS-X. For Script Line 30, enter “SLEEP 15”. For Script Line 31, enter “OFF 1” For Script Line 32, enter “DISPLAY 2” These three script lines are responsible for shutting the guarded plug(s) off if MICAS-X does not refresh the watchdog. Line 30 waits for 15 seconds. Note that this value can be adjusted as desired. This value should be 1.5 to 2 times longer than the MICAS-X WPS7 Acquisition Loop time. If this value is shorter than the acquisition loop time, the scripts will turn off the plug(s) prematurely. Line 31 turns off the guarded plug(s). Therefore, the value “1” should be changed to reflect which plugs you wish to have the watchdog guard. The plugs are numbered 1 to 8, and multiple plugs are specified by stringing their numbers together. Thus “OFF 135” will turn off plugs 1, 3, and 5, and “12345678” will turn off all the plugs. © 2014 David Thomson, Original Code Consulting, [email protected] 105 Line 32 displays the second user string. This provides visual confirmation to the user that the watchdog functionality was activated. © 2014 David Thomson, Original Code Consulting, [email protected] 106