1
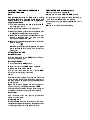
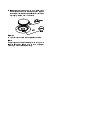
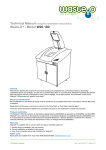
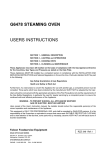
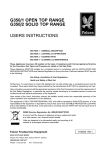
G2102 FORCED
CONVECTION OVEN RANGE
G2112 FORCED
CONVECTION OVEN (May 2010)
USERS INSTRUCTIONS
SECTION 1 - GENERAL DESCRIPTION
SECTION 2 - LIGHTING and OPERATIONS
SECTION 3 - COOKING HINTS
SECTION 4 - CLEANING and MAINTENANCE
These Appliances have been CE-marked on the basis of compliance with the Gas Appliance Directive,
EMC and Low Voltage Directive for the Countries, Gas Types and Pressures as stated on the Data
Plate.
These Appliances MUST BE installed by a competent person in compliance with the INSTALLATION AND
SERVICING INSTRUCTIONS and National Regulations in force at the time. Particular attention MUST be paid
to the following:
I.E.E. Regulations for Electrical Installations
Electricity at Work Regulations
Gas Safety ( Installation & Use) Regulations
Health and Safety at Work Act
Furthermore, if a need arises to convert the Appliance for use with another gas, a competent person must be
consulted. Those parts which have been protected by the manufacturer MUST NOT be adjusted by the User.
Users should be conversant with the appropriate provisions of the Fire Precautions Act and the requirements of
the Gas Safety Regulations, in particular the need for regular servicing by a competent person to ensure the
continued safe and efficient performance of the Appliance.
WARNING - TO PREVENT SHOCKS, ALL APPLIANCES WHETHER
GAS OR ELECTRIC, MUST BE EARTHED
Upon receipt of the User's Instruction manual, the installer should instruct the responsible person(s) of the
correct operation and maintenance of the Appliance.
This equipment is ONLY FOR PROFESSIONAL USE, and shall be operated by QUALIFIED persons. It is the
responsibility of the Supervisor or equivalent to ensure that users wear SUITABLE PROTECTIVE CLOTHING
and to draw attention to the fact that, some parts will, by necessity, become VERY HOT and will cause burns if
touched accidentally.
WEEE Directive Registration No. WEE/DC0059TT/PRO
At end of unit life, dispose of appliance and any replacement parts
in a safe manner, via a licenced waste handler.
Units are designed to be dismantled easily and recycling of all
material is encouraged whenever practicable.
Falcon Foodservice Equipment
HEAD OFFICE AND WORKS
Wallace View, Hillfoots Road, Stirling FK9 5PY
SERVICELINE CONTACT PHONE - 01438 363 000
FAX - 01438 369 900
T100732 Ref.1
SECTION 1 - GENERAL DESCRIPTION
The Oven
The oven has four grid shelves with safety stops on
fixed position runners. One or more shelves can be
removed to accommodate larger items, e.g. chickens.
The burner is situated below the oven compartment
and heats it by conduction and convection. The air
contained within the oven becomes heated by being
circulated by the fan over a heat- exchanger in the
base, and thence over the food, via holes in the oven
side panels. This system promotes even heating
throughout the oven, and in most cases lower
temperatures than those necessary in conventional
ovens can be used.
A cooking guide is provided which contains
instructions for preparation of a wide variety of foods
which can be cooked in this oven.
Oven Controls
Thermostat ON/OFF
Indicator Amber Neon
Thermostat knob
Mains ON indicator
Red Neon
I/O fan switch
Push button for
Oven chamber light
Timer knob
Igniter button
G2102 Open Top Range
Main burner
button
Gas OFF button
(Shut down)
Pilot button
G2112 Oven On Legs
The controls are mounted on a panel at the RH side
of the oven as shown above.
A door-operated microswitch ensures the fans and
burner are turned off whenever the doors are
opened.
Hob Controls (G2102 model only)
Off position
G2112 Oven on Stand
Full flame
setting (High)
Low flame
setting (Simmer)
Each tap is identified to the corresponding burner by
the icons below.
G2112/2 Two Tier Oven
Rear burner
Front burner
LIGHTING THE HOB (2102 Range Only)
SECTION 2 - LIGHTING and OPERATIONS
1. Ensure mains gas is turned ON.
LIGHTING THE OVEN
2. Press and turn knob to FULL FLAME position.
Note
The gas control valve is fitted with a safety 3. Light burner using a taper or match. Continue to
hold knob in for 20 seconds and release.
interlock. Therefore, a period of 3 minutes will
elapse before it is possible to re-light after 4. If burner fails to light, repeat steps 2 to 3 until it
complete shut-down.
does.
1. Turn thermostat knob and power switch to OFF
and close oven doors.
2. Push pilot button marked * in fully and hold.
3. Press and release igniter button and observe pilot
is lit. Repeat as necessary until pilot lights.
4. Continue to hold pilot button in for 20 seconds, then
release it. Observe pilot, if it goes out, wait
3 minutes and repeat from (2).
5. When pilot is established, press down main burner
button marked
.
Set thermostat to required temperature and press
power switch ON, thus lighting main burner and
starting fan.
Turning The Oven OFF
For Short Periods
Turn the thermostat to the OFF position. This will
leave only the pilot alight.
For Longer Periods
1. Turn thermostat to OFF position.
2. Push in burner control OFF button marked O.
3. Switch power I/O switch to OFF.
This will turn both pilot and main burner OFF.
To re-light, follow lighting instructions.
Timer
The timer knob is marked in minutes and should be
set to required cooking time when food is placed in
the oven. It should be turned fully clockwise then back
to desired time.
When set time has elapsed, the warning bell will
continuously ring until operator switches it OFF.
The timer does not switch off oven but provides an
audible warning when cooking cycle is complete.
Oven Light
This illuminates oven from rear via push-button
switch on control panel.
Pre-heating Time
Allow at least 45 mins from switching on a cold oven,
irrespective of temperature setting. Insert the food as
quickly as possible, and close the doors firmly.
5. When lit, turn knob to required setting.
SECTION 3 - COOKING HINTS
Using The Oven
When oven has reached working temperature,
AMBER light will go out then operate ON/OFF as
thermostat maintains temperature.
Opening doors or switching OFF power switch
switches off fan and thermostat/burner.
Loading
All four shelves can be used simultaneously and
normally no manipulation of food on the shelves is
necessary. Containers or food up to 75mm high can
be cooked when using four shelves, but if food bigger
than this is cooked i.e. chicken, one or more shelves
can be removed as necessary. Shelves have stops to
prevent accidental removal: to remove lift stops
above front of side runners.
When loading, oven doors should be kept open for as
short a time as possible in order to minimise loss of
heat.
Tray Size
The oven will accept 2/1 gastronorm trays
(650 x 530mm) or conventional trays up to this size.
Trays and dishes must always be centrally placed on
shelves.
Cooking Charts
This information is provided as guidance only and all
figures are approximate.
Baking
TEMP
TIME
No. of
SHELVES
Scones and Small Buns
230
15 mins
4
Vol-au-Vent Cases
200
10 mins
4
Gingerbread, etc
150
2 hours
4
Meringue (white)
100
Shortbread
175
Biscuits
175
2 hours
30 minutes
15 to 20
minutes
10 to 15
minutes
Fish
TEMP
TIME
No. of
SHELVES
Poached Haddock
175
45 mins
4
Puddings
TEMP
TIME
No. of
SHELVES
Baked Rice
175
4
Bakewell Tarts
190
1 hr to 1 hr
15 minutes
30 to 45
minutes
Large Sponge Slab
(25 - 38mm deep)
200
30 mins
4
Yorkshire Pudding (Large)
240
25 mins
4
4
4
4
4
Meats
Lamb, Roast Beef, etc.
TEMP
TIME
No. of
SHELVES
150 - 175 25perminutes
0.5kg
2
2
Chicken
150
Braised Steak
175
Pork Chops
175
Lancashire Hotpot
175
1.8kg (4lbs)
in 1 hour
1 hour 30
mins - 2hrs
15 to 20
minutes
1 hour 30
mins - 2hrs
Cornish Pasties
190
30 mins
4
Miscellaneous
TEMP
TIME
No. of
SHELVES
Roast Potatoes
200
30 mins
4
Baked Potatoes
215
45 mins
4
Tomatoes
190
8 to 10
minutes
4
Toad in the Hole
215
30 mins
4
Baked Apples
200
30 mins
4
4
4
4
Using the Open Top (G2102 model only)
Open top burners are rated at 5.3kW nett.
The pan supports will safely accommodate pans from
125mm diameter and upward.
Note
For maximum efficiency, place pan centrally over
burner head and avoid flames licking up the pan side.
SECTION 4 - CLEANING and MAINTENANCE
Important
BEFORE CLEANING IS UNDERTAKEN, ISOLATE
FROM MAINS ELECTRICITY SUPPLY. THE
APPLIANCE MUST NOT BE CLEANED WITH A
JET OF WATER OR STEAM CLEANED.
General
All surfaces are easier to clean if spillage is removed
before it becomes burnt on.
Stainless Steel Surfaces
These should be cleaned with hot water and
detergent then dried and polished with a soft cloth.
Cleaning agents containing bleach, abrasives or
caustic chemicals will damage or stain such a surface
and must never be used.
Vitreous Enamel Surfaces
Approved cleaning agents which have the mark of the
Vitreous Enamel Development Centre are
recommended.
It is advisable to clean daily after use. Wipe clean the
vitreous enamel surfaces while still warm using a soft
cloth and hot soapy water. Badly stained removable
parts should be soaked in hot water with an approved
detergent. If parts cannot be removed, the application
of warm water with an approved detergent using
nylon or scotch-cleaning pads will give good results.
Oven
Oven shelves may be removed for cleaning by lifting
stops over front side of runners, but the enamelled
linings are not removeable, except for servicing. Daily
cleaning is best, preferably while the oven is still
warm. Use of a proprietary detergent is the best
general method. For stubborn deposits a proprietary
oven cleaner may be used in accordance with the
manufacturers' instructions. Before removing any
part for cleaning, note how it is arranged and ensure
that it is replaced correctly.
Open Top (G2102 only)
Pan Supports
Clean with warm soapy water. Abrasives such as fine
steel wool, proprietary cleaning pads or nylon pan
scrubbers, should be used with care and only in
cases of extreme overspill. Dry off the pan supports
by hand. NEVER LEAVE TO DRY NATURALLY.
After drying, apply a light film of vegetable oil. This will
prevent oxidisation.
CLEANING INSTRUCTIONS for
OPEN TOP BURNERS
The following instructions should be followed when :
a) A spillage has occurred on the burner.
b) The burner fails to light or stay alight.
c) At the end of each day or cooking period.
Caution
Parts may be hot therefore protection to avoid burns
should be used.
1. Remove pan support.
2. Remove burner head and bezel by lifting upward.
Figure 3
3. Thoroughly clean with soap and water. Ensure all
burner ports are clean and free from food or
cleaning material debris.
Important
Stubborn debris lodged in ports (See Figure 4) can be
removed using a non-metallic implement such as a
cocktail stick. The slots in the base should be freed of
debris using a soft brush.
Dry burner with a lint-free cloth and blow through the
ports to ensure there is no blockage.
Figure 4
Slots
4. Clean any spillage from burner base, ensuring all
food and cleaning material debris is removed.
Dry burner base thoroughly, taking care not to
damage the flame sensor.
Flame Sensor
Figure 5
Important
Do not allow any spillage or cleaning material debris
enter the large hole in the burner base.
Note
Vitreous enamelled pan supports are available as an
optional extra.
Ports
Figure 6
5. Replace burner head and aluminium bezel upon
burner base and ensure the head location pips sit
within the burner bezel notches. When burner head
is properly located, it will not rotate.
Pips
Notch
Figure 7
6. Light burner to check that it operates correctly.
Note
This process should be followed prior to calling for a
Service Engineer. Failure due to lack of proper
cleaning is not covered by warranty.