1
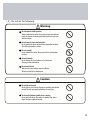
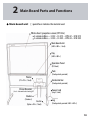
NICHIGAKU ELECTRONIC COPY BOARD
(with 4 Color Printing / ordinary paper supported projector screen)
LF-31S · LFW-31S · LF-32 · LFW-32
LF-33S · LFW-33S · LF-34 · LFW-34
USER MANUAL
INTRODUCTION
Thank you for purchasing Nichigaku Products. This user manual was prepared to ensure that you understand the precautions
and ensure the correct use of this product.
Please take time to read this manual in order to fully utilize its capabilities when used.
Please read the section on "Correct and Safe Use of this Product" before using this product and keep this manual in a place
where it can be readily retrieved for reference when needed.
SUMMARY
Copyboard is an electronic whiteboard designed to improve the efficiency of day to day meetings that can be used to copy the
contents written manually on the white board in 4 colors. The contents may be projected on a screen.
Feeding the whitesheet and copying is done over the operation panel on the main body.
Product numbers referred to in the subsequent sections are as follows.
Product Number
LF-32
LFW-32
LF-34
LFW-34
LF-31S
LFW-31S
LF-33S
LFW-33S
Specification
Two-screen type
Wide
Four-screen type
Wide
"Two-screen type
(One-screen projection screen)"
"Four-screen type
(One-screen projection screen)"
Wide
Wide
Correct and Safe Use of the Product
-- Make sure to read this section before using the product -Read this section to make sure that the product is used correctly and safely and to prevent harm to you
and other persons as well as forestall damage to property
Warning
Indicates possible loss or life or grave injury.
Caution
Indicates possible injury to persons and possible
damage to physical objects.
-- Example of graphic symbols -The symbol
indicates prohibited action.
The image inside the symbol refers to the specific action prohibited.
(The figure on the right means do not dismantle the product.)
The symbol
indicates an action that must be done.
The image inside the symbol indicates the action must be done.
(The figure on the right means that the electric plug should be pulled out from the outlet.)
-- Precautionary Items -Place of Installation
Warning
Do not place in damp places
Do not use in damp places such as near bathtub or humidifier.
This may result to fire or electrocution.
Caution
Do not place near fires
Do not place the main unit and electrical cord near objects
that generate heat like heaters, etc
Do not place in hot places
Do not expose to direct sunlight nor place in hot places to prevent
the internal temperature from rising that could lead to fire.
Do not place where the product may be exposed to oil or steam
Do not place near cooking tables where the product is exposed to oil
and vapor or in dusty places to prevent fire or electrocution.
1
Do not place in unstable places
Do not place on unstable places like shaky tables, and inclined places.
Further, do not place heavy objects on the main unit to prevent loss of
balance that could lead to the unit toppling or falling over.
Caution with the caster locks
When the caster is attached, make sure the caster is locked to prevent
the unit from toppling or falling over and cause injury.
Using the Product
( 1 ) What to do when the following happens
Warning
When smoke occurs
In the unlikely event when smoke or unusual smell appears,
continued use of the unit may lead to fire or electrocution.
Put off the power supply at once, pull out the plug, check that
the smoke stops and call the maintenance service shop at once.
Do not attempt to repair the unit. It is dangerous to do so.
When unit breaks down
In the unlikely event that the unit topples or falls over, put off the
power supply at once, pull out the electrical plug from outlet and
contact the maintenance service shop. Continued use might lead
to fire or electrocution.
When water infiltrates the unit
In the unlikely event that water infiltrates the unit, put off the
power supply at once, pull out electrical plugs from outlet, and call
the maintenance service shop. Continued use may lead to fire
or electrocution.
When foreign material infiltrates the unit
Do not insert or drop metals or flammable materials in the small gaps
in the unit. When a foreign material infiltrates inside the unit,
immediately put off power supply, pull out the plug, and call the
maintenance service shop. Continued use might lead to fire or electrocution.
Please exercise care especially at home or when kids are present.
2
( 2 ) Power Supply
Warning
Do not use power supply other than AC 220V-240V (Regular Power Supply)
Never use power supply other than AC 220-240V, (60 Hz). This might lead
to fire and electrocution. When it is unavoidable and other devices are
used on the same outlet, make sure that the total current does not exceed
the maximum capacity of the outlet.
Precautions on handling power cords
Do not damage, work on, bend forcefully, pull, twist or tie the cords into
knots. Further, do not place heavy object on the wire, heat the wire nor
damage the cord. Fire and electrocution might result.
Do not operate with wet hands
Do not operate with wet hands. You might get electrocuted.
Do not connect several devices to one extension cord.
Do not connect several devices to table top, branching outlets or
branching sockets. This might lead to fire or electrocution.
Caution
Handling of plugs
Always pull out electrical plugs gripping the plug not the line.
Pulling the line cause break on the line and lead to fire or electrocution.
Precaution when turning the power off
When printing is done, wait at least one minute before turning
the power off.
Precaution when connecting to ground
When using the unit in damp places, make sure to connect the equipment
to ground. Ground connection may be done in the following:
– Ground terminal of outlet.
– Bury bronze stick 65cm or deeper into the ground.
– Grounding works (class 3) connection terminal.
Do not connect ground of unit to the following:
– Gas pipe, ground for electromagnetic use, lightning rod, water pipe.
3
( 3 ) Do not do the following:
Warning
Do not connect to other printers
What is written on the white sheet can be printed only with the
printer for the unit. Connecting with other printers may lead to
trouble or failure.
Do not connect to personal computers
Do not connect the main unit to personal computers and print.
This will lead to trouble or failure.
Do not remodel
Do not remodel this device. This may lead to fire, electrocution
or injury.
Do not dismantle
Do not remove the cover (cabinet, etc.) of the device.
This may lead to electrocution.
Do not wet the unit
Take care not to wet or allow water to infiltrate.
This may lead to fire or electrocution.
Caution
Do not ride on the unit
Do not ride on, sit on, lean on the device, especially with children
around. The unit may topple, get broken, or cause injury.
Do not do the following while sheet is moving
Do not touch the white sheet when it is moving. Your arm or
fingers may get caught and injured.
4
( 4 ) Other Precautions
Warning
Take care not to insert foreign objects
Do not place flower vase, potted plants, cups, cosmetics, medicine,
container with water and other small metallic objects. When the
contents spill and infiltrates device, fire or electrocution might result.
Caution
Precaution during lightning
Do not touch cord when there is lightning. This may result to
electrocution from lightning.
Cleaning the electrical plug
Wipe and remove dust and particles that accumulate between
plug and outlets regularly (about once in six months).
Dust may cause fire.
Precaution when not used for long time
When not to be used for a long time, make sure to pull out
plug from the outlet.
Precautions when printing
Do not place your hand inside printer when printing. Parts are
moving inside and might cause injury.
Care for ink cartridge
Do not shake nor drop the cartridge. Ink might leak out and dirty
the surroundings or clothes.
5
Contents
1
2
3
4
5
6
7
8
9
10
11
12
13
14
15
Correct and safe use of the product .................................................................................
Precautions in handing the product .................................................................................
Main board unit - Parts and Functions .............................................................................
Operation .......................................................................................................................
When copying to the printer ........................................................................
Setting the number of pages ....................................................................
Setting the concentration of print .............................................................
Removing the copy ....................................................................................
Moving the white sheet and projection screen ...........................................
Using the projection screen .......................................................................
Setting the paper ...........................................................................................................
Papers that may be used .................................................................................................
Changing the ink cartridge ..............................................................................................
Maintaining the printer ...................................................................................................
Cleaning the ink cartridge nozzle and contact surface ............................................
Precautions in handling the cartridge ....................................................................
Cleaning the rollers ...............................................................................................
Error display ....................................................................................................................
In cases like these (Troubleshooting) .................................................................................
Assembly procedure .........................................................................................................
White sheet protective paper ............................................................................................
Setting the date and time ................................................................................................
After service .....................................................................................................................
Specifications ...................................................................................................................
Auxiliary parts, consumables and optional parts ................................................................
1
7
10
13
13
13
14
14
15
15
16
17
18
20
20
21
21
22
23
25
30
32
33
34
35
6
1
Precautions in Handling
Where to Place
Do not place where the product is exposed directly to sunlight, near the stove, etc.
Do not place where the product lies along the path of airblast from cooler, air-con, etc.
Be sure to lock the casters in place when not moving the unit.
Place on level floor and vibration free.
Unlocked
Locked
Moving the Product
When smoke occurs
In the unlikely event when smoke or unusual smell appears, continued use of the
unit may lead to fire or electrocution. Put off the power supply at once, pull out the
plug, check that the smoke stops and call the maintenance service shop at once.
Do not attempt to repair the unit. It is dangerous to do so.
When unit breaks down
In the unlikely event that the unit topples or falls over, put off the power supply at once,
pull out the electrical plug from outlet and contact the maintenance service shop.
Continued use might lead to fire or electrocution.
When water infiltrates the unit
In the unlikely event that water infiltrates the unit, put off the power supply at once,
pull out electrical plugs from outlet, and call the maintenance service shop. Continued
use may lead to fire or electrocution.
When foreign material infiltrates the unit
Do not insert or drop metals or flammable materials in the small gaps in the unit.
When a foreign material infiltrates inside the unit, immediately put off power supply,
pull out the plug, and call the maintenance service shop. Continued use might lead to
fire or electrocution. Please exercise care especially at home or when kids are present.
Precautions on Writing
See 13 Consumables (page 35) for markers that may be used.
Using markers other than the recommended markers may not copy correctly.
Never use sign pen, ball pen, oil-based marker. What is written with these can not
be erased.
Do not attach paper on the whiteboards using tape pins. Do not strike the board
with sharp objects.
Do not erase or lean on the board while it is moving.
Use the optional carrier sheet to make a copy of data attached to screen.
Use one sheet per screen for maximum of two screens.
> Marker for use on whiteboard
7
Precautions in using the projection screen
The projection screen is especially made for good projection. Dirt and scratches witl adversely affect projection, hence, be sure to
observe the following.
Dirt is clearly projected. Do not touch the projection screen.
Never use markers for white sheet, sign pens, ball pens and oil based markers on the projection screen. These cannot be erased.
Do not rub or scratch with hard objects. This may damage the screen.
Do not use tapes, carrier sheet (format sheet).
Printing Paper
Use ordinary A4 size paper.
Do not store papers in hot, humid places or exposed to direct sunlight.
Read section 5 (page 17) for papers that can be used.
Power
Do not use power supply outlet other than AC 220V -240V, 3A.
Do not step on or bend the power cord.
Do not turn the power off while printing or scrolling the whitesheet. This will lead to failure. Turn off power after operations
are completed.
Turn off power when not using the equipment to save power and maintain functonality.
Connecting the Printer
The printer that comes with this equipment is exclusive to plantage. Connecting other printers is not recommended. Connecting
to personal computer might damage the equipment. Never do these.
8
Daily Maintenance
Exercise care to ensure that equipment can be used in the best possible conditions at all times.
Dust and dirt from erasures cling easily on the white sheet. When this cannot be removed, clean the white sheet with cloth dipped
in water to wipe away dirt.
When marker traces cannot be removed with eraser or dry cloth, wipe with cloth moistened with alcohol. Do not use thinner.
Dirt from marker clings to the eraser (blackboard eraser). Tap the eraser lightly to drop the dirt.
When dust and erasure dirt accumulates on the tray, dip cloth on water, wring the cloth thoroughly and wipe off the dirt and dust.
When the operation panel of the main unit becomes dirty, dip cloth in water or neutral solution and wipe off the dirt.
Maintaining the projection screen
Dust and dirt on the board and tray for marker dirt can dirty the projection sheet. Clean thoroughly.
Take away dust and marker dirt from the projection screen with brush lightly. Never wipe off marker dirt with dry cloth. This will
make the sheet surface dirty.
Never use chemicals such as Benzon, thinner and so forth.
In case the screen is wrongly written with marker for whitesheet, lightly wipe off with 10x dilute neutral solution and take care
that no solution remains, carefully wipe dry with cloth dip in water and tightly wrung.
9
2
Main Board Parts and Functions
Main board unit ( ) parenthesis indicates the material used.
White sheet / projection screen (PET Film)
2-screen endless --- LF-32 – LF-31S – LFW-32 – LFW-31S
4-screen endless --- LF-34 – LF-33S – LFW-34 – LFW-33S
Main board unit
(ABS >ABS< / steel)
Tray
(ABS >ABS<)
Operation Panel
(PC Sheet)
Pole
(Steel particle painted)
Printer
Horizontal bar
(PS >PS< / Steel)
(Steel particle painted)
Printer Receiver
Power Cord
(Steel – Meramin backed coating)
(vinyl / steel)
Stacker
(Stainless)
Caster
(Nylon >PA< / Steel)
Leg
(Steel particle painted / ABS >ABS<)
10
Operation Panel
When the lamp indicator for number of pages blinks, see page 22 for error display.
LF-31S LF-33S
LFW-31S
LFW-33S
Skips projection screen surface and feeds 1 page
of whitesheet to the right.
Left feed key
Feeds one page of white
sheet projection screen to
the left.
Color copy key
Copies the white sheet on
the board on A4 size paper
in color
Power Switch
Switch to " | " to use.
Switch to " " to put off
after use.
Monochrome Copy Key
Copies the white sheet on the
board on A4 size in monochro.
Right feed key
Feeds one page white
sheet to right
Number of Copies
Screen Key
Projects to screen
whatever page is being used
"Dense" Lamp
"Dense" Key
Pressing "Dense" key prints "dense"
copy even for pale characters.
Power Lamp
Number of copies to print Setting Key
Press the number of copies to print.
1~9 copies should be printed.
11
LF-31S LF-33S
LFW-31S
Right feed key
Left feed key
LFW-33S
Power Switch
Monochrome Copy Key
Color copy key
Number of copies
Power Lamp
"Dense" Lamp
"Dense" Key
Number of copies setting key
12
3
Operation
1 Power Supply
Insert the power cord into the AC 220V outlet and switch to "|". Green lamp for power lights up.
Putting the power on automatically matches pages, indicating the screen as number and that the equipment is ready.
When no key is pressed one hour after the power is put on and lamp lits up, the lamp automatically goes off. Everytime a key is
pressed, the lamp goes off after 1 hour when no subsequent operation is done.
No copying can be done within 10 seconds after power is put on. Further, there are instances when the room temperature is
low where the copy concentration does not stabilize in 1 hour after power is put on or after operation is done. Wait for 3
minutes before copying.
2 Handwriting
About 1 cm
Use the recommended markers to write on white sheet.
The area within 1 cm from the edges cannot be copied.
(outside the dotted line on the figure to the right)
About 1 cm
About 1 cm
About 1 cm
Copying to Printer
Setting the number of copies
Copying starts simply by pressing the copy key after
setting the number of copies.
Up to 9 copies may be copied. The counter changes display
from 1 to 9 as copying proceeds and then returns 1.
13
Setting the copy concentration
Pressing "Dense" Key lights up the green lamp and copies the "pale" characters dense.
Lamp
Dense
Pressing "Dense" key once more puts off the green lamp and copy concentration
is restored to standard concentration.
When set to "Dense", black spots may appear on white spaces.
When power is turned off, the copy concentration is restored to standard concentration.
Retrieving Copies
Set the paper to use. See 4. Setting the Paper (page 16)
Copy
Color
Monochrome
Center Mark
Pressing the copy key copies what is shown on the white sheet on A4 paper
in 4 colors.
Disabled when the projection screen is active.
Outputted copies have center mark for use. When centering punch holes during filing
of the copies.
Output Copy
For widetype screen, the copy is shrunk.
Put off power one minute after copying is finished.
14
Moving the white sheet and projection screen
Moving the white sheet / projection screen without copying.
Feed
Left feed
Feeds one page only to the left.
Skips projection screen and feeds one page to the left.
Feed
Set the paper to use. See 4. Setting the Paper (page 16)
Feeds one page only to the left.
Skips projection screen and feeds one page to the left.
Skips projection screen and feeds one page to the left.
Screen
Moving manually
Screen
The projection screen may be drawn out from whatever page.
Although it is possible to move to left or to right manually, avoid doing this. Fast
movements may lead to failure.
Retrieving Copies
1 For models with projection screen, press the Screen key
to bring out the projection screen page.
The upper left corner where the "Caution" label is attached
is the projection screen page.
2 Use this for presentations where projectors and OHP are used.
3 To prevent dust from clinging to the surface of the projection
screen, press the feed key when finished to bring out the white sheet.
Projection screen surface
15
4
Setting the Paper
This section explains how to set ordinary A4 size paper.
Ruffle and align edge of papers
neatly before setting
The surface for printing should
be facing up when set.
Clip the paper guide and
align with edge of paper
Align the right side of the paper to
the right edge of the paper feeder.
This face is the face for printing
NOTE:
Do not insert paper forcefully in the feeder.
When papers that have been printed reaches 20 sheets, remove paper from stacker.
Do not touch paper until ink is dry.
16
5
Papers that may be used
Notes regarding papers
Do not use the following paper types.
Not only printing is not good, the paper will get clogged and lead to failure.
Folded papers
Curled papers
Wrinkled papers
Damp papers
Very thin papers (Weight: less than 64g / m² : tracing paper, etc.)
Very thick paper (Weight: greater than 105g / m² : paper for screen use, etc.)
General use paper
Ordinary paper: A4 size
Ordinary paper for copiers (Weight: 64~105 g/m²)
Reference
The weight of the paper that may be used in feeders should be 105g/m² or less. Greater than this, paper
will clog the feeder and cause trouble.
When storing papers
Replace unused papers inside original bag and store in places that are not too hot or too humid and not
expose to direct sunlight. Store in flat places to avoid wrinkles or folding of paper.
When holding paper
Hold the paper at the edge and avoid touching the face to be printed.
Scratches and dirt on the printing surface will degrade the quality of print.
17
6
1
2
Changing Ink Cartridge
Replace empty cartridge as follows:
Turn on the power supply to the printer
Check that no printing is ongoing and open
the front cover. Move the cartridge carrier to
the unloading position.
Front cover
Cartridge carrier
3
Press the lockbar in front of the cartridge holder
for the left (color) and right (black) cartridges
and open the fixed cartridge cover.
Fixed cartridge cover
Cartridge holder
4
Remove the loaded cartridge and place inside a
sealed container for disposal
Ink Cartridge
(Color)
Ink Cartridge
(Black)
18
5
Dish out the new ink cartridge from the package
and remove the protective tape from the print head
Protective tape
Note
Printing is not possible with the protective tape unremoved.
Make sure to remove tape. Do not touch or remove the metal
contact surface.
6
Set the ink cartridge into the cartridge holder.
Ink Cartridge
(Color)
7
Pull down the fixed cover until it produces a clasping sound.
8
Close the front cover
Ink Cartridge
(Black)
19
7
Maintaining the printer
Cleaning the new contact surface of ink cartridge nozzle
When printing becomes patchy or white lines appear, clean the contact surface of the nozzle of the ink cartridge of ink deposits with
a clean damp cloth.
1 Remove the ink cartridge from the printer.
2 Dampen a clean cloth with lukewarm water and wipe
the contact surface of the nozzle keeping wiping motion
along the same direction.
To thaw dried ink, press damp cloth on the nozzle or contact
surface for 3 seconds and wipe gently to clean surface.
3 Wait until the area that was wiped dries.
Nozzle
4 Mount the cartridge into the printer.
5 Print the document once more.
6 When the printing is not improved, clean the nozzle one more time.
Contact surface
7 When printing does not improve still, change with new cartridge.
20
Precautions in handling ink cartridge
To ensure long use of ink cartridge and maximize printer capabilities, make sure to observe the following.
Do not take ink cartridge from packaging until all preparations are ready.
Do not remove the ink cartridge except when changing or cleaning. Store removed cartridges in a sealed container. Removing the
ink cartridge and not using it for a long time dries the ink causing ink to clog.
Ink cartridges replenished with ink might cause printer defect/trouble and might cause damage. This is not covered by warranty.
To obtain best print results, use Lexmark brand ink cartridge. Trouble and damages caused by using brands other than Lexmark is
not under warranty.
Purchasing Ink Cartridge
Buy ink cartridge from computer or household electronic shops.
Please order the following cord.
Type
Black
Color
Applicable Cord
Standard type 16 or economy type 17
Standard type 26 or economy type 27
Cleaning the roller
When paper is not properly fed, clean the rollers.
1 Prepare commercially available cleaning sheet.
2 Check that power is on.
3 Remove the protective paper on the cleaning sheet.
4 With the particle adhesive surface facing up, align the sheet to the right edge of the feeder.
5 Hold the paper guide and release release lever at the same time and slide in the cleaning sheet aligning the width of the sheet.
6 Press the power switch for about 5 seconds after which feed the cleaning sheet to the printer.
7 Press the power switch once more to eject the cleaning sheet.
8 Press the power switch to power up the printer.
9 Reverse the ejected paper down face up and set to the feeder aligning the edge to the right edge of feeder.
10 Repeat steps 5 to 7 .
21
8
Error Display
Error display appears on the operation panel whenever an error occurs.
Errors are displayed serially.
Error Display
Cause
Countermeasure
White sheet does not
move at the proper
speed.
Check if white sheet is not pressed
externally or that no foreign object
is entrapped. Turn off power and
remove any object trapped in or
leaning on the white sheet, then
turn on the power.
If this does not work, call our
customer service desk and inquire.
Other white sheet
scrolling errors.
Inquire from our customers service
desk.
Printer power plug is not
inserted.
Printer is not connected to the power
supply.
Check printer connection and put on
the power supply.
Out of printer paper.
Provide paper replenishment and press
the power switch.
Out of printer ink.
Replace ink cartridge and press the
power switch.
Paper is jammed.
Remove the paper jammed and press
the power switch.
Other printer error.
Inquire from our customers service
desk.
22
9
In cases like these… (Troubleshooting)
When despite performing the following countermeasures the problem is not solved or for
conditions not mentioned below, inquire from our customer service desk.
Condition
Cause
Countermeasure
Codes starting with the
letter "E" blinks.
Device error occurs.
Section 8. Error Display (page 22) and
do recommended countermeasure.
Even with the power switch
pressed, the green lamp for
"power" does not light up.
The power plug is not
inserted.
Insert the power plug into the outlet.
Blank sheet or streaks
results.
Black sheet results.
Ink cartridge is not
mounted properly.
Check if the protective tape is not
removed. Check if the cartridge is
properly mounted on the cartridge
holder.
The internal flourescent
lamp is busted.
Call our customer support service
and ask for lamp replacement.
Black streaks appear.
If the "Dense" key is active,
press the "Dense" key. If
this does not solve problem,
the internal flourescent lamp
is busted.
Call our customer support service
and ask for lamp replacement.
Characters are pale or patchy.
Handwriting on the white
sheet is too thin or too pale.
Thicken or darken handwriting.
Press the "Dense" key, and darken the
copy concentration. When "Dense" is
chosen, dark spots appear on the white
areas of the copy.
Too little remaining ink in
the ink cartridge.
Replace ink cartridge.
Ink cartridge is dirty.
Clean the contact surface of the nozzle
of ink cartridge.
No more ink in the ink
cartridge.
Replace ink cartridge.
Room temperature is too low.
Wait for at least 3 minutes.
Either out of paper or paper
is jammed.
Replenish paper on the feeder and
press power switch. When paper is
jammed, remove jammed paper.
Color is not right.
The printer power switch
lamp blinks.
23
Condition
Cause
Countermeasure
Printer power switch blinks
twice or four times
intermittently.
The cartridge carrier is
stopped.
Turn printer power off, open front cover
and remove the object that jams the
carrier. Close the front cover and put
power on.
Printer blinks once followed
by two blinks repeatedly.
Ink cartridge circuit is
shorted.
Replace with new ink cartridge.
24
10
Assembling
Before Assembling
Check if the following listed parts are available
or not, and proceed to the next steps.
Select a level place so that equipment does
not topple down.
Stand Parts List
No.
1
2
3
4
5
Board Parts List
No.
1
2
3
4
5
Part Name
Quantity
Pole (with top cap)
2
Leg with caster
2
Horizontal bar
1
Allen bolt with washer (M8 x 35)
4
Allen bolt collar (M8 x 40)
6
Collar
Tighten allen bolts with allen wrench
(provided in the stand packing provided.)
Part Name
Quantity
Main board unit
1
Printer receiver board
1
Bolt for printer receiver board
2
Stacker
1
Magnet
2
Printer Parts List
No.
1
2
3
Part Name
Quantity
Printer Main Unit
1
Ink cartridge
2
When freshly opened from packaging,
the ink cartridge is preset already.
Ordinary A4 size paper
5
This is a precision device, please handle with care.
Shown is the stand fitted type (assembled type). For L, W types, please consult the shop where you bought the item.
Please check p.35 on Auxilliary Parts List also.
25
Stand Assembly
Top cap
1 Assembling the pole stand and legs
Attach the pole to the caster with lock firmly with
allen bolt with washer (M8 x 35).
Viewed from the front, the caster with lock should
be right from and back left.
2 Remove the top cap of the pole as shown in the
figure on the right, pressing the button while
letting the cap slide upwards.
3 Attaching the horizontal bar to the poles.
Turn the pole such that the slit at the top is inwards
(the pole with the cable cover at the right side). Next
with the horizontal bar thread hole to the right and up,
place the bar between poles and fix the bar with allen
bolt with collar (M8 x 40).
Right Side Up
Allen bolt with
collar (M8x40)
Horizontal Bar
With lock
With lock
Front Side
Leg with caster
Allen bolt with washer
Bolt for printer
receiver board
4 Attaching the printer receiver board
Turn the printer receiver board so that the part with cut
is infront and fix the board at the right side of the
horizontal bar.
5 Attaching the stacker
Bend the stacker mounting end inward, insert into the
groove on the printer receiver board to mount the stacker.
Pole
Slit
Printer Receiver Board
Stacker
26
Mounting the board to the stand
Two persons should mount the board on the stand.
1 Before thaking out the main board unit from the packaging,
loosen the allen bolts at the left and right side of the board
by about 10mm.
Take out the board by holding the entire board and lifting
it up not only front frame.
2 Fit in the left and right allen bolt of the board to the upper part
of the board.
3 Fix the board with the allen bolt with color at the middle
of the pole stand.
10mm
Allen Bolt
NOTE
Removing the collar of the bolt when assembling the inner
part of the board might get damaged and lead to fire or
electrocution.
4 Tighten the allen bolts mentioned in 2 and return the
top cat removed earlier in place.
Allen Bolt
with color
27
Mounting the Printer
1 Remove all protective tapes.
2 Peel off the cover paper on the adhesive tape of
the magnet and attach at the bottom of the
printer. (2 places)
3
Place the printer on the printer mounting board.
28
Connecting the printer to the main unit
Rear view diagram
Printer cable
Printer power cord
Adaptor
Main unit power cord
Printer Power cord
Main unit power cord
Printer cable
1 Insert the printer cable from the lower part of the main
unit to the printer. Align the connector properly and insert
fully inside.
3 Place the cable and cord (3 cords) inside the
cable cover on the right pole.
2 Insert the printer power cord adaptor to the connection
for the printer adaptor.
4 Insert the power cord plug of the main unit into
the power supply outlet inside the room.
29
11
Protective paper of the White Sheet
Protective sheet is provided only for 4-screen type.
LF-34 LFW-34
Removing the protective paper
1 A protective paper is attached at the rear side, hence,
after assembly is completed, press the right feed key until
the protective paper is fully on display.
2 Remove the protective paper.
Attaching protective paper
1 To prevent the sheets from sticking to each other re-packaging
or when moving the equipment, please cover the sheet surface
with protective paper using tape.
2 Move one screen to the left by pressing the left feed key.
LF-33S LFW-33S
Removing the protective paper
1 After assembly is completed, turn on the power for the main unit.
The current screen will scroll automatically to the right. A protective
paper is attached at the rear side. Hence, press the left feed key and
scroll one screen more.
2 Remove the protective paper when the protective paper is
displayed fully.
Be extra careful not to hurt the sheet surface when
removing the protective paper.
Attaching protective paper
1 To prevent the sheets from sticking to each other, when
repackaging or when moving the unit, attach a protective
paper on the sheet. Bring out the projection screen with
the screen key.
30
2
Scroll two screens using the left feed key.
3
Attach protective paper on the sheet with tape, etc.
4
Scroll one screen with the right feed key.
5
Bring out projection screen using the screen key and put off power.
Ground Connection
Caution
Connect the unit to the ground when using in humid places.
Connect to earth from the M4 thread ground wire as indicated
in the figure to the right.
The ground wire is not attached so please provide the ground wire.
Particle receiver
Thread ground wire
31
12
Setting the date and time
Although adjusted at the time of shipment, please follow the procedure below when
re-adjustment becomes necessary.
Setting the date and time
1 Place into date and time setting mode
Press the " " key and the "Dense" key and at the same time put the power switch to "|" position.
Turning the power ON displays " " indicating the the unit is on date and time setting mode.
2 Enter the date and time
Pressing the "Number of Pages" key displays the second digit of the western calendar system.
Press the "Dense" key to switch from year, month, date, hour and minute and adjust the values using the "
" and "
" keys.
Example: 15:34, September 12, 2006
Year
Day
Month
Hour
Minute
Move from item
to item with
"Dense
Changes
"Feed"
Returns to home
when "Number of Pages"
is pressed.
3 Save date and time to memory
Pressing the "Number of Pages" key while setting the time prints the time enterred.
32
13
After Service
1. Warranty Certificate
Attached separately.
Read the warranty certificate received during setup very well and keep it safely.
2. Warranty Period
One year from the date of installation.
When repairs are requested within the period of warranty.
Please read all items in this User's Manual and re-inspect the problem. Call the service help support when problem is not solved.
As prescribed in this warranty certificate, repairs will be conducted by the sales outlet where the unit was bought or the service
help desk.
(What to describe when requesting assistance)
Address, Name, Telephone number, product name, manufacturing number, description of trouble or abnormalities, date of visit
desired.
When requesting repairs after warranty period has elapsed.
First, please consult the support help desk. When the repairs required supports the functionality of the equipment, repairs will be
done with a fee as desired by customer.
3. Other Provisions
Please consult the sales outlet from where the product is bought or the service help desk mentioned at the end of this User
Manual regarding repairs and after service items that are not clear.
33
14
Specification
1. Input Parts
Item
LF-32
LF-31S
LF-34
LF-33S
Wide Type
1 External Form (including T-Leg) 1462mm(W) x 1900mm(H) x 620mm(D)
LFW-32 LFW-31S LFW-34 LFW-33S
1962mm(W) x 1900mm(H) x 620mm(D)
2 Weight (including T-Leg)
~36 kg
~40.5 kg
3 Size of Board Surface
~1260mm(W) x (900mm(H)
~1760mm(W) x 900mm(H)
4 Effective size of Input Area
~1240mm(W) x 880mm(H)
~1740mm(W) x 880mm(H)
5 Number of screens
2screen (continuous)
2screen (continuous)
6 Screen number that could be
copied
2screens
7 Installation Copy
Carrier Sheet (Optional details, p.35)
8 Writing tool
Exclusive Marker (Black, Red, Blue, … 3 colors) • Green marker is not provided
~38 kg
1screen
(one screen is
projection
screen)
4screen (continuous)
4screens
3screens
(one screen is
projection
screen)
2screens
~42.5 kg
1screen
(one screen is
projection
screen)
4screen (continuous)
4screens
3screens
(one screen is
projection
screen)
3. Conditions of
Use
2. Read / Write Parts
Recommended markers: Pilot whiteboard transparent marker WBMVM-20L-G
9 Sheet screen feed speed
~10seconds/screen
1 Readout
CCD sensor Linear Readout
2 Light source
Flourescent Lamp (35W High Frequency Light)
3 Printing Type
Thermal Ink Jet
4 Printing Paper
Ordinary Paper A4 (210x297mm)
5 Printer Quality
600 x 300 dpi
6 Outut paper size
A4 size
7 Number of pages to copy
1~9 pages
1 Power / Cord Length
AC 220V-240V ± 10% (60Hz) / 3.5m
Temperature 10~35°C (when running)
2 Ambient conditions
Humidity 45~80% (when running)
34
15
Auxilliary Parts / Consumables /
Optional Parts
The following items are included in this product. (Common to all brands)
Auxilliary Parts
No.
1
2
3
4
Part Name
Warranty Certificate
User Manual
Eraser
Marker (Black, Blue, Red)
Quantity
1 Copy
1 Copy
1 piece
1 each
Remarks
When parts are missing, please contact the sales outlet where the product is bought from.
Consumables
(Common to all types)
No.
1
2
3
4
5
Part Name
Marker (Black)
Marker (Red)
Marker (Blue)
Eraser
Ink Cartridge (Black)
6 Ink Cartridge (Color)
Optional Parts
No.
Part Name
Carrier Sheet
1
Standard Type
Carrier Sheet
1
Wide Type
Product No.
Quantity
Remarks
103503
Green Marker (Black)
1 Dozen
103501
Green Marker (Red)
1 Dozen
103502
Green Marker (Blue)
1 Dozen
104005
CE-203
1 piece
Standard Type 16 or Economy Type 17
(For details, see page 21)
Standard Type 26 or Economy Type 27
(For details, see page 21)
Product No.
Product Name
108935
LA-4-36
108937
LA-4-46
Size
1188 x
840mm
1688 x
840mm
Selling Unit
1 Sheet
1 Sheet
Carrier Sheet (PET Film)
Used when materials are attached on screen for copying.
Place on standard mode when used for carrier sheet.
(When in "Dense" mode, the sheet may become black.)
Two persons should attach the wide carrier sheet type.
To order or inquire prices of consumables/optional parts, please contact the sales outlet
from which the equipment was bought.
35
This equipment is a Class A IT equipment that conforms to VCCI stnadards. When used in houledholds, electronic signal
disturbances may result. The user might be required to take the necessary actions.
This manual may not be reproduced in part or in full without prior permission.
This manual may be revised without prior notice.
For questions regarding items that are not clearly explaned or are doubtful in this manual,
please contact the service desk near you.
First Edition 2006-10
lbb/05/23/2007
36