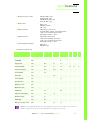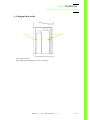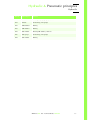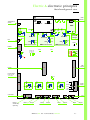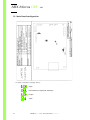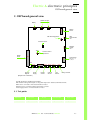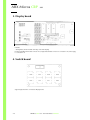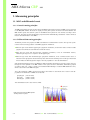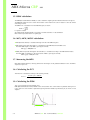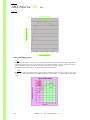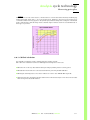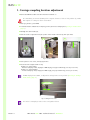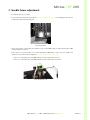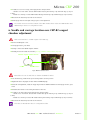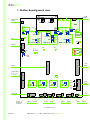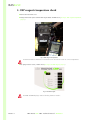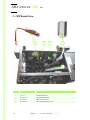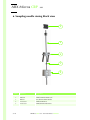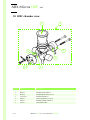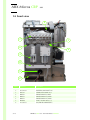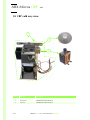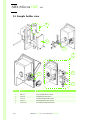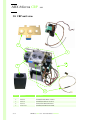
1
ABX Micros CRP 200
Technical manual
P/n:
HORIBA ABX
B.P. 7290
34184 MONTPELLIER Cedex 4 - FRANCE
RAA028A
User Manual
Revisions
Part number
Technical Note
Software
revision
Sections
Date
RAA028A
RAN153A
V1.19
All
06/01/2006
This document applies to the latest software version as indicated above.
When a subsequent software version changes the information in this document, a new section and/
or sections will be released.
◆ Notice of liability:
The Information in this manual is distributed on an "As Is" basis, without warranty. While every
precaution has been taken in the preparation of this manual, Horiba ABX will not assume any
liability to any persons or entities with respect to loss or damage, caused or alleged to be caused
directly or indirectly by not following the instructions contained in this manual, or by using the
computer software and hardware products described herein in a manner inconsistent with our
product labeling.
◆ Potential hazards:
To alert the operator of potentially hazardous conditions, one of the bold captioned headings
which are described below is provided wherever necessary throughout this text.
Flags a procedure that if not followed properly, can prove to be extremely hazardous
to either the operator or the environment or both.
Emphasizes an operating procedure that must be followed to avoid possible damage
to the instrument or erroneous test results.
Emphasizes important information especially helpful to the operator before, during
or after a specific operational function.
◆ Graphics:
All graphics including screens and printouts, photographs are for illustration purposes only and
are not contractual.
◆ Trademarks:
- Other product names mentioned within this publication may be registered trademarks of other
companies.
◆ Copyright ® 2005 by HORIBA ABX
All rights reserved. No part of this book may be reproduced or transmitted in any form or by any
means, electronic, mechanical, photocopying, recording, or otherwise, without the prior written
permission of HORIBA ABX.
HORIBA ABX
Rue du Caducée - Parc Euromédecine
34184 MONTPELLIER Cedex 4 - FRANCE
Tel: (33) (0)4 67 14 15 16
Fax: (33) (0)4 67 14 15 17
2
ABX Micros CRP 200 - Technical Manual - RAA028A
Introduction
Working conditions
Section 01: Introduction
1. Working conditions
1.1. Environment
◆ The operation of the ABX Micros CRP 200 should be restricted to indoor location use only! Operation of the
instrument at altitudes of over 2000 meters (6000 feet) is not recommended.
◆ The instrument is designed for safety from voltage surges according to INSTALLATION CATEGORY II and
POLLUTION DEGREE 2 (IEC EN 61010-1).
◆ Please contact your local HORIBA ABX representative for any information regarding the operation location
when it does not comply with the recommended specifications.
1.2. Location
◆ The ABX Micros CRP 200 should be placed on a clean and leveled table or workbench.
◆ Please note that the ABX Micros CRP 200 and printer weigh approximately 30 kilograms (66 lbs).
◆ Avoid direct exposure to sunlight.
◆ Place your instrument where it is not exposed to water or vapor.
◆ Place your instrument where it is free from vibration or shock.
◆ Place your instrument where an independent power receptacle can be used. Use a receptacle different from
the one used by a device that easily generates noise such as a centrifuge, etc...
◆ Proper ventilation is required on the ABX Micros CRP 200. Provide a space of at least 20 cm (8 inches) at the
back of the instrument to prevent overheating of the power supply.
The ON/OFF switch and the input voltage connection must always be accessible! When
positioning the system for operational use, leave the required amount of space for easy
accessibility to these items.
1.3. Grounding
◆ Proper grounding is required when installing the system. Check the wall outlet ground (Earth) for proper
grounding to the facilities electrical ground. If you are unsure of the outlet grounding, contact your facilities
engineer to verify the proper outlet ground!
1.4. Electromagnetic Environment Check
◆ The ABX Micros CRP 200 has been designed to produce less than the accepted level of electromagnetic
interference in order to operate in conformity with its destination, allowing the correct operation of other
instruments also in conformity with their destination.
◆ In case of suspected electromagnetic noise, check that the instrument has not been placed in the proximity
of electromagnetic fields or short wave emissions, i. e. (Radar, X-rays, Scanners, Cell phones……etc.)
ABX Micros CRP 200 - Technical Manual - RAA028A
1–1
ABX Micros CRP 200
1.5. Humidity and temperature conditions
◆ Temperature range:
CBC mode and CRP mode (CBC+CRP):
ABX Micros CRP 200 must function between 18 to 30°C (65 to 86°F).
Results will be displayed under 18°C ( 64.4°F) but are not reliable.
◆ Humidity:
Maximum relative humidity should be 80% for temperatures up to 31°C (88°F) decreasing linearly to 50%
relative humidity at 40°C (104°F). If the system is kept at a temperature less than 10°C (50°F) or less, it
must be allowed to sit at room temperature for 1 hour before it can be used for operation.
1.6. Environmental Protection
◆ Disposal Used accessories and consumables:
Must be collected by a laboratory specialized in elimination and recycling of this kind of material according
to the local legislation.
◆ Disposal ABX Micros CRP 200 instrument:
It should be disposed of, in accordance with local legislation, and should be treated as being contaminated
with blood. The appropriate biological precautions should be taken. If any doubt, please contact your HORIBA
ABX representative service department.
1.7. Transportation and Storage Conditions
◆ Storage temperature: -20°C (-68°F) +50°C (+122°F)
◆ Storage humidity: 85% or less
Prior to the shipping of an instrument by transporter, whatever the destination, an external
decontamination of the instrument must be carried out.
1–2
ABX Micros CRP 200 - Technical Manual - RAA028A
Specifications
CONTENTS:
Section 02: Specifications
1. Technical Specifications ............................................................... 2-2
2. Physical Specifications ................................................................. 2-2
3. ABX Micros CRP 200 description ................................................. 2-4
4. ABX Micros CRP 200 description ................................................. 2-4
4.1. Front view .............................................................................................2-4
4.2. Display unit...........................................................................................2-5
4.3. Operation panel ....................................................................................2-6
4.4. Left side and rear ...................................................................................2-7
4.5. Right side view ......................................................................................2-8
4.6. Sample tube holder ...............................................................................2-9
4.7. Things to remember during operation ....................................................2-9
4.8. Precaution during operation or handling .............................................2-10
4.9. Reagent door inside.............................................................................2-11
ABX Micros CRP 200 - Technical Manual - RAA028A
2–1
ABX Micros CRP
200
1. Technical Specifications
◆ Model:
ABX Micros CRP 200
◆ Measurement mode:
CBC mode (blood count item only)
CBC + CRP mode (blood count item + CRP item)
QC (CBC) mode (for CBC accuracy control)
QC (CRP) mode (CRP)
◆ Measurement item:
WBC, RBC, HGB, HCT, PLT, CRP (C-reactive protein)
MCV, MCH, MCHC, RDW, MPV, LYM%, LYM#, MON%, MON#, GRA%, GRA#
PCT*, PDW*.
*: In the USA, PCT and PDW parameters are for research use only and not for use in diagnostic procedures.
◆ Methods and technologies:
WBC, RBC and PLT: Impedance
HGB: Spectrophotometry (Cyanmethemoglobin method)
CRP: Latex immuno turbidity rate method
Calculations from stored data that was directly measured for HCT, MCV, MCH, MCHC, RDW, MPV, PCT* and PDW*.
*: In the USA, PCT and PDW parameters are for research use only and not for use in diagnostic procedures.
◆ Sample quantity:
CBC mode: 10µL
CBC + CRP mode: 18µL
QC (CBC) mode: 10 µL
QC (CRP) mode: 18 µL
◆ Throughput analyses:
CBC mode: Within 75 seconds (48 samples/hour)
CBC + CRP mode: Within 270 seconds (14 samples/hour)
QC (CBC) mode: Within 75 seconds (48 samples/hour)
QC (CRP) mode: Within 270 seconds (14 samples/hour)
◆ Reagents:
ABX Minidil LMG (10 Liters).
ABX Cleaner (0.5 L)
ABX Lyse (0.4L)
ABX CRP REA (CRP-R1, CRP-R2, CRP-R3: total 50 mL)
2. Physical Specifications
◆ Power Requirements:
Power supply from 100 V AC to 240 V AC +/- 10%
50 Hz to 60 Hz.
◆ Power consumption
Maximum 150 VA.
◆ Printer
Depends on printer model (See printer’s manual).
◆ Operating Temperature and Humidity:
18°C - 30°C (64°F-86°F) room temperature.
Maximum relative humidity 80% for temperature up to 31°C (88°F) decreasing linearly to 50% relative humidity
at 40°C (104°F).
◆ Dimensions and Weight:
2–2
Dimensions: 31 x 41 x 40 cm (11.8 x 16.7 x 15.7 in.)
Weight: 18 Kg. (40 lbs.)
ABX Micros CRP 200 - Technical Manual - RAA028A
Specifications
Physical Specifications
◆ Minimum specimen volume:
CBC Mode (CBC): 10µl.
QC Mode (CBC): 10µl.
CBC/CRP Mode (CRP): 18µl.
QC mode (CRP): 18µl.
◆ Dilution ratios:
WBC: 1/260.
RBC/PLT: 1/15000.
CRP: 1/50.
◆ HGB measurement:
HGB chamber : LED 555 nm.
Modified Drabkin method (cyanmethemoglobin).
Light source: Electroluminescent diode.
Wavelength: 550nm +/- 10nm.
◆ CRP Measurement:
CRP Chamber: LED 850 nm.
Latex Immunoturibidity rate method
Light source: Electroluminescent diode.
Wavelength: 850nm +/- 10nm.
◆ Counting Aperture Diameters:
WBC: 80µm.
RBC/PLT: 50µm.
◆ Reagent Consumption (ml)
Cycles
Estimated duration
(min.) (s)
MiniDil LMG
(ml)
Lyse(ml)
Cleaner (ml)
R1
(ml)
R2
(ml)
R3
(ml)
STARTUP (1 blank cycle)
1’20’’
27.7
1.4
1.5
-
-
-
SHUTDOWN
1’00’’
-
-
17
-
-
-
Analysis CBC
1’15’’
15.9
0.5
1.3
-
-
-
Analysis CBC/CRP
4’30’’
30.3
0.5
0.9
0.1
0.1
0.2
Prime ALL Reagents
2’25’’
40.0
12.0
6.0
-
-
-
Prime DILUENT
1’24’’
27.0
-
-
-
-
-
Prime LYSE
1’31’’
-
11.6
-
-
-
-
Prime CLEANER
1’13’’
-
-
6.3
-
-
-
Complete Rinse
2’28’’
-
-
-
-
-
-
CBC Bleach clean
2’56’’
-
-
-
-
-
-
CRP Bleach clean
1’14’’
-
-
-
-
-
-
AUTOCLEAN
1’33’’
31.3
-
18.9
-
-
-
Hgb Photometer Adjust
0’55’’
6.0
1.3
-
-
-
-
CRP Blank Adjust
0’55’’
6.0
-
-
-
-
-
BACKFLUSH
0’24’’
15.6
-
-
-
-
Wake up from sleep mode
0’40’’
14.3
0.5
1.3
-
-
-
STARTUP cycle estimated duration and consumptions are given for one blank cycle control. It
could be a maximum of three cycles if Startup does not pass the first time.
ABX Micros CRP 200 - Technical Manual - RAA028A
2–3
ABX Micros CRP
200
3. ABX Micros CRP 200 description
3.1. Front view
C
A
B
◆Start/Pause key
This key is used to change the sleep state to the measurement ready state.
It is also used to set the instrument in the sleep state. Press this key to cancel an error.
◆Mode Key
This key is used to toggle the measurement mode among:
Blood count measurement item mode CBC, CBC + CRP measurement mode, QC (CBC) and
QC(CRP) check (quality assurance).
This key is also used to open the sample holder in the sleep state.
◆Shut Down key
Press this key when ending measurement for the day (pressing this key performs automatic
cleaning and fills the instrument with the cleaning liquid. The power switch can be turned
OFF in this state).
A
2–4
◆Measurement key & sample holder
This key is used to start measurement.
This holder holds the sample tube and the control blood (measurement starts by closing
the holder).
ABX Micros CRP 200 - Technical Manual - RAA028A
Specifications
ABX Micros CRP 200 description
B
C
◆Reagent door 1 open/close
Allows the access to reagents by pushing the place where PUSH is written.
◆Display unit
Displays the measurement results and operating state of the instrument.
3.2. Display unit
A
B
◆Cycle LED:
Lights up or blinks during measurement.
◆Ready LED:
Lights up when measurement is possible or operation commands can be input with the
operation keys.
◆Busy LED:
Lighting of the LED indicates that the instrument is not prepared for measurement. When
this LED is lit, input with the operation key cannot be done. When ending operation for
the day (shutdown), this LED lights up or blinks. This LED lights up during the sleep state.
◆Error LED:
Lights up or blinks if any error occured in the instrument.
A
◆Sample number display:
Displays sample numbers. If an error occurs, the error code number is displayed. During
the measurement of the blood count item + CRP item, counts down and displays the
measurement time left.
B
◆Measurement result display:
Displays the result of each measurement item. When setting the time and, during
calibration, displays numerical value of each operation.
ABX Micros CRP 200 - Technical Manual - RAA028A
2–5
ABX Micros CRP
200
3.3. Operation panel
The User function keypad on the ABX Micros CRP 200 has «8» basic keys with their functions indicated either
above or below the key. Those keys allow the operator to initiate cycles, access menu functions, reprint or
transmit results, modify specific menus and enter calibration coefficients.
The primary function of each key is descibed in detail.
◆ Prime key:
Reagent ABX Minidil LMG, ABX Lyse and ABX Cleaner will be primed into the instrument (required time: 3 min
and 30 seconds/ injection).
◆ Clean key:
This key is used to clean the measuring cell and tubing of the instrument.
◆ Reprint key:
This key is used to send the result of the last measurement to the printer or RS-232C.
It is also used to print calibration coefficients or limit values.
◆ Calibration key:
This key is used to enter the calibration coefficient and CRP reagent sensitivity factor.
◆ «Up» and «Down» arrow key:
Those keys are used to change the numerical values.
◆ Enter key:
This key is used to enter the changed numerical values.
◆ Service key:
This key is used for maintenance of the instrument and various settings.
Do not touch this key unless instructed to do so in this manual or by your service representative.
2–6
ABX Micros CRP 200 - Technical Manual - RAA028A
Specifications
ABX Micros CRP 200 description
3.4. Left side and rear
Fan
Printer output
terminal
RS232 output
terminal
Diluent & Waste
liquid port
Power receptacle
Power switch
◆ Power switch:
Placing this switch to ON supplies the power to the instrument
◆ Power receptacle:
Power cable is connected to this receptacle
◆ Diluent port:
ABX Minidil tube is connected here
◆ Waste liquid port:
Waste liquid tube is connected here
◆ RS232 output terminal:
A cable used for an external computer is connected here
◆ Printer output terminal:
Printer is connected here
ABX Micros CRP 200 - Technical Manual - RAA028A
2–7
ABX Micros CRP
200
3.5. Right side view
Automatic open/close cover
WBC chamber
RBC chamber
CRP-R2
CRP-R1
CRP-R3
Reagent protection cover
Reagent cooling unit
Reagent door 2
◆ Reagent setting position:
Set the reagents (ABX CRP REA: CRP-R1, CRP-R2 and CRP-R3) in the instrument as illustrated.
◆ Reagent door 2:
Turn the button to open the door.
◆ Reagent protection cover:
This cover prevents evaporation of reagent, and dust from getting into reagents.
◆ Automatic open/close cover:
Automatically opens/closes during measurement and primes the reagents separately.
◆ Reagent cooling unit.
Keeps the reagent ABX CRP REA (CRP-R1, CRP-R2 and CRP-R3) cold.
Do not open the reagent door 2 during measurement and during cleaning. If the reagent door
2 is opened, measurement and cleaning stop. By closing the door, the operation continues.
But, if the door is opened or closed during measurement, the reliability of the measured values
will be lost, so please be careful.
2–8
ABX Micros CRP 200 - Technical Manual - RAA028A
Specifications
ABX Micros CRP 200 description
3.6. Sample tube holder
Position 1
Measurement position
Position 4
Position 2
Position 3
◆ Position 1:
(ø13mm x 81mm) for normal sample tube, for example Venoject II, Nipro neo tube, etc.
◆ Position 2:
(ø8mm x 45mm) for a small sample tube.
◆ Position 3:
(ø18.8mm x 35mm) for the control blood bottle and calibration serum CRP.
◆ Position 4:
(ø10.5mm x 68mm) for sampling cup (0.5 ml).
3.7. Things to remember during operation
3.7.1. Sample:
◆ When a whole blood sample is used, use the anti-coagulant (EDTA-K3).
Also, immediately after collecting the blood, turn and mix the blood 10 times or more.
◆ Before starting measurement, slowly turn and mix 5 to 10 times.
◆ Turbidity of the plasma, etc. will not affect the reaction. However, never allow foreign matters such as dirt,
bacteria, and detergent to get into the mix.
◆ If the measurement range is exceeded, dilute the specimen.
3.7.2. Interfering substances:
Rheumatoid factor (Rf), bilirubin, lipids, abnormal proteins and hemoglobin in the sample do not affect the
measurement of CRP only.
ABX Micros CRP 200 - Technical Manual - RAA028A
2–9
ABX Micros CRP
200
3.8. Precaution during operation or handling
◆ When operating the instrument, follow this manual.
◆ Observe Universal Precautions when operating this instrument or handling the specimen.
◆ After the reagent is opened, use it as soon as possible. Close the lid of the container, and store the reagent
in accordance with the specified method. Do not use any reagent after its expiration date has passed.
◆ Do not use frozen reagent. Latex particles will cause auto agglutination to generate «sensitivity
deterioration» and «*mark error».
◆ Mix ABX CRP REA-R3 before use.
◆ Do not mix reagents of different lots. Further, in calibration and sample measurement, be sure to use reagent
of the same lot.
◆ Avoid mixing leftover reagent. Use the same lot of ABX CRP REA-R1, ABX CRP REA-R2, and ABX CRP REA-R3.
◆ Take care so that dirt does not get into the reagent and cell.
◆ ABX CRP REA-R1, ABX CRP REA-R2, and ABX CRP REA-R3 contain sodium azide of 0.1% or less. Sodium azide
may generate explosive metal azide when reacted with zinc or copper pipes.
When disposing of this solution, use a large quantity of water.
For treatment of waste liquid, refer to Chapter 5, «Daily maintenance, Treatment of waste liquid.
◆ All suspect results should be rechecked by reanalysis and/or alternative method.
◆ Results from the instrument should be used in combination with the clinical symptoms of the patient and the
test results.
2–10
ABX Micros CRP 200 - Technical Manual - RAA028A
Specifications
ABX Micros CRP 200 description
3.9. Reagent door inside
ABX Lyse
ABX Miniclean
Reagent setting position
Reagent ABX lyse and ABX Miniclean are set as illustrated.
ABX Micros CRP 200 - Technical Manual - RAA028A
2–11
ABX Micros CRP
2–12
200
ABX Micros CRP 200 - Technical Manual - RAA028A
Hydraulic & Pneumatic principles
CONTENTS:
Section 03: Hydraulic & pneumatic principles
1. Hydraulic ..................................................................................... 3-2
1.1. Hydropneumatic connections................................................................3-2
1.2. Functions of valves ................................................................................3-4
2. Pneumatic diagram ...................................................................... 3-6
ABX Micros CRP 200 - Technical Manual - RAA028A
3–1
ABX Micros CRP
200
1. Hydraulic
1.1. Hydropneumatic connections
Circuit
From
To
Diluent reagent connection
Liquid sensor-1
Liquid sensor-1
T1-3
T1-1
EV11-1
EV11-3
Temperature sensor
Temperature sensor
Diluent syringe-3
EV11-2
EV10-3
EV10-2
T2-1
T2-3
Sample syringe-5
Sample syringe-2
Sample needle
T2-2
EV15-2
EV15-3
CRP syringe-1
EV15-1
EV14-3
EV14-1
T1-2
EV14-2
T4-2
T4-1
CRP flowcell (top)
CRP flowcell (bottom)
CRP mixing chamber
EV10-1
EV7-3
EV7-1
Rinsing block-2
Rinsing block-1
EV8-3
EV7-2
T6-1
T5-2
WBC chamber-3
WBC chamber-2
RBC chamber-3
RBC chamber-2
EV6-2
Lyse bottle
Liquid sensor-2
Liquid sensor-2
EV1-1
EV1-3
Lyse syringe-4
EV1-2
Liquid earth
Liquid earth
T3-3
T3-2
WBC chamber-1
Cleaner bottle
Liquid sensor-2
Diluent circuit
Lyse circuit
Cleaner circuit
3–2
ABX Micros CRP 200 - Technical Manual - RAA028A
Hydraulic & Pneumatic principles
Hydraulic
Circuit
From
To
Liquid sensor-2
EV4-2
EV4-1
T5-3
Air syringe-1
EV2-1
EV2-2
Air
Air syringe-2
Pressure sensor on CRP board
Air syringe-3
EV8-1
Air syringe-4
EV6-1
Air syringe-5
T6-1
T6-3
EV5-2
EV5-1
Waste connection
T6-2
T7-1
T7-3
EV18-1
EV18-2
T4-3
T7-2
T8-3
T8-2
EV12-1
EV12-2
Isolator W
Isolator W
T3-1²
T8-1
EV13-1
EV13-2
Isolator R
Isolator R
RBC chamber-1
Pressure/vacuum circuit
Pressure/vacuum circuit
ABX Micros CRP 200 - Technical Manual - RAA028A
3–3
ABX Micros CRP
200
1.2. Functions of valves
Valve blocks are located close to concerned elements.
Two different blocks:
Valves 1, 2, 8, 10, 11, 14, 15: on front side, horizontal block, behind front panel (See “Fig.1: valve block 1,
page 4”).
Fig.1: valve block 1
Valves 4, 5, 6, 7, 12, 13, 18: on right side, horizontal block, under WBC/RBC Chambers (See “Fig.1: valve block
1, page 4”).
Fig.2: valves block 2
Valve N°
Valve Subject
Function
LV1
Lyse
Control Entry / Exit syringe
LV2
Vacuum syringe
Set to atmosphere
LV4
Cleaner
Counting heads cleaning
LV5
Waste
Control Entry / Exit
LV6
Drain
Counting heads
LV7
Diluent
Directing Rinsing block / Counting heads
LV8
Diluent
Draining of rinsing block
3–4
ABX Micros CRP 200 - Technical Manual - RAA028A
Hydraulic & Pneumatic principles
Hydraulic
Valve N°
Valve Subject
Function
LV10
Diluent
Directing Sampling syringe / Valve 7
LV11
Diluent
Control Entry / Exit syringe
LV12
WBC chamber
Draining
LV13
RBC chamber
Draining
LV14
CRP chamber
Directing CRP chamber / Valve 15
LV15
CRP syringe
Control Entry / Exit syringe
LV18
CRP chamber
Draining
ABX Micros CRP 200 - Technical Manual - RAA028A
3–5
ABX Micros CRP
200
T= 1
2
3
2. Pneumatic diagram
3–6
ABX Micros CRP 200 - Technical Manual - RAA028A
Electric & electronic principles
CONTENTS
Section 04: Electric & electronic principles
1. Main board general view.............................................................. 4-2
1.1. Test points .............................................................................................4-2
1.2. Main Board configuration......................................................................4-4
2. CRP board general view ............................................................... 4-5
2.1. Test points .............................................................................................4-5
3. Display board............................................................................... 4-6
4. Switch board ................................................................................ 4-6
5. Connections ................................................................................. 4-7
5.1. Flat cables .............................................................................................4-7
5.2. Secondary supply cable XBA378BS .......................................................4-8
6. Synoptic ....................................................................................... 4-8
ABX Micros CRP 200 - Technical Manual - RAA028A
4–1
ABX Micros CRP
200
1. Main board general view
1.1. Test points
Adjustment
Test point
Ground
Potentiometer
Target value
WBC line adjustment
TP9
WBC threshold
TP10
RBC line adjustment
TP14
RBC threshold
TP13
PLT line adjustment
TP18
PLT threshold
TP16
TP31
R82
180 mV +/-5
Power supply (check)
TP20
TP31
No adjustment
-12 V +/- 0.5
TP21
TP31
No adjustment
+12 V +/- 0.4
TP21
TP31
No adjustment
+5 V +/-0.15
TP22
TP31
No adjustment
+24 V +2/-1
Reagent syringe motor voltage
TP35
TP31
R186
2.5V +/- 0.05
Vacuum syringe motor voltage
TP36
TP31
R195
2.5V +/- 0.05
Carriage motor voltage
TP37
TP31
R177
1.5V +/- 0.05
CRP syringe motor
TP38
TP31
R168
1.0V +/- 0.05
Aperture voltage (check)
TP19
TP31
No adjustment
60V -1.5/+2.8
4–2
Factory adjusted
TP31
R68
280 mV +/-5
Factory adjusted
TP31
R75
400 mV +/-5
Factory adjusted
ABX Micros CRP 200 - Technical Manual - RAA028A
Electric & electronic principles
Main board general view
Temperature
sensor
J11
J38
J39
RBC Coax
WBC Coax
TP31 TP30 TP29
HGB
assembly
J21
TP25
Gain
TP33
TP15
PLT Pulse Process
RS232
R75
Gain
R87
TP4
J17
Threshold
R81
Threshold
Fan
TP19
Threshold
Aperture
Voltage
R73
R80
TP27
R68
TP16
R16
R97
TP13
Gain
TP11
RBC Pulse Process
R74
TP14
TP10
TP9
R82
R86
R89
TP32
TP24
TP18
TP26
HGB
TP34
TP7
TP28
WBC Pulse Process
J22
TP2
TP12
TP17
TP8
Supplies
TP6
DS6
DS3
DS4
DS5
R5
J13
TP1
TP20
TP22
TP23
TP21
DS1
Printer
J31
Vacuum Syringe
Reagent Syringe
Carriage
+5V
R168
R177
TP37
R186
TP35
R195
J36
TP38
TP3
J35
TP36
Liquid valves
8, 2, 14, 15,
1, 11, 10
CRP
board
J5
Ground
J26
Power
supply
+24V
CRP Syringe
+12V
-12V
Cycle start
Piercer
& CRP flap
openning
J30
Motor
J6
J4
Sensor
VACUUM SYRINGE
J10
J3
J9
Sensor
Motor
REAGENT SYRINGE
J2
J8
J1
Sensor
Motor
CARRIAGE
ABX Micros CRP 200 - Technical Manual - RAA028A
J7
Fan
J37
Sensor
Motor
CRP SYRINGE
4–3
ABX Micros CRP
200
1.2. Main Board configuration
◆ E1 jumper configuration (language setting):
Japan
United States (no display with Hemalink)
English
Japan
4–4
ABX Micros CRP 200 - Technical Manual - RAA028A
Electric & electronic principles
CRP board general view
2. CRP board general view
Needle carriage:
Sensor
Battery
CN2
CN6
Display
board
CN7
CRP
measurement
unit
CN8
CRP blank adjustment
Reagent
cooling
unit
CN1
CN3
CN15
Motor
Liquid valves
18, 12, 7, 4,
9, 13, 5
VR1
Pressure sensor
TP16
Pressure sensor
adjustment
VR2
Mother
board
CN4
TP6
CN10
Security
Power
Magnet
Supply
(Reagent door 2 detection)
CN5
CN12
Diluent
Sensor
CN13
CN14
Cleaner
Sensor
CN9
Lyse
Sensor
Mixing chamber
The CRP board drives all CRP functionnalities:
CRP chamber heating, CRP reagents cooling, CRP reagent door detection, CRP measurement.
CRP board is connected to main board via CN4 connector.
Display board is connected to CRP board via CN3 connector.
Power supply board is connected via CN5 connector
2.1. Test points
Adjustment
Pressure sensor
Test point
Ground
TP16 (on CRP board)
TP6 (on CRP board)
Potentiometer
VR2 (on CRP board)
ABX Micros CRP 200 - Technical Manual - RAA028A
Target value
1.7V +/- 0.1
4–5
ABX Micros CRP
200
3. Display board
Includes:
- Startup/Pause, Mode and Shut down keys and 7 LCD displays
Connected to CRP board via flat connector in J1, Keyboard board flat connector is connected in J2, Power supply
is connected in J3
4. Switch board
Support keyboard and is connected to Display board.
4–6
ABX Micros CRP 200 - Technical Manual - RAA028A
Electric & electronic principles
Connections
5. Connections
5.1. Flat cables
Reference
From
to
E1000349200
J1 on Switch board
J2 on Display board
E1000349100
CN3 on CRP board
J1 on Display board
E1000348900
J1 on liq. valve block 8-10
J35 on Main board
H1009392001
J31 on Main board
Printer output
H1009391001
J22 on Main board
RS232 output
E1000349000
CN1 on CRP board
J1 on liq. valve block 5-18
6. Synoptic
See Synoptic on next page
ABX Micros CRP 200 - Technical Manual - RAA028A
4–7
ABX Micros CRP
4–8
200
ABX Micros CRP 200 - Technical Manual - RAA028A
Analysis cycle technology
CONTENTS:
Section 05: Analysis cycle technology
1. Measuring principles .................................................................... 5-2
1.1. WBC and differential count ...................................................................5-2
1.2. RBC/PLT ................................................................................................5-4
1.3. Hemoglobin measurement principle......................................................5-5
1.4. Hematocrit measurement principle........................................................5-5
1.5. RDW calculation...................................................................................5-6
1.6. MCV, MCH, MCHC calculation ............................................................5-6
1.7. Measuring the MPV: ..............................................................................5-6
1.8. Calculating PCT:....................................................................................5-6
1.9. Measuring the PDW: .............................................................................5-6
1.10. CRP measuring principles....................................................................5-7
ABX Micros CRP 200 - Technical Manual - RAA028A
5–1
ABX Micros CRP
200
1. Measuring principles
1.1. WBC and differential count
1.1.1. General counting principles
The WBC measurement principles are the same as the RBC/PLT measuring principles. The WBC count is performed
in the WBC/HGB chamber. The electronic signal-processing device places an electronic threshold between the
WBC and PLT signals. The electronic pulses for the WBC are then placed into 256 channels according to their
pulse size. The pulses are then thresholded, grouped and then mathematically calculated to create a numerical
value for the determination of the WBC’s.
1.1.2. Differential Measuring principles
The Diluent preserves and prepares the WBC cell membrane for differentiation reaction. The Lyse has specific
reactions with each sub-population of the WBC cytoplasmic membranes.
◆ When the Lyse reacts with the Lymphocytes cytoplasmic membranes, it allows the release of water-soluble
cytoplasm and shrinks the cell membrane around the nucleus.
◆ When the Lyse reacts with the Monocytes cytoplasmic membranes, it has an intermediate reaction,
maintaining it’s large size in comparison to the Lymphocytes.
◆ When the Lyse reacts with the Granulocytes cytoplasmic membranes, it has a limited reaction due to a
molecule in their cytoplasmic structure which protects them from the shrinking action of the lyse. This limited
reaction makes the Granulocytes the largest of the sub-populations in the cell differentiation.
After the differential lysing action, the ABX Micros CRP 200 analyzes the height of each pulse as the cells pass
through the micro-aperture in the WBC chamber. These pulses are then channelized, thresholded, grouped
according to their size, ( 30fL to > 450fL), and calculated mathematically to create the WBC distribution curve,
which is also known as the WBC Histogram.
The 3 sub-populations of WBC’s are placed according to the number of cells and the size of cells in each subpopulation. The distribution of WBC’s are as followed:
Lymphocytes
Monocytes
Granulocytes
(30fL to 100fL)
(100fL to 150fL)
(150fL to 450fL)
This differentiation term is also known as LMG’s.
Pulse height
Lymphocytes
Monocytes
Granulocytes
Cells passing through the WBC aperture
creating electronic pulses.
Time
5–2
ABX Micros CRP 200 - Technical Manual - RAA028A
Analysis cycle technology
Measuring principles
Number of cells
Cells are grouped according to the
number of cells and the cell size.
Cell volume
Pulses are electronically calculated and
smoothed to produce the WBC
distribution curve.
Number of cells
◆Results
Number of cells counted per volume
unit x calibration coefficient
◆Histograms
Distribution curves on 256 counting
channels from 30fl to 450fl.
Cell volume
◆ Technical characteristics for the WBC count:
Dilution
Initial blood volume
Vol. ABX DILUENT
First dilution rate
Vol. Lyse
Second dilution rate
10 µl
2500 µl
1/250
520µl
1/300
Measurement
Method
Ruby diameter
Depression of count
Duration of the count
Impedance
80µm
200mb
2x5 sec.
ABX Micros CRP 200 - Technical Manual - RAA028A
5–3
ABX Micros CRP
200
1.2. RBC/PLT
The RBC’s and PLT’s are measured by an electronic
impedance variation principle. This means that an
electronic field is generated around the microaperture within the chamber in which the blood
cells are pulled through.
The sample is diluted with an electrolytic Diluent
(electronic current conducting fluid), mixed then
pulled through a calibrated micro-aperture. Two
electrodes are placed on either side of the aperture
and electric current continuously passes between
the two electrodes.
As the blood cells pass through the aperture, they
create resistance (Impedance) in the electronic
field between the two electrodes. The voltage,
which measures the cells, is proportional to the
size of the cell. Since the current is constant and
remains unchanged, the larger the cell is, the
«more» resistance it has. The smaller the cell is,
the «less» resistance it has.
These electronic voltages vary in pulse size as the
cells pass through the aperture. The pulses are
amplified, channeled according to size and
threshold, grouped and then mathematically
calculated along with the calibration coefficients
to give a final numerical value for both RBC’s and
PLT’s.
Fig.1: Impedance principle
RBC pulse
Pulse height
PLT pulse
Time
Number of cells
Analogue convertion
Cell volume
Number of cells
◆Results
Number of cells counted per volume unit x
calibration coefficient
◆Histograms
RBC:
Distribution curves on 256 counting channels from
30fl to 300fl.
PLT:
Distribution curves on 128 channels from 2fl to a
mobile threshold.
This threshold moves according to the microcyte
population present in the analysis area.
Data integration and plotting
of RBC distribution curve
Cell volume
RBC
Fig.2: RBC distribution curve
Number of cells
Analogue convertion
Cell volume
Number of cells
PLT
Data integration and plotting
of PLT distribution curve
Cell volume
Fig.3: PLT distribution curve
5–4
ABX Micros CRP 200 - Technical Manual - RAA028A
Analysis cycle technology
Measuring principles
◆ Technical characteristics for the RED BLOOD CELL and PLATELET count:
Dilution
First dilution volume used
30 µl
Vol. ABX DILUENT
2500 µl
Final dilution rate
1/15000
Measurement
Method
Ruby diameter
Depression of count
Duration of the count
Impedance
50µm
200mb
2x5 sec.
Results
Number of cells counted per volume unit x Calibration coefficient
1.3. Hemoglobin measurement principle
During the Startup cycle, an HGB blank test sequence including 2 blank measures is run. If the difference
between these two measures is too important, a third measure is performed.
HGB reference blank sequence will be carried out prior to an analysis to come. If the operator:
- Has left system more than 10 minutes after analysis.
- Has not carried out the Startup cycle after switching on the system.
Every cycle, an HGB blank is carried out on diluent and compared to the previous HGB blank analysis.
Lyse reagent is added to the first dilution in the WBC/HGB chamber.
◆ Lyse
This reagent contains potassium ferricyanide [Fe(CN)]K and potassium cyanide [KCN].
The hemoglobin freed by the lysis of the red blood cells combines with the potassium cyanide to form the
chromogenous cyanmethemoglobin compound.
The compound is then measured by spectrophotometry, through the optical part of the WBC/HGB chamber,
with a wave length of 550 nm.
◆ Technical characteristics for the measurement of the hemoglobin:
Dilution
Initial blood volume
10 µl
Vol. ABX DILUENT
2500 µl
First dilution rate
1/250
Vol. Lyse
520µl
Second dilution rate
1/300
Measurement
Method
Wavelength
Photometry
550nm
Result
Absorbance value obtained x coefficient of calibration
1.4. Hematocrit measurement principle
The height of the impulse generated by the passage of a cell through the micro-aperture is directly proportional
to the volume of the analyzed RBC.
The hematocrit is measured as a function of the numeric integration of the MCV.
ABX Micros CRP 200 - Technical Manual - RAA028A
5–5
ABX Micros CRP
200
1.5. RDW calculation
The RDW (Red cell Distribution Width) is used to determine erythrocyte abnormalities linked to Anisocytosis.
The RDW will enable the user to follow the evolution of the width of the curve in relation to the cell number
and average volume.
The RDW is also a calculation from the RBC histogram, as follow:
KSDRDW = ------------MCV
K = system constant
SD = Determined standard deviation according to statistical studies on cell distribution.
MCV = Mean Corpuscular Volume of erythrocytes
1.6. MCV, MCH, MCHC calculation
◆ MCV (Mean Cell Volume) is calculated directly from the entire RBC histogram.
◆ MCH (Mean Corpuscular Hemoglobin) is calculated from the HGB value and the RBC count.
The Mean HGB weight in each RBC is given by the formula:
MCH (pg) = HGB/RBC x 10
◆ MCHC (Mean Corpuscular Hemoglobin Concentration) is calculated according to the HGB and HCT values.
The Mean HGB concentration in the total volume of RBC is given by the formula:
MCHC (g/dL) = HGB/HCT x 100
1.7. Measuring the MPV:
MPV (Mean Platelet Volume) is directly derived from the analysis of the platelet distribution curve. The MPV is
expressed in µm3 or fl.
1.8. Calculating the PCT:
Thrombocrit is calculated according to the following formula:
PCT%=
PLT(103 /µL) x MPV(fL)
1000
1.9. Calculating the PDW:
This count is derived from the platelet curve.
PDW (Platelet Distribution Curve)= Width of the curve between 15% of the number of platelets starting from 2
fl (S1) and 15% of the number of platelets beginning with the variable top threshold (S2) as shown on next
diagram:
S1
5–6
S2
ABX Micros CRP 200 - Technical Manual - RAA028A
Analysis cycle technology
Measuring principles
1.10. CRP measuring principles
1.10.1. CRP count principles
Measurement
Same as the hemoglobin measurement principle, it is a spectrophotometric absorbance measurement
(Turbidimetry) of the C-Reactive protein after 2 dilutions.
This measurement is performed in CRP Chamber.
◆ Technical characteristics for the CRP count:
Dilution #1
Initial blood volume
8 µl
Vol. ABX CRP REA-R1 (Saponin)
100 µl
Fisrt dilution rate
8/100
Total time for reaction
60 sec.
Dilution #2
Dilution #1
Vol. ABX CRP REA-R2 (Buffer)
Vol. ABX CRP REA-R3 (Latex)
Final dilution rate
Incubation time
108 µl
100 µl
200 µl
2/100
20 sec.
Measurement
Method
Wavelength
Measurement duration
Photometry
850nm
60 sec.
ABX Micros CRP 200 - Technical Manual - RAA028A
5–7
ABX Micros CRP
200
1.10.2. CRP Reagent principles:
ABX CRP REA-R1 Hemolysis reagent on whole blood lyses RBC:
After lyse of RBC, antigens are still present in the solution.
ABX CRP REA-R2 buffer reagent inhibits all different antigens, except C-Reactive protein:
Only C-Reactive proteins are present in the solution.
ABX CRP REA-R3 latex reagent agglutinates C-Reactive proteins around Latex balls:
Agglutinations of C-Reactive proteins and Latex are ready to be measured.
5–8
ABX Micros CRP 200 - Technical Manual - RAA028A
Analysis cycle technology
Measuring principles
1.10.3. CRP Measurement principle:
Absorbance measurement:
C-Reactive proteins and Latex agglutinations are measured by spectrophotometry through the optical part of the
CRP chamber with a wavelength of 850nm:
Light Source
Photo sensor
850 nm L.E.D.
CRP measurement
Cell
First measurement is performed after 20 sec, Then 1 measure each 10s for a total of 7 measurements.
The first absorbance measurement at 20 sec. is used to trigger two different flags:
--.- on display (--.-E on printer) means that Diluent has ran out (dilution is too low);
EE.E on display (--.-P on printer) means that CRP value is in Prozone.
In any case the cycle will be ended.
1.10.4. CRP Calculation:
ABX Micros CRP 200 calculate absorbance for each measure:
Each absorbance is compared to a «CRP Blank Value» wich measurement is from diluent.
Absorbance Log=
Blank measurement
Measured Value
1.10.5. CRP calibration curve
Absorbance slope are calculated between two following absorbance measures.
Absorbance slope average will give C-Reactive protein concentration by projection onto CRP Calibration curve
ABX Micros CRP 200 - Technical Manual - RAA028A
5–9
ABX Micros CRP
200
Absorbance slope
0.18
0.16
Change of absorbance
0.14
0.12
0.10
0.08
0.06
0.04
0.02
0
0
20
40
60
CRP concentration
80
100
1.10.6. CRP flagging areas
Dil:
After the first 20 seconds of the reaction, if the CRP concentration is over 20 mg/dL, the CRP display window
will display «EE.E» and «--.-D» on the printed report. The flagging diagram is used to illustrate the reaction
curve of the CRP concentration when it is above the upper limit of the assay 20 mg/dL.
Note the difference in the reaction curves between serum and whole blood.
Empty:
When a known CRP concentration value is under 15mg/dL, and the absorbance, at the first 20 seconds of the
reaction, is over the HCT x Coefficient, the CRP display window will display «--.--» and «--.-E» on the printed
report.
5–10
ABX Micros CRP 200 - Technical Manual - RAA028A
Analysis cycle technology
Measuring principles
Prozone:
After the first 20 seconds of the reaction, if the absorbance is over the absorbance threshold, the CRP display
window will display «EE.E» and «--.-P» on the printed report. Readings in the Prozone area should not be
considered accurate. If this flag appears on the printed report, dilute the sample and re-analyze it. If the diluted
result is still abnormal, other laboratory reference methods may be needed to obtain an accurate CRP result on
these types of specimens.
1.10.7. CRP final calculation
The final CRP concentration results is determined by the following formula:
CRP = CRP curve x Calibration Coefficient x CRP Reagent Sensitivity Factor x HCT coeff.
◆ CRP Curve: this is the slope data obtained during the antigen/antibody reaction-counting period.
◆ CRP Calibration Coefficient: this is the value obtained when performing the CRP Calibration.
◆ CRP Reagent Sensitivity Factors: those factor numbers are noted on each ABX CRP REA reagent kit.
◆ HCT Coefficient: this is the Hematocrit value obtained from a whole blood sample or from the conversion table
when running whole blood CRP dilutions.
ABX Micros CRP 200 - Technical Manual - RAA028A
5–11
ABX Micros CRP
5–12
200
ABX Micros CRP 200 - Technical Manual - RAA028A
Software versions
CONTENTS:
Section 06: Software versions
1. Software overview ........................................................................ 6-2
1.1. User menu overview: ............................................................................6-2
1.2. Technician Menus Overview.................................................................6-5
ABX Micros CRP 200 - Technical Manual - RAA028A
6–1
ABX Micros CRP
200
1. Software overview
1.1. User menu overview:
In order to access to the special functions, follow the procedure below:
- Check that the instrument is in ready mode.
- Press and hold the Service key (blue).
- Using the Up and Down keys, set up the ten number of the required function on the WBC display, then
press Enter.
- Keep holding the blue Service key and set up the unit number using the Up and Down keys. Press Enter
when the required unit number is selected.
- Release the blue Service key.
«F0» Data saved and QC calculation
N°
Function
Details
WBC
RBC
HGB
HCT
PLT
F01
Display all saved data
Sample number, year, hour
and minute are displayed first.
Press the Enter key, the results
are displayed
Year
Month
Day
Hour
Minute
F02
Printout all saved data
All saved data of
measurement are printed out
F03
Printout saved QC (CBC) data
Saved QC(CBC) data and
calculated values (AVE, MIN,
MAX, CV) are printed out
F04
Printout saved QC (CRP) data
Saved QC(CRP) data and
calculated values (AVE, MIN,
MAX, CV) are printed out
F05
Delete all saved data
All the saved data of
measurement samples are
deleted
F06
Delete saved QC (CBC) data
Saved QC(CBC) data are
deleted
F07
Delete saved QC (CRP) data
Saved QC(CRP) data are
deleted
6–2
ABX Micros CRP 200 - Technical Manual - RAA028A
Software versions
Software overview
«F1» Miscellaneous Cycles
Displayed in the «N°» Window:
N°
Function
Details
F11
Backflush
Applies back pressure on the counting apertures.
F12
Drain chamber
Drains all counting chambers.
F13
Prime Diluent
Primes the ABX Minidil LMG into the system.
F14
Prime lyse
Primes the ABX Lyse into the system.
F15
Prime Cleaner
Primes the ABX Cleaner into the system.
F16
Bleach Clean (CBC)
Used to remove protein buildup and fibrin clots.
F17
CRP prime
Primes the ABX Minidil LMG into the CRP flowcell.
F18
Complete Rinse cycle
Rinses the fluidic system with ABX Minidil LMG.
«F2» Mechanical Cycles
Select a number within a display window by using the Up or Down arrow keys, and then press the Enter key to
accept the change and move to the next display window and/or exit the menu.
N°
Details
WBC
RBC
HGB
HCT
PLT
Sample
needle
0= Down
1= Up
Sample
Carriage
0= Back
1=Forward
Liquid
syringe
0= Down
1= Up
Vacuum/
Waste
syringe
1= Down
0= Up
CRP
syringe
0= Down
1= Up
F21
Sensors
The status of sensors are displayed as «1» or
«0».
Manually move the parts to check that the
sensors are turned ON/OFF properly
F22
Sample
needle
Up/Down
By pressing the Enter key, the needle is
moved down to the lowest position and the
Busy LED starts blinking.
By pressing the Enter key again, the needle
is moved up to home position
F23
Carriage
Left/Right
By pressing the Enter key, the carriage is
moved to the WBC chamber pos., and the
Busy LED starts blinking. By pressing the
Enter key again, the carriage is moved
forward to home position.
F24
Liquid
syringe
By pressing the Enter key, the liquid syringe
is moved up to the highest pos.(home) and
the Busy LED starts blinking. By pressing the
Enter key again, the liquid syringe is moved
down to the lowest position.
F25
Vacuum /
Waste
syringe
By pressing the Enter key, the Vacuum/
Waste syringe is moved up to the highest
position (home) and the Busy LED starts
blinking.
By pressing the Enter key again, the
Vacuum/Waste syringe is moved down to
the lowest position.
F26
Valves
Check that the valves are opened/closed.
The valve N° being checked is displayed on
WBC display in order.
F27
Park
system
The syringes and needle are moved to the
transfer position. After running F27, turn the
power OFF.
Vaves N°
ABX Micros CRP 200 - Technical Manual - RAA028A
6–3
ABX Micros CRP
N°
F28
F29
Door &
tube
holder
sensor
CRP
syringe
200
Details
WBC
RBC
HGB
HCT
Check the status of the door and Tube
holder sensors.
The status of sensors are displayed as «1» or
«0».
Press the Enter key to finish F28. The Ready
LED lights up.
Door
0= Close
1= Open
Sensor 1
(upper)
0= Off
1= On
Sensor 2
(middle)
0= Off
1= On
Sensor 3
(lower)
0= Off
1= On
Control blood:
0
1
0
Vacuum sample tube
0
0
1
Micro sample tube
0
1
1
Mini sample tube (Microtainer)
1
0
1
PLT
By pressing the Enter key, the CRP syringe is
moved down to the lowest position and the
Busy LED starts blinking. Press the Enter Key
again, the CRP syringe is moved up to the
highest position (home).
«F3» Setup Menu
Select a number within a display window by using the Up or Down arrow keys, and then press the Enter key to
accept the change and move to the next display window and/or exit the menu.
N°
Function
Details
WBC
F31
Date Format
Select a setting
format
0 = MMDDYY
1 = DDMMYY
2 = YYMMDD
3 = YYDDMM
F32
Date/Time adjust.
Set year, month,
day, hour, and
minute
YY
F33
Cleaning
frequency
The number of
analysis required for
next autoclean can
be set up in range of
1 to 100
0 = Never
1 = (1 - 100)
F34
Units
Select a unit
0 = Japan STD
1 = SI
2 = Standard
3 = Inter 2
F35
Serial Output /
RS232
Select a format of
RS-232C output
0 = Trans. Off
1 = Internal ABX 1
2 = Standard
3 = Internal ABX 2
F36
Printer
parameters 1
Select a printer
format.
The printer must be
turned ON.
Second Copy
0 = No
1 = Yes
F37
Print setup
Printout of the
instrument
configuration
F38
Printer
parameter 2
Select the printout
of WBC 3 Diff data
Set «1».
6–4
RBC
HGB
HCT
PLT
MM
DD
HR
MIN
Print Limits
0 = No
1 = Yes
Printers
0 = None
1 = Epson
2 = Seiko
3 = Standard
Print
Histo.
0 = No
1 = Yes
Print LMG results
0= No
1= Yes
ABX Micros CRP 200 - Technical Manual - RAA028A
Software versions
Software overview
If you bypass the menu that you want to modify and/or miss a step sequence when selecting a sub-menu
function, you must do the following:
- Re-enter the Menu functions by pressing and holding the blue Service key.
- Re-select the sub-menu within the menu that you have selected by using the Up or Down arrow keys.
- Press the Enter key before releasing the blue Service key.
- Carefully make your selection in the display windows by using the Up or Down arrow keys, and then press
the Enter key to accept the change and move to the next display window and/or exit the menu.
«F4» Laboratory Limits
Select a number within a display window by using the Up or Down arrow keys, and then press the Enter key to
accept the change and move to the next display window and/or exit the menu.
N°
Function
Details
WBC
RBC
HGB
HCT
PLT
F41
Low Limits
(CBC)
Set up the low limits.
WBC
RBC
HGB
HCT
PLT
MCV
MCH
MCHC
WBC
RBC
HGB
HCT
PLT
MCV
MCH
MCHC
F42
High limits
(CRP/CBC)
Set up the high limits.
CRP
CRP
F43
PLT alarm
adjustment
Set up the threshold of PLT
flag.
SCL
SCH
MIC
F44
Low limits
(LMG)
Set up the low limits of
LMG.
LYM%
LYM#
MON%
MON#
GRA%
GRA#
MPV
*PCT
RDW
*PDW
F45
High limits
(LMG)
Set up the high limits of
LMG.
LYM%
LYM#
MON%
MON#
GRA%
GRA#
MPV
*PCT
RDW
*PDW
F46
LMG alarms
adjustment
Set up the threshold of flags.
L1
M2
G1
G3
*: PCT and PDW are not used in the United States. These parameters are strictly used for
investigational and research purposes only.
1.2. Technician Menus Overview
In order to access to the technician functions, follow the procedure below :
- Press and hold the Service key (blue). Using the Up and Down keys, set up the ten number of the required
function on the WBC display, then press Enter.
- Keep holding the Service key (blue) and setup the unit number using the up and down keys. Press the Enter
key when the required unit number is selected.
_ To access a function from F60 to F98, Press the Up and Down key while simultaneously pressing the Service
key and the Mode key.
- Release both keys.
F5 Technician 1 (needle adjustment)
N°
Function
Details
WBC
F51
Needle depth adjustment
See “3. Needle heigth
adjustment, page 4”RAS261
Locate the tip of the needle to the right
side of the WBC chamber, then press the
Enter key. The Up/Down position is
automatically adjusted.
Value
F52
Enter needle value
Enter the pulse count of needle Up/
Down value over WBC chamber.
1000
Units
ABX Micros CRP 200 - Technical Manual - RAA028A
RBC
HGB
HCT
100
Units
10
Units
1
Units
6–5
ABX Micros CRP
200
N°
Function
Details
RBC
HGB
HCT
F53
Needle & carriage check
See “4.2. Adjustment Check,
page 5”RAS261
Position check of the needle Up/Down
and Backward/Forward over the WBC
chamber.
F54
CBC carriage adjustment
See “4.1. Adjustment,
page 5”RAS261
Set the needle tip position to the one
thirds position from the right side of the
WBC chamber and press the Enter key.
The Backward/Forward position is
automatically adjusted.
Value
F55
Enter CBC carriage value
See “4.2. Adjustment Check,
page 5”RAS261
Enter the pulse count of the needle
Backward/Forward over the WBC
chamber
1000
Units
100
Units
10
Units
1
Units
F56
CBC & CRP carriage adjust.
See “5. Needle and carriage
location over CRP chamber
adjustment, page 6”RAS261
Locate the tip of the needle to the right
side of the CRP mixing chamber and
press the Enter key.
The Backward/Forward position is
automatically adjusted.
Needle
value
Carriage
value
F57
CBC & CRP carriage check
See “5. Needle and carriage
location over CRP chamber
adjustment, page 6”RAS261
Position check of needle Backward/
Forward over the CRP mixing chamber.
F58
Enter CRP needle value
See “5. Needle and carriage
location over CRP chamber
adjustment, page 6”RAS261
Enter the pulse count of needle Up/
Down over the CRP mixing chamber.
1000
Units
100
Units
10
Units
1
Units
F59
Enter CRP carriage value
See “5. Needle and carriage
location over CRP chamber
adjustment, page 6”RAS261
Enter the pulse count of the needle
Backward/Forward over the CRP mixing
chamber
1000
Units
100
Units
10
Units
1
Units
F5A
CRP R2 needle adjust.
See “6. Needle and carriage
location over CRP-R2 reagent
chamber adjustment,
page 7”RAS261
Enter the auto-adjustment of the CRP
reagent depth.
- The CRP cover opens
- Move the carriage to the CRP R2
position
- Locate the tip of the needle on the side
of the drain hole
- Press the Enter key
- The pulse count is displayed
- Press the Enter key (completed)
Value
F5B
Enter CRP R2 needle value
See “6. Needle and carriage
location over CRP-R2 reagent
chamber adjustment,
page 7”RAS261
Enter the pulse count of the needle Up/
Down over the CRP mixing chamber
1000
Units
100
Units
10
Units
1
Units
F5C
Carriage holder adjust.
See “1. Carriage sampling
location adjustment,
page 2”RAS261
Enter the auto-adjustment of forward/
backward position of sample aspiration
- The Busy LED start blinking
- Locate sample holder’s smallest hole in
sampling position
- Close the sampling door
- Locate the needle in the center of the
smallest hole and press the Enter key
- The pulse count is displayed
Value
F5D
Enter carriage holder value
See “1. Carriage sampling
location adjustment,
page 2”RAS261
Enter the pulse count of the needle
forward/backward position of sample
aspiration
Value
6–6
WBC
ABX Micros CRP 200 - Technical Manual - RAA028A
Software versions
Software overview
F6 Technician 2
N°
Functions
Detail
WBC
RBC
F61
Needle sensor adjustment
See “2. Needle home
adjustment, page 3”RAS261
Locate the tip of the needle at the same
level as the bottom of rinsing block,
then run F61.
The pulse count from this position to
the needle home position is displayed
on RBC display. Adjust the position of
the needle home sensor until the
values becomes 70+/-5.
F62
HGB blank adjustment:
See HGB blank adjustment
values table below
See “8. HGB photometer
adjustment, page 8”RAS262
The current channel is displayed on
HGB display. By means of R97 on
Main board, adjust the HGB channel
according to the room temperature
using the «HGB blank adjustment
value» chart.
F63
Aperture current adjustment
See “6. Aperture voltage
check, page 6”RAS262
Check the voltage between TP19 and
TP31. Press Enter key to measure the
aperture voltage. It must be between
58.5 and 62.8V.
F64
WBC latex adjustment
See “9. WBC latex
adjustment, page 9”RAS262
Run the WBC latex adjustment
- Value blinking in WBC display shows
the LYM target, depending of latex lot
used, usually 57+/-1.
- Press the Enter key.
- Value blinking in RBC display shows
the GRA target, depending of latex lot
used, usually 180+/-2.
When values are stable, adjust gain by
mean of R74 on Main board.
LYM
GRA
F65
RBC / PLT latex adjustment
See “10. RBC/PLT latex
adjustment,
page 10”RAS262
Run the RBC/PLT latex adjustment
- Value blinking in WBC display shows
the RBC target, depending of latex lot
used, usually 74+/-1.
- Press the Enter key.
- Value blinking in RBC display shows
the PLT target, depending of latex lot
used, usually 64+/-2.
When values are stable, adjust RBC
gain by mean of R81 on Main board
and PLT gain by mean of R87.
RBC
PLT
F66
Bubbling
See “ RAS264: Bubbling
adjustment
Two bubbling phasis are adjustable:
- Bubbling 1 is the first dilution (WBC/
HGB chamber) bubbling value
- Bubbling 2is the second dilution
(WBC/HGB chamber + lyse) bubbling
value (do not change).
130 +0/-20
100 +0/-10
F67
Temperature (T°) adjustment
See “ RAS265: Thermic
adjustment
More than 1 hour after turning ON the
power, run F13 twice (Prime Diluent),
then run F67.
T° is displayed on WBC display. By
means of Up and Down keys, input the
T° read on thermometer, then press the
Enter key.
Value
HGB
70 +/- 5
Value
ABX Micros CRP 200 - Technical Manual - RAA028A
6–7
ABX Micros CRP
200
N°
Functions
Detail
WBC
RBC
F68
Temperature (T°) check
See “ RAS265: Thermic
adjustment
Run F13 twice (Prime Diluent), then
run F68. As calibration, 2°C is
automatically added to the T° input for
T° adjustment.
T° without correction is displayed on
WBC display.
Corrected T° is displayed on RBC
display.
Check T° between RBC display and
thermometer then press the Enter key.
Not calibrated
Calibrated
F69
Pressure check
See “ RAS263: Vacuum
check
Connect a Barflex to the secong input
of the Waste/Vacuum syringe. Press the
Enter key. Vacuum must be within the
following range: from +220 to +190
mb. Wait for 30s, the vacuum drop
down must be less than 2 mb.
HGB blank adjustment values:
Channel
Temperature room
Mini
Nominal
Maxi
15
240
245
250
16
240
245
250
17
239
244
249
18
238
243
248
19
237
242
247
20
236
241
246
21
235
240
245
22
234
239
244
23
234
239
244
24
233
238
243
25
232
237
242
26
231
236
241
27
230
235
240
28
229
234
239
29
228
233
238
30
228
233
238
31
227
232
237
32
226
231
236
33
225
230
235
34
224
229
234
35
223
228
233
6–8
ABX Micros CRP 200 - Technical Manual - RAA028A
HGB
Software versions
Software overview
F7 Technician 3 (Set up and display)
N°
Function
Detail
WBC
RBC
HGB
HCT
F71
Operating mode
Factory use only
Must be set to «0»
0:User
1:Control
F72
Serial number
Instrument serial N° is displayed
1000 Units
100 Units
10 Units
1 Units
F73
Startup number
N° of Startup cycles is displayed
1000 Units
100 Units
10 Units
1 Units
F74
Stand by number
N° of Shutdown cycles is displayed
1000 Units
100 Units
10 Units
1 Units
F75
Cycle number
N° of analysis cycles is displayed
1000 Units
100 Units
10 Units
1 Units
F76
Burn in cycle number
N° of Burn-in cycles is displayed
1000 Units
100 Units
10 Units
1 Units
F77
Burn in
Start Burn-in cycle
When stopping it, turn OFF the
power
Burn in
cycle
number
F78
LED & Displays check
Check the LED display. Press the
Enter key, all LEDs light up at once.
Press again the Enter key, the LED
light up in order.
F79
Board type check
0:8p
255:16/18p
F8 Technician 4 (Tube holder)
N°
Function
Detail
WBC
RBC
HGB
HCT
F81
Automatic adjustment
See “7. Needle depth
adjustment,
page 8”RAS261
While the Busy LED blinks, set a tube and close the
tube holder. Manually move the needle to the bottom
of the tube by the Reagent door 2, then press the
Enter key. Press the Enter key again to validate the
setup.
Value
F82
Position check
See “7. Needle depth
adjustment,
page 8”RAS261
Position check of needle Up/Down over the sample
holder
F83
Not used
F84
Change position 2 value
See “7. Needle depth
adjustment,
page 8”RAS261
Enter the pulse count of needle Up/Down over a
control vial.
1000
100
10
Units
F86
Change position 4 value
Enter the pulse count of needle Up/Down over a
vacuum sample tube
1000
100
10
Units
F87
Change position 5 value
Enter the pulse count of needle Up/Down over a mini
sample tube
1000
100
10
Units
F88
Change position 6 value
Enter the pulse count of needle Up/Down over a
micro sample tube
1000
100
10
Units
F85
ABX Micros CRP 200 - Technical Manual - RAA028A
6–9
ABX Micros CRP
200
F9 Technician 5 (CRP)
N°
Function
Detail
WBC
RBC
HGB
HCT
PLT
F91
CRP photometer adjust
See “7. CRP blank
adjustment,
page 7”RAS262
Press the Enter key, then adjust
VR1 on CRP board to have
3800+/- 50 on WBC display
Value
F92
CRP 1 value adjust.
Do not change
0
2
6
8
4
F93
CRP 2 value adjust.
Do not change
0
0
8
0
2
F94
CRP 3 value adjust.
Do not change
0
2
5
9
5
F95
CRP 4 value adjust.
Do not change
-0
4
0
0
0
F96
Cooler/heater check
See “2. Diluent
temperature in CRP
chamber check,
page 3”RAS265
Check the motor of switch ON/
OFF of cooler and heater
Heater
0:Off
1:On
Cooler
0:Off
1:On
F97
Default values
Set the instrument parameters to
default values.
F98
System Config
Select the number of
measurement items
CRP digits
Select the number of decimal
digits of CRP
6–10
#Param
0:16 Params
1:18 Params
CRP DIGIT
0:1 Digit
1:2 Digits
ABX Micros CRP 200 - Technical Manual - RAA028A
Alarm & error list
CONTENTS:
Section 07: Alarm & error list
1. Trouble not displayed by code: .................................................... 7-2
2. Trouble displayed by code ........................................................... 7-3
ABX Micros CRP 200 - Technical Manual - RAA028A
7–1
ABX Micros CRP
200
Display code type
Troubles that occur in the instrument include the following two types:
◆ Trouble not displayed by code:
Trouble related mainly to the power supply (Details are described forward in this Chapter).
◆ Trouble displayed by code:
Trouble displayed by code on the sample display unit on the front of the main body (Details are described
forward in this Chapter)
1. Trouble not displayed by code:
Before concluding that the instrument has broken down, check the following points:
For whom of contact, see the back cover.
Instrument does not operate even if power is turned ON:
◆ Is the power cable connected ?
Turn OFF the power switch, then connect the power cable.
◆ Is reagent door 2 open ?
Close reagent door 2.
◆ Is the fuse blown ?
Check the fuse holder at the back of the instrument referring to Section 07 Maintenance.
Replace the blown fuse.
Key is not accepted:
◆ Is the instrument in the sleep state ?
Press the Start up/Pause key to light up the Ready LED.
◆ Is reagent door 2 open ?
Close reagent door 2.
◆ Is the error code displayed in the sample N°. display unit ?
Take proper action after referring to paragraph «Error codes» further in this Chapter.
Failed to close the sample holder and it opened
The sample needle has stopped in the process of absorption. If the holder is closed in this state, the needle
will be damaged. When the Ready LED lights up in about 50 seconds after pressing the Start up/Pause key,
measurement can be performed again.
7–2
ABX Micros CRP 200 - Technical Manual - RAA028A
Alarm & error list
Trouble displayed by code
2. Trouble displayed by code
If the instrument detects trouble by self-diagnosis, the error code is displayed on the sample N°. display unit
(Some errors are printed out as a message).
Printed error messages
1- Startup failed:
Indicates that the blank value from self-diagnosis after turning ON the power is not within the specified value.
Content of the error and counter measures are the same as those for E15, E24, and E27.
2- Temperature error:
This is printed when the temperature of the ABX Minidil LMG is not within the temperature range of the
measurement specifications. Use the instrument and reagents in the temperature range of 15 to 30°C.
Error
code
Cause
Content
Actions
E1
Vacuum syringe does not
return to home position in
the specified time frame.
Vacuum syringe motor or
position sensor is defective
or has malfunctioned.
Power OFF. Wait 10 seconds.
Power ON and press the Startup/
Pause key to run Startup.
E2
CBC Liquid syringe does not
return to home position in
the specified time frame.
Liquid syringe motor or
position sensor is defective
or has malfunctioned.
Power OFF. Wait 10 seconds.
Power ON and press the Startup/
Pause key to run Startup.
E3
Sample needle carriage does
not return to home in the
horizontal direction during
the specified time frame.
1 - Sample needle carriage
still has the shipment
retaining clip secured.
2 - Sample carriage motor or
position sensor is defective
or has malfunctioned.
1 - Power OFF, remove instrument
cover, remove the black shipment
clip from the lower movement
guide rail.
2 - Power OFF. Wait 10 seconds.
Power ON and press the Startup/
Pause key to run Startup.
E4
CRP Liquid syringe does not
return to home position in
the specified time frame.
Liquid syringe motor or
position sensor is defective
or has malfunctioned.
Power OFF. Wait 10 seconds.
Power ON and press the Startup/
Pause key to run Startup.
E5
Sample needle does not
return to home in the
vertical direction during the
specified time frame.
1 - Sample needle is bent.
2 - Sample needle carriage
motor or position sensor is
defective or has
malfunctioned.
1 - Replace the sample needle
2 - Power OFF. Wait 10 seconds.
Power ON and press the Startup/
Pause key to run Startup.
E7
Printer does not accept
print signal from the
instrument.
1 -Reprint key was pressed
during a function or a cycle.
2 - Printer is turned OFF.
1 - Complete the function or
cycle, and then press the Reprint
key.
2 - Turn the printer power ON.
E8
Printer does not accept
print signal (printer paper is
run out)
No paper loaded when a
result should be printed out
or when the Reprint key is
pressed
Restart sequence after 30
seconds, or press the Start/Pause
key to reset error
E9
Printer does not accept
print signal (printer is
turned off)
Printer is not on line
Turn the printer On
ABX Micros CRP 200 - Technical Manual - RAA028A
7–3
ABX Micros CRP
Error
code
200
Cause
Content
Actions
E10
Printer does not accept
print signal (printer is busy)
The printer cable is
disconnected when a result
should be printed out or
when the Reprint key is
pressed
1- Connect the printer cable
2- Restart sequence after 30
seconds, or press the Start/Pause
key to reset error
E11
Printer does not accept
print signal (No is selected
for printout format by F36)
No printer has been
selected in F36 print format
selection
Printer does not accept
print signal (printer is
turned off or is not
connected)
1- The printer cable is
disconnected when a result
should be printed out or
when the Reprint key is
pressed
2- The printer power is Off
when a result should be
printed out or when the
Reprint key is pressed
E12
E13
The instrument does not
recognize the position of
the sample tube holder.
The tube holder was not
positioned correctly when
the tube holder door was
closed.
Select printer appropriately in F36
print format selection
1-Connect the printer cable then
restart sequence after 30 seconds,
or press the Start/Pause key to
reset error
2- Turn the printer power On then
restart sequence after 30 seconds,
or press the Start/Pause key to
reset error
1 - Press the Startup/Pause key,
then press the Service key several
times to open the tube holder
door.
2 - Reposition the tube holder so
that it locks into position and
close the tube holder door.
1 - Press the Startup/Pause key,
then press the Service key several
times to open the tube holder
door.
2 - Reposition the tube holder so
that it locks into position and
close the tube holder door.
Position of the sample
holder can not be
recognized correctly
The tube holder was not
positioned correctly when
the tube holder door was
closed.
E15
Blank value is out of range
(WBC~PLT)
Blank value is higher than
specified values:
WBC: 0.3x10³/µL
RBC: 0.02x10⁶/µL
HGB: 0.3 g/dL
HCT: 0.1%
PLT: 10x103/µL
E16
Sample holder is open
Close sample holder
E17
Sample holder does not
open
1- Sample holder does not
open
2- Sample holder opens/
closes to fast or to low
1- Check solenoïd
Remove any physical obstruction
Check switches connections
2- Tighten or loose the «push»
screw located behind the tube
holder.
Adjust the spring position.
E19
Startup unexecuted
Startup unexecuted
Run a Startup cycle
E14
7–4
Check reagent level
Check ground
Perform a Backflush cycle (F11)
Perform a Bleach cleaning cycle
(F16)
Check bubbling
ABX Micros CRP 200 - Technical Manual - RAA028A
Alarm & error list
Trouble displayed by code
Error
code
Cause
Content
Actions
E20
The instrument is waiting
for printing to end
Measurement has been
started though paper runs
out during printout
Press online button:
Sequence restarts after data
transmission finishes and error
message is cleared after current
measurement is completed
E22
Diluent temperature sensor
is disconnected or broken
Diluent temperature sensor
is disconnected or open
circuit is present
Replace liquid temperature sensor
E23
Diluent temperature sensor
is broken
Diluent temperature sensor
is defective
Replace liquid temperature sensor
HGB blank value exceeds
the specified value
HGB blank value is not
within the range (between
180 and 255) though
measured up to 3 times, or
gap from previous value is
more than 5.
Remove WBC and RBC black cover
then check for bubbles in WBC
chamber. Clean the chamber, put
the cover back and run F62
function for blank measurement.
Temperature is low.
Wire of the heater is broken
Run F96 function 40 minutes after
turning on the power and check
that 0/1 is blinking in WBC/RBC
windows.
Check the connector of the heater
Check the exhaust fan operation
Replace the cooler
Heater does not turn on/off
in the specified time
Temperature is high.
Cooler is in failure
Run F96 function 40 minutes after
turning on the power and check
that 0/1 is blinking in WBC/RBC
windows.
Check the connector of the heater
Check the exhaust fan operation
Replace the cooler
E27
CRP blank value exceed the
specified value
CRP blank value is not
within the range (between
3340 and 4014)
Air bubbles in the flowcell
Low intensity of CRP light
source LED
Too high needle position in
mixing chamber may causes
air bubbles during priming
Check blank value variation by
F91.
If variation width is 10 counts or
more, air bubbles are present.
Clean the flowcell or replace it.
If checked values are ouside
3800+/-50 though no significant
variations, make adjustment
A28
Diluent sensor
Diluent is not primed
Connector is disconnected
Prime diluent
Check the sensor connector
A29
Lyse sensor
Lyse is not primed
Connector is disconnected
Prime lyse
Check the sensor connector
A30
Cleaner sensor
Cleaner is not primed
Connector is disconnected
Prime cleaner
Check the sensor connector
E24
E25
E26
Heater does not turn on/off
in the specified time
ABX Micros CRP 200 - Technical Manual - RAA028A
7–5
ABX Micros CRP
Error
code
200
Cause
Content
Actions
Discharge error at (+)
pressure on
While air syringe is pressed
down and waste is
discharged to the tank,
discharge pressure does not
rise
Check diluent level and prime
Check air syringe for leakage
Check valve 5 and its tubings
Discharge error at (+)
pressure off
Pressure remains high and
does not return to
atmospheric level
Check valve 5 and its tubings
Check tube from air syringe to
waste tank
Check that waste tank is on
atmospheric pressure level
Discharge error at (-)
pressure on
While air syringe is pulled
and waste is discharged
from RBC and CRP
chambers, pressure does not
drop
Check air syringe for leakage
Check valves12, 13 and 18 are
open
Check diluent level and prime
E34
Discharge error at (-)
pressure off
Pressure remains low and
does not return to
atmospheric level
Check valves12, 13 and 18 are
closed
Check tubings from chambers to
valves
A35
Temperature is out of range
Temperature is out of the
specified range
Use the instrument from 18 to
30°C
A36
CRP reagent blank is out of
range
CRP reagent blank is out of
range
Set CRP REA properly
E31
E32
E33
7–6
ABX Micros CRP 200 - Technical Manual - RAA028A
Maintenance
CONTENTS:
Section 08: Maintenance
1. Maintenance ................................................................................ 8-2
1.1. Introduction...........................................................................................8-2
1.2. Daily customer maintenance .................................................................8-2
1.3. Weekly customer maintenance..............................................................8-2
2. Maintenance kit ........................................................................... 8-2
3. Procedures ................................................................................... 8-3
ABX Micros CRP 200 - Technical Manual - RAA028A
8–1
ABX Micros CRP
200
1. Maintenance
1.1. Introduction
Customer maintenance has to be carried out according to the recommended frequency, after
having attended a HORIBA ABX approved customer training course.
The system warranty may be affected if damage occurs after a non trained technician
intervenes or if replaced spare parts and consumables do not come from a HORIBA ABX
approved origin.
1.2. Daily customer maintenance
Only a Startup and a Shutdown are required at the beginning and the end of the day.
Those cycles are described in the User manual, Section 4 «Startup & sample analysis».
1.3. Weekly customer maintenance
An overall check for cleanliness of the system is recommended every week.
Any traces of blood or reagent have to be wiped off as soon as possible using a piece of cloth and distilled water.
Never use solvent or abrasive cleaning material to clean the system.
1.4. Acces to the Technician functions
In order to access to the special functions, follow the procedure below:
- Check that the instrument is in ready mode.
- Press and hold the Service key (blue).
- Using the Up and Down keys, set up the ten number of the required function on the WBC display, then
press Enter.
- Keep holding the blue Service key and set up the unit number using the Up and Down keys. Press Enter
when the required unit number is selected.
- Release the blue Service key.
In order to work on the instrument and to run cycles without the cover, place a magnet over
proximity sensor located on the reagent cooling unit.
Place a magnet on
the proximity sensor
8–2
ABX Micros CRP 200 - Technical Manual - RAA028A
Maintenance
Maintenance kit
2. Maintenance kit
Follow the RAS258 Yearly maintenance procedure for maintenance with XEA931AS kit. The kit includes:
Part number
Designation
Qty
FAA017A
O’RING, TANK MIN/AG+WASTE MIC
1
F0020373000
15x1,5 Nit. 70SH O’ring
1
FAA036A
O’RING, FLOW CELL+LYSE DISP.MIC
2
FAA046A
O’RING, COAXIAL CABLE
2
FAA053A
O’RING, SAMPL.NEEDLE MICROS OT
1
FAA055A
O’RING, MICROS SAMPLING SYRINGE
2
H1008304002
Liquid Syringe Diluent Piston
1
GBG275A
O’RING, APERTURE D=0.5 P60/P80
4
3. Procedures
◆Maintenance and adjustments that need to be done on Micros CRP 200 are divided up into
procedures according to the specific assemblies. This should make any update easier as all
interventions can be carried out with the corresponding procedure on its own.
◆ Each procedure has to be read in full before beginning the intervention.
P/N and tittle
Concerns
RAS256: Installation
Unpacking - Micros CRP 200 installation - Reagent priming - Startup
RAS257: Decontamination & rinse
Instrument decontamination before maintenance
RAS258: Yearly maintenance
Yearly maintenance
RAS259: Check up after intervention
Check up after intervention
RAS260: Step by step analysis cycle
Described the analysis cycle step by step
RAS261: Needle & carriage adjustment
Needle & carriage position adjustment
RAS262: Main board & CRP board
Main & CRP boards adjustment (motor voltages, thresholds, gains, etc...)
RAS263: Vacuum check
Vacuum check
RAS264: Bubbling adjustment
Bubbling check
RAS265: Thermic adjustment
Thermic adjustment
RAS268: Front panel dismantling
Cover & front panel dismantling
RAS273: Autoconcentrated cleaning
Bleach cleaning
RAS445: CRP unit replacement
CRP unit replacement
ABX Micros CRP 200 - Technical Manual - RAA028A
8–3
ABX Micros CRP
8–4
200
ABX Micros CRP 200 - Technical Manual - RAA028A
Micros CRP 200
RAS256C
Installation
RAS256: Installation
• Concerns
• Installation kit
• Reagents installation
• Priming and startup
• Required tools
• Hexagonal keys
• Required products
• MICROS CRP Reagents: Bottles.
• Waste container
• Intervention time
• 1 hour
• Frequency
•
• Specific kit or consumables
• Installation kit:
- XEA911A
Disposal gloves, eyes protection and lab coat must be
worn by the operator.
Local or national regulations must be applied in all
the operations.
RAS256C
1. Installation kit (XEA911A)
Ref.
Designation
QTY
DAR014A
Fuse 5x20 3.15A T 250V
2
EAE007A
Tygon tube 1.52mm (0.060’’)
2 ML
EAE009A
Tygon tube 2.29mm (0.090’’)
2 ML
FAA017A
O’RING, TANK MIN/AG+WASTE MIC
1
F0020373000
O’ring 15x1.5 NIT. 70SH
1
FAA036A
O’RING, FLOW CELL+LYSE DISP.MIC
2
FAA053A
O’RING, SAMPL.NEEDLE MICROS OT
1
FAA055A
O’RING, MICROS SAMPLING SYRINGE
2
GBG145A
Reagent straw cap D=20
1
GBG155A
Capsule D=25
1
GBC284A
Cleaner straw
1
GAK302A
Cap
1
XDA693A
Waste tubing P60
1
JAG003A
Plastic box
1
MAB001A
Bent key 2mm
1
MAB002A
Bent key 2.5mm
1
MAB003A
Bent key 1.5mm
1
MAB018A
Bent key 3mm
1
MAB069A
Screwdriver 2.5mm
1
MAB090A
Torx bent key T10
1
XEA019A
Grease KM1011
1
G0166911
Diluent straw + tube
1
G0166920
Waste straw for waste container
1
GBC285A
Waste straw for waste plastic bag
1
G0310450
CRP reagent protection cover
1
G0166861
Waste water tank
1
G0166940
Sample cup
20
2. Printer
Use the printer that is supplied or approved by HORIBA ABX. Do not use any printer that has not been
recommended by a HORIBA ABX qualified technician.
RAS256–2
ABX Micros CRP 200 - Technical Manual - RAA028A
Micros CRP 200
3. Installation
3.1. Removing the fixture securing the carriage for transportation
Fixture
Carriage
Tape
◆ Open the reagent door 2.
◆ Move the fixture securing the carriage to the right.
◆ Shift the fixture horizontally with your thumb and index finger. Release the lock and remove the fixture.
Save the fixture since it is used for TRANSPORTATION.
◆ Peel off the tape securing the reagent cooling unit and reagent cover (open/close).
When peeling off the tape, be sure that the reagent protection cover between the reagent cooling
unit and the reagent cover (open/close) is correctly placed and is not damaged.
ABX Micros CRP 200 - Technical Manual - RAA028A
RAS256–3
RAS256C
3.2. Installing the reagents
◆ ABX Minidil LMG
- Connect the connector end of the attached ABX Minidil LMG tube to the «Diluent» connector on the tube
connecting block on the back of the instrument at the lower left.
- Attach the other end of the Diluent tube to the head of the attached Diluent 10L straw.
- Pull out the cap of the ABX Minidil LMG tank, open the cap, attach the Diluent straw and close cap of the straw.
- Open the remaining quantity check window at the lower side of the front of ABX Minidil LMG packing case.
Diluent
◆Tighten the screw of the connector firmly.
◆Place the ABX Minidil LMG box at the same height as the main body.
◆ Do not bend the DILUENT tube. Do not have it cross a power line to avoid the effects of noise.
◆ The length of the tube should be no longer than 1.5 m (59 inch) and as short as possible.
◆ Do not apply force to the joint of the tube connecting block.
◆ Prevent dirt from getting into the reagent.
◆ The reagent and tube should not be exposed to direct sunlight.
ABX Lyse may contains cyanide. Handle it carefully.
◆ ABX Cleaner and ABX Lyse
- Open the reagent door 1.
- A Lyse straw (A) and a Cleaner straw (B) are already installed (See “Fig.1: Reagent straws, page 4”).
A
B
Fig.1: Reagent straws
- Remove those straws.
- Connect the straws delivred with the instrument (in the installation kit) on the tubings (the tubing with the
label for the Miniclean straw)
- Open the caps on the ABX Cleaner and ABX Lyse bottles.
- Plunge the straws in the bottles then screw the caps.
RAS256–4
ABX Micros CRP 200 - Technical Manual - RAA028A
Micros CRP 200
- Set the ABX Cleaner on the right side of reagent door 1.
- Set the ABX Lyse to the left of the ABX Cleaner.
Be careful not to bend the tube when positioning the reagents.
ABX LYSE
ABX CLEANER
ABX Micros CRP 200 - Technical Manual - RAA028A
RAS256–5
RAS256C
3.3. Installing ABX CRP REA
To enter the CRP reagent sensitivity factors, please refer to RAS259, “4.3.Input of the CRP
reagent sensitivity factors, page 6”.
◆Install the ABX CRP REA only when measuring CRP.
◆This instrument is not provided with a function for checking the remaining quantity of CRP
reagent. The remaining quantity of ABX CRP REA should be checked visually. When the
remaining quantity decreases to below the lower portion of the CRP-R3 reagent label, replace
all three reagents.
◆ Take the ABX CRP REA (CRP-R1, CRP-R2 and CRP-R3) out of the refrigerator.
◆ Push the lower front portion of the reagent door 2 on the main body side and open reagent door 2.
◆ Invert CRP-R3, 2 times. Be sure to remove the cap and slowly set it in the reagent cooling unit. Similarly, be
sure to remove the cap of CRP-R2 and set it in the cold room.
◆ Slowly set CRP-R1 in the R1 reagent holder.
◆This instrument is not provided with a cap detecting function. Therefore, be sure to remove the
CRP-1, CRP-2 and CRP-3 reagent bottle caps before setting the bottles in the instrument.
◆ The reagent should be refrigerated, 2 to 10°C (35.6° to 50 °F), storage in a freezer is
prohibited. After completion of measurement, take the reagent out of the reagent cooling unit,
tighten the cap firmly and store in a refrigerator.
◆ Be careful not to misplace the cap.
◆ Set the reagents in the instrument slowly. If the reagent container is dropped in the reagent
cooling unit, the liquid will spill, so care must be taken.
◆ After the reagent is set, be sure to close the reagent door.
◆ CRP-1 is stable even at room temperature. Accordingly, it is designed not to be placed in the
reagent cooling unit. However, it should be stored in the refrigerator the same as the other
reagents.
RAS256–6
ABX Micros CRP 200 - Technical Manual - RAA028A
Micros CRP 200
3.4. Installing the waste liquid tank
◆Waste liquid may contain cyanide. Handle it carefully. Never ingest the waste liquid as it may
contain biological residual substances (infectious substances).
◆ Always follow the recommended procedures for waste disposal. Never connect the instrument
wastes directly to the laboratory drain pipes. For each waste container, follow the
neutralization procedure (See User manual, Section 7, Maintenance and troubleshooting).
◆ Connect the waste container using the cristal tube 3x6 on the waste output, and place the waste container below
the instrument level (under the bench).
Waste
◆ Insert the other side of the waste tube deeply into the cap head of the attached waste container.
◆ Remove the cap of the waste container and mount a cap with waste tube.
◆Waste liquid tank is not provided with an overflow detecting function. When the quantity of
waste liquid exceeds half of the tank, dispose of the liquid (See User manual, Section 7,
Maintenance and troubleshooting).
◆ Be sure to use waste liquid tank cap. If the tube is directly inserted into the waste liquid tank,
the pressure will cause the instrument to malfunction.
◆Tighten the screw of connector firmly.
◆Install the waste liquid tank at the same height as, or lower than the main body.
◆ Use an attached waste tube (3x6, 1.5m). Do not bend it.
◆ Do not apply force to the joint of the tube connecting block.
3.5. Wiring between the power source and the ground
To avoid electric shock, connect the power cable only to a hospital grade socket outlet.
◆Check if the power switch on the left side of the instrument is OFF.
◆ Insert the attached power cable into the socket on the rear of the instrument.
◆ Connect the 3-pin plug of the power cable into the oulet of 100-240V AC with 50 or 60 Hz.
◆Place the instrument where an independent outlet can be used.
◆Use an outlet different from the one used by a device which easily generates noise such as a
centrifuge.
◆ When placed on a metal table, ground it as well.
ABX Micros CRP 200 - Technical Manual - RAA028A
RAS256–7
RAS256C
3.6. Setting the language
Make sure the instrument is OFF, then configure the jumper E1 on the Main board:
◆ E1 jumper configuration (language setting):
Japan
United States (no display with Hemalink)
English
Japan
3.7. Priming the reagent at installation
◆If the power is supplied when the reagent is not primed in the tube (the condition at
unpacking), error code E-6, E-15 etc. (refer to section 7) may occur frequently. Be sure to prime
the reagent at installation.
◆ Before turning ON the power, be sure to check that the reagent and waste liquid tank are
correctly installed and tubing is connected.
◆ Press PUSH on the top of the instrument and open the upper door.
◆ While pressing the Service key, set the power switch to ON (Error code E-19 will be displayed. This code indicates
startup in the service mode).
◆ When F1 is displayed on the sample display unit, release the Service key. By releasing the Service key, the F1
display turns to N° [1] and the input Ready LED will light up.
◆ Press the Prime key. Reagent (ABX Minidil LMG, ABX Lyse and ABX Cleaner) will be primed into the instrument.
◆ Repeat previous step three times.
◆ When priming has been performed three times, perform «End Cleaning» by pressing the Shutdown key and turn
off the power.
RAS256–8
ABX Micros CRP 200 - Technical Manual - RAA028A
Micros CRP 200
RAS257C
Decontamination & rinse
RAS257: Decontamination & rinse
• Concerns
• Instrument decontamination before maintenance
operation in the following cases:
• Instrument removed from a biohazardous area
• Maintenance intervention on contaminated assemblies
and instrument rinse
• Required tools
• Hexagonal keys
• Clamps
• Flat screw driver
• Torx keys
• Required products
• Fungicidal, bactericidal, virus killing detergent spray,
non corrosive for metals,non plastic altering.
• Bleach solution 12°Cl
• Deionized water
• Absorbant paper
• Distilled water
• Intervention time
• 1h30min
• Frequency
• On request
• Specific kit or consumables
• None
Disposal gloves, eyes protection and lab coat must be
worn by the operator.
Local or national regulations must be applied in all
the operations.
RAS257C
1. Preparation (20min)
◆ Switch on the instrument.
◆ Run a Startup cycle, then a Clean cycle.
◆ Switch off the instrument and remove the supplying cable.
◆ Open the instrument cover.
◆ Spray the bactericidal cleaner on all assemblies that may provide biologic risks and wait for 10 minutes
(assemblies in contact with the operator such as instrument cover, tube holder, keyboard, start key, sampling
needle neighboured assemblies).
2. Manual decontamination (20 min)
◆ Remove the chambers cover.
◆ Dilute the 12°cl bleach to 1 part of bleach for 4 of deionize water (1/5).
◆ Instrument environment must be cleaned and decontaminated.
◆ No sponge, nor cloth must be used. Only absorbant paper, thrown after use, in contamination bins, can be
employed. For small or weak assemblies use accurate drier papers.
◆ All assemblies that is suspected to have contact with biologic product must be disinfected with the diluted
bleach (the stainless steel must be bleached below 30°Celsius).
◆ Blood stains or salt marks must be cleaned with spray detergent first.
Concerned assemblies:
- Outer surfaces of the instrument (perpex, covers, LCD, reagent locations....)
- Keyboards
- Waste connector plug
- Liquid valve push
- Needle neighboured assemblies
- Tube holder assy
- Overflow trays
◆ Reinstall all the assemblies and setup the instrument in its initial configuration.
3. Analysis circuit decontamination (30 min)
◆ Prepair 1 bottle containing 1/2 litre of bleach diluted to 1 part of bleach for 9 parts of deionize water (1/10).
◆ Prepair 1 bottle containing 1/2 litre of distilled water.
◆ Switch on the instrument.
◆ Replace the reagent bottles by the diluted bleach bottle.
◆ Run a Prime cycle.
◆ Fill a sample tube with diluted bleach to 1 part of bleach for 4 of deionize water (1/5).
◆ Run F[76] function: Prime cycle number.
RAS257–2
ABX Micros CRP 200 - Technical Manual - RAA028A
Micros CRP 200
◆ Enter 15 burn-in cycles (1 in HGB display and 5 in HCT display) press Enter to exit function (See “Fig.1: Display,
page 3”).
F76
0
0
1
5
Fig.1: Display
◆ Run F[77] function: Run burn-in cycle and wait until the instrument stop.
4. Drain and rinse (30 min)
◆ Remove the 3 reagent straws from the bottle containing the diluted bleach.
◆ Wrap the straws in absorbant paper.
◆ Run two Prime cycles: the bleach is drained.
◆ Replace the diluted bleach by the distilled water bottle and re-plunge the straws in distilled water.
◆ Run six Prime cycles (Rinse).
◆ Remove the 3 reagent straws from the distilled water (wrap the straws in absorbant paper).
◆ Run two Prime cycles: the distilled water is drained.
◆ Run a Stand by cycle.
◆ Re-install the reagent bottles and the straws.
◆ Switch off the instrument.
◆ Close the instrument cover.
ABX Micros CRP 200 - Technical Manual - RAA028A
RAS257–3
RAS257C
RAS257–4
ABX Micros CRP 200 - Technical Manual - RAA028A
Micros CRP 200
RAS258C
Yearly maintenance
RAS258: Yearly maintenance
• Concerns
• Yearly maintenance
• Required tools
• Hexagonal keys
• Torx keys
• Dynamometric screw driver:
• A302: XEA586AS
• A301: XEA587AS
• A300: XEA585AS
• Cutting pliers
• Required products
• Liquid soap
• Distilled water
• Scalpel
• Micropipette tip
• Silicone grease: LAM 004 A
• Soft paper
• Grease for mechanical assemblies: XEA381A
• Grease Oil Vactra: XEA821A
• Intervention time
• 1h30min
• Frequency
• Once a year
• Specific kit or consumables
• Yearly maintenance kit: XEA931AS
Disposal gloves, eyes protection and lab coat must be
worn by the operator.
Local or national regulations must be applied in all
the operations.
RAS258C
Yearly Maintenance Kit XEA931AS:
Part number
Designation
Qty
FAA017A
O’RING, TANK MIN/AG+WASTE MIC
1
F0020373000
15x1,5 Nit. 70SH O’ring
1
FAA036A
O’RING, FLOW CELL+LYSE DISP.MIC
2
FAA046A
O’RING, COAXIAL CABLE
2
FAA053A
O’RING, SAMPL.NEEDLE MICROS OT
1
FAA055A
O’RING, MICROS SAMPLING SYRINGE
2
H1008304002
Liquid Syringe Diluent Piston
1
GBG275A
O’RING, APERTURE D=0.5 P60/P80
4
1. Vacuum syringe O’ring replacement
(1x FAA017A)
◆ Swith off the instrument and disconnect the power supply cable.
◆ Remove the cover.
◆ Disconnect on vacuum syringe the fourth tube from the top of the syringe.
◆ Unscrew the 4 screws (A) maintening the syringe body to the frame (See “Fig.1: Fourth tube, page 2”).
A
A
A
A
Fig.1: Fourth tube
◆ Manually pull up the piston outside of the vacuum syringe body.
◆ Unscrew the 4 screws from the top plate of the vacuum syringe (See “Fig.2: Syringe screws, page 3”).
◆ Remove the syringe top plate and the old O’ring.
RAS258–2
ABX Micros CRP 200 - Technical Manual - RAA028A
Micros CRP 200
◆ Spread a little amount of silicone grease between two fingers and apply a very thin film of grease on the new
O’ring.
◆ Install the new O’ring and the top plate on the vacuum syringe.
◆ Install back the syringe body on the frame using the 4 screws (A).
Push back the piston inside the syringe body before tightening the 4 O’ring fixation screws CHC
M2.5x8. Tighten those 4 screws with a dynamometric screw driver to 400mN.m
Fig.2: Syringe screws
◆ Connect back the tube on the vacuum syringe.
2. Rinsing block O’ring replacement
(1x FAA053A)
◆ Push backward the sampling needle carriage and lift up the sampling needle.
◆ Remove the clip maintaining the needle in its upper part (See “Fig.3: Clip, page 3”).
Fig.3: Clip
◆ Unscrew the 2 screws of the rinsing block (See “Fig.4: Rinsing block screws, page 4”).
ABX Micros CRP 200 - Technical Manual - RAA028A
RAS258–3
RAS258C
Fig.4: Rinsing block screws
◆ Remove the needle from the rinsing block then the O’ring (See “Fig.5: Needle O’ring, page 4”).
Fig.5: Needle O’ring
◆ Spread a little amount of silicone grease between two fingers and apply a very thin film of grease on the new
O’ring.
◆ Reinstall the rinsing block in reverse order.
◆ Use the A301 dynamometric screw driver to tighten the rinsing block screws to 100mN.m.
RAS258–4
ABX Micros CRP 200 - Technical Manual - RAA028A
Micros CRP 200
3. WBC and RBC chambers maintenance
3.1. RBC chamber: Counting head, electrode seals replacement
(1 x GBG275A + 1 x FAA046A)
◆ Run a drain chamber cycle F[12]
◆ Remove the chamber cover (See “Fig.6: Chamber cover, page 5”).
Fig.6: Chamber cover
◆ Record the tube positions before dismantling the chambers, then unclip the RBC chamber (See “Fig.7: RBC
chamber, page 5”).
Fig.7: RBC chamber
◆ Dismantle the electrode (6) loosening the 2 fixation screws (7) and the terminal holding screw (3), See “Fig.8:
RBC chamber exploded view, page 6”.
ABX Micros CRP 200 - Technical Manual - RAA028A
RAS258–5
RAS258C
Fig.8: RBC chamber exploded view
◆ Use a previously cut micropipette tip to replace the electrode O’ring (1x FAA046A) as shown on following
diagram.
◆ Install the chamber over a piece of white paper or cloth.
◆ Carefully remove the counting head (4) and plunge the aperture (5) in distilled water.
Do not manipulate the aperture using hard instruments. Clean the aperture with a piece of soft
paper or preferably, in between 2 fingers.
◆ Replace the aperture seal (2) ( GBG275A).
◆ Rinse thoroughly with distilled water.
◆ Dry the exterior of the chamber with a soft paper.
Do not apply too much pressure on the electrode fixation screws, as it can break the aperture
(tightening torque = 100mN.m / 14.2 Ozf.in). It is recommended to reconnect the tubes on the
counting head before reassembling the "electrode/chamber/counting head" assy in order to
avoid applying constraint on the chamber.
◆ Position the chamber in its fixation clips then reconnect the tubes.
RAS258–6
ABX Micros CRP 200 - Technical Manual - RAA028A
Micros CRP 200
3.2. WBC chamber: Counting head, electrode seals replacement
(1 x GBG275A + 1 x FAA046A)
◆ Proceed as described for RBC chamber to clean, replace aperture seals and electrode O’ring.
The spectrophotometer can not be dismantled from the chamber. If this one has been dammaged,
it is necessary to replace the whole chamber assy.
When cleaning the spectrophotometer, make sure to thorougly rinse it in order to obtain a
correct HGB blank measure.
4. CRP Syringe O’ring replacement
CRP syringe is located behind front panel, to access this part you must remove the front panel.
See procedure RAS268 Front panel dismantling of this manual.
(1x FAA036A)
◆ Switch off the instrument and disconnect power supply cable.
◆ Remove the cover.
◆ Remove the front panel.
◆ Clamp and disconnect the CRP syringe tube (See “Fig.9: CRP syringe, page 7”).
◆ Unscrew the 2x CHC M2.5x25 fixation screws and remove CRP syringe.
Fig.9: CRP syringe
◆ Open the syringe (3x Torx screws) and remove O’ring and piston.
◆ Spread a little amount of silicone grease between two fingers and apply a very thin film of grease on the new
O’ring.
◆ Install new O’ring then pull it on the piston (See “Fig.10: O’ring installation, page 8”).
ABX Micros CRP 200 - Technical Manual - RAA028A
RAS258–7
RAS258C
Fig.10: O’ring installation
◆ Put piston in syringe body (See “Fig.11: Piston installation, page 8”).
Fig.11: Piston installation
◆ Place the bottom plate to close syringe and tighten the 3 Torx screws.
◆ Install back the syringe on the frame and connect CRP syringe tube back.
Continue maintenance before you put back the front panel.
5. Liquid syringe O’rings and Diluent piston replacement
Liquid syringe is located behind front panel, to access this part you must remove the front panel.
See procedure RAS 268 Front panel dismantling of this manual.
(1x F0020373000, 1x FAA036A, 2x FAA055A, 1xH1008304002)
◆ Push the piston assy in the upper position and clamp the diluent and lyse tubing (See “Fig.12: Liquid syringe,
page 9”).
RAS258–8
ABX Micros CRP 200 - Technical Manual - RAA028A
Micros CRP 200
Fig.12: Liquid syringe
◆ Disconnect diluent, lyse and sampling tubings from the 3 syringes and the tube on the liquid syringe side.
◆ Unscrew the 4 fixation screws and remove the liquid syringe (See “Fig.13: Liquid syringe screws, page 9”).
Fig.13: Liquid syringe screws
◆ Unscrew the 4 CHC screws (A) and the 2 FHC screws (B) in order to remove the syringe bottom plate (See “Fig.14:
Bottom plate, page 10”).
ABX Micros CRP 200 - Technical Manual - RAA028A
RAS258–9
RAS258C
B
A
Fig.14: Bottom plate
◆ Pull out the pistons 1, 2 and 3 from the body with their respective O’ring still around (See “Fig.15: Pistons,
page 10”).
Fig.15: Pistons
◆ Replace all O’rings by new ones.
◆ Replace Diluent piston H1008304002 and check other pistons and syringe body cleanliness. If necessary clean
with a soft paper.
◆ Spread a little amount of silicone grease between two fingers and apply a very thin film of grease on each new
O’ring.
◆ Reinstall the liquid syringe in reverse order.
◆ Use the A302 dynamometric screw driver to tighten the 4 CHC screws (A) to 700mN.m
◆ Use the A301 dynamometric screw driver to tighten the 2 FHC screws (B) to 400mN.m
RAS258–10
ABX Micros CRP 200 - Technical Manual - RAA028A
Micros CRP 200
6. End of maintenance
6.1. Cleaning
◆ Remove and clean the CRP protection, then put it back (See “Fig.16: CRP protection, page 11”).
Fig.16: CRP protection
6.2. Lubricating
◆ Clean the carriage and the needle carriage axes (See “Fig.17: axes, page 11”).
◆ Put one drop of oil on each axes.
Fig.17: axes
◆ Disconnect the diluent and waste inputs located at the rear of the instrument.
◆ Move the vacuum syringe by hand in order to have an access to the motor gearings.
◆ Spread a little amount of grease on the gearings and on coggs of the piston axis (See “Fig.18: Vaccum syringe
lubricating, page 12”).
ABX Micros CRP 200 - Technical Manual - RAA028A
RAS258–11
RAS258C
Fig.18: Vaccum syringe lubricating
◆ Manually move the syringe assembly to spread the grease on all parts of the gearings and piston axis (See
“Fig.19: Manual moving, page 12”).
Fig.19: Manual moving
◆ Spread a little amount of grease on the coggs of the piston axis of CRP syringe and liquid syringe (See “Fig.20:
CRP & reagent syringes lubricating, page 12”).
Fig.20: CRP & reagent syringes lubricating
RAS258–12
ABX Micros CRP 200 - Technical Manual - RAA028A
Micros CRP 200
◆ Finish the front panel mounting.
7. Check
◆ Check for reagents and diluent quantities remaining.
◆ Check that cables (flat cables, connectors,...) and tubings are all connected.
◆ Connect power supply cable.
◆ Switch on printer and instrument.
◆ Run 2 Prime cycles.
◆ Close sampling door to start a blank cycle.
◆ During this cycle check for:
- Watertightness of Waste, CRP and Liquid syringe.
- Watertightness of rinsing block.
- Unusual mechanic noises
- Chambers draining.
- Good opening of CRP block flap.
◆ Then proceed to the Checkup after intervention (Procedure RAS 259).
It is mandatory to proceed to Checkup after intervention procedure after maintenance. This
procedure will make sure you get the best instrument reliability! See procedure RAS 259 in this
manual.
ABX Micros CRP 200 - Technical Manual - RAA028A
RAS258–13
RAS258C
RAS258–14
ABX Micros CRP 200 - Technical Manual - RAA028A
Micros CRP 200
RAS259C
Check up after intervention
RAS259: Check up after intervention
• Concerns
• Checkup after intervention
• Required tools
• None
• Required products
• Fresh and normal blood samples
• Calibration blood samples
• CRP Calibration serum
• Intervention time
• 1h
• Frequency
• On request
• Specific kit or consumables
• None
Disposal gloves, eyes protection and lab coat must be
worn by the operator.
Local or national regulations must be applied in all
the operations.
RAS259C
This procedure must be performed on a clean instrument If instrument is suspected to be not
perfectly clean, perform a CLEAN cycle.
1. Preliminary
◆ Run a STARTUP cycle
2. Repeatability
◆ Based on 10 consecutive analyses on CBC and 5 consecutive analyses on CRP without alarm from one fresh and
normal blood sample.
◆ Run 10 consecutive analyses on CBC and 5 consecutive analyses on CRP.
◆ Control to have variation coefficients within the following acceptable limits:
Measurement range
Parameters
CV
From
To
WBC
< 2.5%
4.75
12.50 x 10³/mm3
RBC
< 2%
4.00
5.00 x 10⁶/mm6
HGB
< 1.7%
12.0
16.6 g/dL
HCT
< 2%
37.0
50.0 %
PLT
< 5%
150
355 x 103/mm3
MCV
< 1%
83
100 fL
RDW
< 3%
12
15 %
MPV
< 3%
7
9 fL
LYM #
< 5%
18.5
47.0 %
MON #
< 10%
2.5
6.0 %
GRA #
< 3%
49
78 %
CRP
< 10%
< 0.5 mg/dL
CRP
< 4%
< 5 mg/dL
X: Mean
Xi: Measure value
n: Measure number
SD: Standard deviation
CV is calculated by means of the below formula:
RAS259–2
ABX Micros CRP 200 - Technical Manual - RAA028A
Micros CRP 200
3. CBC Calibration
Calibration has to be done always on a clean and reproducible instrument, blank values must be
in the acceptable limits
◆ The calibration can be achieved on one parameter or more at the same time.
◆ Turn on the printer and switch on the instrument.
◆ Press Mode key to select CBC mode.
◆ Prepare the calibrator according to the specific instructions (temperature, mixing,etc...).
◆ Measure the calibration blood six times.
◆ After eliminating the maximum and minimum values, acquire the mean value of the remaining four data, for
each of the six measurement item results (WBC, RBC, HGB, HCT,PLT, MPV).
◆ Calculate the ratio: Assay value/Mean value of four data for each parameter
◆ Press Calibration key on the operation panel then press Reprint key: Currently stored calibration coefficients are
printed out:
COEFFICIENTS
DATE: 04/01/2005
WBC
RBC
HGB
HCT
PLT
MPV
RDW
CRP
CRP
CRP
CRP
CRP
FCT A
FCT B
FCT C
BLANK
TIME: 16:37
:
1.10
:
0.84
:
1.27
:
1.03
:
1.17
:
0.90
:
0.81
:
1.08
:
0.90
:
1.04
:
0.87
:14/12/2004
11:30
Calibration
coefficients
◆ Multiply each printed calibration coefficient by each ratio previously calculated to obtain the new calibration
coefficient.
*New calibration coefficient = displayed calibration coefficient x ratio
◆ New calibration coefficient for each item should be in the following range
Calibration range
Parameters
From
To
WBC
1.00
1.21
RBC
0.77
1.00
HGB
0.90
1.15
HCT
0.90
1.20
PLT
0.98
1.50
MPV
1.09
1.31
CRP
0.88
1.09
ABX Micros CRP 200 - Technical Manual - RAA028A
RAS259–3
RAS259C
If the above range is exceeded, the instrument may be malfunctioning. Stop the calibration,
press Clean key and perform measurement again
◆ Using the up and down keys, set the new WBC calibration coefficient obtained in previous step .
◆ Press Enter key.
◆ The RBC calibration coefficient is displayed in RBC display.
◆ Similarly, enter the new RBC calibration coefficient and press Enter key.
◆ Perform as described previously for HGB, HCT, PLT and MPV (See “Fig.1: Coefficients, page 4”):
1.10
0.85
1.06
1.01
1.19
WBC Calibration coefficient
0.92
1.00
MPV Calibration coefficient
RDW Calibration coefficient
0.89
CRP Calibration coefficient
RBC Calibration coefficient
HGB Calibration coefficient
HCT Calibration coefficient
PLT Calibration coefficient
Fig.1: Coefficients
After the coefficient MPV, the RDW coefficient is displayed. Do not change RDW coefficient, it is
factory adjusted.
In case of 18p the PDW coefficient is displayed. Do not change PDW coefficient, it is factory
adjusted.
◆ Press Enter key until you exit function.
◆ The ready LED lights up to indicate that the instrument is ready for measurement.
◆ Measure the control blood to confirm that the assay values are within the allowable range.
RAS259–4
ABX Micros CRP 200 - Technical Manual - RAA028A
Micros CRP 200
4. CRP Calibration
Before starting CRP calibration, make sure that the 3 CRP reagent sensitivity factors correspond
to the reagents. To change those factors, please refer to “4.3.Input of the CRP reagent sensitivity
factors, page 6”.
4.1. Calibrating the CRP mode.
◆ Make sure the printer is ON.
◆ Select the CBC + CRP mode using the Mode key.
◆ Obtain the ABX CRP Std serum and let it equilibrate to room temperature.
◆ Rotate the tube holder so that the calibrator vial will be in the 12:00 o’clock when it is placed into tube holder
for sampling.
◆ Verify that there are sufficient quantities of CRP reagents before running calibration.
Caution: You must remove the caps from all samples before placing them into the tube holder.
Failure to remove the caps will cause severe damage to the sample needle assembly.
◆ Remove the cap from the vial, place the calibrator into the tube holder and close the tube holder door.
◆ The analysis cycle will take approximately 4 minutes 30 seconds. Results will print at the end of the cycle.
◆ Repeat previous steps for 5 to 7 cycles.
◆ When all CRP calibration analyses are complete, obtain all the printed results and calculate the Mean (X),
Standard Deviation (SD) and Coefficient of Variation (CV%) for the following parameter:
Parameters
CRP
C.V.%
< 5.0%
◆ The calibration is acceptable if and only if it comes within the «Calibration Passed» criteria.
4.2. Calibration Passed Criteria
◆ The calibrated parameter must be within it’s CV% limits.
◆ The calculated Mean value of the parameter must be within 20% of the target value indicated on the calibration
assay sheet.
Note: If calibration does not fall within these criteria, then calibration has «Failed».
◆ Press the Calibration key located on the top key pad.
◆ Now press the Reprint key. The old calibration coefficients will be now be printed out.
◆ The WBC coefficient will be flashing in the WBC parameter window. Press the Enter key several times to scroll
down to PLT.
◆ Continue to press the Enter key to scroll past the second WBC and RBC values until the CRP window flashes a
value.
◆ Calculate the new calibration coefficient for CRP using the following formula.
ABX Micros CRP 200 - Technical Manual - RAA028A
RAS259–5
RAS259C
New calibration coefficient =
Target Value (from assay sheet)
x Old cal. coefficient
Mean parameter value (from calculations)
◆ Adjust the CRP coefficient by using the Up or Down arrow keys, then press the Enter key several times to accept
the change and exit the calibration menu.
◆ Verify that your new calibration coefficient is within the ranges listed before.
◆ Now run the calibrator 3 times and verify that the average of all three results are within the limits that are noted
on the assay sheet.
4.3. Input of the CRP reagent sensitivity factors
The CRP reagent sensitivity factors are described on the underside of the colored box lid of ABX CRP REA.
In order to perform lot correction of the reagent, be sure to enter those factor values in the instrument every time
the lot changes.
◆ Select the CBC + CRP mode.
◆ Push «PUSH» on the top front of the main body to open the upper door.
◆ Press the Calibration key.
The WBC result display starts blinking. The WBC calibration coefficient currently stored is displayed. Press the
Reprint key to print out the CRP reagent sensitivity factor (CRP factor) currently stored.
COEFFICIENTS
DATE: 04/01/2005
WBC
RBC
HGB
HCT
PLT
MPV
RDW
CRP
CRP
CRP
CRP
CRP
FCT A
FCT B
FCT C
BLANK
:
1.10
:
0.84
:
1.27
:
1.03
:
1.17
:
0.90
:
0.81
:
1.08
:
0.90
:
1.04
:
0.87
:14/12/2004
11:30
TIME: 16:37
Calibration
coefficients
CRP Reagent
sensitivity factors
Renewed date & time
or UNRENEWED
In the USA, PCT and PDW parameters are for research use only and not for use in diagnostic
procedures.
◆ When the Mode key is pressed in the state that the WBC display is blinking, CRP reagent sensitivity factor A, B
and C currently stored are displayed on the HCT, PLT and CRP displays.
◆ Press the Enter key. Only the HCT display will start blinking. The instrument is now ready to enter the CRP reagent
sensitivity factor A.
◆ Using the Up or Down arrow keys, enter the CRP reagent sensitivity factor A marked on the ABX CRP REA package.
◆ Press the Enter key again. Only the PLT display will start blinking. The instrument is now ready to enter the CRP
reagent sensitivity factor B. Using the Up or Down arrow keys, enter the CRP reagent sensitivity factor B.
RAS259–6
ABX Micros CRP 200 - Technical Manual - RAA028A
Micros CRP 200
◆ Press the Enter key again. Only the CRP display will start blinking. The instrument is now ready to enter the CRP
reagent sensitivity factor C. Using the Up or Down arrow keys, enter the CRP reagent sensitivity factor C.
The entry of the CRP reagent sensitivity factors can be canceled if the Start/Pause key is pressed
before the Enter key. In this case, the CRP reagent correction values remain unchanged. Start
this procedure over again from the beginning.
◆ Check that the new ABX CRP REA kit is placed in the reagent cooling unit.
◆ Close the sampling holder without placing any sample in the tube holder.
Calibration is performed.
When calibration is completed, the instrument becomes ready for measurement. The entered CRP reagent
sensitivity factors are simultaneously printed out.
◆ Check that the printed results agree with the CRP reagent sensitivity factors of CRP.
Calibration is required each time the reagent lot changes.
◆ Run the ABX CRP TROL Low, Medium and High controls and verify that they are within their assay limits noted
on their packages.
When the CRP display blinks:
◆If the Start/Pause key is pressed by mistake during the entering of the sensitivity factors, the
CRP display blinks and the instrument becomes ready for measurement.
◆ If the ABX CRP REA kit is not placed or deteriorated, the CRP display blinks in the Ready state
after completion of calibration.
◆ The measurement can be performed, however, the reliability of the measurement value will be
lost due to the lack of calibration.
◆ A thick line below the result and «CRP REAG. VALUE UNRENEWED» will be printed in the printed
CRP results (see below).
Exemple of display
10.3
4.85
15.7
47.3
271
0.1
Blinks
◆ Carry out the calibration.
◆ Run [F37] function to print the configuration and check the blank CRP value. It must be less
than 0.2.
ABX Micros CRP 200 - Technical Manual - RAA028A
RAS259–7
RAS259C
RAS259–8
ABX Micros CRP 200 - Technical Manual - RAA028A
Micros CRP 200
RAS260C
Step by step analysis cycle
RAS260: Step by step analysis cycle
• Concerns
• Analysis cycle
• Required tools
• None
• Required products
• None
• Intervention time
• None
• Frequency
• On request
• Specific kit or consumables
• None
Disposal gloves, eyes protection and lab coat must be
worn by the operator.
Local or national regulations must be applied in all
the operations.
RAS260C
1. Step by step analysis cycle introduction
1.1. Introduction
◆ The main cycle consists of six principal phases:
1- CRP Preparation #1
2- Preparation Of CBC Dilutions And Counting
3- CRP Preparation #2
4- During CRP Preparation #2 Incubation
5- CRP Measurement
6- CRP After Cycle
◆ All phases are described in this procedure
1.2. Mechanical components
◆ CRP Syringe and liquid syringe:
CRP
syringe
Liquid syringe
◆ Vacuum syringe:
RAS260–2
ABX Micros CRP 200 - Technical Manual - RAA028A
Micros CRP 200
◆ Carriage and sampling needle carriage:
Sampling needle
carriage
Carriage
◆ CRP reagent flap:
CRP
reagent flap
2. Step by step analysis cycle check:
2.1. CRP Preparation #1 (30s)
◆ Carriage to CRP-R1 (Saponin) and draining of needle rinsing block:
- CRP reagent flap is opened.
- Valve 8.
- Vacuum syringe goes up.
- CRP syringe goes down.
- Carriage goes right.
◆ Creation of a 4µl air bubble in the needle, while CRP chamber is drained:
- Liquid syringe goes down.
- Valve 18.
- Vacuum syringe goes up.
◆ 100µl of CRP-R1 reagent (saponin) sampling:
- Valve 2.
- Vacuum syringe initialization.
- Sampling needle carriage goes down.
- Valve 15.
- CRP syringe goes down.
ABX Micros CRP 200 - Technical Manual - RAA028A
RAS260–3
RAS260C
◆ Needle up & cleaning, carriage goes to sampling tube:
- Valve 14.
- CRP syringe goes up.
- Vacuum syringe goes up.
- Valve 11.
- Valve 8.
- Liquid syringe goes up.
- CRP reagent flap is closed.
- Sampling needle carriage goes down.
◆ Creation of a 4 µl air bubble in the needle, while CRP chamber is drained:
- Liquid syringe goes down.
- Valve 18.
- Vacuum syringe goes up.
◆ 8µl blood sampling for CRP count:
- Valve 2.
- Vacuum syringe initialization.
- Sampling needle carriage goes down.
- Liquid syringe goes down.
- Vacuum syringe goes down.
◆ Movement over WBC chamber and needle exterior cleaning:
- Vacuum syringe goes up.
- Sampling needle carriage initialization.
- Valve 11.
- Valve 8.
- Liquid syringe goes up.
- Carriage initialization.
- Carriage goes right.
- Sampling needle carriage goes down.
- Liquid syringe goes down.
- Valve 5.
- Valve 2.
- Vacuum syringe initialization.
- Valve 11.
- Liquid syringe goes up.
◆ Needle up, movement over CRP chamber, rinsing block cleaning and CRP chamber drain:
- Sampling needle carriage initialization.
- Valve 8.
- Vacuum syringe goes up.
- Carriage goes left.
- CRP reagent flap is opened.
- Valve 14.
- CRP syringe goes down.
- Valve 18.
◆ Needle down into CRP chamber to distribute blood sample (8µl) and CRP-R1 (100µl), bubbling:
- Valve 2.
- Vacuum syringe initialization.
- Sampling needle carriage goes down.
- Valve 15.
- CRP syringe goes up.
- Valve 14.
- CRP syringe goes up.
- CRP syringe goes down.
- CRP syringe goes up.
◆ Movement over WBC chamber and needle exterior and interior cleaning:
- Sampling needle carriage initialization.
- CRP reagent flap is closed.
- Carriage goes right.
RAS260–4
ABX Micros CRP 200 - Technical Manual - RAA028A
Micros CRP 200
- CRP syringe goes down.
- Sampling needle carriage goes down.
- Valve 11
- Liquid syringe goes up.
- Valve 10.
- CRP syringe goes up.
◆ WBC chamber and wastes draining:
- Valve 12.
- Vacuum syringe goes up.
- Liquid syringe goes down.
- Vacuum syringe initialization.
- Valve 5.
- Valve 11.
- Liquid syringe goes up.
2.2. Preparation of CBC dilutions and counting
◆ Needle up and rinsing block cleaning, carriage goes to sampling tube:
- Sampling needle carriage initialization.
- Liquid syringe initialization.
- Valve 8.
- Vacuum syringe goes up.
- Sampling needle carriage goes down.
- Carriage initialization.
- Liquid syringe goes down.
- Valve 5.
- Vacuum syringe initialization.
- Valve 2
◆ 10µl blood sampling for CBC count:
- Needle carriage goes down.
- Liquid syringe goes down.
◆ Needle initialization and cleaning:
- Vacuum syringe goes up.
- Valve 11.
- Valve 8.
- Liquid syringe goes up.
- Carriage initialization.
- Sampling carriage goes up.
- Sampling door is opened.
- Carriage goes right.
◆ Hgb blank measurement and counting heads cleaning:
- Hbg blank calculation.
- Valve 11.
- Valve 2.
- Valve 7.
- Valve 6.
- Liquid syringe goes up (diluent for 1.2ml).
◆ WBC chamber and vacuum syringe draining, movement of lyse back in the tubing (near the mixing «T»):
- Valve 12.
- Vacuum syringe goes up.
- Draining.
- Valve 5.
- Vacuum syringe initialization.
- Valve 1.
- Sampling needle carriage goes down.
- Liquid syringe goes down.
ABX Micros CRP 200 - Technical Manual - RAA028A
RAS260–5
RAS260C
◆ Air drawing inside the needle and down into WBC chamber:
- Liquid syringe goes down.
- Sampling needle carriage goes down.
- Valve 11.
- Liquid syringe goes up (diluent for 1.54ml),
- Draining.
- Valve 2.
◆ WBC chamber draining and loaded with diluent, RBC & WBC chamber draining, rinsing block cleaning:
- Valve 12.
- Vacuum syringe goes up.
- Liquid syringe goes down.
- Draining.
- Valve 2.
- Valve 11.
- Liquid syringe goes up.
- Valve 5.
- Vacuum syringe initialization.
- Draining.
- Valve 13.
- Vacuum syringe goes up.
- Draining.
- Valve 12.
- Vacuum syringe goes up.
- Draining.
- Valve 8.
- Sampling needle carriage goes down.
◆ First dilution and bubbling:
- Valve 2.
- Valve 11.
- Vacuum syringe goes down.
- Liquid syringe goes up (0.5ml outside needle).
- Valve 10.
- Liquid syringe goes up (1.2ml of blood and diluent inside needle).
- Valve 12.
- Vacuum syringe goes down and up.
- Vacuum syringe goes down and up.
◆ Needle and liquid syringe initialization, rinsing block cleaning:
- Sampling needle initialization.
- Valve 2.
- Liquid syringe initialization.
- Valve 8.
- Vacuum syringe goes up.
- Valve 2.
- Vacuum syringe initialization.
- Liquid syringe goes down.
◆ First dilution sampling for second dilution:
- Sampling needle carriage goes down.
- Liquid syringe goes down (28.5µl sampling of first dilution in WBC chamber).
- Sampling needle carriage goes up.
◆ Air drawing inside needle, needle cleaning and initialization, transfer from WBC chamber to RBC chamber:
- Liquid syringe goes down.
- Liquid syringe goes up.
- Vacuum syringe goes up.
- Valve 11.
-Liquid syringe goes up.
- Sampling needle carriage initialization.
- Valve 8.
- Valve 2.
- Carriage right (over RBC chamber).
RAS260–6
ABX Micros CRP 200 - Technical Manual - RAA028A
Micros CRP 200
◆ Second dilution in RBC chamber and lyse of first dilution in WBC chamber:
- Sampling needle carriage goes down in RBC chamber.
- Vacuum syringe goes down.
- Valve 12.
- Control of the temperature.
- Valve 2.
- Vacuum syringe goes down.
- Valve 1.
- Liquid syringe goes up (inject 0.5ml of lyse in WBC chamber).
- Valve 11.
- Liquid syringe goes up (0.5ml of diluent outside needle).
- Vacuum syringe goes down.
- Valve 10.
◆ Bubbling of dilution in WBC chamber:
- Valve 12.
- Vacuum syringe goes down.
◆ Bubbling of dilution in RBC chamber:
- Valve 13.
- Vacuum syringe goes down.
- Liquid syringe goes down.
- Sampling needle initialization.
◆ Vacuum syringe draining:
- Valve 5.
- Vacuum syringe initialization.
- Valve 2.
◆ Liquid syringe loading:
- Liquid syringe down.
- Carriage goes left.
- Vacuum syringe up.
◆ Vacuum for the first counting (about 200mb):
- Vacuum syringe goes up.
- Valve 6.
◆ Counting heads cleaning with diluent:
- Valve 7.
- Valve 11.
- Liquid syringe goes up.
◆ Counting...
2.3. CRP Preparation #2
◆ Needle draining and movement over CRP-R2 reagent bottle:
- CRP reagent flap is opened.
- Valve 8.
- Vacuum syringe goes up.
- Sampling needle carriage goes left over CRP-R2 reagent bottle.
◆ Creation of an air bubble into needle:
- Valve 2.
- Vacuum syringe initialization.
◆ 100 µl CRP-R2 reagent (CRP buffer) sampling:
- Sampling needle carriage goes down.
- Valve 15.
- CRP syringe goes down (100µl of CRP-R2 sampling).
ABX Micros CRP 200 - Technical Manual - RAA028A
RAS260–7
RAS260C
◆ Needle up and cleaning, carriage moves over CRP chamber:
- Vacuum syringe goes up.
- Sampling needle carriage goes up.
- Valve 8.
- Carriage right (over CRP chamber).
◆ CRP-R2 reagent mixing in CRP chamber:
- Valve 2.
- Vacuum syringe initialization.
- Sampling needle carriage goes down into CRP chamber.
- Valve 15.
- CRP syringe goes up (inject CRP-R2 reagent in CRP chamber).
- Valve 14.
- CRP syringe goes up.
- CRP syringe goes down.
- CRP syringe goes up.
- Sampling syringe goes up.
- CRP reagent flap is closed.
It takes 20 seconds to complete the reaction between buffer and CRPproteins.
2.4. During CRP Preparation #2 Incubation
◆ Needle moves over WBC chamber, WBC chamber is drained:
- Carriage goes right.
- Valve 12.
- Vacuum syringe goes up.
◆ Curves are printed out
◆ RBC chamber is drained:
- Valve 11.
- Valve 13.
- Vacuum syringe goes up.
◆ Rinsing of WBC chamber with diluent:
- Liquid syringe goes up (inject 2.6ml of diluent into WBC chamber).
- Draining.
◆ Needle moves to RBC chamber:
- Valve 2.
- Carriage right (over RBC chamber).
- Sampling needle carriage goes down.
◆ Vacuum syringe draining and rinsing of RBC chamber with diluent:
- Valve 5.
- Vacuum syringe initialization.
- Valve 11.
- Liquid syringe goes up (inject 2.6ml of diluent into RBC chamber).
◆ Initializations and needle rinsing block draining:
- Liquid syringe initialization.
- Sampling needle carriage initialization.
- Vacuum syringe goes up.
- Valve 6.
- Valve 4.
- Liquid syringe goes down.
- Valve 8.
- Carriage goes left.
◆ Graphic printout
RAS260–8
ABX Micros CRP 200 - Technical Manual - RAA028A
Micros CRP 200
2.5. CRP Measurement
◆ Creation of a 4µl air bubble in the needle and sampling of 200µl of CRP-R3 reagent (latex):
- CRP reagent flap is opened.
- Liquid syringe goes down (aspirate 4µl of air in the needle).
- Sampling carriage goes down into CRP-R3 reagent bottle.
- Valve 15.
- CRP syringe goes down (100µl of CRP-R3 sampling).
◆ Needle goes up and moves to CRP chamber:
- Vacuum syringe goes up.
- Valve 11.
- Valve 8.
- Liquid syringe goes up.
- Sampling needle carriage goes up.
- Carriage goes right over CRP chamber.
◆ Needle goes down into CRP chamber and vacuum syringe is initialized:
- Sampling needle carriage goes down (into CRP chamber).
- Valve 5.
- Vacuum syringe initialization.
- Valve 2.
◆ Distribution of CRP-R3 sample into CRP chamber and CRP chamber dilution mixing:
- Valve 15.
- CRP syringe goes up (inject CRP-R3 reagent into CRP chamber).
- Sampling needle carriage goes up.
- Valve 14.
- CRP syringe goes up & down several times (mixing).
It takes 20 seconds to complete the reaction between latex and CRP proteins.
◆ CRP measurement starts for 80 measures (one per second)
2.6. CRP After Cycle
◆ CRP chamber draining and cleaning with diluent from inside and outside needle:
- Valve 18
- Vacuum syringe goes up
- Sampling needle carriage goes down (into CRP chamber)
- Valve 14
- CRP syringe initialization
- Valve 11
- Liquid syringe goes up
- Valve 10
- Liquid syringe goes up
- Valve 18
- Vacuum syringe goes up
◆ Previous step is repeated one time
◆ Needle out from CRP chamber:
- Vacuum syringe goes up
- Valve 8
- Sampling needle carriage initialization
- Carriage initialization
◆ CRP blank is performed
◆ CRP result is printout
ABX Micros CRP 200 - Technical Manual - RAA028A
RAS260–9
RAS260C
RAS260–10
ABX Micros CRP 200 - Technical Manual - RAA028A
Micros CRP 200
RAS261C
Needle & carriage adjustment
RAS261: Needle & carriage adjustment
• Concerns
• Needle & carriage position adjustment
• Required tools
• Hexagonal keys
• Flat screw driver
• Centering tool GBF055A
• Required products
• None
• Intervention time
• 30 min
• Frequency
• On request
• Specific kit or consumables
• None
Disposal gloves, eyes protection and lab coat must be
worn by the operator.
Local or national regulations must be applied in all
the operations.
RAS261C
1. Carriage sampling location adjustment
◆ Remove the ABX Micros CRP cover then switch the instrument on.
It is mandatory to remove all CRP specific reagents because of risks of vial polution by needle.
Put reagents in a fridge for their conservation.
◆ Enter F[5c] function, press ENTER.
◆ Locate tube holder’s smallest hole in sampling position (A) and close sampling door (See “Fig.1: needle location,
page 2”).
◆ Manually move down needle (B).
◆ Move the carrier to adjust the front/rear position of the needle in the hole (C) then press Enter.
A
B
C
Fig.1: needle location
◆ If the position is not correct, enter F[5d] function.
◆ Press Enter and re-adjust number of step:
Needle is too much forward:
- Decrease «Sampling» value, displayed on WBC display, using Up and Down key (one step for 0.1 mm).
Needle is too much backward:
- Increase «Sampling» value, displayed on WBC display, using Up and Down key (one step for 0.1 mm).
If WBC display shows «000», re-adjust the carriage home sensor position (See “Fig.2: carriage
home sensor, page 2”)
Carriage home
Fig.2: carriage home sensor
This value is «Sampling» value on the configuration ticket.
RAS261–2
ABX Micros CRP 200 - Technical Manual - RAA028A
Micros CRP 200
2. Needle home adjustment
◆ Enter F[61] function, press Enter.
◆ Locate a plane part under the rinsing block (See “Fig.3: Needle home, page 3”) and manually move down the
needle until contact with the plane part.
Fig.3: Needle home
◆ The correct position of the needle home detection sensor is when WBC display is empty and the value in RBC
display is between 65 and 75.
◆ If the value is out of those limits, a «-» will be displayed in WBC window.. In this case, the needle home
detection sensor position must be adjusted (See “Fig.4: Needle home cell, page 3”):
- if the «-» is in the upper part of the WBC window, move the needle home sensor up.
- If the «-» is in the lower part of the WBC window, move the needle home sensor down.
Fig.4: Needle home cell
ABX Micros CRP 200 - Technical Manual - RAA028A
RAS261–3
RAS261C
3. Needle heigth adjustment
◆ Remove chamber cover (See “Fig.5: Cover screws, page 4”).
Fig.5: Cover screws
◆ Enter F[51] function, press Enter.
◆ The carriage moves over WBC chamber. Manually move the needle down until it touch the edge of the WBC
chamber (See “Fig.6: Needle on WBC chamber, page 4”).
Fig.6: Needle on WBC chamber
◆ Press ENTER: Needle moves up and carriage returns to init position, number of steps is returned into WBC diplay,
check value is between 612 and 639.
RAS261–4
ABX Micros CRP 200 - Technical Manual - RAA028A
Micros CRP 200
4. Carriage location over WBC/RBC chamber adjustment
4.1. Adjustment
◆ Locate centering tool (GBF055A) over the RBC and WBC chambers (See “Fig.1: needle location, page 2”).
Fig.7: Centring tool
◆ Enter F[54] function, press ENTER.
◆ Carriage is moved over WBC chamber.
◆ Manually pull down needle inside WBC chamber.
◆ Hit a key to continue, needle moves up and carriage returns to home position.
◆ Adjustment value is displayed between Tube number and WBC displays.
◆ Write down this value and press ENTER to exit function.
This value is «Carriage» value in configuration ticket.
4.2. Adjustment Check
◆ Enter F[53] function, press ENTER.
◆ Carriage is moved over WBC chamber and needle is coming down into it.
◆ Check that the needle is in centering tool and press ENTER.
◆ Carriage is moved over RBC chamber and needle is coming down into it.
◆ Check that the needle is in centering tool and press ENTER.
◆ If needle is not well centered, enter F[55] function and press ENTER:
- Needle is too much backward: decrease «CARRIAGE» value by the meaning of Up and Down keys (1 step for
0.1mm).
- Needle is too much forward: increase «CARRIAGE» value by the meaning of Up and Down keys (1 step for
0.1mm).
◆ Repeat F[53] function until you get a correct adjustment.
ABX Micros CRP 200 - Technical Manual - RAA028A
RAS261–5
RAS261C
5. Needle and carriage location over CRP chamber
adjustment
Make sure that there is no CRP reagent vial in CRP assy.
◆ Enter F[56] function and press Enter: the carriage is moved over CRP glass chamber.
◆ Manually move on the right hand side the carriage and move down the needle until it touch the edge on the
right hand side of glass chamber (See “Fig.8: Needle on glass chamber, page 6”).
Fig.8: Needle on glass chamber
◆ Press the Enter key to continue.
◆ Needle moves up and carriage returns to home position.
◆ Adjustment values are displayed:
- WBC display shows «CRP needle» value
- RBC display shows «CRP carriage» value
◆ Write down both value and validate to exit function.
◆ Enter F[57] function, press Enter.
◆ Carriage is moved over CRP glass chamber and needle is coming down into it.
◆ Check that needle is well centered into the CRP glass chamber.
◆ Close sampling door and press Enter:
- The needle is going inside CRP-R2 chamber.
◆ Press Enter:
- The needle is going inside CRP-R3 chamber.
◆ Press Enter:
- The needle is going inside CRP-R1 chamber.
◆ Press Enter to exit.
◆ If needle is not well centered, enter F[59] function and press Enter:
- Needle is too much backward: decrease «CRP carriage» value by the meaning of Up and Down keys (1 step
for 0.1mm).
or
- Needle is too much forward: increase «CRP carriage» value by the meaning of Up and Down keys (1 step for
0.1mm).
RAS261–6
ABX Micros CRP 200 - Technical Manual - RAA028A
Micros CRP 200
◆ If needle is too low or too high, enter F[58] function and press Enter:
- Needle is too much down: decrease «CRP needle» value by the meaning of Up and Down keys (1 step for
0.1mm).
- Needle is too much up: increase «CRP needle» value by the meaning of Up and Down keys (1 step for 0.1mm).
◆ Write down this value and press Enter to exit function.
◆ Restart F[57] function and repeat until you get a correct adjustment.
The needle must not touch the bottom of the CRP chamber.Those values are «CRP Needle» and
«CRP Carriage» values on configuration ticket.
6. Needle and carriage location over CRP-R2 reagent
chamber adjustment
Make sure that there is no CRP reagent vial in CRP assy.
◆ Remove the CRP plastic cover.
◆ Enter F[5a] function, press Enter.
◆ Carriage is moved over CRP-R2 reagent chamber.
◆ Manually move down needle into chamber (See “Fig.9: CRP-R2 needle location, page 7”).
CRP-R2 reagent chamber bottom
Hole
Needle location
Fig.9: CRP-R2 needle location
Becareful to be out of small hole on bottom of CRP-R2 chamber.
◆ Press the Enter key, needle moves up and carriage returns to home position.
◆ Adjustment value is displayed on Tube number and WBC displays.
◆ Check the new adjustment, install an empty reagent vial into CRP-R2 Chamber and enter F[57] function, press
Enter.
◆ Check that the needle is not touching the bottom of the vial.
◆ If needle is not well located, enter F[5b] function and press Enter:
- Needle is too much down: decrease «R2 needle» value by the meaning of Up and Down keys (1 step for
0.1mm).
- Needle is too much up: increase «R2 needle» value by the meaning of Up and Down keys (1 step for 0.1mm).
◆ Write down this value and press Enter to exit function.
This value is «Needle R2» value in configuration ticket.
ABX Micros CRP 200 - Technical Manual - RAA028A
RAS261–7
RAS261C
7. Needle depth adjustment
◆ Enter F[81] function, press Enter.
◆ Close the tube holder.
◆ Manually move down needle into the tube holder until contact with the bottom of one hole (in any tube holder
position).
◆ Press Enter: The status of the switches and the tube holder position are dispayed.
Switch 1 status
Switch 2 status
Switch 3 status
Tube holder position
◆ Press Enter again: Needle moves up and needle motion value is displayed in WBC window.
Needle motion value
Switch 1 status
Switch 2 status
Switch 3 status
Tube holder position
◆ Press Enter: Sampling door is open and value is stored for the corresponding position.
If the needle motion value is more than 3 digits, the fourth digit is displayed in N° window.
◆ Check for each tube holder position the value is in the following limits:
- Position 2: Limit values: mini. 584 maxi. 606.
- Position 4: Limit values: mini.1029 maxi. 1043.
- Position 5: Limit values: mini. 644 maxi. 665.
- Position 6: Limit values: mini. 931 maxi. 952.
RAS261–8
ABX Micros CRP 200 - Technical Manual - RAA028A
Micros CRP 200
Switch 1
Switch 2
Position 5
Position 2
Position 4
Position 6
Switch 3
Sampling position
0
0
0
Bad position of the tube holder
0
1
0
Position 2
0
0
1
Position 4
1
0
1
Position 5
0
1
1
Position 6
1
1
1
No tube holder
◆ Enter F[82] function to check correct adjustment.
◆ Press Enter, move by hand the needle: It must not touch the bottom of the hole.
◆ Repeat this operation for each position.
Specific adjustment for control blood position:
If needle touchs the bottom of the control blood vial, or if the control blood vial is not well emptied, perform the
following adjustment:
Theorical level for position 2 adjustment
◆ Enter F[81] function to adjust control blood tube holder’s position 2.
◆ Install an empty vial in position 2 of the tube holder, close the tube holder and press Enter: the tube holder
position is displayed.
◆ Manually move the needle down, inside the vial, then press Enter: the needle moves up and the value is
displayed.
◆ Write down this value and enter F[84] function.
◆ Into F[84] function, enter previous «Value + 20steps» (for the vial bottom thickness) then press Enter.
◆ Enter F[82] function to check correct adjustment with the empty vial.
◆ Press Enter,the needle moves down.
◆ Manually move the needle: it must not touch the bottom of the vial.
◆ Press Enter, the needle goes up and the tube holder opens.
◆ Repeat these operations until the adjustment is correct.
ABX Micros CRP 200 - Technical Manual - RAA028A
RAS261–9
RAS261C
RAS261–10
ABX Micros CRP 200 - Technical Manual - RAA028A
Micros CRP 200
RAS262C
Main board & CRP board
RAS262: Main board & CRP board
• Concerns
• Mother board and CRP board adjustment & check
• Required tools
• Hexagonal keys
• Voltmeter
• Flat screwdriver
• Required products
• WBC Latex
• RBC/PLT Latex
• Intervention time
• 1 hour
• Frequency
• On request
• Specific kit or consumables
• WBC Latex: LAD001DS
• RBC/PLT Latex: LAD002BS
Disposal gloves, eyes protection and lab coat must be
worn by the operator.
Local or national regulations must be applied in all
the operations.
RAS262C
1. Mother board general view
Temperature
sensor
J11
J38
J39
RBC Coax
WBC Coax
TP31 TP30 TP29
HGB
assembly
J21
TP16
R16
Threshold
Threshold
J17
Gain
R87
TP4
Fan
TP33
TP15
PLT Pulse Process
RS232
Gain
TP10
TP27
TP19
Threshold
Aperture
Voltage
R73
R80
R97
TP13
Gain
TP11
RBC Pulse Process
R74
TP25
R68
TP9
TP14
R81 R75
R82
R86
R89
TP32
TP24
TP18
TP26
HGB
TP34
TP7
TP28
WBC Pulse Process
J22
TP2
TP12
TP17
TP8
Supplies
TP6
DS6
DS3
DS4
DS5
R5
J13
TP1
TP20
TP22
TP23
TP21
DS1
Printer
J5
J31
Vacuum Syringe
Reagent Syringe
Carriage
+5V
R168
R177
TP37
R186
TP35
R195
J36
TP38
TP3
J35
TP36
Liquid valves
8, 2, 14, 15,
1, 11, 10
CRP
board
Ground
J26
Power
supply
+24V
CRP Syringe
+12V
-12V
Cycle start
Piercer
& CRP flap
openning
J30
Motor
J6
J4
Sensor
VACUUM SYRINGE
J10
J3
J9
Sensor
Motor
REAGENT SYRINGE
J2
J8
Sensor
Motor
CARRIAGE
Fig.1: Mother board
RAS262–2
J1
ABX Micros CRP 200 - Technical Manual - RAA028A
J7
J37
Fan
Sensor
Motor
CRP SYRINGE
Micros CRP 200
2. WBC/RBC/PLT thresholds adjustment
2.1. WBC Threshold Adjustment
Target: 280 mV +/-5
◆ Remove the MICROS CRP cover.
◆ Switch on instrument.
◆ Check between TP10 and TP31 (Ground) WBC threshold.
◆ If necessary adjust WBC threshold by R68 potentiometer on mother board (See “Fig.1: Mother board, page 2”).
2.2. RBC Threshold Adjustment
Target: 400 mV +/-5
◆ Remove the MICROS CRP cover.
◆ Switch on instrument.
◆ Check between TP13 and TP31 (Ground) RBC threshold.
◆ If necessary adjust RBC threshold by R75 potentiometer on mother board (See “Fig.1: Mother board, page 2”).
2.3. PLT Threshold Adjustment
Target: 180 mV +/-5
◆ Remove the MICROS CRP cover.
◆ Switch on instrument.
◆ Check between TP16 and TP31 (Ground) PLT threshold.
◆ If necessary adjust PLT threshold by R82 potentiometer on mother board (See “Fig.1: Mother board, page 2”).
ABX Micros CRP 200 - Technical Manual - RAA028A
RAS262–3
RAS262C
3. Motor voltages adjustment
3.1. Vacuum Syringe
Target: 2.5V +/- 0.05
◆ Remove the MICROS CRP cover.
◆ Switch on instrument.
◆ Check between TP36 and TP31 (Ground) Vacuum syringe motor voltage.
◆ If necessary adjust Vacuum syringe motor voltage by R195 potentiometer on mother board (See “Fig.1: Mother
board, page 2”).
3.2. Reagent Syringe
Target: 2.5V +/- 0.05
◆ Remove the MICROS CRP cover.
◆ Switch on instrument.
◆ Check between TP35 and TP31 (Ground) Reagent syringe motor voltage.
◆ If necessary adjust Reagent syringe motor voltage by R186 potentiometer on mother board (See “Fig.1: Mother
board, page 2”).
3.3. Carriage
Target: 1.5V +/- 0.05
◆ Remove the MICROS CRP cover.
◆ Switch on instrument.
◆ Check between TP37 and TP31 (Ground) Carriage motor voltage.
◆ If necessary adjust Carriage motor voltage by R177 potentiometer on mother board (See “Fig.1: Mother board,
page 2”).
3.4. CRP Syringe
Target 1V +/- 0.05
◆ Remove the MICROS CRP cover.
◆ Switch on instrument.
◆ Check between TP38 and TP31 (Ground) CRP syringe motor voltage.
◆ If necessary adjust CRP syringe motor voltage by R168 potentiometer on mother board (See “Fig.1: Mother
board, page 2”).
RAS262–4
ABX Micros CRP 200 - Technical Manual - RAA028A
Micros CRP 200
3.5. Needle Carriage
No adjustment required for needle carriage motor.
4. Pressure sensor adjustment
Target: 1.7V +/- 0.1
◆ Remove the MICROS CRP cover.
◆ Switch on instrument.
◆ Disconnect the second tubing from the top of the vacuum syringe (See “Fig.2: vacuum syringe, page 5”).
Fig.2: vacuum syringe
◆ Check, on CRP board, between TP16 and TP6 (Ground) Pressure sensor voltage.
◆ If necessary adjust Pressure sensor voltage by VR2 potentiometer on CRP board (See “Fig.1: Mother board,
page 2”).
The adjustable range of VR2 is 270 degrees. Attempting to turn it in excess will damage VR2.
ABX Micros CRP 200 - Technical Manual - RAA028A
RAS262–5
RAS262C
5. Power supply voltages check
No adjustment available for power supply voltages.
5.1. Power supply - 12 V
Target check: -12V +/- 0.5
◆ Remove the MICROS CRP cover.
◆ Switch on instrument.
◆ Check between TP20 and TP31 (Ground) -12V Power suply voltage (See “Fig.1: Mother board, page 2”).
5.2. Power supply + 12 V
Target check: +12V +/ -0.5
◆ Remove the MICROS CRP cover.
◆ Switch on instrument.
◆ Check between TP21 and TP31 (Ground) +12V Power suply voltage (See “Fig.1: Mother board, page 2”).
5.3. Power Supply +24V
Target check: 24V +2/-1
◆ Remove the MICROS CRP cover.
◆ Switch on instrument.
◆ Check between TP22 and TP31 (Ground) +24V Power suply voltage (See “Fig.1: Mother board, page 2”).
5.4. Power Supply +5V
Target check: 5V +/- 0.15
◆ Remove the MICROS CRP cover.
◆ Switch on instrument.
◆ Check between TP23 and TP31 (Ground) +5V Power suply voltage (See “Fig.1: Mother board, page 2”).
6. Aperture voltage check
Target check 60V -1.5/+2.8
◆ Remove the MICROS CRP cover.
◆ Switch on instrument then enter F[63] function.
◆ Check between TP19 and TP31 (Ground) +60V Aperture voltage (See “Fig.1: Mother board, page 2”).
RAS262–6
ABX Micros CRP 200 - Technical Manual - RAA028A
Micros CRP 200
7. CRP blank adjustment
◆ Run a diluent priming (F[13] function).
◆ Enter F[91] function Photometer adjustment.
◆ The instrument automatically fills the flow cell with diluent and shows the CRP blank value on WBC display.
◆ Perform F[91] five times in order to check the repetability of values, and verify that the value does not fall more
than 10 within 30 seconds.
◆ By means of VR1 on CRP board (See “Fig.3: CRP board, page 7”) adjust displayed value to 3800 +/-10.
The adjustable range of VR1 is 270 degrees. Attempting to turn it in excess will damage VR1.
Needle carriage:
Sensor
Battery
CN2
CN6
Display
board
CN7
CRP
measurement
unit
CN8
CRP blank adjustment
Reagent
cooling
unit
CN1
CN3
CN15
Motor
Liquid valves
18, 12, 7, 4,
9, 13, 5
VR1
Pressure sensor
TP16
Pressure sensor
adjustment
VR2
Mother
board
CN4
TP6
CN10
Security
Magnet
Power
Supply
CN5
CN12
Diluent
Sensor
CN13
Cleaner
Sensor
CN14
CN9
Lyse
Sensor
Mixing chamber
Fig.3: CRP board
ABX Micros CRP 200 - Technical Manual - RAA028A
RAS262–7
RAS262C
8. HGB photometer adjustment
The HGB photometer calibration must be done 20 min at least after the instrument has been
switched on. This adjustment must be done with the WBC chamber cover installed ! If the WBC
chamber has been dismantled previously, make sure no liquid has flown in between the
spectrophotomer and the chamber. Clean the inner surfaces of the spectrophotometer as well as
the chamber. Reassemble the assy and tighten the two screws to the following torque: 400mN.m
◆ Remove the MICROS CRP cover.
◆ Dismantle the WBC/HGB chamber cover.
◆ Check the general cleanliness of the WBC chamber/spectrophotometer assy.
◆ Re-install the chamber cover.
◆ Switch on instrument.
◆ Run F[62] function: HGB photometer adjust (after 40 seconds approximately, the function is automatically
exited).
◆ The curent channel is displayed on HGB display (See “Fig.4: HGB display, page 8”).
F62
239
Fig.4: HGB display
◆ By means of R97 (See “Fig.1: Mother board, page 2”) adjust the HGB channel according to the room temperature
using the following chart table.
◆
Tab.RAS262-1: HGB channel
Channel
Temperature room
RAS262–8
Mini
Nominal
Maxi
15
240
245
250
16
240
245
250
17
239
244
249
18
238
243
248
19
237
242
247
20
236
241
246
21
235
240
245
22
234
239
244
ABX Micros CRP 200 - Technical Manual - RAA028A
Micros CRP 200
Channel
Temperature room
Mini
Nominal
Maxi
23
234
239
244
24
233
238
243
25
232
237
242
26
231
236
241
27
230
235
240
28
229
234
239
29
228
233
238
30
228
233
238
31
227
232
237
32
226
231
236
33
225
230
235
34
224
229
234
35
223
228
233
9. WBC latex adjustment
As the WBC gain is a factory adjustment, it is mandatory not to readjust it without taking the
following precautions:
- Carry out previously an autoconcentrated cleaning to make sure of the cleanliness of the WBC
counting circuit (If necessary clean the WBC chamber aperture).
- Do not operate gain adjustment as long as the lympho and granulo values are not stable.
- Make sure the Latex has been thoroughly mixed before.
◆ Remove the MICROS CRP cover.
◆ Switch on instrument.
◆ Run F[64] function: WBC Latex Adjust. (This function allows the dilution of latex in diluent and displays
Lymphocyte and Granulocyte volumes on screen every 3 seconds).
◆ Value blinking in WBC display shows the LYM target depending on the Latex lot used, usually 52 +/-1, if
necessary you can change this value by the mean of Up and Down keys.
◆ Press Enter.
◆ Value blinking in RBC display shows the GRA target depending on the Latex lot used, usually 183 +/-2, if
necessary you can change this value by the mean of Up and Down keys.
◆ Press Enter, the instrument is ready to sample WBC latex (LYM or GRA).
◆ Locate GRAN latex vial in tube holder and close sampling door (cycle duration: 3 min).
◆ RBC display shows the actual measurement of the GRA latex volume.
◆ When value is stable, adjust GRA gain (183 +/-2) by means of R74 potentiometer on mother board (See “Fig.1:
Mother board, page 2”).
◆ At the end of the cycle, average volumes and distribution curve are printed out.
◆ Run F[64] function again, using LYM latex.
ABX Micros CRP 200 - Technical Manual - RAA028A
RAS262–9
RAS262C
◆ Check LYM value displayed in WBC window. The value must be 52 +/-1.
◆ If the LYM value displayed in WBC window is out of range (52 +/-1), run F[64] function again, using GRA latex,
and adjust GRA gain (183 +/-2) by mean of R74 potentiometer on mother board.
◆ Run F[64] function again, using LYM latex, and check LYM value displayed in WBC window.
For WBC gain, the adjustment should only be done on GRA latex solution.
The LYM latex solution is used to check LYM gain only.
Never adjust WBC gain on LYM latex solution.
10. RBC/PLT latex adjustment
As the RBC/PLT gain is a factory adjustment, it is mandatory not to readjust it without taking
the following precautions:
- Carry out previously an autoconcentrated cleaning to make sure of the cleanliness of the RBC/
PLT counting circuit.
If necessary clean the RBC/PLT chamber aperture as described in the procedure CHAMBER
MAINTENANCE of this manual.
Do not operate gain adjustment as long as the RBC and PLT values are not stable, Make sure the
Latex has been thoroughly mixed before.
◆ Remove the MICROS CRP cover.
◆ Switch on instrument.
◆ Run F[65] function: RBC/PLT Latex Adjust. (This function allows the dilution of latex in diluent and displays
RBC and PLT volumes on screen every 3 seconds).
◆ Value blinking in WBC display shows the RBC target depending on the Latex lot used, usually 74 +/-1, if
necessary you can change this value by the mean of Up and Down keys.
◆ Press Enter.
◆ Value blinking in RBC display shows the PLT target depending on the Latex lot used, usually 64 +/-1, if necessary
you can change this value by the mean of Up and Down keys.
◆ Press ENTER, the instrument is ready to sample RBC/PLT latex.
◆ Locate Latex vial in tube holder and close sampling door (cycle duration: 3min).
◆ WBC and RBC displays show the actual measurement of the latex volume.
◆ Adjust RBC gain by means of R81 potentiometer on mother board and PLT gain by means of R87 potentiometer
(See “Fig.1: Mother board, page 2”).
◆ At the end of the cycle average volumes and distribution curves are printed out.
RAS262–10
ABX Micros CRP 200 - Technical Manual - RAA028A
Micros CRP 200
11. Summary adjustment table
Test point (TPxx)
or function (Fxx)
Ground
Potentiometer
Target value
WBC threshold
TP10
TP31
R68
280 mV +/-5
WBC gain (latex)
F64
R74
LYM = 52 +/-1
GRA = 183 +/-2
RBC threshold
TP13
R75
400 mV +/-5
RBC gain
F65
R81
74 +/-1
PLT threshold
TP16
R82
180 mV +/-5
PLT gain
F65
R87
64 +/-1
Vacuum syringe motor voltage
TP36
TP31
R195
2.5V +/- 0.05
Reagent syringe motor voltage
TP35
TP31
R186
2.5V +/- 0.05
Carriage motor voltage
TP37
TP31
R177
1.5V +/- 0.05
CRP syringe motor
TP38
TP31
R168
1.0V +/- 0.05
Adjustment
Needle motor voltage
Pressure sensor
Power supply (check)
CRP blank
HGB photometer
Aperture voltage (check)
TP31
TP31
No adjustment required.
TP16 (on CRP board)
TP6 (on CRP
board)
VR2 (on CRP
board)
1.7V +/- 0.1
TP20
TP31
No adjustment
-12 V +/- 0.5
TP21
TP31
No adjustment
+12 V +/- 0.4
TP22
TP31
No adjustment
+24 V +2/-1
TP21
TP31
No adjustment
+5 V +/-0.15
VR1 (on CRP
board)
3800 +10
R97
See
“Tab.RAS262-1:
HGB channel,
page 8”
F91
F62
TP19 (F63)
TP31
ABX Micros CRP 200 - Technical Manual - RAA028A
60V -1.5/+2.8
RAS262–11
RAS262C
RAS262–12
ABX Micros CRP 200 - Technical Manual - RAA028A
Micros CRP 200
RAS263C
Vacuum check
RAS263: Vacuum check
• Concerns
• Vacuum check
• Required tools
• Hexagonal keys
• Barflex
• Required products
• None
• Intervention time
• 15min
• Frequency
• None
• Specific kit or consumables
• None
Disposal gloves, eyes protection and lab coat must be
worn by the operator.
Local or national regulations must be applied in all
the operations.
RAS263C
1. Vacuum check
Vacuum target: from -220 mb to -190 mb
◆ Open the cover.
◆ Switch on the instrument.
◆ Disconnect second inlet from the top and connect the Barflex instead (See “Fig.1: Second inlet, page 2”).
Fig.1: Second inlet
◆ Run F[69] function: Pressure check
◆ Press ENTER, the busy led is blinking and Vacuum syringe goes up to generate vacuum.
◆ Check that vacuum value read on the Barflex is within the following range: from -220 mb to -190 mb
◆ Wait for 30s at least to check the stability of the vacuum:
- The vacuum drop down must be less than 2 mb.
◆ Press ENTER to exit function.
◆ Disconnect the Barflex and connect back the tube on the Vacuum syringe.
If vacuum is not within the range check the O’ring and the tube
watertightness
RAS263–2
ABX Micros CRP 200 - Technical Manual - RAA028A
Micros CRP 200
RAS264C
Bubbling adjustment
RAS264: Bubbling adjustment
• Concerns
• Bubbling adjustment
• Required tools
• Hexagonal keys
• Required products
• None
• Intervention time
• 10 mn
• Frequency
• On request
• Specific kit or consumables
• None
Disposal gloves, eyes protection and lab coat must be
worn by the operator.
Local or national regulations must be applied in all
the operations.
RAS264C
1. Bubbling adjustment
Two bubbling phasis are adjustable:
◆ Bubbling 1 is the first dilution (WBC/HGB chamber) bubbling value
◆ Bubbling 2 is the second dilution (WBC/HGB chamber + lyse) value and RBC chamber bubbling value.
Both values correspond to a number of steps carried out by the vacuum syringe.
Bubbling range:
- Bubbling 1: Between 150 and 200
- Bubbling 2: between 80 and 140
◆ Remove the MICROS CRP cover.
◆ Switch on instrument.
◆ Run F[66] function (See “Fig.1: WBC bubbling display, page 2”):
F66
150
Fig.1: WBC bubbling display
This value is factory adjusted, and may be different from the default values shown above. It
should be modified only when hematologic erroneous results are given by the instument: If
bubbling is too important, liquid overflows can occur or if bubbling is too low, homogeneity of
the dilution can be decreased.
◆ Increase or decrease Bubbling 1 value blinking in WBC display with Up and Down keys.
◆ Press Enter to display Bubbling 2 value in RBC display (See “Fig.2: RBC bubbling display, page 3”).
RAS264–2
ABX Micros CRP 200 - Technical Manual - RAA028A
Micros CRP 200
F66
150
120
Fig.2: RBC bubbling display
This value is factory adjusted, and may be different from the default values shown above. It
should be modified only when hematologic erroneous results are given by the instument: If
bubbling is too important, liquid overflows can occur or if bubbling is too low, homogeneity of
the dilution can be decreased.
◆ Increase or decrease Bubbling 2 value blinking in RBC display with Up and Down keys.
◆ Press Enter to exit function.
ABX Micros CRP 200 - Technical Manual - RAA028A
RAS264–3
RAS264C
RAS264–4
ABX Micros CRP 200 - Technical Manual - RAA028A
Micros CRP 200
RAS265C
Thermic adjustment
RAS265: Thermic adjustment
• Concerns
• Thermic adjustment
• Required tools
• Hexagonal keys
• Thermometer
• Required products
• None
• Intervention time
• 30 mn
• Frequency
• On request
• Specific kit or consumables
• None
Disposal gloves, eyes protection and lab coat must be
worn by the operator.
Local or national regulations must be applied in all
the operations.
RAS265C
1. Diluent temperature sensor adjustment
◆ Plunge thermometer probe deeply into diluent container.
◆ Run 2 Diluent prime F[13] functions.
◆ Enter F[67] function: Temperature calibration (See “Fig.1: F67 display, page 2”).
F67
25.5
Fig.1: F67 display
◆ Temperature is displayed on WBC display.
◆ With Up and Down keys, input temperature read on thermometer and press Enter.
Temperature must be input as quickly as possible after priming. If not, diluent temperature will
raise in sensor.
◆ Run 2 Diluent prime F[13] functions.
◆ Enter F[68] function: Temperature check (See “Fig.2: F68 display, page 2”).
F68
27.6
25.6
Fig.2: F68 display
◆ Temperature without correction is displayed on WBC display.
◆ Corrected temperature is displayed on RBC display.
◆ Check temperatures between RBC display and thermometer then press Enter.
RAS265–2
ABX Micros CRP 200 - Technical Manual - RAA028A
Micros CRP 200
2. Diluent temperature in CRP chamber check
◆ Remove the instrument cover.
◆ Plunge thermometer probe deeply into CRP chamber (See “Fig.3: CRP chamber temperature, page 3”).
Fig.3: CRP chamber temperature
Instrument must be switched on for about 15min at least to reach its correct temperature.
◆ Run F[96] function: Cooler / Heater check (See “Fig.4: F96 CRP diluent, page 3”).
F96
1
0
Fig.4: F96 CRP diluent
The WBC and RBC displays must be blinking between 0 and 1.
◆ Check temperature on thermometer, temperature must be between 36°C (97°F) and 38°C (100°F).
Fig.5: R66 on CRP board
ABX Micros CRP 200 - Technical Manual - RAA028A
RAS265–3
RAS265C
3. CRP reagents temperature check
◆ Remove the instrument cover.
◆ Plunge thermometer probe between CRP reagent bottle and CRP block (See “Fig.6: CRP reagent temperature,
page 4”).
Fig.6: CRP reagent temperature
Instrument must be switched on for about 15 min at least to reach its correct temperature.
◆ Run F[96] function: Cooler / Heater check (See “Fig.7: F96 CRP reagent, page 4”).
F96
1
0
Fig.7: F96 CRP reagent
The WBC and RBC displays must be blinking between 0 and 1.
RAS265–4
ABX Micros CRP 200 - Technical Manual - RAA028A
Micros CRP 200
RAS268C
Front panel dismantling
RAS268: Front panel dismantling
• Concerns
• Front panel
• Required tools
• Hexagonal keys
• Dynamometric screw driver A302, A301, A300
• Flat screw driver
• Torx keys
• Required products
• None
• Intervention time
• 10 mn
• Frequency
• On request
• Specific kit or consumables
• None
Disposal gloves, eyes protection and lab coat must be
worn by the operator.
Local or national regulations must be applied in all
the operations.
RAS268C
1. Front panel dismantling
◆ Switch off the instrument and disconnect the power supply cable.
◆ Open the front reagent door and remove the 2 bottles (disconnect tube on the stopper).
◆ Unscrew the 6 CHC cover screws with their washers (See “Fig.1: cover screws, page 2”), then remove the cover.
Fig.1: cover screws
◆ Unscrew the 2 CHC M2.5x5 screws under the frame (See “Fig.2: below screws, page 2”).
Fig.2: below screws
◆ Push the carriage back and unscrew the 4 CHC M2.5x8 screws (See “Fig.3: Inside screws, page 2”).
Fig.3: Inside screws
RAS268–2
ABX Micros CRP 200 - Technical Manual - RAA028A
Micros CRP 200
◆ Disconnect all wirings from the front panel board.
◆ Disconnect tube holder’s microswitch wirings.
◆ Disconnect tube holder’s openning system.
◆ Remove front panel carefully
2. Front panel mounting
◆ Reassemble following steps of chapter 1 backward.
Following diagram shows connections for tube holder’s microswitchs and openning system (See
“Fig.4: front panel connections, page 3”).
Refer to the labels on wirings for connection.
L1-E5 (red)
SW9-E9
(orange)
SW9-E10
(blue)
SW9-E9 (orange)
SW10-E11
SW10-E12(purple)
(blue)
SW10-E11 (purple)
SW11-E13
SW11-E14 (grey)
(blue)
SW11-E13 (grey)
SW8-E16 (blue)
L1-E6 (yellow)
SW8-E15 (yellow)
Fig.4: front panel connections
◆ Connect the 2 flat cables and the power supply cable on the Display board (See “Fig.5: Display board
connections, page 3”).
CRP board
flat cable
Keyboard
flat cable
Power supply
cable
Fig.5: Display board connections
◆ Switch on the instrument.
◆ Check that all is operating normally.
ABX Micros CRP 200 - Technical Manual - RAA028A
RAS268–3
RAS268C
RAS268–4
ABX Micros CRP 200 - Technical Manual - RAA028A
Micros CRP 200
RAS273C
Autoconcentrated cleaning
RAS273: Autoconcentrated cleaning
• Concerns
• Instrument cleaning
• Required tools
• None
• Required products
• Minoclair
• Intervention time
• 15 mn
• Frequency
• On request
• Specific kit or consumables
• None
Disposal gloves, eyes protection and lab coat must be
worn by the operator.
Local or national regulations must be applied in all
the operations.
RAS273C
1. Concentrated cleaning
1.1. Drain all chamber
Switch on the instrument
Run a Startup cycle
Run F[12] function:Drain chamber
1.2. CBC Cleaning
Open the cover and remove the chamber cover
Fill RBC and WBC chamber with minoclair (5ml for each chamber)
Switch on the instrument
Run F[16] function: CBC bleach
1.3. CRP Cleaning
Fill CRP chamber with minoclair (5ml)
Run F[17] function: CRP bleach
RAS273–2
ABX Micros CRP 200 - Technical Manual - RAA028A
Micros CRP 200
RAS445A
CRP unit replacement
RAS445: CRP unit replacement
• Concerns
• CRP unit replacement
• Required tools
• Hexagonal keys
• Required products
• None
• Intervention time
• 15 mn
• Frequency
• On request
• Specific kit or consumables
• CRP unit
Disposal gloves, eyes protection and lab coat must be
worn by the operator.
Local or national regulations must be applied in all
the operations.
RAS445A
1. CRP unit dismantling
◆ Turn off the instrument then disconnect the power supply cable.
◆ Open the cover.
◆ Unscrew the 2 CHC screws then remove the chamber cover (See “Fig.1: cover screws, page 2”).
Fig.1: cover screws
◆ Remove the WBC and RBC chamber from the clamps (See “Fig.2: Chambers, page 2”).
Fig.2: Chambers
◆ Disconnect the tubing from the «T» connector (T4-1) to the flowcell (See “Fig.3: tubing, page 2”).
Fig.3: tubing
◆ Cut the tyraps then disconnect CN9 from the CRP board.
◆ Disconnect the connectors on the 2 boards of the CRP unit then unscrew the CHC screws (See “Fig.4: CRP board
connectors, page 3”).
RAS445–2
ABX Micros CRP 200 - Technical Manual - RAA028A
Micros CRP 200
Fig.4: CRP board connectors
◆ Remove the CRP unit (See “Fig.5: CRP unit, page 3”).
Fig.5: CRP unit
◆ Unscrew the CHC screws then remove the LED board and the PD board (See “Fig.6: boards, page 3”).
Fig.6: boards
2. CRP unit replacement
◆ Install those boards on the new CRP unit.
◆ Connect the connectors on the 2 boards.
◆ Install the new CRP unit with the two CHC screws (do not tight the screws).
◆ Pass the connector through the hole of the frame then connect it on the CRP board (CN9).
◆ Connect the tubing on the «T» connector then fix it in the clamp.
◆ Install the WBC and RBC chambers back into their respective clamp.
ABX Micros CRP 200 - Technical Manual - RAA028A
RAS445–3
RAS445A
3. Adjustments
◆ Manually move the carriage over the CRP chamber then move the needle down.
◆ Adjust the CRP unit position to have the needle centered in the CRP chamber (See “Fig.7: needle centering,
page 4”) then tighten the screws.
Fig.7: needle centering
◆ Manually move the needle up.
◆ Connect the power supply cable then turn on the instrument.
◆ Enter F[56] function, press Enter
◆ Carriage is moved over CRP glass chamber.
◆ Manually move on the right hand side the carriage and move down the needle until it touch the edge on the
right hand side of glass chamber (See “Fig.8: Needle on glass chamber, page 4”).
Fig.8: Needle on glass chamber
◆ Hit a key to continue.
◆ Needle moves up and carriage returns to home position.
◆ Adjustment values are displayed:
- WBC display shows «CRP needle» value
- RBC display shows «CRP carriage» value
◆ Write down both value and validate to exit function.
◆ Enter F[57] function, press Enter.
RAS445–4
ABX Micros CRP 200 - Technical Manual - RAA028A
Micros CRP 200
◆ Carriage is moved over CRP glass chamber and needle is coming down into it.
◆ Check that needle is well centered into the CRP glass chamber.
◆ Press Enter for all sequences.
◆ If needle is not well centered, enter F[59] function and press Enter:
- Needle is too much backward: decrease «CRP carriage» value by the meaning of Up and Down keys (1 step
for 0.1mm).
or
- Needle is too much forward: increase «CRP carriage» value by the meaning of Up and Down keys (1 step for
0.1mm).
◆ If needle is too low or too high, enter F[58] function and press Enter:
- Needle is too much down: decrease «CRP needle» value by the meaning of Up and Down keys (1 step for
0.1mm).
- Needle is too much up: increase «CRP needle» value by the meaning of Up and Down keys (1 step for 0.1mm).
◆ Write down this value and press Enter to exit function.
◆ Restart F[57] function and repeat until you get a correct adjustment.
The needle must not touch the bottom of the CRP chamber. Those values are «CRP Needle» and
«CRP Carriage» values on configuration ticket.
◆ Put the black WBC & RBC cover back.
◆ Run a diluent priming (F[13] function).
◆ Enter F[91] function Photometer adjustment.
◆ The instrument automatically fills the flow cell with diluent and shows the CRP blank value on WBC display.
◆ During this cycle, the value displayed on WBC window will slowly decrease.
◆ Perform F[91] five times in order to check the repetability of values, and verify that the value does not fall more
than 10 within 30 seconds.
◆ By means of VR1 on CRP board, adjust displayed value to 3800 +10.
The adjustable range of VR1 is 270 degrees. Attempting to turn it in excess will damage VR1.
ABX Micros CRP 200 - Technical Manual - RAA028A
RAS445–5
RAS445A
RAS445–6
ABX Micros CRP 200 - Technical Manual - RAA028A
Exploded views
CONTENTS:
Section 09: Exploded views
1. List ............................................................................................... 9-2
2. CRP board view ........................................................................... 9-6
3. Reagent sensor 2 view .................................................................. 9-7
4. Liquid syringe view ...................................................................... 9-8
5. CRP syringe view ......................................................................... 9-9
6. Sampling needle rinsing block view ........................................... 9-10
7. Carriage sensor & pulley view .................................................... 9-11
8. LV2 view.................................................................................... 9-12
9. RBC chamber view..................................................................... 9-13
10. WBC chamber view ................................................................. 9-14
11. Power supply view ................................................................... 9-15
12. Cooling fan view ...................................................................... 9-16
13. Reagent connection plate view................................................. 9-17
14. Front view ................................................................................ 9-18
15. Display board view .................................................................. 9-19
16. Syringe mechanical view.......................................................... 9-20
17. Carriage view ........................................................................... 9-21
18. CRP cold assy view .................................................................. 9-22
19. Reagent sensor 1 view .............................................................. 9-23
20. Air syringe cup view................................................................. 9-24
21. Air syringe view ....................................................................... 9-25
22. Main board view ...................................................................... 9-26
23. Front panel view ...................................................................... 9-27
24. Sample holder view.................................................................. 9-28
25. Cover view ............................................................................... 9-29
26. Back view ................................................................................ 9-30
27. Keyboard assy view .................................................................. 9-31
28. CRP unit view .......................................................................... 9-32
29. Right side view......................................................................... 9-33
30. Maintenance kit view ............................................................... 9-34
31. Printer view.............................................................................. 9-35
32. Straw and tubing view .............................................................. 9-36
33. Waste container view ............................................................... 9-37
ABX Micros CRP 200 - Technical Manual - RAA028A
9–1
ABX Micros CRP
200
1. List
N° in
drawing
Drawing
Reference
Designation
2.CRP board view, page 6
1
E0012926700
PCB, BATTERY ASSY CRP200
2.CRP board view, page 6
2
G1001410
PCB,CRP BOARD CRP200
2.CRP board view, page 6
3
E1000349100
CABLE,CRP-DISPLAY CRP200
2.CRP board view, page 6
4
E1000334900
ADHESIVE,FERRITE CRP200
2.CRP board view, page 6
5
E1000348900
CABLE, LIQ.VALVE BLOCK 8-10 CRP
3.Reagent sensor 2 view, page 7
1
G2002320
SENSOR, REAG. SENSOR 2 WAY CRP
3.Reagent sensor 2 view, page 7
2
H1008152002
CABLE, CLEANER SENSOR CRP200
3.Reagent sensor 2 view, page 7
3
H1008152003
CABLE, LYSE SENSOR CRP200
4.Liquid syringe view, page 8
1
F0020373000
O'RING,DILUENT PISTON CRP200
4.Liquid syringe view, page 8
2
FAA055A
O'RING,MICROS SAMPLING SYRINGE
4.Liquid syringe view, page 8
3
FAA036A
O’RING, FLOW CELL+LYSE DISP.MIC
4.Liquid syringe view, page 8
4
G0166380
SYRINGE,3 SYR. BLOCK ASSY CRP200
4.Liquid syringe view, page 8
5
H1008301001
O'RING, TEFLON 12µL SYRINGE CRP200
4.Liquid syringe view, page 8
6
H1008302001
SYRINGE,DIL. BLOCK BODY CRP200
4.Liquid syringe view, page 8
7
H1008303001
SYRINGE,DILUTION BLOCK COVER
4.Liquid syringe view, page 8
8
H1008304002
SYRINGE,DILUENT PISTON (KELF)
4.Liquid syringe view, page 8
9
H1008305001
SYRINGE,LYSE PISTON CRP200
4.Liquid syringe view, page 8
10
H1008331001
NEEDLE,SAMPLE DISPENSER CRP200
5.CRP syringe view, page 9
1
G0166381
SYRINGE,CRP SYRINGE ASSY CRP200
5.CRP syringe view, page 9
2
H1008322001
SYRINGE,CRP SYRINGE BODY CRP200
5.CRP syringe view, page 9
3
H1008323001
SYRINGE,CRP BOTTOM PLATE CRP200
5.CRP syringe view, page 9
4
H1008305001
SYRINGE,LYSE PISTON CRP200
5.CRP syringe view, page 9
5
FAA036A
O'RING,FLOW CELL+LYSE DISP.MIC
6.Sampling needle rinsing block view, page 10
1
FAA053A
O'RING,SAMPLING NEEDDLE MICROS OT
6.Sampling needle rinsing block view, page 10
2
GBC069AS
NEEDLE,SAMPLING MICROS OT/LC
6.Sampling needle rinsing block view, page 10
3
DBK019A
CLIP,SAMPLING NEEDLE HOLDER
6.Sampling needle rinsing block view, page 10
4
H1007659001
NEEDLE,GUIDE CRP200
6.Sampling needle rinsing block view, page 10
5
H1008308001
NEEDLE,RINSING BLOCK CRP200
7.Carriage sensor & pulley view, page 11
1
G0167050
SENSOR,OPTIC CARRIAGE CRP200
7.Carriage sensor & pulley view, page 11
2
G2002319
KIT,PULLEY ASSY CRP200
8.LV2 view, page 12
1
E1000349000
CABLE,LIQ.VALVE BLOCK 5-18 CRP
8.LV2 view, page 12
2
XCA167A
CHAMBER,ISOLATOR (SMALL)
8.LV2 view, page 12
3
XDA481B
VALVE,LIQ. 2WAYS/NC W/O COIL
8.LV2 view, page 12
4
XDA483B
VALVE,LIQ. 3WAYS W/O COIL
8.LV2 view, page 12
5
F0023485400
CUP,OVERFLOW RBC/WBC CRP200
8.LV2 view, page 12
6
XDA588CS
VALVE,7 LIQ VALVE ASSY(18,.,5)
9.RBC chamber view, page 13
1
XBA413A
CABLE,COAX RBC MICROS 60
9.RBC chamber view, page 13
2
FAA046A
O'RING,COAXIAL CABLE
9.RBC chamber view, page 13
3
XDA470ES
CHAMBER,RBC COMPLETE
9.RBC chamber view, page 13
4
GBG275A
O’RING, APERTURE D=0.5 P60/P80
9.RBC chamber view, page 13
5
GBC239A
CHAMBER,COUNTING HEAD MIC 60
9.RBC chamber view, page 13
6
H0525166003
CHAMBER,APERTURE 50µ
9–2
ABX Micros CRP 200 - Technical Manual - RAA028A
Exploded views
N° in
drawing
Drawing
Reference
Designation
9.RBC chamber view, page 13
7
F2000037700
CHAMBER, RBC BODY CRP200
10.WBC chamber view, page 14
1
XBA412A
CABLE,COAX WBC MICROS 60
10.WBC chamber view, page 14
2
XDA472B
CHAMBER,HB ASSY MICROS 60
10.WBC chamber view, page 14
3
XDA471ES
CHAMBER,WBC/HB MICROS 60 CPTE
10.WBC chamber view, page 14
4
H0525166002
CHAMBER,APERTURE 80µ
10.WBC chamber view, page 14
5
GBG275A
O’RING, APERTURE D=0.5 P60/P80
10.WBC chamber view, page 14
6
GBC239A
CHAMBER,COUNTING HEAD MIC 60
10.WBC chamber view, page 14
7
FAA046A
O'RING,COAXIAL CABLE
11.Power supply view, page 15
1
DBM001A
SWITCH,POWER ON/OFF
11.Power supply view, page 15
2
E1000342800
PCB,POWER SUPPLY BOARD CRP200
11.Power supply view, page 15
3
DBK012A
CLIP,FAN HOLDER
11.Power supply view, page 15
4
DBK003A
ADHESIVE,HOLDER FOR FLAT CABLE
11.Power supply view, page 15
5
G0166270
FAN, POWER SUPPLY FAN CRP200
11.Power supply view, page 15
6
DBE018A
CABLE,BUSHING D=9,5 BLACK
12.Cooling fan view, page 16
1
G0172080
FAN, REAR FAN CRP200
12.Cooling fan view, page 16
2
H1008391001
COVER,REAR FAN PROTECTION CRP2
12.Cooling fan view, page 16
3
DBE018A
CABLE,BUSHING D=9,5 BLACK
12.Cooling fan view, page 16
4
G2002532
FAN, MAIN FAN FILTER ASSY CRP200
13.Reagent connection plate view, page 17
1
EAC010A
FITTING,LUER FEMALE I=3MM
13.Reagent connection plate view, page 17
2
F1000380800
FITTING,ANTI ROTATION WASHER
13.Reagent connection plate view, page 17
3
G0166210
REAGENT,CONNEXION PLATE CRP200
14.Front view, page 18
1
XBA281A
SENSOR,TEMPERATURE MIC./LC220
14.Front view, page 18
2
E1000117600
PROTECTION, SHIELD FOAM L=1M
14.Front view, page 18
3
CAG008A
SYRINGE,PLASTIC GUIDE L=63,5
14.Front view, page 18
4
DBE018A
CABLE,BUSHING D=9,5 BLACK
14.Front view, page 18
5
DBE017A
CABLE,BUSHING D=23,8 BLACK
14.Front view, page 18
6
DBE021A
CABLE,BUSHING D=12,7 BLACK
14.Front view, page 18
7
XDA589CS
VALVE,7 LIQ VALVE ASSY(10,.,8)
14.Front view, page 18
8
F1000386000
CUP,OVERFLOW SYRINGES CRP200
15.Display board view, page 19
1
E0013464600
PCB,DISPLAY BOARD CRP200
16.Syringe mechanical view, page 20
1
G0166330
MOTOR,STEP BY STEP+GEAR CRP200
16.Syringe mechanical view, page 20
2
G0167040
SENSOR,OPTIC CRP/DIL SYR. CRP200
16.Syringe mechanical view, page 20
3
H1008310001
SYRINGE,PULLEY SYR/LIQ+AIR CRP200
16.Syringe mechanical view, page 20
4
H1008311001
SYRINGE,WASHER SYR/LIQ+AIR CRP200
16.Syringe mechanical view, page 20
5
H1008333002
MOTOR,CROSSPIECE S/LIQ+AIR CRP200
16.Syringe mechanical view, page 20
6
H1008357001
SYRINGE,GEARING S/LIQ.+AIR CRP200
16.Syringe mechanical view, page 20
7
H1008359001
SYRINGE,COGGRAIL FOR LIQ. SYR.CRP200
16.Syringe mechanical view, page 20
8
H1008376001
MOTOR,REDUCTOR PLATE ASSY CRP200
16.Syringe mechanical view, page 20
9
G2002534
MOTOR,REDUCTOR 3 SYR CRP200
16.Syringe mechanical view, page 20
10
G2002535
MOTOR,REDUCTOR CRP SYR CRP200
16.Syringe mechanical view, page 20
11
H1001636001
SYRINGE,3 SYR.TRANS.GUIDE CRP200
16.Syringe mechanical view, page 20
12
H1008338002
SYRINGE,CRP TRANS.GUIDE CRP200
17.Carriage view, page 21
1
DBE014A
CABLE,BUSHING D=3,2 BLACK
17.Carriage view, page 21
2
F1000391700
BELT,NEEDLE 285MM CRP200
17.Carriage view, page 21
3
F1000391800
BELT,CARRIAGE 650MM CRP200
ABX Micros CRP 200 - Technical Manual - RAA028A
9–3
ABX Micros CRP
200
N° in
drawing
Reference
Designation
17.Carriage view, page 21
4
G0166610
MOTOR,STEPPER CRP200
17.Carriage view, page 21
5
G0166620
SENSOR,NEEDLE CARRIAGE CRP200
17.Carriage view, page 21
6
H1008358001
MOTOR,PULLEY (NEEDLE) CRP200
17.Carriage view, page 21
7
G2002319
KIT,PULLEY ASSY CRP200
18.CRP cold assy view, page 22
1
DAM007A
VALVE,SOLENOID CRP BLOCK
18.CRP cold assy view, page 22
2
H2003841001
REAGENT,SILICON STOPPER CRP200
18.CRP cold assy view, page 22
3
G2002533
CHAMBER, CRP COLD ASSY CRP200
19.Reagent sensor 1 view, page 23
1
G2002318
SENSOR, DILUENT SENSOR CRP200
19.Reagent sensor 1 view, page 23
2
H1008152001
CABLE, DILUENT SENSOR CRP200
20.Air syringe cup view, page 24
1
GBF070A
CUP,OVERFLOW AIR SYRINGE LC270
21.Air syringe view, page 25
1
FAA017A
O'RING,TANK MIN/AG+WASTE MIC
21.Air syringe view, page 25
2
GBC260AS
CHAMBER,INJ.WASTE/VAC.SYR.BODY
21.Air syringe view, page 25
3
G0166320
SENSOR,VAC/WASTE SYRINGE CRP200
21.Air syringe view, page 25
4
H1008317001
CHAMBER,WASTE/VAC. SYR. PISTON
21.Air syringe view, page 25
5
H1008355001
SYRINGE,COGGRAIL FOR AIR SYR.
21.Air syringe view, page 25
6
H1008373001
SENSOR, OPTIC DETECT TAB CRP200
21.Air syringe view, page 25
7
H2003334001
CHAMBER,WASTE CHICANE CRP200
21.Air syringe view, page 25
8
CAG008A
SYRINGE,PLASTIC GUIDE L=63,5
22.Main board view, page 26
1
DBK014A
CABLE,HOLDER RS FLAT CABLE
22.Main board view, page 26
2
DBK015A
CABLE,HOLDER PRINT. FLAT CABLE
22.Main board view, page 26
3
22.Main board view, page 26
4
23.Front panel view, page 27
1
G0332140
COVER,FRONT COVER ASSY CRP200
23.Front panel view, page 27
2
L0163761
COVER,FRONT REAGENT DOOR CRP200
23.Front panel view, page 27
3
L0338230
COVER, KEYBOARD CRP200
23.Front panel view, page 27
4
F0022990300
COVER,REAGENT DOOR LOCK CRP200
24.Sample holder view, page 28
1
CAE006A
SWITCH,MICROSWITCH XC5-81-82
24.Sample holder view, page 28
2
DAM006A
VALVE,SOLENOID MICROS CT PIERC
24.Sample holder view, page 28
3
G0166791
SAMPLING,BLOCK ASSY CRP200
24.Sample holder view, page 28
4
G0175390
SAMPLING,STANDARD TUBE HOLDER
24.Sample holder view, page 28
5
G0289970
SAMPLING,BRAKING GEAR + SPRING
24.Sample holder view, page 28
6
H1016977001
COVER,SAMPLING BLOCK DOOR CRP200
25.Cover view, page 29
1
F1001306800
COVER,SIDE DOOR LOCK ASSY CRP2
25.Cover view, page 29
2
G0166801
COVER, MAIN COVER ASSY CRP200
25.Cover view, page 29
3
H1031791001
COVER,CRP REAGENT DOOR CRP200
26.Back view, page 30
1
DAR014A
FUSE,3.15A (5X20)
26.Back view, page 30
2
E1000072400
FILTER,MAIN POWER CRP200
26.Back view, page 30
3
H1009391001
CABLE,RS232 OUTPUT CRP200
26.Back view, page 30
4
H1009392001
CABLE,PRINTER OUTPUT CRP200
27.Keyboard assy view, page 31
1
E0013099900
PCB,KEYBOARD BOARD CRP200
27.Keyboard assy view, page 31
2
E1000349200
CABLE,DISPLAY-KEYBOARD CRP200
27.Keyboard assy view, page 31
3
F0022990300
COVER,REAGENT DOOR LOCK CRP200
28.CRP unit view, page 32
1
G0166461
CHAMBER,ADJ. CRP UNIT ASSY UL
28.CRP unit view, page 32
2
G0166480
SENSOR,CRP DOOR SWITCH UL CRP200
28.CRP unit view, page 32
3
G0166511
CHAMBER,CRP READ.ASSY UL CRP200
Drawing
9–4
ABX Micros CRP 200 - Technical Manual - RAA028A
Exploded views
N° in
drawing
Reference
Designation
28.CRP unit view, page 32
4
G0332050
COVER,PLASTIC REAG.COVER CRP200
28.CRP unit view, page 32
5
H1008320001
CHAMBER,SAPONINE BOTTLE HOLDER
29.Right side view, page 33
1
H1008348001
CARRIAGE,BOTTOM HORIZ AXIS CRP
29.Right side view, page 33
2
H1008350001
CARRIAGE,TOP HORIZ AXIS CRP
29.Right side view, page 33
3
H1008389001
COVER,RBC/WBC BLACK COVER
30.Maintenance kit view, page 34
1
FAA017A
O'RING,TANK MIN/AG+WASTE MIC
30.Maintenance kit view, page 34
2
F0020373000
O’RING, DILUENT PISTON CRP200
30.Maintenance kit view, page 34
3
FAA036A
O'RING,FLOW CELL+LYSE DISP.MIC
30.Maintenance kit view, page 34
4
FAA046A
O’RING, COAXIAL CABLE
30.Maintenance kit view, page 34
5
FAA053A
O’RING, SAMPLING NEEDLE MICROS OT
30.Maintenance kit view, page 34
6
FAA055A
O'RING,MICROS SAMPLING SYRINGE
30.Maintenance kit view, page 34
7
H1008304002
SYRINGE, DILUENT PISTON (KELF)
30.Maintenance kit view, page 34
8
GBG275A
O’RING, APERTURE D=0.5 P60/P80
30.Maintenance kit view, page 34
9
XEA931AS
KIT, YEARLY MAINTENANCE CRP2001
31.Printer view, page 35
1
CBE053A
PRINTER,SEIKO DPU414 W/O CORD
31.Printer view, page 35
2
CBE057A
PRINTER,DPU414 SUPPLY 220V/6V
31.Printer view, page 35
3
CBE058A
PRINTER,DPU414 SUPPLY 110V/6V
32.Straw and tubing view, page 36
1
XDA693A
TUBING,WASTE P60/CRP200
32.Straw and tubing view, page 36
2
GBC284A
REAGENT,STRAW CLEANER CRP200
32.Straw and tubing view, page 36
3
GBC285A
REAGENT,STRAW WASTE CRP200
Drawing
ABX Micros CRP 200 - Technical Manual - RAA028A
9–5
ABX Micros CRP
200
2. CRP board view
1
2
3
4
5
Number
9–6
Reference
Designation
1
E0012926700
PCB, BATTERY ASSY CRP200
2
G1001410
PCB,CRP BOARD CRP200
3
E1000349100
CABLE,CRP-DISPLAY CRP200
4
E1000334900
ADHESIVE,FERRITE CRP200
5
E1000348900
CABLE, LIQ.VALVE BLOCK 8-10 CRP
ABX Micros CRP 200 - Technical Manual - RAA028A
Exploded views
3. Reagent sensor 2 view
2
3
1
Number
Reference
Designation
1
G2002320
SENSOR, REAG. SENSOR 2 WAY CRP
2
H1008152002
CABLE, CLEANER SENSOR CRP200
3
H1008152003
CABLE, LYSE SENSOR CRP200
ABX Micros CRP 200 - Technical Manual - RAA028A
9–7
ABX Micros CRP
200
4. Liquid syringe view
4
10
8
9
7
2
1
3
5
6
Number
9–8
Reference
Designation
1
F0020373000
O'RING,DILUENT PISTON CRP200
2
FAA055A
O'RING,MICROS SAMPLING SYRINGE
3
FAA036A
O’RING, FLOW CELL+LYSE DISP.MIC
4
G0166380
SYRINGE,3 SYR. BLOCK ASSY CRP200
5
H1008301001
O'RING, TEFLON 12µL SYRINGE CRP200
6
H1008302001
SYRINGE,DIL. BLOCK BODY CRP200
7
H1008303001
SYRINGE,DILUTION BLOCK COVER
8
H1008304002
SYRINGE,DILUENT PISTON (KELF)
9
H1008305001
SYRINGE,LYSE PISTON CRP200
10
H1008331001
NEEDLE,SAMPLE DISPENSER CRP200
ABX Micros CRP 200 - Technical Manual - RAA028A
Exploded views
5. CRP syringe view
1
4
3
5
2
Number
Reference
Designation
1
G0166381
SYRINGE,CRP SYRINGE ASSY CRP200
2
H1008322001
SYRINGE,CRP SYRINGE BODY CRP200
3
H1008323001
SYRINGE,CRP BOTTOM PLATE CRP200
4
H1008305001
SYRINGE,LYSE PISTON CRP200
5
FAA036A
O'RING,FLOW CELL+LYSE DISP.MIC
ABX Micros CRP 200 - Technical Manual - RAA028A
9–9
ABX Micros CRP
200
6. Sampling needle rinsing block view
3
2
4
1
5
Number
Reference
Designation
1
FAA053A
O'RING,SAMPLING NEEDDLE MICROS OT
2
GBC069AS
NEEDLE,SAMPLING MICROS OT/LC
3
DBK019A
CLIP,SAMPLING NEEDLE HOLDER
4
H1007659001
NEEDLE,GUIDE CRP200
5
H1008308001
NEEDLE,RINSING BLOCK CRP200
9–10
ABX Micros CRP 200 - Technical Manual - RAA028A
Exploded views
7. Carriage sensor & pulley view
2
1
Number
Reference
Designation
1
G0167050
SENSOR,OPTIC CARRIAGE CRP200
2
G2002319
KIT,PULLEY ASSY CRP200
ABX Micros CRP 200 - Technical Manual - RAA028A
9–11
ABX Micros CRP
200
8. LV2 view
3
4
1
5
2
6
Number
Reference
Designation
1
E1000349000
CABLE,LIQ.VALVE BLOCK 5-18 CRP
2
XCA167A
CHAMBER,ISOLATOR (SMALL)
3
XDA481B
VALVE,LIQ. 2WAYS/NC W/O COIL
4
XDA483B
VALVE,LIQ. 3WAYS W/O COIL
5
F0023485400
CUP,OVERFLOW RBC/WBC CRP200
6
XDA588CS
VALVE,7 LIQ VALVE ASSY(18,.,5)
9–12
ABX Micros CRP 200 - Technical Manual - RAA028A
Exploded views
9. RBC chamber view
3
7
5
4
1
2
6
Number
Reference
Designation
1
XBA413A
CABLE,COAX RBC MICROS 60
2
FAA046A
O'RING,COAXIAL CABLE
3
XDA470ES
CHAMBER,RBC COMPLETE
4
GBG275A
O’RING, APERTURE D=0.5 P60/P80
5
GBC239A
CHAMBER,COUNTING HEAD MIC 60
6
H0525166003
CHAMBER,APERTURE 50µ
7
F2000037700
CHAMBER, RBC BODY CRP200
ABX Micros CRP 200 - Technical Manual - RAA028A
9–13
ABX Micros CRP
200
10. WBC chamber view
2
3
1
5
7
6
Number
4
Reference
Designation
1
XBA412A
CABLE,COAX WBC MICROS 60
2
XDA472B
CHAMBER,HB ASSY MICROS 60
3
XDA471ES
CHAMBER,WBC/HB MICROS 60 CPTE
4
H0525166002
CHAMBER,APERTURE 80µ
5
GBG275A
O’RING, APERTURE D=0.5 P60/P80
6
GBC239A
CHAMBER,COUNTING HEAD MIC 60
7
FAA046A
O'RING,COAXIAL CABLE
9–14
ABX Micros CRP 200 - Technical Manual - RAA028A
Exploded views
11. Power supply view
3
5
4
6
2
1
Number
Reference
Designation
1
DBM001A
SWITCH,POWER ON/OFF
2
E1000342800
PCB,POWER SUPPLY BOARD CRP200
3
DBK012A
CLIP,FAN HOLDER
4
DBK003A
ADHESIVE,HOLDER FOR FLAT CABLE
5
G0166270
FAN, POWER SUPPLY FAN CRP200
6
DBE018A
CABLE,BUSHING D=9,5 BLACK
ABX Micros CRP 200 - Technical Manual - RAA028A
9–15
ABX Micros CRP
200
12. Cooling fan view
4
2
3
1
Number
Reference
Designation
1
G0172080
FAN, REAR FAN CRP200
2
H1008391001
COVER,REAR FAN PROTECTION CRP200
3
DBE018A
CABLE,BUSHING D=9,5 BLACK
4
G2002532
FAN, MAIN FAN FILTER ASSY CRP200
9–16
ABX Micros CRP 200 - Technical Manual - RAA028A
Exploded views
13. Reagent connection plate view
3
1
2
Number
Reference
Designation
1
EAC010A
FITTING,LUER FEMALE I=3MM
2
F1000380800
FITTING,ANTI ROTATION WASHER
3
G0166210
REAGENT,CONNEXION PLATE CRP200
ABX Micros CRP 200 - Technical Manual - RAA028A
9–17
ABX Micros CRP
200
14. Front view
5
7
1
6
4
3
8
5
2
Number
Reference
Designation
1
XBA281A
SENSOR,TEMPERATURE MIC./LC220
2
E1000117600
PROTECTION, SHIELD FOAM L=1M
3
CAG008A
SYRINGE,PLASTIC GUIDE L=63,5
4
DBE018A
CABLE,BUSHING D=9,5 BLACK
5
DBE017A
CABLE,BUSHING D=23,8 BLACK
6
DBE021A
CABLE,BUSHING D=12,7 BLACK
7
XDA589CS
VALVE,7 LIQ VALVE ASSY(10,.,8)
8
F1000386000
CUP,OVERFLOW SYRINGES CRP200
9–18
ABX Micros CRP 200 - Technical Manual - RAA028A
Exploded views
15. Display board view
1
Number
1
Reference
Designation
E0013464600
PCB,DISPLAY BOARD CRP200
ABX Micros CRP 200 - Technical Manual - RAA028A
9–19
ABX Micros CRP
200
16. Syringe mechanical view
1
6
9
5
11
2
8
Number
Reference
Designation
1
G0166330
MOTOR,STEP BY STEP+GEAR CRP200
2
G0167040
SENSOR,OPTIC CRP/DIL SYR. CRP200
3
H1008310001
SYRINGE,PULLEY SYR/LIQ+AIR CRP200
4
H1008311001
SYRINGE,WASHER SYR/LIQ+AIR CRP200
5
H1008333002
MOTOR,CROSSPIECE S/LIQ+AIR CRP200
6
H1008357001
SYRINGE,GEARING S/LIQ.+AIR CRP200
7
H1008359001
SYRINGE,COGGRAIL FOR LIQ. SYR.CRP200
8
H1008376001
MOTOR,REDUCTOR PLATE ASSY CRP200
9
G2002534
MOTOR,REDUCTOR 3 SYR CRP200
10
G2002535
MOTOR,REDUCTOR CRP SYR CRP200
11
H1001636001
SYRINGE,3 SYR.TRANS.GUIDE CRP200
12
H1008338002
SYRINGE,CRP TRANS.GUIDE CRP200
9–20
10
4
7
2
3
ABX Micros CRP 200 - Technical Manual - RAA028A
12
Exploded views
17. Carriage view
4
5
6
1
3
7
2
Number
Reference
Designation
1
DBE014A
CABLE,BUSHING D=3,2 BLACK
2
F1000391700
BELT,NEEDLE 285MM CRP200
3
F1000391800
BELT,CARRIAGE 650MM CRP200
4
G0166610
MOTOR,STEPPER CRP200
5
G0166620
SENSOR,NEEDLE CARRIAGE CRP200
6
H1008358001
MOTOR,PULLEY (NEEDLE) CRP200
7
G2002319
KIT,PULLEY ASSY CRP200
ABX Micros CRP 200 - Technical Manual - RAA028A
9–21
ABX Micros CRP
200
18. CRP cold assy view
3
2
1
Number
Reference
Designation
1
DAM007A
VALVE,SOLENOID CRP BLOCK
2
H2003841001
REAGENT,SILICON STOPPER CRP200
3
G2002533
CHAMBER, CRP COLD ASSY CRP200
9–22
ABX Micros CRP 200 - Technical Manual - RAA028A
Exploded views
19. Reagent sensor 1 view
1
2
Number
Reference
Designation
1
G2002318
SENSOR, DILUENT SENSOR CRP200
2
H1008152001
CABLE, DILUENT SENSOR CRP200
ABX Micros CRP 200 - Technical Manual - RAA028A
9–23
ABX Micros CRP
200
20. Air syringe cup view
1
Number
1
9–24
Reference
Designation
GBF070A
CUP,OVERFLOW AIR SYRINGE LC270
ABX Micros CRP 200 - Technical Manual - RAA028A
Exploded views
21. Air syringe view
5
6
3
8
4
7
1
2
Number
Reference
Designation
1
FAA017A
O'RING,TANK MIN/AG+WASTE MIC
2
GBC260AS
CHAMBER,INJ.WASTE/VAC.SYR.BODY
3
G0166320
SENSOR,VAC/WASTE SYRINGE CRP200
4
H1008317001
CHAMBER,WASTE/VAC. SYR. PISTON
5
H1008355001
SYRINGE,COGGRAIL FOR AIR SYR.
6
H1008373001
SENSOR, OPTIC DETECT TAB CRP200
7
H2003334001
CHAMBER,WASTE CHICANE CRP200
8
CAG008A
SYRINGE,PLASTIC GUIDE L=63,5
ABX Micros CRP 200 - Technical Manual - RAA028A
9–25
ABX Micros CRP
200
22. Main board view
4
3
1
2
Number
Reference
Designation
1
DBK014A
CABLE,HOLDER RS FLAT CABLE
2
DBK015A
CABLE,HOLDER PRINT. FLAT CABLE
3
Not available at the time of publication
4
Not available at the time of publication
9–26
ABX Micros CRP 200 - Technical Manual - RAA028A
Exploded views
23. Front panel view
3
1
2
4
Number
Reference
Designation
1
G0332140
COVER,FRONT COVER ASSY CRP200
2
L0163761
COVER,FRONT REAGENT DOOR CRP200
3
L0338230
COVER, KEYBOARD CRP200
4
F0022990300
COVER,REAGENT DOOR LOCK CRP200
ABX Micros CRP 200 - Technical Manual - RAA028A
9–27
ABX Micros CRP
200
24. Sample holder view
4
6
1
3
5
2
1
Number
Reference
Designation
1
CAE006A
SWITCH, MICROSWITCH XC5-81-82
2
DAM006A
VALVE,SOLENOID MICROS CT PIERC
3
G0166791
SAMPLING,BLOCK ASSY CRP200
4
G0175390
SAMPLING,STANDARD TUBE HOLDER
5
G0289970
SAMPLING,BRAKING GEAR + SPRING
6
H1016977001
COVER,SAMPLING BLOCK DOOR CRP200
9–28
ABX Micros CRP 200 - Technical Manual - RAA028A
Exploded views
25. Cover view
2
3
1
Number
Reference
Designation
1
F1001306800
COVER,SIDE DOOR LOCK ASSY CRP2
2
G0166801
COVER, MAIN COVER ASSY CRP200
3
H1031791001
COVER,CRP REAGENT DOOR CRP200
ABX Micros CRP 200 - Technical Manual - RAA028A
9–29
ABX Micros CRP
200
26. Back view
3
4
2
1
Number
Reference
Designation
1
DAR014A
FUSE,3.15A (5X20)
2
E1000072400
FILTER,MAIN POWER CRP200
3
H1009391001
CABLE,RS232 OUTPUT CRP200
4
H1009392001
CABLE,PRINTER OUTPUT CRP200
9–30
ABX Micros CRP 200 - Technical Manual - RAA028A
Exploded views
27. Keyboard assy view
2
1
3
Number
Reference
Designation
1
E0013099900
PCB,KEYBOARD BOARD CRP200
2
E1000349200
CABLE,DISPLAY-KEYBOARD CRP200
3
F0022990300
COVER,REAGENT DOOR LOCK CRP200
ABX Micros CRP 200 - Technical Manual - RAA028A
9–31
ABX Micros CRP
200
28. CRP unit view
4
3
1
5
2
Number
Reference
Designation
1
G0166461
CHAMBER,ADJ. CRP UNIT ASSY UL
2
G0166480
SENSOR,CRP DOOR SWITCH UL CRP200
3
G0166511
CHAMBER,CRP READ.ASSY UL CRP200
4
G0332050
COVER,PLASTIC REAG.COVER CRP200
5
H1008320001
CHAMBER,SAPONINE BOTTLE HOLDER
9–32
ABX Micros CRP 200 - Technical Manual - RAA028A
Exploded views
29. Right side view
2
1
3
Number
Reference
Designation
1
H1008348001
CARRIAGE,BOTTOM HORIZ AXIS CRP
2
H1008350001
CARRIAGE,TOP HORIZ AXIS CRP
3
H1008389001
COVER,RBC/WBC BLACK COVER
ABX Micros CRP 200 - Technical Manual - RAA028A
9–33
ABX Micros CRP
200
30. Maintenance kit view
9
1
7
5
4
2
3
6
8
Number
Reference
Designation
1
FAA017A
O'RING,TANK MIN/AG+WASTE MIC
2
F0020373000
O’RING, DILUENT PISTON CRP200
3
FAA036A
O'RING,FLOW CELL+LYSE DISP.MIC
4
FAA046A
O’RING, COAXIAL CABLE
5
FAA053A
O’RING, SAMPLING NEEDLE MICROS OT
6
FAA055A
O'RING,MICROS SAMPLING SYRINGE
7
H1008304002
SYRINGE, DILUENT PISTON (KELF)
8
GBG275A
O’RING, APERTURE D=0.5 P60/P80
9
XEA931AS
KIT, YEARLY MAINTENANCE CRP200
9–34
ABX Micros CRP 200 - Technical Manual - RAA028A
Exploded views
31. Printer view
3
2
1
Number
Reference
Designation
1
CBE053A
PRINTER,SEIKO DPU414 W/O CORD
2
CBE057A
PRINTER,DPU414 SUPPLY 220V/6V
3
CBE058A
PRINTER,DPU414 SUPPLY 110V/6V
ABX Micros CRP 200 - Technical Manual - RAA028A
9–35
ABX Micros CRP
200
32. Straw and tubing view
1
2
3
Number
Reference
Designation
1
XDA693A
TUBING,WASTE P60/CRP200
2
GBC284A
REAGENT,STRAW CLEANER CRP200
3
GBC285A
REAGENT,STRAW WASTE CRP200
4
G0166911
REAGENT,STRAW DILUENT CRP200 (Not available at the time of publication)
9–36
ABX Micros CRP 200 - Technical Manual - RAA028A
Exploded views
33. Waste container view
1
Number
Reference
Designation
1
G0166861
REAGENT, WASTE CONTAINER CRP2
ABX Micros CRP 200 - Technical Manual - RAA028A
9–37
ABX Micros CRP
9–38
200
ABX Micros CRP 200 - Technical Manual - RAA028A