1
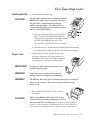
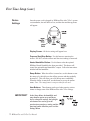
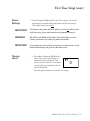
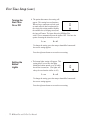
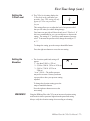
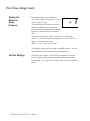
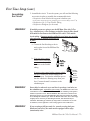
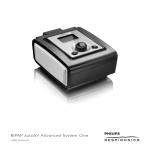
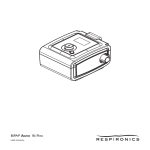
First Time Setup
WARNING!
Do not use the REMstar Plus with C-Flex system until an appropriate
professional adjusts the settings! To order any accessories not included
with this system, contact your home care provider.
Note to home care provider: Before beginning setup, be sure that you
have available the REMstar Plus with C-Flex Home Care Provider
Setup Instructions. Setup instructions are not provided in this manual.
WARNING!
DO NOT connect any equipment to the REMstar Plus with C-Flex
unless recommended by Respironics or your health care provider.
CAUTION!
If the REMstar Plus with C-Flex has been exposed to either very hot
or very cold temperatures, allow it to adjust to room temperature
(approximately 2 hours) before beginning setup.
8 ❍ REMstar Plus with C-Flex User Manual
First Time Setup (cont.)
Installing the Filter 1. Install the filters and filter cap.
CAUTION!
The foam filter must be in place at all times when the
REMstar Plus with C-Flex is operating. The white
ultra-fine filter is optional and can be used in
addition to the foam filter. The ultra-fine filter is
recommended for people who are sensitive to tobacco
smoke or other small particles.
a. Place one of the foam filters over the ultra-fine
filter. If you are not using the ultra-fine filter,
simply place the foam filter into the filter area on
the back of the REMstar Plus with C-Flex.
An extra filter is included for your convenience.
b. Attach the filter cap. Position the cap so that the small opening on the
cap is facing down. Insert the cap’s tabs into the filter area opening.
Power Cord
2. Connect the power cord. Plug the socket end of
the power cord into the AC inlet on the back of
the REMstar Plus with C-Flex. Plug the pronged
end of the power cord into an electrical outlet.
!
!
IMPORTANT!
To remove AC power, disconnect the power cord
from the electrical outlet.
WARNING!
Inspect the power cord often for any signs of
damage. Replace a damaged cord immediately.
WARNING!
The REMstar Plus with C-Flex is activated and ready for use when the
power cord is connected. The pressure start/stop button turns the
blower on/off.
3. Place the REMstar Plus with C-Flex on a firm,
flat surface.
CAUTION!
Make sure the REMstar Plus with C-Flex is away
from any heating or cooling equipment (e.g., forced
air vents, radiators, air conditioners). Also make sure that bedding,
curtains, or other items are not blocking the filter or vents of the device.
Air must flow freely around the device for the system to work properly.
REMstar Plus with C-Flex User Manual
❍ 9
First Time Setup (cont.)
Device
Settings
Once the power cord is plugged in, REMstar Plus with C-Flex’s system
version number, the total hours of use, and then the total therapy hours
will appear.
Display Screen: All device settings will appear here.
Pressure Start/Stop Button: Use this button to start/stop the
airflow. DO NOT start the airflow until the circuit tubing is connected.
Heated Humidifier Button: Use this button when the optional
REMstar Heated Humidifier has been prescribed. This button will
control the optional heated humidifier’s output. Follow the instructions
included with the humidifier.
Ramp Button: When the airflow is turned on, use this button to start
the ramp cycle (which lowers the airflow pressure and then gradually
increases it). This will allow you to fall asleep more comfortably.
When the airflow is turned off, use this button to access the patient
menu. Note: The ramp feature is not prescribed for all users.
User Buttons: These buttons can be used when entering various
menus to change some of the REMstar Plus with C-Flex settings.
IMPORTANT!
In the Setup Menu, the humidifier and
ramp buttons operate as up and down
keys to change the settings, the left/right
user buttons are used to go to the
previous/next question or setting, and the
start/stop button will allow you to exit the
Settings Menu.
10 ❍ REMstar Plus with C-Flex User Manual
Previous Next
Exit
Settings
First Time Setup (cont.)
Device
Settings
4. Verify/Change the REMstar Plus with C-Flex settings. To start the
setup menu, press and hold the ramp button until the device beeps
(The airflow must be turned off.)
IMPORTANT!
Pressing the ramp button (when the airflow is turned on) will lower the
airflow pressure, if prescribed, and then will gradually increase it.
WARNING!
DO NOT use the REMstar Plus with C-Flex if the display is erratic.
Contact your home care provider for further instructions.
IMPORTANT!
If at any time you wish to exit the setup menu, press the pressure on/off
button and the display will go back to the main screen.
Therapy
Hours
a. The number of nights the REMstar Plus
with C-Flex was used for therapy for
more than 4 hours will appear. This
screen is only for reference. Your home
care provider may periodically ask you
for this information.
Press the right user button to access the next setting.
REMstar Plus with C-Flex User Manual
❍ 11
First Time Setup (cont.)
Turning the
Alert Tone
On or Off
b. The patient disconnect alert setting will
appear. This setting has two functions.
When a large, continuous air leak (such
as mask removal) has been detected in
the circuit, this setting enables/disables
the audible alert (a beeping sound) and
the Auto-off feature. The latter allows the REMstar Plus
with C-Flex to automatically turn the airflow OFF. You have the
option of turning the alert tone on or off.
0
1 = on
0 = off
To change the setting, press the ramp or humidifier button until
the correct setting appears.
Press the right user button to access the next setting.
Setting the
Button
Lights
c. The button lights setting will appear. This
setting allows you to have the lights
behind the buttons turned on or off while
the airflow is turned on. (The lights will
always be on when the airflow is off.)
1 = on
0
0 = off
To change the setting, press the ramp or humidifier button until
the correct setting appears.
Press the right user button to access the next setting.
12 ❍ REMstar Plus with C-Flex User Manual
First Time Setup (cont.)
Setting the
C-Flex Level
d. The C-Flex level setting displays the
C-Flex level set by your home care
provider. Note: This setting will only
appear if C-Flex was prescribed
for you.
This setting allows you to adjust the level of air pressure relief
that you feel when you exhale during therapy.
Your home care provider will have already set a C-Flex level. If
this is not comfortable for you, you can increase or decrease the
setting. The setting of “1” provides a small amount of pressure
relief. To increase the pressure relief, change the setting to “2”
or “3.”
To change the setting, press the ramp or humidifier button.
Press the right user button to access the next setting.
Setting the
Elevation
e. The elevation symbol and setting will
appear.
1 = less than 2,500 ft. (<762 m)
2 = 2,500 to 5,000 ft. (762 m to 1524 m)
3 = 5,001 to 7,500 ft. (1525 m to
2286 m)
*over 7,500 ft. = The airflow pressure
may not be accurate. Contact your home
care provider to have your pressure setting
adjusted.
3
To change the elevation setting, press the
ramp or humidifier buttons.
Press the right user button to access the
next setting.
WARNING!
Using the REMstar Plus with C-Flex at an incorrect elevation setting
could result in airflow pressures higher than the prescribed setting.
Always verify the elevation setting when traveling or relocating.
REMstar Plus with C-Flex User Manual
❍ 13
First Time Setup (cont.)
Setting the
Minimum
Ramp
Pressure
f. The ramp starting pressure will appear.
Note: This setting will only appear if ramp
was prescribed for you.
The ramp feature will reduce the pressure
and then gradually increase (ramp) the
pressure to the prescription pressure setting
so that you can fall asleep more comfortably.
Your home care provider will have already set a ramp starting
pressure. If you feel the ramp starting pressure is set too low or too
high, you can change the setting.
(Range: 4 cm H2O - Prescription Pressure)
To change the setting, press the ramp or humidifier button. (You can
hold the button down to make the setting change faster.)
Exit the Settings
The settings are complete. Press the left user button to access the
previous setting, or press the pressure start/stop button to exit the
settings menu. Or, if you want to return to step a, press the right user
button.
14 ❍ REMstar Plus with C-Flex User Manual
First Time Setup (cont.)
Assembling
the Circuit
5. Assemble the circuit. To use the system, you will need the following
accessories in order to assemble the recommended circuit.
• Respironics Nasal Mask with integrated exhalation port
(or Respironics mask with separate exhalation port such as the Whisper Swivel® II)
• Respironics 6 ft. (1.83 m) Flexible Tubing
• Respironics Headgear (for the mask)
WARNING!
If multiple persons are going to use the REMstar Plus with C-Flex
(e.g., rental devices), a low-resistance, main flow bacteria filter should
be installed in-line between the REMstar Plus with C-Flex and the
circuit tubing. Pressures must be verified by your home care provider
when alternate or optional accessories are
in place.
a. Connect the flexible tubing to the air
outlet on the front of the REMstar Plus
with C-Flex.
b. If you are using a mask
with a built-in exhalation
port, connect the mask’s
connector to the flexible
tubing.
Mask's
Connector
Flexible
Tubing
If you are using a mask with a separate exhalation port, connect the flexible tubing to the
exhalation port. Position the exhalation port so
that the vented air is blowing away from your
face. Connect the mask’s connector to the
exhalation port.
WARNING!
Rotating
Connector
Whisper
Swivel II
Vent Holes
Flexible
Tubing
Do not block or otherwise try to seal the air openings (vent holes) on
the exhalation port. Explanation of the warning: The REMstar Plus with C-Flex
is intended to be used with masks and circuits that have an exhalation port designed to
exhaust CO2 from the circuit. When the REMstar Plus with C-Flex is turned on and
functioning properly, new air from the REMstar Plus with C-Flex flushes the exhaled
air out through the exhalation port. When the REMstar Plus with C-Flex is turned off,
enough fresh air will not be provided through the mask, and exhaled air may be
rebreathed. Rebreathing of exhaled air for longer than several minutes can, in some
circumstances, lead to suffocation. This warning applies to most CPAP devices.
WARNING!
If you are using a full face mask (i.e., a mask covering both your
mouth and your nose), the mask must be equipped with a safety
(entrainment) valve.
REMstar Plus with C-Flex User Manual
❍ 15