1
WebTransactions V7.0
Connection to OSD Applications
Edition: June 2005
Copyright © Fujitsu Siemens Computers GmbH, 2005.
All rights reserved. Delivery subject to availability; right of technical modifications reserved.
All hardware and software names used are trademarks of their respective manufacturers.
This manual was produced by
cognitas. Gesellschaft für Technik-Dokumentation mbH
www.cognitas.de
Contents
1
1.1
1.2
1.3
1.4
1.5
1.6
Preface . . . . . . . . . . . . . . . . . . . . . . . . . . . . . . . . . . . . . . . . . . . . . . . . . . . . . . . . . . . . . . 7
Product characteristics . . . . . . . . . . . . . . . . . . . . . . . . . . . . . . . . . . . . . . . . . . . . . . . . . . . 7
Architecture of WebTransactions for OSD . . . . . . . . . . . . . . . . . . . . . . . . . . . . . . . . . . . . . 9
WebTransactions documentation . . . . . . . . . . . . . . . . . . . . . . . . . . . . . . . . . . . . . . . . . . 11
Structure and target group of this manual . . . . . . . . . . . . . . . . . . . . . . . . . . . . . . . . . . . 14
New functions . . . . . . . . . . . . . . . . . . . . . . . . . . . . . . . . . . . . . . . . . . . . . . . . . . . . . . . . 14
Notational conventions . . . . . . . . . . . . . . . . . . . . . . . . . . . . . . . . . . . . . . . . . . . . . . . . . . 15
2
2.1
2.1.1
2.1.1.1
2.1.1.2
2.1.2
2.1.3
2.1.4
2.1.5
2.2
Installing WebTransactions . . . . . . . . . . . . . . . . . . . . . . . . . . . . . . . . . . . . . . . . . . . . . .
Installation . . . . . . . . . . . . . . . . . . . . . . . . . . . . . . . . . . . . . . . . . . . . . . . . . . . . . . . . . . .
Windows . . . . . . . . . . . . . . . . . . . . . . . . . . . . . . . . . . . . . . . . . . . . . . . . . . . . . . . . . . . .
Installation via the user interface . . . . . . . . . . . . . . . . . . . . . . . . . . . . . . . . . . . . . . . . . .
Silent installation . . . . . . . . . . . . . . . . . . . . . . . . . . . . . . . . . . . . . . . . . . . . . . . . . . . . . .
Solaris . . . . . . . . . . . . . . . . . . . . . . . . . . . . . . . . . . . . . . . . . . . . . . . . . . . . . . . . . . . . . .
Linux . . . . . . . . . . . . . . . . . . . . . . . . . . . . . . . . . . . . . . . . . . . . . . . . . . . . . . . . . . . . . . .
BS2000/OSD . . . . . . . . . . . . . . . . . . . . . . . . . . . . . . . . . . . . . . . . . . . . . . . . . . . . . . . .
WebLab installation . . . . . . . . . . . . . . . . . . . . . . . . . . . . . . . . . . . . . . . . . . . . . . . . . . . .
Licensing . . . . . . . . . . . . . . . . . . . . . . . . . . . . . . . . . . . . . . . . . . . . . . . . . . . . . . . . . . . .
17
17
18
18
19
21
22
23
23
24
3
3.1
3.1.1
3.1.2
3.1.3
3.1.4
3.1.5
3.1.6
3.2
3.2.1
3.2.1.1
3.2.1.2
3.2.2
3.2.3
3.3
Example session . . . . . . . . . . . . . . . . . . . . . . . . . . . . . . . . . . . . . . . . . . . . . . . . . . . . .
Administering the WebTransactions server . . . . . . . . . . . . . . . . . . . . . . . . . . . . . . . . . . .
Setting the browser . . . . . . . . . . . . . . . . . . . . . . . . . . . . . . . . . . . . . . . . . . . . . . . . . . . .
Starting the administration program . . . . . . . . . . . . . . . . . . . . . . . . . . . . . . . . . . . . . . . .
Entering licenses . . . . . . . . . . . . . . . . . . . . . . . . . . . . . . . . . . . . . . . . . . . . . . . . . . . . . .
Creating users . . . . . . . . . . . . . . . . . . . . . . . . . . . . . . . . . . . . . . . . . . . . . . . . . . . . . . . .
Creating a pool . . . . . . . . . . . . . . . . . . . . . . . . . . . . . . . . . . . . . . . . . . . . . . . . . . . . . . . .
Assigning the pool to a user . . . . . . . . . . . . . . . . . . . . . . . . . . . . . . . . . . . . . . . . . . . . . .
Connecting a host application to the Web . . . . . . . . . . . . . . . . . . . . . . . . . . . . . . . . . . .
Creating a project . . . . . . . . . . . . . . . . . . . . . . . . . . . . . . . . . . . . . . . . . . . . . . . . . . . . . .
Creating a base directory . . . . . . . . . . . . . . . . . . . . . . . . . . . . . . . . . . . . . . . . . . . . . . . .
Generating the automask template . . . . . . . . . . . . . . . . . . . . . . . . . . . . . . . . . . . . . . . .
Saving the project . . . . . . . . . . . . . . . . . . . . . . . . . . . . . . . . . . . . . . . . . . . . . . . . . . . . .
Starting a session . . . . . . . . . . . . . . . . . . . . . . . . . . . . . . . . . . . . . . . . . . . . . . . . . . . . .
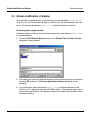
Global modification of display . . . . . . . . . . . . . . . . . . . . . . . . . . . . . . . . . . . . . . . . . . . .
25
26
27
28
30
33
34
36
37
37
38
42
43
45
50
WebTransactions for OSD
Contents
3.4
3.4.1
3.4.2
3.5
3.5.1
3.5.2
3.5.3
Format-specific modifications of display . . . . . . . . . . . . . . . . . . . . . . . . . . . . . . . . . . . .
Generating a format-specific template with the capture process . . . . . . . . . . . . . . . . . .
Editing a format-specific template . . . . . . . . . . . . . . . . . . . . . . . . . . . . . . . . . . . . . . . . .
Starting a WebTransactions application . . . . . . . . . . . . . . . . . . . . . . . . . . . . . . . . . . . . .
Creating a start template . . . . . . . . . . . . . . . . . . . . . . . . . . . . . . . . . . . . . . . . . . . . . . . .
Starting a session with WebLab . . . . . . . . . . . . . . . . . . . . . . . . . . . . . . . . . . . . . . . . . . .
Alternative ways of starting a WebTransactions application . . . . . . . . . . . . . . . . . . . . . .
54
55
58
63
63
66
67
4
4.1
4.2
Creating the base directory . . . . . . . . . . . . . . . . . . . . . . . . . . . . . . . . . . . . . . . . . . . . 69
Creating a base directory with WebLab . . . . . . . . . . . . . . . . . . . . . . . . . . . . . . . . . . . . . 69
Structure of a base directory . . . . . . . . . . . . . . . . . . . . . . . . . . . . . . . . . . . . . . . . . . . . . 71
5
5.1
5.1.1
5.1.2
5.2
Configuring and starting WebTransactions . . . . . . . . . . . . . . . . . . . . . . . . . . . . . . . . .
Configuring character sets . . . . . . . . . . . . . . . . . . . . . . . . . . . . . . . . . . . . . . . . . . . . . . .
7-bit ASCII character set . . . . . . . . . . . . . . . . . . . . . . . . . . . . . . . . . . . . . . . . . . . . . . . .
8-bit character set . . . . . . . . . . . . . . . . . . . . . . . . . . . . . . . . . . . . . . . . . . . . . . . . . . . . .
Starting a WebTransactions application . . . . . . . . . . . . . . . . . . . . . . . . . . . . . . . . . . . . .
73
73
73
74
76
6
6.1
6.2
6.2.1
6.2.2
6.3
6.4
6.5
Integrating a host application without editing . . . . . . . . . . . . . . . . . . . . . . . . . . . . .
Master templates OSD.wmt and OSD_Pocket.wmt . . . . . . . . . . . . . . . . . . . . . . . . . . . .
AutomaskOSD.htm template . . . . . . . . . . . . . . . . . . . . . . . . . . . . . . . . . . . . . . . . . . . . .
Creating variants of AutomaskOSD.htm (with WebLab) . . . . . . . . . . . . . . . . . . . . . . . . .
Structure of AutomaskOSD.htm . . . . . . . . . . . . . . . . . . . . . . . . . . . . . . . . . . . . . . . . . . .
wtKeysOSD.htm template . . . . . . . . . . . . . . . . . . . . . . . . . . . . . . . . . . . . . . . . . . . . . . .
wtBrowserFunctions.htm template . . . . . . . . . . . . . . . . . . . . . . . . . . . . . . . . . . . . . . . . .
wtPKEYS.htm template . . . . . . . . . . . . . . . . . . . . . . . . . . . . . . . . . . . . . . . . . . . . . . . . .
77
78
80
80
82
90
91
91
7
7.1
7.1.1
7.1.2
7.1.3
7.1.4
7.2
7.2.1
7.2.2
7.3
Editing templates . . . . . . . . . . . . . . . . . . . . . . . . . . . . . . . . . . . . . . . . . . . . . . . . . . . . . 93
Capturing with WebLab . . . . . . . . . . . . . . . . . . . . . . . . . . . . . . . . . . . . . . . . . . . . . . . . . 94
Recording recognition criteria individually . . . . . . . . . . . . . . . . . . . . . . . . . . . . . . . . . . . 94
Recording recognition criteria jointly . . . . . . . . . . . . . . . . . . . . . . . . . . . . . . . . . . . . . . . 97
Editing recognition criteria . . . . . . . . . . . . . . . . . . . . . . . . . . . . . . . . . . . . . . . . . . . . . . 102
Editing the capture database . . . . . . . . . . . . . . . . . . . . . . . . . . . . . . . . . . . . . . . . . . . . 102
Individual templates for pop-up boxes . . . . . . . . . . . . . . . . . . . . . . . . . . . . . . . . . . . . . 103
Without special pop-up handling: identification problems . . . . . . . . . . . . . . . . . . . . . . 104
Generating templates for pop-ups . . . . . . . . . . . . . . . . . . . . . . . . . . . . . . . . . . . . . . . . 105
Using descriptive names . . . . . . . . . . . . . . . . . . . . . . . . . . . . . . . . . . . . . . . . . . . . . . . 109
8
8.1
8.1.1
8.1.2
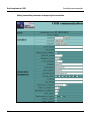
Controlling communication . . . . . . . . . . . . . . . . . . . . . . . . . . . . . . . . . . . . . . . . . . .
System object attributes . . . . . . . . . . . . . . . . . . . . . . . . . . . . . . . . . . . . . . . . . . . . . . . .
Overview . . . . . . . . . . . . . . . . . . . . . . . . . . . . . . . . . . . . . . . . . . . . . . . . . . . . . . . . . . .
Interaction between system object attributes and methods . . . . . . . . . . . . . . . . . . . . .
113
113
114
128
WebTransactions for OSD
Contents
8.2
8.2.1
8.2.2
8.3
8.3.1
8.3.2
8.3.5
8.3.6
8.3.6.1
8.3.6.2
8.3.6.3
8.3.6.4
8.4
8.4.1
8.4.2
8.5
Host objects . . . . . . . . . . . . . . . . . . . . . . . . . . . . . . . . . . . . . . . . . . . . . . . . . . . . . . . . . 130
Host data objects . . . . . . . . . . . . . . . . . . . . . . . . . . . . . . . . . . . . . . . . . . . . . . . . . . . . . 130
Host control objects . . . . . . . . . . . . . . . . . . . . . . . . . . . . . . . . . . . . . . . . . . . . . . . . . . . 134
Terminal functions supported by the browser . . . . . . . . . . . . . . . . . . . . . . . . . . . . . . . 138
Terminal functions supported . . . . . . . . . . . . . . . . . . . . . . . . . . . . . . . . . . . . . . . . . . . . 138
Interaction between the host control object WT_KEY.KEY and the template
wtKeysOSD.htm . . . . . . . . . . . . . . . . . . . . . . . . . . . . . . . . . . . . . . . . . . . . . . . . . . . . . . 141
Mapping keys in wtKeysOSD.js . . . . . . . . . . . . . . . . . . . . . . . . . . . . . . . . . . . . . . . . . . 143
Interaction between wtCommonBrowserFunctions.js and
wt<browser>BrowserFunctions.js . . . . . . . . . . . . . . . . . . . . . . . . . . . . . . . . . . . . . . . . . 148
Using the WT_BROWSER object . . . . . . . . . . . . . . . . . . . . . . . . . . . . . . . . . . . . . . . . 152
P key support . . . . . . . . . . . . . . . . . . . . . . . . . . . . . . . . . . . . . . . . . . . . . . . . . . . . . . . . 154
Definition in WTML . . . . . . . . . . . . . . . . . . . . . . . . . . . . . . . . . . . . . . . . . . . . . . . . . . . . 154
wtPKEYS.htm template . . . . . . . . . . . . . . . . . . . . . . . . . . . . . . . . . . . . . . . . . . . . . . . . 155
Handling PKEYs . . . . . . . . . . . . . . . . . . . . . . . . . . . . . . . . . . . . . . . . . . . . . . . . . . . . . 159
Saving PKEYs . . . . . . . . . . . . . . . . . . . . . . . . . . . . . . . . . . . . . . . . . . . . . . . . . . . . . . . 161
Start templates for OSD . . . . . . . . . . . . . . . . . . . . . . . . . . . . . . . . . . . . . . . . . . . . . . . . 162
OSD-specific start template in the start template set (wtstartOSD.htm) . . . . . . . . . . . 163
WTBean wtcStartOSD.wtc for the generation of a Start template . . . . . . . . . . . . . . . . 167
Creating a new OSD communication object (wtcOSD) . . . . . . . . . . . . . . . . . . . . . . . . 169
9
9.1
9.2
9.3
9.4
9.4.1
9.4.2
9.4.3
9.4.4
9.4.4.1
9.4.4.2
9.4.5
Using print/asynchronous support . . . . . . . . . . . . . . . . . . . . . . . . . . . . . . . . . . . . .
Enabling print/asynchronous support . . . . . . . . . . . . . . . . . . . . . . . . . . . . . . . . . . . . .
Functionality of print/asynchronous support . . . . . . . . . . . . . . . . . . . . . . . . . . . . . . . .
Handling asynchronous messages . . . . . . . . . . . . . . . . . . . . . . . . . . . . . . . . . . . . . . .
Print support . . . . . . . . . . . . . . . . . . . . . . . . . . . . . . . . . . . . . . . . . . . . . . . . . . . . . . . .
Terminal hardcopy printing . . . . . . . . . . . . . . . . . . . . . . . . . . . . . . . . . . . . . . . . . . . . . .
Host data printing . . . . . . . . . . . . . . . . . . . . . . . . . . . . . . . . . . . . . . . . . . . . . . . . . . . . .
Browser display printing . . . . . . . . . . . . . . . . . . . . . . . . . . . . . . . . . . . . . . . . . . . . . . . .
Print functions delivered (Windows browser platform) . . . . . . . . . . . . . . . . . . . . . . . . .
Browser print . . . . . . . . . . . . . . . . . . . . . . . . . . . . . . . . . . . . . . . . . . . . . . . . . . . . . . . .
WTAPrint print plugin . . . . . . . . . . . . . . . . . . . . . . . . . . . . . . . . . . . . . . . . . . . . . . . . . .
Configuring the print server for Windows . . . . . . . . . . . . . . . . . . . . . . . . . . . . . . . . . . .
8.3.3
8.3.4
171
171
172
176
180
181
184
189
190
190
195
201
Glossary . . . . . . . . . . . . . . . . . . . . . . . . . . . . . . . . . . . . . . . . . . . . . . . . . . . . . . . . . . . 203
Abbreviations . . . . . . . . . . . . . . . . . . . . . . . . . . . . . . . . . . . . . . . . . . . . . . . . . . . . . . . 225
Related publications . . . . . . . . . . . . . . . . . . . . . . . . . . . . . . . . . . . . . . . . . . . . . . . . . 227
Index . . . . . . . . . . . . . . . . . . . . . . . . . . . . . . . . . . . . . . . . . . . . . . . . . . . . . . . . . . . . . . 233
WebTransactions for OSD
Eine Dokuschablone von Frank Flachenecker
by f.f. 1992
1 Preface
Over the past few years, more and more IT users have found themselves working in
heterogeneous system and application environments, with mainframes standing next to
UNIX and Windows systems and PCs operating alongside terminals. Different hardware,
operating systems, networks, databases and applications are operated in parallel. Highly
complex, powerful applications are found on mainframe systems, as well as on UNIX and
Windows servers. Most of these have been developed with considerable investment and
generally represent central business processes which cannot be replaced by new software
without a certain amount of thought.
The ability to integrate existing heterogeneous applications in a uniform, transparent
IT concept is a key requirement for modern information technology. Flexibility, investment
protection, and openness to new technologies are thus of crucial importance.
1.1 Product characteristics
With WebTransactions, Fujitsu Siemens Computers offers a best-of-breed web integration
server which will make a wide range of business applications ready for use with browsers
and portals in the shortest possible time. WebTransactions enables rapid, cost-effective
access via standard PCs and mobile devices such as tablet PCs, PDAs (Personal Digital
Assistant) and mobile phones.
WebTransactions covers all the factors typically involved in web integration projects. These
factors range from the automatic preparation of legacy interfaces, the graphic preparation
and matching of workflows and right through to the comprehensive frontend integration of
multiple applications. WebTransactions provides a highly scaleable runtime environment and
an easy-to-use graphic development environment.
WebTransactions for OSD
7
Product characteristics
Preface
On the first integration level, you can use WebTransactions to integrate and link the following
applications and content directly to the Web so that they can be easily accessed by users
in the internet and intranet:
–
–
–
–
–
–
Dialog applications in BS2000/OSD
UNIX applications
AS400 applications
MVS or z/OS applications
System-wide transaction applications based on openUTM
Dynamic web content
Users access the host application in the internet or intranet using a web browser of their
choice.
Thanks to the use of state-of-the-art technology, WebTransactions provides a second
integration level which allows you to replace or extend the typically alphanumeric user interfaces of the existing host application with an attractive graphical user interface and also
permits functional extensions to the host application without the need for any intervention
on the host (dialog reengineering).
On a third integration level, you can use the uniform browser interface to link different host
applications together. For instance, you can link any number of previously heterogeneous
host applications (e.g. MVS or OSD applications) with each other or combine them with
dynamic Web contents. The source that originally provided the data is now invisible to the
user.
In addition, you can extend the performance range and functionality of the WebTransactions
application through dedicated clients. For this purpose, WebTransactions offers an open
protocol and special interfaces (APIs).
Furthermore, the object-oriented access to OSD, MVS and. openUTM host applications via
business objects – previously provided in the BizTransactions supply unit – is now also
integrated in WebTransactions. For more detailed information on business objects (BOs) and
the BizTransactions functionality, see the “Application Integration with Business Objects”
manual.
Host applications and dynamic Web content can be accessed not only via WebTransactions
but also by “ordinary” terminals or clients. This allows for the step-by-step connection of a
host application to the Web, while taking account of the wishes and requirements of
different user groups.
8
WebTransactions for OSD
Preface
Architecture of WebTransactions for OSD
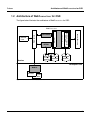
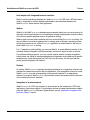
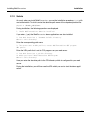
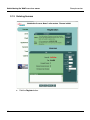
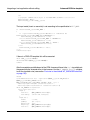
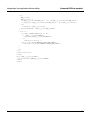
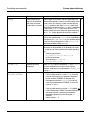
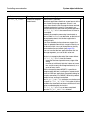
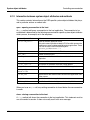
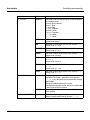
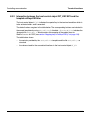
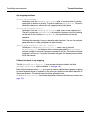
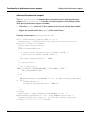
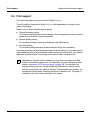
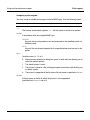
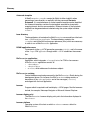
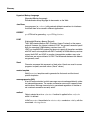
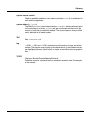
1.2 Architecture of WebTransactions for OSD
The figure below illustrates the architecture of WebTransactions for OSD:
WTML
template
Runtime
Automask
Host application
WTEdit
Integrated
terminal emulation
Kernel
Web server
Browser
User
WTPublish
Host adapter
WebTransactions
Capture
database
Development time
WebLab
Browser
HTML
editor
Figure 1: Architecture of WebTransactions for OSD
WebTransactions for OSD
9
Architecture of WebTransactions for OSD
Preface
Host adapter with Integrated terminal emulation
Both at runtime and during development, WebTransactions for OSD uses a 9750 emulation
which is integrated in the host adapter and handles communications between the
WebTransactions kernel and the host application.
WebLab
WebLab is the WebTransactions development environment which you can use to perform all
the steps from the connection of a host application through the generation and post-editing
of the format-specific templates and on to application testing.
WebLab does not have to be installed on the host on which WebTransactions is running. You
can use WebLab on another machine that is running under a Windows operating system.
All the data required to run a WebTransactions application is administered on the host on
which WebTransactions is running.
For 1:1 depiction or global editing, you can use WebLab to create different variants of the
standard Automask template, which dynamically converts all output formats at runtime.
For individual editing purposes, you may use the capture function to create recognition
criteria which are stored in the capture database and generate a so-called format-specific
template and a format description file (FLD file) from the format. You can post-edit the
format-specific templates with WebLab.
Runtime
At runtime, WebTransactions searches the capture database for a recognition criterium that
matches the screen format sent by the host application. If the recognition criterium is found,
WebTransactions uses the corresponding format-specific template. If an appropriate
criterium is not found, WebTransactions dynamically converts the screen format on the basis
of the standard Automask template.
Integration of business objects
WebTransactions for OSD also contains an environment for the connection of OSD host
applications via business objects. For information on how to create these business objects
using the WebTransactions Business Object Builder, see the “Application Integration with
Business Objects” manual.
10
WebTransactions for OSD
Preface
WebTransactions documentation
1.3 WebTransactions documentation
The WebTransactions documentation consists of the following documents:
●
An introductory manual which applies to all supply units:
Concepts and Functions
This manual describes the key concepts behind WebTransactions:
●
–
The various possible uses of WebTransactions.
–
The concept behind WebTransactions and the meanings of the objects in
WebTransactions, their main characteristics and methods, their interaction and life
cycle.
–
The dynamic runtime of a WebTransactions application.
–
The administration of WebTransactions.
–
The WebLab development environment.
A Reference Manual which also applies to all supply units and which describes the
WebTransactions template language WTML. This manual describes the following:
Template Language
After an overview of WTML, information is provided about:
–
The lexical components used in WTML.
–
The class-independent global functions, e.g. escape() or eval().
–
The integrated classes and methods, e.g. array or Boolean classes.
–
The WTML tags which contain functions specific to WebTransactions.
–
The WTScript statements that you can use in the WTScript areas.
–
The class templates which you can use to automatically evaluate objects of the
same type.
–
The master templates used by WebTransactions as templates to ensure a uniform
layout.
–
A description of Java integration, showing how you can instantiate your own Java
classes in WebTransactions and a description of user exits, which you can use to
integrate your own C/C++ functions.
WebTransactions for OSD
11
WebTransactions documentation
●
Preface
–
The ready-to-use user exits shipped together with WebTransaction.
–
The XML conversion for the portable representation of data used for communication
with external applications via XML messages and the conversion of WTScript data
structures into XML documents.
A User Guide for each type of host adapter with special information about the type of
data source:
Connection to AS400 applications
Connection to openUTM applications via UPIC
Connection to OSD applications (this User Guide)
Connection to MVS applications
Connection to UNIX applications
All the host adapter guides contain a comprehensive example session. The manuals
describe:
●
–
The installation of WebTransactions with each type of host adapter.
–
The setup and starting of a WebTransactions application.
–
The conversion templates for the dynamic conversion of formats on the web
browser interface.
–
The editing of templates.
–
The control of communications between WebTransactions and the host applications
via various system object attributes.
–
The handling of asynchronous messages and the print functions of
WebTransactions.
A User Guide that applies to all the supply units and describes the possibilities of the
HTTP host adapter:
Access to Dynamic Web Contents
This manual describes:
12
–
How you can use WebTransactions to access a HTTP server and use its resources.
–
The integration of SOAP (Simple Object Access Protocol) protocols in
WebTransactions and the connection of web services via SOAP.
WebTransactions for OSD
Preface
WebTransactions documentation
●
A User Guide valid for all the supply units which describes the open protocol, and the
interfaces for the client development for WebTransactions:
Client APIs for WebTransactions
This manual describes:
●
–
The concept of the client-server interface in WebTransactions.
–
The WT_RPC class and the WT_REMOTE interface. An object of the WT_RPC class
represents a connection to a remote WebTransactions application which is run on
the server side via the WT_REMOTE interface.
–
The Java package com.siemens.webta for communication with WebTransactions
supplied with the product.
A User Guide valid for all the supply units which describes the web frontend of
WebTransactions that provides access to the general web services and the business
objects:
Web-Frontend for Web Services and Business Objects
This manual describes:
●
–
The concept of web frontend for object-oriented backend systems.
–
The generation of templates for the connection of business objects and general web
services to WebTransactions.
–
The testing and further development of web frontends for business objects and
general web services.
A User Guide which describes the BizTransactions components:
Application Integration With Business Objects
This manual describes the concept behind BizTransactions together with its mode of
operation and its components. It explains all the steps involved in creating business
objects and web services.
The manual is intended for all users who want to create business objects for accessing
host applications in order to:
–
develop graphical user interfaces for host applications (e.g. via GUIs created using
WebTransactions, Visual Basic, Visual C++, Microfocus NetExpress or Java).
–
provide the host application as a web service, for example in the internet.
–
integrate interactions with host applications in Microsoft Office products (e.g. the
current data of an openUTM mainframe application in Excel tables).
WebTransactions for OSD
13
Structure and target group of this manual
Preface
1.4 Structure and target group of this manual
This documentation is intended for everybody who wants to use WebTransactions to connect
OSD dialog applications to the Web.
The individual chapters describe the necessary steps. If you have not yet worked with
WebTransactions for OSD, you should first read chapter 3, which presents an example
session which will give you an initial insight into working with WebTransactions.
This manual provides all the OSD-specific information necessary to complement the introductory WebTransactions manual “Concepts and Functions” and the WebTransactions
reference manual “Template Language”.
Scope of this description
WebTransactions for OSD runs on the system platforms BS2000/OSD, Solaris, Linux and
Windows. This document applies to all WebTransactions platforms. Where an item of information applies to one WebTransactions platform only, this will be indicated.
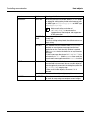
1.5 New functions
This section only lists the OSD-specific innovations. For a general overview of the new
features, refer to the WebTransactions manual “Concepts and Functions”.
14
Type of new feature
Description
New system object attributes
AUTOTAB
END_WAIT_CONDITION.*
IGNORE_ASYNC
LZE_CHAR
NIL_MODE
PORT_NUMBER
As of page 113
New host data object attributes
RangeName
RangeStartColumn
RangeLength
As of page 131
WebTransactions for OSD
Preface
Notational conventions
1.6 Notational conventions
The following notational conventions are used in this documentation:
typewriter font
Fixed components which are input or output in precisely this
form, such as keywords, URLs, file names
italic font
Variable components which you must replace with real specifications, also used for menu items
bold font
Items shown exactly as displayed on your screen or on the
graphical user interface; also used for menu items
[]
Optional specifications. Do not enter the square brackets
themselves.
{alternative1 | alternative2 } Alternative specifications. You must select one of the expressions inside the curly brackets. The individual expressions are
separated from one another by a vertical bar. Do not enter the
curly brackets and vertical bars themselves.
...
Optional repetition or multiple repetition of the preceding
components
i
Ê
WebTransactions for OSD
Important notes and further information
Prompt telling you to do something.
15
Eine Dokuschablone von Frank Flachenecker
by f.f. 1992
2 Installing WebTransactions
The WebTransactions installation files can be downloaded from the Web.
i
Detailed information on the hardware and software requirements can be found in
the release notice accompanying the product.
2.1 Installation
WebTransactions for OSD consists of the host adapter via which communications with the
OSD applications transit, the WebTransactions runtime system and the host adapter for
dynamic web contents.
WebTransactions for OSD contains the installation package for the WebLab development
environment which you can use to connect host applications to the WWW, edit the appearance of host formats and extend their functionality. You may need to install WebLab explicitly
on your development machine (see section “WebLab installation” on page 23).
In addition to these components, WebTransactions for OSD also contains the associated
host adapter for BizTransactions and the BizTransactions runtime system for the connection
of host applications via business objects.
i
Before installing WebTransactions, make sure that the web server and, if necessary,
Java are already installed.
Make a note of the Java installation directory together with the following information
from the web server configuration:
–
–
–
WebTransactions for OSD
root directory for web pages (=document directory)
CGI directory
URL prefix for CGI programs
17
Installation
Installing WebTransactions
2.1.1 Windows
For Windows, WebTransactions is available as a Windows installer package
(msi file) WebTransactionsOSD70.msi after it has been downloaded.
2.1.1.1
Installation via the user interface
To perform installation, you must possess Windows administrator rights. There are various
ways of starting installation
–
Via the Settings/Control Panel command in the Start menu.
–
Via Windows Explorer.
Double click the msi file or single click this file with the right mouse button and then, in
the context menu which appears, select the Install command.
Setting the web server and Java environment settings
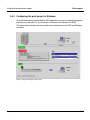
When you start WebTransactionsOSD70.msi you will see a series of dialog boxes in which
you must enter the installation directory and the values for your web server:
–
–
–
–
Root directory for web pages (= document directory).
CGI directory and URL prefix.
ISAPI directory and ISAPI prefix (optional).
Directory of the Java2 library jvm.dll for Java integration (optional).
When you have entered the values, the installation will be started and the required
components will be installed. If you install WebTransactions with an additional host adapter
on the same system, these values will be taken over by the new installation.
Selecting components
You can now select all the components you want to install. In the Select Installation Type
dialog box, select one of the following entries:
Typical or Complete
This will install all the WebTransactions components.
Custom
The installation program proposes the following components:
–
–
–
18
WebTransactions runtime system.
WebTransactions demo applications
BizTransactions runtime system
WebTransactions for OSD
Installing WebTransactions
2.1.1.2
Installation
Silent installation
For a silent installation, use the Windows installer Msiexec.exe. You can find a complete
description of this command in, for example, the Windows online help. In order to run an
installation with Msiexec.exe you will require administrator access rights.
Use the Msiexec.exe command with the following syntax:
Msiexec.exe /I "package" /q
[INSTALLDIR="install-dir"]
[DOCUMENTROOTDIR="documentroot-dir"]
[HTTPSCRIPTSDIR="cgi-dir"]
[JAVA2SYS="java-dir"]
[ISPREFIX="isapi-prefix"]
[URLPREFIX="cgi-prefix"]
[ISAPICHECK="isapicheck"]
[JAVA2CHECK="java2check"]
The parameters have the following meaning:
package
Path for the package to be installed (e.g. C:\tmp\WebTransactionsOSD70.msi).
install-dir
The WebTransactions installation directory.
Default value: C:\Programme\WebTransactionsV7 or
C:\Program Files\WebTransactionsV7
documentroot-dir
Web server document directory.
Default value: C:\InetPub\wwwroot
cgi-dir The CGI directory of the web server.
Default value: C:\InetPub\scripts
java-dir
Directory of the Java2 library jvm.dll. This entry is only necessary when the
support for the Java interface is to be installed.
isapi-prefix
URL prefix for ISAPI.
Default value: scripts
cgi-prefix
URL prefix for CGI.
Default value: scripts
WebTransactions for OSD
19
Installation
Installing WebTransactions
isapicheck
This indicates if the ISAPI interface for WebTransactions is to be installed.
Possible values: Yes | No
Default value: No
java2check
This indicates if the support for the Java interface is to be installed.
Possible values: Yes | No
Default value: No
Example
Msiexec.exe /I "C:\tmp\WebTransactionsOSD70.msi" /q
INSTALLDIR="D:\Programme\WebTransactionsV7"
DOCUMENTROOTDIR="C:\Programme\Apache Group\Apache\htdocs"
HTTPSCRIPTSDIR="C:\Programme\Apache Group\Apache\cgi-bin"
JAVA2SYS="D:\Programme\jdk1.3.1\jre\bin\classic"
URLPREFIX="cgi-bin" JAVA2CHECK="Yes"
20
WebTransactions for OSD
Installing WebTransactions
Installation
2.1.2 Solaris
As usual, when you install WebTransactions, you use the installation procedure pkgadd with
root authorization. To do this, enter the absolute path name of the unpacked product file:
pkgadd -d /absolute_path/filename
During installation, the following questions are displayed:
1. Should WebTransactions demos be installed?
If you enter y (yes) the WebTransactions demo applications are also installed.
2. Your Web Server has a ’document default directory’
Where is this directory?
Enter the corresponding path name.
3. The server uses an URL prefix to access WebTransactions CGI program.
URL prefix:
Enter the URL prefix that is set for CGI programs on your web server.
4. Your Web Server has a cgi-bin directory,
in which you install WebTransactions CGI-Program.
Where is this directory?
Here you enter the absolute path to the CGI directory which is configured for your web
server.
During the installation, you will then see the URL which you use to start the demo application.
WebTransactions for OSD
21
Installation
Installing WebTransactions
2.1.3 Linux
WebTransactions is available as a compressed archive for downloading and has the suffix
.gz (for example, webtransOSDV7.tar.gz). You must first decompress this file using the
command:
gunzip -d webtransOSDV7.tar
Please note that you must not specify the suffix .gz. You can then fetch the installation files
from the archive using the tar command:
tar -xvf webtransOSDV7.tar
Start the installation procedure doinstall with root authorizations:
./doinstall
During installation you will be asked the following questions:
You can install WebTransactions into any directory.
Where is this directory ? [/opt]
You should now enter a different path name if you do not want WebTransactions to be
installed under the default path /opt.
Your Web Server has a directory for CGI programs.
Where is this directory ? [/usr/local/httpd/cgi-bin]
Enter the corresponding path name.
Your Web Server uses an URL prefix to access the CGI programs in
/usr/local/httpd/cgi-bin
What is this prefix ? [cgi-bin]
Enter the URL prefix used for CGI programs on your web server
Are this settings OK ? [y]
Confirm your specifications to terminate installation.
22
WebTransactions for OSD
Installing WebTransactions
Installation
2.1.4 BS2000/OSD
Standard installation is performed using the SOLIS procedure. If the IMON product (Installation MONitor) is started in the source system then you can also perform a standard installation using IMON.
To install POSIX, you can use the POSIX installation tool.
Once you have installed WebTransactions you can configure the web server as follows:
Ê
Open the configuration file/opt/apache/conf/dso.conf.
Ê
Remove the hash symbol (#) from the line # mod_webta and close the file.
Ê
Restart the web server.
2.1.5 WebLab installation
When you install WebTransactions on any platform, the msi file for the installation of WebLab
under Windows (WebLab70.msi) is written to the web server’s document directory that is
located below the directory webtav7.
Transferring the installer package to the development computer
The WebLab installer package can be downloaded to the required development computer
via a browser call specifying the following URL:
http://web-server/webtav7/wtdownload.htm
Installing WebLab under Windows
When you have downloaded the WebLab installer package to your development computer,
install the msi file as usual via the graphical user interface (see page 18) or with
Msiexec.exe (see page 19).
In both cases, you need only specify the WebLab installation directory.
WebTransactions for OSD
23
Licensing
Installing WebTransactions
2.2 Licensing
After installation, you must configure the number of licenses present and the machinespecific activation key. To do this, you require the WebTransactions administration interface
and select the Licences menu item. For more information on the administration program,
see the WebTransactions manual “Concepts and Functions”.
24
WebTransactions for OSD
3 Example session
In this chapter, you will learn about what you can do with WebTransactions and become
familiar with a number of basic rules for working with WebTransactions. This example
session is intended to serve as procedural description which will show you how you can
connect a host application to the Web simply and quickly.
In this example session, you will first use the administration program to create the conditions necessary for your work with WebLab and WebTransactions. Next you will use WebLab
to connect the host application to the Web. You will then get to know the ways in which you
can make global and format-specific changes in a template.
Please note that all path specifications are based on the assumption that
WebTransactions has been installed in the initial directory.
i
Tutorial
You can follow this example session by downloading the tutorial from the WebTransactions
home page (http://www.Fujitsu-Siemens.com/WebTransactions) to your own computer. The
tutorial simulates the host application so that you can follow all the steps described in this
example session on your computer.
If you want to follow the progress of this example yourself, proceed as follows:
Ê
Install WebTransactions for OSD if it is not yet installed on your server. For more information, see chapter “Installing WebTransactions” on page 17.
Ê
Then double-click on tutorial.exe to run the program. This automatically sets up a
base directory together with all the necessary data.
WebTransactions for OSD
25
Administering the WebTransactions server
Example session
You must make certain settings to ensure that WebTransactions reads the data from a
copy rather than attempting to connect to a host. This is greatly simplified by the fact
that the base directory already contains two start templates which make these settings
for you.
startauto.htm
Use this start template if you want to simulate a session that works with the
automask template
starttempl.htm
Use this start template if you want to simulate a session that works with recorded
formats.
Ê
Enter the name of the required start template in WebLab in the place of wtstart and
you will then be taken directly to the first recorded format.
3.1 Administering the WebTransactions server
Once you have installed WebTransactions for OSD on a computer (see also chapter
“Installing WebTransactions” on page 17), you must create the conditions necessary for your
work with WebTransactions and WebLab. To do this, you use the administration program that
is described in the WebTransactions manual “Concepts and Functions”.
The first step in WebLab is to set the browser that WebLab is to use to operate the
WebTransactions application. Your work with the administration program is subdivided into
the following steps:
1. Enter the licenses
2. Set up the user
3. Create the pool
4. Assign the pool to the user
26
WebTransactions for OSD
Example session
Administering the WebTransactions server
3.1.1 Setting the browser
Before you start to work, you should - in WebLab - set the browser which you want WebLab
to use to operate the WebTransactions application. This step is only necessary if you are
working with WebLab for the first time.
Ê
Start WebLab with the command Start/Programs/WebTransactions 7.0/WebLab. The
WebLab main window is displayed on the screen. For a detailed description of the main
window and its components, see the WebTransactions manual “Concepts and Functions” and the online help.
Ê
In WebLab you can now select the Options/Preferences command. The Properties
dialog box is displayed on screen with the Programs tab open.
Ê
In the lower section, Browser, select the browser which is installed on your computer,
and specify how it is to be used by WebLab.
Ê
Click on OK to confirm your settings.
WebTransactions for OSD
27
Administering the WebTransactions server
Example session
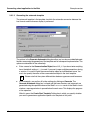
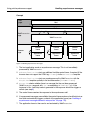
3.1.2 Starting the administration program
28
Ê
Choose the Administration/Server command to start the administration program
initially. The dialog box Administrate Server opens on the screen.
Ê
Under URL of WTPublish, click the Change button. The URL of WTPublish dialog
box will be displayed.
Ê
Select the Protocol to be used for the connection.
Ê
In the other fields, enter the corresponding values for your host:
Server
Host computer on which WebTransactions runs.
Port
Corresponding port number.
CGI-Path
Path for the CGI program WTPublish.
Program
CGI program.
Ê
Confirm with OK. The values will be entered in the Administrate Server dialog box.
Ê
Confirm with OK. The administration program is started and the first window is shown
in the browser.
WebTransactions for OSD
Example session
Administering the WebTransactions server
Log on as the admin user. This user is set up without a password when WebTransactions
is set up. The licensing page is now displayed automatically.
Ê
i
WebTransactions for OSD
If you are working with the administration program for the first time then, for reasons
of security, you should assign a password for the admin user after login.
29
Administering the WebTransactions server
Example session
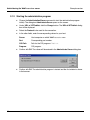
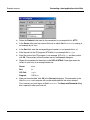
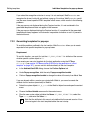
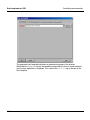
3.1.3 Entering licenses
Ê
30
Click the Register button.
WebTransactions for OSD
Example session
Administering the WebTransactions server
This opens the registration page:
Ê
To register licenses for a stand-alone server, click on Single Server under Type of
license.
Ê
Enter the number of servers that you want to license in the Number of licences field.
Ê
Enter your e-mail address and additional parameters as required.
WebTransactions for OSD
31
Administering the WebTransactions server
Ê
Example session
Click Request Key to submit the form.
The license key will then soon be sent to the specified e-mail address.
Ê
Enter the number of acquired licenses and the valid license key notified to you by e-mail
in the Licenses and Key fields of the licensing page.
Ê
Confirm by clicking Set followed by Save.
The licenses are activated and the new number of licenses is displayed in the status bar.
32
WebTransactions for OSD
Example session
Administering the WebTransactions server
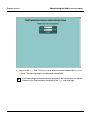
3.1.4 Creating users
Ê
Click on the Users menu item to enter new users. The Users window is displayed in the
browser.
Ê
Enter the name of the new user in the Username input field in the work area.
Ê
If you wish, enter a description or comment for the user in the Comment field and click
on Add. The user is now entered for operations with WebTransactions and WebLab.
However, as yet the user has no rights. You must assign these.
Ê
However, you should first click on the Change Password button and enter a password
for the new user. You proceed in exactly the same way to assign a password for admin.
WebTransactions for OSD
33
Administering the WebTransactions server
Example session
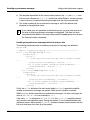
3.1.5 Creating a pool
Ê
Next, click on the Pools menu item to create a pool under which base directories can
be created. The Pools window is displayed in the browser.
Ê
Enter the name of the directory in the Directory input field in the work area (you must
specify the absolute path name). Please note that if this directory does not already exist
you must select the directory creation option.
Ê
In the Virtual Path entry field, type the name of a directory below the web server’s document directory that is allocated to the new pool. This directory corresponds to the start
of the virtual path used by the web server to directly (i.e. without it being necessary to
call WebTransactions) access the files of WebTransactions applications (e.g. images, entry page etc.) in this directory.
i
34
If you want to use base directories with identical names in different pools, the values
for Virtual Path corresponding to the pools have to be different.
WebTransactions for OSD
Example session
Ê
Administering the WebTransactions server
You may also enter a description or comment for the pool in the Comment field before
clicking on the Add button. The new pool is now entered for WebTransactions and WebLab operation. You can enter further pools as required.
You can now use WebLab to create the base directories under the pools which you have
created in this way. However, as yet no WebLab user can access such a pool since the
pool has not yet been assigned to a user.
WebTransactions for OSD
35
Administering the WebTransactions server
Example session
3.1.6 Assigning the pool to a user
Ê
In the pools table, click on the pool which you have just created. The
Pool window with the newly created pool is displayed in the browser.
This window displays the users who are permitted to access the new pool. Currently no
user is assigned to this pool. A list displays all the users who are permitted to work with
WebTransactions on this host.
36
Ê
Click on an entry in this list to select the user you have just created and then click on
the Add button. The selected user is entered as possessing access to this pool. You
have now completed the preparations required in order to work with WebTransactions.
Ê
Click on the Save button to save the current WebTransactions configuration.
Ê
Click on the Exit button to terminate the administration program.
Ê
Exit the browser.
WebTransactions for OSD
Example session
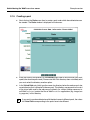
Connecting a host application to the Web
3.2 Connecting a host application to the Web
Once you have performed the preparations for your work with WebTransactions and
WebLab, you can use WebTransactions development environment - WebLab - to connect the
host application to the WWW. To do this, you must perform the following steps:
1. Create the project
–
Create a base directory
–
Generate an automask
2. Save the project
3. Start a session
3.2.1 Creating a project
The project stores the most important data that is required by WebLab to generate and edit
a WebTransactions application, e.g. the WebTransactions server data.
Ê
To create a project, choose the Project/New... command.
Ê
In the next dialog box, you are asked whether you want to generate a base directory.
Click Yes. This opens the Connect dialog box, see next section.
WebTransactions for OSD
37
Connecting a host application to the Web
3.2.1.1
Example session
Creating a base directory
The base directory is the fundamental requirement for connecting a host application to the
web using WebTransactions. This directory contains all the necessary files and links to the
programs that constitute a WebTransactions application.
The base directory must always be located on the host on which WebTransactions is
running. In the Connect dialog box, you enter this WebTransactions server and the paths to
the CGI programs WTPublish.exe and WTEdit.exe.
–
WTEdit.exe receives all WebLab requests. It performs all the necessary tasks on behalf
of WebLab (which may be running on a different host) on the WebTransactions server
(e.g. creation of a base directory) and enables WebLab to access running
WebTransactions sessions.
–
WTPublish.exe receives all requests from the browser. It starts new WebTransactions
sessions or establishes connections to an open session for each subsequent dialog
step.
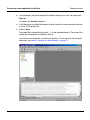
Ê
38
Under Connection to server - URL of WTPublish, click Change. The
URL of WTPublish dialog box will be displayed.
WebTransactions for OSD
Example session
Connecting a host application to the Web
Ê
Select the Protocol to be used for the connection; in our example this is HTTP.
Ê
In the Server field, enter the name of the host on which WebTransactions is running; in
our example this is diana.
Ê
In the Port field, enter the corresponding port number; in our example this is 80.
Ê
Enter the path for the CGI program WTPublish; in our example this is scripts.
Ê
Enter the name of the CGI program, in our example WTPublish.exe, and then confirm
with OK. These values will now be taken over by the Connect dialog box.
Ê
Repeat this procedure for the entries under URL of WTEdit. Once again enter the
values for your host; in our example these are:
Ê
Server
diana
Port
80
CGI Path
scripts
Program
WTEdit.exe
When you have finished, click OK in the Connect dialog box. The connection to the
WebTransactions host computer will now be established with the values entered.
First, however, you must log on to WebTransactions. The Name and Password dialog
box is opened to allow you to do this.
WebTransactions for OSD
39
Connecting a host application to the Web
Example session
Ê
Enter the user name and password that you specified in section “Creating users” on
page 33.
Ê
Click on OK to confirm. The Create basedir dialog box is displayed on the screen.
The upper list of this dialog box displays the pools under which the logged on user is
able to create base directories on the WebTransactions server.
Ê
40
In the list, click on the pool which you created in section “Creating a pool” on page 34.
WebTransactions for OSD
Example session
Connecting a host application to the Web
Ê
Enter a name in the Name of new Base Directory input field, here example_osd.
Ê
Next select the host adapter via which WebTransactions communicates with the host application, here OSD. Only those host adapters that are actually installed are displayed.
The host adapter for HTTP is preset by default.
Ê
Confirm your entries with OK. The Generate Automask dialog box is displayed, see
next section.
WebTransactions for OSD
41
Connecting a host application to the Web
3.2.1.2
Example session
Generating the automask template
The automask template is the template via which the automatic conversion between the
host formats and the browser display is performed.
The options in the Generate Automask dialog box allow you to make more detailed specifications concerning the generation of the template and its subsequent implementation. The
options are described in the online help.
Ê
Enter a name for the Communication Object, here OSD_0. If you do not enter anything
here, the default setting OSD_0 is used. If you want to open multiple connections during
a session, it is useful to give the communication object an individualized name. You
must also specify the name of the communication object in the start template.
i
Ê
Please note that the system differentiates between uppercase and lowercase.
In this example, you confirm all further settings by clicking on Generate. The
Generate Automask dialog box is closed and the base directory and automask are
generated using the specified values at the WebTransactions server. In the WebLab main
window, a message window is opened below the work area. This displays the progress
of the operation.
WebLab opens the Create Start Template? dialog box in which you specify whether
you want to generate an application-specific start template at this point.
42
WebTransactions for OSD
Example session
Ê
Connecting a host application to the Web
For the purposes of this example session, click on No. The Define New Project dialog
box is now opened, see next section.
A start template that takes the user directly to the first format in the host application will
be created at the end of the example session (see section “Creating a start template”
on page 63).
3.2.2 Saving the project
You define the settings for the newly created project in the Define New Project dialog box.
WebTransactions for OSD
43
Connecting a host application to the Web
Ê
Example session
In this example, you should accept all the default settings and save the project with
Save as...
This opens the Save As dialog box.
Ê
In this dialog box you select the directory in which you want to save the project and enter
a name for the project file.
Ê
Click on Save.
The project file is created with the suffix .wtp in the selected directory. The name of the
project file is displayed in the WebLab title bar.
You are then connected with your new base directory. For an overview of the created
directories, see section “Structure of a base directory” on page 71.
44
WebTransactions for OSD
Example session
Connecting a host application to the Web
3.2.3 Starting a session
Once you have created the base directory, you can start a session to the host application.
Ê
Choose the File/Start Session command. The Start Session dialog box is displayed
on the screen.
In this dialog box the connection data such as the web server name, CGI program path
and the base directory name have already been taken over from the project settings.
You just need to specify the name of the start template with which the host application
is to be started.
Ê
Enter the name of a start template in the Start Template dialog box, here
wtstart. wtstart.htm is a supplied start template which is copied into the base directory and can be used for all host applications.
Ê
Click on OK to start the session. The dialog box is closed. The set browser is opened
and the general start template wtstart is displayed and calls for a new
WebTransactions session with the start template wtstart. wtstart displays a form in
the browser window.
WebTransactions for OSD
45
Connecting a host application to the Web
Example session
In this form of the general start template, you can now enter the connection parameters for
WebTransactions in order to set up a new communication object.
46
Ê
Select the OSD entry in the PROTOCOL pick list.
Ê
Specify the name of the communication object, here OSD_0. The name of the communication object must correspond to the name which you used when generating the automask template.
Ê
Now click on the create button to create a new communication object. Your specifications are processed by WebTransactions and the OSD-specific start template
wtstartOSD.htm continues checking and displays the next form.
WebTransactions for OSD
Example session
WebTransactions for OSD
Connecting a host application to the Web
47
Connecting a host application to the Web
Example session
With the OSD-specific start template you set the connection parameters and open the
connection to the host application, in the same way as if you were connecting to the host
application from a terminal or an emulation.
Ê
For HOST_NAME enter the name of the computer on which the host application is running.
Ê
For SYM_DEST enter the symbolic name of the host application, here Travel. The symbolic name is the name under which the application is known at the host computer.
Ê
If the host application expects a specific terminal name you can enter this in the
STATION_NAME box.
Ê
Now click on the run button to open the connection to the host application. The first
screen of the OSD application is output with AutomaskOSD.htm.
The AutomaskOSD.htm template provides you with a button bar for communications with the
OSD application. This button bar replicates the special keys of the 9750 terminal
(see section “AutomaskOSD.htm template” on page 80).
If you now want to terminate the connection to the host, click the Disconnect button.
Processing again branches to the template wtstartOSD (see also section “OSD-specific
start template in the start template set (wtstartOSD.htm)” on page 163). Select main menu
and click on the go to button to return to the general start template. You can now select quit
to exit the WebTransactions application.
48
WebTransactions for OSD
Example session
Connecting a host application to the Web
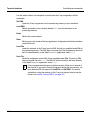
In the example session you proceed as follows:
Ê
Enter your ID and password to log on to the Travel host application.
Ê
Press DUE to start the Travel application. The next format of the Travel application is
displayed in the browser.
WebTransactions for OSD
49
Global modification of display
Example session
3.3 Global modification of display
As an example of a global change, a company logo is to be integrated in AutomaskOSD.htm.
To do this, you must first transfer the logo to a directory that can be accessed by the web
server. You can use the directory wwwdocs/image in the base directory to do this.
Performing binary image transfers
Proceed as follows in WebLab to transfer the company logo to the directory wwwdocs/image
in the base directory:
50
Ê
Choose the File/Transfer Binary command. The Choose Files for binary Transfer
dialog box is now displayed.
Ê
In this dialog box, you must select the directory in which the company logo is stored and
then click OK to confirm. The Choose destination directory dialog box is now
displayed.
Ê
In this dialog box, select the directory wwwdocs/image in the base directory of your
WebTransactions application and then click OK to confirm. The company logo is transferred to the base directory. This directory is physically created under the web server’s
document directory.
WebTransactions for OSD
Example session
Global modification of display
Inserting the logo in the Automask template
In this example, the WebTransactions logo is to be inserted as a global change.
Ê
Choose the File/Open Current Template command.
–
This loads the template AutomaskOSD.htm in the WebLab work area. This template
outputs the current format of the host application
–
This also updates the corresponding object tree with all the current variables in the
WebLab object window.
Ê
Now scroll through the template until you reach the BODY tag.
Ê
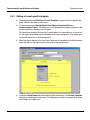
Insert an empty line after the BODY tag and choose the Add/HTML/image command.
The Add:img dialog box is now displayed.
In this dialog box you can specify the image file and other parameters for the display
and orientation of the image. The path for the image file must be relative to the web
server’s document directory since the web server only searches this directory for
images. By transferring the image to wwwdocs/image, you ensure that this is the case.
WebTransactions for OSD
51
Global modification of display
Example session
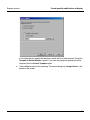
You can use the system object attribute WWWDOCS_VIRTUAL to access the image without
having to specify a long path name. WWWDOCS_VIRTUAL already contains the full path from
the web server’s document directory through to the wwwdocs directory in the base directory.
Ê
Use the Browse button to find the image file. If the file is under wwwdocs, WebLab will
automatically use VIRTUAL and the name will be created as follows:
##WT_SYSTEM.WWWDOCS_VIRTUAL#/image/wtlogo.gif
Ê
Click OK to confirm. WebLab inserts the following line in the Automask template after
the BODY tag:
<img src="##WT_SYSTEM.WWWDOCS_VIRTUAL#/image/wtlogo.gif">
Ê
52
To view the changes, choose the Control/Update in Browser command. The logo is
output in the browser window. If you save the modified Automask template then this
change applies to all subsequent forms since the Automask template determines the
automatic conversion for all forms.
WebTransactions for OSD
Example session
WebTransactions for OSD
Global modification of display
53
Format-specific modifications of display
Example session
3.4 Format-specific modifications of display
As you have seen, changes in the Automask template affect the display of all the formats in
the browser. However, if you want to restrict a browser display modification to a single
format, you need a so-called format-specific template. This requires you to perform the
following steps:
1. Use the capture process to generate the format-specific template
2. Edit the format-specific template
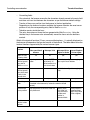
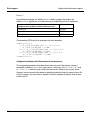
As an example of an individual format design, consider a value-based selection (the user
makes his or her choice by entering a number) mapped to a drop-down list as illustrated in
the table below:
Before
54
After
WebTransactions for OSD
Example session
Format-specific modifications of display
3.4.1 Generating a format-specific template with the capture process
To create format-specific templates for the formats of the host application, you use
capturing in WebLab. This interactive process allows you to create recognition criteria for
individual screen formats, i.e. patterns for the recognition of known formats.
Ê
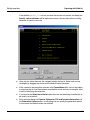
Choose the Generate/Capture/from current screen command.
i
In the start template wtstartOSD.htm for the communication-specific system
object attribute CAPTURE_FILE the pathname config/capture.sdb is entered as
default (see section “Starting a session” on page 45). The default is also used
in the example. The capture database is set up on the first access. This stores
all the recognition criteria that you create using the Capture process.
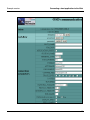
The Capture dialog box is opened on the screen and contains a display of the current
format.
Ê
Use the mouse to drag a rectangle over the indicated section TRAV0. This specifies that
this format is identified through the presence of TRAV0 at this position in the format.
WebTransactions for OSD
55
Format-specific modifications of display
Ê
Example session
Click on OK to start generation. The recognition criterium that you have selected in this
way is saved together with the format name in the capture database and the format-specific template TRAV0 is created. Instead of the Automask template, the format-specific
template is now used to display the format.
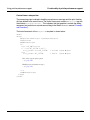
Generated template
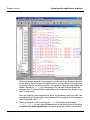
The text below displays the section from the generated template TRAV0.htm which depicts
the formats of the fields. For the structure of a complete template, see section “Structure
of AutomaskOSD.htm” on page 82.
The generated template TRAV0.htm was generated with the following generation options:
Generation method: Inline script, Display attributes: None.
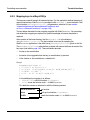
<!-- - - - - - - - - - - - - - - - - - - - - - - - - - - - - - - - - - - <!-- begin of host screen section
<!-- - - - - - - - - - - - - - - - - - - - - - - - - - - - - - - - - - - <div style="color:##OSD_0.WT_Color.Default = "\#000000"#"><pre>\
-->
-->
-->
In the capture procedure, a host object is assigned to every field in a format. The individual
host objects are output on the screen one after the other. In the case of output fields, the
evaluation operator ##objectname.HTMLValue# ensures that the contents are displayed on the
screen. To simplify orientation within the template, the contents at the time of capture are
saved in a comment ahead of the evaluation operator.
<span class="screenline" id="SL1"><wtrem ** *TRAV0
S I E M E N S
T r a v e l
A g e n c y
**>\
##OSD_0.E_01_001_059.HTMLValue#\
<wtrem ** MMENUE
**>\
##OSD_0.E_01_060_008.HTMLValue#\
<wtrem **
**>\
##OSD_0.E_01_068_005.HTMLValue#\
<wtrem ** 04-11-08 **>\
##OSD_0.E_01_073_008.HTMLValue#</span>
<span class="screenline" id="SL2"><wtrem ** MMENUE
MAIN MENUE
**>\
##OSD_0.E_02_001_041.HTMLValue#\
<wtrem **
**>\
##OSD_0.E_02_042_031.HTMLValue#\
<wtrem ** 11:02:45 **>\
##OSD_0.E_02_073_008.HTMLValue#</span>
<span class="screenline" id="SL3"><wtrem ** ------------------------------------------------------------------------------- **>\
##OSD_0.E_03_001_080.HTMLValue#</span>
<span class="screenline" id="SL4"><wtrem **
**>\
##OSD_0.E_04_001_080.HTMLValue#</span>
<span class="screenline" id="SL5"><wtrem **
**>\
##OSD_0.E_05_001_024.HTMLValue#\
56
WebTransactions for OSD
Example session
Format-specific modifications of display
The format’s input fields are represented by input tags of type text if the original field was
unprotected. If the original field was protected (input is invisible), then the tag is of type
password. The specification value="##object-name.Value#" ensures that the value from the
field in the format is entered in the input field.
<input type="##(OSD_0.E_05_025_001.Visible == 'No') ? 'password' : 'text'#" ##(
WT_BROWSER.acceptClass ) ? 'class="box" style="width:9px"' : ''# name="E_05_025_001"
size="1" maxlength="1" markable="1" value="##OSD_0.E_05_025_001.Value#"/>\
<wtrem **
1. Reservation **>\
...
<wtrem ** Please choose desired function ! **>\
##OSD_0.E_20_025_032.HTMLValue#\
<wtrem **
**>\
##OSD_0.E_20_057_024.HTMLValue#</span>
<span class="screenline" id="SL21"><wtrem **
**>\
##OSD_0.E_21_001_080.HTMLValue#</span>
<span class="screenline" id="SL22"><wtrem ** ------------------------------------------------------------------------------- **>\
##OSD_0.E_22_001_080.HTMLValue#</span>
<span class="screenline" id="SL23"><wtrem **
**>\
##OSD_0.E_23_001_080.HTMLValue#</span>
<span class="screenline" id="SL24"><wtrem **
**>\
##OSD_0.E_24_001_080.HTMLValue#</span>
All the input fields are administered in an object.
<wtoncreatescript>
<!-wtInputFields = {E_05_025_001:OSD_0.E_05_025_001};
//-->
</wtoncreatescript></pre></div>
<!-- - - - - - - - - - - - - - - - - - - - - - - - - - - - - - - - - - - <!-- end of host screen section
<!-- - - - - - - - - - - - - - - - - - - - - - - - - - - - - - - - - - - </td>
WebTransactions for OSD
-->
-->
-->
57
Format-specific modifications of display
Example session
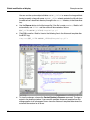
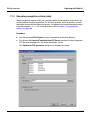
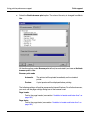
3.4.2 Editing a format-specific template
Ê
Choose the command File/Open Current Template to open the format-specific template TRAV0 in the WebLab work area.
Ê
Choose the command Design/Select Host Objects Graphically/From a
Communication Object. The dialog box for the graphical host object selection for the
current template is displayed on the screen.
This dialog box displays the format as it would appear in an emulation or at a terminal.
All the output fields which cannot be edited have a grey background. The single input
field in this format has a white background.
58
Ê
Move the mouse pointer to this input field (because of the selection the field becomes
blue) and click on the right mouse button to open the context menu.
Ê
Choose the Drop-Down List command from the context menu. The Choose Template
dialog box is displayed on the screen. This dialog box is the first displayed by a wizard
which helps you create a list.
WebTransactions for OSD
Example session
Format-specific modifications of display
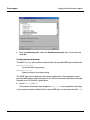
In this dialog box you specify the template in which the list is to be inserted. The option
Template in Active Window is preset. If you have not previously opened the active
template, click the Current Template option.
Ê
Click on Next to confirm this presetting. The second dialog box, Assign Values, is displayed on the screen.
WebTransactions for OSD
59
Format-specific modifications of display
Example session
In this example, the Internal Value corresponds to the numerical value which the user
must enter to select an item in the field. The Value on user interface is the description
matching the internal value and corresponds to an entry in the pick list.
60
Ê
Enter the internal values and the corresponding descriptions (see figure on page 52) in
the input fields. Click on the Add button to take over a pair of values into the list.
Ê
When the list is complete, click on Finish to confirm. The corresponding HTML code for
the conversion of a list is entered along with the corresponding values in the template
TRAV0.htm.
Ê
To view this replacement, scroll through the template TRAV0 until you reach the host
section. This section starts with the comment begin of host screen section.
WebTransactions for OSD
Example session
Format-specific modifications of display
The format-specific template is constructed in a similar way to the Automask template.
All the fields of the host format are listed by name in the host section, with each name
consisting of the line and column position. The uppermost fields are used to depict the
header; the new list (select tag) corresponds to the old input field and accepts the
selected value. The other fields are responsible for the remainder of the display as you
see it in the browser.
Since the selection is now performed via the list, the explanatory texts after the list are
no longer required. Consequently, you can delete all the host objects and the comments
from the template TRAV0.htm.
Ê
Delete all the fields in the format after the select list through to and including
7 End of Session. You can use the Find command in the context menu of the dialog
box Select host objects graphically to search for the relevant fields in the template.
WebTransactions for OSD
61
Format-specific modifications of display
Ê
Example session
Choose the command Control/Update in Browser to view the result of your change.
If you now want to terminate the host connection, click on the Disconnect button.
Processing branches to the template wtstartOSD.htm (see section “OSD-specific start
template in the start template set (wtstartOSD.htm)” on page 163). You can choose
main menu and click on the go to button to return to the general start template. Here you
can click on quit to exit the WebTransactions application.
62
WebTransactions for OSD
Example session
Starting a WebTransactions application
3.5 Starting a WebTransactions application
You start an edited WebTransactions application with WebLab in the same way as an
automatic 1:1 conversion (see section “Starting a session” on page 45). The only difference
is: You must make sure that in the template wtstartOSD.htm the path name of the format
database (in this example: config/capture.sdb) is entered correctly in the
CAPTURE_FILE parameter.
However, you can also create your own start template for the integrated host application
which will take the user directly to the first format of the host application.
3.5.1 Creating a start template
WebLab also provides you with a special WTBean for the creation of host applicationspecific start templates. This is a standalone WTBean.
Before you can access WTBeans, there must be a connection to a WebTransactions
application.
i
Ê
Choose the File/New/wtcStartOSD command to call the WTBean. This opens the dialog box Add:wtcStartOSD which contains four tabs in which you can edit the properties of the WTBean.
You define the name and directory of the start template in the wtcStartOSD tab. By
default, the file name is set to config/forms/startOSD.htm.
Ê
Under File name,enter the directory and name of the start template, in this case
config/forms/Start_Travel.htm.
Ê
Next, choose the WT_SYSTEM attributes tab.
In this tab you define the most important attributes of the system object. The default
values are sufficient for the example session.
Ê
Choose the OSD connection parameter tab.
WebTransactions for OSD
63
Starting a WebTransactions application
Example session
The most important settings are the name of the communication object, the host application, the host computer and the capture data base.
Ê
Enter the name of the communication object, in this case OSD_0
i
You should note that the name of the communication object must be the same
as the name used in the Automask template.
Ê
Enter the name of the host application, in this case travel.
Ê
Enter the Internet address or symbolic name of the system on which the host application is running, here system1.
Ê
Enter the name of the capture database, in this case config/travel.sdb. If you click
Browse you can also perform an interactive search of the capture database in the file
selection box.
Ê
Click on the Further options tab.
Here you will see a tree structure in which you can edit other properties relating to the
connection to the OSD host application.
Ê
64
Set the properties required for your host application. No further modifications are required for the sample application.
WebTransactions for OSD
Example session
Ê
Starting a WebTransactions application
Click OK. The Add:wtcStartOSD dialog box is closed. The start template
Start_Travel.htm is generated and displayed in the WebLab work area. The start template
is stored in the base directory under config/forms.
The start template Start_Travel.htm will now make the settings undertaken here every time
it is called. You no longer have to make these settings every time you start a session as
described in section “Starting a session” on page 45 with wtstart.htm and
wtstartOSD.htm.
WebTransactions for OSD
65
Starting a WebTransactions application
Example session
3.5.2 Starting a session with WebLab
There are two ways of starting a WebTransactions session with the application-specific
WebLab start template:
–
–
You select the File/Start Session command. In this case the Start session dialog box
will be displayed.
Ê
In the Start Template input field, enter the name of the application-specific start
template.
Ê
Confirm with OK.
In the template tree you click with the right mouse button on the application-specific
start template. In the context menu which appears, select the command Start session.
In both cases WebLab immediately starts the session with the template selected as the start
template.
66
WebTransactions for OSD
Example session
Starting a WebTransactions application
3.5.3 Alternative ways of starting a WebTransactions application
The above example only explains how to start a WebTransactions application from WebLab
during development. In productive operation, however, there are other ways of doing this.
For a complete description, see the WebTransactions manual “Concepts and Functions”.
–
You can give the supplied entry page wtadm.htm the name of the start template and
provide the user with this.
–
You can write your own entry page in which WebTransactions is started via a form or link.
Example
<form method="post" action=
"/cgi-prefix/WTPublish.exe/basedir?startTemplate">
<input type="submit" value="Start WebTransactions">
</form>
–
You could also start WebTransactions without an entry page by simply entering the URL
directly:
http://WebServer/cgi-prefix/WTPublish.exe/basedir?startTemplate
For basedir you must specify the absolute path of the base directory.
Example
http://diana/scripts/WTPublish.exe/d:\webta\apps\
beispiel_osd?Start_Travel
WebTransactions for OSD
67
Eine Dokuschablone von Frank Flachenecker
by f.f. 1992
4 Creating the base directory
Once you have installed WebTransactions on the WebTransactions server and WebLab on
your personal Windows computer, you can use WebLab to create one or more base directories. A base directory includes all the files which configure WebTransactions for a specific
application scenario.
If you de-install WebTransactions or install a new product version, the individual configurations are therefore retained.
4.1 Creating a base directory with WebLab
Before you can create a base directory for a WebTransactions application, the
WebTransactions administrator must have created a user ID for you and then subsequently
released one or more pools for this user ID in which you can create a base directory.
Before you create a base directory, it is recommended that you first create a project to store
most important data required by WebLab when working with the WebTransactions application. When creating a project, you are automatically offered the opportunity to create a
base directory.
To do this, proceed as follows:
Ê
Call WebLab, e.g. via Start/Programs/WebTransactions 7.0/WebLab
Ê
There are two possibilities for starting to create a base directory:
Ê
Select the Project/New... command and when asked whether you want to create a
base directory, answer Yes (see section “Creating a project” on page 37).
or
Ê
Choose the Generate/Basedir... command and specify that a new project is to be
created when the relevant query appears.
In both instances, the Connect dialog box is opened.
Ê
Enter the connection parameters in the Connect dialog box and click on OK.
WebTransactions for OSD
69
Creating a base directory with WebLab
Creating the base directory
Ê
In the following dialog box, enter your user ID and password and click on OK.
Ê
Enter the following in the Create basedir dialog box:
– from the list of proposed pools, select the pool in which the base directory is to be
created
– enter the name of the new base directory
– check the OSD box in the Host Adapter section
– click on OK.
Ê
Enter the required options in the Generate Automask dialog box. These correspond to
the options for the generation of format-specific templates.
Ê
Click on Generate. WebLab now creates the base directory together with all the files
that are required for the execution of the WebTransactions application. The structure and
contents of the base directory are described in the WebTransactions manual “Concepts
and Functions” and in section “Structure of a base directory” on page 71.
Converting a base directory to a new version
70
Ê
Select Generate/Update Base Directory. This opens the Update Base Directory
dialog box.
Ê
If you only want to change the links from the base directory to the new installation
directory, select the Update all links option. Select this option when you have updated
the files that are supplied or generated by WebTransactions.
Ê
If all files which are copied or generated on creation of the base directory need to be
recreated, select the Overwrite all files option.
WebTransactions for OSD
Creating the base directory
Structure of a base directory
4.2 Structure of a base directory
This section describes the specific aspects of the base directory that only apply to the OSD
host adapter.
i
Information regarding the structure of base directories that applies to all host adapters can be found in the WebTransactions manual “Concepts and Functions”.
The Pkeys subdirectory
As default, the Pkeys subdirectory contains the mapping of the programmable keys
(P keys). The mapping of the P keys must be in an XML file which you have created, for
example, with the wtPKEYS.htm template and which you can store as session specific. After
a WebTransactions session is started it is possible to load the P key mapping stored in the
Pkeys directory to the current emulation.
WebTransactions for OSD
71
Eine Dokuschablone von Frank Flachenecker
by f.f. 1992
5 Configuring and starting WebTransactions
WebTransactions for OSD is available for the platforms BS2000/OSD, Solaris, Linux and
Windows. It is connected to the host via a 9750 terminal emulation which is integrated with
the host adapter.
You use certain system object attributes to set the necessary configuration data such as the
host application name and host name. The relevant attributes are listed in section “Interaction between system object attributes and methods” on page 128. The corresponding
values for these attributes are set in the start template, see section “OSD-specific start
template in the start template set (wtstartOSD.htm)” on page 163.
5.1 Configuring character sets
The 9750 terminal emulation which is integrated in WebTransactions for OSD supports the
classic 7-bit ASCII character set. If the emulation is configured as a 9763 terminal then a
number of 8-bit character sets complying with the standard ISO-8859-x are also supported.
5.1.1 7-bit ASCII character set
The 7-bit ASCII character set comprises 128 characters including control characters.
Certain characters may be replaced by country-specific variants, for example “|” by “?”, with
the result that a number of different 7-bit variants are supported.
WebTransactions supports these 7-bit variants by means of the system object attribute
NATIONAL_VARIANT. This can have the following values:
–
–
–
–
–
–
–
–
–
Danish
English (UK)
English (USA)
French
French-Belgian
German
International
Italian
Norwegian
WebTransactions for OSD
73
Configuring character sets
–
–
–
Configuring and starting WebTransactions
Spanish
Swedish
Swiss
The host adapter converts the 7-bit variants into the 8-bit character set ISO Latin-1 which
is used by the browser.
This character set comprises 256 characters. Of these, the first 128 are identical with the
classical 7-bit ASCII character set. In contrast, the second 128 characters contain the
various special characters and letters used in certain languages, e.g. “ö”, “ß” or “á”.
The 9750 emulation must be configured to correspond to the character set which is used
by the OSD host application.
5.1.2 8-bit character set
WebTransactions supports 8-bit character sets (ISO-8859-x) when emulating a 9763
terminal, i.e. when the system object attribute TERMINAL_TYPE has the value 9763.
The ISO-8859-x standard covers a number of different 8-bit character sets which support
different languages:
ISO standard
Character set
ISO-8859-1
Latin-1
ISO-8859-2
Latin-2
ISO-8859-5
Cyrillic
ISO-8859-7
Greek
ISO-8859-9
Turkish
The old 7-bit character sets are also supported for reasons of compatibility.
At the start of communications with the terminal, some OSD applications demand a status
request to which the terminal responds with a list of the 8-bit character sets which it
supports. At each communications step, these OSD applications supply information about
the current character set (7-bit or 8-bit). The WebTransactions OSD host adapter interprets
this information and sets the connection-specific system object attribute HOST_CHARSET
accordingly (see section “System object attributes” on page 113). For example, in the case
of a 7-bit character set it is set to ISO-8859-1 and the national variant is taken into account.
74
WebTransactions for OSD
Configuring and starting WebTransactions
Configuring character sets
All generated standard templates contain the following script which sets the global system
object attribute CHARSET to the value of HOST_CHARSET:
WT_SYSTEM.CHARSET = host_system.HOST_CHARSET;
i
You must incorporate this value assignment in any templates which you create
yourself.
WebTransactions uses the value from WT_SYSTEM.CHARSET when sending the HTML page to
the browser in the HTTP protocol (HTTP header field content-type, see the
WebTransactions manual “Concepts and Functions”). This means that browsers which
support this concept can dynamically set the corresponding character set.
By default, the HTTP protocol uses the 8-bit ISO Latin-1 character set. In HTTP V1.1 you
can specify a different character set for the browser. Depending on the type and configuration of the browser you are using, you may have to automatically take the value from the
HTTP header content-type/charset or to configure a fixed character set.
The WTML template language supports all 8-bit character sets. This means, for example,
that with an appropriate editor you can type Cyrillic characters provided that the OSD host
application supports this character set.
WebTransactions for OSD
75
Starting a WebTransactions application
Configuring and starting WebTransactions
5.2 Starting a WebTransactions application
If you do not wish to customize the individual formats, and you only wish to use the option
of automatically converting host formats as described in the chapter “Integrating a host
application without editing” on page 77, no further steps are necessary. Once you have
installed WebTransactions (see page 17) and created a base directory (see page 69), your
WebTransactions application is ready to use. To start the host application, you can use the
start template set supplied with the product, which is described in section “Start templates
for OSD” on page 162.
For productive operation, you should generate an application-specific start template in
WebLab using the WTBean wtcStartOSD.wtc.
76
WebTransactions for OSD
6 Integrating a host application without editing
WebTransactions for OSD provides special templates for the dynamic conversion of 9750
formats at the Web browser interface. This allows you to adapt the Look & Feel of the host
application so that it resembles normal operation on a real terminal or terminal emulation:
–
OSD.wmt/OSD_pocket.wmt
OSD-specific master templates for the general layout of the forms. These templates are
used for the generation of the Automask template and the format-specific templates.
–
AutomaskOSD.htm
Conversion template for OSD host applications which is able to use a form to automatically convert all formats of an OSD application to an HTML page.
–
wtKeysOSD.htm
This template inserts the controls that represent the special keys of the 9750-Terminals.
wtKeysOSD.htm is not only used during dynamic conversion. The format-specific
templates generated using the capture process also use wtKeysOSD.htm.
–
wtBrowserFunctions.htm
This template is responsible for keyboard conversion at the browser so that users at the
browser can edit the host application formats in just the same way as at an emulation
or terminal.
With the exception of the master template, these conversion templates are generated
automatically in the directory basedir/config/forms when the base directory is set up.
Variants of the AutomaskOSD.htm template can also be created using WebLab (see section
“Creating variants of AutomaskOSD.htm (with WebLab)” on page 80).
Global modifications, e.g. to suit the corporate identity, can be carried out in the
AutomaskOSD.htm template. These are then applied automatically to all formats of the host
application. Global modifications, that you carry out in the master template, get effective, as
soon as you generate templates using this master template (automask or individual
templates). The master template is stored in the weblab directory of the WebLab installation
directory.
If application-specific changes are to be carried out in the master template, it makes sense
to copy the master template from the WebLab computer to the base directory of the
WebTransactions server and make the changes there in order to ensure that the master
template is a component of the base directory.
WebTransactions for OSD
77
Master templates
Integrating a host application without editing
6.1 Master templates OSD.wmt and OSD_Pocket.wmt
WebTransactions uses master templates as a model for the generation of the Automask and
the format-specific templates. They therefore ensure a consistent layout. Like any other
template, master templates can contain fixed HTML areas and any WTML tags and
WTScripts. However, in master templates you can also use special master template tags,
known as MT tags, which are described in the WebTransactions manual “Template
Language”.
The use of master templates is especially effective in the case of host applications in which
large numbers of formats possess a similar structure: e.g. a fixed subdivision into header,
workspace and footer or in cases where you have generated only selected, format-specific
templates and have converted the less frequent formats using the Automask template.
In such cases, you simply need to define the structure of the master template and assign
this master template as a model on the generation both of the format-specific templates and
the Automask template. All the generated templates will then have the required structure.
WebTransactions for OSD is supplied with the standard master templates OSD.wmt and
OSD_Pocket.wmt. You can customize these templates to your particular needs or use them
unchanged. The standard master templates already contain all the WTML tags and
WTScripts that are the same for all the templates of the product variant in question. It can,
for example, contain the check on whether a private system object exists.
Via the WebLab graphic user interface, you can specify which master template is to be used
for generation. You can define certain generation options (e.g. the generation method) both
in the master template or directly in WebLab. The settings in WebLab override the
corresponding settings in the master templates.
Using OSD.wmt or OSD_pocket.wmt
The OSD_Pocket.wmt master template has been developed specially for use with the Pocket
Internet Explorer. You can use it to generate an Automask template (see section
“AutomaskOSD.htm template” on page 80) and for format-specific templates (see section
“Capturing with WebLab” on page 94).
78
WebTransactions for OSD
Integrating a host application without editing
Master templates
OSD_Pocket.wmt has the following additional functions:
–
It generates a frameset for the screen. It contains two frames, one for command
inputting and another for the display.
–
Only the field where the cursor is currently located can be invoked as the entry field.
–
The lines on the screen are automatically made to fit the screen and are colored.
–
Extra long outputs are automatically continued on the next page.
–
The screen display can be edited during runtime:
– To obtain a 01:01 representation, use the Command/Screen command.
– To adapt the representation to the screen width, use the Command/Compact
command. In this case, the parameters and the corresponding entry field are
displayed on one line.
WebTransactions for OSD
79
AutomaskOSD.htm template
Integrating a host application without editing
6.2 AutomaskOSD.htm template
The AutomaskOSD.htm template dynamically creates a representation of the last format
received from the host with receive. It allows you to process any 9750 format without any
pre-editing and is always used by WebTransactions if no format-specific template is present
for the host format. It is possible to choose between different variants using the system
object attribute AUTOMASK.
6.2.1 Creating variants of AutomaskOSD.htm (with WebLab)
The AutomaskOSD.htm template is usually generated automatically when a base directory
is created. However, WebLab also allows you to generate variants with different options
which provide optimum support for the various designs of your WebTransactions application.
To do this, choose the command Generate/Automask. The Generate Automask dialog
box is displayed on the screen.
80
WebTransactions for OSD
Integrating a host application without editing
AutomaskOSD.htm template
The parameters that you can set in this dialog box control how the Automask template is
generated. The parameters have the following meanings:
Master Template
Specifies the master template that is to be used for generation of the Automask
template, see also section “Master templates OSD.wmt and OSD_Pocket.wmt” on
page 78. A master template is always required. The supplied master template
OSD.wmt is used by default.
Host Protocol
Specifies the protocol via which the host application communicates with the
WebTransactions host adapter.
Communication Object
Specifies the name of the current communication object. The name of the communication object is primarily of importance when you want to integrate more than one
host application with WebTransactions. The name must correspond to the name in
the start template.
Default: OSD_0.
Dynamic Display Attributes
All field attributes are supported and read from the host object at runtime.
First line as menu bar
Specifies whether the generated WTML template supports the first line of the format
as the menu bar. If you activate this field, all text fields in the first screen line of the
host application will be generated as buttons. The option is not relevant for
WebTransactions for OSD.
Automask file
Specifies the directory and the name for the generated template.
Default path:
basedir/config/forms/AutomaskOSD.htm.
If you save the Automask in another directory under config, you can implement
style and language variants. See the WebTransactions manual “Concepts and
Functions”.
Application Prefix
If you want to integrate multiple host applications which may possibly possess
identical format names, then WebLab can insert a prefix for the FLD file or template
in front of the actual file name. The file name then consists of:
[email protected] or [email protected]
WebTransactions for OSD
81
AutomaskOSD.htm template
Integrating a host application without editing
6.2.2 Structure of AutomaskOSD.htm
Below you can see the Automask template generated using the master template OSD.wmt
(see section “Master templates OSD.wmt and OSD_Pocket.wmt” on page 78).
The comments are the expansion of the statement %%GenerationInfo%.
<html>
<wtrem>***********************************************************************</wtrem>
<wtrem>** WTML document: AutomaskOSD
**</wtrem>
<wtrem>***********************************************************************</wtrem>
<wtrem>**
**</wtrem>
<wtrem>** Document generation based on Master Template :
**</wtrem>
<wtrem>** C:\Programme\WebTransactionsV7\weblab\OSD.wmt
**</wtrem>
<wtrem>**
**</wtrem>
<wtrem>** Generated at Tue Jan 04 13:54:57 2005
**</wtrem>
<wtrem>**
**</wtrem>
<wtrem>** Options used by the generator :
**</wtrem>
<wtrem>**
- %OPTIONS:
**</wtrem>
<wtrem>**
CommObj = OSD_0
**</wtrem>
<wtrem>**
NationalVariant = International - PartialFormatMode = No
**</wtrem>
<wtrem>**
- %OPTIONS:
**</wtrem>
<wtrem>**
self defined Tag = taggedInputCrossCall
**</wtrem>
<wtrem>**
- %OPTIONS:
**</wtrem>
<wtrem>**
self defined Tag = taggedInputCrossCall
**</wtrem>
<wtrem>**
- %OPTIONS:
**</wtrem>
<wtrem>**
self defined Tag = taggedOutputCrossCall
**</wtrem>
<wtrem>**
- %OPTIONS:
**</wtrem>
<wtrem>**
self defined Tag = taggedOutputCrossCall
**</wtrem>
<wtrem>**
- %LINES:
**</wtrem>
<wtrem>**
TaggedInput = Enabled - TaggedOutput = Enabled
**</wtrem>
<wtrem>**
DisplayAttributes = Dynamic - CursorInProtectedField = Yes
**</wtrem>
<wtrem>**
- %RECEIVES:
**</wtrem>
<wtrem>**
Parameters not specified
**</wtrem>
<wtrem>***********************************************************************</wtrem>
<wtrem>** WebTransactions V7.0
Fujitsu Siemens Computers GmbH, 2005 **</wtrem>
<wtrem>***********************************************************************</wtrem>
References to the communication object and the associated specific system object attribute
are created to ensure uniform access to the connection parameters and host objects.
<wtoncreatescript>
<!-//{{WebLab(assignCommunicationObject)
OSD_0 = WT_HOST.active || WT_HOST.OSD_0;
if (OSD_0.WT_SYSTEM != null)
OSD_0_system = OSD_0.WT_SYSTEM;
// communication specific system object
else
OSD_0_system = WT_SYSTEM;
// global system object
82
WebTransactions for OSD
Integrating a host application without editing
AutomaskOSD.htm template
//}}
// propagate communication object to included WTML documents //////////////
wtCurrentComm = OSD_0;
wtCurrentComm_system = OSD_0_system;
The input mode (insert or overwrite) is set according to the specification in EDIT_MODE.
if ( wtCurrentComm_system.EDIT_MODE )
{
if ( typeof wtCurrentComm_system.isOverwrite == 'undefined' &&
wtCurrentComm_system.EDIT_MODE.match(/OVERWRITE/) )
wtCurrentComm_system.isOverwrite = true;
else if (wtCurrentComm_system.EDIT_MODE == 'OVERWRITE')
wtCurrentComm_system.isOverwrite = true;
else if (wtCurrentComm_system.EDIT_MODE == 'INSERT')
wtCurrentComm_system.isOverwrite = false;
} else
wtCurrentComm_system.isOverwrite = false;
//-->
</wtoncreatescript>
If there is a PROLOG template this will be executed.
<wtif (OSD_0_system.PROLOG)>
<wtinclude Name="##OSD_0_system.PROLOG#">
</wtif>
After the mandatory establishment of the HTML framework there is the Style tag which sets
the general display characteristics in the browser. Use the WT_BROWSER.charSize attribute
to set the character size (see section “Font size in the attribute WT_BROWSER.charSize”
on page 152).
<head>
<title>WebTransactions V7.0 - application ##OSD_0_system.SYM_DEST# on
##OSD_0_system.HOST_NAME#</title>
##WT_SYSTEM.CGI.HTTP_USER_AGENT.indexOf( 'MSIE' ) >= 0 ?
'<meta http-equiv="Pragma" content="no-cache"/>' :
'<meta http-equiv="Cache-Control" content="no-cache"/>'#
<wtif (WT_BROWSER.acceptClass)>
<style type="text/css">
input {
font-size:
##WT_BROWSER.charSize#px;
font-family: courier new, monospace;
}
input.box {
border:
0 solid;
padding:
1px 0 1px 0;
margin-left: -1px;
margin-top:
##WT_BROWSER.marginTop#px;
font-size:
##WT_BROWSER.charSize#px;
WebTransactions for OSD
83
AutomaskOSD.htm template
Integrating a host application without editing
font-family: courier new, monospace;
color:
#000000;
background-color: #FFFFFF;
}
input.button {
font-size:
font-family:
border-width:
margin-left:
}
select {
font-size:
font-family:
}
pre {
font-size:
font-family:
margin:
}
</style>
</wtif>
</head>
##WT_BROWSER.charSize#px;
courier new, monospace;
1pt;
-1pt;
##WT_BROWSER.charSize#px;
courier new, monospace;
##WT_BROWSER.charSize#px;
courier new, monospace;
0;
After this a form (<form>) is opened which enables dialog with the user at the browser.
To operate the dialog, <wtInclude> is used to call the templates wtKeysOSD.htm and
wtBrowserFunctions.htm in order to support the best 01:01 representation. The controls of
these template thus become part of the form.
<body bgcolor="#C0C0C0">
<form WebTransactions name="Automask">
<table frame="border" rules="all">
<tr>
<td>
<wtinclude name="wtBrowserFunctions">
<wtinclude name="wtKeysOSD">
<wtif (OSD_0_system.FORMTPL)>
<wtinclude Name="##OSD_0_system.FORMTPL#">
</wtif>
</td>
</tr>
84
WebTransactions for OSD
Integrating a host application without editing
AutomaskOSD.htm template
This wtOnCreate script defines the display attributes for the host objects. Here, the
taggedOutput() function is used to edit the output fields, and the taggedInput() function
is used to edit the input fields.
<tr>
<td>
<wtoncreatescript>
<!-function taggedInput( hostObject )
{
currentLength = hostObject.Length;
input = '<input type=' + (hostObject.Visible == 'No' ? '"password"' :
'"text"' );
if ( WT_BROWSER.is_ie || WT_BROWSER.is_ns61up)
{
input += ' class="box" style="width:' + (currentLength *
WT_BROWSER.charWidth + 1) + 'px';
input += (hostObject.Blinking == 'Yes' ? '; background-color:#FFC0C0' :
'');
input += (hostObject.Underline == 'Yes' ? ( hostObject.Intensity ==
'Reduced' ? '; color:#A0A0FF' : '; color:#0000A0' ) :
( hostObject.Intensity ==
'Reduced' ? '; color:#A0A0A0' : '' )) + '"';
}
input += ' name="' + hostObject.Name + '" size="' + currentLength
+ '" maxlength="' + currentLength
+ '" value="' + hostObject.Value;
if (WT_BROWSER.acceptInputAttributes)
input +=
(hostObject.Input == 'Numeric'?'" numeric="1':'')
+ (hostObject.Markable == 'Yes'?'" markable="1':'')
+ (hostObject.Type == 'Protected'?'"
wtprotected="1':'');
input +=
'"/>';
document.write( input );
}
function taggedOutput( hostObject )
{
output = hostObject.HTMLValue;
if ( hostObject.Visible == 'Yes' )
{
if ( hostObject.Inverse == 'Yes' )
{
if ( hostObject.Color=='#000000' )
output = '<font color="#FFFFFE" style=\"background-color:#000001\">'
+ output + '</font>';
else
output = '<font color="#000000" style=\"background-color:' +
hostObject.Color + '\">' + output + '</font>';
}
WebTransactions for OSD
85
AutomaskOSD.htm template
Integrating a host application without editing
else if (hostObject.Color !=
OSD_0.WT_Color.Default)
output = '<font color=\"' + hostObject.Color + '\">' + output +
'</font>';
if (hostObject.Intensity == 'Normal')
output = '<b>' + output + '</b>';
if (hostObject.Blinking == 'Yes')
output = '<i>' + output + '</i>';
if (hostObject.Underline == 'Yes')
output = '<u>' + output + '</u>';
document.write( output );
}
else
{
document.write( "
".substr(0,hostObject.Length));
}
}
//-->
</wtoncreatescript>
<!-- - - - - - - - - - - - - - - - - - - - - - - - - - - - - - - - - - - <!-- begin of host screen section
<!-- - - - - - - - - - - - - - - - - - - - - - - - - - - - - - - - - - - <div style="color:##OSD_0.WT_Color.Default = "\#000000"#"><pre>\
-->
-->
-->
A key functionality of AutomaskOSD.htm consists in a loop which represents each format
component as an HTML element. To this end, the host adapter provides the host objects
$FIRST and $NEXT. With WebLab, the code of the AutomaskOSD template can be influenced
by the options selected at generation as well as by the master template. You can determine,
for example, whether attributes such as Blinking are to be represented.
<wtoncreatescript>
<!-if ( typeof wtInputFields == 'undefined' )
wtInputFields = new Object;
currentLine
= 1;
document.write('<span class="screenline" id="SL1">');
for (element = OSD_0.$FIRST.Name; OSD_0 && element != '$END'; element =
OSD_0.$NEXT.Name)
{
currentHostObject = OSD_0[element];
if ( currentHostObject.StartLine != currentLine )
{
document.write ('</span>
<span class="screenline" id="SL',++currentLine,'">');
}
if ( currentHostObject.Type == 'Protected' && currentHostObject.Markable == 'No' )
{
taggedOutput( currentHostObject );
}
else
86
WebTransactions for OSD
Integrating a host application without editing
AutomaskOSD.htm template
{
wtInputFields[ element ] = currentHostObject;
taggedInput( currentHostObject );
}
}
document.write('</span>');
//-->
</wtoncreatescript>
</pre></div>
<!-- - - - - - - - - - - - - - - - - - - - - - - - - - - - - - - - - - - <!-- end of host screen section
<!-- - - - - - - - - - - - - - - - - - - - - - - - - - - - - - - - - - - </td>
</tr>
</table>
-->
-->
-->
A loop is used across the input fields for all the browsers which ignore the maxlength
attribute in the <input> tag. The loop adds the client-side attribute maxLength to the appropriate DOM object as this is not available automatically. For all browsers which do not
accept attributes in the <input> tag, the attribute markable is set, provided that the corresponding host object is markable.
<script type="text/javascript">
<!-<wtoncreatescript>
<!-for( element in wtInputFields )
{
if (!WT_BROWSER.acceptMaxLength)
document.writeln('wtSetMaxLength(\'', element, '\',', wtInputFields[ element
].Length, ' );' );
if (!WT_BROWSER.acceptInputAttributes)
{
if (wtInputFields[ element ].Input == 'Numeric')
document.writeln('wtSetInputAttribute("numeric", "', element, '");');
if (wtInputFields[ element ].Markable == 'Yes')
{
document.writeln('wtSetInputAttribute("markable", "', element, '");');
if (wtInputFields[ element ].Type == 'Protected')
document.writeln('wtSetInputAttribute("wtprotected", "', element, '");');
}
}
}
//-->
</wtoncreatescript>
//-->
</script>
</form>
WebTransactions for OSD
87
AutomaskOSD.htm template
Integrating a host application without editing
Following the loop involving all the fields, the focus in the web browser window is then set
to the field in whose corresponding screen the cursor was positioned (provided the field is
an input field).
<wtrem** initial focus selection *****************************************>
<script type="text/javascript">
<!-wtSetFocus('##OSD_0.WT_FOCUS.Field#');
//-->
</script>
<wtrem** Script executed after post of HTML page ***************************>
Finally, in an OnReceive script there is one call each to send and receive in order to
synchronize the WebTransactions dialog cycles and the host dialog steps. The
setNextPage() function determines the next template that is to be processed.
<wtonreceivescript>
<!-if( OSD_0[WT_POSTED.wt_cursor] )
{
if(WT_POSTED.wt_cursorOffset && WT_POSTED.wt_cursorOffset*1>0)
{
wtCursorField = OSD_0[WT_POSTED.wt_cursor];
OSD_0.WT_FOCUS.Field =
'E_'+wtCursorField.STARTLINE+'_'+(wtCursorField.STARTCOLUMN*1+WT_POSTED.wt_cursorOffset
*1)+'_1';
}
else
OSD_0.WT_FOCUS.Field = WT_POSTED.wt_cursor;
}
if (OSD_0_system.EDIT_MODE &&OSD_0_system.EDIT_MODE.match(/USER/))
OSD_0_system.isOverwrite = (WT_POSTED.wt_isOverwrite=='1');
//{{WebLab(processPostedData)
for ( element in wtInputFields )
{
currentHostObject = wtInputFields[element];
if ( currentHostObject.Type == 'Unprotected' )
currentHostObject.Value = WT_POSTED[element];
}
wtMarkedFields = WT_POSTED.wt_markedFields.split(',');
for( i=1; i<wtMarkedFields.length; i++)
OSD_0[wtMarkedFields[i]].Modified = 'Yes';
//}}
//{{WebLab(processHostCommunication)
if ( WT_POSTED.wt_special_key == 'Suspend' || OSD_0_system.SUSPEND )
{
OSD_0_system.SUSPEND = false;
}
else
{
88
WebTransactions for OSD
Integrating a host application without editing
AutomaskOSD.htm template
try {
OSD_0.send();
OSD_0.receive();
if( OSD_0_system.CAPTURED_FLD == "Yes" && OSD_0_system.APPLICATION_PREFIX )
setNextPage( OSD_0_system.APPLICATION_PREFIX + '@' + OSD_0_system.FLD );
else
setNextPage( OSD_0_system.FLD );
WT_SYSTEM.CHARSET = OSD_0_system.HOST_CHARSET;
}
catch (e) {
if ( OSD_0.$CONNECTION.ALIVE == 'No' )
if ( OSD_0_system.DISCONNECT )
setNextPage(OSD_0_system.DISCONNECT);
else
setNextPage('wtstart');
else if ( WT_SYSTEM.COMMUNICATION_ERROR_FORMAT )
setNextPage( WT_SYSTEM.COMMUNICATION_ERROR_FORMAT );
}
}
//}}
//-->
</wtonreceivescript>
</body>
<wtif (OSD_0_system.EPILOG)>
<wtinclude Name="##OSD_0_system.EPILOG#">
</wtif>
</html>
WebTransactions for OSD
89
wtKeysOSD.htm template
Integrating a host application without editing
6.3 wtKeysOSD.htm template
A real terminal has special keys with associated functions that can be reproduced almost
fully in a terminal emulation (e.g. by assigning substitute keys).
The wtKeysOSD.htm template therefore provides controls for the OSD-specific standard
keys. The functions of frequently used keys such as Enter are represented by Submit
buttons, while all the other functions are represented by pick lists. In addition,
wtKeysOSD.htm contains some buttons that do not correspond to any terminal key
(DISCONNECT, REFRESH, SUSPEND and Print).
The individual controls are described in the table on page 142.
wtKeysOSD.htm includes the file wtKeysOSD.js which contains the mapping of the special
keys for WebTransactions. In this file you can adapt the key mapping to your needs and also
extend it. A complete description of this procedure is given in section “Mapping keys in
wtKeysOSD.js” on page 143).
The OSD.wmt master template contains a call (<wtInclude>) to wtKeysOSD.htm.All other
templates created using this master template (whether with Automask or the capture
procedure) will thus also contain this call.
When you select a key function by clicking your mouse or by selecting a list item, the
browser sends the form data to WebTransactions. To do this, wtKeysOSD.htm creates an
invisible input field with the parameters <input type="hidden" and
name="wt_special_key" ...>. The function selected is stored in this field and transferred
together with the visible field to WebTransactions. Here, the desired function in executed by
the terminal emulation integrated in the host adapter using send and receive. Whether or
not there is any communication depends on the key function selected. In some cases (e.g.
REFRESH), the host communication is suppressed.
To implement the keys functions, the host adapter uses the host object WT_KEY (see the
table on page 142). All functions provided by wtKeysOSD.htm and wtKeysOSD.js are
mapped to a corresponding value in WT_KEY.Key (in a OnReceive script). The value of
WT_KEY.Key controls the behavior of the send and receive calls.
90
WebTransactions for OSD
Integrating a host application without editing
wtBrowserFunctions.htm template
6.4 wtBrowserFunctions.htm template
A real terminal can also be controlled via the keyboard. This behavior can be largely reproduced in a terminal emulation.
The wtBrowserFunctions.htm template uses Javascripts to provide you with keyboard
support in the browser. Different browser versions also support different functions.
The OSD.wmt master template contains a call for wtBrowserFunctions.htm. All other
templates created using this master template (whether with Automask or the capture procedure) will thus also contain this call.
wtBrowserFunctions.htm also uses the <input> tags created by wtKeysOSD.htm.
When you activate a browser function from the keyboard, the browser sends the form data
to WebTransactions. Here, the desired function in executed by the terminal emulation
integrated in the host adapter using send and receive.
In section “Terminal functions supported” on page 138 there is a list showing the functions
supported by each browser.
6.5 wtPKEYS.htm template
A 9750 terminal also provides you with programmable keys (P keys) which you can
customize with the functions of your choice.
The template wtPKEYS.htm provides an easy method for making the P keys available on the
browser. The template is a model only and you can edit or extend it to suit your own
particular needs. For a description of the procedure, see section “P key support” on
page 154.
wtPKEYS.htm includes the template wtPkeyValues.htm which contains a table for the
mapping of special keys as buttons. It also includes the definition of the WT_PKEYS class used
in the wtPkeyFunctions.htm template. The WT_PKEYS class provides you with the methods
to be used for administering the P keys.
To display the wtPKEYS.htm template, go to the host application screen, go to the pkeys picklist and select the command P. wtPKEYS.htm will then be called in place of the current
template with the setNextPage() function.
WebTransactions for OSD
91
Eine Dokuschablone von Frank Flachenecker
by f.f. 1992
7 Editing templates
Once you have connected your host application to the Web, the way the formats are
displayed at a browser corresponds to that of a terminal (1:1 conversion). In many cases,
this conversion, which is performed by the Automask template, is sufficient and requires no
further design steps.
However, if you want to make use of the many and varied user interface design possibilities
available for Web applications and prepare the host application’s different dialog steps
yourself, then it is no longer enough simply to use the Automask template. Postprocessing
can then be performed using so-called format-specific templates.
You can generate these format-specific templates using the WebLab capture process and
then adapt them to meet your specific requirements. This chapter describes how you
prepare individual browser displays for specific formats.
Here, we can differentiate between the following steps:
1. First you use WebLab to set up a WebTransactions session and then open a host
connection.
2. Next you use the capture function in WebLab to identify the host formats that you intend
to prepare separately (see section “Capturing with WebLab” on page 94).
3. Once you have prepared a format-specific template for a host format which you want to
customize, you can edit it as you wish in WebLab, see the WebTransactions manual
“Concepts and Functions”.
WebTransactions for OSD
93
Capturing with WebLab
Editing templates
7.1 Capturing with WebLab
Once you have opened a connection to the host application with WebLab you can use the
interactive capture function to create recognition criteria for the individual host format that
are administered in the capture database.
At runtime, WebTransactions recognizes the formats on the basis of the recognition criteria
which are administered in a special database, the capture database. WebTransactions
requires the capture database during the deployment phase in order to assign the appropriate format-specific templates to the received host formats. Every entry in this database
links one or more recognition criteria to a format. Whenever a Receive statement is
concluded in a template, WebTransactions works through the capture database sequentially,
in order to determine whether there is a criterion corresponding to the received format. If a
hit is found, then the format name is written to the FLD attribute of the private system object.
Otherwise the value from the AUTOMASK attribute is used.
The setNextPage statement in a template specifies which template is to be executed next
after a Receive statement. This can be, for example, the template that is determined via the
recognition criteria in the FLD attribute. See the section on the dialog cycle in the
WebTransactions manual “Concepts and Functions”.
You create the capture database by defining recognition criteria for the individual formats
by means of the capture procedure. You can either define the criteria individually for each
format or define them jointly by means of a format description source.
7.1.1 Recording recognition criteria individually
When you perform capture in this way, you specify the recognition criteria individually for
each format.
Procedure
Ê
Check to see whether the correct path name is entered in the start template for the
system object attribute CAPTURE_FILE.
In the start template wtstartOSD.htm the path name config/capture.sdb is entered as
the default in the CAPTURE_FILE parameter. The capture database that is specified in
the start template will be created on the first access.
94
Ê
Make the appropriate entries in the host application to navigate to the format for which
you want to create a recognition criterion.
Ê
Select the Generate/Capture/from current screen command to open the Capture
dialog box with the current format.
WebTransactions for OSD
Editing templates
Capturing with WebLab
If the attribute CAPTURE_FILE was not set when the session was started, the dialog box
Specify capture database will be opened on screen. You can then select a existing
database or specify a new one.
Ê
Here you can select the areas that uniquely identify the format. Select one or more
rectangles by dragging the mouse with the default button held down.
Ê
Enter a name for the recognition criterium in the Format Name field. You can also select
a name from the list if you have already recorded the format and now, for example, want
to edit its identifying characteristics.
Ê
If you choose the Select last criterion option then the last identifying characteristic to
be used is set by default.
Ê
Next, open the dialog box Capture: Options for FLD and Template Generation with
the Generation Options button. In this dialog box you specify the generation options.
In most cases the default values are sufficient.
WebTransactions for OSD
95
Capturing with WebLab
96
Editing templates
Ê
Enter the required generation options and click OK to confirm. The preset values are
used for input fields in which you make no entry.
Ê
Click on OK to close the Capture dialog box. WebLab then generates an FLD file and
an HTML template for this format:
–
FLD files are special description files. WebTransactions requires them at runtime if
you use descriptive IFG names, see also section “Using descriptive names” on
page 109. Otherwise, FLD files are used by WebLab, the WebTransactions development environment, to implement the “graphical host object selection” function. In
order for WebTransactions to be able to access these files at runtime, they must be
stored under basedir/config.
–
HTML templates are interpreted by WebTransactions at runtime and determine the
user interface displayed at the browser.
WebTransactions for OSD
Editing templates
Capturing with WebLab
7.1.2 Recording recognition criteria jointly
When you perform capture in this way, you jointly define the recognition criteria for all the
formats required in a host application. For this to be possible, you must possess a format
description source with the necessary formats. You generate the format description source
using the program IFG2FLD. For more information, refer to section “Using descriptive
names” on page 109.
Procedure
Ê
Use the command File/Connect to open a connection to the base directory.
Ê
First choose the Generate/Templates/from IFG library command in order to generate
FLD files and templates from the format description source.
The Options for FLD generation dialog box is displayed on screen.
WebTransactions for OSD
97
Capturing with WebLab
98
Editing templates
Ê
In the Input group, you enter the format description source. The formats described
there are displayed in the Formats list.
Ê
In the Output group, you then select the directory to which the generated FLD files are
to be written.
Ê
Confirm with Next. The Generate FLD and Template dialog box is displayed.
Ê
In the Output group, enter the directory to which the generated templates are to be
written.
Ê
Check the Continue with ’Capture from FLD files’ box to perform joint recognition
criteria capture.
Ê
Click Finish to confirm. In the next dialog box, you specify the capture database in
which the recognition criteria are to be saved. The FLD files and templates are then
generated.
WebTransactions for OSD
Editing templates
Capturing with WebLab
If, in the past, you have already generated FLD files and templates from a format
description source then you can skip these steps and start recording the recognition
criteria directly using the Generate/Capture/from FLD file command.
i
The Capture from FLD files dialog box is displayed.
Ê
In Format list, select the first format for which you want to define recognition criteria.
The format is displayed in the right of the dialog box.
WebTransactions for OSD
99
Capturing with WebLab
Ê
Editing templates
In the displayed format, select the areas which uniquely identify the format. You can
select one or more rectangles by holding down the usual mouse button while dragging
the mouse.
When you have selected one or more recognition criteria for a format, these are entered
in the capture database and the format name is displayed in bold in the Format list.
Unlike the process for recording individual recognition criteria, you cannot freely specify
the format names.
100
WebTransactions for OSD
Editing templates
Capturing with WebLab
You can also record the recognition criteria for multiple formats simultaneously.
Ê
To do this, use SHIFT and the right mouse button to select the formats for which you
want to record recognition criteria in the Format list of the Capture from FLD files. The
first of the selected formats is displayed in the dialog box. The other selected formats
are available for processing in the tabs below this.
When you do this, all the selected formats are automatically assigned the same recognition
criteria as the first format. To check this, you can open the individual formats via the tabs.
WebTransactions for OSD
101
Capturing with WebLab
Editing templates
7.1.3 Editing recognition criteria
You can edit the individual recognition criteria during the capture process. To do this, click
on the Edit button in the Capture or Capture from FLD files dialog box. The Edit Capture
dialog box is displayed on the screen.
This dialog box presents all the recognition criteria that you have selected for the current
host format, together with their locations and sizes. The Delete button allows you to remove
individual recognition criteria again.
You can use the options Characters and Attributes to determine whether the contents of
the selected area and/or its representation are to be used for the recognition of the
associated format.
7.1.4 Editing the capture database
i
You do not need a connection to the host application in order to edit the capture
database.
You edit the capture database in WebLab in the Capture Management dialog box. This
dialog box is opened using the command Generate/Capture Management.
The dialog box shows you in tabular form the formats for which recognition criteria already
exist in the capture database.
The Capture Management dialog box lists the formats in the sequence in which they were
entered in the capture database. When capturing, new formats are added at the end. At
runtime, the capture database is searched through sequentially. For this reason, you can
change the sequence of the formats, for example in order to move frequently used formats
closer to the start and thus reduce the search time or to ensure that if similar formats exist
it is the more precisely specified of them that has priority for recognition.
102
WebTransactions for OSD
Editing templates
Individual templates for pop-up boxes
7.2 Individual templates for pop-up boxes
Host formats can contain pop-up boxes.
If you are working exclusively with the AutomaskOSD.htm conversion template, you need not
make any special arrangements for pop-up boxes, as they are displayed by the Automask
mechanism in the form of semi-graphics within the application format.
For individually adapted templates, WebTransactions provides system object attributes for
pop-up handling. If the USE_POPUP_RECOGNITION attribute is set to “Yes” at runtime, these
pop-ups are automatically recognized and sent to the Web browser in the form of distinct
pages. If characters other than the defaults are used for pop-up recognition, you must use
the system object attributes to set these characters for pop-up display, see also section
“System object attributes” on page 113.
Before describing the WebTransactions pop-up functionality in section “Generating
templates for pop-ups” on page 105, we must first examine the problems that may arise in
the identification of individual templates without special pop-up handling.
WebTransactions for OSD
103
Individual templates for pop-up boxes
Editing templates
7.2.1 Without special pop-up handling: identification problems
The WebLab capture process is used to define certain format areas as recognition criteria.
The way these areas are selected may have an effect on the correct functioning of format
recognition. This can be illustrated by means of an example:
An area is defined as a recognition criterium for the format (without pop-up box) of a dialog
application:
However, if a pop-up which overlays the recognition criterium is displayed, then
WebTransactions does not recognize the format at runtime since part of the criterium is not
present in the format (because it is hidden by the pop-up). In such a case, WebTransactions
would not display the entire format by using a corresponding format-specific template but
would instead use the conversion template AutomaskOSD.htm.
104
WebTransactions for OSD
Editing templates
Individual templates for pop-up boxes
If you select the recognition criterium in a way it is not overlayed, WebTransactions can
recognize the format, both with and without a pop-up. At runtime, WebTransactions would
use the same format-specific WTML template in both cases, which results in the following
problems:
If the pop-up was not displayed during the Capture function, it is not contained in the
generated template and does not appear in the browser.
If the pop-up was displayed during the Capture function, it is contained in the generated
template and always appears in the browser irrespective of whether or not it is present in
the actual format.
7.2.2 Generating templates for pop-ups
To avoid the problems outlined in the last section, WebTransactions allows you to create
separate format-specific templates for pop-up boxes.
Requirement
To use this function, you must first set the USE_POPUP_RECOGNITION attribute of the communication-specific system object to YES.
If you create your own start template for the host application using the WTBean
wtcStartOSD (see section “WTBean wtcStartOSD.wtc for the generation of a Start
template” on page 167), you can set this attribute directly in the start template:
Ê
In the Add:wtcStartOSD dialog, choose the Further Options tab.
Ê
Under Popup recognition, click the entry Popup recognition/enable.
Ê
Click on Popup recognition/enable to change the value of the entry from No to Yes.
If you are already within a session you started with WebLab, you can also create the
attribute for this session dynamically in WebLab:
Ê
Select the system object OSD_0_system in the WebLab object tree and open the context
menu.
Ê
Choose the New Variable command in the context menu.
Ê
Give the new system object attribute the Name USE_POPUP_RECOGNITION, select the
Type string and enter the Value Yes.
i
WebTransactions for OSD
Note that the attribute in this case is only defined for the current session. It has
to be set again in the start template before the next startup.
105
Individual templates for pop-up boxes
Editing templates
If the host application does not use the preset values for displaying the pop-up frames you
must also set the other system object attributes for pop-up recognition, see also section
“System object attributes” on page 113. These system object attributes are also required at
runtime.
Procedure
Proceed as follows to record the pop-ups with the capture procedure:
Ê
106
In the host application, navigate to the format with the pop-up boxes.
WebTransactions for OSD
Editing templates
Individual templates for pop-up boxes
Ê
Choose the Generate/Capture/from current screen command to record the pop-up
box using the capture function. The Capture dialog box is displayed on the screen with
the pop-up box. Note the difference between the contents of the entire screen and the
contents of the area recognized as the popup box.
Ê
Enter a name for the pop-up box and specify the generation options for the template and
FLD file in the dialog box Capture: Options for FLD and Template Generation.
WebTransactions for OSD
107
Individual templates for pop-up boxes
Editing templates
Pop-up recognition at runtime
At WebTransactions runtime, pop-up recognition is performed as follows:
●
If a pop-up is recognized in a host format, WebTransactions searches the capture
database (config/application.sdb) for a pop-up with the corresponding recognition
criterium. If an appropriate pop-up is found, WebTransactions uses the identified pop-up
template The pop-up is now displayed alone in the browser without the host format
behind it. Below, you can see this procedure on the basis of pop-ups converted using a
format-specific template:
●
Recognition of formats with the capture database functions is performed in the following
sequence:
i
108
–
If popup recognition is active and a popup recognition criterion matches the format,
the individual popup template is used.
–
If a normal recognition criterion matches the format, the individual template is used
for the entire format.
–
If no recognition criterion is available for the entire format, WebTransactions uses the
conversion template which is named in the AUTOMASK attribute (usually
AutomaskOSD).
Even if a pop-up is identified and displayed individually by WebTransactions, the host
objects $FIRST and $NEXT refer to the first or next field of the underlying host format
and not to the first or next field of the pop-up.
WebTransactions for OSD
Editing templates
Using descriptive names
7.3 Using descriptive names
In the capture function, a format’s field names are generated from the line and column
position of the field in the format together with its length. This results in extremely abstract
names which have little to do with the purpose or contents of the field and hinder rather than
support the programmer when editing the template.
IFG
library
IFG2FLD
File Transfer
Format description sources
WebLab
However, in the capture function, you can also use a so-called format description source
and in this way generate the original field names in the templates. The format description
source is the result of an IFG2FLD run with which the format description is read from the IFG
library and stored in the source. The format description source contains all the field names
which the developer of the host formats originally defined using the formatting system. The
field names generally refer to the function of the field and are therefore more descriptive.
Templates
Figure 2: Generating templates from a format description source
You can specify the format description source when performing capturing in WebLab.
WebTransactions for OSD
109
Using descriptive names
Editing templates
Procedure
If you want to use descriptive names for template generation, proceed as follows:
Transfer one of the following LMS libraries in binary form to the OSD host under the ID
under which the IFG library is stored.
Ê
Library
Meaning
WTifg2fldFTP.lms
For transfer with FTP
WTifg2fldOpenFT.lms For transfer with openFT or with the TRANSFER-FILE command in
BS2000
Ê
Log on at the OSD host under this ID.
Ê
Perform the IFG2FLD run as described in the next section.
Ê
Transfer the format description source in text mode to the machine on which WebLab is
running.
Ê
In the capture process, specify the format description source in the
Generation Options dialog box.
i
For runtime you must set the communication-specific system object attribute
FIELD_NAMES to the value User_defined. You can achieve this, for example, by
activating the option Global parameter/Enable Field names on the
Further options tab when creating or editing an application-specific start template.
Using IFG2FLD
IFG2FLD is located in the OSD-LMS library WTifg2fldFTP.lms or WTifg2fldOpenFT.lms. You
can find these libraries in the directory install_dir/lib.
IFG2FLD is an OSD program and you must therefore transfer the corresponding library to an
OSD user ID. The target name of the library in BS2000 depends on the transfer mode you
select. This may be either WTIFG2FLD.LMS or WTIFG2FLDOPENFT.LMS. You can then start
IFG2FLD from the transferred library with the following command:
/START-PROGRAM FROM-FILE=*PHASE(LIBRARY=library,ELEMENT=IFG2FLD)
110
WebTransactions for OSD
Editing templates
Using descriptive names
You start IFG2FLD with the START-PROGRAM command and the output is written to SYSLST.
The following commands are accepted by IFG2FLD:
Command
Description
MAPFILE IFG-library
Assigns the IFG library for processing.
PROFILE Userprofile
Assigns a user profile for conversion. Every IFG library contains
at least one user profile for format editing. The user profile is a
set of default values for handling the IFG, for the format
properties, for the format field properties as well as for
properties which affect programming.
CONVERT Formatname
[/version| /ALL]
Takes the specified IFG format over into the format description
source. Optionally, you can also specify the version of the
format.
If you do not specify the version then the most recent format
version is entered. If, instead of a version, you specify the value
/ALL then all the versions of the format are entered in the format
description source.
CONVERT *ALL
[/version| /ALL]
Takes all the specified IFG formats in the IFG library over into
the format description source. Optionally, you can also specify
the version of the format. Only formats with this version are then
entered.
If you do not specify the version then the formats with the most
recent version are entered in the format description source. If,
instead of a version, you specify the value /ALL then all the
formats of all versions are entered.
END
Generates the format description source and terminates
IFG2FLD.
Example
To perform a conversion with IFG2FLD you may, for example, need to perform the following
steps in OSD:
/ASSIGN-SYSLST output-file
/START-PROGRAM FROM-FILE=*PHASE(LIBRARY=library,ELEMENT=IFG2FLD)
MAPFILE IFG-library
CONVERT *ALL
END
/ASSIGN-SYSLST *P
WebTransactions for OSD
111
Eine Dokuschablone von Frank Flachenecker
by f.f. 1992
8 Controlling communication
8.1 System object attributes
Certain system object attributes can be used to control communication between
WebTransactions and the OSD host application.
This section describes only those attributes which are provided specifically for the OSD
interface connections or which are of special significance to this connection. System object
attributes that are of equal significance to all WebTransactions protocol variants are
described in the WebTransactions manual “Concepts and Functions”.
If a WT_SYSTEM object (connection-specific system object) exists under the communication
object used, the attributes described in this section must be defined there. Otherwise, they
must be declared as attributes of the global system object WT_SYSTEM. The only exceptions
are the COMMUNICATION_INTERFACE_VERSION and FORMAT attributes, which always refer to
the global system object.
Attributes can be set in the first template (start template) when starting WebTransactions,
and can be retained for the entire session or actively modified during the session (see
sections on active dialog in the WebTransactions manual “Concepts and Functions”).
i
WebTransactions for OSD
General information on connection-specific and global system objects can be found
in the WebTransactions manual “Concepts and Functions”.
113
System object attributes
Controlling communication
8.1.1 Overview
The table below provides an overview of the attributes and their effect.
The system object attributes are divided into the following categories:
o
(open)
Attributes used in open.
t
(temporary)
Attributes used during communication which can be modified in the templates at any
time
r
(read only)
Attributes used during communication which cannot be modified in the templates
c
(communication module)
Attributes set automatically by the communication module
The category to which each attribute belongs is indicated in the right-hand column of the
table below.
Attribute name
Meaning
APPLICATION_PREFIX
Prefix for the host appli- This prefix makes it possible to identify FLD and
cation name
template files which possess the same “format names”
but belong to different host applications.
These FLD and template files must be saved in the
following form:
[email protected] or
[email protected]
Description/category
o
AUTOMASK
Default conversion
template
t
Name of the conversion template to be used if an
identifier for the current screen is not found in the
capture database.
Default value: AutomaskOSD.
If no identifier was found and the contents of the
AUTOMASK attribute were taken over, but the corresponding template is not available, the template
specified in DEFAULT_FORMAT is used.
If an identifier is found but a corresponding template is
not, the template specified in DEFAULT_FORMAT is
likewise used (see WebTransactions manual “Concepts
and Functions”).
114
WebTransactions for OSD
Controlling communication
System object attributes
Attribute name
Meaning
Description/category
AUTOTAB
Cursor automatically
jumps to the following
field when the end of
current field is reached
When using 9750 terminals, the host application can
c
determine the reaction of the cursor when it gets to the
end of a field. This feature is made available with the
AUTOTAB attribute of the WebTransactions application.
The attribute can take the values Yes and No depending
on the current AUTOTAB status of the terminal. The
Automask template and all templates generated using
the OSD.wmt master template evaluate this attribute.
BYPASS
Bypass print file flag
c,
WebTransactions sets this attribute to Yes if a bypass
print file was created when receive was called. Before t
evaluation of $MESSAGE.PRINTING, this attribute should
be set to No by the template, as in the wtasync.htm
template provided by WebTransactions.
CAPTURE_FILE
Capture database
Name of the capture database (...\Capture.sdb).
The name can be specified as an absolute path name
or a relative path name (relative to the base directory),
e.g.:
– absolute specification:
C:\osdappli1\config1\$dialog.sdb
– relative specification
(base directory = osdappli):
config1\$dialog.sdb
CAPTURED_FLD
Identifier for format
recognition
WebTransactions sets this attribute to Yes on a receive c
call if the received format is found in the capture
database. If the format is not found then CAPTURED_FLD
is set to No.
COMMUNICATION_
INTERFACE_VERSION
Interface version
Global WT_SYSTEM attribute
– If this variable contains a value < "3.0", then the
name of the host format is entered in the global
system attribute FORMAT on reception of a
message from the host (receive). If no format
name can be determined, FORMAT is set to the
value of AUTOMASK.
–
WebTransactions for OSD
t
o
If this variable contains a value of "3.0" or higher, no
value is entered for FORMAT since the choice of the
next page (format) is made by the templates
themselves (generally by evaluating the FLD
attribute).
Default setting: 7.0
115
System object attributes
Controlling communication
Attribute name
Meaning
Description/category
CONNECTION_MESSAGE
Short message for the
opening of a
connection
Short message of maximum length of 80 bytes for the
o
establishment of a connection, optional. This short
message forms part of the Connection Letters which are
passed to the partner when a connection is opened.
A short message can be specified as a string or as a
hexadecimal value:
host_system.CONNECTION_MESSAGE=C’cccc’
or
host_system.CONNECTION_MESSAGE=X’xxxxxxxx’
This attribute can be used, for example, to specify any
access or network password which may be required.
CONNECTION_PASSWORD
Password for opening
of connection
Password of maximum length of 4 bytes for the estab- o
lishment of connections to DCAM applications, optional.
This password forms part of the Connection Letters
which are passed to the partner when a connection is
opened.
The password must be generated in BCAM with XSTAT
APPPW= and can be specified either as a string or as a
hexadecimal value:
host_system.CONNECTION_PASSWORD=C’cccc’
or
host_system.CONNECTION_PASSWORD=X’xxxxxxxx’
DISCONNECT
Template for disconnection
This template is activated once the host connection has t
been terminated. For example, if the user clicks the
Disconnect button then the template stored in this
attribute is called.
Default value: wtstart
DISPLAY_EURO
Display Euro symbol
If this attribute is set to Yes then the character that corre- t
sponds to code X’A4’ of the ISO-8859 code table is
output as the Euro character.
If DISPLAY_EURO=No (default value) then the currency
symbol (¤) is displayed for X’A4’.
DISPLAY_EURO=YES is only effective if the
TERMINAL_TYPE attribute is set to 9763 and the
HOST_CHARSET attribute is set to ISO-8859-1,
ISO-8859-2 or ISO-8859-9.
END_MARK
Replacement character Default value: ~ (Tilde)
for end mark
You can specify a different replacement character.
116
t
WebTransactions for OSD
Controlling communication
System object attributes
Attribute name
Meaning
Description/category
END_WAIT_CONDITION.
EXPECTED_BLOCKS
End of screen recognition regarding the
number of sub-messages that make up the
entire form
When this attribute is set, receive stops waiting,
despite MULTIPLE_IO_TIMEOUT, when the expected
number of sub-messages have arrived.
If additional messages are already waiting in the network
and these can be processed without waiting, then the
RECEIVED_BLOCKS after the receive may be larger
than END_WAIT_CONDITION.EXPECTED_BLOCKS.
Default: empty
See also RECEIVED_BLOCKS.
t
END_WAIT_CONDITION.
FLD_EXPECTED,
END_WAIT_CONDITION.
FLD_DIFFERENT_FROM
End of screen recognition using recognized
format;
Requirement: Must be
using capture database
If a format defined in the capture database is recognized
(attributes FLD and CAPTURED_FLD) and matches the
specifications in the relevant attribute, then receive
stops waiting despite MULTIPLE_IO_TIMEOUT.
Default: empty
t
END_WAIT_CONDITION.
CURSOR_IN_LINE and
END_WAIT_CONDITION.
CURSOR_IN_COLUMN,
END_WAIT_CONDITION.
CURSOR_NOT_IN_LINE
and
END_WAIT_CONDITION.
CURSOR_NOT_IN_COLUMN
End of screen recogni- If the cursor reaches one of the positions defined in the
tion using the position set conditions, receive stops waiting despite
of the cursor
MULTIPLE_IO_TIMEOUT.
Default: empty
t
END_WAIT_CONDITION.
MATCH_STARTLINE,
END_WAIT_CONDITION.
MATCH_STARTCOLUMN,
END_WAIT_CONDITION.
MATCH_VALUE
and
END_WAIT_CONDITION.
MATCH_OPERATION
End of screen recognition using the field
content in a particular
section of the screen
If the screen buffer has a character string MATCH_VALUE
at the position that is defined with MATCH_STARTLINE
and MATCH_STARTCOLUMN,
(MATCH_OPERATION ="==") or
not (MATCH_OPERATION ="!="), then receive stops
waiting despite MULTIPLE_IO_TIMEOUT.
Default: empty.
t
EPILOG
Epilog
This attribute contains the name of a template (without t
the suffix '.htm'). If the attribute is defined then the corresponding template is included at the end of the
generated template.
Default: No inclusion
The attribute is only evaluated by the generated
standard template and not by the host adapter.
See also PROLOG and FORMTPL
i
WebTransactions for OSD
117
System object attributes
Controlling communication
Attribute name
Meaning
Description/category
FIELD_NAMES
Use IFG field names
If this attribute is set to User-defined descriptive field o
names can be used, which are specified in the IFG
library. Otherwise the generic field names generated by
the host adapter are used.
Possible values: User-defined, Generic
Default: User-defined
i
FIRST_IO_TIMEOUT
Timer for the receive
call
Please note, that in the delivered start
templates and Beans Generic is implemented
as default.
By default the timer is set to 60 seconds. If no message t
is received from the host during this period then the
receive call returns.
This means e.g. that in a single template it is possible to
cater for host applications which output a welcome
screen on the establishment of the connection as well as
host applications which immediately expect an input.
To do this, you set FIRST_IO_TIMEOUT to a low value
and then check after the first receive call whether a
message has been received from the host
(RECEIVED_BLOCKS="0")
However, an error is indicated if no message is received
from the host within the time specified in
FIRST_IO_TIMEOUT. If you want WebTransactions to
suppress this message, set
DISABLE_COMMUNICATION_ERROR.
If FIRST_IO_TIMEOUT is greater than
TIMEOUT_APPLICATION, a value derived from
TIMEOUT_APPLICATION is used:
– If TIMEOUT_APPLICATION > 10:
FIRST_IO_TIMEOUT corresponds to
TIMEOUT_APPLICATION -5
– If TIMEOUT_APPLICATION > 1:
FIRST_IO_TIMEOUT corresponds to
TIMEOUT_APPLICATION -1
– If TIMEOUT_APPLICATION =1:
FIRST_IO_TIMEOUT corresponds to
TIMEOUT_APPLICATION
The value is indicated in seconds, in some cases with a
decimal point or comma. The smallest unit is
500 milliseconds.
118
WebTransactions for OSD
Controlling communication
System object attributes
Attribute name
Meaning
Description/category
FLD
Format name
Name of the format that was received from the host
application. If WebTransactions has not recognized any
format name (e.g. even when no capture database is
assigned) then FLD is set to the value of AUTOMASK
(always set by receive).
See also FORMAT
FORMTPL
Form field
This attribute contains the name of a template (without t
the suffix '.htm'). If the attribute is defined then the corresponding template is included at the start of the
wtDataForm in the generated templates.
Default: No inclusion
c,
r
The attribute is only evaluated by the generated
standard template and not by the host adapter.
See also PROLOG and EPILOG.
i
HARDCOPY
Hardcopy print file flag
WebTransactions sets this attribute to Yes if a hardcopy
print file was prepared when the receive call was
issued.
Before the evaluation of $MESSAGE.PRINTING, the
attributes should be reset to No by the template as in the
wtasync.htm template provided by WebTransactions.
c,
t
HOST_CHARSET
Character set of the
host application
The host adapter sets this attribute to the value of the
character set with which the host OSD application
operates. The following values are possible:
ISO-8859-1:
various western European languages such as
English, German, French - also known as Latin-1
ISO-8859-2:
various central European languages - also known
as Latin-2
ISO-8859-5:
Cyrillic
ISO-8859-7:
Greek
ISO-8859-9:
Turkish
HOST_CHARSET overrides the CHARSET attribute in the
supplied templates(see the WebTransactions manual
“Concepts and Functions”).
c,
r
HOST_NAME
Name of the host
system
Name or Internet address of the host computer. If you
o
use a symbolic name, you must specify this either locally
(in the HOSTS file) or in the Domain Name Service
(DNS).
WebTransactions for OSD
119
System object attributes
Controlling communication
Attribute name
Meaning
Description/category
IGNORE_ASYNC
Ignore the ASYNC
condition
Usually (IGNORE_ASYNC=’NO’), when using the send
method call, a check is performed to see whether new
data has arrived asynchronously from the host.
If this is the case, data is not sent to the host, instead
REFRESH_BY_ASYNC is set to Yes and WT_KEY.Key is
set to Refresh.The subsequent receive method call
takes the existing host data and does not wait for additional data with FIRST_IO_TIMEOUT and
MULTIPLE_IO_TIMEOUT.
t
If IGNORE_ASYNC is set to Yes, the data is sent, regardless of any asychronously received data. This avoids
manual repeating the send call.
WT_KEY.KEY remains unchanged, REFRESH_BY_ASYNC
is not set to Yes because no refresh has been carried
out. IGNORE_ASYNC suppresses recognition of the asynchronous message.
Default is NO.
See also MULTIPLE_IO_TIMEOUT, REFRESH_BY_ASYNC
LOCAL_PORT
Number of the local
port
LZE_CHAR
Character for represen- On a real 9750 type terminal or corresponding emula- t
tation of the logical line tion, it is possible for the host application to output LZE
end (LZE)
characters which only have a significance when data is
entered at the host application. This allows, for example,
a number of BS2000/OSD commands to be entered with
a single data transmission. These are then processed
one after the other.
If the attribute LZE_CHAR is used to specify a character,
WebTransactions is able to support this functionality.
Set a character that is not used in the host application for
any other purpose, see also END_MARK.
Default: empty
120
If this attribute is specified then this port will be used by o
the socket connection as the output port on the local
system.
WebTransactions for OSD
Controlling communication
System object attributes
Attribute name
Meaning
Description/category
MULTIPLE_IO_TIMEOUT
Timeout for complete
screen format
Default value: 2 (seconds)
t
Some host applications send their screen formats in the
form of several message segments. Since it is not
always clear when the last message has been received,
a timeout mechanism is used. If a message is not
received from the host within the time period specified in
MULTIPLE_IO_TIMEOUT, the screen format is taken to
be complete.
However, the reception processing is terminated as
soon as WebTransactions can determine, on the basis of
the employed protocol, that the host application is
waiting for input.
If you have enabled print/asynchronous support, the
screen is updated automatically at regular intervals so
that formats which are as yet incomplete can be fully
constructed on the next refresh (see page 176).
If you are sure that the host application does not use
message segments, you can set this value to 0.
The aim is to recognize the end of the screen without
MULTIPLE_IO_TIMEOUT since this timeout
– increases the time elapsed for every stage of the
dialog
– must be set sufficiently high that it does not cause
the end of screen to be recognized too early as a
result of heavy traffic.
With the transport protocol NEABT it is possible to
recognize when the host is waiting for a response with
almost all OSD host applications (exceptions being, for
example, connections via OMNIS). When this protocol
element arrives, waiting is terminated.
The END_WAIT_CONDITION attributes can also be used
to cancel MULTIPLE_IO_TIMEOUT: Only when all of the
conditions that have been set there are fulfilled, will waiting be cancelled despite the fact that
MULTIPLE_IO_TIMEOUT has not been completed.
See also END_WAIT_CONDITION attributes
WebTransactions for OSD
121
System object attributes
Controlling communication
Attribute name
Meaning
Description/category
NATIONAL_VARIANT
Language variant for
communication
between
WebTransactions and
the host application
This attribute specifies the language variant of the 7-bit t
character set.
Possible values:
– Danish
– English (UK)
– English (USA)
– French
– French-Belgian
– German
– International
– Italian
– Norwegian
– Spanish
– Swedish
– Swiss
NIL_MODE
When outputting host
objects, treat NIL and
SPACE differently
On a real 9750 type terminal or a corresponding emula- t
tion, field contents which contain a binary null (NIL) are
displayed with a centered dot. WebTransactions replaces
this character with a space for the VALUE host object
attributes (VALUE, HTMLVALUE, RAWVALUE) in order to
ensure that the output is suitable for the browser. This
means that it is not possible to tell whether the SPACEs
are to be saved as SPACEs or whether the NIL in the
screen buffer is to be retained.
If the NIL_MODE attribute is set to true, the NILs are not
replaced by SPACE, they are instead displayed as the
character with the code 0xB7 which is available as a
’center point’ in many character sets.
This ensures that a clear differentiation can be made
between SPACE and NIL.
The attribute is effective with every receive. This means
that changing the attribute between two host object evaluations has no effect.
Default: false
OFFLINE_COMMUNICATION Switch for playing back Value "Yes": A previously recorded emulation trace is
a trace file
“played back” (offline session). The name of the file in
which the session was recorded is specified in the
attribute OFFLINE_TRACEFILE.
Default: No
See also: RECORD_HOST_COMMUNICATION
OFFLINE_LOGFILE
122
File name of the
emulation trace to be
generated
o
File name of the emulation trace which is to be recorded o
Default: WEBTADUMP.LOG
other values are possible
see also RECORD_HOST_COMMUNICATION
WebTransactions for OSD
Controlling communication
System object attributes
Attribute name
Meaning
Description/category
OFFLINE_TRACEFILE
File name of an
emulation trace
File name of an emulation trace which is to be played
back.
see also OFFLINE_COMMUNICATION
PADDING_CHARACTER
Padding characters for
unprotected fields
If this attribute contains a space then input fields are
t
padded out with spaces; otherwise the null character (\0)
is used as the padding character (default value)
PROLOG
Prolog
This attribute contains the name of a template (without t
the suffix '.htm'). If the attribute is defined then the corresponding template is included at the start of the generated template.
Default: No inclusion
o
The attribute is only evaluated by the generated
standard template and not by the host adapter
See also EPILOG and FORMTPL
i
POPUP.COLUMN
Start column of the
received pop-up
If a pop-up is received following a receive call and this c,
pop-up is recognized by the capture mechanism, this
r
attribute contains the column number of the top left-hand
corner of the pop-up in the host format.
Possible values:
0 (if there is no pop-up) - maximum number of columns
Default value: 0.
POPUP.HEIGHT
Height of the received
pop-up
If a pop-up is received following a receive call and this c,
pop-up is recognized by the capture mechanism, this
r
attribute contains the total height of the pop-up
(including the frame).
Possible values: 0 (if there is no pop-up) - maximum
number of lines (including the frame)
Default value: 0.
POPUP.HSTART
Pop-up recognition
parameter
Characters used to begin the horizontal frame of a pop- t
up panel.
The default value is a colon followed by a period “:.”, i.e.
WebTransactions recognizes the horizontal frame of a
pop-up if it begins with a colon or period.
POPUP.HMIDDLE
Pop-up recognition
parameter
Characters used to form the horizontal frame of a popup panel.
The default value is a period “.”.
POPUP.HEND
Pop-up recognition
parameter
Characters used to end the horizontal frame of a pop-up t
panel.
The default value is a colon followed by a period “:.”, i.e.
WebTransactions recognizes the horizontal frame of a
pop-up if it ends with a colon or period.
WebTransactions for OSD
t
123
System object attributes
Controlling communication
Attribute name
Meaning
Description/category
POPUP.LINE
Line number of the top
left-hand corner of a
received pop-up.
If a pop-up is received following a receive call and this c,
pop-up is recognized by the capture mechanism, this
r
attribute contains the line number of the top left-hand
corner of the pop-up in the host format.
Possible values:0 (if there is no pop-up) - maximum
number of lines.
Default value: 0.
POPUP.VSTART
Pop-up recognition
parameter
Characters used to begin the vertical frame of a pop-up t
panel.
The default value is a period “.”.
POPUP.VMIDDLE
Pop-up recognition
parameter
Characters used to form the vertical frame of a pop-up
panel.
The default value is a period “.”.
t
POPUP.VEND
Pop-up recognition
parameter
Characters used to end the vertical frame of a pop-up
panel.
The default value is a colon “:”
t
POPUP.WIDTH
Width of the received
pop-up
If a pop-up is received following a receive call and this c,
pop-up is recognized by the capture mechanism, this
r
attribute contains the width of the pop-up (the number of
columns including the frame).
Possible values:
0 (if there is no pop-up) - maximum number of columns
(including frames)
Default value: 0.
PORT_NUMBER
Port number
Port number for communications with the OSD host
application via TCP/IP
Default value: 102
RECEIVED_BLOCKS
Number of messages
Number of messages processed by the host during the c,
last receive call. This attribute can be used to check r
how many message segments the host used to output
the current format.
If this value is 1 for all formats, the
MULTIPLE_IO_TIMEOUT attribute can be set to 0
because once the first message has been received it is
no longer necessary to wait for further messages in order to complete the format.
Otherwise, this value can be used with
END_WAIT_CONDITION.EXPECTED_BLOCKS in order to
cancel wait times due to MULTIPLE_IO_TIMEOUT.
RECORD_HOST_
COMMUNICATION
Switch for emulation
trace
Value "Yes": Emulation trace activated
Default: "No"
See also: OFFLINE_TRACEFILE
124
o
o
WebTransactions for OSD
Controlling communication
System object attributes
Attribute name
Meaning
Description/category
REFRESH_BY_ASYNC
Automatic setting of
refresh when
asynchronous
messages are
received.
If this attribute is set to Yes then the host control object c
WT_KEY.Key was automatically set to the value Refresh
during the last send because an asynchronous
message has been received since the last receive.
As a result, the old format was updated on the last call of
the form send/receive. This means that there was no
dialog step with the host application as the user might
have expected. The user is presented with the updated
format.
To prevent the user from waiting pointlessly for a
response from the host application, you should depending on the value REFRESH_BY_ASYNC - generate
a note for the user.
No (default value) means that the content of the format’s
input fields and the value of WT_KEY.Key were sent to
the host application unchanged (this also sends the
contents of the screen buffer).
See also IGNORE_ASYNC
STATION_NAME
Station name
SYM_DEST
Name of the OSD host e.g. $DIALOG
application on the host
system
c,
o
TERMINAL_TYPE
Terminal type
o
WebTransactions for OSD
Station name used to establish communications with the o
OSD host application. You only need to enter a value for
this attribute if the OSD application uses special station
names. If no value is specified, WebTransactions
automatically generates a station name and returns the
generated name in this attribute.
Max. length: 8
Terminal type as simulated by WebTransactions.
Possible values:
9750 (default)
9755
9763 (if 8-bit character set used)
125
System object attributes
Controlling communication
Attribute name
Meaning
Description/category
TRACE_LEVEL
Trace level
This attribute controls the contents of the trace file.
Possible values: 0,1,2,3,3E,3M,3EM
where:
– 0,1,2,3
Different trace levels
– E
Output of the emulation function calls
– M
Output of all host matrices, i.e. “raw” mask data
– L
Output to a log file
Default value: 3EM (= maximum trace)
t
USE_POPUP_RECOGNITION Pop-up recognition flag This attribute is set to Yes if pop-up panels are to be
recognized.
Default value: No.
t
WT_ASYNC
Printing and
asynchronous
messages
This attribute is set to Yes if print functions and
asynchronous messages are to be supported.
Default value: No.
WT_BROWSER_PRINT
Activates browser
printing
only for browser
platform Windows
This attribute must be set to Yes if browser printing is to t
be activated (see section “Browser print” on page 190).
The attributes under WT_BROWSER_PRINT_OPTIONS will
only be evaluated when this value is set to Yes.
Default value: No
WT_BROWSER_PRINT_
OPTIONS.MODE
Controls browser
printing
only for Windows
browser platform
Indicates if printing is to take place immediately on the
default printer or if a print preview is to be displayed.
Possible values:
Automatic
Print on the default printer
Preview
Display a print preview
WT_BROWSER_PRINT_
OPTIONS.ORIENTATION
Controls browser
printing
only for Windows
browser platform
Indicates the page orientation; only for use with Internet t
Explorer.
Possible values:
Portrait
vertical orientation
Landscape
horizontal orientation
WT_BROWSER_PRINT_
OPTIONS.HEADER
Controls browser
printing
only for Windows
browser platform
Text for the page headers; only for use with Internet
t
Explorer (see the section “Variables in header and footer
lines” on page 192).
WT_BROWSER_PRINT_
OPTIONS.FOOTER
Controls browser
printing
only for Windows
browser platform
Text for the page footers; only for use with Internet
t
Explorer (see the section “Variables in header and footer
lines” on page 192).
126
t
t
WebTransactions for OSD
Controlling communication
System object attributes
Attribute name
Meaning
Description/category
WT_BROWSER_PRINT_
OPTIONS.LEFT
Controls browser
printing
only for Windows
browser platform
Indicates the size of the left margin in mm; only for use
with Internet Explorer.
WT_BROWSER_PRINT_
OPTIONS.RIGHT
Controls browser
printing
only for Windows
browser platform
Indicates the size of the right margin in mm; only for use t
with Internet Explorer.
WT_BROWSER_PRINT_
OPTIONS.TOP
Controls browser
printing
only for Windows
browser platform
Indicates the size of the top margin in mm; only for use
with Internet Explorer.
t
WT_BROWSER_PRINT_
OPTIONS.BOTTOM
Controls browser
printing
only for Windows
browser platform
Indicates the size of the bottom margin in mm; only for
use with Internet Explorer.
t
WebTransactions for OSD
t
127
System object attributes
Controlling communication
8.1.2 Interaction between system object attributes and methods
This section contains information on the OSD-specific system object attributes that play a
role in particular actions or method calls.
open - opening a connection to the host
An open method call opens a connection to the host application. The connection to be
established is determined by the following communication-specific system object attributes
which you can, for example, set in the templates:
System object attribute
Value
APPLICATION_PREFIX
Prefix for the host application name.
This prefix makes it possible to identify FLD files which possess the
same format names but belong to different host applications. These
FLD files must be saved in the following form:
[email protected]
HOST_NAME
Specification of host name or its IP address
LOCAL_PORT
Number of the local port
OFFLINE_COMMUNICATION
To run an emulation trace without connection to the host
application.
OFFLINE_LOGFILE
File name of the emulation trace that is to be recorded.
OFFLINE_TRACEFILE
File name of an emulation trace that is to be played.
PORT_NUMBER
Specification of the port number for the OSD host application
RECORD_HOST_
COMMUNICATION
Switch for the emulation trace.
STATION_NAME
Specification of the station name if the OSD host application uses
station names
SYM_DEST
Specification of the host application name
TERMINAL_TYPE
Specification of the terminal type as simulated by WebTransactions
When you issue an open call, any existing connection is closed before the new connection
is made.
close - closing a connection to the host
A close method call closes the connection to the host application. This statement must be
run at the end of a session. It does not usually result in an error message.
128
WebTransactions for OSD
Controlling communication
System object attributes
send - sending a message to the host application
A send method call usually sends a message to the host application. The host object
attribute WT_KEY.Key determines whether this involves real communication with the host
application, or whether the call is handled exclusively by the host adapter (e.g. Refresh).
The templates supply WT_KEY.Key with a value for the functions provided by wtKeysOSD.htm
(see section “wtKeysOSD.htm template” on page 90). An important role is played by the
system object attributes REFRESH_BY_ASYNC and IGNORE_ASYNC. If REFRESH_BY_ASYNC is set
to Yes and IGNORE_ASYNC to No, WT_KEY.Key was set automatically to the value Refresh
during the last send.
receive - receiving a message from the host application
A receive method call usually retrieves a message from the host application. The host
object attribute WT_KEY.Key determines whether this involves dialog with the host application.
The host adapter checks whether the message received from the host application corresponds to a recognition criterium in the capture database. If so, continued processing
depends on the value of the attribute COMMUNICATION_INTERFACE_VERSION.
COMMUNICATION_INTERFACE_VERSION >= "3.0"
●
The host adapter enters the value in the FLD attribute of the connection-specific system
object. The template itself must ensure that FORMAT is set correctly. In templates
generated by V3.0 or higher, the function setNextPage ensures that FORMAT is set
correctly.
COMMUNICATION_INTERFACE_VERSION < "3.0"
●
FORMAT is also set in addition to FLD to ensure that “old” templates remain executable.
If no recognition criterium is found in the capture database then FLD or FORMAT is set to the
value of the system object attribute AUTOMASK.
i
WebTransactions for OSD
Additional information can be found in the descriptions for the system object
attributes “FIRST_IO_TIMEOUT” on page 118 and “MULTIPLE_IO_TIMEOUT” on
page 121 as well as the attributes of the END_WAIT_CONDITION group as of page 117.
129
Host objects
Controlling communication
8.2 Host objects
WebTransactions for OSD uses two types of host object:
–
–
host data objects containing data from the host application
host control objects that control the host interface
8.2.1 Host data objects
Host data objects are provided in order to enable communication between WebTransactions
and the host application. They are created by WebTransactions when a new screen format
(possibly including a pop-up) arrives from the host. Each field of the screen format (and of
the pop-up if one is present) is assigned to a host object. When a receive call is issued,
these objects are available in the form of a screen image. The objects can be identified via
generic names or via IFG fields.
Generic names for host data objects
Generic names are always assigned. If the connection-specific system object attribute
FIELD_NAMES has the value User-defined then the names defined with IFG are also
used, see section “IFG names of host data objects” on page 131.
In the case of generic names, the objects are named in accordance with their position in the
screen format, which is defined by the line and column number:
E_yy_xxx_lll (for the fields of a screen format)
F_yy_xxx_lll (for the fields of a pop-up)
Explanation
130
E
Field of a screen format
F
Field of a pop-up
yy
Two-character line position, beginning with 1 for the top line
(not including the frame in pop-ups)
xxx
Three-character column position, beginning with 1
(not including the frame in pop-ups)
lll
Three-character number of screen characters in a screen line beginning with position
yy_xxx
WebTransactions for OSD
Controlling communication
Host objects
These naming conventions allow you to access any sequence of screen characters within
a screen line. For instance, you can access a screen line containing 80 host data objects of
length 1, or one host data object of length 80. If a host data object contains more than one
field or is part of a field, the attributes *Value are set in accordance with yy, xxx and lll. All
other attributes (Input, Modified, etc.) are set in accordance with the field in which the host
data object begins. However, you will generally access host objects that correspond to
screen fields.
If a host data object extends beyond the field limits, it is truncated at column 80 in screen
formats, and at the last pop-up column in pop-ups.
Short names for generic host data objects
Object names can be specified in short form by omitting the length specification or leading
zeros. To use this option, however, you will require a more detailed overview of the use of
element names. For instance, WT_FOCUS always returns the full element name. The first of
the following query conditions is thus never TRUE:
<wtif (WT_FOCUS.Field == "E_1_2_3")>
...
--> incorrect
<wtif (WT_FOCUS.Field == "E_01_002_003")>
--> correct
IFG names of host data objects
In templates, you can also work with (descriptive) IFG names instead of the generic names.
Preconditions for this are,
–
that the communication-specific system object attribute FIELD_NAMES contains the value
User-defined
–
and that you have already used WebLab to create an FLD file for a format and have used
the format description source to do this. You must have specified this source under
Generation Options during capturing.
Attributes of host data objects
The table below shows all the attributes of the dynamic host data objects. Attributes shown
in bold type can be overwritten.
WebTransactions for OSD
131
Host objects
Controlling communication
The names of objects and attributes are usually case sensitive. However, the names of host
object attributes are not case sensitive and they can be written in upper or lower case.
132
Object name
Attribute name
Meaning
E_yy_xxx_lll
or
F_yy_xxx_lll
VALUE
Contents of the screen field represented by the object name.
Binary zeros (NIL) are replaced by blanks, if the system
object attribute NIL_MODE is set to true. Blanks at the end of
the field are removed. Single quotes, double quotes, and
ampersands (&) are converted for output in HTML.
When using entry fields (see type Unprotected) the content
of the VALUE attribute can be modified. Changing VALUE
emulates the keyboard input of a user at a terminal.
HTMLVALUE
This attribute corresponds to the Value attribute, but its
contents are returned in their entirety. The following special
characters are converted for output in HTML:
<, >, ä, ö, ü, Ä, Ö, Ü, ß
RAWVALUE
The content of this field is returned as an unconverted
sequence of 8-bit characters; only binary zeros are converted
into spaces.
STARTLINE
Line in which the represented screen field begins
Possible values: 1<= n<=last screen line
This depends on the screen type:
24x80: n<=25
32x80: n<=33
43x80: n<=44
27x132: n<=28
NAME
Name of the field
STARTCOLUMN
Column in which the screen field begins
Possible values: 1<=n<=last screen line
Also see example 1
LENGTH
Length of the field
Possible values: 1<=n<=last screen line
TYPE
Field type
Protected
Unprotected
INPUT
Data type of input
Alpha or Numeric
MARKABLE
Yes or No
MODIFIED
Yes or No
BLINKING
Yes or No
UNDERLINE
Yes or No
VISIBLE
Yes or No
Read-only field
Entry field
WebTransactions for OSD
Controlling communication
Object name
1
Host objects
Attribute name
Meaning
INTENSITY
Normal or Reduced
INVERS
Yes or No
COLOR
This returns the RGB color value of the relevant field. The
value also depends on the settings of the host object
WT_COLOR. If the attributes of WT_COLOR have not been
set then the following values are returned:
#000000: No color attribute set
#0000FF: Blue
#FF0000: Red
#FFC0CB: Magenta
#008000: Green
#40E0D0: Turquoise
#FFFF00: Yellow
#FFFFFE: White
RangeName
Name of the area specified by the host object.
RangeLength
Length of the area specified by the host object.
RangeStartColumn
Column in which the area specified by the host object begins.
Possible values: 1<=n<=maximum screen width
The difference between RangeStartColumn and StartColumn is shown on the basis of an example.
When receiving data from the host, the field E_03_020_010 was recognized:
E_03_020_010. StartColumn returns 20, E_03_020_010.RangeStartColumn also returns 20
Now access different from recognized field:
E_03_022_001.StartColumn returns 20, E_03_022_001.RangeStartColumn returns 22
The same with RangeLength, RangeName ...
WebTransactions for OSD
133
Host objects
Controlling communication
8.2.2 Host control objects
Host control objects are provided for controlling the host interface, and continue to exist for
the entire session.
–
the system line (WT_SYSTEM_LINE)
–
the sequence of fields in a screen
–
the field in which is cursor is positioned
–
the ENTER key to be used
The table below lists all the host control objects and their attributes. Attributes shown in bold
type can be overwritten.
The names of objects and attributes are usually case sensitive. However, the names of host
object attributes are not case sensitive and they can be written in upper or lower case.
Object name
Attribute
Meaning of attribute
$CONNECTION
ALIVE
Checks whether the connection to the host is still active.
This attribute should be thought of as an extension to
$MESSAGE.WAITING. Under certain circumstances
WAITING may have the value NO following the establishment of a connection. As a result, disconnection is not
noticed if only WAITING checked during asynchronous
processing.
$FIRST
Name
Full name of the first field in the current screen. If no
object exists, the name $END is returned.
Also all attributes of dynamic host objects (E_yy_xxx_lll)
134
WebTransactions for OSD
Controlling communication
Host objects
Object name
Attribute
Meaning of attribute
$MESSAGE
PRINTING
When this attribute is evaluated, WebTransactions sends
the oldest file waiting to be printed to the browser (with
the MIME type webta/hardcopy-print or MIME type
webta/bypass-print).
i
$NEXT
Make sure that the evaluation of
$MESSAGE.PRINTING terminates the
interpretation of the template and suppresses
HTML generation.
PRINTFILE_
NAME
This attribute returns the name of the file which is to be
printed next.
If no file is waiting to be printed, the attribute returns an
empty string.
WAITING
This attribute indicates whether WebTransactions has
received an asynchronous message from the host
application or not. Each time this attribute is queried,
WebTransactions checks the buffer for an asynchronous
message.
If it finds a message, the value of $MESSAGE.WAITING is
set internally to "Yes". WebTransactions then reads the
asynchronous message the next time receive is called.
Name
Full name of the next field in the current screen starting
from the field last accessed. You can use this object to
work through each screen field, including the system line
(WT_SYSTEM_LINE), step-by-step.
If there are no further objects, the name $END is
returned.
Also all attributes of dynamic host objects (E_yy_xxx_lll)
$SCREEN
WebTransactions for OSD
CONTENTS
All the characters of the whole screen an one string. May
be useful for comparing two complete screen images.
135
Host objects
Object name
Attribute
Meaning of attribute
WT_COLOR
DEFAULT
RGB color values for fields for which no color attribute is
set. Possible values:
#000000: Black (default)
#0000FF: Blue
#FF0000: Red
#FFC0CB: Magenta
#008000: Green
#40E0D0: Turquoise
#FFFF00: Yellow
#FFFFFE: White
BLUE
RGB color value for fields with the color attribute blue.
Default value #0000FF
RED
RGB color value for fields with the color attribute red.
Default value: #FF0000
MAGENTA
RGB color value for fields with the color attribute pink.
Default value: #FFC0CB
GREEN
RGB color value for fields with the color attribute green.
Default value: #008000
CYAN
RGB color value for fields with the color attribute
turquoise.
Default value: #40E0D0
YELLOW
RGB color value for fields with the color attribute
yellow.
Default value: #FFFF00
WHITE
RGB color value for fields with the color attribute white.
Default value: #FFFFFE.
Field
Object name of the field in which the cursor is currently
positioned. This name is specified in full in the form
E_yy_xxx_lll or a descriptive name and includes a length
specification.
Writing this attribute positions the cursor.
If the attribute is empty or invalid, the cursor is positioned
in the first row of the first column.
OFFSET
Offset of the cursor from the start of the field to the
cursor position.
Field
As for WT_FOCUS, except the object name is stored
without a length specification in the form E_yy_xxx.
WT_FOCUS
WT_FOCUS_SHORT
136
Controlling communication
WebTransactions for OSD
Controlling communication
Host objects
Object name
Attribute
Meaning of attribute
WT_KEY
KEY
Indicates the special key in the terminal emulation to be
activated when send is executed.
The permitted values are described in section
“Interaction between the host control object
WT_KEY.KEY and the template wtKeysOSD.htm” on
page 141.
Corresponding buttons are included in the current
templates by using wtKeysOSD.htm.
(<wtInclude ...>).
PKEYn
Enables direct access to the contents of the PKey n.
When a value is assigned to this attribute, the
appropriate PKey is loaded in the emulation. Evaluating
this attribute returns the current contents.
The object tree of the WebLab development environment
only shows those P keys with mapped content. Use of
this attribute is described in section “P key support” on
page 154.
Possible values for n: 1 to 255
Name
Name of the field in the system line
WT_SYSTEM_LINE
Also all attributes of dynamic host objects (E_yy_xxx_lll).
WebTransactions for OSD
137
Terminal functions
Controlling communication
8.3 Terminal functions supported by the browser
In WebTransactions for OSD you can display host application formats in the browser without
any post-editing (01:01 conversion). This function is contained in the master template
OSD.wmt (see page 78). The templates that you generated via the master template include
the templates wtBrowserFunctions.htm and wtKeysOSD.htm which provide the functions
required.
wtBrowserFunctions.htm in turn includes the following Javascript files:
wtCommonBrowserFunctions.js
contains the Javascript code that will be run for all browsers.
wt<browser>BrowserFunctions.js
contains the Javascript code for the current browser.
wtKeysOSD.htm contains the OSD-specific buttons for the standard keys and include the
Javascript file wtKeysOSD.js which contains the special key mapping for WebTransactions
for OSD. In this file you can adapt the key mapping to your needs and also extend it (see
section “Mapping keys in wtKeysOSD.js” on page 143).
8.3.1 Terminal functions supported
The following terminal functions are provided:
138
–
Pixel-precise layout of text and entry fields with the help of style sheets.
–
Support for terminal special keys sent to WebTransactions. For some of these keys there
are equivalents on the PC keyboard (e.g. the “F” keys). In some cases key combinations
are be used to start terminal functions.
–
Support for terminal special keys which work directly in the browser form (e.g. cursor
positioning keys). For some of these keys there are equivalents on the PC keyboard
(e.g. the “F” keys). In other cases, terminal functions are started using key
combinations.
–
Autotab:
When the maximum length of an entry field is reached the cursor automatically moves
to the next entry field.
WebTransactions for OSD
Controlling communication
Terminal functions
–
Overwriting fields:
Like a terminal, the browser overwrites the characters already present in the entry field
and does not insert text between the characters as per the browser default settings.
–
Transfer of the cursor position from the browser to the host application:
Depending on the browser functions available, the browser transfers the exact cursor
position or only the corresponding entry field to WebTransactions.
–
Tabulator remains inside the form:
The entry focus does not leave the form generated by WebTransactions. Using the
tabulator key in the browser also automatically moves the focus onto the browsers
controls.
Which of the terminal functions (F keys, cursor positioning keys ...) is actually displayed on
the browser will depend on the type and version of the browser. The tables below show the
terminal functions supported by the various browser types.
Terminal
function
Layout of text
and entry fields
Support for
terminal special
keys sent to
WebTransactions
Browser support
Non specialized
browser
Netscape V4.0
no
no
Netscape V6.0 or Internet Explorer
higher or Gecko
V4.0 or higher
yes
only via a pick list or only the ENTER
by individual configurable mapping via
button
key directly; all
keys or pick lists or buttons
other function via a
pick list or button
Support for
terminal special
keys which work
directly in the
browser form
no
no
Autotab
no
yes
by individual configurable mapping via
a key
yes
Overwriting
fields
yes
(simulated in the browser by automatic selection of field
content)
Transmits the
cursor position
Only the position at the start of the last
entry field used
Tabulator
remains inside
the form
WebTransactions for OSD
yes
no
Position at the
start of the last
entry field used
and the exact
position in
protected fields.
yes
yes
Exact position in
protected fields
and in entry fields
(V5.0 or higher)
yes
139
Terminal functions
Controlling communication
Key support by Internet Explorer V4.0 or higher or by a Gecko-based browser
If you use Internet Explorer V4.0 or higher or a Gecko-based browser (Netscape V6 or
higher), then the 9750 terminal keys are mapped as follows1:
Key used in Internet Explorer
Corresponding key at the 9750 terminal
ENTER
ENTER
F1 ... F12
F1 ... F12
Shift+F1 ... Shift+F12
F13 ... F24
CTRL+F1 ... CTRL+F12
K1 ... K12
CTRL+Shift+F1
CTRL+Shift+F2
K13
K14
CTRL+1 ... CTRL+9, CTRL+0
P1 ... P9, P10
CTRL+Shift+1 ... CTRL+Shift+9, CTRL+Shift+0
P11 ... P19, P20
CTRL+Shift+F12
MAR
EM
EM
INS
INS
1
Here, '+' means that the keys specified must be pressed together at the same time. On some keyboards the
STRG key is marked with CTRL.
140
WebTransactions for OSD
Controlling communication
Terminal functions
8.3.2 Interaction between the host control object WT_KEY.KEY and the
template wtKeysOSD.htm
The host control object WT_KEY indicates the special key in the terminal emulation which is
to be activated when send is executed.
The default values are given in the table below. The corresponding buttons are included in
the current templates by using wtKeysOSD.htm (<wtInclude ...>). wtKeysOSD.htm includes the
Javascript file wtKeysOSD.js which contains the mapping of the special keys for
WebTransactions for OSD (see section “Mapping keys in wtKeysOSD.js” on page 143).
The table below shows:
–
the controls provided by the wtKeysOSD.htm template and the file wtKeysOSD.js as
standard.
–
the values stored for the associated functions in the host control object WT_KEY.
WebTransactions for OSD
141
Terminal functions
Controlling communication
Key on 9750
terminal
Value of
WT_KEY.KEY
Meaning
DÜ
DUE
Data entry to host
DÜ2
DUE2
As DÜ
Data released to host but with a different transfer ID.
K1 ... K14
K1 ... K14
Short message to the host application; no more data will be
transferred.
F1 ... F24
F1 ... F24
As DÜ
Data released to host but with a different transfer ID.
P1 ... P20
PKEY1 ...
PKEY20
Programmable key executed. The programmable keys can be
loaded from the OSD application or loaded by assigning a
value on the host control object WT_KEY.PKEYn.
Marks a field as selected.
MAR
142
Disconnect
Closes the connection to the host. The subsequent receive
call supplies the FLD system object attribute with the contents
of the system object attribute DISCONNECT.
This function is similar to switching off a real terminal or
shutting down an emulation program without signing off
properly from the host application.
Refresh
Refresh the display of the HTML page.
This function is required in order to display messages that
arrived asynchronously or were delayed, i.e. after the screen
contents are taken as complete and sent to the browser in the
form of an HTML page (see also MULTIPLE_IO_TIMEOUT,
page 121). The Refresh function does not involve dialog with
the host application. Host communication is suppressed with
the send and receive calls.
ClearScreen
Clears the screen.
Print
Requests terminal hardcopy printing (see section “Terminal
hardcopy printing” on page 181).
WebTransactions for OSD
Controlling communication
Terminal functions
8.3.3 Mapping keys in wtKeysOSD.js
The browser used will accept all keyboard entries. For the application-defined mapping of
special function keys, WebTransactions provides the file wtKeysOSD.js as an interface. A call
to the function wtCreateKeySelectList() will generate a selection list (see section
“Interaction between wtCommonBrowserFunctions.js and
wt<browser>BrowserFunctions.js” on page 148).
The text below describes the key mapping supplied with WebTransactions. You can adapt
and extend key mapping as required; no special knowledge of browser templates is
required.
After creation of the base directory, the file wtKeysOSD.js is in the directory
<basedir>/wwwdocs/javascript. The key interface to be used for adapting the
WebTransactions application is the table (array) wtKeyMappingTableInput given in this file.
The wtKeyMappingTableInput table defines an object with several attributes for each of the
key maps (see table in page 144). These attributes describe:
–
the key or key combination
–
the action to be triggered when the key (or combination) is pressed
–
if this function is also available on a selection list.
Example
wtKeyMappingTableInput = [
{ sl:'title of my select list'},
{ la:'Select', ac:doToggleMark, kc:VK_F12, mk:MK_CTRL+MK_SHIFT },
{ la:'ENTER', ac:'DUE2' },
{ co:'P1', ac:'P1', kc:VK_F1, mk:MK_ALT }
];
In this definition the mapping is as follows:
– CTRL+SHIFT+F12 calls the function doToggleMark()
– ALT+F1 sends the function code F1 to WebTransactions
This definition creates a selection list with the following content:
title of my select list
no function
Select
calls up the function doToggleMark()
ENTER
sends the function code DUE2 to WebTransactions
WebTransactions for OSD
143
Terminal functions
Controlling communication
In the wtKeyMappingTableInput table you can enter the following attributes:
Description
Attribute
Meaning
la
label
Label, e.g. for entry in the selection list. If the attribute is not
specified, no entry will be generated for the list. The corresponding
key will, however, be mapped on a function.
co
comment
Comment. This attribute is not evaluated.
This attribute has been provided as an alternative to the attribute la;
by changing the attribute from la to co you can, for example, remove
a key from the selection list.
ac
action
Action to be executed when the mapped key is pressed or when the
action is selected from a list.
If this attribute is a string type, the content will be transferred to
wt_special_key.value and sent to WebTransactions. This means
that the form is transferred to WebTransactions and as a special
function is given the value of ac (e.g. F1 as function key).
If this attribute is a function type, a client-side function with this
name will be called. This function must be defined.
The Javascript files wt<browser>BrowserFunctions.js provide
the following functions:
– doCursorHome
– doCursorUp
– doCursorDown
– doCursorLeft
– doCursorRight
– doTab
– doBackTab
– doToggleMark
– doToggleInsert.
The implementation of these functions can be empty; this depends
on the browser capabilities (see the section “Callback functions in
key mapping” on page 149).
If this attribute is not defined, no action can be executed. Editing of
the keyboard entries is left to the browser.
kc
144
key code
Number assigned to the pressed key in the keyboard driver.
The script wtCommonBrowserFunctions.js has a symbol for many
of the keys; the symbol name begins with VK_.
For key combinations there is also the modifier key (mk).
WebTransactions for OSD
Controlling communication
Terminal functions
Description
Attribute
Meaning
mk
modifier
key
Additional modifier key pressed (see definition in
wtCommonBrowserFunctions.js):
– 0 = MK_NONE (= no modifier key pressed)
– 1 = MK_CTRL
– 2 = MK_ALT
– 4 = MK_SHIFT
In key combinations the corresponding values are added:
– 3 = MK_CTRL + MK_ALT
– 5 = MK_CTRL + MK_SHIFT
– etc.
If no mk is specified then the value 0 = MK_NONE is used.
sl
WebTransactions for OSD
select
list
At the start of each selection list to be generated, a component with
the index 0 will be generated as a header. The component has no
function. The text for this “0” component is specified in the attribute
sl.
Any selection lists created previously will be closed when the
attribute sl occurs.
For improved readability, sl can be made to be the only attribute in
the table object.
145
Terminal functions
Controlling communication
Structure of wtKeysOSD.js
This section describes the wtKeyMappingTableInput table from the wtKeysOSD.js file
supplied with WebTransactions:
The object wtKeyMappingTableInput is created as literal.
wtKeyMappingTableInput = [
The attribute sl indicates the start of the selection list with the label more.
{ sl:'more'},
The attribute co indicates a comment for better readability. There is no la attribute for the
following entries. The entries should not appear in the selection list. Use kc and mk to find
the mapping for a PC key. With ac JavaScript functions are specified, which are to be
processed, when the appropriate key or key combination is pressed.
{
{
{
{
{
{
{
{
{
{
{
{
{
co:'MAR', ac:doToggleMark, kc:VK_F12, mk:MK_CTRL+MK_SHIFT },
co:'MAR', ac:doToggleMark, kc:VK_MAR, mk:0 },
co:'END', ac:doEnd, kc:VK_END },
co:'Insert', ac:doToggleInsert, kc:VK_INS },
co:'CursorUP', ac:doCursorUp, kc:VK_UP },
co:'CursorDOWN', ac:doCursorDown, kc:VK_DOWN },
co:'CursorLEFT', ac:doCursorLeft, kc:VK_LEFT },
co:'CursorRIGHT', ac:doCursorRight, kc:VK_RIGHT },
co:'SDZ', ac:doPageUp, kc:VK_PGUP },
co:'SNZ', ac:doPageDown, kc:VK_PGDN },
co:'HOME', ac:doCursorHome, kc:VK_HOME },
co:'TAB', ac:doTab, kc:VK_TAB },
co:'BACKTAB', ac:doBackTab, kc:VK_TAB, mk:MK_SHIFT },
The attribute la indicates the entries in the selection list.
{ la:'K1', ac:'K1', kc:VK_F1, mk:MK_CTRL },
{ la:'K2', ac:'K2', kc:VK_F2, mk:MK_CTRL },
{ la:'K3', ac:'K3', kc:VK_F3, mk:MK_CTRL },
...
{ la:'K14', ac:'K14', kc:VK_F2, mk:MK_CTRL+MK_SHIFT },
{ la:'F1', ac:'F1', kc:VK_F1 },
{ la:'F2', ac:'F2', kc:VK_F2 },
...
{ la:'F24', ac:'F24', kc:VK_F12, mk:MK_SHIFT },
{ la:'ClearScr', ac:'ClearScreen' },
{ la:'DUE2', ac:'DUE2' },
{ la:'InsClip', ac:doInsertClipBoard, kc:VK_V, mk:MK_CTRL+MK_SHIFT },
146
WebTransactions for OSD
Controlling communication
Terminal functions
The following la attributes indicate the selection list for the P keys.
{ la:'P1', ac:'PKEY1', kc:VK_1, mk:MK_CTRL, sl:'pkeys' },
{ la:'P2', ac:'PKEY2', kc:VK_2, mk:MK_CTRL },
...
{ la:'P20', ac:'PKEY20', kc:VK_0, mk:MK_CTRL+MK_SHIFT },
Do not close the last entry in the table with a comma. If you do close the entry with a comma,
the program will wait for a further entry before the literal end ( ] ).
{ la:'P', ac:'PKEYS' }
];
WebTransactions for OSD
147
Terminal functions
Controlling communication
8.3.4 Interaction between wtCommonBrowserFunctions.js and
wt<browser>BrowserFunctions.js
The file wtCommonBrowserFunctions.js contains the Javascript code which will be run for
all browsers. The wt<browser>BrowserFunctions.js files contain the Javascript code
which will be run depending on the current browser. For example,
wtGeckoBrowserFunctions.js contains the Javascript code for Gecko-based browsers.
After creation of the base directory, the files are located in the directory
<basedir>/wwwdocs/javascript.
If you want to adapt the Javascript code in these files you will need specialist knowledge of
browser behavior and browser interaction with WebTransactions. The following text
describes the interaction between the functions and data structures as supplied with the
product.
Symbols
The file wtCommonBrowserFunctions.js is called before the files
wt<browser>BrowserFunctions.js and wtKeysOSD.js. This file contains the definition of
the variables for symbolically invoking the keys in the other *.js files.
// some symbolic keycodes /////////
VK_TAB
= 9;
VK_RETURN= 13;
VK_SHIFT = 16;
VK_CTRL = 17;
VK_ALT
= 18;
VK_PAUSE = 19;
VK_ESC
= 27;
VK_PGUP = 33;
VK_PGDN = 34;
VK_END
= 35;
VK_HOME = 36;
VK_LEFT = 37;
VK_UP
= 38;
VK_RIGHT = 39;
VK_DOWN = 40;
VK_INS
= 45;
VK_0
= 48;
VK_1
= 49;
...
MK_NONE = 0;
MK_CTRL = 1;
MK_ALT
= 2;
MK_SHIFT = 4;
148
WebTransactions for OSD
Controlling communication
Terminal functions
Key mapping functions
function wtCreateKeyMap()
Generates, from the wtKeyMappingTableInput table, a structure which is simpler
and quicker to access at runtime. The call is made from wtKeysOSD.htm. The call is
absolutely necessary; without this call, mapping cannot take place.
function wtCreateKeySelectList()
Generates, from the wtKeyMappingTableInput table, one or more selection lists.
The call is made from wtKeysOSD.htm. It is possible to suppress the list by leaving
out the call for this function in wtKeysOSD.htm; the function keys will remain
operative.
Following this example it is easy to describe other functions. You can, for example,
generate a key or a table component for each function.
function wtHandleKeyboard( modifier, keyCode )
Called from wt<browser>BrowserFunctions.js when a key is pressed.
wtHandleKeyboard(), on the basis of the structure generated bywtCreateKeyMap(),
can now establish if an action has been assigned to this key: If an action has been
assigned, it will be run. If no action has been assigned, the keyboard event will be
left to the browser.
Callback functions in key mapping
The file wtCommonBrowserFunctions.js also provides functions used by the table
wtKeyMappingTableInput (see the attribute ac on page 144).
Most of these functions return false as a result in order to indicate that no general mapping
for these keyboard entries is available. In this case you should use the default behavior of
the current browser. This default behavior will be uploaded to the
wt<browser>BrowserFunctions files where required by functions with the same names (see
page 151).
WebTransactions for OSD
149
Terminal functions
Controlling communication
Procedure
The behavior described above is obtained as follows:
1. Whenever a PC key is pressed, the browser calls the function onKeyDown from the file
wt<browser>BrowserFunctions.js.
2. The function onKeyDown transmits the modifier key and the key code (see the
wtKeyMappingTableInput table on page 144), and then calls the function
wtHandleKeyboard (if this is present) in the file wtCommonBrowserFunctions.js.
3. The function wtHandleKeyboard recognizes if an action is defined for this key in the table
wtKeyMappingTableInput under ac (see page 144).
If there is a function pointer under ac, the further procedure continues as follows:
4. wtHandleKeyboard calls the function and then returns the callback value at onKeyDown.
This occurs with actions such as HOME, TAB or CursorDown. The callback function is used
at this stage to process actions on the client PC with the aid of the browser.
5. The function onKeyDown signals to the browser that the key has just been pressed
(callback value true). In this case the browser will no longer react to the key. If this is
not the case, the browser will run its standard reaction for the current keyboard entry.
If there is a character string under ac, the further procedure continues as follows:
4. The content of the string is transferred to the attribute wt_special_key.value (see
section “wtKeysOSD.htm template” on page 90). The form is transferred to
WebTransactions together with the value of ac (e.g. "@1" as the PF1 key) as a special
function.
5. In this case the callback value to the browser is always true (the key is processed
immediately. The browser no longer reacts to the key.
If the attribute ac is not defined (i.e. no action has been assigned to the key pressed), the
callback value false will be signalled to indicate that the browser will handle the keyboard
entry.
150
WebTransactions for OSD
Controlling communication
Terminal functions
WebTransactions-specific callback functions
WebTransactions provides a series of special implementations of the callback functions
designed for individual browser types.
Some of the following functions are uploaded bywtGeckoBrowserFunctions.js depending
on the capabilities of the Gecko browser. wtExplorerBrowserFunctions.js will upload all
these functions (most of the possibilities are recognized by Internet Explorer) and then run
the functions described below.
i
You can also develop customized callback functions in order to extend the user
interface. In this case, you should ensure that a function invoked in the
tablewtKeyMappingTableInput (see page 144) is also defined in the file
wtCommonBrowserFunctions.js and in the corresponding file
wt<browser>BrowserFunctions.js.
function doCursorUp()
Positions the cursor in the entry field above the current cursor position.
function doCursorDown()
Positions the cursor in the entry field below the current cursor position.
function doCursorLeft()
If the cursor is at the start of an entry field, moves the cursor to the end of the
previous entry field. Otherwise, the browser will react to the key entry (moving the
cursor inside the field).
function doCursorRight()
If the cursor is at the end of an entry field, moves the cursor to the start of the next
entry field. Otherwise, the browser will react to the key entry (moving the cursor
inside the field).
function doCursorHome()
Positions the cursor at the start of the first entry field.
function doTab()
Skips to the start of the next entry field.
function doBackTab()
Skips to the start of the previous entry field.
function doToggleMark()
The marking of the entry field where the focus is located, is toggled.
function doToggleInsert()
Toggles between the Insert and Overwrite modes.
WebTransactions for OSD
151
Terminal functions
Controlling communication
8.3.5 Using the WT_BROWSER object
In order to avoid having to transmit the browser properties and font sizes many times during
a session, WebTransactions creates the object WT_BROWSER at the beginning of each
session. It is then available globally during the whole session.
The WT_BROWSER object contains the following attributes:
–
–
–
–
Browser ID
Browser version
Browser properties
Font size to be used
These attributes are used in the following templates:
–
All templates generated with the master templates OSD.wmt or OSD_Pocket.wmt (e.g.
AutomaskOSD.htm).
–
wtBrowserFunctions.htm
wtBrowserFunctions.htm includes wt<browser>BrowserFunctions.js and gives the
font size (and other properties).
Font size in the attribute WT_BROWSER.charSize
In the WT_BROWSER object the attribute WT_BROWSER.charSize has the default setting 14
(previous static value).
If the attribute WT_POSTED.wtCharSize already exists at the start of a session then its value
will automatically be taken over by WT_BROWSER.charSize. This feature makes it possible for
individual users to set their own font sizes (depending on the screen resolution setting).
The value of WT_BROWSER.charSize can also be set while a session is running by using the
method WT_BROWSER.setCharSize().
i
You should not try to edit the attribute WT_BROWSER.charSize directly because other
attributes depend on this value.
You can re-initialize the object WT_BROWSER using the methodWT_BROWSER.refresh(). This
will also refresh the attributes WT_SYSTEM.CGI.HTTP_USER_AGENT and
WT_POSTED.wtCharSize. This procedure would make sense, for example, when a running
session in a roaming session is taken over by another browser (for details on roaming
sessions, see the WebTransactions manual “Concepts and Functions”).
152
WebTransactions for OSD
Controlling communication
Terminal functions
Example application of WT_BROWSER.charSize
Allows a user on the call page of a WebTransactions application to select the font size to be
used for displaying the application (e.g. via a selection list):
Font Size:
<select name="wtcharSize">
<option value="12">12
<option value="14" SELECTED>14
<option value="17">17
<option value="20">20
</select>
At the start of the session, these entries will automatically be taken over when the attribute
WT_POSTED.wtCharSize is evaluated. All the size settings in AutomaskOSD.htm and in the
generated templates will depend on this value.
You can also use Javascript to make the entry field for wtcharSize dependent on the screen
width. You can do this, for example, when you call up a page via a Submit button with a entry
field for the font size:
<body onload="document.forms.wtaform.wtCharSize.value =
Math.round(screen.width/75)">
<form method="post" name="wtaform"
action="/scripts/WTPublish.exe/D:/webta/basedir?Start">
<input type="submit" value="Start">
Font Size:
<input type="text" name="wtCharSize">
...
</form>
</body>
WebTransactions for OSD
153
Terminal functions
Controlling communication
8.3.6 P key support
A 9750 terminal also provides you with programmable keys (P keys) which you can
customize with the functions of your choice. In order to make P keys programmable from
WTML, WebTransactions for OSD provides an additional set of objects for the host control
object WT_KEY (see section “Host control objects” on page 134).
These objects are marked with PKEYn, where n is a value from 1 to255. PKEY objects are only
displayed in the object tree of the WebLab development environment when the
corresponding P keys for the emulation have been defined.
Even though a 9750 terminal only supports 20 P keys, in WebTransactions for OSD you can
define 255 PKEY objects. The Javascript file wtKeysOSD.js contains the programming for
the P keys from P-1 to P-20 ready to use. You can adapt or expand this file to your
requirements (see section “Mapping keys in wtKeysOSD.js” on page 143).
8.3.6.1
Definition in WTML
When you define PKEY objects in WTML, you should note the following points:
154
●
Each PKEY can be defined with a sequence of up to 255 characters.
●
The following replacement mappings can be used for terminal functions. The
replacement mappings are reconstructed when the P keys are read.
–
[AM], [EM],
–
[DUE], [DUE2],
–
[Pn] with 1 <= n <= 20
–
[F1], [F2], [F3], [F4], [F5]
–
[Kn] with 1 <= n <= 14
–
[SMR], [SML], [SMO], [SMU], [SNZ], [SBA], [SZA], [SDZ], [TAR], [TAL]
–
[EFG], [AFG], [AFZ], [EFZ], [LZF], [LSP], [LVD], [MAR], [FAZ], [LZE], [RS]
●
PKEY numbers must not contain leading zeros.
●
In order to ensure compatibility with protocol 810, the following rules should be
observed:
–
All PKEYs (1 to 255) can be defined and used at all times.
–
However, only the keys from PKEY1 to PKEY20 can be chained and read by the host
application (terminal function LPBE = Read P area).
WebTransactions for OSD
Controlling communication
Terminal functions
Example
...
WT_KEY.PKEY1 = ’SH-USER-STA[EM][DUE]’;
WT_KEY.KEY = ’PKEY1’;
host.send();
...
8.3.6.2
wtPKEYS.htm template
The template wtPKEYS.htm supplied provides a simple method for programming the P keys
on the browser. The template is an example only and you can edit or extend it to suit your
own particular needs. The example can be used, for example, to store the P keys in a freely
selectable file. In order to automatically restore the last content of the P keys for the user at
the start of each new session, you can store the P keys in a file whose name includes the
host name or the user ID.
To call the template and assign the P keys, proceed as follows:
Ê
On the screen of your host application, select the command pkeys/P.
In the current session, this entry will call wtPKEYS.htm instead of the current template
with the function setNextPage().
WebTransactions for OSD
155
Terminal functions
Controlling communication
This screen allows you to assign functions to the listed PKEYs.
The data processed in this screen is managed in a separate processing memory.
Only when you press the Set EMU button are the values programmed in the
emulation.
i
You have two options:
156
–
Make your entries directly into the line concerned.
–
Click on the button for the function you require. The corresponding replacement
mapping will be entered in the cursor position provided that the browser supports
transmission of the cursor in the entry field. If this is not the case, the replacement
mapping will be appended at the end of the entry field which has just been used. The
assignment of functions to buttons is specified in the template wtPkeyValues.htm which
is included in wtPKEYS.htm. The function keys have the following meaning:
AFG
Remove character
AFZ
Remove line
AM
Home mark
DUE or DUE1
Start data transmission with DU1
WebTransactions for OSD
Controlling communication
Terminal functions
DUE2
Start data transmission with DU2
EFG
Insert character mode
EFZ
Insert line
EM
End mark
F1 .. F5
Function keys
FAZ
Reset the field separators to their original status
(field start character FBZ and display control character ASZ);
e.g. markings made with MAR
K1 .. K14
Short message
LSP
Delete image
LVD
Delete variable
LZE
Logical line end
LZF
Delete up to line/field end
MAR
Mark field
P1 .. P20
Programming key
RS
Reset the emulation (e.g. after EFG)
SBA
Cursor to start of image
SDZ
Cursor to start of previous line
SML
Cursor left
SMO
Cursor up
SMR
Cursor right
SMU
Cursor down
SNZ
Cursor to start of next line
SZA
Cursor to line start
TAL
Tabulator left
TAR
Tabulator right
WebTransactions for OSD
157
Terminal functions
Controlling communication
Use the action buttons in the template to control how the P key assignments will be
processed:
Set EMU
Loads the P key assignment from the processing memory to your emulation.
Load EMU
Reads the content of the currently defined PKEYs from the emulation to the
processing memory.
Reset
Resets the screen content.
Back
Returns you to the screen of the host application. Assignments which have not been
saved will be lost.
Load File
Loads the contents of the P keys from the XML file that you specified under File to
the processing memory. The XML file must contain the P key assignments and must
be in the base directory of the WebTransactions application under Pkeys.
Save File
Saves the assignment to the XML file you specified under File. The entry in File
does not require the suffix .xml. The XML file will be created in the base directory
of the WebTransactions application under Pkeys.
i
158
P keys programmed during an emulation session will be lost at the end of
the session. If you want to use the assignment during the next session, you
must load the XML file again with Load File and Set EMU. The options
available for using the contents of the P keys for the next session can be
found in the section “Saving PKEYs” on page 161.
WebTransactions for OSD
Controlling communication
8.3.6.3
Terminal functions
Handling PKEYs
The PKEYs are created as objects under WT_KEY.
To edit the objects, use the template wtPkeyFunctions.htm with the following methods The
methods are defined in the classWT_PKEYS. wtPkeyFunctions.htm is also included in
wtPKEYS.htm.
Methods for WT_PKEYS class objects
WT_PKEYS([number])
The constructor specifies the number of entered PKEY objects under the object
WT_KEY.
Default value: 20
setDirectory(directory)
Specifies the directory where the XML file with the PKEY assignments is to be
created.
Default value: base directory/Pkeys
setFileName(file)
Specifies the name for the XML file with the PKEY content. The file is created relative
to the directory which has been set with setDirectory().
getFileName()
Supplies the file name specified with setFileName().
setPassword(password)
Specifies the password to be used to protect the XML file.
readFromFile()
Reads the PKEYs from the file specified with setDirectory() and setFileName().
saveToFile()
Writes the content of the PKEY assignment in the file specified with setFileName().
After a call from setClusterParameter() the file will be distributed to the other
cluster members.
loadFromEmu()
Reads the content of PKEYs from the emulation.
WebTransactions for OSD
159
Terminal functions
Controlling communication
setToEmu()
Loads the content of PKEYs to the emulation.
getKeyValue(number)
Supplies the content of the specified PKEY from the WT_PKEY instance.
setKeyValue(number,value)
Sets the PKEY entered with a number in the WT_PKEY instance to the value value.
initClusterParameter (file,user,password,clusterName)
Creates a transfer file for all the values required for the distribution of files in a
cluster configuration (see WebTransactions manual “Concepts and Functions”).
file
Name of the transfer file used in the setClusterParameter() method. The
file will be created in XML format with the suffix .xml.
user, password
User name and password to enable file distribution in the cluster.
clusterName
Name of the cluster configuration.
As a preparatory step, the initClusterParameter() method must be called up
once on the cluster controller. The resulting file.xml file can then be distributed to
the cluster members using WebLab. You must repeat this procedure if the cluster
definition or the access rights have been changed. The user name user and the
password password must have access to the corresponding base directory on all the
participating machines.
setClusterParameter(file)
Specifies that saveToFile() should use the cluster definition set with
initClusterParameter() in order to be able to distribute the PKEYs to the cluster
members.
160
WebTransactions for OSD
Controlling communication
8.3.6.4
Terminal functions
Saving PKEYs
In a terminal emulation installed on a client PC, the contents of PKEYS is saved locally on the
PC under the protection of the Windows user name. The contents are available when a new
emulation call is made and, depending on the operating system, are also protected against
access by other users.
However, this does not apply to WebTransactions where the host adapter simulation runs on
the server. Host adapters and emulations have no way of knowing which PC and which user
name were used to log on to the current session on the client PC.
This means that various measures are available in order to restore the previous content of
the P keys to the next session for the same user and in order to protect the P key content
from unauthorized access. These measures depend on the current customer
specifications.
There are several ways of regularly saving the PKEY content:
●
You can use the PKEY assignment that you set with the WTBean wtcSingleSignOn. In
this case, you must create the PKEY assignment in the WebTransactions object tree area
that is saved for each user by wtcSingleSignOn (see WTBean documentation).
●
You can save the PKEY assignment so that is one-to-one assigned to a user, for
example,
–
in a file whose name is derived from an IP address or a PC name.
This procedure is not possible in the PROXY operating mode.
–
in a file whose name is saved in a cookie. You must ensure that the file name is only
assigned once.
This procedure is not possible where cookies are not allowed.
–
in a file whose name is derived from a user name.
This option may be restricted depending on the following questions:
– Is VBScript allowed?
– Is the user name at the Windows log-on unique in the group of users belonging
to the WebTransactions application?
–
Using a cookie directly.
This procedure is not possible where cookies are not allowed. This option can be
restricted by the maximum length of the cookie permitted.
WebTransactions for OSD
161
Start templates for OSD
Controlling communication
8.4 Start templates for OSD
After the WebTransactions application is started (via an entry page or by direct input of the
URL), the parameters for the connection to the host application must be set in a start
template.
WebTransactions provides you with ready-made start templates, which you can use as the
basis for your own start templates. You have two options:
●
the start template set (ready-to-use)
This start template set can be used immediately. The required parameters are reentered on every start and most of them are set to normal default values. It is suitable
for starting an individual host application or several host applications integrated in a
WebTransactions application.
The set consists of the general start template wtstart.htm, which you can use for
example to create communication objects and switch between different parallel host
connections, as well as specific start templates for the individual host adapters. The
start template wtstartOSD.htm is supplied specially for WebTransactions for OSD. This
OSD-specific start template is described in section “OSD-specific start template in the
start template set (wtstartOSD.htm)” on page 163. The general start template is
described in the WebTransactions manual “Concepts and Functions”.
●
WTBean for the generation of a start template
To connect an individual OSD application, you should use a specially generated start
template. The WTBean wtcStartOSD.wtc helps you to generate such templates.
162
WebTransactions for OSD
Controlling communication
Start templates for OSD
8.4.1 OSD-specific start template in the start template set (wtstartOSD.htm)
If you selected the OSD protocol in the general start template wtstart.htm (described in the
WebTransactions manual “Concepts and Functions”) and created a new communication
object, the system branches to the wtstartOSD.htm template. This template allows you to
set OSD-specific parameters:
–
–
You can define connection parameters and open a connection to an OSD application.
If you select the run option, the connection to the host application is established (open)
and the first screen of the application is fetched (receive).
If you select the open option, a connection is established to the host application and the
wtstartOSD.htm template is displayed again. If the connection was opened success-
fully, this template contains additional buttons for communicating with the OSD application. If you select close, the connection to the host application is shut down.
–
If you select the receive option, the wtstartOSD.htm template is displayed again. It now
contains a new host attributes section in which you can set the host attributes, for
example, for pop-up recognition. Clicking on the enter dialog button displays the first
screen of the host application.
WebTransactions for OSD
163
Start templates for OSD
Controlling communication
Setting connection parameters and opening the connection
164
WebTransactions for OSD
Controlling communication
Start templates for OSD
In the connection parameters area, you can set system object attributes with the same
name to the desired values (see section “System object attributes” on page 113).
In the workflow area, you define the next action to be performed.
destination
In this field, you can select the template to be used. Then click on go to to branch to the
selected page. The default value here is main menu, and allows you to return to the
general entry page wtstart.htm. If several connections are already open, they are
offered for selection. The system then branches to the respective host adapter-specific
start templates of these connections.
access host
This field contains the actions that can be performed in the current session. If a
connection has not yet been opened, the only options available are open and run:
open
This button opens a connection to the host. The start template now displays
additional buttons for communication.
run
Like open, this button also opens a connection to the host. However, this also
retrieves the first message from the host and displays it in the Web browser.
parameters
The reset button resets the parameters to the status received by the browser. The
update button allows you to send the values of the page to WebTransactions without
engaging in communication with the host.
WebTransactions for OSD
165
Start templates for OSD
Controlling communication
Establishing communication
(only possible during a connection to the host that was opened using open)
As soon as a connection is opened, the following buttons for communication with the host
application are provided in the workflow area under access host. During communication,
only the buttons supported at each point in the process are offered for selection. If you
selected open, these are the receive and close buttons:
receive / send
The receive and send buttons toggle.
receive receives the next message from the host application and expands the start
template in order to set the host attributes. send sends a message to the host application. send sends the current data buffer without modifying the data.
close
This button closes the connection to the host application and returns to the first page
displayed. There you can select and open a new connection.
Setting the host attributes
(only possible when a connection to the host is open and at least one dialog has
taken place with the host using send/receive)
A new section, host attributes, is available in which you can specify the host attributes for
pop-up recognition and key conversion. The following buttons may also be displayed during
communication if a message was received from the host application.
receive / send
The receive and send buttons toggle.
receive receives the next message from the host application and expands the start
template in order to set the host attributes. send sends a message to the host application. send sends the current data buffer without modifying the data. If you wish to send
a screen containing modified data to the host application in the first step, you should
select enter dialog.
enter dialog / resume dialog
This button branches directly to the next host application screen. You can then complete
this screen and send it to the host application.
If you return to this page from an active host application by selecting the suspend
button, the resume dialog button appears in place of the enter dialog button.
close
This button closes the connection to the host application and returns to the first page.
There you can select and open a new connection.
166
WebTransactions for OSD
Controlling communication
Start templates for OSD
8.4.2 WTBean wtcStartOSD.wtc for the generation of a Start template
To connect an individual OSD application you can generate an application-specific start
template. To do this, you use the WTBean wtcStartOSD.wtc. This is a standalone WTBean.
wtcStartOSD.wtc contains the inline WTBean wtcOSD.wtc which can be used to create a
new OSD communication object, and thus to establish a connection to an OSD application
(see the section “Creating a new OSD communication object (wtcOSD)” on page 169).
Before you can access WTBeans there must be a connection to a WebTransactions
application.
i
You use the File/New/wtcStartOSD command to open the WTBean for editing. WebLab
generates the Add:wtcStartOSD dialog box which contains four tabs:
–
In the wtcStartOSD tab you specify the name of the start template you want to
generate.
–
In the WT_SYSTEM attributes tab you specify the most important system object
attributes.
–
In the OSD connection parameters tab you specify the most important connection
parameters.
–
In the Further options tab you can edit all the parameters for the connection to the
OSD application within a tree structure.
WebTransactions for OSD
167
Start templates for OSD
Controlling communication
The generated start template itself does not generate any pages in the browser.
When WebTransactions is started, the template corresponding to the first format received
from the host application is displayed. This is due to the wtinclude tag at the end of the
Start template.
168
WebTransactions for OSD
Controlling communication
Creating a new OSD communication object (wtcOSD)
8.5 Creating a new OSD communication object (wtcOSD)
TheWTBean wtcOSD is supplied in order to enable you to create a new OSD communication
object in a template and thus establish a connection to an OSD application. You can also
use this WTBean to open multiple connections in parallel. wtcOSD is and inline WTBean. For
more information, see the WebTransactions manual “Concepts and Functions”.
i
Before you can access inline WTBeans, there must be a connection to the
WebTransactions application and the template in which you want to insert the
WTBean must be open.
You use the Add/WTBean/wtcOSD command to open the WTBean for editing. WebLab
generates the Add:wtcOSD dialog box:
In this dialog box you can edit the parameters for the new communication object. The most
important parameters can be found in the first tab, OSD connection parameters. The
mandatory parameters are displayed in red. You can edit all the other parameters in a tree
structure in the Further options tab.
Once you have entered values for the parameters and clicked OK to confirm your settings,
the code of the WTBean is generated from the parameters and the description file and is
inserted at the cursor position in the opened template.
WebTransactions for OSD
169
Creating a new OSD communication object (wtcOSD)
Controlling communication
The WTBean is made up of protected and unprotected code areas. The protected areas are
grayed out. In these areas, you are only able to influence the WTBean via the interface. To
do this, select the Edit WTBean command from the context menu of the start line of the
WTBean (in pink) (see the WebTransactions manual “Concepts and Functions”).
170
WebTransactions for OSD
9 Using print/asynchronous support
If you enable print/asynchronous support, WebTransactions automatically checks for
asynchronous messages or print information at definable intervals.
If asynchronous messages are found, the application screen displayed in the browser is
automatically updated (automatic refresh). If print information is found, it is printed out.
WebTransactions provides print/asynchronous support via the frame set described in
section “Functionality of print/asynchronous support” on page 172. JavaScript must be
permitted in the configuration of your Web browser.
9.1 Enabling print/asynchronous support
To enable print/asynchronous support, you must set the WT_ASYNC attribute of the
connection-specific system object to "YES" (the default value is "NO").
If you use the supplied start template wtstartOSD.htm to start a WebTransactions session,
click on the Start radio button for the option Print/Asynchronous support.
If you use your own start template, you must insert an assignment where WT_ASYNC is set to
Yes in order to be able to start print/asynchronous support. This is usually carried out via
the WTBean wtcOSD by setting the Enable asynchronous messages entry to Yes.
The browsers in common use today that support the <iframe> HTML tag enable unlimited
print support even without the activation of the WT_ASYNC attribute. Existing print data is
checked only for every dialog step triggered by the user. Asynchronous print data using
BYPASS printing may be printed with a delay.
WebTransactions for OSD
171
Functionality of print/asynchronous support
Using print/asynchronous support
9.2 Functionality of print/asynchronous support
Print support and asynchronous support operate according to the same principle.
●
If the browser does not support the <iframe> HTML tag and print/asynchronous
support is enabled (i.e. WT_ASYNC is set to "Yes"), a script in the
wtBrowserFunctions.htm template starts the frame set wtframes.htm.
wtframes consists of two frames:
–
An application frame in which the host application screens are displayed as normal.
–
An “invisible” control frame designed exclusively for querying whether
asynchronous messages or print information is available, and for initiating appropriate actions if necessary. In this control frame, the template wtasync.htm which is
made available by WebTransactions takes control. It is assigned to the same session
as the application frame. In this template, WebTransactions operates in so-called
asynchronous mode which does not affect the dialog flow of the host application.
Since the application frame occupies the entire browser window and the control frame
is not visible on the interface, the Web browser user is not aware that the session is
being conducted with a frame set after print/asynchronous support is enabled. When
you close the connection and return to the start template, the frame set is automatically
unloaded.
Format of the wtframes.htm template
<html>
<head>
<title>WebTransactions</title>
</head>
<frameset rows="100%,*" border="0">
<frame name="application" src="##WT_System.HREF_ASYNC#" />
<frame name="control"
src="##WT_System.HREF_ASYNC#&WT_ASYNC_PAGE=wtasync" />
</frameset>
</html>
●
172
If, on the other hand, the browser supports the <iframe> HTML tag and print/asynchronous support is activated (i.e. WT_ASYNC has been set to "Yes"), only the “invisible”
control frame is called inline (with <iframe>) in which the template wtasync.htm made
available by WebTransactions takes control.
WebTransactions for OSD
Using print/asynchronous support
Functionality of print/asynchronous support
Control frame: wtasync.htm
The processing steps involved in handling asynchronous message and the print functionality are defined in the control frame. The control frame must contain a wtDataform tag with
the attribute asyncPage="wtasync". This indicates that the template is outside the dialog
sequence (see sections on asynchronous dialog in the WebTransactions manual “Concepts
and Functions”).
The basic framework of the wtasync.htm template is shown below:
<html>
<body>
<wtDataform name="async" asyncPage="wtasync">
</wtDataform>
<wtOnCreateScript>
<!-host = WT_HOST.active;
if ( host.WT_SYSTEM != null )
host_system = host.WT_SYSTEM; // Private System Objects
else
host_system = WT_SYSTEM;
// Public System Objects
Processing steps for print requests
... (see page 182)
Handling of asynchronous messages
... (see page 178)
//-->
</wtOnCreateScript>
</body>
</html>
WebTransactions for OSD
173
Functionality of print/asynchronous support
Using print/asynchronous support
wtBrowserFunctions.htm template
The wtBrowserFunctions.htm template plays an important role in print/asynchronous
support. wtBrowserFunctions.htm contains a script that performs the following actions
when print/asynchronous support is enabled:
–
Starts the wtframes frame set, if this is necessary but has not already been loaded.
–
Begins the cyclical submission (Submit) of the control frame.
Structure of the script in wtBrowserFunctions.htm:
<wtIf ( wtCurrentComm_system.WT_ASYNC == 'Yes')>
<wtrem>support of asynchronous message and printing with browsers not
supporting <iframe>//////</wtrem>
<script type="text/javascript">
<!-function AutomaticRefresh()
{
if( parent.control && parent.control.document.forms[0] ) {
parent.control.document.forms[0].submit();
}
setTimeout('AutomaticRefresh()', 5000);
}
if( !parent.control )
{
self.location.href =
'##WT_SYSTEM.HREF_ASYNC#&DUMMY=##WT_SYSTEM.FORMAT_STATE#' +
'&WT_ASYNC_PAGE=wtframes';
}
else
{
##(wtCurrentComm_system.HARDCOPY == 'Yes' || wtCurrentComm_system.BYPASS
== 'Yes') ?
'AutomaticRefresh();' :
'setTimeout("AutomaticRefresh()", 5000);'#
}
//-->
</script>
<wtElse><wtIf ( (wtCurrentComm_system.HARDCOPY == 'Yes' ||
wtCurrentComm_system.BYPASS == 'Yes') && WT_BROWSER.acceptIframe )>
<wtrem>just synchronous support of printing with browsers supporting
<iframe>////////////////////////</wtrem>
174
WebTransactions for OSD
Using print/asynchronous support
Functionality of print/asynchronous support
<iframe id="asyncFrame"
style="visibility:hidden;height:0;position:absolute;"
src="##WT_SYSTEM.HREF_ASYNC#&WT_ASYNC_PAGE=wtasync"></iframe>
</wtIf></wtIf></wtIf>
It is possible to modify the time interval at which the control frame is cyclically submitted
(default value: 5000 ms).
WebTransactions for OSD
175
Handling asynchronous messages
Using print/asynchronous support
9.3 Handling asynchronous messages
Asynchronous messages are messages sent to the terminal without being expressly
requested by the user - i.e. without the user pressing a particular key or clicking an interface
element.
If you access a host application that uses asynchronous messages via the Web,
WebTransactions acts as a terminal and accepts asynchronous messages. However, by the
time an asynchronous message is received by WebTransactions, the current page has
already been sent to the browser. The modification caused by the asynchronous message
is not apparent until the browser page is refreshed.
Without print/asynchronous support, the following problem occurs: the Web browser user
cannot determine whether WebTransactions has received an asynchronous message and
can therefore only refresh the page “on spec”.
WebTransactions solves this problem by automatically refreshing the browser page each
time an asynchronous message is received - provided that print/asynchronous support is
enabled (WT_SYSTEM.WT_ASYNC="Yes"). To perform this function, WebTransactions uses the
wtframes frame set or the <iframe> HTML tag described in section “Functionality of
print/asynchronous support” on page 172.
Regardless of the content of the WT_ASYNC attribute, REFRESH_BY_ASYNC is set to Yes if an
asynchronous message has been received. The template is able to evaluate this value and
warn the user that the last send request was ignored because of an asynchronous message
and will request the user to retransmit the message.
176
WebTransactions for OSD
Using print/asynchronous support
Handling asynchronous messages
Concept
Host
page
Host
1
Buffer
4
WebTransactions
page
8
WebTransactions
3
Browser
page
5
Control
frame
2
7
9
Control
frame
Control
frame
Application
frame
Application
frame
6
Application
frame
Figure 3: Handling asynchronous messages
1. The host application sends an asynchronous message. This is not immediately
processed by WebTransactions.
2. wtBrowserFunctions.htm starts an additional invisible control frame, if required (if the
browser does not support the HTML tag <iframe>), via the wtframes.htm template.
3. wtBrowserFunctions.htm starts an asynchronous call to WebTransactions with the
wtasync.htm template cyclically in the invisible section (frame or <iframe>).
4. wtasync.htm checks whether there is a message that has not been processed
(WebTransactions responds with "Yes" on evaluating $MESSAGE:WAITING). If the
response is Yes, JavaScript code is generated in the response which then triggers a
refresh (see step 6)
5. The control frame receives the response to the asynchronous call.
6. If unprocessed messages are available, the control frame receives a JavaScript instruction which automatically triggers a refresh of the application frame (see “Handling of
asynchronous messages defined in wtasync.htm” on page 178).
7. The application frame is then sent to and evaluated by WebTransactions.
WebTransactions for OSD
177
Handling asynchronous messages
Using print/asynchronous support
8. The template responsible for the current screen performs the send and receive functions as usual. However, as WT_KEY.KEY contains the value “Refresh”, no new message
is sent to the host, instead all remaining messages from the host are processed.
9. The screen modified by the asynchronous message is sent to the browser and
displayed in the application frame.
i
If you create your own templates for individual formats, you must take account of
the area in which asynchronous messages are displayed. This does not occur
automatically with WebLab if this area is empty and if the static option was set when
the Capture function is executed.
Handling of asynchronous messages defined in wtasync.htm
The following processing steps for handling asynchronous messages are defined in
wtasync.htm:
// Support of Asynchronous message //////////////////////////////////////
else if ( host.$MESSAGE.WAITING == "Yes" )
document.write (
'<script>' +
' if( parent.application && parent.application.document.forms[0]
)' +
'
parent.application.wtSubmitKey( \'Refresh\' );' +
' else if( parent.document.forms[0] && parent.wtSubmitKey )' +
'
parent.wtSubmitKey( \'Refresh\' );' +
'</script>' );
else if (host.$CONNECTION.ALIVE == 'No' )
document.write (
'<script>' +
' if( parent.application && parent.application.document.forms[0]
)' +
'
parent.application.wtSubmitKey( \'Disconnect\' );' +
' else if( parent.document.forms[0] && parent.wtSubmitKey )' +
'
parent.wtSubmitKey( \'Disconnect\' );' +
'</script>' );
Firstly, the WAITING attribute of the host control object $MESSAGE is queried to establish
whether asynchronous messages are present. Each time this attribute is queried,
WebTransactions checks the buffer for asynchronous messages. If it finds a message, the
value of $MESSAGE.WAITING is set internally to "Yes".
If the value "Yes" is returned for $MESSAGE.WAITING, the wtasync.htm template automatically refreshes the application frame. During this process, it is first checked whether the
application frame is active and the wtSubmitKey method is present (communication with the
host may have been shut down by a disconnect).
178
WebTransactions for OSD
Using print/asynchronous support
Handling asynchronous messages
Customizing the wtasync.htm template
It is possible to modify the wtasync.htm template slightly, thus changing the handling of
asynchronous messages. For instance, you may wish to output a message box informing
the user that asynchronous messages have arrived instead of automatically refreshing the
application frame.
if (host.$MESSAGE.WAITING == "Yes")
document.write ("<script> top.alert ('You received an asynchronous
message. Please Refresh')</script>");
WebTransactions for OSD
179
Print support
Using print/asynchronous support
9.4 Print support
This section describes how to print data with WebTransactions.
The print functions supported by WebTransactions differ depending on the type of information to be printed.
WebTransactions offers the following print options:
●
Terminal hardcopy printing
This involves printing the alphanumeric display of the host application screen as it would
appear on your terminal or terminal emulation.
●
Browser display printing
This involves printing the information displayed in the Web browser.
●
Host data printing
This involves printing information prepared and sent by the host application.
In the case of terminal hardcopy printing and browser display printing, it is possible to distinguish whether the print job was initiated by a Web browser user (user-driven), or by the host
application (software-driven). The printing of host data is always software-driven.
i
Depending on the print function selected, you may have to configure your Web
browser and possibly a print server. For information on how to configure the Web
browser, see section “WTAPrint print plugin” on page 196. For instructions on
configuring the print server, see the product documentation for the print server.
Printouts are normally sent directly to a printer. During configuration, however, you
can define the print process such that printouts are routed to a file. This option is
available for all print functions described in this section.
180
WebTransactions for OSD
Using print/asynchronous support
Print support
9.4.1 Terminal hardcopy printing
With terminal hardcopy printing, the alphanumeric display of the host application screen is
printed as it would appear on your terminal or terminal emulation. In this case,
WebTransactions prints the entire application screen.
Concept
Terminal hardcopy printing is handled on the basis of the wtframes frame set described in
section “Functionality of print/asynchronous support” on page 172; this frame set consists
of an application frame and a control frame.
WebTransactions
WebTransactions
page
1
Formatting a
print file
4
3
Browser
page
2
Control
frame
Control
frame
Application
frame
Application
frame
5
Figure 4: Terminal hardcopy printing
When you request a terminal hardcopy printout, WebTransactions generates a corresponding print file (step 1). Triggered by the script in wtBrowserFunctions.htm, the control
frame is automatically submitted (step 2) and WebTransactions is asked to confirm whether
or not a print file exists (step 3). If a print file does exist, the prepared file is sent to the
browser (step 4). For instructions on how to configure and start the corresponding print
program, see section “Print functions delivered (Windows browser platform)” on page 190.
i
WebTransactions for OSD
The print file generated by WebTransactions is a pure text file in which lines are
separated by the control characters <CR><LF>.
181
Print support
Using print/asynchronous support
Processing steps defined in wtasync.htm for terminal hardcopy printing
// Support of hardcopy print ////////////////////////////////////////////
if ( host_system.HARDCOPY == "Yes" )
{
host_system.HARDCOPY = "No";
// Reset flag before
if (!host_system.WT_BROWSER_PRINT ||
host_system.WT_BROWSER_PRINT.toLowerCase() != 'yes')
host.$MESSAGE.PRINTING;
// calling host.$MESSAGE.PRINTING
else
{
WT_SYSTEM._printFile = WT_SYSTEM.BASEDIR + "/tmp/" +
WT_SYSTEM.SESSION + "/" + host.$MESSAGE.PRINTFILE_NAME;
if (host_system.WT_BROWSER_PRINT_OPTIONS.MODE != "Automatic")
document.writeln("<script>window.open
('"+WT_SYSTEM.HREF_ASYNC+"&WT_ASYNC_PAGE=wtc_bp_Print','_blank','toolbar=no,s
crollbars=yes,width=800,height=600')</script>");
else
{
document.clear();
forward ('wtc_bp_Print');
}
}
}
When a terminal hardcopy print file becomes available for printing, WebTransactions sets the
HARDCOPY attribute of the connection-specific system object to "Yes". If a print request is
displayed in this way, HARDCOPY is initially reset to "No" in wtasync.htm. The PRINTING
attribute of the host control object $MESSAGE is then evaluated, causing WebTransactions to
send the print file to the browser.
If the printout is to be carried out with the browser print function, $MESSAGE.PRINTFILE_NAME
is used to determine the name of the print file and a separate template is started for the print
request (wtc_bp_print.htm).
Otherwise, the PRINTING attribute of the host control object $MESSAGE is evaluated which
causes WebTransactions to send the file to be printed to the browser. As a result of the MIME
type, this recognizes the data as print data and passes it to an appropriately configured
application (e.g. WTAPrint.exe).
i
182
Please note that HARDCOPY must be reset to "No" before the host control object’s
$MESSAGE.PRINTING attribute is evaluated. This is because the evaluation process
terminates interpretation of the template and suppresses HTML generation.
WebTransactions for OSD
Using print/asynchronous support
Print support
Terminal hardcopy printing initiated by the user
To activate terminal hardcopy printing, simply click the Print button. This button is defined
in the wtKeysOSD.htm template, which is included by the AutomaskOSD.htm conversion
template and by the individual templates created with WebLab.
When you click on this button, the current page is sent from the browser to WebTransactions.
WebTransactions interprets the template as normal, with one exception: when executing the
send call, WebTransactions recognizes that the Print button has been activated and does
not send a message to the host. Instead, a print file is generated containing an alphanumeric representation of the current screen.
Terminal hardcopy printing initiated by the host application
Terminal hardcopy printing can also be initiated if WebTransactions receives a message from
the host application containing an appropriate hardcopy escape sequence. In this case,
WebTransactions handles the incoming message as normal, i.e. an appropriate HTML page
is generated and sent to the browser. A print file is also created containing an alphanumeric
representation of the current screen (see step 1 in the diagram on page 177).
WebTransactions for OSD
183
Print support
Using print/asynchronous support
9.4.2 Host data printing
OSD applications are able to route information to specific printers. There are two ways of
implementing this bypass printing concept:
1. The printer has the same name as the terminal which is connected to the host application. In OSD terminology, the “station name” is used. In the WebTransactions
environment, the terminal corresponds to the WebTransactions server. In this case, the
print file is sent directly to the WebTransactions server.
2. The printer has its own station name. The terminal is simply used for print control and
is known to the host application.
The host application possesses a number of interfaces for station name information.
Example for OSD/UTM environment
1. KDCS INFO
This KDCS call requests information from UTM. The operation modifier SI is used to
query the station name.
2. KDCS INIT
This KDCS call is used to log onto a UTM program. The operation modifier PU returns
information about the current conversion. For details see the openUTM manual
“Programming Applications with KDCS for COBOL, C and C++”.
Printer with same name as terminal
The host application sends the information to be printed to WebTransactions. The OSD host
adapter recognizes that bypass printing has been activated. It writes the information which
is to be printed to a file and sets the system object's BYPASS attribute to "Yes". This file is
stored in the temporary directory of the corresponding WebTransactions session. As in the
case of hardcopy printing, the control frame is sent at regular intervals in the background
and WebTransactions is asked whether a print file exists (see section “Terminal hardcopy
printing” on page 181). If a print file does exist, the prepared file is sent to the browser. A
corresponding MIME type should be defined at the browser in order to start an associated
print program (see section “Configuring the web browser” on page 196).
i
184
By default, WebTransactions transfers the data in the BYPASS message independently of its content (i.e. transparently). This has the advantage that it is possible to
print both graphic and text files.
WebTransactions for OSD
Using print/asynchronous support
Print support
Bypass printing with conversion
OSD applications often prepare bypass printing only for “simple” printers such as type 9001.
If a different printer type is connected to the client, it may be necessary for WebTransactions
to modify the print file rather than simply forward it. These changes may, for example,
consist in defining a different maximum line length or converting certain strings in the print
file. In this case, you must configure additional option and conversion files in the browser,
see section “Assigning a print program” on page 197.
Processing steps defined in wtasync.htm for terminal bypass printing
// Support of bypass print //////////////////////////////////////////////
else if (host_system.BYPASS
== "Yes")
{
host_system.BYPASS = "No";
// Reset flag before
if (host_system.WT_BROWSER_PRINT.toLowerCase() != 'yes')
host.$MESSAGE.PRINTING;
// calling host.$MESSAGE.PRINTING
else
{
exits = new WT_Userexit ('WTSystemExits');
if (!host_system.PRINTFILE_NAME)
WT_SYSTEM._printFile = WT_SYSTEM.BASEDIR + "/tmp/" +
WT_SYSTEM.SESSION + "/" + host.$MESSAGE.PRINTFILE_NAME;
else
{
var i =
host_system.PRINTFILE_NAME.replace(/\\/g,'/').lastIndexOf('/');
files = exits.Getdir (host_system.PRINTFILE_NAME.substring(0,i),
host_system.PRINTFILE_NAME.substring(i+1) + '*');
if (files)
{
filesArray = files.split('\n');
WT_SYSTEM._printFile =
host_system.PRINTFILE_NAME.substring(0,i+1)+ filesArray[0];
}
else
WT_SYSTEM._printFile = WT_SYSTEM.BASEDIR + "/tmp/" +
WT_SYSTEM.SESSION + "/" + host.$MESSAGE.PRINTFILE_NAME;
}
if (host_system.WT_BROWSER_PRINT_OPTIONS.MODE != "Automatic")
document.writeln("<script>window.open
('"+WT_SYSTEM.HREF_ASYNC+"&WT_ASYNC_PAGE=wtc_bp_Print','_blank','toolbar=no,s
crollbars=yes,width=800,height=600')</script>");
else
{
document.clear();
WebTransactions for OSD
185
Print support
Using print/asynchronous support
forward ('wtc_bp_Print');
}
}
}
When a terminal bypass print file is waiting to be printed, WebTransactions sets the
connection-specific system object’s BYPASS attribute to "Yes". If a print request is indicated
in this way, then the value of BYPASS is reset to "No" in wtasync.htm.
If printing is to be carried out with the browser print function, $MESSAGE.PRINTFILE_NAME is
used to determine the name of the print file and a separate template is started for the print
request (wtc_bp_print.htm).
Otherwise, the PRINTING attribute of the host control object $MESSAGE is evaluated which
causes WebTransactions to send the file to be printed to the browser. As a result of the MIME
type, this recognizes the data as print data and passes it to an appropriately configured
application (e.g. WTAPrint.exe).
i
Please note that the value of BYPASS must be reset to "No" before the host control
object attribute $MESSAGE.PRINTING is evaluated since interpretation of the template
is aborted and HTML generation is suppressed when $MESSAGE.PRINTING is
evaluated.
Printer with a name different from that of the terminal
In this case, you can use an existing print server product for Host-to-LAN printing.
i
This solution can only be used in an Intranet. In addition, the printer type (PCL,
Postscript, etc.) must be configured accordingly in the OSD system.
Using an existing print server product for host-to-LAN printing
To send OSD application print jobs to a specific LAN printer you must install a print server
on the PC to which the printer is connected. This means that network printers are available
for host-driven print functions.
PC operating system
Print server
Windows 2000/2003/XP TCP/IP print server supplied as standard service
The software product RSO V3.0A or higher must be installed on the computer running the
OSD application.
Print server configuration is described in section “Configuring the print server for Windows”
on page 201.
186
WebTransactions for OSD
Using print/asynchronous support
Print support
Assigning a printer to a Web browser client
To output print information on a printer located close to the user, special naming conventions that somehow reflect this correlation must be used in the configuration of the OSD
application. For instance, the printer situated close to the terminal with the station name
STATABCD could be configured with the name PRNABCD. In this case, the assignment
convention would be as follows: if the print job is started by a terminal with the station name
STATxxxx it should be sent to the printer PRNxxxx.
To allow this type of convention to be extended to use for Web access, you must ensure that
each browser user uses a specific individual station name which is configured in the OSD
system. Within WebTransactions templates, the host name and IP address of the computer
on which the browser is running can be accessed via system object attributes. In the case
of the CGI interface, these attributes are as follows:
WT_SYSTEM.CGI.REMOTE_HOST contains the host name
WT_SYSTEM.CGI.REMOTE_ADDR contains the IP address
In this way you can assign each browser computer a special station name in the
WebTransactions template.
Example 1
In the following example, the WebTransactions clients (systems that access the
WebTransactions application via a Web browser) are identified by their station names.
A special station name, which is configured in the OSD system, is assigned to each
WebTransactions client.
Name of the WebTransactions client
(host name of the system on which the browser runs)
Station name
D241PBOH
STATPBOH
D241PCRS
STATPCRS
D241PDAN
STATPDAN
Corresponding WT script (to be inserted in the start template):
<wtOnCreateScript>
WT_SYSTEM.STATION_NAME = "STAT" + WT_SYSTEM.CGI.REMOTE_HOST.substring(4.4)
</wtOnCreateScript>
WebTransactions for OSD
187
Print support
Using print/asynchronous support
Example 2
In the following example, the WebTransactions clients (systems that access the
WebTransactions application via a Web browser) are identified by their IP addresses.
IP address of the WebTransactions client
(IP address of the system on which the browser runs
Station name
133.125.22.3
STAT001
133.122.54.6
STAT002
135.12.8.1
STAT003
Corresponding WTScript (to be inserted in the start template):
<wtOnCreateScript>
if (WT_SYSTEM.CGI.REMOTE_ADDR == "133.125.22.3")
WT_SYSTEM.STATION_NAME = STAT001;
else if (WT_SYSTEM.CGI.REMOTE_ADDR == "133.122.54.6")
WT_SYSTEM.STATION_NAME = STAT002;
else if (WT_SYSTEM.CGI.REMOTE_ADDR == "135.12.8.1")
WT_SYSTEM.STATION_NAME = STAT003;
</wtOnCreateScript
Assignment problems with Web access via a proxy server
The assignment procedure described above does not work if the browser system is
connected to WebTransactions via a proxy server. In this case, the CGI.REMOTE_HOST and
CGI.REMOTE_ADDR attributes only contain the name and IP address of the proxy server.
However, you can resolve this problem by identifying individual users by means of user IDs.
For this purpose, you must insert a request in the start template asking the user to enter
his/her user ID.
188
WebTransactions for OSD
Using print/asynchronous support
Print support
Example
<html>
<head>
<title>Identification Page</TITLE>
</head>
<body style="font-family: courier" bgcolor="#C0C0C0">
<wtDataForm name="Identify">
Please identify yourself
<input type = "TEXT" name = "USERID" size = "4" maxlength = "4"
>
</wtDataForm>
</body>
</html>
<wtOnReceiveScript>
WT_SYSTEM.STATION_NAME= "STAT"
+ WT_POSTED.USERID;
........... open application with the correct station name ..........
</wtOnReceiveScript>
9.4.3 Browser display printing
This print function is not provided by the program WTAPrint.exe which is made available
with WebTransactions and which must be installed on every client, rather it is based on the
print functionality of the Web browser.
Browser display printing initiated by the user
To print the information displayed in the browser window, use the Web browser print
functions (Print... command in the File menu).
Browser display printing initiated by the host application
The information displayed in the browser is printed automatically by Netscape Navigator if
the self.print() method is called in a JavaScript on the client.
This can be achieved by inserting the following statement in an wtOnCreate script:
document.write ("<SCRIPT>self.print();</SCRIPT>");
WebTransactions for OSD
189
Print support
Using print/asynchronous support
9.4.4 Print functions delivered (Windows browser platform)
WebTransactions contains various print functions which you can use for terminal hardcopy
printing (see page 181) and host data printing (see page 184). The print functions are:
–
–
Browser print, which will run without the print plugin installed on the client PC.
WTAPrint print plugin
The wtKeysOSD.htm template generates an additional Print button if it is possible to trigger
a print function. This is the case when one of the following conditions are fulfilled:
9.4.4.1
–
Print/asynchronous support is activated (i.e. WT_ASYNC has been set to "Yes").
–
The browser supports the <iframe> HTML tag.
Browser print
The browser print function is implemented as a parameter of the inline WTBean wtcOSD
(see section “Creating a new OSD communication object (wtcOSD)” on page 169 and the
WebTransactions manual “Concepts and Functions”).
WTBean wtcOSD contains an ActiveX component which is automatically loaded and
installed. Depending on the browser setting, the user must confirm that the ActiveX control
indicated can be installed.
In browser printing, unlike in browser display printing, it is not the form that is visible to the
user which is printed, it is an invisible document. This is prepared especially for printing in
order to give the same result as the print function of a terminal.
Settings in the start template
In order to be able to use the browser print function, you must set the following parameters
in the start template:
Ê
For example, in the dialog box Edit wtcStartOSD select the tab Further options.
Ê
Under Global parameter, click the Enable asynchronous messages entry.
Ê
Select the Enable asynchronous messages option. The value of the entry is changed
from No to Yes.
If it is sufficient that at each dialog step a check is performed to see whether print data
is available, and if all browsers used support the <iframe> HTML tag, then you do not
need support for asynchronous messages.
Ê
190
Next, under Browser print, click the Enable browser print entry.
WebTransactions for OSD
Using print/asynchronous support
Ê
Print support
Select the Enable browser print option. The value of the entry is changed from No to
Yes.
All the other options under Browser print will only be evaluated if you have set Activate
browser print to Yes:
Browser print mode
Automatic
The printout will be printed immediately on the standard
printer.
Preview
A print preview will be displayed before printing.
The following settings will only be processed in Internet Explorer. For all other browsers,
you must use the page settings dialog box of the browser used.
Page header
Text for the page header (see section “Variables in header and footer lines” on
page 192)
Page footer
Text for the page footer (see section “Variables in header and footer lines” on
page 192)
WebTransactions for OSD
191
Print support
Using print/asynchronous support
Page orientation
Portrait
Vertical format
Landscape
Horizontal format
Left margin, Right margin, Top margin, Bottom margin
Margin width in mm
Variables in header and footer lines
For Internet Explorer you can use the following variable entries in the header and footer
lines.
&w
Window title
&u
Page address (URL)
&d
Date, short form (e.g. 15/04/03)
&D
Date, long form (e.g. Tuesday 15 April 2003)
&t
Time (as set in the system control panel)
&T
Time, 24-hour format
&p
Current page number
&P
Total number of pages in the document
&&
Ampersand (&)
&b
Text after this code will be centred
&b&b The text after the first &b will be centred, the text after the second &b will be
right justified
Example
The entry in the header line
page &p of &P&bWebTransactions Browser Print&b&d
on the top-most line of the printout, prints
page number
192
WebTransactions Browser Print
today's date
WebTransactions for OSD
Using print/asynchronous support
Print support
wtc_bp_print.cnv conversion file
Use the wtc_bp_print.cnv conversion file to convert the print control sequence in HTML
code. The file is in the base directory of the corresponding WebTransactions application.
This function converts the print control sequence by reading the print file in the template
wtc_bp_Print.htm. This template specifies the conversion file as a second (optional)
parameter for the call of the Getfile user exit (see the WebTransactions manual
“Template Language”).
The conversion file supplied contains the following entries:
* Printer conversion file
00=20
7F="?"
"<"="<"
">"=">"
Each line in the conversion file must have the following format: search text=replacement text.
search text and replacement text are the old and the new character strings. The entries
are constructed as follows:
–
Entries consist of either two-place hexadecimal code or a string, enclosed in double
inverted commas.
–
A two-place hexadecimal code can be used inside a character string; the code must be
preceded by a (\).
Example
"\195H"="</pre><pre class=pb>"
replaces the control character sequence with a CSS page break which has already
been defined in the template.
–
Backslashes and double inverted commas in character strings must be cancelled with
backslashes (\\ and \").
The conversion rules are used from top to bottom. Additional changes can be made the
template wtc_bp_Print.htm, (e.g. using the replace method of the string class).
WebTransactions for OSD
193
Print support
Using print/asynchronous support
Print preview
If the Browser print mode in the Start template is set to Preview, a print preview will be
displayed before printing begins.
This button will only be displayed if the session was started in WebLab. This opens
another browser window which marks all the control and binary characters in the
printout.
– Characters < 0x20: hexadecimal in red
– Characters > 0x7F (8-bit characters): with any hexadecimal shown in blue in
brackets
– Blank spaces: dots with a yellow background
– The end of the display shows any sequences of control characters found. These
entries can be used by the conversion file (see section “wtc_bp_print.cnv
conversion file” on page 193).
In Internet Explorer, this button prints the document on the printer set as the
standard printer. In all other browsers, this button calls up the Print dialog box.
This button opens and closes the browser print preview. This button is only
displayed in Internet Explorer.
This button opens the page properties settings. This button is only displayed in
Internet Explorer.
194
WebTransactions for OSD
Using print/asynchronous support
9.4.4.2
Print support
WTAPrint print plugin
The WTAPrint print plugin is available for downloading on the WebTransactions server. To
download the plugin, use the Wtdownload.htm page. When WebTransactions is installed, this
page is created in the web server document directory under webtav7. When you have
downloaded WTAPrint you can install it on the browser host.
If you install WTAPrint with the installation program WTAPrint2000 (also available as a
download), the registration entries for Internet Explorer will also be created. WTAPrint can
be used for all web browsers running on the Windows platform. You can also use WTAPrint
to edit print data with exchange rules. This procedure can be necessary in order to support
certain printers.
Activation of the print plugin WTAPrint is implemented as a parameter of the inline WTBean
wtcOSD (see section “Creating a new OSD communication object (wtcOSD)” on page 169
and the WebTransactions manual "Concepts and Functions”).
Settings in the start template
In order to be able to use the print plugin, you must set the following parameters in the start
template:
Ê
For example, in the dialog box Edit wtcStartOSD select the tab Further options.
Ê
Under Global parameter, click the Enable asynchronous messages entry.
Ê
Select the Enable asynchronous messages option. The value of the entry is changed
from No to Yes.
If it is sufficient that at each dialog step a check is performed to see whether print data
is available, and if all browsers used support the <iframe> HTML tag, then you do not
need support for asynchronous messages.
WebTransactions for OSD
195
Print support
Ê
Using print/asynchronous support
Next, under Browser print, check the Enable browser print entry. It must have the
value No.
Configuring the web browser
The WebTransactions print functions send print files with a special MIME type to the browser.
webta/hardcopy-print
for terminal hard copy printing
webta/bypass-print
bypass printing for host data printing.
This MIME type must be defined in the browser configuration. The procedure for most
common web browsers (Internet Explorer as of V4.0 with all versions of Windows, Netscape
Navigator as of V6, Mozilla) is given below:
Ê
Install wtaprint2000.exe.
The browsers listed below then recognize wtaprint.exe as an application for printing.
If your browser requires a default suffix for each MIME type, you can enter the suffix .whp.
196
WebTransactions for OSD
Using print/asynchronous support
Print support
Assigning a print program
You must assign a suitable print program to these MIME types. Use the following syntax:
WTAPrint.exe
"%1" method target [filename] [option-file]
"%1"
The browser automatically replaces "%1" with the name of the file to be printed.
method
in accordance with the assigned MIME type.
HARDCOPY
the print data are interpreted as text and prepared for the specified printer via
Windows spool.
BYPASS
the print files are already prepared for the specified printer and are sent to the
printer.
target
Possible values: 0, 1, 2 or 3
0
Manual printer selection (a dialog box opens for each print job allowing you to
select the desired printer).
1
The default printer is used.
2
The printout is saved to a file (a dialog box opens for each print job allowing you
to specify a path).
3
The printout is appended to the file whose full path name is specified in filename.
filename
Full path name of the file to which the printout is to be appended
(permitted only if target is set to 3)
WebTransactions for OSD
197
Print support
Using print/asynchronous support
option file
Full path name of the file in which the options for print file conversion are defined.
This file must have the following structure:
[Options]
[ConversionFile=conversion-file]
[MaxLengthLine=maxlength-line]
[MaxLengthPage=maxlength-page]
[CharSet=charset]
[Font=font]
i
Note, you need to enter the square brackets as shown here for [options].
All other brackets in this syntax identify, as usual, optional specifications.
conversion-file
Full pathname of the conversion file. You can use the conversion file to
convert strings, see the example no. 3. The file must be located in the same
directory as WTAPrint. It may contain a maximum of 1023 lines; each line
may have a maximum length of 255 characters and must have the form
hex-old=hex-new. hex-old and hex-new are the old and new strings in their full
hexadecimal notation.
maxlength-line
maximum line length. If this value is not specified, the printing file is
analysed for the longest line.
The smallest calculated value is 80.
The option MaxLengthLine will only be processed if the value HARDCOPY for
the method is present (see page 197).
maxlength-page
maximum page length. If this value is not specified, the printing file is
analysed for the longest page.
The smallest calculated value is 60.
The option MaxLengthPage will only be processed if the value HARDCOPY for
the method is present (see page 197).
198
WebTransactions for OSD
Using print/asynchronous support
Print support
charset
Character set identifier in the Windows interface CreateFont.
Default value: 1 (DEFAULT_CHARSET).
You have to specifiy the following identifiers for the character sets:
ANSI_CHARSET
ARABIC_CHARSET
CHINESEBIG5_CHARSET
DEFAULT_CHARSET
EASTEUROPE_CHARSET
GB2312_CHARSET
GREEK_CHARSET
HANGEUL_CHARSET
HANGUL_CHARSET
HEBREW_CHARSET
JOHAB_CHARSET
OEM_CHARSET
RUSSIAN_CHARSET
SHIFTJIS_CHARSET
SYMBOL_CHARSET
THAI_CHARSET
TURKISH_CHARSET
VIETNAMESE_CHARSET
font
WebTransactions for OSD
0
178
136
1
238
134
161
129
129
177
130
255
204
128
2
222
162
163
name of a font, which has to be present on the Windows system. If you
dont’t specify this value, the first font is used, which fulfills the conditions in
the options MaxLengthLine, MaxLengthPage and CharSet. MaxLengthLine
and MaxLengthPage in this case are converted to a font size.
199
Print support
Using print/asynchronous support
Examples
1. Configuration for terminal hardcopy printing:
MIME type:
webta/hardcopy-print
Assigned program:
WTAPrint.exe "%1" HARDCOPY 0
2. Configuration for bypass printing:
MIME type:
webta/bypass-print
Assigned program:
WTAPrint.exe "%1" BYPASS 0
WTAPrint.exe "%1" BYPASS 3 "C:\TEMP\PRINT FILE"
3. Configuration for bypass printing with conversion:
MIME type:
webta/bypass-print
Assigned program:
WTAPrint.exe "%1" HARDCOPY 0 "C:\webta\conversion.ini"
Options fileconversion.ini:
[Options]
MaxLengthLine=90
ConversionFile=C:\webta\webtaprint.cnv
Conversion file webtaprint.cnv:
65=8080
66=8182
6567=8A
The following rules apply to this file:
–
–
–
200
A complete, hexadecimal, 2-digit representation must be used. It must not contain
spaces or other non-hexadecimal characters.
The longest matching string in the conversion file is always used. If, for example, the
input file contains the string 6567 then, in this example, this is converted to 8A (not
to 808067).
If a string (xxxx=...) occurs more than once, the last of these strings is used for
replacement.
WebTransactions for OSD
Using print/asynchronous support
Print support
9.4.5 Configuring the print server for Windows
To make network printers accessible for OSD applications, you must install and configure a
print server on the client PC. A print server is included on the Windows CD-ROM.
The figure below illustrates the steps which must be performed at the OSD and Windows
machines.
Figure 5: Steps for setting up a print server
WebTransactions for OSD
201
Print support
Using print/asynchronous support
OSD configuration with the RSO utility SPSERVE
DEVICE-NAME
Station name of the printer for the OSD application.
DEVICE-TYPE
Printer type, e.g. PCL4, Postscript, etc.
INTERNET-ADDRESS
IP-address of the client PC.
LPD-PRINTER-NAME
Name of the printer at the client PC.
Windows 2000/2003/XP:
202
Ê
If there is no “TCP/IP print services” service available, install this via
Start/Settings/Control Panel/Add/Remove Programs/
Add/Remove Windows Components/Other Network File and Print Services
or
/Details/Print Services for UNIX
Ê
Activate the “TCP/IP print services”.
WebTransactions for OSD
Glossary
A term in ->italic font means that it is explained somewhere else in the glossary.
active dialog
In the case of active dialogs, WebTransactions actively intervenes in the control
of the dialog sequence, i.e. the next ->template to be processed is determined
by the template programming. You can use the ->WTML language tools, for
example, to combine multiple ->host formats in a single ->HTML page. In this
case, when a host ->dialog step is terminated, no output is sent to the ->browser
and the next step is immediately started. Equally, multiple interactions between
the Web ->browser and WebTransactions are possible within one and the same
host dialog step.
array
->Data type which can contain a finite set of values of one data type. This data
type can be:
– ->scalar
– a ->class
– an array
The values in the array are addressed via a numerical index, starting at 0.
asynchronous message
In WebTransactions, an asynchronous message is one sent to the terminal without having been explicitly requested by the user, i.e. without the user having
pressed a key or clicked on an interface element.
attribute
Attributes define the properties of ->objects.
WebTransactions for OSD
●
In WebTransactions, an attribute may be, for example, the color, size or
position of an object or it can itself be an object. Attributes are also interpreted as ->variables and their values can be queried or modified.
●
In BizTransactions, an attribute may be a ->property of a
->catalog object or ->catalog element.
203
Glossary
Automask template
A WebTransactions ->template created by WebLab either implicitly when
generating a base directory or explicitly with the command Generate
Automask. It is used whenever no format-specific template can be identified.
An Automask template contains the statements required for dynamically
mapping formats and for communication. Different variants of the Automask
template can be generated and selected using the system object attribute
AUTOMASK.
base directory
The base directory is located on the WebTransactions server and forms the basis
for a ->WebTransactions application. The base directory contains the
->templates and all the files and program references (links) which are necessary
in order to run a WebTransactions application.
BCAM application name
Corresponds to the openUTM generation parameter BCAMAPPL and is the name
of the −>openUTM application through which −>UPIC establishes the connection.
BizTransactions application
Application, which integrates -> host applications for COM or Java access.
A BizTransactions application consists of:
– ->host adapters
– ->business objects
– a ->client, which addresses the business objects
BizTransactions catalog
Central database used and processed by the BizTransactions Studio during the
development phase. For instance, the BizTransactions catalog contains a
description of the ->host applications and of the messages (->services)
exchanged with the host application.
browser
Program which is required to call and display ->HTML pages. Familiar browsers
include, for example, Netscape Navigator or Microsoft Internet Explorer.
browser display print
The WebTransactions browser display print prints the information displayed in
the ->browser.
browser platform
Operating system of the host on which a ->browser runs as a client for
WebTransactions.
204
WebTransactions for OSD
Glossary
buffer
Definition of a record, which is transmitted from a ->service. The buffer is used
for transmitting and receiving messages. In addition there is a specific buffer for
storing the ->recognition criteria and for data for the representation on the
screen.
business object (BO)
Object-oriented view of a ->host application: Business Objects in BizTransactions
combine a number of ->services of an application to form a logical object. A
description of each business object is stored in the ->BizTransactions catalog.
This description then forms the basis for generating an ActiveX component,
.NET component or ->JavaBean which then represents the business object.
business object class
Java, .NET or Visual Basic class generated by the BizTransactions Studio on the
basis of a business object stored in the ->BizTransactions catalog.
capturing
To enable WebTransactions to identify the received ->formats at runtime, you can
open a ->session in ->WebLab and select a specific area for each format and
name the format. The format name and ->recognition criteria are stored in the
->capture database. A ->template of the same name is generated for the format.
Capturing forms the basis for the processing of format-specific templates for the
WebTransactions for OSD, MVS, As400 and UNIX product variants.
capture database
The WebTransactions capture database contains all the format names and the
associated ->recognition criteria generated using the ->capturing technique. You
can use ->WebLab to edit the sequence and recognition criteria of the formats.
catalog element
Subordinate ->catalog objects in BizTransactions, such as ->buffers, ->records or
->fields. The ->properties of catalog elements are ->attributes.
catalog object
Descriptions saved in the ->BizTransactions catalog for
– ->Host applications
– ->Services
– ->Business objects
– ->Classes
– ->Functions
->Catalog-elements are subordinate to the catalog-objects. The ->properties of
catalog objects and elements are ->attributes. A separate ->XML schema is
assigned to each catalog object.
WebTransactions for OSD
205
Glossary
CGI
(Common Gateway Interface)
Standardized interface for program calls on ->Web servers. In contrast to the
static output of a previously defined->HTML page, this interface permits the
dynamic construction of HTML pages.
class
Contains definitions of the ->properties and ->methods of an ->object. It provides
the model for instantiating objects and defines their interfaces.
In BizTransactions the ->catalog object of the type class contains only properties
which means that a class is also considered as a user-defined data structure.
Access methods for the class properties are added through generation. A class
can be used by the following catalog elements:
– Properties of ->business objects
– Properties of other classes
– ->Method parameters
– ->Function parameters
class directory
A directory in BizTransactions which contains the generated ->business object
classes and ->service classes.
class template
In WebTransactions, a class template contains valid, recurring statements for the
entire object class (e.g. input or output fields). Class templates are processed
when the ->evaluation operator or the toString method is applied to a ->host data
object.
client
Requestors and users of services in a network. A BizTransactions client
accesses ->business objects within a ->client application.
cluster
Set of identical ->WebTransactions applications on different servers which are
interconnected to form a load-sharing network.
COM
Component Object Model.
The COM defines a standard governing the way in which software components
can access the services or data provided by other software components.
206
WebTransactions for OSD
Glossary
communication object
This controls the connection to an ->host application and contains information
about the current status of the connection, the last data to be received etc.
conversion tools
Utilities supplied with WebTransactions and BizTransactions. These tools are
used to analyze the data structures of ->openUTM applications and store the
information in files. These files can then be imported in the form of an object
description into the ->BizTransactions catalog or used in WebLab as ->format
description sources in order to generate WTML templates and ->FLD files.
COBOL data structures or IFG format libraries form the basis for the conversion
tools. The conversion tool for DRIVE programs is supplied with the product
DRIVE.
daemon
Name of a process type in UNIX/POSIX systems which runs in the background
and performs no I/O operations at terminals.
data access control
Monitoring of the accesses to data and ->objects of an application.
data type
Definition of the way in which the contents of a storage location are to be interpreted. Each data type has a name, a set of permitted values (value range), and
a defined number of operations which interpret and manipulate the values of
that data type.
DCOM
Distributed Component Object Model
This is based on the ->COM standard and defines the way in which COM objects
can provide their services or data outside system boundaries.
WebTransactions for OSD
207
Glossary
dialog
●
In WebTransactions, a dialog describes the entire communication between
browser, WebTransactions and ->host application. It will usually comprise
multiple ->dialog cycles. WebTransactions supports a number of different
types of dialog.
–
–
–
–
●
->passive dialog
->active dialog
->synchronized dialog
->non-synchronized dialog
In BizTransactions a dialog is defined as a series of ->dialog steps. A method
of a ->Business Object is the same as a dialog with the ->host application.
dialog cycle
Cycle that comprises the following steps when a ->WebTransactions application is
executed:
– construct an ->HTML page and send it to the ->browser
– wait for a response from the browser
– evaluate the response fields and possibly send them to the->host application
for further processing
A number of dialog cycles are passed through while a ->WebTransactions application is executing.
dialog step
In BizTransactions, a dialog step begins by sending a dialog message to the
->host application, and ends with a response from the host application.
distinguished name
The Distinguished Name (DN) in ->LDAP is hierarchically organized and
consists of a number of different components (e.g. “country, and below country:
organization, and below organization: organizational unit, followed by: usual
name”). Together, these components provide a unique identification of an object
in the directory tree.
Thanks to this hierarchy, the unique identification of objects is a simple matter
even in a worldwide directory tree:
– The DN "Country=DE/Name=Emil Person" reduces the problem of achieving a unique identification to the country DE (=Germany).
– The DN "Organization=FSC/Name=Emil Person" reduces it to the organization FSC.
– The DN "Country=DE/Organization=FSC/Name=Emil Person" reduces it to
the organization FSC located in Germany (DE).
208
WebTransactions for OSD
Glossary
document directory
->Web server directory containing the documents that can be accessed via the
network. WebTransactions stores files for download in this directory, e.g. the
WebLab client or general start pages.
Domain Name Service (DNS)
Procedure for the symbolic addressing of computers in networks. Certain
computers in the network, the DNS or name server, maintain a database
containing all the known host names and IP numbers in their environment.
dynamic data
In WebTransactions, dynamic data is mapped using the WebTransactions object
model, e.g. as a ->system object, host object or user input at the browser.
EHLLAPI
Enhanced High-Level Language API
Program interface, e.g. of terminal emulations for communication with the SNA
world. Communication between the transit client and SNA computer, which is
handled via the TRANSIT product, is based on this interface.
EJB
(Enterprise JavaBean)
This is a Java-based industry standard which makes it possible to use in-house
or commercially available server components for the creation of distributed
program systems within a distributed, object-oriented environment.
entry page
The entry page is an ->HTML page which is required in order to start a
->WebTransactions application This page contains the call which starts
WebTransactions with the first ->template, the so-called start template.
evaluation operator
In WebTransactions the evaluation operator replaces the addressed
->expressions with their result (object attribute evaluation). The evaluation operator is specified in the form ##expression#.
expression
A combination of ->literals, ->variables, operators and expressions which return
a specific result when evaluated.
FHS
Format Handling System
Formatting system for BS2000/OSD applications.
WebTransactions for OSD
209
Glossary
field
A field is the smallest component of a service and element of a ->record or
->buffer.
field file (*.fld file)
In WebTransactions, this contains the structure of a ->format record (metadata).
filter
Program or program unit (e.g. a library) for converting a given ->format into
another format (e.g. XML documents to ->WTScript data structures).
format
Optical presentation on alphanumeric screens (sometimes also referred to as
screen form or mask).
In WebTransactions each format is represented by a ->field file and a ->template.
format type
(only relevant in the case of ->FHS applications and communication via ->UPIC)
Specifies the type of format: #format, +format, -format or *format.
format description sources
Description of multiple ->formats in one or more files which were generated from
a format library (FHS/IFG) or are available directly at the ->host for the use of
“expressive” names in formats.
function
A function is a user-defined code unit with a name and ->parameters. Functions
can be called in ->methods by means of a description of the function interface (or
signature).
holder task
A process, a task or a thread in WebTransactions depending on the operating
system platform being used. The number of tasks corresponds to the number
of users. The task is terminated when the user logs off or when a time-out
occurs. A holder task is identical to a ->WebTransactions session.
host
The computer on which the- >host application is running.
210
WebTransactions for OSD
Glossary
host adapter
Host adapters are used to connect existing ->host applications to
WebTransactions and BizTransactions. At runtime, for example, they have the
task of establishing and terminating connections and converting all the
exchanged data.
host application
Application that is integrated with WebTransactions or BizTransactions.
host control object
In WebTransactions, host control objects contain information which relates not to
individual fields but to the entire ->format. This includes, for example, the field in
which the cursor is located, the current function key or global format attributes.
host data object
In WebTransactions, this refers to an ->object of the data interface to the ->host
application. It represents a field with all its field attributes. It is created by
WebTransactions after the reception of host application data and exists until the
next data is received or until termination of the ->session.
host data print
During WebTransactions host data print, information is printed that was edited
and sent by the ->host application, e.g. printout of host files.
host platform
Operating system of the host on which the ->host applications runs.
HTML
(Hypertext Markup Language)
See ->Hypertext Markup Language
HTTP
(Hypertext Transfer Protocol)
This is the protocol used to transfer ->HTML pages and data.
HTTPS
(Hypertext Transfer Protocol Secure)
This is the protocol used for the secure transfer of ->HTML pages and data.
hypertext
Document with links to other locations in the same or another document. Users
click the links to jump to these new locations.
WebTransactions for OSD
211
Glossary
Hypertext Markup Language
(Hypertext Markup Language)
Standardized markup language for documents on the Web.
Java Bean
Java programs (or ->classes) with precisely defined conventions for interfaces
that allow them to be reused in different applications.
KDCDEF
openUTM tool for generating ->openUTM applications.
LDAP
(Lightweight Directory Access Protocol)
The X.500 standard defines DAP (Directory Access Protocol) as the access
protocol. However, the Internet standard “LDAP” has proved successful specifically for accessing X.500 directory services from a PC.
LDAP is a simplified DAP protocol that does not support all the options available
with DAP and is not compatible with DAP. Practically all X.500 directory services
support both DAP and LDAP. In practice, interpretation problems may arise
since there are various dialects of LDAP. The differences between the dialects
are generally small.
literal
Character sequence that represents a fixed value. Literals are used in source
programs to specify constant values (“literal” values).
master template
WebTransactions template used to generate the Automask and the formatspecific templates.
message queuing (MQ)
A form of communication in which messages are not exchanged directly, rather
via intermediate queues. The sender and receiver can work at separate times
and locations. Message transmission is guaranteed regardless of whether or
not a network connection currently exists.
method
Object-oriented term for a ->function. A method is applied to the ->object in
which it is defined.
In BizTransactions, the method of a ->business object conducts a ->dialog with the
associated ->host application.
212
WebTransactions for OSD
Glossary
module template
In WebTransactions, a module template is used to define ->classes, ->functions
and constants globally for a complete ->session. A module template is loaded
using the import() function.
MT tag
(Master Template tag)
Special tags used in the dynamic sections of ->master templates.
multitier architecture
All client/server architectures are based on a subdivision into individual software components which are also known as layers or tiers. We speak of
1-tier, 2-tier, 3-tier and multitier models. This subdivision can be considered at
the physical or logical level:
– We speak of logical software tiers when the software is subdivided into
modular components with clear interfaces.
– Physical tiers occur when the (logical) software components are distributed
across different computers in the network.
With WebTransactions and a host connection in BizTransactions, multitier models
are possible both at the physical and logical level.
name/value pair
In the data sent by the ->browser, the combination, for example, of an ->HTML
input field name and its value.
non-synchronized dialog
Non-synchronized dialogs in WebTransactions permit the temporary deactivation of the checking mechanism implemented in ->synchronized dialogs. In this
way, ->dialogs that do not form part of the synchronized dialog and have no
effect on the logical state of the ->host application can be incorporated. In this
way, for example, you can display a button in an ->HTML page that allows users
to call help information from the current host application and display it in a
separate window.
WebTransactions for OSD
213
Glossary
object
Elementary unit in an object-oriented software system. Every object possesses
a name via which it can be addressed, ->attributes, which define its status
together with the ->methods that can be applied to the object.
In BizTransactions objects only exist as instances of ->classes during run time.
However, for simplicity’s sake, the object definitions created during development
are also referred to as objects. Thus, we speak of, for example, ->business
objects stored in the ->BizTransactions catalog although these are actually only
definitions. These definitions are used by BizTransactions to generate ->business
object classes which serve to instantiate the “actual” business objects at runtime.
openUTM
(Universal Transaction Monitor)
Transaction monitor from Fujitsu Siemens Computers, which is available for
BS2000/OSD and a variety of UNIX and Windows platforms.
openUTM application
A ->host application which provides services that process jobs submitted by
->clients or other ->host applications. openUTM responsibilities include transaction management and the management of communication and system
resources. Technically speaking, the UTM application is a group of processes
which form a logical unit at runtime.
openUTM applications can communicate both via the client/server protocol
->UPIC and via the emulation interface (9750).
openUTM-Client (UPIC)
The openUTM-Client (UPIC) is a product used to create client programs for
openUTM. openUTM-Client (UPIC) is available, for example, for UNIX,
BS2000/OSD and Windows platforms.
openUTM program unit
The services of an ->openUTM application are implemented by one or more
openUTM program units. These can be addressed using transaction codes and
contain special openUTM function calls (e.g. KDCS calls).
parameter
Data which is passed to a ->function or a ->method for processing (input parameter) or data which is returned as a result of a function or method (output parameter).
214
WebTransactions for OSD
Glossary
passive dialog
In the case of passive dialogs in WebTransactions, the dialog sequence is
controlled by the ->host application, i.e. the host application determines the next
->template which is to be processed. Users who access the host application via
WebTransactions pass through the same dialog steps as if they were accessing
it from a terminal. WebTransactions uses passive dialog control for the automatic
conversion of the host application or when each host application format corresponds to precisely one individual template.
password
String entered for a ->user id in an application which is used for user authentication (->system access control).
polling
Cyclical querying of a given event.
pool
In WebTransactions, this term refers to a shared directory in which WebLab can
create and maintain ->base directories. You control access to this directory with
the administration program.
post
To send data.
posted object (wt_Posted)
List of the data returned by the ->browser. This ->object is created by
WebTransactions and exists for the duration of a ->dialog cycle.
process
The term “process” is used as a generic term for process (in Solaris, Linux and
Windows) and task (in BS2000/OSD).
project
In the WebTransactions development environment, a project contains various
settings for a ->WebTransactions application. These are saved in a project file
(suffix .wtp). You should create a project for each WebTransactions application
you develop, and always open this project for editing.
property
Properties define the nature of an ->object, e.g. the object “Customer” could
have a customer name and number as its properties. These properties can be
set, queried, and modified within the program.
WebTransactions for OSD
215
Glossary
protocol
Agreements on the procedural rules and formats governing communications
between remote partners of the same logical level.
protocol file
●
BizTransactions: Messages about specific program status conditions are
written during the program execution into a log file.
●
openUTM-Client: File into which the openUTM error messages as are written
in the case of abnormal termination of a conversation.
●
In WebTransactions, protocol files are called trace files.
roaming session
->WebTransactions sessions which are invoked simultaneously or one after
another by different ->clients.
record
A record is the definition of a set of related data which is transferred to a ->buffer.
It describes a part of the buffer which may occur one or more times.
recognition criteria
Recognition criteria are used to identify ->formats of a ->terminal application and
can access the data of the format. The recognition criteria selected should be
one or more areas of the format which uniquely identify the content of the
format.
scalar
->variable made up of a single value, unlike a ->class, an ->array or another
complex data structure.
216
WebTransactions for OSD
Glossary
service
In BizTransactions, services are messages exchanged with the
->host application. In the case of access via the terminal interface (9750/3270),
they are ->formats. In program-to-program communication, they correspond to
message structures.
Services are created using the BizTransactions Studio. They are automatically
entered in the ->BizTransactions catalog and can be used by the (COM) ->clients.
Depending on the type of server application, a service may represent:
●
a 9750 emulation screen
●
a 3270 emulation screen
●
an openUTM ->dialog step (in the case of interconnection via UPIC) which is
distinguished by:
●
–
the FHS format
–
the data structure of a DRIVE procedure
–
the data structure of a COBOL program
(structure of the UPIC message buffer)
a message sent or received by the ->host adapter
service (openUTM)
In ->openUTM, this is the processing of a request using an ->openUTM application. There are dialog services and asynchronous services. The services are
assigned their own storage areas by openUTM. A service is made up of one or
more ->transactions.
service application
->WebTransactions session which can be called by various different users in turn.
service data
description of a ->service in the BizTransactions catalog. The service data contain
a description of the structure of the service and either
– a ->recognition criterion or
– data for the presentation of the service while recording a ->dialog
service node
Instance of a ->service. During development and runtime of a ->method a service
can be instantiated several times. During modelling and code editing those
instances are named service nodes.
WebTransactions for OSD
217
Glossary
session
When an end user starts to work with a ->WebTransactions application this opens
a WebTransactions session for that user on the WebTransactions server. This
session contains all the connections open for this user to the
->browsers, special ->clients and ->hosts.
A session can be started as follows:
– Input of a WebTransactions URL in the browser.
– Using the START_SESSION method of the WT_REMOTE client/server interface.
A session is terminated as follows:
– The user makes the corresponding input in the output area of this
->WebTransactions application (not via the standard browser buttons).
– Whenever the configured time that WebTransactions waits for a response
from the ->host application or from the ->browser is exceeded.
– Termination from WebTransactions administration.
– Using the EXIT_SESSION method of the WT_REMOTE client/server interface.
A WebTransactions session is unique and is defined by a ->WebTransactions
application and a session ID. During the life cycle of a session there is one
->holder task for each WebTransactions session on the WebTransactions server.
SOAP
(originally Simple Object Access Protocol)
The ->XML based SOAP protocol provides a simple, transparent mechanism
for exchanging structured and typecast information between computers in a
decentralized, distributed environment.
SOAP provides a modular package model together with mechanisms for data
encryption within modules. This enables the uncomplicated description of the
internal interfaces of a ->Web-Service.
style
In WebTransactions this produces a different layout for a ->template, e.g. with
more or less graphic elements for different->browsers. The style can be changed
at any time during a ->session.
synchronized dialog
In the case of synchronized dialogs (normal case), WebTransactions automatically checks whether the data received from the web browser is genuinely a
response to the last ->HTML page to be sent to the ->browser. For example, if
the user at the web browser uses the Back button or the History function to
return to an “earlier” HTML page of the current ->session and then returns this,
WebTransactions recognizes that the data does not correspond to the current
->dialog cycle and reacts with an error message. The last page to have been
sent to the browser is then automatically sent to it again.
218
WebTransactions for OSD
Glossary
system access control
Check to establish whether a user under a particular ->user ID is authorized to
work with the application.
system object (wt_System)
The WebTransactions system object contains ->variables which continue to exist
for the duration of an entire ->session and are not cleared until the end of the
session or until they are explicitly deleted. The system object is always visible
and is identical for all name spaces.
TAC
See ->transaction code
tag
->HTML, ->XML and ->WTML documents are all made up of tags and actual
content. The tags are used to mark up the documents e.g. with header formats,
text highlighting formats (bold, italics) or to give source information for graphics
files.
TCP/IP
(Transport Control Protocol/Internet Protocol)
Collective name for a protocol family in computer networks used, for example,
in the Internet.
WebTransactions for OSD
219
Glossary
template
A template is used to generate specific code. A template contains fixed information parts which are adopted unchanged during generation, as well as variable
information parts that can be replaced by the appropriate values during generation.
●
In WebTransactions, a ->WTML file is a file with special tags for controlling
the dynamic generation of a ->HTML page and for the processing of the
values entered at the ->browser. It is possible to maintain multiple template
sets in parallel. These then represent different ->styles (e.g. many/few
graphics, use of Java, etc.).
WebTransactions uses different types of template:
– ->Automask templates for the automatic conversion of the ->formats of
AS400, MVS, OSD and UNIX applications.
– Custom templates, written by the programmer, for example, to control
an ->active dialog.
– Format-specific templates which are generated for subsequent postprocessing.
– Include templates which are inserted in other templates.
– ->Class templates
– ->Master templates to ensure the uniform layout of fixed areas on the
generation of the Automask and format-specific templates.
– Start template, this is the first template to be processed in a
WebTransactions application.
●
In BizTransactions, templates are supplied files which contain code sections
that can be used as patterns for the generation functions of BizTransactions.
template object
->Variables are used to buffer values for a ->dialog cycle in WebTransactions.
terminal application
Application on a ->host computer which is accessed via a 9750 or 3270 interface.
terminal hardcopy print
A terminal hardcopy print in WebTransactions prints the alphanumeric representation of the ->format as displayed by a terminal or a terminal emulation.
transaction
Processing step between two synchronization points (in the current operation)
which is characterized by the ACID conditions (Atomicity, Consistency, Isolation
and Durability). The intentional changes to user information made within a
transaction are accepted either in their entirety or not at all (all-or-nothing rule).
220
WebTransactions for OSD
Glossary
transaction code/TAC
Name under which an openUTM service or ->openUTM program unit can be
called. The transaction code is assigned to the openUTM program unit during
configuration. A program unit can be assigned several transaction codes.
UDDI
(Universal Description, Discovery and Integration)
Refers to directories containing descriptions of ->Web services. This information
is available to web users in general.
UPIC
(Universal Programming Interface for Communication)
Carrier system for openUTM clients which uses the X/Open interface, which
permity CPI-C client/server communication between a CPI-C-Client application
and the openUTM application.
URI
(Uniform Resource Identifier)
Blanket term for all the names and addresses that reference objects on the
Internet. The generally used URIs are->URLs.
URL
(Uniform Resource Locator)
Description of the location and access type of a resource in the ->Internet.
user exit
Functions implemented in C/C++ which the programmer calls from a
->template.
user ID
User identification which can be assigned a password (->system access control)
and special access rights (->data access control).
UTM
See ->openUTM
variable
Memory location for variable values which requires a name and a ->data type.
visibility of variables
->Objects and ->variables of different dialog types are managed by
WebTransactions in different address spaces. This means that variables belonging to a ->synchronized dialog are not visible and therefore not accessible in a
->asynchronous dialog or in a dialog with a remote application.
WebTransactions for OSD
221
Glossary
web server
Computer and software for the provision of ->HTML pages and dynamic data
via ->HTTP.
web service
Service provided on the Internet, for example a currency conversion program.
The SOAP protocol can be used to access such a service. The interface of a
web service is described in ->WSDL.
WebTransactions application
This is an application that is integrated with ->host applications for internet/
intranet access. A WebTransactions application consists of:
– a ->base directory
– a start template
– the ->templates that control conversion between the ->host and the
->browser.
– protocol-specific configuration files.
WebTransactions platform
Operating system of the host on which WebTransactions runs.
WebTransactions server
Computer on which WebTransactions runs.
WebTransactions session
See ->session
WSDL
(Web Service Definition Language)
Provides ->XML language rules for the description of ->web services. In this
case, the web service is defined by means of the port selection.
WTBean
In WebTransactions ->WTML components with a self-descriptive interface are
referred to as WTBeans. A distinction is made between inline and standalone
WTBeans:
– An inline WTBean corresponds to a part of a WTML document
– A standalone WTBean is an autonomous WTML document
A number of WTBeans are included in of the WebTransactions product, additional WTBeans can be downloaded from the WebTransactions homepage
(www.Fujitsu-Siemens.com/WebTransactions).
222
WebTransactions for OSD
Glossary
WTML
(WebTransactions Markup Language)
Markup and programming language for WebTransactions ->templates. WTML
uses additional ->WTML tags to extend ->HTML and the server programming
language ->WTScript, e.g. for data exchange with ->host applications. WTML
tags are executed by WebTransactions and not by the ->browser (serverside
scripting).
WTML tag
(WebTransactions Markup Language-Tag)
Special WebTransactions tags for the generation of the dynamic sections of an
->HTML page using data from the->host application.
WTScript
Serverside programming language of WebTransactions. WTScripts are similiar
to client-side Java scripts in that they are contained in sections that are introduced and terminated with special tags. Instead of using ->HTML-SCRIPT tags
you use ->WTML-Tags: wtOnCreateScript and wtOnReceiveScript. This indicates
that these scripts are to be implemented by WebTransactions and not by the
->browser and also indicates the time of execution. OnCreate scripts are
executed before the page is sent to the browser. OnReceive scripts are
executed when the response has been received from the browser.
XML
(eXtensible Markup Language)
Defines a language for the logical structuring of documents with the aim of
making these easy to exchange between various applications.
XML schema
An XML schema basically defines the permissible elements and attributes of an
XML description. XML schemas can have a range of different formats, e.g. DTD
(Document Type Definition), XML Schema (W3C standard) or XDR (XML Data
Reduced).
In BizTransactions, an XDR schema defines the permitted elements and
attributes of a catalog object.
WebTransactions for OSD
223
Eine Dokuschablone von Frank Flachenecker
by f.f. 1992
Abbreviations
BO
Business Object
CGI
Common Gateway Interface
DN
Distinguished Name
DNS
Domain Name Service
EJB
Enterprise JavaBean
FHS
Format Handling System
HTML
Hypertext Markup Language
HTTP
Hypertext Transfer Protocol
HTTPS
Hypertext Transfer Protocol Secure
IFG
Interactive Format Generator
ISAPI
Internet Server Application Programming Interface
LDAP
Lighweight Directory Access Protocol
LPD
Line Printer Daemon
MT tag
Master Template tag
MVS
Multiple Virtual Storage
OSD
Open Systems Direction
SGML
Standard Generalized Markup Language
SOAP
Simple Object Access Protocol
WebTransactions for OSD
225
Abbreviations
226
SSL
Secure Socket Layer
TCP/IP
Transport Control Protocol/Internet Protocol
Upic
Universal Programming Interface for Communication
URL
Uniform Resource Locator
UTM
Universal Transaction Monitor
wtc
WebTransactions Component
WTML
WebTransactions Markup Language
XML
eXtensible Markup Language
WebTransactions for OSD
Related publications
WebTransactions manuals
You can download all the WebTransactions manuals from the following Web address
http://manuals.Fujitsu-Siemens.com/servers/man/man_us/appi_man/webta_hb.htm.
[1]
WebTransactions
Concepts and Functions
Introduction
Target group
Users who want information on the functional scope and performance of WebTransactions.
Contents
The manual contains a general description of the concepts behind the product, as well as
information on the object concept and the dynamic session procedure.
[2]
WebTransactions
Template Language
Reference Manual
Target group
Users who wish to actively create WebTransactions applications.
Contents
The manual contains a description of all the language resources in the template language
WTML. When you integrate host applications into the Web, this language allows you to
adapt the results of automatic conversion to suit your requirements.
WebTransactions for OSD
227
Related Publications
[3]
WebTransactions
Client APIs for WebTransactions
User Guide
Target group
Users who wish to implement Clients for WebTransactions.
Contents
The manual describes all the interfaces WebTransactions provides developing client programs. You can develop not only your own Java clients with the suppiled classes, but also
clients in any programming language which communicate with WebTransactions via the client protocol. WebTransactions itself can function as a client of a WebTransactions application.
[4]
WebTransactions
Connection to openUTM Applications via UPIC
User Guide
Target group
Users who wish to use WebTransactions to connect openUTM dialog applications to the Web.
Contents
The manual describes all the steps required for connecting openUTM dialog applications to
the Web. It supplements the introductory manual “Concepts and Functions“ and the Reference Manual “Template Language“ by providing all the information relating to openUTM.
[5]
WebTransactions
Connection to MVS Applications
User Guide
Target group
Users who wish to use WebTransactions to connect MVS dialog applications to the Web.
Contents
The manual describes all the steps required for connecting MVS dialog applications to the
Web. It supplements the introductory manual “Concepts and Functions“ and the Reference
Manual “Template Language“ by providing all the information relating to MVS.
228
WebTransactions for OSD
Related Publications
[6]
WebTransactions
Connection to AS400 applications.
User Guide
Target group
Users who wish to use WebTransactions to connect AS400 dialog applications to the Web.
Contents
The manual describes all the steps required for connecting AS400 dialog applications to the
Web via the 5250 protocol. This manual supplements the introductory manual “Concepts
and Functions” and the reference manual “Template Language” and provides all the
information relating to AS400.
[7]
WebTransactions
Connection to UNIX applications
User manual
Target group
Users who wish to use WebTransactions to connect UNIX dialog applications to the Web.
Contents
The manual describes all the steps required for connecting UNIX-dialog applications to the
Web via Telnet or the rlogin protocol. This manual supplements the introductory manual
“Concepts and Functions” and the reference manual “Template Language” and provides all
the information relating to UNIX.
[8]
WebTransactions
Access to Dynamic Web Contents
User Guide
Target group
Users who wish to use WebTransactions to access dynamic Web contents.
Contents
The manual describes all the steps required for accessing dynamic web contents via the
HTTP protocol. It supplements the introductory manual “Concepts and Functions“ and the
Reference Manual “Template Language“ by providing all the information relating to HTTP.
WebTransactions for OSD
229
Related Publications
[9]
WebTransactions
Web Frontend for Web Services and Business Objects
User Guide
Target group
Users who wish to use WebTransactions in conjunction with Web services and business
objects.
Contents
This manual describes
– the concept of Web frontends for object-oriented backend systems.
– the generation of templates for connecting business objects and general Web services
to WebTransactions.
– the testing and further development of the Web frontend for business objects and general Web services.
[10]
BizTransactions
Application Integration with Business Objects
Target group
This manual addresses users wishing to create business objects for accessing host applications in order to
– develop graphical interfaces for host applications (e.g. via GUIs, created using
WebTransactions, Visual Basic, Visual C++, Microfocus NetExpress or Java).
– make the host application available as a Web service, for example, on the Internet.
– integrate interactions with host applications into Microsoft Office products (e.g. current
data of an openUTM mainframe application to Excel tables).
Contents
This manual describes the concept, functions and components of BizTransactions. It
explains all steps required to create business objects and Web services.
230
WebTransactions for OSD
Related Publications
Other publications
The manuals are available as online manuals, see http://manuals.fujitsu-siemens.com, or in
printed form which must be paid and ordered separately at http://FSC-manualshop.com.
[11]
openUTM (BS2000/OSD, UNIX, Windows)
Programming Applications with KDCS for COBOL, C and C++
Core Manual
Target group
This manual is intended for programmers who wish to use the KDCS program interface for
programming UTM applications.
Contents
The manual describes the KDCS interface in the form valid for COBOL, C and C++. This
interface incorporates both the basic functions of the Universal Transaction Monitor and the
calls for distributed processing. It also contains a description of working together with databases.
WebTransactions for OSD
231
Eine Dokuschablone von Frank Flachenecker
by f.f. 1992
Index
$FIRST (host control object) 134
$MESSAGE (host control object)
PRINTING 135
WAITING 135
$NEXT (host control object) 135
$SCREEN (host control object) 135
7-bit ASCII character set 73
9750 screen
dynamic conversion 77
9750 terminal 154
P keys 155
9750 terminal emulation 73
A
active dialog 203, 208
application
frame 172
starting 76
APPLICATION_PREFIX (system object
attribute) 114, 128
architecture
WebTransactions 9
array 203
asynchronous message 176, 203
asynchronous support
concept 177
attribute 203
Automask 10
AUTOMASK (system object attribute) 80, 114
automask template 204
generating (example) 42
automask variants 80
WebTransactions for OSD
AutomaskOSD.htm 80
variants 80
AUTOTAB (system object attribute)
115
B
base data type 203
base directory 204
converting to a new version 70
creating 69
example 38
BCAM application name 204
BCAMAPPL 204
BizTransactions application 204
BizTransactions catalog 204
BLINKING (host data object attribute) 132
BO see business object
browser 204
terminal functions 138
browser display print 189, 204
browser platform 204
browser print 190
conversion file 193
start template 190, 195
buffer 205
business object 205
business object class 205
BYPASS (system object attribute) 115
C
capture database 205
path name 115
capture function 94
CAPTURE_FILE (system object attribute) 115
CAPTURED_FLD (system object attribute) 115
capturing 205
233
Index
catalog element 205
catalog object 205
CGI (Common Gateway Interface) 206
character set 73
class 206
business object 205
directory 206
templates 206
ClearScreen 142
client 206
close 128
cluster 206
COLOR (host data object attribute) 133
COM 206
communication object 207
connection parameters 169
creating 169
COMMUNICATION_ INTERFACE_VERSION
(system object attribute) 115
configuration
character set 73
character sets for emulations 74
coupling 73
CONNECTION_MESSAGE (system object
attribute) 116
control frame 172
controls 141
conversion tools 207
country-specific characters 74
create
base directory 69
project 37
cursor position (field information) 134
custom editing of formats 93
Cyrillic character set 74
D
daemon 207
data
dynamic 209
entry to host 142
type of input 132
data access control 207
data type 207
234
DCOM 207
define
epilog 117
form field 119
prolog 123
dialog 208
active 208
non-synchronized 208, 213
passive 208, 215
synchronized 208, 218
types 208
dialog cycle 208
dialog step 208
Disconnect 142
DISCONNECT (system object attribute) 116,
142
DISPLAY_EURO (system object attribute) 116
distinguished name 208
document directory 209
Domain Name Service (DNS) 209
DÜ 142
DÜ2 142
DUE 142
E
EHLLAPI 209
EJB 209
element name attributes 134
end of screen recognition 117
END_MARK (system object attribute) 116
END_WAIT_CONDITION (system object
attribute) 121
END_WAIT_CONDITION.
CURSOR_IN_COLUMN (system object
attribute) 117
END_WAIT_CONDITION. CURSOR_IN_LINE
(system object attribute) 117
END_WAIT_CONDITION.
CURSOR_NOT_IN_COLUMN (system object
attribute) 117
END_WAIT_CONDITION.
CURSOR_NOT_IN_LINE (system object
attribute) 117
WebTransactions for OSD
Index
END_WAIT_CONDITION.
FLD_DIFFERENT_FROM (system object
attribute) 117
END_WAIT_CONDITION. FLD_EXPECTED
(system object attribute) 117
END_WAIT_CONDITION. MATCH_OPERATION
(system object attribute) 117
END_WAIT_CONDITION.
MATCH_STARTCOLUMN (system object
attribute) 117
END_WAIT_CONDITION. MATCH_STARTLINE
(system object attribute) 117
END_WAIT_CONDITION. MATCH_VALUE
(system object attribute) 117
END_WAIT_CONDITION.EXPECTED_BLOCKS
(system object attribute) 117
ENTER key 134
enter licenses (example) 30
entry page 209
EPILOG (system object attribute) 117
evaluation operator 209
expression 209
F
F1 ... F24 142
FHS 209
field 210
field file 210
field sequence 134
field type 132
FIELD_NAMES (system object attribute)
filter 210
first template, see start template
FIRST_IO _TIMEOUT (system object
attribute) 118
FLD (system object attribute) 119
FLD file 96
fld file 210
font size 152
format 210
#format 210
*format 210
+format 210
-format 210
WebTransactions for OSD
118
format description source 94, 210
format type 210
FORMTPL (system object attribute) 119
function 210
doBackTab() 151
doCursorDown() 151
doCursorHome() 151
doCursorLeft() 151
doCursorRight() 151
doCursorUp() 151
doTab() 151
doToggleInsert() 151
doToggleMark() 151
wtCreateKeyMap() 149
wtCreateKeySelectList() 149
wtHandleKeyboard (modifier, keyCode)
149
G
generate
start template 167
getFileName (WT_PKEYS) 159
getKeyValue (WT_PKEYS) 160
Greek character set 74
H
HARDCOPY (system object attribute) 119
holder task 210
host 210
host adapter 211
host application 211
host control object 134, 211
WT_KEY 141
host data object 130, 211
name 130
short name 131
host data print 184, 211
host object 130
host platform 211
HOST_CHARSET (system object attribute) 119
HOST_NAME (system object attribute) 119, 128
HTML 212
HTMLVALUE (host data object attribute) 122,
132
HTTP 211
235
Index
HTTPS 211
hypertext 211
Hypertext Markup Language (HTML)
212
I
IFG names 131
IFG2FLD
application 110
IGNORE_ASYNC (system object attribute) 120
individual template
pop-up support 105
initClusterParameter (WT_PKEYS class) 160
inline WTBean 222
inserting 169
INPUT (host data object attribute) 132
insert
inline WTBean 169
standalone WTBean 167
installation
BS2000/OSD 23
host adapter 17
Linux 22
silent 19
Solaris 21
WebLab 23
WebTransactions 17
Windows 18
integrated terminal emulation 10
INTENSITY (host data object attribute) 133
INVERS (host data object attribute) 133
ISO Latin-1 74
ISO-8859-1 74
ISO-8859-2 74
ISO-8859-3 74
ISO-8859-4 74
ISO-8859-5 74
ISO-8859-x 73, 74
J
Java Bean
212
K
K1 ... K14 142
KDCDEF 212
236
key mapping
defining 143
wtKeysOSD.js
key support 140
143
L
Latin-1 74
Latin-2 74
LDAP 212
LENGTH (host data object attribute) 132
licensing 24
literals 212
loadFromEmu 159
LOCAL_PORT (system object attribute) 120,
128
LZE_CHAR (system object attribute) 120
M
MARKABLE (host data object attribute) 132
master template 212, 220
OSD.wmt 78
OSD_Pocket.wmt 78
tag 213
message
receiving 129
sending 129
message queuing 212
message segment sequence 121
method 212
MIME type 196
MODIFIED (host data object attribute) 132
module template 213
MT tag 213
MULTIPLE_IO_TIMEOUT (system object
attribute) 121
multitier architecture 213
N
NAME (host data object attribute) 132
name/value pair 213
NATIONAL_VARIANT (system object
attribute) 73, 122
NIL_MODE (system object attribute) 122
non-synchronized dialog 208, 213
WebTransactions for OSD
Index
O
object 214
OFFLINE_COMMUNICATION (system object
attribute) 122, 128
OFFLINE_LOGFILE (system object
attribute) 122, 128
OFFLINE_TRACEFILE (system object
attribute) 123, 128
open 128
openUTM 214
application 214
Client 214
program unit 214
service 217
operations 207
OSD.wmt 78
OSD_Pocket.wmt 78
P
P keys 154
assignment 155
P1 ... P20 142
PADDING _CHARACTER (system object
attribute) 123
parameter 214
passive dialog 208, 215
password 215
PKEY1 ... PKEY20 142
polling 215
pool 215
pop-up box 103, 105
pop-up recognition 108
POPUP.COLUMN (system object attribute) 123
POPUP.HEIGHT (system object attribute) 123
POPUP.HEND (system object attribute) 123
POPUP.HMIDDLE (system object attribute) 123
POPUP.HSTART (system object attribute) 123
POPUP.LINE (system object attribute) 124
POPUP.VEND (system object attribute) 124
POPUP.VMIDDLE (system object attribute) 124
POPUP.VSTART (system object attribute) 124
POPUP.WIDTH (system object attribute) 124
PORT_NUMBER (system object attribute) 124,
128
WebTransactions for OSD
posted object 215
posting 215
Print (wtKeysOSD.htm) 142
print server 186, 201
print support 180
browser display print 189
host data printing 184
terminal hardcopy printing 181
web browser configuration 196
print/asynchronous support 171
enabling 171
functionality 172
printing host data 184
process 215
project 215
creating 37
example 37, 43
saving 43
PROLOG (system object attribute) 123
property 215
protocol 216
protocol file 216
R
RangeLength (host data object attribute) 133
RangeName (host data object attribute) 133
RangeStartColumn (host data object
attribute) 133
RAWVALUE (host data object attribute) 122, 132
readFromFile (WT_PKEYS class) 159
receive 129
RECEIVED_ BLOCKS (system object
attribute) 124
recognition criteria 216
recording individually 94
record 216
individual recognition criterium 94
record structure 210
RECORD_HOST_COMMUNICATION (system
object attribute) 124, 128
Refresh 142
REFRESH_BY_ ASYNC (system object
attribute) 125
RSO utility 202
237
Index
S
save
project 43
saveToFile (WT_PKEYS class) 159
scalar 216
screen field contents 132
send 129
service 217
service (openUTM) 217
service data 217
service node 217
session 218
start templates 162
starting 45
WebTransactions 218
setClusterParameter (WT_PKEYS class) 160
setDirectory (WT_PKEYS class) 159
setFileName (WT_PKEYS class) 159
setKeyValue (WT_PKEYS class) 160
setPassword (WT_PKEYS class) 159
setToEmu (WT_PKEYS class) 160
SOAP 218
special characters 74, 132
special keys 137, 141
mapping 90
SPSERVE 202
standalone WTBean 222
inserting 167
start
session 45
session (WebLab) 66
start template 162
start template 162, 220
generation 167
setting system object attributes 164
wtstartOSD.htm 163
start template set 162
STARTCOLUMN (host data object attribute) 132
STARTLINE (host data object attribute) 132
station name 184
STATION_NAME (system object attribute) 125,
128
status request 74
style 218
238
subdirectory
tmp 71
SYM_DEST (system object attribute) 125, 128
synchronized dialog 208, 218
system access control 219
system object 219
interaction between attributes and calls 128
OSD-specific attributes 113
set attributes in the start template 164
T
TAC 221
tag 219
TCP/IP 219
TCP/IP print server 186
template 220
class 206
customized generation 93
for pop-up box 103
master 220
object 220
start 220
terminal application 220
terminal connection
opening 128
terminal functions 138
terminal hardcopy printing 181, 220
TERMINAL_TYPE (system object attribute) 125,
128
Thread 210
tmp subdirectory 71
TRACE_LEVEL (system object attribute) 126
transaction 220
transaction code/TAC 221
Turkish character set 74
TYPE (host data object attribute) 132
U
UDDI 221
UNDERLINE (host data object attribute)
update
base directory 70
UPIC 221
URI 221
132
WebTransactions for OSD
Index
URL 221
USE_POPUP_ RECOGNITION (system object
attribute) 126
user exits 221
user ID 221
UTM see openUTM
V
VALUE (host data object attribute) 122, 132
value range of a data type 207
variable 221
visibility 221
VISIBLE (host data object attribute) 132
W
web browser
configuration for print support 196
web server 222
web service 222
WebLab 10
installing 23
WebTransactions
architecture 9
session 218
starting applications 76
WebTransactions application 222
WebTransactions platform 222
WebTransactions server 222
WSDL 222
WT_ASYNC (system object attribute) 126
WT_Browser 152
font size 152
WT_BROWSER_PRINT (system object
attribute) 126
WT_BROWSER_PRINT_ OPTIONS.BOTTOM
(system object attribute) 127
WT_BROWSER_PRINT_ OPTIONS.FOOTER
(system object attribute) 126
WT_BROWSER_PRINT_ OPTIONS.HEADER
(system object attribute) 126
WT_BROWSER_PRINT_ OPTIONS.LEFT
(system object attribute) 127
WT_BROWSER_PRINT_ OPTIONS.MODE
(system object attribute) 126
WebTransactions for OSD
WT_BROWSER_PRINT_ OPTIONS.ORIENTATION (system object attribute) 126
WT_BROWSER_PRINT_ OPTIONS.RIGHT
(system object attribute) 127
WT_BROWSER_PRINT_ OPTIONS.TOP (system
object attribute) 127
WT_COLOR (host control object) 136
WT_FOCUS (host control object) 131, 136
WT_FOCUS_SHORT (host control object) 136
WT_KEY (host control object) 90, 129, 137
WT_KEY.KEY 142
WT_KEY.Key 90, 129
WT_KEY.PKEY 154
WT_PKEYS 159
WT_SYSTEM_LINE (host control object) 137
WTAPrint 190
wtasync.htm 173
handling of asynchronous messages 178
print support 182, 185
WTBean 222
wtcOSD 169
wtBrowserFunctions.htm 91, 138
print/asynchronous support 174
wtc_bp_print.cnv 193
wtc_bp_Print.htm 193
wtCommonBrowserFunctions.js 148
wtcOSD 169
wtcStartOSD 167
wtcUTM 169
wtframes.htm 172
wtKeyMappingTableInput 143
wtKeysOSD.htm 90, 138
controls 141
wtKeysOSD.js 90, 141, 143, 146
WTML 223
WTML tag 223
wtPkeyFunctions.htm 159
wtPKEYS.htm 91, 155
wtPkeyValues.htm 156
WTScript 223
wtstartOSD.htm 162
WWW browser 204
WWW server 222
239
Index
X
XML 223
XML schema 223
240
WebTransactions for OSD
Fujitsu Siemens Computers GmbH
User Documentation
81730 Munich
Germany
Comments
Suggestions
Corrections
Fax: (++49) 700 / 372 00001
e-mail: [email protected]
http://manuals.fujitsu-siemens.com
Submitted by
Comments on WebTransactions V7.0
Connection to OSD Applications
✁
WebTransactions for OSD
Information on this document
On April 1, 2009, Fujitsu became the sole owner of Fujitsu Siemens Computers. This new subsidiary of Fujitsu has been renamed Fujitsu Technology Solutions.
This document from the document archive refers to a product version which
was released a considerable time ago or which is no longer marketed.
Please note that all company references and copyrights in this document have
been legally transferred to Fujitsu Technology Solutions.
Contact and support addresses will now be offered by Fujitsu Technology Solutions and have the format …@ts.fujitsu.com.
The Internet pages of Fujitsu Technology Solutions are available at
http://ts.fujitsu.com/...
and the user documentation at http://manuals.ts.fujitsu.com.
Copyright Fujitsu Technology Solutions, 2009
Hinweise zum vorliegenden Dokument
Zum 1. April 2009 ist Fujitsu Siemens Computers in den alleinigen Besitz von
Fujitsu übergegangen. Diese neue Tochtergesellschaft von Fujitsu trägt seitdem den Namen Fujitsu Technology Solutions.
Das vorliegende Dokument aus dem Dokumentenarchiv bezieht sich auf eine
bereits vor längerer Zeit freigegebene oder nicht mehr im Vertrieb befindliche
Produktversion.
Bitte beachten Sie, dass alle Firmenbezüge und Copyrights im vorliegenden
Dokument rechtlich auf Fujitsu Technology Solutions übergegangen sind.
Kontakt- und Supportadressen werden nun von Fujitsu Technology Solutions
angeboten und haben die Form …@ts.fujitsu.com.
Die Internetseiten von Fujitsu Technology Solutions finden Sie unter
http://de.ts.fujitsu.com/..., und unter http://manuals.ts.fujitsu.com finden Sie die
Benutzerdokumentation.
Copyright Fujitsu Technology Solutions, 2009