1
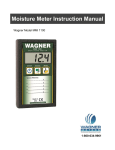
Moisture Meter
Instruction Manual
for Wagner Models:
• MMC 205
• MMC 210
• MMC 220
Table of Contents
Introduction .............................. Pages 3-6
Instructions - MMC-205........... Pages 7-9
Instructions - MMC-210........Pages 10-13
Instructions - MMC-220........Pages 13-17
Taking Measurements............Pages 17-19
Features...................................... Page 20
Meter Storage ............................ Page 21
Meter Calibration........................ Page 21
Meter Specifications ..............Pages 22-23
FCC Compliance Statement ..Pages 24-25
Warranty ................................Pages 26-27
Repair Service .........................Back Cover
2
Introduction
Congratulations!
You have purchased one of the most accurate
moisture measurement instruments for
wood in the world. Using patented
electromagnetic wave technology, Wagner
hand-held meters have been proven by
universities and institutes worldwide to
provide superior measurement results.
Utilizing an electro-magnetic field, your
Wagner moisture meter measures a
relatively large cross-sectional area each
time you take a reading, giving you a far
better representation than other technologies
of the true moisture content of your wood.
Pin-type meters do not provide this, only
measuring a very small area, and only at a
particular depth. Very short, non-insulated
pins are especially prone to just reading the
surface of your wood.
3
Introduction Continued. . .
Your Wagner meter measures the moisture
content in a 11/2 inch wide by 21/2 inch long
by 3/4 inch thick area of your wood. This
closely approximates the full-thickness
cross-section method used when performing
the ASTM D 4442-92 Oven Dry lab test for
determining moisture content in wood. This
ASTM standard (and its international
counterparts) is the standard to which all
moisture meters for wood are compared for
accuracy. Wagner technology has been
proven in many studies to provide some of
the most accurate results in the industry
when compared to this worldwide standard.
The Wagner MMC-200 Series Moisture
Meters utilize the latest design features
available in moisture measurement
technology. They are designed to fit
comfortably in a jacket pocket or toolbox,
and are ideal for anyone who needs a
professional quality tool to inspect wood or
4
wood products for accurate moisture
content. They are popular with flooring
installers, woodworkers, cabinet and
furniture makers, contractors, and quality
assurance inspectors.
Other important features of Wagner handheld meters include:
• The "Wood-Friendly"™ MMC-200 series
meters use advanced electromagnetic
wave technology to accurately measure
wood moisture content* to a depth of 3/4
inch. The MMC-205 can read values from
5% to 20%, while the MMC-210 can read
5% to 30%. The MMC-220 can read 5%
to 30% at settings up to .80 SG. Note: If
the MMC220 species setting value
selected is more than 80, the maximum
moisture content reading attainable will
be lower than 30%.
5
Introduction Continued. . .
• Useful for inspections on many types of
materials, including solid and laminated
wood products.
• Selectable wood species setting eliminates
complicated and time consuming wood
species adjustment corrections.
• Easy to read digital display read-out scaled
in 0.1% increments (1.0% for the MMC205).
• Virtually unaffected by wood temperature
or surface moisture. **
*Confirmed in university study–
information available upon request.
**Contact Wagner technical support for
guidelines when wood is frozen.
6
Operational Instructions—MMC 205
On/Off/Species Button:
When the meter is Off,
momentarily pressing and
releasing this button will cause
the meter to turn On, and briefly
display the firmware version, then enter
Measurement mode. When the meter is in
Measurement mode, and the button is
momentarily pressed and released, it will
display the species setting value. Press and
release the button again to return to
Measurement mode.
To turn Off the meter from Measurement
mode only, press the On/Off/Species
button for 3 seconds and then release. The
meter will also turn itself off automatically
when not in use as described in the autoshutdown section.
7
MMC 205 Instructions Continued. . .
Species Setting:
The species setting can be changed to
compensate for a variety of wood species.
When measuring another species other than
the factory default setting of 0.50 Specific
Gravity (SG), the species setting needs to
be changed. Refer to the Species Setting
Tables included with your meter to locate
the correct species setting for your wood.
If your species setting is not listed, refer to
the “Species Corrections” portion of this
manual. The values entered into the MMC205 meter omit the decimal point, so for
example the Douglas Fir value of 0.50 would
be “50” when programming the Species
Setting Value.
When the meter is in Measurement mode,
momentarily pressing and releasing the
On/Off/Species button will cause the display
to show the current specific gravity setting.
Press the button a second time for 3 seconds
8
and release to enter CHANGE SPECIES
MODE, or momentarily press and release
the button to return to Measurement mode.
When CHANGE SPECIES MODE has been
selected, a blinking colon symbol (:) will
appear on the display. Momentarily pressing
the On/Off/Species button again will
increment the selected specific gravity value
by 01. The value will go as high as 70, then
will wrap around to 30 and continue
incrementing. When the desired setting has
been reached, press button for 3 seconds and
release to store the value and return to
Measurement mode.
Your commonly used species setting values
can be written on the meter overlay decal in
the space provided using a pencil or nonpermanent marker, and erased with a swab
dipped in isopropyl alcohol. Avoid using a
permanent marker because staining of the
decal may occur.
9
Operational Instructions—MMC 210
On/Hold Button:
When the meter is Off,
momentarily pressing and
releasing this button will cause
the meter to turn On, and briefly
display the firmware version, then enter
Measurement mode.
When the meter is in Measurement mode,
and the On/Hold button is momentarily
pressed and released, it will enter Hold mode
to allow the user to “freeze” the moisture
content reading. Hold mode is selected
when the symbol (÷) appears in the left
corner of the display. This is ideal for
keeping a moisture reading on the display
when you are taking moisture readings in
hard-to-reach places. The reading will be
“frozen” on the display until you press and
release the On/Hold button again.
10
To turn Off the meter, press the On/Hold
button for 3 seconds. The meter will also
turn itself off automatically when not in use
as described in the auto-shutdown section.
Species Button:
The species setting can be
changed to compensate for a
variety of wood species. When
measuring another species other
than the factory default setting of 0.50
Specific Gravity (SG), the species setting
needs to be changed. Refer to the Species
Setting Tables included with your meter to
locate the correct species setting for your
wood. If your species setting is not listed,
refer to the “Species Corrections” portion
of this manual. The values entered into the
MMC-210 meter omit the decimal point, so
for example the Douglas Fir value of 0.50
would be “50” when programming the
Species Setting Value.
11
MMC 210 Instructions Continued. . .
When the meter is in Measurement mode,
momentarily pressing and releasing the
species button will cause the display to show
the current specific gravity setting.
Momentarily press and release the button
a second time to enter CHANGE SPECIES
MODE, or momentarily press and release
the On/Hold button to return to
Measurement mode.
When CHANGE SPECIES MODE has
been selected, a blinking colon symbol (:)
will appear near the left side of the display.
Pressing the SPECIES button again will
increment the selected specific gravity value
by 01, or hold the button down to increment
by 10. The value will go as high as 70, then
will wrap around to 30 and continue
incrementing. When the desired setting has
been reached, press the On/Hold button to
store the species setting value and return to
Measurement mode.
12
Your commonly used species setting values
can be written on the meter overlay decal in
the spaces provided using a pencil or nonpermanent marker, and erased with a swab
dipped in isopropyl alcohol. Avoid using a
permanent marker because staining of the
decal may occur.
Operational Instructions — MMC 220
On/Hold Button:
When the meter is Off,
momentarily pressing and
releasing this button will
cause the meter to turn On,
and briefly display the firmware version,
then enter Measurement mode.
When the meter is in Measurement mode,
and the On/Hold button is momentarily
pressed and released, it will enter Hold
mode to allow the user to “freeze” the
moisture content reading. Hold mode is
13
MMC 220 Instructions Continued. . .
selected when the symbol (÷) appears in
the left corner of the display. This is ideal
for keeping a moisture reading on the
display when you are taking moisture
readings in hard-to-reach places. The
reading will be “frozen” on the display
until you press and release the On/Hold
button again.
To turn Off the meter, press the On/Hold
button for 3 seconds, and then release.
The meter will also turn itself off
automatically when not in use as
described in the auto-shutdown section.
Species Button:
The species setting can be
changed to compensate for a
variety of wood species. When
measuring another species
other than the factory default setting of
0.50 Specific Gravity (SG), the species
14
setting needs to be changed. Refer to the
Species Setting Tables included with your
meter to locate the correct species setting
for your wood. If your species is not
listed, refer to the “Species Corrections”
portion of this manual. The values
entered into the MMC-220 meter omit the
decimal point, so for example the Douglas
Fir value of 0.50 would be “50” when
programming the Species Setting Value.
When the meter is in Measurement mode,
momentarily pressing and releasing the
species button will cause the display to
show the current specific gravity setting.
Momentarily press and release the button
a second time to enter CHANGE
SPECIES MODE, or momentarily press
and release the On/Hold button to return
to Measurement Mode.
15
MMC 220 Instructions Continued. . .
When CHANGE SPECIES MODE has
been selected, a blinking colon symbol (:)
will appear near the left side of the
display. Pressing the Species button again
will increment the selected specific
gravity value by 01, or hold the button
down to increment by 10. The value will
go as high as 100, then will wrap around
to 20 and continue incrementing. When
the desired setting has been reached, press
the On/Hold button to store the species
setting value and return to Measurement
mode.
NOTE: If the species setting value
selected is more than 80, the maximum
moisture content reading attainable will be
lower than 30%.
16
Your commonly used species setting
values can be written on the meter overlay
decal in the space provided using a pencil
or non-permanent marker, and erased with
a swab dipped in isopropyl alcohol. Avoid
using a permanent marker because
staining of the decal may occur.
Taking Measurements
In order to take correct moisture content
measurements,
ensure that the
meter’s specific
gravity (species)
setting is the right
one for your species
of wood as listed in
the Species Setting Tables.*
Be sure to press down firmly on the center
of the meter with approximately 3 pounds
17
Taking Measurements continued. . .
of force to ensure good sensor plate contact
with the wood surface. This is especially
important on rough-sawn lumber. Do not
take readings where there is a noticeable
defect or knot in the lumber.
If there is visible surface moisture or water,
wipe off any excess, and let the surface of
the wood dry-out for a couple of minutes,
then take the reading. If possible, turn the
board over and measure the other side. If
the thickness of the piece is greater
than 11/2 inches, it is a good idea to take
measurements on both sides.
If the lumber thickness is less than the scan
depth of the meter, an air gap of at least one
inch needs to be maintained underneath the
wood to prevent erroneous high readings.
Ensure that there is nothing (including your
hand) under the material you are measuring,
especially any metal. The actual moisture
18
sensing area is a 1 1/2 inch by 2 1/2 inch
rectangle on the meter’s backside (opposite
side of the display and keypad). In order to
take a valid measurement, this sensing area
must be completely covered with the wood
or other material you are measuring. If the
sensing area is not completely covered, your
moisture reading will be inaccurate.
Additional meter corrections may be
necessary if you are measuring Raft Wood
(salt water permeated), or lumber treated
with Copper, Chrome, Arsenic (CCA), or
Ammonical, Copper, Quantenary (ACQ).**
*Refer to the Species Setting Tables in the
supplemental manual provided.
**Contact Wagner Technical Services for
further information for these
applications.
19
Features (All 200 Series Meters)
Auto-Shutdown:
The meter will automatically shutdown in
60 seconds when the meter’s moisture
content reading has not changed by more
than 2%, and none of the meter buttons have
been pressed. The shutdown timer will reset
anytime the meter reading changes or a
button has been pressed.
Low Battery Indicator:
If the meter is On, and battery voltage is
low, the LO BAT indicator will be shown
on the left side of the display. When the LO
BAT indicator is on, you must replace the
battery or the meter may not function
properly. If the battery needs to be replaced,
use either a 9-volt alkaline or a ni-cad
rechargeable. Be sure to observe proper
battery polarity.
20
Meter Storage
For a long service life, it is important to store
your meter properly. Avoid excessively hot
or cold locations, and keep the meter in the
case provided. Do not store the meter in an
area with excessive electro-magnetic
interference, such as near an electric motor,
or where it could be crushed, such as in front
of a forklift. Do not leave the meter in an
operating kiln during the drying cycle.
Meter Calibration
The meter has been calibrated at the factory
and should not require re-calibration. If you
need to have the calibration verified, please
contact the Wagner Electronics Sales
Department to purchase a calibration
verification block if you don’t already have
one. Should the meter need to have a
calibration adjustment, it will need to be
returned to Wagner Technical Services
Department.
21
MMC-200 Series Meter Specifications
Size:
Length:
Width:
Height:
4 9/16 inches
2 3/4 inches
1 1/16 inches
Scanning Area:
Length
2 1/2 inches
Width
1 1/2 inches
Scanning Depth:
3
/4 inch
Weight:
0.37 pounds
Power:
9 volt alkaline or ni-cad
rechargeable
Auto Power Shut Down:
60 seconds
22
Measurement Ranges:
(MMC-205):
5% - 20% MC scaled in 1% increments
(MMC-210):
5% - 30% MC scaled in 0.1% increments
(MMC-220):
5% - 30% MC scaled in 0.1% increments
(up to .80 SG)
Note:
If the MMC 220 species setting value
selected is more than 80, the maximum
moisture content reading attainable will
be lower than 30%.
Density (SG) Range (MMC-205):
0.30 to 0.70 SG
Density (SG) Range (MMC-210):
0.30 to 0.70 SG
Density (SG) Range (MMC-220):
0.20 to 1.00 SG
Operating Temperature:
30 to 110 degrees Fahrenheit
23
FCC Compliance Statement
This equipment has been tested and found to comply
within the limits for a Class B digital device,
pursuant to Part 15 of the FCC Rules. These limits
are designed to provide reasonable protection against
harmful interference in residential installations.
This equipment generates, uses, and can radiate
radio frequency energy and, if not installed and
used in accordance with the instructions, may
cause harmful interference to radio communications.
However, there is no guarantee that interference
will not occur in a particular installation.
If this equipment does cause interference to radio
or television equipment reception, which can be
determined by turning the equipment off and on,
the user is encouraged to try to correct the
interference by one or more of the following
measures:
• Reorient or relocate the receiving antenna.
• Move the equipment away from the receiver.
• Plug the equipment into an outlet on a circuit
different from that to which the receiver is
powered.
• If necessary, the user should consult the dealer or
an experienced radio/television technician for
additional suggestions.
24
CAUTION: Only equipment certified to comply with
Class B (computer input/output devices, terminals, printers,
etc.) should be attached to this equipment. Finally, any
changes or modifications to the equipment by the user not
expressly approved by the grantee or manufacture could
void the user's authority to operate such equipment. This
device complies with Part 15 of the FCC Rules. Operation
is subject to the following two conditions:
(1) This device may not cause harmful interference, and
(2) this device must accept any interference received,
including interference that may cause undesired
operation.
Canadian Department of Communications
compliance statement
This equipment does not exceed class B limits per radio
noise emissions for digital apparatus, set out in the Radio
Interference Regulation of the Canadian Department of
communications. Operation in a residential area may cause
unacceptable interference to radio and TV reception,
requiring the owner or operator to take whatever steps are
necessary to correct the interference.
Avis de conformité aux normes du ministère des
Communications du Canada
Cet équipement ne dépasse pas les limites de Classe B
d’émission de bruits radioélectriques pour les appareils
numériques, telles que prescrites par le Réglement sur le
brouillage radioélectrique établi par le ministère des
Communications du Canada. L’exploitation faite en milieu
résidentiel peut entrainer le brouillage des réceptions radio
et télé, ce qui obligerait le propriétaire ou l’opérateur à
prendre les dispositions nécessaires pour en éliminer les
causes.
25
Warranty
Wagner Electronic Products, Inc., warrants this
product against defects in material and
workmanship for one (1) year from the date of
purchase, subject to the following terms and
conditions:
Wagner’s liability under this warranty shall be
limited, at Wagner’s option, to the repair or
replacement of this product or any part thereof,
which is demonstrated to be defective. To exercise
this warranty, customer must telephone, fax or email Wagner’s Customer Service Department for
an RMA (Return Materials Authorization) number
and factory instructions for shipment. This limited
warranty does not apply if the product has been
damaged by accident, negligent handling, misuse,
alteration, damage during shipment, or improper
service. Wagner Electronic Products, Inc., shall in
no event be liable for any breach of warranty or
defect in this product, which exceeds the amount of
purchase price of the product. Wagner Electronic
Products, Inc., shall not be liable for incidental or
consequential damages for the breach of any express
or implied warranty with respect to this product or
its calibration.
With proper care and maintenance, the meter
should stay in calibration; however, because Wagner
26
Electronic Products, Inc., has no control over the
manner in which the unit will be used, it makes no
warranty that the meter will stay in calibration for
any specific period of time. Wagner Electronic
Products, Inc., recommends returning the unit to the
factory for a diagnostic checkup and recalibration
in the event the meter is dropped or otherwise
damaged, or the meter accuracy is suspect.
This warranty is in lieu of all other warranties,
whether oral or written, express or implied. Any
implied warranties, including implied
warranties of merchantability and fitness for a
particular purpose, are excluded. Agents and
employees of Wagner Electronic Products, Inc., are
not authorized to make modifications to this
warranty or additional warranties binding on
Wagner Electronic Products, Inc. Accordingly,
additional statements, whether oral or written,
except written statements from an officer of
Wagner Electronic Products, Inc., do not constitute
warranties and should not be relied upon by the
customer.
This warranty is personal to the customer
purchasing the product from Wagner Electronic
Products, Inc., and is not transferable.
27
Repair Service
In the event of damage, failure, or if the
unit requires re-calibration, contact the
Wagner Electronics Technical Services
Department for an RMA number prior to
returning it for repair.
Wagner Electronic Products, Inc.
326 Pine Grove Road,
Rogue River, OR 97537 USA
Phone: (541) 582-0541
Fax: (541) 582-4138
E-mail: [email protected]
Visit Our Moisture Measuring Information Center at:
www.moisturemeters.com
© 2003WEPI Wagner Part #500-60200-001 Rev. B