1
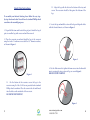
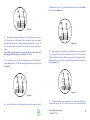
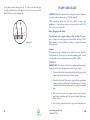
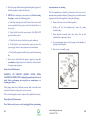
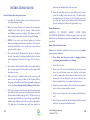
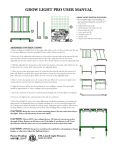
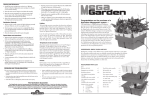
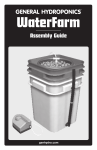
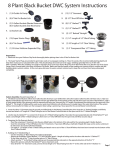
User’s
Manual
Table of Contents
Welcome and congratulations on your purchase
of the Instant Garden
The Instant Garden is a high performance hydroponic growing
system designed with simplicity in mind. Anyone from the novice to
the professional green thumb can use the Instant Garden with ease
and get fantastic results.
With your Instant Garden you just fill the reservoir with water,
add a weekly dose of our special SUPER HYDRO FOOD and the
home hydroponic system does the rest. Instant Garden features
an automatic water recycling system so you don’t have to worry
about watering and you don’t have to pay a high water bill, because
hydroponic technology uses only 10% of the water used in traditional
dirt based gardening.
Plus, with the addition of the Instant Garden grow light kit using
either high intensity LED grow lights, or T5 fluorescent bulbs, the
Instant Garden lets you grow great tasting organic produce indoors
all year long.
Amy Cooper
President / Co-Founder
Caution . . . . . . . . . . . . . . . . 1
Assembly
Parts List
. . . . . . . . . . . . .
2
Step by Step Instructions . . . . . . . . 3
Pump User Guide . . . . . . . . . . . . . 10
Instructions For Use
Operation . . . . . . . . . . . . . .
15
Maintenance . . . . . . . . . . . . .
16
PH Levels . . . . . . . . . . . . . . 17
Troubleshooting . . . . . . . . . . . . 17
Caring For Your Seedlings . . . . . . . . . . . . . . 19
Super Hydro Food (Nutrients) . . . . . . . . 21
Limited One-Year Warranty . . . . . . . . . . . . . . 23
www.instantgarden.com
1-888-501-7521
CAUTION!
ASSEMBLY
Read this material before using this product. Failure to do so can
result in serious injury. Save this manual.
Parts List
When unpacking make sure that the product is intact and undamaged.
If any parts are missing or broken, please call 1-888- 501-7521 as
soon as possible.
CAUTION!
The Instant Garden is a hydroponic grow system that uses water
infused with nutrients to feed your plants. Inherent with any
planter that uses water there is a risk of splashing, leaking, spilling
or otherwise causing water to escape the system. Please take care to
place your Instant Garden in a location where water spills will not
cause damage.
Save this Manual.
Keep this manual for safety warnings, precautions, assembly,
operating instructions, inspection, maintenance and cleaning
procedures. Write the product’s month and year of purchase in the
back of the manual. Keep this manual and the receipt in a safe and
dry location for future reference.
1
1.
Reservoir (10 GAL) with lid x 1
2.
Legs x 2
3.
White trays x 3
4.90o rubber fittings x 3
5.120o rubber fittings x 2
6.
1/2” to 1/4” 90o reducer fitting x 1
7.
5/8” OD white drain hose 11.5” x 2
8.
5/8” OD white drain hose 5” x 1
9. 3/8” OD white fill hose 39” x 1
10. Submersible pump x 1
11. 500g container of Instant Garden Super Hydro Food
12. Instant Garden grow cubes x 5
14. Allen wrench x 1
15. Small screws for leg joints x 4
16.
1/4-20 1” screws and 3/4” washers x 12
(for connecting legs to reservoir)
17.
Instant Garden User’s Guide
www.instantgarden.com
1-888-501-7521
2
Step by Step Instructions
To assemble your Instant Garden, please follow the easy stepby-step directions below. You will need a standard Phillips head
screwdriver for assembly purposes.
1. Unpack all the items and locate the bag of parts. Inside the bag of
parts is a smaller bag with screws and an Allen wrench.
2.2 Align the legs with the slots in the bottom of the tray and
secure. The reservoir should be flat against the bottom of the
legs.
3. Locate the top and middle sections of the legs and align the holes
with the threaded inserts, as Shown in Figure 2.
2. Place the reservoir on-end and attach the legs to the reservoir
using the twelve 1” machine screws with the 3/4” diameter washers,
as Shown in Figure 1.
Figure 2
Figure 1
4. Use the Allen wrench to tighten the 4mm screws into the threaded
inserts securing the two sections of legs, as seen in Figure 3.
DO NOT OVER TIGHTEN!
2.1 On the bottom of the reservoir, secure the legs to the
reservoir using 12 of the 1/4-20 screws provided and a standard
Phillips head screwdriver. Place the screw in the slot and thread
into the holes on the underside of the reservoir.
DO NOT OVER TIGHTEN!
Figure 3
3
www.instantgarden.com
1-888-501-7521
4
5. Locate the steel clip, as seen in Figure 4.
8. Locate the three white growing trays and snap them into the legs,
as seen in Figure 6.
Figure 4
Figure 6
6. Slip the steel clip over the joint between the top and middle leg
sections, as seen in Figure 5. This will secure the two sections of the
legs together.
9. Locate the 39” long 3/8” hose and insert the end with the fitting
into the 1/2” hole on the left side of the top tray, as seen in Figure 7.
Figure 5
7. The lid fits on top of the reservoir with the two slots fitting over
the leg gussets.
5
Figure 7
10. Put the other end of the 36” long 3/8” hose through the 3/8”
hole in the middle left of the reservoir lid, as seen in Figure 8.
www.instantgarden.com
1-888-501-7521
6
the drain hose in the 1/2” hole located on the right side of the middle
tray, as seen in Figure 10.
Figure 8
11. The pump is included in the parts bag. Push the hose over the
1/4” fitting on top of the pump. Once connected, place the pump
upright in the reservoir, securing it with the suction cups. Use one of
the two holes in the rear of the reservoir for the power cord on the
pump.
Note: Make sure the pump is secured to the reservoir floor and
not supported by the power cord or the 3/8” hose.
12. Locate the two 12” long, 5/8” drain hoses. Insert the 120 degree
rubber fitting in the 1/2” hole on the right side of the top tray, as seen
in Figure 9.
Figure 10
14. Repeat this process with the second drain hose going from the
1/2” hole on the left side of the middle tray to the 1/2” hole on the
left side of the bottom tray. Make sure you use the 120 degree rubber
fitting on the top tray and the 90 degree fitting on the bottom tray, as
seen in Figure 11.
Figure 11
Figure 9
13. Insert the 90 degree rubber fitting located on the opposite end of
7
15. The final drain hose goes from the 1/2” hole on the left side of
the bottom tray to the 5/8” hole on the lid of the reservoir. Insert
www.instantgarden.com
1-888-501-7521
8
the 90 degree rubber fitting into the 1/2” hole in the tray and put
the other end of the hose through the 5/8” hole on the reservoir lid
directly below, as seen in Figure 12.
PUMP USER GUIDE
WARNING: Read this material before using this product. Failure to
do so can result in serious injury. SAVE this manual.
When unpacking make sure that the product is intact and
undamaged. If any parts are missing or broken, please call 1-888501-7521 as soon as possible.
Before Plugging in the Pump
Figure 12
The plug must have a supply voltage of 120v at 60Hz. The pump
can be connected to any plug with a Ground Fault Interrupt (GFCI
Plug) which has been installed according to local and national
electrical code.
Caution
The pump has been evaluated for use with clear water and fully
soluble nutrients. Do not use in or around swimming pools. Do not
use with dirty water or nutrients that are not 100% soluble.
WARNING:
IMPORTANT! For your own safety, before turning on the pump the
pump, please have the following items checked by an expert:
1. To reduce the risk of electrical shock, only use the pump that
comes with your Instant Garden Grow System.
2. Risk of electric shock. This pump is supplied with a grounding
conductor and grounding-type attachment plug. To reduce
the risk of electric shock, connect only to a properly grounded
plug.
3. Risk of electric shock. This pump has not been tested in
applications other than with the Instant Garden Hydroponic
Grow System.
4. The electrical connections must be protected from moisture.
9
www.instantgarden.com
1-888-501-7521
10
5. If there is a danger of flooding, the electrical connections
must be moved to higher ground.
6. Circulation of caustic fluids, as well as the circulation of
abrasive materials, must be avoided at all costs.
7. The pump must be protected from frost.
8. The pump must be protected from running dry.
9. Access by children should be prevented with appropriate
measures.
10.To avoid the possibility of the pump plug or receptacle getting
wet, keep plug and receptacle off the ground and/or anywhere
near the reservoir. This also applies to any extension cords
used.
WARNING: Handling the power cord on this unit will expose
you to lead, a chemical known to the State of California to
cause cancer, and birth defects or other reproductive harm.
Wash hands after handling. (California Health and Safety
Code 25249.5, et seq.)
11.The warnings, precautions, and instructions discussed in
this instruction guide cannot cover all possible conditions
and situations that may occur. It must be understood by the
operator that common sense and caution are factors that
must be supplied by the operator.
Pump Fluid Type - Water Only
The pump is designed for use with fresh water with a maximum
temperature of 77 degrees F (25 degrees C). Do not use in hot water.
Do not use the pump for other fluids, especially not fuels, cleaning
fluids, or other chemical products. Your Instant Garden works best
with a water temperature between 60-75 degrees F (16-24 degrees C)
Keep this manual for safety warnings and precautions, assembly,
11
operating, inspection, maintenance and cleaning procedures.
Installation
1. The pump is designed to be used in the Instant Garden
Hydroponic Grow System.
2. The pump must be placed on the bottom of the reservoir.
To ensure the pump work properly, keep the bottom of the
reservoir free from sludge and dirt of all kinds.
3. For proper cooling of the pump, only operate the pump when
it is completely submerged.
Pump Power Supply
1. The pump is equipped with a shock-proof plug according
to regulations. The pump is designed to be connected to
120volts at 60 Hz GFCI protected safety socket.
2. Make sure that the socket is sufficiently secured and in
excellent condition.
3. When the plug is inserted into the socket the pump will
operate.
WARNING! If the power cord or plug is damaged in any way,
do not use the pump. The power cord may only be repaired by a
certified electrician.
Pump Operation
Set the pump on a level spot in the reservoir. The suction cups must
be in contact with the reservoir floor.
NOTE: Do not plug in pump yet.
CAUTION: Verify pump is secured to the reservoir floor and not
supported by the power cord or the 3/8” hose. Do not use the
hose to support the pump.
www.instantgarden.com
1-888-501-7521
12
4. Once the pump is fully submerged and adequately supported,
shift the regulator to adjust the flow rate.
5. NOTE: After reading these instructions, and before starting
the pump, consider the following points:
a. Verify that the pump rests on the floor of the reservoir and
is not suspended by the power cord or the attached hose to
the top tray.
b. Verify that the electrical connection is 120v 60Hz GFCI
protected safety socket.
c. Verify that the electrical socket is in good condition.
d. Verify that the water and moisture cannot get near the
power supply socket or any extension cord connections.
e. Verify that the pump is installed to prevent it from running
dry.
any maintenance or cleaning.
The below maintenance should be performed at least once every 3
months under optimal conditions. If pump starts to sound abnormal,
unplug it and check the impeller by doing the following:
1. Remove the front cover and filter/regulator.
2. Gently pull out the Impeller(rotor) from the pump
body(housing).
3. Rinse Impeller assembly with clean water. Use an old
toothbrush to remove any debris.
4. To prevent damage, do not rest the pump on the Impeller or
pry against the Impeller.
5. Once clean, reassemble pump.
6. Once you’ve verified that the pump is properly setup, dry
your hands and plug the power cord into the electrical outlet
to begin pump operation.
Pump General Maintenance
WARNING: TO PREVENT SERIOUS INJURY FROM
ACCIDENTAL OPERATION: Unplug the pump from its electrical
outlet before performing any inspection or maintenance, or
cleaning procedures.
If the pump is moved to a different reservoir, flush it out with clean
water and dry before setting up in a new reservoir.
If the cord is damaged it must be replaced by a qualified electrician.
Pump Quarterly Maintenance
Note: Make sure the power cord is unplugged before performing
13
www.instantgarden.com
1-888-501-7521
14
INSTRUCTIONS FOR USE
Instant Garden Operating Instructions
1. Assemble the Instant Garden per the instructions in the
Assembly Guide provided.
2. Place the Instant Garden in a location that has adequate
sunlight for the plants you are growing. Different plants
need different amounts of sunlight. Most plants do well in
direct sunlight while others do well with partial shading.
3. NOTE: Do not place your Instant Garden in a location
where water damage would cause a problem. The best place
for the Instant Garden is on a concrete, tile or treated wood
patio or on dirt or grass.
4. The reservoir should be filled to the fill line at 10 gallons
of fresh, clean water. The Instant Garden works best with a
water temperature between 60-75 degrees F (16-24 degrees
C).
5. Any nutrients added should be 100% water soluble and not
have any large particles which could cause the pump or fill/
drain hoses to clog.
6. Make sure there is sufficient water in the reservoir at all
times to cover the pump by filling to the 10 gallon fill line.
The pump will malfunction if left only partially submerged
or run dry. Keep the pump totally submerged at all times.
7. When the reservoir is full of water and the nutrients have
been added its time to turn on your system and test the flow.
Nutrient water should pump up the 3/8” fill hose to the top
tray and begin to fill that tray. Once the top tray is filled the
nutrient water will drain down the second tray through the
5/8” drain hose. The nutrient water will then drain to the
15
third tray and finally back into the reservoir.
8. Once the water flow has been successfully tested, you can
insert the seedling baskets into the trays. The baskets have
an angled bottom. The lower part of the basket goes to the
rear of the tray. Insert the tray and twist-lock the basket into
place by rotating the basket to the right until it stops.
Pump Maintenance
WARNING: TO PREVENT SERIOUS INJURY FROM
ACCIDENTAL OPERATION: Unplug the pump from its electrical
outlet before performing any inspection or maintenance, or cleaning
procedures.
Pump Quarterly Maintenance
Maintenance should be performed at least once every 3 months
under optimal conditions.
1. Note: Make sure the power cord is unplugged before
performing any maintenance or cleaning.
2. Lid of the reservoir.
3. Remove the 3/8” hose from the fitting on the top tray and
direct the used nutrient water into a bucket, on the grass
or dirt or some other safe location to drain out the water.
Alternately you can dump the reservoir but only after the
baskets and plants have been removed from the trays.
4. Rinse the reservoir and use a soft brush to clean any sediment,
debris, sludge or algae from the reservoir.
5. If the trays are empty they can be removed and cleaned as
well.
6. Once clean, reassemble the Instant Garden, refill the reservoir
with fresh, clean water and add nutrients.
www.instantgarden.com
1-888-501-7521
16
PH Levels
The optimal PH level for hydroponic growing is between 5.5 and 6.5
PH. Most municipal water will be around 7.0 PH and that PH will
decrease to the optimal range once the nutrients are added to the
water.
1. If you want to test the PH level of your Instant Garden, PH
strips can be ordered on our website. You can also purchase
an electronic pen PH tester through the Instant Garden
website (www.instantgarden.com).
2. If you have PH testing strips: In order to test your PH, fill
your reservoir with fresh clean water. Use a PH test strip to
test PH both before and after you add your nutrients. If your
PH, after adding nutrients, is above 7.0 you may want to
purchase some PH Down solution from the Instant Garden
web site (www.instantgarden.com). Alternately, you can use
distilled white vinegar to lower the PH of your nutrient water.
Try 1-2 scoops and retest.
Instant Garden Troubleshooting
For the best performance of your Instant Garden take note of these
helpful tips.
1. Drooping plants typically means there is a problem with the
nutrient water flow. Yellowing leaves typically means a PH
problem. Discoloration of the leaves, particularly and the
tips of the leaves, typically means too much nutrients.
2. In order to test your PH fill your reservoir with fresh, clean
water. Use a PH test strip to test PH both before and after you
add your nutrients. If your PH after adding nutrients is above
7.0 you may want to purchase some PH Down solution from
the Instant Garden web site. Alternately, you can use distilled
white vinegar to lower the PH of your nutrient water. Try 1-2
tablespoons and retest.
17
3. PH test strips which can be reordered from the Instant
Garden Web site. You can also purchase an electronic pen
PH Tester through the Instant Garden website.
4. As with any outdoor garden, your plants will be susceptible
to insects. Because the Instant Garden does not use any dirt,
you won’t have problems with dirt based bugs but there is the
potential of flying or crawling insect to affect your Instant
Garden. We recommend any of the fine organic insecticides
you can find at your local garden center or most home
improvement stores.
5. Water temperature is important. Your Instant Garden will
work best with a water temperature between 60 and 75
degrees F (16-24 degrees C). If your Instant Garden is in full
sunlight in a hot environment you may have to find a cooler
place. Some plants will not be affected while other plants
require cooler water temperatures.
6. Depending upon outside temperatures and the type of crops,
a full reservoir should last 1-2 weeks. During hotter months
and/or as the plants get larger, they will require more water
and nutrients at an accelerated rate. We recommend checking
water levels once a week during cooler temperatures and twice
a week during hotter temperatures. As your plants grow they
use up what nutrients they need and the remaining nutrients
as well as salts can accumulate in your reservoir. You will
want to empty and clean your reservoir every 2-4 weeks as it
is convenient to insure the best growth of your garden.
7. Make sure the Instant Garden is level. If the pump is on and
water is flowing to the top tray, but not adequately to the
second and third trays, the Instant Garden may not be level.
www.instantgarden.com
1-888-501-7521
18
CARING FOR YOUR SEEDLINGS
Upon receipt of your Instant Garden seedlings, there are some
important steps to follow
1. Open box immediately and carefully remove the Shippers from
the cardboard box.
2. Remove any tape and open the clear cover attached to the black
bottom tray.
3. Instant Garden Seedlings all come with a plant stake with information about the variety of your Instant Garden Seedling.
in the middle or top tray.
9. Plant your seedlings directly in your Instant Garden. During
the summer months, plant your seedlings IN THE EVENING.
The extreme heat and nutrients can be a little overwhelming for
a seedling that has spent a few days in a box! Ensure the rockwool is touching the bottom of the Instant Garden Basket. If it
is not, the seedling will not get watered.
10.Make sure you have followed the directions in your Instant Garden Growing Guide for filling the reservoir, adding nutrients,
and balancing the pH.
11.Most importantly, Have FUN watching your garden grow!
4. Remove each seedling from the bottom tray carefully by grabbing the Instant Garden Basket and gently pulling out. DO
NOT PULL ON THE PLANT ITSELF!
5. Water the seedlings thoroughly.
6. If you are planting your seedlings immediately go to step 8.
Otherwise, you may replace them into the bottom black tray
after they have been watered. It is important to keep the rock
wool cubes moist but not saturated with water. DO NOT FILL
THE TRAY UP WITH WATER. The moist cubes can stay in the
tray but be sure to water regularly to ensure they will not dry
out. It is fine to leave them here for a week or more, providing
you water them every day, possibly twice a day.
7. NOTE: In the cooler months, if temperatures are at or below 45
overnight, bring the seedlings inside but put them back outside
the next day. When you are ready to transplant them to your
Instant Garden follow steps below.
8. It is important to place your plants in the Instant Garden so that
the bigger plants will not block or impede the smaller plants.
We suggest you place the plants that will grow bigger, like
squash, cucumber, tomato, etc., in the bottom tray. Plants that
will stay smaller, like greens and smaller herbs, should be grown
19
www.instantgarden.com
1-888-501-7521
20
NUTRIENTS
Super Hydro Food
Application Rates:
New Reservoir (10 Gallons): 3 scoops
Add Weekly: 2 scoops
We recommend you replace the water in your reservoir every 2-4
weeks depending on the health of your plants.
Store in a cool, dry location.
Total Nitrogen (N)......................................................12%
4% Ammonical Nitrogen
8% Nitrate Nitrogen
Available Phosphate (P2O5)......................................12%
Soluble Potash (K2O).................................................12%
Calcium (Ca)..............................................................3.5%
Magnesium (Mg).......................................................0.8%
Sulfur (S).....................................................................1.5%
Boron (B)..................................................................0.05%
Copper (Cu).............................................................0.05%
Iron (Fe)......................................................................0.2%
Manganese (Mn)........................................................0.6%
Molybdenum (Mo)..............................................0.0005%
Zinc (Zn).....................................................................0.1%
Derived from: Potassium Nitrate, Calcium Chloride, Ammonium Phosphate, Potassium
Phosphate, Magnesium Sulfate, Ammonium Nitrate, Iron EDTA, Manganese EDTA, Zinc
EDTA, Copper EDTA, Sodium Molybdate, Boric Acid.
CAUTION: Keep nutrients out of reach of children.
Do not ingest nutrients internally!
Information regarding the contents and levels of metals in this product is available at
www.aapfco.org/metals.htm
21
LIMITED ONE-YEAR WARRANTY
1. Mobile Farming Systems, Inc. (“Warrantor”), whose address
is 970 West Foothill Blvd., Azusa, CA 91702, warrants that the
product described in this warranty is free from defects in workmanship and materials for a period of one (1) year.
2. This warranty extends to the original purchaser of the product
warranted under this warranty.
3. This warranty covers the “Instant Garden” product and each
of its component parts, except for the water pump. Warranty
coverage for the water pump is covered by the manufacturer.
You will find the water pump manufacturer’s warranty with the
literature supplied.
4. In the event of a defect, malfunction, or other failure of the
product not caused by any misuse, damage, or normal wear and
tear to the product while in the possession of the consumer, the
Warrantor will remedy the failure or defect, without charge to
the consumer, within ninety (90) days. The remedy will consist
of repair or replacement of the product, or refund of the purchase price, at the Warrantor’s option. However, the Warrantor
will not elect refund unless it is unable to provide replacement
and repair is not commercially practicable and cannot be made
within the time for performance, or unless the consumer is
willing to accept the refund.
5. If the product or one of its component parts contains a defect
or malfunction, after a reasonable number of attempts by the
Warrantor to remedy the defects or malfunctions, the consumer
is entitled to either a refund or replacement of the product or
its component part or parts. Replacement of a component part
includes its free installation.
www.instantgarden.com
1-888-501-7521
22
Notes
6. The term of this warranty begins on the date of purchase of the
product by the consumer, and continues for a period of one (1)
year.
7. Failure to follow any restrictions or warnings supplied with
the product shall make this warranty null and void and of no
further effect.
8. To obtain performance of any obligation under this warranty,
the consumer must contact Mobile Farming Systems, Inc. at
970 West Foothill Blvd., Azusa, CA 91702. If you have any
questions please feel free to contact Customer Service at 1-888501-7521.
9. IMPLIED WARRANTIES, INCLUDING ANY WARRANTY
OF MERCHANTABILITY OR FITNESS FOR A PARTICULAR
PURPOSE, IMPOSED ON THE SALE OF THE INSTANT
GARDEN PRODUCT UNDER STATE LAW, ARE LIMITED
TO ONE (1) YEAR DURATION FOR THE PRODUCT AND
ANY OF ITS COMPONENT PARTS. SOME STATES DO
NOT ALLOW LIMITATIONS ON HOW LONG AN IMPLIED
WARRANTY LASTS, SO THE ABOVE LIMITATION MAY
NOT APPLY TO YOU.
10.THE WARRANTOR SHALL NOT BE LIABLE FOR ANY
INCIDENTAL OR CONSEQUENTIAL DAMAGES ARISING
OUT OF THE USE OR OWNERSHIP OF THE INSTANT
GARDEN PRODUCT. SOME STATES DO NOT ALLOW
THE EXCLUSION OR LIMITATION OF INCIDENTAL OR
CONSEQUENTIAL DAMAGES, SO THE ABOVE LIMITATION OR EXCLUSION MAY NOT APPLY TO YOU.
11.This warranty gives you specific legal rights, and you may also
have other rights that vary from State to State.
23
www.instantgarden.com
1-888-501-7521
24
970 West Foothill Blvd.
Azusa, CA 91702
1-888-501-7521
www.instantgarden.com