1
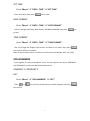
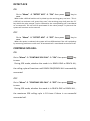
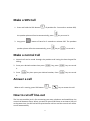
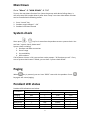
User Manual SOS PENDANT PHONE WITH MAN DOWN PENDANT Overview 1 Contents of the PENDANT Kit: Pendant Base Unit AC Adapter Lanyard Phone Cord 2 Connecting the Base Unit Installing the backup Batteries (optional) 3 Pendant charging Note: charge pendant for at least 12 hours before first use. Navigating in the Menu 1. Press 2. Press 3. Press key in standby mode to go to the main menu. or key in the main menu to select the desired menu. key takes you back to the previous menu from any menu, long press this key can return to standby screen directly. 4. Press key make a call and accept call. Press to cancel the call. Switching the device ON/OFF A. Press and hold key for 6 seconds on the front of the pendant to switch on. You can hear “power on” or “power off”. B. Put the pendant on the base for 6 seconds, the pendant can switch on automatically. You can hear “power on”. Menu DATE + TIME SET DATE Go to “Menu” “DATE + TIME” “SET DATE”. Enter date value then press key to save. 4 SET TIME Go to “Menu” “DATE + TIME” “SET TIME”. Enter time value then press key to save. DATE FORMAT Go to “Menu” “DATE + TIME” “DATE FORMAT”. You can change the display date format: DD-MM or MM-DD then press key to save. TIME FORMAT Go to “Menu” “DATE + TIME” “TIME FORMAT”. You can change the display time format: 24 Hours or 12 Hours then press key to save, default is 24 Hours. Note: If you set date format is 12 Hours, on idle screen will display “AM” and “PM”. SOS NUMBERS If you register for the two pendants, there are two options can select (PENDANT1 and PENDANT 2), select your desired pendant to set. PENDANT 1 / PENDANT 2 LIST Go to “Menu” “SOS NUMBERS” “LIST”. Press or key until the desired phone number appears and press key to view. 5 EDIT Go to “Menu” “SOS NUMBERS” “EDIT”. You can save 3 SOS call numbers. These numbers, previously saved in order of sequence, will be automatically dialed in an emergency when you pressed “SOS key”. Press or key until the desired SOS call number appears, then enter correct phone number and press key to save. DELETE ALL Go to “Menu” “SOS NUMBERS” “DELETE ALL”. You can delete all SOS call numbers, when you press this, “CONFIRM?” appears, press key to delete. If all SOS numbers are deleted, “SET P1 SOS” or “SET P2 SOS” will be displayed on the screen. Note: SOS NUMBERS default is “EMPTY”. SOS MODE REACH ONE Go to “Menu” “SOS MODE” “REACH ONE” then press key to save. When this option is selected, SOS call will stop when any one of the SOS calling number is successfully connected. REACH ALL Go to “Menu” “SOS MODE” “REACH ALL” then press key to save. When this option is selected, SOS call will stop when ALL the saved SOS calling number is successfully connected. 6 DETECT ACK ON Go to “Menu” “DETECT ACK” “ON” then press save. key to When make a SOS call and the call is picked up, the receiving party can hear: “This is a SOS call, to continue a call, press # key now”, the receiving party shall press the “#” key within the voice prompt 5 cycles. Otherwise, the corresponding call is considered as un-successful. The call will be terminated at the voice prompt 5 cycles and the system will continue to the next call. OFF Go to “Menu” “DETECT ACK” “OFF” then press save. key to When this option is selected, the system will not differentiate if the call is picked up by answering machine or voice mail. All answered call is considered as successful call. CONTINUE SOS CALL ON Go to “Menu” “CONTINUE SOS CALL” “ON” then press to save. key During SOS mode, whether the mode is in REACH ONE or REACH ALL, the calling cycle will continue until REACH ONE/REACH ALL is successfully connected. OFF Go to “Menu” “CONTINUE SOS CALL” “OFF” then press to save. key During SOS mode, whether the mode is in REACH ONE or REACH ALL , the maximum SOS calling cycle is 10 times if there is no successful connected call. 7 ANSWER CALL ON Go to “Menu” “ANSWER CALL” “ON” then press key to save. When this option is selected, there is incoming ring tone for the pendant and end user can press the SOS HELP Key to pick up any incoming call. OFF Go to “Menu” “ANSWER CALL” “OFF” then press key to save. When this option is selected, there is no incoming ring tone for the pendant. PILL ALARM If you register for the two pendants, there are two options can select (PENDANT1 and PENDANT 2), select your desired pendant to set. PENDANT 1 / PENDANT 2 SET 1. Go to “Menu” “PILL ALARM” “SET” “START” Enter you desired time and press key to save. 2. Go to “Menu” “PILL ALARM” “SET” “DURATION” Enter you desired duration time and press key to save. 3. Go to “Menu” “PILL ALARM” “SET” “TIMES/DAY” Enter you desired prompt times and press key to save. 4. Go to “Menu” “PILL ALARM” “SET” “REPEAT” You can select turn on or turn off this function then press key to confirm. This is an alarm reminder for taking medication. For example, if you set “Start at 9am, Duration is 4 hours, 4 times/day, Repeat is ON”, then you will hear the voice prompt “Please take medication now” at 9am, 1pm,5pm,9pm. Since Repeat is ON, so this alarm will be repeated every day. End user can press key to cancel the announced pills alarm. 8 CLEAR 1. Go to “Menu” “PILL ALARM” “CLEAR” Press key to confirm it, you can clear the alarm all of your settings. ALARM If you register for the two pendants, there are two options can select (PENDANT1 and PENDANT 2), select your desired pendant to set. PENDANT 1 / PENDANT 2 SET 1. Go to “Menu” “ALARM” “SET”. Enter desired alarm time and press you can press key to save. When the pendant is alarm, key to cancel it. CLEAR 1. Go to “Menu” “ALARM” “CLEAR”. In this menu, you can press key to clear you settings of alarm. When the settings alarm time come, you can hear beep sound from the pendant, press key can stop the alarm. If you don’t press key to cancel the alarm, after about 5 minutes the alarm will repeat, total 5 times. LANGUAGE Go to “Menu” “LANGUAGE” There are 3 languages you can select. Press language and press key to confirm. 9 or key to select desired DEFAULT 1. Go to “Menu” “DEFAULT” This function can restore factory settings, excluding date/time setting and SOS help number/Alarm/Pill Alarm. “CONFIRM?” appears, Press key to confirm. REGISTRATION REGISTER 1. Go to “Menu” “REGISTRATION” “REGISTER” press key, the base screen display “PLEASE WAIT…”, at the same time you should press and hold + key for 3 seconds and you can hear ‘beep” tone, after a few seconds you can see “SUCCESS” on screen and you can hear “beep” tone. If register is failed, the base screen will display “failed”, you can register again. DEREGISTER 1. Go to “Menu” “DEREGISTER” Press key to deregister, the base screen display “PLEASE WAIT…” , after a few seconds, you can see “PLS REGISTER” on base screen. If deregister is failed, the base screen will display “failed”, you can deregister again. Note: In normal mode, please do not long press the “ + key”, because it will make the pendant not work properly. This action is only use for register menu. 10 Make a SOS Call 1. Press and hold the SOS button of pendant for 2 seconds to activate SOS, the speaker phone will active automatically, press 2. Long press key to cancel it. button of base for 2 seconds to activate SOS. The pendant speaker phone will active automatically, press key or to cancel it. Make a normal Call 1. Normal call can be made through the pendant and having the base keypad for dialing. 2. Press your desired number then press key, press key can cancel key then press your desired number, Press key can cancel it. 3. Press it. Answer a call When a call is coming, press SOS button or key to answer the call. How to cut off line-out The line-out modular jack is for connecting your own telephone and establishes the normal call between them. When you want to press SOS button to activate a SOS call at the same time, the SOS call will be prioritized to call out and the normal call will be cut off automatically. 11 Man Down Go to “Menu” “MAN DOWN” “ON” Turn on the man down function first. Once the person with device falling down, it will call preset SOS number directly after have “beep” ten times. Man down function can be cancelled with following action: 1. Press “cancel” key 2. Pendant angel changed >30° 3. Pendant have been moved System check Short press + key for 1 second on the pendant to start system check. You can hear “system check, please wait”. System check including: 1. Pendant and Base connection 2. Out of range 3. line availability 4. SOS numbers If all of above 4 items is OK, you can hear voice prompt: “All functions are ok”. If any one of system check items is failed, you can hear “system check failed”. Paging When key is pressed, you can hear “BEEP” tone with the pendant. Press key again will cancel paging. Pendant LED status Pendant LED indications see below: Conditions Charging Full charge Low power Make a call Out of range Page Pendant BATTERY LED Red Green Red / Red Red pendant RANGE LED / / / Red / / 12 Turn On 1 sec Always 0.5 sec Always 0.5 sec 0.5 sec Turn Off 1 sec / 2 sec / 2 sec 0.5 sec Back up battery charging indication: If there is no back up battery installed, there shall be no icon on the base LCD. If there is back up battery installed, Battery icon on the base LCD will scroll during charging. If the backup battery full charged, battery icon on the base LCD will become full. SERVICE According to FCC regulation. This equipment which has been certified and registered by the FCC, may only be repaired by authorized person, the FCC certification may be voided. Should you encounter any problems, please call the FUTURE CALL LLC. Toll-free Customer Hotline for assistance: 1-888-934-CALL (2255) Monday - Friday between the hours of 9:00 am - 6:00 pm PST For general inquires, you can e-mail to [email protected] or visit our website at www.future-call.com FOR WARRANTY AND OUT-OF WARRANTY SERVICE: You may call our toll-free hot line on 1-888-934-CALL (2255) 9 AM-6 PM PST or E-mail to [email protected] QUESTIONS? STOP...doesn’t take unit back to the store. LOOK...for the toll-free “help” telephone number. LISTEN... as our experts talk you through the problem. LIMITED WARRANTY AND SERVICE Warrants this product to be free from defective materials or factory workmanship and will replace or repair this unit or any part thereof, except batteries, if it proves to be defective in normal use or service within 180 days from date of original purchase. Our obligation under this warranty is the repair or replacement of the defective instrument or any part thereof, except batteries. This warranty will be considered void if unit is tampered with, improperly serviced, or subjected to misuse, negligence or accidental damage. There are no other express warranties other than those stated herein. This warranty gives you specific legal rights, and you may also have other rights which vary from state to state. TO OBTAIN SERVICE PLEASE E-MAIL US ON [email protected] OR CALL +1 (415) 7120584 (IF THE UNIT IS UNDER WARRANTY PROOF OF PURCHASE MUST BE PROVEN 13