1
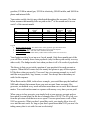
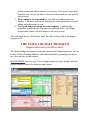
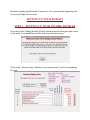
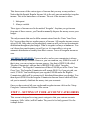
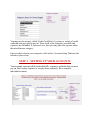
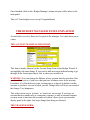
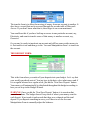
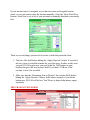
Family Budget - User Manual Created by Greg Baker Requirements: Mircosoft Access 2003 or above Index Introduction and Overview Page 3 Page 4 Page 6 The Need for a Good Budget Understanding the Theory of Your Budget Family Budget Main Manager Overview Setting Up Your Budget – The Budget Setup Wizard Page 8 Page 9 Page 10 Page 12 Step 1 – Setting up your Income Step 2 – Setting up your categories Step 3 – Setting up your accounts Step 4 – Setting up your budget Budget Manager Panel Page 14 Page 14 Page 15 Page 16 Page 18 Page 18 The Account Manipulation Form The Transfer Form The Deposit Form The Transaction Form The Account Display Form The Buttons on the Right Side Page 19 Page 20 Troubleshooting tips For the Advance User of Microsoft Access and Visual Basic Establishing a Good Home Budget THE NEED FOR A GOOD BUDGET One of the major causes of divorce is bad money habits. Finances are a difficult thing for many people to manage properly. Mismanagement has caused communication difficulties, tension, frustration, anger, resentment, and suspicion. Money has ruined friendships and debt has slain dreams and mired people in desperation. For most of these people a simple understanding of the basics of budgeting would have saved them much anguish and grief. This manual is meant to help you understand the practical theory behind having a good budget. Most digital budget programs on the market today are actually nothing more than glorified check registers. They don‘t actually focus on the budgeting aspect properly. To have a good budget you need these things: 1. The ability to pay for all your expenses with what you make. In other words, your expenses cannot exceed your income. If this is not true for you, you need to cut back on your spending! 2. The character to let the budget be your boss. You must obey the budget! 3. Knowledge of the monthly average of every bill and every expense within a normal calendar year. Keep ALL your receipts for up to 5 years! 4. Common sense in regards to money. 5. And a strong desire to get your finances on the right track. UNDERSTANDING THE THEORY OF A GOOD BUDGET This is not by any means the only way to do a budget. It is however, the simplest and, in my opinion, the most effective. Here is the basic theory of budgeting. Imagine having a separate bank account for every bill you had. And for the sake of argument, let‘s say you get paid weekly at $400.00 a week. Each time you get paid, you would deposit a portion of that paycheck throughout ALL your bank accounts. You would put, perhaps, a $100.00 in rent, $100.00 in Groceries, $50.00 in gasoline, $25.00 in natural gas, $25.00 in electricity, $40.00 in tithe, and $60.00 in phone and internet bills. Your entire weekly check is now distributed throughout the accounts. The chart below assumes that monthly bills are paid on the 1st of the month and it is now week 3 of the current month. Account / Expense Rent Groceries Natural Gas Electricity Tithe Phone / Internet Legend: Weekly Budgeted Amount $100 $100 $25 $25 $40 $60 Actual Expense / Bill $400 $100 $100 $100 $40 $240 Paid Weekly / Monthly Monthly Weekly Monthly Monthly Weekly Monthly Current Amount $300 $102 $75 $75 $40 $180 Weekly budgeted amount - how much of the weekly paycheck goes into that account. Actual Expenses – Is how much you actually have to pay to pay the expense. Paid Weekly / Monthly – Just tells us how often the bill is paid. Current Amount – Is how much money resides in the account (in this case on week 3). Your budget needs to be set up on a 4 week month. Only three months out of the year will there actually be an extra paycheck (only for those paid weekly or every other week). The budget works best when you base it off of 4 weeks of paychecks. The theory is that you set aside a portion of your paycheck for each account or expense. When the bill comes due, the money has grown to pay off the expense. It‘ll be there when you need it. You won‘t have to scrounge around, try to stall until the next paycheck, beg, borrow, or steal. You always have the money set aside for the expense. When Rent reaches $400, in the above example, you would then pay the landlord $400 and subtract that amount from your rent account. Some accounts, like groceries, are debited every week and often more than once a week. But it doesn‘t matter. You credit each account or expense with money every time you are paid. When you go to buy groceries you simply look at your grocery account and see how much you can spend. In the above example there is $102. The $2 is left over from the previous week that was never spent. You can spend some or all of that $102 on groceries. What you don‘t spend this week, you simply allow it to roll over into the next week. As long as you don‘t spend more than $102 you won‘t be taking money that is set aside for rent or electricity! Doing your budget this way tells you how much money you can spend in that category or expense. This keeps you from overspending and from taking money that needs to be set aside for another use in the future. Step 1 – List every expense and debt you have. Step 2 – Break them into categories, like Home and Household, Utilities, Vehicle, and so on. Step 3 – Determine how much money you need for that expense on a monthly, 4 week, average. Some expenses, like natural gas, vary depending on the season. Take the average of an entire year and use that amount for your monthly budget. Step 4 – Determine how much of your weekly paycheck needs to go into each account so that by the time the bill is due, you can pay it off (usually ¼ of the amount due). Step 5 – Every time you get paid, take ¼ of the monthly amount needed and add it to each account. Step 6 – Never spend more than is actually in the account. Always look at your budget to know how much you can spend in each area. Step 7 – Subtract any payments or receipts from the appropriate categories every day you spend money. Step 8 – Repeat steps 5-7. A budget isn‘t a complex thing, but it does take discipline. You must let that budget become your boss. You must let it tell you if you can or cannot spend a certain amount of money. You see, you don‘t actually open up a separate checking account for each bill. Instead you keep track of it either on paper or digitally. When you add up all the money in all of your accounts the total should equal what you have in your checking account. There are 4 ways you can keep track of your budget accounts. 1. In envelopes. Use 1 envelope for every expense or account. Each week cash your check and divide the money up into your various envelopes. When you need money for, say gasoline, you open that envelope and see how much you can spend. 2. On paper, like a spreadsheet. You designate a page for each account, bill, or expense. You then draw columns. Start with how much you have in that account and add or subtract as necessary. Your money stays in the bank this way, but you are able to clearly see how much you can spend in each account. 3. On a computer via a spreadsheet. You follow a similar method as number 2. But here, you can use calculations of the spreadsheet to do the adding and subtracting for you. 4. Use a good budget program for your computer. A good budget program automates most of this process explained above. The budget program that comes with this manual is one such system. That‘s the basic theory. With that in mind, let‘s take a closer look at the budget program itself. THE FAMILY BUDGET PROGRAM Requires Mircosoft Access 2003 or Above The Family Budget is designed to automate much of the budgeting process for you. It does all the calculating, addition, and subtraction while presenting your money in a clear and easy to find manner. SUGGESTION: Create a copy of your budget program to play around with until you are familiar with all the functions and features. The main panel consists of 5 areas: 1. Account Manipulation Form (yellow) Manipulate accounts directly Change account balances directly Add new accounts Activate and Inactivate accounts to show or not show on the Account Display Screen. 2. Transfer Form (blue) Transfer money from one account to another account. Transfer excess money from one account into a needy account 3. Deposit Form (green) Deposit money from a Regular Income Source automatically. Distributes money according a pre-planned budget setup (See Budget Setup Wizard Button or Change/Edit Budget Button) Deposit money from a Regular Income Source manually by clicking the ‗Extra Paycheck‘ check box (not shown in screenshot above). Deposit money from an Irregular Income Source manually through all your accounts. 4. Transaction Form (red) Enter receipts from your daily expenditures to subtract those expenses from your accounts. Debit individual credit card transactions Debit hand written checks Debit automatic bank withdrawals Debit ATM or Cash withdrawals 5. Account Display Screen (brown) See all active accounts and account balances See total balance of all accounts Use to see how much you can spend in each account This manager panel is where you will do most of all that you do in your accounts. If your income sources change then you‘ll need to click on the See/Adjust Income Button. Which means you may need to adjust your Budget for your regular income as well. But that is getting slightly ahead of ourselves. Let‘s start from the beginning and set up your budget from scratch. SETTING UP YOUR BUDGET STEP 1 – SETTING UP YOUR INCOME SOURCES First click on the ‗Budget Startup Wizard‘ button located in the upper right corner of the panel. You should then see the following welcome screen: Click on the ‗Income Setup‘ Button to set up your income. You‘ll see something like this: This shows some of the various types of income that you may or may not have. Notice that the Sample Regular Income Job is the only one not marked as irregular income. This is the main source of income. The rest of the income is either: 1. Infrequent 2. Always variable These types of income need to be marked ‗Irregular‘. Anytime you get income from one of these sources, you‘ll need to manually disperse the money across your budget. The only accounts that need a dollar amount entered into the ‗Enter Your Gross Pay‘ box are those that are regular sources of income. All irregular income sources stay at $0.00. Only what you can absolutely count on will you set up for automatic distribution throughout your budget. What is irregular is always an unknown. You can‘t know how much money you will get, so it is impossible to set up an automatic distribution of money from those sources. Leave all irregular income as zero. ALTERNATE SENERIO: You are in sales, and so your commission is always different and always variable. However, you can count on, say, $500.00 a week. If that is true, you can set up two income sources. One that is REGULAR called, ‗Regular Commission‘ and one that is IRREGULAR called: ‗Irregular Commission‘. The Regular Commission will have $500.00 put in the ‗Enter Your Gross‘ box. The Irregular Commission will remain $0.00. So if you get paid, one week, $750.00. You would deposit your regular $500.00 under the Regular Commission which will be automatically distributed throughout your budget. You then deposit $250.00 in the Irregular Commission Income source which will then ask you to manually distribute the money into your accounts. Once you have entered all your regular and irregular income click on the ‗Setup Categories‘ button at the bottom of the screen. STEP 2 – SETTING UP YOUR ACCOUNT CATEGORIES This screen is designed to set up generic categories that your various accounts (expenses / bills / debts) will fall under. They need to be fairly general. See the example below: You may need a category called ‗Credit Card Debt‘ if you have a variety of credit cards that you are trying to pay off. Enter in all of the categories your bills and expenses can fall under. If you aren‘t sure, then you may place the expense under the miscellaneous category. Once you have chosen your categories, click on the ‗Accounts Setup‘ Button at the bottom of your screen. STEP 3 – SETTING UP YOUR ACCOUNTS Your accounts represent all the individual bills, expenses, and debts that you must pay on. Don‘t merge expenses if you pay them separately. Have complete individual accounts. This form is essentially the same yellow account manipulation form that you saw on your main panel. This form will allow you to create, delete, change, and set the balance of each account. Choose a name such as ‗mortgage‘, choose the category to associate it with such as ‗Home and Household‘, write a description if you desire, and set the current balance. WARNING: Setting the balance here is necessary, but don‘t get in the habit of doing this after the budget is completely set up. The balance needs to be as close to the amount that should be there according to when the bill or payment is due. For example, if it is week 2 of the current month (out of 4 weeks) and your mortgage is $400.00 payable on the first of next month, the ideal starting balance would then be $200.00. WARNING: When you first set up your budget you are very likely not going to have the correct balances in each account that you need. This is because you have been living from paycheck to paycheck. It will take around 2 months of penny pinching to get all your accounts to where they need to be. When your budget is done right, you‘ll actually have about a month‘s reserve of money all the time. So for the first couple of months you need to save as much money as you can from extraneous, or variable accounts so you can build your essential accounts to the levels they ought to be. Make sure you click the ‗Add/Save Account‘ button to save the information of your account. This will be important if you change the information later. If you don‘t click the button, your changes will not be saved. Once you have all your accounts set up with their current balance, you need to double check that the sum of all the accounts equals the balance of your checking accounts (minus all checks and transactions that may not have cleared your bank, and add any deposits that may not have shown up on your statement). WARNING: If you don‘t make sure that the total sum of your accounts equals what you really have in your checking or savings accounts, you will very likely overspend. We all know how expensive it is to accumulate overdraft fees. Once done, click the ‗Budget Setup‘ button at the bottom of the screen. STEP 4 – SETTING UP YOUR BUDGET The budget is where you tell the system where your money is going from your regular income sources only. Here is a sample of what it looks like: The Budget Setup displays your accounts by category. Let‘s breakdown the screen starting with the Natural Gas account at the top of the list: 1. Determine if Natural Gas is paid weekly, monthly, or yearly. Check the appropriate box. 2. Put the amount budgeted in the Allotted Amount Box. Natural Gas is a variable expense. Here, we have calculated the average over an entire year and put $54.24. During the summer months this is much more than needed. But the excess just adds up so that in the winter months we have the extra to make the payments. 3. Chose which Regular Income Source to draw the money from. If you have more than one Regular Income Source, remember that you can only chose one of them for each account. You can‘t split income up between two sources for one account. Not with this budget anyway. 4. The last three boxes are filled out automatically. They show how much of your weekly paycheck goes into that account, shows the monthly amount allotted, and also the yearly amount (for your information). The ‗Regular Monthly Income Box‘ to the bottom right: 1. Shows ALL sources of Regular income. 2. Shows how much CAN BE budgeted for that source. 3. Shows how much HAS BEEN budgeted so far that source. TROUBLE SHOOTING: If for some reason a dialog box appears telling you that you have exceeded the income amount for that source—but you haven‘t. Ignore it. It‘s a glitch reported by several people and I have no idea what is causing it. As long as you get the numbers to match, you‘re fine. Then the three boxes at the bottom and to the left: Blue, Red and Green. The Blue Box – Shows the total monthly income needed for the category viewed. In this case, for Utilities, we need to come up with $270.24 a month to pay all the utilities. The Red Box – Shows the total monthly income needed for ALL categories. With this number, you are trying to match the total value for all your regular income sources. Once you have distributed your income through all your accounts, this number should equal the sum of all your regular income sources The Green Box – Shows how much more of your regular income (all combined) you need to budget. This number needs to be at zero to complete your budget. WARNING: If the green box does not get to zero, you have not budget ALL your income. This will create havoc with your budget. You‘ll always seem to lose money when you compare your budget to your checking accounts. If you have excess then praise the Lord! And go back and create a personal account to put all the extra money into. Once finished, click on the ‗Budget Manager‘ button and you will be taken to the main panel. That‘s it! Your budget is now set up! Congratulations! THE BUDGET MANAGER PANEL EXPLAINED As said in the overview, there are five parts to the manager. Let‘s take them one at a time. THE ACCOUNT MANIPULATION FORM: This form is nearly identical to the Account Setup Form in the Budget Wizard. It accomplishes the same things. If you need to add an account without having to go through all the former procedures, this is where you would do it. WARNING: You can change the Balance of any account directly from here. But you should only do so if you know that you have a balance error in the account. Even then, it is often better to create a transaction or a deposit to balance out the account so you have a record of what you did. Doing it here will leave no record of the change. Very dangerous. This is the easiest way to ‗activate‘ or ‗inactivate‘ an account. If you have an account that was meant only as a temporary expense, or only a seasonal expense, you may want to inactivate the account so it doesn‘t show up on your account display panel to the right. Just keeps things from being so cluttered. THE TRANSFER FORM: The transfer form is to allow the moving of money from one account to another. It does leave a record that can be accessed through the records table of Mircosoft Access. If you don‘t know what that is, then forget it was even mentioned. You would use this if you have built up an excess in one particular account, say, Electricity, and want to transfer some of that money to another account, say, Groceries. Or you may be ready to inactivate an account and still has some residue money in it. Just transfer it out and then go to the ‗Account Manipulation Form‘ to inactivate the account. THE DEPOSIT FORM: This is the form where you make all your deposits into your budget. Let‘s say that your weekly paycheck arrived. You just type in the date, select what source and if it is a regular income for a regular week, just hit the ‗New/Save Deposit‘ button. Your money will automatically be distributed throughout the budget according to how you set it up in the Budget Wizard. WARNING: Once you hit the ‗New/Save Deposit‘ button, it is an action that cannot be undone. The budget doesn‘t keep track of where your money went for each deposit. It just sends it and records that there was a deposit and the total deposit. If you deposit something in error, you‘ll have to use the Account Manipulation Form to manually adjust the balances. If your income source is irregular, or you have an extra week regular income check, or you just want to enter the income manually, select the ‗Extra Week Reg Income‘ check box to see a list of your accounts to manually distribute your money into. There are several things you need to be aware of with this particular form: 1. Tab out of the field before hitting the ‗Apply Deposits‘ button. If you don‘t tab out, it won‘t record the amount for your last entry. In other words, once you put $125.00 in groceries you need to hit the TAB button on your keyboard to go to the next account field. If you don‘t TAB out of the account, it won‘t be recorded. 2. Make sure that the ‗Remaining Amt to Deposit‘ line reaches $0.00 before hitting the ‗Apply Deposits‘ button. In the above example, if you hit the button now, $415.00 will be lost. You‘ll have to deposit that money again separately. THE TRANSACTION FORM: This is where you will enter in all your receipts, checks, credit card purchase, automatic withdrawals, cash withdrawals, and so forth. 1. Type of Withdrawal – Since everyone‘s withdrawal types will be different, this will be blank at first. You need to TYPE it in! The type will be displayed as an option the next time you enter a withdrawal transaction. 2. Check Number – Is where you enter in the check number of a written check. This box will be inaccessible unless you specify ‗Check‘ in the Withdrawal Type box. WARNING: If you write a check you MUST specify ‗Check‘ for the Check Number box to be activated so that you may enter the check number. 3. Date – Enter in the date of the withdrawal, not necessarily the current date. 4. Pay to the Order of – Type in the merchant or creditor‘s name. In the future, you will find that this box will pre-fill itself as you type. Or you can select from a drop down menu. 5. Amount – Enter the amount of the transaction 6. Budget Category – Select the appropriate category. This is required. 7. Budget Account – Select the appropriate account to debit. This is required. 8. Spent By (Intl) – The initials of whoever performed the transaction. This is optional and only important if you are interested in tracking who is spending money where. 9. Memo – Write down details of the transaction. This is optional but recommended any time the transaction doesn‘t make clear what you purchased or paid for. 10. Transaction Has Cleared (check box) – This is inaccessible on this form. To clear this transaction you will need to click the ‗Clear Transaction‘ button on the far right. 11. New/Save Transaction (button) – Must be clicked to actually save the transaction. When clicked, the amount for this transaction will automatically be deducted from the specified account for you. This is a reversible action. You can delete or change the amount and the account will be debited or credited as needed automatically. 12. Delete Transaction (button) – Allows you to delete the transaction if you need to. Say you accidently created a duplicate transaction and need to delete one of them. Hit this button and the amount that was previously debited will then be credited back to the account. THE ACCOUNT DISPLAY FORM: This form merely displays all your ACTIVE accounts, balances, and a grand total at the bottom. The Accounts Total amount should be equal to your bank account balance. If they are not, you have an error somewhere. BUTTONS ON THE RIGHT SIDE: 1. Budget Setup Wizard – To setup the initial budget. 2. See/Adjust Income – To change or add regular or irregular income sources. 3. Add/Edit Categories – To change, add, or delete categories for accounts. 4. Change/Edit Budget – To alter how your regular income is distributed. 5. Clear Deposits – To assist in balancing your budget with your bank statements. 6. Clear Transactions – To assist in balancing your budget with your bank statements. 7. Spending Reports – Detailed and customized reports for your transactions. 8. Income Reports – Detailed and customized reports for your deposits. 9. Run Calculator – Runs the calculator. TROUBLESHOOTING 1. LOADING ERROR - If the program loads up into Access with an error and asks you to Debug. Don‘t. This is because you have most likely deleted information that the program assumes is there. Simply set your budget up from the Setup Wizard and this problem will go away. 2. ‘MISSING REFERENCE’ Error - If, for some strange reason, you get an error that says: ―Missing References‖, this is due to different libraries that Access needs. To solve this problem follow this procedure: - Right click on the Budget Manager Form and select ‗Design View‘. There is usually a button on the menu that allows for this as well. - Find and click on ‗View Code‘. This will bring up a separate window with Visual Basic for Application encoding. - Click on Tools. - Click on References. - Unclick any checked box that is immediately followed by a ‗MISSING:‘ notation. - Click save. - Close out all Access windows and reload. 3. EXCEEDED INCOME ERROR - When you are setting up your budget, occasionally an error appears telling you that you have exceeded the income amount for that source—but you know you haven‘t. Ignore it. It‘s a glitch reported by several people and I have no idea what is causing it. As long as you get the numbers to match, you‘re fine. 4. OFF BY A FEW CENTS - You may notice when you attempt to reconcile your Budget Program with your bank statements that you are always a few cents off. This is due to the rounding features in some of the coding. This may or may not be true to you. 5. CONVERTING TO NEW VERSION ERROR – For some reason converting the database to the newest version may produce a fatal error. I haven‘t had time to figure out why. So I suggest you don‘t do that. There is no need to save the information separately. Everything can be done directly from the forms. Only direct manipulation of the forms, reports, and tables require saving. See advance users. FOR THE ADVANCE USER FAMILIAR WITH MICROSOFT ACCESS WARNING: A knowledge of Mircosoft Access and Visual Basic for Applications is necessary to understand the following section. If you are at all unsure, please don‘t attempt any of the procedures listed! WARNING: Doing any of the following can do irreparable damage to your budget database. Please make a copy or a backup. This being a Microsoft Database, it is possible to fully customize it to your liking. You can alter forms, create more reports, create new tables, and redesign the layout. To manipulate any of the layout design, forms, tables, and reports hit F11. To manipulate any of the coding click on the ‗View Code‘ in the Design View of the particular Form you are trying to manipulate. Many of the reports depend upon information sent from a reports popup form. Any manipulation of either the report or the popup form can destroy the relationship between the two. Adding new reports to the popup form requires that you add coding to your report to receive information from the popup. Use established reports for a guide. This will give you some idea of what you can do. Enjoy. And God bless all of you!