1
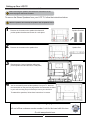
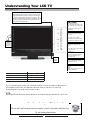
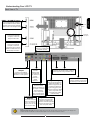
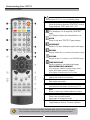
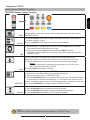
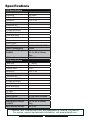
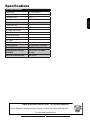
™
Manual LCD Television
Questions? Need some help?
This manual should help you understand your new product.
If you have questions, call our helpline number found on the
insert with this icon:
Or visit www.polaroid.com.
TABLE OF CONTENTS
• Warnings and Precautions .........................................................1
• Introduction to Your LCD TV ........................................................................ 2
Cleaning Your LCD TV ................................................................................................... 3
Your LCD TV’s Digital Tuner .......................................................................................... 3
Package Contents .......................................................................................................... 4
Key Features ................................................................................................................... 5
• Setting Up Your LCD TV .............................................................7
How to Remove the TV Stand ....................................................................................... 7
How to Remove the Stereo Speakers .......................................................................... 8
How to Get Started ........................................................................................................ 9
• Understanding Your LCD TV ....................................................10
Front View of TV ........................................................................................................... 10
Back View of TV.............................................................................................................11
Your Remote Control ................................................................................................... 12
• Connecting Your LCD TV............................................................................. 14
Connecting Your LCD TV to A/V Devices .................................................................. 14
Connecting Your LCD TV to A/V Devices with HDMI ................................................. 15
Connecting Your LCD TV to a PC with VGA (D-Sub) ................................................ 16
Connecting Your LCD TV’s Power Cord..................................................................... 17
• Using Your LCD TV .......................................................................................... 18
Turning Your TV ON and OFF ..................................................................................... 18
How to Operate Your TV for the First Time ............................................................... 19
How to Operate the Main Menu .................................................................................. 20
How to Customise Picture Settings ........................................................................... 21
How to Customise Audio Settings ............................................................................. 22
How to Customise ARC- Aspect Ratio Control ......................................................... 23
How to Use Picture-in-Picture (PIP) Functions ......................................................... 24
How to Setup Analogue TV (ATV) ............................................................................... 25
How to Manage Your Analogue Channels.................................................................. 26
How to Setup Digital TV (DTV) .................................................................................... 27
How to Record Digital TV (DTV) Output .................................................................... 28
How to Perform Channel Scan in Digital TV (DTV) Mode ......................................... 29
How to Setup Additional DTV Features ...................................................................... 30
How to Setup “New Channel Alert”in DTV Mode ...................................................... 31
How to Use the DTV Information Banner .................................................................. 32
How to Use the EPG (Electronic Programme Guide) in DTV Mode ........................ 33
How to Manage Your Preferred Digital (DTV) Channels ........................................... 34
How to Set Your Preferences in DTV Mode ............................................................... 35
How to Use Child Lock ................................................................................................ 36
How to Use the On Timer Feature .............................................................................. 37
How to Use PC and SCART Connectivity Menu ........................................................ 38
How to View Your TV’s Information and Reset Settings ........................................... 39
How to Use the TELETEXT Functions ........................................................................ 40
Specifications ..............................................................................42
Troubleshooting ..........................................................................44
WARNINGS AND PRECAUTIONS
To prevent any injuries, use the following safety precautions during the installation, use, and
maintenance of this equipment. This equipment must not be disassembled by anyone other
than a qualified service professional.
Definition of Symbols:
Avoid risk of
electric shock.
ENGLISH
WARNING
CAUTION
Use caution.
Use these important operation
and maintenance
instructions.
Actions should
never be
performed.
Actions must be
performed as
directed.
Only use a cart
or stand
recommended
by the
manufacturer.
▪ Do not expose this equipment to rain or moisture.
▪ Do not remove the TVs back cover. Tampering with the TV cover may void your warranty.
▪ Opening or removing the TV cover may expose you to dangerous voltage and other hazards.
▪ Refer servicing to qualified service professionals. There are no user-serviceable parts inside the TV.
▪ Do not attempt to service the equipment yourself. Servicing by a qualified professional is required
when the equipment has been damaged in any way. For example, if the power cord or plug is
damaged, if liquid is spilled on the equipment, it is exposed to rain or moisture, objects fall on the
equipment, or the TV does not operate normally.
▪ Damage may result from the improper use of controls, adjustments, or procedures. Proper
procedures are explained in this user’s manual.
▪ Only use attachments and accessories specified by the manufacturer. If wall-mounting your
TV, be sure to use a VESA complaint wall-mounting kit.
▪ Always remove the power cord from the outlet before cleaning the equipment.
▪ Never use liquid or aerosol cleaners on the equipment. Clean only with a soft dry cloth.
▪ Do not place the equipment on any uneven or unstable carts, stands, tables, shelves etc.
The equipment may fall, causing serious injury and/or serious damage to the equipment itself.
▪ Handle this equipment and stable cart or stand with care. When moving this
equipment and stable cart or stand, quick stops, excessive force, and uneven
surfaces may cause them to overturn or fall.
▪ Always place the equipment on the floor or on a stable, level surface that is strong enough
to support the weight of the equipment.
▪ Use and handle the power cord with care.
▪ Unplug the equipment during lightning storms or when unused for long periods of time.
▪ Do not pull the AC power cord. Do not handle the power cord with wet hands.
▪ Do not place any heavy objects on the power cord or the equipment itself.
▪ Do not touch the power cord and antenna cable during lightning.
▪ Do not allow power cord to be walked on or pinched particularly at the plugs, outlets, and TV inputs.
▪ Never handle this equipment near water or expose it to liquid, rain, or moisture.
▪ Do not place in direct sunlight because the heat may cause damage.
▪ Do not expose equipment to extreme temperature or heat sources such as radiators, heaters, etc.
▪ Do not insert anything into the ventilation openings of your equipment. Inserting any metal or flammable objects may result to fire or electric shock.
▪ Do not block any ventilating openings. Leave an open space around the equipment.
▪ Never place the equipment on or near fabric covered surfaces or rugs, in bookcases or built-in
cabinets that may offer poor ventilation.
1
Introduction to Your LCD TV
Polaroid. Add a little colour to your life.
Since 1937, people have turned to Polaroid for their photography needs.
Today, families look to Polaroid for consumer electronics that define the
digital age: plasma and LCD TVs, portable and standard DVD players,
digital cameras, personal media players, and so much more. And while our
selection has changed, you will still receive the same friendly, helpful
service that made Polaroid an icon.
Congratulations on your new Polaroid TV purchase. To ensure your new
TV provides you with years of enjoyment, please read this guide carefully.
©2007 by
. All rights reserved.
“Polaroid” and “Polaroid and Pixel” are trademarks of Polaroid Corporation.
Changes are periodically made to this document. Changes, technical inaccuracies, and
typographic errors will be corrected in subsequent editions.
For service, support and warranty information, visit www.polaroid.com.
This product contains electrical or electronic materials. The presence of these materials may, if
not disposed of properly, have potential adverse effects on the environment and human health.
Presence of this label on the product means it should not be disposed of as unsorted waste
and must be collected separately. As a consumer, you are responsible for ensuring that this
product is disposed of properly. To find out how to properly dispose of this product, please
go to www.polaroid.com and click on “Company“ or call the customer service number for your
country listed in the instruction manual.
This TV incorporates High-Definition Multimedia Interface (HDMITM) technology.
HDMI, the HDMI logo and High-Definition Multimedia Interface are trademarks or registered
trademarks of HDMI Licensing LLC.
2
Cleaning Your LCD TV
There are no parts which can be serviced or
cleaned inside the TV’s cabinet.
Your LCD TV’s Digital Tuner
The UK is going Digital!
Find out if you already have a digital signal or when your area will switch off the old signal by
visiting:
http://www.digitaluk.co.uk/
Even if you don’t have a digital signal yet, it will be coming to you soon. In the meantime, if you
are having problems getting good reception, call our helpline customer service number. Look for
the insert with the phone icon at the bottom of this page for the service number for your area.
Questions about your TV’s features?
Call our helpline customer service number. Look for the insert with this icon:
Or visit www.polaroid.com.
3
ENGLISH
You can increase the life of your LCD display by taking the following precautions:
• Before cleaning, always disconnect the power line and all connection cables.
• Do not use any solvents, caustic or gaseous cleaning agents.
• Clean the display with a soft, lint-free cloth.
• Ensure that no water droplets remain on the screen. Water can cause permanent
discolouration.
Introduction to Your LCD TV
Package Contents
Your LCD TV package should have all of the following materials.
LCD TV
Component Video Cables
(Red, Green, Blue)
Remote Control
and
2 AAA Batteries
Composite A/V Cables
(Yellow, Red, White)
Documents
•
•
•
•
AC Power Cord*
Quick Start Guide
Worldwide Contact Insert
Warranty Card
User’s Manual
These items are all you need to set up and operate your LCD TV in its basic configuration.
*Note: The Power Cord may differ depending on country.
Make sure all of the above materials are included in the box. If you are missing
any items, please contact the Polaroid customer service department using the Polaroid
Contact insert.
4
Introduction to Your LCD TV
Key Features
Built-In Digital TV Tuner
▪ Digital Tuner gives you access to the latest broadcast technology that features digitally
crisp picture and sound.
http://www.digitaluk.co.uk/
Even if you don’t have a digital signal yet, it will be coming to you soon. In the
meantime, if you are having problems getting good reception, call our helpline
customer service number. Look for the insert with the phone icon at the bottom of this
page for the service number for your area.
Improved Digital Teletext Services (MHEG-5)
▪ Bring faster access to on-screen interactive information & services.
7-day Electronic Programme Guide
▪ Makes it easy to plan your viewing schedule.
Dual HDMI Connectivity
▪ Lets you connect multiple HD sources, bringing you the best available picture and
audio from your home entertainment center.
HD-Ready Liquid Crystal Display (LCD)
▪ Offers amazing picture quality when connected to an HD source or digital signal.
Polaroid Definia™ Video Processor with Digital Noise Reduction
▪ Increases sharpness and reduces imperfections for a pure, true-to-life picture.
3D Comb Filter with Motion Adaptation
▪ Provides intricate picture detail and realistic colour.
Picture-in-Picture (PIP)
▪ Allows you to view two programs simultaneously when connected to two A/V sources.
Questions about your TV’s features?
Call our helpline customer service number. Look for the insert with this icon:
Or visit www.polaroid.com.
5
ENGLISH
The UK is going Digital! Find out if you already have a digital signal or when your area
will switch off the old signal by visiting:
Introduction to Your LCD TV
Key Features (Continued)
Wide-Range Stereo Speakers
▪ Deliver dynamic sound with crystal clear highs and powerful bass.
Detachable Speakers with Dedicated Subwoofer Output
▪ Provide maximum flexibility and a design to fit your space and style.
Automatic Volume Control Option
▪ Reduces volume increases during commercial breaks.
PC Connectivity
▪ It is simple with the use of the VGA (D-sub) input.
Detachable TV Stand
▪ Easy to remove if you prefer to wall-mount your TV.
Energy Efficient Power Switch
▪ Allows you to conserve energy when the TV is not in use.
Multilingual On-Screen Display, Remote Control & Sleep Timer
▪ Features provide the convenience and functionality that you need.
Questions about your TV’s features?
Call our toll-free customer service number. Look for the insert with this icon:
Or visit www.polaroid.com.
6
Setting Up Your LCD TV
How to Remove the TV Stand from Your LCD TV
If you prefer to mount your new Polaroid TV on a wall, please reference the instructions included in the wallmounting kit (sold separately).
To mount your TV, verify what size VESA standard wall-mounting kit should be used
by looking at the Specifications page in this User’s Manual.
Only the wall-mounting kit specified should be used with your TV.
Contact a qualified technician for assistance when installing the wall-mounting kit.
ENGLISH
To remove the TV stand from your LCD TV, follow the instructions below.
1
To prevent damaging the surface of the LCD TV, place
the TV face down on a stable surface, covered by a soft cloth.
Soft Cloth
2
3
Remove the 4 screws that secure the stand to the LCD TV.
4 Screws
Remove the stand from the LCD TV and put it in a safe place.
If you would also like to remove the stereo speakers before
mounting the TV to the wall, please look at the following page
for instructions.
For Wall-Mounting: Using the instructions provided in the VESA
standard wall-mounting kit, secure the stand to the TV with all
of the screws supplied in the wall-mounting kit.
LCD TV
TV Stand
To reattach the TV stand, follow these instructions in reverse.
Need help setting up your TV?
Call our helpline customer service number. Look for the insert with this icon:
Or visit www.polaroid.com.
7
Setting up Your LCD TV
How to Remove the Stereo Speakers from Your LCD TV
Before removing the speakers, first follow the instructions on the
previous page to remove the TV stand.
To remove the Stereo Speakers from your LCD TV, follow the instructions below.
When the speakers are removed, the speakers will not produce sound.
1
2
3
4
Remove the 4 screws on the speaker brackets and
put the speaker brackets and screws in a safe place.
Speaker Brackets
Remove the 4 screws on the speaker box.
Speaker Box
Disconnect the 2 sets of speaker cables and
put the speaker box and screws in a safe place.
You’ve successfully removed the speakers from your TV. Now use
the instructions on the previous page and/or the instructions included
in your wall-mounting kit (not included) to mount your television.
To reattach the speakers, follow these instructions in reverse.
Need help setting up your TV?
Call our toll-free customer service number. Look for the insert with this icon:
Or visit www.polaroid.com.
8
Setting up Your LCD TV
How to Get Started
1
Connect your aerial lead (not supplied) to your TV or use Component or Composite video cables with Composite
2
3
Connect the supplied AC power cord to the back of your LCD TV. Then connect the other end of the AC
power cord to the wall outlet.
Insert the two supplied AAA batteries into the remote control, using the instructions below.
STEP 1
Slide the back cover down to open the battery
compartment of the remote control.
STEP 2
Insert two AAA batteries. Make sure to match the (+) and (-)
ends of the batteries to the (+) and (-) ends indicated in the
battery compartment. Slide the cover back into place.
4
Connect any other audio/video equipment to your LCD TV, using the instructions in the section entitled
“Connecting Your LCD TV” in this User’s Manual.
Questions about your remote control?
Call our helpline customer service number. Look for the insert with this icon:
Or visit www.polaroid.com.
9
ENGLISH
audio cables to connect to your cable or satellite box.
Refer to the section entitled “Connecting your LCD TV” in this User’s Manual for other methods for connecting
your LCD TV.
Understanding Your LCD TV
Front View of TV
LED
A blue indicator light comes on when the power is ON.
A purple indicator light comes on when in the standby
PC mode. A red indicator light comes on when in TV
standby mode. When the TV power is completely turned
off (using the Energy Efficient AC Power Switch), the
indicator light will also turn off.
EXIT/ARC
(Aspect Ratio Control)
Press to adjust the display mode
(I.E. Panoramic, 16:9, Zoom, etc.)
In OSD menu, press to exit the
OSD Menu.
VOLUME +/-
Press to adjust the volume up
and down.
In the OSD menu, press to
select different main-menu items
and change the values for items.
AC Power
Switch
Turns main
power ON
and OFF.
CHANNEL ▲▼
Change the channel up and
down.
In the OSD menu, press to select
a sub-menu item.
MENU
Press once to display the OSD
(On-Screen Display) menu.
Press again exit.
IR
Infrared
Receiver
SOURCE
Press to choose from different
input signal sources.
Press to turn LCD TV On or
to enter Standby.
TV Status
LED Indicator Light Status
OFF (AC Power Switch is OFF)
Off
Standby (Passive)
Red
Power ON (TV, Video, or PC Mode)
Blue
Standby (Active--only available in PC mode)
Purple
The TV Function Buttons control your TV’s basic features. You can use these to adjust the onscreen display (OSD) items, like features in the main menu or sub-menu. To use more
advanced features, you must use the remote control.
NOTE:
The Energy Efficient AC Power Switch allows you to conserve energy when the TV is not in use.
Questions about your TV’s features?
Call our toll-free customer service number. Look for the insert with this icon:
Or visit www.polaroid.com.
10
Understanding Your LCD TV
Back View of TV
Connect HD digital AV equipment
with the HDMI connector. HDMI
supports enhanced, high-definition
video and two-channel digital audio.
AC Power
Switch
D-SUB (VGA) Input
ENGLISH
HDMI 1 & HDMI 2 Inputs
AC Power
Cord Input
Connect to a Personal
Computer, or other AV
equipment with VGA.
PC AUDIO IN
Connect to a Personal
Computer, or other AV
equipment using an Audio
Cable. Provides audio for DSUB (VGA) connection.
Subwoofer Output
Connect to a Subwoofer
or Speaker System.
DIGITAL AUDIO
Output
Connect to the DIGITAL
AUDIO jack on the digital or
standard 5.1 audio system.
ANT IN
SCART 1 & SCART 2 Inputs
Connect
antenna cable
to the ANT IN
from antenna to
receive
standard or
digital
television.
Connect to the SCART output on external
video equipment using a SCART cable.
Common Interface
Component Inputs
Connect to a DVD player,
Digital Set-Top-Box, or
other A/V equipment with
component (YPbPr) A/V
inputs using green, blue,
and red component cables.
Use in conjunction with
composite audio cables
(red and white).
S-VIDEO Input
Connect to the SVIDEO and AUDIO (L/
R) outputs on external
video equipment.
Use in conjunction
with composite audio
cables (red and white).
Composite A/V
Outputs
Connect to the Composite
VIDEO and AUDIO (L/R)
inputs on AV equipment
using the yellow, red, and
white composite cables.
Common interface slot for future
use with Pay-to-View Channels.
Composite A/V Inputs
Connect to the Composite
VIDEO and AUDIO (L/R)
outputs on external equipment
video using the yellow, red, and
white composite cables.
NOTE:
Composite Audio Out (L/R): The level of audio output cannot be changed using the volume control on your display. This
connector should be used with an external audio amplifier that can be used to control the volume.
11
Understanding Your LCD TV
Your Remote Control
1
Put the LCD TV in or out of Standby Mode
2
3
TELETEXT
Press the button to show the TELETEXT Service
Toggle between TEXT / MIX / PAT / OFF
INDEX
ATV (Analogue): Go to page100 (TELETEXT
reset)
DTV (Digital): Display info when banner is on
HOLD
Press to stop auto TELETEXT page change
INTERRUPT
Switch to TV when waiting for required text page
REVEAL
Display hidden info (i.e. solutions for puzzle or quiz)
EXPAND
Enlarge the top 1/2 or bottom 1/2 of TELETEXT page
TIME/SUB-PAGE
Press to access to your desired sub-page
RED/GREEN/YELLOW/BLUE
ATV (Analogue): Display recording setting & user
profile (Direct page access for Teletext)
DTV (Digital): Function keys for DTV mode.
4
5
CH ▲▼
Change the channel up and down
0-9
Enter digits numerically
6
VOL + and Increases and decreases volume on your TV
7
RTN
Return to previously viewed channel or source
8
MUTE
Press once to mute the audio
Press again to restore the audio
9
APC (Automatic Picture Control)
Toggle between Normal / Cinema / Dynamic.
Do not use any cleaners (porcelain, stainless steel, toilet, or oven cleaner etc.)
on the remote control beause it may result in damage to the remote control.
12
Understanding Your LCD TV
Your Remote Control (Continued)
10
ARC (Aspect Ratio Control)
In Video mode, toggle picture mode between
Auto Image / Panoramic / 16:9 / 14:9 / 4:3 / Zoom
12
13
14
15
16
17
18
◄ ►▲▼
In OSD menu (DTV or ATV), scroll through and
access menu items.
EXIT
Press to exit the OSD menu or sub-menu
MENU
Display the On-Screen Display (OSD) menu or
return to a layer of menu
SCART
Switch to SCART1 / SCART2 / SCART2 S
VIDEO
Switch to Composite / S-VIDEO / Component
TV
Select either Analogue TV or Digital TV
PC/HD
Switch to VGA / HDMI 1/ HDMI 2
SLEEP
Select a time to automatically turn off your TV. Timer
can be set 00 to 120 minutes in 10 minute intervals.
SUB-TITLE
ATV (Analogue): show information.
DTV (digital): toggle SUB-TITLE On/Off
GUIDE
ATV (Analogue): press to navigate
DTV (digital): display 7 days EPG
SOUND
Select sound according to different TV broadcasts
19
PIP ON/OFF
Enable or disable PIP viewing picture
Toggle PIP mode between PIP / OFF
POSITION
Move PIP sub-picture position
SIZE
Toggle PIP sub-picture size: Small / Middle / Large
Audio/Video Swap
Toggle A/V source between primary window & PIP
sub-window.
SOURCE ▲▼
Select PIP input source: HDMI 1/ HDMI 2 / TV / DTV /
SCART1 / SCART2 / SCART2 S / Composite /
Component / S-VIDEO
13
ENGLISH
11
In VGA (PC) mode, toggle picture mode between
16:9 / 4:3
OK
In OSD menu, setup a function or enter a sub-menu
Connecting Your LCD TV
Connecting Your LCD TV to A/V Devices
This TV offers many different options for connecting your A/V devices. Connecting your device to your TV
using higher quality video connections will bring you a better viewing experiece. The bar below shows the
best viewing options in sequence from best to basic.
ANT IN:
Antenna (Aerial) In
NOTE: Not all cables are included.
Questions about your connections or cables?
Call our toll-free customer service number. Look for the insert with this icon:
Or visit www.polaroid.com.
14
Connecting Your LCD TV
Connecting Your LCD TV to A/V Devices with HDMI
We highly recommend you use the HDMI (High Definition Multimedia Interface) input whenever possible to
receive an incredible High Definition picture. Please keep in mind, however, that not all A/V devices are
capable of this type of connection.
Make sure your external A/V devices are set to output an HDMI signal. Consult your A/V device’s User’s
Manual for instructions on how to output an HDMI signal.
HDMI CABLE
NOTES:
• HDMI cables are not included.
• No audio cable is needed with an HDMI connection.
• Either HDMI 1 or HDMI 2 can be used.
Questions about your connections or cables?
Call our toll-free customer service number. Look for the insert with this icon:
Or visit www.polaroid.com.
15
ENGLISH
For the best viewing experience, connect your TV to an HD digital cable/ satellite box, HD DVD player and/
or other HD A/V device using the HDMI connection.
Connecting Your LCD TV
Connecting Your LCD TV to PC with VGA (D-Sub)
Connect a VGA cable to the D-SUB (VGA) input on the TV and the VGA output on a PC. To also receive
sound, connect an audio cable to the PC AUDIO IN jack on the TV and AUDIO OUT jack on a PC.
NOTES:
• VGA and PC-Audio cables are not included.
Questions about your connections or cables?
Call our toll-free customer service number. Look for the insert with this icon:
Or visit www.polaroid.com.
16
Connecting Your LCD TV
Connecting Your LCD TV’s Power Cord
Connect the power cord into the AC IN located in the back of the TV and the other end to the power
outlet on the wall.
2
Turn on the AC POWER SWITCH. When the TV is plugged in and the AC power switch is turned on,
the indicator light on the front of the TV will turn red.
AC Power
Switch
Power Cord
(Power cord will vary
depending on country)
Questions about your connections or cables?
Call our toll-free customer service number. Look for the insert with this icon:
Or visit www.polaroid.com.
17
ENGLISH
1
Using Your LCD TV
Turning your TV ON and OFF
TURN ON
Once all of your connections have been made and the AC Power Switch is ON, press the
of the TV or on the remote control to turn on the TV. The indicator light will turn blue.
button on the side
BLUE
TURN OFF
When the TV is on and the AC Power Switch is turned on, press the
button on the side of the TV or on
the remote control to turn the TV off. The indicator light on the front of the TV will turn red when the TV
enters Standby mode.
Always turn the AC Power Switch off or disconnect the LCD TV from the main voltage
button on the front
when the LCD TV will not be used for a long period of time. The
panel is only used for switching the LCD TV into standby, it does not disconnect the
device from the main voltage. To completely disconnect the main voltage, please turn
off the AC Power Switch or remove the power plug from the socket.
18
Using Your LCD TV
How To Operate Your TV for the First Time
1
When you turn on your TV for the first time, the Auto Install menu will appear automatically on the
screen. Make sure your TV is connected to an aerial (antenna) cable. The Auto Install process should
take about 10 minutes to complete.
1
Press the ▲ or▼ button to highlight Country* and press OK.
2
Press the ◄ or ►button to select your Country and press OK.
3
Press the ▲ or▼ button to highlight Language** and press OK.
4
Press the ◄ or ►button to select your preferred Language and press OK.
5
Press the ▲ or▼ button to highlight Start Channel Scan and press OK to
start Channel Scan.
When the Channel Scan Progress reaches 100%, the Service Scan is
complete. The TV should now return to normal operation.
*Available Countries Include:
Austria, Belgium, Czech, Denmark, Finland, France, Germany, Great Britain, Greece, Hungary, Ireland, Italy,
Netherlands, Norway, Poland, Portugal, Slovakia, Slovenia, Spain, Sweden, Switzerland, Turkey and more.
*Available Languages Include:
English, French, German, Spanish, Italian, Finnish, Swedish, Dutch, Danish and Norwegian.
3
Select an input source using the table below.
Remote Control Button
Input Source
TV
Switch to ATV (Analogue) and DTV
(digital) modes
PC/HD
Switch to VGA/ HDMI 1/ HDMI 2 modes
VIDEO
Switch to Composite/ S-Video/
Component modes
SCART
Switch to SCART1/ SCART 2/ SCART 2S
19
ENGLISH
2
Once all of your connections have been made and the AC Power Switch has been turned on, press
the
button on the side of the TV or on the remote control to turn on the TV. The indicator light will
turn blue.
Using Your LCD TV
How to Operate the Main Menu
1
2
With the AC Power Switch turned, press the
button to turn on the LCD TV.
Press the MENU button on the remote control or on the side of the TV to display the on-screen Main Menu. Use
the ◄► buttons to select your Main Menu option.
MAIN MENU
SUB-MENU
Use the ◄► buttons on the remote control to select the
menu option icon. Use the ▲▼ buttons on remote to move
down to Sub-Menu items. Press OK to select the option.
Highlight the sub-menu item that you prefer and press OK
to select that option.
Menu Option Icon
Menu Option Name
Menu Option Name
SubMenu
Name
Sub-Menu Items
Sub-Menu Items
Instructions
Adjustment
Information
Scroll Bar
How to use the Main Menu and Sub-Menu:
1. With the power on, press MENU on the remote control.
The OSD (On-Screen Display) Main Menu will appear.
2. Press ◄ or ►to select the main menu option.
Press▼ to enter the sub menu option.
3. Press ▲or▼to select one sub-menu item.
Press OK to select.
4. Press ◄ or ► to make adjustments.
Press OK to return to select.
5. Press MENU to return to the Main Menu.
6. Press EXIT to exit the Main Menu.
NOTE:
*The Scroll Bar on the side of the OSD indicates if there are settings further up or
down the screen.
**VGA mode is best viewed with lower brightness and contrast settings.
20
Using Your LCD TV
How to Customise the Picture Settings
With the power ON, in any mode, press the SOURCE button to choose desired source.
Press MENU.
Use the ◄► buttons to select VIDEO and press ▼ button.
Use the ▲▼ buttons to highlight your desired VIDEO option. Press OK to enter the Sub-Menu.
Use the ◄► buttons to make adjustments in the adjustment bar and press OK.
Press MENU to return to the Main Menu, or press EXIT to exit the Menu.
MAIN MENU:
ADJUSTMENT BAR:
The VIDEO MENU includes the following video setting options:
BACKLIGHT
Adjust the backlight level of the screen.
CONTRAST
Control the difference between the brightest and darkest regions of the picture.
BRIGHTNESS
COLOUR
SHARPNESS
Control the overall brightness of the picture.
NOISE REDUCTION
Decrease picture “noise” or imperfections due to a weak signal. Switch to Auto/ High/
Middle/ Low/ Off. We recommend not using “High” Noise Reduction on fast-moving images.
Control the colour intensity of the picture.
Increase this setting to sharpen the edges in the picture.
Decrease this setting to soften the edges in the picture.
NOTE:
*The Scroll Bar on the side of the OSD indicates if there are settings further up or
down the screen.
**VGA mode is best viewed with lower brightness and contrast settings.
21
ENGLISH
1
2
3
4
5
6
Using Your LCD TV
How to Customise the Sound Settings
1
2
3
4
5
6
With the power ON, in any mode, press the SOURCE button to choose desired source.
Press MENU.
Use the ◄► buttons to select AUDIO and press ▼ button.
Use the ▲▼ buttons to highlight your desired AUDIO option. Press OK to enter the Sub-Menu.
Use the ◄► buttons to make adjustments in the adjustment bar and press OK.
Use MENU to return to the Main Menu, or press EXIT to exit the Menu.
MAIN MENU:
ADJUSTMENT BAR:
The AUDIO MENU includes the following audio setting options:
SURROUND MODES
Choose different audio effects for your TV.
AVC (Automatic Volume
Correction)
Automatically adjust the volume by lowering the speaker output when the volume is high
or by raising the speaker output when the volume is low. Switch to ON or OFF to enable
or disable the AVC function. Can be used to reduce unwanted volume increases during
commercial breaks.
BALANCE
EQUALIZER
Adjust the relative volume of the speakers with a multiple speaker system.
Choose your preferred Audio Scenerio. The BASS and TREBLE can only be adjusted
when EQUALIZER is set in INDIVIDUAL mode.
Neutral:
Preset original sound
Movie:
Emphasizes live sound for movies
Music:
Enhanced sound quality for music
Individual:
Customised sound mode
BASS
Control the relative intensity of lower-pitched sounds.
TREBLE
Control the relative intensity of higher-pitched sounds
22
Using Your LCD TV
How To Customise ARC - Aspect Ratio Control
Press the ARC button to change to a different picture format on the screen.
When connected to certain sources, some modes maybe unavailable.
AUTO IMAGE
4:3 NORMAL
Displays at 4:3 aspect ratio for traditional broadcasts for nonwidescreen viewing in the correct proportions. There will be
black strips on both sides of the screen.
14:9
Display 14:9 broadcasts in the correct proportions. There will
be black strips on both sides of the screen.
16:9 WIDE
Display 16:9 broadcasts in the correct proportions. Can also
expand the width of 4:3 broadcasts evenly to fill the 16:9
screen. There maybe black strips at the top and bottom or
sides of the screen.
PANORAMIC
Expand 4:3 broadcasts to fit the 16:9 screen by expanding the
image at the edges of the screen. This creates less distortion
at the centre of the screen.
ZOOM
Display broadcasts in letter box format in the correct
proportions. The top and bottom of the images are slightly
cropped.
How To Customise APC - Automatic Picture Control
Press the APC button on the remote control repeatedly to cycle through the APC settings. The button toggles
through the different screen brightness options– Normal / Cinema / Dynamic.
NORMAL
Select this mode in a normal environment
CINEMA
Select this mode in a dark environment
DYNAMIC Select this mode in a bright environment
NOTE:
In VGA (PC) sources, only the 16:9 and 4:3 formats will be available.
23
ENGLISH
In this mode, the TV can automatically select the best
aspect ratio for the broadcast.
Using Your LCD TV
How To Use Picture-in-Picture (PIP) Functions
Use these buttons on the remote control to use the PIP functions.
ON/OFF
Select a mode of the PIP mode. Press repeatedly to turn PIP ON or OFF.
POSITION
Move the sub-picture from corner to corner on the TV screen. Press repeatedly to change the POSITION.
SIZE
Select a size of the sub-picture: Small--Middle--Large. Press repeatedly to change the SIZE.
SWAP VIDEO
Interchange the picture of main source and sub source.
Interchange the voice of main source and sub source.
SOURCE ▲▼ Select a second source: HDMI / TV / DTV / SCART1 / SCART2 / SCART2 S / Composite /
Component / S-VIDEO as the sub picture.
SWAP AUDIO
NOTES:
• The LCD TV has to be connected two AV sources at least, and then PIP function can be activated.
• To change channels in PIP picture, please switch PIP picture to main picture.
PIP Mode Table
This table shows what types of
sources can work in main picture
and PIP picture. “Main” means
main source and “Sub” means
sub source. The symbol “O”
means both main source and
sub source can operate.
NICAM/A2 (IGR) Broadcast Selection
Depending on the particular program being broadcast,
you can press the SOUND button to listen to different
language sources. Under different systems, broadcast
function will show differently.
Sound A
Send the primary broadcast language to the speakers
Sound B
Send the secondary broadcast language to the speakers
Mono
Provides mono sound
Stereo
Provides stereo sound
24
Using Your LCD TV
How to Setup Analogue TV (ATV)
1
2
Press the MENU button on the remote control to display the on-screen Main Menu. Use the ◄ or ►
buttons to select Channel Options and press ▼.
Use the ▲ or ▼ buttons to highlight your desired option. Press OK to enter the Sub-Menu.
The OSD screen will vary based on different functions. Refer to the Message Bar to adjust your favourite settings.
Press OK to confirm your setting.
Press MENU to return to the previous menu, or press EXIT to exit the menu.
Channel Options:
MAIN MENU OPTION
Automatic Program Search
Search and store all available channels.
SUB-MENU OPTION
Country
Choose a county.
SUB-MENU OPTION
Start Channel Scan
Start scanning all channels.
SUB-MENU OPTION
MAIN MENU OPTION
Return
Return to previous menu.
Channel Management
Manage the channels to your own preferences.
SUB-MENU OPTION
Sort
Set the channel order according to your preference.
SUB-MENU OPTION
Delete
Delete the selected channel.
SUB-MENU OPTION
Rename
Rename the selected channel.
SUB-MENU OPTION
Add/Change
Add or fine tune a selected channel.
SUB-MENU OPTION
Return
Return to the previous menu.
Reset
You can reset all settings to their original default settings, except the scanned channels.
MAIN MENU OPTION
25
ENGLISH
3
4
5
6
With the power turned on, press the TV button to select ATV mode and enter Analogue TV mode.
Using Your LCD TV
How to Manage Your Analogue Channels: Rename, Sort, Delete
1
2
3
4
5
6
7
With the power turned on, in ATV Analogue TV mode, press TV button to select ATV mode.
Press the MENU button on the remote control to display the on-screen Main Menu. Use the ◄► buttons to
select “Channel Options” and press OK.
Use the ▲▼ buttons to highlight Channel Management and press OK to enter the edit menu.
Use the ▼ button to highlight Rename and press OK to enter the Channel Naming menu.
In the Channel Naming menu, press ▲ or▼ to select the programme that you want to rename and then press
OK to edit the name.
Press the ► button to enter the name display area (5 characters) and press ▲ or▼ to choose the characters
and then press OK to confirm.
Press MENU to return to the Main Menu, or press EXIT to exit the menu.
NOTE: To sort or delete, please select your preferred item in the sub-menu and follow above steps.
26
Using Your LCD TV
How to Setup Digital TV (DTV)
1
2
Press the MENU button on the remote control to display the on-screen Main Menu. Use the ◄► buttons to
select “Channel Options” and press ▼.
Use the ▲▼ buttons to highlight your desired option. Press OK to enter the sub-menu.
The OSD screen will vary based on different functions. Refer to the Message Bar to adjust your favourite settings.
Press OK to confirm your setting.
Press MENU to return to the previous menu, or press EXIT to exit the menu.
Channel Options:
MAIN MENU OPTION
DTV Output Recording
Record all available channels.
MAIN MENU OPTION
Channel Scan
Start scanning all channels.
SUB-MENU OPTION
Country
Choose a country.
SUB-MENU OPTION
Confirm
Scan and erase old info.
Return
Return to the previous menu.
MAIN MENU OPTION
SUB-MENU OPTION
Setup
Setup some DTV settings.
MAIN MENU OPTION
New Channel Alert
Informs you of new channels becoming available.
MAIN MENU OPTION
Reset
You can reset all settings to their original default settings, except the scanned channels.
27
ENGLISH
3
4
5
6
With the power turned on, press TV button to select DTV mode.
Using Your LCD TV
How to Record Digital TV (DTV) Output
1
2
3
4
With the power turned on, in DTV mode, press SOURCE button to choose desired source.
Press the MENU button on the remote control to display the on-screen Main Menu. Use the ◄► buttons to
select Channel Options and press ▼.
Use the ▲▼ buttons to highlight DTV Output Recording.* Press OK to enter the setting mode.
Press MENU to return to the previous menu, or press EXIT to exit the menu.
*NOTE: To use DTV recording, a video recording device must be connected to the TV in advance. This feature
locks a channel during recording for a set period of time. Only one channel may be recorded at a time.
Have questions about your TV’s menus?
Call our helpline customer service number. Look for the insert with this icon:
Or visit www.polaroid.com.
28
Using Your LCD TV
How to Perform Channel Scan in Digital TV (DTV) Mode
1
2
Press the MENU button on the remote control to display the on-screen Main Menu. Use the ◄► buttons to
select Channel Options and press ▼.
Use the ▲▼ buttons to highlight Channel Scan. Press OK to enter the sub-menu.
Press ▼ to Country and press OK.
Use the ◄► buttons to select your desired country and press OK.
Press ▼ to highlight Confirm* and press OK. If you want perform the DTV scan, press OK to start DTV scan.
Press MENU to return to the previous menu, or press EXIT to exit the menu.
*NOTE: A warning message will appear after you select “Confirm” in sub-menu.
Your previous stored information will be substituted and erased.
29
ENGLISH
3
4
5
6
7
With the power turned on, press TV button to select DTV mode.
Using Your LCD TV
How to Setup Additional DTV Features
1
2
3
4
With the power turned on, in DTV mode, press SOURCE button to choose desired source.
Press the MENU button on the remote control to display the on-screen Main Menu. Use the ◄► buttons to
select Channel Options and press ▼.
Use the ▲▼ buttons to highlight Setup. Press OK to enter the setting mode.
Press MENU to return to the previous menu, or press EXIT to exit the menu.
SETUP Options:
Banner Display Time
Adjust the display time of the banner. Switch to 3, 5, or 10 seconds.
Subtitle Language*
Choose your preferred subtitle language.
Audio Language
Choose your preferred audio language.
Signal Strength
Show the signal strength for the channel.
Software Update
Update the software. If an update is made, a message bar notifying you of the update will appear.
*NOTE: The language selection for audio and subtitles is offered according to your local broadcasters. Language selection includes: English, Gaelic Welsh, French, German, Spanish, Italian, Finnish, Swedish, Dutch, Denmark and Norway.
30
Using Your LCD TV
How to Setup “New Channel Alert” in DTV Mode
3
4
5
With the power turned on, in DTV mode, press SOURCE button to choose desired source.
Press the MENU button on the remote control to display the on-screen Main Menu. Use the ◄► buttons to
select Channel Options and press ▼.
Use the ▲▼ buttons to highlight New Channel Alert. Press OK to enter the setting mode.
Use the ◄► buttons to select ON or OFF in the message bar and press OK to confirm.
Press MENU to return to the previous menu, or press EXIT to exit the menu.
31
ENGLISH
1
2
Using Your LCD TV
How to Use the DTV Information Banner
1
2
3
With the power turned on, in DTV mode, press SOURCE button to choose desired source.
Use the CH ▲▼/ OK/ or ▲▼ buttons to display the banner.
Once the banner appears on the screen, the following options will be available:
• Use the ▲▼buttons to highlight channel in the bar. Press OK to enter the setting mode.
• Press the SUB-TITLE button to display the DTV SUBTITLE menu.
• Press the
button to display more detailed information about the selected channel.
• Press the GREEN button to display the DTV Multi-Audio menu.
• Press the YELLOW button to display the DTV Profile menu.
• Press the RED button to display the MHEG5 menu.*
*MHEG5 is only available in the UK.
1. Logical channel number
6. Now/Next status
11. MHEG indicator
2. Channel name
7. Duration of event
12. Multi-audio indicator
3. Channel status
8. Subtitle status
13. Event information indicator
4. Current time
9. User profile
14. Subtitle indicator
5. Event name
10. Encrypted channel indicator
15. Teletext indicator
32
Using Your LCD TV
How to Use the EPG (Electronic Programme Guide) in DTV Mode
EPG (Electronic Programme Guide) is only available with Digital TV. Users can research and view a list of current and
future broadcast television programmes.
With the power turned on, in DTV mode, press TV button to select DTV source.
Press the GUIDE button on the remote control to display the EPG.
When the EPG appears on the screen, the following options will be available:
• Press the GUIDE button to display the user profile.
• Use the ◄ or ► button to select service category.
• Press the BLUE button to display the theme list.
• Browse the 7-day EPG by using the numeric buttons (1-7) on the remote control.
33
ENGLISH
1
2
3
Using Your LCD TV
How to Manage Your Preferred Digital (DTV) Channels
After completing Channel Scan, follow the steps below to use the DTV Guide:
1
Press GUIDE on the remote control once to enter the EPG DTV Guide (see picture 1 below). Press again to
setup your preferred channels in DTV mode (see picture 2 below).
2
Press the RED button on the remote control to display the User Profile for editing. The maximum number of
User Profiles available is three users.
3
4
5
Press the BLUE button on the remote control to rename or edit Users Profiles (see picture 3 below).
Press the GREEN button on the remote control to enter All Channels in the right side of the DTV guide.
Use the ◄► buttons to select your favourite channels. There is no limitation to edit your preferred channel
numbers in the right side of All Channels (see picture 4).
Press the GREEN button on the remote control repeatedly to switch between User Profiles and All Channels.
Press the YELLOW button on the remote control to delete items of User Profiles.
PICTURE 1
PICTURE 2
PICTURE 3
PICTURE 4
34
Using Your LCD TV
How to Set Your Preferences in DTV Mode
1
2
Press the MENU button on the remote control to display the on-screen Main Menu. Use the ◄► buttons to
select Preferences and press ▼.
Use the ▲▼ buttons to highlight your desired option. Press OK to enter the sub-menu.
Press MENU to return to the previous menu, or press EXIT to exit the menu.
OSD IN ATV/DTV MODE
Preferences:
OSD: Make adjustments for the OSD (On-Screen Display)
OSD Sub-Menu Options:
Language
Select language for the OSD
OSD Contrast
Adjust the OSD contrast
OSD Brightness
Adjust the OSD brightness
Transparency
Adjust the OSD transparency
Return
Return to the previous menu
Child Lock: Lock some channels for protective purposes.
Change PIN: Create your own PIN.
On Timer: Turn the TV ON or OFF automatically.
Colour Mode: Adjust the colour of the picture.
Normal
Colour is natural
Warm
Colour has a reddish tint
Cool
Colour has a bluish tint
User*
Customise the colour mode
User Mode:
Colour R
Adjust the red ratio of the picture
Colour G
Adjust the green ratio of the picture
Colour B
Adjust the blue ratio of the picture
35
ENGLISH
3
4
With the power turned on, in DTV mode, press SOURCE button to choose desired source.
Using Your LCD TV
How to Use Child Lock
1
2
3
4
5
6
With the power turned on, press SOURCE button to choose desired source.
Press the MENU button on the remote control to display the on-screen Main Menu. Use the ◄ or ►
button to select Preferences and press ▼.
Use the ▲ or ▼ buttons to highlight Child Lock. Press OK to enter the Child Lock menu.
Use the ◄ ► buttons to update the current status.
Enter the PIN (Personal Identification Number) by using numeric buttons (0-9).
Press MENU to return to the previous menu, or press EXIT to exit the menu.
Setup your Child Lock preferences for the first time:
Change PIN after setting up your Child Lock
preferences:
NOTES:
• The default PIN is “0000”. Remember the new PIN code you enter because in order to create a new
code, you must enter the code that you selected.
• Follow steps 1-5 (above) to remove the child lock permanently.
• Child Lock is set or removed separately in each source.
36
Using Your LCD TV
How to Use the Timer Features
Sleep Timer Feature
1
Select a time to automatically turn off your TV. Timer can be set 00 to 120 minutes in 10 minute intervals.
On Timer Feature
1
2
3
4
5
6
With the power turned on, in DTV mode, press SOURCE button to choose desired source.
Press the MENU button on the remote control to display the on-screen Main Menu. Use the ◄► buttons to
select Preferences and press ▼.
Use the ▲▼ buttons to highlight On Timer. Press OK to enter the sub-menu.
Press ▼ highlight TV on after. Press OK to set the timer.
Enter the desired hours and minutes* by using the numeric buttons (0-9) and press OK.
Press ▼ highlight Confirm. Press OK to confirm and the TV will turn ON automatically when the time elapsed.
MAIN MENU IN ATV MODE
NOTE:
• For example, if you want to set 10 minutes for TV on after, press numeric buttons “0010” on the remote.
• If you do not do the “Confirm” in step 6, it is not completed.
• The picture of Preferences in “ATV” is different from the one in DTV. Child Lock and Change PIN are only offered in ATV
mode.
37
ENGLISH
2
With the power turned on, press the SLEEP button on your remote control.
Using Your LCD TV
How to Use PC and SCART Connectivity Menu
1
2
3
4
5
6
With the power turned on, press PC/HD button to select VGA mode.
Press the MENU button on the remote control to display the on-screen Main Menu. Use the ◄► buttons to
select Connectivity and press ▼.
Press the ▼ button to highlight PC. Press OK to enter the sub-menu.
Use the ▲▼ buttons to highlight your desired option and press OK.
Use the ◄► buttons to make adjustments and press OK.
Press MENU to return to the previous menu, or press EXIT to exit the menu.
Connectivity:
Main Menu (In any mode, except for VGA mode)
PC: The option of PC in the main menu of Connectivity only appears in
VGA mode.
Sub-Menu Options:
Auto Image
Automatically adjust picture
H Position
Adjust the horizontal position of the picture
V Position
Adjust the vertical position of the picture
Phase
Adjust the picture phase
Clock
Adjust the width of the picture
Return
Return to the main menu
Scart1 Output:
Output SCART1 signal - TV / Composite / S-VIDEO / DTV
Scart2 Output:
Output SCART2 signal - TV / Composite / S-VIDEO / DTV
Your current PC resolution and frequency appears, when PC is connected. To adjust the PC resolution, follow these steps:
1
2
Connect your PC and turn the power on.
Use ▲▼ buttons to highlight your desired option and press OK on the remote control.
Notes:
• “Wide mode selection” will appear in some specific PC resolutions of 1024x768, 1280x768, 1360x768, 640x350 & 720x400.
• Auto mode is strongly recommended.
38
Using Your LCD TV
How to View Your TV’s Information and Reset Your Settings
Information:
3
With the power turned on, in any mode, press SOURCE button to select desired source.
Press the MENU button on the remote control to display the on-screen Main Menu. Use the ◄► buttons to
select Information. You can also use the SUB-TITLE button to select Information.
Press OK, MENU, or EXIT to exit the menu.
Information:
Information Screen:
Panel Res.
Display the TV’s panel resolution
Main Source
Display the source of the main picture
Main Format
Main picture input format
Sub Source
Display the source of the sub-picture
Sub Format
Sub-picture input format
Sound Mode
Display the sound mode information
APC Mode
Display the APC mode information
ARC Mode
Display the ARC mode infor
Reset:
You can reset all of your TV’s settings to their original default settings, except scanned channels. Follow the instructions
below to reset your settings.
1
2
3
With the power turned on, in any mode, press MENU button. Use the ◄► buttons to select Channel Options.
Use ▲▼ buttons to highlight Reset and press OK when finished.
Press EXIT to exit the menu.
Reset (In Analogue ATV mode)
Reset (In Digital DTV mode)
39
ENGLISH
1
2
Using Your LCD TV
How to Use the TELETEXT Functions
TELETEXT is an information service broadcast offered by some TV stations (depending on the country) which gives upto-the-minute information, news, weather, television programs, share prices, subtitles, and so on.
This TV has 100 Teletext page number memories.
TELETEXT Operation:
1
2
With the power turned on, in any mode, select a TV station on which TELETEXT is transmitted.
Press the TELETEXT button on the remote control to display the TELETEXT screen.
Display:
Two page numbers, TV station name, date, and time are displayed on the screen’s headline. The first page
number indicates your selection and the second page number shows the current page being displayed.
3
Press TELETEXT to toggle between the following text modes: TEXT/ MIX/ PAT/ OFF.
TEXT Mode
MIX Mode
PAT Mode (Picture & Text)
TELETEXT Page Selection:
1
Enter the required TELETEXT page as a three-digit number.
Display:
The selected page number is displayed at the top left corner of the screen. The TELETEXT page counter
searches until the selected page number is located. The desired page is displayed on the screen.
2
3
Use CH▲▼ buttons or
buttons to select the preceding or following page.
Use RED/ GREEN/ YELLOW/ BLUE buttons on the remote control to perform Fastext movement.
Display:
Four subject-heading pages can be selected quickly by pressing the corresponding coloured buttons Red/ Green/
Yellow/ Blue on the remote control.
40
Using Your LCD TV
How to Use the TELETEXT Functions
TELETEXT Remote Control Functions:
ENGLISH
Press the INDEX button on the remote control to display the Index Page and the list of
INDEX TELETEXT contents.
1 Press the REVEAL button once to display concealed information, such as solutions
REVEAL
2
to riddles, puzzles, or a quiz.
Press the REVEAL button again to conceal the revealed answer.
1 While watching a TV program with TELETEXT, press the TIME button. The current
2
TIME
time information will be displayed on the screen.
The time information will disappear after pressing the TIME button again.
SUB-PAGE: Press the TIME button to stop the running Teletext page and enter your
sub-page number.
The TELETEXT page you selected may contain more information than what is
displayed on the screen; the rest of the information will be displayed on a sub-page.
1 Press the HOLD button on the remote control to stop automatic page change.
Display:
The STOP symbol will be displayed at the top left-hand corner of the screen
and the automatic page change will stop.
HOLD 2 Press the HOLD button again to continue.
In the TELETEXT mode, pressing the INTERRUPT button on the remote will switch the
screen to the TV mode while waiting for the text page you required.
1 Select required page number in TELETEXT mode.
2 Press the INTERRUPT button on the remote control to switch to TV mode while waiting
for the text page. A small blue box displaying “???” will appear in the upper left corner.
3 When required text page is found, the required page number will appear in the blue box.
INTERRUPT 4 Press the INTERRUPT button again to return to TELETEXT mode.
Double the size of the text.
1 Press the EXPAND button to enlarge the top half of the page.
2 Press the EXPAND button again to enlarge the bottom half of the page.
EXPAND 3 Press the EXPAND button again to return to the normal display.
NOTE:
On-Screen Display (OSD) adjustments are not available in TELETEXT mode.
41
Specifications
LCD Specifications
Panel Size
Brightness
Contrast Ratio
Resolution
Inputs
Composite A/V
Component (YPbPr)
S-Video with Audio
VGA (D-Sub) with Audio
HDMI with Audio
Composite A/V Output
RF Input
SCART Input
Power Source
Power Consumption
Dimensions & Weight
(HxWxD)
VESA wall-mount size
LCD Specifications
Panel Size
Brightness
Contrast Ratio
Resolution
Inputs
Composite A/V
Component (YPbPr)
S-Video with Audio
VGA (D-Sub) with Audio
HDMI with Audio
Composite A/V Output
RF Input
SCART Input
Power Source
Power Consumption
Dimensions & Weight
(HxWxD)
VESA wall-mount size
32” (80 cm)
500 cd/m2
1200:1
1366 x 768
1
1
1
1
2
1
1
2
AC 100~240V, 50/60HZ
<180W
651.5 x 828 x 240mm,
22kg
200 x 100
37” (94cm)
500 cd/m2
1000:1
1366 x 768
1
1
1
1
2
1
1
2
AC 100~240V, 50/60HZ
<190W
722.5 x 947 x 240mm,
25kg
200 x 100
“Polaroid” and “Polaroid and Pixel” are trademarks of Polaroid Corporation.
For service, support and warranty information, visit www.polaroid.com.
42
Specifications
42” (106.68cm)
500 cd/m2
1500:1
1366 x 768
1
1
1
1
2
1
1
2
AC 100~240V, 50/60HZ
<310W
816 x 1067 x 270mm,
36.1kg
638 x 310
Have questions about your TV’s specifications?
Call our helpline customer service number. Look for the insert with this icon:
Or visit www.polaroid.com.
43
ENGLISH
LCD Specifications
Panel Size
Brightness
Contrast Ratio
Resolution
Inputs
Composite A/V
Component (YPbPr)
S-Video with Audio
VGA (D-Sub) with Audio
HDMI with Audio
Composite A/V Output
RF Input
SCART Input
Power Source
Power Consumption
Dimensions & Weight
(HxWxD)
VESA wall-mount size
Troubleshooting
There is no picture or sound.
▪ Make sure the AC cord is connected
▪ Make sure AC Power Switch is turned on.
▪ Verify that there is a valid source signal.
▪ Make sure the correct input mode is selected.
There is no picture from AV.
▪ Make sure the BRIGHTNESS is properly adjusted.
▪ Make sure the video source is properly connected to desired source.
▪ Make sure the correct input mode is selected.
▪ The fluorescent lamp may have reached the end of its life. Contact an
authorized service center.
There is no sound.
▪ Make sure the volume is not set to minimum.
▪ Make sure the sound is not muted
▪ Make sure that headphones are not connected.
There is no picture or sound , just noise.
▪ The source signal may be weak.
▪ Your provider may be experiencing difficulties.
▪ Check your input connections.
Picture is not clear.
▪ The source signal may be weak.
▪ The provider may be experiencing difficulties.
▪ Check input connections.
Need help troubleshooting?
Call our helpline customer service number. Look for the insert with this icon:
Or visit www.polaroid.com.
44
Troubleshooting (Continued)
Picture is light or improperly tinted.
▪ Check the Hue, Saturation and Colour adjustments.
▪ Reset the TV to the factory default settings.
ENGLISH
The picture is too dark.
▪ Select a different APC mode.
▪ Check the Brightness of Picture Settings.
▪ The fluorescent lamp may have reached the end of its life. Contact
an authorized service center.
Remote control does not work.
▪ Install new batteries.
▪ Make sure the remote sensor window isn’t blocked.
▪ Make sure the system is in the right mode (TV, PC/HD, VIDEO,
SCART)
There are stripes on the screen or colours fade.
▪ There may be interference from other appliances. (e.g. microwave
ovens, mobile phones, etc.)
▪ There may be interference between the video source cable and
the power cable.
▪ Make sure the power and video cables are not touching.
Other Notes:
Static or other external interference may cause the LCD TV to behave abnormally. If this occurs,
unplug the power supply cord from the outlet and plug it in again.
If the problems persist, disconnect the power from the wall and the back of the TV and consult a
qualified technician.
45
Troubleshooting (Continued)
The picture is not sharp.
▪ The signal source may be weak.
▪ The provider may be experiencing difficulties.
▪ Check input connections.
▪ Check the Sharpness of Picture Settings.
The picture moves.
▪ The source signal may be weak.
▪ The provider may be experiencing difficulties.
▪ Check input connections.
The picture is doubled or tripled.
▪ The source signal may be weak.
▪ Check input connections.
The picture is spotted.
▪ There may be interference from other appliances nearby or
around the LCD TV. (e.g. microwave ovens, mobile phones,
etc.)
46
ENGLISH
Questions? Need some help?
Call our helpline number found on the insert with this icon:
Or visit www.polaroid.com.
20071024
47