1
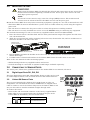
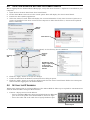
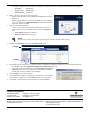
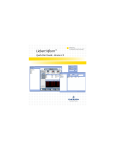
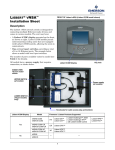
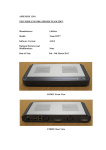
LIEBERT® RDU-S™ RACK MANAGEMENT DEVICE
Quick-Start Guide
The Liebert RDU-S is a compact rack processing unit designed to monitor the environment in electronic
equipment racks and rooms through various types of sensors and cameras. The unit can accommodate
multiple sensors, such as temperature, humidity, water, smoke, motion and door sensors. It can also be used
for remote notification such as activating a beacon light to report problems.
The compact design makes it suitable for installation in a rack, where it takes up little space, or it may be
mounted on a wall for access without opening the equipment rack.
1.0
PORTS AND INDICATORS
Figure 1 shows the front panel of the Liebert RDU-S. The ports and their functions are listed in Table 1.
Figure 1
Ports and indicators on front of unit
Ground
connector
FRONT OF UNIT
Relay
output
ports
Power
input
Table 1
RJ45 sensor
ports
Micro SD
card slot
USB ports
12VDC
output
STATUS INDICATORS
DO1 /DO2
outputs
Power
Alarm
DO1
Power
Alarm
Not Used
DO2
Run
Not Used
Not Used
Ethernet
port
Status
indicators
Run
Port descriptions
Port
#
Label
Function
Power input
1
100-240V~Input
Input power to the unit: 100-200VAC, 50 and 60Hz
Relay output ports
2
DO1, DO2
Connect to output relays 1 and 2
12VDC output
1
12V
Power to external sensor (12VDC power)
Ground connector
1
GND
12VDC ground
Micro SD card slot
1
Micro SD
Expand storage capacity with 2G, 4G or 8G Micro SD card
USB ports
2
USB1, USB2
Connect to a USB camera
Ethernet port, RJ45
1
ETH
Connect to a 10/100 Ethernet port for Web access & SNMP connectivity
Digital input ports
3
DI1, DI2, DI3
Connect digital sensors (one sensor per port)—on/off, dry contact sensors
such as smoke detectors and motion detectors
Liebert SN ports
2
RJ45 sensor ports*:
Connect Liebert SN™ sensors for temperature, humidity and other conditions
* See Section 3.0 for details on connecting sensors to RJ45 sensor ports (excluding Ethernet port).
Status Indicators
Refer to Table 2 for details on the unit’s status indicators: relay outputs, power, alarm and run.
Table 2
Indicator
Indicator descriptions
Status of:
Color
Status - Indicator On / Flashing
Status - Indicator Off
DO1, DO2
Relay outputs
Yellow
On
Relay DO1 or DO2 is closed.
Off
Relay DO1 or DO2 is open.
POWER
Input power
Green
On
Input power is present.
Off
Input power is not present.
On-Solid
Unit has a critical alarm.
Flashing
Flashing Unit has a warning alarm.
Off
No alarms detected.
Flashing
Unit is operating normally.
Off
Unit is not running.
ALARM
Alarms
Red
RUN
Unit operation
Green
1
Liebert® RDU-S™
2.0
MOUNTING THE UNIT
WARNING
!
Ensure that the Liebert RDU-S is Off and that all local and remote input power sources have
been disconnected before beginning to install the unit. Never open, alter or move the unit
while input power is present.
NOTE
All external circuits must be safety extra-low voltage (SELV) circuits. The insulation and
isolation must be enhanced between the SELV circuits and the power grid.
Mount the Liebert RDU-S securely before connecting equipment, typically in a 19" rack or mounted on a wall.
• The Liebert RDU-S must be installed near a power outlet or socket within easy reach using the supplied
power cord.
• The unit must be connected to the power outlet or socket with protective earthing terminal.
• The unit must be securely installed in a rack or on a wall BEFORE using or connecting any equipment.
For horizontal mounting in a rack, use the factory-supplied brackets and screws (M3 and M6):
1. Place the shorter side of a bracket flush with the front panel and the longer side against one side of the
unit, shown below left.
2. Align the rear bracket hole with a mounting hole on the unit, shown below left, and use an M3 screw to
fasten the bracket to the side of the unit.
Mounting hole
for rack mounting
Unit with both side
brackets attached
FRONT OF UNIT
Bracket flush with front of unit
3. Repeat Steps 1 and 2 for the bracket on the other side. The Liebert RDU-S with both brackets attached is
shown above right.
4. Use M6 screws to fasten both brackets of the Liebert RDU-S onto the rack’s front or rear rails.
Refer to the user manual for other mounting options:
• Wall mounting with factory-supplied brackets and screws
• Vertical mounting in a rack with an optional round hanger available separately.
3.0
CONNECTING TO SENSOR PORTS
For sensor ports, follow these guidelines and see the Liebert RDU-S user manual, SL-31310.
3.1
Digital Input Ports DI1, DI2, DI3
The three digital input ports DI1, DI2 and DI3, shown at right, may be used
to connect digital sensors, such as smoke detectors and motion detectors.
Digital
3.2
Liebert SN Sensor Ports
The two ports labeled with a Liebert SN icon , shown at right, are
designed for use with Liebert SN sensors. Each sensor is shipped with a
cable to connect to one of the Liebert SN ports on the Liebert RDU-S. You
may use this cable or another standard straight-through cable.
To connect the sensor:
• Insert either end of an RJ45 connector on the factory-supplied RJ45RJ45 cable (or user-supplied cable) into the Liebert SN port on the
Liebert RDU-S, identified by the icon shown below.
Icon
Description
Liebert SN
ports
Purpose
Use these ports ONLY
for Liebert SN sensors.
• Connect the other end of the cable to the sensor.
Liebert® RDU-S™
2
input
ports
DI1-3
Liebert SN ports
Connect
one end
of an RJ45
cable to a
Liebert SN
port
Connect
other end
to sensor
4.0
JAVA CONFIGURATION SETTINGS FOR LIEBERT RDU-S
Before logging into the Liebert RDU-S Web pages, verify that Java Version 1.7 Update 21 is installed on your
computer.
1.
2.
3.
4.
Open the Java Control Panel from the Control Panel.
On the Start Menu enter Java in the search option. This will display the Java Control Panel.
Launch the Java (32-bit) application.
Select the “About” button. This will display the version information. Verify that Version 7 Update 21 or
greater is installed. If the Java version on the computer is older than Version 7, Java must be updated
before continuing.
“About”
Button
Java Version
5. Under the Security tab of the Java Control Panel, set the Security Level to Medium.
Security
Level
Slider
Security
Tab
Disable the Java
Plug-in option by
removing the
check mark from
the box
6. Click the “Apply” button to accept the changes
7. Under the Advanced tab disable (uncheck) the Java Plug-in option.
8. Click the “Apply” button to accept the changes and close the Java Control Panel. Follow the subsequent
instructions for logging into the Liebert RDU-S.
5.0
SETTING THE IP ADDRESS
Follow these instructions to set the IP address of the Liebert RDU-S. This step is required for communication
with the Liebert RDU-S using the Web interface.
1. Connect a laptop and set its IP address:
• Insert a standard Ethernet cable (not included) into the Ethernet
port on the front panel of the Liebert RDU-S, shown at right.
• Insert the other end of the cable into a laptop’s Ethernet port.
Ethernet port
3
Liebert® RDU-S™
• If needed, configure the laptop’s IP settings to communicate on a 192.168.0.X network, for example:
IP address
192.168.0.9
Subnet mask
255.255.255.0
Default gateway 192.168.0.1
2. Open a browser and go to the login page:
• Open a Web browser such as Microsoft Windows® Internet
Explorer.
• Enter the IP address of the Liebert RDU-S in the address
bar—the default is http://192.168.0.10. The login window
appears, shown at right.
3. Log in to the Web interface:
• Select a user name from the drop-down list and enter a
password (both case-sensitive), then click the Login button:
• User Name (default is admin)
• Password (default is Liebert)
NOTE
For security, change the default password (see the user manual, SL-31310).
4. Click the Configure tab, then click Network at left.
Configure
Network
5. Determine which method to use for IP address assignment: DHCP (automatic) or Static (fixed address).
• For DHCP, click the Obtain IP address automatically button.
• To assign a Static IP address, click Use the following IP
address, then enter the appropriate IP address, subnet
mask and gateway address, for example:
6. Click Apply to save any changes.
7. A confirmation window indicates the unit must be rebooted for
the change to take effect. Click OK, and the unit will reboot.
8. If needed, reset the laptop’s IP settings (as before Step 1.)
Liebert Corporation
1050 Dearborn Drive
P.O. Box 29186
Columbus, OH 43229
Telephone: 1-800-877-9222
Facsimile: 1-614-841-6022
www.liebert.com
© 2010 Liebert Corporation
All rights reserved throughout the world. Specifications subject
to change without notice.
® Liebert is a registered trademark of Liebert Corporation. All
names referred to are trademarks or registered trademarks of
their respective owners.
SL-31305_REV4_06-13
4