1
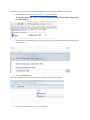
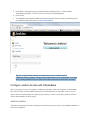
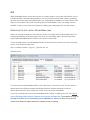
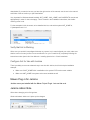
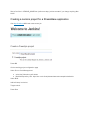
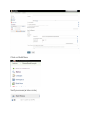
Jenkins on Windows with StreamBase
Using a Continuous Integration (CI) process and server to perform frequent application building,
packaging, and automated testing is such a good idea that it’s now a mainstream practice. StreamBase
users often ask TIBCO for guidance in integrating StreamBase with a CI server infrastructure. This
document steps through one way to do that.
TIBCO doesn’t sell a CI server product: there are plenty of fine CI servers out there. By far the most
commonly used CI server for Java-based applications is Jenkins.
Development Tool Chain
Setting up a CI environment inevitably depends on other Software Development Lifecycle (SDLC) and
DevOps tool choices. We’ll pick a tool chain for this document that represents the choices we most
frequently see StreamBase customers make, and which also represent our de facto recommendations for
StreamBase users who are setting up a CI environment for the first time. That we made these choices for
this document doesn’t mean other choices won’t also work perfectly well, and if you are already happy
with other tools and know them well, then it is probably better not to switch just because of what we did
here.
In particular, the “average” StreamBase application team today:
●
Develops applications using a local Windows workstation, usually in a corporate IT department,
●
and both the workstations and the development environments are managed and specified
according to local corporate standards.
Is very familiar with Java application development for server-side applications, and uses the
Eclipse IDE for its Java work
Uses JUnit4 for Java functional unit testing, and SBUnit for StreamBase functional unit testing
●
● Uses subversion for a source control repository
● Uses ant to build its applications and to run automated functional unit tests
● Uses Maven for software dependency management, though in a variety of ways
● Uses Jenkins as a CI server
The tool chain we picked:
●
●
●
StreamBase Studio: IDE for StreamBase and Java application development
m2e
JUnit4
● subversion
● ant
● maven
● Jenkins
Note: These notes are based on Jenkins 1.632, StreamBase 7.5.4, and Windows 7 Professional. There
may be variations for different versions of any these.
These notes assume there is a CI server machine that will have both Jenkins and StreamBase installed
on it. Other configurations are certainly possible but not explored here.
This note also assumes that StreamBase has already been installed on the CI server. Instructions for
installing StreamBase on Windows are here.
We’re going to use Subversion as our source control repository in this document. Others work fine, too.
Git and Github are rapidly becoming commonplace among StreamBase users, and the next version of
this document will mostly like provide explicit steps for using Git instead of, or in addition to, Subversion.
The Windows Environment
Microsoft Windows has some challenges when it comes to configuring multiple Java-based packages. In
particular, system environment variables such as PATH, JAVA_HOME, and CLASSPATH tend to get set
by different tools, and the paths tend to get so cluttered it becomes hard to determine what version of
what you’re actually going to get when you run things.
The StreamBase product itself works hard to keep that clutter and guesswork to a minimum by simply not
relying on those environment variables at all. However, in a Jenkins-based environment, such isolation is
more difficult to maintain.
This document presents a very simplified installation process to get you up and running on a machine that
is assumed to be pretty clean. However, if the machine you are using as a CI server already has a lot of
things on it, your Jenkins jobs might start failing in hard-to-diagnose ways.
So, if you see problems following the steps below, it’s not a bad idea to consider what’s set in the
environment of the Jenkins server and think about how it ought to be set for running StreamBase-related
jobs.
We’ll try to do a better job in setting up isolated environments for Jenkins and the other toolchain tools in
future versions of this document, but for now consider setting up your CI server using a fresh Windows
image as a way to minimize configuration headaches later.
Downloading and Installing Jenkins
There are many ways to do this install Jenkins. In this document, we’re just going to get Jenkins installed
and up and running as quickly as possible.. The Jenkins wiki installation page for Windows site actually
recommends a somewhat different procedure that involves more steps. This document presents the steps
we actually took on a Windows 7 Pro machine. If you are already well-versed in Jenkins installation,
please feel free to use the method that works for you and of course you may use a pre-existing Jenkins
installation of your choice.
At the moment we have no recommendations about the range of Jenkins versions to use with
StreamBase, and will revise these notes as we have them.
The main Jenkins web site is at https://jenkins-ci.org/
We’ll refer to the directory that Jenkins was installed into as JENKINS_HOME in this document.
1. Download latest from http://mirrors.jenkins-ci.org/windows/latest
These instructions use 1.632. If you are using the latest that’s beyond that, things might
be a little different.
2. Go to where you downloaded your zip file, right-click on the zip file and select Extract All from the
context menu.
3. Press the Extract button
After the extraction is finished, Windows Extract All pops up an Explorer window:
4. Run setup.exe by double-clicking on it in Explorer
5. Press Next > Next (assuming you accept the default install directory) > Install (it wants
Administrator privileges - Press Yes if the Account Control dialog appears)
6. Press Finish
7. The installation automatically installs Jenkins as a Windows Service, starts it, and then pops up
your default browser and points it to http://localhost:8080/
Tip: The Jenkins installer probably set up permissions on the Jenkins install dir
(JENKINS_HOME) (probably C:\Program Files (x86)\Jenkins) for the Administrator. You might
want to change permissions there if others users will need access to this directory hierarchy.
Configure Jenkins for Use with StreamBase
We’re only going to touch on the things to configure that directly impact the integration of StreamBase
with Jenkins. There are many different things such as authentication you may want to set up on your
Jenkins server. Since this paper isn’t really trying to teach you how to use Jenkins, please consult the
Jenkins documentation for such things.
Jenkins Location
That said, many people will need to change the Jenkins server port just on the very simplest installation to
test out the integration.
Jenkins default port is 8080. This is a pretty commonly used port for many web server-based things. You
can change the port by using the Jenkins console in a web browser. (Jenkins > Configure System >
Manage Jenkins > Jenkins Location, or by editing the --httpPort value in the services/arguments element
of JENKINS_HOME/jenkins.xml.
If you change the Jenkins Location, you have to restart the Jenkins server/service to put the change into
effect.
Source Repository Viewer Plugin
It’s going to be very handy to be able to view the source code related to test reports, so while not
absolutely necessary, consider installing a source repository viewer plugin into your Jenkins server. This
is optional.
Since we’re using Subversion for the examples in this document, we pick ViewVC, which is one of the
viewers the StreamBase product engineering team uses in its own work.
Manage Jenkins > Manage Plugins > Available > ViewVC Plugin and check the Install check box. The
press the Install without restart button.
Then wait until you see this screen:
Configure StreamBase on the CI machine
(Consider setting STREAMBASE_HOME as a system environment variable. At least to get started. As the
sample StreamBase ant scripts require it. These samples don’t consider having multiple StreamBase
versions on the CI server.)
Make sure %STREAMBASE_HOME%\bin is on system PATH
Java
Make sure the JDK you want for Ant is available on the system %JAVA_HOME%.
StreamBase requires the full JDK, not just a JRE.
It’s possible to use the JDK that installs with StreamBase itself, which is in
%STREAMBASE_HOME%/jdk64.
You may wish to install and use a separate JDK for Jenkins to use. If you do that, recall that TIBCO
recommends that you compile StreamBase applicaitons and Java plug-ins with the same JDK version as
the one bundled with your StreamBase installation. The version installed with StreamBase is documented
on the StreamBase Supported Configurations documentation page under JDK Requirements. Some
StreamBase users use a locally installed version of the JDK with StreamBase, as well, so consult with
local StreamBase users for local JDK practice.
For the examples in this document, we use the installed StreamBase JDK:
Ant
While StreamBase Studio comes with a version of Ant that’s used for running Ant inside Studio, and it’s
probably possible to leverage that (especially if your local corporate policies make it hard to go directly
get open-source packages), it’s probably best to use a separate ant installation for Jenkins since it is like
that you’ll use Jenkins to do CI with more things than just StreamBase. It’s like you already have ant
installed. In case you don’t here’s a brief guide to installing and configuring ant for use with Jenkins.
Determine the Ant version StreamBase uses
While it isn’t usually necessary to use exactly the version of Ant that’s built into StreamBase Studio, it’s
probably best that they are at least pretty close, since you will probably want to develop and test ant
scripts inside StreamBase Studio and then have Jenkins run them later.
To find out what version of Ant StreamBase Studio has, start up Studio, and then look at the Ant plug-in
version. From the Studio main menu:
Help > Installation Details > Plug-ins > Type filter text: ant
and have a look:
You can see here that StreamBase Studio, in this case version 7.5.4 has Ant 1.9.2. The Ant version is
determined from the Eclipse release that underlies this Studio release. We haven’t made any
determination that more recent versions of Ant will or won’t work with StreamBase.
If you want to actually use the Ant from StreamBase Studio instead of installing your own, see How to
run the Studio-provided version of Apache Ant from the command line. The downside of using the
provided Ant is that if you are customizing your Ant installation for Jenkins, you have to do that in the
context of the Studio Ant install, and that’s not always so easy to manage.
We could be very conservative and match the Ant version we use with Jenkins exactly with the
StreamBase version and never have to worry about any Ant version incompatibilities at all. It’s probably
fine to use the latest available ant release, especially if it’s still 1.9.x..
Download Ant
1. Browse to http://ant.apache.org/
2. Select Download > Binary Distributions
Pick the version of ant you want and download. For example, to get Ant 1.9.2, go to
http://archive.apache.org/dist/ant/binaries/ and download
http://archive.apache.org/dist/ant/binaries/apache-ant-1.9.2-bin.zip
Install Ant
Follow the installation instructions for Ant in the Apache Ant User Manual > Installing Apache Ant section,
with the caveat that the link above is to the latest version of Ant, and might differ from the one you just
downloaded. If you want to be sure you have the right version of the manual, use the one in the manual
sub-folder of the ant version you just downloaded.
Very important for Windows-based installed, ANT_HOME, JAVA_HOME, and CLASSPATH must be set
appropriately in order for Ant to be happy. This is covered in Ant installation instructions, but doublechecking never hurts.
For the examples in this document, we’ve installed Ant into, and set the system ANT_HOME to,
C:\java\apache-ant-1.9.2
Verify that Ant is Working
We’re sure you wouldn’t have skipped this step on purpose, but in case it slipped your mind, make sure
that Ant runs on its own just fine from a command line on your CI machine by completely following the
instructions under Apache Ant User Manual > Installing Apache Ant > Check Installation
Configure Ant for Use with Jenkins
There’s probably some more advanced way to use Ant with Jenkins, but for this simple installation
example:
●
●
Make sure %ANT_HOME%/bin is available on the system PATH environment variable
Make sure ANT_HOME is a system environment variable as well
Maven Plug-in for Jenkins
Jenkins comes pre-installed with the Maven Project Plugin. Just use that as is.
Jenkins Admin Note
We’ve been changing a lot of things here.
We should restart Jenkins so it picks up the changes:
Start a Cmd line in JENKINS_HOME then jenkins.exe stop; jenkins.exe start if you change anything after
install.
Creating a Jenkins project for a StreamBase application
Goto http://localhost:8080 and create a new job:
Create a Freestyle project
Press OK
On the resulting project configuration page
Under Source Code Management:
●
select the Subversion radio button
● Modules/Repository URL: https://svn.code.sf.net/p/streambase-ant-example/code/double
Under Build:
Add build step: Invoke Ant
Targets: sbunit
Press Save
Click on Build Now
Verify success (a blue circle)