1
Release 2.5
User Manual
User Manual Opensphere Release 2.5
1. INTRODUCTION
1.1. INTRODUCING OPENSPHERE
1.1.1. OVERVIEW
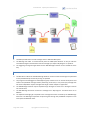
Developing large projects in distributed environments is never a simple task. Being dependent from
other teams makes it hard or sometimes even impossible to develop and test parts of the project
under one’s responsibility. Opensphere can simulate system components which aren’t available yet,
allowing to progress with development on schedule and independently from other teams. The built in
testing framework enables executing regular regression test runs making sure the product is
thoroughly tested before the delivery.
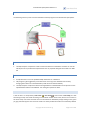
Opensphere is a client application that supports and simplifies the daily work of people that have to
deal with technical aspects within a complex system integration environment. EAI consultants,
software developers, system integrators and testers through Opensphere get offered an easy to use
and powerful framework that speeds up analysis, development and testing of message based
middleware, database dependent applications and custom components. Opensphere is based on
persistent projects that can freely be structured and configured to meet personal needs and
preferences.
The Opensphere application offers a comprehensive but easy to use graphical user interface that lets
you build projects with individual structure each, easily configure and execute components based on
copyright © centeractive ag
Page 2 of 156
User Manual . Opensphere Release 2.5
Tibco Rendezvous®, JMS (Apache ActiveMQ™, TIBCO EMS™, HornetQ, OpenJMS, SonicMQ, SwiftMQ
etc.), web services, databases etc., widely exchange data and run tests with complex comparison
rules.
Opensphere makes use of XML for comparing complex data structures (including nested XML), to
maintain the project structure, single components and the application state over session boundaries.
Components and projects can easily be exported to XML files and shared with other team members
that may import them into their projects or may use them in other tools such as rvscript.
The Application does not require any server installation itself but is ready to be used within a few
minutes. The program is based on Java and can therefore be used on most operation systems.
1.1.2. TESTING
1.1.2.1.
TESTING FRAMEWORK
Effective testing of integration solutions starts right at the beginning of integration projects. The
Opensphere testing framework lets you develop tests in parallel to the software engineering process
and maintain them during the whole product lifecycle. Reusability in software development is quite
a common requirement; this software applies it on test modules as well.
However, the Opensphere automated testing framework does not
components, it also provides comprehensive support in multiple domains.
only
reuse
proven
Project specific test configuration and structuring
Test suites
Graphical test case editor
Graphical comparison rule editor
Message reporting, publishing and comparing for WebService, JMS and Tibco Rendezvous®
Comparing of XML structures applying user configured comparison rules
Comparing of data retrieved from databases
Automatic reporting (publishing) of testing results
Running tests in batch mode through Apache Ant
The result of an integration test is often limited to a statement reflecting its success and it hopefully
provides some information on the source component and the data that got produced. Within an
systems integration environment, a business process may fail due to an unavailable system, an
incompatible interface, some version mismatch etc. If a test fails, we need more information than just
above mentioned items, we are also interested in intermediate data, messages being exchanged,
system availability and further details that will help us to quickly locate the source of a potential
problem. And of course we also need detailed information about the cause of an error.
Opensphere enables you to build tests that generate such detailed reports that you will be able to
quickly find most errors. The application contains a test engine driven by user defined test suites that
contain a number of test cases with a graphical configurable test flow each. Comparison rules can be
defined for entire messages through simple mouse clicks; this also includes nested XML structures. In
Page 3 of 156
copyright © centeractive ag
User Manual Opensphere Release 2.5
case of special needs, experts get full control over generated XPath expressions and can even extend
the powerful comparison rules generated by default.
1.1.2.2.
AUTOMATED REGRESSION TESTING
Supporting a proven testing methodology, Opensphere lets you build sets of regression tests adjusted
to your project specific requirements. Once the tests are built, they can be run at any time yielding
immediate and detailed reports of the test results.
This automated regression testing approach strongly improves the reliability of integration
solutions. It is a key enabler for enterprises to adapt their systems to changing requirements on time
and to budget.
1.1.3. TIBCO INTEGRATION
Opensphere enables you to simply create, edit, change, save and record Tibco Rendezvous® and Tibco
EMS™ messages. Dedicated project tree nodes allow sending and receiving messages upon simple
mouse click. Subscriber or consumer nodes can automatically reply to the received messages by
sending predefined messages whereas other dynamic nodes act as powerful application simulators.
1.1.3.1.
PREREQUISITES
Creating RV/EMS Publisher and Subscriber, JMS Message Producer and Consumer, Webservice Client
and Server components within Opensphere doesn’t require any knowledge of the specific program
libraries (APIs) nor any programming language skills at all. It's as easy as to work with your preferred
text editing program!
1.1.3.2.
PERSISTENCE AND SCRIPTING
Opensphere projects are stored in XML files and automatically reloaded at application start-up. TIBCO
Rendezvous® messages recorded with the RV Message Detector or created through the RV Message
Editor can individually be saved to XML files and be reused elsewhere. The RV Subscriber and the RV
Application Simulator modules as well can be configured to automatically write all recorded
Rendezvous® messages to a reusable XML file.
The configuration of program modules such as the RV Application Simulator can be exported to an
XML file and be reloaded at any time into another project or be used in another application. Messages
and configured programs can also be saved to the rvscript format, the all-purpose scripting tool for
TIBCO Rendezvous®. A program module present in the rvscript format is fully functional and behaves
same as if run within the RV Tool Collection. Generated RV programs however are not supposed to be
used in a productive environment but will help build complex systems but also greatly improve and
speed up the development and test process within your company.
copyright © centeractive ag
Page 4 of 156
User Manual . Opensphere Release 2.5
1.1.4. DATABASE SUPPORT
Opensphere offers comprehensive database support in various functional areas. SQL statements can
also be executed from independent nodes or within test steps either to initialize tables, to simulate a
component or to compare values from different tables on a same or on distinct databases.
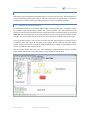
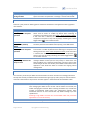
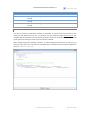
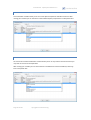
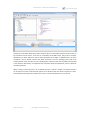
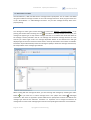
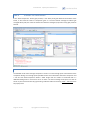
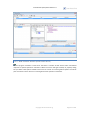
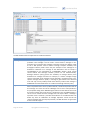
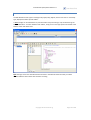
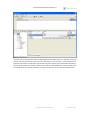
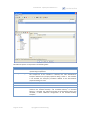
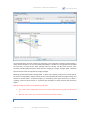
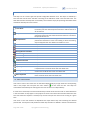
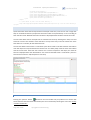
1.1.5. GRAPHICAL USER INTERFACE
The Opensphere graphical user interface (GUI) provides a single window that is equipped to handle
the complete range of functionality provided. The driving component is the left located tree based
browser that shows the user defined structure of the active project. Every tree node has its associated
detail view that is displayed right to the project browser as soon as the node gets selected. By right
clicking a node, a menu pops up that contains all functions that can be invoked on the specific node.
The main window contains a menu bar and a tool bar that offer global functions or functions shared
by different node types. Some of the detail views however contain additional tool bars offering
context specific functionality. An optional displayed tabbed pane located on the windows bottom
contains a variable number of worker panels.
Extra non project specific tools such as the Tibco Rendezvous® message detector may also be added
to the window and stay there as floating dialog or can be docked as working panel.
Page 5 of 156
copyright © centeractive ag
User Manual Opensphere Release 2.5
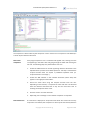
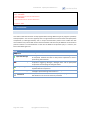
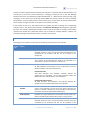
Window Element
Main Menu
Main Toolbar
Project Browser
Node Detail View
Worker Panel
1.1.5.1.
Description
Provides access to many menus, such as File, Project and Tools.
Provides shortcuts to commands. Its buttons are grouped by functionality.
Some of them are activated or deactivated respectively according to the
current selected project node.
Displays the content (structure) of the current project. Place the mouse
pointer on a node and press the left mouse button to get its relevant details
displayed right to the project browser. Right-click any node to get a pop-up
menu displayed that contains all available methods that can be invoked on
that node.
A double-click on most nodes displays their property dialog.
Shows the relevant runtime details of the current selected project tree
node. The detail view of a folder node for example contains several internal
windows representing the console of all direct depending executable nodes;
the detail view of a test case detail view contains a tabbed pane showing
different views on the test case each. Further properties of a node can be
shown by right-clicking it and select the appropriate item from the popped
up menu.
Shows information on processes running in the background or running in
parallel to the interactive GUI process. Most worker panels are instances of
a message pane (see below).
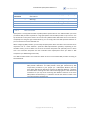
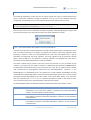
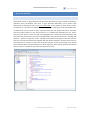
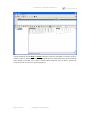
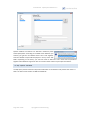
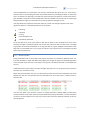
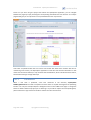
NOTIFICATION PANES
Opensphere uses special panes to show notifications on a specific topic; they are used to report work
progress, results of comparison programs etc. Notifications are displayed with different colors
depending on their type. The notification pane offers a table view and a text view; the table view
summarizes information and may hide details that would all be visible in the text view. Details of a
single table row are displayed in a dialog when a mouse click occurs on the row. To give a quick
overview on something and for performance reasons, the table view is most often used by default.
You can change between table and text view by selecting the appropriate item in the pop-up menu
that appears when you right click inside the message pane.
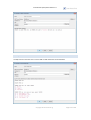
1.1.5.2.
CONSOLES
copyright © centeractive ag
Page 6 of 156
User Manual . Opensphere Release 2.5
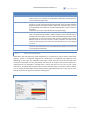
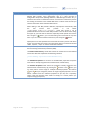
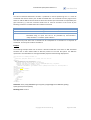
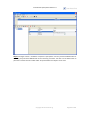
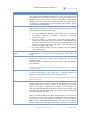
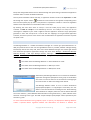
Consoles are message panels that show process activity and add functions accessible through a popup menu; they are used to observe and control the execution of processes. Consoles appear in the
detail views of executable nodes. The appearance of consoles can be changed through the option
dialog shown beside that gets displayed if you right click inside a console and choose the item Console
Options… from the pop-up menu. Alternatively those same options can be changed in the tools
options dialog that appears when the item Tool > Tool Options… from the main menu gets selected.
The new settings are applied to all consoles within the application.
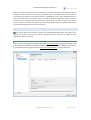
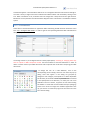
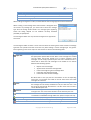
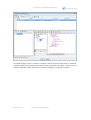
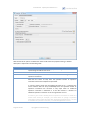
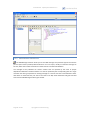
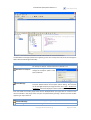
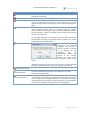
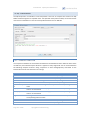
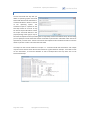
1.1.6. TOOL OPTIONS
The basic behavior of Opensphere can be customized through the Tool Options dialog that is invoked
by selecting the menu item Tool > Tool Options… from the main menu. The left located menu tree lets
you select the item of your choice in order to change the related configuration.
Page 7 of 156
copyright © centeractive ag
User Manual Opensphere Release 2.5
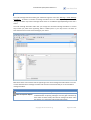
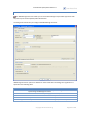
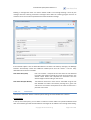
1.1.6.1.
PATHS
The „Paths“ panel lets you define the following file system options.
Option
Projects Directory
Test Publishing Directory
1.1.6.2.
Description
The parent directory on the file system where the program proposes
to save new Opensphere projects
Default location (directory from the file system) to be proposed by the
application when test suite results are published. If this option is not
set, the location proposed will be the “pub” directory within the
current project folder.
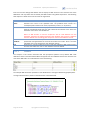
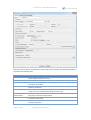
FILE
On the „File“ panel you can define the following options.
Option
Open last project on
program start
Create backup copy when
saving project
Automatically define name
and location of messaging
component files
Description
Defines whether the last visited project should be loaded
automatically if the application is launched
Specifies whether a backup copy of the previous file content should
be created each time the project file is saved. The backup copies are
saved into the “backup” folder of the current project directory. The
name of the backup file has the following format
<yyyyMMss_HHmmss>_<project
file
name>
(i.e.
20040728_154619_myProject.osp)
Specifies whether message files are automatically created to a
location that corresponds to the project structure.
Create backup copy when
saving messages
Store text data within
CDATA section
If this option is selected and a property dialog of a messaging
component (i.e. RV Publisher or JMS Consumer) is closed
without indicating where to save the message(s), the messaging
component node path will determine the location of the
message file and the messages get stored automatically by
Opensphere when the property dialog is closed by pressing the
“OK” button.
If this option is not selected, the user must himself specify the
location of the message file within a file chooser dialog.
Specifies whether a backup copy of the previous file content should
be created each time a Tibco Rendezvous® message file is saved. The
backup copies are saved into the same directory as the original
message. The name of the backup file has the following format:
bck_<yyyyMMss_HHmmss>_<file-name>
(i.e. bck_20040728_162613_employees.rvm)
Indicates that text data contained in message components has to be
put within CDATA sections when a message is transformed to XML. If
this radio box is selected and some text data contains itself a
character sequence that terminates the CDATA section ("]]>"), all
special character get escaped and the data is not set within a CDATA
section.
copyright © centeractive ag
Page 8 of 156
User Manual . Opensphere Release 2.5
Option
Use escape characters when
storing text data
1.1.6.3.
Description
Specifies that text data contained in message components get all
special characters escaped when a message is transformed to XML.
GUI
Select the „GUI“ panel for defining options related to the behavior and appearance of the graphical
user interface.
Option
Message Editor
Hide comparison rule panel
by default
XML Editor
Hide attribute panel by
default
XML Editor
Hide comparison rule panel
by default
Worker Panel
Keep message detector tab
always in front
1.1.6.4.
Description
Determines whether the comparison rule panel in the message list
editor shall be shown or hidden by default when switching to
comparison rule editing (menu item View > Show Comparison Rules).
If this check box is selected, the user is still enabled to show the
comparison rule panel at any time by simply activating the related
toggle button
on the editor tool bar.
Indicates whether the attribute panel located below the XML tree
structure panel has to be hidden when opening a new XML editor.
Determines whether the comparison rule panel in the XML editor has
to be shown or hidden by default when switching to comparison rule
editing (menu item View > Show Comparison Rules). If this check box
is selected, the user is still enabled to show the comparison rule
panel at any time by simply activating the related toggle button
on the editor tool bar.
Select this check box if you want to keep the Tibco Rendezvous®
message detector worker panel to stay always in front when new
tabs get added. This is especially useful when running a series of test
suites that get all their own worker panel added to the bottom of the
application. That allows the tester to monitor the ongoing overall
message flow.
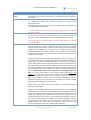
CONSOLE
The “Console” panel lets you define the look and feel of consoles. Consoles are message panels that
show process activity and add functions accessible through a pop-up menu; they are used to observe
and control the execution of processes. Consoles appear in the detail views of executable nodes.
Property
Screen Buffer Size
Background Color
Selection Color
Page 9 of 156
Description
Specifies the number of messages the console should keep in the buffer. If a
new message gets added to the console and the buffer size exceeds, the
oldest message gets removed. When choosing the buffer size, consider the
number of executable nodes within your Opensphere projects. Every
executable node has its own console that may buffer message up to the
specified size.
Choosing a high buffer size with lots of executable nodes may cause the
application to run out of memory.
Determines the background color of the consoles.
Determines the background color of the selected row or message
copyright © centeractive ag
User Manual Opensphere Release 2.5
Property
Text Color
Information
Text Color Warnings
Text Color Errors
Selected Text Color
Font
1.1.6.5.
Description
Specifies the text color to be used for displaying messages of type
“Information”
Specifies the text color to be used for displaying messages of type
“Warning”
Specifies the text color to be used for displaying messages of type “Error”
Determines the text color of a selected row or message
Defines the overall font to be used in the console
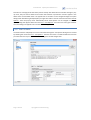
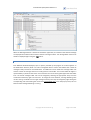
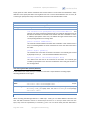
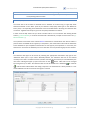
JMS PROVIDER
Opensphere is not shipped itself with any JMS product specific libraries. The “JMS Provider” panel lets
you define JMS providers required for using Opensphere with the JMS products of your choice. The
top located list on the panel contains an item for every JMS Provider defined for the current instance
of Opensphere. Using the right located buttons, you can simply add a new JMS provider definition or
you can remove the current selected one.
When configuring JMS providers, you basically tell Opensphere where to find the Java classes that are
required to act as a client towards a particular JMS implementation (product). Depending on the
available classes, you then define one to three connection templates and optionally also an admin
class. The connection templates are then available within Opensphere when you define a JMS
component (i.e. JMS Message Consumer).
The “JMS Provider Details” box shows the details of the current selected JMS provider according to
the table below.
Property
Name
Description
Name of the JMS provider (i.e. “Tibco EMS”) that must be unique between all
JMS provider definitions. The JMS provider name gets referenced by JMS
components you define in your project (i.e. a JMS Queue Browser) but also
from within JMS listener definitions mad for the Message Detector. Therefore
be careful when choosing the name and avoid changing it if it is still referenced
somewhere. If you may think of working with different releases of the same
JMS product simultaneously, it is advised to include the release number in the
name straight from the beginning.
copyright © centeractive ag
Page 10 of 156
User Manual . Opensphere Release 2.5
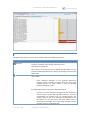
Property
Java Libraries
Description
This list contains all Java archives (.jar and/or .zip files) used by a client of the
defined JMS provider. Since Opensphere acts as a client through its
configurable components (Message Detector, JMS Message Producer etc.), it
needs to have access to related Java classes. Such classes are the factory classes
for creating connections to the related JMS server or admin classes that let you
retrieve information about available destinations.
When adding a new JMS provider definition, Opensphere automatically adds
the
Java
archive
files
present
in
the
folder
<OPENSPHERE_HOME>/lib/jmsAdmin. These files contain a set of
predefined admin classes for known JMS provider. From the file chooser dialog
that pops up, you now have to select the required provider specific Java archive
files. Using the
button, you can add missing Java archive files at any time
later or you can remove selected unnecessary ones using the
button.
JNDI
Opensphere scans the specified Java archive files for factory classes and admin
classes and provides them within the appropriate bottom located tab labeled
“JNDI”, “Queue”, “Topic” or “Admin” for further selection.
This panel lets you define a template for JMS connection definitions through
the Java Naming and Directory Interface (JNDI).
The Initial Context Factory combo box contains all classes found in the defined
Java archive files that implement the following interface:
javax.naming.spi.InitialContextFactory
The Available Properties list contains all available JNDI properties except the
ones that are already assigned to the selected initial context factory.
The Selected Properties table shows the properties already assigned to the
selected initial context factory. By pressing the
button or the button, you
can easily add or remove single or multiple selected properties. The buttons
and
let you change the position of single assigned properties. You can
define a default value for individual properties if you like, this is especially
useful if the final property value needs to comply to a certain pattern (i.e.
“tibjmsnaming://host:port”).
Page 11 of 156
copyright © centeractive ag
User Manual Opensphere Release 2.5
Property
Queue
Description
This panel lets you define a template for JMS queue connection definitions.
The Connection Factory combo box contains all classes found in the defined
Java archive files that implement the following interface:
javax.jms.QueueConnectionFactory
The Available Properties list contains all properties available for the selected
queue connection factory except the ones that are already assigned to it.
Topic
The Selected Properties table shows the properties already assigned to the
selected queue connection factory. By pressing the
button or the button,
you can easily add or remove single or multiple selected properties. The
buttons
and
let you change the position of single assigned
properties. You can define a default value for individual properties if you like,
this is especially useful if the final property value needs to comply to a certain
pattern (i.e. “tcp://host:7222”).
This panel lets you define a template for JMS topic connection definitions.
The Connection Factory combo box contains all classes found in the defined
Java archive files that implement the following interface:
javax.jms.TopicConnectionFactory
The Available Properties list contains all properties available for the selected
topic connection factory except the ones that are already assigned to it.
Admin
The Selected Properties table shows the properties already assigned to the
selected topic connection factory. By pressing the
button or the button,
you can easily add or remove single or multiple selected properties. The
buttons
and
let you change the position of single assigned
properties. You can define a default value for individual properties if you like,
this is especially useful if the final property value needs to comply to a certain
pattern (i.e. “tcp://host:7222”).
This panel lets you define an administrator class used to show and retrieve
available destinations.
The Admin Class combo box contains all classes found in the defined Java
archive files that implement the following interface:
com.centeractive.opensphere.msg.jms.admin.JMSAdmin
If the file openSphereJMSAdmin_n_n.jar from the directory
<OPENSPHERE_HOME>/lib/jmsAdmin is defined in the list of java
libraries, a few admin classes for well-known JMS providers will be available by
default. If there is no predefined admin class available for your JMS provider,
you can write your own by implementing above mentioned JMSAdmin
interface. The javadoc for the JMSAdmin interface can be found in the
appendix at the end of this document, the binary code is contained in the
openSphere_n_n.jar that is located in the folder
<OPENSPHERE_HOME>/lib.
copyright © centeractive ag
Page 12 of 156
User Manual . Opensphere Release 2.5
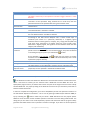
1.1.6.6.
DATABASE/JDBC
The “Database/JDBC” panel lets you define options related to database connections, please consult
the section “Database Support”.
1.1.6.7.
STARTUP
Here you can specify whether at program startup you want to be notified when a new version of
Opensphere is ready for download.
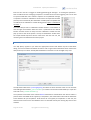
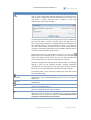
1.2. GETTING STARTED
To work with Opensphere, you must first create a project by choosing the menu item File > New
Project. Within the displayed project options dialog you have to enter a project name and a working
directory. Optionally you can define project default settings for Tibco Rendezvous®. The entered
options can be changed later on.
When the dialog is closed through the OK button, the project node appears in the project browser,
ready to get dependent nodes created underneath. Such nodes are added using the Project menu
within the main menu or by right-clicking on the project node and choosing the appropriate add item.
The project structure can freely be composed and adapted to the needs of the user. Direct dependent
nodes of the project node can be folders or test suites; folder nodes may contain other folders or any
Page 13 of 156
copyright © centeractive ag
User Manual Opensphere Release 2.5
kind of executable node; test suites contain 1-to-n test cases. Dependent nodes may themselves
contain a certain number of dependents.
When a new node is added as a dependent of an existing node, its property dialog is shown and lets
you configure the component. This property dialog can be shown again at any time by right-clicking
the node and choosing ‘Properties…’ from the popped up menu or by double-clicking a selected node.
Most property dialogs are non-modal to allow you to compare and copy the settings between
different modes.
copyright © centeractive ag
Page 14 of 156
User Manual . Opensphere Release 2.5
2. OPENSPHERE PROJECTS
To take full advantage of the comprehensive functionality of the application, you will have to work
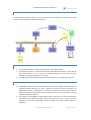
within a project. An Opensphere project is a freely composed hierarchical tree structure containing
group nodes and atomic nodes (leafs) that offer specific functionality each. Meanwhile a folder node
simply provides a view on console windows of dependent executable nodes (multiple-document
interface), a simulator node for example is fully configurable and acts like an independent server
program.
2.1. PROJECT STRUCTURE
2.1.1. FILE SYSTEM
When a new project is defined in the project property dialog a project folder
(folder named Welcome for the sample beside) is automatically created on the
file system within a directory you are free to choose. The name of the project
folder is identically with the project name that was defined in the dialog. The
project folder initially contains the project file and some reserved folders
Opensphere uses by default for exporting node definitions, publishing test suite
results, dynamically generating files and storing backup files of the project. The project structure on
the file system usually will grow as new nodes are added to the project.
Opensphere project files have the extension .osp and contain the XML formatted definition of the
project made through the graphical user interface. Resources such as Tibco Rendezvous® messages
that can be defined in the property dialogs of specific program tree nodes are not stored within the
project file itself. The resources are saved as independent files (i.e. extension .rvm for Tibco
Rendezvous® message files) and the project file will get that file path written to it. This path is a
relative reference to the project folder in case the resource file is underneath that folder or it is an
absolute path in case the resource file is stored somewhere else (outside the project file structure).
An overview of all file resources referenced (used) by the different components within your
Opensphere project can be obtained by selecting the “Resource Overview” tab that appears in the
detail view of the root project tree node.
In order to be able to easily move and/or exchange entire Opensphere projects without losing any
references to resources, it is recommended to store all your resources underneath the owning project
folder.
2.1.2. PROJECT BROWSER
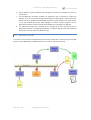
The project structure appears as a tree within the Project Browser at the left side of the Opensphere
application, the top most and first appearing node being the project node. The project structure is
defined by the user by adding group and leaf nodes. The project node itself allows you to add a
restricted number of dependent node types, the so called top level nodes (folders and test suites).
Other group nodes accept dependent node types that make sense in the given context; a test case
node for example will only accept test step nodes.
Page 15 of 156
copyright © centeractive ag
User Manual Opensphere Release 2.5
Every node within the project tree can be exported to a file and imported to other projects or simply
to another location within the same project. Exported nodes are of XML format and can easily be
shared with other people or archived for further use depending on your needs. Beside this feature,
every node offers other functionality that is accessible through the application toolbar (common
functions only) or through the pop-up menu that appears when you press the right mouse button
while its pointer is located on the node. A left mouse button double click on a selected node brings up
its property dialog that lets you customize the node.
2.2. PROJECT TREE NODES
The project node is the root of each project. The subsequent described nodes may appear in the
project tree structure. Only common folders, databases and test suites can be added as direct
dependents to the project node.
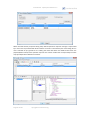
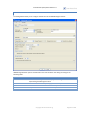
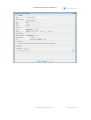
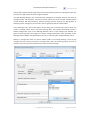
2.2.1. PROJECT PROPERTIES
When creating a new project through the menu item File > New Project, the project properties dialog
gets displayed automatically and requires some data to be entered. The same dialog can be shown at
any time later by selecting the menu item Project > Project Properties… from the main menu.
copyright © centeractive ag
Page 16 of 156
User Manual . Opensphere Release 2.5
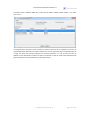
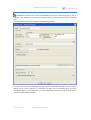
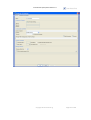
2.2.1.1.
GENERAL
On the „General“ panel you define the name and location of the Opensphere project.
Option
Project Name
Description
Name of the Opensphere project. When a new project is created, the
proposed project name is “New” and is best replaced by some more
appropriate name. Changing the project name for a new project does
automatically change the name of the project directory in the text field
below.
When a project file is created for a new project, it gets the name of the
project together with the extension .osp and it is placed in the project
directory.
Directory on file system that gets the project data written to it by default.
Opensphere proposes a directory that is composed by the base “Projects
Directory” defined in the tool options dialog (“Paths” tab) and a dependent
folder that has the same name as the project (tool options can be changed
through the menu item Tool > Options…).
The project directory can be set for new projects only. For existing projects,
it is the folder that contains the project file.
Project Directory
2.2.1.2.
WSDL CACHE
This panel shows the content of the project specific WSDL file cache and lets you add and remove
WSDL definitions to it. Please consult the section “SOAP Web Services” for further details.
2.2.1.3.
SSL KEYSTORE CACHE
This panel shows the content of the project specific SSL keystore cache and lets you change its
definition. Opensphere uses keystores and trustores for performing web service communication over
a secure socket layer.
The action buttons located on top of the panel are shortly explained in the table below.
Icon
Description
Import SSL Certificate
Imports an SSL certificate to the selected keystore
Remove Certificates
Removes all certificates from the selected keystore
Create Keystore
Creates a new empty keystore and adds it to the cache
Add Keystore File
Addes an existing keystore file to the project specific cache
Delete Keystore
Deletes the selected keystore from the cache
Page 17 of 156
copyright © centeractive ag
User Manual Opensphere Release 2.5
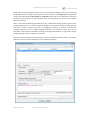
2.2.1.4.
TIBCO
The „Tibco“ pages let you define project default settings for Tibco Rendezvous®.
Option
Tibco Rendezvous
Transport
Rendezvous String
Encoding
2.2.1.5.
Description
Tibco Rendezvous® transport settings used for sending and receiving
messages from inside the project.
Character encoding for converting between Java Unicode strings and
Rendezvous wire format strings. The default encoding depends on the
locale where Java is running.
TIBCO / RENDEZVOUS (ADVANCED)
Select the „Tibco / Rendezvous (Advanced)“ page to define advanced options for Tibco Rendezvous®.
Custom Editors
In the top area of the panel, you can define a number of custom editors for specific rendezvous field
data. Those editors get used when Tibco Rendezvous® messages will be edited in the message editor
dialog. Simply press the “add” button and define what custom editor to use for what kind of field
data. Every definition must specify the editor class together with one or several field identifiers such
as name, ID or data type. Opensphere always uses the editor where the most field identifiers match.
copyright © centeractive ag
Page 18 of 156
User Manual . Opensphere Release 2.5
Option
Field Name
Field ID
Data Type
Editor Class Name
Description
Name of the Rendezvous message field
ID of the Rendezvous message field
Data type of the Rendezvous message field
The full name of a class that extends the editor class
com.centeractive.opensphere.msg.JCustomDataEditor. This
abstract class has the following methods that are invoked by Opensphere to set
Rendezvous field data and to determine whether this data is editable. In case it
is editable, Opensphere makes sure, the edited value gets written back to the
corresponding Rendezvous message field.
public boolean isEditable()
This method indicates whether the field data is editable. If this method returns
true, the method getData has to be overwritten to return the data contained in
the editor
public Object getData()
This method returns the data contained in the editor. This method gets invoked
by Opensphere only in case the method isEditable returns true
abstract public void setData(Object data)
This method sets the data to be contained in the editor. This method gets
invoked by Opensphere each time the Rendezvous field node gets selected in
the message editor
User Data Type Handler (Encoder/Decoder)
In the bottom area of the panel you can define a class that is responsible for encoding and/or
decoding Rendezvous user types.
Option
Handler Class
Name
User Data Types
Description
The full name of a class that implements the interfaces
com.tibco.tibrv.TibrvMsgEncoder and/or
com.tibco.tibrv.TibrvMsgDecoder
Comma separated integer values between TibrvMsg.USER_FIRST(128) and
TibrvMsg.USER_LAST(255) each. The class TibrvMsg is in the package
com.tibco.tibrv.
2.2.2. EXPORTING AND IMPORTING NODES
Every dependent project node can be exported to an XML file through the “export” button
located in the main toolbar or through the node specific pop-up menu. This allows you to share
components with other users or to reuse them in other Opensphere projects.
To import a node under the new parent node, you have to press the “import” button
or to select
the corresponding menu item within the node specific pop-up menu. Executable nodes and test step
nodes are interchangeable in the way that an exported executable node can be imported as a test
step of the same type (i.e. Rendezvous Generic Publisher).
Page 19 of 156
copyright © centeractive ag
User Manual Opensphere Release 2.5
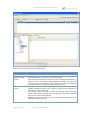
2.2.3. FOLDER
The folder
can contain any executable node and other folders. This node is also named group
viewer since it offers a view on all console windows of direct dependent executable nodes. This way
its detail view looks like a multiple-document interface (MDI) or desktop. Console windows can be
arranged through the “Window” menu; you have the choice between horizontally, vertically and
cascading arrangement.
The folder view has its own toolbox where a button appears for every node type that can be added to
the folder. The folder accepts other folders as well as executable node (see below) as its dependents.
When the start button is pressed while a certain folder within the project tree is selected, all its direct
dependent executable nodes are started. The same, if the stop button on a selected folder is pressed,
all its direct dependent executable nodes stop running.
2.2.4. EXECUTABLE NODE
The executable node is an embedded program module or process that runs under the control of the
Opensphere application. The complexity of the executable nodes varies a lot; it may be a simple
operating system command, a SQL Processor or a configurable Tibco Rendezvous® application
simulator to mention only three of them. The following table gives an overview of all executable
nodes that can be added to a folder node. Depending on how your Opensphere program was
installed, some of these nodes however may not be available.
Executable Type
OS Command
Executor
RV Publisher
RV Subscriber
Description
Represents an operating system command, an independent program or a
batch file.
This node acts as publisher for a single or collection of distinct Tibco
Rendezvous® message. It is easy configurable through its option dialog.
Depending on the user settings, it re-sends the message on the chosen
interval. The content of the published messages as well as the received
replay message is be displayed in the console. The message can be
imported, freely edited and saved to an external file using the in-built tree
based message editor.
This node subscribes to a Tibco Rendezvous® subject or a subject
hierarchy and receives corresponding messages. It is easy configurable
through its option dialog. Depending on the user settings it buffers
inbound messages and lets them display in the message editor dialog. It is
also able to reply to received messages by sending one or several
predefined reply and forward messages. Single messages or message
collection can be imported, freely edited and saved to a file using the inbuilt tree based message editor.
copyright © centeractive ag
Page 20 of 156
User Manual . Opensphere Release 2.5
Executable Type
RV Application
Simulator
JMS Message
Producer
JMS Message
Consumer
JMS Queue Browser
Web Service Client
(HTTP)
Web Service Client
(JMS)
Web Service Server
SQL Query Viewer
SQL Processor
Description
The RV Application Simulator node is an extension of the RV Subscriber
node and is useful where a dummy implementation of Rendezvous
components such as adapters is needed to be able to test dependent
programs. The nodes property dialog contains a mapper where the fields
of the hypothetical inbound message can individually be assigned to fields
of one or several outbound messages with different structure each. During
program execution, the values of those fields are automatically copied
from the source (inbound message) to the target field and those
dynamically built messages are replayed or forwarded on the defined
subject.
The JMS Message Producer allows you to send JMS messages and provides
support for both the point-to-point and the publish/subscribe domains.
You can import, modify or create the message to be sent, define the
number of iterations and the interval to be observed between.
The JMS Message Consumer allows you to receive JMS messages and
provides support for both the point-to-point and the publish/subscribe
domains
The JMS Queue Browser acts as the JMS Message Consumer but is
restricted to Queue and allow you to download all messages currently in
the specified Queue without removing them.
This node is responsible for invoking sends SOAP messages over HTTP to
invoke operations on remote web services. The component gets
generated from a WSDL file the user has to choose. Available operations
can be selected to create operation invocations with user defined
arguments. The client is easily configurable and able to invoke different
operations with different arguments, to repeat invocations, to store the
responses etc.
This node is similar to the above described “Web Service Client (HTTP)”
except that it uses JMS as the communication transport.
This program node simulates a web server that offers a set of web services
that are dynamically added or removed. New service implementations are
generated from a WSDL file chosen by the user. For each operation, the
response can be freely defined and altered at any time.
The SQL Query Viewer executes a user defined SQL select statement on
any JDBC compatible database and shows the result in a table.
The SQL Processor is used to perform SQL DDL and DML statements on
any JDBC compatible database.
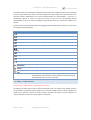
The status of executable nodes within the project tree is shown by a small icon that gets applied on
top of the regular node icon. The following status icons can appear.
Initializing
initialized
running
terminated with error
successfully performed
Page 21 of 156
copyright © centeractive ag
User Manual Opensphere Release 2.5
2.2.5. TEST SUITE
The folder like test suite node is used to logically group series of test cases and run them in the
desired order. Test suites with all their dependent nodes can be published after execution in order to
be shown within a web browser. Test suites only appear as direct dependents of the project node
only.
2.2.6. TEST CASE
Test cases depend on test suites and represent a certain number of test steps that are part of a
graphical definable process flow. The test case detail view is composed of several tabbed panels that
show a different aspect of the test case each. You have the choice between the test flow chart (test
logic), the test step consoles (execution monitor) and the result panel.
2.2.7. TEST STEP
Test steps (test tasks) are part of a test case and controlled by its test flow engine. The appearance of
them within the project tree depends on their functionality, which may be as simple as the sleeper
test step
that interrupts the test case processing during the specified time; or it may be complex
such as the SQL Comparison test step
distinct databases.
that compares and reports data retrieved from one or two
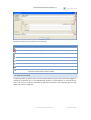
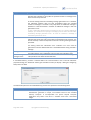
2.3. SUBSTITUTION VARIABL ES
Opensphere lets you define substitution variables on project level within a single dialog. This is useful
where the same variable values are defined at several places within the project and especially also
when a project at some point needs to be adapted to a different environment. The substitution
variable dialog is invoked from the main menu through the menu Project > Substitution Variables… or
directly from the popup menu of the project node.
You may define as many substitution variables as you like, simply click the “add”
button, then
enter the variable name and choose its type in the dialog shown above. The value of most
substitution variables can be edited directly in the table row as soon as the dialog gets closed. Some
types of substitution variables (i.e. JavaScript) let you define the value in a specific editor dialog. The
copyright © centeractive ag
Page 22 of 156
User Manual . Opensphere Release 2.5
substitution variable value can be used in many places within the project for replacing substitution
variable markers, strings that corresponds to the variable name enclosed by the specified prefix and
postfix. Given the example substitution variable definition from the dialog shown above, the
substitution variable marker “%user%” would be replaced by the name of the current connected user.
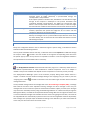
The easiest way to enter a substitution variable marker in a text field is to click
the right mouse button while the cursor is positioned at the desired location
and then choose an entry from the substitution variable list (see sample
beside) that pops up next to the mouse pointer.
2.3.1. STRING SUBSTITUTION VARIABLES
Substitution variables by default are simple string literals that keep their value unchanged unless they
are explicitly modified by the user within the dialog.
2.3.2. PASSWORD SUBSTITUTION VARIABLES
Password substitution variables are string literals. Their real value is represented by a placeholder
character in order to be hidden to non-authorized people.
2.3.3. STRING APPENDER SUBSTITUTION VARIABLES
The string appender substitution variable can have an initial value or it can be empty at initialization.
Each time a substitution is made, a user defined string gets appended to the previous value. The value
of a string appender variable is reset to its initial value each time the start button gets pressed. It can
also be reset during test execution depending on the value chosen in the column titled “Reset”. The
following table explains in detail the behavior of the distinct values.
“Reset” Value
none
per test suite
per test case
per test step
Description
The string appender value is not reset unless the start button gets pressed
The string appender value gets reset to its initial value each time a test suite
starts running
The string appender value gets reset to its initial value each time a test case
starts running
The string appender value gets reset to its initial value each time a test step
starts running
2.3.4. SEQUENCE SUBSTITUTION VARIABLES
Sequence substitution variables supply a value and get incremented each time they are used. The first
value supplied is the initial value defined within the substitution variable dialog. The number to be
used for incrementing the variable is defined in the dialog as well (column “Increment By”). The value
of a sequence variable is reset to its initial value each time the start button gets pressed. It can also be
reset during test execution depending on the value chosen in the column titled “Reset”. The following
table explains in detail the behavior of the distinct values.
Page 23 of 156
copyright © centeractive ag
User Manual Opensphere Release 2.5
“Reset” Value
none
per test suite
per test case
per test step
Description
The sequence value is not reset unless the start button gets pressed
The sequence value gets reset to its initial value each time a test suite starts
running
The sequence value gets reset to its initial value each time a test case starts
running
The sequence value gets reset to its initial value each time a test step starts
running
2.3.5. JAVASCRIPT SUBSTITUT ION VARIABLES
The value of JavaScript substitution variables is generated at runtime from the execution of the
JavaScript code defined by the user. The feature uses the JavaScript engine Mozilla Rhino that
complies with JSR 223. Rhino reaches beyond JavaScript into Java as it allows you to write powerful
scripts quickly by making use of the many Java libraries available.
When editing JavaScript substitution variables, an editor dialog (see below) pops up that lets you
write the script code. This code must be terminated by an instruction that returns the substitution
value (i.e. “return myVar;”).
copyright © centeractive ag
Page 24 of 156
User Manual . Opensphere Release 2.5
Date Formatting Sample
Depending on the current date following code will produce a value similar to “Friday, 27.4.2012”.
//@@ keep this line unchanged when no main() function is defined @@//
var weekday = new Array("Sunday", "Monday", "Tuesday", "Wednesday", "Thursday", "Friday", "Saturday");
var now = new Date();
return weekday[now.getDay()] + ", " + now.getDate() + "." + now.getMonth() + "." + now.getFullYear();
Date Formatting Sample with main( ) method
If you remove the first line (//@@ keep this line unchanged…), Opensphere expects a main() method
it tries to execute. This main method must be parameter-less and its last instruction must return the
substitution value. Feel free to define other functions that are invoked from within the main method.
The script in the box below formats the date/time that is one hour in the future. Depending on the
current date following code will produce a value similar to “27.04.2012 16:24:38”.
// returns the specified number in two digit format
function format(num) {
if (num < 10) {
return "0" + num;
}
return num;
}
// returns the current date/time + 1 hour in the format 'dd.MM.yyyy HH:mm:ss'
function main() {
now = new Date(new Date().getTime() + 3600000);
return format(now.getDate()) + "." + format(now.getMonth() + 1) + "." + now.getFullYear()
+ " " + format(now.getHours()) + ":" + format(now.getMinutes()) + ":" + format(now.getSeconds()) ;
}
File Reading Sample (Java Style)
The following code reads a file on the local file system and provides its content.
//@@ keep this line unchanged when no main() function is defined @@//
data = java.lang.StringBuilder();
fileReader = new java.io.FileReader("readme.txt");
bufReader = new java.io.BufferedReader(fileReader);
while ((line = bufReader.readLine()) != null) {
data.append(line + "\n");
}
bufReader.close();
return data.toString();
Page 25 of 156
copyright © centeractive ag
User Manual Opensphere Release 2.5
2.3.5.1.
REQUESTING USER INPUT
The JavaScript substitution variable can also be used to request user input at runtime whenever the
value of a particular substitution variable is requested. To do so, you can use standard Java Swing
components. The following one line code sample illustrates how to request the user name.
//@@ keep this line unchanged when no main() function is defined @@//
return javax.swing.JOptionPane.showInputDialog("Please enter the user name");
Each time the value of such a substitution variable is requested, the following dialog will appear and
the value entered by the user becomes the actual value of the substitution variable.
2.3.6. JAVA BEAN METHOD SUBSTITUTION VARIABLES
The value of the Java bean method substitution variable is obtained by invoking a method from a Java
bean. This method does either not expect any argument or expect a single string argument. When
specifying a method, it needs to be fully qualified by its class name, the method name, a pair of
parenthesis and optionally the string argument. The string argument must be enclosed in double
quotes except if null for a null reference is explicitly specified. The specified class must have a
parameter-less that allows Opensphere to create new objects.
The chosen method may be present in the Java runtime environment or it may be written by the
customer. In the latter case, you need to include it in a JAR file that gets stored in the libext folder of
the Opensphere installation directory. If you write your own class, you can implement the interface
com.centeractive.opensphere.substitution.ResetableBean contained in the
lib/openSphere-n.n.n-obfuscated.jar file. This interface has a single method named reset. The reset
method will be invoked by Opensphere each time the start button gets pressed. It can also be invoked
during test execution depending on the value chosen in the column titled “Reset”. If the Java bean
does not implement the ResetableBean interface, Opensphere creates a new instance of the
class (a new bean) each time it would otherwise invoke the reset method.
The following table explains in detail the behavior of the distinct values of the “Reset” column.
“Reset” Value
none
per test suite
per test case
Description
In case the start button gets pressed (in no other case), a new Java bean gets
instantiated. If the Java bean however implements the ResetableBean
interface, its reset method is invoked instead.
Each time a test suite starts running, a new Java bean gets instantiated. If the Java
bean however implements the ResetableBean interface, its reset method is
invoked instead.
Each time a test case starts running, a new Java bean gets instantiated. If the Java
bean however implements the ResetableBean interface, its reset method is
invoked instead.
copyright © centeractive ag
Page 26 of 156
User Manual . Opensphere Release 2.5
per test step
Each time a test step starts running, a new Java bean gets instantiated. If the Java
bean however implements the ResetableBean interface, its reset method is
invoked instead.
In the Java runtime environment you can find Java bean like classes with methods that can be used as
data source for this type of substitution variables. Below you find a few examples of method
signatures that may help you solve a specific problem.
java.lang.Random.nextInt()
java.lang.StringBuffer.append("-")
java.util.concurrent.atomic.AtomicLong.getAndIncrement()
2.3.7. STATIC METHOD SUBSTITUTION VARIABLES
The value of the static method substitution variable is obtained by invoking a static method that does
either not expect any argument or expect a single string argument. When specifying a static method,
it needs to be fully qualified by its class name, the method name, a pair of parenthesis and optionally
the string argument. The string argument must be enclosed in double quotes except if null for a null
reference is explicitly specified.
In case you write your own class that provides a static method for this type of substitution variable,
you need to include it in a JAR file that gets stored in the libext folder of the Opensphere installation
directory. In the Java runtime environment you can also find classes with static methods that can be
used as data source for the static method substitution variables. Below you find a few examples of
method signatures that could help you in a specific situation.
java.lang.Math.random()
java.lang.System.getenv("JAVA_HOME")
java.lang.System.getProperty("user.name")
java.util.Locale.getDefault()
java.util.UUID.randomUUID()
Opensphere provides an inbuilt class with a handy static method that returns the current date as a
formatted string. The date/time pattern is the one used by the Java class SimpleDateFormat (see
http://java.sun.com/j2se/1.5.0/docs/api/java/text/SimpleDateFormat.html) and can be freely
composed by the user. The method signature to be entered in the “(Initial) Value” column of the
substitution variable dialog is the following;
com.centeractive.opensphere.substitution.inbuilt.CurrentDateFor
matter.format("<pattern>")
for example:
com.centeractive.opensphere.substitution.inbuilt.CurrentDateFor
matter.format("dd.MM.yyyy HH:mm:ss")
Page 27 of 156
copyright © centeractive ag
User Manual Opensphere Release 2.5
2.3.8. DERIVED SUBSTITUTION VARIABLES
The value of derived substitution variables is produced at runtime performing one or a series of
commands that extract certain part of XML formatted data. The commands tell the program from
where to read the XML content and how to extract the relevant part. Commands are separated by the
pipe character (‘|’) and each command hands over its result to be taken as the source by the
following command. The table below lists available commands.
Command
file:<location>
http:<location>
xpath:<XPath>
Description
references an XML file that gets read from the file system
references an XML file that gets read over HTTP
reads the value at the referenced XPath location. This command expects an XML
formatted string as input and has to be preceded by "file:<location>",
“http:<location>” or another “xpath:<XPath>”.
The value entry must start with a command to be interpreted as a command or a sequence of
commands. It cannot just include it somewhere.
Example:
The following example shows how to extract a derived substitution value from an XML formatted
structure that is itself nested inside an XML file present on the local file system. The XML file
represents a Tibco Rendezvous® message with XML payload created through Opensphere.
<?xml version="1.0" encoding="ISO-8859-1"?>
<!-Generated by Opensphere Release 1.3.0 / Tuesday 2005-05-28 08:39:30
-->
<msgArray>
<xMsg replyEnabled="true" forwardEnabled="false">
<msg sendSubject="" replySubject="">
<msgField name="ID" type="I16" id="0">10</msgField>
<msgField name="Name" type="STRING" id="0"><![CDATA[XMLComparison]]></msgField>
<msgField name="Document" type="MSG" id="0">
<msgField name="XMLData" type="STRING" id="0"><![CDATA[<?xml version="1.0" encoding="UTF-8"?>
<person>
<name>Muller</name>
<firstname>Céline</firstname>
<address>
<street>Rua Gonzalez</street>
<ZIP>2001</ZIP>
<city>Genêve</city>
</address>
</person>
]]>
</msgField>
</msgField>
</msg>
<comparison/>
</xMsg>
</msgArray>
Command: “file:C:/temp/XMLMessage.rvm|xpath://msgField[@name='XMLData']/text()|
xpath:/person/firstname/text()”
Resulting Value: “Céline”
copyright © centeractive ag
Page 28 of 156
User Manual . Opensphere Release 2.5
2.3.9. SYSTEM PROPERTY SUBSTITUTION VARIABLES
This substitution variable allows you to use all Java System Properties available at runtime. After
naming your variable you can choose from the available System properties from a drop down box:
2.3.10.
ENVIRONMENT VARIABLE SUBSTITUTION VARIABLES
An environment variable substitution variable allows you to use any external environment that you
may have set such as for example PATH.
After naming your variable you can choose from the available Environment Variables (at start-up)
from a drop down box:
Page 29 of 156
copyright © centeractive ag
User Manual Opensphere Release 2.5
3. BUILT-IN EDITORS
3.1. XML EDITOR
Opensphere contains a highly featured multi document XML Editor that gets invoked as standalone
application from the Windows start menu. A single document XML editor can be shown inside
Opensphere by selecting the menu item Tool > XML Editor. It also appears as inbuilt editor of other
components (i.e. inside the Tibco Rendezvous® message editor enabling you to edit nested XML data).
The XML editor lets you create or load a single document but also multiple documents. Each XML
document appears within its own internal frame or as a tabbed pane depending on your choice.
Documents are shown in a text view with color highlighting and a content assistant (see below). Left
of the text view, the document structure is represented by a tree where each element – including text
elements – appears as single tree nodes. The XML element detail view appears below the structure
tree view, it shows the element name together with the element attributes. All of the three views are
synchronized; if for example a certain tree node gets selected, its text representation gets marked
and its element detail view gets displayed. The XPath expression that uniquely identifies the selected
element is shown in addition in the status bar below the text view.
copyright © centeractive ag
Page 30 of 156
User Manual . Opensphere Release 2.5
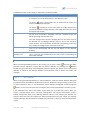
The buttons appearing on the XML Editor’s main tool bar and the one located on top of each structure
tree are explained in the table below.
Button
New
Description
Creates a new XML document
Open File
Opens an existing XML file
Save
Saves the XML document to the file system
Save As
Saves the XML to a file chosen by the user
Undo
Undo the last action but this is a new document action
Redo
Redo the last action but to undo action has been called
Cut
Cut a text
Copy
Copy a text
Paste
Paste a text
Search
Parse the current document and show a tree for easily navigating
Parse
Parse the current document and show any error in red
Format
Formats the current XML text applying indentation
Comment
Comment the current tree node
Split
Split the current editor in two ones
Run
Comparison
Toggle Work
Tab Pane
Starts comparing the two XML documents currently loaded in the editor
Select Node
Shows or hides the tabbed pane that contains the results or already performed
XML comparisons
Select the current tree node in text
Edit Text Node
Opens an editor dialog and lets the user edit the current selected text tree node
Expand All
Expands the selected tree node and all its dependants
Collapse All
Collapses the selected tree node and all its dependants
3.1.1. EDITOR ASSISTANTS
XML content assistant is available for three parts:
1.
2.
3.
Element completion (from a schema like DTD or W3C Schema)
Entity completion (from DTD declaration and default ones)
System completion like CDATA or comment. This completion is enabled by inserting
"<!".
The syntax assistant works in several ways:
1.
2.
By reading a DTD (relative to the current document or not). The DTD will be
automatically read for your current XML document each time it is saved, loaded or
parsed.
By reading a Schema (relative to the current document or not). The schema will be
automatically read for your current XML document each time it is saved, loaded or
parsed.
Page 31 of 156
copyright © centeractive ag
User Manual Opensphere Release 2.5
A bookmark appears in the text editors left bar as an icon together with the colored line it belongs to.
The mark is set by a single mouse click inside the text editors left bar and removed by clicking on the
icon. When a bookmark is set, it follows each line change thus it stays bound to the right element.
Bookmarks are not persistent and will therefore disappear when a document is reloaded from the file
system.
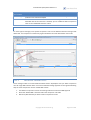
3.1.2. CUSTOMIZING
There exists a convenient feature for application wide customizing of XML elements. Select the menu
item Tool > Configure XML Nodes.. in order to get the corresponding definition XML node definition
dialog displayed.
The dialog contains a pre-configured entries used by Opensphere, removing or changing them may
have an impact on XML comparison results. Feel free however to add new definitions in order to
obtain a custom view of your XML documents and to optimize the result when comparing your XML
documents.
To change the icon of a node definition, click on the
corresponding cell and simply choose an icon from the pop up
dialog. Icons that appear in the dialog are grouped by
categories. Each category corresponds to a direct dependent
sub directory of the folder resources/xmlNodeIcons contained
in the Opensphere home directory. To make your own icons
available in the icon chooser, copy them to one of the existing
sub folders or create new ones that reflect the topic (category)
of the icons. Since the images are loaded at application start
up, you have to re-launch the program to see new ones in the
icon chooser dialog.
copyright © centeractive ag
Page 32 of 156
User Manual . Opensphere Release 2.5
Each row from the dialogs table defines how to display an XML element in the structure tree of the
XML Editor and may define how to identify the XML element using XPath expressions. The following
table explains in detail how to set the values of single fields.
Column
Element
Name
Attribute
Additional
Attribute
Icon
3.1.2.1.
Description
The name of the XML element that is affected by this definition. This may be the
elements local name or the qualified name. The qualified name consists of a
namespace prefix and the local name, separated by a colon (i.e. “ot:person”).
Name of the attribute that uniquely identifies the element. The value of this
attribute is displayed beside the tree node instead of the element name. Either the
‘Attribute’ or the ‘Icon’ must be defined.
When an XML element is used for comparison and its node definition has the
‘Attribute’ specified, the XPath expression that identifies the element is different
from the default one. Accordingly the comparison result can be different as well.
The ‘Additional Attribute’ is optional. The value of this element attribute is put inside
parenthesis and appended to the name of the structure tree node. There is no other
side effect as the one explained for the ‘Attribute’ setting.
Image that is used for rendering the tree node that represents XML element within
structure tree. Either the ‘Icon’ or the ‘Attribute’ must be defined.
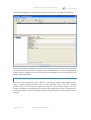
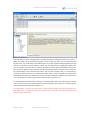
EXAMPLE
The example in this section illustrates how the Opensphere (Release 1.2.0) default XML node
definitions shown in the table below affects the appearance of an XML document in the structure tree
view of the XML Editor. The node definitions are the following.
Our example XML document represents a Tibco Rendezvous® message created through Opensphere.
The figure below shows a portion of that document as formatted text.
Page 33 of 156
copyright © centeractive ag
User Manual Opensphere Release 2.5
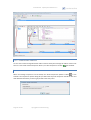
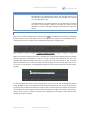
The result of the rather simple node definitions is the surprisingly more readable XML structure tree
shown below.
Without XML node definitions
With default XML node definitions
3.1.3. XML COMPARISON
Comparing XML structures is one of the core tasks within Opensphere. Sometimes it is done behind
the scenes but often it is explicitly defined and run by the user from within the XML Editor.
Comparisons run by the XML Editor always expect 2 loaded documents, one being the reference
document (expected data), the other one the checked document (current data).
3.1.3.1.
COMPARISON RULE VIEW
A reference document is obtained by either loading a document that was last saved being in the
“Comparison Rule View” or by activating this view on any other document. To switch to the
“Comparison Rule View”, select the menu item View > Show Comparison Rules. The view shows an
additional panel on its bottom that is used for creating and maintaining comparison rules. Except in
full comparison mode, the XML comparison engine always expects user defined rules to perform fine.
Such rules identify single XML elements from both documents and specify the function to be used
when comparing their values. Alternatively an XML element can also be compared against a literal
value defined in the comparison rule or the function may simply check whether an element is empty
or not.
The “Comparison Rule View” is different from the default view also in the way that it shows the
comparison icon
in front of each structure tree node. The icon may be enabled or disabled in
order to indicate whether a comparison rule is currently defined for the corresponding node.
Comparison rules can be created or removed by simply clicking on the icon. Alternatively you can
create or alter comparison rules directly within the bottom located rule table.
Such user defined rules however will not be reflected by an enabled icon within the structure tree
unless they use exactly the same XPath expression as if they were created by Opensphere.
copyright © centeractive ag
Page 34 of 156
User Manual . Opensphere Release 2.5
Comparison rules define what value certain elements from an actual XML structure should contain to
be considered correct values. To be able to successfully locate XML nodes, they must be uniquely
identified by an XPath expression that is either generated by the editor or edited by the user. Each
comparison rule by default contains two XPath expressions, one for identifying the node to be
checked (actual value), the other one for identifying the node that holds the expected value (located
in the reference document). The expected value may alternatively be specified by a literal instead of
an XPath expression.
When creating a new comparison rule, its default function is “equals”. Another rule specific function
can be chosen from the combo box that appears in the function table cell. When comparison is done,
the selected function generates a default error text in case the expected value in not correct.
Page 35 of 156
copyright © centeractive ag
User Manual Opensphere Release 2.5
The table below explains each item of a comparison rule in detail.
Comparison Rule
Attribute
Value Path
Function
Expected Value
User Message
Description
This attribute specifies the actual value from the XML formatted data that has
to be checked. It must be a valid XPath expression.
This attribute specifies the function that must be applied either on the actual
value only (i.e. “is empty”) or between the actual value and the expected value
(i.e. “is greater than”). Available functions are the following ones:
equal to
The actual value must be the same as the expected
value
not equal to
The actual value must be different from the expected
value
less then
The actual value must be lexographically smaller then
the expected value. The comparison is based on the
Unicode value of each character in the strings.
greater then
The actual value must be lexographically greater then
the expected value. The comparison is based on the
Unicode value of each character in the strings.
less or equal to
The actual value must be lexographically smaller then
or equal to the expected value. The comparison is
based on the Unicode value of each character in the
strings.
greater or equal to
The actual value must be lexographically greater then
or equal to the expected value. The comparison is
based on the Unicode value of each character in the
strings.
empty
The actual value must be empty
not empty
The actual value must not be empty
length
The length of the actual value must the one specified
by the expected value. The expected value must be a
valid integer value.
contains
The actual value must contain the expected value as a
substring
is contained in
The actual value must be contained in the expected
value as a substring
starts with
The actual value must start with the expected value
ends with
The actual value must end with the expected value
The expected value is also known as the reference value. It is usually a
predefined value that is specified either by an XPath expression or by a litter
value. The expected value is interpreted as literal in case it is enclosed by
quotation marks (“”), otherwise it is always considered to be an XPath
expression.
The optional “User Message” gets added to the function message and lets you
produce some customized output.
copyright © centeractive ag
Page 36 of 156
User Manual . Opensphere Release 2.5
3.1.4. COMPARISON MODES
According with the above explanations, we distinguish between the following comparison modes
supported by the XML Editor.
1.
Full comparison
The XML document shown in the “Comparison Rule View” acts as the reference document
(driving document) meanwhile another document is the one that is checked. Comparison is
done by checking if the value of the text nodes from corresponding elements in both
documents is the same.
2.
Rule only comparison
All comparison rules define their expected values as literals. The payload (XML data) of the
reference document in the “Comparison Rule View” is not considered and may be empty.
3.
Specified node comparison
All comparison rules define their expected values as XPath expressions. The reference
document is expected to contain all the referenced nodes with some useful value.
4.
combination of 2 and 3
3.1.4.1.
RUN COMPARISON
The comparison is started through the “Run Comparison” button
that gets only activated if the
editor contains two documents, one of them being in the “Comparison Rule View”. When comparison
is started, the XML Editor first arranges the internal frames one beside the other, the reference
document (expected data) always appearing right to the checked document (actual data). The
comparison result is shown in a new message pane in the bottom part of the editor.
Page 37 of 156
copyright © centeractive ag
User Manual Opensphere Release 2.5
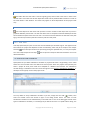
The comparison is driven either by the comparison rules or if there are no comparison rules defined, it
is driven by the reference document.
Rule driven
comparison
Document driven
Every single comparison rule is evaluated and applied once, starting from the
rule appearing in the table’s first row going through the table until reaching the
last row. The following steps are performed for each rule.
1.
Locate the XML element in the left appearing reference document if the
expected value is present as an XPath expression. This step is omitted if the
compare function does not expect a predefined expected value (i.e.
compare function “not empty” ).
2.
Locate the XML element in the checked document (actual data) that
appears in the right part of the editor.
3.
Check the actual value using the compare function from the rule.
Depending on the function, it compares the value with the one extracted
from the reference document but it may also be more basic such as
checking the emptiness of the value.
4.
Print the result in case the check fails
5.
Optionally print a message in case verbose comparison is requested
If a document is displayed in “Comparison Rule View” but it does not have any
comparison rule defined, the comparison is driven by this document (reference
copyright © centeractive ag
Page 38 of 156
User Manual . Opensphere Release 2.5
comparison
document). It is considered to contain the expected data. The comparison
engine passes through the XML structure of the reference document and does
the following for every single element.
1.
Locate the corresponding element from the checked document appearing
in the right part of the editor. To do so, it generates an XPath expression
from the reference element.
2.
Print an error in case the element in the checked document cannot be
found. This prints for example /person[1]/name[1] not found
or
3.
Compare the text values of both elements
4.
Print the result in case the values are not identical
5.
Optionally print a message in case verbose comparison is requested
Once the whole reference document has been traversed and the corresponding
option (see below) is selected, the comparison engine passes through the
checked document and does the following for every single element.
6.
Locate the corresponding element from the reference document (again
using XPath)
7.
Print an error in case the element in the reference document cannot be
found. This prints for example /person[1]/haircolor[1] not expected
The following comparison options can be selected or unselected through the menu Tool > Options
Verbose Comparison
The comparison process by default only reports detail results in case
single comparisons fail. To get more detailed output, select the menu
item Verbose Comparison.
Full Structure Check
When a document driven comparison (without explicit comparison
rules) is performed, elements from the checked document by default
are compared only in case they are also contained in the reference
document. Additional elements in the checked document are ignored.
If the Full Structure Check menu item is selected, the comparison is
done in both directions in order to get a full structure comparison.
Page 39 of 156
copyright © centeractive ag
User Manual Opensphere Release 2.5
3.2. HTML EDITOR
Opensphere contains a fully featured HTML Editor that is used for editing and formatting the main
description of Opensphere projects as well as the description of various components. The figure
below shows the inbuilt HTML Editor on the test case property dialog. The available buttons are self describing as they can be found same on most other popular text editors.
3.3. HEXADECIMAL EDITOR
Frequently message and other data is present in raw format that cannot be interpreted as such by the
application. Sometimes however, you know about the internal format of such data and you want to
be able to edit it. The Opensphere embedded Hexadecimal Editor that gets invoked through the menu
item Tool>Hex Editor… enables you to see and edit binary data. The capture below shows how the
editor looks like.
copyright © centeractive ag
Page 40 of 156
User Manual . Opensphere Release 2.5
The editor shows two horizontally arranged panes that offer both a different view on the same data
and that let you both edit that data. The left located pane shows a byte wise representation of the
document content. Depending on the current selected button, the representation – the base - is
hexadecimal, decimal or octal. The right pane shows for each line the corresponding textual
representation using the character encoding currently selected within the combo box located on the
tool bar.
Functions within the Hexadecimal Editor are triggered either through tool bar buttons or menu items
according to the following table:
Button
Open File (CTRL+O)
Description
Load the content of the file into the editor
Save (CTRL+S)
Save data into a file
Save As
Save data into the specified file
Undo (CTRL+Z)
Undo previous changes
Redo (CTRL+Y)
Redo undone changes
Search/Replace
(CTRL+F)
Search and maybe replace a given pattern
Cut (CTRL+X)
Cut selected data
Copy (CTRL+C)
Copy selected data
Paste (CTRL+V)
Paste data from clipboard
Goto
Go to the specified index
Hexadecimal
Decimal
Octal
Encoding
Display bytes in hexadecimal representation
Display bytes in decimal representation
Display bytes in octal representation
The character encoding used for representing the textual
representation of the content can be changed at any time by selecting
the appropriate value from the combo box
3.4. OBJECT FORM EDITOR
This feature is in experimental mode and not yet activated
The object form editor lets you edit a complex structured entity in an intuitive way. Nested elements
can be added or removed through a simple click on a button; nested structures can be expanded and
collapsed, list elements moved to another position. Specific field editors provide assistance to
improve the edition of data of a certain type (i.e. date/time).
Page 41 of 156
copyright © centeractive ag
User Manual Opensphere Release 2.5
The buttons appearing on the editor are the following:
Button
Add
Description
Adds a property (field) from the object or an element from the list
Remove
Removes a property (field) from the object or an element from the list
Collapses the sub-structure
Expands the sub-structure
Moves the element with the focus up by one position in the list
Moves the element with the focus down by one position in the list
Shows a text editor for the field the editor button appears beside
Edit Date/Time
Shows an editor from where the user can easily choose the date and time for
the field the editor button appears beside
3.5. ROW SET EDITOR
The Row Set Editor is used to define row sets (tabular data) that gets used as processing trigger for
messaging components such as the JMS Message Producer, the RV Publisher or the Web Service
Client. The source of a row set can be either an SQL select statement or static data that gets manually
edited and stored in an XML file.
copyright © centeractive ag
Page 42 of 156
User Manual . Opensphere Release 2.5
Each row of a row set is a trigger for sending (publishing) all messages - or invoking the operations that are defined for the messaging component. The field values from the triggering row can be used
to replace substitution value markers anywhere in the published message
or operation invocation. Substitution value markers correspond to the field
(column) name enclosed by the substitution variable prefix and postfix that
are defined in the substitution variable dialog (menu Project > Substitution
Variables…).
The easiest way to enter a substitution variable marker in a text field is to
click the right mouse button while the cursor is positioned at the desired
location and then choose an entry from the substitution variable list that
pops up next to the mouse pointer. The top six substitution variable from
the sample beside represent column names from the local row set, the
remaining ones are defined for the entire project.
3.5.1. SQL QUERY
The “SQL Query” appears if you select the appropriate named radio button top left of the editor
dialog. You have to define a database connection and a single select statement that will retrieve the
data (result set) at runtime. Already defined database connections can be changed at any time.
The SQL editor offers basic syntax highlighting and allows to write comment either as line comment
with leading double slashes ( // line comment ) or as block comment that is delimited by a couple of a
slash and a star ( /* block comment */ ).
The syntactical correctness of the entered SELECT statements is checked when the “Check” button is
pressed. If the used JDBC driver supports pre-compilation, the check method will send the statement
to the database for pre-compilation. Some drivers do not support pre-compilation. In this case, the
statement will not be sent to the database until it is executed and only the starting key word is then
checked.
Page 43 of 156
copyright © centeractive ag
User Manual Opensphere Release 2.5
3.5.2. MANUALLY EDITED DATA
If you select the top left located radio button labeled “Static Data”, the data has to be entered
manually into a table. The table structure (number and name of the columns) gets defined by the user
within a dialog that pops up upon mouse click on the
button. Table rows can be arranged by
moving them up or down. The entered data is finally stored to a user chosen XML file from where it
will be read again at component runtime.
The items that appear on top of the manually entered reference data table are the following.
Item
Open File
Save
Save As
Define Columns
Description
Opens an XML file and loads its content into the table. Any previous
loaded data will be removed and the table structure will correspond to
the one defined in the loaded file
Saves the table data back to the XML file. If no file has been defined yet,
a file chooser dialog is displayed and lets the user chose the file.
Saves the table data into an XML file chosen by the user
Opens a dialog that lets the user
define the table columns.
Single columns can be added,
removed or simply be moved to
another position.
copyright © centeractive ag
Page 44 of 156
User Manual . Opensphere Release 2.5
Item
Load from Database
Description
Opens a dialog that lets you load data using an SQL query on a database
of your choice. Please limit the number of rows by carefully editing the
SQL query.
Any previous loaded data will be removed and the table structure will
correspond to the data retrieved from the database.
Load from CSV File
Be aware that the loaded data will have to be stored into a file.
This button is used if you want to load data contained in a CSV file.
When pressing the button, the user is prompted to choose the CSV
source file and then he’ll see the following dialog where he can specify
how the file content should be processed.
Any previous loaded data will be removed and the table structure will
correspond to the data retrieved from the CSV file.
Be aware that the loaded data will have to be stored into a file other
than the CSV source file.
Page 45 of 156
copyright © centeractive ag
User Manual Opensphere Release 2.5
4. MESSAGING
4.1. MESSAGING PROGRAM NODES
Certain tree nodes acting like independent programs are used to send and/or receive messages using
different types of protocols such as Tibco Rendezvous®, JMS or HTTP (SOAP). The detail view of such
messaging program tree nodes is a tabbed pane that holds the “Console” tab where all program
activities are shown in textual mode. The console view is the basic detail view that is also available on
other (none messaging) executable nodes. The additional “Messages” tab shows all inbound and
outbound messages from messaging program components in an easy readable way.
Inbound message are shown by a left directed arrow
while outbound message are represented
by a right directed arrow . Messages that are dependent on a previous message have their arrow
shifted to the right. This is shown in the figure below that belongs to a Rendezvous Subscriber node.
Each time the component received an inbound message on the subject “test.subject”, it replied on
the subject “test.reply.subject” and sent another two messages on the subjects
“test.forward.subject.abc” and “test.forward.xyz” each.
The maximum number of messages retained in the “Messages” tab is 100 by default. Each time a
newly added message exceeds this number, the oldest message does get removed from the table
automatically. The limitation of 100 messages can be adapted for every single messaging program
node in its property dialog in the field “Message Table Size” that appears in the “Message Retention”
box.
copyright © centeractive ag
Page 46 of 156
User Manual . Opensphere Release 2.5
4.2. MESSAGE EDITORS
Tibco Rendezvous®, JMS and Web Service messages within Opensphere can be shown and edited
using the standalone message list editor or the multi message document. Some program nodes such
as the “RV Publisher” or “JMS Message Consumer” let you edit messages directly within their
property dialog.
4.2.1. MESSAGE LIST EDITOR
The message list editor gets invoked through the menu item Message > Message Editor… or by
pressing the toolbar button showing the icon
. The editor is basically divided into two parts, the
message list appearing on its top and the message view that on its bottom that shows the details of
the message currently selected in the list. The message view shows the message structure as a tree
and lets you select single nodes. The message dependent details of the selected tree node get
displayed right to the tree. Some tree nodes contain read only information some others are editable.
Some data may be edited directly within the message list (table) or within the message structure tree;
this is dependent on the message type however.
When working with the message list editor, you start creating new messages by activating the “Add”
button
or you load one or several messages from a file (“Open File” button ). Messages
contained in files have an application specific XML format. Opensphere however first deducts the
message type from the file extension. Therefore it is important not to change the extension of
message files. Current known message types and their corresponding file extensions are listed below.
Page 47 of 156
copyright © centeractive ag
User Manual Opensphere Release 2.5
Message Type
JMS Message
Tibco Rendezvous® Message
Web Service Message (can contain wso and wsr)
File Extension
jms
rvm
wsm
When loading messages from a file, the editor detects the message type from the file extension.
When creating a new message from scratch within a dialog that does
not contain any message yet, you have first to select the message
type from the dialog shown beside. The message types appearing
within the dialog depend on the modules currently activated
(installed) in Opensphere.
The message list editor can only contain messages of one type at the
same time.
The message list editor contains a menu and a tool bar that contain generic items valid for all message
types but also specific items that are shown only when editing a certain message type. The generic
items appearing in the menu and/or on the tool bar are listed in the following table:
Button
Open File
Description
Opens a file that contains the definition of one or several messages in
the Opensphere specific XML format. When a new message file is loaded
into the editor that shows already one or several messages, those
messages are not simply replaced by the new ones. Instead the user is
asked how he wants the new messages to be loaded. He can choose
between the following options:
Replace current messages
Append to the end of the message table
Insert at the beginning of the message table
Insert after the selected message
Insert before the selected message
Add Message
Be aware that in case you press the save button or the corresponding
menu item, all messages are saved to the file from where the latest
messages were loaded.
Saves the message contained in the message editor to its original file. If
the message was not initially loaded from a file, this will save it to a new
file using the appropriate file extension. The file name and its location
can be altered by the user.
Saves the message contained in the message editor to a file other then
its original one. The name and its location can be chosen by the user.
Switches to the mapping view and back to the normal view. This button
is available on embedded message editors for specific components only.
Adds a new empty message to the multiple message editor
Duplicate Message
Duplicates the selected message from the message
Remove
Removes the selected message from the message
Save
Save As
copyright © centeractive ag
Page 48 of 156
User Manual . Opensphere Release 2.5
Button
Show Comparison
Rules
Description
Switches the message list editor to the comparison rule mode
First
Navigates to the first message in the message table
Prior
Navigates to the previous message in the message table
Next
Navigates to the next message in the message table
Last
Navigates to the last message in the message table
Find
Opens the search dialog shown below and lets the user define and
perform a search for data present inside the message contained in the
message editor.
Find Again
Performs the defined search again starting at the current position
To move single rows within the message table to a new position or to remove
them from there, right click the corresponding row-header and select one of the
menu items contained in the pop-up menu. The same menu items are also
available in the Edit menu.
Page 49 of 156
copyright © centeractive ag
User Manual Opensphere Release 2.5
4.2.2. MULTI MESSAGE DOCUMENT EDITOR
The multi message document editor gets invoked through the menu item Message > Multi Message
Doc Editor…. It contains a number of message list editors that are added dynamically. Each internal
message list editor may contain messages of the same or of a different type depending on the user’s
choice.
The multi message document editor lets you arrange the contained message list editors in several
ways. Either you prefer them appearing within a tabbed pane or you may want to see them as
internal frames that can be tiled according to your choice.
Most items of the menu and the tool bar appearing on the multi message document editor act on the
current selected internal message list editor and have the same functionality as on the standalone
message list editor.
Item
New
Show Comparison Option
Description
Adds a new internal message list editor
Shows a dialog where the user may define a few options that are
considered when comparing messages. This item gets activated only
if the editor contains exactly two internal message list editor and if
one of them is in view mode “Show Comparison Rules”.
copyright © centeractive ag
Page 50 of 156
User Manual . Opensphere Release 2.5
Item
Start Comparison
Toggle Work Tab
Configure XML Nodes
Description
Starts comparing the messages currently contained in the two
internal message list editors.
This item gets activated only if the editor contains exactly two
internal message list editor and if one of them is in view mode
“Show Comparison Rules”.
Shows or hides the work tabs that appear on the bottom of the
editor.
Shows a dialog where the user can define the appearance of XML
nodes (see. Customizing)
4.2.3. MESSAGE COMPARISON
The multi message document editor can be used for comparing messages. To do so, it must contain
two message list editors, one that holds the reference messages and one that holds the messages to
be checked.
4.2.4. COMPARISON RULE EDITING
Comparison rules on messages can be defined within a message list editor if its current view mode is
“Show Comparison Rules” (see menu item View > Show Comparison Rules). If you switch to this node,
the comparison rule panel appears at the bottom of the message list editor and comparison sensitive
nodes are shown together with a disabled compare icon
. Message comparison rule editing is
done in a similar as for XML documents; the main difference is the way how paths appear in the
comparison rule table. Whereas XML comparison rule definition uses XPath only notation, message
comparison rule also uses a more readable unix like tree path notation.
4.2.4.1.
TREE NODE RULES
A new message comparison rule is added through a click on the disabled icon located left to the tree
node. The icon gets then enabled
and a row is added to the table within the comparison rule
panel. If you click on the enabled icon again, the message rules get removed from the table. The
sequence of the comparison rules within the table can be altered through the “up” and “down”
buttons. When comparison is done, the comparison rules are processed in the same sequence as they
are present in the table, the top most gets processed first.
Page 51 of 156
copyright © centeractive ag
User Manual Opensphere Release 2.5
Comparison rules define what value certain elements from an actual messag should contain to be
considered correct values. To be able to successfully locate XML nodes, they must be uniquely
identified by an XPath expression that is either generated by the editor or edited by the user. Each
comparison rule by default contains two XPath expressions, one for identifying the node to be
checked (actual value), the other one for identifying the node that holds the expected value (located
in the reference message). The expected value may alternatively be specified by a literal instead of an
XPath expression.
When creating a new comparison rule, its default function is “equals”. Another rule specific function
can be chosen from the combo box that appears in the function table cell. When comparison is done,
the selected function generates a default error text in case the expected value in not correct.
The table below explains each item of a comparison rule in detail.
Comparison
Rule Attribute
Value Path
Description
This attribute specifies the actual value from the message that has to be checked.
It must be a valid XPath expression.
Instead of showing the XPath expression, the comparison rule table shows a unix
like notation that identifies the message node the comparison references. If you
start editing the cell by clicking inside the cell, you will actually see the previously
hidden XPath expression and you can adapt it to your needs. As an example the
below located path editor shows the XPath expression for a Tibco Rendezvous®
message node identified by the tree path “/Person/Address/ZIP Code”
copyright © centeractive ag
Page 52 of 156
User Manual . Opensphere Release 2.5
Comparison
Rule Attribute
Description
Function
This attribute specifies the function that must be applied either on the actual value
only (i.e. “is empty”) or between the actual value and the expected value (i.e. “is
greater then”). Available functions are the following ones:
equal to
not equal to
less then
Expected Value
Page 53 of 156
The actual value must be the same as the expected value
The actual value must be different from the expected value
The actual value must be lexographically smaller then the
expected value. The comparison is based on the Unicode
value of each character in the strings.
greater then
The actual value must be lexographically greater then the
expected value. The comparison is based on the Unicode
value of each character in the strings.
less or equal to
The actual value must be lexographically smaller then or
equal to the expected value. The comparison is based on
the Unicode value of each character in the strings.
greater or equal to
The actual value must be lexographically greater then or
equal to the expected value. The comparison is based on
the Unicode value of each character in the strings.
empty
The actual value must be empty
not empty
The actual value must not be empty
length
The length of the actual value must the one specified by the
expected value. The expected value must be a valid integer
value.
contains
The actual value must contain the expected value as a
substring
is contained in
The actual value must be contained in the expected value
as a substring
starts with
The actual value must start with the expected value
ends with
The actual value must end with the expected value
The expected value is also known as the reference value. It is usually a predefined
value that is specified either by an XPath expression or by a litter value. The
expected value is interpreted as literal in case it is enclosed by quotation marks
(“”), otherwise it is always considered to be an XPath expression.
Instead of showing an XPath expression, the comparison rule table shows a unix
like notation that identifies the message node the comparison references. If you
start editing the path by clicking inside the cell, you will actually see the previously
hidden XPath expression and you can adapt it to your needs (see also “Value
Path”).
copyright © centeractive ag
User Manual Opensphere Release 2.5
Comparison
Rule Attribute
User Message
Nested XML
4.2.4.2.
Description
The optional “User Message” gets added to the function message and lets you
produce some customized output.
This check box indicates whether the referenced message structure node contains
itself XML data. If the check box is selected, you are enabled to define comparison
rules on the nested XML structure as well.
NODE DETAIL RULES
For some type of messages, more specific comparison rules can be defined inside the message node
detail view. The compare icon and the way it gets activated is the same described for tree nodes.
4.2.4.3.
NESTED XML CONTENT RULES
Some message nodes can contain XML formatted content. Opensphere lets you define comparison
rules for single XML element within such custom defined message payload. Go through the following
steps to create comparison rules for nested XML content.
1.
2.
3.
First define a comparison rule for the message node that contains the XML payload
Select the “Nested XML” check box within the comparison rule table
Define any XML element you want to add a comparison rule for
copyright © centeractive ag
Page 54 of 156
User Manual . Opensphere Release 2.5
4.2.5. COMPARISON PROCESS
As soon as the multi message document editor contains exactly two message list editors and if one of
them is in view mode “Show Comparison Rules”, the “Start Comparison” button
4.2.5.1.
gets enabled.
COMPARISON OPTIONS
When the message comparison can be started, the “Show Comparison Options” button
is also
enabled. The comparison options dialog lets you define the way how comparison should be done and
how detailed information you like to get printed to the work panel.
Page 55 of 156
copyright © centeractive ag
User Manual Opensphere Release 2.5
Option
Comparison Mode
Description
The comparison mode can be selected from the combo box.
Compare all for equality
All message fields of the compared messages must be identical with the
message fields of the reference message. This applies to the field names, the
field ID’s, the values and the message structure.
“Compare all for equality” is selected by default. Therefore if you define
comparison rules and you don’t get the expected result, please check first the
selected comparison mode.
Compare equality not structure
All fields of the compared message must be equal to that of the reference
message. Fields that are in the compared message but not in the reference
message are ignored.
Compare defined only
Only message fields explicitly defined for comparison are considered. A
message field is defined when the check box “Check” on its node detail view is
selected. The message structure beside the defined fields is not considered.
Verbose
Excluded Paths
Compare all but defined (inverse comparison)
Compares all message nodes except those a comparison rule is defined for
The comparison process by default only reports detail results in case single
comparisons fail. To get more detailed output, select this check box.
Comma separated list of XPath expressions that identify elements (paths) that
must entirely be excluded when comparison is done. Comparison is done on
the XML representation of individual messages. Therefore for being able to
define valid XPath expressions, one has to know about the XML representation
of messages. Useful expressions for Tibco Rendezvous® messages for example
would
be
“//rvMsgFieldGroup[@name='^prefixList^']”
or
“//rvMsgFieldGroup[@name='^tracking^']”. Excluded paths are considered only
for comparison mode “Compare all for equality”.
copyright © centeractive ag
Page 56 of 156
User Manual . Opensphere Release 2.5
4.2.5.2.
RUNNING THE COMPARISON
If the “Start Comparison” button gets pressed, a new work panel gets added to the bottom of the
frame, it will show the result as comparison goes on. The two internal message list editors get
arranged side by side, the one that contains the reference messages (comparison rules) gets placed to
the left.
4.2.5.3.
COMPARISON RESULT
The detailed result of the message comparison is shown in a new message pane at the bottom of the
comparison dialog. The message pane by default shows some information about the comparison and
a row for each failed comparison within a table. Single rows are shown as structured text in a
dedicated dialog when a mouse click occurs on them. The entire message result panel can also be
shown as plain structured text by right clicking inside the table and choosing View > Text Pane from
the popup menu.
Page 57 of 156
copyright © centeractive ag
User Manual Opensphere Release 2.5
The following figure shows an example of a comparison result in the text pane view. The comparison
was done in verbose mode (see property dialog).
start comparing messages (compare all for equality)
excluded tree paths are: /^prefixList^, /^tracking^
excluded XPath's are: /msg/msgField[@name='^prefixList^'], /msg/msgField[@name='^tracking^']
1 message will be compared to 1 reference message
message number 1 is not correct
/msg/text is excluded from comparison
/msg/Person/text is excluded from comparison
/msg/Person/Title/text is fine
/msg/Person/Name/text is fine
/msg/Person/Firstname/text is fine
/msg/Person/Birthdate/text is fine
/msg/Person/Address/text is excluded from comparison
/msg/Person/Address/Street/text is fine
/msg/Person/Address/Housenumber/text is fine
/msg/Person/Address/ZIP Code/text is fine
/msg/Person/Address/Location/text is fine
/msg/Person/Address/State/text is fine
/msg/Person/Address/Country/text is fine
/msg/Person/Job History/text is excluded from comparison
/msg/Person/Job History/Job/text is excluded from comparison
/msg/Person/Job History/Job/Desc/text is fine
/msg/Person/Job History/Job/Company/text is fine
/msg/Person/Job History/Job/Hire Date/text is fine
/msg/Person/Job History/Job/text is excluded from comparison
/msg/Person/Job History/Job/Desc/text
expected <Consultant> but was <Senior Consultant>
/msg/Person/Job History/Job/Company/text
expected <centeractive ag> but was <IBM>
/msg/Person/Job History/Job/Hire Date/text
expected <01.01.1999 00:00:00> but was <01.04.2000 00:00:00>
/msg/Person/Job History/Job/text is excluded from comparison
/msg/Person/Job History/Job/Desc/text
expected <Business Analist> but was <Senior Consultant>
/msg/Person/Job History/Job/Company/text
expected <Microsoft> but was <IBM>
/msg/Person/Job History/Job/Hire Date/text
expected <01.07.1998 00:00:00> but was <01.04.2000 00:00:00>
/msg/Person/Job History/Job/text is excluded from comparison
/msg/Person/Job History/Job/Desc/text
expected <Programmer> but was <Senior Consultant>
/msg/Person/Job History/Job/Company/text
expected <Microsoft> but was <IBM>
/msg/Person/Job History/Job/Hire Date/text
expected <01.02.1994 00:00:00> but was <01.04.2000 00:00:00>
1 incorrect message found totally
copyright © centeractive ag
Page 58 of 156
User Manual . Opensphere Release 2.5
Below you can see the result of a non-verbose sample comparison where a message field contains
nested XML content.
start comparing messages (compare defined only)
excluded tree paths are: /^prefixList^, /^tracking^
1 message will be compared to 1 reference message
message number 1 is not correct
/msg/Document/XMLData (nested XML content...)
.../person/name[1]/text()
expected <Müller> but was <Muller>
.../person/address[1]/street[1]/text()
expected <Rua Goñzalez> but was <Rua Gonzalez>
1 incorrect message found totally
4.3. SOAP WEB SERVICES
Opensphere lets you define SOAP web service clients and server simulators based on existing WSDL
files through a few mouse clicks. SOAP is an XML-based protocol for exchanging information between
computers.
4.3.1. WSDL FILE CACHE
The Web Services Description Language (WSDL) is an XML-based language that is used for describing
the functionality offered by a web service. A WSDL description of a web service - usually contained in
a WSDL file - provides a machine-readable description of how the service can be called, what
parameters it expects, and what data structures it returns. WSDL files constitute a contract between
clients and servers.
The WSDL files used to generate web service clients or server stubs are stored within the gen/wsdl
folder of the Opensphere project directory they belong to. When a new project is created, this folder
is empty but as soon as you invoke any SOAP web service related function, Opensphere asks you to
select a local or a remote WSDL file. The selected WSDL file is then parsed and added to the WSDL file
cache for subsequent user selections. The WSDL file is also stored within the gen/wsdl folder together
with included WSDL files or reference schema files (XSDs). Every time an Opensphere project is
opened, its gen/wsdl folder is scanned and the WSDL files are loaded to the WSDL file cache.
Page 59 of 156
copyright © centeractive ag
User Manual Opensphere Release 2.5
Whenever Opensphere needs a WSDL file to accomplish a
web service related task, the program requests it from the
user through the dialog shown beside. The dialog lists all
entries from the project WSDL file cache. When no WSDL file
was used for this project yet, the WSDL file cache is empty.
If no WSDL files are shown in the dialog or if the desired one is
not listed yet, you can import a new one to the WSDL file
cache by pressing the appropriate button from the top
located tool bar. Their respective functionality is explained in
the table below.
The WSDL file cache can also be viewed and altered on the project properties dialog that gets
displayed if you select Project > Project Properties… from the main menu.
Icon
Description
Add WSDL File
This function lets you select a WSDL file from the file system.
Add Remote WSDL
This function lets you select a remote WSDL file by entering an HTTP URL
in a pop-up dialog. Such an URL could look as follows:
http://www.mycompany.com:8080/store/ArticleService?wsdl
Delete WSDL
Deletes the selected WSDL definition from the cache
4.3.2. WEB SERVICE MESSAGE EDITOR
Web service components within Opensphere use XML formatted messages (file extension wsm) to
define what data to exchange and how to address the counterpart. Such messages can be operation
invocations or the result to such invocation. Operation invocation messages are requests that are
sent to a web service server. Operation result messages let you define the data a web service server
component shall send back as a response to a corresponding operation invocation.
You’ll always need a WSDL file that describes the location of the service and the operations the
service exposes. Operation invocations are typically defined for the web service client; results are
defined on the server component for one or several service operations. In some cases, those
messages are defined independently from a client or a server. This can be done through the
standalone message list editor (menu item Message > Message Editor…) and through the multi
message document editor (menu item Message > Multi Message Doc Editor…).
copyright © centeractive ag
Page 60 of 156
User Manual . Opensphere Release 2.5
The following figure shows an operation invocation result that’s being edited inside a standalone
message list editor. The message is displayed using the “Show Comparison Rules” mode and can be
saved to an XML file in order to be used as a reference message in a comparing component.
Page 61 of 156
copyright © centeractive ag
User Manual Opensphere Release 2.5
4.3.3. WEB SERVICE SERVER (SOAP OVER HTTP)
This program simulates a HTTP server that hosts a number of web services with user-defined
responses to specific operation invocations. When the server node gets created, its property dialog
lets you define a few options related to the server as a whole. The most significant option is the HTTP
port on which the server listens on incoming web service operation invocations.
copyright © centeractive ag
Page 62 of 156
User Manual . Opensphere Release 2.5
Web Service Server options are defined on the first tab within the properties dialog, a detailed
description is explained in the following table.
Option
Name
Protocol
Port
Terminate after…
Description
The name that appears in the project tree together with the node
representing the web service server
Choose HTTP or HTTPS
HTTP or HTTPS port on which the server listens on incoming web service
operation invocations
The selected check box together with the number in the behind located text
field tells the server to stop after the specified number of operation
invocations have been accepted and processed.
In case the trailing check box “Exceeding generates error” is selected, the
server however does not stop immediately when the specified number of
operation invocations has occurred. It only stops when an additional
operation invocation is detected or if the idle timeout is reached. An
additional operation invocation in this case generates an error.
In order to get a server checking that no operation invocations is made on a
certain web service for example; you would have to specify 0 operation
invocation(s) and to select the check box “Exceeding generates error”. As soon
as it detects an operation invocation, it would then generate an error.
Page 63 of 156
copyright © centeractive ag
User Manual Opensphere Release 2.5
Option
Abort after…
SSL Client Certificate
Use Cached Keystore
Keystore Password
Message Table Size
Write operation
invocations to file
Deploy services each
time the server gets
started
Description
The selected check box together with the specified number of seconds
indicates that the process has to stop after the specified time of inactivity.
The time of inactivity is the time elapsed since the last operation invocation
has been processed.
The trailing check box “Generates error” indicates if an error must be
generated in case the defined idle time is exceeded without having detected
any operation invocation.
Defines an X.509 client certificate to run the web service endpoint over a
secure socket layer. A certificate (also known as a public-key certificate) is a
digitally signed statement from one entity (person, company, etc.), saying
that the public key (and some other information) of another entity has some
specific value. When data is digitally signed, the signature can be verified to
check the data integrity and authenticity.
You can run several web-service servers with different keystores – just bear in
mind that if you specify a keystore that contains multiple X.509 certificates,
Opensphere randomly uses one of them.
If this checkbox is selected, you must choose a keystore from the project
specific cache. Prior to be able to use cached keystore, they must be defined
in the dialog that pops up when you activate the
button.
If this checkbox is not selected, the
button lets you choose an existing
keystore from the file system. This file is referenced externally and is never
copied to the project directory.
The password used to access the keystore
The maximum number of messages that are contained in the message table.
This table appears on the “Messages” tab from the tree node detail view.
Select this check box if you want the server to write inbound messages to a
file specified in the below located text field
Select this check box to make sure the server simulator runs always with the
latest definition of the web service implementation. If this check box is not
selected, you have to manually deploy new and changed web service
implementations through the server node popup menu.
Once you have defined the server options, you have to define the operation response messages. This
is done on the second tab within the server property dialog. Either you import an existing definition
by opening an XML file (file extension wsm) or you press the
button that lets you select a WSDL
definition from the project specific WSDL file cache and then choose available operation responses
from the dialog shown below. The dialog lets you also select a set of self-explanatory options that
determine how the program initially generates the SOAP content of the response messages. If you
want to choose operation responses from a different WSDL file, simply click the button labeled
“Switch WSDL…” and make your choice.
copyright © centeractive ag
Page 64 of 156
User Manual . Opensphere Release 2.5
Within the Web Service properties dialog every defined operation response message is represented
by a row on the top located table while its details are shown in the bottom part of the dialog when a
row is selected. All you got left to do is editing the result data within the SOAP Content node. The
payload (SOAP Content) of the operation response can contain markers that are replaced by the value
of project dependent substitution variables.
Page 65 of 156
copyright © centeractive ag
User Manual Opensphere Release 2.5
4.3.4. WEB SERVICE CLIENT (SOAP OVER HTTP)
The Web Service Client is able to invoke the web service operations with different data (SOAP
Content) each. This component uses SOAP over HTTP – or HTTPS - to communicate with the remote
service. When a new client is created, you are asked to select a WSDL file from the WSDL file cache.
The Opensphere program will try to extracts the location and port of the target service from the
initially selected WSDL file. The property dialog of the Web Service Client lets you extensively
customize its behavior within the first tab.
In order to complete the configuration, you have to add (define) at least one operation invocation on
the tab labeled “Operation Invocations”. This is done by opening an XML file (file extension wsm) or
by by activating the
button. Latter lets you select a WSDL definition from the project specific
WSDL file cache and then choose available operation invocations from the dialog shown below. The
dialog lets you also select a set of self-explanatory options that determine how the program initially
generates the SOAP content of the operation invocation messages. If you want to choose operation
invocations from a different WSDL file, simply click the button labeled “Switch WSDL…” and make
your choice.
The payload (SOAP Content) of the operations to be invoked can contain markers that are replaced by
the value of project dependent substitution variables. Markers can also be replaced by the
corresponding data of a single row when the driving component for invoking operations is a row set.
Row sets can be defined as static data within an editor but they can also be the result of an SQL select
statement that gets executed each time the Web Service Client is started.
copyright © centeractive ag
Page 66 of 156
User Manual . Opensphere Release 2.5
Web Service Client options are defined on the first tab within the dialog, the detailed description is
explained in the following table.
Option
Name
Protocol
Host
Port
Use HTTP Proxy...
Use Proxy Basic
Authentication…
Connect Timeout
Response Timeout
Page 67 of 156
Description
The name that appears in the project tree together with the node
representing the web service client
HTTP or HTTPS
The name or the IP address of the target computer that hosts the web
service(s) to be invoked
The port number the target computer listens for incoming web service
operation invocations
Select this check box and enter appropriate values for “Proxy Host” and
“Proxy Port” if you communicate through an HTTP proxy.
Select this check box and enter “Username” and “Password” next to it if the
HTTP proxy needs basic authentication.
Maximum number of milliseconds the client tries to establish a HTTP
connection to the server.
Maximum number of milliseconds the client waits for receiving operation
invocation responses.
copyright © centeractive ag
User Manual Opensphere Release 2.5
Option
Op. Invocation
Trigger
Number of Iterations
Description
Determines how the operation invocation process shall be triggered.
According to the selection, some controls in this box get visible, some others
non visible.
Number of iterations the client should send operations invocations each time
it is started. This number has no effect if the client was told to invoke
operations forever.
Accomplishing sending all operation invocations of the defined message array
is considered to be one iteration.
Infinite
This field is visible only if the operation invocation trigger selection is “Iterator
Counter (Counter)”.
Indicates if operations invocations should be sent until the process is stopped
by external intervention. If this check box is unchecked, “Number of
Iterations” setting determines how many operations invocations are sent.
Row Set
This field is visible only if the operation invocation trigger selection is “Iterator
Counter (Counter)”.
This line shows what kind of data row set is used to control the message
sending process. Row sets are tabular data that can be defined in a separate
dialog by pressing the “Define…” button. In that dialog, you can either define
an SQL query on a database of your choice or you can define your own static
table data that will be stored to an XML file. If you define a row set based on
an SQL select statement, the statement gets executed every time the Web
Service Client is started.
When you decide to define static data, Opensphere lets you do that from
scratch but it also offers the possibility to import the data from a database. In
both cases, you can alter the data immediately or at any time later to make it
fit your needs. When after defining a new static row set you close the Row Set
Editor by pressing the “OK” button, Opensphere may ask you to save the row
set data to an XML file of your choice. Opensphere can also be told to decide
by its own where to store the XML file. This can be achieved by selecting the
option “Automatically define name and location of messaging component
files” on the File panel within the tool options dialog (select Tool > Tool
Options… from the main menu). When this option is selected and the static
row set data was never saved to a file, you will see “File: not yet defined”
right to the “Define…” button. That’s there because Opensphere will not
automatically assign a file name and save the data to it until the property
dialog gets closed through the “OK” button.
Please consult the chapter “3.5 Row Set Editor” for detailed information
about the row set editor.
When running the Web Service Client, the rows from the row set (regardless
if resulting from an SQL query or from static data) are traversed one by one
until the last row is reached. Every row corresponding to one iteration, will
trigger the invocation of all operations present in the operation list. The
values from the current row can be used as string type substitution values in
the operation data of that one iteration. To make the substitution happen,
you simply place the column name, enclosed by the appropriate pre- and
postfix wherever you wish within your operation, same as you do with
ordinary substitution values (see 2.3 Substitution Variables).
copyright © centeractive ag
Page 68 of 156
User Manual . Opensphere Release 2.5
Option
Interval
Use HTTP Basic
Authentication
Username
Password
SSL Client Certificate
Use Cached
Truststore
Truststore Password
Message Table Size
Write operation
responses to file
Description
This field is visible only if the operation invocation trigger selection is “Data
Row Set”.
Sets the time in milliseconds the client should wait between operations
invocations. If the operations being invoked send a result back, then the
publisher waits the time specified after having received that result.
Indicates whether the web service operation invocation uses HTTP basic
authentication
Username to be used for authentication. This value is used only in case the
“Use Authentication” checkbox is selected.
User password to be used for authentication. This value is used only in case
the “Use Authentication” checkbox is selected.
Defines an X.509 client certificate(s) to whom the client should trust while
connecting to the web service endpoint over a secure socket layer. A
certificate (also known as a public-key certificate) is a digitally signed
statement from one entity (person, company, etc.), saying that the public key
(and some other information) of another entity has some specific value.
When data is digitally signed, the signature can be verified to check the data
integrity and authenticity.
If this checkbox is selected, you must choose a truststore from the project
specific cache. Prior to be able to use cached truststore, they must be defined
in the dialog that pops up when you activate the
button.
If this checkbox is not selected, the
button lets you choose an existing
truststore from the file system. This file is referenced externally and is never
copied to the project directory.
The password used to access the truststore
The maximum number of messages that are contained in the message table.
This table appears on the “Messages” tab from the tree node detail view.
Select this check box if you want the client to write result messages
(responses) to a file specified in the below located text field
4.3.5. WEB SERVICE CLIENT (SOAP OVER JMS)
This Web Service Client uses SOAP over JMS for the communication with the remote web service.
When a new client is created, you are asked to select a WSDL file from the WSDL file cache. The
Opensphere program will try to extracts the location and port of the target service from the initially
selected WSDL file. The property dialog of the Web Service Client lets you extensively customize its
behavior within the first tab.
In order to complete the configuration, you have to add (define) at least one operation invocation on
the tab labeled “Operation Invocations”. This is cone by opening an XML file (file extension wsm) or
by by activating the
button. Latter lets you select a WSDL definition from the project specific
WSDL file cache and then choose available operation invocations from the dialog shown below. The
dialog lets you also select a set of self-explanatory options that determine how the program initially
generates the SOAP content of the operation invocation messages. If you want to choose operation
Page 69 of 156
copyright © centeractive ag
User Manual Opensphere Release 2.5
invocations from a different WSDL file, simply click the button labeled “Switch WSDL…” and make
your choice.
The payload of the operations to be invoked can contain markers that are replaced by the value of
project dependent substitution variables. Markers can also be replaced by the corresponding data of
a single row when the driving component for invoking operations is a row set. Row sets can be
defined as static data within an editor but they can also be the result of an SQL select statement that
gets executed each time the Web Service Client gets started.
copyright © centeractive ag
Page 70 of 156
User Manual . Opensphere Release 2.5
Web Service Client options are defined on the first tab within the dialog, the detailed description is
explained in the following table
Option
Name
serverURL
userName
userPassword
Destination Type
Page 71 of 156
Description
The name that appears in the project tree together with the node
representing the web service client
The URL of the JMS server (i.e. tcp://localhost:7222)
The user name in case an identification is required
The password in case an identification is required
Lets you choose between the destination type “Queue” or “Topic”
copyright © centeractive ag
User Manual Opensphere Release 2.5
Option
Destination
Message Body Type
Timeout
Op. Invocation Trigger
Number of Iterations
Infinite
Description
The name of the destination (either a topic or a queue).
Opensphere lets you discover destinations through the search button
located right to the destination field. This is a feature that requires a JMS
connection with administrator privileges. If you have such a user, temporary
specify the corresponding connection, discover and select your destination.
Don’t forget to specify a non-administrator connection for further use.
To know about valid destinations for Tibco EMS™ for example, you may also
open the EMS Administration Tool and connect to the JMS provider
specified by hostname and port. You could for example type connect
"tcp://localhost:7222 ". Once the connection is established, enter
the command "show queues" or "show topics" and you get a list
of available destinations.
This combo box lets you choose between Bytes and Text messages
Operation invocation timeout in milliseconds
Determines how the operation invocation process shall be triggered.
According to the selection, some controls in this box get visible, some others
non visible.
Number of iterations the client should send operations invocations each
time it is started. This number has no effect if the client was told to invoke
operations forever.
Accomplishing sending all operation invocations of the defined message
array is considered to be one iteration.
This field is visible only if the message sending trigger selection “Iterator
Counter (Counter)”.
Indicates if operations invocations should be sent until the process is
stopped by external intervention. If this check box is unchecked, “Number
of Iterations” setting determines how many operations invocations are sent.
This field is visible only if the message sending trigger selection “Iterator
Counter (Counter)”.
copyright © centeractive ag
Page 72 of 156
User Manual . Opensphere Release 2.5
Option
Row Set
Description
This line shows what kind of data row set is used to control the message
sending process. Row sets are tabular data that can be defined in a separate
dialog by pressing the “Define…” button. In that dialog, you can either
define an SQL query on a database of your choice or you can define your
own static table data that will be stored to an XML file. If you define a row
set based on an SQL select statement, the statement gets executed every
time the Web Service Client is started.
When you decide to define static data, Opensphere lets you do that from
scratch but it also offers the possibility to import the data from a database.
In both cases, you can alter the data immediately or at any time later to
make it fit your needs. When after defining a new static row set you close
the Row Set Editor by pressing the “OK” button, Opensphere may ask you to
save the row set data to an XML file of your choice. Opensphere can also be
told to decide by its own where to store the XML file. This can be achieved
by selecting the option “Automatically define name and location of
messaging component files” on the File panel within the tool options dialog
(select Tool > Tool Options… from the main menu). When this option is
selected and the static row set data was never saved to a file, you will see
“File: not yet defined” right to the “Define…” button. That’s there because
Opensphere will not automatically assign a file name and save the data to it
until the property dialog gets closed through the “OK” button.
Please consult the chapter “3.5 Row Set Editor” for detailed information
about the row set editor.
When running the Web Service Client, the rows from the row set (regardless
if resulting from an SQL query or from static data) are traversed one by one
until the last row is reached. Every row, corresponding to one iteration, will
trigger the invocation of all operations present in the operation list. The
values from the current row can be used as string type substitution values in
the operation data of that one iteration. To make the substitution happen,
you simply place the column name, enclosed by the appropriate pre- and
postfix wherever you wish within your operation, same as you do with
ordinary substitution values (see 2.3 Substitution Variables).
Interval
Message Table Size
Write operation
responses to file
Page 73 of 156
This field is visible only if the operation invocation trigger selection is “Data
Row Set”.
Sets the time in milliseconds the client should wait between operations
invocations. If the operations being invoked send a result back, then the
publisher waits the time specified after having received that result.
The maximum number of messages that are contained in the message table.
This table appears on the “Messages” tab from the tree node detail view.
Select this check box if you want the client to write result messages
(responses) to a file specified in the below located text field
copyright © centeractive ag
User Manual Opensphere Release 2.5
4.4. JMS
4.4.1. JMS MESSAGE EDITOR
JMS messages within Opensphere can be shown and edited using the standalone message list editor
(menu item Message > Message Editor…) and through the multi message document editor (menu
item Message > Multi Message Doc Editor…). JMS specific program nodes such as the “JMS Message
Producer” also let you edit JMS messages directly within their property dialog.
When adding a new message to the message list editor, a
dialog pops up where you have to select the type of JMS
message you want to add. The JMS message type cannot be
changed on an existing message but the message list editor can
contain messages of different JMS type at the same time.
A Message (without body) does not contain a body at all and
could be used for some kind of advisory.
A Bytes message object is used to send a message containing a stream of non-interpreted bytes.
A Map message object is used to send a set of name-value pairs.
An Object message object is used to send a message that contains a serializable object in the Java
programming language (“Java object”).
A Stream message object is used to send a stream of primitive types in the Java programming
language.
A Text message object is used to send a message containing plain text. This message type may also
contain XML formatted content.
4.4.1.1.
JMS MESSAGE HEADER AND PROPERTIES
The JMS message header contains a number of standard properties. Few of them are editable within
the message editor while the other can only be set by the message producer itself. To see the
properties, you have to select to message root node within the structure tree. As you may notice in
the figure below, you can also define custom properties in the table that appears at the bottom of the
node detail view.
copyright © centeractive ag
Page 74 of 156
User Manual . Opensphere Release 2.5
The JMS header fields are explained in the table that follows:
Header Fields
Delivery Mode
Expiration
Page 75 of 156
Description
Client marks a message as persistent if it feels that the application will have
problems if the message is lost in transit. A client marks a message as nonpersistent if an occasional lost message is tolerable. Clients use delivery mode
to tell a JMS provider how to balance message transport reliability with
throughput. Delivery mode covers only the transport of the message to its
destination. Retention of a message at the destination until its receipt is
acknowledged is not guaranteed by a PERSISTENT delivery mode. Clients
should assume that message retention policies are set administratively.
Message retention policy governs the reliability of message delivery from
destination to message consumer. For example, if a client's message storage
space is exhausted, some messages may be dropped in accordance with a sitespecific message retention policy. A message is guaranteed to be delivered
once and only once by a JMS provider if the delivery mode of the message is
PERSISTENT and if the destination has a sufficient message retention policy.
When a message is sent, the JMSExpiration header field is left unassigned.
After completion of the send or publish method, it holds the expiration time of
the message. This is the sum of the “Message Time-To-Live” value specified in
the properties dialog of the JMS Message Producer and the GMT at the time of
the send or publish. If the time-to-live is specified as zero, the JMSExpiration is
set to zero to indicate that the message does not expire. When a message's
expiration time is reached, a provider should discard it. The JMS API does not
define any form of notification of message expiration. Clients should not
receive messages that have expired; however, the JMS API does not guarantee
that this will not happen.
copyright © centeractive ag
User Manual Opensphere Release 2.5
Header Fields
Priority
Correlation ID
Type
Destination
Message ID
Timestamp
Description
The JMS API defines ten levels of priority value, with 0 as the lowest priority
and 9 as the highest. In addition, clients should consider priorities 0-4 as
gradations of normal priority and priorities 5-9 as gradations of expedited
priority. The JMS API does not require that a provider strictly implement
priority ordering of messages; however, it should do its best to deliver
expedited messages ahead of normal messages.
A Client can use the JMSCorrelationID header field to link one message with
another. A typical use is to link a response message with its request message.
JMSCorrelationID can hold one of the following: A provider-specific message ID
An application-specific String A provider-native byte[] value. Since each
message sent by a JMS provider is assigned a message ID value, it is convenient
to link messages via message ID. All message ID values must start with the 'ID:'
prefix. In some cases, an application (made up of several clients) needs to use
an application-specific value for linking messages. For instance, an application
may use JMSCorrelationID to hold a value referencing some external
information. Application-specified values must not start with the 'ID:' prefix;
this is reserved for provider-generated message ID values.
Some JMS providers use a message repository that contains the definitions of
messages sent by applications. The JMSType header field may reference a
message's definition in the provider's repository. The JMS API does not define a
standard message definition repository, nor does it define a naming policy for
the definitions it contains. Some messaging systems require that a message
type definition for each application message be created and that each message
specify its type. In order to work with such JMS providers, JMS clients should
assign a value to JMSType, whether the application makes use of it or not. This
ensures that the field is properly set for those providers that require it. To
ensure portability, JMS clients should use symbolic values for JMSType that can
be configured at installation time to the values defined in the current
provider's message repository. If string literals are used, they may not be valid
type names for some JMS providers.
The JMSDestination header field contains the destination to which the message
is being sent. When a message is sent, this field is ignored. After completion of
the send or publish method, the field holds the destination specified by the
method. When a message is received, its JMSDestination value must be
equivalent to the value assigned when it was sent.
The JMSMessageID header field contains a value that uniquely identifies each
message sent by a provider. When a message is sent, JMSMessageID can be
ignored. When the send or publish method returns, it contains a providerassigned value. A JMSMessageID is a String value that should function as a
unique key for identifying messages in a historical repository. The exact scope
of uniqueness is provider-defined. It should at least cover all messages for a
specific installation of a provider, where an installation is some connected set
of message routers. All JMSMessageID values must start with the prefix 'ID:'.
Uniqueness of message ID values across different providers is not required.
The JMSTimestamp header field contains the time a message was handed off
to a provider to be sent. It is not the time the message was actually
transmitted, because the actual send may occur later due to transactions or
other client-side queueing of messages. When a message is sent,
JMSTimestamp is ignored. When the send or publish method returns, it
contains a time value somewhere in the interval between the call and the
return. The value is set as milli seconds.
copyright © centeractive ag
Page 76 of 156
User Manual . Opensphere Release 2.5
Header Fields
Reply To
Redelivered
Description
The JMSReplyTo header field contains the destination where a reply to the
current message should be sent. If it is empty, no reply is expected. The
JMSReplyTo can be defined manually with the limitation that at runtime the
entered value is always considered to be of the same type as the one from
JMSDestination. Therefore if a JMS Consumer tries to reply to a topic message,
the JMSReplyTo will be published as a topic as well. The JMSReplyTo is
automatically overridden if a JMS Publisher uses the communication type
“Request”.
Indicates whether this message is being redelivered. If a client receives a
message with the JMSRedelivered field set, it is likely, but not guaranteed, that
this message was delivered earlier but that its receipt was not acknowledged at
that time.
In addition to the header fields, it is possible to define custom properties. The type of properties can
be boolean, byte, short, integer, long, float, double or String. The name of properties must not be null
or empty. By convention:
if the name of a property begins with JMSX, the property is specified by JMS API (like
JMSXGroupID and JMSXGroupSeq to group messages) and is expected to work with all
provider (JMS API 1.1 defines JMSXUserID, JMSXAppID, JMSXDeliveryCount, JMSXGroupID,
JMSXGroupSeq, JMSXProducerTXID, JMSXConsumerTXID, JMSXRcvTimestamp and
JMSXState. See JMS API documention for more information),
if the name starts with JMS_vendor_name, the property targets the JMS provider and is
TM
specific to this provider (like the property JMS_TIBCO_COMPRESS which tells Tibco EMS to
compress the message)
if the name does not start with JMS, the property is an application specific property.
Any of these fields can be used in a message selector to select incoming messages.
Page 77 of 156
copyright © centeractive ag
User Manual Opensphere Release 2.5
4.4.1.2.
JMS MESSAGE BODY
The JMS API defines five types of message body: Bytes, Map, Object, Stream and Text. For each body
type, Opensphere offers specific editors.
A Text message can be edited either as plain text without any formatting it may be edited using the
built-in XML editor. To switch between both editors, simply click on the appropriate tab located at the
bottom of the node detail view.
Byte messages are shown and edited within the built-in hexadecimal editor that lets you switch
between different base modes and character encoding.
copyright © centeractive ag
Page 78 of 156
User Manual . Opensphere Release 2.5
A dynamic table let you edit Map and Stream messages. Single rows are added or removed, moved to
another position or altered as much you want. Depending on the selected data type, values are edited
either directly in the table cell or within a specific editor dialog that pops up when a mouse click
occurs on the cell or on the icon appearing right to it.
Page 79 of 156
copyright © centeractive ag
User Manual Opensphere Release 2.5
Object messages contain a JavaBeans component. Opensphere uses the java.beans.XMLEncoder for
serializing and java.beans.XMLDecoder for de-serializing such data. The data can be edited either as
plain text or within the built-in XML editor. Only Serializable Java objects can be used.
copyright © centeractive ag
Page 80 of 156
User Manual . Opensphere Release 2.5
4.4.2. JMS MESSAGE PRODUCER
The JMS Message Producer allows you to send JMS messages and provides support for both the
point-to-point and the publish/subscribe domains. You can import, modify or create the messages to
be sent, define the number of iterations and the interval to be observed between.
The messages to be published can contain markers that are replaced by the value of project
dependent substitution variables. Markers can also be replaced by the corresponding data of a single
row when the driving component for sending messages is a row set. Row sets can be defined as static
data within an editor but they can also be the result of an SQL select statement that gets executed
each time the JMS Message Producer gets started.
Page 81 of 156
copyright © centeractive ag
User Manual Opensphere Release 2.5
4.4.2.1.
JMS MASSAGE PRODUCER OPTIONS
The dialog below allows you to configure the behavior of the JMS Message Producer.
JMS Message Producer options are defined on the first tab within the dialog according to the
following table.
Option
Name
serverURL
userName
userPassword
Destination Type
Description
The name that appears in the project tree together with the node
representing the Message Producer
The URL of the JMS server (i.e. tcp://localhost:7222)
The user name in case an identification is required
The password in case an identification is required
Lets you choose between the destination type “Queue” or “Topic”
copyright © centeractive ag
Page 82 of 156
User Manual . Opensphere Release 2.5
Option
Destination
Communication Type
Request Timeout
Message Time-To-Live
Message Sending
Trigger
Number of iterations
Infinite
Row Set
Description
The name of the destination (either a topic or a queue).
Opensphere lets you discover destinations through the search button
located right to the destination field. This is a feature that requires a JMS
connection with administrator privileges. If you have such a user, temporary
specify the corresponding connection, discover and select your destination.
Don’t forget to specify a non-administrator connection for further use.
As an example if you work with Tibco EMS™ and you want to know about
valid destinations, you may also launch the EMS Administration Tool and
connect to the JMS provider specified by hostname and port. You could for
example type connect “tcp://localhost:7222“. Once the connection
is established, enter the command “show queues“ or “show topics“
and you get a list of available destinations.
You can choose between communication type “Send” and “Request”. While
“Send” does not expect any reply message, “Request” expects one on a
temporary destination created on the fly.
The number of seconds the publisher must block until it receives a reply
message when sending messages using the communication type “Request”.
Time in seconds from its dispatch time that a produced message should be
retained by the message system. The message time to live is unlimited if the
entered value is zero.
Determines how the message producing process shall be triggered.
According to the selection, some controls in this box get visible, some others
non visible.
Number of iterations the publisher should send messages each time it is
started. This number has no effect, if the publisher was told to send
messages forever.
This field is visible only if the message sending trigger selection is “Iterator
(Counter)”.
Indicates if messages should be sent (published) until the process is stopped
by external intervention. If this check box is unchecked, “Number of
Iterations” setting determines how many messages are sent.
This field is visible only if the message sending trigger selection is “Iterator
(Counter)”.
This line shows what kind of data row set is used to control the message
sending process. Row sets are tabular data that can be defined in a separate
dialog by pressing the “Define…” button. In that dialog, you can either define
an SQL query on a database of your choice or you can define your own static
table data that will be stored to an XML file. If you define a row set based on
an SQL select statement, the statement gets executed every time the JMS
Message Producer is started.
When you decide to define static data, Opensphere lets you do that from
scratch but it also offers the possibility to import the data from a database.
In both cases, you can alter the data immediately or at any time later to
make it fit your needs. When after defining a new static row set you close
the Row Set Editor by pressing the “OK” button, Opensphere may ask you to
save the row set data to an XML file of your choice. Opensphere can also be
told to decide by its own where to store the XML file. This can be achieved
Page 83 of 156
copyright © centeractive ag
User Manual Opensphere Release 2.5
Option
Description
by selecting the option “Automatically define name and location of
messaging component files” on the File panel within the tool options dialog
(select Tool > Tool Options… from the main menu). When this option is
selected and the static row set data was never saved to a file, you will see
“File: not yet defined” right to the “Define…” button. That’s there because
Opensphere will not automatically assign a file name and save the data to it
until the property dialog gets closed through the “OK” button.
Please consult the chapter “3.5 Row Set Editor” for detailed information
about the row set editor.
When running the JMS Message Producer, the rows from the row set
(regardless if resulting from an SQL query or from static data) are traversed
one by one until the last row is reached. Every row, corresponding to one
iteration, will trigger the sending action of all messages present in the
message list. The values from the current row can be used as string type
substitution values in the messages of that one iteration. To make the
substitution happen, you simply place the column name, enclosed by the
appropriate pre- and postfix wherever you wish within your message, same
as you do with ordinary substitution values (see 2.3 Substitution Variables).
Interval
Generates error when
no reply…
Message Table Size
Write incoming reply
message to file
This field is visible only if the message sending trigger selection is “Data Row
Set”.
Sets the time in milliseconds the publisher should wait between messages.
This checkbox is enabled only if the selected communication type is
“Request”. If the checkbox is selected, Opensphere generates an error
(considers the program run as failed).
The maximum number of messages that are contained in the message table.
This table appears on the “Messages” tab from the tree node detail view.
Select this check box if you want the JMS Message Producer to write
incoming reply messages to a file specified in the below located text field
copyright © centeractive ag
Page 84 of 156
User Manual . Opensphere Release 2.5
The second tab appearing on the dialog lets you define the message or messages to be produced.
Message header fields are editable only if they appear with white background color. Most other fields
are set by the JMS provider when a message is sent. The JMSExpiration is set by the JMS Message
Producer when a message is sent; its value depends on the “Message Time-To-Live” field that can be
found in the property dialog.
4.4.2.2.
ADDITIONAL FEATURES
Except the configurable behavior that is defined in the property dialog, a JMS Message Producer
offers a number of additional features. Like any other executable node or test step, a Message
Producer node can be exported to an XML file through the “export” button located in the main
toolbar or through the corresponding menu item from the specific pop-up menu. It may then be reimported to a folder or a test case regardless whether it was exported from an executable node or a
test step.
Page 85 of 156
copyright © centeractive ag
User Manual Opensphere Release 2.5
4.4.3. JMS MESSAGE CONSUMER
The JMS Message Consumer allows you to receive JMS messages and provides support for both
the point-to-point and the publish/subscribe domains.
The dialog shown below lets you configure the JMS Message Consumer
JMS Message Consumer options are defined on the first tab within the dialog; their signification is
explained in the following table
Option
Name
serverURL
userName
userPassword
Destination Type
Description
The name that appears in the project tree together with the node
representing the Message Consumer
The URL of the JMS server (i.e. tcp://localhost:7222)
The user name in case an identification is required
The password in case an identification is required
Let’s you choose between the destination type “Queue” or “Topic”
copyright © centeractive ag
Page 86 of 156
User Manual . Opensphere Release 2.5
Option
Destination
Message Selector
Message Filter
Description
The name of the destination (either a topic or a queue).
Opensphere lets you discover destinations through the search button located
right to the destination field. This is a feature that requires a JMS connection
with administrator privileges. If you have such a user, temporary specify the
corresponding connection, discover and select your destination. Don’t forget
to specify a non-administrator connection for further use.
To know about valid destinations for Tibco EMS™ for example, you may also
open the EMS Administration Tool and connect to the JMS provider specified
by hostname and port. You could for example type connect
“tcp://localhost:7222“. Once the connection is established, enter the
command “show queues“ or “show topics“ and you get a list of
available destinations.
Select this check box if you want to specify a condition on incoming messages.
Once you select the check box, you can enter your message selector below. If
any syntax error is found, the mistake is underlined. By locating the cursor
over the text area, a tooltip appears and gives you information on the
mistake.
The message filter field lets you enter the filter criteria. That field and the two
check boxes located to right to it determines whether a detected message is
retained or ignored by Opensphere. When a message gets detected,
Opensphere by default (both check boxes unselected) examines whether this
value is contained somewhere in the message. If this is not the case, the
message gets discarded and the user won’t see it at all.
Regular Expression: If this check box is selected, Opensphere checks if the
string representation of the entire message matches the specified filter
criteria.
Inverse: The application of the message filter can be inversed by selecting this
check box.
Defining a message filter does not reduce network traffic since message
filtering is done client side in the message consumer. Filtering voluminous
messages slows down the receiving program that has to check for the
occurrence (the match) of the specified value within the whole message.
Message filtering is not available if the destination type “QUEUE” is set.
Page 87 of 156
copyright © centeractive ag
User Manual Opensphere Release 2.5
Option
Terminate after…
Description
The selected check box together with the number in the behind located text
field tells the subscriber to stop after the specified number of messages have
been received and processed.
In case the trailing check box “Exceeding message generates error” is
selected, the subscriber however does not stop immediately when the
specified number of messages is received. It only stops when an additional
message is detected or if the idle timeout is reached. An additional message
in this case generates an error.
Abort after…
Message Table Size
Write incoming
messages to file
To get a subscriber checking that no message is sent on a certain subject for
example, you would have to specify 0 message(s) and to select the check box
“Exceeding message generates error”. As soon as it detects a message, it
would then generate an error.
The selected check box together with the specified number of seconds
indicates that the process has to stop after the specified time of inactivity.
The time of inactivity is the time elapsed since the last incoming message has
been processed. The trailing check box “Generates error” indicates if an error
must be generated in case the defined idle time is exceeded without having
received a message.
The maximum number of messages that are contained in the message table.
This table appears on the “Messages” tab from the tree node detail view.
Select this check box if you want the subscriber to write inbound messages to
a file specified in the below located text field.
copyright © centeractive ag
Page 88 of 156
User Manual . Opensphere Release 2.5
4.4.4. JMS QUEUE BROWSER
The JMS Queue Browser acts same as the JMS Message Consumer without being able to reply to
messages. This module lets you download messages from the specified queue without removing
them.
The dialog below allows you to configure the JMS Message Browser.
The options are similar to the Message Consumer options. Compared to Message Consumer, Queue
Browser has no ending condition as it downloads messages from the specified queue and stops
immediately after the last message. There is no transacted feature either as the Queue Browser does
not alter the downloaded messages.
Page 89 of 156
copyright © centeractive ag
User Manual Opensphere Release 2.5
4.5. TIBCO RENDEZVOUS
Tibco Rendezvous® messages are self-describing tree like structured data constructs. The top level
message node holds information on the send subject and the reply subject and it contains zero or
more dependent message fields. Such fields are sub-messages (field groups) containing themselves
other fields or they are payload data fields.
4.5.1. RENDEZVOUS MESSAGE EDITOR
TIBCO Rendezvous messages within Opensphere are shown and edited using the standalone
message list editor (menu item Message > Message Editor…) and through the multi message
document editor (menu item Message > Multi Message Doc Editor…). Rendezvous specific program
nodes such as the “RV Publisher” also let you edit Rendezvous messages directly within their property
dialog.
The message list editor lets you display and modify existing messages but it also offers the possibility
to create messages from scratch. A message can be read from a file and saved back either to the
application specific XML format (.rvm) or as rvscript (.rvs). To save a message as rvscript, select the
menu item File > Save As rvscript… .
Each Rendezvous message has exactly one send subject and may have a reply subject. While the send
subject can be edited directly within the message table appearing on top of the dialog, both subjects
can be edited also within the detail view that gets displayed as soon as the message root node gets
selected. The message root node detail view contains also an area where the text representation of
the entire message appears.
copyright © centeractive ag
Page 90 of 156
User Manual . Opensphere Release 2.5
Non root nodes are either message fields or message field groups, represented either by a sheet or a
folder. The detail view of message field groups is similar to the root node, you can choose between
the two views. The “Field Group” view however does not contain fields for editing subjects but others
that let you edit their name and identity. In both, the root node and the message group detail view,
you can switch to the table view by selecting the bottom located “Direct Dependents” labeled tab.
This is useful for getting a quick overview of all direct dependent nodes. The table view is an explorer
like representation of the selected tree node. If the top level message node or a sub-message is
selected, the detail view shows all its dependent nodes within a table. All editable cells appear with
white background while non-editable cells appear with gray background. Editable value cells have an
icon on their right; it invokes a specific editor dialog as soon as you click on it.
If a message field node other than a field group is selected (data node), the detail view of its parent
node is shown but the row representing the selected node gets also selected in the table (appears
with blue background on Windows systems i.e.).
The send subject - as well as the reply subject - of the top level message node does not appear in the
table detail view. To display and edit them, you will have to select the root node and switch to the
default view (for detail view)
Page 91 of 156
copyright © centeractive ag
User Manual Opensphere Release 2.5
The detail view of message field nodes by default appears with fields that let you edit their name, the
identity, the data type and the value of course. Depending on the data type a certain edit format is
required. Opensphere provides data type related support by displaying the expected format pattern,
through popup editors and through specific built-in editors. Editing date/time, binary and XML data
for example is fast and seamless and does not require to switch to any tool external to Opensphere.
copyright © centeractive ag
Page 92 of 156
User Manual . Opensphere Release 2.5
Page 93 of 156
copyright © centeractive ag
User Manual Opensphere Release 2.5
The Rendezvous message specific items appearing in the menu and/or the tool bar of the message list
editor offer the following functionality:
Item
Save as rvscript
Rendezvous Transport
Send Message
Description
Saves the messages currently contained in the editor to a file that can
be used by an rvscript. The file extension by default is rvs.
Pops up a dialog where you can
change the transport options used
by the publisher
Publishes the current displayed Tibco Rendezvous® message on the
transport defined within the transport options dialog. The transport
can be changed temporary through the menu item Tools > Rendezvous
Transport…, which will display the above shown option dialog.
Each tree node has its own popup menu that is displayed when you right click on it. Some of the
actions available in the popup menu may also be performed by pressing a button from the toolbar
appearing on top of the tree:
Button
Add Sub Message
Description
Adds a sub message (message field group) to the selected node
Add Message Field
Adds a message field to the selected node
copyright © centeractive ag
Page 94 of 156
User Manual . Opensphere Release 2.5
Button
Expand All
Description
Makes a copy of the selected sub message (message field group)
node and adds it to the parent node
Makes a copy of the selected message field node and adds it to the
parent node
Moves the selected node up to the previous position within its
parent node
Moves the selected node down to the next position within its parent
node
Expands the node and all its dependent nodes recursively
Collapse All
Collapses the node and all its dependent nodes recursively
Remove
Removes the selected node and all its dependent nodes
Duplicate Sub Message
Duplicate Message Field
Move Up
Move Down
4.5.2. RV PUBLISHER
The RV Publisher acts as publisher for one or several predefined Tibco Rendezvous® messages
using the default reliable message delivery or the certified message delivery protocol. You can import,
modify or create messages to be published, define the number of iterations and the interval to be
observed between. Each message in the defined list may be different in structure and value and may
have different send and reply subject. The messages defined in the list are published sequentially
starting from the first to the last occurrence and then restarting with the first one.
The messages to be published can contain markers that are replaced by the value of project
dependent substitution variables. Markers can also be replaced by the corresponding data of a single
row when the driving component for sending messages is a row set. Row sets can be defined as static
data within an editor but they can also be the result of an SQL select statement that gets executed
each time the RV Publisher gets started.
The RV publisher can also be run using request/reply together with an INBOX or with your self defined
reply subject.
There are many scenarios an RV Publisher can be employed, some of them are listed below.
Simulate an adapter
Kick off a business process by sending one or several initialization messages
Send a set of recorded messages for help debugging an existing program
Publish a bunch of previously recorded messages to test a new software module
Publish a huge amount of messages with variable data from a database for stress testing a
software component
Send messages to test a RV Application Simulator configuration
etc.
4.5.2.1.
PUBLISHER OPTIONS
An RV Publisher is easy configurable through the properties dialog shown below. The dialog is split
into two panels that can be selected through the tabs labeled “Definition” and “Messages”.
Page 95 of 156
copyright © centeractive ag
User Manual Opensphere Release 2.5
copyright © centeractive ag
Page 96 of 156
User Manual . Opensphere Release 2.5
RV Publisher options are explained in the following table
Option
Name
Use Project Settings
Service
Network
Daemon
Protocol
Page 97 of 156
Description
The name that appears in the project tree together with the node
representing the publisher
This checkbox defines what Tibco Rendezvous® transport shall be used for
this component. If the checkbox is selected, the Tibco Rendezvous®
transport defined in the project properties dialog is used. If the checkbox
is not selected, the transport parameters defined on the RV Publisher
properties dialog are used.
Tibco Rendezvous® service
Tibco Rendezvous® network
Tibco Rendezvous® daemon
Determines the quality of delivery of Rendezvous messages. Available
protocols are “Reliable Delivery” and “Certified Delivery”. If “Certified
Delivery” is selected, the “Advanced” button at the dialogues bottom gets
activated; it offers additional configuration of the certified delivery
transport.
copyright © centeractive ag
User Manual Opensphere Release 2.5
Option
Send Type
Time-out
Description
Messages can be published or sent as a request. If a request is sent and the
reply subject of the predefined message(s) is an inbox, the program listens
on messages sent to that inbox. It blocks until a message is received or until
the defined time-out is reached. An inbox is specified (and automatically
created) by selecting the check box located beside the reply subject field. If
the send type is “Request/Reply” and the message reply subject is empty,
the message is simply published.
Time in seconds to wait for a reply message when a request message is
published (see Send Type). The exact behavior depends on the type of reply
subject defined for the published message.
1.
Message Sending
Trigger
Number of Iterations
Infinite
Row Set
If the reply subject is an INBOX, the option defines the time in seconds
the publisher blocks if no message is received on that inbox
(synchronous reply)
2. If the reply subject is a custom value, the publisher simply holds on
execution for the defined amount of seconds if no corresponding reply
message is detected (asynchronous reply). Corresponding in this case
means any message that has its send subject set to the value of the
published message’s reply subject.
3. If the reply subject is empty, time-out is ignored since such messages
are simply published.
Determines how the message sending process shall be triggered. According
to the selection, some controls in this box get visible, some others non
visible.
Number of iterations the publisher should send messages each time it is
started. This number has no effect if the publisher was told to send
messages forever.
Finishing sending all messages of the defined message list is considered to
be one iteration.
This field is visible only if the message sending trigger selection is “Iterator
Counter (Counter)”.
Indicates if messages should be sent (published) until the process is stopped
by external intervention. If this check box is unchecked, “Number of
Iterations” setting determines how many messages are sent.
This field is visible only if the message sending trigger selection is “Iterator
Counter (Counter)”.
This line shows what kind of data row set is used to control the message
sending process. Row sets are tabular data that can be defined in a separate
dialog by pressing the “Define…” button. In that dialog, you can either
define an SQL query on a database of your choice or you can define your
own static table data that will be stored to an XML file. If you define a row
set based on an SQL select statement, the statement gets executed every
time the RV Publisher is started.
When you decide to define static data, Opensphere lets you do that from
scratch but it also offers the possibility to import the data from a database.
In both cases, you can alter the data immediately or at any time later to
make it fit your needs. When after defining a new static row set you close
the Row Set Editor by pressing the “OK” button, Opensphere may ask you
copyright © centeractive ag
Page 98 of 156
User Manual . Opensphere Release 2.5
Option
Description
to save the row set data to an XML file of your choice. Opensphere can also
be told to decide by its own where to store the XML file. This can be
achieved by selecting the option “Automatically define name and location
of messaging component files” on the File panel within the tool options
dialog (select Tool > Tool Options… from the main menu). When this option
is selected and the static row set data was never saved to a file, you will see
“File: not yet defined” right to the “Define…” button. That’s there because
Opensphere will not automatically assign a file name and save the data to it
until the property dialog gets closed through the “OK” button.
Please consult the chapter “3.5 Row Set Editor” for detailed information
about the row set editor.
When running the RV Publisher, the rows from the row set (regardless if
resulting from an SQL query or from static data) are traversed one by one
until the last row is reached. Every row will trigger the sending action of all
messages present in the message list, hence corresponds to one iteration.
The values from the current row can be used as string type substitution
values in the messages of that one iteration. To make the substitution
happen, you simply place the column name, enclosed by the appropriate
pre- and postfix wherever you wish within your message, same as you do
with ordinary substitution values (see 2.3 Substitution Variables).
Interval
Generates error…
Message Table Size
Write incoming reply
messages to file
This field is visible only if the message sending trigger selection is “Data Row
Set”.
Sets the time in milliseconds the publisher should wait between messages
when sending them. If the message being sent is a request where the
publisher waits on a reply message (inbox), then the publisher waits the
time specified after having received the reply.
Indicates whether an error should be generated if using request/reply send
type and no corresponding reply message is received within the defined
timeout period. An error will be generated only in case the reply subject is
an inbox however.
The maximum number of messages that are contained in the message
table. This table appears on the “Messages” tab from the tree node detail
view.
Select this check box if you want the RV Publisher to write received reply
messages to a file specified in the below located text field. This feature is
available only in case that the send type is “Request/Reply”.
If “Certified Delivery” protocol is selected within the “Communication” box on the RV Publisher
properties dialog, the “Advanced” button gets activated and lets you display a dialog for configuring
that protocol in detail.
Page 99 of 156
copyright © centeractive ag
User Manual Opensphere Release 2.5
The advanced options for the certified delivery protocol are explained in the following table
Option
CM Name
Ledger Name
Synchronize Ledger
Request Old
4.5.2.2.
Description
Name of the persistent correspondent. If the CM Name is not set, Tibco
Rendezvous® generates a unique, non-reusable name for the certified
delivery transport. A correspondent can persist beyond transport
destruction only when it has BOTH a reusable name AND a file-based
ledger.
Name of the file based ledger. If the Ledger Name is not set, then the new
transport stores its ledger exclusively in process-based storage, the
correspondent is not persistent.
If this option specifies a valid file name, Rendezvous uses that file for ledger
storage. If the transport is destroyed or the process terminates with
incomplete certified communications, the ledger file records that state.
When a new transport binds the same reusable name, it reads the ledger
file and continues certified communications from the state stored in the file.
Specifies the way information must update the ledger. If the check box is
selected, operations that update the ledger file do not return until the
changes are written to the storage medium.
This parameter indicates whether a persistent correspondent requires
delivery of messages sent to a previous CM transport with the same name,
for which delivery was not confirmed. Its value affects the behavior of other
CM sending transports.
ADDITIONAL FEATURES
Except the configurable behavior that is defined in the property dialog, an RV Publisher offers a
number of additional features.
Like any other executable node or test step, a publisher node can be exported to an XML file through
the “export” button
located in the main toolbar or through the corresponding menu item from
the specific pop-up menu. It may then be re-imported to a folder or a test case regardless whether it
was exported from an executable node or a test step.
By selecting the menu item “Save as rvscript…” from the nodes pop-up menu, the publisher is saved
as rvscript to a file defined by the user. This ready to use script can be run unchanged or adapted to
your needs. Below listing shows an rvscript generated from a simple Rendezvous Generic Publisher
node.
copyright © centeractive ag
Page 100 of 156
User Manual . Opensphere Release 2.5
4.5.3. RV SUBSCRIBER
This node subscribes to a Tibco Rendezvous® subject or a subject hierarchy and receives
corresponding messages to which it is able to reply with predefined messages. Depending on the user
settings it buffers inbound messages and/or displays their content in a message dialog. The subscriber
replies to received messages by sending one or several reply messages either as a bunch or
sequentially. Single messages or message collections can be imported, freely edited and saved to a file
using the message editor present in the option dialog.
An RV Subscriber can be used for the following tasks:
Simulate a simple Rendezvous® enabled application
Simulate an adapter including its automatic and condition depending shut down
Reply to incoming messages and help debug or test a new program
Record a predefined number of messages and save them to an XML file for further use in
other programs or scripts
etc.
4.5.3.1.
SUBSCRIBER OPTIONS
A subscriber is easy configurable through the option dialog shown below. The dialog is split into two
panels that can be selected through the tabs “Definition” and “Reply/Forward Messages”.
Page 101 of 156
copyright © centeractive ag
User Manual Opensphere Release 2.5
copyright © centeractive ag
Page 102 of 156
User Manual . Opensphere Release 2.5
Subscriber options are explained in the table below
Reply/Forward Message
Option
Description
Reply/Forward all
Indicates whether all predefined messages should be replied and/or
defined messages
forwarded together in response to an inbound message.
together
If the check box is selected, all messages are sent according to their definition.
If the check box is not selected, a single predefined message is sent each time
an inbound message is detected. The messages are processed sequentially
starting with the first message in the table up to the last one.
Reply/Forward table The table columns “Reply” and “Forward” indicate for each predefined
columns
message individually whether they should be replied and/or forwarded in
response to an inbound message.
If the “Reply” column check box is selected, the message is sent to the reply
address of the inbound message ore simply ignored it the inbound message
does not have a reply subject defined.
Messages that have the “Forward” column check box selected are sent to the
send subject defined for them.
Page 103 of 156
copyright © centeractive ag
User Manual Opensphere Release 2.5
Reply/Forward Message
Subscription
Definition
Option
Description
Name
The name that appears in the project tree together with the node
representing the subscriber
Use Project Settings This checkbox defines what Tibco Rendezvous® transport shall be used for this
component. If the checkbox is selected, the Tibco Rendezvous transport
defined in the project properties dialog is used. If the checkbox is not
selected, the transport parameters defined on the RV Subscriber properties
dialog are used.
Service
Tibco Rendezvous® service
Network
Tibco Rendezvous® network
Daemon
Tibco Rendezvous® daemon
Listen on Subject
The subject or subject hierarchy, the process should subscribe to.
Protocol
Determines the quality of delivery of Rendezvous reply or forward messages.
Available protocols are “Reliable Delivery” and “Certified Delivery”. If
“Certified Delivery” is selected, the “Advanced” button at the dialog bottom
gets activated; it offers additional configuration of the certified delivery
transport (The Advanced options dialog settings are explained in detail in the
chapter “Rendezvous Generic Publisher”)
Time-out
Time-out in milliseconds the listener call-back method has to wait before to
process the next inbound message
Message Filter
The message filter field lets you enter the filter criteria. That field and the two
check boxes located to right to it determines whether a detected message is
retained or ignored by Opensphere. When a message gets detected,
Opensphere by default (both check boxes unselected) examines whether this
value is contained somewhere in the message. If this is not the case, the
message gets discarded and the user won’t see it at all.
Regular Expression: If this check box is selected, Opensphere checks if the
string representation of the entire message matches the specified filter
criteria.
Inverse: The application of the message filter can be inversed by selecting this
check box.
Defining a message filter does not reduce network traffic since message
filtering is done client side in the message consumer. Filtering voluminous
messages slows down the receiving program that has to check for the
occurrence (the match) of the specified value within the whole message.
copyright © centeractive ag
Page 104 of 156
User Manual . Opensphere Release 2.5
Reply/Forward Message
Terminate after…
The selected check box together with the number in the behind located text
field tells the subscriber to stop after the specified number of messages have
been received and processed.
Abort after…
Message Table Size
Write incoming
messages to file
In case the trailing check box “Exceeding message generates error” is selected,
the subscriber however does not stop immediately when the specified
number of messages is received. It only stops when an additional message is
detected or if the idle timeout is reached. An additional message in this case
generates an error.
To get a subscriber checking that no message is sent on a certain subject for
example, you would have to specify 0 message(s) and to select the check box
“Exceeding message generates error”. As soon as it detects a message, it
would then generate an error.
The selected check box together with the specified number of seconds
indicates that the process has to stop after the specified time of inactivity. The
time of inactivity is the time elapsed since the last incoming message has been
processed.
The trailing check box “Generates error” indicates if an error must be
generated in case the defined idle time is exceeded without having received a
message.
The maximum number of messages that are contained in the message table.
This table appears on the “Messages” tab from the tree node detail view.
Select this check box if you want the subscriber to write inbound messages to
a file specified in the below located text field.
If “Certified Delivery” protocol is selected within the “Communication” box on the RV Subscriber
properties dialog, the “Advanced” button gets activated and lets you display a dialog for configuring
that protocol in detail.
The advanced options for the certified delivery protocol are explained in the following table.
Option
CM Name
Page 105 of 156
Description
Name of the persistent correspondent. If the CM Name is not set, Tibco
Rendezvous® generates a unique, non-reusable name for the certified
delivery transport. A correspondent can persist beyond transport
destruction only when it has BOTH a reusable name AND a file-based
ledger.
copyright © centeractive ag
User Manual Opensphere Release 2.5
Option
Ledger Name
Synchronize Ledger
Request Old
4.5.3.2.
Description
Name of the file based ledger. If the Ledger Name is not set, then the new
transport stores its ledger exclusively in process-based storage, the
correspondent is not persistent.
If this option specifies a valid file name, Rendezvous uses that file for ledger
storage. If the transport is destroyed or the process terminates with
incomplete certified communications, the ledger file records that state.
When a new transport binds the same reusable name, it reads the ledger
file and continues certified communications from the state stored in the file.
Specifies the way information must update the ledger. If the check box is
selected, operations that update the ledger file do not return until the
changes are written to the storage medium.
This parameter indicates whether a persistent correspondent requires
delivery of messages sent to a previous CM transport with the same name,
for which delivery was not confirmed. Its value affects the behavior of other
CM sending transports.
ADDITIONAL FEATURES
Except the configurable behavior that is defined through the option dialog, a Rendezvous Generic
Subscriber offers the following features.
Like any other executable node or test step, a subscriber node can be exported to an XML file through
the “export” button
located in the main toolbar or through the corresponding menu item from
the specific pop-up menu. It may then be re-imported to a folder or a test case regardless whether it
was exported from an executable node or a test step.
4.5.4. RV APPLICATION SIMULATOR
The RV Application Simulator extends the RV Subscriber program. It is extremely useful where an
intermediate implementation of Tibco Rendezvous® enabled components such as an adapter is
needed. It lets you test modules that depend on other components in case they are not yet ready.
The “Reply/Forward Messages” panel of the simulator property dialog shown below contains a
mapper. To switch from the standard message editing to the mapping view, you have to press the
“mapping view” button
message edit mode.
located in the toolbar. Press this button again to switch back to standard
The top located message within the message table is the Source Message Template (SMT), a message
that holds the structure of the expected incoming messages. All other messages in the array are
messages that can be used to be replied or forwarded to whatever subject you want (such messages
may have been recorded previously using the RV Message Detector or created manually through the
Message List Editor). The fields of the expected inbound message SMT can be assigned to fields of one
or several outbound messages with individual structure each. During program execution, the values of
the mapped fields are automatically copied from the source to the target field and those dynamically
built messages are replayed and/or forwarded according to the definition you made. Some fields of
course may also still contain their initial static values.
copyright © centeractive ag
Page 106 of 156
User Manual . Opensphere Release 2.5
As mentioned above, the first message row appearing in the application simulator property dialog is
always that of the SMT, it has no row number itself however. The SMT is a message that can be edited
the same way, as would be any other message within the dialog. The SMT must have the same
structure (including field names) for fields that have mappings to target messages fields; otherwise
the field values cannot be copied to the target messages.
Mappings are defined between message fields. To add a new mapping, simply click on a field node of
the source message (SMT), drag the mouse pointer to the desired field within the target message and
release the mouse button. A selected mapping is removed by pressing the delete key. To select a
mapping, move the mouse pointer on it (pointer gets changed to a hand) and press the left mouse
button.
Message mapping is subject to the following constraints:
The names of the mapped field and of all its parent nodes must not include a forward slash
‘/’.
Identical node names on the same hierarchical level must be avoided
4.5.4.1.
Page 107 of 156
ADDITIONAL FEATURES
copyright © centeractive ag
User Manual Opensphere Release 2.5
Except the configurable behavior that is defined through the option dialog, a Rendezvous Application
Simulator offers a number of additional features.
Like any other executable node or test step, an application simulator node can be exported to an XML
file through the “export” button
located in the main toolbar or through the corresponding menu
item from the specific pop-up menu. It may then be re-imported to a folder or a test case regardless
whether it was exported from an executable node or a test step.
By selecting the menu item “Save as rvscript…” from the nodes pop-up menu, the application
simulator is saved as rvscript to a file defined by the user. This ready to use script can be run
unchanged or adapted to your needs. Together with the application simulator script, Opensphere
generates a client test rvscript that is used to test the mappings of the generated application
simulator; the test script name is the same as the one defined for the application simulator script but
has prefix “Test”.
4.6. MESSAGE DETECTOR
The Message Detector is a module that detects messages of a certain type (Tibco Rendezvous® or
JMS) and presents them to the user through different views. It provides powerful message filtering
functionality and lets one easily edit, store and re-send detected messages. The module gets started
from inside the Opensphere application through the menu items Message > Rendezvous Message
Detector, Message > JMS Topic Message Detector, Message > JMS Queue Message Detector or
Message > EMS Monitor, it may also be invoked by pressing the corresponding button from the main
tool bar:
This button starts the Message Detector in “Tibco Rendezvous” mode
This button starts the Message Detector in “JMS Topic” mode
This button starts the Message Detector in “JMS Queue” mode
Alternatively the Message Detector can be started as standalone
application through the Opensphere menu group on the windows
start menu. In that case the user has to choose the message type
he wants to listen on within the dialog shown beside.
The Message Detector listens on one or several destinations
(topics/queues/subjects or topic/subject hierarchies) the user
defines in the field located in the dialog tool bar. When defining
Tibco Rendezvous® subjects, feel free to use the known wildcards
such as the asterisk (*) that substitutes whole elements or the greater-than (>), which matches all the
elements remaining to the right. The field accepts multiple topics/subject entries separated by the
semicolon (;) each.
For each entered destination string (subjects, topics or queues), the Opensphere Message Detector
creates a separate listener regardless whether two destinations are identical or whether one
copyright © centeractive ag
Page 108 of 156
User Manual . Opensphere Release 2.5
represents a subset of another destination. Every single listener reports received messages
independent from the other listeners. Therefore if for example you define the same destination twice
within the destination list, messages intercepted on that destination would be reported twice as well.
When the Message Detector gets started, it detects messages that are sent on the specified
destination (subject, topic or queue), buffers and displays them up to the configured buffer size.
Buffered messages of the selected row can be displayed within a Message List Editor by pressing the
appropriate button from the tool bar (
). The messages may through that editor be modified
and saved to an XML formatted file for further use.
The Message Detector has two default views (tabs) on received messages:
The Message Sequence View on the other hand displays every single received message in a
chronological order; the last arrived on its bottom. When running the Message Detector in
“Tibco Rendezvous” or “JMS Topic” mode, all detected messages get displayed on the same
and unique Message Sequence View to clearly show the chronologically sequence of
detected messages.
The Destination Summary View is a condensed overview of all distinct destinations messages
have been detected for.
When the Message Detector is run in “JMS Queue” mode, a dedicated Message Sequence View
appears for each defined JMS queue.
When the Message Detector is run in “Tibco EMS Monitor” mode, two tabs named “Monitor Message
Sequence” and “Included Message Sequence” are shown one beside the other. The “Monitor
Message Sequence” shows all detected monitor messages in a chronological order. The “Included
Message Sequence” shows the sequence of original messages extracted from monitor messages if
there are any available.
All views have convenient pop-up menus that appear as soon as the user right clicks on a table row.
Single menu items let you directly display message details, save messages to a file, resend a message
etc.
4.6.1. MESSAGE SEQUENCE VIEW
This view shows every received message as a new table row. New detected messages are added to
the bottom of the table. The table size is limited to what the user chooses from the combo box
located top right on the dialog (“Sequence Buffer Size”). When a new message is added to the buffer,
the oldest one gets discarded in case the new added message would make the buffer size exceed.
Page 109 of 156
copyright © centeractive ag
User Manual Opensphere Release 2.5
When the Message Detector is started as standalone application, the details of the selected message
are displayed at the bottom of the view as shown in the figure above. The message detail view can be
hidden or displayed again using the
button.
4.6.2. DESTINATION SUMMARY VIEW
Each different destination(subject, topic or queue) received by the program at runtime appears on
the Destination Summary View in its own row together with a counter that reflects the number of
messages totally received on that destination. An additional column shows the message buffer size
and the number of messages that are currently present in the buffer. The current buffer fill degree is
represented by a yellow bar that turns more and more into red as the fill grade approaches the buffer
limit. The overall message buffer size can be changed by selecting the appropriate entry from the
combo box located top right in the tool bar. To change this value however, message detecting must
not be running. The buffer size of single message summary rows may be changed by right clicking the
corresponding row and selecting the menu item Change Buffer Size… from the pop-up menu, this can
be done while message detecting is running.
copyright © centeractive ag
Page 110 of 156
User Manual . Opensphere Release 2.5
4.6.3. TOOL BAR AND POP-UP MENUS
The table below gives an overview of the toolbar buttons of the Message Detector:
Button
Open File
Start
Description
Lets you select and open a message event file that was previously
written to a message event swapping directory (see 0
Message Event Swapping).
Please keep in mind that the current defined message buffer size may
prevent the Message Detector from loading all message events from the
selected file.
If the Message Detector is launched in “Tibco Rendezvous” or “JMS
Topic” Mode
Starts detecting messages on the specified destinations
(subjects, topics or queues) and keeps doing this until it gets
stopped through the “Stop” button or until the Message
Detector dialog gets closed.
If the Message Detector is launched “JMS Queue” Mode
Removes all current displayed messages from the “Destination
Summary View” and the “Message Sequence Views” and starts
downloading the messages from all specified queues. The
program stops as soon as all messages are downloaded from
the queues or if the user presses the “Stop” button. Keep in
mind that the messages are not physically removed from the
queues but remain unchanged there.
Page 111 of 156
copyright © centeractive ag
User Manual Opensphere Release 2.5
Button
Stop
Remove Rows
Show Message
Show Message Buffer
Enable Auto Refresh
Disable Auto Refresh
Show Predefined
Listener Definitions
Show Current
Connection Definition
Description
Stops the message detecting process. It can be restarted at any time
through the start button.
Removes all rows from the message tables
Shows the most recent detected message represented by the selected
row of the message summary table or the selected row from the
message sequence table. The message is shown within the Message List
Editor.
Shows all currently buffered messages represented by the selected row
of the message summary table or all messages from the message
sequence table. This messages are shown within the Message List Editor.
The same dialog is shown as well when double clicking the left mouse
button on any table row.
The messages appearing in the table on top of the editor are ordered
chronologically ascending, the message with the highest row number
being the most recent detected one.
This button enables automatic
refreshing of the displayed
messages. The user has to
enter the number of seconds
to be observed by the
application
prior
to
automatically refresh the
content of the message
detector. This button is only
available in case the message detector is launched in “JMS Queue”
mode.
Automatic refreshing will be active only when the message detecting
process gets started next time by using the regular “Start” button.
This button disables automatic refreshing of the displayed messages
Shows a dialog that lets you predefine message listeners by editing their
transport and destinations/subjects. These definitions are made
persistent by the application.
Displays a dialog where the user can define the settings of the current
used connection (or transport) for detecting new messages. The settings
can be changed only if message detecting is not running. Restarting the
message detecting process with changed settings does not automatically
remove previous detected messages from the message tables.
copyright © centeractive ag
Page 112 of 156
User Manual . Opensphere Release 2.5
Button
Description
Show Message
Selector Dialog
Displays a dialog where the user can define a message selector when
working with JMS listeners. The message selector can only be edited if
the JMS listeners defined on the message detector are not running.
The message selector field is available for JMS message listeners only; it
lets you define SQL like criteria that reduce the set of received messages
(please consult standard JMS documentation). Defining message
selectors prevents the JMS provider of delivering certain messages to
the consumer and can significantly reduce network traffic.
Page 113 of 156
copyright © centeractive ag
User Manual Opensphere Release 2.5
Button
Show Message Filter
Dialog
Description
Displays a dialog where the user can define message filter options in
order to have corresponding messages displayed on a separate tab. The
user can enter a simple value that shall be contained in a message or he
may define a regular expression that is applied on the string
representation of the entire message.
The message filter field lets you enter any value at any time. Additionally
you may also define a name for the filter. When you define the first
filter, a new tab gets added to the message detector and messages from
the “Message Sequence” tab immediately also appear in the table of
that tab if their content matches the filter criteria. Newly detected
messages are checked by Opensphere and are added to the filter table in
case their content matches the filter criteria.
Existing filter criteria can be changed on the fly if you press the
button when the corresponding tab is selected or the corresponding
button that appears directly on the tab. You can add new filters and
inherently new tabs if you select the “Add new tab” check box.
Defining a message filters does not reduce network traffic since message
filtering is done by the message consumer. Filtering voluminous
messages will even slow down the receiving program that has to check
for the occurrence of the specified value within the whole message.
Toggle Message
Detail View
Dock
Undock
Destination Field
Find JMS Destination
The message filter can be inversed by selecting the check box located
top right on the dialog.
Shows or hides the message details in the message sequence view. This
button appears only in case the Message Detector is run as a standalone
application.
Docks the Message Detector at the bottom of the application in its own
tabbed panel.
Undocks the Message Detector from the bottom of the application and
shows it as standalone dialog.
This text field accepts the destination (Rendezvous subject, JMS topic or
queue), the Message Detector shall work with.
This button lets you search for available destinations to be added to the
destination field. The function is available only if the current selected
JMS Provider has an admin class defined (see Error! Reference source
ot found. Error! Reference source not found.).
copyright © centeractive ag
Page 114 of 156
User Manual . Opensphere Release 2.5
Button
Sequence Buffer Size
Description
This combo box lets you change the size of the message buffers, which
corresponds to the message table size for the message sequence and
the filter tabs. On the destination summary tab, the buffer size is applied
on a “per destination” way.
The buffer/table size is limited to what the user chooses from the combo
box. When a new message is added to the table, the oldest one gets
discarded in case the new added message would make the buffer size
exceed.
4.6.4. MESSAGE TIMELINES (FILTERED MESSAGES)
When one or several message filters are defined (see
Show Message Filter Dialog), the Message
Detector shows a chart on its bottom where a message timeline appears for every defined filter. A
message time line has a number of items attached that represent a message each.
When you move the mouse pointer over a message item, its destination together with the message
detection time will be displayed as a tool tip. In case a message item represents more than one
messages with identical detection time each, this would be shown in the tooltip as well, the figure
below for example shows an item that represents two messages since the tool tip starts with “2x”. If
you click on a message item, a message editor dialog pops up and lets you edit, store and resend the
message.
If a message timeline contains lots of message items, you may not be able to distinguish between
single messages. To get a more detailed view of the desired time period, you can zoom into the chart
by simply mark the desired area with the mouse pointer. Press the left mouse button and move the
mouse top left to see the original chart area again. By pressing the right mouse button, you will see a
pop-up menu that lets you further customize the message chart and perform other functions like
printing the chart for example.
Page 115 of 156
copyright © centeractive ag
User Manual Opensphere Release 2.5
4.6.5. MESSAGE EVENT SWAPPING
The Message Detector keeps detected messages in the buffer (table) up to the number defined in the
combo box appearing right on the toolbar. When newly added messages exceed the defined buffer
size, the oldest message gets discarded and cannot be retrieved anymore. In order to be able to
access such messages at some time later on, the program lets you define a folder where it shall write
such discarded message events to. Optionally you can also instruct the Message Detector to write all
detected message events to the file system and not only the ones that exceed the buffer size.
Message events are written to a file within the configured target directory up to the size defined by
the user. Each time the size of the message event file is reached, a new one gets created. The file
names contain the name of the GUI tab together with the creation date in the format “yyyyMMddhhmmss”.
In front of the message sequence and the message filter tabs (see figure below) you’ll find a button
that lets you open the message swap options dialog.
The button appears with a different icon depending whether message event swapping for that
specific tab is currently defined or not:
Icon
Description
Message swapping for this tab is currently not enabled (not defined)
Message swapping for this tab is currently enabled
If you click the button, the Swap Options dialog below appears and lets you either remove the
existing configuration or define a new one.
copyright © centeractive ag
Page 116 of 156
User Manual . Opensphere Release 2.5
The different controls on the dialog are explained in the following table:
Control
Target Directory
Description
The directory where message events shall be written to. Message swapping
is enabled as soon as this field contains a valid directory name.
The button
opens a dialog where you can browse the file system and
select an existing target directory.
Maximum File Size
Write all messages
Write exceeding
messages only…
The button
removes the current entry from the target directory field
and thereby disables message swapping if the dialog would also get closed
through the “OK” button.
The maximum size in kilobytes for message event swapping files. Each time
the size of the current file is exceeded; a new file is created and gets the
following message events written to it.
Since the message events stored in swapping files are most often aimed to
be reloaded into the Message Detector program, the file size should be
chosen carefully. The current buffer size defined in the GUI may prevent you
from loading all message events contained in such a file.
If this radio box is selected, all detected message events that appear in the
table of the corresponding tab will also be written to the swapping
directory.
If this radio box is selected, message events are written to the file system
only in case they get discarded from the table of the corresponding tab
upon buffer overflow.
4.6.6. PERSISTENT LISTENER DEFINITIONS
When the message detecting process is not running, you can open a dialog
that lets you define
persistent listener definitions. Simply add new listener definition by activating the
button
located top right on the dialog. If the dialog gets closed through the “OK” button, the current selected
definition is copied to the Message Detector and determines how to detect and handle new
messages.
4.6.6.1.
RV LISTENER
When launching the Message Detector in “Tibco Rendezvous” mode, the listener definition dialog lets
you define listeners with different Rendezvous transports, Rendezvous string encoding as well as one
or several subjects to listen on. The Rendezvous listener definition dialog gets invokes through the
button. In case you enter more than one subject, they must be separated by a semicolon (;) each.
In the “Message Filter” field at the bottom of the dialog you can define filter criteria. When you
choose a message listener with a non-empty message filter, the program automatically creates a
tabbed message filter panel on the Message Detector. When a new message gets detected, the
program checks the filter value against the whole message (send and reply subject and message
content). Messages will be added to the tabbed filter panel only in case they match the defined filter
criteria.
Page 117 of 156
copyright © centeractive ag
User Manual Opensphere Release 2.5
Defining a message filter does not reduce network traffic since message filtering is done by the
message consumer. Filtering voluminous messages slows down the receiving program that has to
check for the occurrence of the specified value within the whole message.
If the entered subject is able to detect Rendezvous host status info advisory messages, the Message
Detector automatically creates two additional tabbed panels that will contain a row for every
detected host and service as follows:
Host Status Info (Total)
Each row contains a snapshot of the value from the last detected
host status info advisory message for a given host and service. The
statistic values within each snapshot are cumulative since the
daemon began communicating on the service.
Host Status Info (Per Minute)
The statistical values from each row are calculated using the last
two detected host status info advisory message for a given host
and service. The amount corresponds to the value increase over a
period of one minute.
4.6.6.1.1.
ADVANCED
Activate the “Advanced“ button to define optional settings for Tibco Rendezvous® listeners.
Custom Editors
In the top area of the panel, you can define a number of custom editors for specific Rendezvous field
data. Those editors get used when Rendezvous messages will be edited in the message editor dialog.
copyright © centeractive ag
Page 118 of 156
User Manual . Opensphere Release 2.5
Simply press the “add” button and define what custom editor to use for what kind of field data. Every
definition must specify the editor class together with one or several field identifiers such as name, ID
or data type. Opensphere always uses the editor where the most field identifiers match.
Option
Field Name
Field ID
Data Type
Editor Class Name
Description
Name of the Rendezvous message field
ID of the Rendezvous message field
Data type of the Rendezvous message field
The full name of a class that extends the editor class
com.centeractive.opensphere.msg.JCustomDataEditor. This
abstract class has the following methods that are invoked by Opensphere to set
Rendezvous field data and to determine whether this data is editable. In case it
is editable, Opensphere makes sure, the edited value gets written back to the
corresponding Rendezvous message field.
public boolean isEditable()
This method indicates whether the field data is editable. If this method returns
true, the method getData has to be overwritten to return the data contained in
the editor
public Object getData()
This method returns the data contained in the editor. This method gets invoked
by Opensphere only in case the method isEditable returns true
abstract public void setData(Object data)
This method sets the data to be contained in the editor. This method gets
invoked by Opensphere each time the Rendezvous field node gets selected in
the message editor
User Data Type Handler (Encoder/Decoder)
In the bottom area of the panel you can define a class that is responsible for encoding and/or
decoding Rendezvous user types.
Option
Handler Class
Name
User Data Types
4.6.6.2.
Description
The full name of a class that implements the interfaces
com.tibco.tibrv.TibrvMsgEncoder
and/or
com.tibco.tibrv.TibrvMsgDecoder
Comma separated integer values between TibrvMsg.USER_FIRST(128) and
TibrvMsg.USER_LAST(255) each. The class TibrvMsg is in the package
com.tibco.tibrv.
JMS TOPIC LISTENER
When launching the Message Detector in “JMS Topic” mode, you can define different listeners with
their own JMS connection and one or several topics to listen on. In case you enter more then one
topic, they must be separated by a semicolon (;) each. You can either freely edit the destinations
Page 119 of 156
copyright © centeractive ag
User Manual Opensphere Release 2.5
(topics) field or detect and add single topics to the list by selecting them from a dialog that pops up if
you press the “Add” button located top right to the field.
The “JMS Message Selector” lets you specify what messages to be detected, based on the values of
message headers and properties. The SQL like criteria reduces the set of received messages (please
consult standard JMS documentation). Defining message selectors prevents the JMS provider of
delivering certain messages to the consumer and can significantly reduce network traffic.
In the “Message Filter” field at the bottom of the dialog you can define filter criteria. When you
choose a message listener with a non-empty message filter, the program automatically creates a
tabbed message filter panel on the Message Detector. When a new message gets detected, the
program checks the filter value against the whole message (destination name, properties, body).
Messages will be added to the tabbed filter panel only in case they match the defined filter criteria.
Defining a message filter does not reduce network traffic since message filtering is done by the
message consumer. Filtering voluminous messages slows down the receiving program that has to
check for the occurrence of the specified value within the whole message.
copyright © centeractive ag
Page 120 of 156
User Manual . Opensphere Release 2.5
4.6.6.3.
JMS QUEUE BROWSER
When launching the Message Detector in “JMS Queue” mode, you can define different persistent
listener definitions with their own JMS connection and one or several queues to download messages
from. The queue listener definition dialog gets invokes through the
button. In case you enter
more than one queue, they must be separated by a semicolon (;) each. You can either freely edit the
destinations (queues) field or detect and add single queues to the list by selecting them from a dialog
that pops up if you press the
button located top right on the field.
The “JMS Message Selector” lets you specify what messages to be detected, based on the values of
message headers and properties. The SQL like criteria reduces the set of received messages (please
consult standard JMS documentation). Defining message selectors prevents the JMS provider of
delivering certain messages to the consumer and can significantly reduce network traffic.
In the “Message Filter” field at the bottom of the dialog you can define filter criteria. When you
choose a message listener with a non empty message filter, the program automatically creates a
tabbed message filter panel on the Message Detector. When a new message gets detected, the
program checks the filter value against the whole message (destination name, properties, body).
Messages will be added to the tabbed filter panel only in case they match the defined filter criteria.
Defining a message filter does not reduce network traffic since message filtering is done by the
message consumer. Filtering voluminous messages slows down the receiving program that has to
check for the occurrence of the specified value within the whole message.
Page 121 of 156
copyright © centeractive ag
User Manual Opensphere Release 2.5
4.6.6.4.
TIBCO EMS™ MONITOR
This message detecting mode is applicable only if you work with TIBCO Enterprise Message Service™
(EMS) software. Prior to be able to use the Message Detector as a TIBCO EMS Monitor, you must
define a JMS Provider for EMS.
When launching the Message Detector in “Tibco EMS Monitor” mode, you can define different
listeners with their own EMS connection and specific monitor topics that must all start with
$sys.monitor. When adding a new listener definition, the topic $sys.monitor.*.* appears as the
default value in the “Destinations” field. This topic lets you detect all messages sent by the EMS server
to notify about certain events. To see monitor messages related to JMS message communication, you
have to add destination specific topics according to the EMS documentation. This can be achieved by
pressing the “Add” button located top right of the “Destination” field. Available destinations get
copyright © centeractive ag
Page 122 of 156
User Manual . Opensphere Release 2.5
shown within a pop-up dialog from where they can be selected; the program makes sure to generate
the appropriate monitor topic. If for example you choose the topic named topic.test.5, the generated
monitor messages would be $sys.monitor.T.*.topic.test.5. Each topic in the “Destination” field must
be separated by a semicolon (;). Further details about monitoring topics can be found in the official
EMS documentation.
When a new monitor definition gets added to the list, a default JMS message selector appears in the
corresponding field. This is used for monitoring message communication and has the effect that you
would see a monitor message only when a message gets posted by a producer. Therefore the
messages appearing on the “Included Message Sequence” tab would be unique. You may be
interested in other events as well when monitoring message communication; so you have to remove
the JMS message selector or adapt it to your needs.
Except the above described monitoring topics and the pre-defined message selector, the listener
definition is done the same as would be a normal “JMS Topic Listener”.
Page 123 of 156
copyright © centeractive ag
User Manual Opensphere Release 2.5
4.6.7. DETECTING TIBCO EMS™ QUEUE MESSAGES
This section is applicable only if you work with Tibco Enterprise Message Service™ (EMS) software.
When you’re using the Message Detector in the JMS Queue Browser mode, you must be aware that
messages sent to a JMS queue may be consumed by another program even before you can see them.
If you are interested in messages sent to a queue and you want to make sure you can see all messages
arriving to that queue, you have to switch off all other message consumer programs.
Using the EMS Monitor you can however see the queue messages when you add the appropriate
monitor topic. The queue queue.test.1 for example can be monitored using the topic
$sys.monitor.Q.*.queue.test.1. When running the message detector, the original message contained
in the monitoring message gets extracted and displayed on a separate tabbed pane named “Included
Message Sequence”.
As an alternative to monitoring messages you may create a JMS destination bridge that will
automatically duplicate every message to a second destination, a topic or a queue. There is no impact
on the original message sent to the queue. If for example we got a queue named sample.queue, the
following entry in the EMS configuration file bridges.conf would make sure that every message gets
replicated to the topic named sample.topic.
[queue:sample.queue]
topic=sample.topic
5. DATABASE SUPPORT
Opensphere offers support for direct database operations. You may use a simple “SQL Query Viewer”
“SQL Processor” executable node, a “SQL Comparison” test step.
5.1. DATABASE CONNECTION
Prior to be able to establish a database connection, you have to define the appropriate JDBC driver
class and add the corresponding JDBC library to the classpath of Opensphere. Open the tool options
dialog by selecting the menu item Tool > Tool Options Properties… and select the node
Database/JDBC. Activating the “Add” button will then add a new JDBC driver definition to the list. The
name appearing in the list can be freely chosen. Each driver definition must define the driver class as
well as a sample URL that helps the user specifying a real URL at connection time.
copyright © centeractive ag
Page 124 of 156
User Manual . Opensphere Release 2.5
Specific database connections are defined in different places
within Opensphere. According to the JDBC driver definition you
entered, you get the non-editable driver class name together
with the editable sample URL displayed in the top most text
fields. Depending on the driver, you will then have to define the user name and the password
together with additional arguments. One or several of those entries may be optional however.
5.2. SQL QUERY VIEWER
The SQL Query Viewer executes an SQL select statement on the database and presents the result in a
table. The data can be saved to an XML formatted file.
Page 125 of 156
copyright © centeractive ag
User Manual Opensphere Release 2.5
5.3. SQL PROCESSOR
The SQL Processor executes one or several DDL or DML statements on the database.
copyright © centeractive ag
Page 126 of 156
User Manual . Opensphere Release 2.5
5.4. SQL COMPARISON
The SQL Comparison is available as a test step within a test case. It compares the results of an SQL
SELECT statement against an expected result. The expected result (reference data) can be retrieved at
runtime from a database or it can be manually edited and stored in an XML file.
5.4.1. COMPARE FUNCTION
The comparison between the actual data retrieved from the database and the reference data is done
on field level, the selected compare function is applied on every single field. You can choose between
the following compare functions. String comparison is done lexicographically and based on the
127Unicode value of each character in the strings.
Function
equal to
not equal to
less then
greater then
less or equal to
greater or equal
to
empty
not empty
length
contains
is contained in
starts with
Page 127 of 156
Description
The checked value must be the same as the corresponding reference value.
The checked value must not be the same as the corresponding reference value.
The checked value must be less than the corresponding reference value.
The checked value must be greater than the corresponding reference value.
The checked value must be less or equal to the corresponding reference value.
The checked value must be greater or equal to the corresponding reference
value.
The checked value must be empty, the value of the corresponding reference
value is not considered.
The checked value must not be empty, the value of the corresponding reference
value is not considered.
The length of the checked value must be identical to the number specified in the
corresponding reference value
The checked value must contain the corresponding reference value.
The checked value must be contained in the corresponding reference value.
The checked value must start with the corresponding reference value.
copyright © centeractive ag
User Manual Opensphere Release 2.5
ends with
matches
The checked value must end with the corresponding reference value.
The checked value must match the regular expression specified in the
corresponding reference value.
5.4.2. SQL QUERY
The actual data to be checked is retrieved from a database at runtime using a single SQL select
statement entered on the “Data” panel. If you select the “SQL Query” data type on the “Reference
Data” panel, a corresponding select statement must also be defined for retrieving the reference data
at runtime. Together with the query you have to specify a database connection.
In both cases the SQL editor lets you write comment either as line comment with leading double
slashes ( // line comment ) or as block comment that is delimited by a couple of a slash and a star ( /*
block comment */ ).
The syntactical correctness of the entered SELECT statements is checked when the “Check” button is
pressed. If the used JDBC driver supports pre-compilation, the check method will send the statement
to the database for pre-compilation. Most drivers do not support pre-compilation. In such cases, the
statement is not sent to the database prior to its execution and only the starting key word is checked.
5.4.3. MANUALLY EDITED REFERENCE DATA
The reference data type can be chosen by selecting the appropriate radio button top right on the
“Reference Data” pane. If you select “Manually Edited”, the reference data has to be entered
manually into a table. The table structure (number and name of the columns) is to be defined by the
user within a dialog that pops up upon mouse click on the
button. Table rows can be arranged
by moving them up or down. The reference data can also be loaded from a database (
) or a CSV file
( ) and be further edited within the dialog if required. The entered data is finally stored to a user
chosen XML file from where it will be read again at runtime.
copyright © centeractive ag
Page 128 of 156
User Manual . Opensphere Release 2.5
The buttons that appear on top of the manually entered reference data table are the following.
Item
Open File
Save
Save As
Define
Columns
Description
Opens an XML file and loads its content into the table. Any previous loaded data
will be removed and the table structure will correspond to the one defined in
the loaded file
Saves the table data back to the XML file. If no file has been defined yet, a file
chooser dialog is displayed and lets the user chose the file.
Saves the table data into an XML file chosen by the user
Opens a dialog that lets the user
define the table columns.
Single columns can be added,
removed or simply moved to
another position.
Load from
Database
Opens a dialog that lets you load data using an SQL query on a database of your
choice.
Any previous loaded data will be removed and the table structure will
correspond to the data retrieved from the database.
Be aware that the loaded data will have to be stored into a file and limit the
number of rows by carefully editing the query.
Page 129 of 156
copyright © centeractive ag
User Manual Opensphere Release 2.5
Load from
CSV File
This function lets you choose a CSV file from the file system and load its data
according to the options you define in the dialog shown below.
Column Names Line Number
Indicates what line within the CSV files contains the column names.
Lines appearing in front of this line will be ignored. The first line in the
file is number one. If the checkbox is not selected, the column names
are generated by Opensphere.
Field Separator
Indicates how single fields within the CSV file are separated. This field
can be left empty if the CSV file contains a single column.
Comment Identifier
Specifies how lines with comment are marked in the CSV file. If this field
contains a value, all lines that start with that value are considered to be
comment and will not be loaded.
Any previous loaded data will be removed and the table structure will
correspond to the data retrieved from the CSV file.
Be aware that the loaded data will have to be stored into an XML file in order to
be available for comparison.
5.4.4. COMPARISON RESULT
When the SQL comparison is run, the result with detected differences is reported to a dedicated
message pane within the test result pane of the enclosing test case. The following example shows
such a result report.
Start comparing SQL select result with reference data
row 3: FIRSTNAME…
row 5: FIRSTNAME…
row 9: FIRSTNAME…
comparison failed
To get well formatted and detailed information of a single row within a dedicated dialog, simply click
on it. The whole formatted report can be displayed by right clicking inside the message pane and
choosing the item View > Text Pane from the pop up menu. It could look like shown below.
Start comparing SQL select result with reference data
row 3: FIRSTNAME
copyright © centeractive ag
Page 130 of 156
User Manual . Opensphere Release 2.5
expected <Grégoire > but was <Gregoire>
row 5: FIRSTNAME
expected <Henricson> but was <Henrichson>
row 9: FIRSTNAME
expected <Bernasconi> but was <Bernaconi>
comparison failed
6. TEST ENGINE
6.1. TESTING USE CASES
This section illustrates the basic concept applied when testing different types of programs (modules)
with Opensphere. The use cases typically show a single module that communicates with Opensphere
components (i.e. Message Detector) over a unique communication protocol such as JMS. Real test
cases however may interact with several external modules and there may be different communication
protocol involved. To make distinction of the role the different components play in a scenario, the
items listed below got used.
Item
Opensphere
Component
Expected Message
Execution Message
Flow
Setup Message Flow
Execution Message
Test Result
Page 131 of 156
Description
Configurable component such as a Rendezvous Publisher
Message definition file that specifiies how the actual messages have to
be compared. It defines the data or data portions expected at a certain
point during test execution.
Message flow that happens during the test execution. This may
comprise a triggering messages, messages from and to Opensphere
components and the program that gets tested.
Messages captured prior to the actual test execution and prepared as
expected data for comparison.
Message definition (data) file used for triggering the test execution and
messages captured during that execution.
Comparison result viewable within the Opensphere program or within a
web browser once the result has been published
copyright © centeractive ag
User Manual Opensphere Release 2.5
6.1.1. TIBCO RV TESTING
The figure below illustrates a simple use case that points out how Opensphere can be used to debug
and test a Tibco Rendezvous® (RV) enabled program.
6.1.1.1.
1.
2.
3.
The RV Message Detector records messages with a well-defined subject.
The Message List Editor is invoked directly from the RV Message Detector or from the AE
data import facility. It lets you edit the recorded messages and make them look like
messages you expect “My Program” to produce.
The triggering message that gets feed into the RV Publisher can be created the same way.
6.1.1.2.
4.
5.
TEST SETUP
TEST EXECUTION
An XML file is loaded into the RV Publisher and the contained messages are published on the
predefined subject recursively as long as specified. The purpose of those messages is to
trigger some process in “My Program”. The XML file that gets loaded into the RV Publisher
may have been edited directly in the property dialog or it may previously have been recorded
using the RV Message Detector.
The program to be debugged or tested (My Program) maintains one or several subscriptions
and receives the published messages. While performing some tasks, it may send reply
messages but also send independent request messages that target another adapter or
application.
copyright © centeractive ag
Page 132 of 156
User Manual . Opensphere Release 2.5
6.
7.
8.
The RV Publisher reports expected reply messages or writes error messages if it does not
receive them.
The RV Application Simulator simulates an application that is supposed to respond to
requests. In our case it receives the request message from “My Program”, dynamically writes
specific data into a predefined acknowledge message and sends it back on the reply subject.
It may also forward dynamically build messages to another involved program. The RV
Application Simulator writes all received Tibco Rendezvous® messages to an XML file.
The expected messages get compared to the messages that were received by the RV
Application Simulator. The Message Comparator component goes through the predefined
comparison rules and reports the detailed result.
6.1.2. JMS TOPIC TESTING
The next use case illustrates how Opensphere components interact with a custom program using JMS
topics (i.e. with TIBCO Enterprise Message Service™) in order to test its functionality.
Page 133 of 156
copyright © centeractive ag
User Manual Opensphere Release 2.5
6.1.2.1.
1.
2.
3.
The EMS Topic Message Detector records messages with a well-defined topic.
The Message List Editor is invoked directly from the EMS Topic Message Detector. It lets you edit
the recorded messages and make them look like messages you expect “My Program” to produce.
The triggering message that gets feed into the JMS Message Producer can be created the same
way.
6.1.2.2.
4.
5.
6.
7.
8.
TEST SETUP
TEST EXECUTION
The XML file is loaded into the JMS Message Producer and the contained messages are published
on the predefined topic recursively as long as specified.
The program to be debugged or tested (My Program) maintains one or several subscriptions and
receives the published messages. While performing some tasks, it may send reply messages but
also send independent request messages that target another adapter or application.
The JMS Message Producer reports expected reply messages or writes error messages if it does
not receive them.
The JMS Message Consumer receives the message from “My Program” and writes them to an
XML file.
The expected messages get compared to the messages that were received by the JMS Message
Consumer. The Message Comparator component goes through the predefined comparison rules
and reports the detailed result.
6.1.3. JMS QUEUES TESTING
The figure below shows a test scenario where Opensphere components interact with a custom
program using JMS queues (i.e. with TIBCO Enterprise Message Service™) queues.
copyright © centeractive ag
Page 134 of 156
User Manual . Opensphere Release 2.5
6.1.3.1.
1.
2.
3.
The EMS Queue Browser records messages from a dedicated JMS queue
The Message List Editor is invoked directly from the EMS Queue Browser. It lets you edit the
recorded messages and make them look like messages you expect “My Program” to produce.
The triggering message that gets feed into the JMS Message Producer can be created the same
way.
6.1.3.2.
4.
5.
6.
7.
8.
TEST SETUP
TEST EXECUTION
The XML file is loaded into the JMS Message Producer and the contained messages are published
on the predefined topic recursively as long as specified.
The program to be debugged or tested (My Program) maintains one or several subscriptions and
receives the published messages. While performing some tasks, it may send reply messages but
also send independent request messages that target another adapter or application.
The JMS Message Producer reports expected reply messages or writes error messages if it does
not receive them.
The JMS Message Consumer receives the message from “My Program” and writes them to an
XML file.
The expected messages get compared to the messages that were received by the JMS Message
Consumer. The Message Comparator component goes through the predefined comparison rules
and reports the detailed result.
Page 135 of 156
copyright © centeractive ag
User Manual Opensphere Release 2.5
6.1.4. DATABASE TESTING
The following scenario points out how a database enabled program could be tested in Opensphere.
6.1.4.1.
1.
The SQL Compare component is used to load some data from a database. This data can now be
edit by the user to produce the expected data. The so prepared data gets then saved to an XML
file
6.1.4.2.
2.
3.
4.
TEST SETUP
TEST EXECUTION
An SQL Processor runs some predefined SQL statements on a database
“My Program” gets triggered by some data event occurring in the database and reacts by
changing other data in the same database (could also be another database).
The SQL Compare component reads the changed data from the database and compares it to the
expected data read from the XML file. The result gets reported in detail.
6.2. TEST STRUCTURE
A test structure is composed by Test suites
, test cases
and all kind of test steps, the test
suite being the top most node containing a user defined number of test cases, which in turn contain a
set of test steps. Test suites and test cases can be enabled or disabled by simply clicking on the green
(or gray) ball that appears in front of the node icon. Newly created test nodes are enabled by default.
copyright © centeractive ag
Page 136 of 156
User Manual . Opensphere Release 2.5
If you run a test suite, only its enabled test cases get performed. If you want to run a series of test
suites, Opensphere let you only select enabled test suites.
A new test suite is created through the menu item Project > Add Test Suite or by pressing on the
corresponding button
on the main tool bar. When the test suite node gets added to the project
structure tree, it lets you define its name and description in a pop up dialog. Single test cases are then
added by selecting Add Test Case from the pop up menu that appears when right clicking the test
suite node. Alternatively you may also press the button
from the main tool bar.
6.2.1. TEST CASE LOGIC
6.2.1.1.
TEST FLOW CHART
The logical execution sequence of test steps is defined on the test case level through a test flow chart.
When a new test case is created underneath a test suite, it gets automatically added the mandatory
start state that acts as entry point of every test flow. Any other test steps can then be added to the
flow chart and connected to other steps through a few mouse clicks:
Left click with the mouse on the desired button in the left located test step tool palette
and again within the flow chart to have a new test step added to it.
Press the left mouse button when the mouse pointer is at the center of test step
(source), move the mouse to another test step (target) while keeping the mouse button
pressed. Release the button and you get a new connection between the two test steps.
The flow chart allows only forward connections; given a source test step, you may not
target a test step that is already a direct or indirect predecessor of that source.
Existing test steps and connections among them may be changed or removed from the
flow chart; the start state shape however cannot be removed.
A test case must have all its test steps connected to become executable
Page 137 of 156
copyright © centeractive ag
User Manual Opensphere Release 2.5
6.2.2. TEST STEPS
Test steps belong to a test case and are integrated in its logical flow.
6.2.2.1.
TEST STEP INITIALIZATION
Test steps by default are initialized when the owner test case is initialized. The listener of an RV
Subscriber test step for example is set up at initialization; its dispatcher however starts working only
when the step is started. The test initialization can be changed in the test case property dialog. If you
want specific test steps have to be initialized just before running them, select the corresponding
check box on the “Execution Control” tab.
copyright © centeractive ag
Page 138 of 156
User Manual . Opensphere Release 2.5
6.2.2.2.
TEST STEP TYPES
Test steps are of a certain type with specific configurable behavior each. Test steps are owned by a
test case that controls their execution according to the definition made in the test flow chart. The
table below shows test steps that are available; some of them simply wrap existing executable nodes
and behave basically the same as them.
Test Step
OS Command
Description
Acts as entry point for the test case process flow. Every test case
has exactly one start state shape that is direct or indirect source of
all connections.
Sleeps the specified number of seconds and interrupts the
processing of the test case within the branch where it is located in
the process flow-chart.
Interrupts the process flow during a manual intervention. The
process flow continues as soon as the dialog is closed. Processing
may be stopped if the user detects and notifies an error.
Wraps the executable node of same name
RV Publisher
Wraps the executable node of same name
RV Subscriber
Wraps the executable node of same name
RV Application Simulator
Wraps the executable node of same name
JMS Message Producer
Wraps the executable node of same name
JMS Message Consumer
Wraps the executable node of same name
JMS Queue Browser
Wraps the executable node of same name
Web Service Client
Wraps the executable node of same name
Web Service Server
Wraps the executable node of same name
SQL Processor
Wraps the executable node of same name
SQL Comparison
Compares the results from two SQL select statements. The result
is reported to the result tab of the test case detail view.
Compares messages contained in two distinct files and reports the
result to the result tab of the test case detail view.
Compares the content of two distinct files and reports the result
to the result tab of the test case detail view.
Start State
Sleeper
Check/Confirm
Message Comparison
File Comparison
6.3. TEST EXECUTION
Test cases as well as test suites can be executed independently by simply select the corresponding
node in the project tree and press the “Run” button
on the main tool bar. Test steps are
controlled and executed by the owning test case and cannot be run independently.
If a test suite is executed, it will first simultaneously initialize all its test cases and run them afterwards
in the same order as they appear in the project tree. A test case must finish execution before the next
test case within the sequence is started; only one test case per test suite can be running at a given
time.
Test cases in turn first initialize all dependent test steps before they start executing the defined
process flow. The sequence and parallelism of test step execution is defined in the test case flow chart
Page 139 of 156
copyright © centeractive ag
User Manual Opensphere Release 2.5
and also dependent on the execution time and user intervention during the test run. A test step is
started as soon as all preceding test steps have finished execution; preceding test steps are those that
have a connection line pointing to a specific test step. Each test step performs a certain task when it
gets activated. It stops when certain predefined criteria are fulfilled or if the test case as a whole gets
stopped either through user intervention or because another test step got an error.
Test steps within the project tree show their status by a small icon that gets applied on top of the
regular test step icon. The following status icons can appear.
initializing
initialized
running
terminated with error
successfully performed
On the test flow chart, those icons appear as well but the status is also rendered by the color of the
test step rectangles. The default yellow color of test steps within the test case flow chart is changed
to gray after its successful initialization. A running test step has a green background meanwhile a test
step that has terminated with an error gets red colored. Test steps that were successfully executed
return to be of yellow color.
6.3.1. MONITORING
During initialization and run of the tests, test progress and status are reported on different levels. The
icon that represents a single node within the project tree changes its appearance depending whether
a test item (test suite, test case or test step) is running, has successfully executed or terminated with
an error.
A dedicated worker panel reports all status changes during the test run using colours that represent
the status (i.e. red text for errors).
Within the test suite detail view, you can see the status of the test suite and all dependent test cases
whereas the test case view presents the same information for all its test steps in a table but also in
the flow chart.
The test case detail view moreover contains a multiple-document interface (MDI) containing the
console windows of every test step that reports detailed processing information. The start step does
not have a console window since it acts only as entry point of the test step flow and does not do any
processing itself.
copyright © centeractive ag
Page 140 of 156
User Manual . Opensphere Release 2.5
6.3.2. BATCH PROCESSING
Opensphere lets you execute test suites defined in a project from the command-line. The class
com.centeractive.opensphere.batch.OpenSphereBatchTestRunner implements
the functionality for running all active test suites within a specified project file and publishes the
HTML formatted test result to the location of your choice.
The example presented below demonstrates how to run the batch runner through the use of Apache
Ant, a powerful Java-based build tool. You may use additional predefined tasks from the Ant
framework to send notification with the test result, to publish the result to a web server using FTP, to
archive the test result directory and much more. Please consult the Ant documentation to learn more.
Each Opensphere project is supplemented with a sample Ant build.xml file located in the bin/batch
folder. Adjust that file in order to run a specific test:
1.
2.
Set the properties listed in the table mentioned below.
Set the “project” fileset indicating Opensphere project files (.osp) to run the test suites for.
Property
openSphereHome
testReportDir
maxRuntimePerTestSuite
showResult
Page 141 of 156
Description
Path to the Opensphere installation home directory
Path of the directory where to store the HTML
formatted test report. This directory will contain an
index.html file once the tests have been executed.
Defines the maximum number of seconds a test
suite must run before it gets stopped automatically.
The default is 3600 seconds, which is 1 hour.
Indicates whether the test result should be shown
within a popping-up browser window as soon as the
copyright © centeractive ag
Required
yes
yes
no
no
User Manual Opensphere Release 2.5
failOnError
rvRoot
emsRoot
testing process has finished. The possible values are
“true” or “false”, “false” being the default value.
Indicates if the osTest task shall fail in case an
unexpected error occurs while processing one of the
specified Opensphere project files. The possible
values are “true” or “false”, “false” being the default
value. If an unexpected error occurs for every
specified project, the osTest task fails regardless the
value of this attribute.
Defines the root folder of TIBCO Rendezvous®
product. Do not change if RV_ROOT environmental
variable is set.
Defines the root folder of TIBCO EMS™ product. . Do
not change if EMS_ROOT environmental variable is
set.
no
yes (for RV)
yes (for EMS)
The following listing presents a sample build.xml encompassing all of the aforementioned
configuration options.
<project name="Opensphere Batch Test" default="runOSTest">
<property environment="env"/>
<description>
This Ant build file runs Opensphere tests defined in different project files,
publishes the testing result to a web server and notifies dedicated people about
the newly available testing results.
</description>
<!-- ~~~~~~~~~~~~~~~~~~~~~~~~~~~~~~~~~~~~~~~~~~~~~~~~~~~~~~~~~~~~~~~~~~~~~~~~~~~~~~~~~~ -->
<!-- ~~~~~~~~~~~~~~~~~~~~~~~ OPTIONS TO BE DEFINED BY THE USER ~~~~~~~~~~~~~~~~~~~~~~~~ -->
<!-- ~~~~~~~~~~~~~~~~~~~~~~~~~~~~~~~~~~~~~~~~~~~~~~~~~~~~~~~~~~~~~~~~~~~~~~~~~~~~~~~~~~ -->
<!-- set global properties for this build -->
<property name="openSphereHome" location="TODO" />
<property name="testReportBaseDir" location="TODO" />
<property name="maxRuntimePerTestSuite" value="60" />
<property name="showResult" value="false" />
<property name="rvRoot" location="${env.RV_ROOT}" />
<property name="emsRoot" location="${env.EMS_ROOT}" />
<!-- declare the projects to execute -->
<fileset id="projects" dir="TODO">
<include name="TODO.osp" />
</fileset>
<!-- ~~~~~~~~~~~~~~~~~~~~~~~~~~~~~~~~~~~~~~~~~~~~~~~~~~~~~~~~~~~~~~~~~~~~~~~~~~~~~~~~~~ -->
<!-- ~~~~~~~~~~~~~~~~~~~~~ DO NOT CHANGE UNLESS REALLY NECESSARY ~~~~~~~~~~~~~~~~~~~~~~ -->
<!-- ~~~~~~~~~~~~~~~~~~~~~~~~~~~~~~~~~~~~~~~~~~~~~~~~~~~~~~~~~~~~~~~~~~~~~~~~~~~~~~~~~~ -->
<!-- set classpath for standalone execution -->
<path id="classpath">
<fileset dir="${openSphereHome}/lib/">
<include name="*.jar" />
</fileset>
<pathelement location="${openSphereHome}/gen/classes" />
<pathelement location="${rvRoot}/lib/tibrvj.jar" />
<pathelement location="${emsRoot}/lib/tibjms.jar" />
</path>
<!-- initializes timestamps and test report directory -->
<target name="init">
<tstamp>
<format property="TODAY" pattern="yyyy-MM-dd" />
</tstamp>
<mkdir dir="${testReportBaseDir}" />
</target>
<!-- convert the specified fileset to comma-separeted absoulte paths -->
<pathconvert property="projectPaths" refid="projects" />
<!-- run Opensphere projects in a separate virtual machine -->
<target name="runOSTest" depends="init" description="defines the Opensphere test task">
<java classname="com.centeractive.opensphere.batch.OpenSphereTestTask" fork="true">
copyright © centeractive ag
Page 142 of 156
User Manual . Opensphere Release 2.5
<classpath refid="classpath" />
<jvmarg value="-DopenSphereHome=${openSphereHome}" />
<jvmarg value="-DtestReportDir=${testReportBaseDir}/${TODAY}" />
<jvmarg value="-DmaxRuntimePerTestSuite=${maxRuntimePerTestSuite}" />
<jvmarg value="-DshowResult=${showResult}" />
<jvmarg value="-Dfileset=${projectPaths}" />
</java>
</target>
<!-- copies the Ant log file to the test result directory -->
<target name="copyLogFile" depends="runOSTest" description="copies the log to the test result directory">
</project>
6.4. TEST RESULT
Quick information about the result (successful or failed) of a test suite, a test case or even a single test
step can be obtained from the project tree where the nodes are represented by an icon according to
their execution state. Detailed information however is displayed within the detail view of the nodes.
The test suite detail view for example lists all contained test cases by showing their state, start and
end time as well as the duration of the execution. The top most entry in the list contains this same
information as a summary for the whole test suite.
The test case detail view contains a “Test Result” pane which shows a list with execution information
of all test steps and a top located line for the test case. This looks pretty much the same as the detail
view of the test suite. If the test case contains one or several comparison test steps, the results of
them are displayed above the mentioned list. The screen shot below shows a “Test Result” pane of a
test case that contains a “SQL Comparison” test step.
6.4.1. PUBLISHING
Pressing the “publish” button
located in the main toolbar lets you publish one or several test
suites that have been executed. Alternatively this can be achieved by selecting the menu item Testing
> Publish Test Results…
Page 143 of 156
copyright © centeractive ag
User Manual Opensphere Release 2.5
Within beside shown dialog simply select the test suites you
want to publish and confirm your choice by pressing the “OK”
button. The selected test suite together with all dependent
test cases will be generated to HTML formatted pages that
can be viewed in a standard web browser.
copyright © centeractive ag
Page 144 of 156
User Manual . Opensphere Release 2.5
Same as if you were using the project tree within the Opensphere application, you can navigate
between the pages by simply selecting the corresponding node within the tree structure. The sample
pages below give you an impression on how published test cases may look like.
Test suites are published with the aim to share test results with other team members but also for
maintaining a test history. The Opensphere application in fact does not hold the information on test
results over session boundaries; it only maintains the test definition, which includes the test structure,
the test flow and logic of single test steps.
6.4.1.1.
CUSTOMIZING
When a test suite is published, some files contained in the directory <Opensphere
HOME>/pubresources are used as template and some other are copied unchanged to the publishing
location. You may for example adapt the background color of the HTML frame page or change the
banner to better reflect the project you are working in. If you edit or replace the corresponding files,
please make first a copy of them to be able to restore the initial environment.
Page 145 of 156
copyright © centeractive ag
User Manual Opensphere Release 2.5
6.4.1.2.
TEST RESULT WEB SERVER
A simple JSP based web application for showing published test results is shipped with Opensphere
and available as web archive under resources\webserver\testreporting.war. This web archive can for
example be copied to the webapps folder of a Tomcat application running on a server. The testing
results on the other hand must be published to the results folder within the unpacked web
application same as Opensphere does it when running in batch mode with the sample Ant build file as
described in the chapter above.
6.5. TEST STEP DETAILS
This section describes the details of individual test step types that are part of a test case and appear in
its graphical test flow.
6.5.1. SLEEPER
The Sleeper test step sleeps the specified number of seconds and
interrupts the processing of the test case within the branch
where it is located in the process flow chart.
The number of seconds the test step has to sleep is defined
within the test step property dialog shown beside.
6.5.2. CHECK/CONFIRM
The Check/Confirm test step interrupts the
process flow during some manual intervention.
When this test step is triggered (started), it
shows a modal dialog with the message that
has previously been defined in the property
dialog. The message may tell the user to just
check something, to prepare some resources or
what ever is needed to successfully run the test
case.
The process flow continues as soon as the
dialog is closed. Processing may be
stopped if the user detects an error
during his intervention. In that case, he
will have to enter the reason that made
him abort the test execution; this text will
be reported in the result pane of the test
case.
copyright © centeractive ag
Page 146 of 156
User Manual . Opensphere Release 2.5
6.5.3. OS COMMAND
The OS Command test step lets you
define an operating system command
that would otherwise be executed in a
command window or within a console
of the operating system. The
command output is reported to the
test step console at run time. It may
be used as simple information as does
the simple command defined in the
property dialog at the right; it may on
the other hand perform some processing that is required by further executed test steps. On the dialog
you can specify the result codes that indicate successful script execution. Individual codes need to be
separated by a comma each. The test case will be interrupted and be considered as failed in case the
actual script return code is not contained in this field.
The output on the console window of a simple dir command could look like follows. Such output
may be used to check if certain file has been written to a given folder for example. To be able to react
on the information, it would be advisable to add a Check/Confirm test step after such an OS
Command test step.
Page 147 of 156
copyright © centeractive ag
User Manual Opensphere Release 2.5
6.5.4. EXECUTABLE
The Executable test step executes an independent program that has the extension ‘.exe’ on Windows
operating systems. It may also be used to execute a batch file (‘.bat’) or any other executable file. Its
property dialog looks much like the one of the OS Command test step.
6.5.5. WEB SERVICE SERVER
This test step behaves basically the same as the executable node with the same name. Please consult
the related detailed description. It is good practice to have a web service server located outside of a
test case. To make sure the server is running when the test is executed, a confirmer test step can be
added to the test case flow. Its task is to notice the user that he has to check whether the server is
running.
6.5.6. WEB SERVICE CLIENT
This test step behaves basically the same as the executable node with the same name. Please consult
the related detailed description.
6.5.7. JMS MESSAGE PRODUCER
This test step behaves basically the same as the executable node with the same name. Please consult
the related detailed description.
6.5.8. JMS MESSAGE CONSUMER
This test step behaves basically the same as the executable node with the same name. Please consult
the related detailed description.
6.5.9. JMS QUEUE BROWSER
This test step behaves basically the same as the executable node with the same name. Please consult
the related detailed description.
6.5.10.
RV PUBLISHER
This test step behaves basically the same as the executable node with the same name. Please consult
the related detailed description.
6.5.11.
RV SUBSCRIBER
This test step behaves basically the same as the executable node with
consult the related detailed description.
6.5.12.
the same name. Please
RV APPLICATION SIMULATOR
copyright © centeractive ag
Page 148 of 156
User Manual . Opensphere Release 2.5
This test step behaves basically the same as the executable node with
consult the related detailed description.
6.5.13.
the same name. Please
SQL QUERY VIEWER
This test step behaves basically the same as the executable node with the same name. Please consult
the related detailed description.
6.5.14.
SQL PROCESSOR
This test step behaves basically the same as the executable node with the same name. Please consult
the related detailed description.
6.5.15.
SQL COMPARISON
This test step behaves the way it is described in the section “Database Support”. Please consult the
related detailed description.
6.5.16.
MESSAGE COMPARISON
This test step compares XML formatted messages contained in two distinct files that must be
specified within the property dialog.
The check box labeled “Pop Up Comparator Dialog” indicates if message comparison should be done
in the Message Compare Editor when the test step is executed.
If the check box is selected, the Message Compare Editor is displayed containing the
reference messages and the compared messages from the specified files. The user will then
have to execute the message comparison by activating the appropriate button and he will
also be allowed to change the comparison rules and to edit the messages. The comparison
result will be reported to the result pane of the dialog and disappear as soon as it gets
closed. When closing the dialog, the user is free to decide if the message comparison (and
with it the test step) was successful or if it failed. Test step execution with the Message
Compare Editor displayed is especially useful during test case set up.
Page 149 of 156
copyright © centeractive ag
User Manual Opensphere Release 2.5
If the check box is not selected, comparison is done automatically and the result is fully
reported to the test case result pane. This mode should always be used for automated
regression tests.
The reference message file is usually selected from the file system
since it is supposed to
contain stable data maintained in a protected location. The file name can also be imported through
the message editor
where it can be edited in the reference message mode. In some cases
however it could make sense to select an entry from the combo box labeled “Reference Message
File”. This combo box in fact contains the names of all message files that are used in other test steps
inside the same test case.
On the other hand you have to define the message file containing the messages that are compared
with the reference messages. This will likely be a file that has been created by a messaging program
such as the JMS Message Producer/Consumer, the Rendezvous Publisher/Subscriber or a Web Service
Client/Server test step (reply messages). For this reason the combo box labeled “Message File” will
already contain all names of message files defined in such test steps within the same test case. This
file name can also be selected from the file system, through the message editor or the path can be
entered manually.
Select the Compare Mode from the appropriate combo box. This will determine how message fields
are compared in general. The compare mode does not influence whether the send and the reply
subject will be checked for equality between a compared message and the reference message.
Subject comparison is done only in case you select on or both of the appropriate checkbox.
For details about the comparison process and how the test step reports its results, consult the
description of the Message Editors that behind the scenes uses the same functionality.
6.5.16.1.
COMPARISON OPTIONS
Compare Mode
Compare all for equality
compare all for equality
(include nested XML)
Compare equality not
structure
Compare defined only
Compare all but defined
(inverse comparison)
All message fields of the compared messages must be identical with the
message fields of the reference message. This applies to the field names,
the field ID’s, the values and the message structure.
All elements of a compared message must be identical to that of the
reference message. The actual message must not contain fields that are
not present in the reference message. This also the checks the structure
and values of nested XML content.
All fields of the compared message must be equal to that of the
reference message. Fields that are in the compared message but not in
the reference message are ignored.
Only message fields explicitly defined for comparison are considered. A
message field is defined when the check box “Check” on its node detail
view is selected. The message structure beside the defined fields is not
considered.
All message fields not explicitly defined for comparison are considered.
copyright © centeractive ag
Page 150 of 156
User Manual . Opensphere Release 2.5
Other Options
Excluded Paths
6.5.17.
Comma separated list of XPath expressions that identify elements (branches) that
must entirely be excluded when comparison is done. Comparison is done on the
XML representation of individual messages. Therefore for being able to define
valid XPath expressions, one has to know about the XML representation of
messages. Useful expressions for Tibco Rendezvous® messages for example
would
be
“//rvMsgFieldGroup[@name=’^prefixList^’]”
or
“//rvMsgFieldGroup[@name=’^tracking^’]”. Excluded paths are considered only
in case the comparison mode is “Compare all for equality”.
FILE COMPARISON
This test step compares the content of two distinct files that must be specified within the property
dialog shown below (Depending on the selected file content type, the dialog has a different look).
The combo box labeled “File Content” lets you define the type of files you want to compare. Current
available types are “text”, “XML” and “CSV”.
The check box labeled “Pop Up Comparator Dialog” is available for XML file content only. It indicates
if message comparison should be done in the XML Editor when the test step is executed.
If the check box is selected, the XML Editor is displayed containing the content from the
reference file and the compared content from the specified files. The user will then have to
execute the file comparison by activating the appropriate button and he will also be allowed
to change the comparison rules and to edit the file content. The comparison result will be
reported to the result pane of the dialog and disappear as soon as it gets closed. When
closing the dialog, the user is free to decide if the file comparison (and with it the test step)
was successful or if it failed. Test step execution with the XML Editor displayed is especially
useful during test case set up.
If the check box is not selected, comparison is done automatically and the result is fully
reported to the test case result pane. This mode should always be used for automated
regression tests.
The reference file is usually selected from the file system
since it is supposed to contain stable
data maintained in a protected location. The file name can also be imported through the text editor
dialog
. In some cases however it could make sense to select an entry from the combo box labeled
“Ref. File”. This combo box contains the names of all files that are used in other test steps inside the
same test case.
Page 151 of 156
copyright © centeractive ag
User Manual Opensphere Release 2.5
Further you have to define the file containing the data that is compared with the reference data. This
will likely be a file that has been created by a messaging component such as the JMS Message
Producer/Consumer, the Rendezvous Publisher/Subscriber or a Web Service Client test step (reply
messages). For this reason the combo box labeled “File” will already contain all names of message
files defined in such test steps present in the same test case. This file name can also be selected from
the file system, through the editor or the path can be entered manually.
If the content of the file or the reference file has specific character encoding, the corresponding
charset name (i.e. UTF-16) has to be entered in the Character Encoding field that appears right to the
file name. This charset is applied when the file is read in order to be shown in a dialog (i.e. text editor)
and when the comparison is performed. When a file is saved from a dialog however, it always uses
standard encoding and the entered charset is not taken into account.
6.5.17.1.
COMPARISON OPTIONS
Depending on the selected content type, the following compare options are available.
Content
Type
Option
text
Comment Identifier
Specifies how lines with comment are marked in the text file. If
this field contains a value, all lines that start with that value are
considered to be comment and will not be included in the
comparison.
Excluded Lines
Specifies the lines that shall not be included in the comparison.
The numbers of the excluded lines need to be separated by a
comma each. The first line number is number one.
Compare Mode
Compare full structure
All XML elements and attributes of the compared file must be
identical with the ones from reference file.
XML
Comparison Rules
Only XML elements and attributes explicitly defined for
comparison are considered. The message structure beside the
defined elements and attributes is not considered.
Comparison Rules Inversed
All XML elements and attributes not explicitly defined for
comparison are considered, defined ones are ignored.
CSV
Column Names Line
Number
Indicates what line within the CSV files contains the column
names. Lines appearing in front of this line will be ignored. The
first line in the file is number one. If the checkbox is not selected,
the column names are generated by Opensphere.
Field Separator
Indicates how single fields within the CSV files are separated. This
field can be left empty if the CSV files contain a single column
Comment Identifier
Specifies how lines with comment are marked in the CSV file. If
this field contains a value, all lines that start with that value are
considered to be comment and will not be included in the
copyright © centeractive ag
Page 152 of 156
User Manual . Opensphere Release 2.5
comparison.
Included Columns
all
All columns contained in the CSV files will be considered for
comparison.
by name
Only columns with the specified names are considered for
comparison. Individual column names need to be separated by a
comma each.
by position
Only columns at the specified position are considered for
comparison. Individual column positions need to be separated by
a comma each.
Compare Function
Page 153 of 156
Defines the function to be applied when comparing individual
fields. The following function are available:
Function
Description
equal to
The checked value must be the same as the
corresponding reference value.
not equal to
The checked value must not be the same as
the corresponding reference value.
less then
The checked value must be less then the
corresponding reference value.
greater then
The checked value must be greater then the
corresponding reference value.
less or equal
The checked value must be less or equal to
to
the corresponding reference value.
greater or
The checked value must be greater or equal
equal to
to the corresponding reference value.
empty
The checked value must be empty, the value
of the corresponding reference value is not
considered.
not empty
The checked value must not be empty, the
value of the corresponding reference value is
not considered.
length
The length of the checked value must be
identical to the number specified in the
corresponding reference value
contains
The checked value must contain the
corresponding reference value.
is contained in The checked value must be contained in the
corresponding reference value.
starts with
The checked value must start with the
corresponding reference value.
ends with
The checked value must end with the
corresponding reference value.
matches
The checked value must match the regular
expression specified in the corresponding
reference value.
copyright © centeractive ag
User Manual Opensphere Release 2.5
7. SAMPLES
7.1. SAMPLE PROJECTS
Opensphere is delivered with sample projects that illustrate how the different modules work
together. Most samples are kept simple and cover only the basic functionality of the application. All
sample projects are located within the directory <USER_HOME>/.opensphere/projects/samples and
contain a detailed description that appears when the projects is loaded.
7.2. TIBCO RENDEZVOUS® XML FORMAT
The document below shows a simple Tibco Rendezvous® custom message that has been created from
scratch within the RV Message Editor prior to be saved to the XML file.
<?xml version="1.0" encoding="UTF-8"?>
<!-Generated by Opensphere Release 1.4.0 / Tuesday 2005-08-04 21:21:50
-->
<os:msgArray xmlns:os="http://www.centeractive.com/namespaces/opensphere">
<os:xMsg>
<rvMsg sendSubject="opensphere.test.person.create" replySubject="">
<rvMsgFieldGroup name="Person" id="0">
<rvMsgField name="Title" id="0" type="STRING"><![CDATA[Mr.]]></rvMsgField>
<rvMsgField name="Name" id="0" type="STRING"><![CDATA[Dufour]]></rvMsgField>
<rvMsgField name="Firstname" id="0" type="STRING"><![CDATA[Philipe]]></rvMsgField>
<rvMsgField name="Birthdate" id="0" type="DATETIME">17.03.1971 00:00:00</rvMsgField>
<rvMsgFieldGroup name="Address" id="0">
<rvMsgField name="Street" id="0" type="STRING"><![CDATA[Rue de la Gare]]></rvMsgField>
<rvMsgField name="Housenumber" id="0" type="STRING"><![CDATA[26]]></rvMsgField>
<rvMsgField name="ZIP Code" id="0" type="STRING"><![CDATA[1010]]></rvMsgField>
<rvMsgField name="Location" id="0" type="STRING"><![CDATA[Lausanne]]></rvMsgField>
<rvMsgField name="State" id="0" type="STRING"><![CDATA[VD]]></rvMsgField>
<rvMsgField name="Country" id="0" type="STRING"><![CDATA[Switzerland]]></rvMsgField>
</rvMsgFieldGroup>
</rvMsg>
</os:xMsg>
</os:msgArray>
copyright © centeractive ag
Page 154 of 156
User Manual . Opensphere Release 2.5
8. APPENDIX
8.1. DISCLAIMER
Java and all Java-based trademarks and logos are trademarks or registered trademarks of Oracle
and/or its affiliates in the U.S. and other countries.
This product includes
(http://www.apache.org/)
software
developed
by
the
TM
Apache
Software
Foundation
TM
Tibco and all related products such as Rendezvous , EMS etc. are trademarks or registered
trademarks of TIBCO Software Inc. in the U.S. and other countries.
Other names may be trademarks of their respective owners.
8.2. TERMS AND ABBREVIATIONS
CM
Certified Message Delivery is a TIBCO Rendezvous® protocol. Certified delivery
features offer greater certainty of delivery – even in situations where processes
and their network connections are unstable
DML
The SQL Data Manipulation Language is a portion of the SQL standard that is
concerned with manipulating the data in a database as opposed to the
structure of a database. The core verbs for DML are SELECT, INSERT, DELETE,
UPDATE, COMMIT and ROLLBACK
EAI
Enterprise Application Integration consists of special software, called
middleware that sits between different applications and intelligently translates
and routes data between them. It eases the frustration with IT felt by business
managers of large corporations who find themselves with many different
systems that don t work well together. As IT is now so strategic for almost every
business, anything that adversely impacts its effectiveness has a business cost.
Therefore, EAI normally brings substantial benefit and financial return to those
organizations that implement it.
EMS
The TIBCO Enterprise Message Service
implementation.
GUI
Graphical User Interface
HTML
The HyperText Mark-up Language is a language to specify the structure of
documents used in the Internet
JDBC
Java Database Connectivity is a standard vendor-independent Java interface for
connecting to relational databases. It allows you to access a wide range of SQL
Page 155 of 156
copyright © centeractive ag
TM
is a Java Messaging Service (JMS)
User Manual Opensphere Release 2.5
databases with exact same syntax.
Rendezvous
TIBCO Rendezvous® software is an industrial-strength messaging tool that
allows application developers to build scalable distributed applications
RV
See Rendezvous
rvscript
All-purpose scripting tool for TIBCO Rendezvous®. To get a copy of the product,
request it at [email protected]
SMT
The Source Message Template is a hypothetical inbound message that is used
for defining mappings within a Tibco Rendezvous® simulator process
SQL
Structured Query Language that lets you select data from a database
TIBCO
TIBCO Software is the leading global provider of business integration solutions
URL
The Uniform Resource Locator is a standard way to specify the location of a
resource (i.e. a file) available electronically
XML
XML is the Extensible Mark-up Language. It is designed to improve the
functionality of the Web by providing more flexible and adaptable information
identification. It is called extensible because it is not a fixed format like HTML (a
single, predefined mark-up language). Instead, XML is actually a `meta
language' - a language for describing other languages - which lets you design
your own customized mark-up languages for limitless different types of
documents
copyright © centeractive ag
Page 156 of 156