1
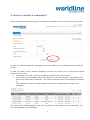
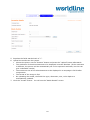
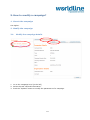
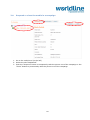
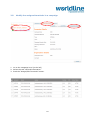
1
Table of Contents
Table of Contents ................................................................................................................2
1.
Introduction .................................................................................................................4
2.
How to login? ..............................................................................................................5
1.
Login ...........................................................................................................................................5
2.
Choose your Access Point & Role (optional) ...............................................................5
3.
Go to the tab Advertising ...................................................................................................6
3.
How to consult a campaign? .................................................................................7
4.
How to create a campaign? ..................................................................................8
1.
Create a campaign ................................................................................................................8
2.
Add Media .................................................................................................................................9
3.
Assign Terminals ................................................................................................................. 11
3.1. Assign terminals using the pre-loaded list .............................................12
3.2.
5.
6.
Assign terminals by uploading your own list of terminals ............13
How to modify a campaign? ...............................................................................14
1.
Search the campaign......................................................................................................... 14
2.
Modify the campaign ......................................................................................................... 14
2.1.
Modify the campaign details .....................................................................14
2.2.
Modify the media in a campaign .............................................................16
2.3.
Modify the sequence of the media in a campaign ...........................17
2.4.
Suspend or close the media in a campaign........................................18
2.5.
Modify the assigned terminals in a campaign ...................................19
How to suspend a campaign? ............................................................................21
1.
Search the campaign......................................................................................................... 21
2.
Suspend a campaign ......................................................................................................... 21
2
7.
8.
How to close a campaign? ...................................................................................22
1.
Search the campaign......................................................................................................... 22
2.
Close a campaign ................................................................................................................ 22
Appendix: Layout of the terminal file to upload .........................................23
3
1. Introduction
This document is a “User Manual Guide” and describes the functionalities supported by the
Advertising GUI.
The advertisement functionality consists in displaying advertisements on terminals during the
idle time of the terminal. Advertisements consist only in pictures (logos, text image…). The
displaying of advertisements is initiated when the terminal is in idle mode and is interrupted in
case of card insertion, loading of software, entering a menu, starting a transaction, …
An advertisement “campaign” can be introduced in the advertisement GUI. An advertising
campaign is defined by following elements:
• The set of advertisements (pictures) to be displayed.
o
The resolution of the advertisements to be displayed must be 320x240. If the
resolution is different, the picture will be automatically set in the expected
resolution.
o The maximum size of the advertisements to be displayed in a campaign is 50 kB
after compression.
o The format of the image is JPG.
• The sequence of displaying these advertisements
• The duration of displaying each advertisement
• The begin date and the end date of the campaign.
• The advertisement category of the campaign. So, this campaign can only be displayed
on terminals that accept this advertisement category.
• A list of addressed terminals
There are 2 types of campaigns
• Internal campaign: this type of campaign is under the control of the merchant. Every
merchant can manage his own campaign and can only select terminals belonging to him.
• External campaigns: this type of campaign is under the control of Worldline. It can also
be used by an external advertisement company to post its own advertisements,
(merchants must sign an agreement with Worldline to accept this). An external
campaign will always have a higher priority than an internal campaign and it will
overrule the displayed advertisements.
The advertising GUI allows the management of internal advertisement campaigns. The
functionalities provided are the following:
• Consult an advertisement campaign
• Create an advertisement campaign
• Update an advertisement campaign
•
•
Suspend an advertisement campaign (temporary)
Close an advertisement campaign (permanent)
The above functionalities will be described in the remainder of this document.
4
2. How to login?
After having signed the agreement with Worldline, you will receive your username via e-mail.
This mail will also contain a personal link to set your initial password.
The chosen password must:
• Have a length between 10 and 20 characters
• Contain at least 1 uppercase letter,1 lowercase letter and 1 digit.
After choosing such a password you can login via https://merchant-extranet.sipsatos.com/portal/home
1. Login
Enter your username & password. Click the Login button.
2. Choose your Access Point & Role (optional)
This is an optional step, in case you have multiple user roles. For advertising, you must select
the “VASM-Advertising” role.
5
3. Go to the tab Advertising
At the
•
•
•
upper part of this screen :
you can select your language
you find the link to change your password
you find the link to change your e-mail address
6
3. How to consult a campaign?
At the launch of the advertising GUI, the “Search campaign”’ screen is the first screen you see.
In case you want to see all the campaigns you have created, you can simply push the “Search”
button.
In case you want to see a specific campaign, you have to provide one or more of the criteria
present in the screen.
• The search result will contain all campaigns matching all of the criteria
• The searching on campaign name and reference is not case sensitive. Specifying only a
part of the name can be sufficient. The search result will return all campaigns containing
it.
• The organization name is a free text part that can be used during the creation of a
campaign
The result of the search appears in the grid. By clicking on the reference of the campaign, you
can see all details of the campaign.
7
4. How to create a campaign?
1. Create a campaign
1. Click on the “Create Campaign” button.
2. Populate the fields marked with a “*”.
• The campaign name is a name of your choice
• The only option for the campaign type is “INTERNAL”
8
•
•
•
The priority level can be 2 or 3. A campaign with priority level 2 will overrule a
campaign with priority level 3.
A campaign will be active from 05:00h of the activation date until 23:59h of the
deactivation date. Thus, both campaign activation date and campaign deactivation date
are included in the period of campaign.
The organization name is a free text part of your choice.
3. Click the “Create” button. You will see the campaign details.
2. Add Media
4. Click the “Add Media” button. You are redirected to the “Create Media” screen.
9
5. Populate the fields marked with a “*”.
6. Upload the media into the system.
• Choose the picture via the “Browse” button and press the “Upload” button afterwards.
• The resolution of the advertisements to be displayed must be 320x240. (If the resolution
is different, the picture will be automatically set in the expected resolution, but this can
give undesirable results)
• The maximum size of the advertisements to be displayed in a campaign is 50 kB after
compression.
• The format of the image is JPG.
• On uploading the media, the fields like type, dimension, size, color depth are
automatically updated.
7. Click the “Create” button. You will see the “Media Details” screen.
10
You can now add more media now in case you want to add multiple images to the campaign.
3. Assign Terminals
Click the “Assign/Edit Terminal” button. You are redirected to the “Assign Terminals” screen.
11
3.1. Assign terminals using the pre-loaded list
8. Select the terminals (on which the advertisements should be displayed) from the terminal
list, using the checkbox on the left.
9. Use the green arrow to assign these terminals to the campaign and indicate activation and
deactivation dates, which are first day and last day for terminal activity.
10. Push the “Save” button.
12
Obviously, you can only assign your own terminals to the campaign.
After having pushed the “Save” button, you will be redirected to the screen with the terminal
list.
Using the “Export Terminal List” button you can save this terminal list to a .csv file. The format
of this file is described at the end of this document.
You can use this file later to import this terminal list for a future campaign. The next paragraph
describes how to do this.
3.2.
Assign terminals by uploading your own list of terminals
In case the list of terminals under your control is very long, it could be difficult to select your
terminals as described above.
You can also upload your own terminal list using a predefined file with the extension .csv. You
choose first the file in your directory and then upload it via the “Upload” button. In case of the
list of terminals under your control is very long, you can use a filter to reduce the list. This filter
is based on the Zip Code, the Terminal ID, the Ship To or the Address.
The terminals in the list will appear in the available terminals grid and you can assign them to
the campaign.
The file format of the terminal list to upload is described in the appendix of this document.
13
5. How to modify a campaign?
1. Search the campaign
See higher.
2. Modify the campaign
2.1.
Modify the campaign details
1. Go to the campaign level (in the left)
2. Select the tab “General Information”
3. Push the “Update” button to modify the parameters of a campaign.
14
4. You can modify the
1. Priority level
2. Activation Date
3. Deactivation Date
15
2.2.
Modify the media in a campaign
1. Go to the media level (in the left)
2. Select the tab “General Information”
3. Push the “Update” button to modify the parameters of the media.
4. You can modify the
4. Display time
5. Media file in use
16
2.3.
Modify the sequence of the media in a campaign
1. Go to the media level (in the left)
2. Select the tab “General Information”
3. Use the “Move Up” and “Move Down” buttons to change the sequence of display.
17
2.4.
Suspend or close the media in a campaign
1. Go to the media level (in the left)
2. Select the tab “Dashboard”
3. Push the “Suspend” button to temporarily take the picture out of the campaign or the
“Close” button to permanently take the picture out of the campaign.
18
2.5.
Modify the assigned terminals in a campaign
1. Go to the campaign level (in the left)
2. Select the tab “General Information”
3. Push the “Assign/Edit Terminals” button.
19
4. Use the green arrow to add terminals or the red arrow to remove terminals from the
assigned terminal list
5. Push the “Save” button. (Even in case you only removed terminals with the red arrow, it is
necessary to push the “Save” button afterwards in order to register these modifications.)
Obviously, you can only assign your own terminals to the campaign.
20
6. How to suspend a campaign?
1. Search the campaign
See above
2. Suspend a campaign
1. Go to the campaign level (in the left)
2. Select the tab “General Information”
3. Push the “Suspend” button
A campaign which has a ‘Suspended’ status can be activated again by means of the “Activate”
button, which appears instead of the “Suspend” button after suspension.
21
7. How to close a campaign?
1. Search the campaign
See above
2. Close a campaign
To close a campaign, there are two methods:
-
-
Update the deactivation date of the campaign, via the ‘Update Campaign’ screen.
Use the Close button in ‘Campaign Detail’ screen
1. Go to the campaign level (in the left)
2. Select the tab “General Information”
3. Push the “Close” button
A campaign which has a ‘Closed’ status cannot be reactivated afterwards.
22
8. Appendix: Layout of the terminal file to upload
The predefined terminal file must be a .CSV file.
The layout of the predefined file is
o
o
A first line equal to ‘Terminal ID;Activation Date;Deactivation Date’
other lines with 3 fields separated by ‘;’
- the terminal id
- the activation date of the campaign on the terminal
• format YYYY-MM-DD
- the deactivation date of the campaign on the terminal
• format is YYY-MM-DD
Example:
Terminal ID;Activation Date;Deactivation Date
97979771;2014-03-01;2014-03-10
97979772;2014-03-11;2014-03-20
97979773;2014-03-21;2014-03-21
23