1
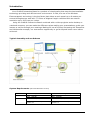
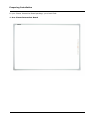
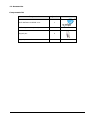
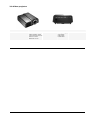
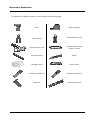
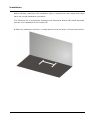
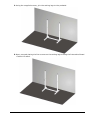
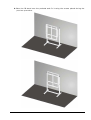
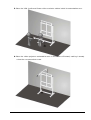
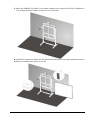
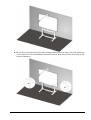
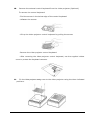
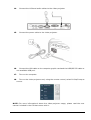
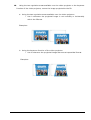
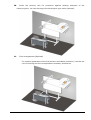
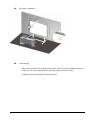
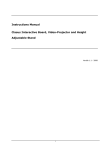
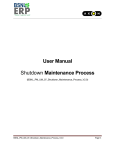
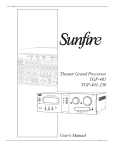
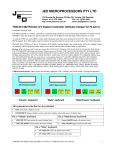
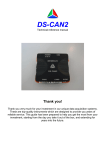
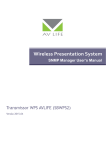
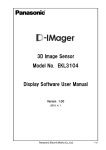
Instructions Manual
Clasus Interactive Board, Video-Projector and Height
Adjustable Stand
PEDESTAL OPTION
Versão 1.0 - 2008
1
Legend
Instructions: additional instructions.
Note: Problems that could occur, and how to avoid them.
Warning: Circumstances to avoid, as could result in damage.
Previous Considerations
Even if powered only with low voltage, to reduce the risk of fire or
electric shock, do not expose your Clasus Interactive Board to rain or
moisture.
Please make sure that your Clasus Interactive Board is firmly
attached to the wall or stand, before using it.
Keep your Clasus Interactive Board away from direct sunlight.
Read the safety warnings and precautions published by the projector
manufacturer. Do not stare or allow others to stare directly into the
projector’s projection beam.
You can use water ink based dry pen to write on your Clasus
Interactive Board. Do not never use abrasive, or corrosive products to
clean. An wet tissue should be enough to the worst cases.
Do not never use permanent markers on you Clasus Interactive Board
surface.
Avoid to scratch the frontal surface of your Clasus Interactive Board
with cutting or sharp objects.
Apply the adequate force when working with the digital pen on the
Clasus Interactive Board.
Do not never allow infiltrations of any kind of liquids or dust in your
Clasus Interactive Board.
2
Table of Contents
Page
Introduction ........................................................................... 4
Preparing installation............................................................... 5
Necessary Equipment .............................................................. 10
Installation............................................................................. 11
3
Introduction
Your CLASUS Interactive Board is a product of raised quality that uses the best available
technology providing and efficient work environment. In fact, the use of the Wireless
Electromagnetic technology is the key factor that allows a work speed up to 6 meters per
second throughout an area with 77 inches of diagonal length combined with an exterior
resolution up to 205 lines per inches.
Using the CLASUS Interactive Board combined with a video-projector and a desktop or
notebook computer, you can make the difference when making your presentations, guide your
lessons or carries through your meetings. Making full use of this set, harnessing the Interactive
and Multimedia concepts, is a tremendous opportunity to go far beyond levels never before
achieved.
Typical Assembly and use Scheme
System Requirements (Microsoft Windows version)
Hardware
Software
Minimal configuration
CPU: 1GHz
RAM: 128 MB
Windows 2000, XP, Vista
Recommended configuration
CPU:1.7 GHz
RAM :256 MB
Windows 2000, XP, Vista
Microsoft Internet Explorer 6.0.0,
Firefox 2.x
Microsoft Internet
Firefox 2.x
4
Explorer
6.0.0,
Preparing Installation
In your Clasus Interactive Board package, you should find:
1. One Clasus Interactive Board
5
1.1 Accessories
Components list
Component
Quant.
DVD Software A-MIGO V1.0
1
USB adapter cable (10m)
1
Digital pen
2
Digital pen stand
1
6
2.0 Stands
Wall mount stand
Video-projector sustentation arm
Video-projector setting cover
Ground stand base
Setting legs
Nuts
Hex socket screws
Hex screws
7
Phillips screw
Wall plugs
8
3.0 Video-projector
Model BENQ MP771
Included accessories
User manual
Quick initiation guide
User manual in the CD
Remote control
Batteries for RC
Transport luggage
VGA Cable
USB Cable
PWR Cable
9
Necessary Equipment
To install the CLASUS solution you will need the following tools:
Drill
Tape measure
Combination pliers
Side cutters
Socket wrench set
Double open-ended
wrench 10mm
Drill bits 6mm
Pencil
Hexagon keys
Utility knife
Slotted screwdriver
Phillips screwdriver
Hammer
Carpenter’s level
10
Installation
Before starting, make sure the installation place is cleared from any object that could
harm the normal installation procedure.
The following list of procedures illustrates the Interactive Board (IB) stand assembly
process over a pedestal for the Clasus Lift.
1. Place the pedestal on the floor in a way that the holes will stay in a functional position.
11
2. Using the supplied screws, join the setting legs to the pedestal.
3. Next, proceed placing the four screws on the setting legs to hang the Interactive Board
Clasus Lift stand.
12
4. Place the IB stand over the pedestal and fix it using the screws placed during the
previous procedure.
13
5. Place the VGA, Audio and Power video-projector cables inside its sustentation arm.
6. Place the video-projector sustentation arm in the Clasus Lift stand, making it steady
using the correspondent screw.
14
7. Place the USB/RS-232 cable in the stand. Make sure to leave the RS-232 interface on
the IB side and the USB to connect on the computer.
8. Install the Interactive Board on the stand and make sure the upper attachment point
matches the attachment point of the IB.
15
9. Fix the IB to the stand using the two screws available on the back of the IB, fastening
it from back to front and between the stand and the IB at the position according to the
below illustration.
16
10.
Remove the external control keyboard from the video-projector (Optional).
To remove the control keyboard:
- Find the screws in the below edge of the control keyboard.
- Unfasten the screws.
- Lift up the video-projector control keyboard by pulling the screws.
- Remove the video-projector control keyboard.
- After removing the video-projector control keyboard, use the supplied rubber
cover to protect the keyboard contacts.
11.
Fix the Video-projector setting cover to the video-projector using the three indicated
positions.
17
12.
Fix the video-projector setting cover, with the video-projector, to the sustentation
arm through the three indicated positions.
13.
Connect the RS-232 interface to the IB.
18
14.
Connect the VGA and audio cables to the video-projector.
15.
Connect the power cable to the video-projector.
16.
Connect the VGA cable to the computer graphic card and the USB/RS-232 cable to
one available USB port.
17.
Turn on the computer.
18.
Turn on the video-projector and, using the remote control, select D-Sub/Comp as
source.
NOTE: For more information’s about the video-projector usage, please read the user
manual included in the CD that comes with it.
19
19.
Using the two regulation areas available over the video-projector or the keystone
function of the video-projector, centre the image projected to the IB.
a. Using the two regulation areas available over the video-projector:
i. Use it whenever the projected image is not vertically or horizontally
within the IB area.
Examples:
b. Using the keystone function of the video-projector:
i. Use it whenever the projected image assumes a trapezoidal format.
Examples:
20
20.
Insert the security lock for protection against stealing attempts of the
video-projector. You can also apply the Kensington type cable (optional).
21.
Final arrangements (Optional)
For a better appearance of the final solution and cables protection, consider the
use of trunking and the correspondent necessary accessories.
21
22.
IB height regulation
23.
Final testing
After concluding all the installation process, test the whole installed solution to
make sure all its components are working properly and securely.
CLASUS solution installation process ended.
22