1
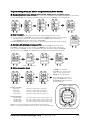
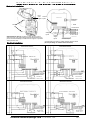
Quick Start Guide for the Shark® 100-S
S/200-S
S Submeters
Mechanical Installation
Front
Current
cover
support Inputs
To Ethernet
RJ45 Jack
RS485
Screws
To MasterDevice
Voltage
Inputs
Shark® Submeter Opened - All wiring is done with the cover as
shown.The front cover support fits into its base. Do not rest the support on the board assembly, and make sure the support is up before
closing the front cover.
Electrical Installation
To Other Slaves
Power
Supply
Inputs
Communication Connections - RS485, Ethernet and KYZ Pulse
(Do not put Voltage on communication terminals!)
WYE Direct
3 Phase, 4-wire
DELTA Direct
3 Phase, 3-wire
e Electro Industries/Gauge Tech
KYZ PulseOutput
Doc # E145723 V1.07
WYE with PTs
3 Phase, 4-wire
DELTA with PTs
3 Phase, 3-wire
Q-1
Program Settings Using the Meter’s Faceplate Buttons (Cover Closed)
Q Configuration Mode Using Buttons: MENU, ENTER, DOWN (Arrow) and RIGHT (Arrow)
Push MENU from any Readings screen. The MAIN MENU screens appear. Push DOWN and the Configuration Mode String (CFG) blinks in
A Screen. Push ENTER. The Configuration Mode Scroll, CT, PT screen appears. Push DOWN to scroll to CT, PT, Cnct.
Q Enter Password
All parameters in Configuration Mode (except Scroll) require a 4-digit PASSWORD to change a setting.
On the CT, PT, Cnct screen., push ENTER. The Ct-n screen appears. Push DOWN and the Password screen appears.
Four dashes appear in the B Screen. The left digit flashes. Use the DOWN button to change the digit.
Use the RIGHT button the move to the next digit. Push ENTER.
If the correct Password was entered, you return to the Ct-n and the left digit of the setting flashes (ready for change).
Q Configure CTs (Example Screens) and PTs
There are 3 CT Screens: Ct-n (Numerator), Ct-d (Denominator) and Ct-S (Scaling). PT Screens are similar.
Push DOWN to scroll from 0 to 9 to enter a new digit. Push RIGHT to move to the next digit. When the new
setting is entered, push ENTER. The Ct-d screen is PRESET at the factory and cannot be changed. Push ENTER,
repeat steps for Ct-S. Push ENTER. PT Configuration Screens will appear next, then Connection (Cnct) screens
* PRESET to 5 or 1 Amp Value
Q Wiring Connection (Cnct)
Use RIGHT to scroll settings.
Push MENU twice. Stor ALL? YES
appears. To store all settings, push
ENTER. Stor ALL DONE appears.
Or, if you do not want to store the new
settings, push RIGHT to Stor ALL? no.
Push ENTER and return to Auto-Scroll
Parameter Designators.
3 Element WYE
2.5 Element WYE
2 CT DELTA
Example CT Settings:
200/5 Amps:
800/5 Amps:
2,000/5 Amps:
10,000/5 Amps:
Set the Ct-n value for 200, Ct-S value for 1.
Set the Ct-n value for 800, Ct-S value for 1.
Set the Ct-n value for 2000, Ct-S value for 1.
Set the Ct-n value for 1000, Ct-S value for 10.
Example PT Settings:
14,400/120 Volts:
138,000/69 Volts:
345,000/115 Volts:
345,000/69 Volts
Pt-n value is 1440, Pt-d value is 120, Pt-S value is 10.
Pt-n value is 1380, Pt-d value is 69, Pt-S value is 100.
Pt-n value is 3450, Pt-d value is 115, Pt-S value is 100.
Pt-n value is 345, Pt-d value is 69, Pt-S value is 1000.
NOTE: For other wiring configurations and further details, refer to the Shark®
Submeter User’s Manual & Communicator EXT 3.0 Software Manual on the enclosed CD.
e Electro Industries/Gauge Tech
Doc # E145723 V1.07
MENU
ENTER
DOWN
RIGHT
Q-2