1
2
Volume
CREATIVE DATA TECHNOLOGIES, INC.
DATALAYER.NET™
User’s Guide
T A B L E
O F
C O N T E N T S
Table of Contents
Table of Contents............................................................................................................................. 1
Chapter 1 – DataLayer.NET Overview ............................................................................................ 3
1.1 Overview of the DataLayer.NET Components ........................................................ 3
1.2 Summary............................................................................................................................. 4
Chapter 2 – Using the DataConnection Component ..................................................................... 5
2.1 Adding a Reference to the DataLayer.NET assembly.......................................... 5
2.2 Adding the Project Level IMPORT for the CDT.DATALAYER Namespace ..... 6
2.3 Connecting to the Database ........................................................................................ 7
2.4 Automatic Null Conversions ........................................................................................ 9
2.5 RunSQLStatement Routine .......................................................................................... 10
2.6 Scalar Functions ............................................................................................................. 11
2.7 Using Parameterized SQL for best practices ........................................................ 13
2.8 Transaction Handling Routines in DataLayer.NET .............................................. 14
2.9 Summary for the DataConnection component ...................................................... 15
Chapter 3 – Using the DataHandler Component ......................................................................... 16
3.1 Using the Code Generator Program......................................................................... 16
3.2 Importing newly generated Class Source files into your Project .................. 18
3.3 Decorating your class files with Attributes .......................................................... 20
3.4.1 C# Generated DataHandler Class Files............................................................... 20
3.4 Using your DataHandler classes for ANYTHING ! Really! ............................... 22
3.5 Using the DataHandler classes in read-only mode ............................................. 23
3.6 Using Parameterized Queries for best practices ................................................ 23
3.7 The DataSet buffer; where the data is kept while you are working with it 24
3.8 Retrieving Data into the DataSet buffer using the GetAllRows() routine.... 24
3.9 Retrieving Data into the DataSet buffer using the Paging routines .............. 25
3.10 Strongly Typed Interface for the DataHandler Classes .................................. 26
3.11 Adding and Deleting Rows ....................................................................................... 27
3.12 Updating DataSet buffer data using 3 available methods ............................. 28
3.13 Sending Updates to the database ......................................................................... 28
1
T A B L E
O F
C O N T E N T S
3.14 Adding new rows from scratch (without first fetching other rows) ........... 29
3.15 Sequencer Columns.................................................................................................... 30
3.16 Column Value Search Functions ............................................................................ 32
Chapter 4 – Review of a Real-World Program ............................................................................. 34
4.1 Overview of the Sample Program ............................................................................. 34
4.2 Global variables and the MDI Frame Window ....................................................... 35
4.3 Product Codes Maintenance Window ..................................................................... 37
4.4 Customer List Window ................................................................................................. 40
4.5 Customer Edit Window ................................................................................................. 45
4.6 Order List Window ......................................................................................................... 47
4.7 Order Edit Window......................................................................................................... 53
Appendix A – Setting up the OrderEntrySystem Database........................................................ 63
2
C H A P T E R
1
–
D A T A L A Y E R . N E T
O V E R V I E W
1
Chapter
Chapter 1 – DataLayer.NET Overview
1.1 Overview of the DataLayer.NET Components
The DataLayer.NET Library is broken into two main components. The first component is called the
DataConnection class. It is used to help you manage the database connection, manage
transactions (if needed), and provide scalar database functions for your use. The second
component is called the DataHandler class. This is the main component that does most of the
database work for you when performing data retrieval and managed updates.
Here is the design philosophy we used when we built the DataLayer.NET Library:
§ Make the components intuitive and easily understood by average programmers.
§ Provide functionality that saves the programmer from having to work at such a low level with
the ADO.NET Framework (directly interacting with ADO.NET classes such as the
SqlConnection, SqlDataAdapter, SqlDataReader, SqlTransaction, SqlCommand,
SqlParameter, and all the equivalent classes for the ODBC and OLE-DB interfaces).
§ Provide a programming platform that minimizes the dependence of any particular back-end
database, where none of the interaction with the ADO.NET classes above will need to be
coded by the programmer, making it much easier to scale an application from SQL Server to
Oracle (OLE-DB driver), for example.
§ Make the library capable of accessing any of the following three types of databases:
* Microsoft SQL Server
* Any ODBC database
* Any OLE-DB database
§ Handle NULL values for the VB programmer. When reading or setting database values, VB
programmers do not have the ability to represent a NULL value with program variables. The
DataLayer.NET has a feature you can enable or disable that will automatically convert null
values to each data type’s MinValue constant. For example, a NULL integer will be read in
as Integer.MinValue, and a NULL datetime value will be read in as DateTime.MinValue.
§ Dramatically decrease the amount of coding that is required to create typical database
interactive programs.
§ Provide support for Parameterized SQL statements for best practices. The use of
parameterized SQL protects your applications from SQL Injection attacks, and the SQL also
runs much faster, as the back-end database (particularly SQL Server) can cache the SQL
command signatures on the cache and run the SQL much faster upon subsequent matching
SQL execution.
3
C H A P T E R
§
§
§
§
§
§
§
1
–
D A T A L A Y E R . N E T
O V E R V I E W
Fully support the use of the DataLayer.NET library for VB.NET programmers and C#.NET
programmers for Client/Server, Web (ASP.NET) or 3-tier applications.
Provide a strongly typed interface to the column data, exposing the actual database column
types read from the database.
Leverage the IntelliSense feature of the Visual Studio.NET environment to save typing time
and avoid typing errors during programming. This is an additional benefit of the strongly
typed interface of the DataLayer.NET library.
Trust and empower the programmers, but do not tie their hands behind their backs. Provide
them with the data access objects to make their lives easier, but do not prevent them from
directly sending some SQL to the database should they see fit. Extend their SQL
Knowledge; do not try to replace it.
From the programmer’s perspective, the library must be flexible to changes in the database
structures (tables). The programmer will only have to update the schema information in a
single class (the inherited DataHandler class for the table).
Performance must be a key goal in the design, as programmers will not want to use the
library if they find out that there is a 10 – 20% reduction in performance by doing so. On the
contrary, our clients experience a significant increase in performance when they adopt the
parameterized SQL methodology as well as using the DataLayer.NET library.
Provide a record retrieval system that can either retrieve ALL of the rows of the result set into
a buffer (DataSet), or retrieve the rows one page at a time, where page size and which page
to retrieve can be specified by the user at runtime.
1.2 Summary
You can see from the above list of features above, the DataLayer.NET is going to save you a lot of
coding and make your applications a lot easier to create and maintain. Some developers have
stated that they saved as much as 60 to 70% code savings in the data access layers of their
programs.
4
C H A P T E R
2
–
U S I N G
T H E
D A T A C O N N E C T I O N
C O M P O N E N T
2
Chapter
Chapter 2 – Using the DataConnection
Component
2.1 Adding a Reference to the DataLayer.NET assembly
Before you can use the DataLayer.NET components in your program, you have to add the
DataLayer.dll assembly as a reference to your project. In order to do this, follow these steps:
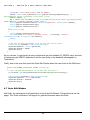
1. Expand the “References” folder in the Solution Explorer for the your application, and then
right-click on the References and choose “Add Reference…” from the popup menu.
NOTE: If you do not see the References folder, you may need to click on the “Show all files”
button on the toolbar inside the Solution Explorer.
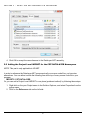
2. Click the Browse button and navigate to the C:\Program Files\DataLayer folder, and select
the DataLayer.dll file and click Open.
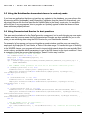
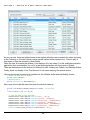
3. You will see the DataLayer.dll assembly selected in the bottom part of the window as follows:
(screen image on next page)
5
C H A P T E R
2
–
U S I N G
T H E
D A T A C O N N E C T I O N
C O M P O N E N T
4. Click OK to accept the new reference to the DataLayer.NET assembly.
2.2 Adding the Project Level IMPORT for the CDT.DATALAYER Namespace
NOTE: This part is only applicable to VB.NET.
In order to reference the DataLayer.NET components all your source code files, you have two
alternatives. You can either include the following line at the top of every source code file in your
program:
IMPORTS CDT.DATALAYER
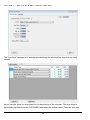
Or, you can add a Project Level IMPORT in one place (preferred method) by following these steps:
1. Right-click on the your Project name in the Solution Explorer, and select Properties from the
popup menu.
2. Click on the References tab on the left side.
6
C H A P T E R
2
–
U S I N G
T H E
D A T A C O N N E C T I O N
C O M P O N E N T
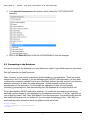
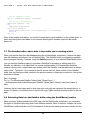
3. In the Imported amespaces at the bottom, select (check) the “CDT.DATALAYER”
assembly:
4. Click on the Save All button on the top of Visual Studio to save the changes.
2.3 Connecting to the Database
In order to connect to the database, you must declare an object of type DataConnection, as follows:
Dim objConnection As DataConnection
Often, however, you will want to make this a global variable in your application. There are several
exceptions to this. For example, if you are developing an ASP.NET web application, you may want
to declare the connection variable local to your subroutine, perform the work required, and close the
database connection all within the same subroutine. Another example is when you are
programming a 3-tier application. For the middle tier application’s code, you are typically
connecting, performing work, and disconnecting from the database all in a single function call.
For a typical desktop VB.NET application, however, it is usually the case where you are simply
declaring a global variable in your application for the database connection. To do this, right-click on
your project and select “Add”, then “Add Module” from the popup menu. We usually simply give the
new module a filename such as “globals.vb” (you can name it anything you like). After that, you
would add the public declaration inside the globals module as follows:
Module Globals
Public gSQLConn As DataConnection
End Module
7
C H A P T E R
2
–
U S I N G
T H E
D A T A C O N N E C T I O N
C O M P O N E N T
Notice several things: I have used the prefix “g” instead of “obj” to indicate that the object is a global
variable, and not a local variable. Also notice that I have called it gSQLConn (using “SQL” in the
variable name). This further conveys that this connection handle is used to connect to a SQL Server
database, as opposed to some other database type such as DB2, Oracle, etc. Now you can use
this gSQLConn database handle throughout your VB.NET application.
Note: The sample code snippet given above, and throughout these discussion chapters are
not really meant for you to immediately try out as a sample program. There is no sample
program being built here. The source code is only given for reference so you can become
familiar with the syntax used.
Now that we have declared a variable that will hold the database connection, we need to decide
where and when to actually connect to the database. Some applications need the user to log in and
give their UserID and Password. For these type applications, you would build a login window asking
the user for their UserID and Password, and your application would actually connect to the
database in the code behind the Login button on that window. On the other hand, some
applications do not require login, and can simply connect to the database when they start up, such
as in the Form’s Load event.
Wherever you determine appropriate, the following steps are required to create a DataConnection
object and connect to the database:
gSQLConn = New DataConnection(DataLayer_ConnectionType.SQLServer)
gSQLConn.ConnectionString = "user id=guest;password=guestpass;" & _
"initial catalog=Northwind;data source=localhost"
Try
gSQLConn.Connect()
Catch ex As Exception
MsgBox(ex.Message, MsgBoxStyle.Critical, "Problem:")
Exit Sub
End Try
Notice that when you instantiate the DataConnection object, you can optionally specify the
connection type (i.e. – SQLServer) as a parameter. You can also set this property directly in your
code as well:
gSQLConn.ConnectionType = DataLayer_ConnectionType.SQLServer
Next in the code above is the setting of the ConnectionString property. Each type of database has
its own custom type of tokens that must be set to form the ConnectionString property. The example
given above is for SQL Server. Check your database documentation for the required
ConnectionString format and content, or refer to http://www.connectionstrings.com for a great
reference guide to connection strings for many types of databases.
There is one more important token of which you should be aware. When your application tries to
connect to the database, you can set a connection timeout value (in seconds). The default value is
8
C H A P T E R
2
–
U S I N G
T H E
D A T A C O N N E C T I O N
C O M P O N E N T
15 seconds if you do not include this parameter. Here is a sample ConnectionString that includes
this Connect Timeout parameter:
gSQLConn.ConnectionString = "user id=guest;password=guestpass;" & _
"initial catalog=Northwind;data source=localhost;" & _
"Connect Timeout=30;"
And finally, in the code snippet above, you can see the statement gSQLConn.Connect() is actually
connecting to the database. As usual, you should always wrap database calls in a Try / Catch error
handling block, as in the sample code.
2.4 Automatic Null Conversions
The DataConnection component has a Boolean property called “AutoConvertNulls” that you can set
to True or False. The default value is True, which means it will convert all NULL values read from
the database into the appropriate data type’s MinValue constant when reading the data. This is
especially necessary with VB.NET programs because you can not load a NULL value into a
variable. For example, let’s suppose you had directly opened a DataReader object and were
reading in some field’s data into a local variable as follows:
intAge = dr.Item(“age”)
If the value for the “age” field in that record has a NULL value, you will get an error on this line. The
normal way that you have to handle this as a programmer is something like the following:
If IsDbNull(dr.Item(“age”)) Then
intAge = 0 ‘ or -1, or some special value to let you know no value was present.
Else
intAge = dr.Item(“age”)
End If
With the DataLayer.NET strongly typed interface and the AutoConvertNulls property set to true, you
would be able to keep it to a single line of code, as follows:
intAge = objPerson.AGE(1)
If the record’s “age” value is NULL, you will have intAge set to the Integer.MinValue constant.
You can use this in your code if you want to detect nulls:
If (intAge = Ineger.MinValue) Then
MsgBox(“Hey, there is a Null value for the Age detected!”)
End If
The following MinValue constants are set for you by the DataLayer.NET library, depending upon the
column’s data type:
Integer.MinValue
Double.MinValue
Decimal.MinValue
DateTime.MinValue
9
C H A P T E R
2
–
U S I N G
T H E
D A T A C O N N E C T I O N
C O M P O N E N T
For String variables, NULL value detection is handled a little differently. There is no “MinValue”
constant for Strings. For most applications, simply converting the NULL value to an empty String “”
is the desired behavior, so that is what we programmed into the DataLayer.NET library. However,
this doesn’t allow your program to distinguish a record that had a NULL value, as opposed to a
record that had an empty string stored in the database. If you need to be able to detect NULL
values in strings, you need to use the NullStringValue property. The default value for this property
is an empty string “”. However, if you want to detect null string values in your database, you could
set this property to something special like “<NULL>” that is not likely for you to get in your actual
database values. Here is suggested sample syntax for setting this property:
gSQLConn.NullStringValue = “<NULL>”
This NullStringValue property is a two-way street. Not only can it be used for reading and detecting
null string values in the database, it can also be used if you want to set a String field in your
database record to a NULL value. Here is a sample of how to do this (assuming you have set the
NullStringValue per the above sample code to “<NULL>”:
objEmployee.MIDDLE_INITIAL(1) = gSQLConn.NullStringValue
After executing the statement above and then performing the Update(), the MIDDLE_INITIAL
column for the record indicated will contain a NULL value.
Again, for 99% of all applications, you don’t have to be overly concerned with NULL string detection
and processing, so the default setting for the NullStringValue = empty string “” works fine for most
programs.
2.5 RunSQLStatement Routine
Sometimes when you are programming, you just need to run an SQL statement directly against the
database that performs some function, but does not necessarily return a result set.
For these situations, we have provided you with the DataConnection component’s
RunSQLStatement Routine.
Here is the call interface for the routine:
Method Signature: RunSQLStatement(byval strSQL As String)
Argument 1: strSQL As String: The SQL Statement to run
Returns: Nothing
As you can see, it takes a single argument: an SQL string containing the SQL command to run. For
example, if you wanted to run an SQL Command to create a temporary table containing a copy of
the Products table:
Dim strSQL As String
10
C H A P T E R
2
–
U S I N G
T H E
D A T A C O N N E C T I O N
C O M P O N E N T
strSQL = “select * into #TempProducts FROM Products”
Try
gSQLConn.RunSQLStatement(strSQL)
Catch
MsgBox(“Error creating the temp products table: “ & ex.Message
Exit Sub
End Try
2.6 Scalar Functions
At times, you need to retrieve a single result from the database, and you don’t want (nor should you
have to) go through the trouble of creating a bunch of classes and source code to support the
retrieval of the single result.
For this purpose, we have created a set of scalar functions for you to use to retrieve the single
column, single row (scalar) results:
GetIntegerSQLResult
GetStringSQLResult
GetDoubleSQLResult
GetDecimalSQLResult
GetDateTimeResult
Here is the calling interface for the first one listed (GetIntegerSQLResult):
Method Signature: GetIntegerSQLResult(byval strSQL As String)
Argument 1: strSQL As String: SQL Query that returns a single row, single column Integer
result
Returns: Integer (or Integer.MinValue if the database returns a NULL response)
Here is a sample of when you would want to use this function. Let’s suppose you have a table
called EMPLOYEE that contains all the information about your employees. The Primary Key for the
table is an Integer field called ID_EMPLOYEE, and it is the responsibility of the application to
generate unique ID numbers for each employee as it inserts the records. In order to do this, you
will need to perform a MAX() lookup on the current maximum value for the ID_EMPLOYEE column
in the table, as follows:
Dim intMaxID As Integer
Dim intNewID As Integer
Dim strSQL As String
strSQL = “SELECT MAX(id_employee) FROM EMPLOYEE”
Try
IntMaxID = gSQLConn.GetIntegerSQLResult(strSQL)
11
C H A P T E R
2
–
U S I N G
T H E
D A T A C O N N E C T I O N
C O M P O N E N T
Catch
MsgBox(“Error getting MAX employee ID number: “ & ex.Message)
Exit Sub
End Try
If (intMaxID = Integer.MinValue) Then
intNewID = 1
Else
intNewID = intMaxID + 1
End If
…(SQL operation to INSERT the new EMPLOYEE record would go here)
Notice how I am checking for the null value (MinValue) and assigning a value of 1. This will happen
when you are inserting the very first employee into the EMPLOYEE table.
Here are the calling interfaces of the other scalar functions that are available:
Method Signature: GetStringSQLResult(byval strSQL As String)
Argument 1: strSQL As String: SQL Query that returns a single row, single column String
result
Returns: String (or NullStringValue if the database returns a NULL response)
Method Signature: GetDoubleSQLResult(byval strSQL As String)
Argument 1: strSQL As String: SQL Query that returns a single row, single column Double
result
Returns: Double (or Double.MinValue if the database returns a NULL response)
Method Signature: GetDecimalSQLResult(byval strSQL As String)
Argument 1: strSQL As String: SQL Query that returns a single row, single column Decimal
result
Returns: Decimal (or Decimal.MinValue if the database returns a NULL response)
Method Signature: GetDateTimeSQLResult(byval strSQL As String)
Argument 1: strSQL As String: SQL Query that returns a single row, single column DateTime
result
12
C H A P T E R
2
–
U S I N G
T H E
D A T A C O N N E C T I O N
C O M P O N E N T
Returns: DateTime (or DateTime.MinValue if the database returns a NULL response)
2.7 Using Parameterized SQL for best practices
Often, when you are sending SQL statements to the database, you need to specify values in your
syntax. For example, if you wanted to retrieve all of the Employees from the EMPLOYEE table that
have a last name starting with the letters MAR, in response to some search window you put
together that the user can type in last name (or partial last name) to search for. You might be
tempted to code the following statements:
Dim strSQL As String = “SELECT id_employee, nme_first, nme_last from EMPLOYEE “ & _
“ WHERE nme_last LIKE ‘” & Trim(txtSearchBox.Text) & “%’”
Dim objEmployees as New EMPLOYEE(gSQLConn, strSQL)
Try
ObjEmployees.GetAllRows()
Catch
MsgBox(“Error fetching employees: “ & ex.Message)
End Try
With respect to pure syntax, the example above would work. However, there are two very important
problems with doing it directly like this.
First of all, it opens up your application to SQL Injection attacks. This is of particular concern for
web based applications where you are accepting input from the public. SQL Injection attacks occur
when the user types special characters into input boxes to try to trick your program into performing
unintended operations when the screen is submitted and your SQL runs.
The second big concern is performance. If you use parameterized SQL instead of directly plugging
the values into your SQL, the back-end database will be able to cache the SQL’s parameter
signature, and the SQL statement will run much faster on subsequent executions, regardless of the
actual value (or last name in this sample) that you are seeking.
Here is the same sample above, modified to make proper use of parameters:
Dim strSQL As String = “SELECT id_employee, nme_first, nme_last from EMPLOYEE “ & _
“ WHERE nme_last LIKE @LName”
Dim objEmployees as New EMPLOYEE(gSQLConn, strSQL)
Dm strValue As String = Trim(txtSearchBox.Text) & “%”
objEmployees.Parameters.Add(New CmdParameter(“@LName”,SqlDbType.varchar,strValue))
Try
ObjEmployees.GetAllRows()
Catch
MsgBox(“Error fetching employees: “ & ex.Message)
13
C H A P T E R
2
–
U S I N G
T H E
D A T A C O N N E C T I O N
C O M P O N E N T
End Try
As you can see, with the help of the DataLayer.NET library, with only a single line of code added,
you are able to protect your program from SQL Injection attacks, make the SQL perform much
better, and clean up the ugly SQL concatenation that was required to sew in the values with the
previous method used.
2.8 Transaction Handling Routines in DataLayer.NET
Sometimes when you are developing a muti-user database, it becomes necessary to execute a
series of SQL operations in an environment that is guaranteed not to be affected by the interaction
of any other users who are using the program at the same time, and all of the statements must
successfully execute, or they must all be cancelled (rolled back) in the database.
For these situations, we must wrap the series of SQL statements or operations with a transaction
block. A transaction block is treated as a single unit by the database. Either every single one of the
statements in the block execute successfully, or if there is any error along the way, they are all
rolled back in the database.
The DataLayer.NET library provides 4 routines relative to transaction processing:
StartTransaction()
CommitTransaction()
RollbackTransaction()
InTrans()
Here is what a typical Transaction block looks like from the point of view of your program:
Try
gSQLConn.BeginTransaction()
…(SQL operation 1)
…(SQL operation 2)
…(etc, etc.)
gSQLConn.CommitTransaction()
Catch
gSQLConn.RollbackTransaction()
MsgBox(“Error encountered, transaction rolled back: “ & ex.Message)
End Try
As you can see, if any of the SQL operations throw an exception, all of them are rolled back.
For a real-world example, take the sample earlier in the program where we are needing to generate
a new Employee ID number. This is not likely to happen until you have thousands of people using
the program all at once who are heavily using this same screen that enters new employee records
all day (not very likely, but we’ll go ahead and dress up this code for the example). Here is the
modified code fragment to generate and use the next ID number:
Dim intMaxID As Integer
14
C H A P T E R
2
–
U S I N G
T H E
D A T A C O N N E C T I O N
C O M P O N E N T
Dim intNewID As Integer
Dim strSQL As String
strSQL = “SELECT MAX(id_employee) FROM EMPLOYEE”
Try
gSQLConn.BeginTransaction()
intMaxID = gSQLConn.GetIntegerSQLResult(strSQL)
If (intMaxID = Integer.MinValue) Then
intNewID = 1
Else
intNewID = intMaxID + 1
End If
…(SQL operation to INSERT the new EMPLOYEE record would go here)
gSQLConn.CommitTransaction()
Catch
gSQLConn.RollbackTransaction()
MsgBox(“Error saving new Employee record: “ & ex.Message)
Exit Sub
End Try
The code in the sample above would prevent any other user from being assigned the same next
available Employee ID Number, thereby preventing any errors that might occur as a result of this.
There is one more function available relating to Transactions. It is the InTrans() routine. This
function will return a True if the connection is in the middle of a open / pending transaction, or a
False if there is no open transaction.
2.9 Summary for the DataConnection component
You can see that the DataConnection component is used for global operations such as managing
the database connection, transactions, scalar functions, directly executing SQL, and other
housekeeping chores such as specifying desired handling of NULL values.
In your applications, you will typically only need to use a single DataConnection component.
Exceptions to this are when you have a program that must connect simultaneously to more than
one database. For these, you will need multiple DataConnection objects declared, and all of this is
seamlessly supported by the DataLayer.NET library.
In the next chapter, you will be learning about the DataHandler component. It is used to manage
data retrieval and updates for single entities (tables). You will typically have a descendant
DataHandler class defined for each one of the tables in your system that you are using.
15
C H A P T E R
3
–
U S I N G
T H E
D A T A H A N D L E R
C O M P O N E N T
3
Chapter
Chapter 3 – Using the DataHandler
Component
3.1 Using the Code Generator Program
The DataHander class is abstract and therefore cannot be used directly. Instead, in your programs,
you need declare classes (one for each table in your database) that inherit from the DataHandler
class, and then you use your inherited classes in your program.
The process of creating these inherited classes is made virtually effortless by the DataLayer.NET
Code Generator Program. All you have to do is feed it a SQL Query, and it will build a class file for
you (in VB.NET or C#.NET) that you simply import into your project. The SQL query can be a very
simple “SELECT * FROM TableName” type query, or it can contain complex left outer joins,
correlated sub-queries, etc. That last statement may seem odd to you, since the DataHandler
classes are used for both retrieval and updates. You see, the data retrieval functionality is kept
completely separate from the data update facilities of the class. Because of this, you can have a
display / browse window of employees that also includes information that is left outer joined from
another table, such as the name of the department to which they belong, and at the same time, you
can use that same exact object for updating the individual employee records when you go to code
the employee edit window. How does it do this, you ask? Well, the data retrieval portion of the
component works strictly off the SQL query you feed into it. The update facility, on the other hand,
depends heavily on several things you need to define in your class, including using the attributes
(more on this later) to identify which columns are updateable and which ones are part of the primary
key. You also need to tell the class which table name should be used for the updates. Using this
information, the class is able to manufacture the INSERT, UPDATE, and DELETE statements
needed when updating the database after changes have been made.
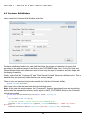
Here is a brief walk-thru of using the Code Generator to generate and import a new class file:
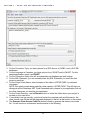
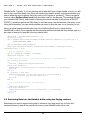
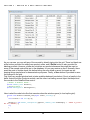
1. After launching the desktop icon for the Code Generator Program, you should see the main
window (screen shot on next page):
16
C H A P T E R
3
–
U S I N G
T H E
D A T A H A N D L E R
C O M P O N E N T
2. For the Connection Type, you have options for a) SQL Server, b) ODBC, and c) OLE-DB
databases.
3. For the Language to Generate, you have options for a) VB.NET and b) C#.NET. For this
sample application, leave it as VB.NET.
4. For the Connection String, this will vary depending on database type and location.
5. For the SQL Statement, you can normally enter any SQL Statement you would like that
returns a result set.
6. For the Output Class Name, enter the name of the table in UPPER CASE, by standard
convention.
NOTE: We usually create these particular class names in UPPER CASE. This will help you
distinguish all the DataLayer.NET Code Generated entity classes in your application from all
the other classes as you develop your application.
7. For the Output Directory, use the Browse button to select the folder where your project is
located on your hard drive.
8. If everything is set up correctly, you should notice the complete path and filename for the
class source code file that will be generated displayed in the box at the bottom of the screen.
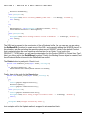
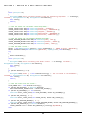
9. The Generate Class Source Code File button is used to generate the class source code
file. You will receive a confirmation window similar to the following:
17
C H A P T E R
3
–
U S I N G
T H E
D A T A H A N D L E R
C O M P O N E N T
10. Click OK, and then exit the Code Generator Program using the Exit button.
3.2 Importing newly generated Class Source files into your Project
After generating the new class source code file, you will need to import the new file into your
project. Here are the steps to accomplish this task:
1. In the Visual Studio.NET environment, right click on the project’s name and select “Add”, and
then “Add Existing Item…” from the sub-menu.
2. Select the class source code file and click the Open button to import the file.
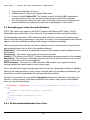
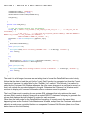
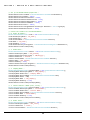
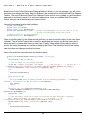
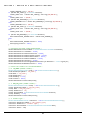
Here is a sample of what the generated source code files look like:
Imports CDT.DATALAYER
' Class PRODUCT_TYPES generated by DataLayer.NET Code Generator.
<Serializable()> Public Class PRODUCT_TYPES
Inherits DataHandler
Sub New(ByVal DataConn As DataConnection, ByVal SQL As String)
MyBase.New(DataConn, SQL)
Me.UpdateTable = "PRODUCT_TYPES"
End Sub
Public Shared Function GetBaseSQL() As String
Dim SQL As String
SQL = "SELECT id_product,txt_description,qty_on_hand,qty_reorder_level," & _
"amt_cost,amt_price,nme_manufacturer " & _
"FROM PRODUCT_TYPES"
Return SQL
End Function
<Updateable()> Public Property ID_PRODUCT(ByVal RowNum As Integer) As String
Get
ID_PRODUCT = GetStringData(RowNum, "ID_PRODUCT")
End Get
Set
SetData(RowNum, "ID_PRODUCT", Value)
End Set
End Property
<Updateable()> Public Property TXT_DESCRIPTION(ByVal RowNum As Integer) As String
18
C H A P T E R
3
–
U S I N G
T H E
D A T A H A N D L E R
C O M P O N E N T
Get
TXT_DESCRIPTION = GetStringData(RowNum, "TXT_DESCRIPTION")
End Get
Set
SetData(RowNum, "TXT_DESCRIPTION", Value)
End Set
End Property
<Updateable()> Public Property QTY_ON_HAND(ByVal RowNum As Integer) As Integer
Get
QTY_ON_HAND = GetIntegerData(RowNum, "QTY_ON_HAND")
End Get
Set
SetData(RowNum, "QTY_ON_HAND", Value)
End Set
End Property
<Updateable()> Public Property QTY_REORDER_LEVEL(ByVal RowNum As Integer) As Integer
Get
QTY_REORDER_LEVEL = GetIntegerData(RowNum, "QTY_REORDER_LEVEL")
End Get
Set
SetData(RowNum, "QTY_REORDER_LEVEL", Value)
End Set
End Property
<Updateable()> Public Property AMT_COST(ByVal RowNum As Integer) As Decimal
Get
AMT_COST = GetDecimalData(RowNum, "AMT_COST")
End Get
Set
SetData(RowNum, "AMT_COST", Value)
End Set
End Property
<Updateable()> Public Property AMT_PRICE(ByVal RowNum As Integer) As Decimal
Get
AMT_PRICE = GetDecimalData(RowNum, "AMT_PRICE")
End Get
Set
SetData(RowNum, "AMT_PRICE", Value)
End Set
End Property
<Updateable()> Public Property NME_MANUFACTURER(ByVal RowNum As Integer) As String
Get
NME_MANUFACTURER = GetStringData(RowNum, "NME_MANUFACTURER")
End Get
Set
SetData(RowNum, "NME_MANUFACTURER", Value)
End Set
End Property
End Class
The general structure of these VB.NET files offers the following prominent features:
19
C H A P T E R
•
•
•
•
3
–
U S I N G
T H E
D A T A H A N D L E R
C O M P O N E N T
Class name declaration at the top
A New constructor that sets the UpdateTable name.
A function called GetBaseSQL. This function is useful for building SQL statements in
your descendant classes, as it provides all the columns in a bare SQL statement.
Get / Set properties defined for each column in the table. Notice that the data type and
methods called by each property are particular to the datatype of each column.
3.3 Decorating your class files with Attributes
NOTE: This section only applies to the VB.NET usage of the DataLayer.NET library. The C#
DataHandler uses method calls in the constructor to accomplish the same configuration tasks.
The DataHandler class uses a .NET technology called “reflection” to learn a little bit about each
column of the table being represented in your class. At runtime, it looks downstream at the inherited
objects to see what attributes are defined, and changes its behavior accordingly.
After you generate each class file, you need to modify the class to decorate each column with the
appropriate attributes. Here is a list of the available attributes:
Updateable() = The column is an updateable column (to be included in update statements sent to
the database.
PrimaryKey() = The column is part of the primary key for the table.
Identity() = The column is an IDENTITY column (automatically generated number) in the database.
Sequencer() = The column is a child table sequencer (don’t worry about this for now, more on this
can be found in later on in this User’s Manual).
DB2Timestamp() = The column is a DB2 timestamp. DB2 requires a very specific format for
sending updates and inserts based on these column types.
As you can see from looking at the generated source code, the “Updateable()” attribute is added by
default by the code generator for every column. Note that when you are adding the attributes, you
do not have to enter the parenthesis (they will automatically be added).
Typically, all you need to do is go add the PrimaryKey() attribute for each one of the primary key
columns. In order to specify more than one attribute for a column, simply put a comma between
them, as in the following sample:
<PrimaryKey(), Updateable()> Public Property ID_PRODUCT(ByVal RowNum As Integer) As
Integer
Get
ID_PRODUCT = GetIntegerData(RowNum, "ID_PRODUCT")
End Get
Set
SetData(RowNum, "ID_PRODUCT", Value)
End Set
End Property
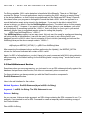
3.4.1 C# Generated DataHandler Class Files
20
C H A P T E R
3
–
U S I N G
T H E
D A T A H A N D L E R
C O M P O N E N T
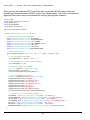
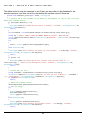
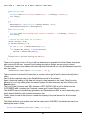
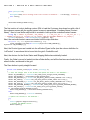
When you use the DataLayer.NET Code Generator to generate C#.NET classes, they look
dramatically different than their VB.NET cousins (see sample below). This is due to the different
approach that must be used to accomplish the strongly typed property indexers.
using
using
using
using
using
System;
System.Collections.Generic;
System.Text;
CDT.DATALAYER;
System.Collections;
namespace QuickStartCS.Domain
{
public class PRODUCT_TYPES : DataHandler
{
// Declare all the column properties...
public DataLayerIndexer_String ID_PRODUCT;
public DataLayerIndexer_String TXT_DESCRIPTION;
public DataLayerIndexer_Integer QTY_ON_HAND;
public DataLayerIndexer_Integer QTY_REORDER_LEVEL;
public DataLayerIndexer_Decimal AMT_COST;
public DataLayerIndexer_Decimal AMT_PRICE;
public DataLayerIndexer_String NME_MANUFACTURER;
// Class Constructor...
public PRODUCT_TYPES(DataConnection dc, String SQL) : base(dc, SQL)
{
// Set the Update Table Name...
this.UpdateTable = "PRODUCT_TYPES";
// Set the DataLayer object up for C# Mode...
this.CSharpMode = true;
// Name the Primary Key Columns...
ArrayList objPKList = new ArrayList();
objPKList.Add("ID_PRODUCT");
this.SetPrimaryKeyArrayList(objPKList);
// Name the Updateable columns...
ArrayList objUpdateColumns = new ArrayList();
objUpdateColumns.Add("ID_PRODUCT");
objUpdateColumns.Add("TXT_DESCRIPTION");
objUpdateColumns.Add("QTY_ON_HAND");
objUpdateColumns.Add("QTY_REORDER_LEVEL");
objUpdateColumns.Add("AMT_COST");
objUpdateColumns.Add("AMT_PRICE");
objUpdateColumns.Add("NME_MANUFACTURER");
this.SetUpdateColumnArrayList(objUpdateColumns);
}
// Initialize all the Property Indexers...
ID_PRODUCT = new DataLayerIndexer_String(this, "ID_PRODUCT");
TXT_DESCRIPTION = new DataLayerIndexer_String(this, "TXT_DESCRIPTION");
QTY_ON_HAND = new DataLayerIndexer_Integer(this, "QTY_ON_HAND");
QTY_REORDER_LEVEL = new DataLayerIndexer_Integer(this, "QTY_REORDER_LEVEL");
AMT_COST = new DataLayerIndexer_Decimal(this, "AMT_COST");
AMT_PRICE = new DataLayerIndexer_Decimal(this, "AMT_PRICE");
NME_MANUFACTURER = new DataLayerIndexer_String(this, "NME_MANUFACTURER");
21
C H A P T E R
3
–
U S I N G
T H E
D A T A H A N D L E R
C O M P O N E N T
public static String GetBaseSQL() {
String SQL;
SQL = "SELECT id_product,txt_description,qty_on_hand,qty_reorder_level," +
"amt_cost,amt_price,nme_manufacturer " +
"FROM PRODUCT_TYPES";
return SQL;
}
}
}
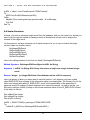
The general structure of these C#.NET files offers the following prominent features:
• The namespace declaration for the class. Typically all of these classes are put into a
separate folder in the project, and that folder’s name is included in the namespace.
• Class declaration
• Declaration of Column Indexer Properties.
• Class Constructor, including:
o Statement setting CSharpMode flag to true
o Identification of the Primary Key Column(s)
o Identification of the Updateable Columns.
o Initialization code for each of the Column Indexers.
• GetBaseSQL function. This function is useful for building SQL statements in your
descendant classes, as it provides all the columns in a bare SQL statement.
3.4 Using your DataHandler classes for ANYTHING ! Really!
Don’t be afraid to take these generated class files and add properties and methods to them to carry
our your specific business logic processing. As long as you do not include any of the attributes
defined above for your new custom properties, they will be completely ignored by the underlying
DataHandler class while processing your retrievals and updates. However, the more common thing
that developers do is to leave the DataHandler descendant classes alone (as generated and
decorated), and separate all the business logic processing into dedicated classes in another folder
(and different namespace).
Another common thing for developers to do is called encapsulation. Let’s suppose you have a
parent table called ORDERS, and a child table called ORDER_ITEM that is related to the ORDERS
table. You could create a business layer class called Order that uses composition to wrap both the
ORDERS buffer and the ORDER_ITEM buffer into a single class that is managed as a whole. This
way, you could create methods such as “Validate_Order” that inspect the entire order (both the
ORDERS table record along with all the ORDER_ITEM records) to make sure the entire Order is
Valid. Also, you could create a method called “Load” that takes an Order ID number as an
argument. The Load method would not only load the single ORDERS record into the object, but it
would also load the multiple ORDER_ITEM records that belong to this particular Order. A similar
reverse implementation for a “Save” method could be easily done. This way, you have a single
intelligent Order object managing all the operations behind the scenes to manage all the information
(in multiple tables) associated with this individual Order.
22
C H A P T E R
3
–
U S I N G
T H E
D A T A H A N D L E R
C O M P O N E N T
3.5 Using the DataHandler descendant classes in read-only mode
If you have an application that does not perform any updates to the database, you can enforce this
by removing all the Updateable() and PrimaryKey() attributes from the class file. Alternatively, you
can simply remove the line that specifies the UpdateTable in the New() constructor. An exception
will be thrown if any programmer tries to program an Update() against a table that does not have
these attributes properly defined.
3.6 Using Parameterized Queries for best practices
This was mentioned above for the DataConnection component, but is worth bringing up once again
to make sure that you are aware that the Parameterized Queries are also available for you to use
when you are retrieving data using the SQL Queries for your DataHandler classes.
For example, let’s suppose you have put together a search window, and the user can search for
employees by Employee ID, Last Name, or Date of Hire date range. To handle this type of flexibility
in the WHERE clause, your program will need to inspect which search boxes the user actually filled
out at runtime, and decide which parameters to use in the SQL based on the input conditions. Here
is a sample of what the source code behind the “Search” button may look like:
' Now build the SQL to fetch the data...
Dim strWhereClause As String = ""
mEmployees = New EMPLOYEES(gSQLConn, "")
Dim SQL As String
SQL = "SELECT EmployeeID,FirstName,LastName,Address1,Address2,City,State,Zip " & _
"FROM EMPLOYEES"
' Add a WHERE clause parameter for each one of the search conditions given...
If (txtEmployeeID.Text <> "") Then
strWhereClause &= "(EmployeeID = @EmployeeID) AND "
mEmployees.Parameters.Add(New CmdParameter("@EmployeeID", SqlDbType.Int, _
Cint(txtEmployeeID.Text)))
End If
If (txtLastName.Text <> "")) Then
strWhereClause &= "LastName LIKE @LastName AND "
mEmployees.Parameters.Add(New CmdParameter("@LastName", SqlDbType.varchar, _
txtLastName.Text & "%"))
End If
If (txtHireDateStart.Text <> "") Then
strWhereClause &= "(HireDate BETWEEN @HireDateStart AND @HireDateEnd) AND "
mEmployees.Parameters.Add(New CmdParameter("@HireDateStart", SqlDbType.DateTime, _
CDate(txtHireDateStart.Text)))
mEmployees.Parameters.Add(New CmdParameter("@HireDateEnd", SqlDbType.DateTime, _
CDate(txtHireDateEnd.Text)))
End If
' Add the WHERE clause (if applicable)...
If (strWhereClause <> "") Then
SQL = Mid(strWhereClause, 1, Len(strWhereClause) - 4) ' Removes the trailing AND.
End If
23
C H A P T E R
3
–
U S I N G
T H E
D A T A H A N D L E R
C O M P O N E N T
' Add the ORDER BY clause...
SQL &= " ORDER BY LastName, FirstName"
' Now retrieve the Employees...
mEmployees.SQLQuery = SQL
Try
mEmployees.GetAllRows()
Catch ex As Exception
MsgBox("Error Retrieving list of Employees: " & ex.Message)
Exit Sub
End Try
Note: In the sample code above, you would of course have to add validation on the criteria given, to
catch such things as invalid dates or non-numeric Employee ID numbers input into the search
boxes, etc.
3.7 The DataSet buffer; where data is kept while you’re working with it
When you retrieve data from the database using the a DataHandler component, it fetches the data
from the database and stores it into a DataSet buffer. This DataSet buffer is completely accessible
by your program directly, if needed, using the DataSet property of your inherited DataHandler class.
You can use this DataSet property to populate a DataGrid for browsing or editing records. A
DataSet, by definition, is an object that can contain multiple tables. For DataHandler DataSets,
however, there is only a single table ever created inside the DataSet, and the table name is always
called “data”. Therefore, if you wanted to directly access the Last_Name column of the DataSet
buffer from the Employee class created in the previous section to populate a combo box, the syntax
would be as follows:
Dim I As Integer
For I = 0 To mEmployees.DataSet.Tables(“data”).Rows.Count – 1
cboEmployees.Items.Add(mEmployees.DataSet.Tables(“data”).Rows(I).Item(“Last_Name”))
Next
However, there is rarely any need to dive down into such ugly raw syntax as the sample above. In
section 3.9 below, you will learn how to use the Strongly Typed interface for easy access to the row
data.
3.8 Retrieving Data into the DataSet buffer using the GetAllRows() routine
When you have finished preparing the SQL query for the DataHandler component, you command
the object to fetch the data using one of two different methods. Most of the time, a simple call to the
GetAllRows() method will be used. This fetches all of the records meeting the query directly into the
24
C H A P T E R
3
–
U S I N G
T H E
D A T A H A N D L E R
C O M P O N E N T
DataSet buffer. Typically, if you are working with a table that have a large number of rows, you will
want to first count how many rows there are matching the search criteria, and decide whether you
want to allow the user to retrieve that many rows or not (impose a “governor”). There is a special
function called GetQueryRowCount() that should be used for this purpose. This method will take
your standard SQL Query, and instead of fetching the actual row data, it will perform a SELECT
COUNT(*) operation against the SQL Query to see how many rows there will be if the query is run.
Using this information, you can decide whether you want to allow the user to run the query or not.
Here is a typical example showing the use of the GetQueryRowCount() routine and the
GetAllRows() routine. Let’s suppose that this particular window enforces that they always type in a
last name to search for (and that’s the only search field):
mEmployees = New EMPLOYEES(gSQLConn, "")
Dim SQL As String
SQL = "SELECT EmployeeID,FirstName,LastName,Address1,Address2,City,State,Zip " & _
"FROM EMPLOYEES WHERE "
SQL &= "LastName LIKE @LastName"
mEmployees.Parameters.Add(New CmdParameter("@LastName", SqlDbType.varchar, _
txtLastName.Text & "%"))
' Add the ORDER BY clause...
SQL &= " ORDER BY LastName, FirstName"
mEmployees.SQLQuery = SQL
' First perform a count of the matching Employees in the database...
Dim intCount As Integer
Try
IntCount = mEmployees.GetQueryRowCount()
Catch ex As Exception
MsgBox("Error performing Count of matching Employees: " & ex.Message)
Exit Sub
End Try
If (intCount > 500) Then
MsgBox("There were too many employees (" & CStr(intCount) & _
") matching your search conditions.")
Exit Sub
End If
' Now go ahead and retrieve the Employees...
Try
mEmployees.GetAllRows()
Catch ex As Exception
MsgBox("Error Retrieving list of Employees: " & ex.Message)
Exit Sub
End Try
3.9 Retrieving Data into the DataSet buffer using the Paging routines
Sometimes you need to support being able to retrieve a very large result set, but you don’t
necessarily want to read all the records into memory (the DataSet buffer) all at once.
25
C H A P T E R
3
–
U S I N G
T H E
D A T A H A N D L E R
C O M P O N E N T
For this need, the DataLayer.NET library supports the notion of paging through your result set.
Let me start by saying there are usually ways to work around having to do this, so the set of
circumstances is fairly narrow. You can usually simply restrict the user from retrieving more than
10,000 rows, and the data retrieval will still occur in about 2 or 3 seconds. Even for web
applications, you can store the DataHandler object on a Session variable, and simply have a
DataGrid control to page through the records in the DataSet. This DataSet is typically held in
memory in the session variable with little or no performance degredation (not to mention that the
records only have to be retrieved once).
However, if there is a high traffic website supporting thousands of concurrent users, you can’t
simply go allocating that kind of memory on a per user (per web session thread) basis, as that
would not scale up very well. In that case, using the Paging routines here would be appropriate.
Here are the routines you would use for the Paging interface (instead of the GetAllRows Routine):
PageSize
– Before retrieving the first page, set this to state how many rows should be
fetched for each page.
GetPage(n) – Gets a particular page number from the database (1 is the first page, not 0)
CurrentPage – A read-only property telling which page is currently in the DataSet buffer.
PageCount – A read-only property that runs a query to calculate how many pages there are.
GetNextPage – Retrieves the next page of data
GetPrevPage – Retrieves the previous page of data
GetFirstPage – Retrieves the first page of data
GetLastPage – Retrieves the very last page of data
Typically, the user interface for implementing a paged DataGrid will have buttons underneath the
grid that read “First”, “Previous”, “Next”, and “Last”, along with a display that tells the user how
many records there are, and the current page number, such as:
“1,458 Employees
Page 1 of 78”
Again, to re-iterate, using the paging interface is usually only needed for high transaction volume
web apps. If you are building a normal application under medium load, particularly if it is a desktop
application, you can simply retrieve all of the row data into a DataSet and let the DataGrid present a
scrollbar for the user to scroll quickly through all the records. The users actually prefer not to have
to fuss with the paging controls unless they have to, as it is much quicker for them to perform
alternate searching and sorting of their data, and navigate through the long result sets.
3.10 Strongly Typed Interface for the DataHandler Classes
As is often the case, you will need to directly interact with the data in the DataSet buffer. This is
where the DataLayer.NET library’s Strongly Typed Interface really shines.
To access the row data, you simply type in the DataHandler’s object name, type a period, and you
are presented with an alphabetical list of all the columns in the table. All you have to do is type the
first few letters of the column name until the correct one is highlighted, and then press the tab key
26
C H A P T E R
3
–
U S I N G
T H E
D A T A H A N D L E R
C O M P O N E N T
to accept the column name. The complete column name will be typed into your source code for you.
This is compliments of a technology in Visual Studio.NET called IntelliSense.
Here are a few samples of reading and updating some rows in the Employee object:
‘ Obtain the State of the 4th employee in the buffer…
Dim strState As String
StrState = objEmployees.STATE(4)
‘ Update the Last Name of the 1st employee on the list…
objEmployees.LAST_NAME(1) = “SMITH”
Note that the second sample above is only updating the values in the DataSet buffer. The updates
are not being sent to the database at the time this statement runs. You need to call the Update()
method (covered in the section 3.11 below) to send the updates to the database.
IMPORTANT NOTE: The Strongly Typed row data interface is always 1 based. In other words, the
following line will always return the FIRST employee’s row value for the Last Name:
MsgBox(objEmployees.LAST_NAME(1))
This 1-based interface makes looping through the rows much easier, as you don’t have to mess
around with remembering to subtract 1 from the indexers, etc.
Here is a sample that demonstrates an easier way to implement the sample code from section 3.6
above, using the strongly typed interface:
Dim I As Integer
For I = 1 To mEmployees.RowCount
cboEmployees.Items.Add(mEmployees.LAST_NAME(I))
Next
3.11 Adding and Deleting Rows
As with any database application, you need to be able to add and delete rows from your database
tables. To provide this functionality, the DataHandler class provides the AddRow and the
DeleteRow routines.
Here is the calling interface for the AddRow method:
Method Signature: AddRow()
Arguments: (none)
Returns: Integer : The row number that was added to the DataSet buffer
Here is an example where a row is being added to a table:
‘ Add the new row…
27
C H A P T E R
3
–
U S I N G
T H E
D A T A H A N D L E R
C O M P O N E N T
Dim intNewRow As Integer
intNewRow = mEmployees.AddRow()
‘ Populate a few values for the new row…
mEmployees.EmployeeID(intNewRow) = 279
mEmployees.FirstName(intNewRow) = “Fred”
mEmployees.LastName(intNewRow) = “Flinstone”
Note: In the sample above, nothing has been saved yet to the database. That occurs when you call
the Update() method. This way, all of your changes to all of your records are “queued” up and send
to the database all at once. If you are processing updates in a loop, you can make repeated calls to
the Update() method with each iteration of the loop. Only the new updates made since the last
invocation of the Update() method will be sent to the database.
And here is the calling interface for the DeleteRow method:
Method Signature: DeleteRow(ByVal intRow As Integer)
Arguments: intRow As Integer: The row number that you would like to delete
Returns: (nothing)
Here is an example that deletes the 7th row from the DataSet:
mEmployees.DeleteRow(7)
3.12 Updating DataSet buffer data using three available methods
Just to bring it all together in one place for you, there are three methods available for updating the
row data in the DataSet buffer:
1) Updating the rows using the strongly typed interface (preferred over #2 below):
mEmployees.LAST_NAME(1) = “SMITH”
2) Updating the rows of the DataSet table directly using the ADO.NET syntax:
mEmployees.DataSet.Tables(“data”).Rows(0).Item(“Last_Name”) = “SMITH”
3) Connecting a DataGrid Control to the DataSet and letting the user directly update the row data:
Dim mBindingSource As New BindingSource(mEmployees.DataSet,"data")
DataGrid1.DataSource = mBindingSource
3.13 Sending Updates to the database
Use the Update() method for sending updates to the database:
Method Signature: Update()
Arguments: (none)
28
C H A P T E R
3
–
U S I N G
T H E
D A T A H A N D L E R
C O M P O N E N T
Returns: (nothing)
The Update method will throw an exception if there are any errors sending the updates to the
database, so you need to wrap the call to the Update() method in a Try / Catch block, as follows:
Try
mEmployees.Update()
Catch ex As Exception
MsgBox("Error Updating the Employees table: " & ex.Message)
Exit Sub
End Try
3.14 Adding new rows from scratch (without first fetching other rows)
Sometimes you need to insert a new record into a table, but it is not associated with any previous
rows or DataHandler object that already has some rows fetched.
This situation presents an interesting dilemma for the DataHandler class. You see, it needs to have
some kind of result set already retrieved into the DataSet so that the DataSet table is properly
initialized with all of the columns and data types loaded (table “schema” information).
To provide a solution for this issue, we have a routine called InitializeEmptyBuffer().
Here is the calling interface:
Method Signature: InitializeEmptyBuffer()
Arguments: (none)
Returns: (nothing)
The InitializeEmptyBuffer method takes the SQL statement and temporarily mangles the WHERE
clause to say “WHERE 1 = 0” to force the database to return an empty result set. However, even
though no rows are returned into the DataSet, it does return the schema information for the result
set, which allows you to then subsequently add the new row (or as many rows as needed).
Here is an example:
mEmployees = New EMPLOYEES(gSQLConn, EMPLOYEES.GetBaseSQL)
' Initialize the DataSet buffer...
Try
mEmployees.InitializeEmptyBuffer()
Catch ex As Exception
MsgBox("Error initializeing Employees buffer: " & ex.Message)
Exit Sub
End Try
29
C H A P T E R
3
–
U S I N G
T H E
D A T A H A N D L E R
C O M P O N E N T
' Add the new Employee record to the DataSet buffer in memory...
Dim intRow As Integer
IntRow = mEmployees.AddRow()
' Set a few of the values for the new Employee...
mEmployees.ID_EMPLOYEE(intRow) = 247
mEmployees.FIRST_NAME(intRow) = "Henry"
mEmployees.LAST_NAME(intRow) = "Longfellow"
' Now go ahead and INSERT the new Employee record into the database...
Try
mEmployees.Update()
Catch ex As Exception
MsgBox("Error Inserting the Employee: " & ex.Message)
Exit Sub
End Try
3.15 Sequencer Columns
If you are working with a set of child records that belong to a parent table, then you most likely will
have some sort of sequence number column that becomes part of the primary key for the child
table.
The following methods help automate the tedious process of sequence key generation:
<Sequencer()> Attribute that you decorate for the sequencing column (if there is one)
GetNextSequenceNumber() Scans the current values of the Sequencer Column values in the data
buffer, and returns the next available sequence number. It returns 1
if no rows are present.
Here is the calling interface for the GetNextSequencerNumber routine:
Method Signature: GetNextSequencerNumber()
Arguments: (none)
Returns: Integer : The next available sequence number to use for a new row being added.
For example, let’s suppose we have a table called EMPLOYEE_ACTION that contains all the
payroll raises and promotions for a particular employee over their tenure. The table contains two
primary key columns: An ID_EMPLOYEE to identify which employee it is, and a sequencer column
called NUM_SEQ_ACTION (Integer) that gets assigned numbers in sequence (1, 2, 3…) as new
rows are added.
30
C H A P T E R
3
–
U S I N G
T H E
D A T A H A N D L E R
C O M P O N E N T
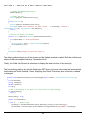
Here is a sample of what the class file for the table would look like (with just a few columns shown):
Imports CDT.DATALAYER
' Class EMPLOYEE_ACTION generated by DataLayer.NET Code Generator.
<Serializable()> Public Class EMPLOYEE_ACTION
Inherits DataHandler
Sub New(ByVal DataConn As DataConnection, ByVal SQL As String)
MyBase.New(DataConn, SQL)
Me.UpdateTable = "EMPLOYEE_ACTION"
End Sub
Public Shared Function GetBaseSQL() As String
Dim SQL As String
SQL = "SELECT
employeeid,num_seq_action,dte_action,cde_action,amt_adjustment,amt_new_salary" & _
"FROM EMPLOYEE_ACTION"
Return SQL
End Function
<PrimaryKey(), Updateable()> Public Property EMPLOYEEID(ByVal RowNum As Integer) As
Integer
Get
EMPLOYEEID = GetIntegerData(RowNum, "EMPLOYEEID")
End Get
Set
SetData(RowNum, "EMPLOYEEID", Value)
End Set
End Property
<PrimaryKey(), Updateable(), Sequencer()> Public Property NUM_SEQ_ACTION(ByVal RowNum
As Integer) As Integer
Get
NUM_SEQ_ACTION = GetIntegerData(RowNum, "NUM_SEQ_ACTION")
End Get
Set
SetData(RowNum, "NUM_SEQ_ACTION", Value)
End Set
End Property
<Updateable()> Public Property DTE_ACTION(ByVal RowNum As Integer) As Datetime
Get
DTE_ACTION = GetDateTimeData(RowNum, "DTE_ACTION")
End Get
Set
SetData(RowNum, "DTE_ACTION", Value)
End Set
End Property
<Updateable()> Public Property AMT_ADJUSTMENT(ByVal RowNum As Integer) As Decimal
Get
AMT_ADJUSTMENT = GetDecimalData(RowNum, "AMT_ADJUSTMENT")
End Get
31
C H A P T E R
3
–
U S I N G
T H E
D A T A H A N D L E R
C O M P O N E N T
Set
SetData(RowNum, "AMT_ADJUSTMENT", Value)
End Set
End Property
<Updateable()> Public Property AMT_NEW_SALARY(ByVal RowNum As Integer) As Decimal
Get
AMT_NEW_SALARY = GetDecimalData(RowNum, "AMT_NEW_SALARY")
End Get
Set
SetData(RowNum, "AMT_NEW_SALARY", Value)
End Set
End Property
End Class
As you can see, I have added the Sequencer() attribute to the NUM_SEQ_ACTION column, as well
as adding the PrimaryKey attributes to the EMPLOYEEID and NUM_SEQ_ACTION columns. This
means the NUM_SEQ_ACTION column now has three attributes defined. This is completely OK for
this situation.
Next, here is the sample code that looks at all the EMPLOYEE_ACTIVITY rows present, and
returns the next available sequence number:
Dim intNewSeq As Integer
IntNewSeq = mEmployeeActions.GetNextSequenceNumber()
Note: In order to use the GetNextSequence() method, you must have to have first retrieved the
existing rows into the DataSet buffer (even if there are no rows in existence yet). The method loops
through all the rows that currently exist in the DataSet buffer. It does not perform any database
lookup of the next available sequence number.
Here is the typical sequence of events that would be followed for our example with the Employee
Actions table:
1. A particular Employee record is selected by the user for editing.
2. The EMPLOYEE record is read into a DataHandler class object.
3. All of the EMPLOYEE_ACTION records for the selected employee are read into another
DataHandler class object.
4. The employee’s record, along with all his or her action records, are displayed in a window for
the user to interact with.
5. The user clicks the “Add Action” button to add a new EMPLOYEE_ACTION record.
6. At this time, the application would call the GetNextSequenceNumber() routine to determine
the next available NUM_SEQ_ACTION value to use for the new record.
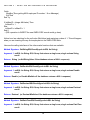
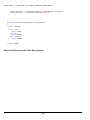
3.16 Column Value Search Functions
Sometimes you need to search through your buffer to locate the row that contains a particular value
in some given column. This is handy in situations, for example, where you have a code lookup table
32
C H A P T E R
3
–
U S I N G
T H E
D A T A H A N D L E R
C O M P O N E N T
loaded into a buffer, and want to locate the row for a particular code so that you can obtain the
description for the code.
The following methods provide this functionality:
A. GetFirstRowForStringColumnValue
B. GetFirstRowForIntegerColumnValue
Here is the calling interface for the GetFirstRowForStringColumnValue Function:
Method Signature: GetFirstRowForStringColumnValue(string sColName, sValue)
Arguments: sColName – The column name you would like to search for the value in.
sValue – The string value that you are searching for.
Returns: Integer : The row number where the value was found. Zero if not found.
And here is the calling interface for the GetFirstRowForIntegerColumnValue Function:
Method Signature: GetFirstRowForIntegerColumnValue(string sColName, sValue)
Arguments: sColName – The column name you would like to search for the value in.
iValue – The Integer value that you are searching for.
Returns: Integer : The row number where the value was found. Zero if not found.
Here is an example where we are searching for the description for a code table row:
Dim strCode As String
Dim intRow As Integer
Dim strDescription As String
strCode = “VOCSVS”
‘ next, assuming we have a Buffer called objCodes loaded that has a Code table loaded
‘ with the following two columns present: ID_CODE, TXT_DESCRIPTION….
intRow = objCodes.GetFirstRowForStringColumnValue(“ID_CODE”,strCode)
IF (intRow > 0) THEN
strDescription = objCodes.TXT_DESCRIPTION(intRow)
END IF
33
C H A P T E R
4
–
R E V I E W
O F
A
R E A L - W O R L D
P R O G R A M
4
Chapter
Chapter 4 – Review of a Real-World
Program
4.1 Overview of the Order Entry Sample Program
The learning approach in this chapter is to show you a completed real-world program, and dissect it
step by step so that you can see how it is coded.
The Sample Program is an Order Entry System. We will be reviewing each window separately,
moving from the simplest window (Product code table maintenance window) to the most powerful
window (multiple tab page Order Edit Window).
In order to follow along with the explanations, and to be able to run the code for yourself to see how
it behaves, download the code using the following link, and unzip it to a new folder called
C:\Projects\OrderEntrySystem:
http://sourceforge.net/projects/datalayernet/files/OrderEntrySystem.zip/download
Open the solution in Visual Studio. Check the References to make sure that the DataLayer
assembly was properly located in your project so the program can work correctly. If you installed the
DataLayer folder to an alternate location, you will need to remove the broken reference, and add in
the DataLayer assembly from your alternate location.
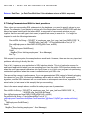
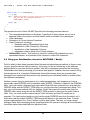
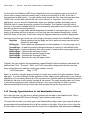
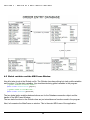
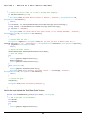
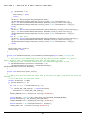
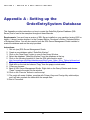
Let’s first take a look at the OrderEntrySystem database (see diagram below). There is a table for
Customers, Orders, Order Items, and Product Types. The relationships are that are in place is that
an Order must have a valid Customer identified, an Order Item must have a valid Order, and an
Order Item must also have a valid Product Type identified. Notice that there are two top-level tables
present: The Customer table and the Orders table (the Product Types table is considered just a
lookup table). Each of these top-level tables has a single primary key column. The Order Items
table “belongs” to the Orders table, so it has a composite primary key consisting of two columns: the
ID_ORDER for the Order it belongs to, along with a NUM_SEQ_ITEM integer column to uniquely
identify each item within the order (1, 2, 3, etc.). We could have designed the database having the
Customer table as the only top-level entity, as each Order certainly “belongs” to a particular
customer. However, this was not done because an Order is something tangible that you can put
your hands on (piece of paper, receipt, etc.), and needs to have its own unique identifier
(ID_ORDER) that is not dependent on the Customer table for identification purposes.
34
C H A P T E R
4
–
R E V I E W
O F
A
R E A L - W O R L D
P R O G R A M
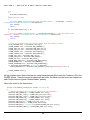
4.2 Global variables and the MDI Frame Window
Now let’s take a look at the Globals.cs file. The Globals class has nothing but static public variables
and functions. For the static variables, this simulates declaring global variables in the program:
// global database connection handle...
public static DataConnection gSQLConn;
// global handle to the MDI Frame...
public static MainFrame gMainFrame;
The two global static variables declared above are for the Database connection object and the
handle to the MDI Frame Window.
The two static functions in the Globals class are just miscellaneous functions used in the program.
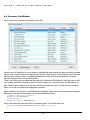
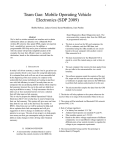
Next, let’s examine the MainFrame.cs window. This is the main MDI frame of the application:
35
C H A P T E R
4
–
R E V I E W
O F
A
R E A L - W O R L D
P R O G R A M
As you can see, there are toolbar buttons at the top that is used to open the various windows in the
application, as follows:
Yosemite Sam – Opens the Product Codes maintenance window
Sylvester – Opens the Customer List window
Tasmanian Devil – Opens the Order List window
Stop button – Exits the Program
Most database applications require some sort of way to identify the user. This can be done with a
login window, or you can automatically pull the network ID of the user. For this application, however,
we are going to keep things very simple so that we can focus on learning about the DataLayer
library. Accordingly, this application simply opens a connection to the database when the
MainFrame window opens, and automatically closes it when the window closes. Here is the code
for this:
private void MainFrame_Load(object sender, EventArgs e)
{
// Assign the global handle to this MDI Frame Window...
Globals.gMainFrame = this;
// Connect to the database...
Globals.gSQLConn = new DataConnection(DataLayer_ConnectionType.SQLServer);
Globals.gSQLConn.ConnectionString = "Server=localhost; Database=OrderEntrySystem; Integrated
Security=SSPI;Connect Timeout=30";
try
{
Globals.gSQLConn.Connect();
36
C H A P T E R
4
–
R E V I E W
O F
A
R E A L - W O R L D
P R O G R A M
}
catch(Exception ex)
{
MessageBox.Show("Error connecting to the OrderEntrySystem database: " + ex.Message,
"Problem:");
this.Close();
Application.Exit();
}
}
private void MainFrame_FormClosing(object sender, FormClosingEventArgs e)
{
// Close the database connection...
if (Globals.gSQLConn.ConnectionState == ConnectionState.Open)
Globals.gSQLConn.Disconnect();
}
Pretty straight forward. As you can see, we are using the static global variable Globals.gSQLConn
for storing the live connection to the database. All that needs to be done here is assigning a
Connection String, and then calling the Connect() method.
Next, for each toolbar button, you will see code similar to the code below to open the appropriate
window:
private void toolStripButtonProductList_Click(object sender, EventArgs e)
{
// Open the Product List Window...
ProductListWindow objProdListWin = new ProductListWindow();
objProdListWin.MdiParent = Globals.gMainFrame;
objProdListWin.Show();
}
4.3 Product Codes Maintenance Window
This window is very simple and has very few lines of code, but it demonstrates how easy it is to use
the DataLayer library to facilitate the retrieval and update of records in a table. This is for
demonstration purposes only. For a real-world application, you probably would not let the user
directly manipulate the records using a grid.
Here is what the window looks like:
37
C H A P T E R
4
–
R E V I E W
O F
A
R E A L - W O R L D
P R O G R A M
As you can see, you can edit any of the records by directly typing into the grid. There is a blank row
at the bottom provided for adding new product codes, and a Delete button is also provided for
deleting products. However, please do not delete any products because they might be used on
some of the sample orders that are in the database, so you may receive an error. Normally, there
would be code to double-check this before letting the user delete a record, but again we are
keeping things simple here for demonstration purposes. Finally, a Save button is provided to save
the changes to the grid.
First, there are several window-level private variables declared (see below). One is a handle to the
buffer that will hold the Products records, and the other is a binding source object that helps bind
the records to the DataGridView control:
// Buffer to Products buffer...
private PRODUCT_TYPES mProducts;
// Binding Source...
private BindingSource mBindingSource;
Here is what the code looks like that executes when the window opens (to load up the grid):
private void ProductListWindow_Load(object sender, EventArgs e)
{
this.Location = new Point(0, 0);
mProducts = new PRODUCT_TYPES(Globals.gSQLConn, PRODUCT_TYPES.GetBaseSQL() + " WHERE id_product
NOT IN ('000000')");
try
{
38
C H A P T E R
4
–
R E V I E W
O F
A
R E A L - W O R L D
P R O G R A M
mProducts.GetAllRows();
}
catch (Exception ex)
{
MessageBox.Show("Error retrieving PRODUCT_TYPES rows: " + ex.Message, "Problem:");
this.Close();
}
}
try
{
mBindingSource = new BindingSource(mProducts.DataSet, "data");
dataGridView1.DataSource = mBindingSource;
}
catch (Exception ex)
{
MessageBox.Show("Error binding Products records to DataGrid: " + ex.Message, "Problem:");
this.Close();
}
The SQL text is passed to the constructor of the mProducts buffer. As you can see, we are using
the GetBaseSQL() method to create most of the SQL, and manually adding the WHERE clause. In
this situation, we are excluding the special product record “000000”, which is the default Product
that is selected when the user creates a new line item for an Order. If you look in the
PRODUCT_TYPES table, you will see the description for this Product 000000 is “Select Item Type”.
Next, you see a call to the GetAllRows() method. Finally, the Binding Source object is created, and
the mProducts Buffer is bound to the DataGridView control.
The Delete button is pretty sick. Check it out:
private void btnDelete_Click(object sender, EventArgs e)
{
if (mProducts.RowCount() > 0)
dataGridView1.Rows.Remove(dataGridView1.CurrentRow);
}
Finally, here is the code for the Save button:
private void btnSave_Click(object sender, EventArgs e)
{
try
{
Globals.gSQLConn.BeginTransaction();
mProducts.Update();
Globals.gSQLConn.CommitTransaction();
}
catch (Exception ex)
{
Globals.gSQLConn.RollbackTransaction();
MessageBox.Show("Error saving changes to Products table: " + ex.Message, "Problem:");
return;
}
MessageBox.Show("Changes Successfully Saved.");
}
Just a simple call to the Update method, wrapped in a transaction block.
39
C H A P T E R
4
–
R E V I E W
O F
A
R E A L - W O R L D
P R O G R A M
4.4 Customer List Window
Here is what the Customer List Window looks like:
Notice first of all that there is a row selection highlight bar that goes all the way across the window.
As you click on each record, the highlight bar moves to that record. This grid does not let the user
edit the cells. Instead, there is a dedicated window provided to let the user edit the Customer
records (covered in the next section below).
There is an Edit button provided that will open the Customer Edit Window to allow the user to edit
the currently selected Customer’s record. Double-clicking on a record invokes the Edit button as
well. There is also a button to let the user add a new Customer record. Finally, there is a Delete
button to let the user delete the highlighted customer.
Again, similar to the Product Code Maintenance Window, there are private window-level variables
declared for the mCustomers buffer as well as the Binding Source:
// Buffer to hold list of Customers...
private CUSTOMER mCustomers;
// Binding Source...
private BindingSource mBindingSource;
Here is the code that executes when the window opens, to load the data grid:
private void CustomerListWindow_Load(object sender, EventArgs e)
{
40
C H A P T E R
4
–
R E V I E W
O F
A
R E A L - W O R L D
P R O G R A M
this.Location = new Point(0, 0);
// Set up the DataGridView properties...
dataGridView1.SelectionMode = DataGridViewSelectionMode.FullRowSelect;
dataGridView1.VirtualMode = false;
dataGridView1.AutoGenerateColumns = false;
dataGridView1.AllowUserToOrderColumns = true;
dataGridView1.AllowUserToDeleteRows = false;
dataGridView1.AllowUserToAddRows = false;
dataGridView1.MultiSelect = false;
dataGridView1.AlternatingRowsDefaultCellStyle.BackColor = Color.LightCyan;
dataGridView1.RowHeadersVisible = false;
// Create the columns for the DataGridView...
// Customer ID number...
DataGridViewTextBoxColumn colID = new DataGridViewTextBoxColumn();
colID.DataPropertyName = "id_customer";
colID.HeaderText = "ID";
colID.AutoSizeMode = DataGridViewAutoSizeColumnMode.AllCells;
colID.Name = "id_customer";
colID.ReadOnly = true;
colID.DefaultCellStyle.Alignment = DataGridViewContentAlignment.MiddleCenter;
dataGridView1.Columns.Add(colID);
// Company Name...
DataGridViewTextBoxColumn colCompanyName = new DataGridViewTextBoxColumn();
colCompanyName.DataPropertyName = "nme_company";
colCompanyName.HeaderText = "Company Name";
colCompanyName.AutoSizeMode = DataGridViewAutoSizeColumnMode.None;
colCompanyName.Width = 350;
colCompanyName.Name = "nme_company";
colCompanyName.ReadOnly = true;
dataGridView1.Columns.Add(colCompanyName);
// Contact Person's Name (Last, First)...
DataGridViewTextBoxColumn colContactName = new DataGridViewTextBoxColumn();
colContactName.DataPropertyName = "ContactName";
colContactName.HeaderText = "Contact Name";
colContactName.AutoSizeMode = DataGridViewAutoSizeColumnMode.AllCells;
colContactName.Name = "ContactName";
colContactName.ReadOnly = true;
dataGridView1.Columns.Add(colContactName);
// City, State...
DataGridViewTextBoxColumn colCityState = new DataGridViewTextBoxColumn();
colCityState.DataPropertyName = "CityState";
colCityState.HeaderText = "City, State";
colCityState.AutoSizeMode = DataGridViewAutoSizeColumnMode.AllCells;
colCityState.Name = "CityState";
colCityState.ReadOnly = true;
dataGridView1.Columns.Add(colCityState);
// # Orders...
DataGridViewTextBoxColumn colNumOrders = new DataGridViewTextBoxColumn();
colNumOrders.DataPropertyName = "NumOrders";
colNumOrders.HeaderText = "# Orders";
colNumOrders.DefaultCellStyle.Alignment = DataGridViewContentAlignment.MiddleRight;
colNumOrders.AutoSizeMode = DataGridViewAutoSizeColumnMode.AllCells;
41
C H A P T E R
4
–
R E V I E W
O F
A
R E A L - W O R L D
P R O G R A M
colNumOrders.Name = "NumOrders";
colNumOrders.ReadOnly = true;
dataGridView1.Columns.Add(colNumOrders);
Load_Data();
}
private void Load_Data()
{
// Load the Customer Records into the DataGrid.
string SQL = "SELECT C.id_customer,C.nme_company,C.nme_cnct_lst + ', ' + C.nme_cnct_lst As
ContactName," +
"C.adr_city + ', ' + C.adr_state As CityState,(SELECT COUNT(*) FROM dbo.ORDERS O
WHERE O.id_customer = C.id_customer) As NumOrders " +
"FROM CUSTOMER C WHERE id_customer > 0";
mCustomers = new CUSTOMER(Globals.gSQLConn, SQL);
try
{
mCustomers.GetAllRows();
}
catch (Exception ex)
{
MessageBox.Show("Error retrieving CUSTOMER rows: " + ex.Message, "Problem:");
this.Close();
}
try
{
mBindingSource = new BindingSource(mCustomers.DataSet, "data");
dataGridView1.DataSource = mBindingSource;
}
catch (Exception ex)
{
MessageBox.Show("Error binding Products records to DataGrid: " + ex.Message, "Problem:");
this.Close();
}
}
The code it is a bit longer, because we are taking time to format the DataGridView control nicely.
Notice that the data to load the grid (in the “Load_Data” function) is separated out from the Form’s
Load event, because it is called also by the “Refresh_List” method. This Refresh_List method is
called by the Customer Edit Window whenever the user saves changes to a customer’s record, so
that it can refresh the records displayed in the grid. Otherwise the Customer List Window would
continue to display old / incorrect information after a customer record is updated.
The Load_Data event is creating its own custom SQL statement that only retrieves the exact
columns that it needs to display, along with a nested SELECT statement subquery to generate the
column that displays the total number of orders for each customer.
Other than the extra code for the DataGridView formatting, it is pretty much the same thing
happening here as the Product Code Maintenance Window, except here the Customer records will
edited in a much more controlled fashion on a separate Customer Edit Window (there is no Save
button here on this List Window).
42
C H A P T E R
4
–
R E V I E W
O F
A
R E A L - W O R L D
P R O G R A M
The delete button’s code first searches to see if there are any orders in the database for the
selected customer, and does not let the user delete the customer record if there are:
private void btnDelete_Click(object sender, EventArgs e)
{
// Check to see if this customer has any Orders in the database. If they do, don't let them
delete this customer record...
if (mCustomers.RowCount() == 0)
{
MessageBox.Show("No Customer Record present to delete!", "Problem:", MessageBoxButtons.OK,
MessageBoxIcon.Exclamation);
return;
}
int iCustomerID = int.Parse(dataGridView1.CurrentRow.Cells[0].Value.ToString());
string SQL = "SELECT COUNT(*) FROM dbo.ORDERS WHERE id_customer = @CustomerID";
Globals.gSQLConn.Parameters.Add(new CmdParameter("@CustomerID", SqlDbType.Int, iCustomerID));
int iCount;
try
{
iCount = Globals.gSQLConn.GetIntegerSQLResult(SQL);
}
catch (Exception ex)
{
MessageBox.Show("Error checking for Orders for this Customer: " + ex.Message, "Problem:",
MessageBoxButtons.OK, MessageBoxIcon.Exclamation);
return;
}
if (iCount > 0)
{
MessageBox.Show("You cannot delete this Customer record because there are " +
iCount.ToString() + " Orders in the database for them!", "Problem:", MessageBoxButtons.OK,
MessageBoxIcon.Stop);
return;
}
// Confirm with the user...
string sCustName = dataGridView1.CurrentRow.Cells[1].Value.ToString();
DialogResult dlgResult = MessageBox.Show("Are you sure you want to Delete [" + sCustName +
"]?", "Confirmation:", MessageBoxButtons.YesNoCancel, MessageBoxIcon.Question);
if (dlgResult != DialogResult.Yes)
return;
// delete the customer record...
dataGridView1.Rows.Remove(dataGridView1.CurrentRow);
// Save the change...
try
{
Globals.gSQLConn.BeginTransaction();
mCustomers.Update();
Globals.gSQLConn.CommitTransaction();
}
catch (Exception ex)
{
Globals.gSQLConn.RollbackTransaction();
MessageBox.Show("Error deleting this Customer record: " + ex.Message, "Problem:",
MessageBoxButtons.OK, MessageBoxIcon.Exclamation);
return;
43
C H A P T E R
4
–
R E V I E W
O F
A
R E A L - W O R L D
P R O G R A M
}
// refresh the grid...
Load_Data();
}
MessageBox.Show("Customer Successfully Deleted.");
The “Add New Customer” button’s code goes ahead and adds a new blank record into the
database, after looking up the next available ID_CUSTOMER value:
private void btnAddNewCustomer_Click(object sender, EventArgs e)
{
// Insert a new Customer record into the database...
int iMaxID;
int iNewID;
try
{
Globals.gSQLConn.BeginTransaction();
string SQL = "SELECT MAX(id_customer) FROM dbo.CUSTOMER";
iMaxID = Globals.Zero_If_MinValue(Globals.gSQLConn.GetIntegerSQLResult(SQL)); //
GetIntegerResult returns int.MinValue if the result is null.
iNewID = iMaxID + 1;
SQL = "INSERT INTO dbo.CUSTOMER(id_customer,dtm_created) VALUES (@CustID,CURRENT_TIMESTAMP)";
Globals.gSQLConn.Parameters.Add(new CmdParameter("@CustID",SqlDbType.Int,iNewID));
Globals.gSQLConn.RunSQLStatement(SQL);
Globals.gSQLConn.CommitTransaction();
}
catch (Exception ex)
{
Globals.gSQLConn.RollbackTransaction();
MessageBox.Show("Error adding a new Customer record: " + ex.Message, "Problem:",
MessageBoxButtons.OK, MessageBoxIcon.Exclamation);
return;
}
}
// Now open the Customer Edit Window to let the user edit the new record...
CustomerEditWindow objEditWin = new CustomerEditWindow();
objEditWin.MdiParent = Globals.gMainFrame;
objEditWin.CustomerID = iNewID;
objEditWin.Show();
Finally, the Edit button opens up the Customer Edit Window for the customer record that is
highlighted:
private void btnEdit_Click(object sender, EventArgs e)
{
// Open the Customer Edit Window to let the user edit this record...
int iCustomerID = int.Parse(dataGridView1.CurrentRow.Cells[0].Value.ToString());
}
CustomerEditWindow objEditWin = new CustomerEditWindow();
objEditWin.MdiParent = Globals.gMainFrame;
objEditWin.CustomerID = iCustomerID;
objEditWin.Show();
44
C H A P T E R
4
–
R E V I E W
O F
A
R E A L - W O R L D
P R O G R A M
4.5 Customer Edit Window
Here is what the Customer Edit Window looks like:
We have a dedicated textbox for each field that limits the number of characters for each field
according to the defined length of the fields in the CUSTOMER table. Also, for the Zip Code and
Phone Number fields, edit masks are used to force only the input of numbers, and also helps with
the display formatting.
Finally, notice that the “Customer ID” and “Date Record Created” fields are a different color. This is
because they are read-only fields that the user cannot change.
There is only one window-level private variable (to hold the mCustomer buffer):
private CUSTOMER mCustomer;
Next, here is the code that executes when the window opens:
Note: At the time the window opens, the “CustomerID” property has already been set accordingly
by the code that opened this window, and is equal to the ID_CUSTOMER value for the Customer
record being edited.
private void CustomerEditWindow_Load(object sender, EventArgs e)
{
this.Location = new Point(0, 0);
// Load the customer's record, based on the CustomerID given...
mCustomer = new CUSTOMER(Globals.gSQLConn, CUSTOMER.GetBaseSQL() + " WHERE id_customer =
@CustID");
mCustomer.Parameters.Add(new CmdParameter("@CustID", SqlDbType.Int, CustomerID));
45
C H A P T E R
4
–
R E V I E W
O F
A
R E A L - W O R L D
P R O G R A M
try
{
mCustomer.GetAllRows();
}
catch (Exception ex)
{
MessageBox.Show("Error retrieving this Customer record: " + ex.Message, "Problem:",
MessageBoxButtons.OK, MessageBoxIcon.Exclamation);
this.Close();
return;
}
if (mCustomer.RowCount() == 0)
{
MessageBox.Show("Customer record " + CustomerID.ToString() + " was not found in the
database!", "Problem:", MessageBoxButtons.OK, MessageBoxIcon.Exclamation);
this.Close();
return;
}
// Load the textboxes with the current values from the Customer record...
txtID_CUSTOMER.Text = CustomerID.ToString();
txtNME_COMPANY.Text = mCustomer.NME_COMPANY[1];
txtNME_CNCT_FST.Text = mCustomer.NME_CNCT_FST[1];
txtNME_CNCT_LST.Text = mCustomer.NME_CNCT_LST[1];
txtADR_STREET1.Text = mCustomer.ADR_STREET1[1];
txtADR_STREET2.Text = mCustomer.ADR_STREET2[1];
txtADR_CITY.Text = mCustomer.ADR_CITY[1];
txtADR_STATE.Text = mCustomer.ADR_STATE[1];
mskADR_ZIP.Text = mCustomer.ADR_ZIP[1];
mskPHN_AREA_CODE.Text = mCustomer.PHN_AREA_CODE[1];
mskPHN_NUMBER.Text = mCustomer.PHN_NUMBER[1];
mskPHN_EXTENSION.Text = mCustomer.PHN_EXTENSION[1];
if (mCustomer.DTM_CREATED[1] != DateTime.MinValue)
txtDTM_CREATED.Text = mCustomer.DTM_CREATED[1].ToString("MM/dd/yyyy H:mmtt");
txtNME_COMPANY.Focus();
}
No big surprises here. Notice how we are using Parameterized SQL to add the Customer’s ID to the
WHERE clause. Once the record is loaded into the buffer, the fields from the record are loaded into
each Textbox control (typical “Scatter/Gather” pattern).
Here is the code for the Save button:
private void btnSave_Click(object sender, EventArgs e)
{
// Update the buffer with the latest values from the textboxes...
mCustomer.NME_COMPANY[1] = txtNME_COMPANY.Text.Trim();
mCustomer.NME_CNCT_FST[1] = txtNME_CNCT_FST.Text.Trim();
mCustomer.NME_CNCT_LST[1] = txtNME_CNCT_LST.Text.Trim();
mCustomer.ADR_STREET1[1] = txtADR_STREET1.Text.Trim();
mCustomer.ADR_STREET2[1] = txtADR_STREET2.Text.Trim();
mCustomer.ADR_CITY[1] = txtADR_CITY.Text.Trim();
mCustomer.ADR_STATE[1] = txtADR_STATE.Text.Trim();
mCustomer.ADR_ZIP[1] = Globals.Trim_Dashes(mskADR_ZIP.Text.Trim());
mCustomer.PHN_AREA_CODE[1] = mskPHN_AREA_CODE.Text.Trim();
46
C H A P T E R
4
–
R E V I E W
O F
A
R E A L - W O R L D
P R O G R A M
mCustomer.PHN_NUMBER[1] = Globals.Trim_Dashes(mskPHN_NUMBER.Text.Trim());
mCustomer.PHN_EXTENSION[1] = mskPHN_EXTENSION.Text.Trim();
try
{
mCustomer.Update();
}
catch (Exception ex)
{
MessageBox.Show("Error updating this Customer record: " + ex.Message, "Problem:",
MessageBoxButtons.OK, MessageBoxIcon.Exclamation);
this.Close();
return;
}
// Refresh the Customer List Window...
foreach(Form objForm in Globals.gMainFrame.MdiChildren)
{
if (objForm.Name == "CustomerListWindow")
{
CustomerListWindow oList = (CustomerListWindow)objForm;
oList.Refresh_List();
}
}
}
MessageBox.Show("Changes Successfully Saved.");
We are gathering back up the values from each TextBox control and updating the values in the
mCustomer buffer. After that, it is just a simple call to the Update() method.
Finally, there is code to search for any and all instances of the Customer List Window, and if any
are found, a call to the Refresh_List() method is invoked so that it will refresh the displayed list from
the database.
4.6 Order List Window
Next we have the Order List Window, and we are going to step up the game a little bit on this one.
Here is what the window looks like:
47
C H A P T E R
4
–
R E V I E W
O F
A
R E A L - W O R L D
P R O G R A M
As you can see, there are search boxes at the top that allow the user to search for orders by typing
in the Customer or Contact Person’s name (partial names will be matched too). There is also a
drop-down to filter the records by Order Status.
When the user first opens the window, it just displays ALL the orders. For this small demonstration
application, this is acceptable, for not for a real-world application with thousands of Orders.
There are buttons across the bottom for Editing the order, Adding new Orders, and Deleting Orders.
Finally, there is a display of the Total Amount for all orders meeting the search criteria.
Here are the private window-level variables for the mOrders buffer and the Binding Source:
// Buffer to hold list of Orders...
private ORDERS mOrders;
// Binding Source...
private BindingSource mBindingSource;
Next, here is the code that executes when the window loads up:
private void OrderListWindow_Load(object sender, EventArgs e)
{
this.Location = new Point(0, 0);
// Load the Order Status drop-down...
cboOrderStatus.Items.Add(new ComboItem("ALL", "ALL"));
cboOrderStatus.Items.Add(new ComboItem("Placed", "PLACED"));
cboOrderStatus.Items.Add(new ComboItem("Processing", "PROCESSING"));
cboOrderStatus.Items.Add(new ComboItem("Shipped", "SHIPPED"));
cboOrderStatus.Items.Add(new ComboItem("Backordered", "BACKORDER"));
cboOrderStatus.Items.Add(new ComboItem("Cancelled", "CANCELLED"));
ComboItem.Select_Combo_Value(ref cboOrderStatus, "ALL");
48
C H A P T E R
4
–
R E V I E W
O F
A
R E A L - W O R L D
P R O G R A M
// Set up the DataGridView properties...
dataGridView1.SelectionMode = DataGridViewSelectionMode.FullRowSelect;
dataGridView1.VirtualMode = false;
dataGridView1.AutoGenerateColumns = false;
dataGridView1.AllowUserToOrderColumns = true;
dataGridView1.AllowUserToDeleteRows = false;
dataGridView1.AllowUserToAddRows = false;
dataGridView1.MultiSelect = false;
dataGridView1.AlternatingRowsDefaultCellStyle.BackColor = Color.LightCyan;
dataGridView1.RowHeadersVisible = false;
// Create the columns for the DataGridView...
// 0. Order ID number...
DataGridViewTextBoxColumn colID = new DataGridViewTextBoxColumn();
colID.DataPropertyName = "id_order";
colID.HeaderText = "ID";
colID.AutoSizeMode = DataGridViewAutoSizeColumnMode.AllCells;
colID.Name = "id_order";
colID.ReadOnly = true;
colID.DefaultCellStyle.Alignment = DataGridViewContentAlignment.MiddleCenter;
dataGridView1.Columns.Add(colID);
// 1. Order Date...
DataGridViewTextBoxColumn colDate = new DataGridViewTextBoxColumn();
colDate.DataPropertyName = "dtm_placed";
colDate.DefaultCellStyle.Format = "MM/dd/yyyy";
colDate.HeaderText = "Placed";
colDate.AutoSizeMode = DataGridViewAutoSizeColumnMode.AllCells;
colDate.Name = "dtm_placed";
colDate.ReadOnly = true;
colDate.DefaultCellStyle.Alignment = DataGridViewContentAlignment.MiddleCenter;
dataGridView1.Columns.Add(colDate);
// 2. Company Name...
DataGridViewTextBoxColumn colCompanyName = new DataGridViewTextBoxColumn();
colCompanyName.DataPropertyName = "nme_company";
colCompanyName.HeaderText = "Company Name";
colCompanyName.AutoSizeMode = DataGridViewAutoSizeColumnMode.None;
colCompanyName.Width = 300;
colCompanyName.Name = "nme_company";
colCompanyName.ReadOnly = true;
dataGridView1.Columns.Add(colCompanyName);
// 3. Contact Person's Name (Last, First)...
DataGridViewTextBoxColumn colContactName = new DataGridViewTextBoxColumn();
colContactName.DataPropertyName = "ContactName";
colContactName.HeaderText = "Contact Name";
colContactName.AutoSizeMode = DataGridViewAutoSizeColumnMode.AllCells;
colContactName.Name = "ContactName";
colContactName.ReadOnly = true;
dataGridView1.Columns.Add(colContactName);
// 4. Order Total...
DataGridViewTextBoxColumn colTotal = new DataGridViewTextBoxColumn();
colTotal.DataPropertyName = "amt_total";
colTotal.HeaderText = "Total";
colTotal.AutoSizeMode = DataGridViewAutoSizeColumnMode.AllCells;
49
C H A P T E R
4
–
R E V I E W
O F
A
R E A L - W O R L D
P R O G R A M
colTotal.Name = "amt_total";
colTotal.DefaultCellStyle.Format = "$#,##0.00";
colTotal.DefaultCellStyle.Alignment = DataGridViewContentAlignment.MiddleRight;
colTotal.ReadOnly = true;
dataGridView1.Columns.Add(colTotal);
// 5. Status...
DataGridViewTextBoxColumn colStatus = new DataGridViewTextBoxColumn();
colStatus.DataPropertyName = "cde_status";
colStatus.HeaderText = "Status";
colStatus.AutoSizeMode = DataGridViewAutoSizeColumnMode.AllCells;
colStatus.Name = "cde_status";
colStatus.ReadOnly = true;
dataGridView1.Columns.Add(colStatus);
Load_Data();
}
private void Load_Data()
{
// Load the Order Records into the DataGrid.
string SQL = "SELECT O.id_order,O.dtm_placed,C.nme_company,C.nme_cnct_lst + ', ' +
C.nme_cnct_lst As ContactName," +
"O.cde_status,O.amt_total " +
"FROM dbo.ORDERS O " +
"LEFT OUTER JOIN dbo.CUSTOMER C ON C.id_customer = O.id_customer" ;
mOrders = new ORDERS(Globals.gSQLConn, "");
string sWhereClause = "";
string sName = txtName.Text.Trim();
if (sName != "")
{
sWhereClause += " AND ((C.nme_company LIKE @CName) OR (C.nme_cnct_lst LIKE @CName) OR
(C.nme_cnct_fst LIKE @CName))";
sName = "%" + sName + "%";
mOrders.Parameters.Add(new CmdParameter("@CName", SqlDbType.VarChar, sName));
}
string sStatus = ComboItem.Get_Combo_Value_String(cboOrderStatus);
if (sStatus != "ALL")
{
sWhereClause += " AND (O.cde_status = @Status)";
mOrders.Parameters.Add(new CmdParameter("@Status", SqlDbType.VarChar, sStatus));
}
// Chop off the leading 'AND' if needed...
if (sWhereClause != "")
SQL += " WHERE " + sWhereClause.Substring(4) + " ORDER BY dtm_placed DESC";
else
SQL += " ORDER BY dtm_placed DESC";
mOrders.SQLQuery = SQL;
try
{
mOrders.GetAllRows();
}
50
C H A P T E R
4
–
R E V I E W
O F
A
R E A L - W O R L D
P R O G R A M
catch (Exception ex)
{
MessageBox.Show("Error retrieving ORDERS rows: " + ex.Message, "Problem:");
this.Close();
}
try
{
mBindingSource = new BindingSource(mOrders.DataSet, "data");
dataGridView1.DataSource = mBindingSource;
}
catch (Exception ex)
{
MessageBox.Show("Error binding Orders records to DataGrid: " + ex.Message, "Problem:");
this.Close();
}
// Refresh the total amount for all orders...
decimal decTotal = 0.0m;
if (mOrders.RowCount() > 0)
{
for (int i = 1; i <= mOrders.RowCount(); i++)
{
if (mOrders.AMT_TOTAL[i] != decimal.MinValue)
decTotal += mOrders.AMT_TOTAL[i];
}
}
txtTotal.Text = decTotal.ToString("$#,##0.00");
}
There is a lot going on here. First you will see statements to populate the Order Status drop-down
with choices for the user. Instead of just loading description strings, we are using a custom
“ComboItem” class to load objects into the drop-down that include not only the displayed values but
also the codes:
cboOrderStatus.Items.Add(new ComboItem("ALL", "ALL"));
Take a moment to review the ComboItem.cs source code to get a feel for the functionality that it
offers.
Next is all the code that sets up the DataGridView and all of its columns.
Again, the actual loading of the data into the grid is kept separate in the Load_Data() function,
because it is not only called when the window opens, but also whenever the user clicks on the
Search button.
The Load_Data() function uses SQL that has a LEFT OUTER JOIN to pull in fields from the
CUSTOMER table, including the Company’s name and Contact Person’s name.
The WHERE clause is dynamically generated, and Parameterized SQL is used, depending upon
which search fields the user entered information into.
Finally, there is code at the bottom to refresh the display of the total amount for all the orders
retrieved.
The Delete button’s code makes sure that the order hasn’t SHIPPED, and blocks the user from
deleting that order if it has:
private void btnDelete_Click(object sender, EventArgs e)
51
C H A P T E R
4
–
R E V I E W
O F
A
R E A L - W O R L D
P R O G R A M
{
// delete the current order (if it hasn't already been shipped)...
if (mOrders.RowCount() == 0)
{
MessageBox.Show("No Order Record present to delete!", "Problem:", MessageBoxButtons.OK,
MessageBoxIcon.Exclamation);
return;
}
int iOrderID = int.Parse(dataGridView1.CurrentRow.Cells[0].Value.ToString());
string sStatus = dataGridView1.CurrentRow.Cells[4].Value.ToString();
if (sStatus == "SHIPPED")
{
MessageBox.Show("You cannot delete this order record, it has already SHIPPED!", "Problem:",
MessageBoxButtons.OK, MessageBoxIcon.Exclamation);
return;
}
// Confirm with the user...
DialogResult dlgResult = MessageBox.Show("Are you sure you want to Delete Order ID [" +
iOrderID.ToString() + "]?", "Confirmation:", MessageBoxButtons.YesNoCancel, MessageBoxIcon.Question);
if (dlgResult != DialogResult.Yes)
return;
// delete the order record...
dataGridView1.Rows.Remove(dataGridView1.CurrentRow);
// Save the change...
try
{
Globals.gSQLConn.BeginTransaction();
mOrders.Update();
Globals.gSQLConn.CommitTransaction();
}
catch (Exception ex)
{
Globals.gSQLConn.RollbackTransaction();
MessageBox.Show("Error deleting this Order record: " + ex.Message, "Problem:",
MessageBoxButtons.OK, MessageBoxIcon.Exclamation);
return;
}
// refresh the grid...
Load_Data();
MessageBox.Show("Order Successfully Deleted.");
}
Here’s the code behind the “Add New Order” button:
private void btnAddNewOrder_Click(object sender, EventArgs e)
{
// Add a new order to the database...
int iMaxID;
int iNewID;
try
{
Globals.gSQLConn.BeginTransaction();
52
C H A P T E R
4
–
R E V I E W
O F
A
R E A L - W O R L D
P R O G R A M
string SQL = "SELECT MAX(id_order) FROM dbo.ORDERS";
iMaxID = Globals.Zero_If_MinValue(Globals.gSQLConn.GetIntegerSQLResult(SQL)); //
GetIntegerResult returns int.MinValue if the result is null.
iNewID = iMaxID + 1;
SQL = "INSERT INTO dbo.ORDERS(id_order,id_customer,dtm_placed,cde_status,cde_shipping_method)
VALUES (@OrderID,-1,CURRENT_TIMESTAMP,'PLACED','USPS')";
Globals.gSQLConn.Parameters.Add(new CmdParameter("@OrderID", SqlDbType.Int, iNewID));
Globals.gSQLConn.RunSQLStatement(SQL);
Globals.gSQLConn.CommitTransaction();
}
catch (Exception ex)
{
Globals.gSQLConn.RollbackTransaction();
MessageBox.Show("Error adding a new Order record: " + ex.Message, "Problem:",
MessageBoxButtons.OK, MessageBoxIcon.Exclamation);
return;
}
}
// Now open the Order Edit Window to let the user edit the new record...
OrderEditWindow objEditWin = new OrderEditWindow();
objEditWin.MdiParent = Globals.gMainFrame;
objEditWin.OrderID = iNewID;
objEditWin.Show();
As you can see, it is performing a query to determine the next available ID_ORDER value, and then
it is performing an INSERT statement to add the new Order to the database (all wrapped in a
Transaction).
Finally, here is the code that opens the Order Edit Window when the user clicks on the Edit button:
private void btnEdit_Click(object sender, EventArgs e)
{
// Open the Order Edit Window to let the user edit this record...
int iOrderID = int.Parse(dataGridView1.CurrentRow.Cells[0].Value.ToString());
}
OrderEditWindow objEditWin = new OrderEditWindow();
objEditWin.MdiParent = Globals.gMainFrame;
objEditWin.OrderID = iOrderID;
objEditWin.Show();
4.7 Order Edit Window
And finally, the centerpiece of this application is the Order Edit Window. This window has two tab
pages. The “Order Information” tab page is for general information about the Order:
53
C H A P T E R
4
–
R E V I E W
O F
A
R E A L - W O R L D
P R O G R A M
The “Line Items” tab page is for entering and displaying the individual line items that are being
ordered:
As you can see, there is a drop-down box for the selection of the customer. This drop-down is
dynamically populated from the CUSTOMER table when the window opens. There are also drop54
C H A P T E R
4
–
R E V I E W
O F
A
R E A L - W O R L D
P R O G R A M
down boxes for the Order Status and Shipping Method. When you run the program, you will notice
that when you change the Order Status to Shipped, the window will un-hide the Date/Time Shipped
Textbox. The built-in Microsoft Date/Time Calendar Picker control is not nullable, so this hide/show
approach is used here instead. For real-world applications, there is a nullable Date/Time picker
control that you can download and use (open source).
Here are the window-level private variables.
private
private
private
private
ORDERS mOrder;
ORDER_ITEM mItems;
PRODUCT_TYPES mProductTypes;
bool mCalculating = false; // whether the DataGridView for the line items is in the
// process of recalculating prices and total $.
// Binding Source for the Items DataGrid...
private BindingSource mBindingSource;
There is a buffer object for the Order record (mOrder), as well as a buffer object for the Line Items
(mItems). The mProductTypes buffer is used for populating the choices on the line items grid to
allow the user to choose each item’s product type. Finally, a flag called mCalculating is used to
control the event processing as it relates to keeping the Order Total refreshed as the user enters
new line items and changes existing line items.
Here is the code that executes when the window opens:
private void OrderEditWindow_Load(object sender, EventArgs e)
{
this.Location = new Point(0, 0);
// Load the values for the Customer drop-down...
string SQL = "SELECT id_customer, nme_company + ' (' + nme_cnct_fst + ' ' + nme_cnct_lst + ') ' + CONVERT(varchar(6),id_customer) As nme_company FROM dbo.CUSTOMER ORDER BY nme_company";
CUSTOMER objCustList = new CUSTOMER(Globals.gSQLConn, SQL);
try
{
objCustList.GetAllRows();
}
catch (Exception ex)
{
MessageBox.Show("Error retrieving customer list for populating drop-down: " + ex.Message,
"Problem:", MessageBoxButtons.OK, MessageBoxIcon.Exclamation);
this.Close();
return;
}
for (int i = 1; i <= objCustList.RowCount(); i++)
cboID_CUSTOMER.Items.Add(new ComboItem(objCustList.NME_COMPANY[i],
objCustList.ID_CUSTOMER[i]));
objCustList = null;
// Load the Product Types into a buffer for the Items tab page drop-down to populate...
SQL = "SELECT id_product, txt_description + ' [' + id_product + ']' As
txt_description,amt_price FROM dbo.PRODUCT_TYPES ORDER BY txt_description";
mProductTypes = new PRODUCT_TYPES(Globals.gSQLConn, SQL);
try
{
mProductTypes.GetAllRows();
55
C H A P T E R
4
–
R E V I E W
O F
A
R E A L - W O R L D
P R O G R A M
}
catch (Exception ex)
{
MessageBox.Show("Error retrieving Product Types for populating drop-down: " + ex.Message,
"Problem:", MessageBoxButtons.OK, MessageBoxIcon.Exclamation);
this.Close();
return;
}
// Load the values for the Order Status drop-down...
cboCDE_STATUS.Items.Add(new ComboItem("Placed", "PLACED"));
cboCDE_STATUS.Items.Add(new ComboItem("Processing", "PROCESSING"));
cboCDE_STATUS.Items.Add(new ComboItem("Shipped", "SHIPPED"));
cboCDE_STATUS.Items.Add(new ComboItem("Backordered", "BACKORDER"));
cboCDE_STATUS.Items.Add(new ComboItem("Cancelled", "CANCELLED"));
// Load the values for the Shipping Method drop-down...
cboCDE_SHIPPING_METHOD.Items.Add(new ComboItem("UPS", "UPS"));
cboCDE_SHIPPING_METHOD.Items.Add(new ComboItem("Fed-Ex", "FEDEX"));
cboCDE_SHIPPING_METHOD.Items.Add(new ComboItem("USPS", "USPS"));
// Load the Order record...
mOrder = new ORDERS(Globals.gSQLConn, ORDERS.GetBaseSQL() + " WHERE id_order = @OrderID");
mOrder.Parameters.Add(new CmdParameter("@OrderID", SqlDbType.Int, this.OrderID));
try
{
mOrder.GetAllRows();
}
catch (Exception ex)
{
MessageBox.Show("Error retrieving this Order record: " + ex.Message, "Problem:",
MessageBoxButtons.OK, MessageBoxIcon.Exclamation);
this.Close();
return;
}
if (mOrder.RowCount() == 0)
{
MessageBox.Show("Order [" + this.OrderID.ToString() + " was not found in the database!",
"Problem:", MessageBoxButtons.OK, MessageBoxIcon.Exclamation);
this.Close();
return;
}
// Load the record onto the screen...
txtID_ORDER.Text = this.OrderID.ToString();
if (mOrder.DTM_PLACED[1] != DateTime.MinValue)
dateTimePickerDTM_PLACED.Value = mOrder.DTM_PLACED[1];
if (mOrder.ID_CUSTOMER[1] != int.MinValue)
ComboItem.Select_Combo_Value(ref cboID_CUSTOMER, mOrder.ID_CUSTOMER[1]);
if (mOrder.CDE_STATUS[1] != "")
ComboItem.Select_Combo_Value(ref cboCDE_STATUS, mOrder.CDE_STATUS[1]);
if (mOrder.CDE_SHIPPING_METHOD[1] != "")
ComboItem.Select_Combo_Value(ref cboCDE_SHIPPING_METHOD, mOrder.CDE_SHIPPING_METHOD[1]);
if (mOrder.AMT_SUBTOTAL[1] != Decimal.MinValue)
txtAMT_SUBTOTAL.Text = mOrder.AMT_SUBTOTAL[1].ToString("$#,##0.00");
else
56
C H A P T E R
4
–
R E V I E W
O F
A
R E A L - W O R L D
P R O G R A M
txtAMT_SUBTOTAL.Text = "$0.00";
if (mOrder.AMT_TAXES[1] != Decimal.MinValue)
txtAMT_TAXES.Text = mOrder.AMT_TAXES[1].ToString("$#,##0.00");
else
txtAMT_TAXES.Text = "$0.00";
if (mOrder.AMT_SHIPPING[1] != Decimal.MinValue)
txtAMT_SHIPPING.Text = mOrder.AMT_SHIPPING[1].ToString("$#,##0.00");
else
txtAMT_SHIPPING.Text = "$0.00";
if (mOrder.AMT_TOTAL[1] != Decimal.MinValue)
txtAMT_TOTAL.Text = mOrder.AMT_TOTAL[1].ToString("$#,##0.00");
else
txtAMT_TOTAL.Text = "$0.00";
if (mOrder.DTM_SHIPPED[1] != DateTime.MinValue)
dateTimePickerDTM_SHIPPED.Value = mOrder.DTM_SHIPPED[1];
else
{
dateTimePickerDTM_SHIPPED.Visible = false;
lblShipping.Visible = false;
}
// Configure the Order Items DataGridView...
dataGridViewItems.SelectionMode = DataGridViewSelectionMode.CellSelect;
dataGridViewItems.VirtualMode = false;
dataGridViewItems.AutoGenerateColumns = false;
dataGridViewItems.AllowUserToOrderColumns = false;
dataGridViewItems.AllowUserToDeleteRows = false;
dataGridViewItems.AllowUserToAddRows = false;
dataGridViewItems.MultiSelect = false;
dataGridViewItems.AlternatingRowsDefaultCellStyle.BackColor = Color.LightCyan;
dataGridViewItems.RowHeadersVisible = false;
// Create the columns for the DataGridView...
// 0. ID_ORDER (hidden column)...
DataGridViewTextBoxColumn colID = new DataGridViewTextBoxColumn();
colID.DataPropertyName = "id_order";
colID.Name = "id_order";
colID.HeaderText = "";
colID.ReadOnly = true;
colID.Visible = false;
dataGridViewItems.Columns.Add(colID);
// 1. NUM_SEQ_ITEM (hidden column)...
DataGridViewTextBoxColumn colSeq = new DataGridViewTextBoxColumn();
colSeq.DataPropertyName = "num_seq_item";
colSeq.Name = "num_seq_item";
colSeq.HeaderText = "#";
colSeq.AutoSizeMode = DataGridViewAutoSizeColumnMode.AllCells;
colSeq.ReadOnly = true;
dataGridViewItems.Columns.Add(colSeq);
// 2. Product Type...
DataGridViewComboBoxColumn colProduct = new DataGridViewComboBoxColumn();
colProduct.DataPropertyName = "cde_product_type";
colProduct.HeaderText = "Product Type";
colProduct.AutoSizeMode = DataGridViewAutoSizeColumnMode.None;
colProduct.Width = 350;
57
C H A P T E R
4
–
R E V I E W
O F
A
R E A L - W O R L D
P R O G R A M
colProduct.Name = "cde_product_type";
colProduct.DataSource = mProductTypes.DataSet.Tables["data"];
colProduct.ValueMember = "id_product";
colProduct.DisplayMember = "txt_description";
dataGridViewItems.Columns.Add(colProduct);
// 3. Qty...
DataGridViewTextBoxColumn colQty = new DataGridViewTextBoxColumn();
colQty.DataPropertyName = "qty_ordered";
colQty.HeaderText = "Qty";
colQty.AutoSizeMode = DataGridViewAutoSizeColumnMode.AllCells;
colQty.Name = "qty_ordered";
colQty.DefaultCellStyle.Alignment = DataGridViewContentAlignment.MiddleRight;
dataGridViewItems.Columns.Add(colQty);
// 4. Unit Price...
DataGridViewTextBoxColumn colUnitPrice = new DataGridViewTextBoxColumn();
colUnitPrice.DataPropertyName = "amt_item";
colUnitPrice.HeaderText = "Unit $";
colUnitPrice.DefaultCellStyle.Format = "$#,##0.00";
colUnitPrice.AutoSizeMode = DataGridViewAutoSizeColumnMode.AllCells;
colUnitPrice.Name = "amt_item";
colUnitPrice.DefaultCellStyle.Alignment = DataGridViewContentAlignment.MiddleRight;
dataGridViewItems.Columns.Add(colUnitPrice);
// 6. Total...
DataGridViewTextBoxColumn colTotal = new DataGridViewTextBoxColumn();
colTotal.DataPropertyName = "amt_line_total";
colTotal.HeaderText = "Total $";
colTotal.DefaultCellStyle.Format = "$#,##0.00";
colTotal.AutoSizeMode = DataGridViewAutoSizeColumnMode.AllCells;
colTotal.Name = "amt_line_total";
colTotal.ReadOnly = true;
colTotal.DefaultCellStyle.Alignment = DataGridViewContentAlignment.MiddleRight;
dataGridViewItems.Columns.Add(colTotal);
// Load the Items into the grid...
SQL = "SELECT id_order,num_seq_item,cde_product_type,qty_ordered,amt_item,amt_line_total " +
"FROM dbo.ORDER_ITEM WHERE id_order = @OrderID ORDER BY num_seq_item";
mItems = new ORDER_ITEM(Globals.gSQLConn, SQL);
mItems.Parameters.Add(new CmdParameter("@OrderID", SqlDbType.Int, this.OrderID));
try
{
mItems.GetAllRows();
}
catch (Exception ex)
{
MessageBox.Show("Error retrieving Line Items for this order: " + ex.Message, "Problem:",
MessageBoxButtons.OK, MessageBoxIcon.Exclamation);
this.Close();
return;
}
try
{
mBindingSource = new BindingSource(mItems.DataSet, "data");
dataGridViewItems.DataSource = mBindingSource;
}
58
C H A P T E R
4
–
R E V I E W
O F
A
R E A L - W O R L D
P R O G R A M
catch (Exception ex)
{
MessageBox.Show("Error binding Order Item records to DataGrid: " + ex.Message, "Problem:");
this.Close();
}
dateTimePickerDTM_PLACED.Focus();
}
The first section of code is defining custom SQL to load the Customer drop-down box with a list of
the customer names with the contact person’s name in parenthesis “Company Name (Contact
Name)”. Next, a local buffer objCustList is created to load up all the customer/contact names:
string SQL = "SELECT id_customer, nme_company + ' (' + nme_cnct_fst + ' ' + nme_cnct_lst + ') ' + CONVERT(varchar(6),id_customer) As nme_company FROM dbo.CUSTOMER ORDER BY nme_company";
CUSTOMER objCustList = new CUSTOMER(Globals.gSQLConn, SQL);
Next, the customer/contact names are loaded into the drop-down box:
for (int i = 1; i <= objCustList.RowCount(); i++)
cboID_CUSTOMER.Items.Add(new ComboItem(objCustList.NME_COMPANY[i],
objCustList.ID_CUSTOMER[i]));
Next, the Product types are loaded into the mProductTypes buffer (see the column definition for
“colProduct” to see where this is bound into the grid’s ComboBox cell.
Next, the choices for the Order Status and Shipping Method are statically loaded.
Finally, the Order’s record is loaded into the mOrder buffer, and all the line items are loaded into the
mItems buffer, and bound to the grid.
The Save button is pretty straight forward:
private void btnSave_Click(object sender, EventArgs e)
{
// Save the changes back to the buffer and update the order in the database...
mOrder.ID_CUSTOMER[1] = ComboItem.Get_Combo_Value_Integer(cboID_CUSTOMER);
mOrder.DTM_PLACED[1] = dateTimePickerDTM_PLACED.Value;
mOrder.AMT_SUBTOTAL[1] = Globals.Get_Raw_Money_Amount(txtAMT_SUBTOTAL.Text.Trim());
mOrder.AMT_TAXES[1] = Globals.Get_Raw_Money_Amount(txtAMT_TAXES.Text.Trim());
mOrder.AMT_SHIPPING[1] = Globals.Get_Raw_Money_Amount(txtAMT_SHIPPING.Text.Trim());
mOrder.AMT_TOTAL[1] = Globals.Get_Raw_Money_Amount(txtAMT_TOTAL.Text.Trim());
mOrder.CDE_SHIPPING_METHOD[1] = ComboItem.Get_Combo_Value_String(cboCDE_SHIPPING_METHOD);
mOrder.CDE_STATUS[1] = ComboItem.Get_Combo_Value_String(cboCDE_STATUS);
if (dateTimePickerDTM_SHIPPED.Visible)
mOrder.DTM_SHIPPED[1] = dateTimePickerDTM_SHIPPED.Value;
else
mOrder.DTM_SHIPPED[1] = DateTime.MinValue;
// Update the records in the database...
try
{
Globals.gSQLConn.BeginTransaction();
// Update the ORDERS record...
mOrder.Update();
59
C H A P T E R
4
–
R E V I E W
O F
A
R E A L - W O R L D
P R O G R A M
// Update the ORDER_ITEM records...
mItems.Update();
// Commit the work...
Globals.gSQLConn.CommitTransaction();
}
catch(Exception ex)
{
Globals.gSQLConn.RollbackTransaction();
MessageBox.Show("Error updating the Order record: " + ex.Message, "Problem:",
MessageBoxButtons.OK, MessageBoxIcon.Exclamation);
return;
}
// Refresh the Order List Window...
foreach (Form objForm in Globals.gMainFrame.MdiChildren)
{
if (objForm.Name == "OrderListWindow")
{
OrderListWindow oList = (OrderListWindow)objForm;
oList.Refresh_List();
}
}
MessageBox.Show("Changes Successfully Saved.");
}
The data is gathered back up off the screen and the Update method is called. Both the mOrder and
mItems buffers are updated inside a Transaction block.
Finally, the Order List Window is refreshed to display the latest version of the record(s).
This has nothing really to do with the DataLayer.NET library, but here is the code that automatically
recalculates the Order Subtotal, Taxes, Shipping, and Grand Total every time a line item is added
or changed:
private void dataGridViewItems_CellValueChanged(object sender, DataGridViewCellEventArgs e)
{
int iProductRow;
string sProdType;
decimal decPrice;
int iQty;
// don't do anything if the grid is in the process of recalculating...
if (mCalculating)
return;
mCalculating = true;
switch (e.ColumnIndex)
{
case 2:
// Product Type
sProdType = dataGridViewItems.Rows[e.RowIndex].Cells[2].Value.ToString();
iProductRow = mProductTypes.GetFirstRowForStringColumnValue("ID_PRODUCT",sProdType);
60
C H A P T E R
}
}
4
–
R E V I E W
O F
A
R E A L - W O R L D
P R O G R A M
if (iProductRow == 0)
{
mCalculating = false;
return;
}
decPrice = mProductTypes.AMT_PRICE[iProductRow];
dataGridViewItems.Rows[e.RowIndex].Cells[4].Value = Math.Round(decPrice, 2);
iQty = int.Parse(dataGridViewItems.Rows[e.RowIndex].Cells[3].Value.ToString());
dataGridViewItems.Rows[e.RowIndex].Cells[5].Value = Math.Round(decPrice * iQty,2);
break;
case 3:
// Qty
decPrice = decimal.Parse(dataGridViewItems.Rows[e.RowIndex].Cells[4].Value.ToString());
iQty = int.Parse(dataGridViewItems.Rows[e.RowIndex].Cells[3].Value.ToString());
dataGridViewItems.Rows[e.RowIndex].Cells[5].Value = Math.Round(decPrice * iQty,2);
break;
case 4:
// Unit Price
decPrice = decimal.Parse(dataGridViewItems.Rows[e.RowIndex].Cells[4].Value.ToString());
iQty = int.Parse(dataGridViewItems.Rows[e.RowIndex].Cells[3].Value.ToString());
dataGridViewItems.Rows[e.RowIndex].Cells[5].Value = Math.Round(decPrice * iQty,2);
break;
Recalculate_Order_Totals();
mCalculating = false;
private void dataGridViewItems_CurrentCellDirtyStateChanged(object sender, EventArgs e)
{
// This event is only needed because of an MS bug. When you bind a ComboBox to a grid, it
doesn't properly fire a CellValueChanged event when the user selects an item.
// Moving the focus to another column forces the CellValueChanged event to fire.
if (dataGridViewItems.CurrentCell.ColumnIndex == 2)
dataGridViewItems.CurrentCell = dataGridViewItems[3,
dataGridViewItems.CurrentCell.RowIndex];
}
private void Recalculate_Order_Totals()
{
// Add up all the item totals and report them on the front tab page, recalculate the taxes and
shipping...
// First add up all the line item totals...
decimal decSubTotal = 0.00M;
if (mItems.RowCount() > 0)
{
for (int i = 1; i <= mItems.RowCount(); i++)
{
if (mItems.AMT_LINE_TOTAL[i] != decimal.MinValue)
decSubTotal += mItems.AMT_LINE_TOTAL[i];
}
txtAMT_SUBTOTAL.Text = decSubTotal.ToString("$#,##0.00");
string sMethod = ComboItem.Get_Combo_Value_String(cboCDE_SHIPPING_METHOD);
decimal decShipping = Get_Shipping_Cost(sMethod);
txtAMT_SHIPPING.Text = decShipping.ToString("$#,##0.00");
decimal decTaxes = Math.Round(decSubTotal * 0.075M,2);
txtAMT_TAXES.Text = decTaxes.ToString("$#,##0.00");
61
C H A P T E R
4
–
R E V I E W
O F
A
R E A L - W O R L D
P R O G R A M
decimal decTotal = Math.Round(decSubTotal + decShipping + decTaxes,2);
txtAMT_TOTAL.Text = decTotal.ToString("$#,##0.00");
}
}
private decimal Get_Shipping_Cost(string sMethod)
{
switch (sMethod)
{
case "USPS":
return 5.00M;
case "UPS":
return 10.00M;
case "FEDEX":
return 20.00M;
}
}
return 0.00M;
End of Code Review of the Order Entry System.
62
C H A P T E R
4
–
R E V I E W
O F
A
R E A L - W O R L D
P R O G R A M
Appendix A - Setting up the
OrderEntrySystem Database
This Appendix provides instructions on how to create the OrderEntrySystem Database (SQL
Server) that is used in the examples throughout these Manuals.
Requirements: You must have a version of SQL Server installed on your machine (version 2005 or
higher). It doesn’t matter whether it is the Compact Edition, Developer’s Edition, Standard Edition,
or Enterprise Edition. You will also need to have the SQL Server Management Studio installed to
create the database and run the script provided.
Instructions:
1. Get into (run) SQL Server Management Studio.
2. Create a new database called “OrderEntrySystem”
3. Click on the “New Query” button to open a new Query Window.
4. Select the database “OrderEntrySystem” from the dropdown at the top.
5. Click on the following hyperlink to view the SQL table creation script:
http://sourceforge.net/projects/datalayernet/files/Create_Order_Entry_Tables.txt/download
6. Click anywhere inside your browser, and then hit Control-A to select all the text.
7. Right-click on the text and choose “Copy” from the popup context menu.
8. Close your browser.
9. Back in SQL Server Management Studio, Right-click on the Query Window and choose
“Paste” to paste the script into the window.
10. Click on the “Execute” button to run the script.
11. The script will create 4 tables, complete with Primary Keys and Foreign Key relationships,
and it will also populate the tables with the sample data.
12. End of Procedure.
63